Introduction #
The 3CX Power Dialer automates high-volume calls using custom contact lists to deliver personalized, text-to-speech messages to customers or patients. This simple, reliable tool integrates directly with 3CX, allowing any industry from political campaigns to medical offices to automate reminders and collect feedback using the Call Flow Designer (CFD).
Why choose the 3CX Power Dialer? #
 |
ENHANCE PRODUCTIVITY | 3CX Power Dialer streamlines your workflow, saves time, and improves customer engagement through smooth CRM integration, bulk call handling, automated reminders, and flexible customization. |
 |
SEAMLESS INTEGRATION WITH CRM | Connect your 3CX Power Dialer to your CRM or practice management system for seamless appointment updates and a complete view of customer interactions. |
 |
HANDLE MASS CALLS | While handling multiple calls at once, you can reach more customers, boosting productivity and reducing overall call time. |
 |
NEVER MISS AN APPOINTMENT | Utilize automatic reminders to customers for reduced missed appointments and improved customer satisfaction. |
 |
CUSTOMIZE YOUR MESSAGES | Utilize text-to-speech functionalities for customized communication, creating tailored or pre-recorded messages to provide adaptability in conveying appropriate information to your clientele. |
Installation overview #
 |
DOWNLOAD SOFTWARE | You can order the 3CX Power Dialer online at https://www.voiptools.com. Your order confirmation email will include your license key and a link to download the software. |
 |
INSTALL PREREQUISITES | You must install several prerequisites before installing the 3CX Power Dialer. The Advanced Installer identifies and installs these applications automatically. Click here to learn about the required prerequisites. |
 |
INSTALL 3CX POWER DIALER | This User Guide contains step-by-step instructions to successfully install the 3CX Power Dialer. Begin by extracting the installer from the downloaded zip file (Step 1 above), then run the setup program named PowerDialer.exe |
 |
LOGIN TO THE WEB APPLICATION | You can now log in to your software using the Extension and PIN. |
3CX Power Dialer Applications #
- Appointment Reminders (medical, service, delivery) 📅
- Payment collections 💰
- School reminders: closings/lunch accounts/library fees/unexcused absences 🏫
- Community emergency notifications 🚨
- Political campaign messages 🗳️
- Fundraisers 🎗️
- Satisfaction Surveys 📋
- Solicit 🙋♂️
NOTE:
- Number of simultaneous calls is dependent on 3CX license and available trunks / bandwidth.
- SMS notifications are performed by sending emails to the cell carrier’s email-to-sms gateway
Prerequisites #
Before installing the 3CX Power Dialer, you need to ensure that your computer meets the minimum requirements mentioned below:
| PREREQUISITE | PURPOSE |
|---|---|
| 3CX Version V20 | 3CX Power Dialer is designed to work seamlessly with this version for enhanced features and performance. |
| Windows 10 or above / Windows Server 2012 or above | These operating systems provide the necessary environment for the application to run efficiently. |
| VoIPTools Universal Updater | This component is necessary for updates, ensuring the application remains current and functional. |
| VoIPTools Relay Service | It is used for proper integration and functionality of the 3CX Power Dialer within the 3CX environment. |
| Microsoft SQL Server 2016 or above (Including the free SQL Express edition) | 3CX requires Microsoft SQL Server 2016 or later for database management. |
| Static IP for VoIPTools and 3CX servers | This is to ensure proper two-way communication, both the 3CX server (Relay) and the VoIPTools server. Dynamically assigned IP addresses are not supported. Additionally, it is recommended to use HTTPS for secure communication, which requires a FQDN for SSL/TLS certificate validation between the VoIPTools server and the Relay. |
| Port number 5451 opened on your device | Port 5451 is a specific network port used by 3CX for communication purposes. Opening this port on the device’s firewall allows incoming and outgoing traffic to pass through, enabling the 3CX software to send and receive data over the network effectively. |
- Since the add-on ‘3CX Power Dialer’ includes a CFD application, you will need to install either Pro or AI version of 3CX.
- When installing SQL Server, we recommend you install it in “Mixed Mode” to include SQL Authentication, and install SQL Management Studio.
Configure Calls Via SIP Trunk #
If you are working with multiple SIP (Session Initiation Protocol) trunks, you can configure calls via the desired SIP trunk. For this, firstly, you need to assign a caller ID to the desired SIP trunk. Secondly, you need to force Power Dialer calls to go through the desired SIP trunk using outbound rules. Power Dialer can prepend digits to the phone number. For example, if you prepend 8888 (using the Power Dialer global setting) to all the phone numbers when the call is placed, you can then create an outbound rule that looks for these prepended digits and route these calls through a specific trunk. This approach means you will need a separate SIP trunk for every DID you want to present, or go in and change the outbound caller ID of the desired trunk before running the dialer campaign.
To force the Power Dialer calls to go through the desired SIP trunk using outbound rules, follow the steps,
- Open your 3CX Admin Console application.
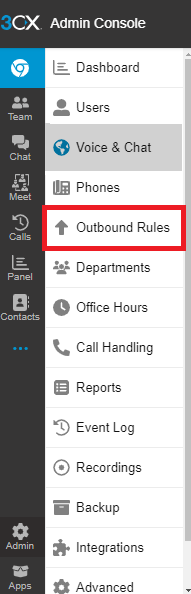
- In the left side panel, click the Outbound Rules
 option .
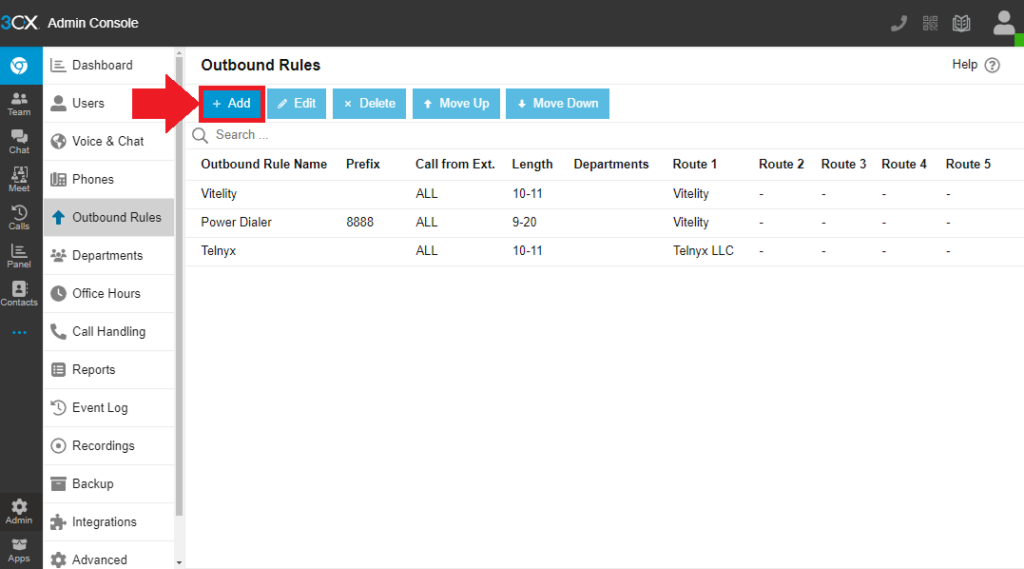
- In the Outbound Rules screen, click the + Add to add a new outbound rule.
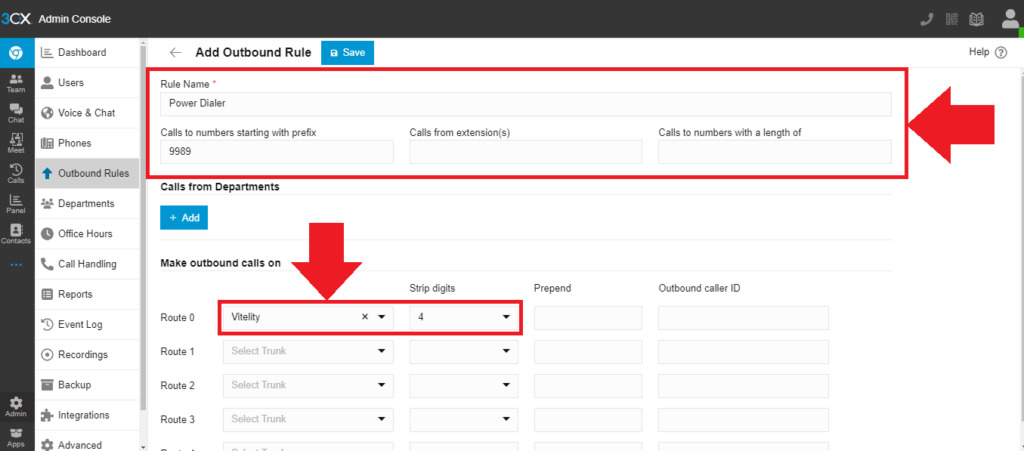
- On the Add Outbound Rules screen, in the Rule Name field, enter the desired Outbound rule name.
- Click on the desired extension and in the Calls To Numbers Starting With Prefix field, enter the desired digits to prepend to the calls that you want to route through the desired SIP trunk.
- Under the Make Outbound Calls On section,
- From the desired route dropdown list, select the SIP trunk through which you want to route the calls.
- From the Strip Digits dropdown list, select the count of prepended digits.
- Click the Save
 button to save your outbound rule.
Step-by-Step Installation Procedure #
The following section guides you through a detailed walk-through of the installation process.
Step 1: Download 3CX Power Dialer #
Find the software download link in the Order Confirmation Email, or you can download the application by following the procedure,
- Open your browser and go to the VoIPTools official website or click here to get redirected to the website.
- Search for the Power Dialer Application and click the Download
 button to download your application.
Step 2: Install the Prerequisites #
Click on the software installer downloaded in Step 1. The installation wizard will automatically identify the prerequisites and assist you with each installation required to 3CX Power Dialer. It includes .NET Framework (Web Installer), SQL Server Express (Web Installer), and SQL Server Management Studio.
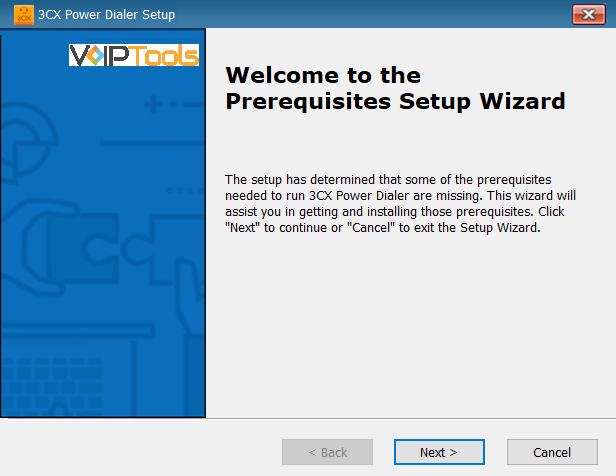
- Click the downloaded installer executable to launch the Prerequisites Setup Wizard and click Next.
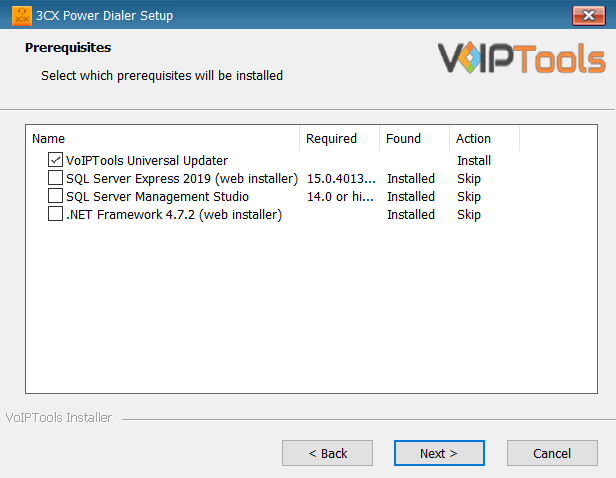
- In the Prerequisites window, install all the required prerequisites identified by the installer, or select/ unselect the applications based on your requirements and click Next to continue.
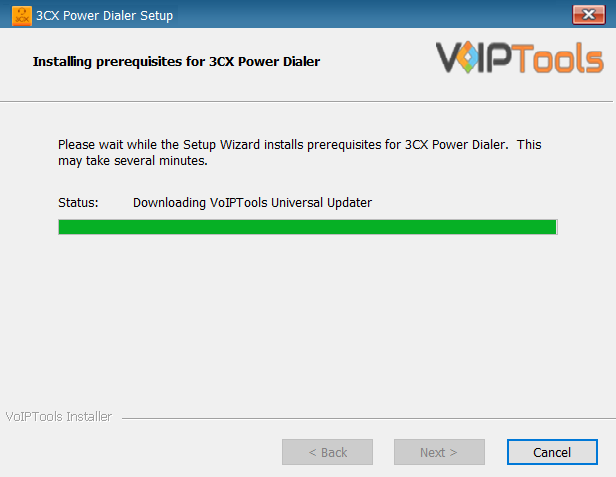
The installer will download and install the selected applications. It may take several minutes to complete.
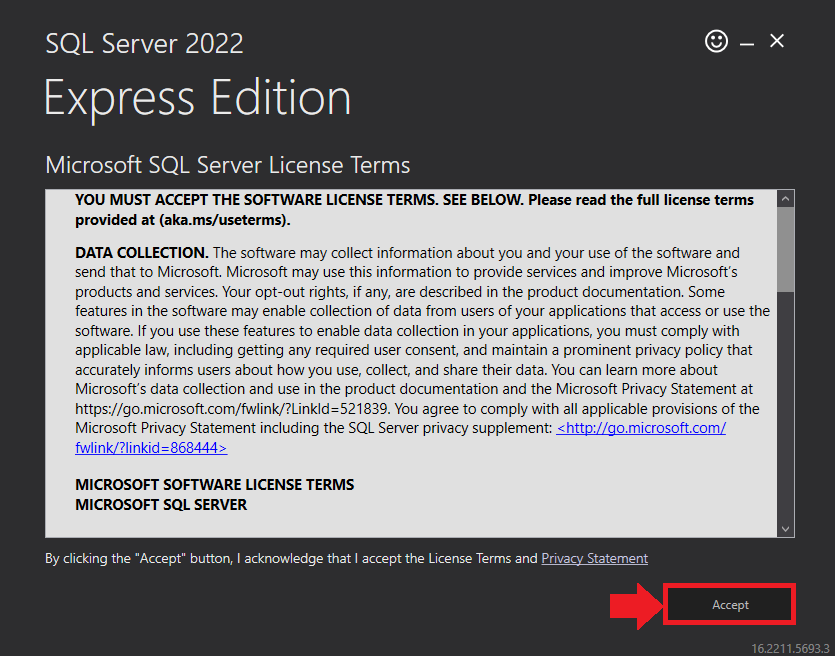
- In the Microsoft SQL Server License Terms click the Accept button to acknowledge the license terms and continue.
- This page appears if you do not have SQL Server Express preinstalled in your device.
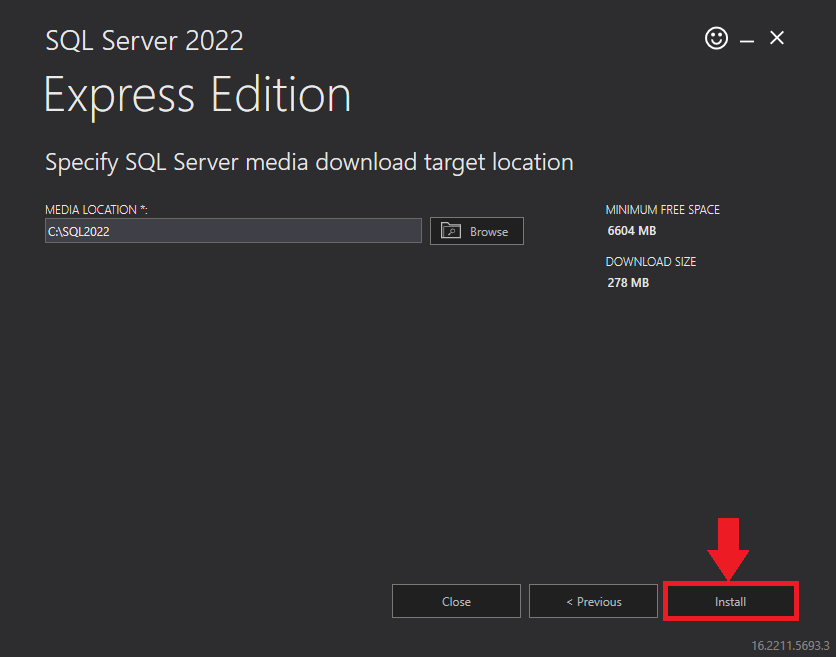
- View the SQL Server Media target location in the Media Location field. If required, you can click the Browse button to change the location. Click Install to begin the installation of SQL Server Express.
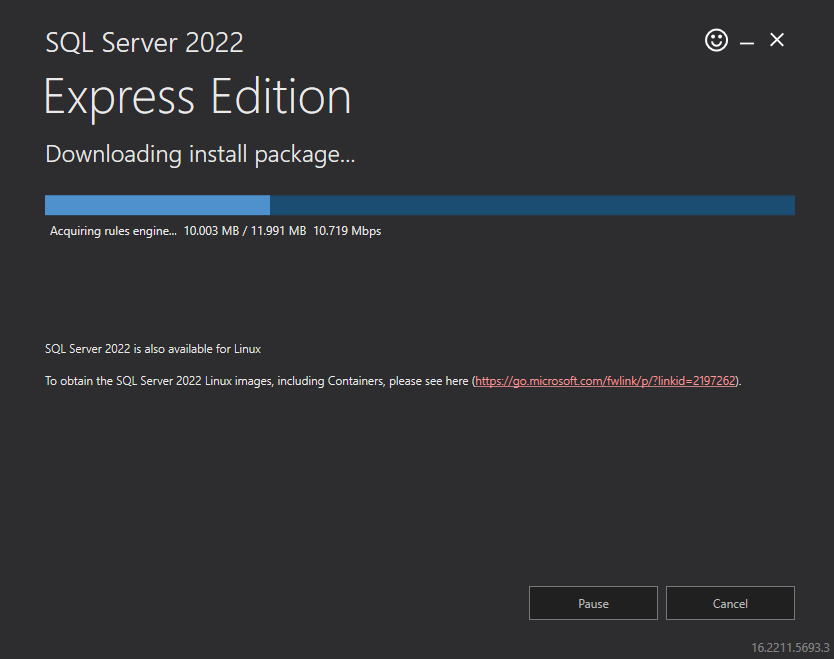
SQL server installation is in progress. This may take several minutes to complete.
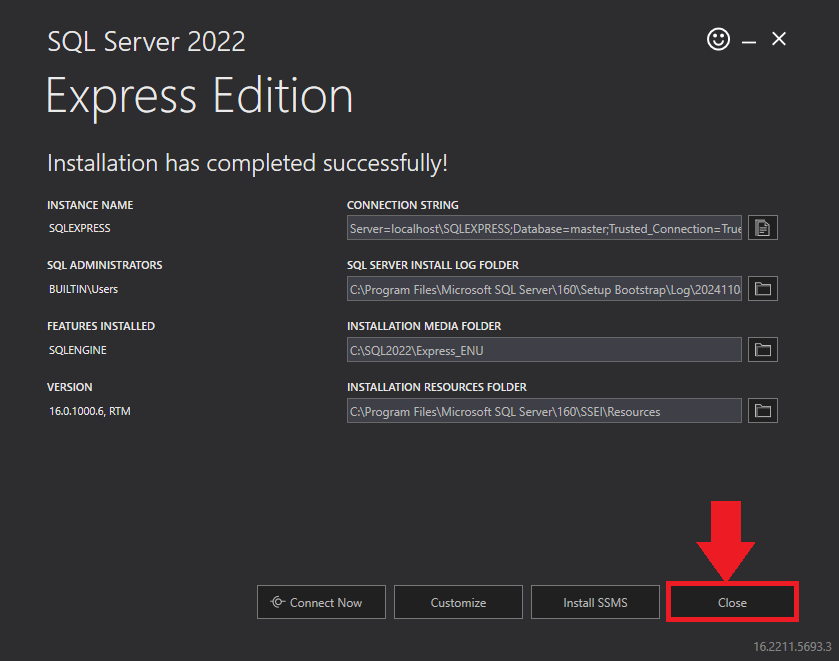
- Click the Close button once the prerequisites are installed.
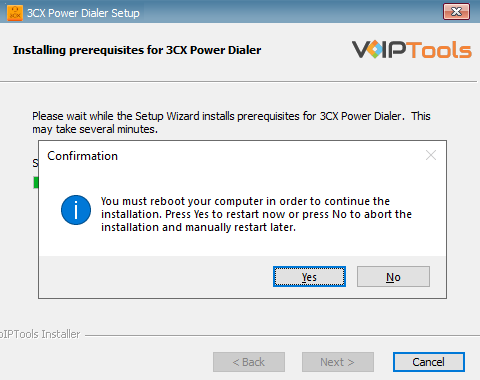
- Click Yes > in the Confirmation Message Box to reboot the computer.
Step 3: Start the installation process #
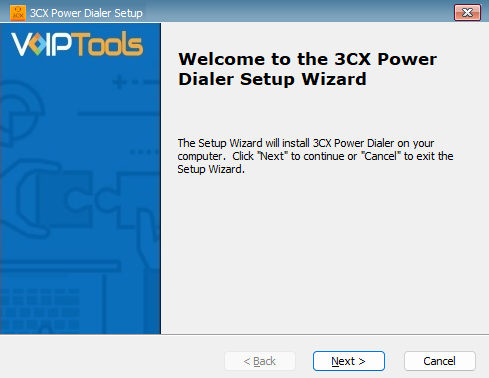
- Click Next > on the 3CX Power Dialer Setup Wizard screen.
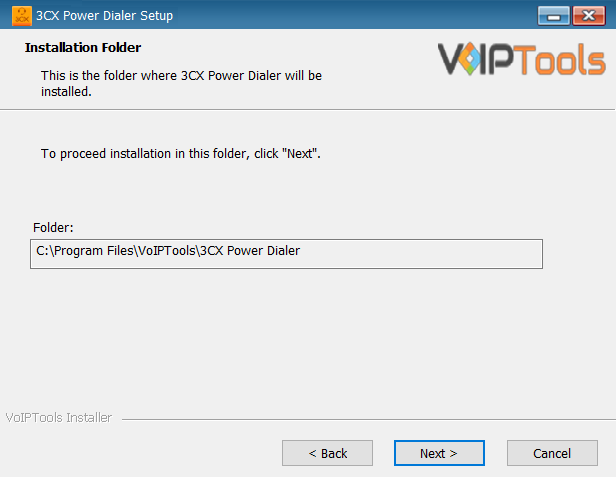
- On the Select Installation Folder window, the Folder field displays the path where the 3CX Power Dialer gets installed. You cannot change the location path.
- Click Next > to continue with the installation.
Step 4: Test Relay Settings #
- In the 3CX Relay Services window, in the Relay Host field, enter the FQDN of your 3CX server.
Do not include https:// to the Relay host data.
- Enter 8801 in the Relay Port field.
- Enter the public key you copied from VoIPTools Relay services in the Public Key text area.
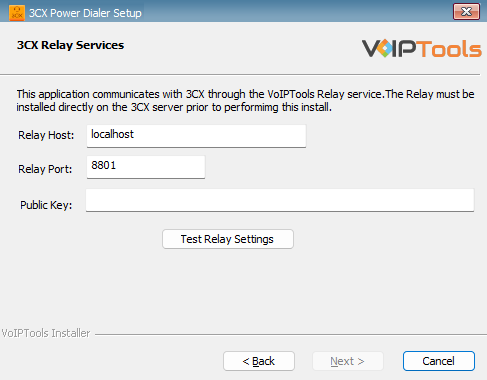
- Click the Test Relay Settings to confirm that ‘3CX Power Dialer’ can communicate with the Relay services running on the 3CX server.
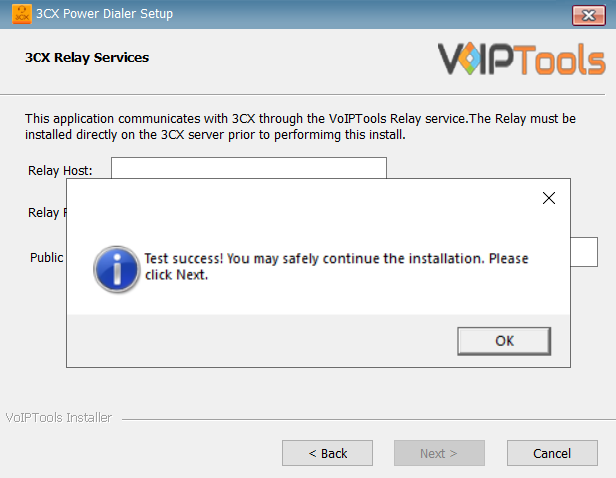
- If the ‘3CX Power Dialer’ is successfully able to communicate with the Relay services that run on the 3CX server, a Success message box appears. Click OK. If the test fails, you will not be able to continue until communication with the relay is established.
- Click Next > to continue with the installation.
- You must set the Relay Port to 8801.
- If the Relay test fails, you cannot continue the installation until you establish communication with the Relay. If the test was unsuccessful:
- Confirm you have the correct firewall port open (default TCP 8801) on the 3CX server and the firewall protecting the 3CX server.
- Confirm that you have entered the correct FQDN for the 3CX server.
- Confirm that the 3CX Power Dialer and Relay use the same port and protocol.
Step 5: Configure the database #
When configuring the 3CX Power Dialer, select an existing Microsoft SQL Server instance in your environment. The database server can be a remote SQL Server, or a local instance running on the VoIPTools server.
You can set up the SQL database using SQL Authentication or Windows Integrated Authentication.
SQL Authentication #
- Enter your server name in the Server field.
- If using the free SQL Express Edition, the default SQL Instance name is SQLExpress.
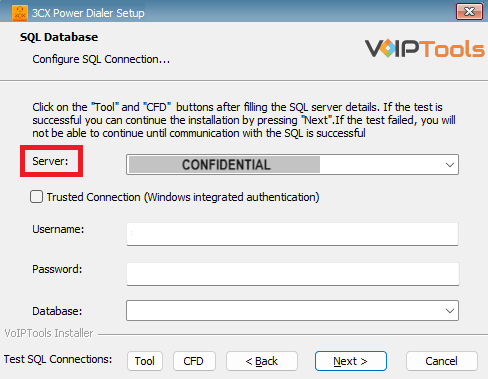
- If you want to use ‘SQL Authentication’, then install SQL Server in ‘Mixed‘ mode.
- If SQL Server is installed on a server other than the server where 3CX Exporter is installed, you will need to configure SQL Server to allow remote connections.
- Enter your credentials in the Username and Password fields.
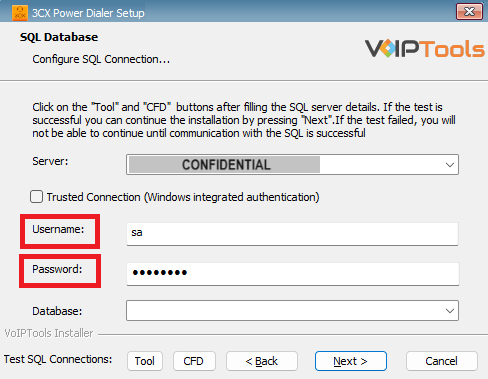
Make sure that you select a SQL Login that has sufficient permissions to alter the database and create SQL objects.
- Select or enter the 3CX Emergency Notifier in the Database dropdown.
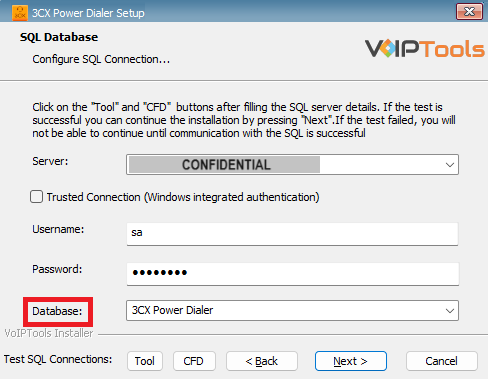
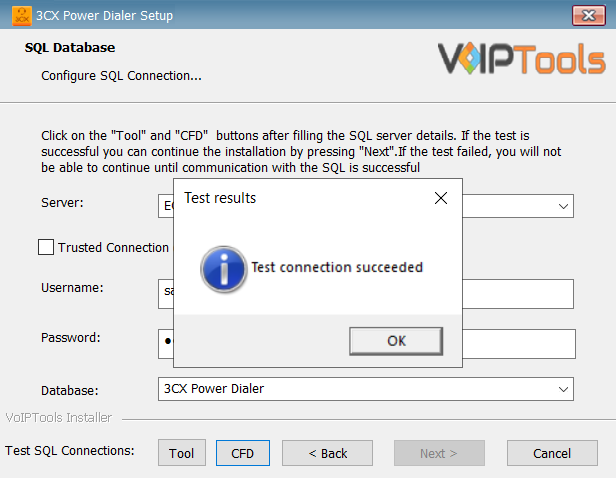
- In the Test SQL Connections section, click the Tool button to test the connection and click OK in the Test Results popup box.
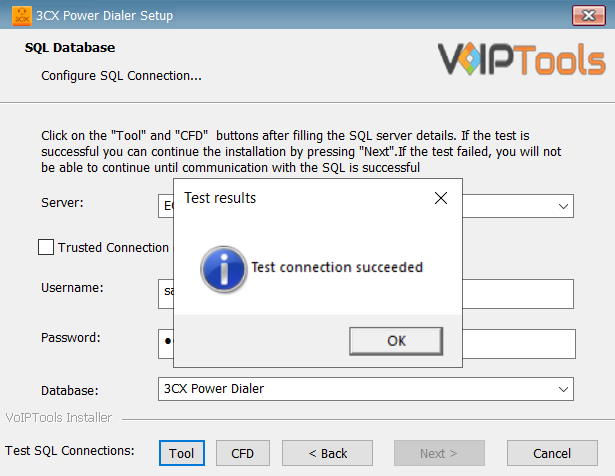
- Click the CFD button to confirm the 3CX connectivity with SQL Server and click OK on the Test Results message box.
- Click OK on the Test Results dialogue box.
Windows Integrated Authentication #
- To use Windows Integrated Authentication check the Trusted Connection (Windows integrated authentication) checkbox.
- The VoIPTools installer will create a local Windows user name as “VoIPTools” and give you sufficient rights to this user to create/update the SQL database.
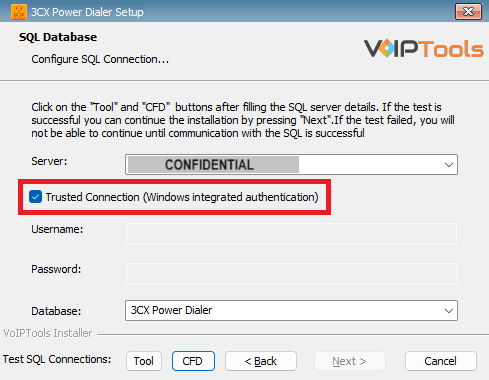
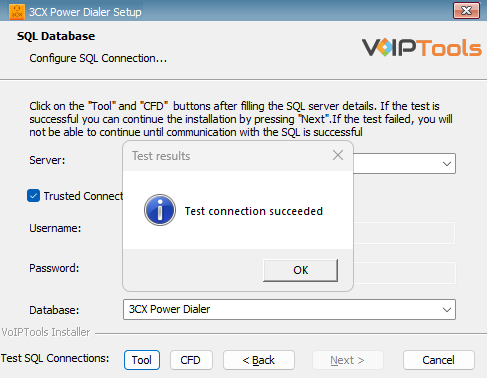
- In the Test SQL Connection section, click the Tool button to test the connection.
- Click the Next button which gets enabled when the database connection is successful.
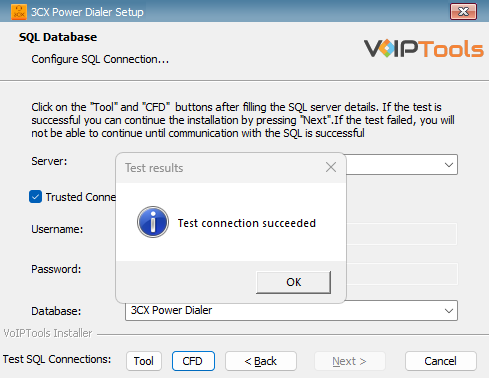
- Click the CFDbutton to confirm the 3CX connectivity with SQL Server and click OK on the Test Results message box.
- Click OK on the Test Results dialogue box.
We encourage you to use SQL Authentication rather than Windows authentication. Many of our tools leverage a Call Flow Designer (CFD) application running on the 3CX. Frequently our CFD applications require access to a SQL database. If the 3CX server and the database server are not in an Active Directory domain, Windows authentication will fail. To use SQL authentication, your SQL Server must be configured to run in “Mixed Mode”. If you installed SQL Server with one of our tools, we configure SQL in “Mixed Mode”.
Step 6: Installing 3CX Power Dialer #
- Click Install in the Ready to Install window.
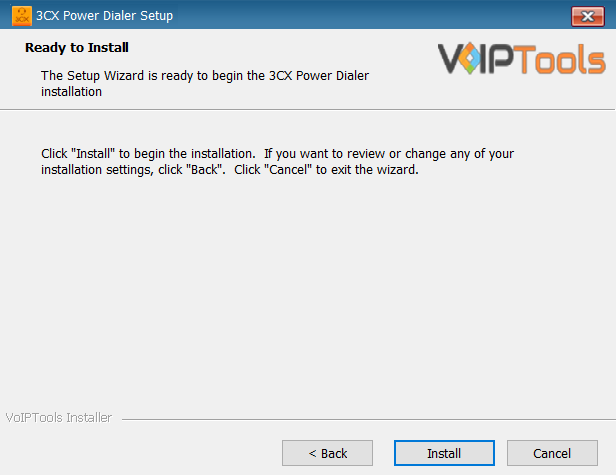
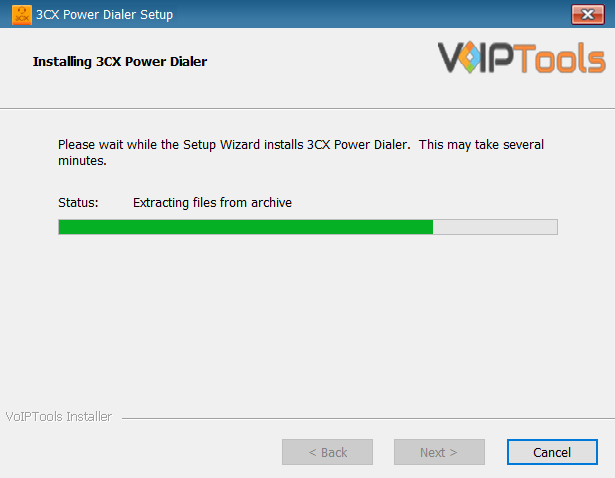
The application installation may take several minutes to complete.
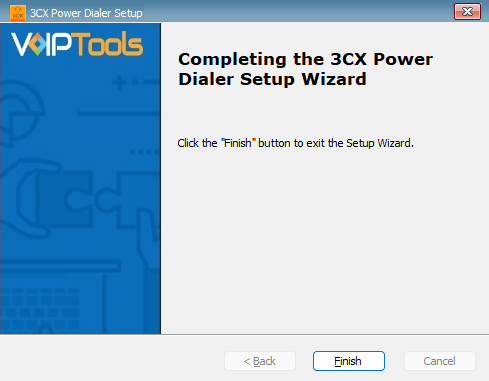
- Check the Launch 3CX Power Dialer checkbox and click Finish when the installation is complete.
Step 7: Log in to the Web Application #
Follow the procedure to login to your application,
- Double-click the 3CX Power Dialer Desktop Icon
 to open the web application.
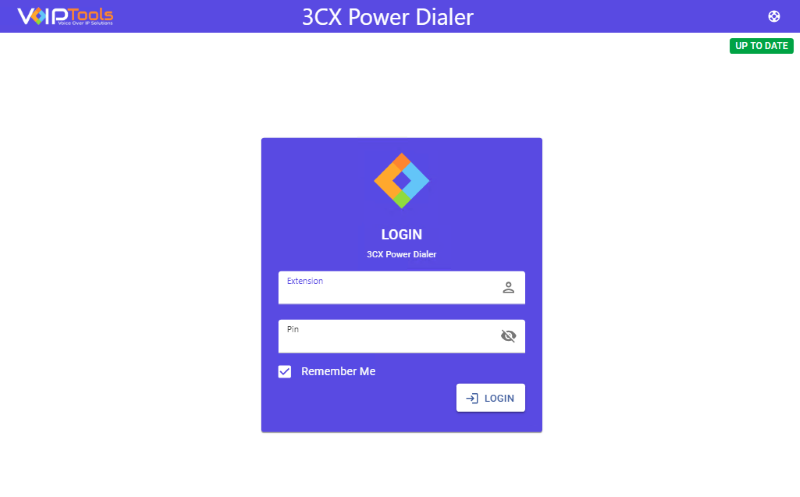
 - On the Login page, do the following tasks,
- In the Extension field, enter your 3CX extension number.
- In the PIN field, enter your 3CX voicemail PIN.
- Click the Login button to log in to your account.
Web Portal #
The web portal is a Contact Manager that helps you to manage the contact details of your customers.
To access the ‘3CX Dialer’ web portal, click the Web Portal button on the configuration program, or click on the desktop icon that was created during the installation process (3CX Dialer Web).
Login Rights #
The 3CX Power Dialer facilitates distinct logins for managers and users, enabling precise demarcation and effective control of their roles and responsibilities within an organization.
Manager Rights #
As a Manager, you can:
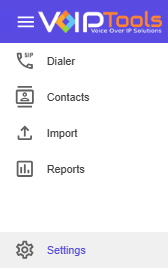
- Access the Dialer, Contacts, Import, Report, and Settings. Manage contacts, appointments, and list records from Contacts, and import contact data from CSV files through the Import screen.
User Rights #
As a Normal User, you can:
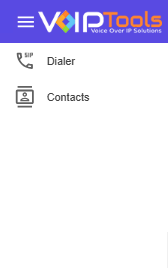
- View only Dialer and Contacts.
- In the Contacts screen, you cannot select the list name to delete.
Settings Menu #
SQL tab #
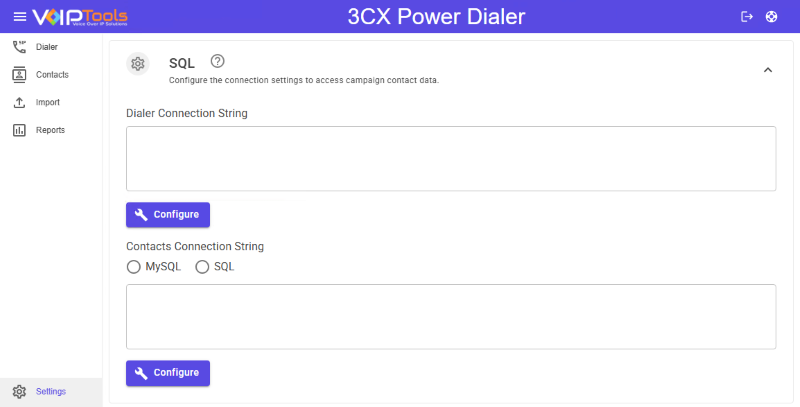
SQL tab enables you to configure Microsoft SQL Server Settings. The dialer uses the Contacts Connection String to connect to the required database and get the contact details.
You use the contacts from either MySQL or SQL.
Using references from SQL #
Follow the procedure to use contacts from SQL,
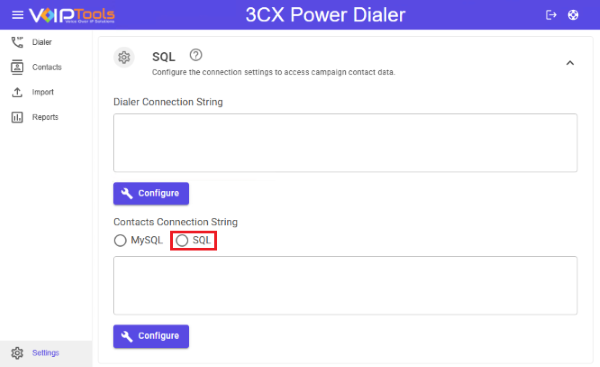
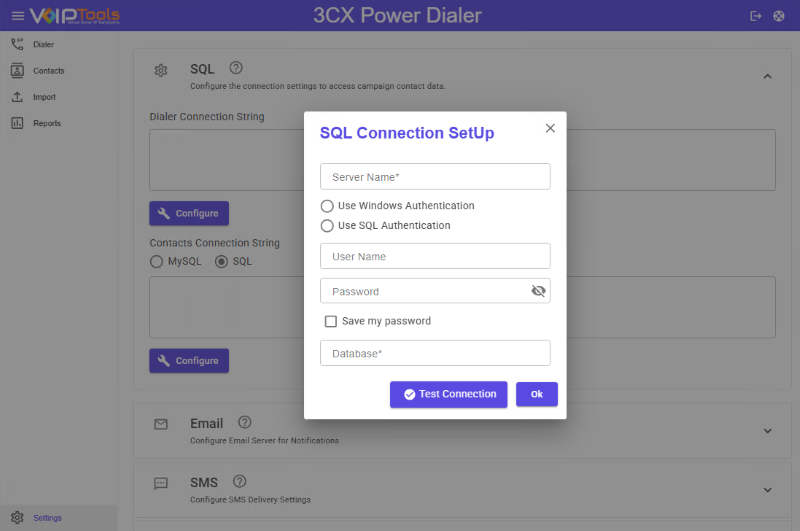
- On the SQL tab in the Contacts Connection String section, select the SQL radio box.
- In the SQL Connection Setup popup enter the following details,
- In the Server Name field, enter the IP address of your server.
- You can select either the Use Windows Authentication radio box for authenticating using Windows or you can select the Use SQL Server Authentication radio box for authenticating using SQL.
- If you have selected authentication by SQL server, enter your credentials in the User Name and the Password fields.
- Click the Test Connection button to test the connection to the SQL server and click OK.
Using references from MySQL #
Follow the procedure to use the contacts from MySQL,
- On the SQL tab in the Contacts Connection String section, select the MySQL radio box.
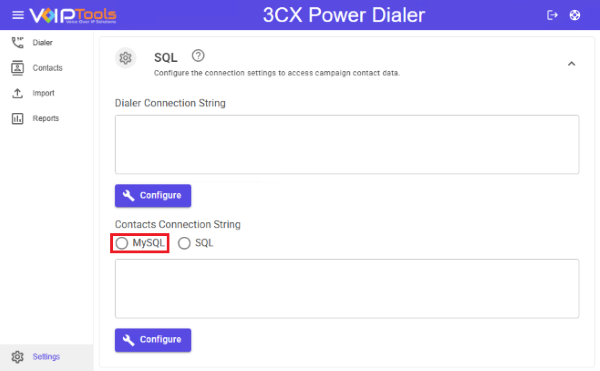
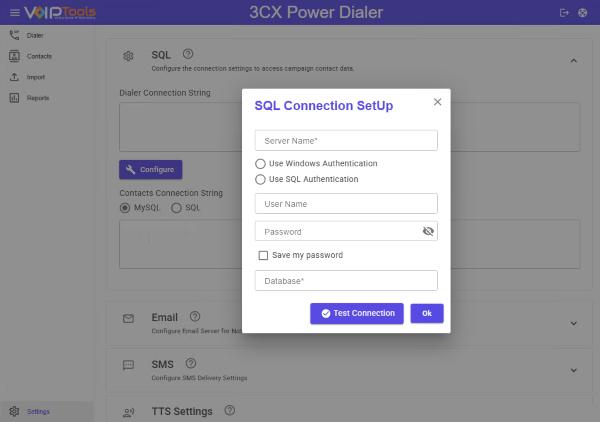
- In the text area, enter the connection string manually,
- Example: SERVER=localhost; DATABASE=3cxpowerDialer; UID=root; PASSWORD=mypassword;persistsecurityinfo=True;
Email tab #
The Email tab lets you configure Email Server Settings. Follow the procedure to send notifications via email:
- In the Settings menu, click the Email tab.
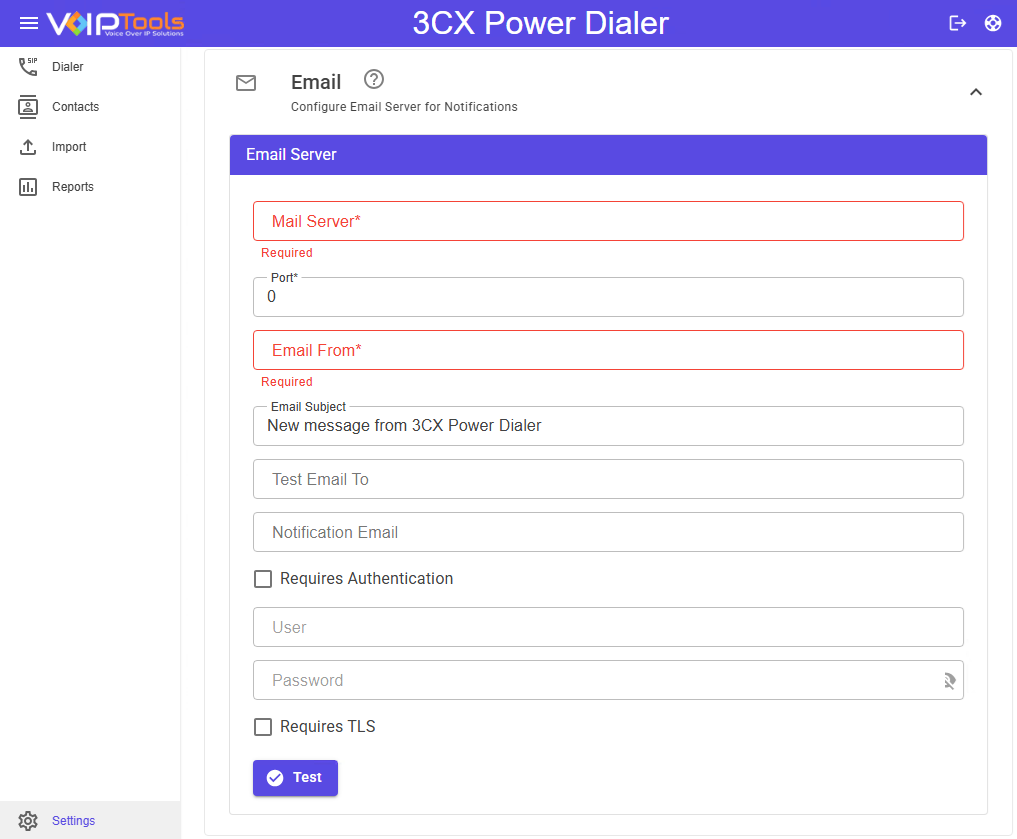
- In the Mail Server field, enter the IP address or ‘Fully Qualified Domain Name’ (FQDN) of your email server.
- In the Port field, enter the appropriate port number.
- The default port number is 25.
- In the Email From field, enter the reply email address for email and SMS text notifications.
- In the Email Subject field, enter the subject for the email.
- In the Test Email To field, enter a valid test email address.
- In the Notification Email field, enter the email address to send an email about call data once you complete a campaign.
- The data includes details like the number of calls answered, unanswered, and failed in that campaign.
- In the User and Password fields, enter the username and password of your email address.
- Click the Test button to send a test mail and check if you have successfully configured the email server settings.
- Check Requires SSL check box if your server requires a secure connection to relay email.
SMS Tab #
The SMS feature in a Power Dialer enables quick text-based communication, aiding follow-ups, engagement, and efficient customer service, expanding reach and providing documented interaction within the platform.
SMS Tab Prerequisites #
| SIP Services: | Ensure you have SIP services from a supported carrier. |
| Enable SMS Texting on Number: | Activate SMS texting on your phone number through the carrier’s settings or dashboard. |
| Obtain API Security Credentials: | Obtain your carrier’s SMS Messaging API security credentials (e.g., API Key, Secret Key) from your carrier’s portal or support documentation. |
| Recipient’s Carrier | The recipient’s carrier refers to the mobile service provider associated with the contact’s phone number. Knowing this carrier is vital for using the email-to-SMS method, as each carrier has a unique format (e.g., [PhoneNumber]@[CarrierGateway]) to convert emails into SMS messages for delivery. |
SMS Service Using Email to SMS Gateway: #
Follow the procedure to send SMS using Email to SMS Gateway,
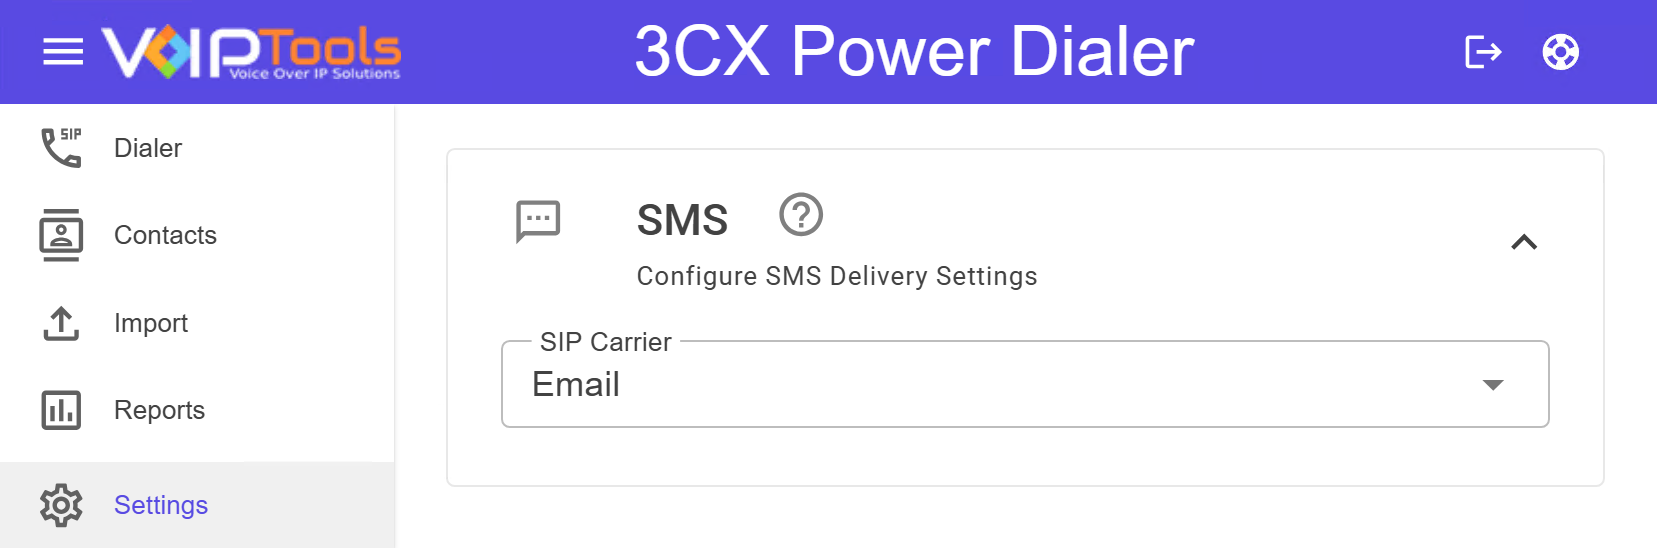
- In the SIP Carrier dropdown list, select the Email option and click the Save button.
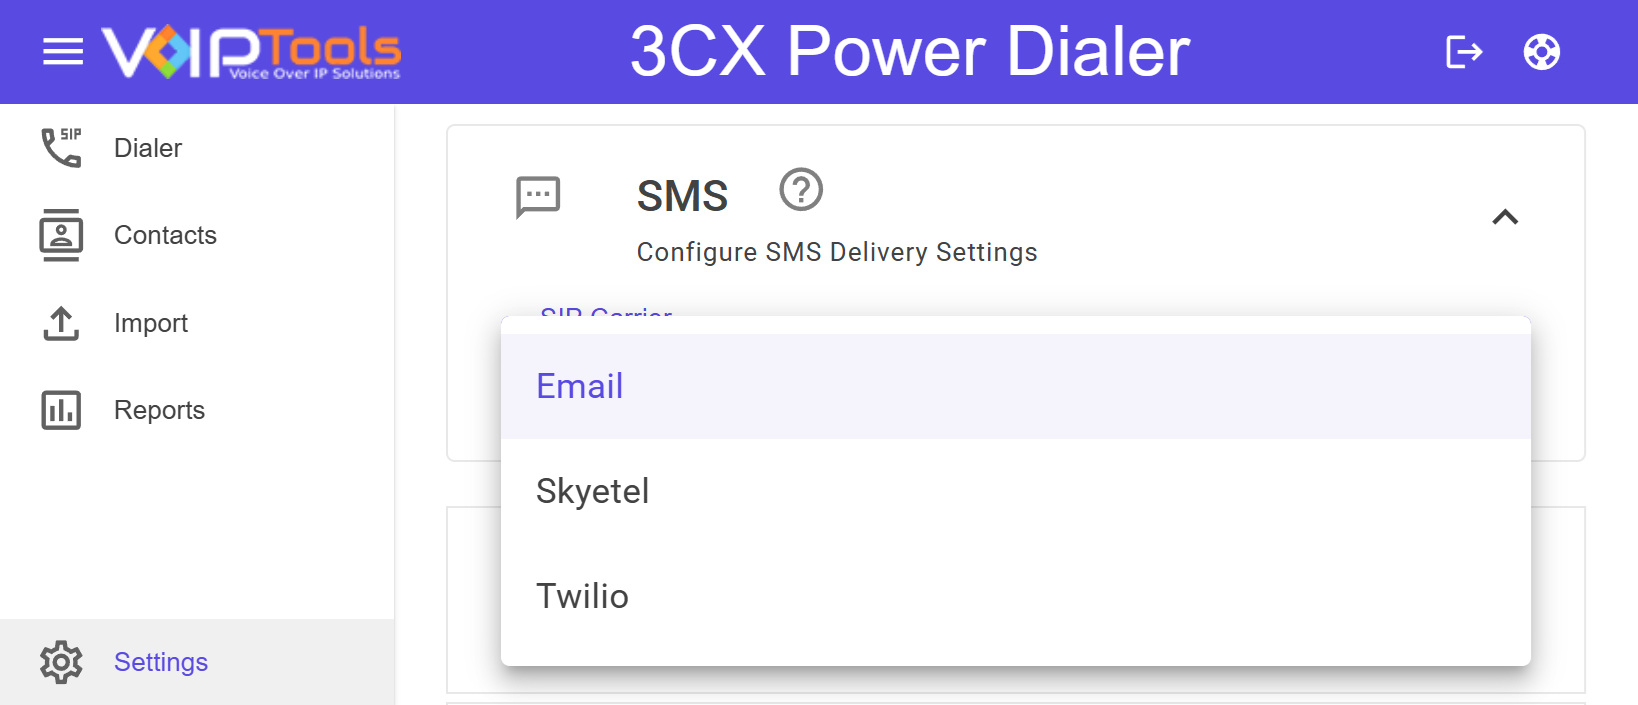
- On the Email tab, all the details in the Email tab section is used for this option.
- For instance, the email format for a Verizon user with the number 123456789 is 123456789@Vtext.com.
SMS Service Using Skyetel: #
Follow the procedure to send SMS using Skyetel,
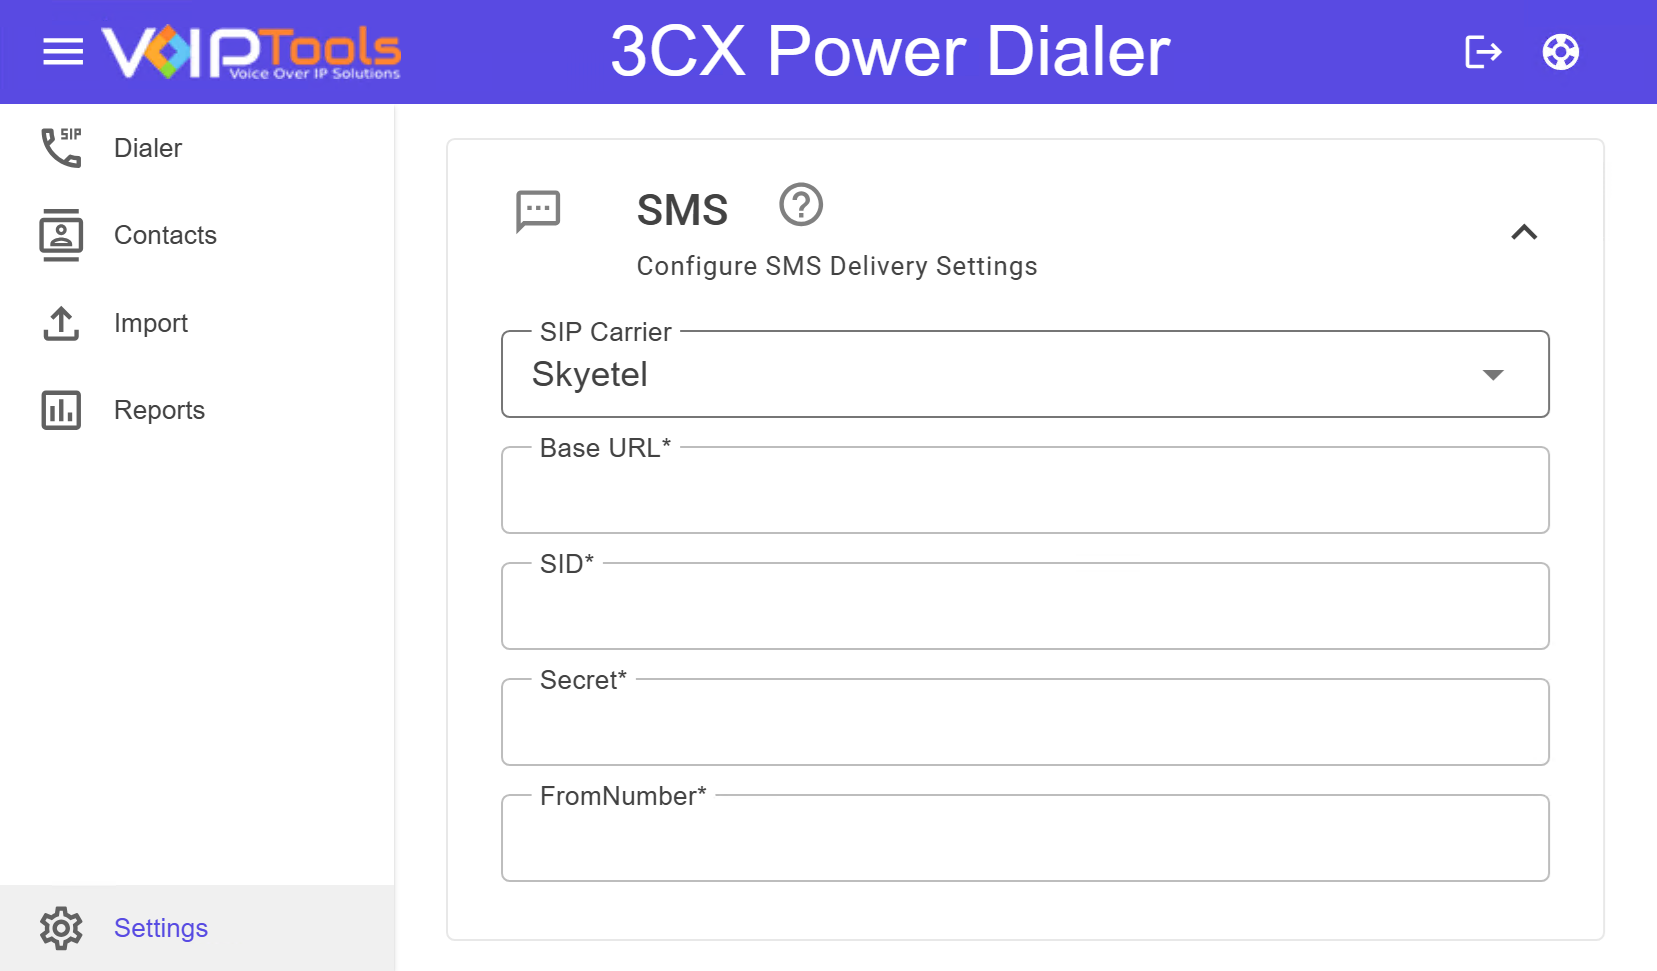
- In the SIP Carrier dropdown list, select the Skyetel option.
- Enter the necessary credentials for Integration and click the Save button to save the settings
SMS Service Feature Using Twilio #
Follow the procedure to send SMS using Twilio,
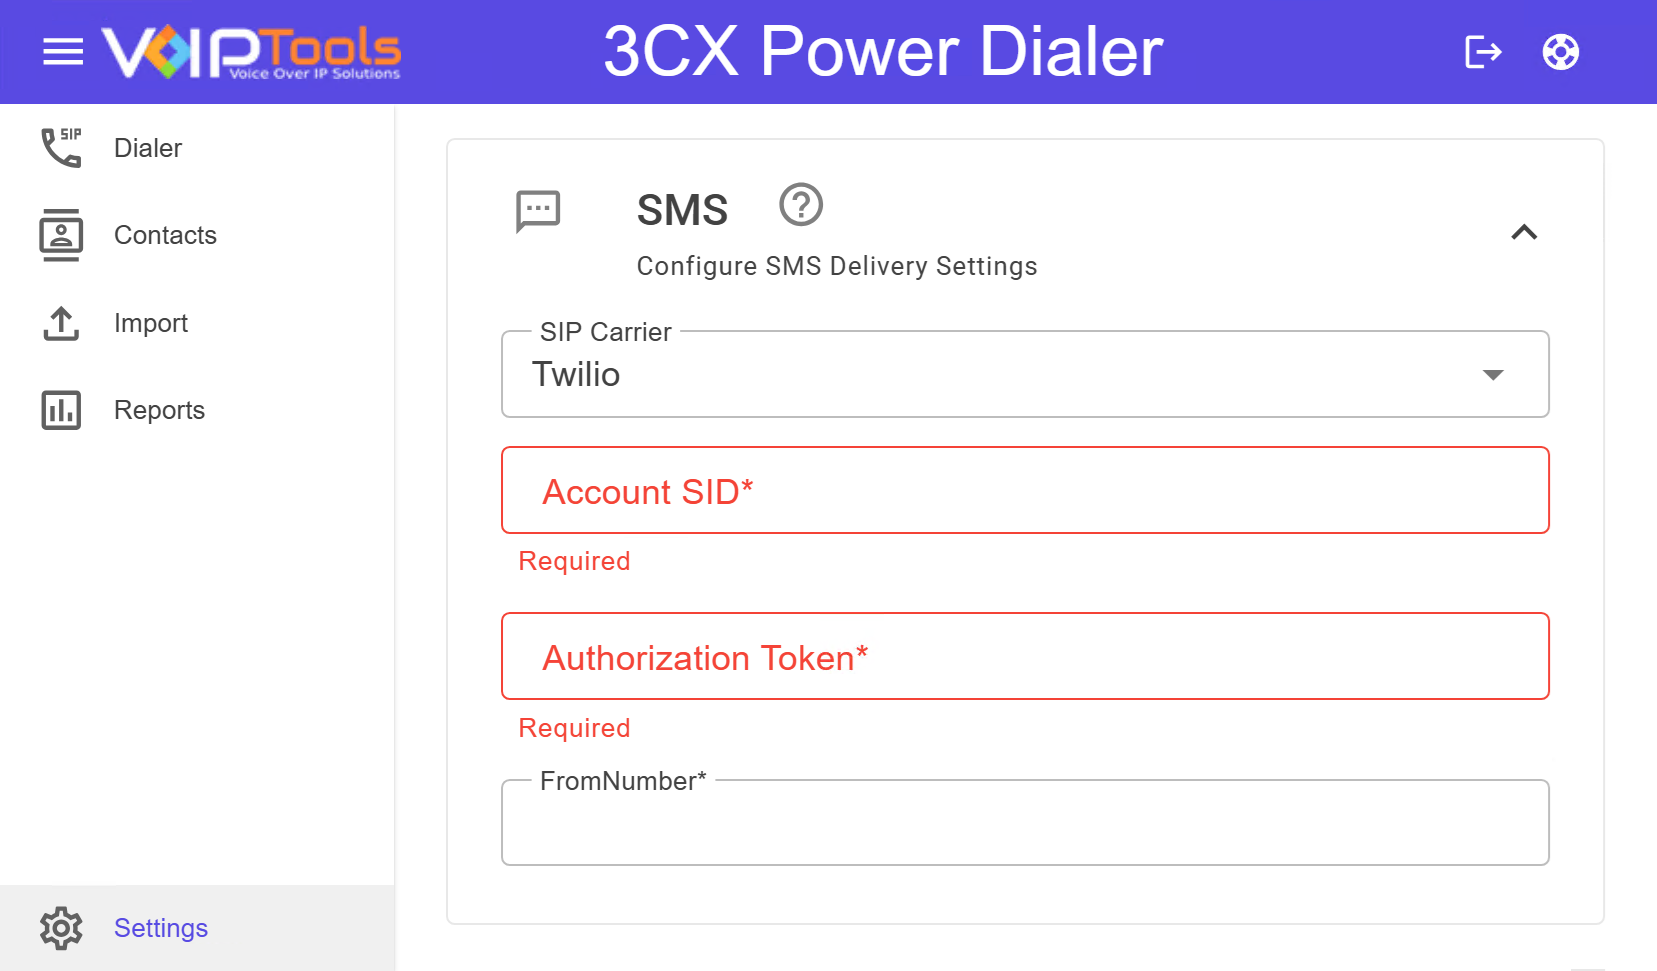
- In the SIP Carrier dropdown list, select the Twilio option.
- Enter the necessary credentials for Integration and click the Save button to save the settings
TTS Settings tab #
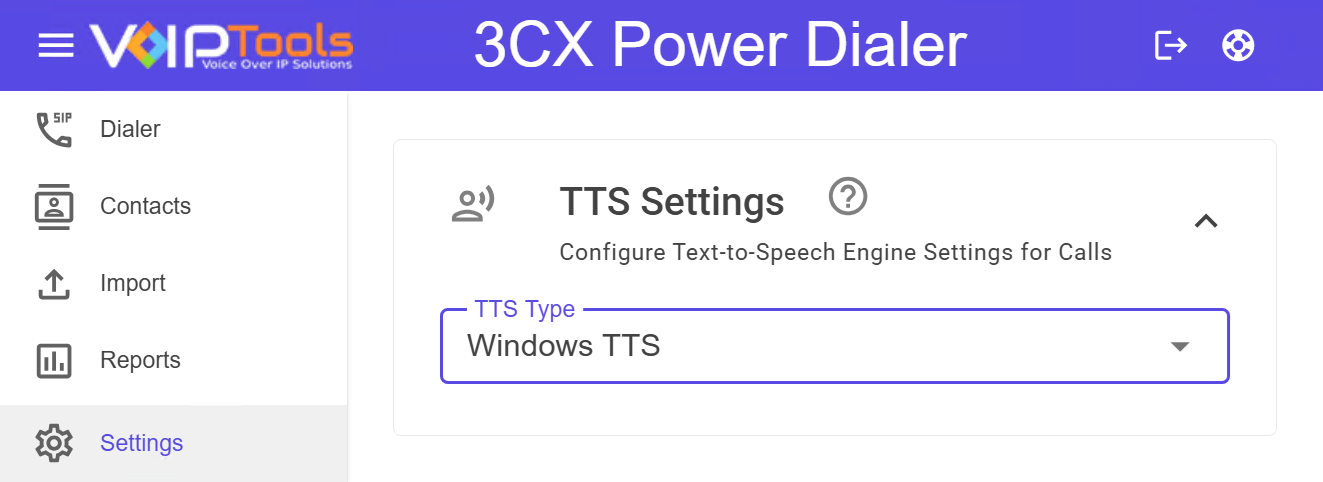
Text-to-speech (TTS) represents a method of speech synthesis that transforms text into audible speech. Within the TTS Settings tab, you have the option to select the preferred TTS type, either Windows or Amazon Polly. The speech synthesizers furnished by Microsoft for employment with applications utilizing the Microsoft Speech API or the Microsoft Speech Server Platform are known as the Microsoft text-to-speech voices. Conversely, Amazon Polly operates as a Text-to-Speech (TTS) service employing sophisticated deep-learning techniques to produce speech that closely resembles human vocalization.
- In the Settings screen, click the TTS Settings tab.
- From the TTS Type dropdown list:
- Select Windows TTS to create TTS using Microsoft Speech API and it will Save automatically.
-
- Select Amazon Polly if you want to use create TTS using Amazon Web Services.
- In the Amazon ID field, enter a valid Amazon ID.
- In the Amazon Key field, enter a valid Amazon Key to log in.
- Select Amazon Polly if you want to use create TTS using Amazon Web Services.
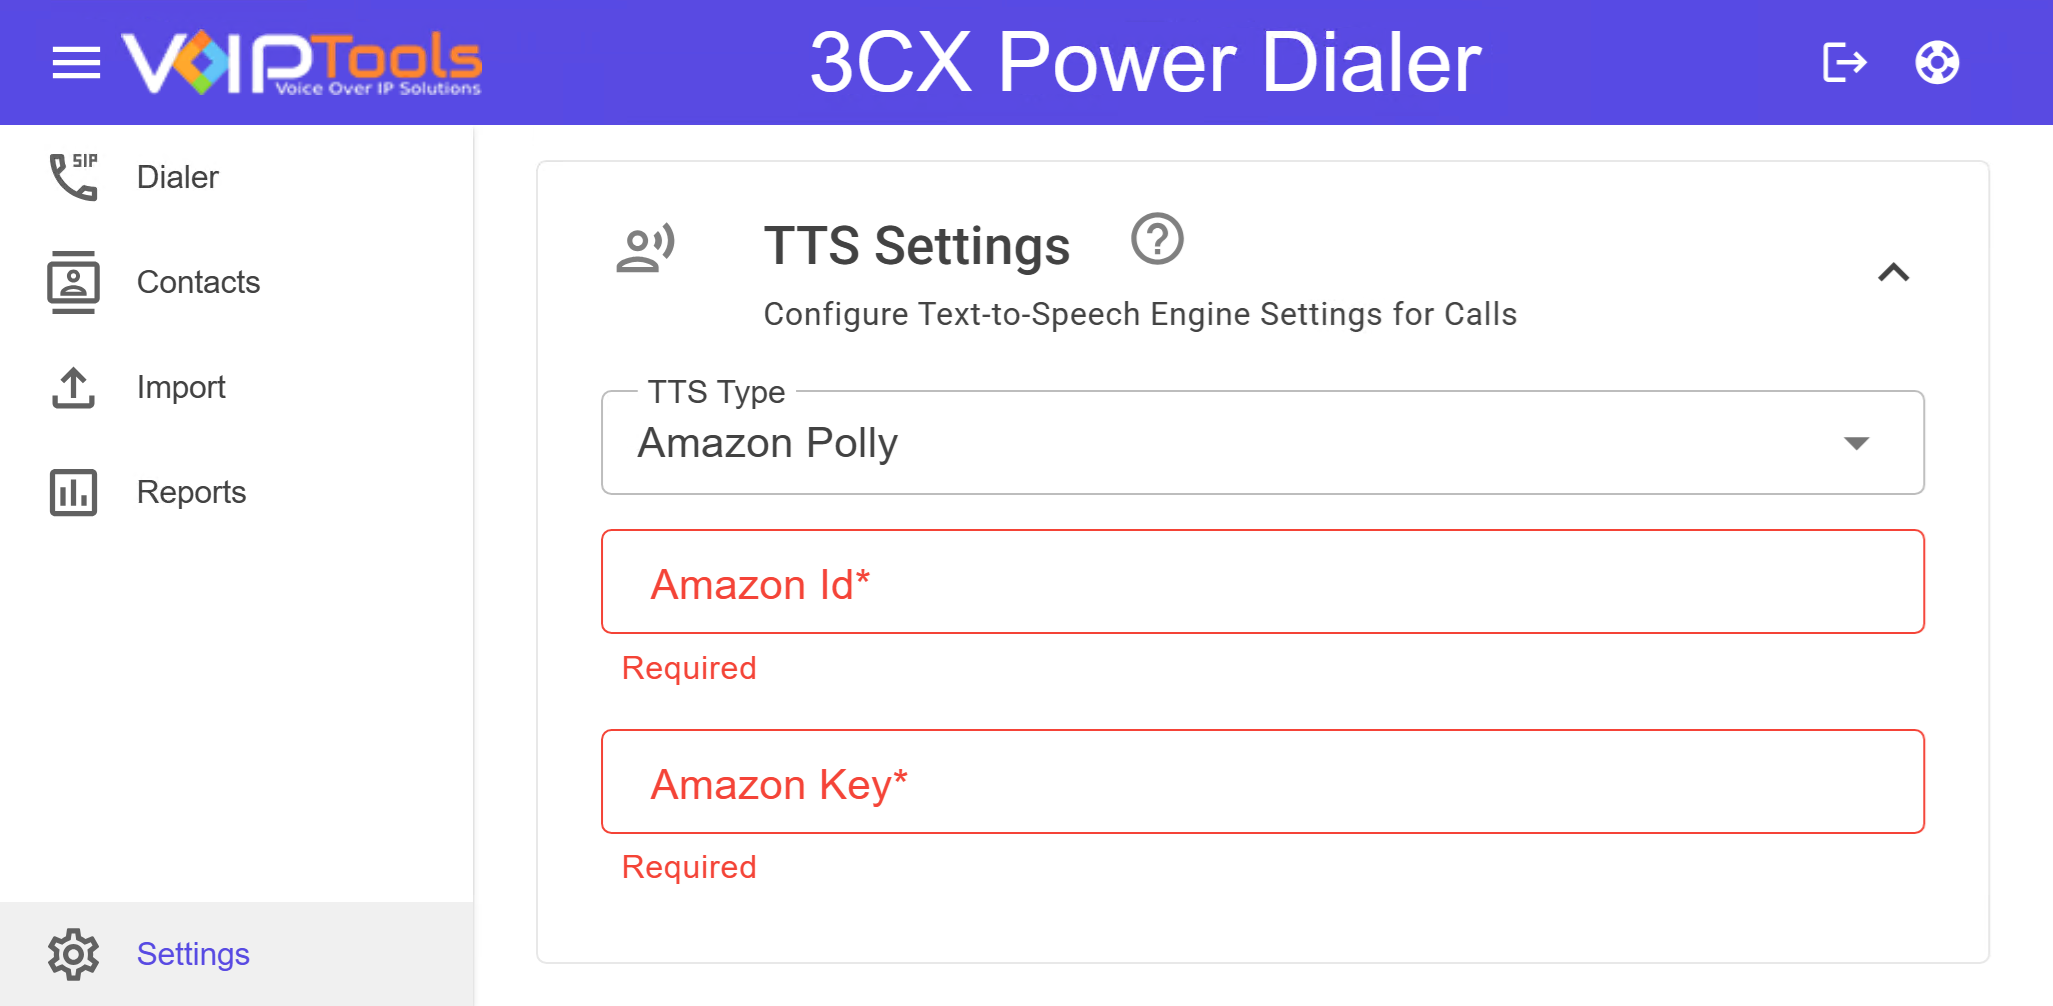
To know how to create Amazon Web Services (AWS) account and generate AWS access key ID and secret key ID, click here.
-
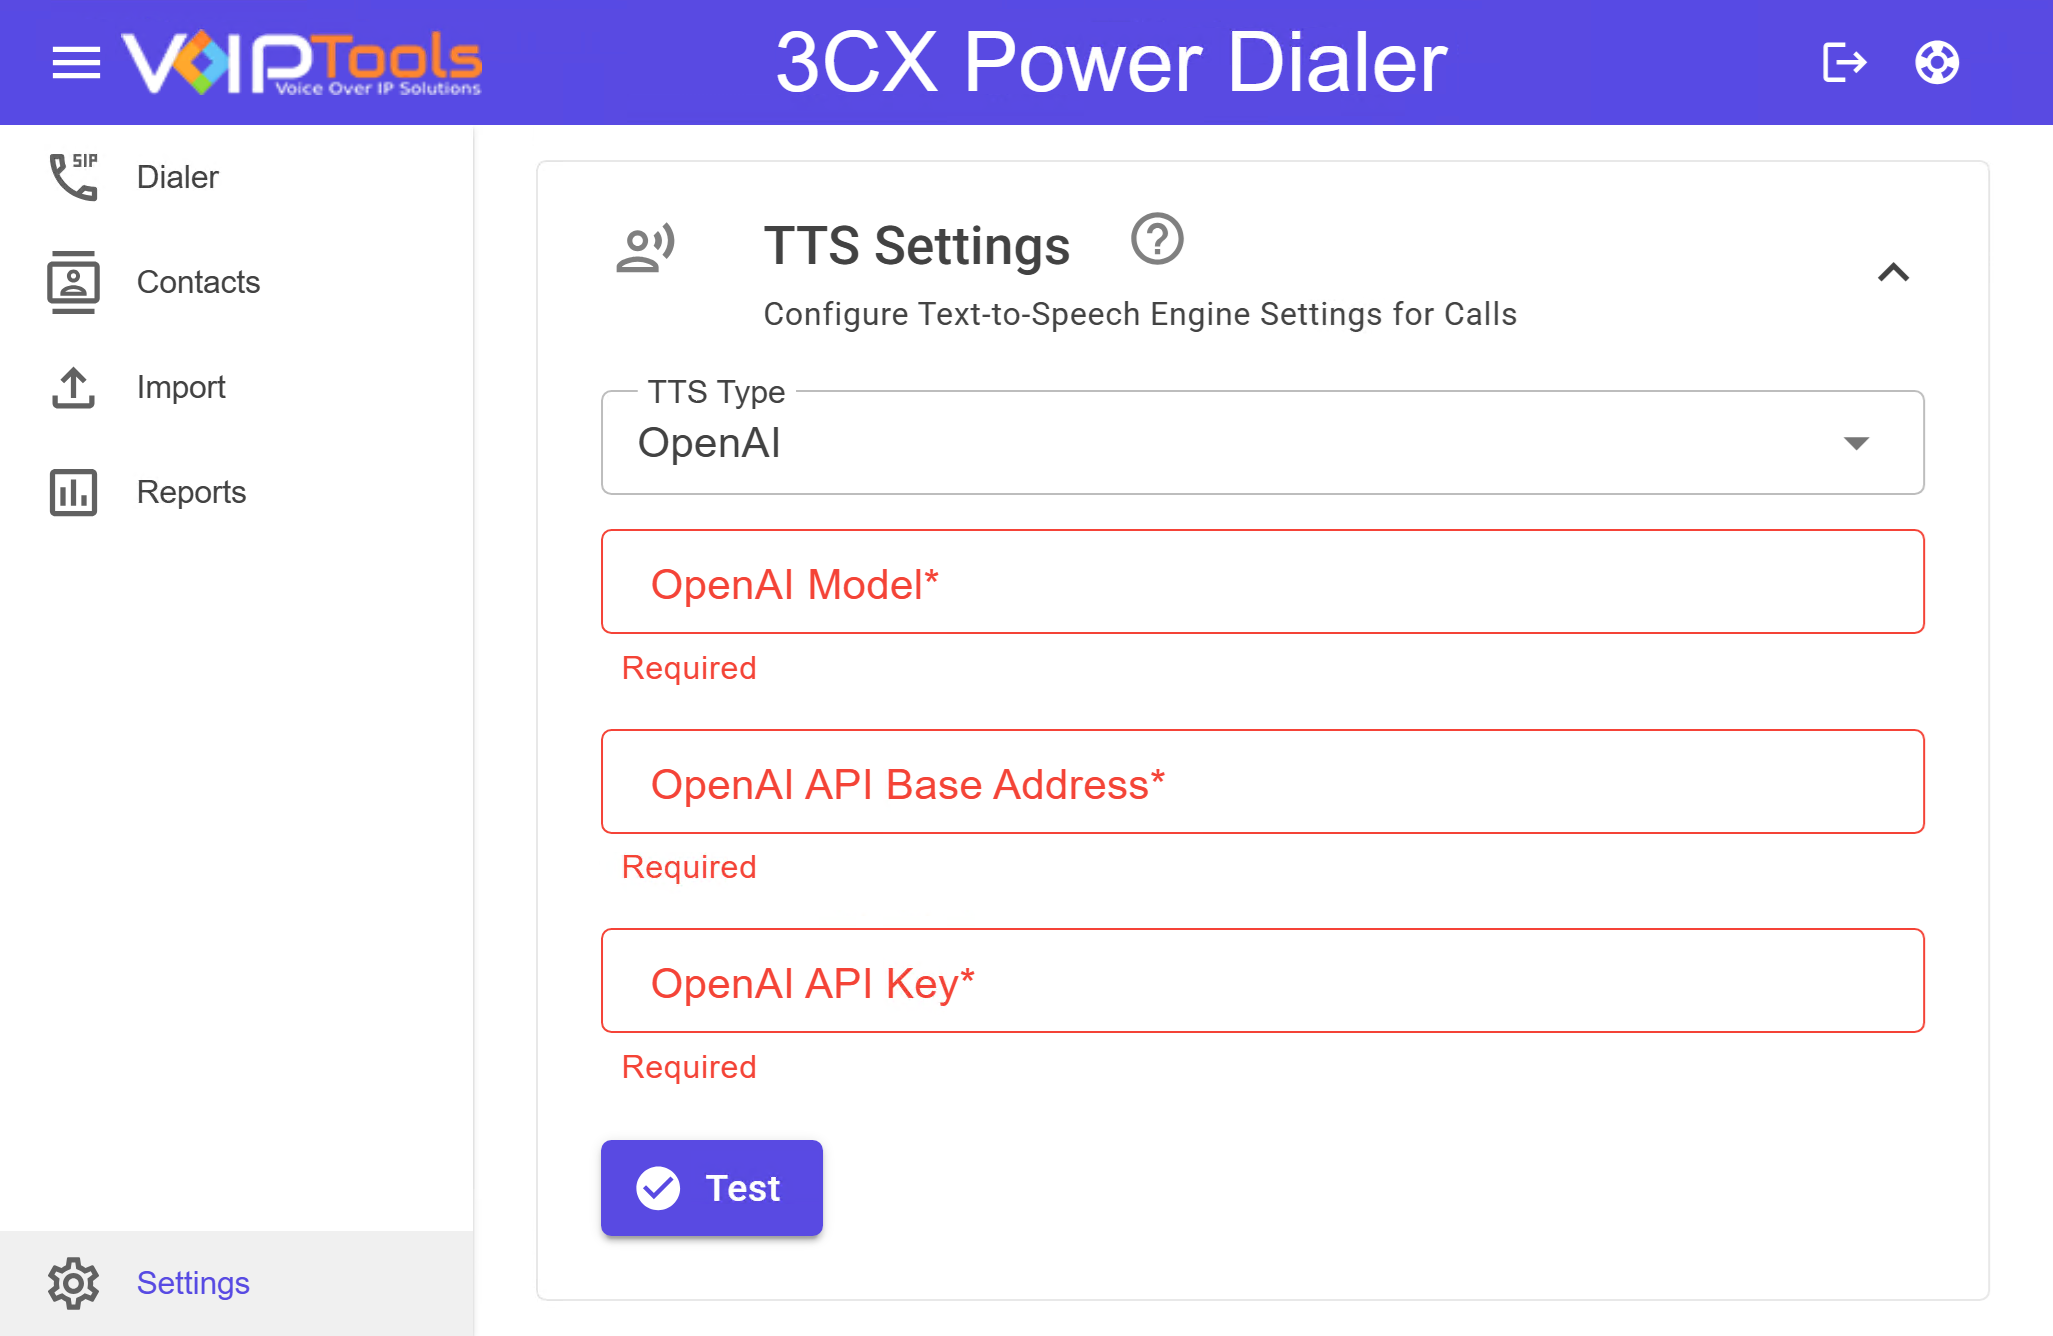
- Select OpenAI if you want to use create TTS using Amazon Web Services.
- In the OpenAI Model field, enter a valid model.
- In the OpenAI API Base Address field, enter a valid base address to log in.
- In the OpenAI API Key field, enter a valid API key.
- Click Test to validate the connection.
- Select OpenAI if you want to use create TTS using Amazon Web Services.
#
3CX (Advanced) tab #
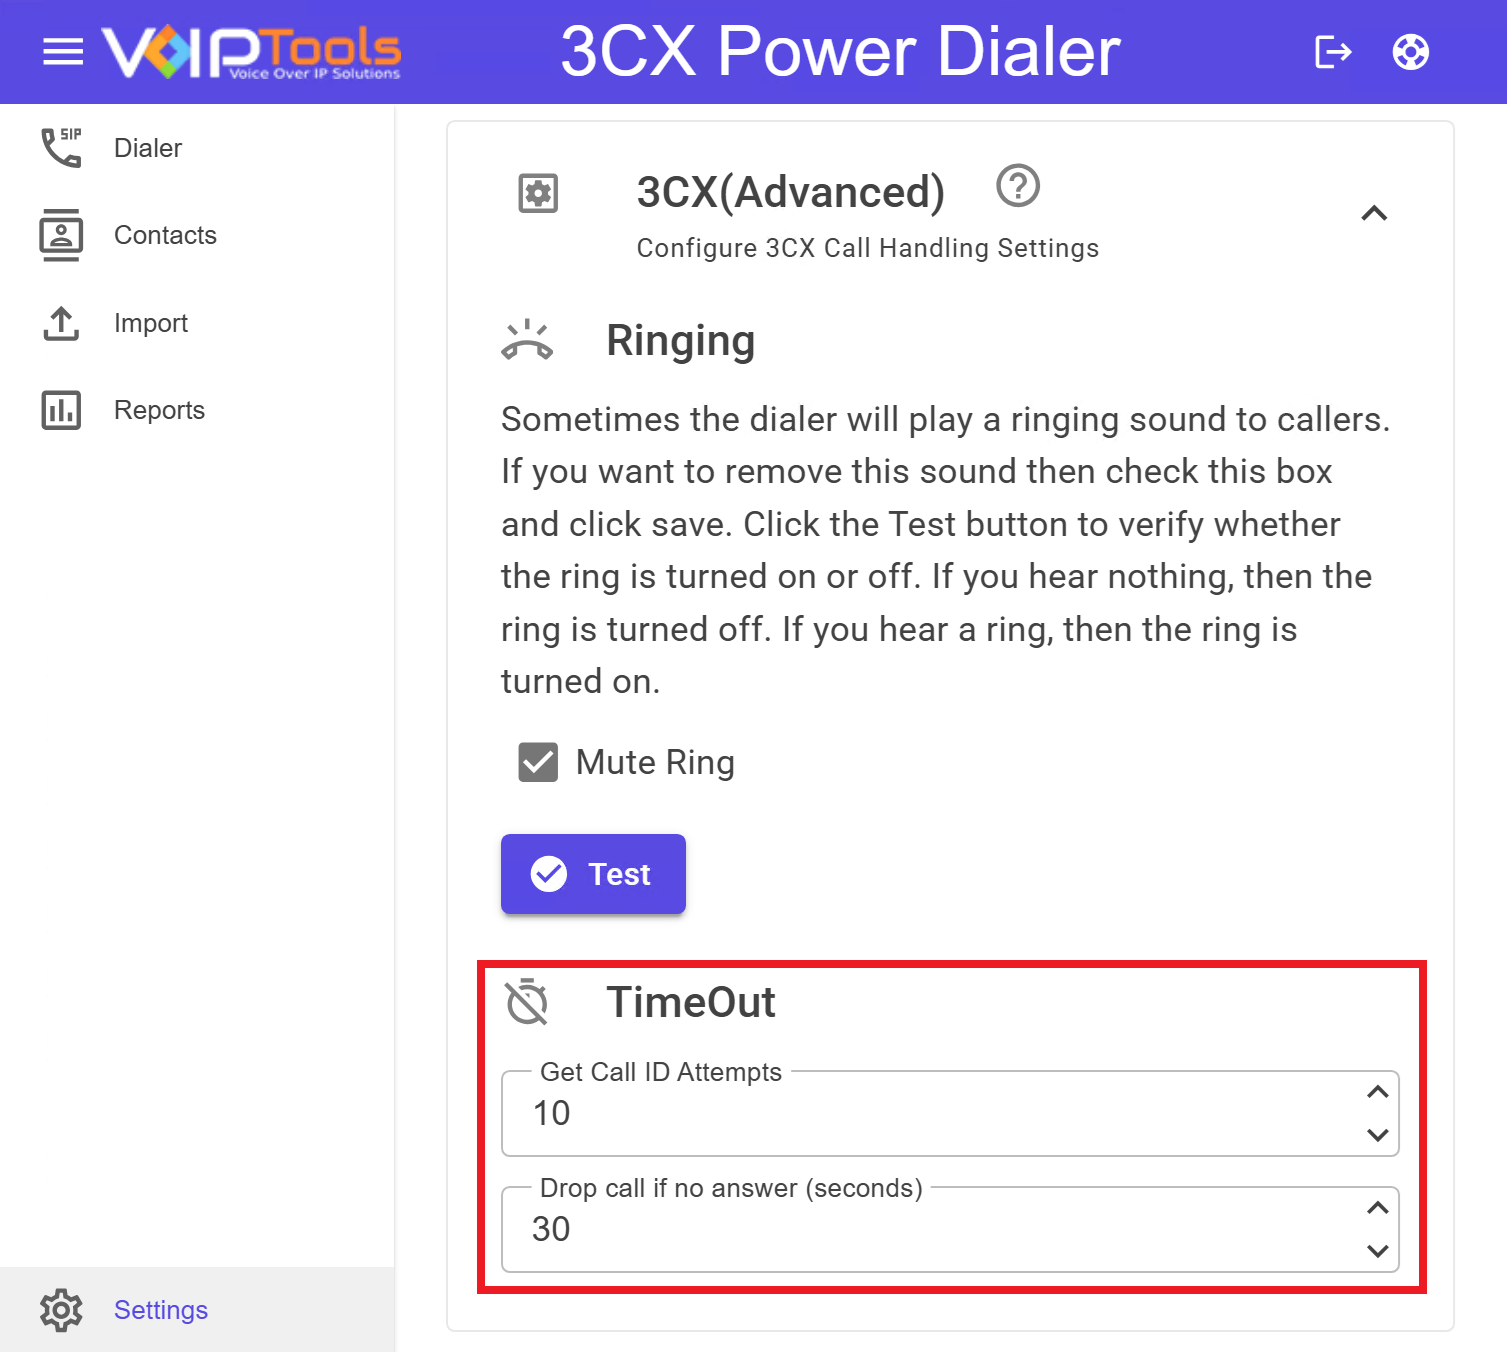
The 3CX tab enables you to configure Ringing Sound and Timeout Settings for 3CX.
Ringing #
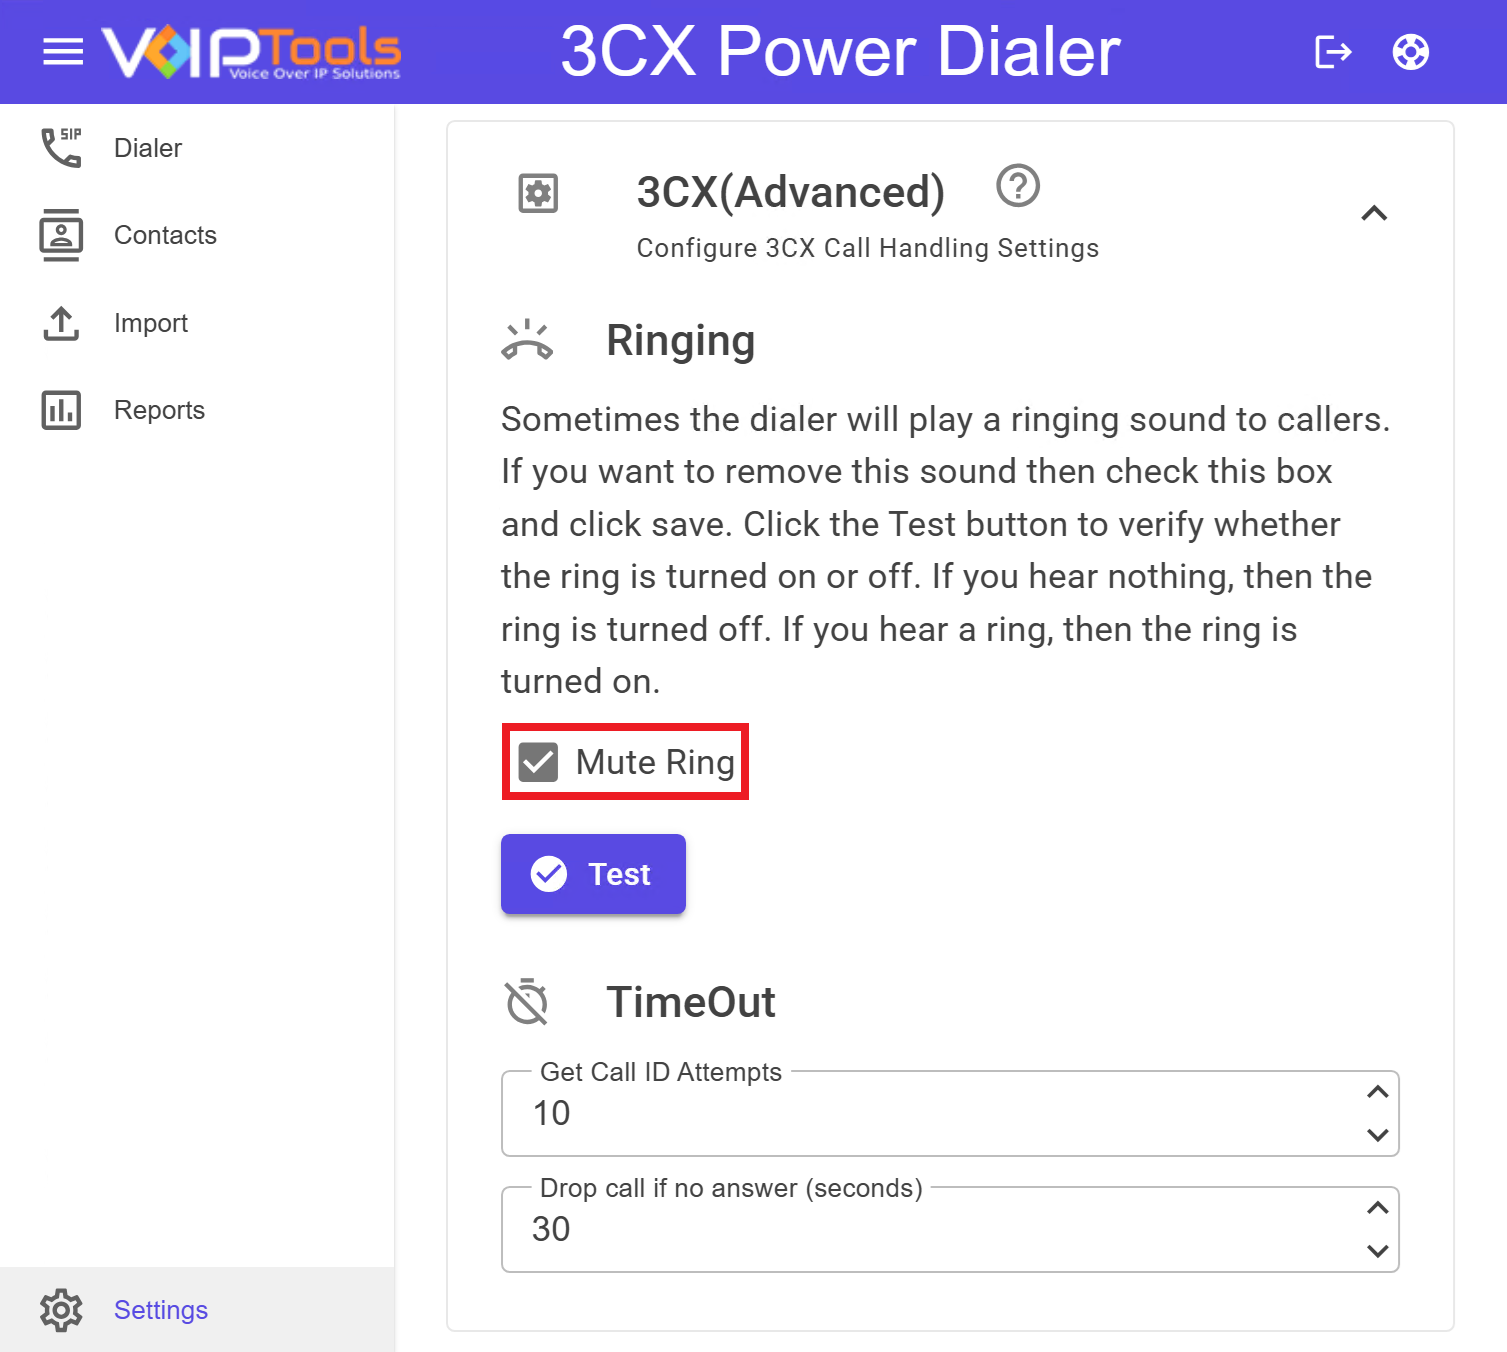
This feature is to provide you with the ability to control the ringing sound during incoming calls. The Ringing section lets you mute/unmute the notification to the callers.
Follow the procedure to configure the Ringing settings,
- In the Ringing section, check the Mute Ring check box to mute the ringing sound or uncheck the Mute Ring box to unmute the ringing sound.
- Click the Test button to verify whether the ring is turned ON or turned OFF.
Timeouts #
The Timeout feature lets you configure the timeout settings and call attempts for the 3CX Power Dialer.
- In the Timeouts section and in the Get Call ID Attempts box, set the desired number so that if the call is not received, then the call attempts will be made as per the set number of times.
When a call remains unanswered after specified attempts, the Run Report in the Dialer tab will indicate the call status as “Call Failed.”
- From the Drop call if no answer (seconds) box, set the desired number (in seconds) so that if the call is not received within the set number of seconds, then the call will be dropped.
- Click Test to validate the Timeout settings.
Appointment Type #
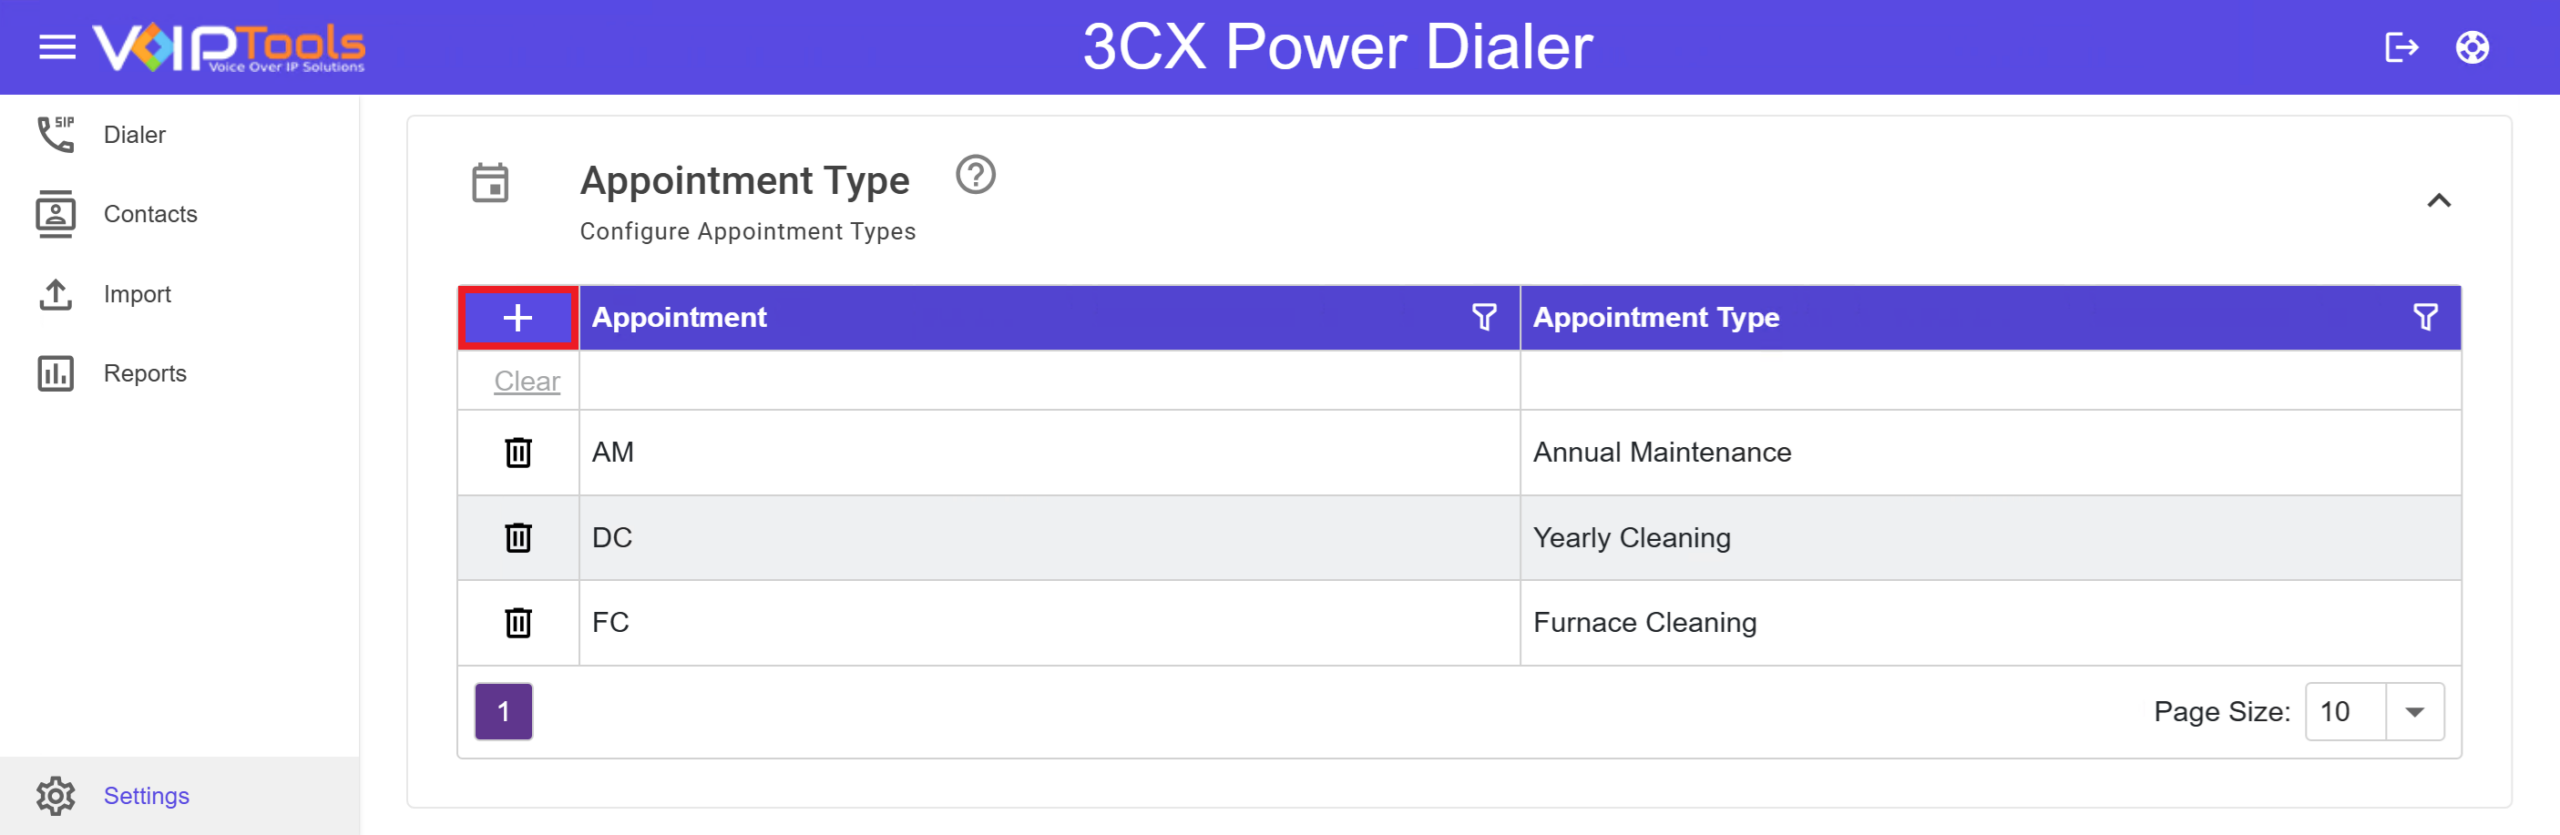
The Appointment Type tab displays the list of all the appointments.
Follow the procedure to add an appointment,
- In the Appointment Type tab, click the Add
 button to add an appointment.
- In the Appointment field, enter the name of your appointment.
- In the Appointment Type field, enter the type of your appointment.
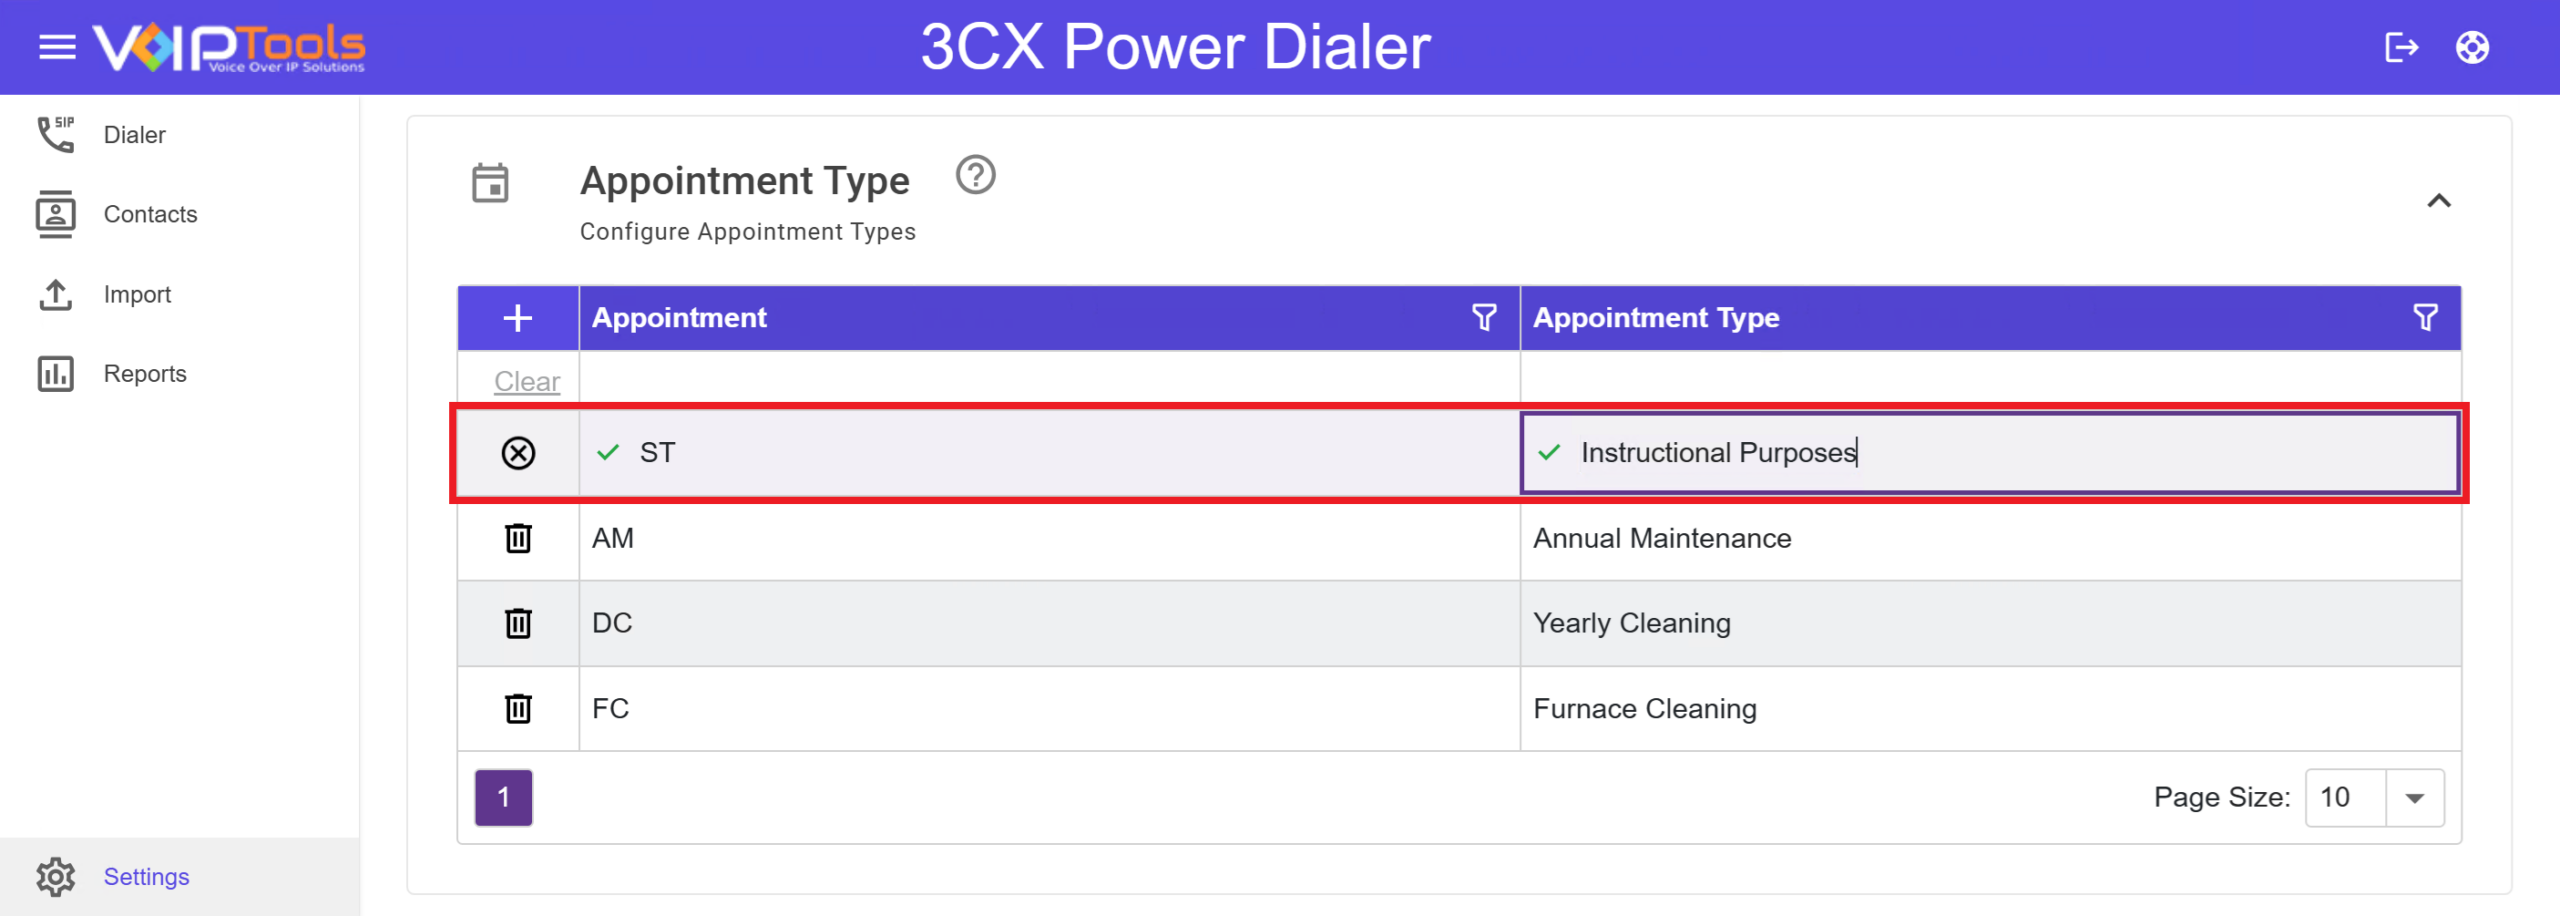
Appointment should not be duplicate.
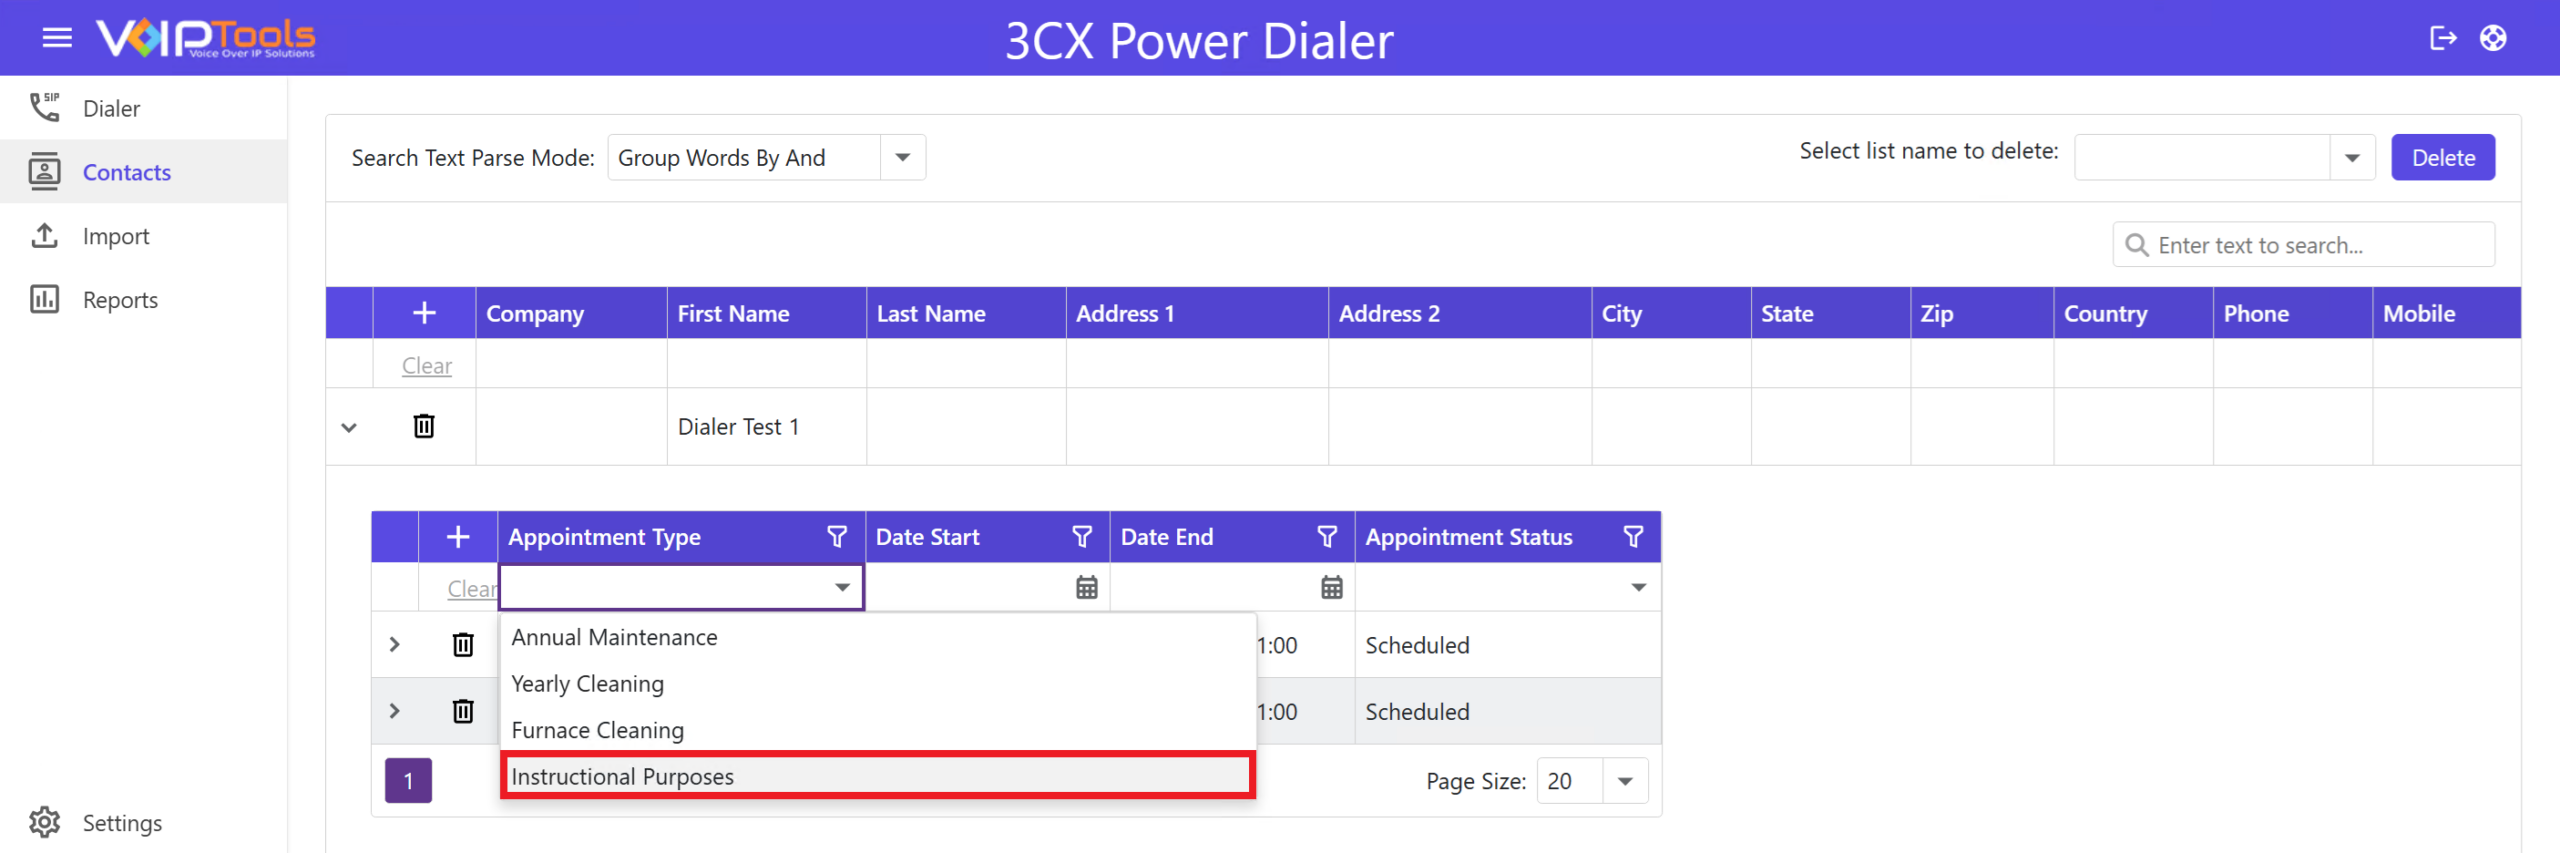
The appointment type gets reflected in the Contacts screen.
Custom Branding #
Make the portal look like your own: change the logo, header title, and accent colors.
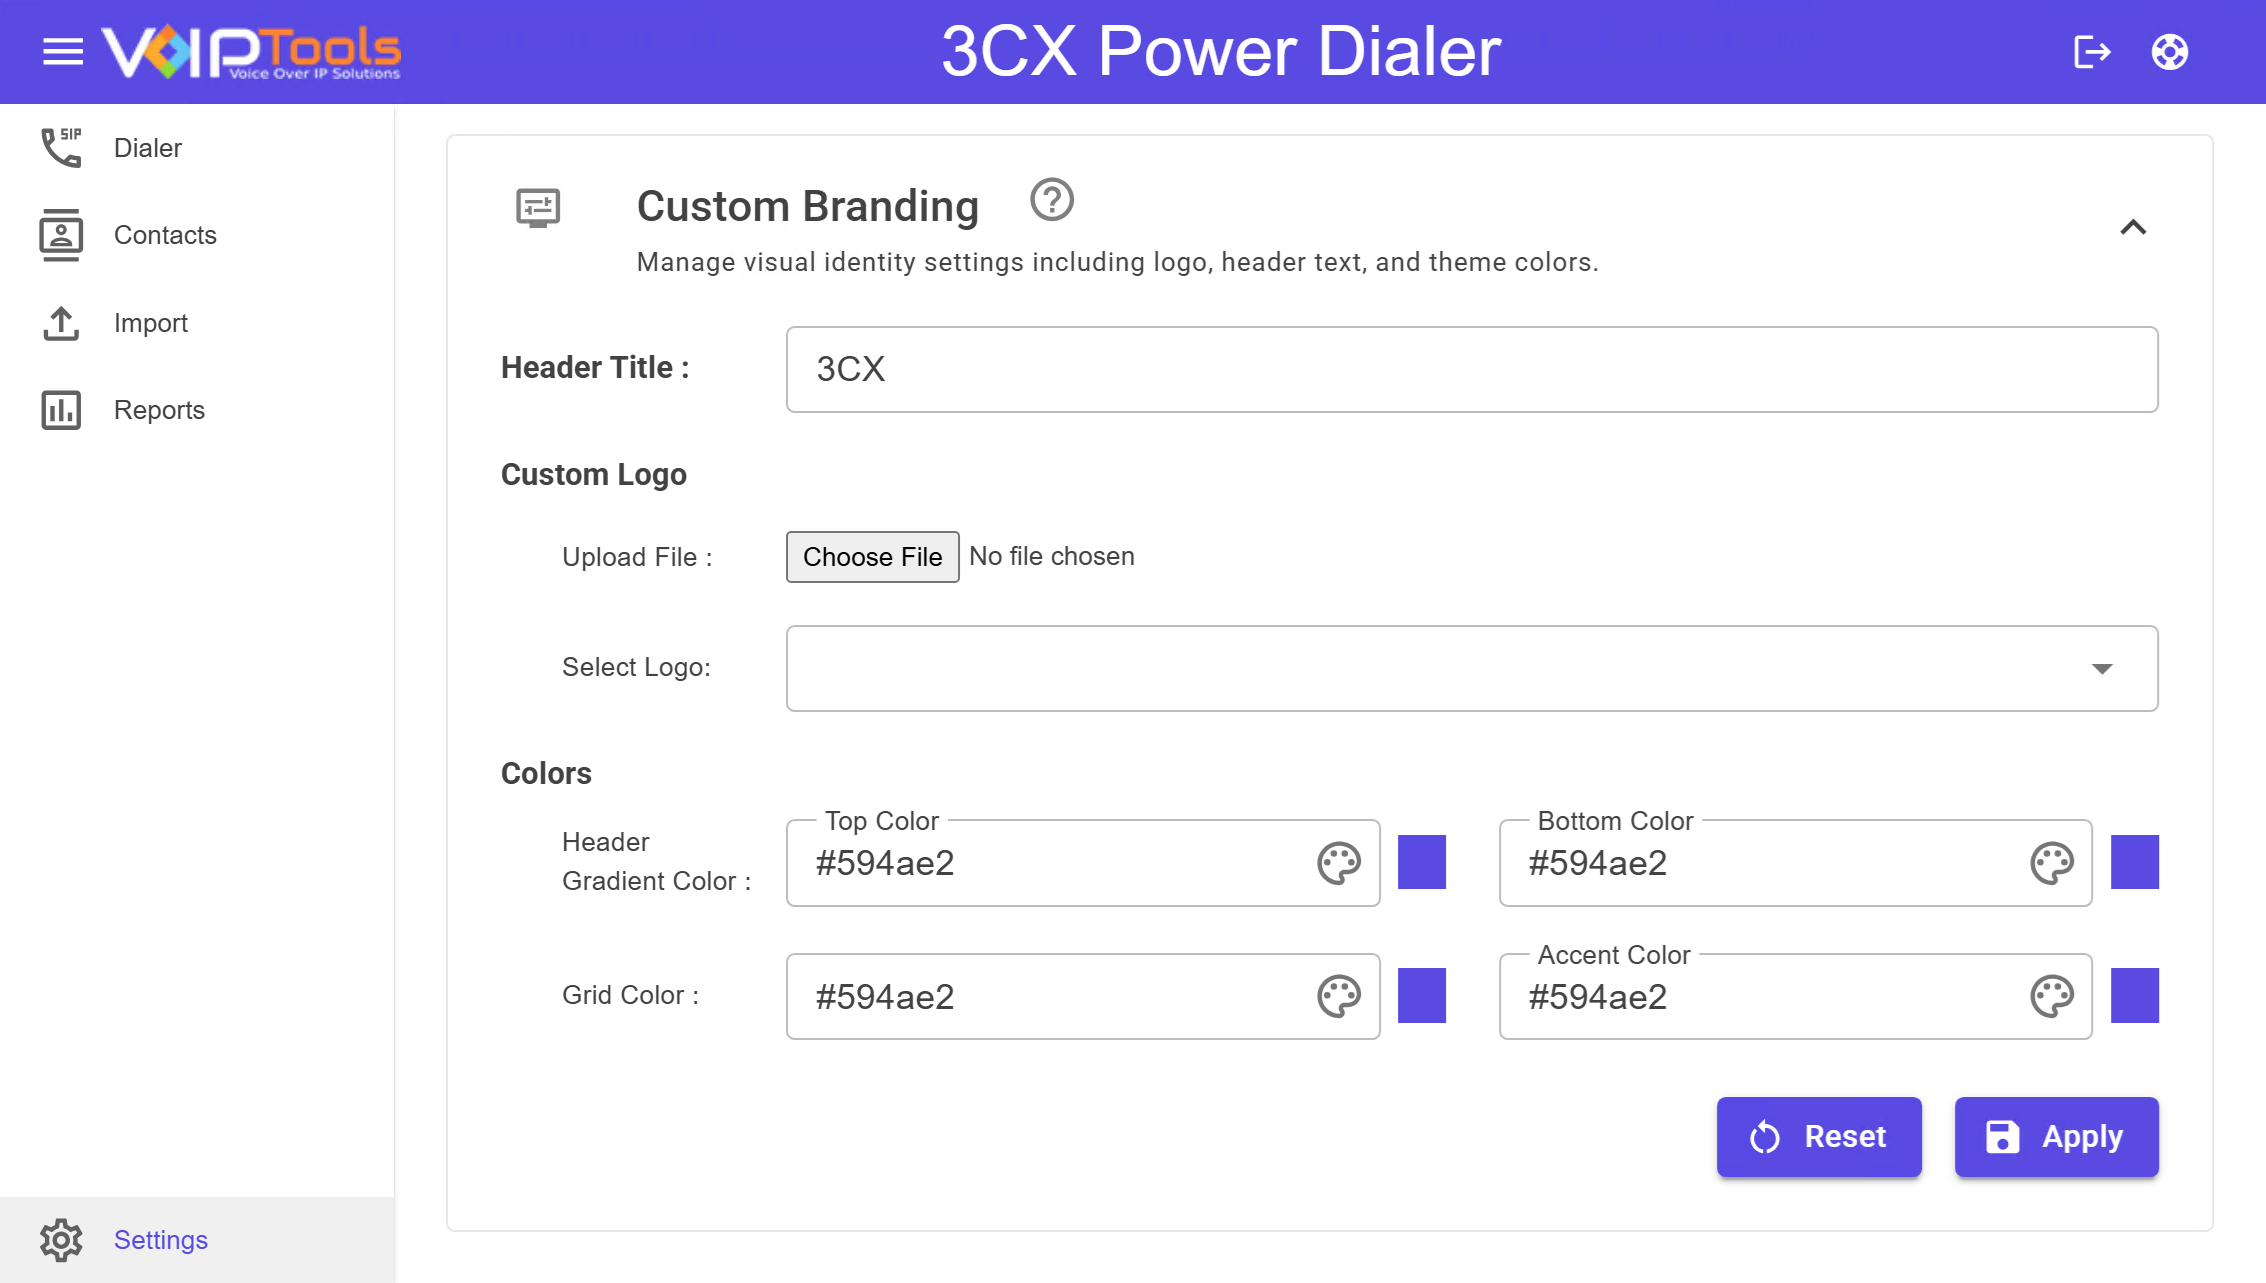
Figure 48: Custom Branding section expanded showing color pickers and logo upload area
- Click Custom Branding to expand the section.
- Enter a Header Title to replace the default application name at the top of the portal.
- Upload a logo via Choose File, or pick a previously uploaded one from the Select Logo
 dropdown.
 - Set your colors using the pickers below.
- Click Apply to save everything.
Color settings #
Dialer Menu #
The dialer can dial only one campaign at a time. To create a campaign, you need to configure various parameters in each of the following tabs:
- Contacts tab
- Audio tab
- Email tab
- SMS tab
- Setup tab
- Run tab
Overview of Dialer screen #
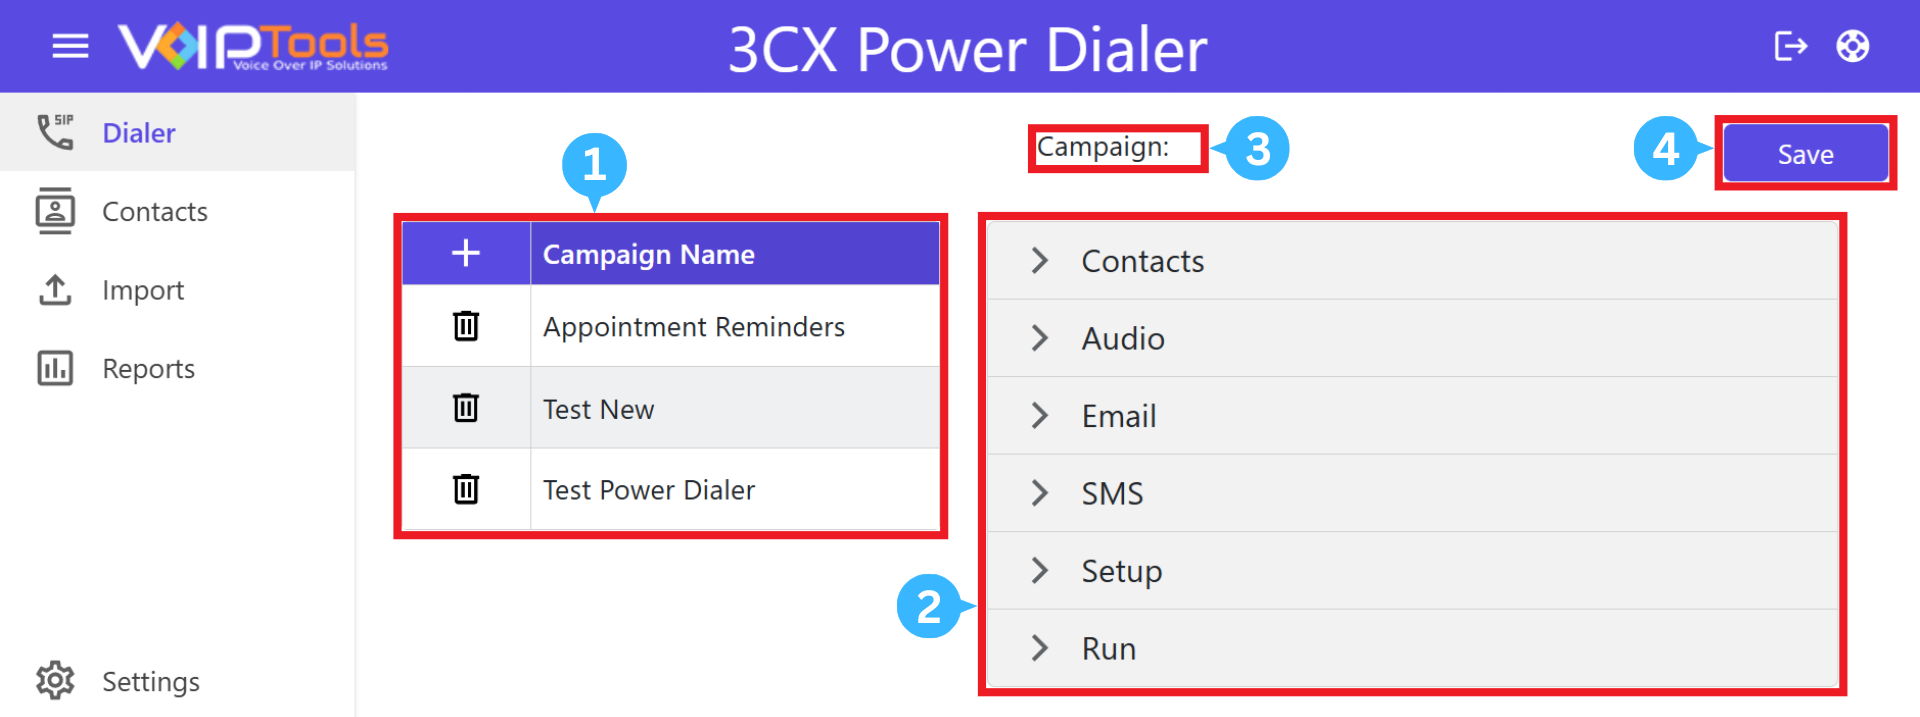
The following figure shows the overview of the Dialer screen,
 |
Campaign Section | Lets you add, delete, and select a campaign to do desired modifications. |
 |
Dialer screen tabs | The list of Dialer Screen tabs. You can select the tabs and make modifications to the campaigns. |
 |
Campaign Name | The name of the selected campaign gets displayed. |
 |
Save button | Saves the configured campaign settings. |
Create a Campaign #
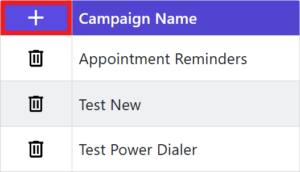
- In the 3CX Dialer configuration screen, click the Add Campaign button.
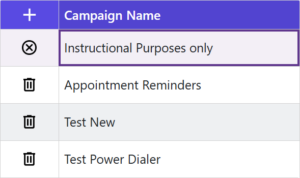
- In the Campaign Name field, enter a name for the campaign.
Contacts tab #
The purpose of the Contacts tab is to provide a centralized location for managing and accessing contact details. This tab is designed to facilitate the retrieval and organization of contact information stored in a database.
Follow the procedure to retrieve the contact information from the database,
- In the Dialer menu, click the Contacts tab.
- In the Query field, type the appropriate ‘SQL Query’ to retrieve the desired contact details from the database.
- From the Phone dropdown, select the appropriate column name that represents the phone number so that the dialer uses the number specified in that column to make a call.
- From the Email dropdown, select the appropriate column name that represents the email address so that the dialer uses the email address specified in that column to send the email message.
- From the SMS Text dropdown, select the appropriate column name that represents the SMS text so that the dialer uses the number specified in that column to send the SMS text.
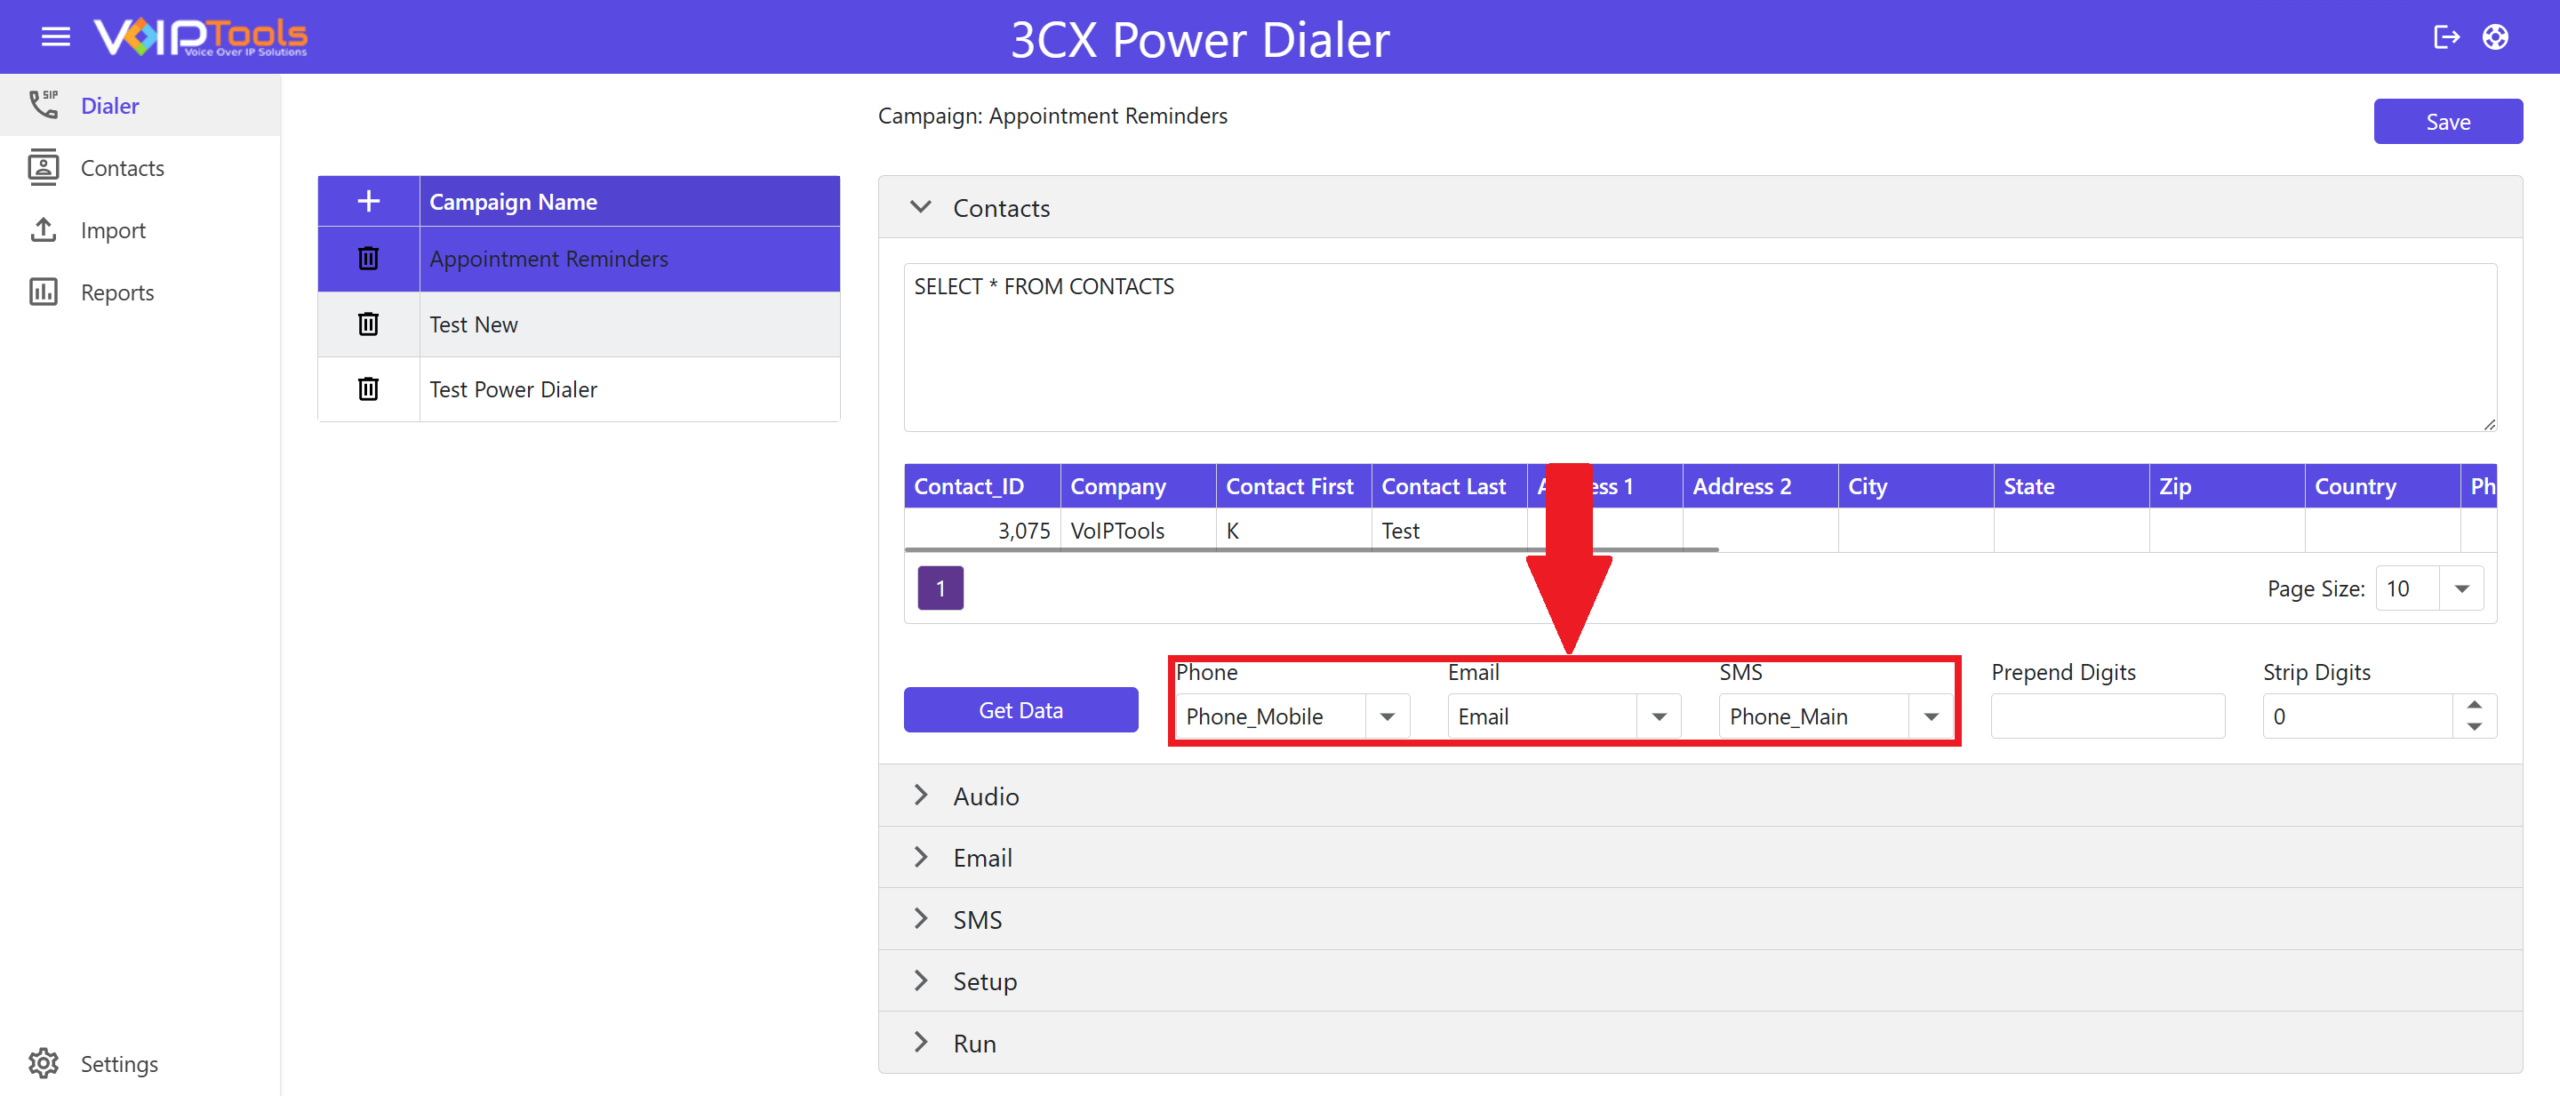
-
- In the Prepend section and from the Prepend Digits field, set the desired value so that when you attempt to call a number, the Power Dialer will prepend the digit to your number.
- In the Strip Digits box, set the value to the number of prepend digits.
- For example, if you enter 8852 in the Prepend Digits field, you must enter Four in the Strip Digits field.
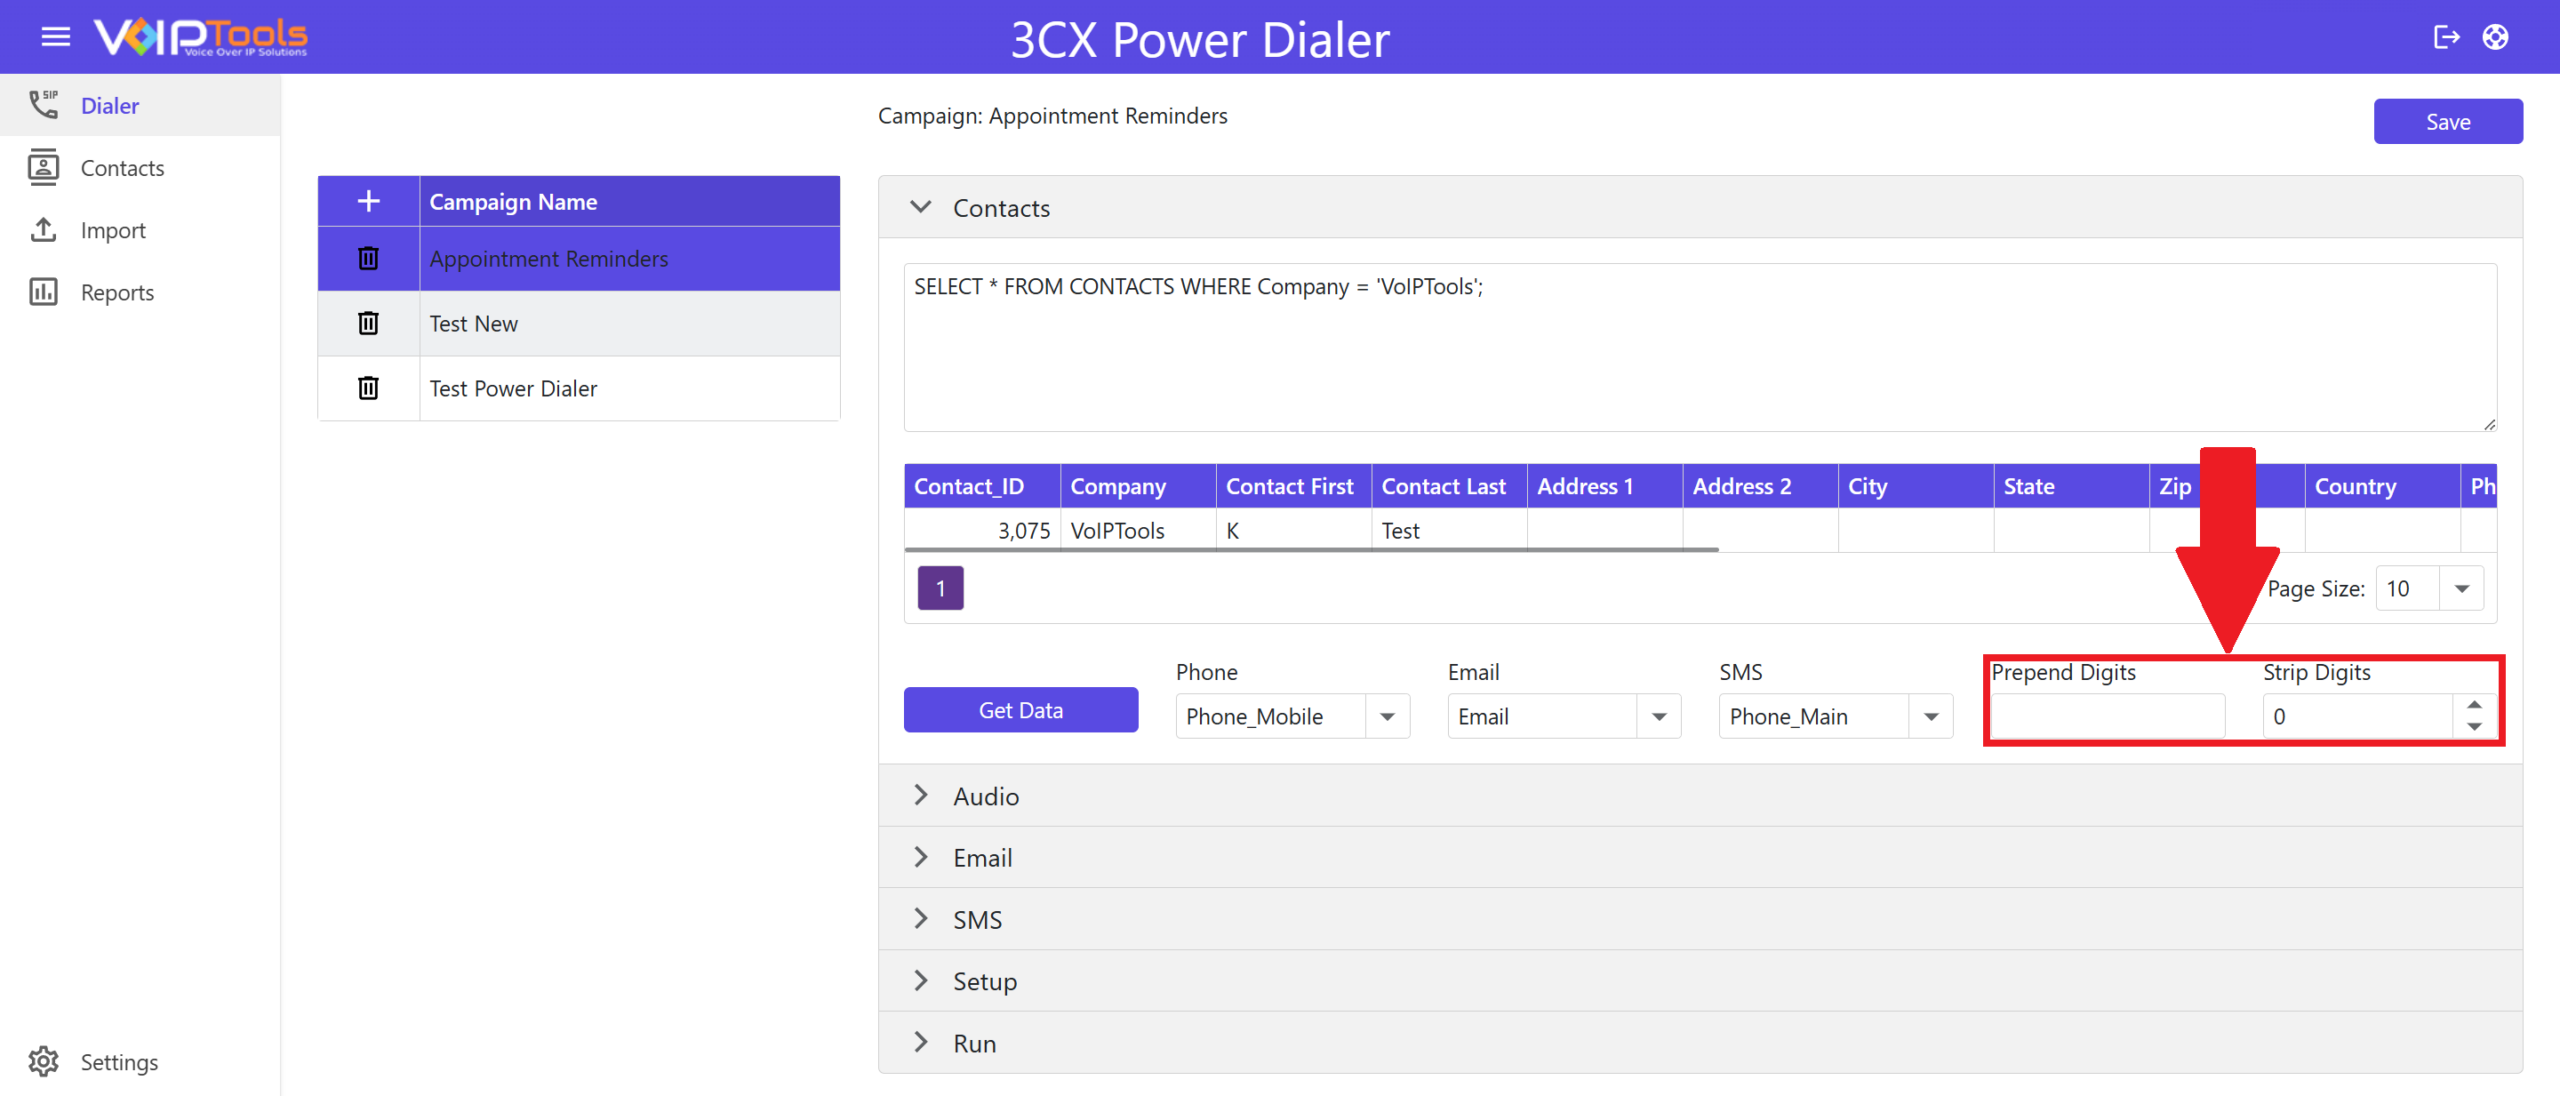
- Click the Get Data button to view the contact data retrieved from the database and click Save to save your changes.
You can configure any one or two or all of ‘Phone’, ‘Email’ and/ or ‘SMS’ so that the dialer responds accordingly.
The Prepend section enables you to configure the ‘Prepend’ settings. When you call a number, the ‘Power Dialer’ will add the ‘Prepend Digits’ to the beginning of your phone number. The ‘Strip Digits’ defines the number of prepend digits and you should set it manually.
Audio tab #
The Audio tab enables you to choose the ‘Text-To-Speech’ or ‘Pre-Recorded’ audio file to play the message when a dialer makes a call to the contact.
Text-To-Speech #
- Check the Scripted check box to enable ‘Text-To-Speech Audio’ to play as a message when the dialer makes a call to the contact.
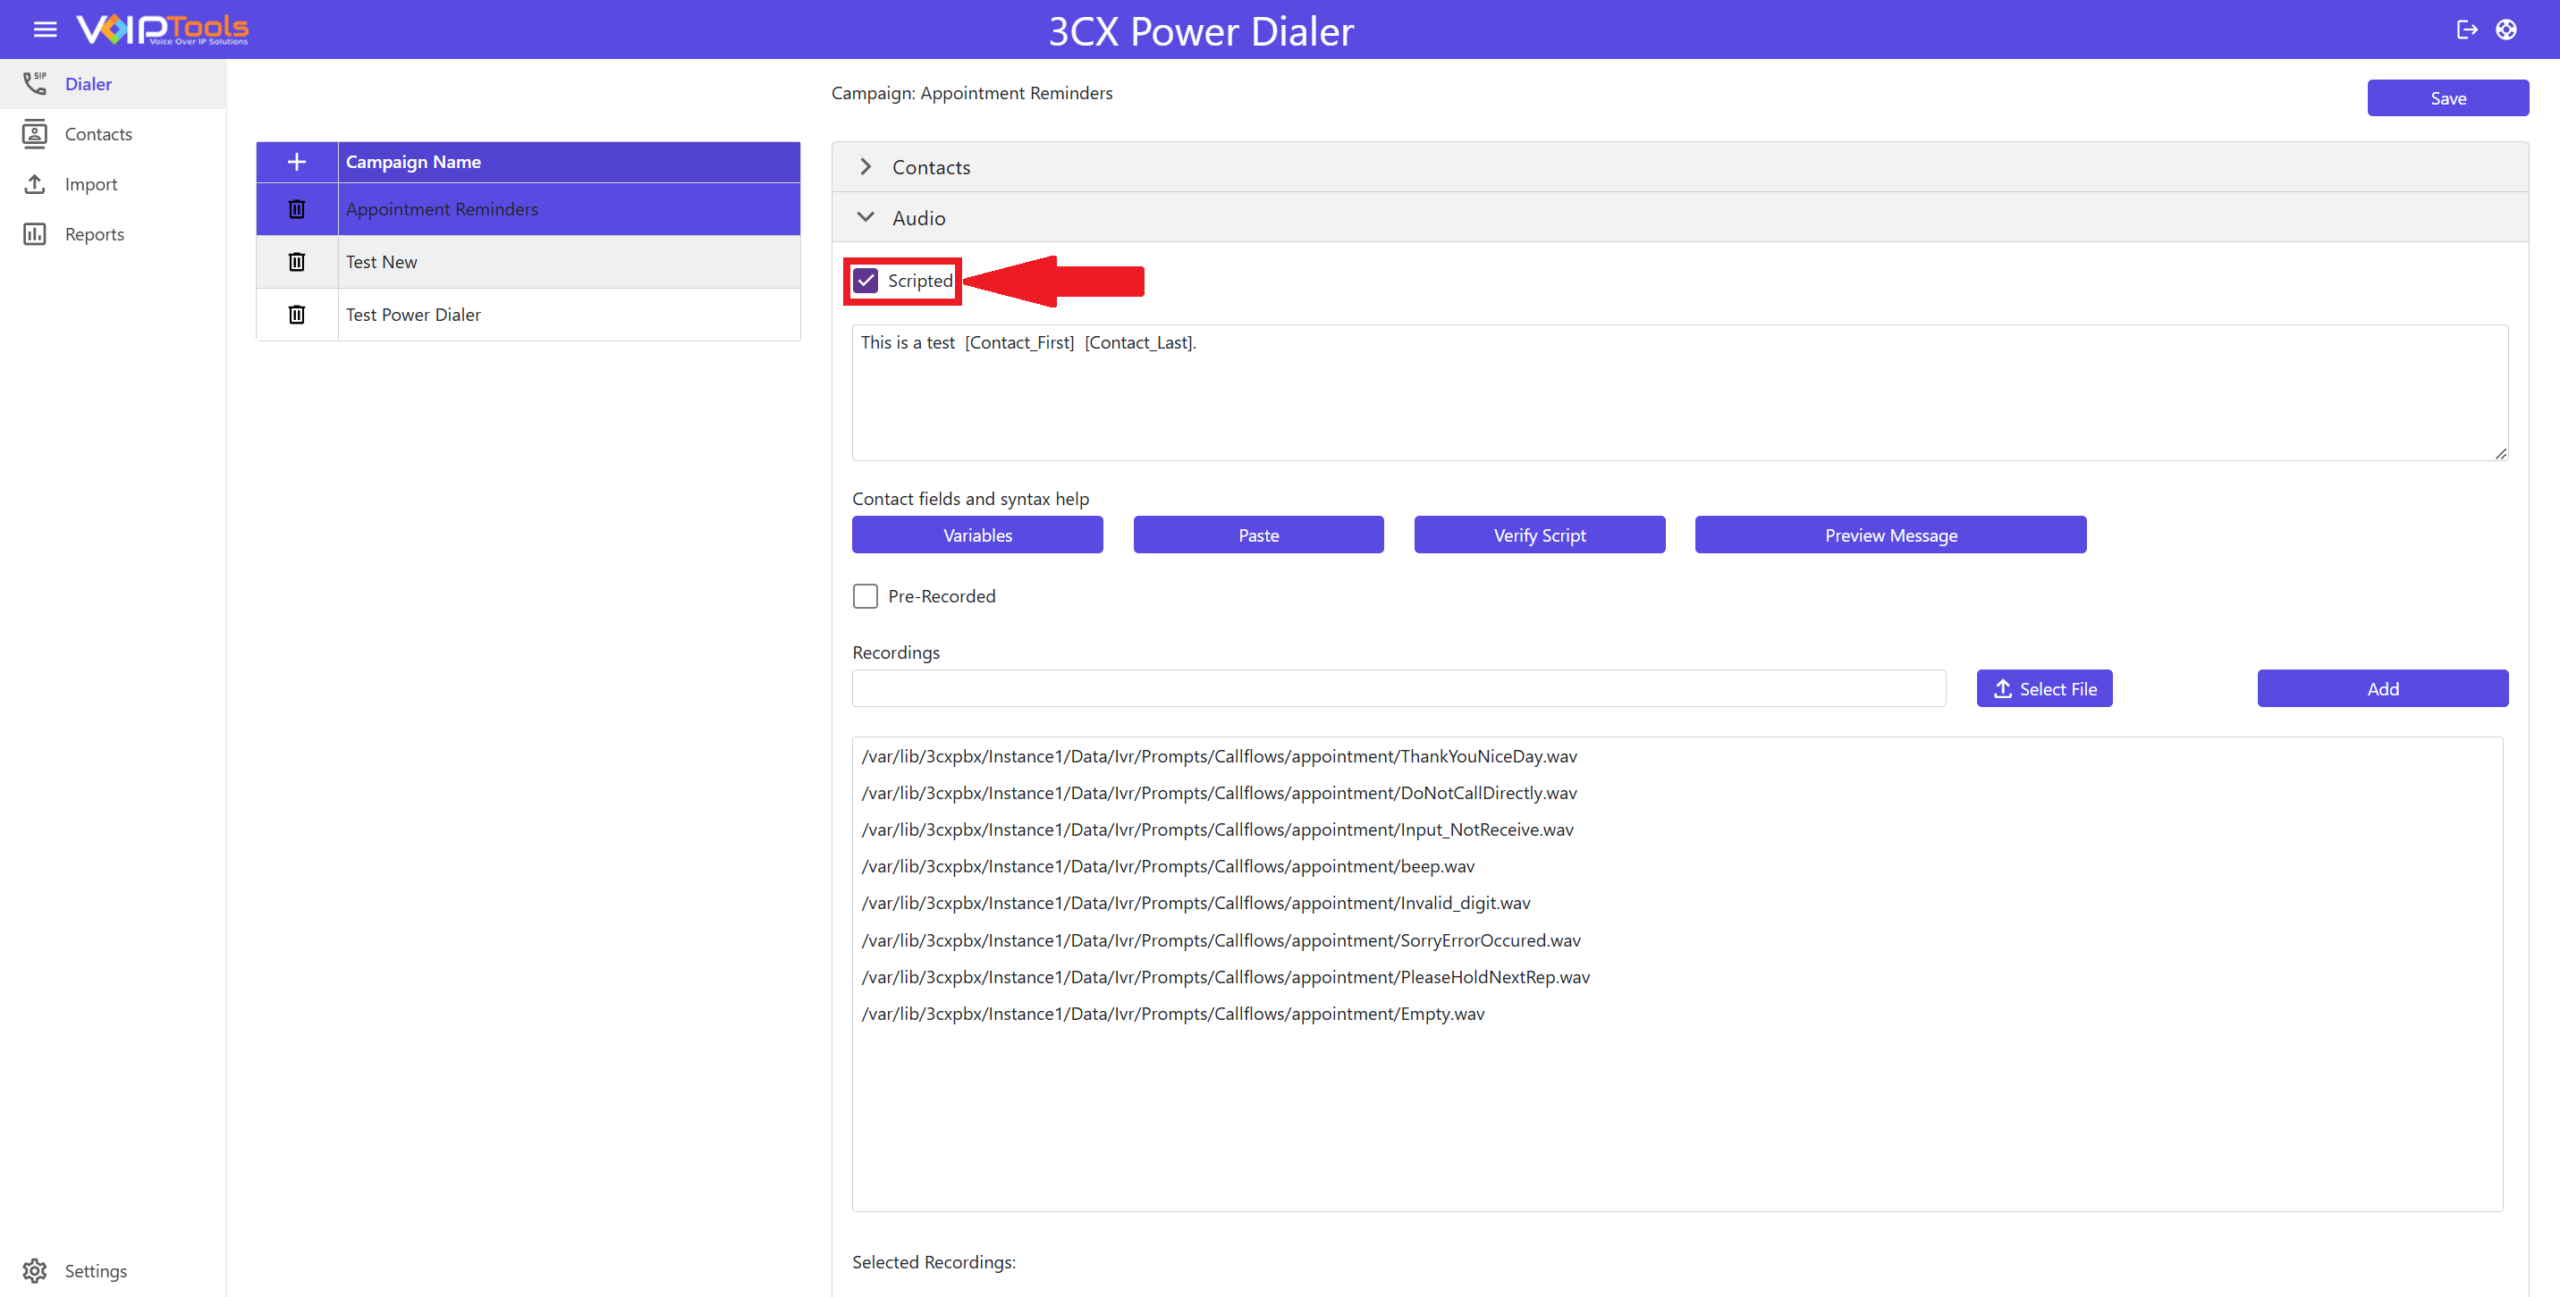
- Type the text that you want the dialer to play as a message when the contact receives the call.
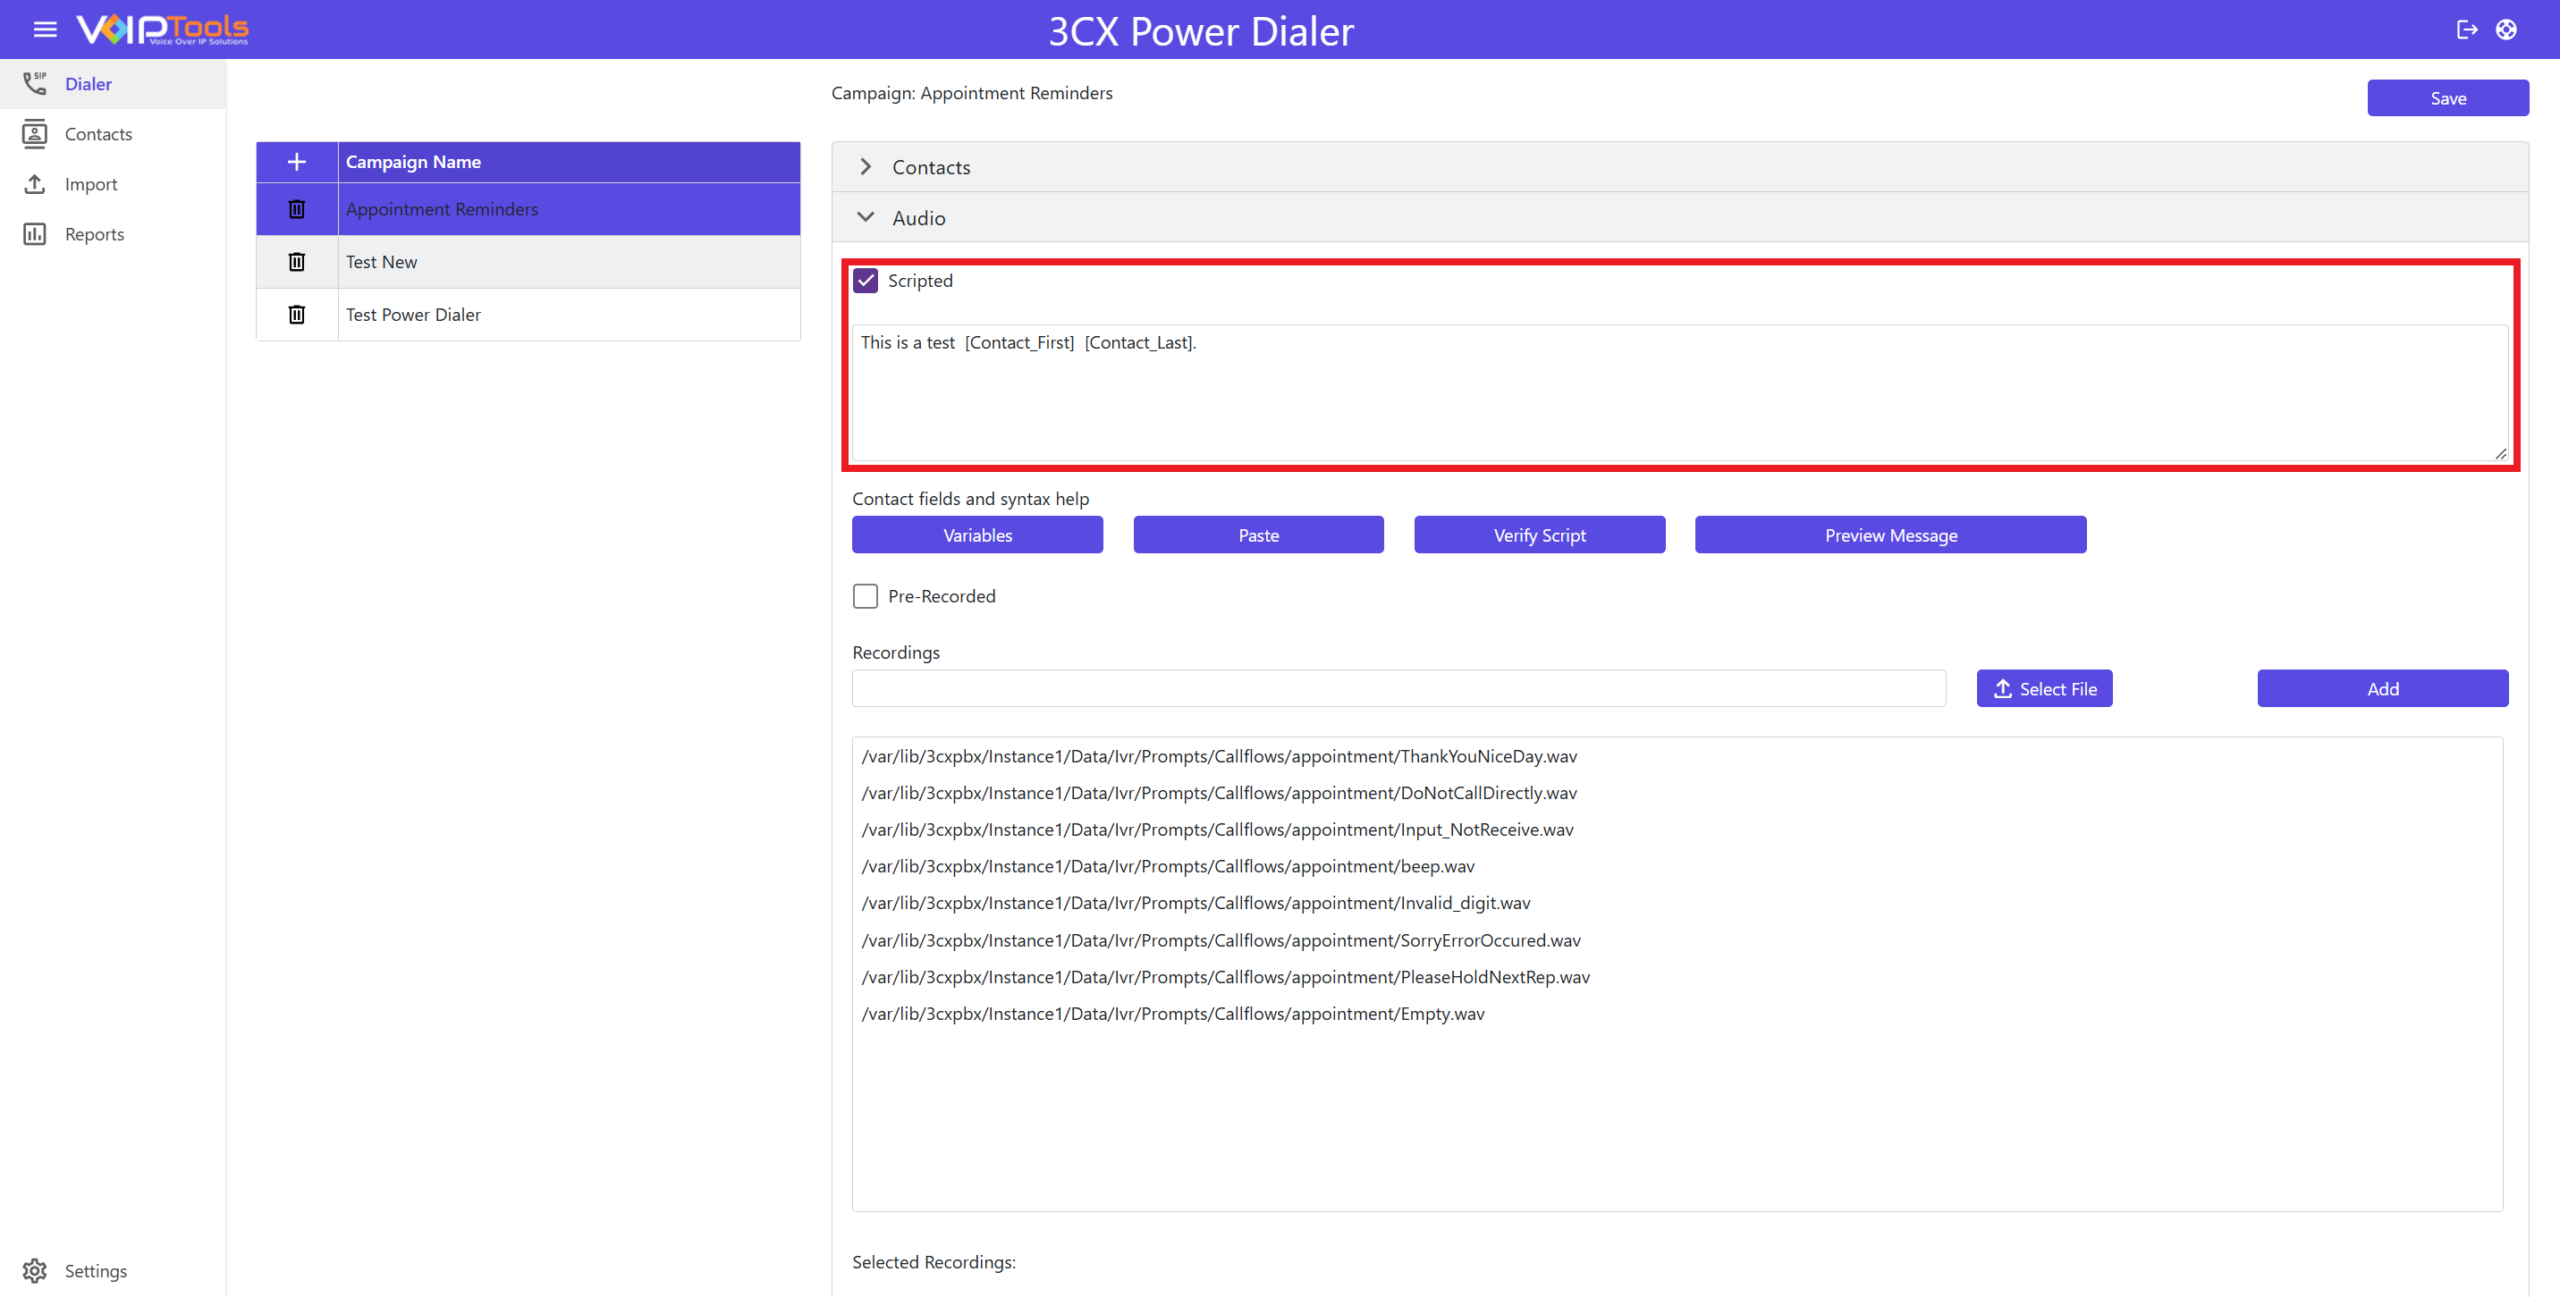
- Click the Variables button to include appropriate column rows in your text so that the dialer uses the column data while performing ‘Text-To-Speech’.
- Select the appropriate column and click the Copy button.
- Click the Paste button to paste the copied column rows.
- Click Verify Script button to verify if you have created the script for the correct contact.
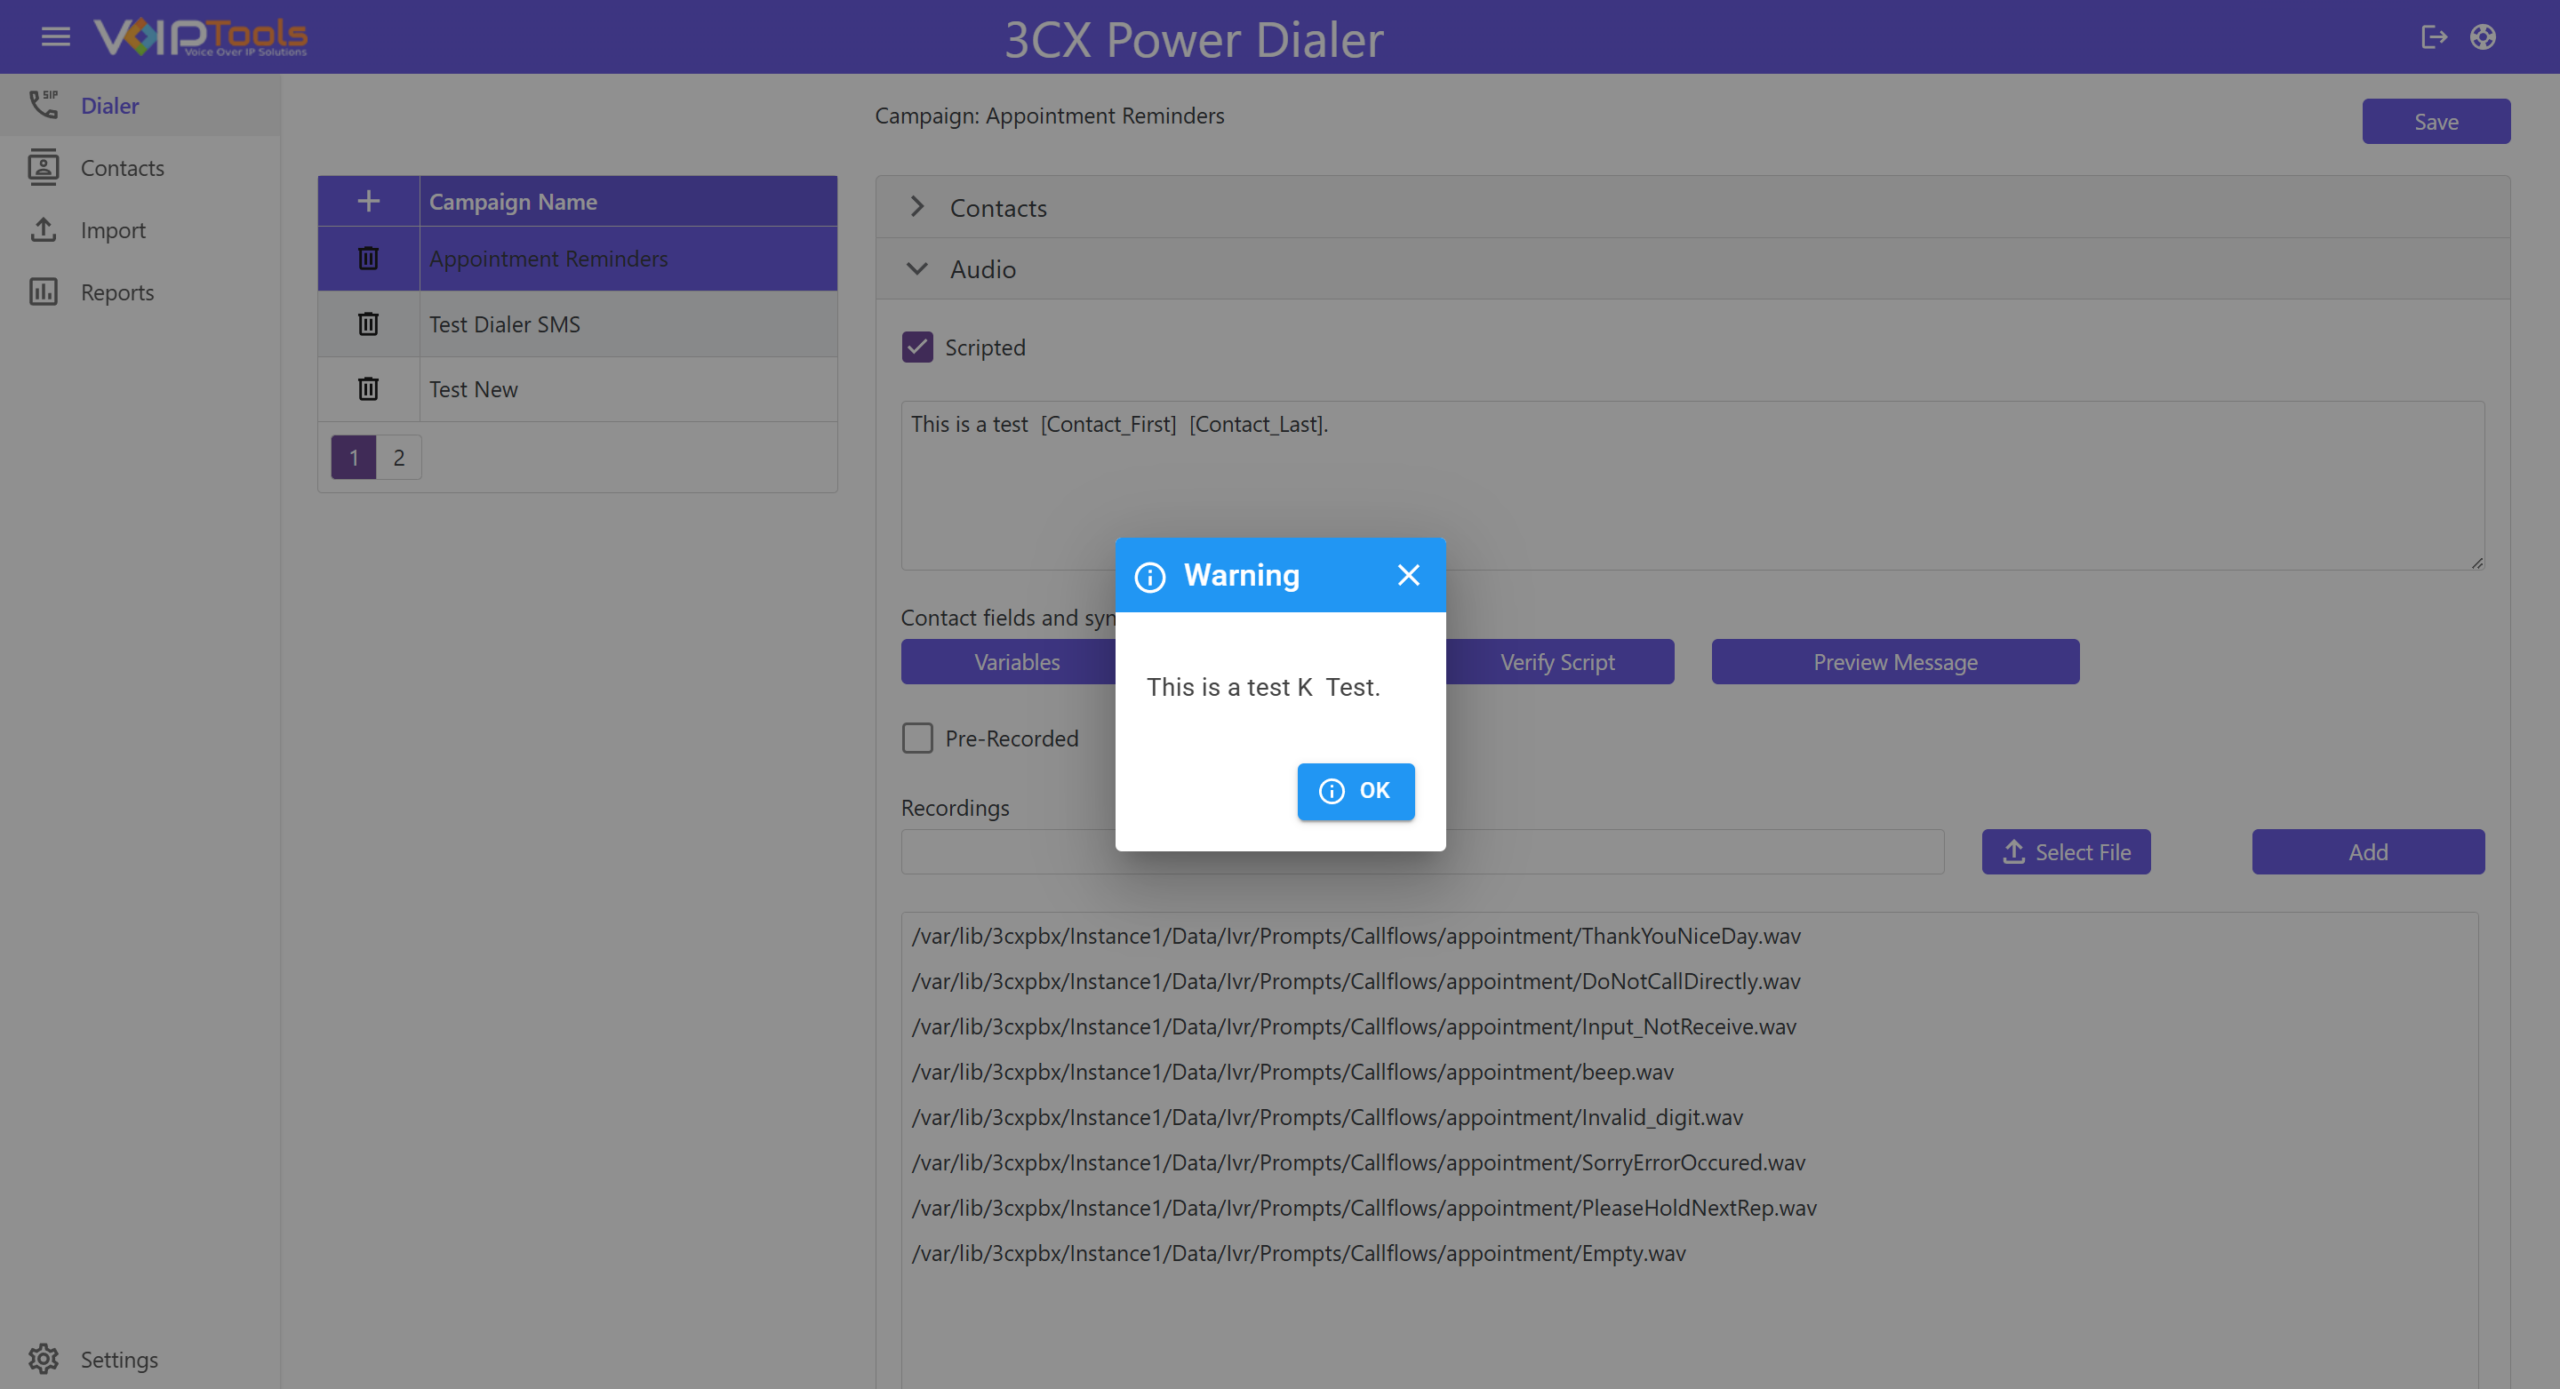
- Click the Preview Message button to play the message for yourself so that you can hear what it sounds like and make necessary changes if required.
- Click Save on the upper right corner of the screen to save the ‘Text-To-Speech.’
Pre-Recorded #
Enable Pre-recorded audio #
- Check the Pre-Recorded check box to enable ‘Pre-Recorded Audio’ to play as a message when the dialer calls the contact.
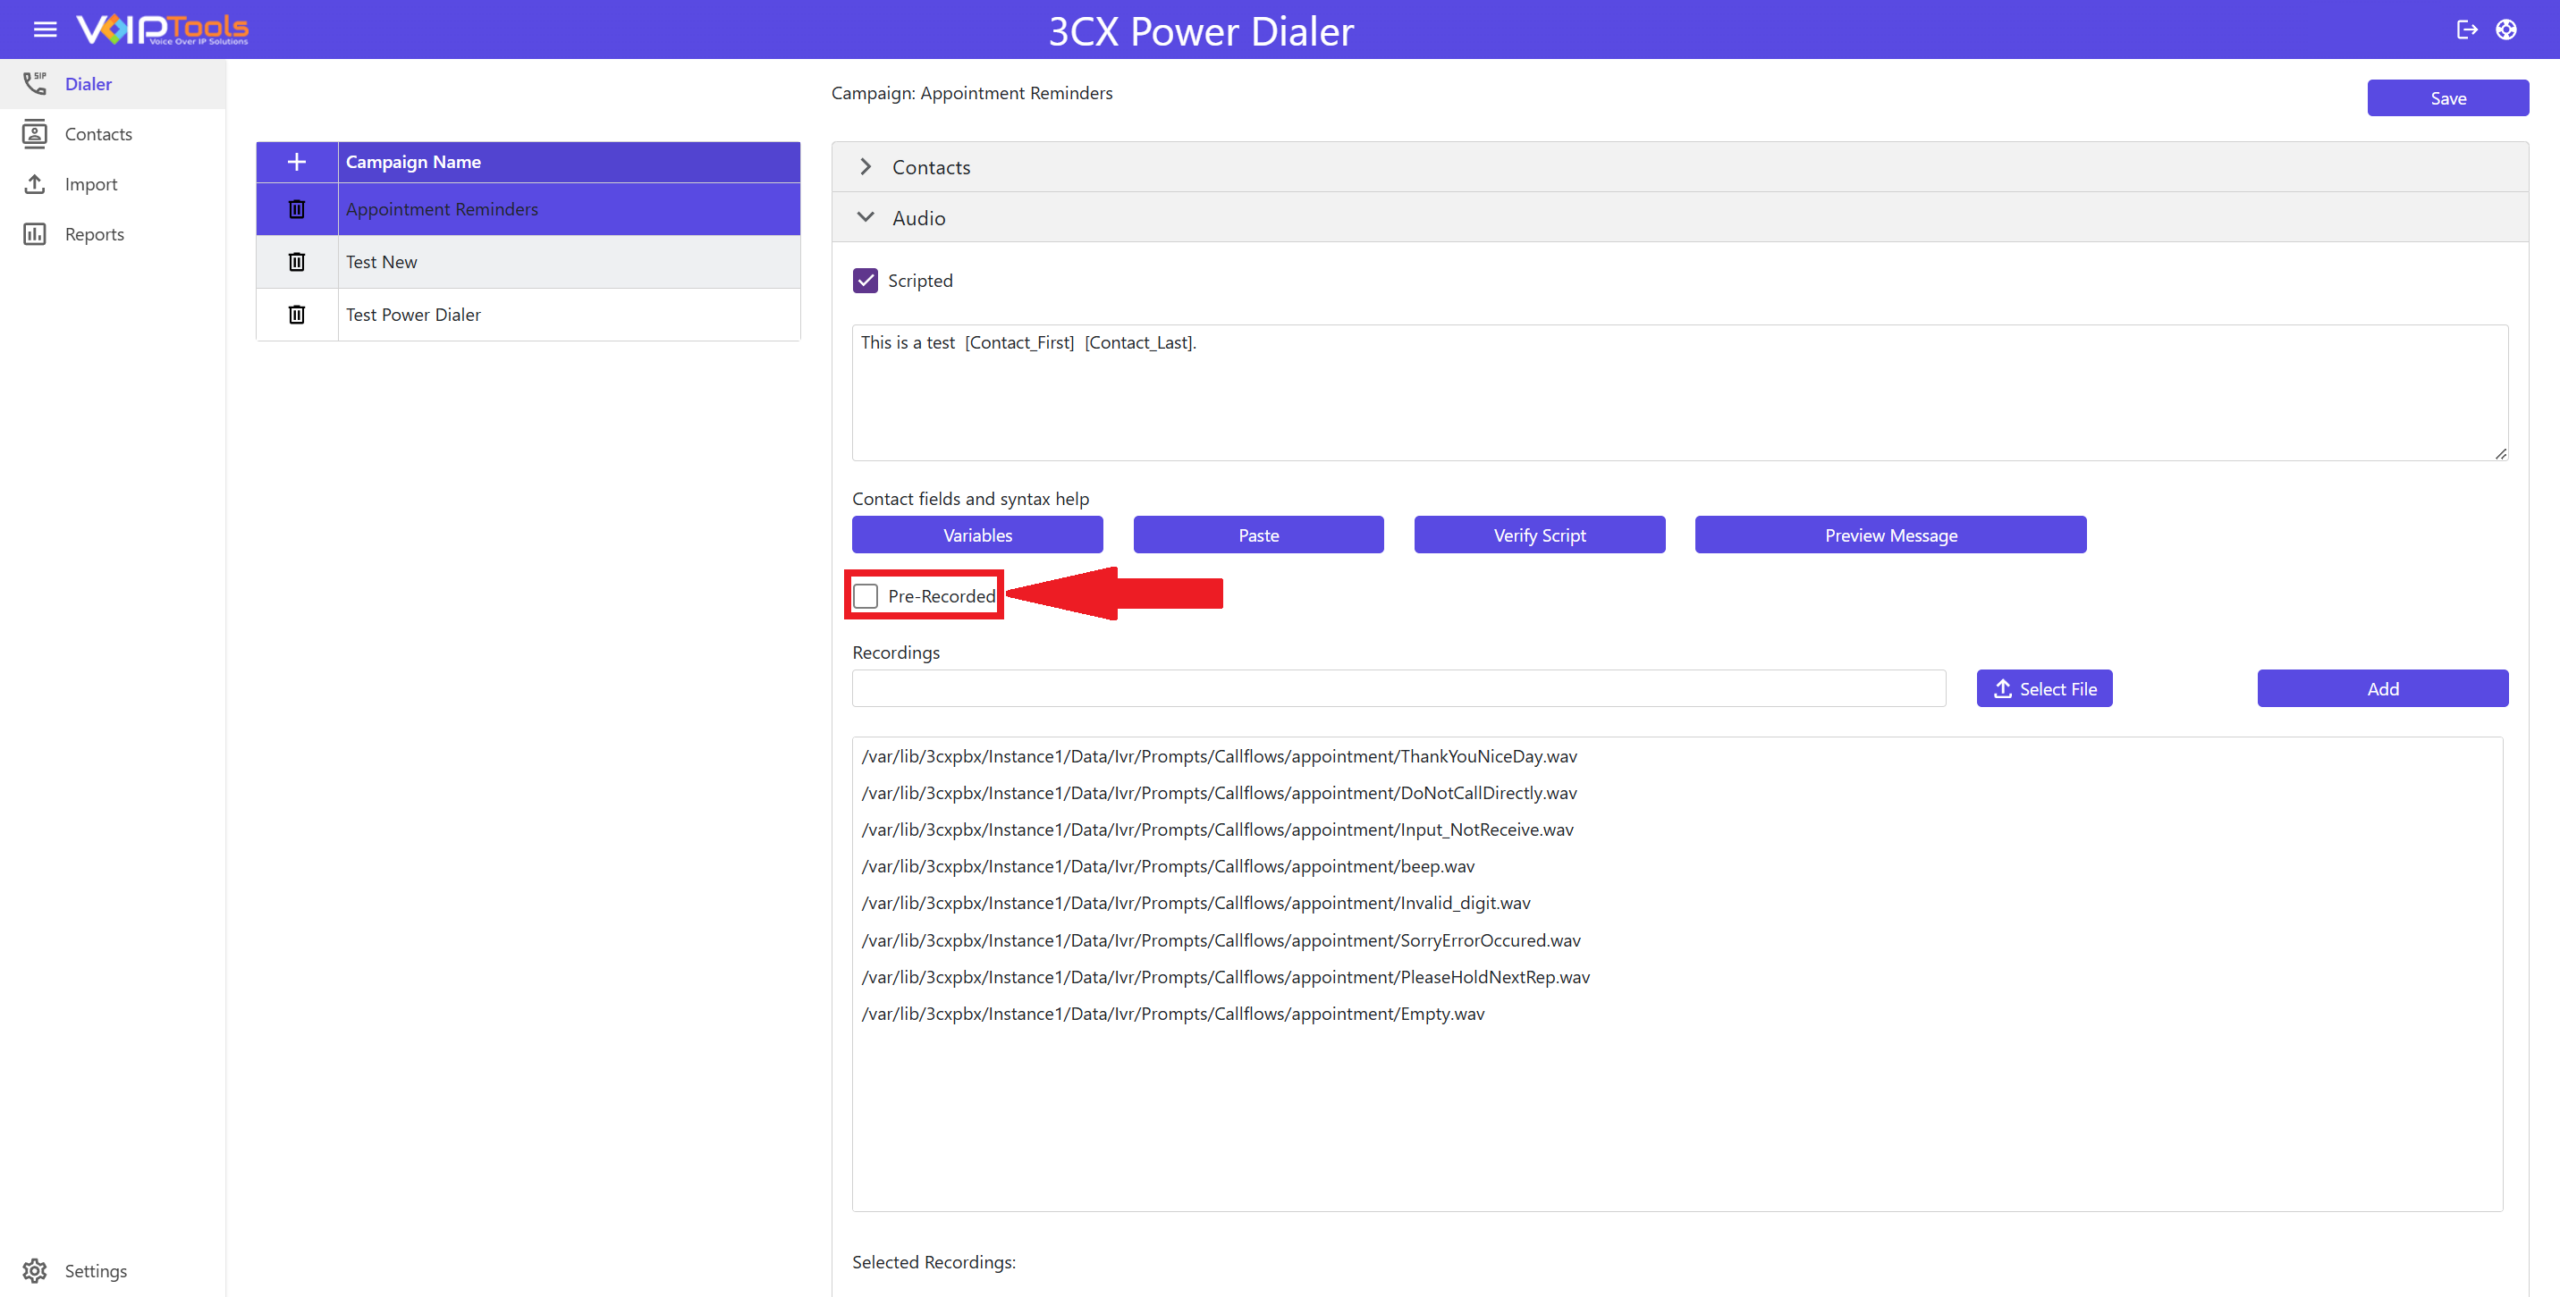
- From the Recordings list box, select the previously uploaded pre-recorded audio file.
- On the upper right corner of the screen, click Save to save the ‘Pre-Recorded’ message.
Add a new Prerecorded file #
- On the 3CX Dialer configuration screen, and in the Campaigns screen, click the Audio tab.
- Check Pre-Recorded check box.
- Click the Select File button and browse for the pre-recorded file that is located in your local system.
- Click Add button to add the pre-recorded audio file to the Recordings list box.
- On the upper right corner of the screen, click Save to save the ‘Pre-Recorded’ file to the Recordings list box.
Email tab #
The Email tab enables you to compose a Campaign Email that you want to send to the desired contact(s).
- In the Subject field, enter the subject for the email
- In the Email text area, type the email message.
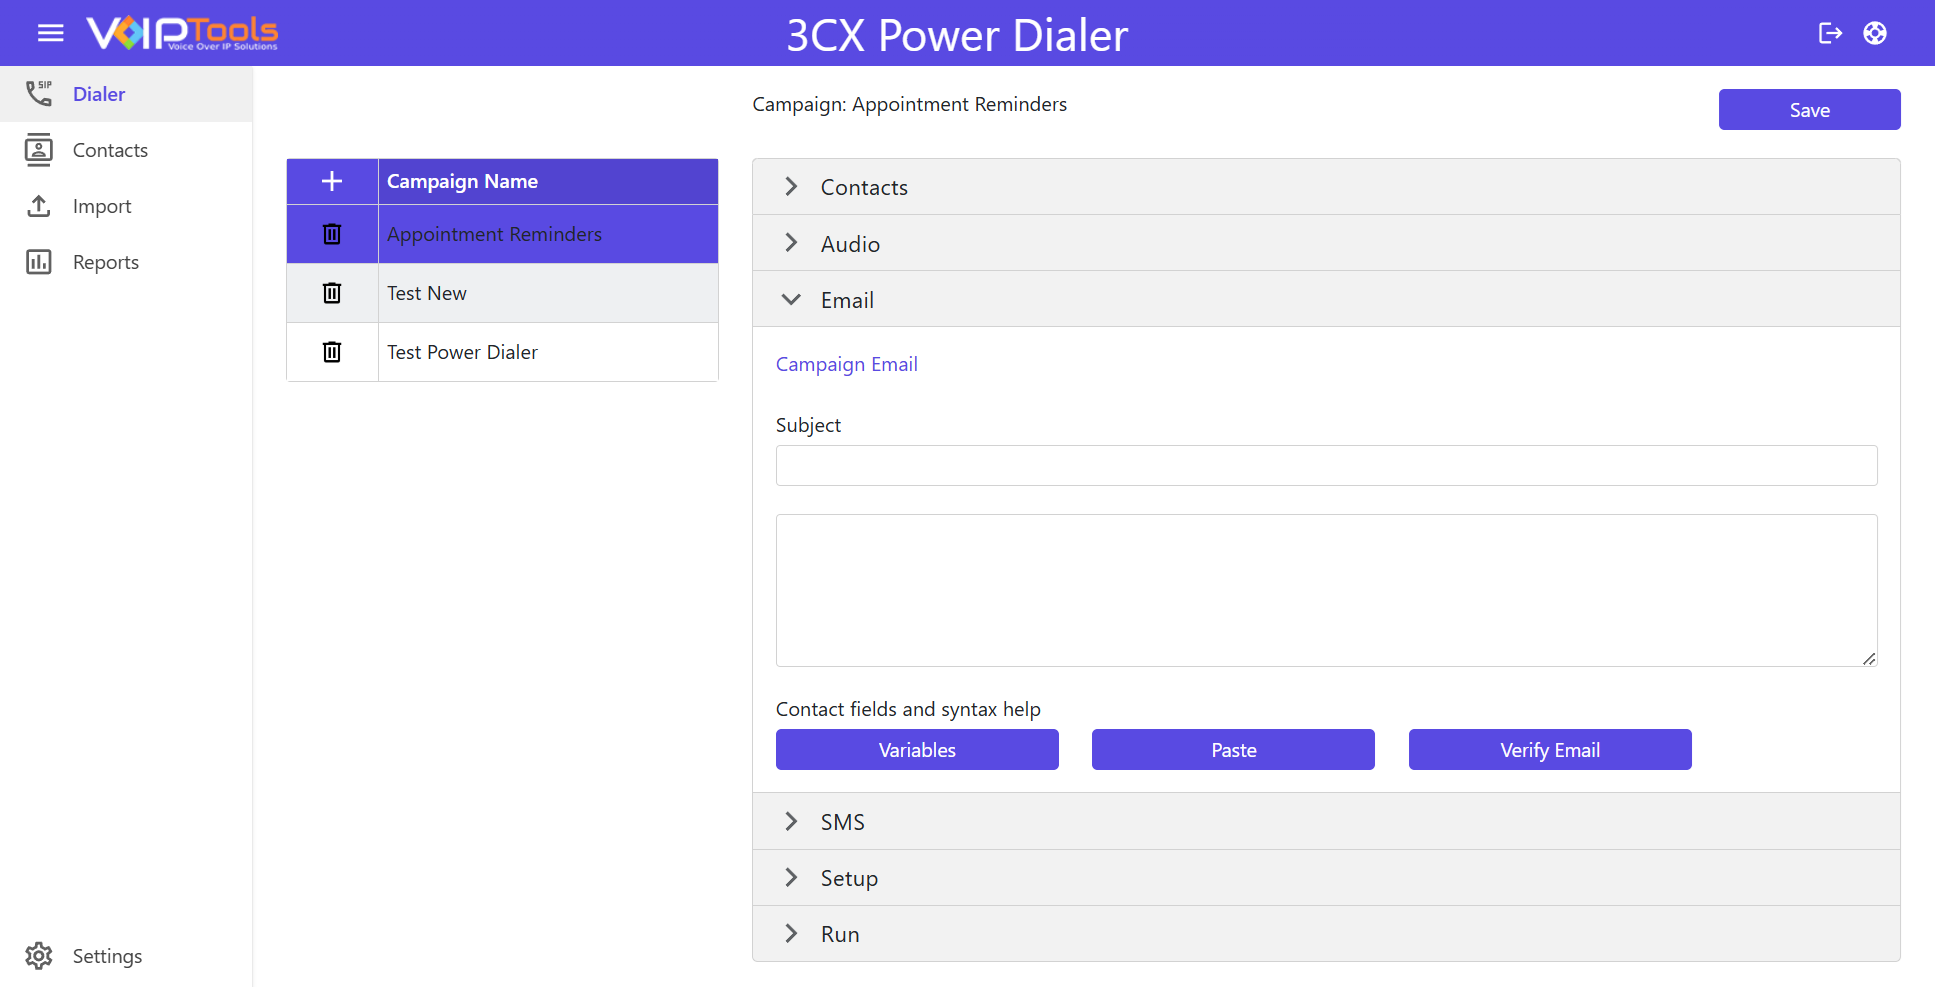
- You can use the Variables button to insert field variables into your script and click Verify Email button to verify your message.
- Click Save on the upper right corner of the screen to save the email message.
Variables button #
The Variables feature facilitates the inclusion of variables in your SMS or in your Email, providing a straightforward mechanism for incorporating database data into your text-to-speech recordings. A variable serves as a placeholder that is replaced with relevant information from the database during the creation of the recording. The available fields in the variable list are determined by the SQL command entered on the Contacts tab.
Follow the procedure to include the field variables in your script,
- In the SMS tab or in the Email tab, click the Variables button to open the list of field variables.
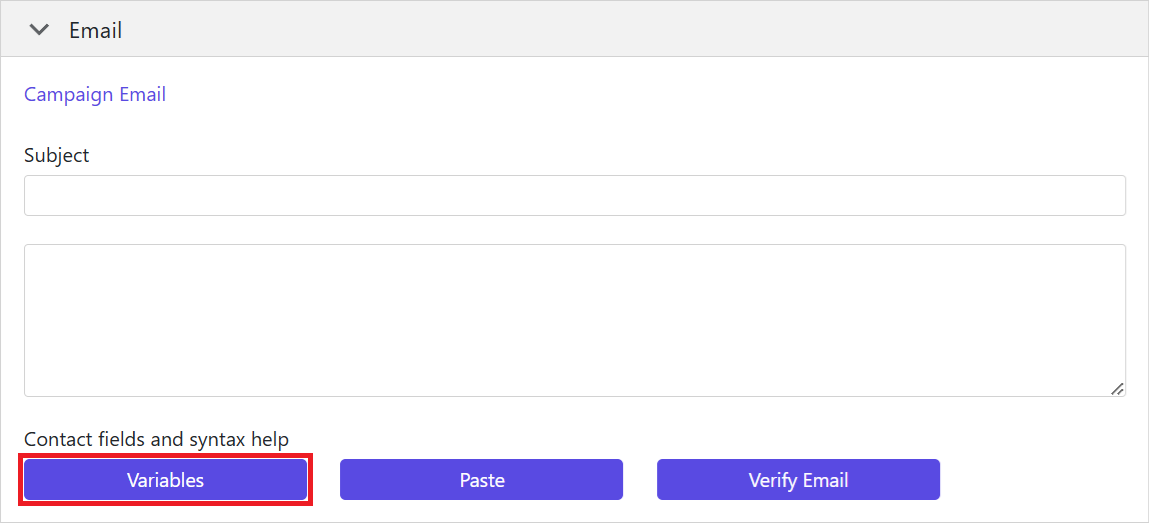
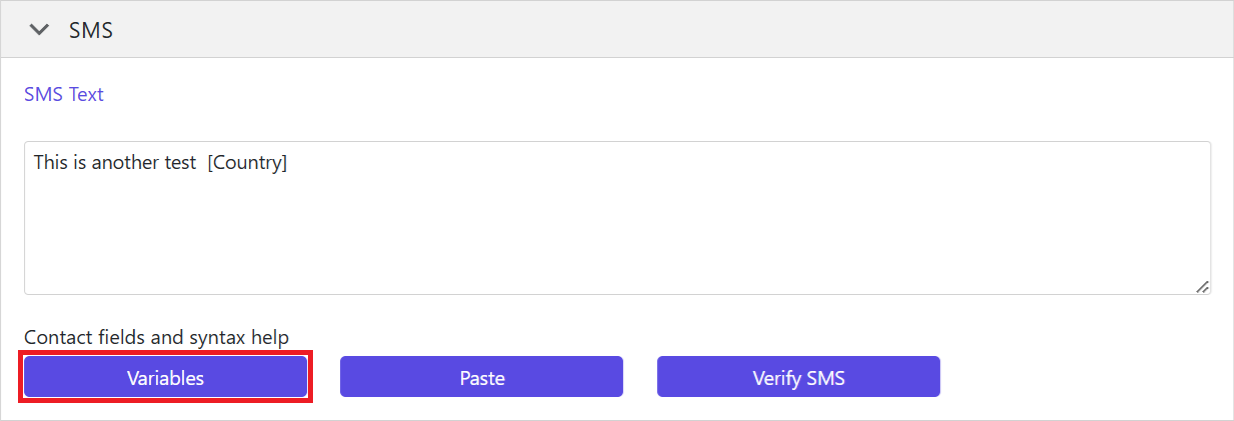
- In the Help box, select the desired field variable and click the Copy button.
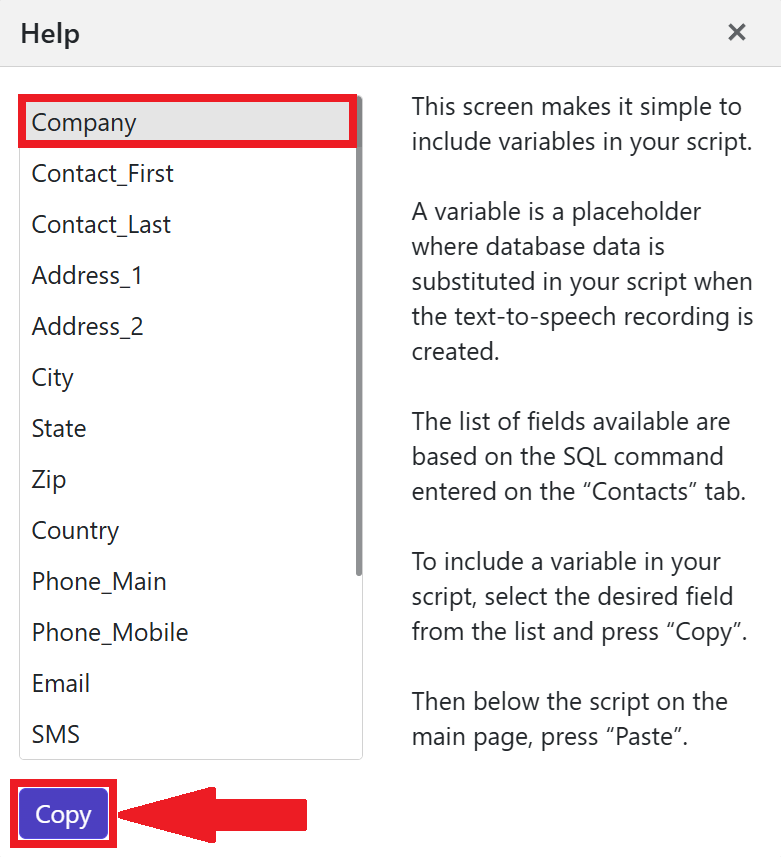
- Close the Help box and click the Paste button to paste the selected variables.
-
- You can click the Verify Email / Verify SMS button to verify your script.
SMS tab #
The SMS tab enables you to compose an SMS Text Message that you want to send to the desired contact(s).
- In the SMS Text field, enter your SMS text message. You can click the Variable button to use the available field variables.
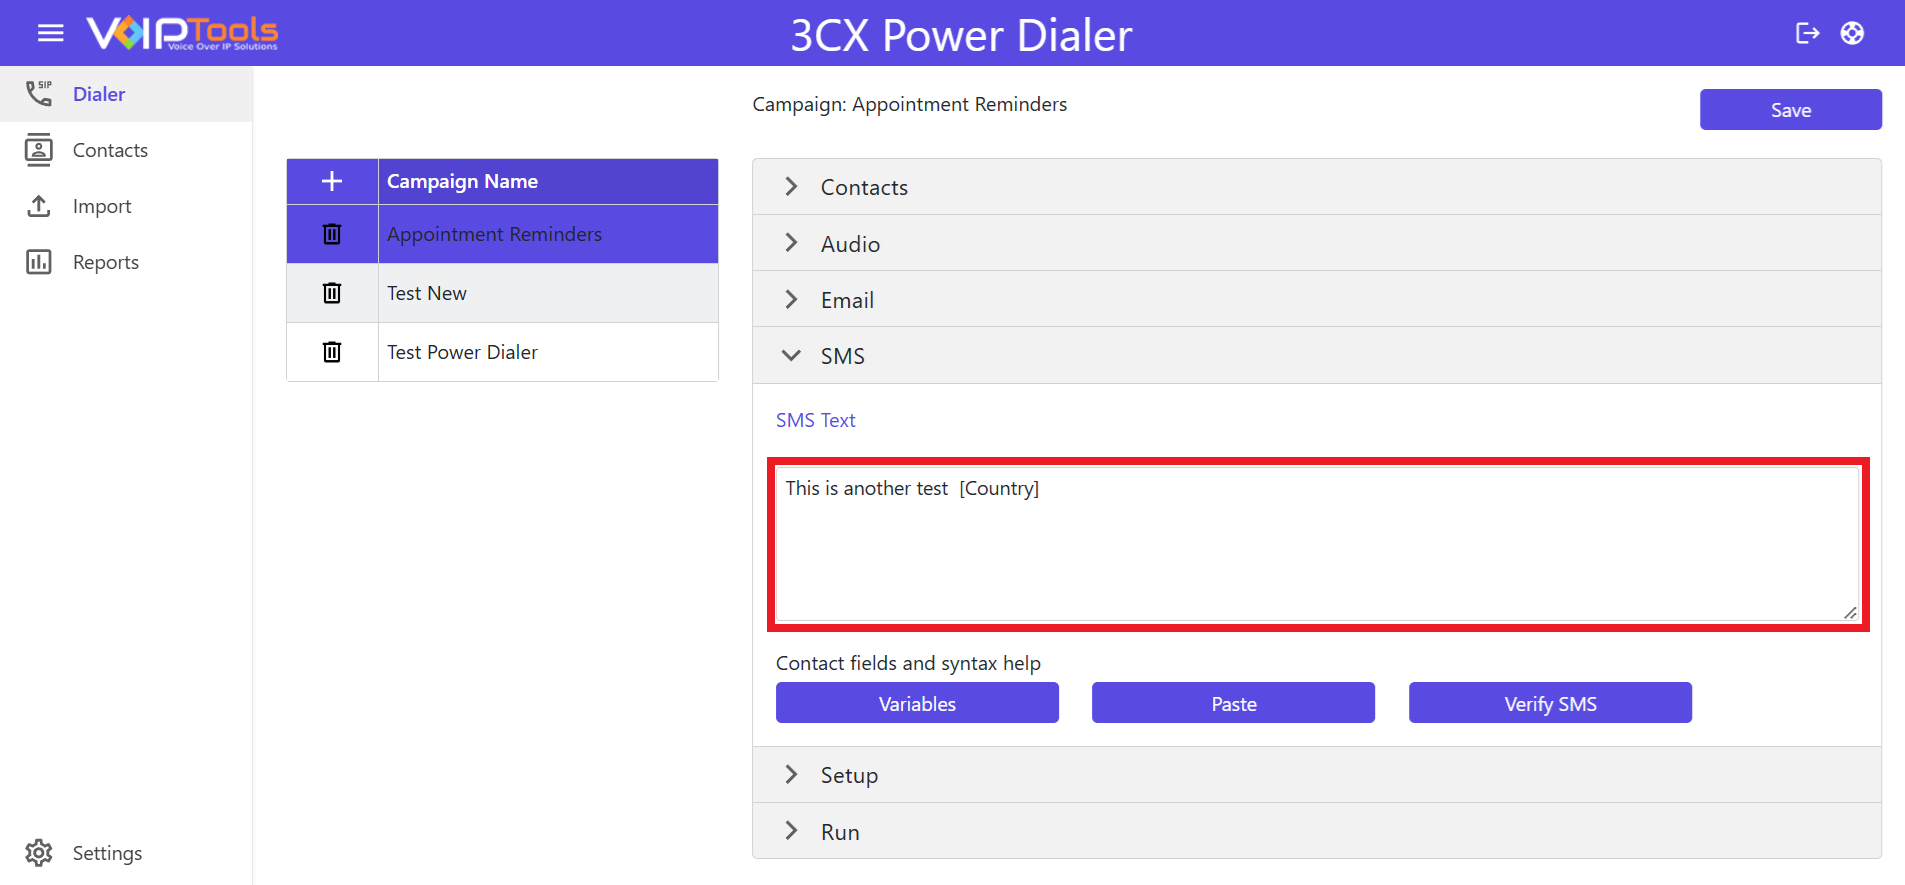
- Click Verify SMS button to preview the message and make corrections if necessary.
- On the upper right corner of the screen, click Save to save the SMS text message.
Setup tab #
The Setup tab enables you to schedule the call for the desired contact. We can make four types of calls:
Set the Text-To-Speech method #
The TTS settings in the Setup tab differ for Amazon Poly and Windows TTS. Click here to change the TTS type.
Amazon Poly #
When you select Amazon Poly,
- Select the desired culture in the Culture list.
- Select the desired voice in the Voice list.
Windows TTS #
When you select Windows TTS,
- Select the volume level in the Volume dropdown.
- Select the voice type from the Voice dropdown.
- Select the voice rate from the Rate dropdown.
OpenAI #
1. Select the TTS model from the Model dropdown: tts-1 is standard quality,
tts-1-hd is higher quality and slightly slower to generate.
2. Select the voice from the Voice dropdown. Each voice has a distinct tone:
Nova and Shimmer are warmer, Onyx is deeper, Alloy is neutral.
3. Select the speaking rate from the Speed dropdown.
Configure Dialer Call Setup #
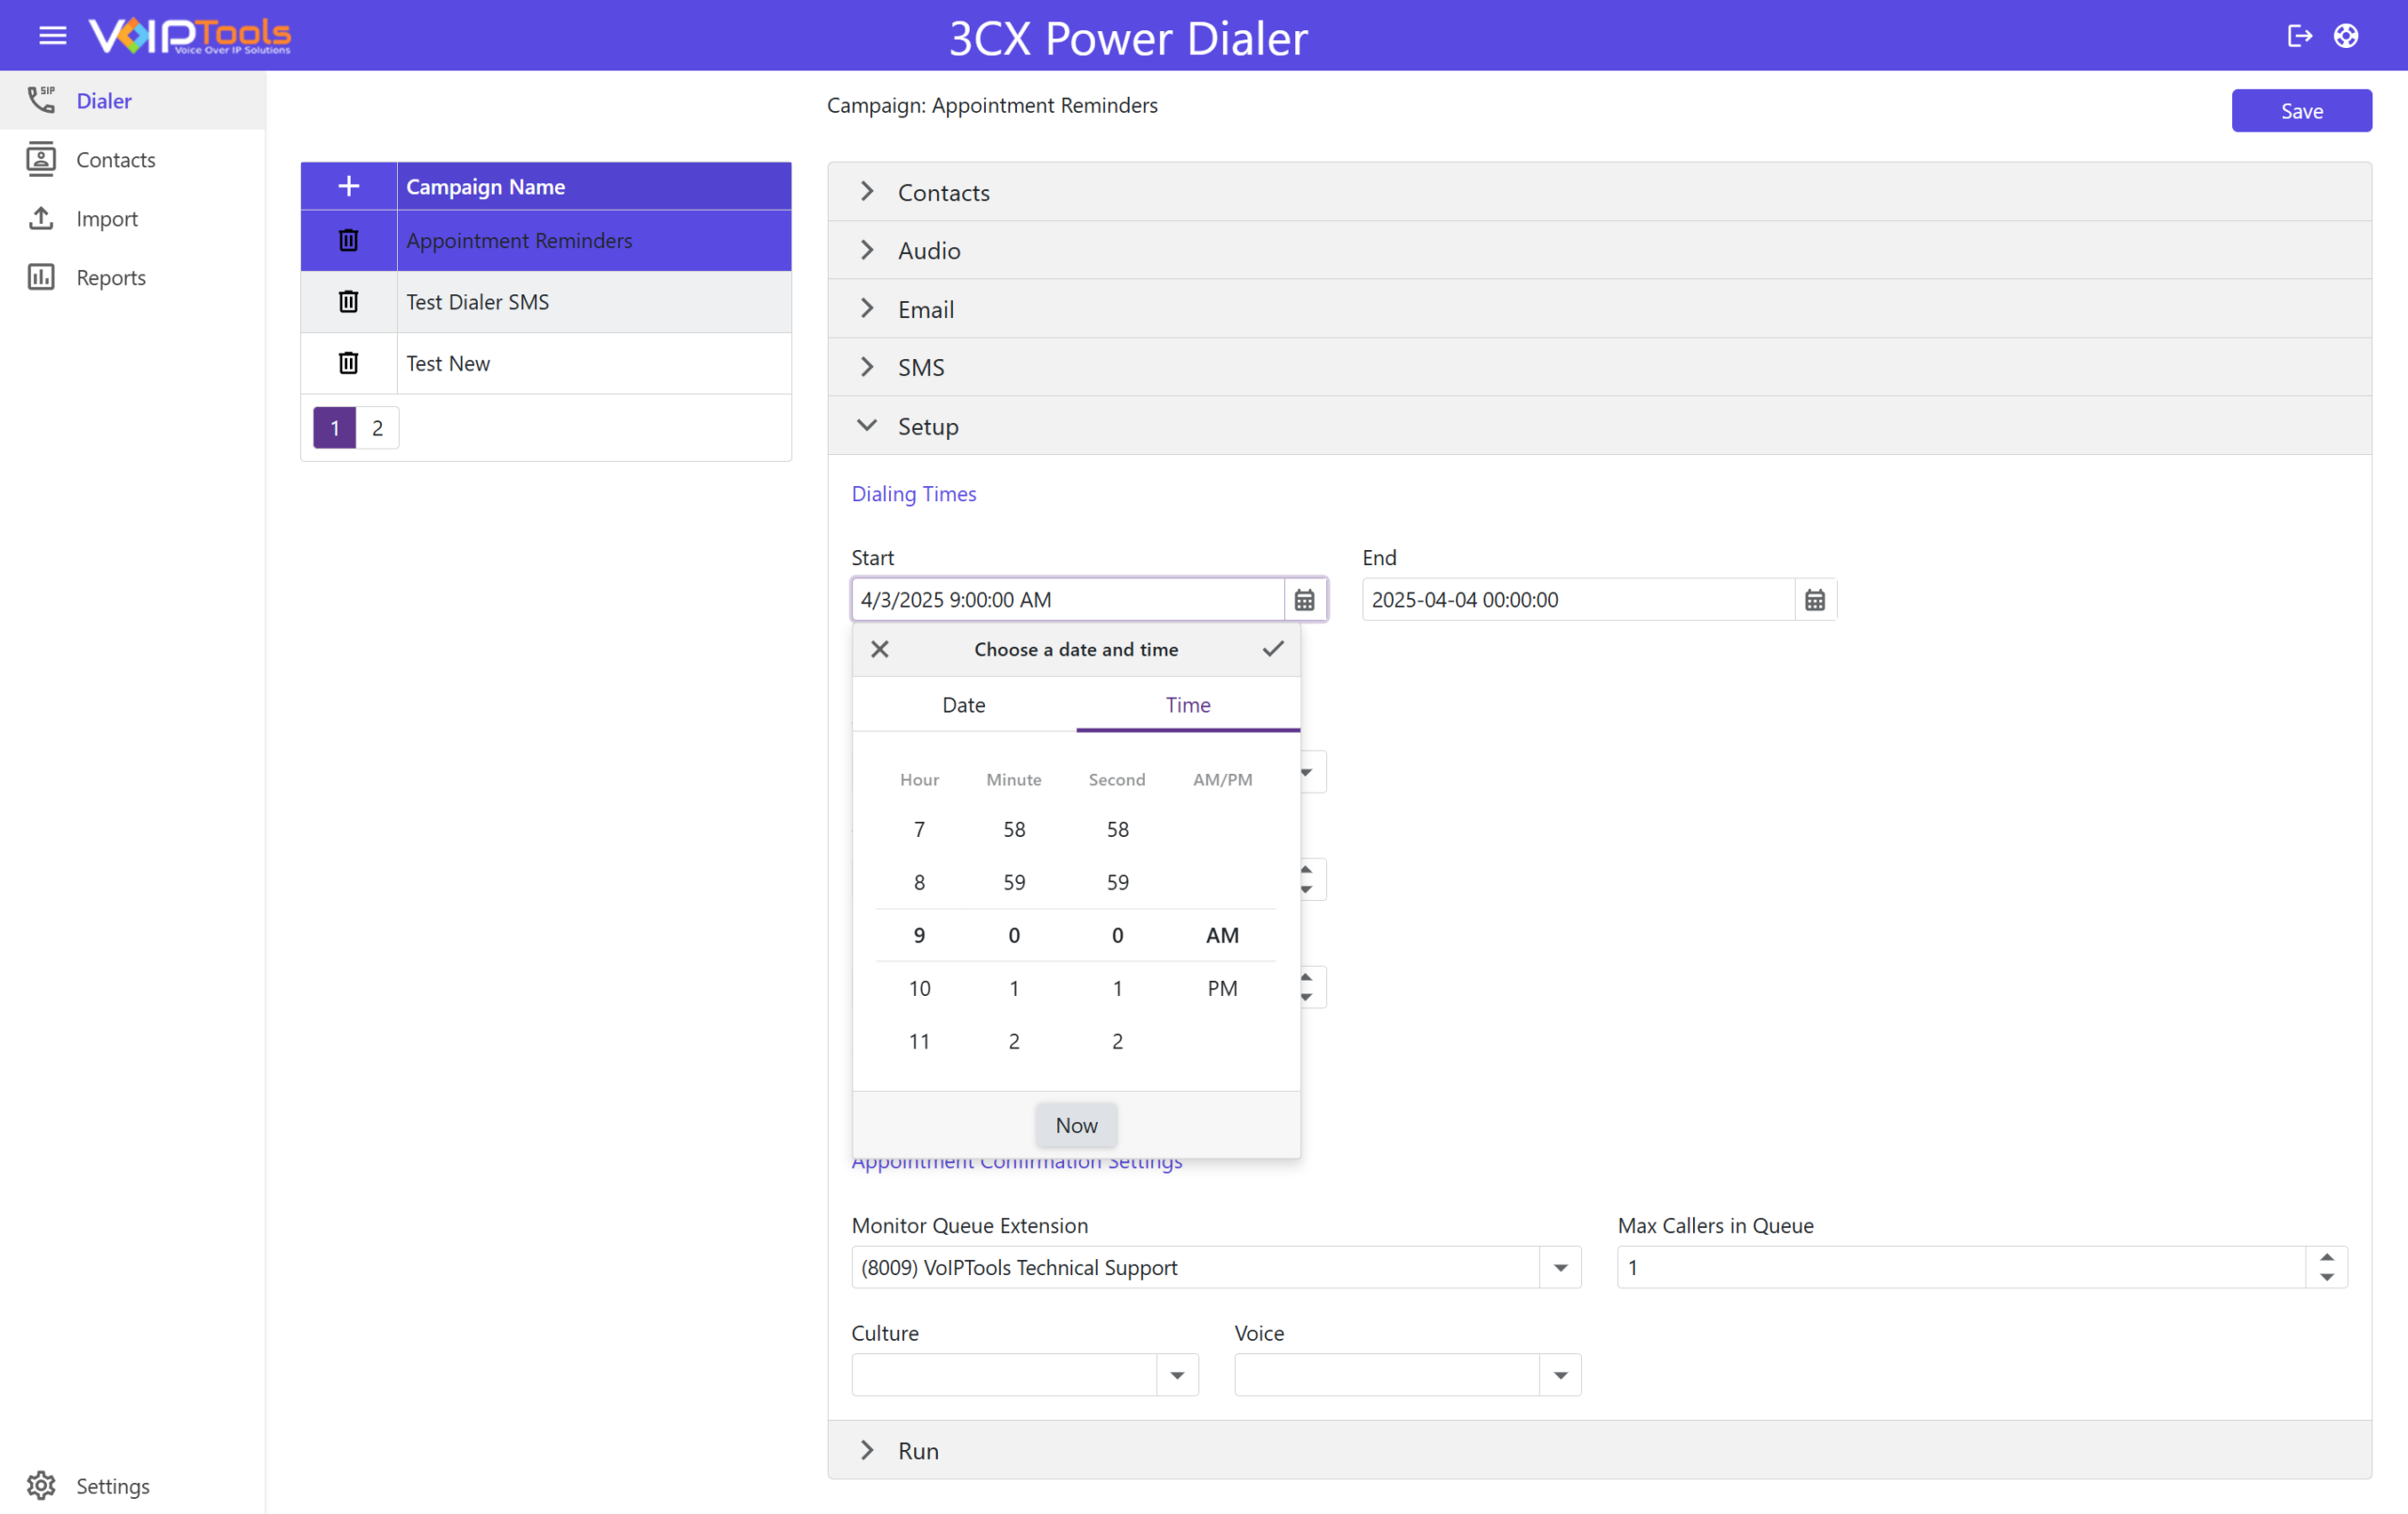
- In the Setup tab and in the Dialing Times section,
- Click the Start time box and select the time at which you want to start the dialer.
- Click the End time box to select the end time at which you want to end the dialer.
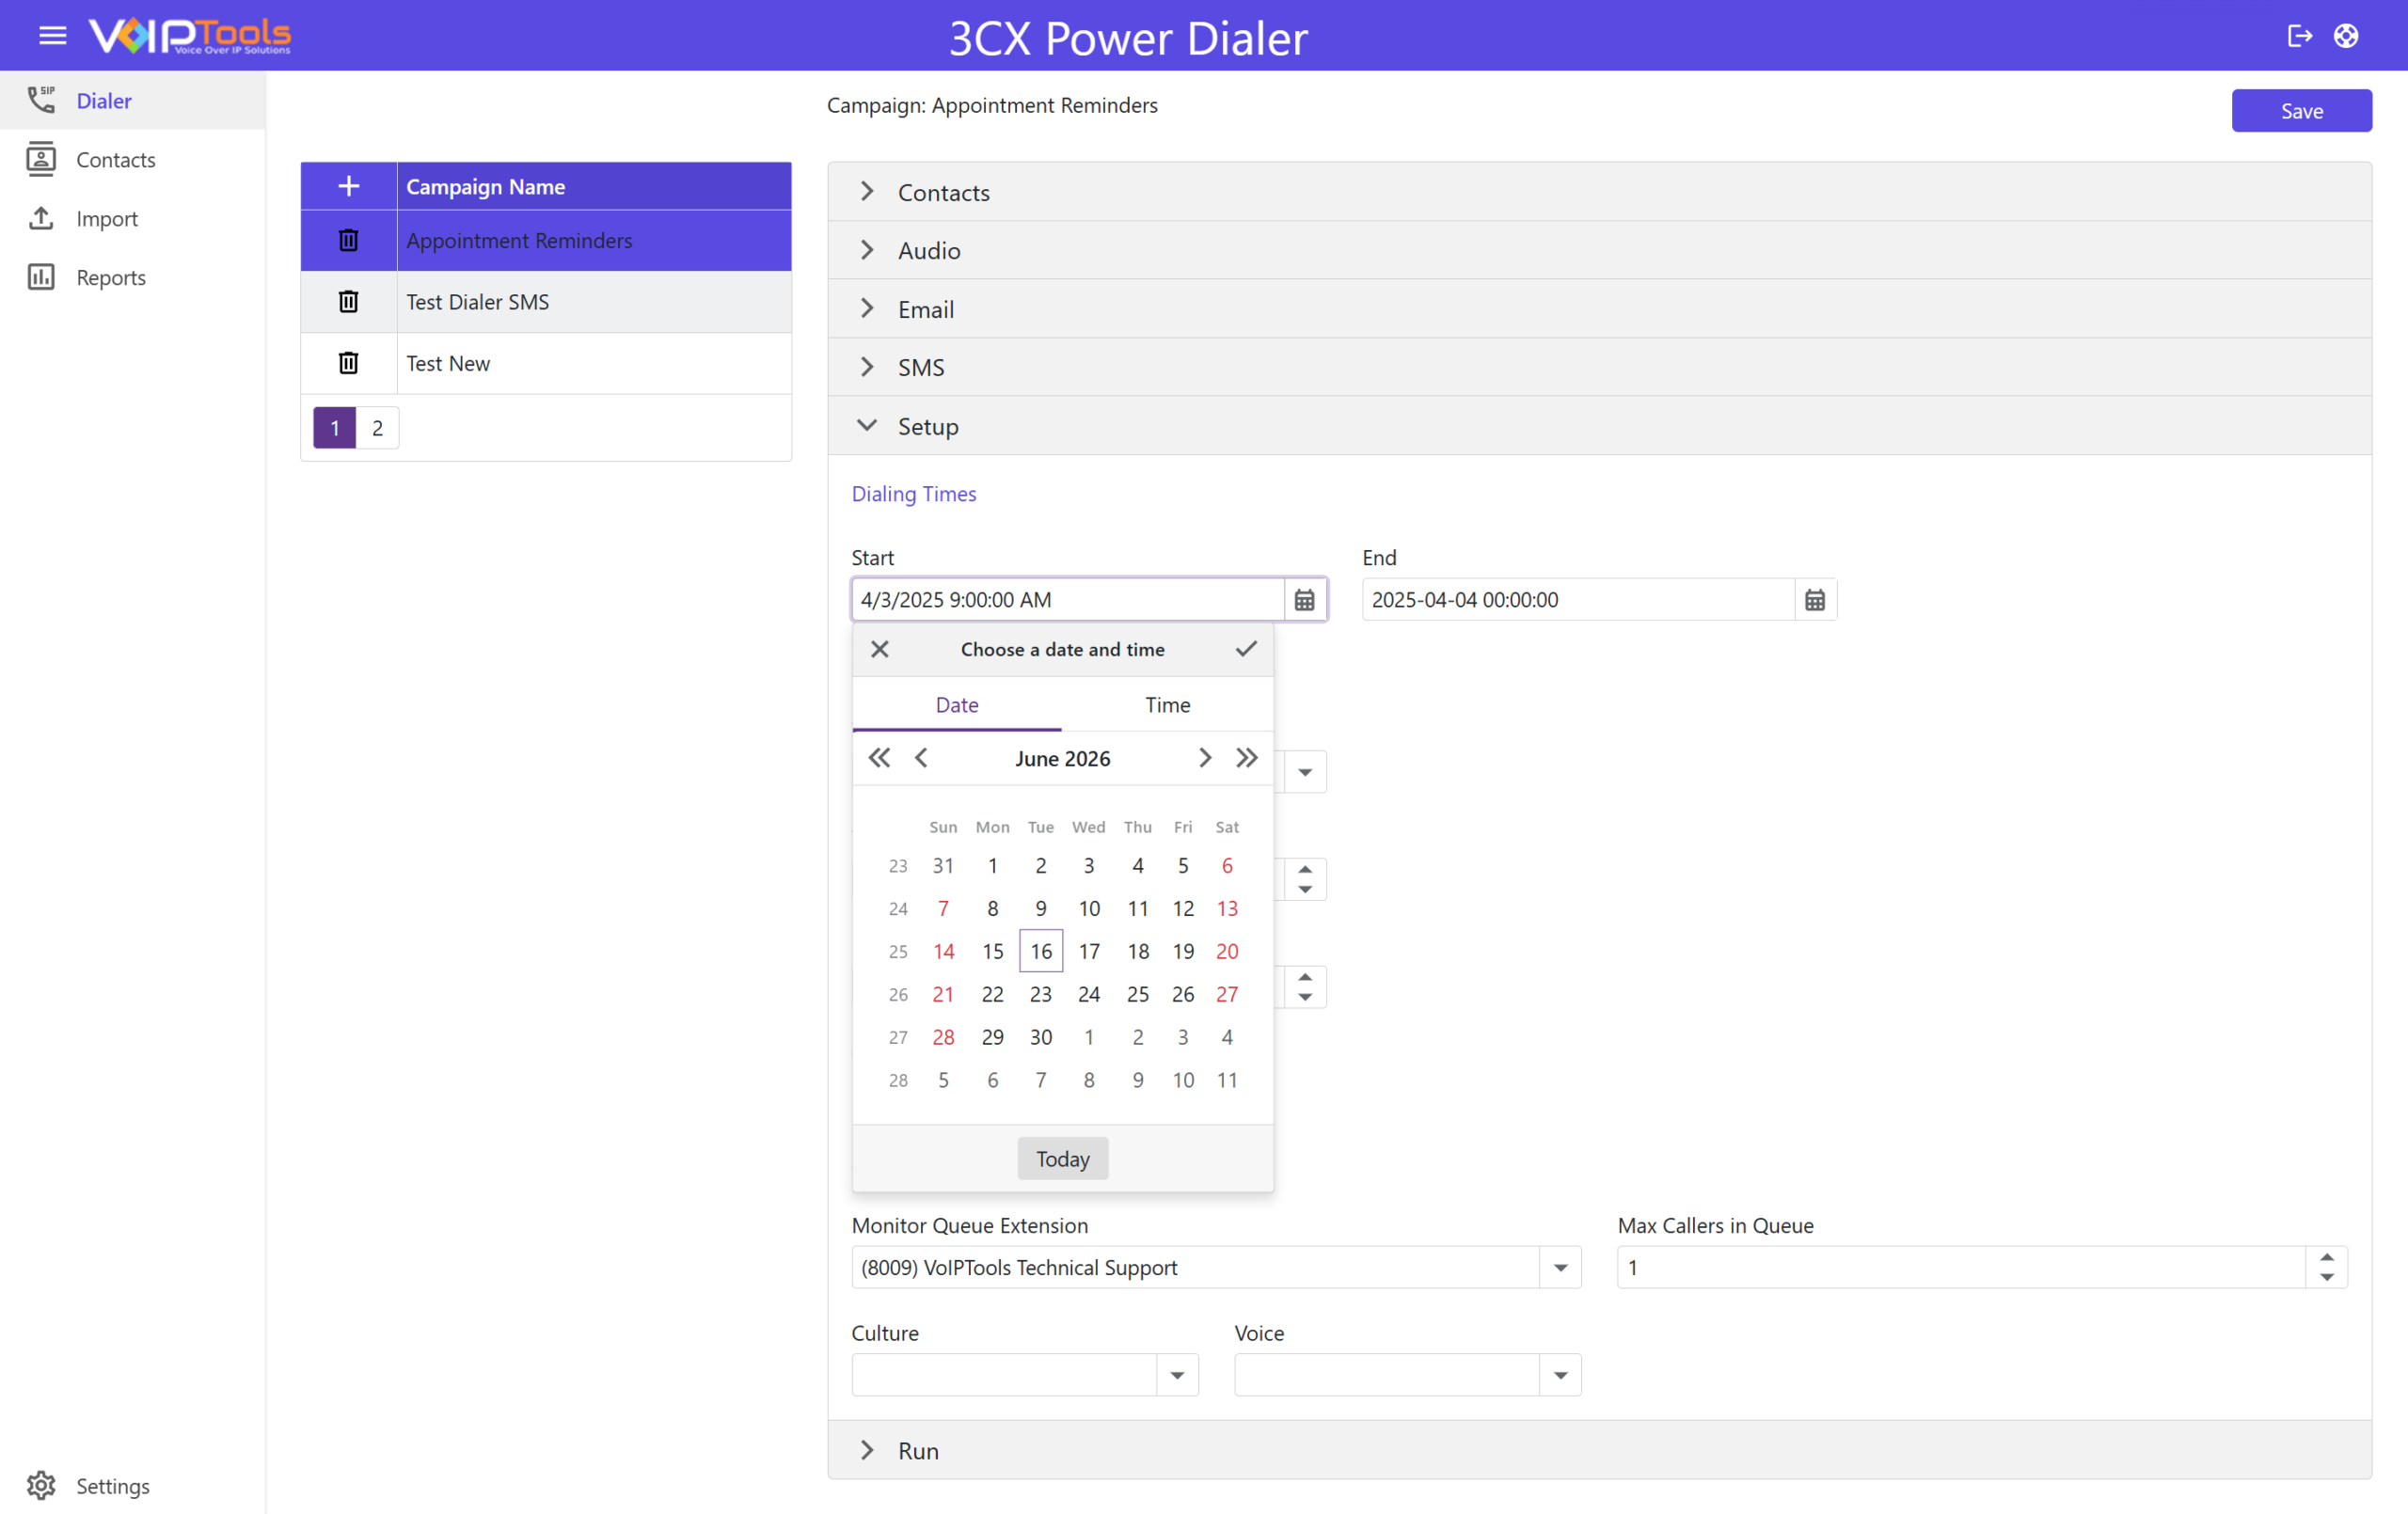
- In the Call Handling section, from the Transfer Call To Dialer App dropdown, select the desired option to which you want to send the dialer.
When the Power Dialer is configured to make appointment reminders, the contact is given the option to press 1 to confirm the appointment, or press 2 to be connected with a customer service representative. When they press 1 or 2 this information is written to a log file.
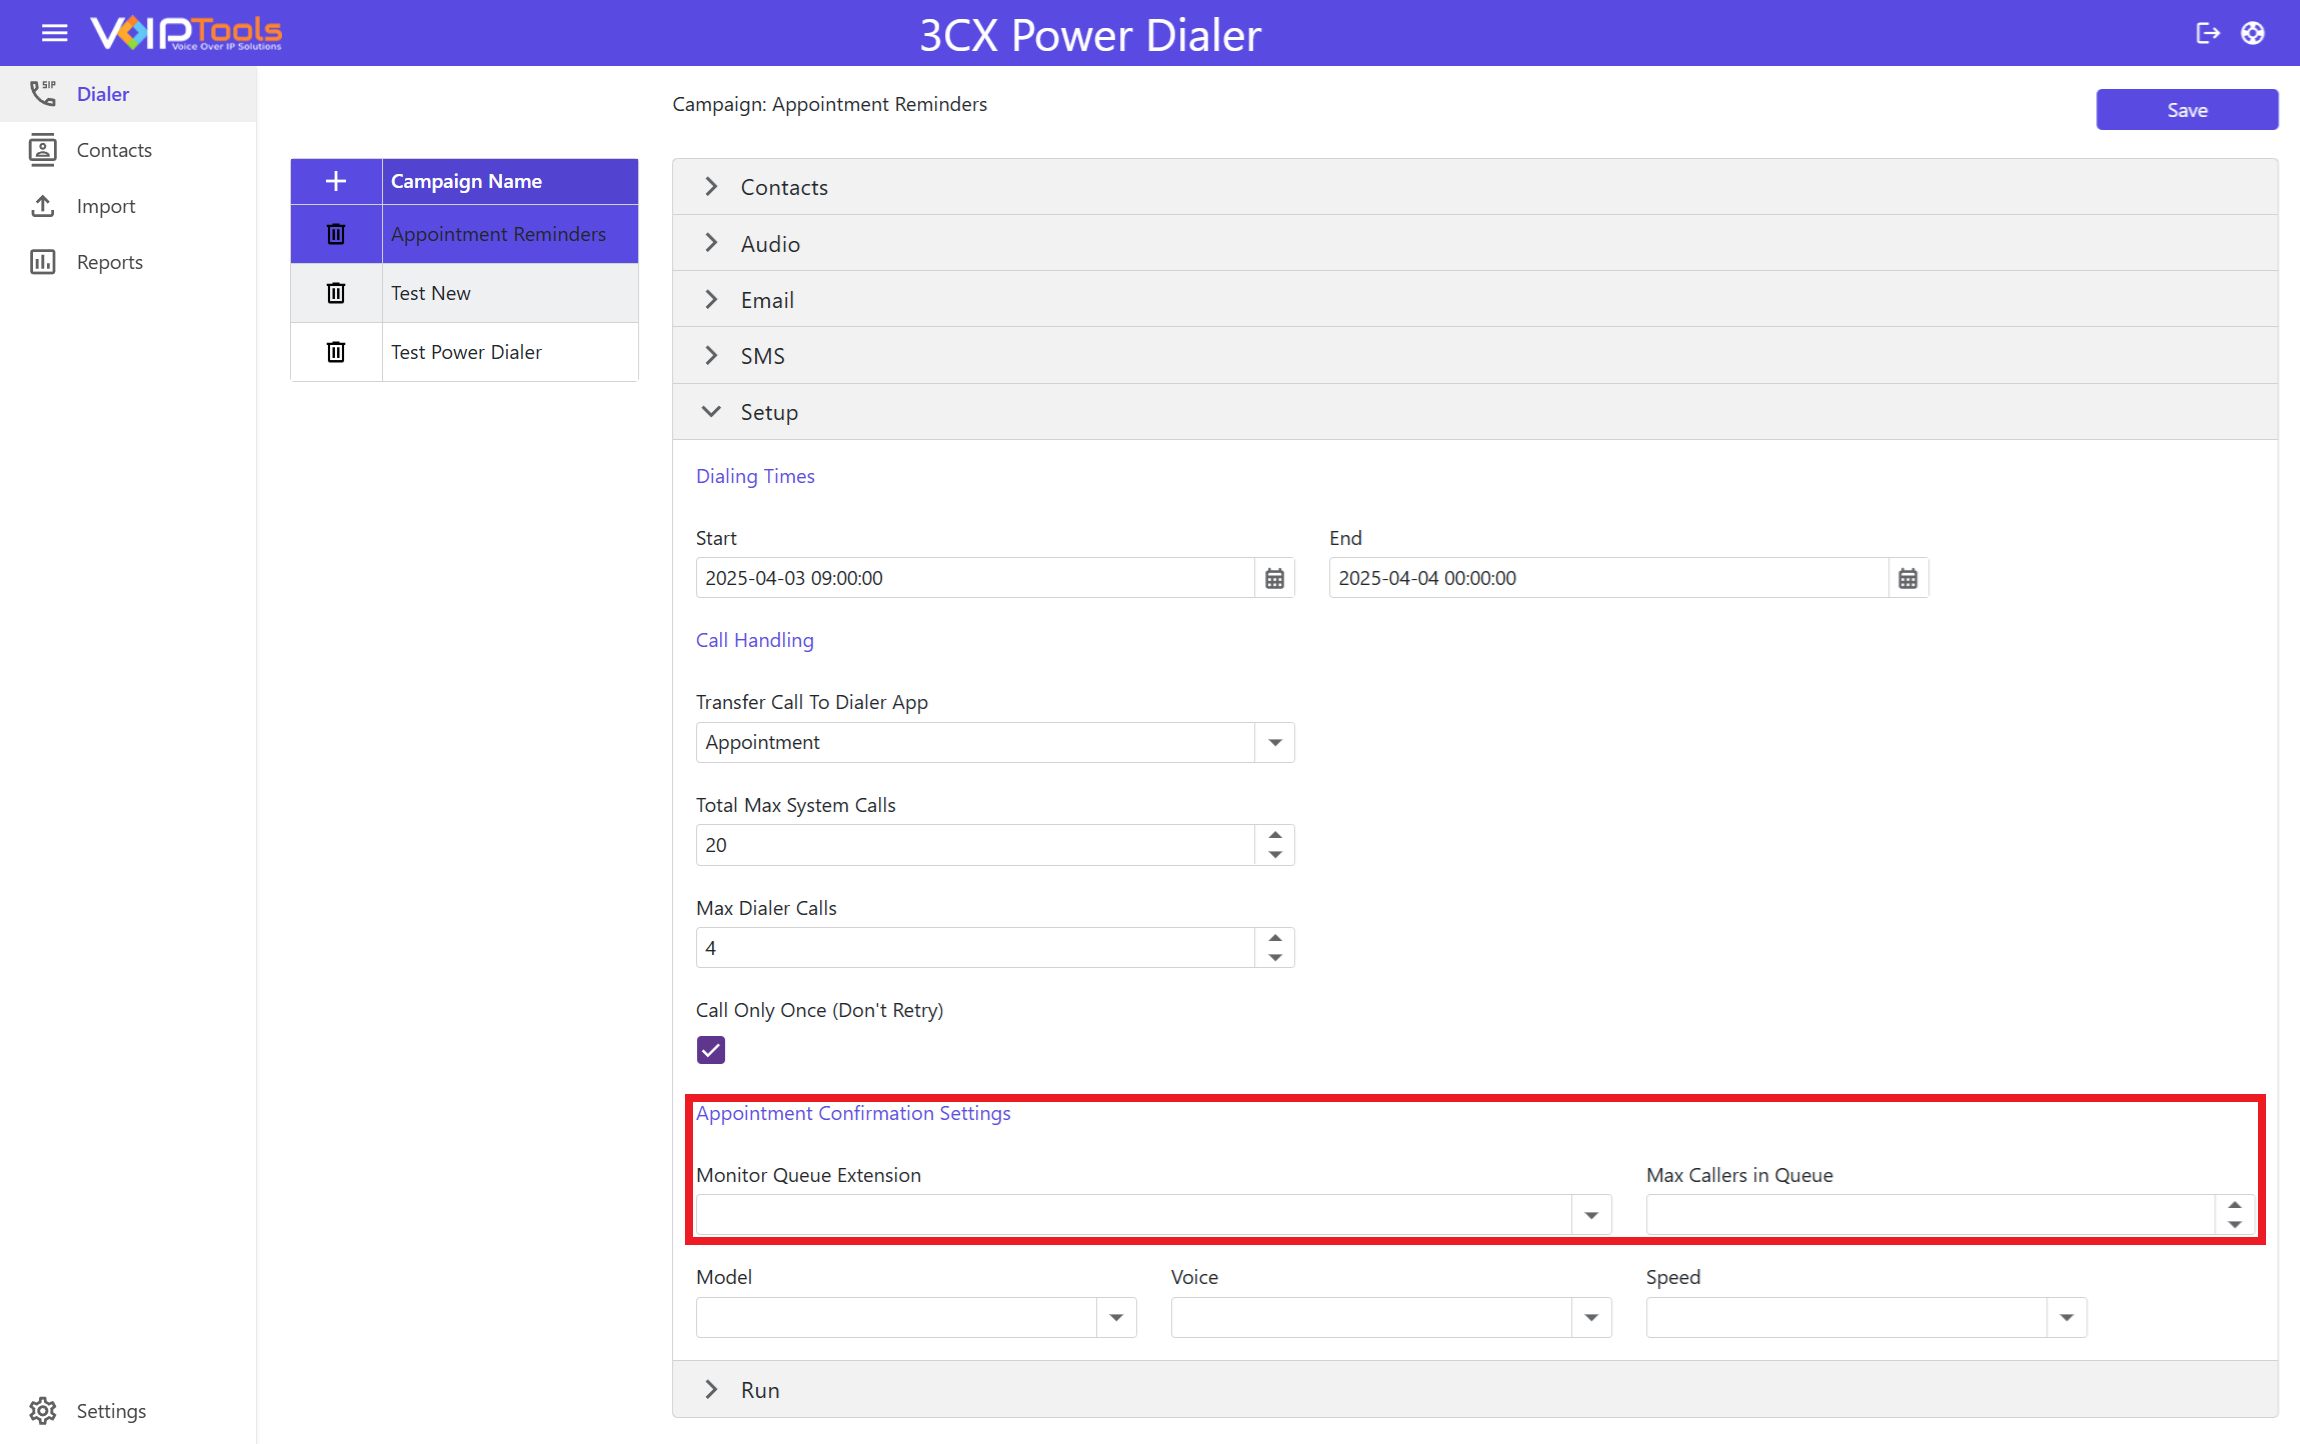
- On the Appointment Confirmation Settings section,
- In the Monitor Queue Extension list, select the queue you want to monitor
- In the Max Callers In The Queue field, enter the maximum number of callers waiting in the queue.
-
- Set the voice settings as per the selected TTS settings.
- On the upper right corner of the screen, click Save to save the dialer call setup configuration.
Set the Reciever in the Dialer App #
The Setup tab allows you to schedule the call for the desired contact. You can make four types of calls:
Case 1: Transfer Call To Dialer App as Play Announcement: #
- In the Total Max System Calls box, type or select the maximum number of active PBX calls so that when this number is reached, the dialer will not make calls.
- From the Max Dialer Calls box, type or select the maximum number of simultaneous calls the dialer can make.
- Check the Call Only Once (Don’t Retry) box to attempt the simultaneous call only once and do not retry.
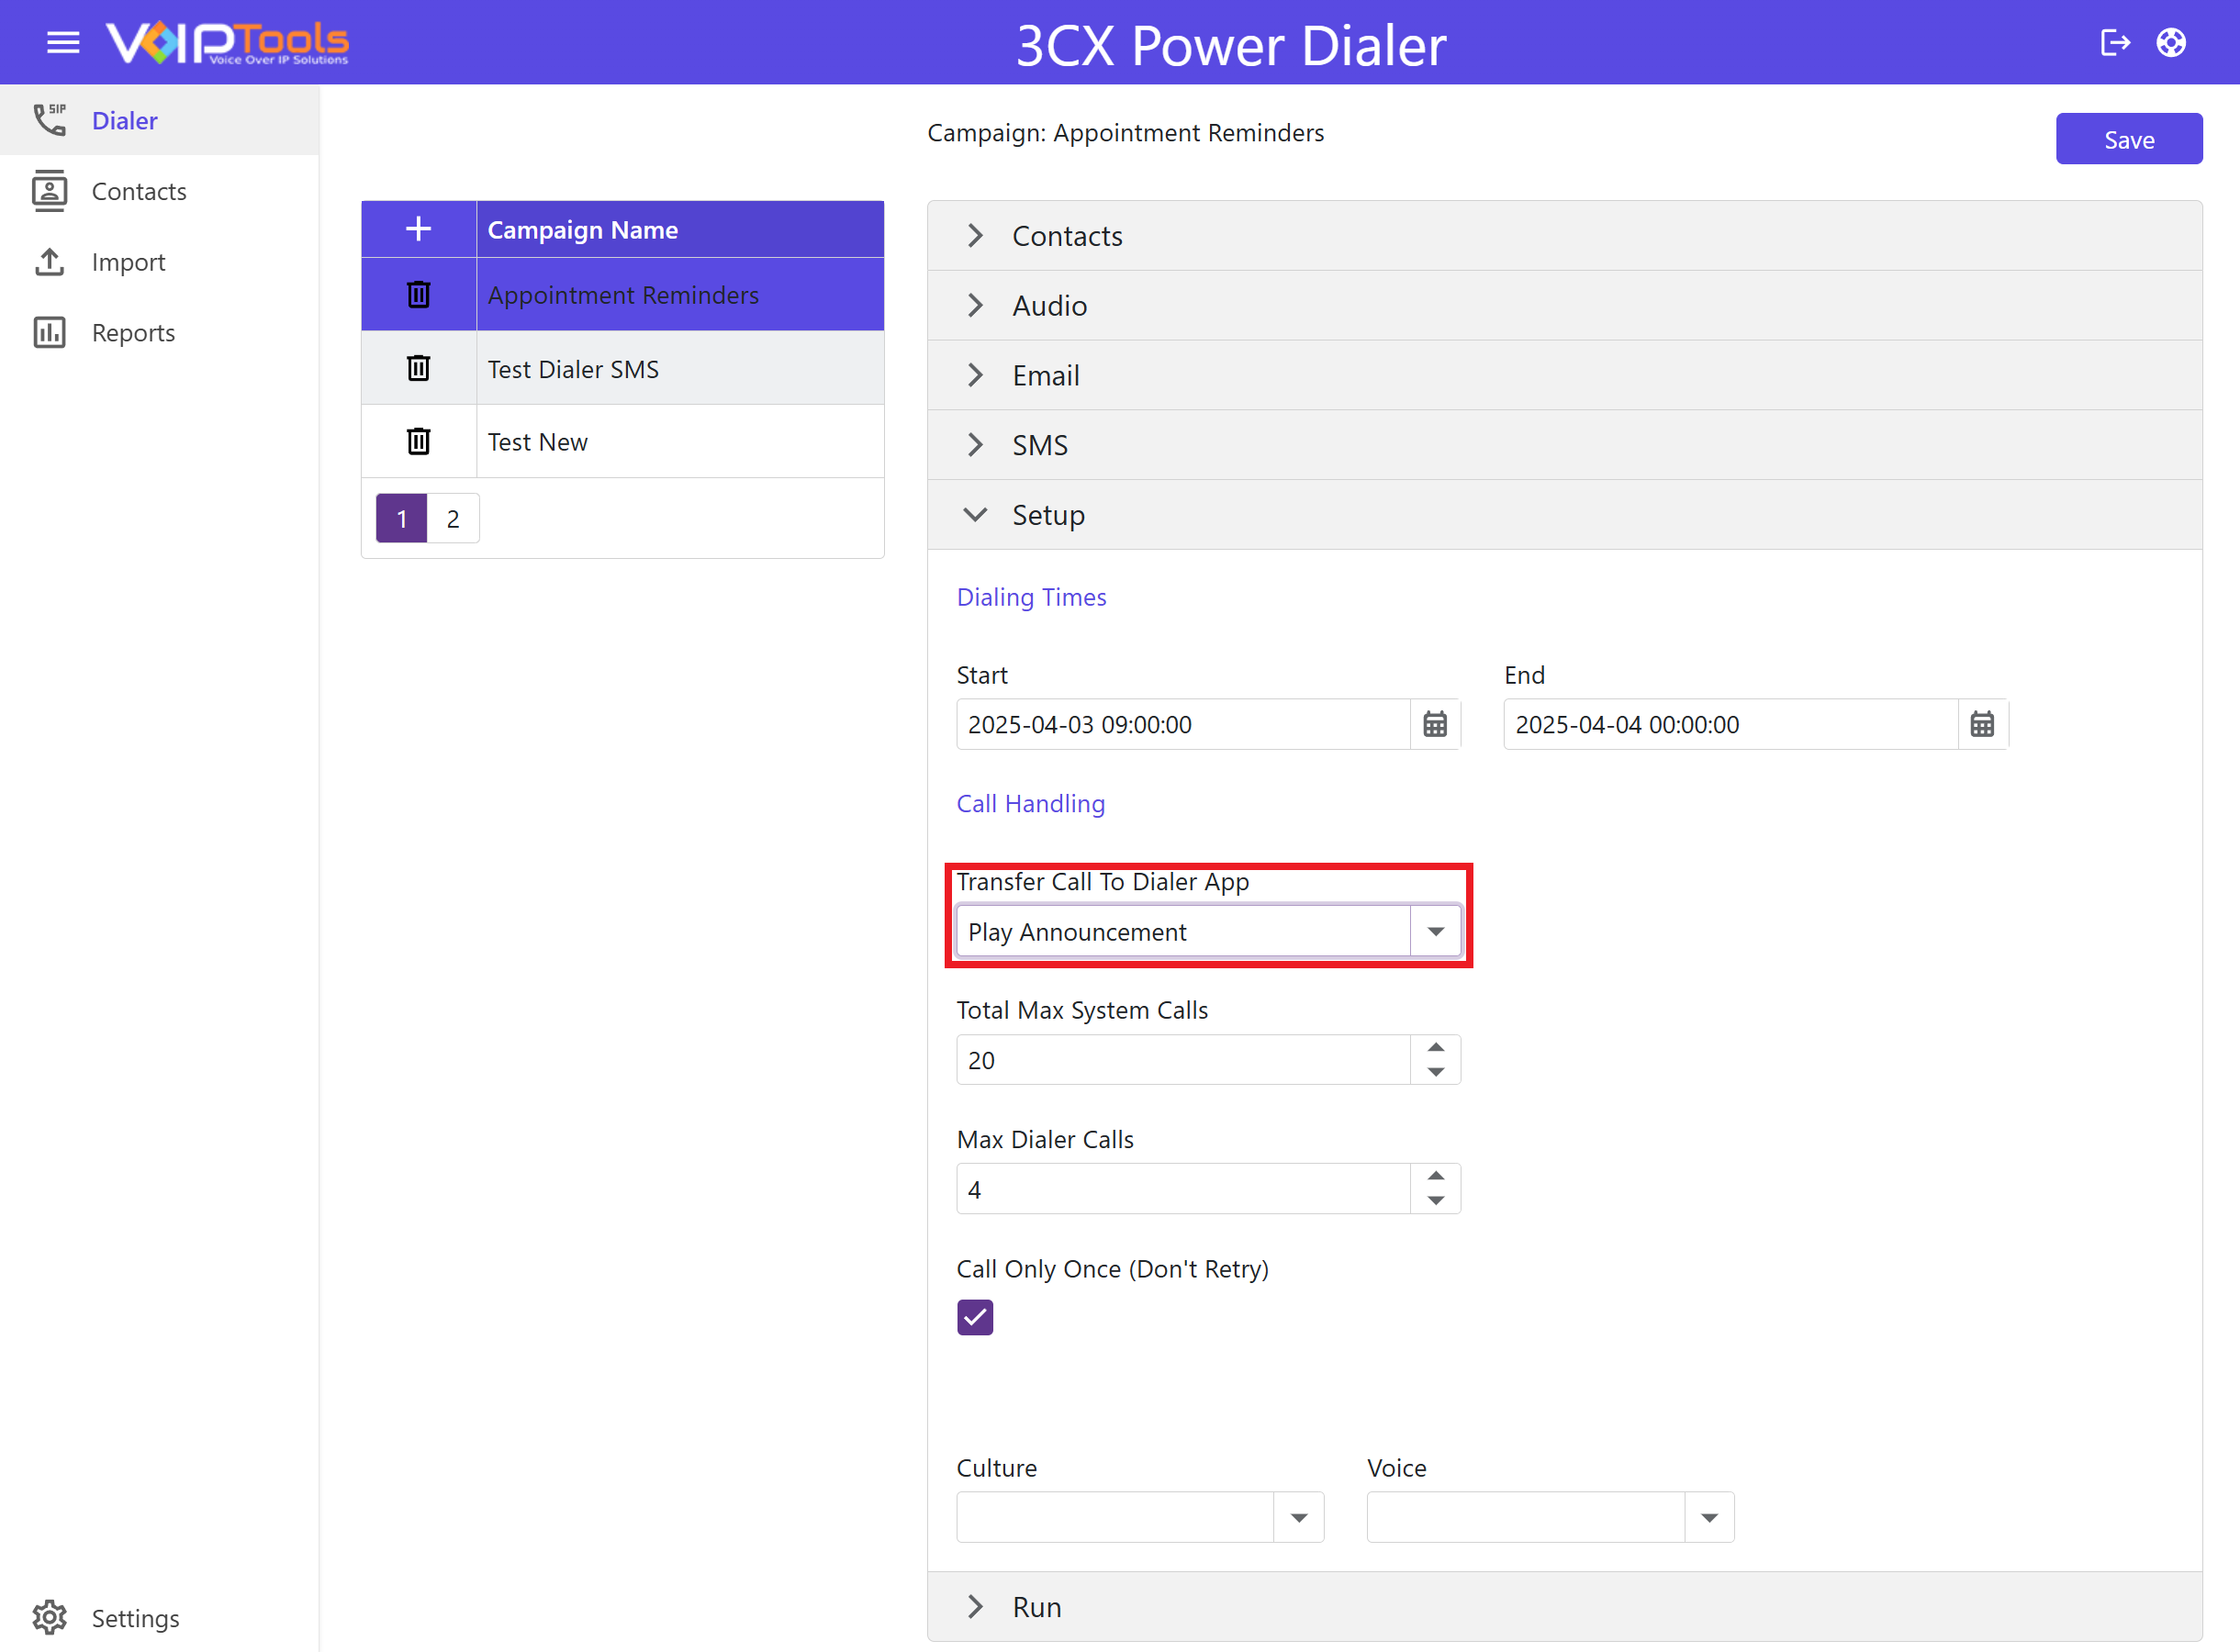
If the entire PBX has this many active calls (Total Max System Calls) then the dialer will pause making calls. This setting is used to ensure that the dialer does not consume all the available 3CX simultaneous calls.
For example, if you want to be sure there are always 4 lines free for non-dialer calls and you have 16 SC 3CX license, then enter 12 for this value.
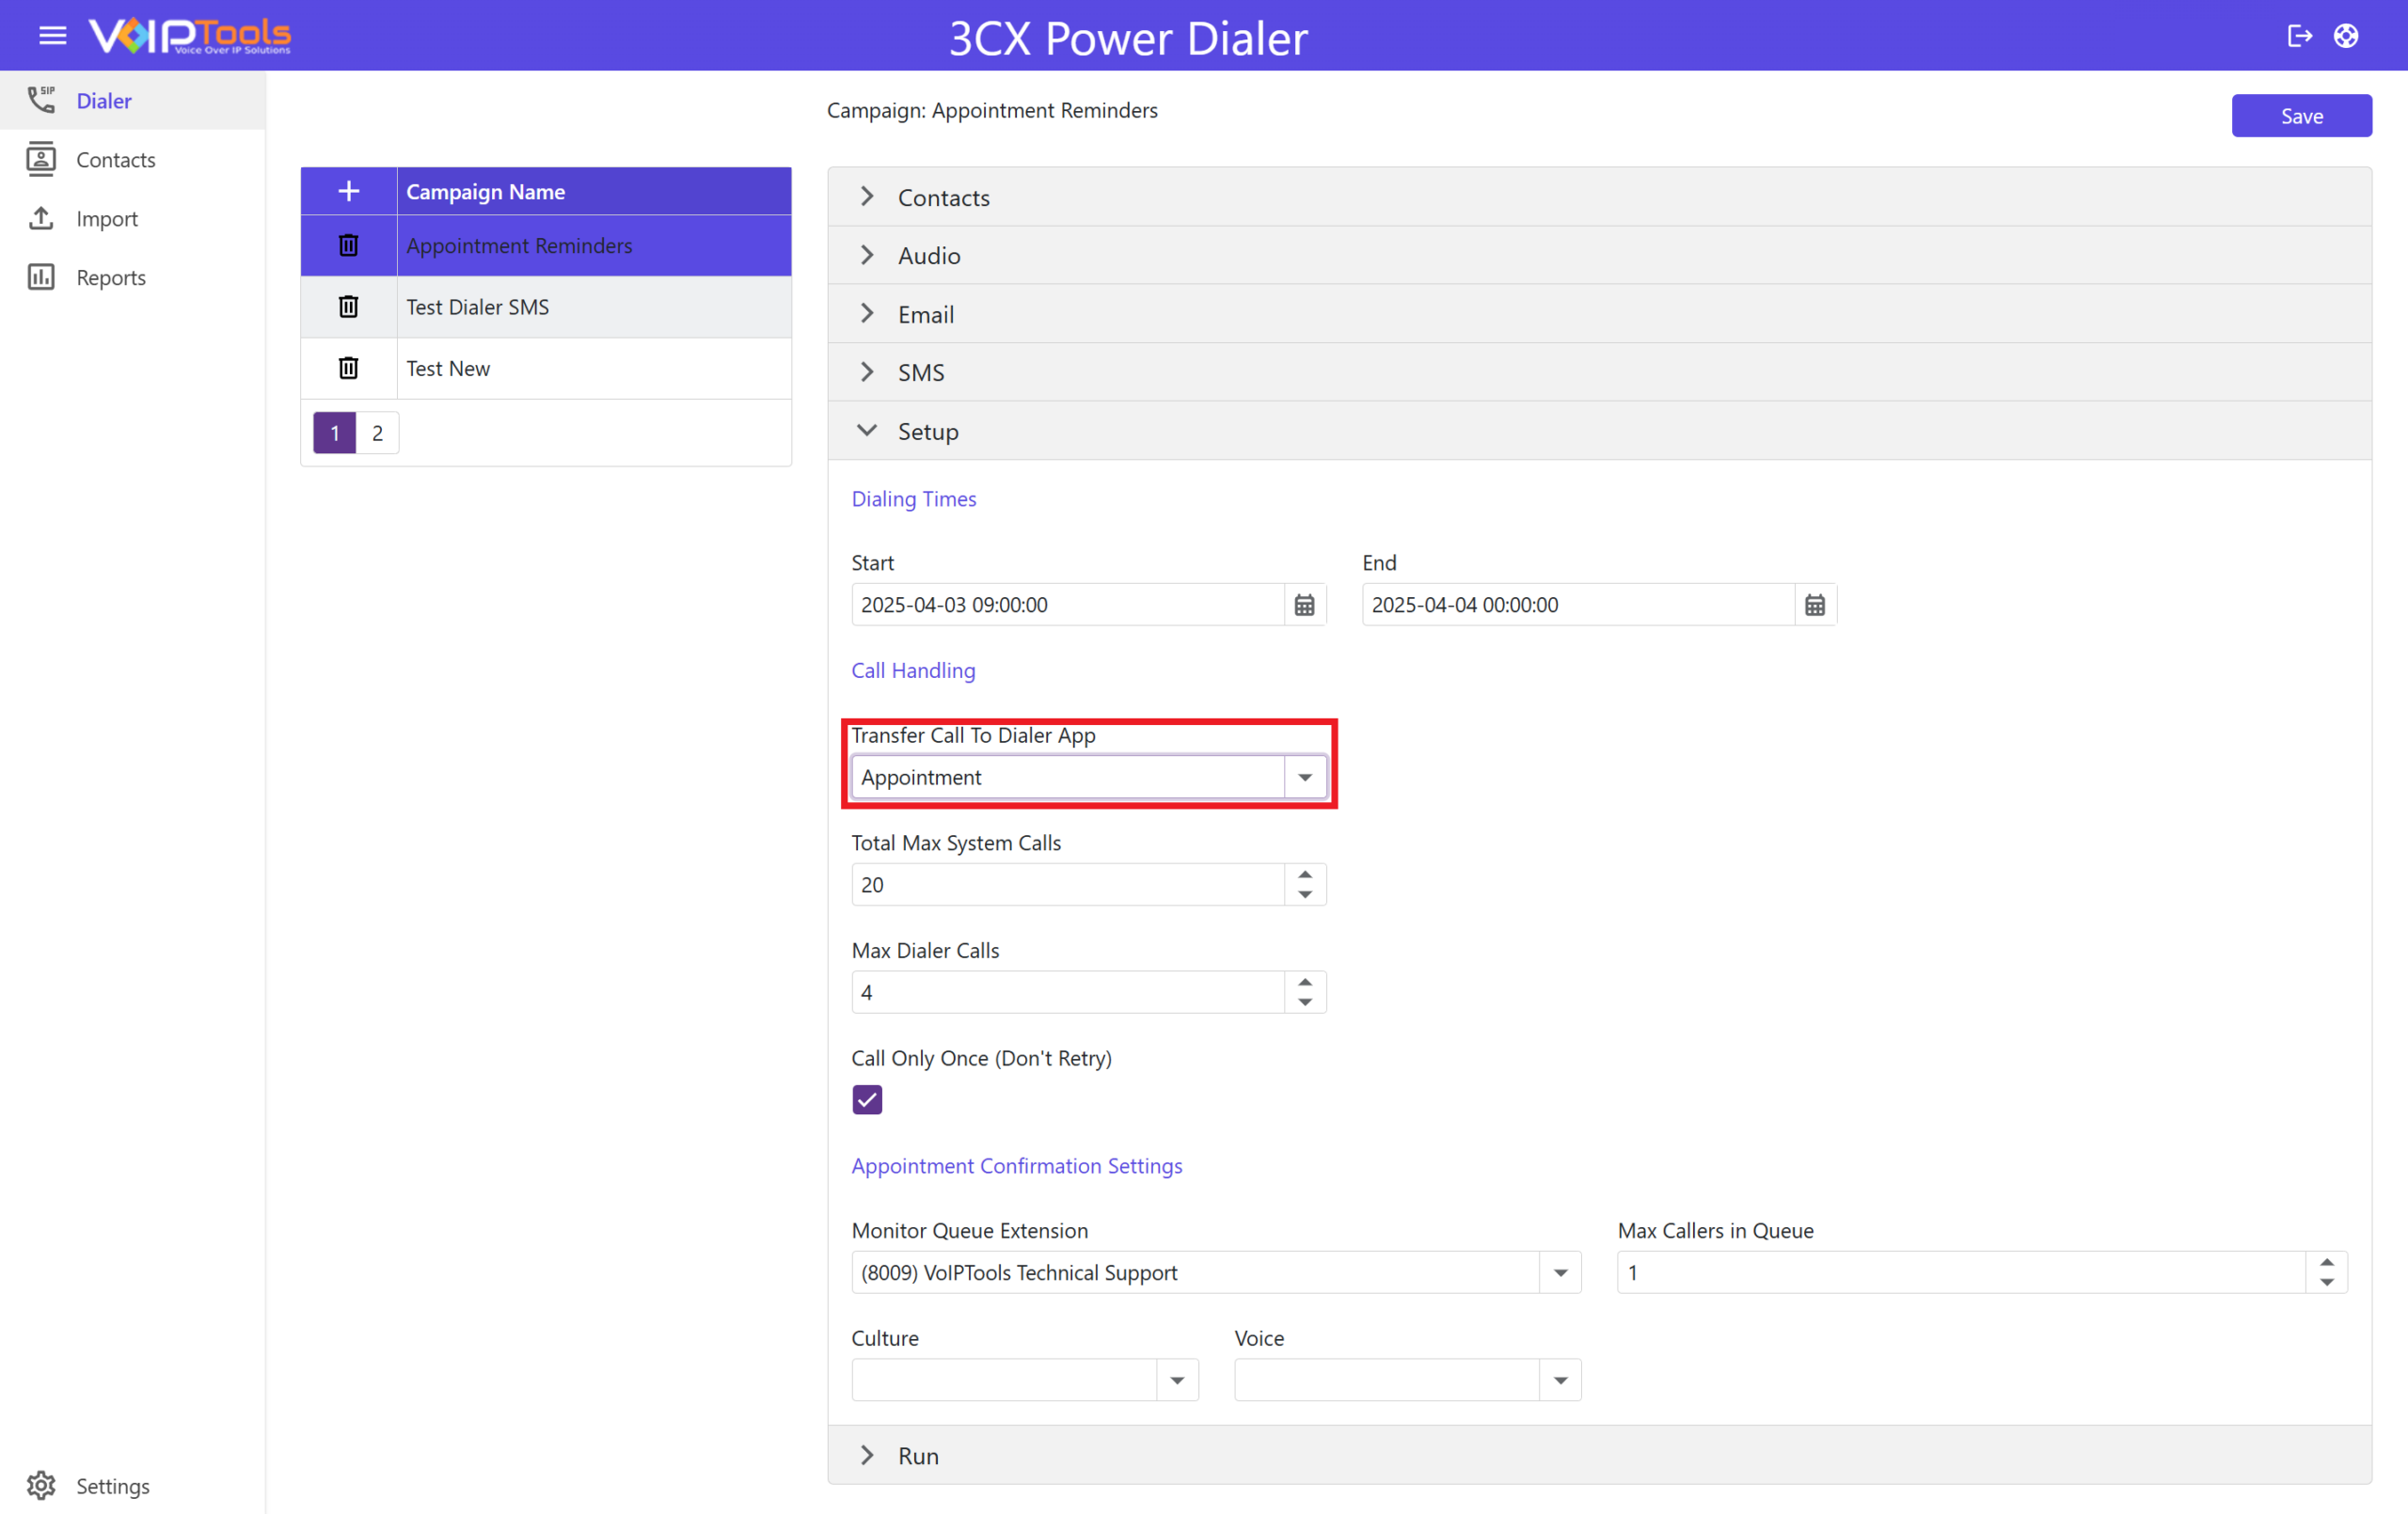
Case 2: Transfer Call to Dialer App as an Appointment #
- From the Total Max System Calls box, type or select the maximum number of active PBX calls so that when this number is reached, the dialer will not make calls.
- From the Max Dialer Calls box, type or select the maximum number of simultaneous calls the dialer can make.
- Check the Call Only Once (Don’t Retry) box to attempt the simultaneous call only once and do not retry.
- In the Monitor Queue Extension list, select the Queue/ IVR/ extension to monitor.
- In the Max Callers In Queue field, enter the maximum number of callers in the queue.
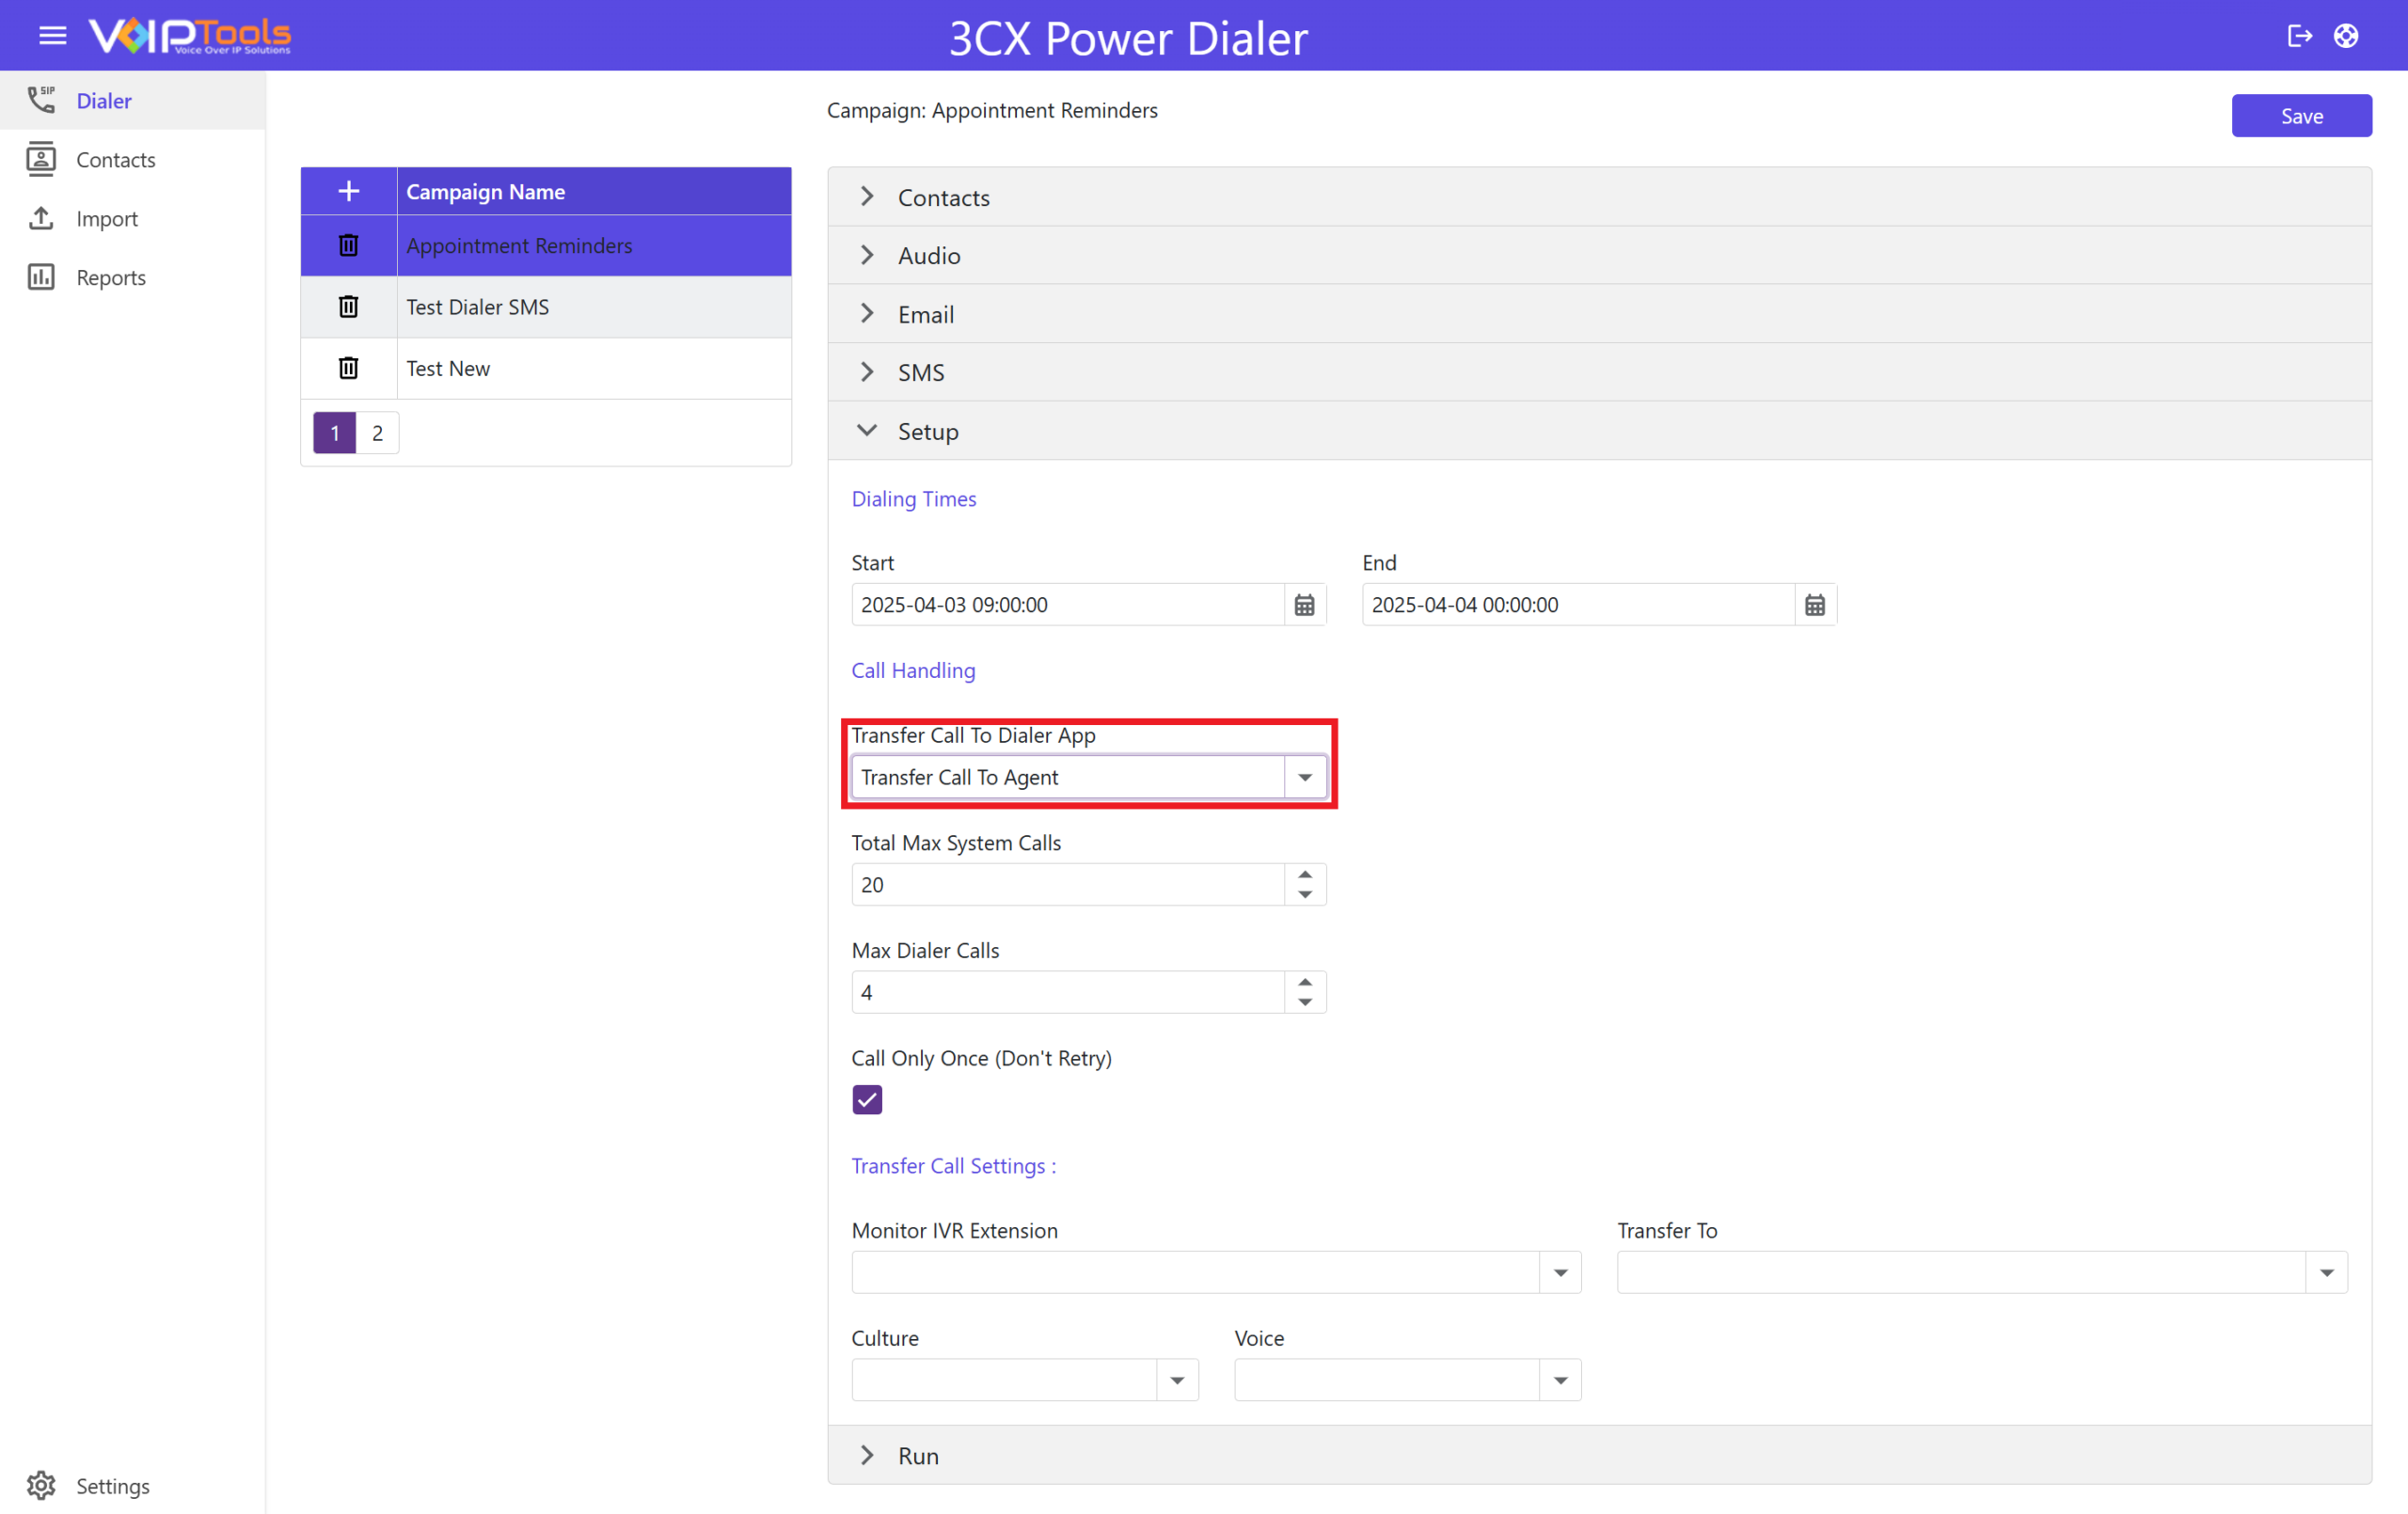
CASE 3: Transfer Call to Dialer App as Transfer Call to Agent #
- From the Total Max System Calls box, type or select the maximum number of active PBX calls so that when this number is reached, the dialer will not make calls.
- From the Max Dialer Calls box, type or select the maximum number of simultaneous calls the dialer can make.
- Check the Call Only Once (Don’t Retry) box to attempt the simultaneous call only once and do not retry.
- In the Monitor IVR Extension list, select the IVR to which you want the dialer to transfer the contact.
- In the Transfer To list, select the queue to receive the call.
In 3CX V20, an IVR extension is introduced to address changes in the call-handling functionality that were not required in earlier versions (up to version 18). Prior to V20, calls could be initiated directly to a queue without any intermediary steps. However, with the release of V20, 3CX modified the “Make Call” functionality, now requiring calls to first establish a connection with an internal party before proceeding to an external queue.
As a result of this update, direct call routing to a queue is no longer supported. To mitigate this, an IVR system is utilized as an intermediary. When a call is made, it is first routed through the IVR, and once the external party answers, the call is automatically transferred to the appropriate queue based on the selection made in the “Transfer To” dropdown menu. This solution ensures compatibility with the updated call routing process in 3CX V20.
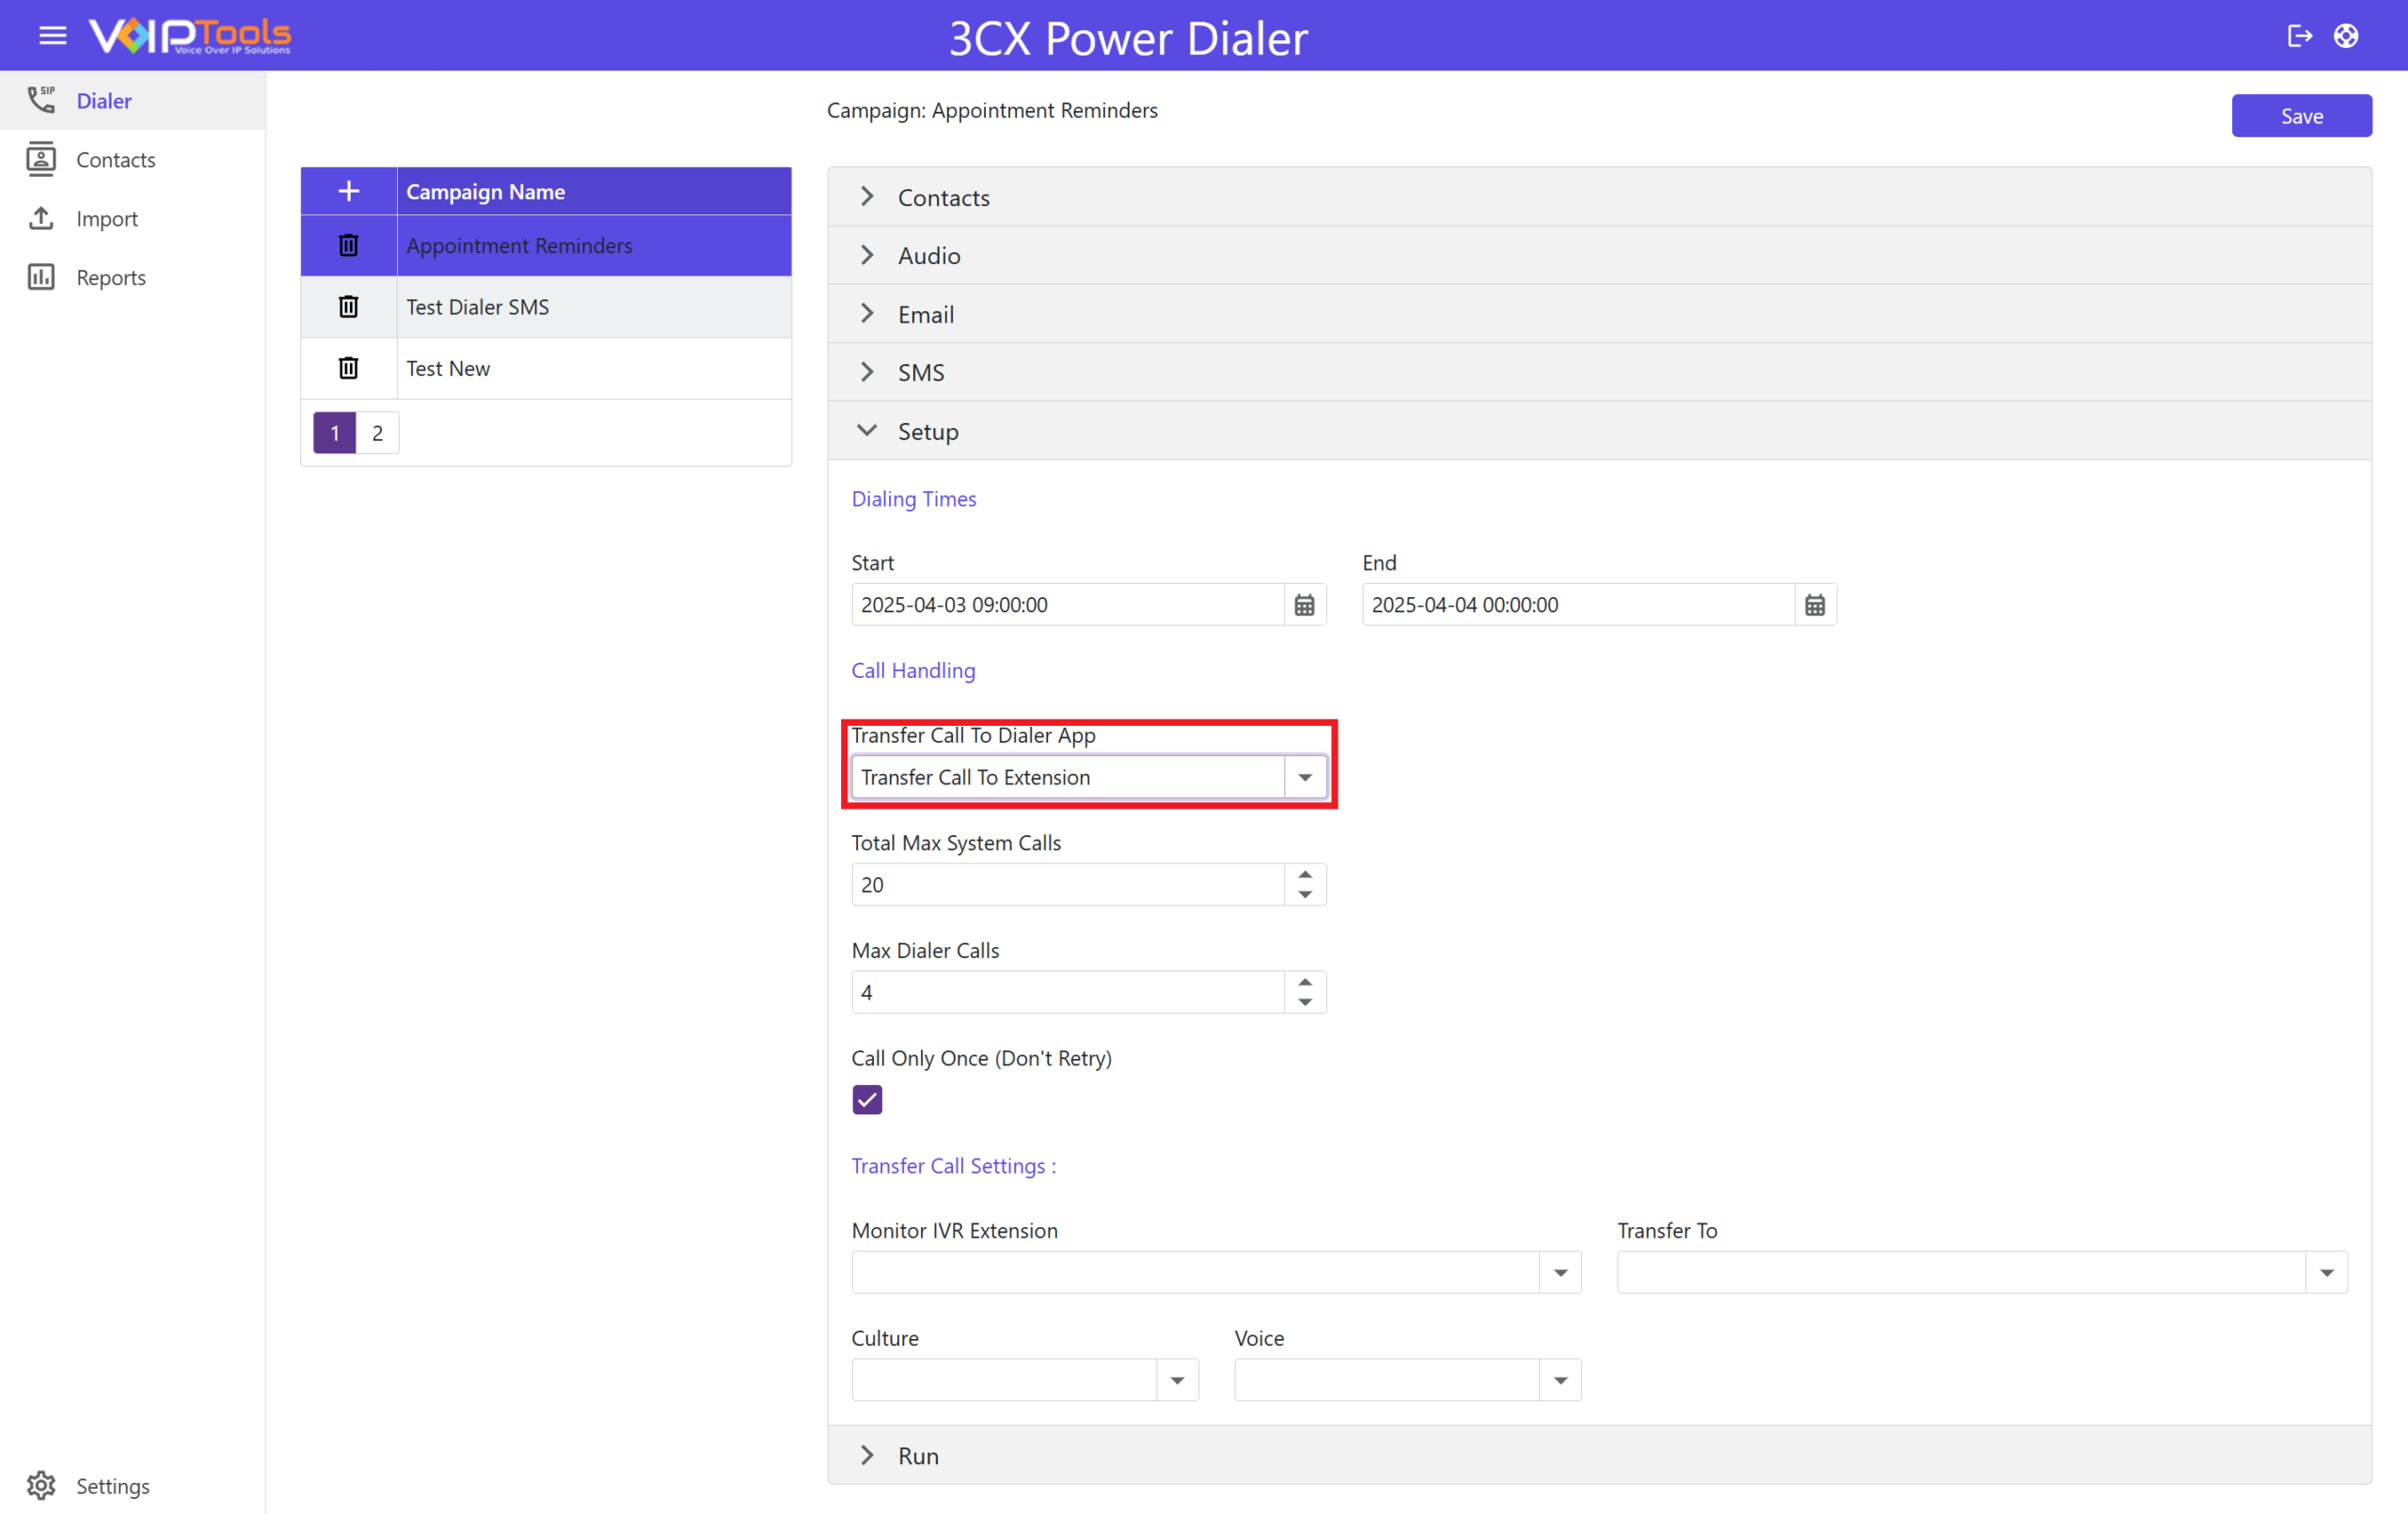
CASE 4: Transfer Call to Dialer App as Transfer Call to Extension #
- From the Total Max System Calls box, type or select the maximum number of active PBX calls so that when this number is reached, the dialer will not make calls.
- From the Max Dialer Calls box, type or select the maximum number of simultaneous calls the dialer can make.
- Check the Call Only Once (Don’t Retry) box to attempt the simultaneous call only once and do not retry.
- In the Transfer To list, select the Extension to receive the make call.
Run tab #
The Run tab lets you export the report of your campaign run in various formats including PDF, CSV, and XLS. By doing so, it lets you gain access to a comprehensive and easily accessible record of your campaign’s performance. Exporting the campaign run report in PDF, CSV, and XLS formats lets you effectively analyze, track, present, and store your campaign data. This feature enhances your decision-making, facilitates collaboration, and ensures transparency in the evaluation of your campaign’s performance.
You can do the following tasks in this tab,
- Create a new campaign run
- Export the campaign run report
- Delete a campaign run
Create a new run #
Follow the procedure to create a new campaign run,
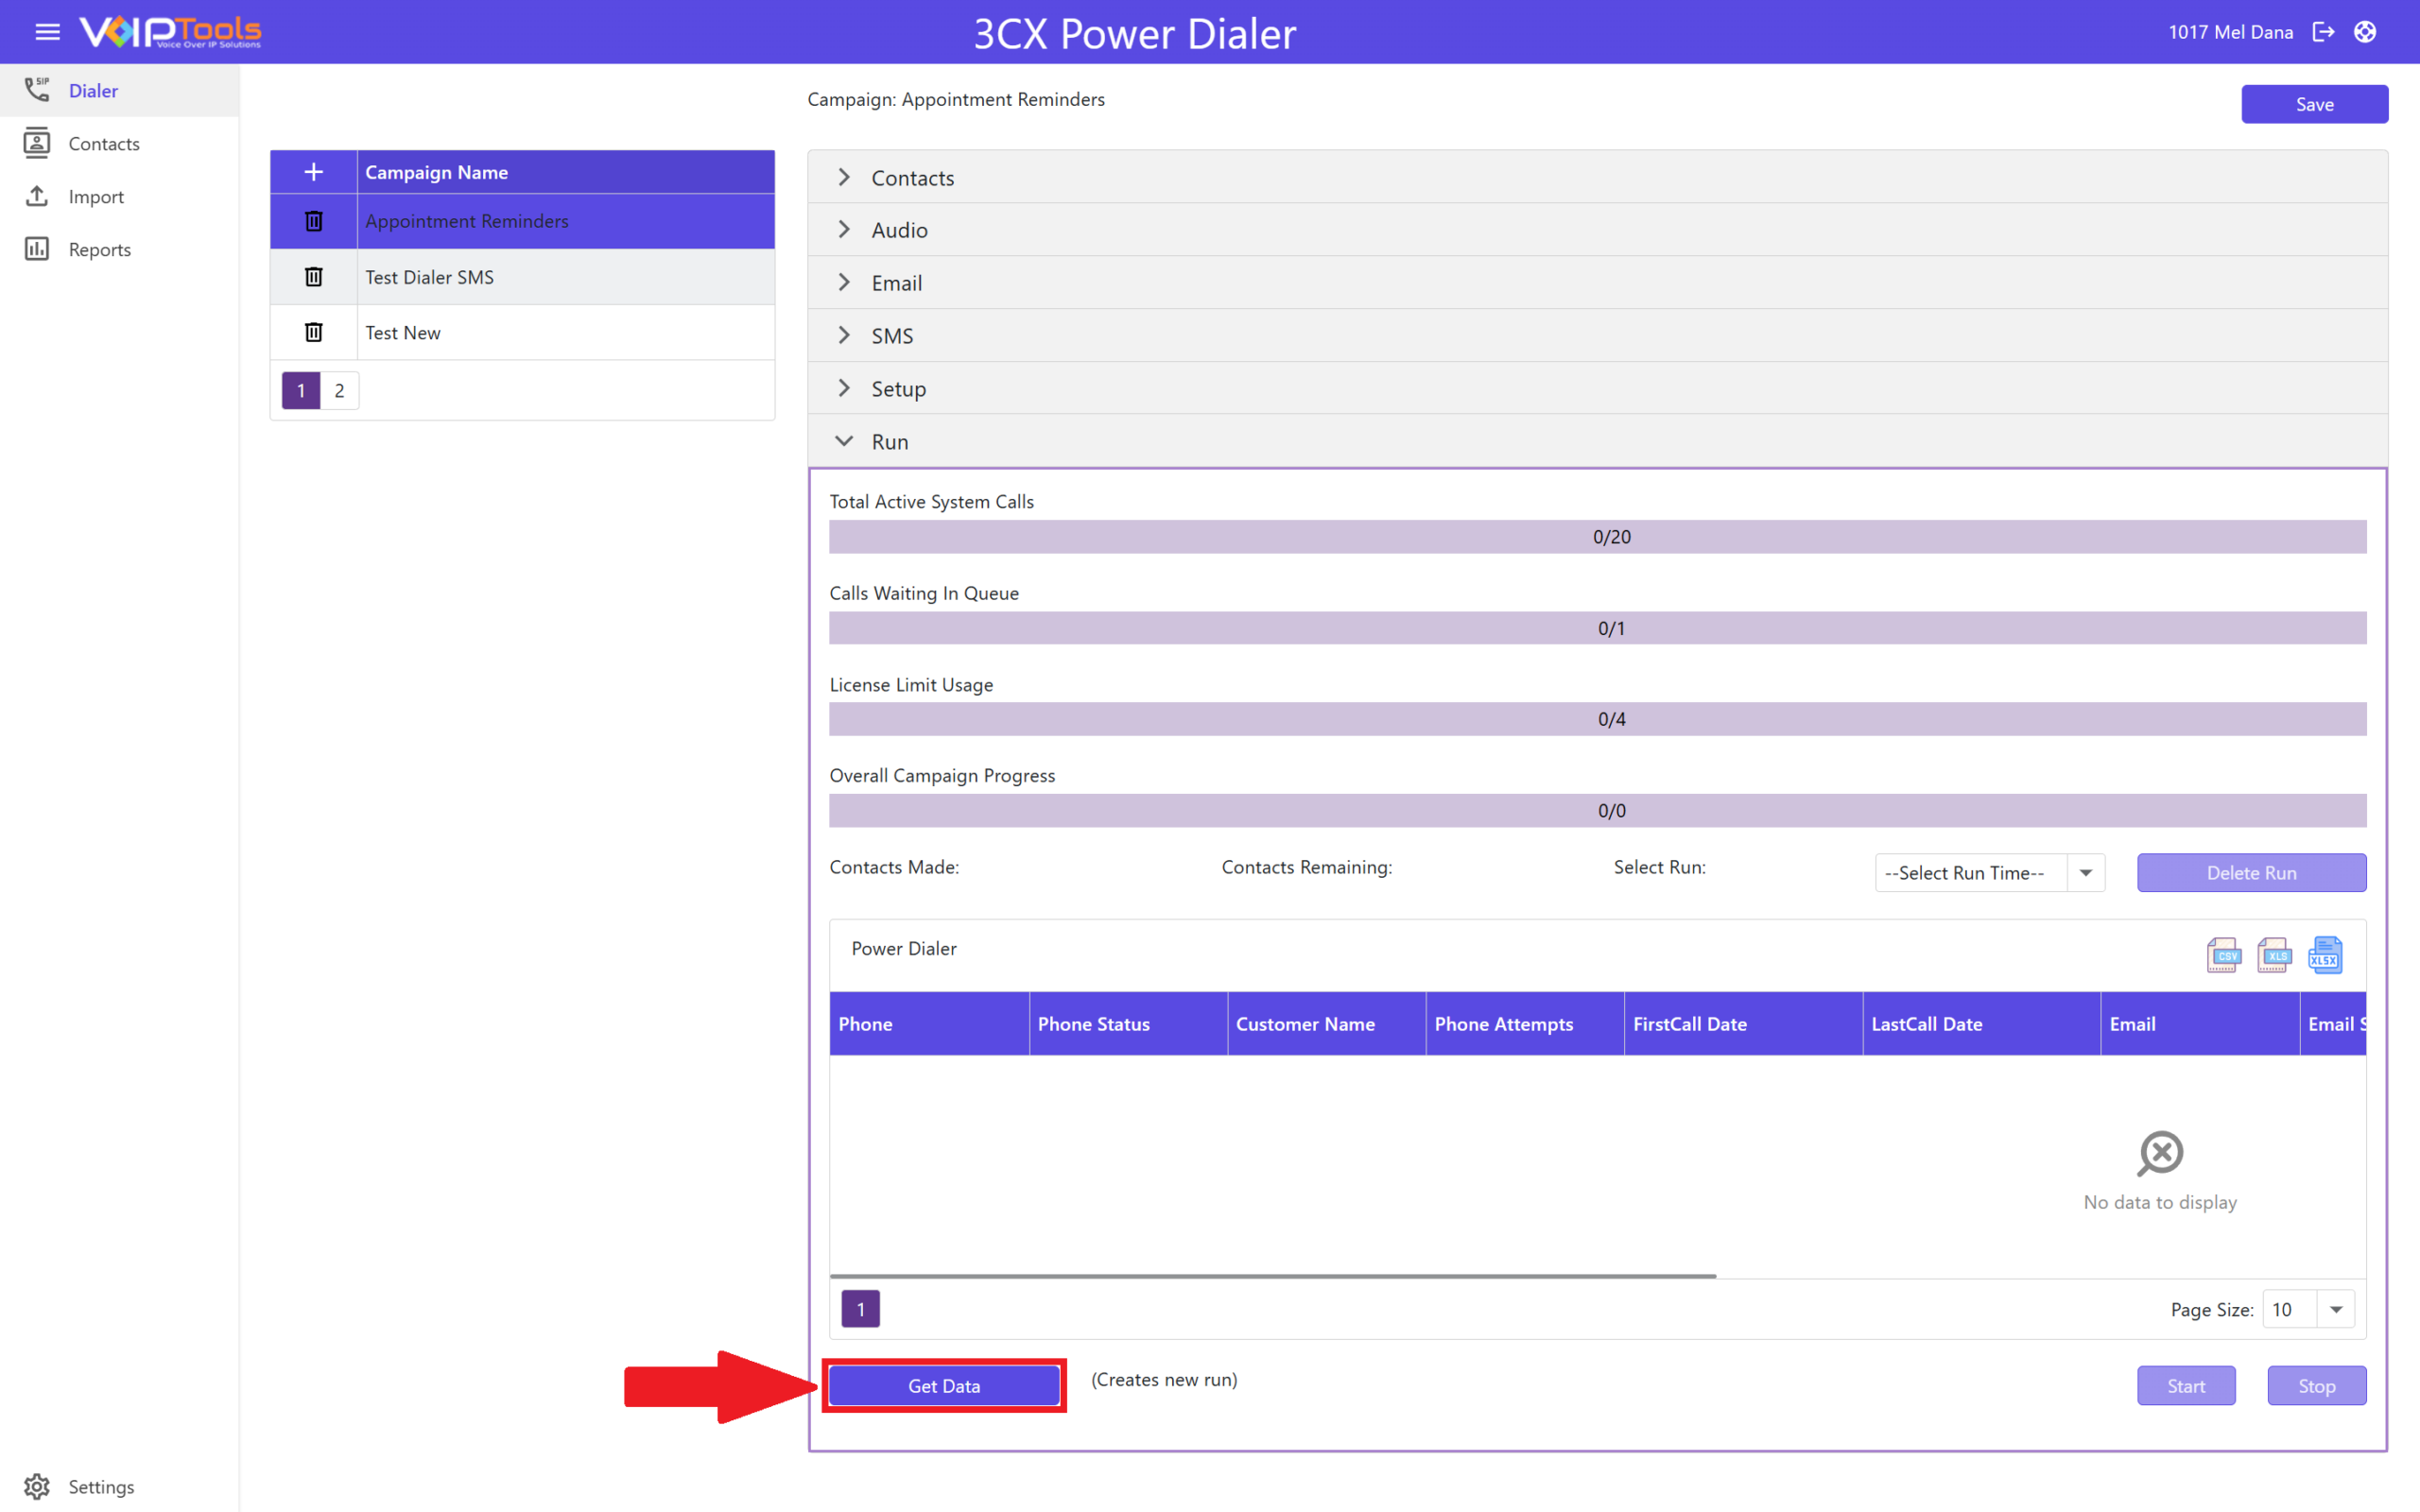
- Click the Get Data button to extract the contacts specified in the Contacts tab.
- Select the Data and Time at which you want to start the campaign in the Select Run dropdown.
- Click the Start button to enable the dialer to run the call according to the parameters you set in the Contacts tab, Audio tab, Email tab, SMS tab, and Setup tab.
- Click Stop to stop the dialer from making calls to the campaign.
The Power Dialer will continue running the campaign in the background even if you refresh the page or open other tabs within the application. The campaign will only stop after it has been fully completed. To stop an ongoing campaign manually, you must stop and then restart the Power Dialer service.
The Power Dialer initiates contact with the first entry in the table during a campaign run. After contacting, each subsequent contact moves up in the table. The completed contact moves to the next row. This pattern continues, cycling through contacts until the end of the campaign. At the end, the first contact is displayed last, allowing real-time monitoring of the current contact being dialed as it appears at the top.
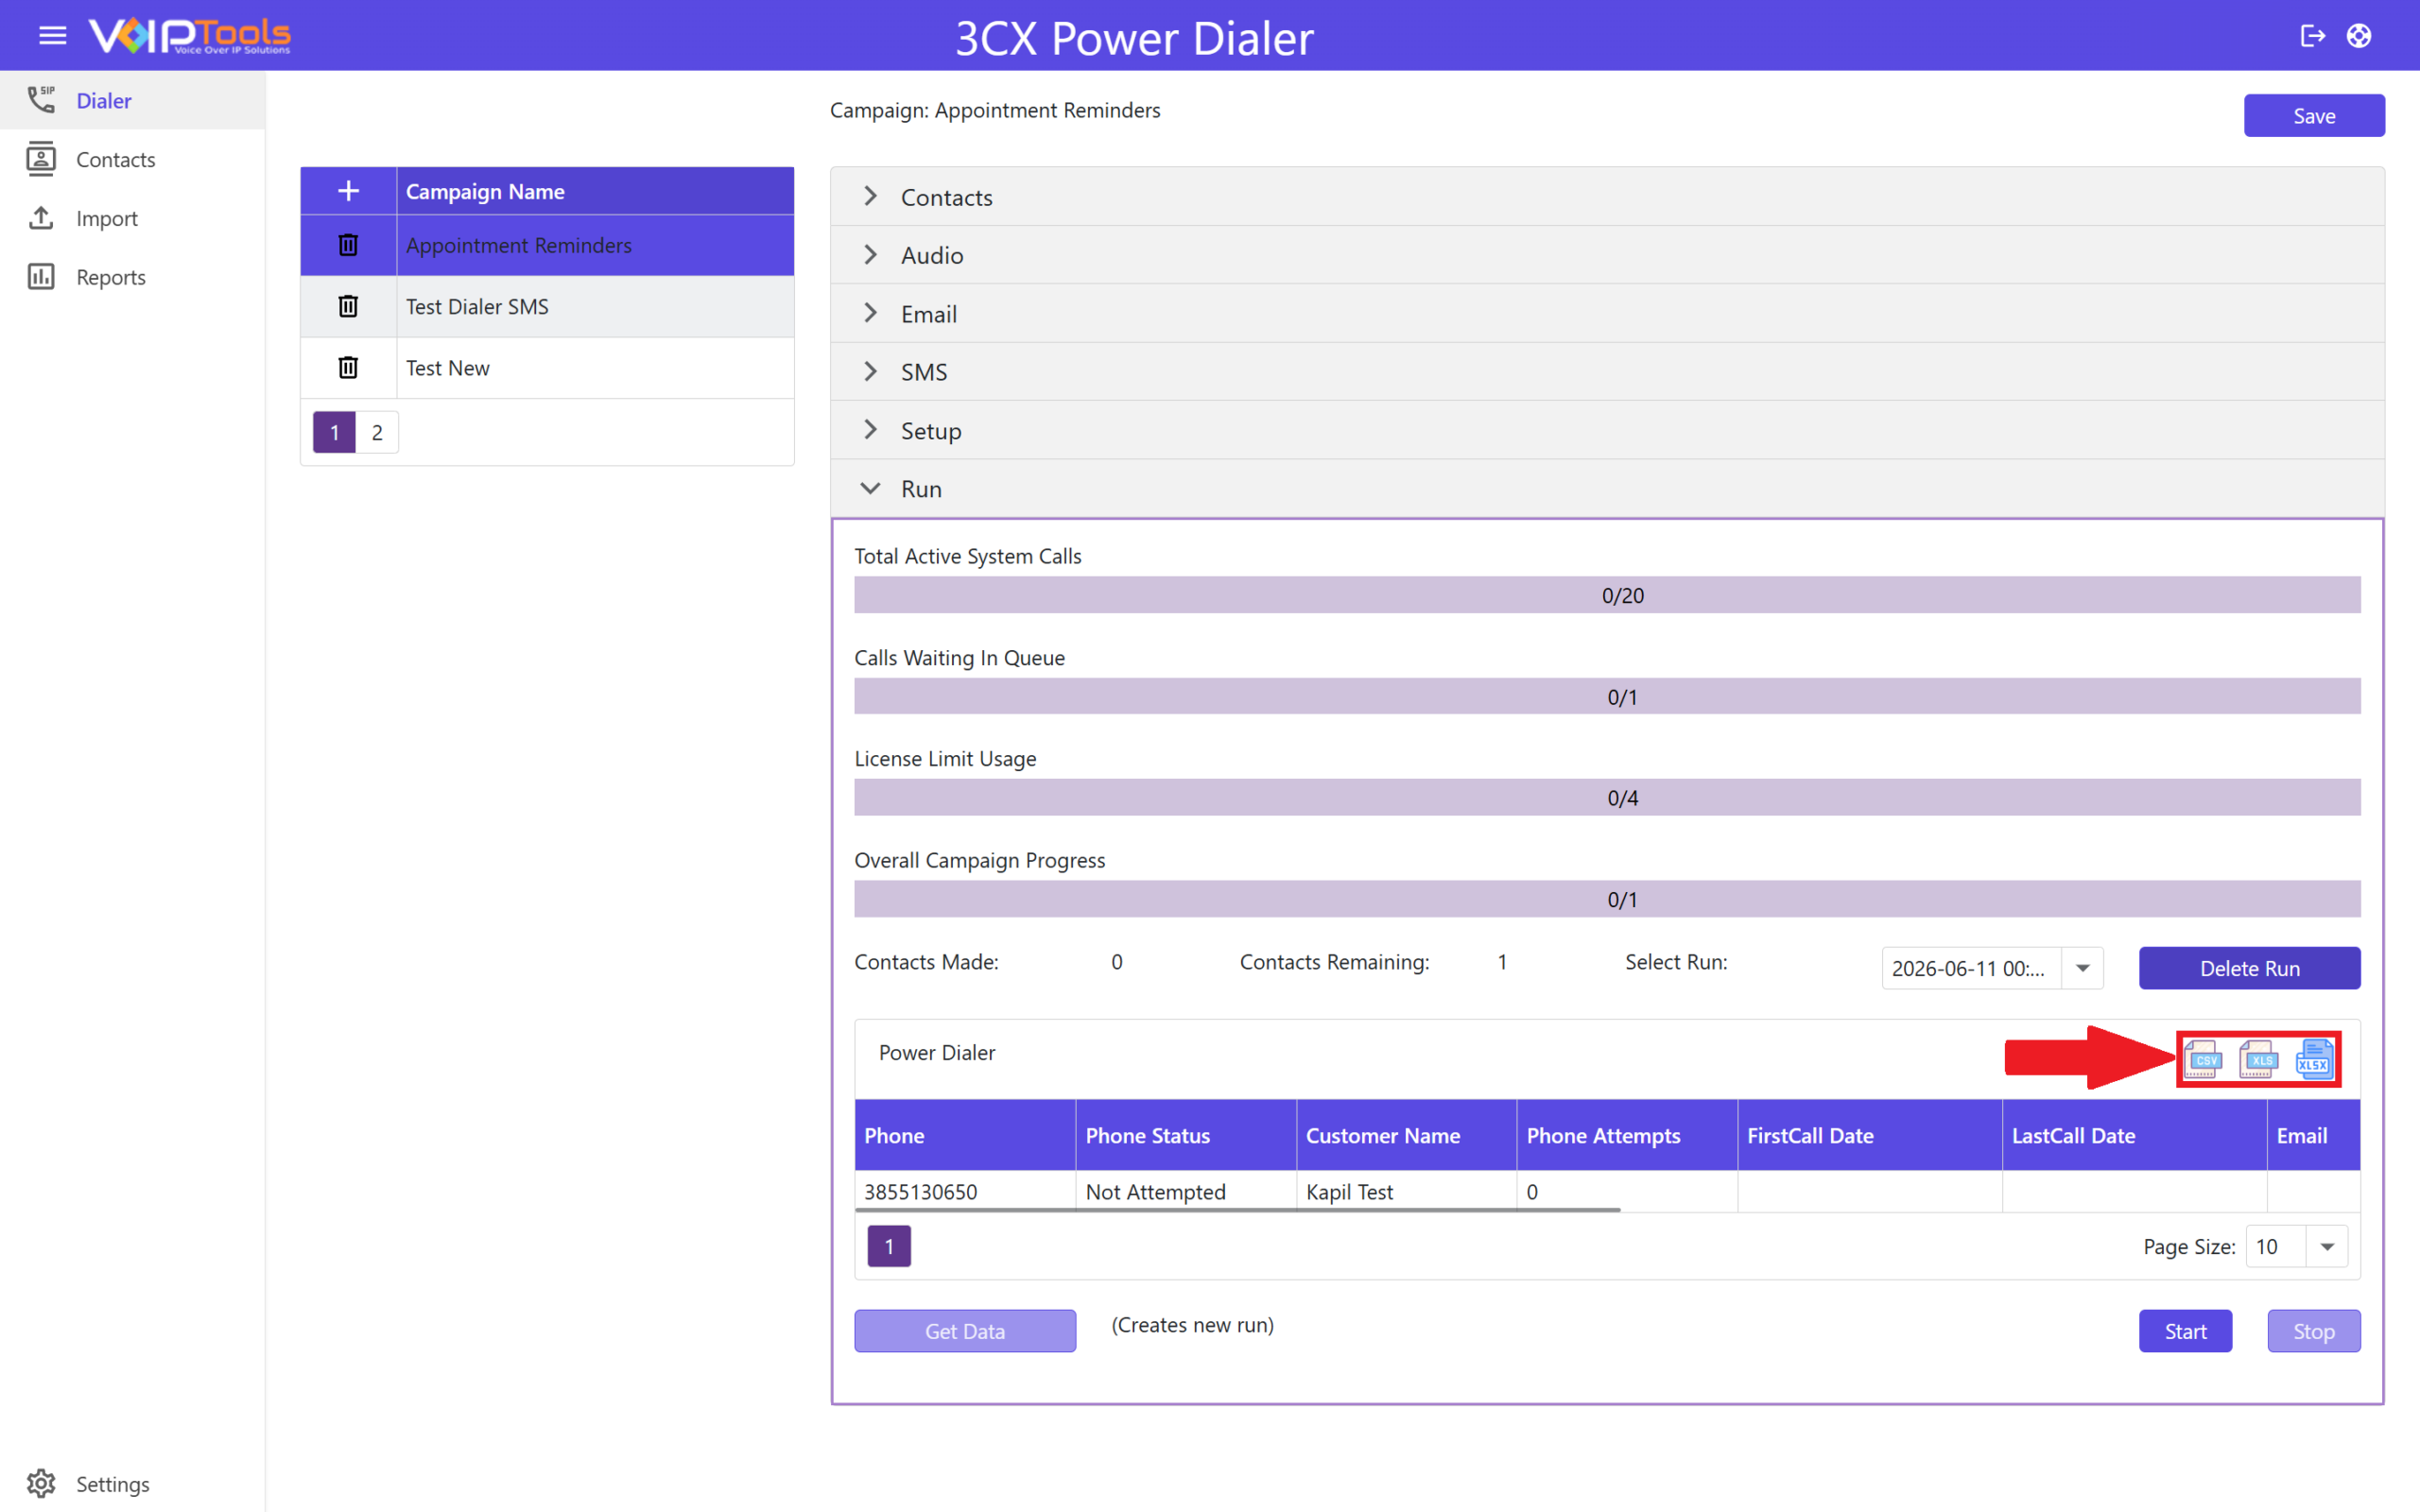
Export campaign Run report #
You can export the campaign run in PDF, CSV, and XLS format.
Delete a Campaign Run #
Follow the procedure to delete the campaign run,
- In the Select Run dropdown, select run time to delete.
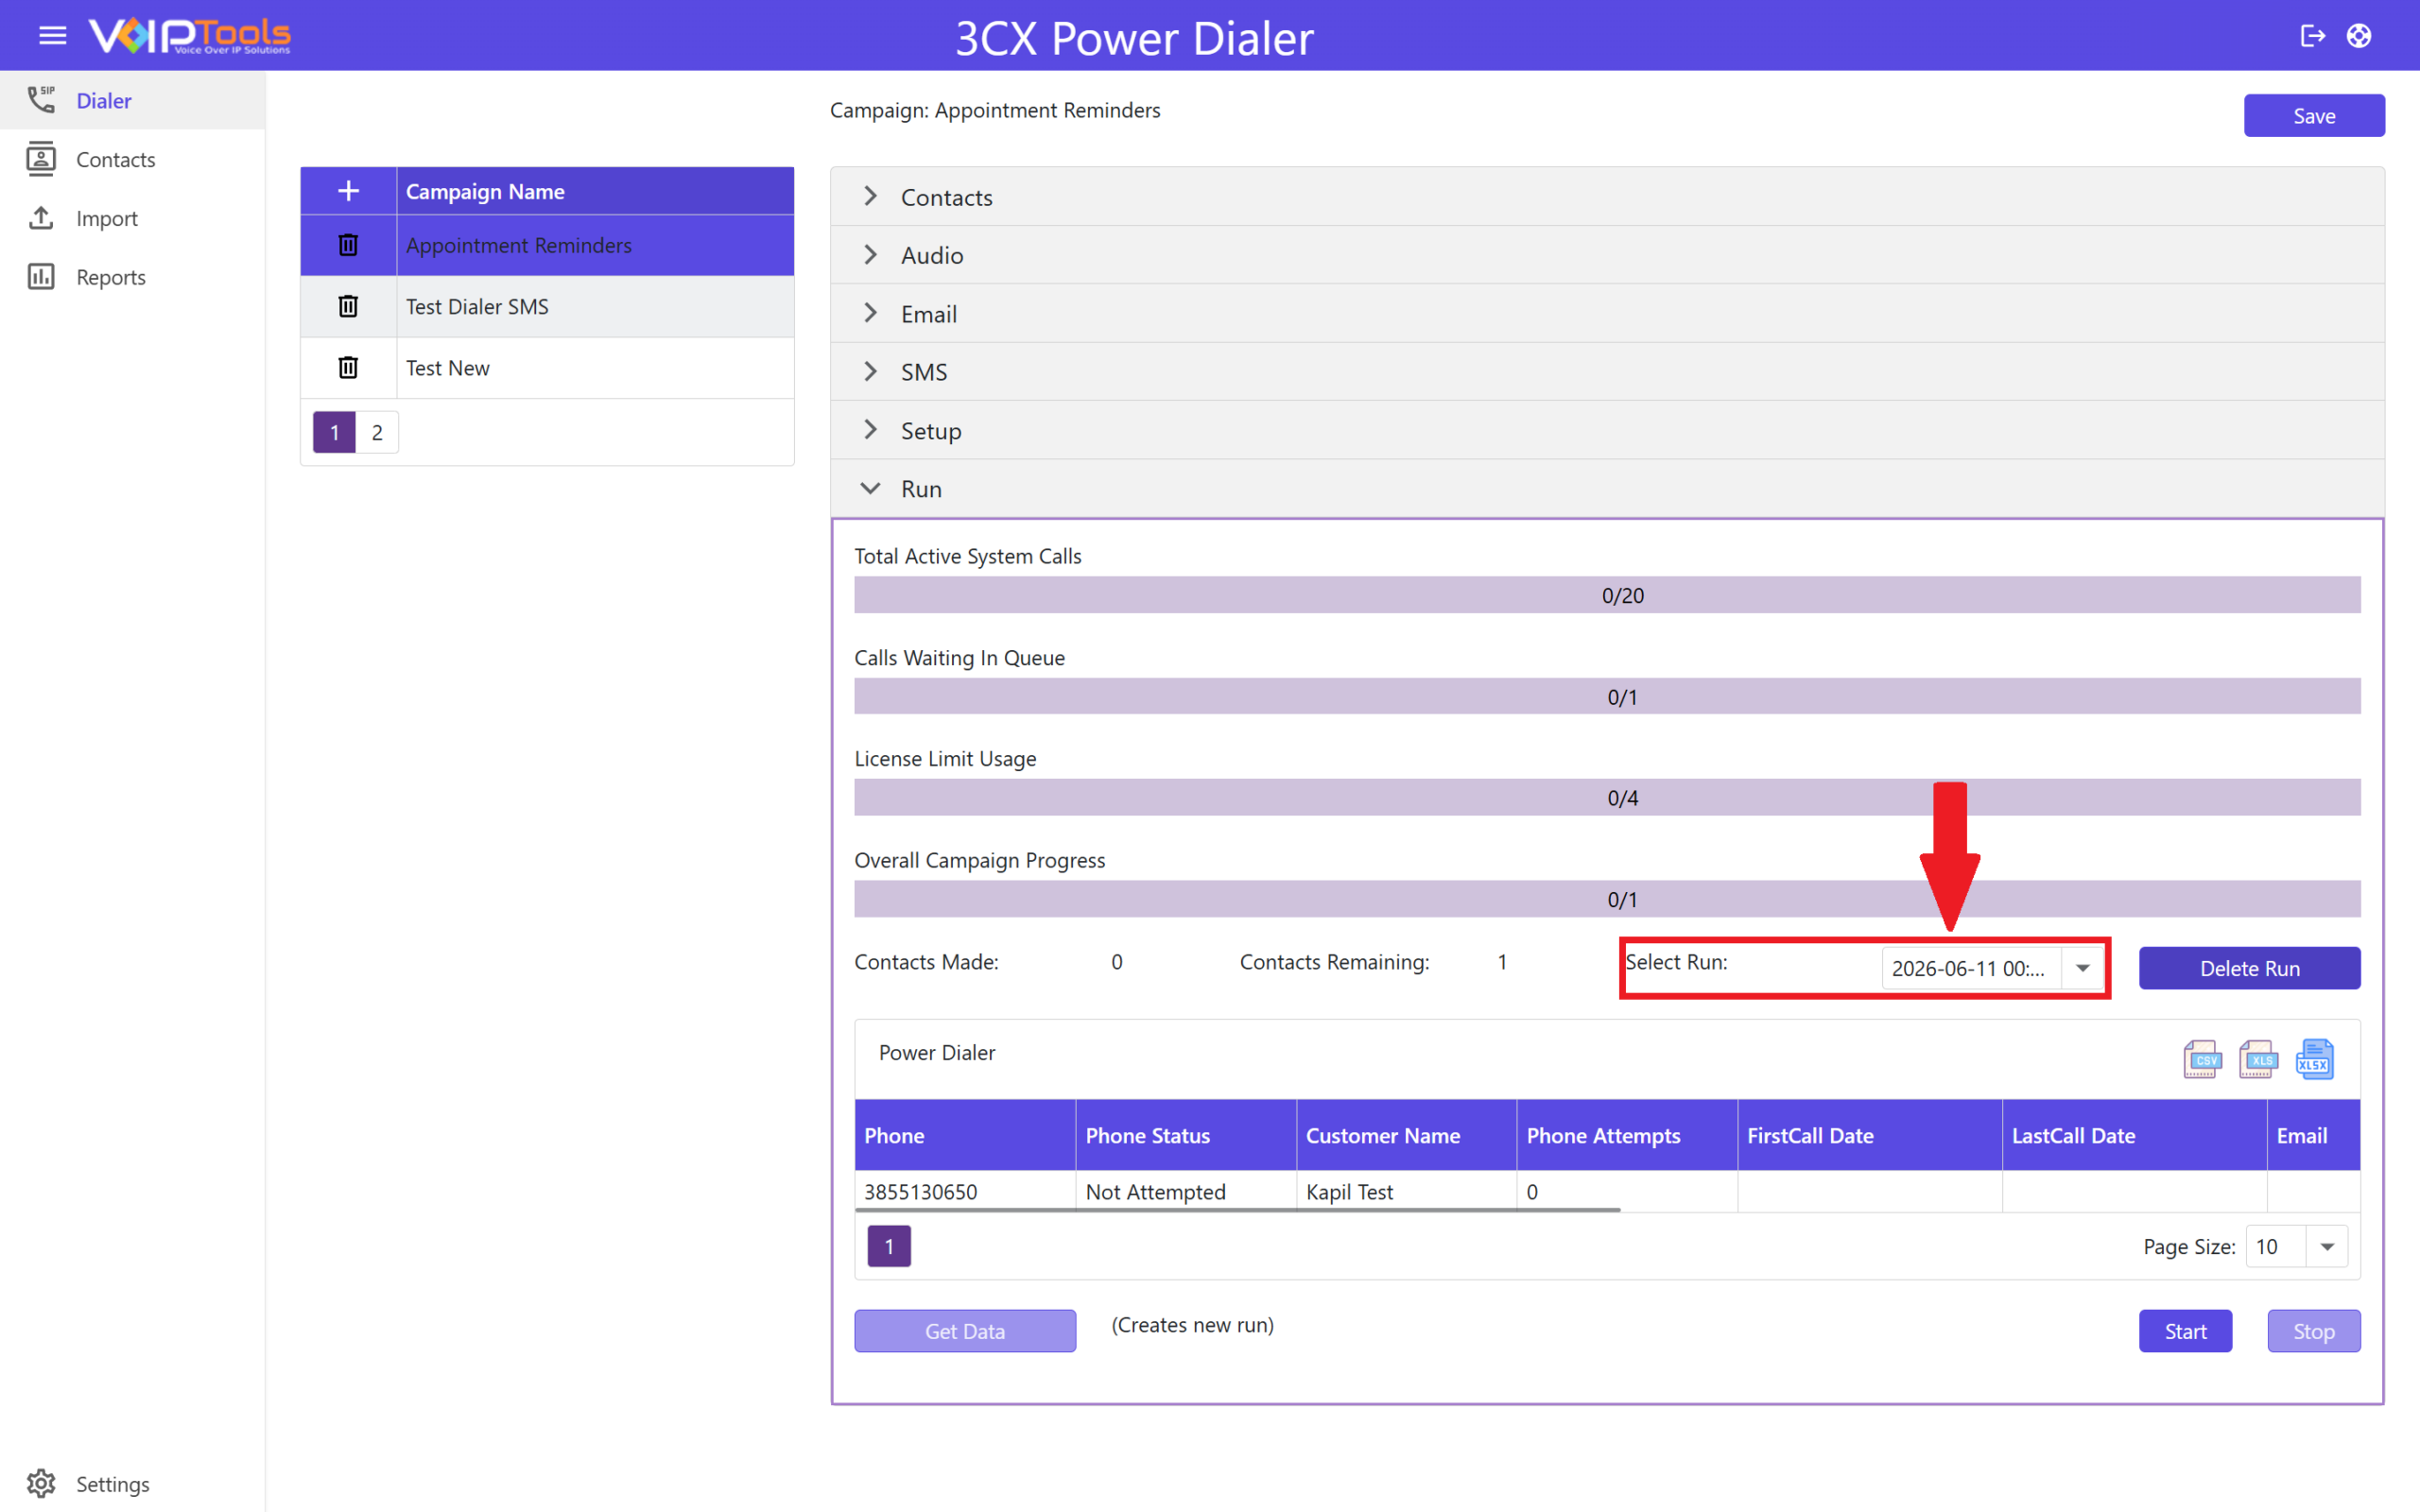
- Click the Delete Run button to delete the selected run time.
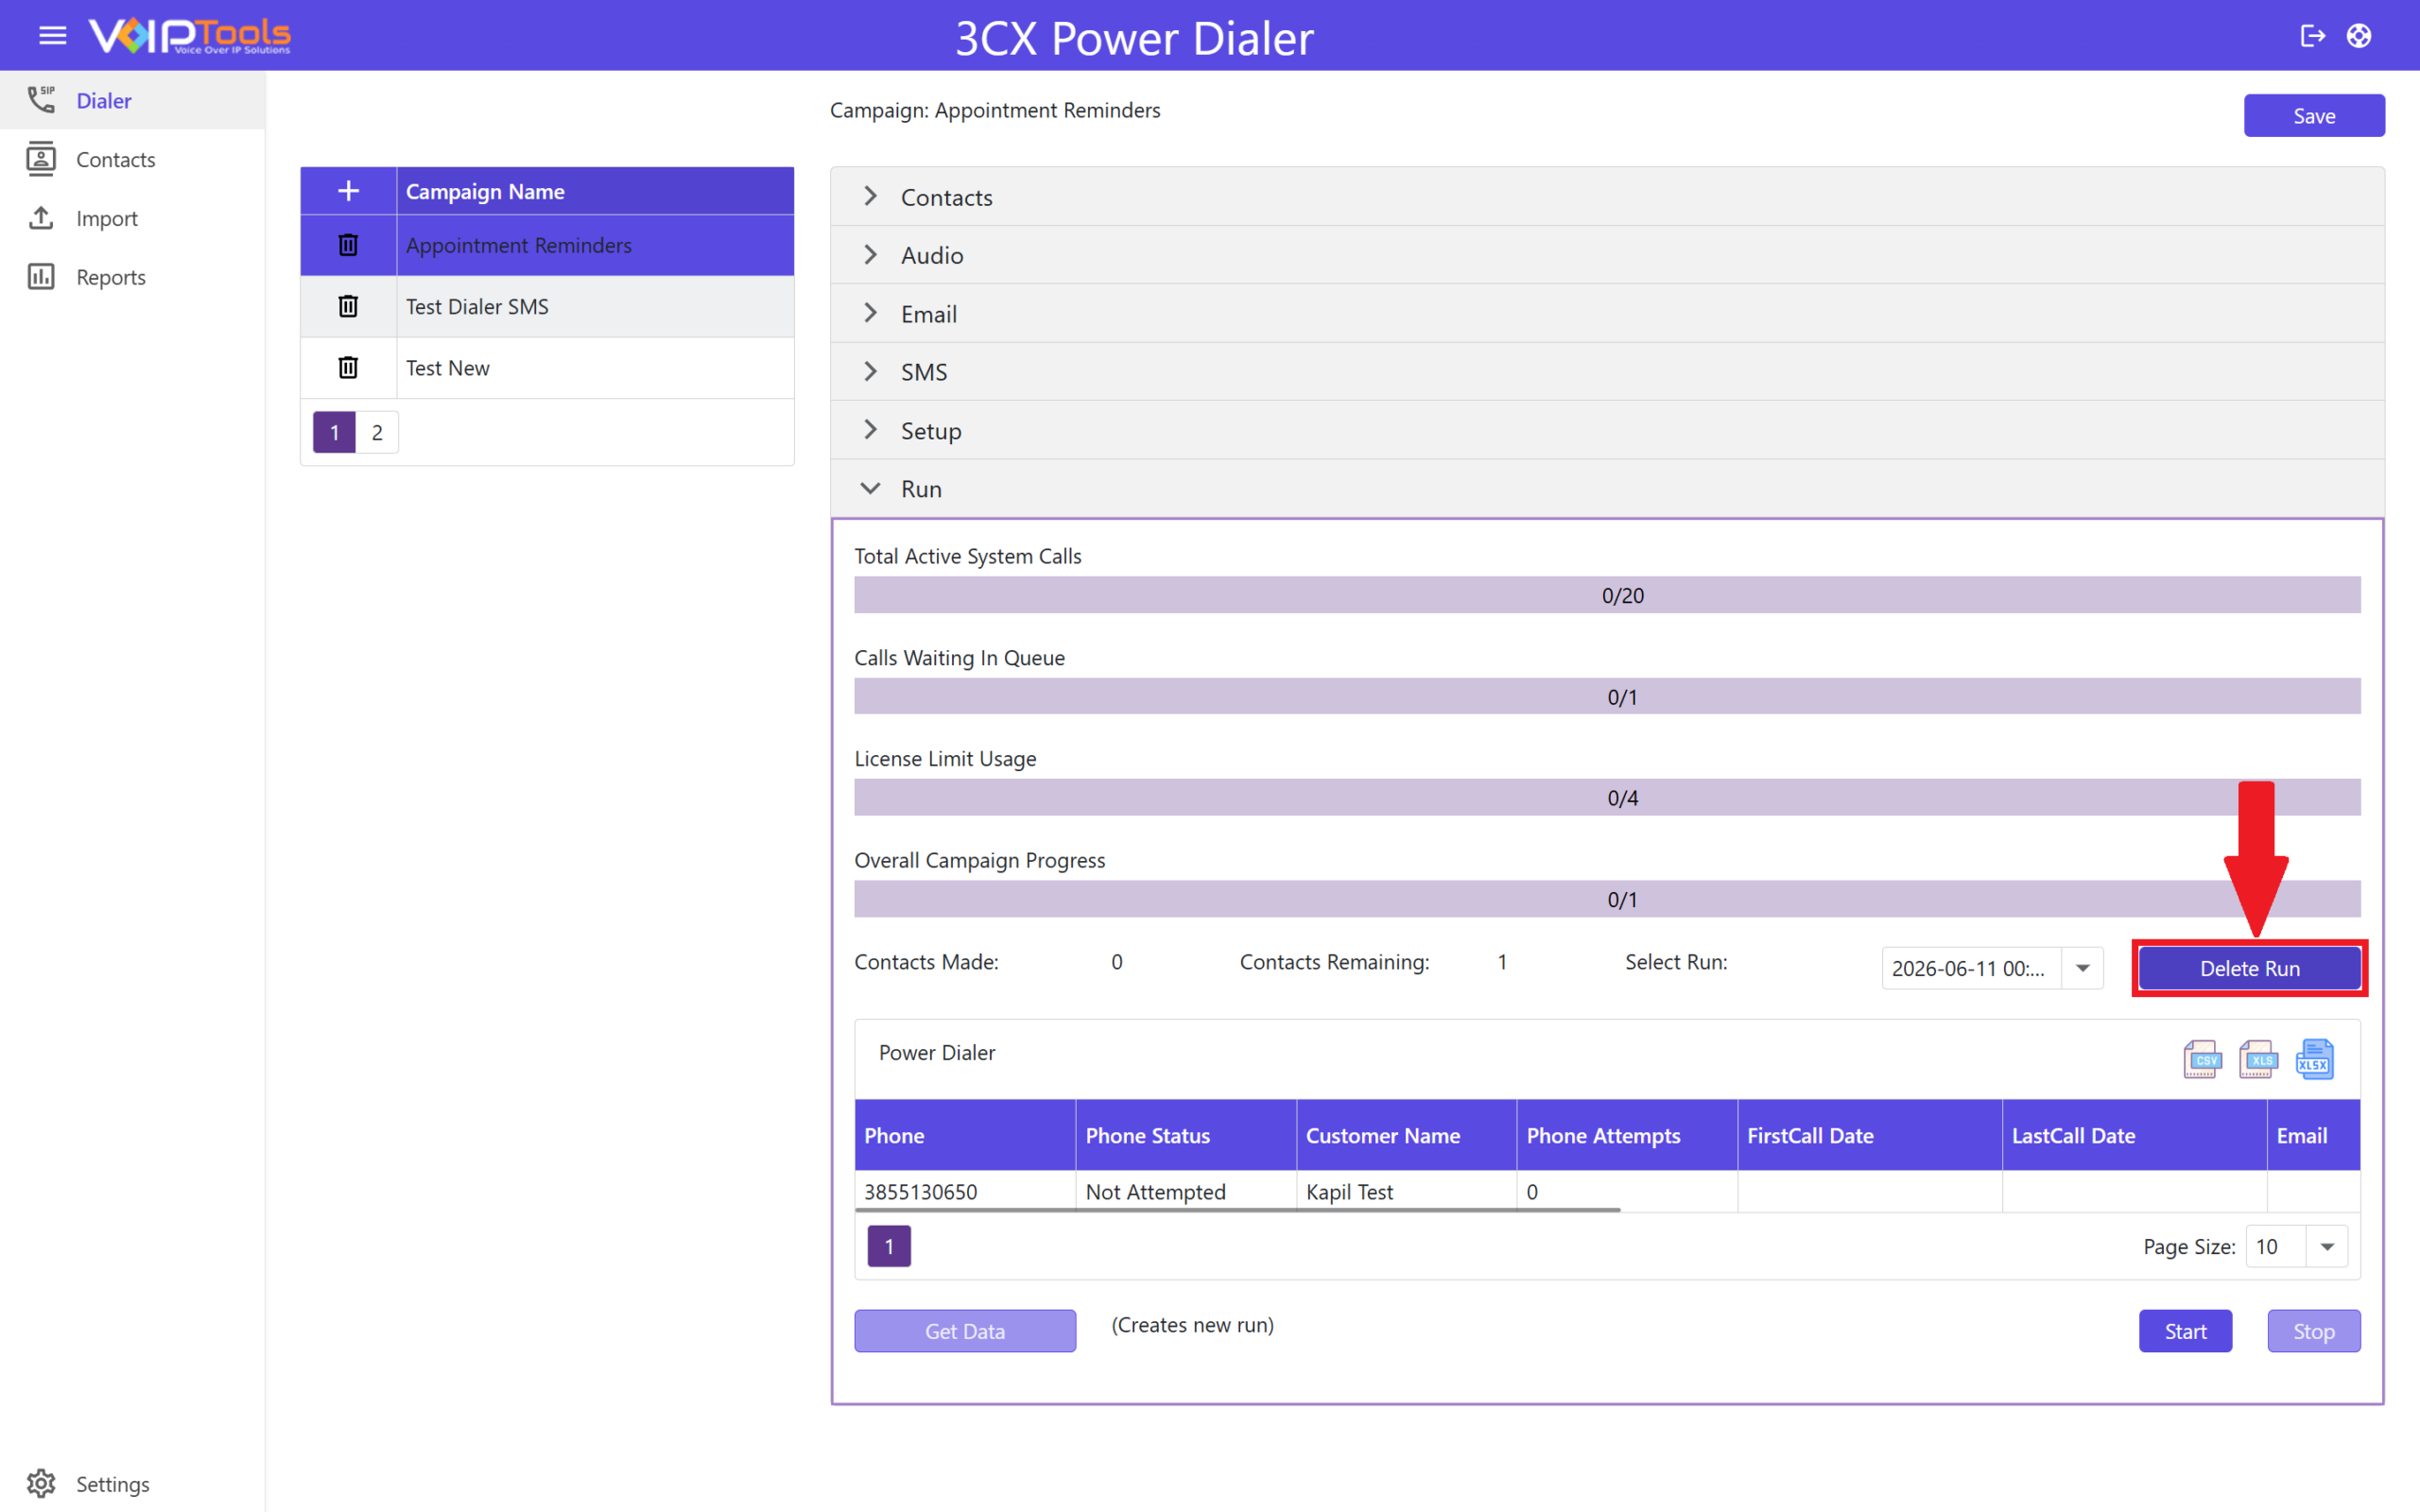
Deleting a campaign run also removes the associated data from the Reports tab.
Contacts Menu #
The Contacts screen lets you search for a specific list, select a list name to delete (only for the ‘Manager’ role), add a new contact, add an appointment for contact, and specify an action for an appointment.
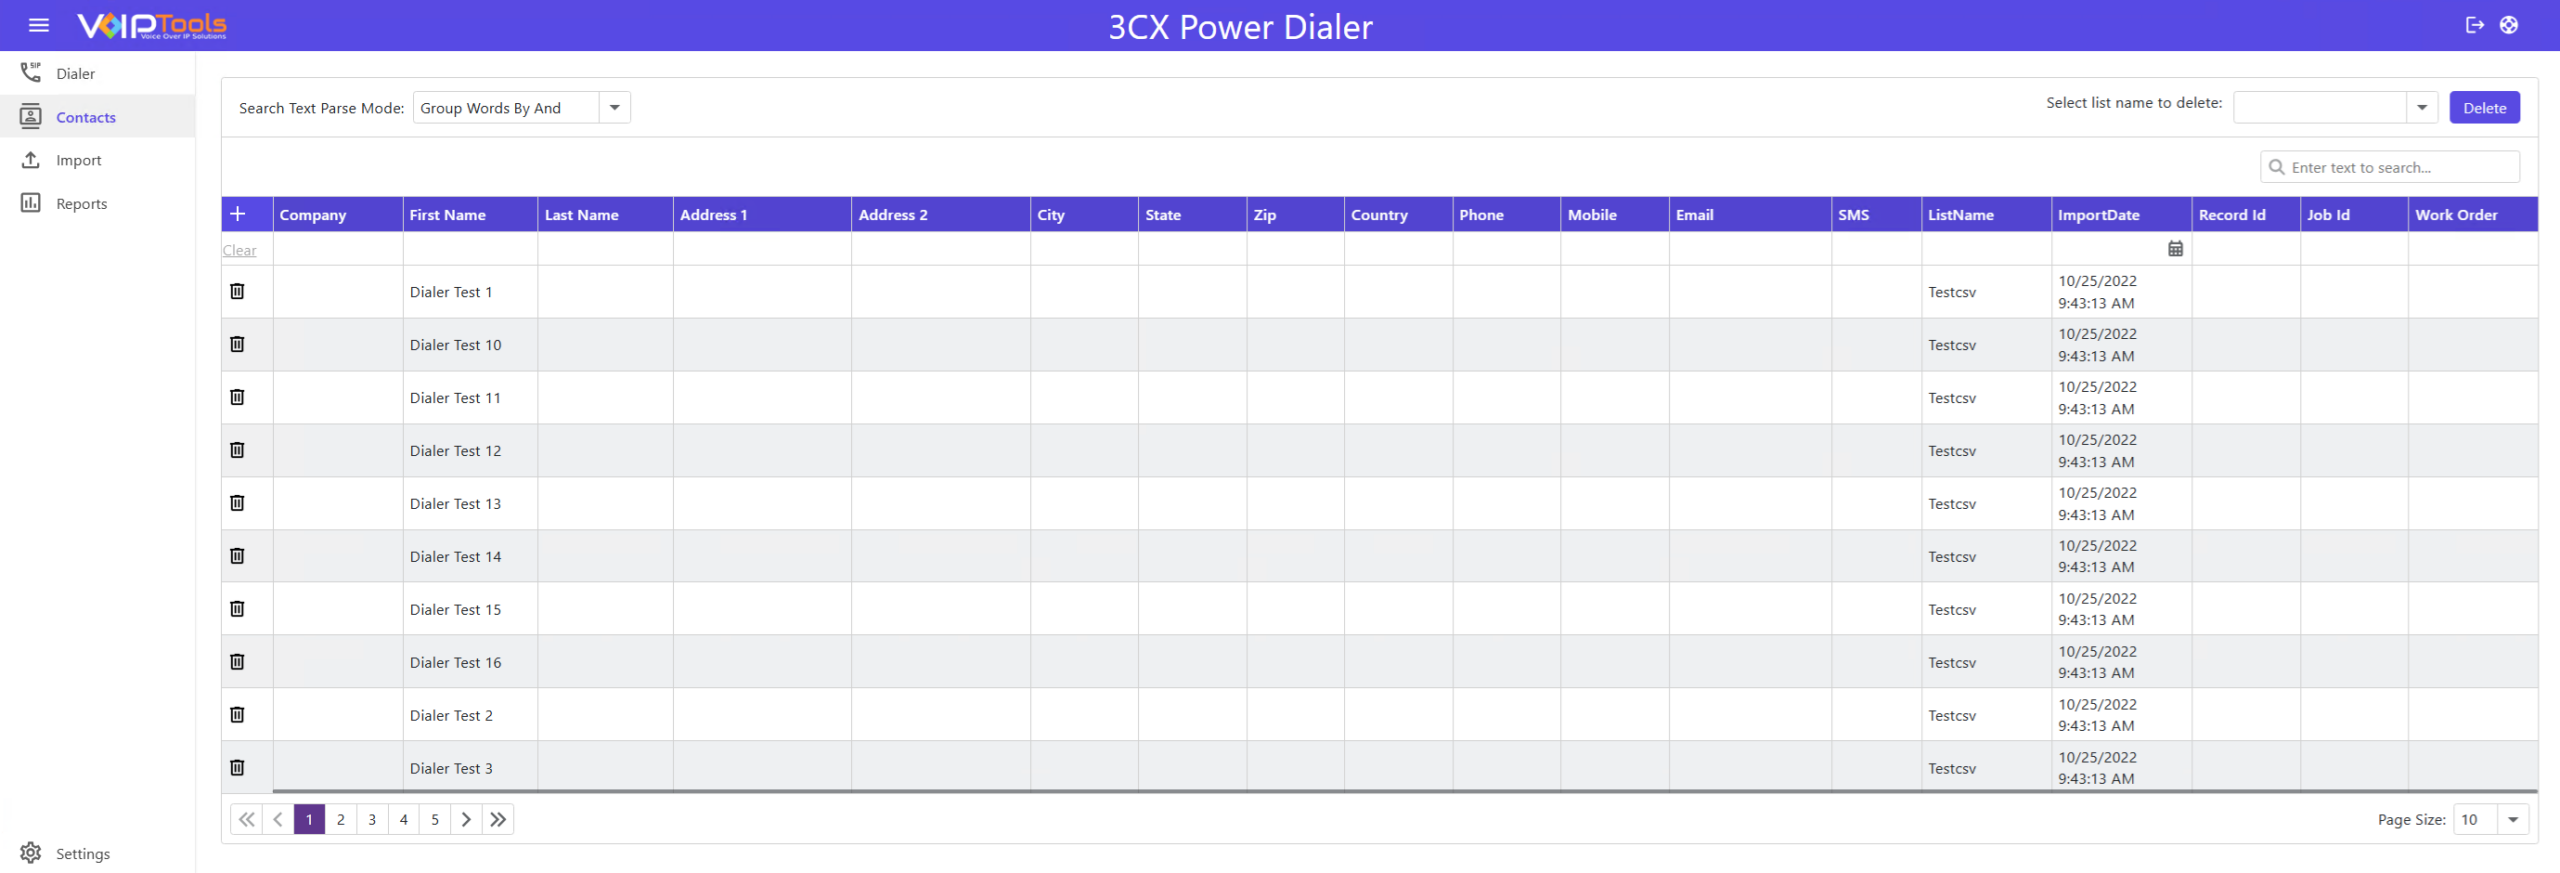
Figure 74: Contacts Menu Overview
| Field | Description |
|---|---|
| Company | The organization or business the contact is associated with. |
| First Name | The contact’s given name. |
| Last Name | The contact’s surname or family name. |
| Address 1 | Primary street address line for the contact. |
| Address 2 | Secondary address information, such as a suite, floor, or unit number. |
| City | The city portion of the contact’s address. |
| State | The state, province, or region of the contact’s address. |
| Zip | Postal or ZIP code for the contact’s address. |
| Country | The country associated with the contact’s address. |
| Phone | The contact’s primary phone number. This is the number the dialer calls during a campaign. |
| Mobile | The contact’s mobile or cell phone number. |
| The contact’s email address. Also used for SMS delivery via email-to-SMS gateway. | |
| SMS | Indicates whether the contact is enabled to receive SMS notifications. |
| ListName | The name of the contact list this record belongs to. Used to group and manage contacts by campaign or import batch. |
| ImportDate | The date and time this contact record was imported into the system. |
| Record Id | A unique identifier assigned to this contact record by the database. |
| Job Id | Links the contact to a specific dialer job or campaign run. |
| Work Order | An optional reference field for associating the contact with an external work order or ticket. |
Adding a contact #
You can add a contact directly from the Contacts grid without leaving the page.
- Click the + icon in the top-left corner of the grid header row.
- A blank row will appear at the top of the grid with editable fields.
- Fill in the contact details: First Name, Last Name, Phone, Email, and any other relevant columns.
- Press Enter or click away from the row to save the new contact.
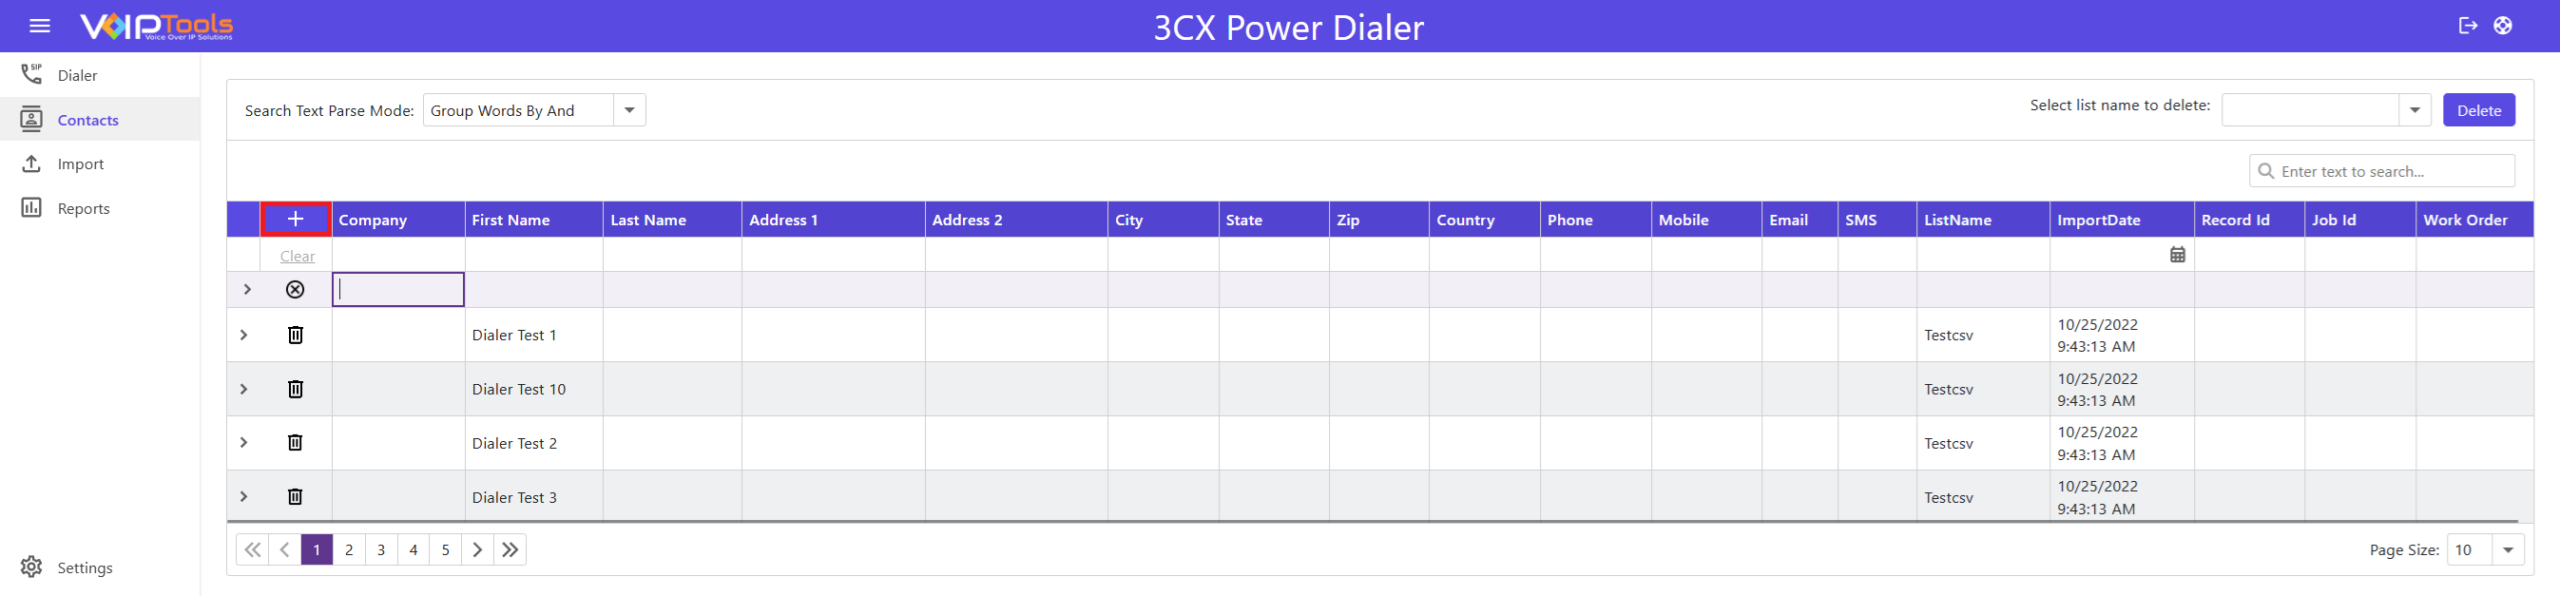
The ListName field is useful to fill in here since it groups this contact with others for easier bulk management and deletion later.
Add an Appointment for a Contact #
-
- Click Expand
 button beside the contact to which you want to add the appointment.
- Click Expand
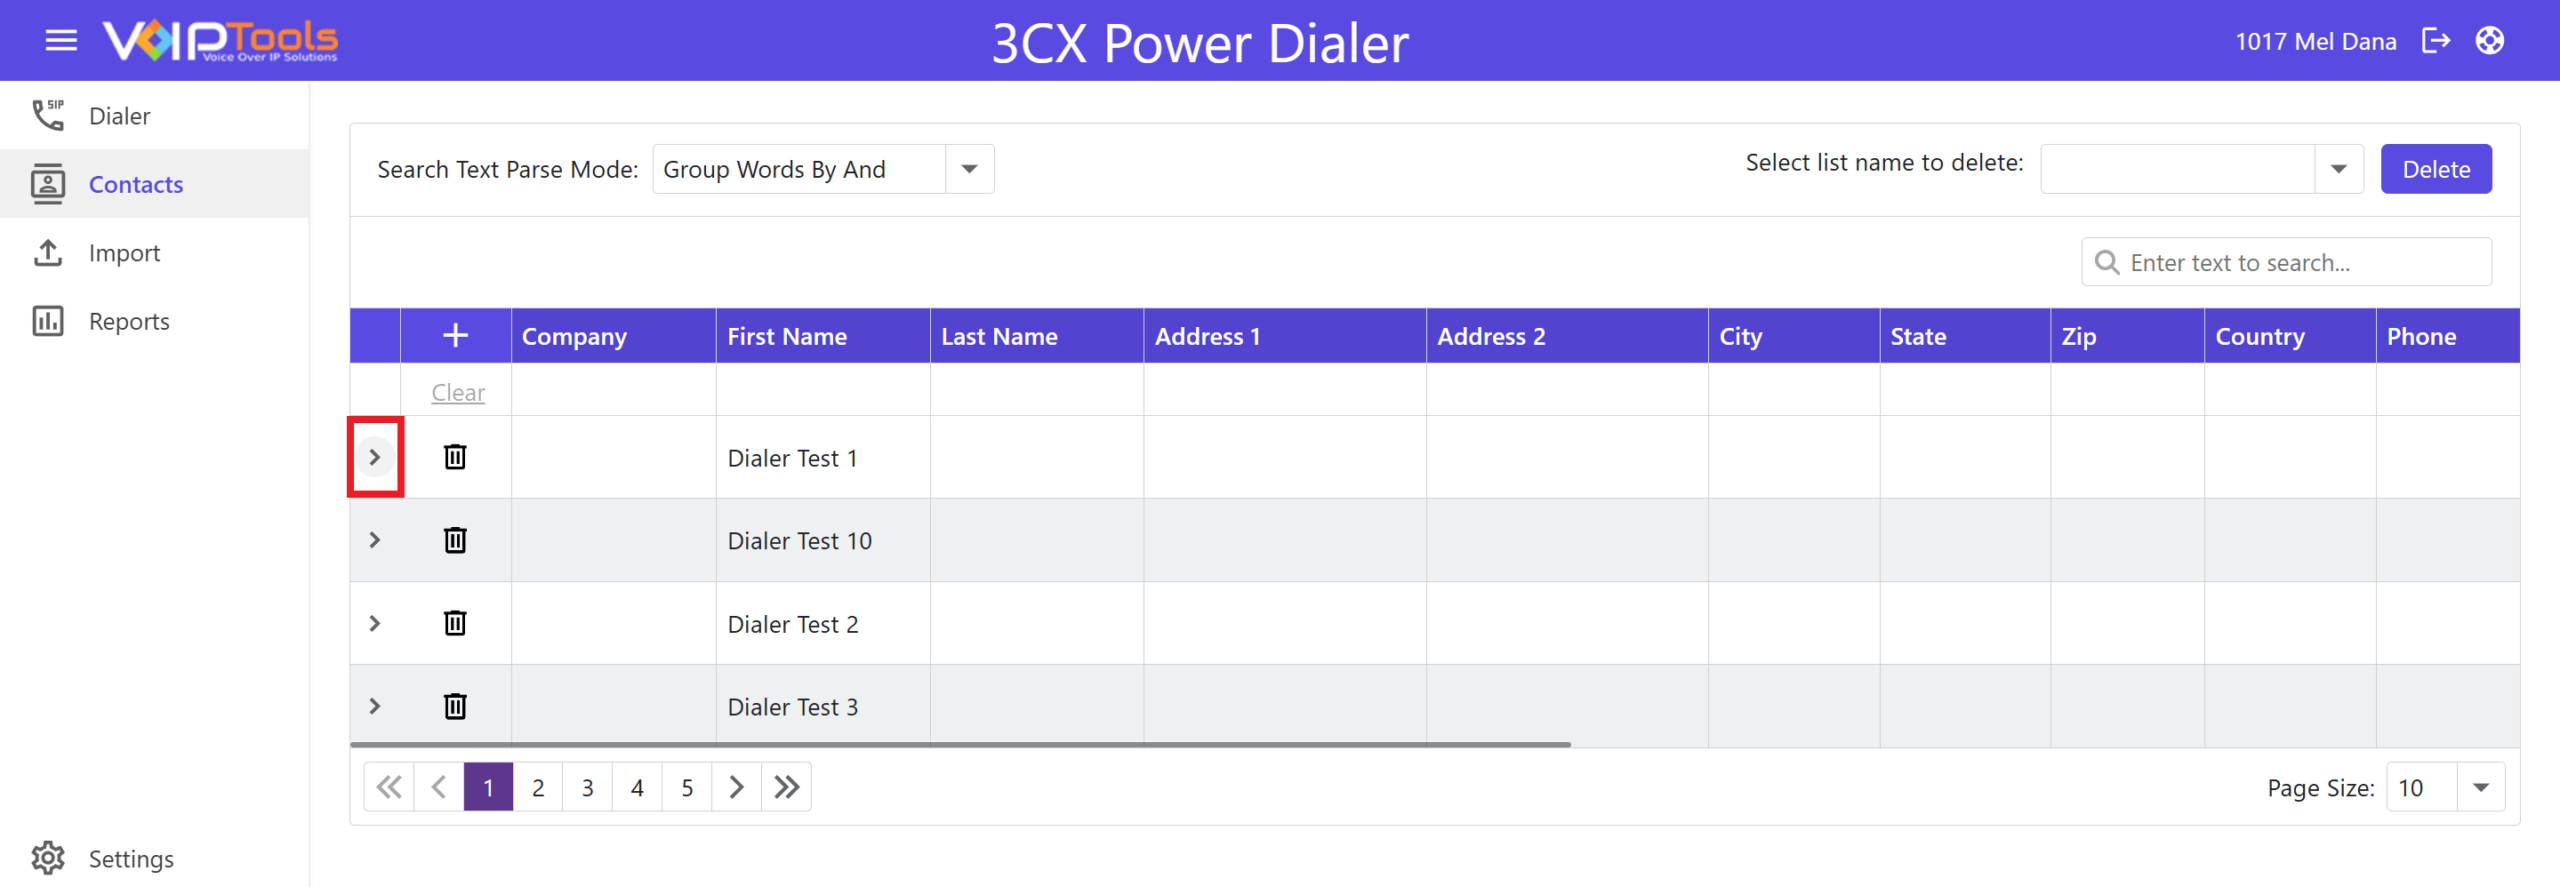
- In the column header, click Add button to add a new appointment for the contact.
- From the Appointment Type dropdown, select the type of appointment that you want to add for the contact.
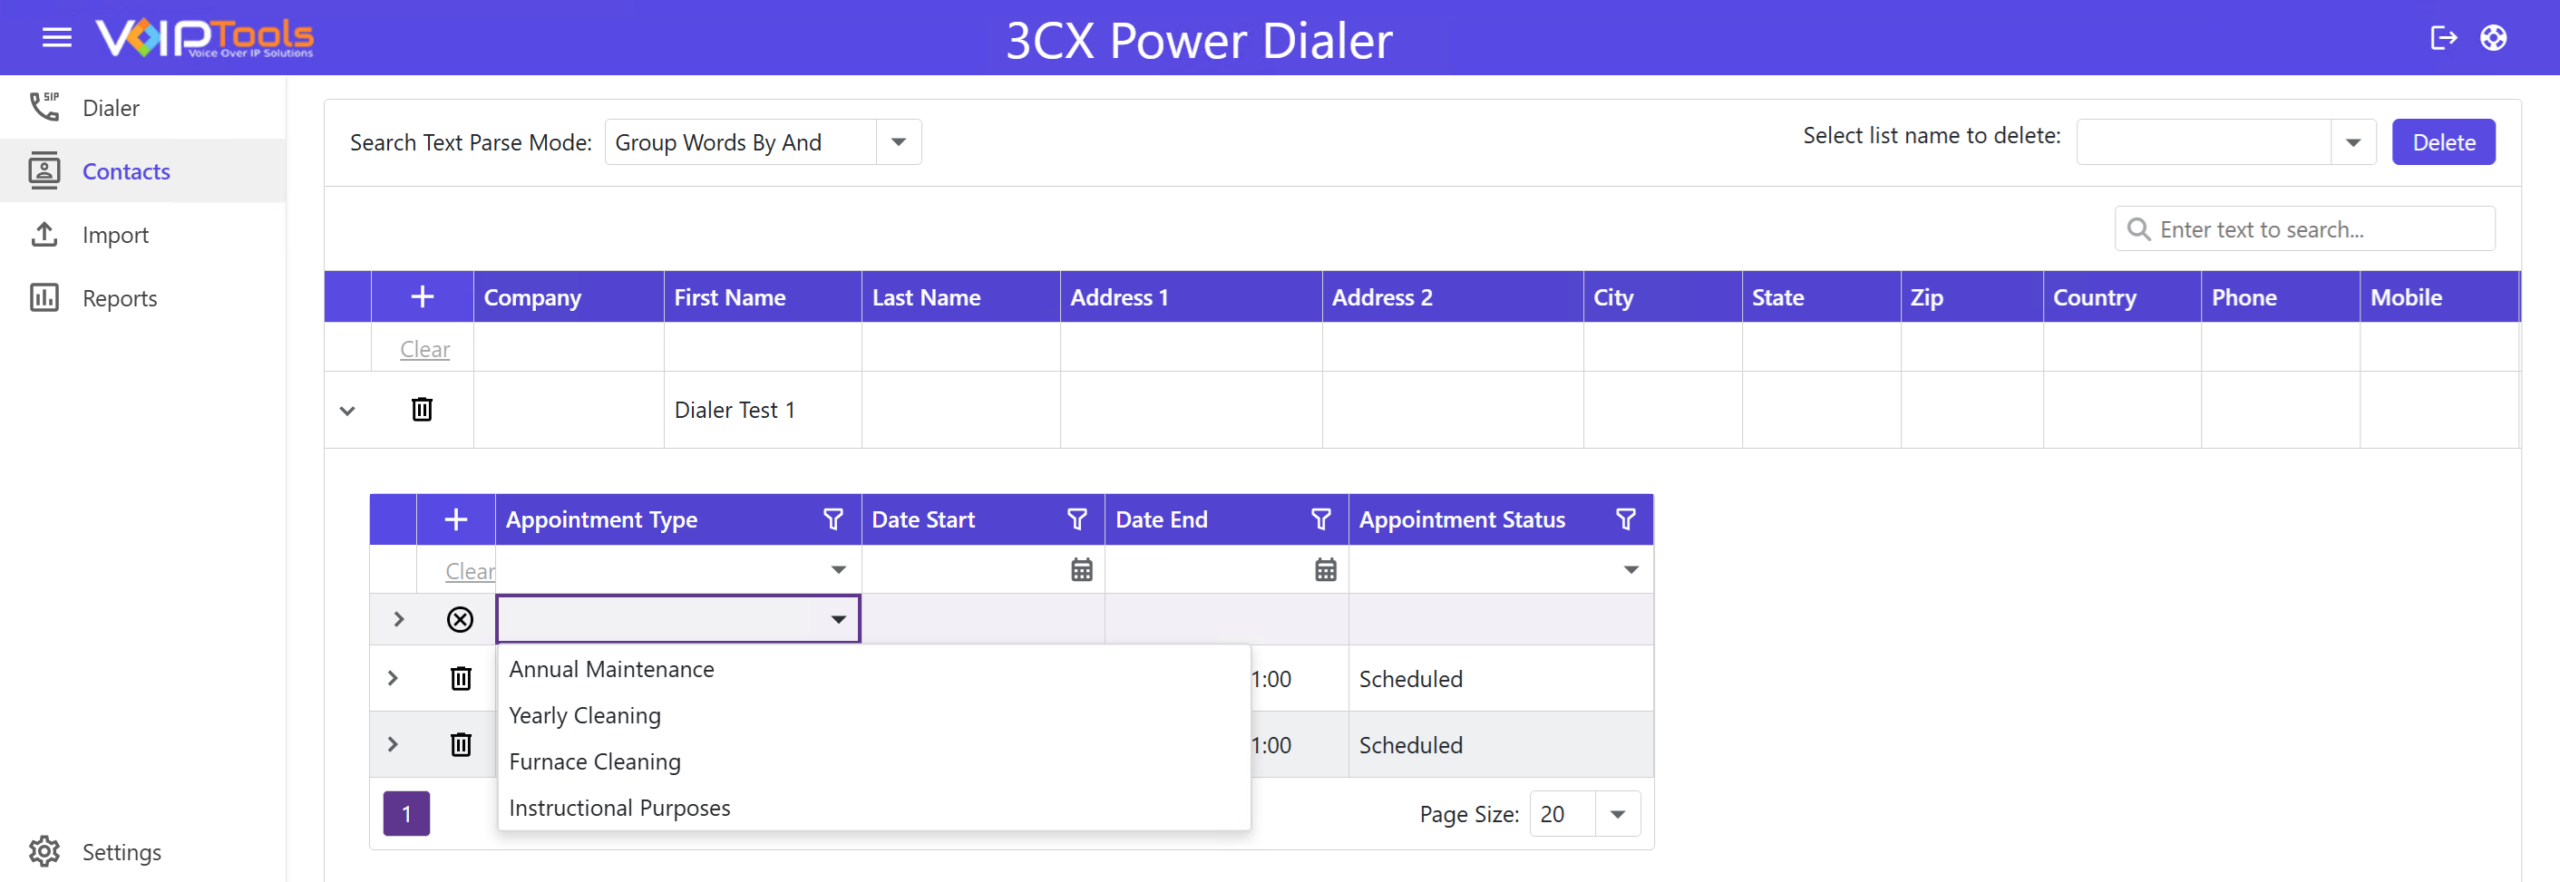
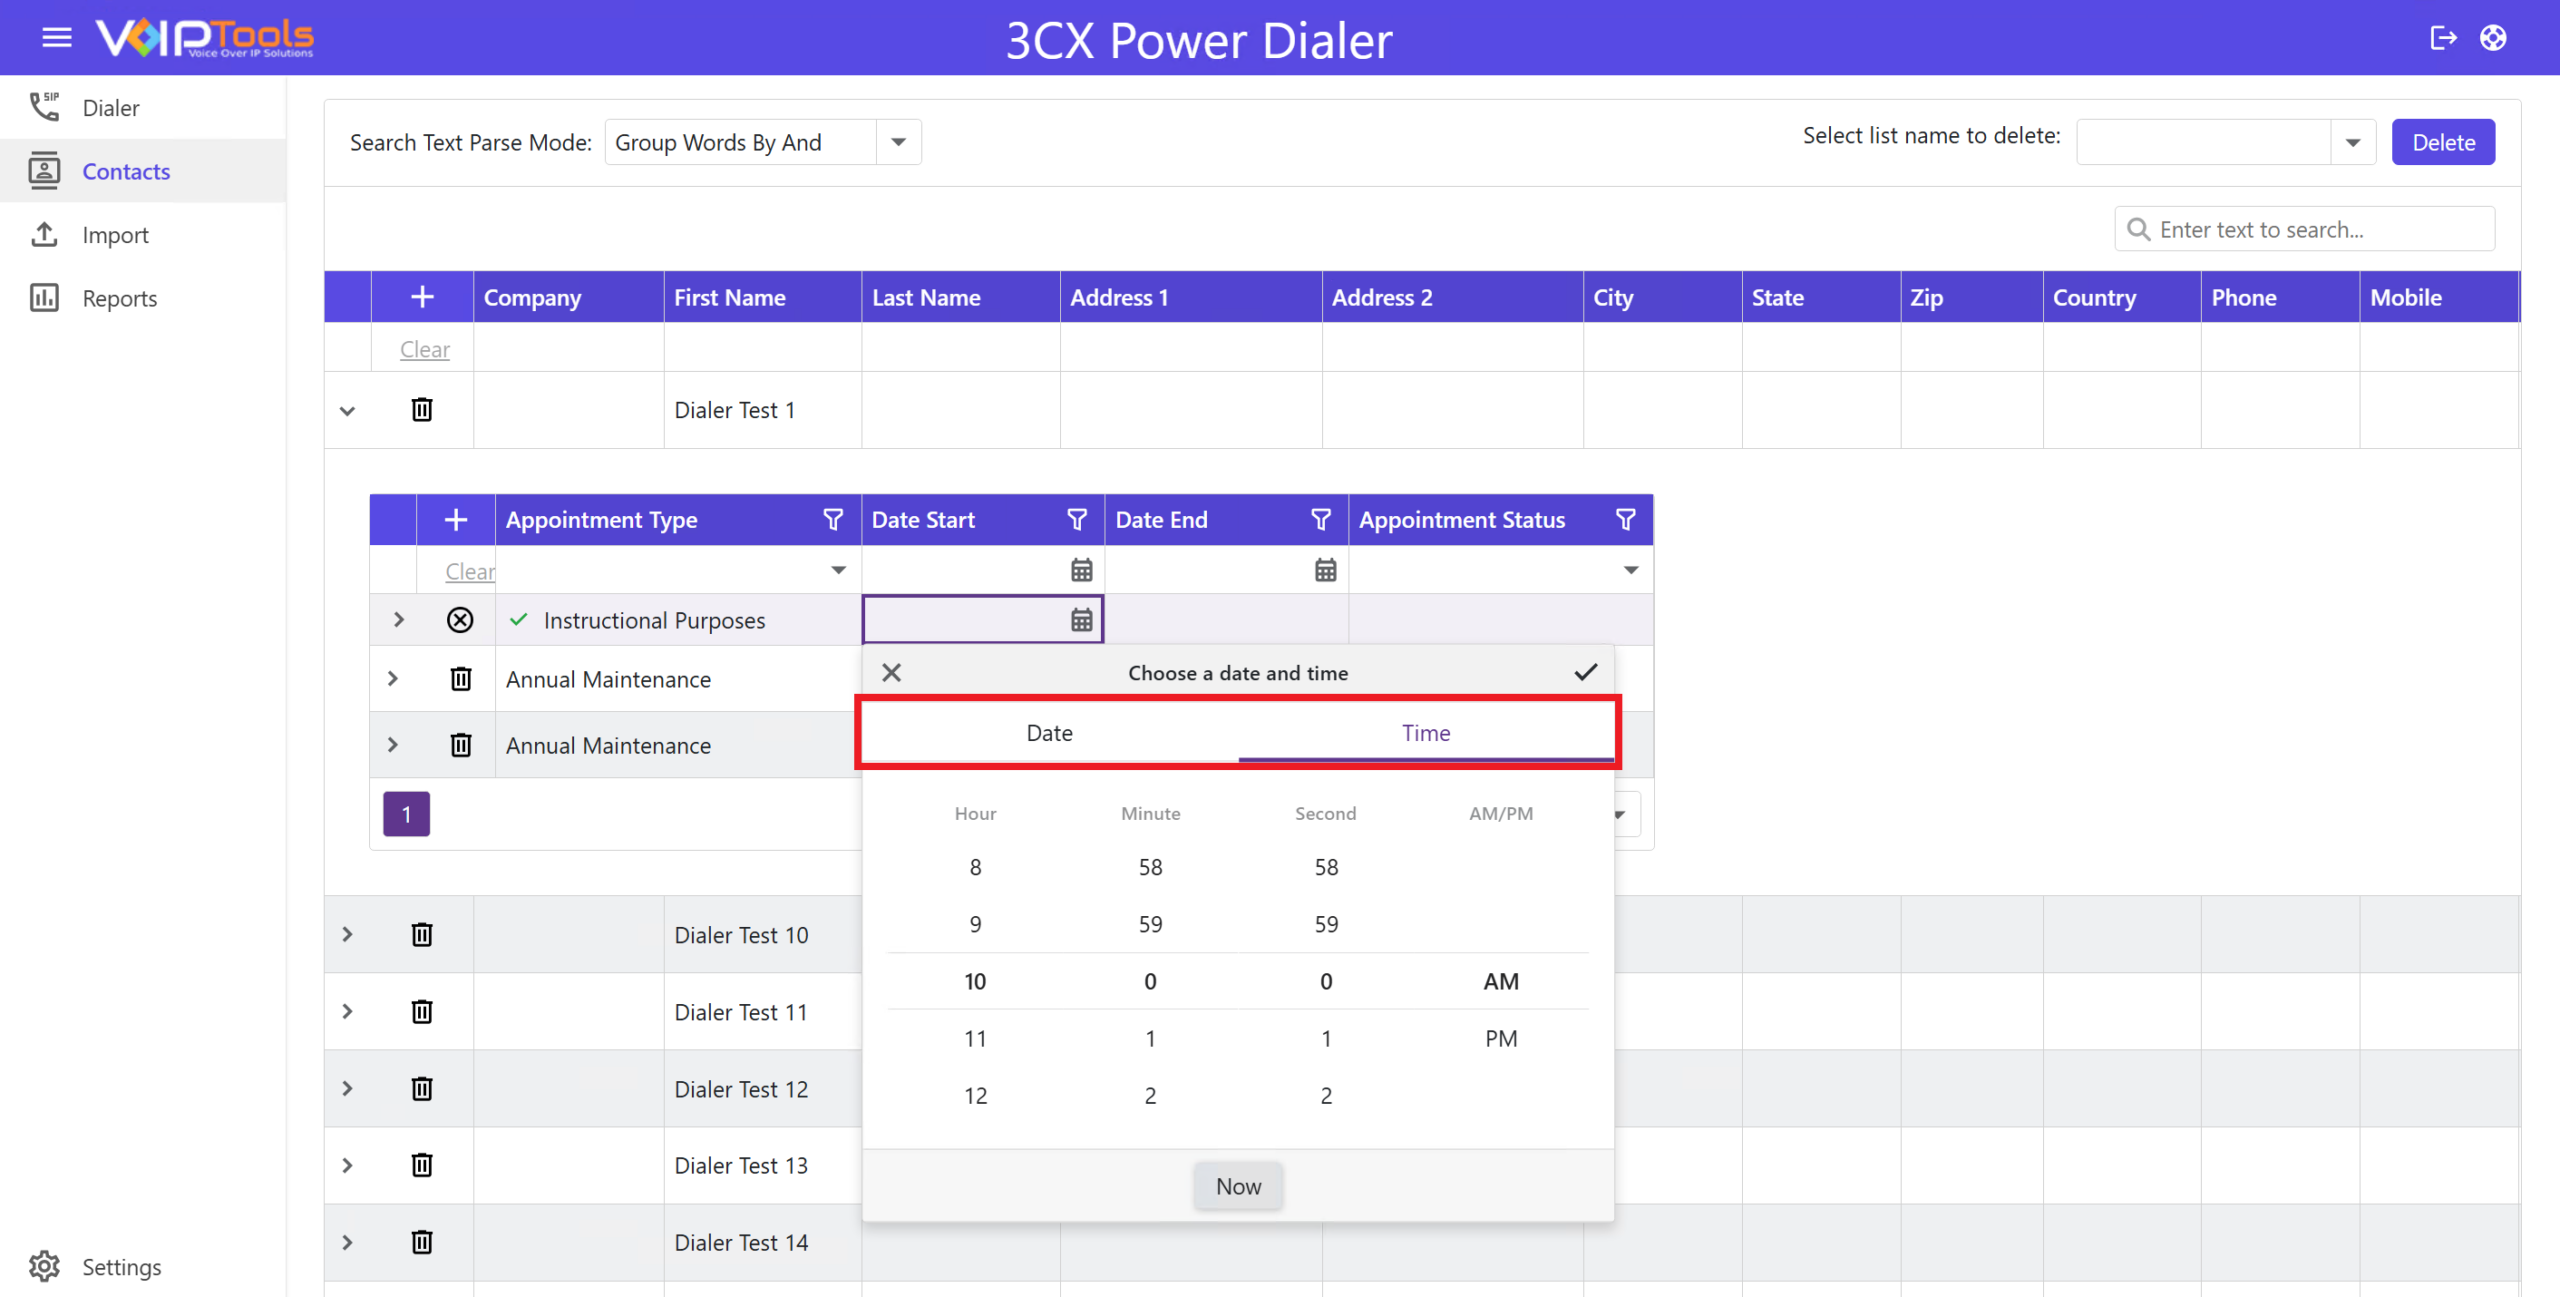
- From the Date Start calendar, select the start date and time at which the appointment starts for the contact, and from the End Date calendar, select the end date and time at which the appointment ends for the contact.
- Select an appointment status in the Appointment Status list. The Appointment Status field automatically displays the appointment status.
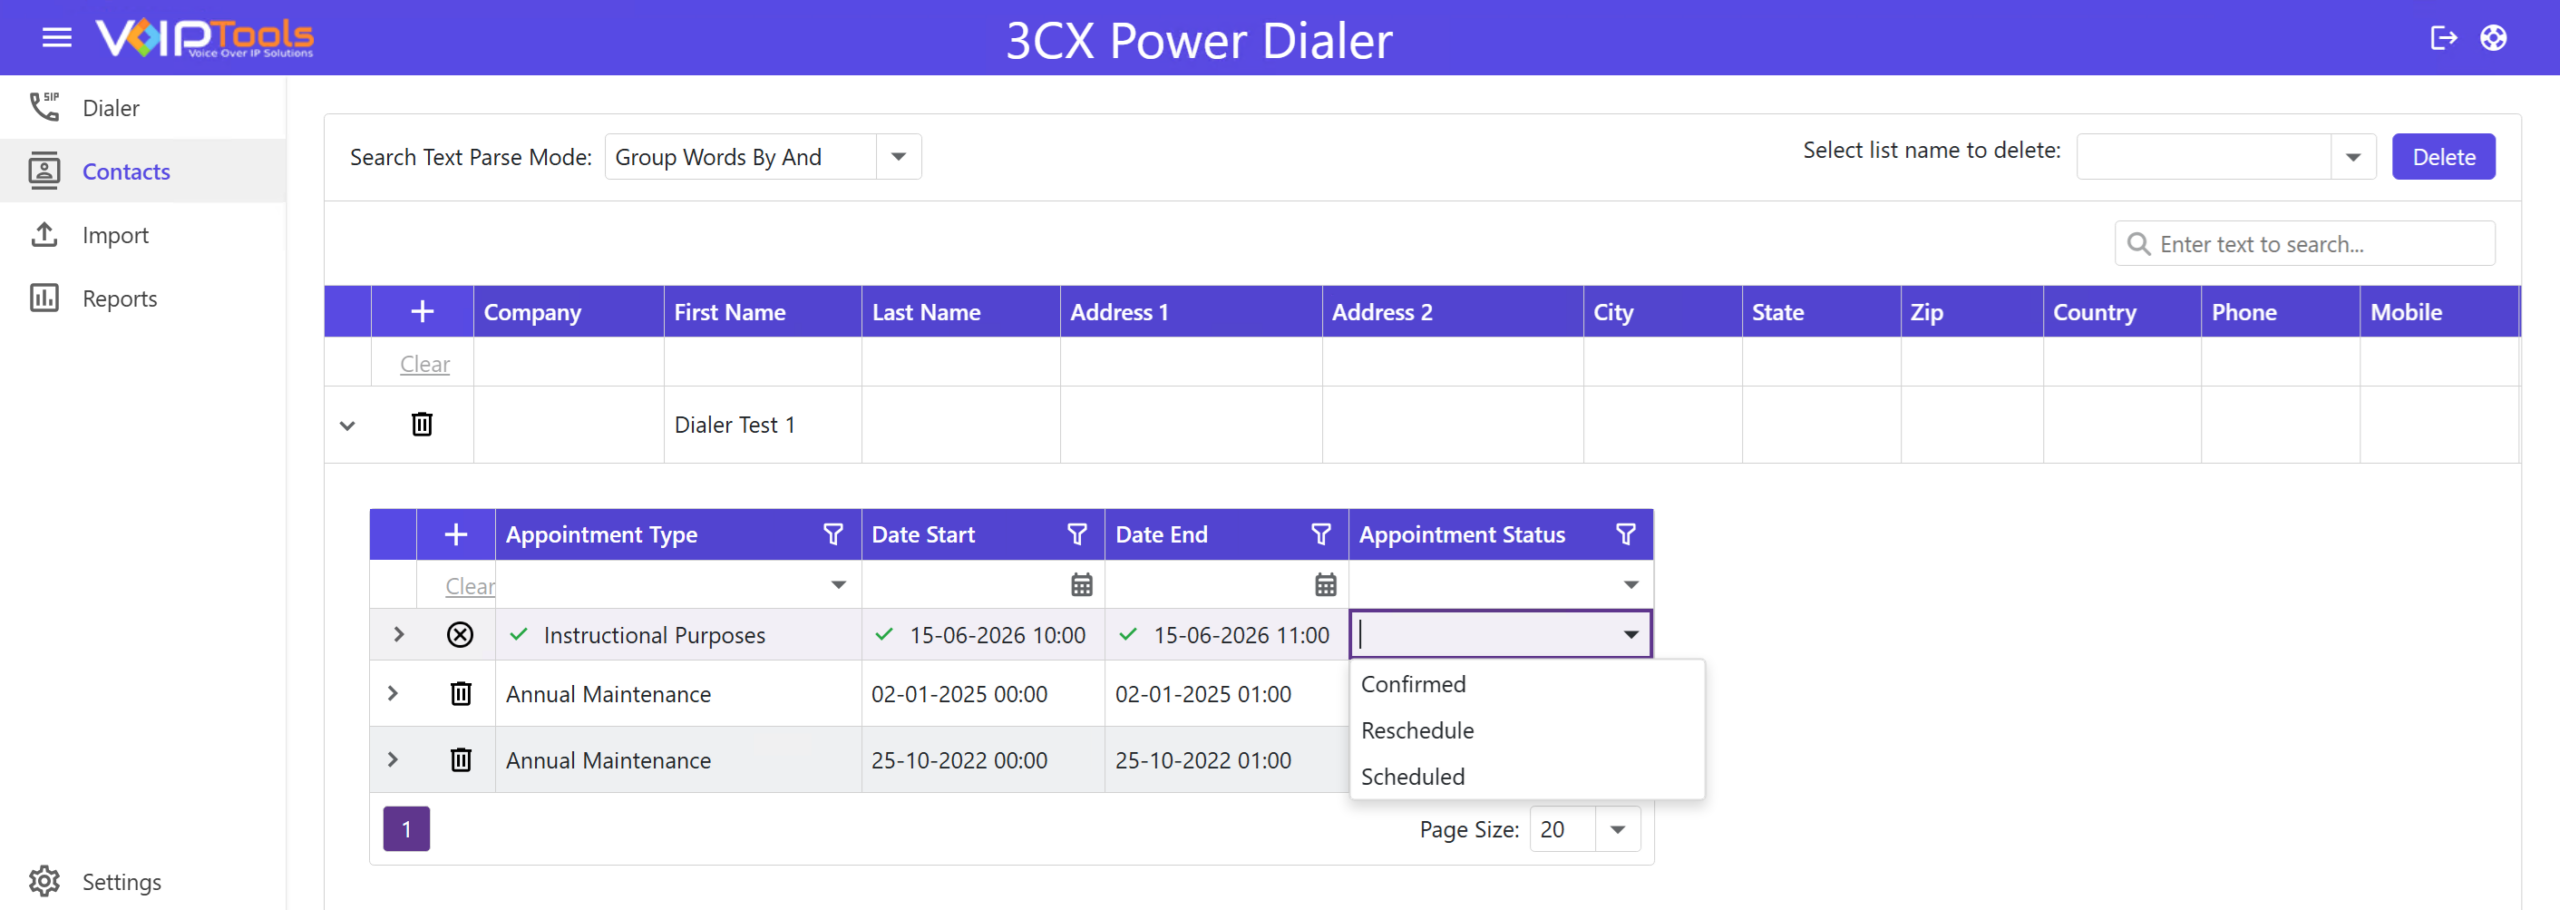
You can interchange the columns in your preferred way by dragging the columns.
Specify Action for an Appointment #
- Click Expand
 button beside the contact to display the appointment for which you want to specify the action.
 - Again, click the Expand button beside the appointment you want to specify an action.
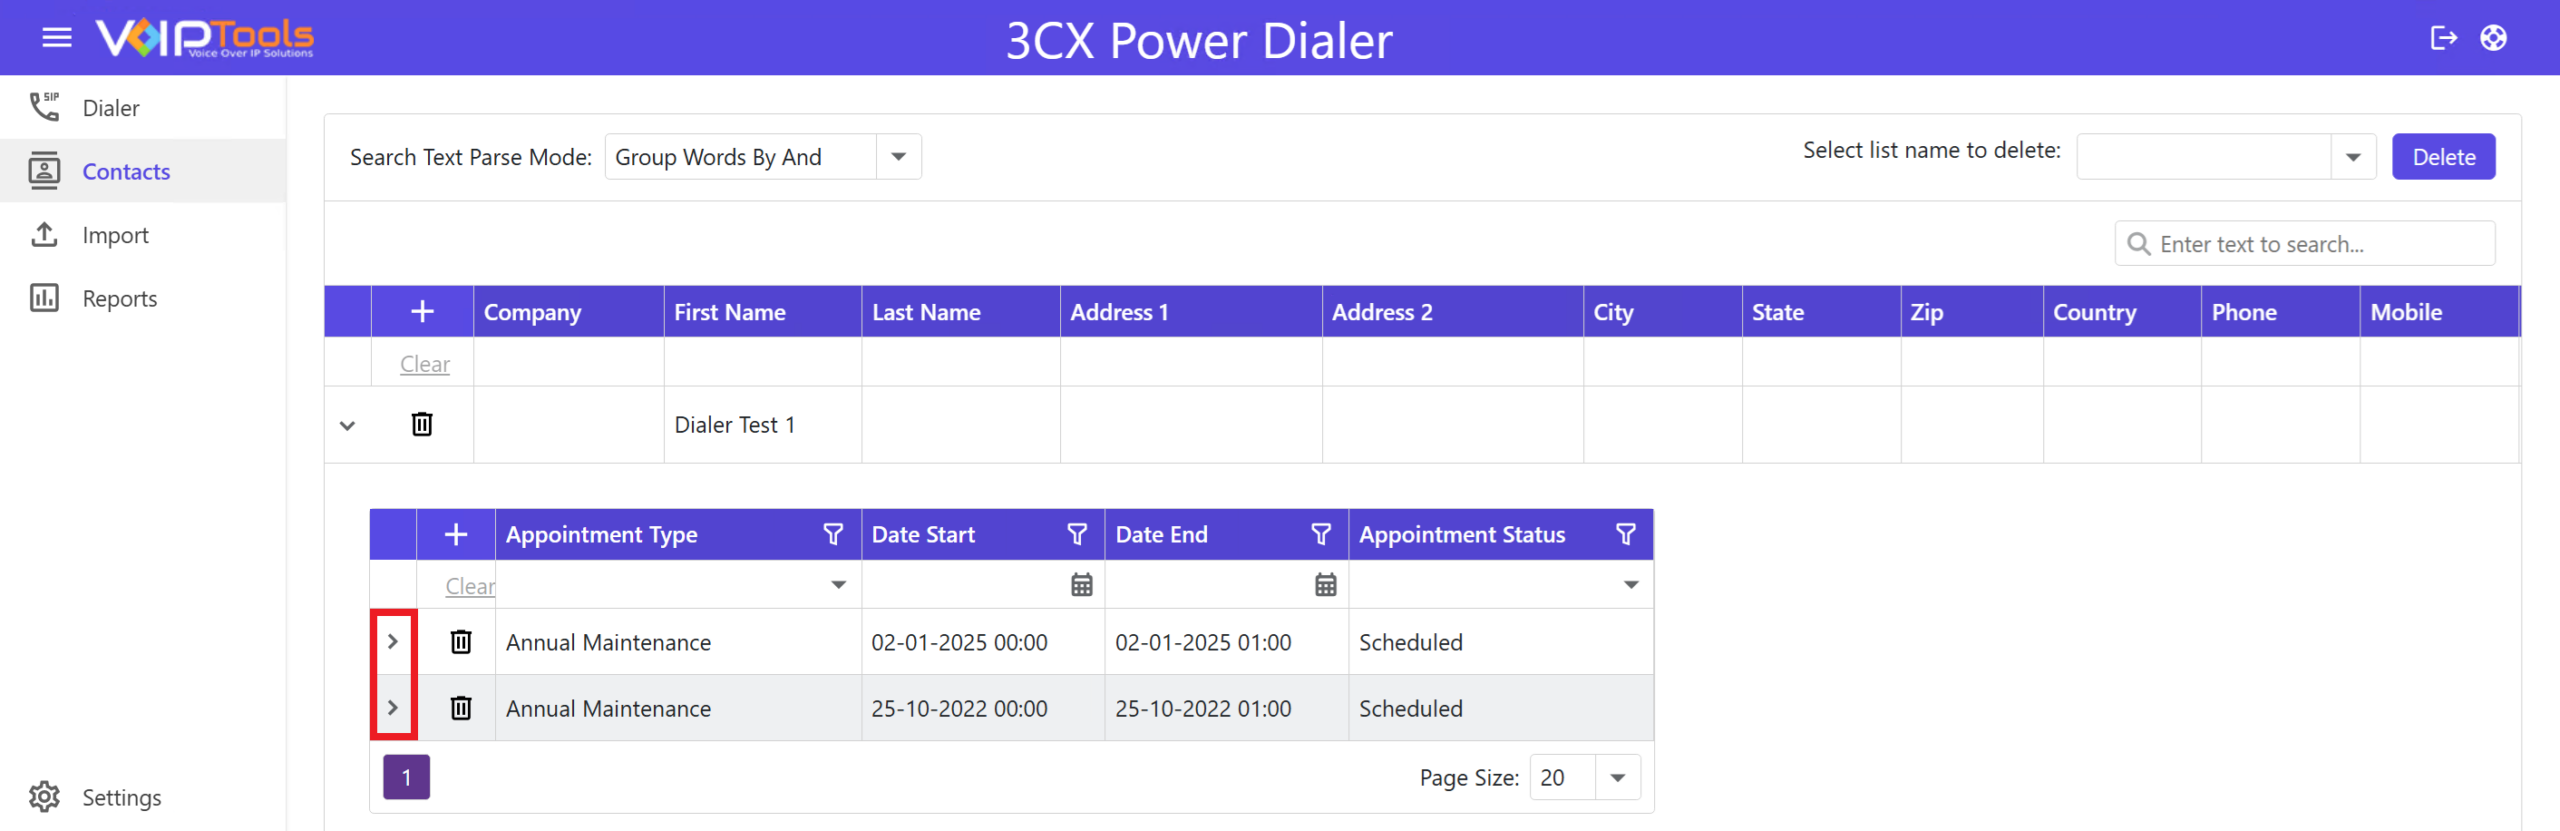
- Click the Add
 button to create a new action.
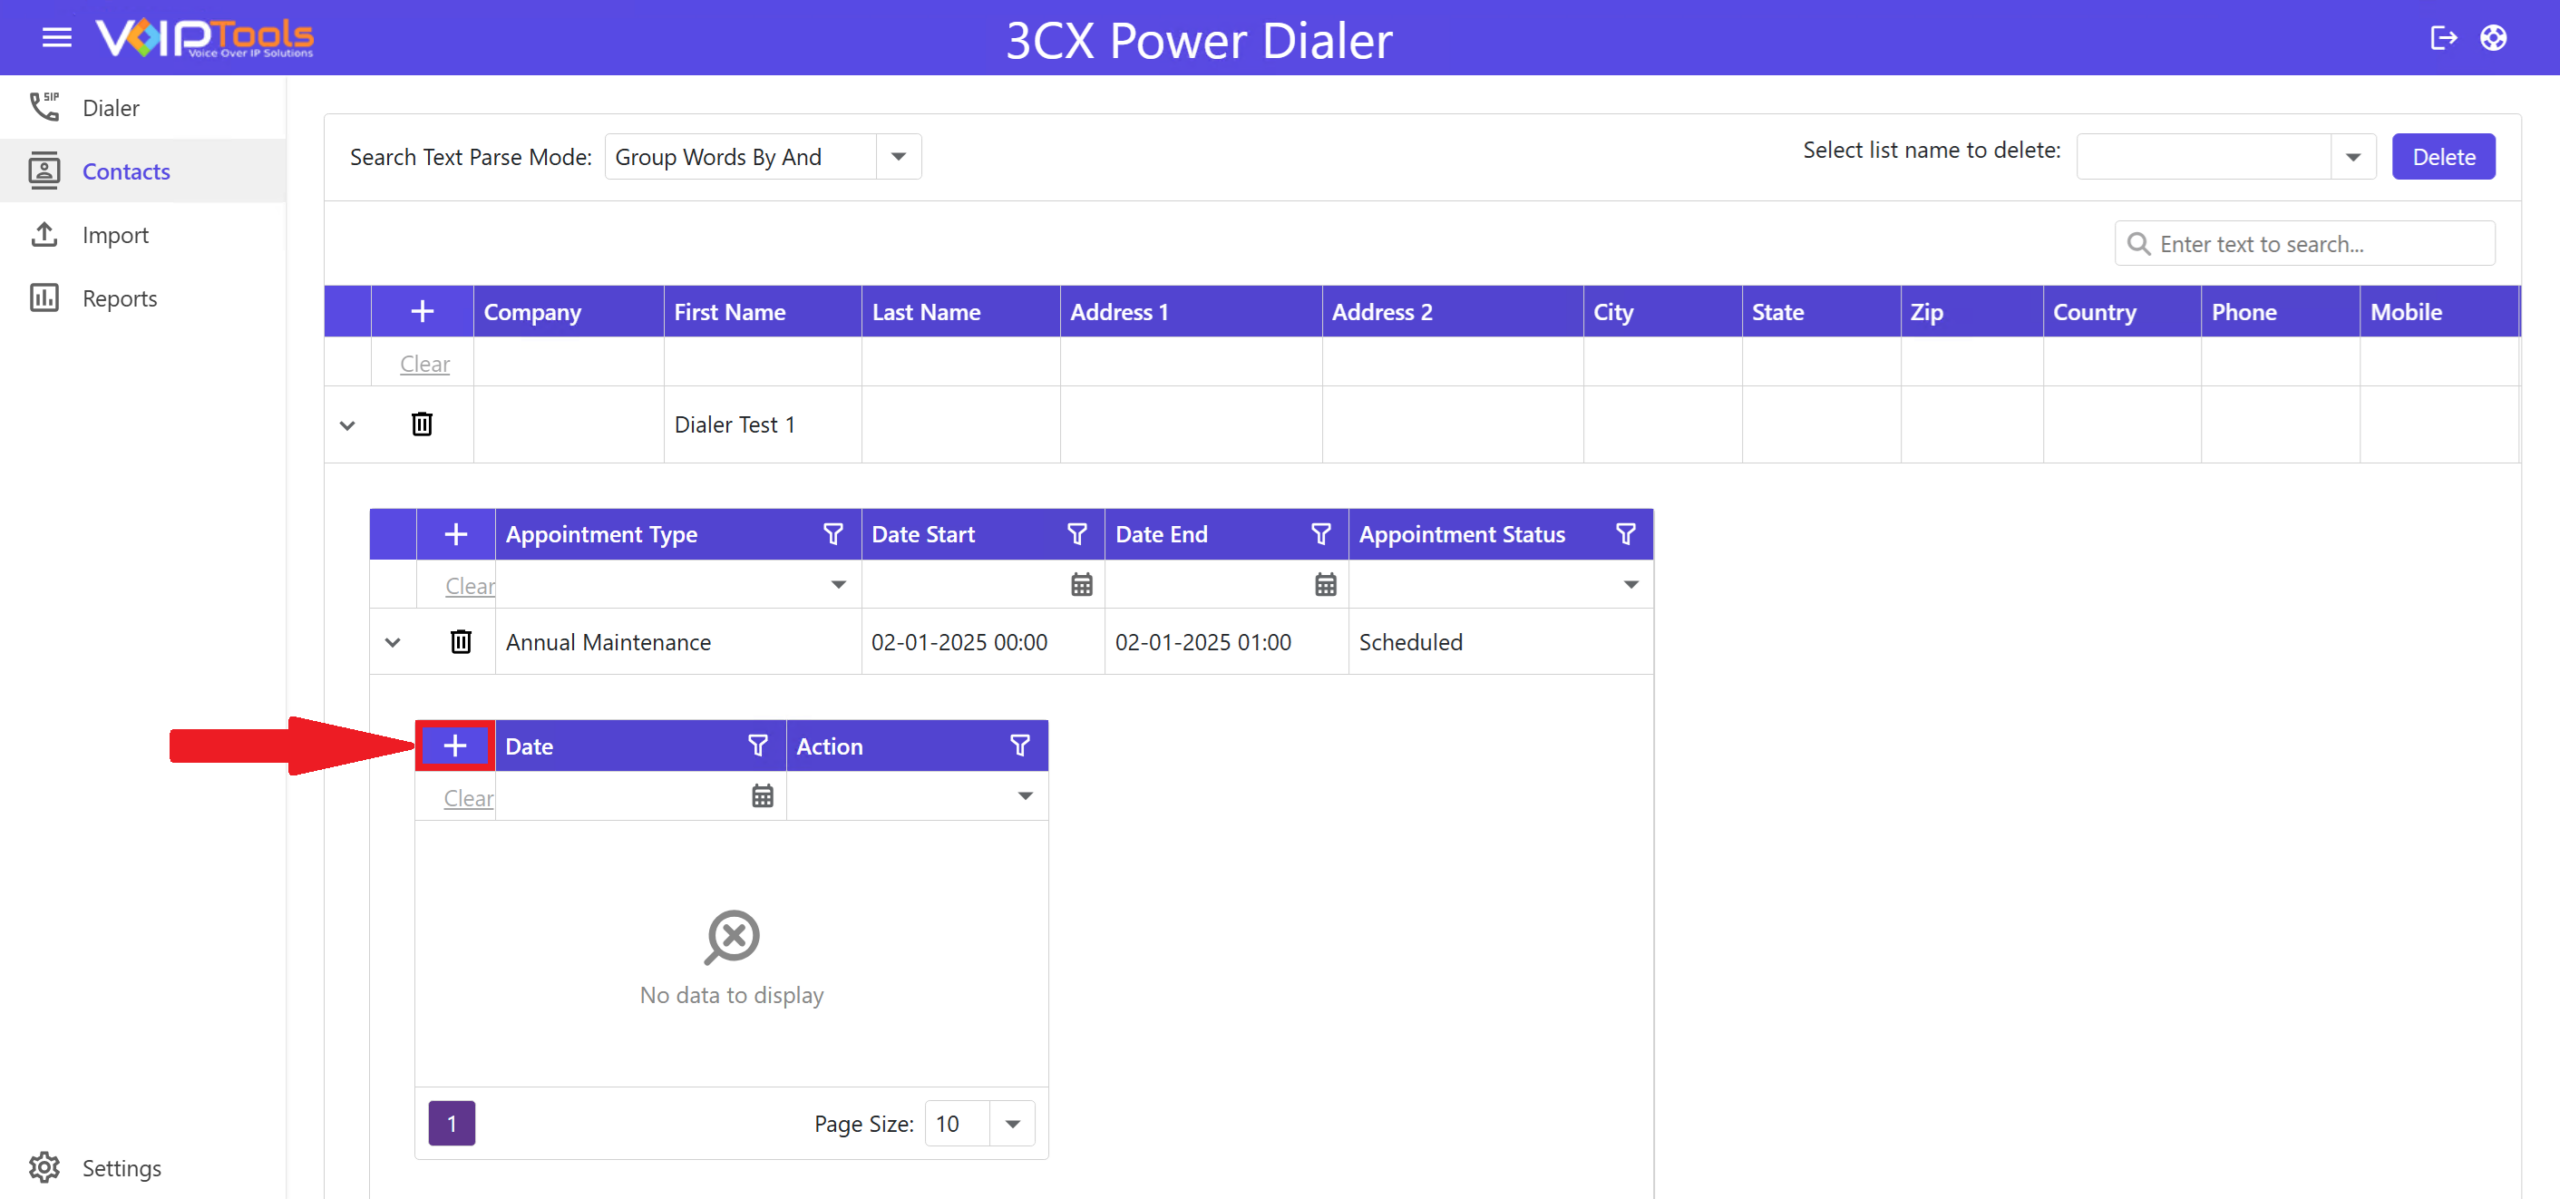
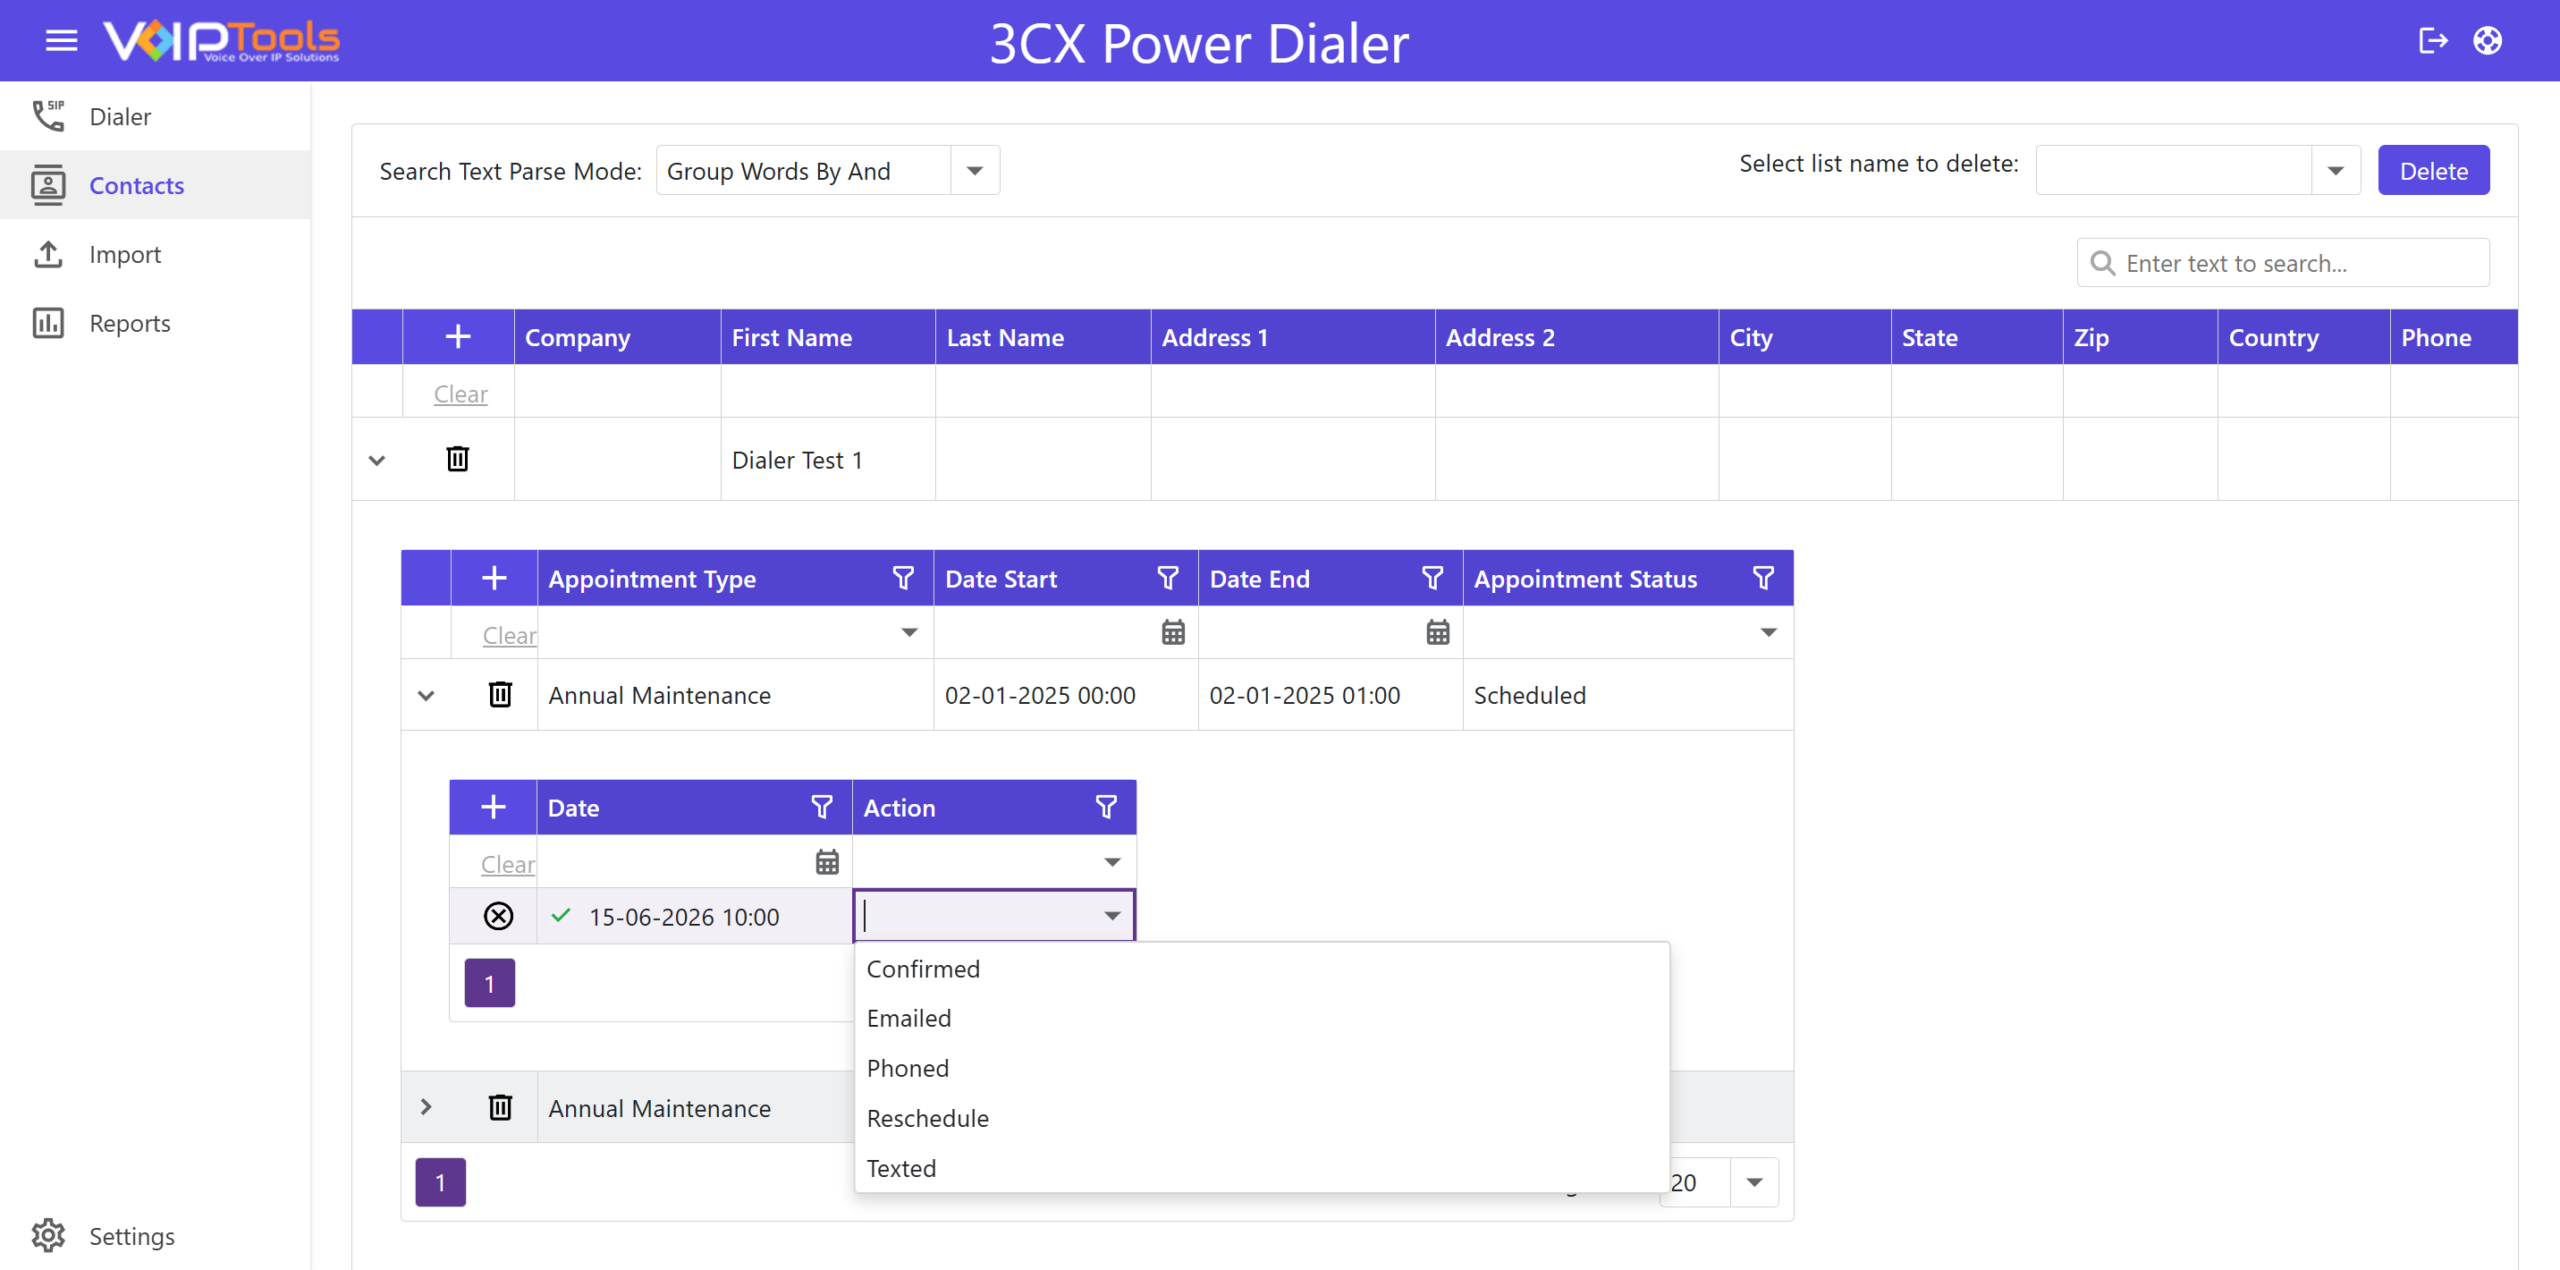
- Select the date and time of action from the Calendar.
- In the Action list dropdown, select the type of action for the appointment.
Deleting a single record #
- Locate the contact row you want to remove.
- Click the trash icon on the left side of that row.
- A confirmation popup will appear. Click Yes to delete the record or No to cancel.
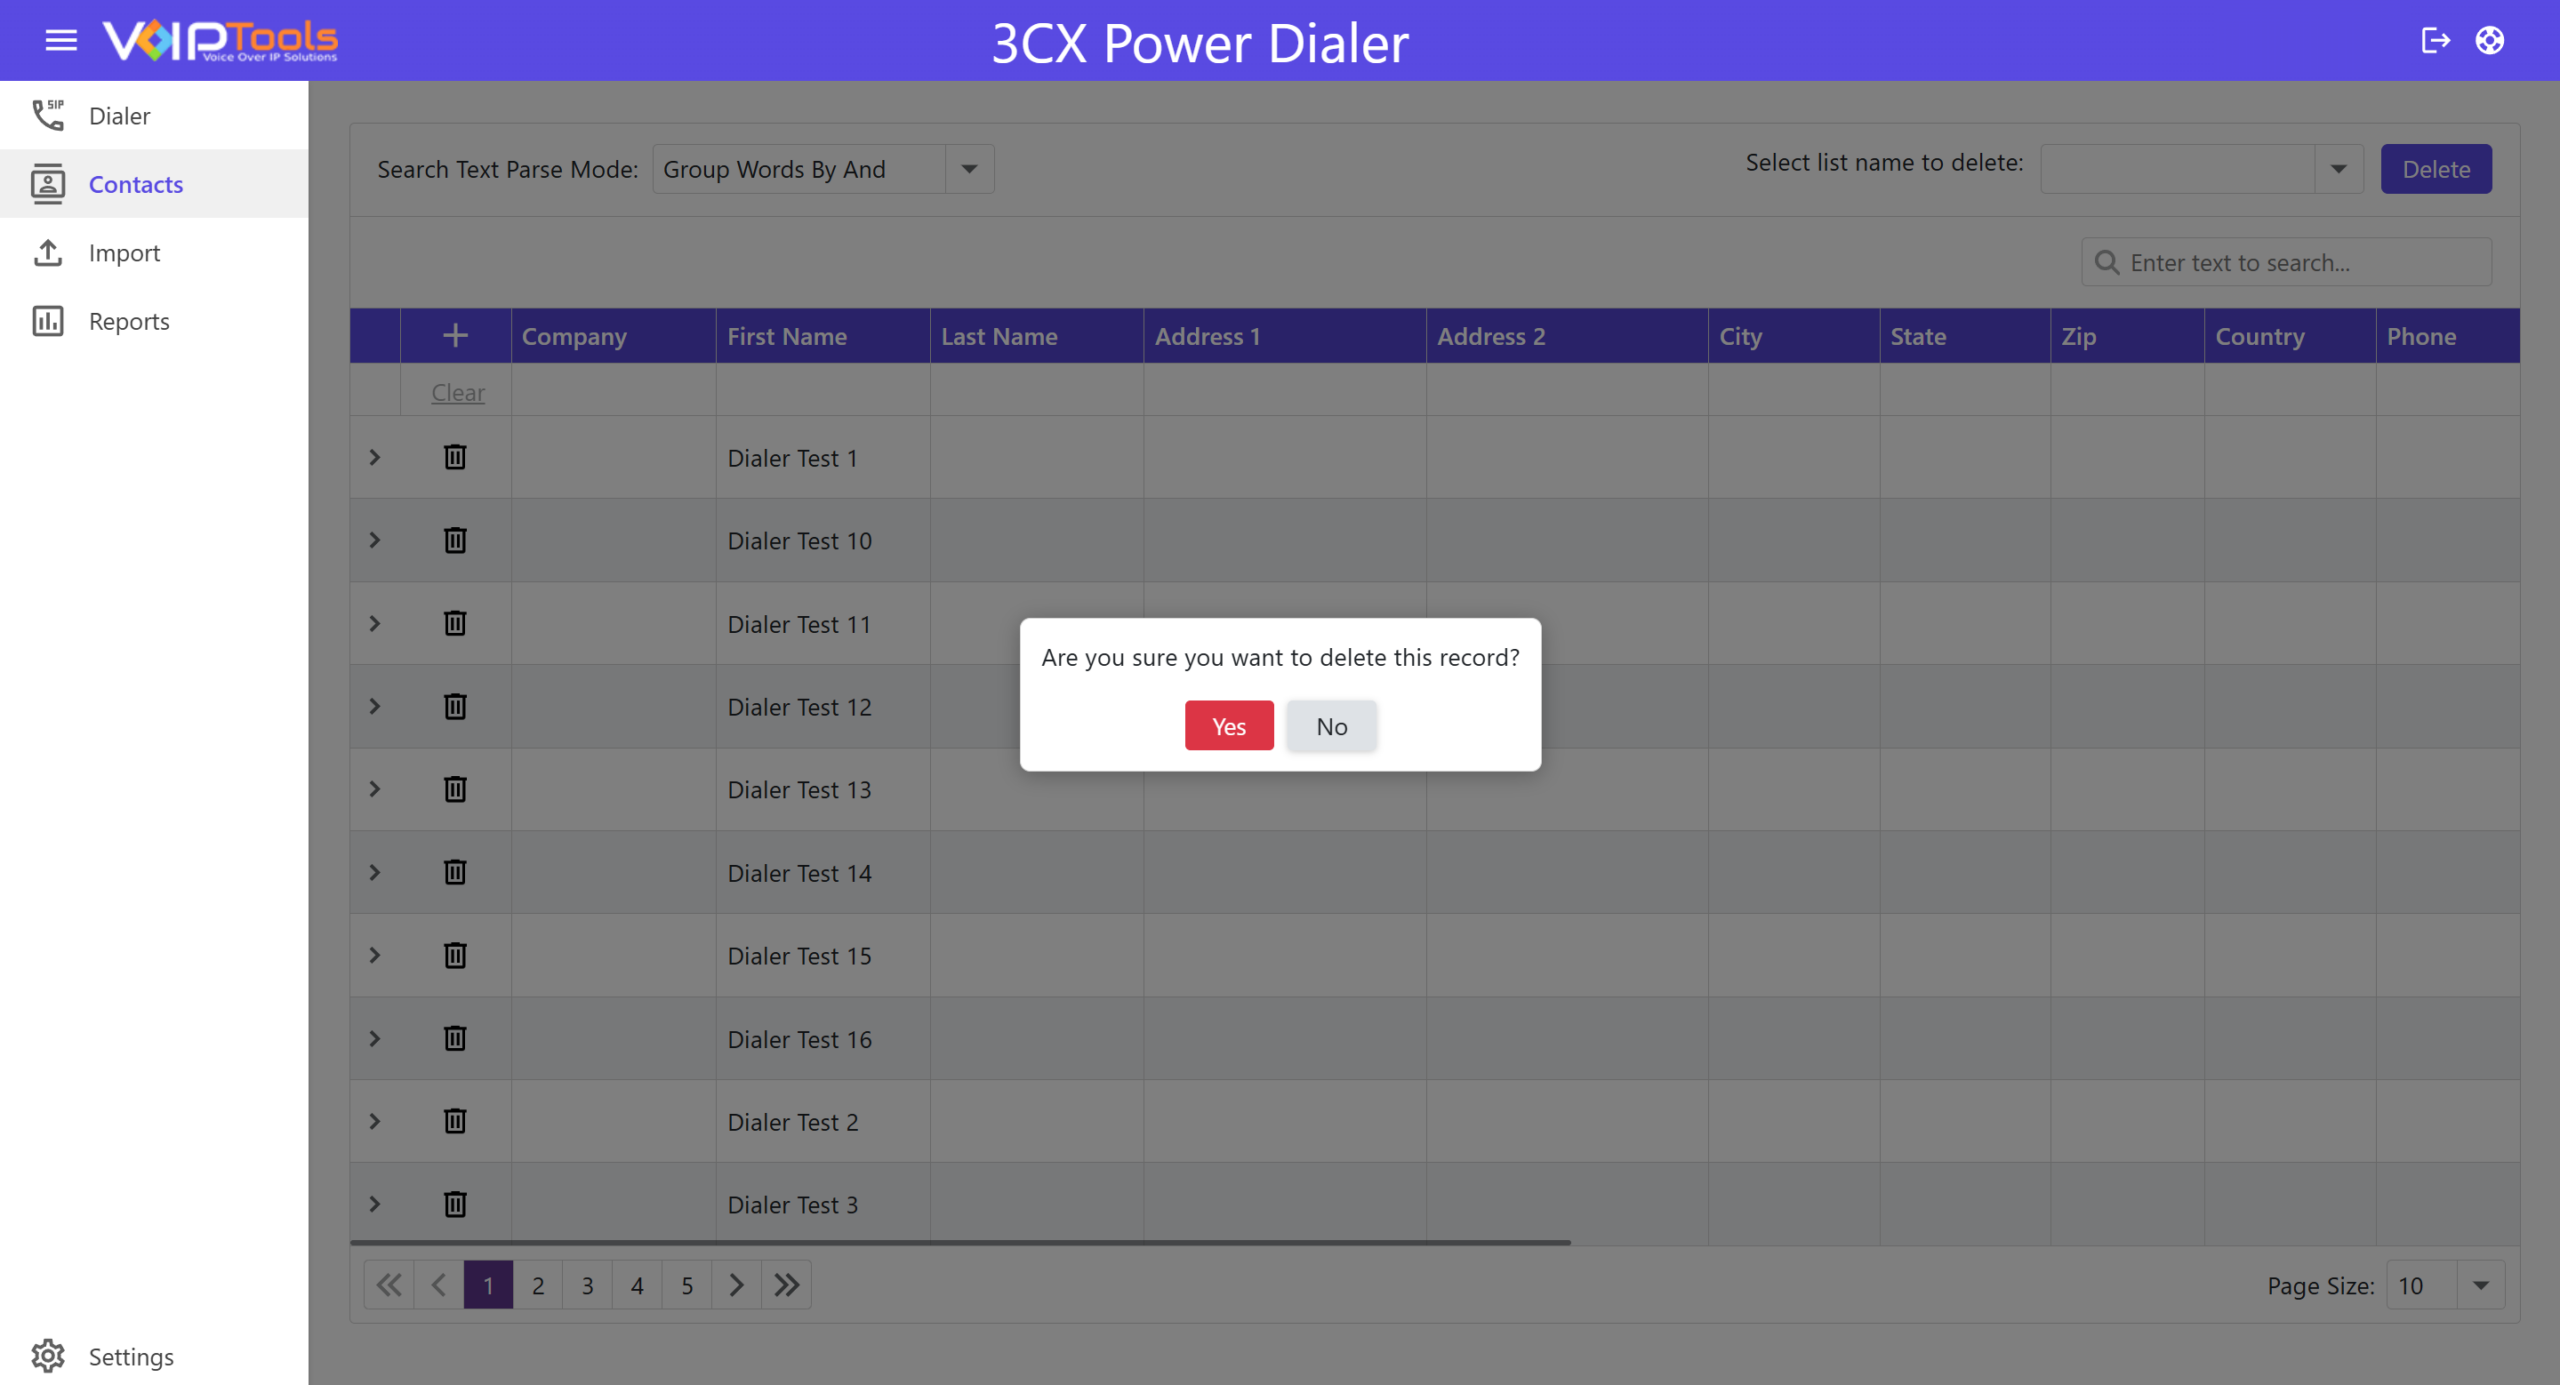 Figure 83: Confirmation Popup
Deleting an entire contact list #
- Click the Select list name to delete dropdown in the toolbar.
- Choose the list you want to remove.
- Click the Delete button. All contacts belonging to that list will be permanently removed.
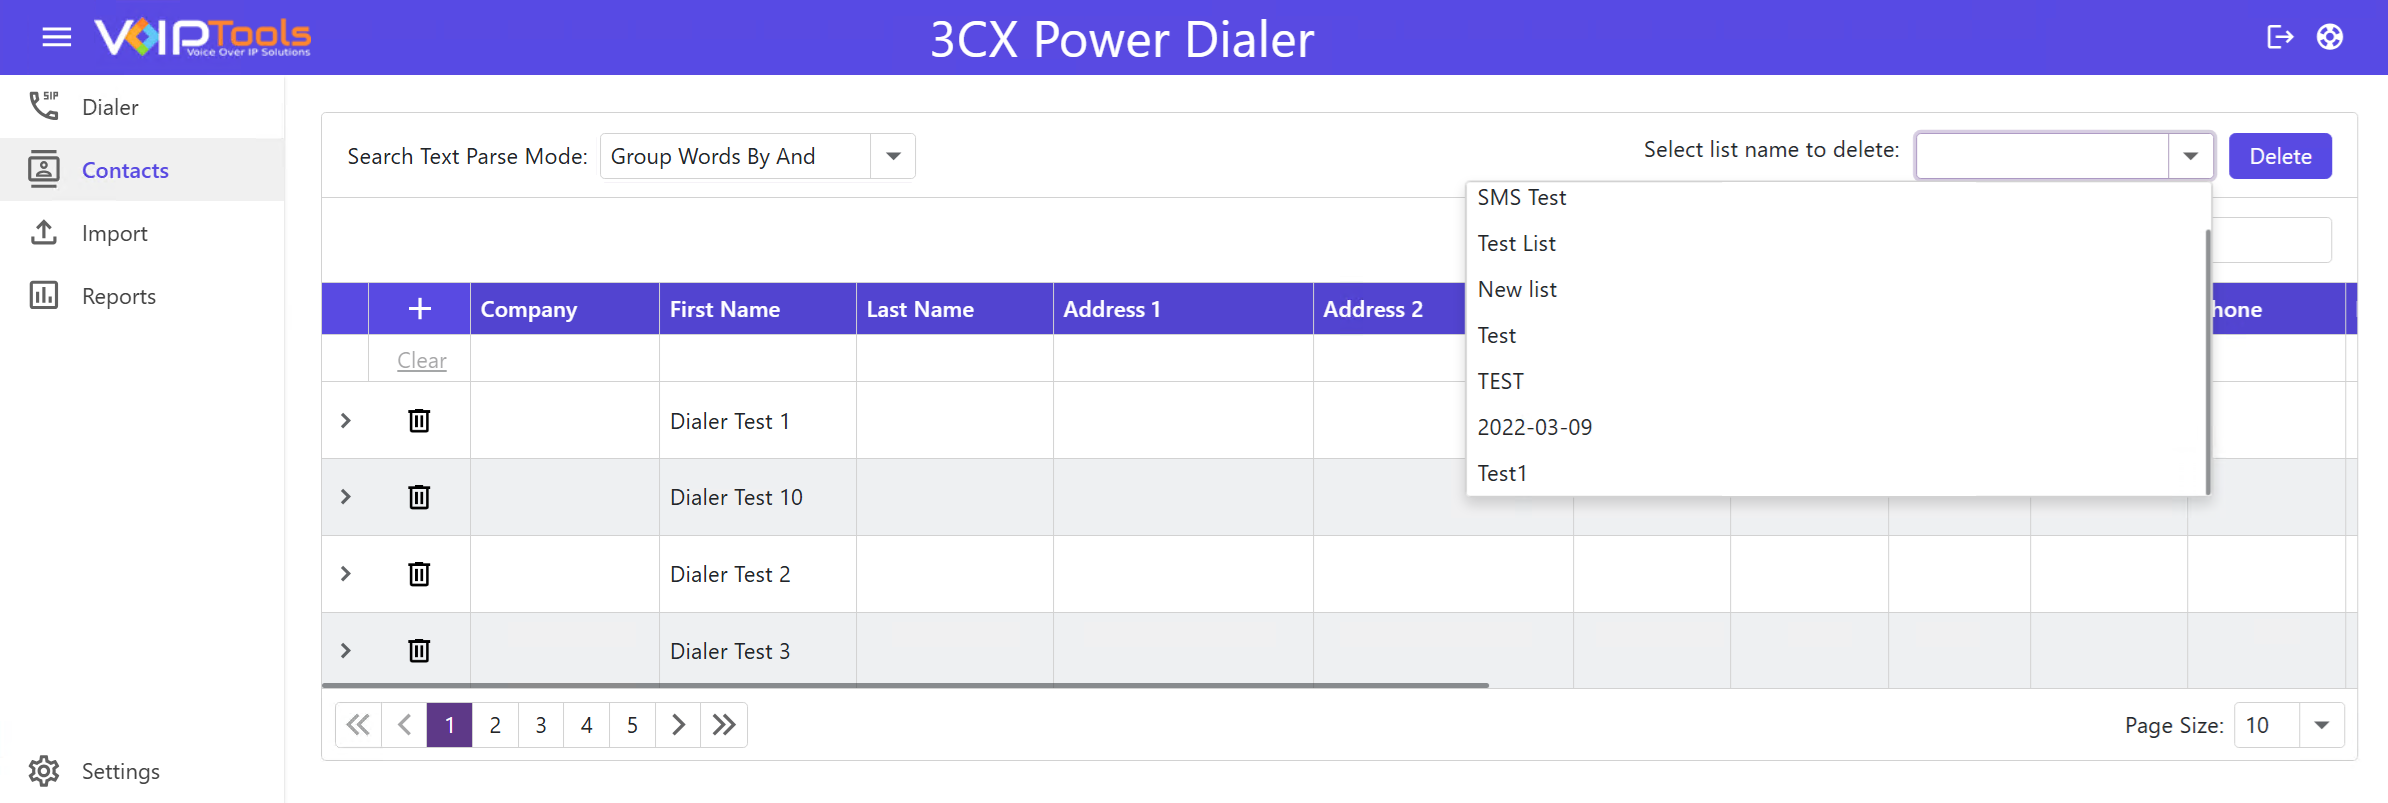
There is no confirmation prompt before deletion. Make sure you have the right record selected before clicking the Delete button . Deleting a list removes every contact record in that list. This action cannot be reversed. Export or back up any records you need before proceeding.
Import Menu #
You can access the Import screen only as a Manager. As a Manager, you have the privilege of importing contacts from a CSV file into the central repository of contacts. Additionally, you can utilize the proficient query builder integrated within the system to effectively locate your desired contacts.
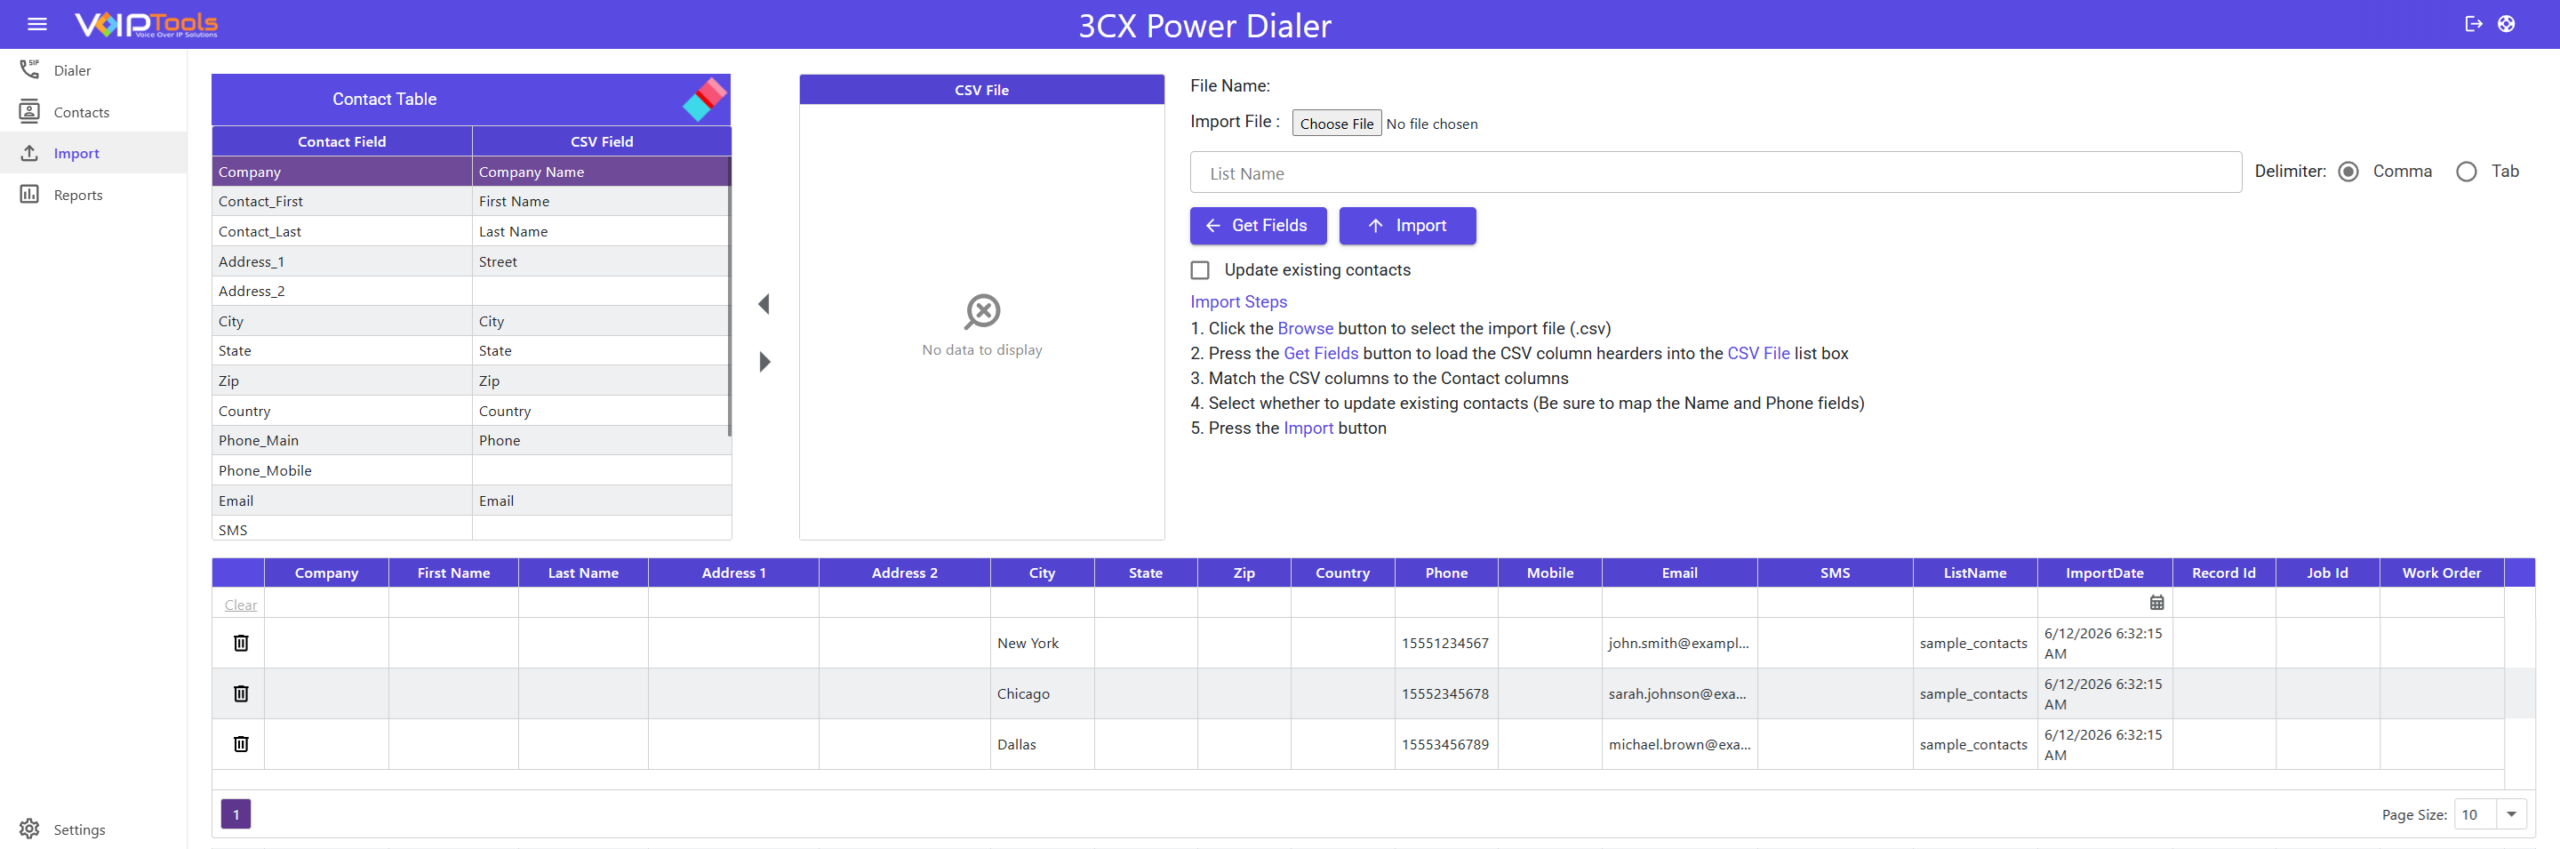
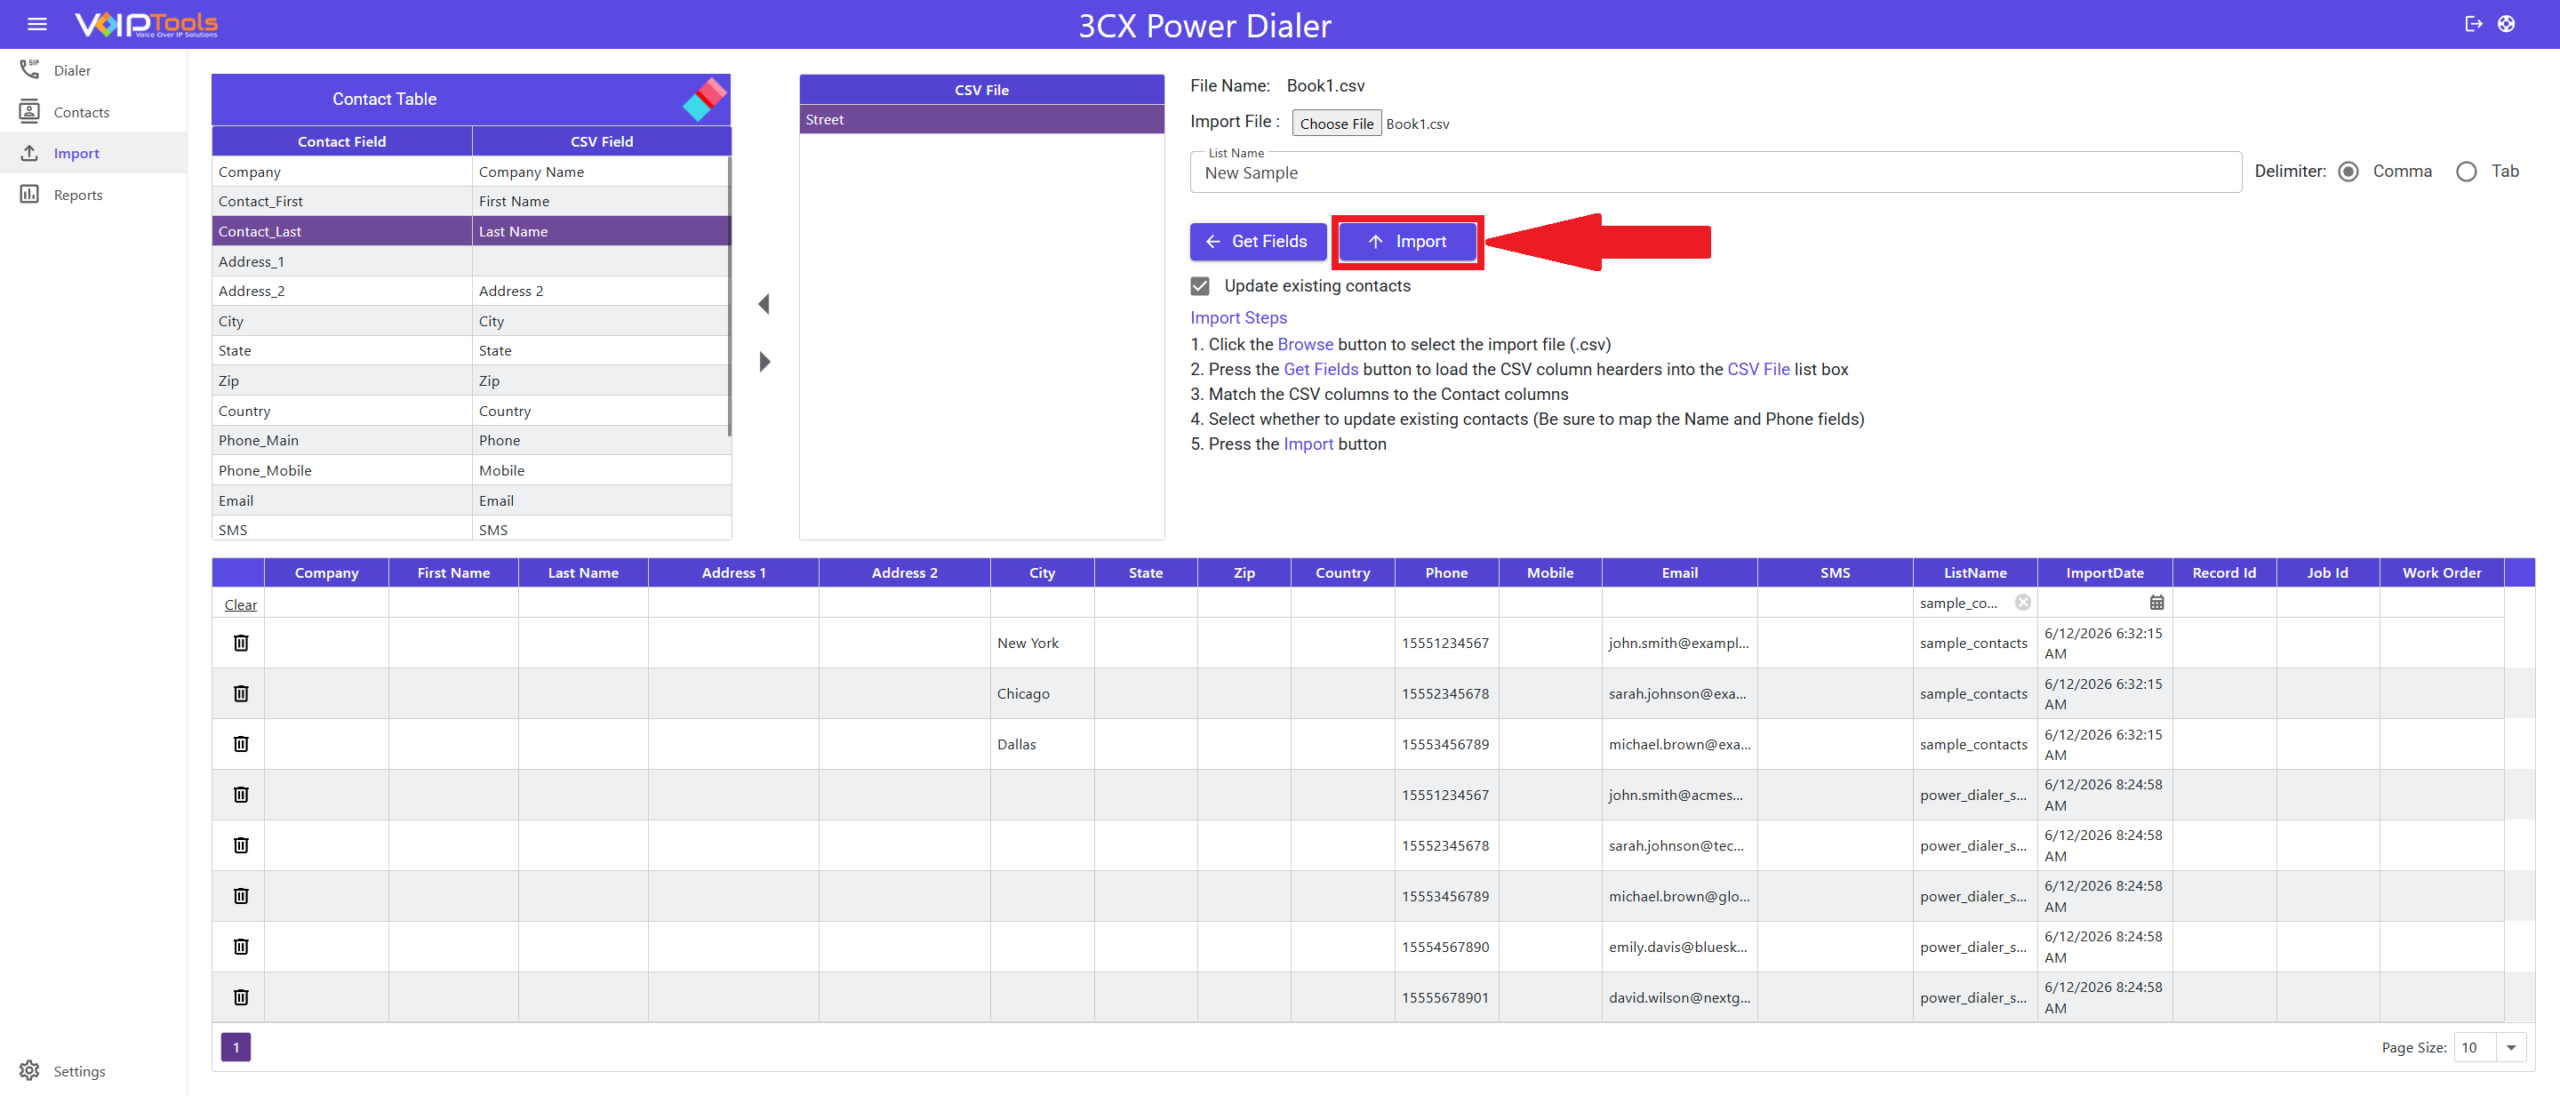
Figure 85: Import Menu Overview
Field Definitions #
After a successful import, the contacts grid below the mapping panel displays the imported records. The columns in this grid are described below.
| Field | Description |
|---|---|
| Clear filter | Resets all active column filters and restores the full list of contacts. Use this any time you want to clear what you’ve searched for. |
| Filter row filter | The empty row directly below the column headers is a live filter row. Type into any cell in this row to filter the grid by that column — for example, type a city name under City, or a list name under ListName. Filters across multiple columns work together to narrow results further. |
| Company | The organization or business the contact is associated with. |
| First Name | The contact’s given name, mapped from the Contact_First field. |
| Last Name | The contact’s surname or family name, mapped from the Contact_Last field. |
| Address 1 | The contact’s primary street address, mapped from the Address_1 field. |
| Address 2 | Secondary address information such as a suite or unit number, mapped from Address_2. |
| City | The city portion of the contact’s address. |
| State | The state, province, or region of the contact’s address. |
| Zip | The postal or ZIP code for the contact’s address. |
| Country | The country associated with the contact’s address. |
| Phone | The contact’s primary phone number. This is the number the dialer calls during a campaign, mapped from Phone_Main. |
| Mobile | The contact’s mobile or cell phone number, mapped from Phone_Mobile. |
| The contact’s email address. Also used for SMS delivery via email-to-SMS gateway. | |
| SMS | Indicates whether the contact is enabled to receive SMS notifications. |
| ListName | The name assigned to this contact’s import batch. Matches the value entered in the List Name field before importing — used to group and manage contacts together. |
| ImportDate | The date and time this contact record was imported into the system. Auto-populated on import. |
| Record Id | A unique identifier automatically assigned to this contact record by the database. |
| Job Id | Links the contact to a specific dialer job or campaign run, if applicable. |
| Work Order | An optional reference field for associating the contact with an external work order or ticket. |
Import Contacts from CSV file #
Follow the procedure to import the contacts list,
- Log in to the 3CX Power Dialer Web application with Manager credentials.
- Click Import in the left navigation.
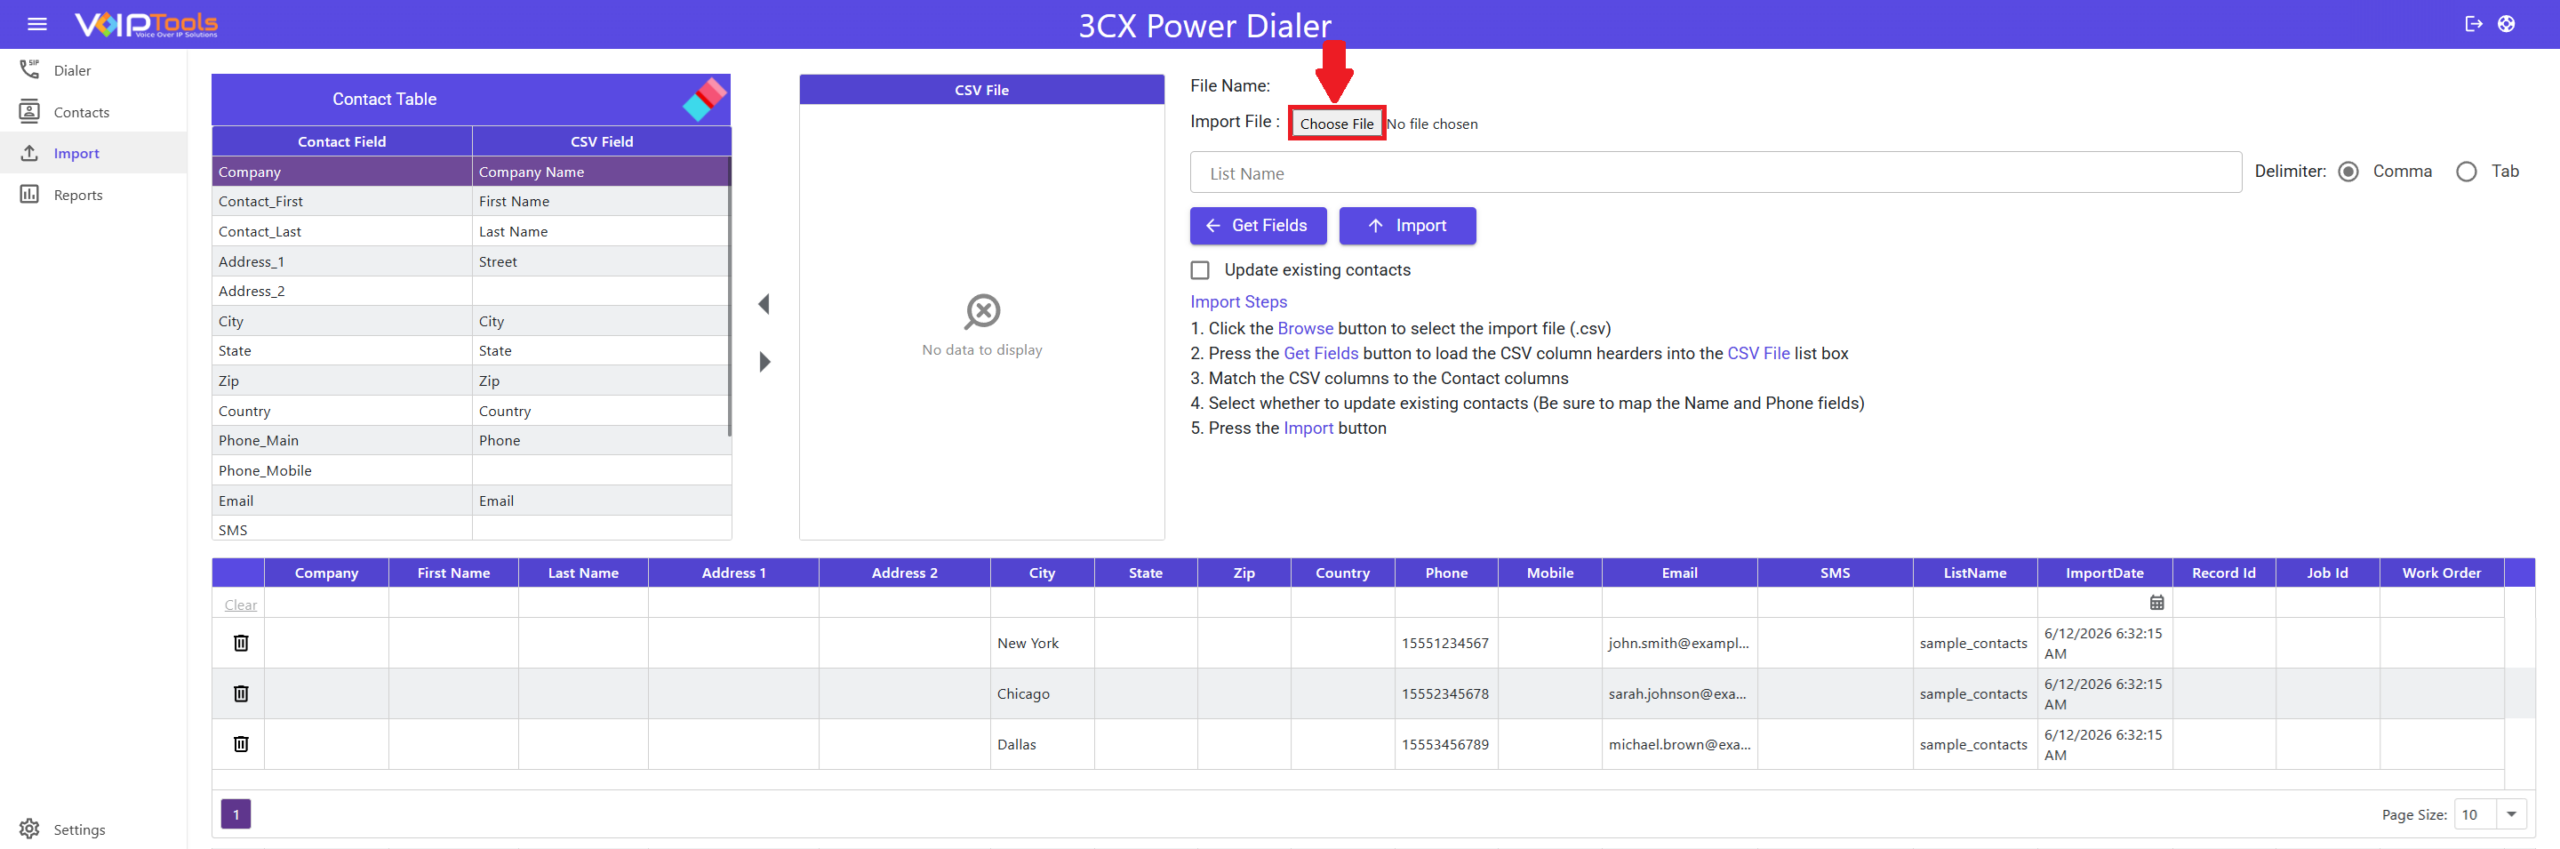
- Click the Choose File button to browse CSV files on your local device.
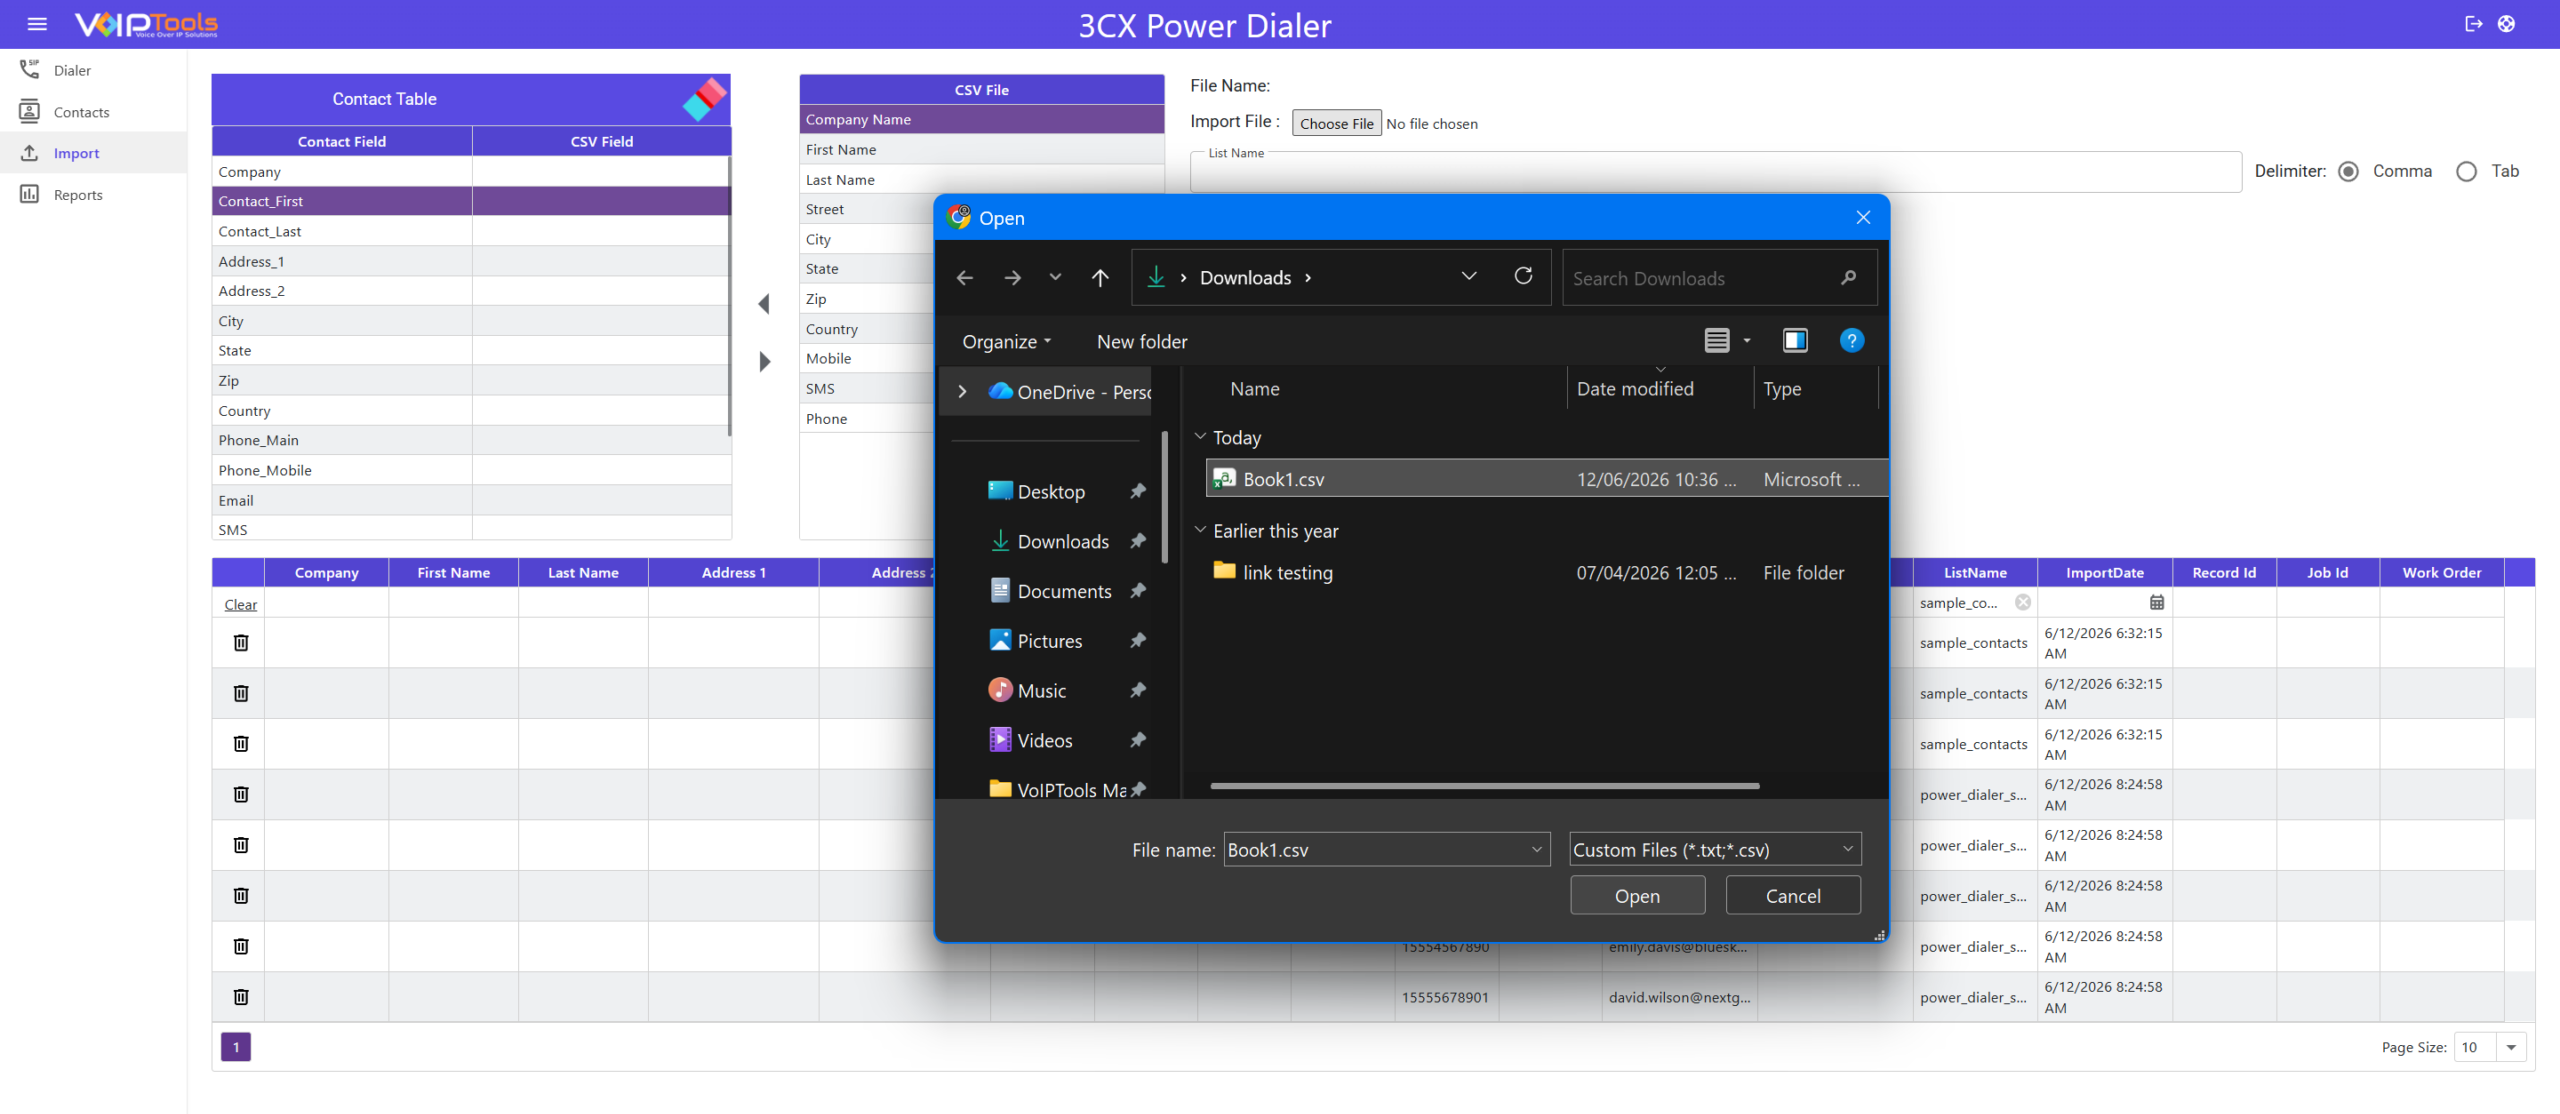
- Browse for the CSV file and double-click the file to upload it to the application.
- Select the desired Delimiter option,
- If your CSV file has data separated by commas, select the Comma radio box.
- If your CSV file has data separated by tab spaces, select the Tab radio box.
- In the List Name field, enter the list name.
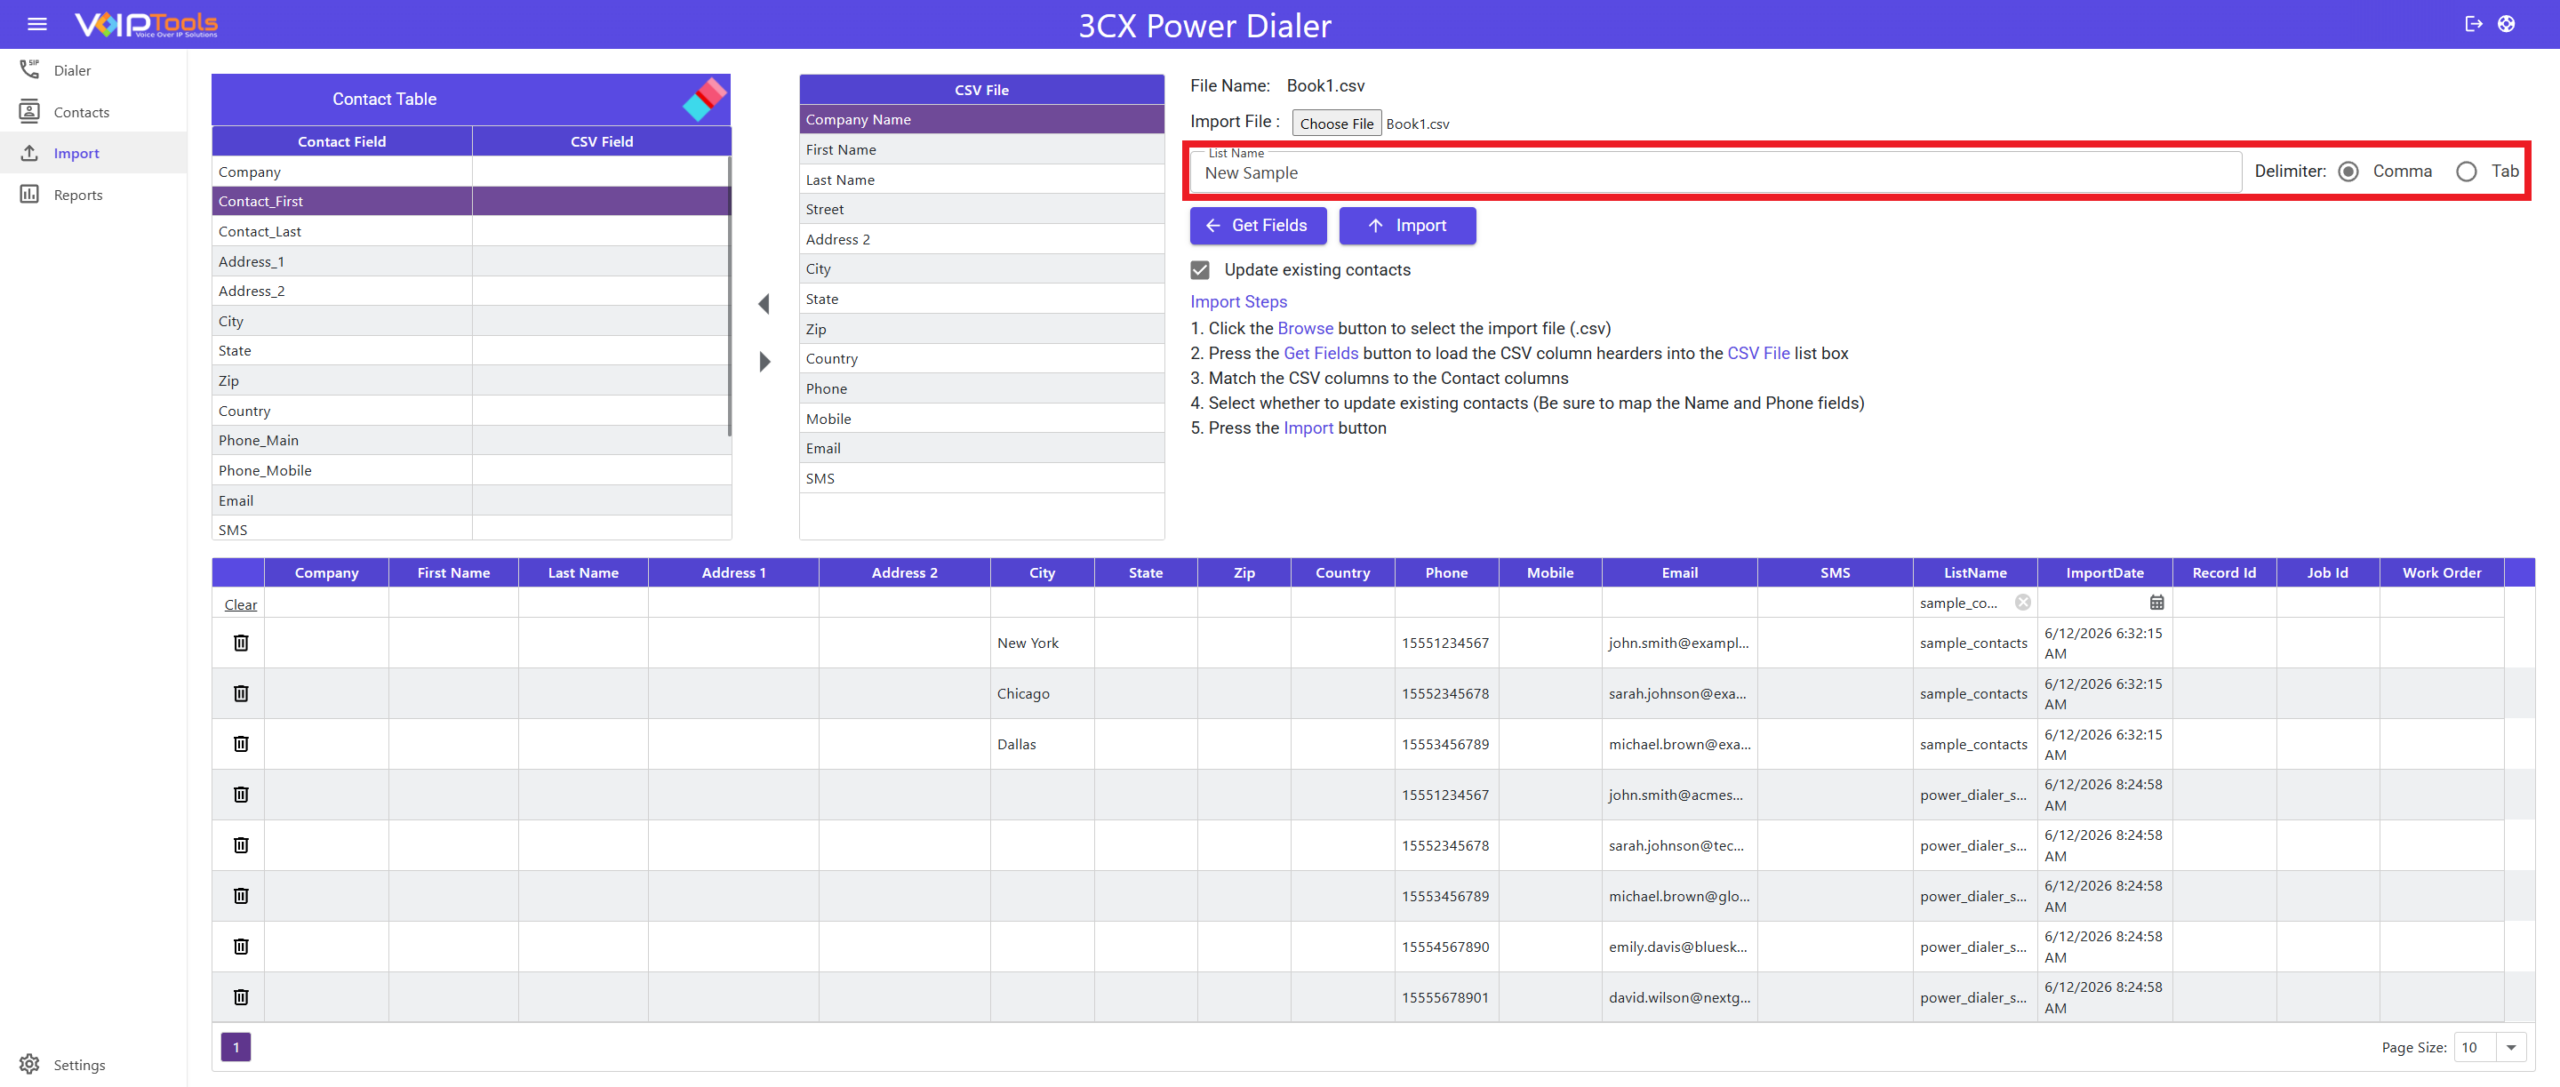
If you do not specify the List Name, then the contact will be created without a list name.
- Click the Get Fields
 button to extract the data from the CSV file.
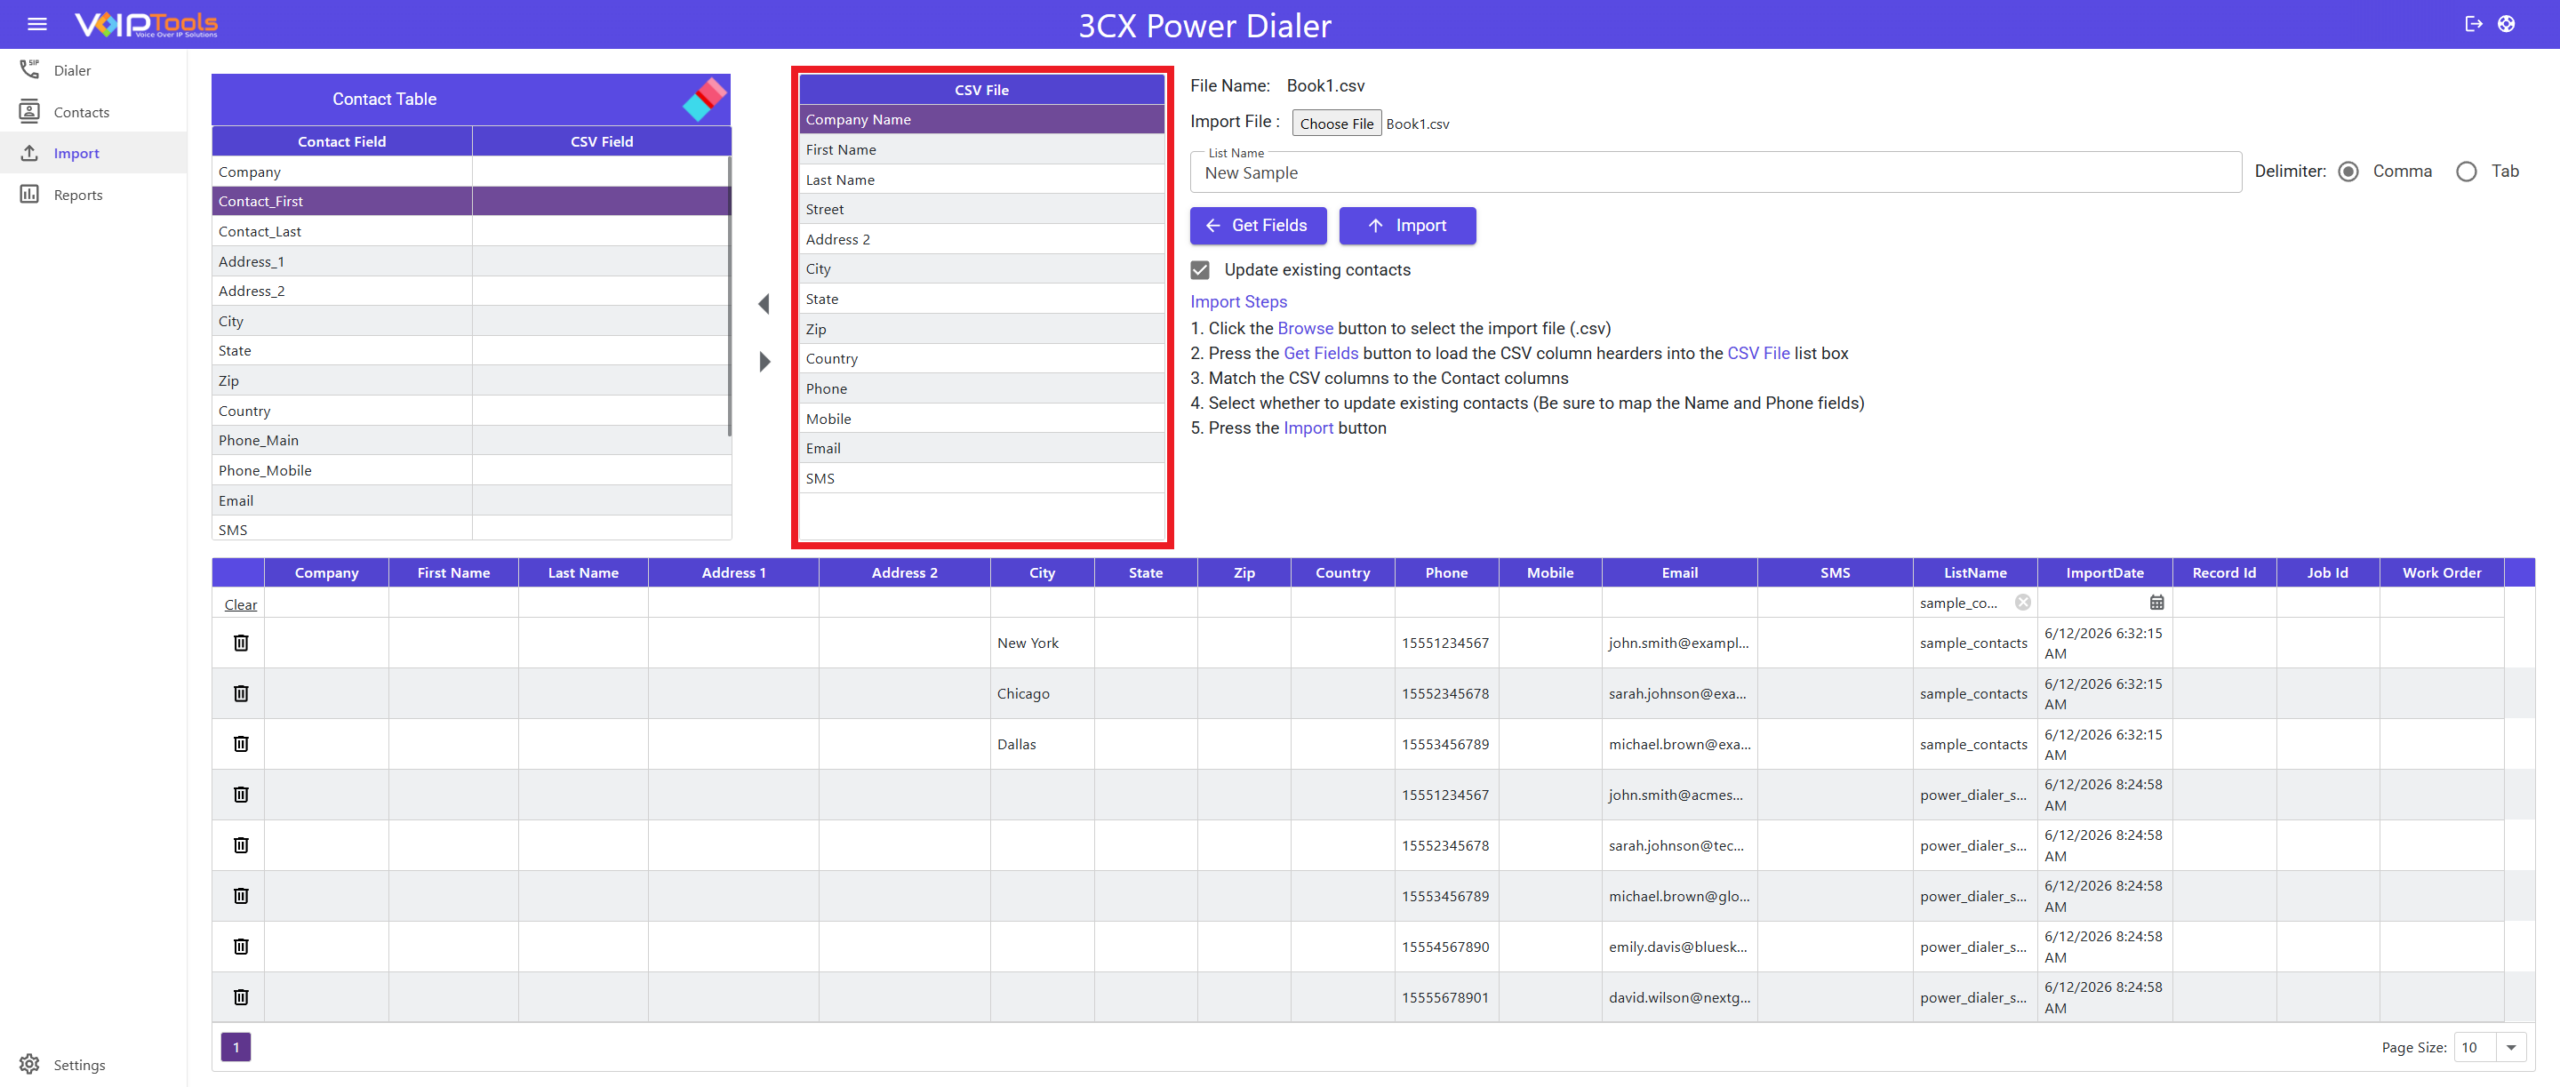
- Map the fields from CSV File section to the Contact Table section using the Add button and the Remove
 button.
- For example, to map the name field,
- Select the name in the CSV File section and click the Contact_First row in the Contact Table section.
- Click the Add button to map the fields.
- For example, to map the name field,
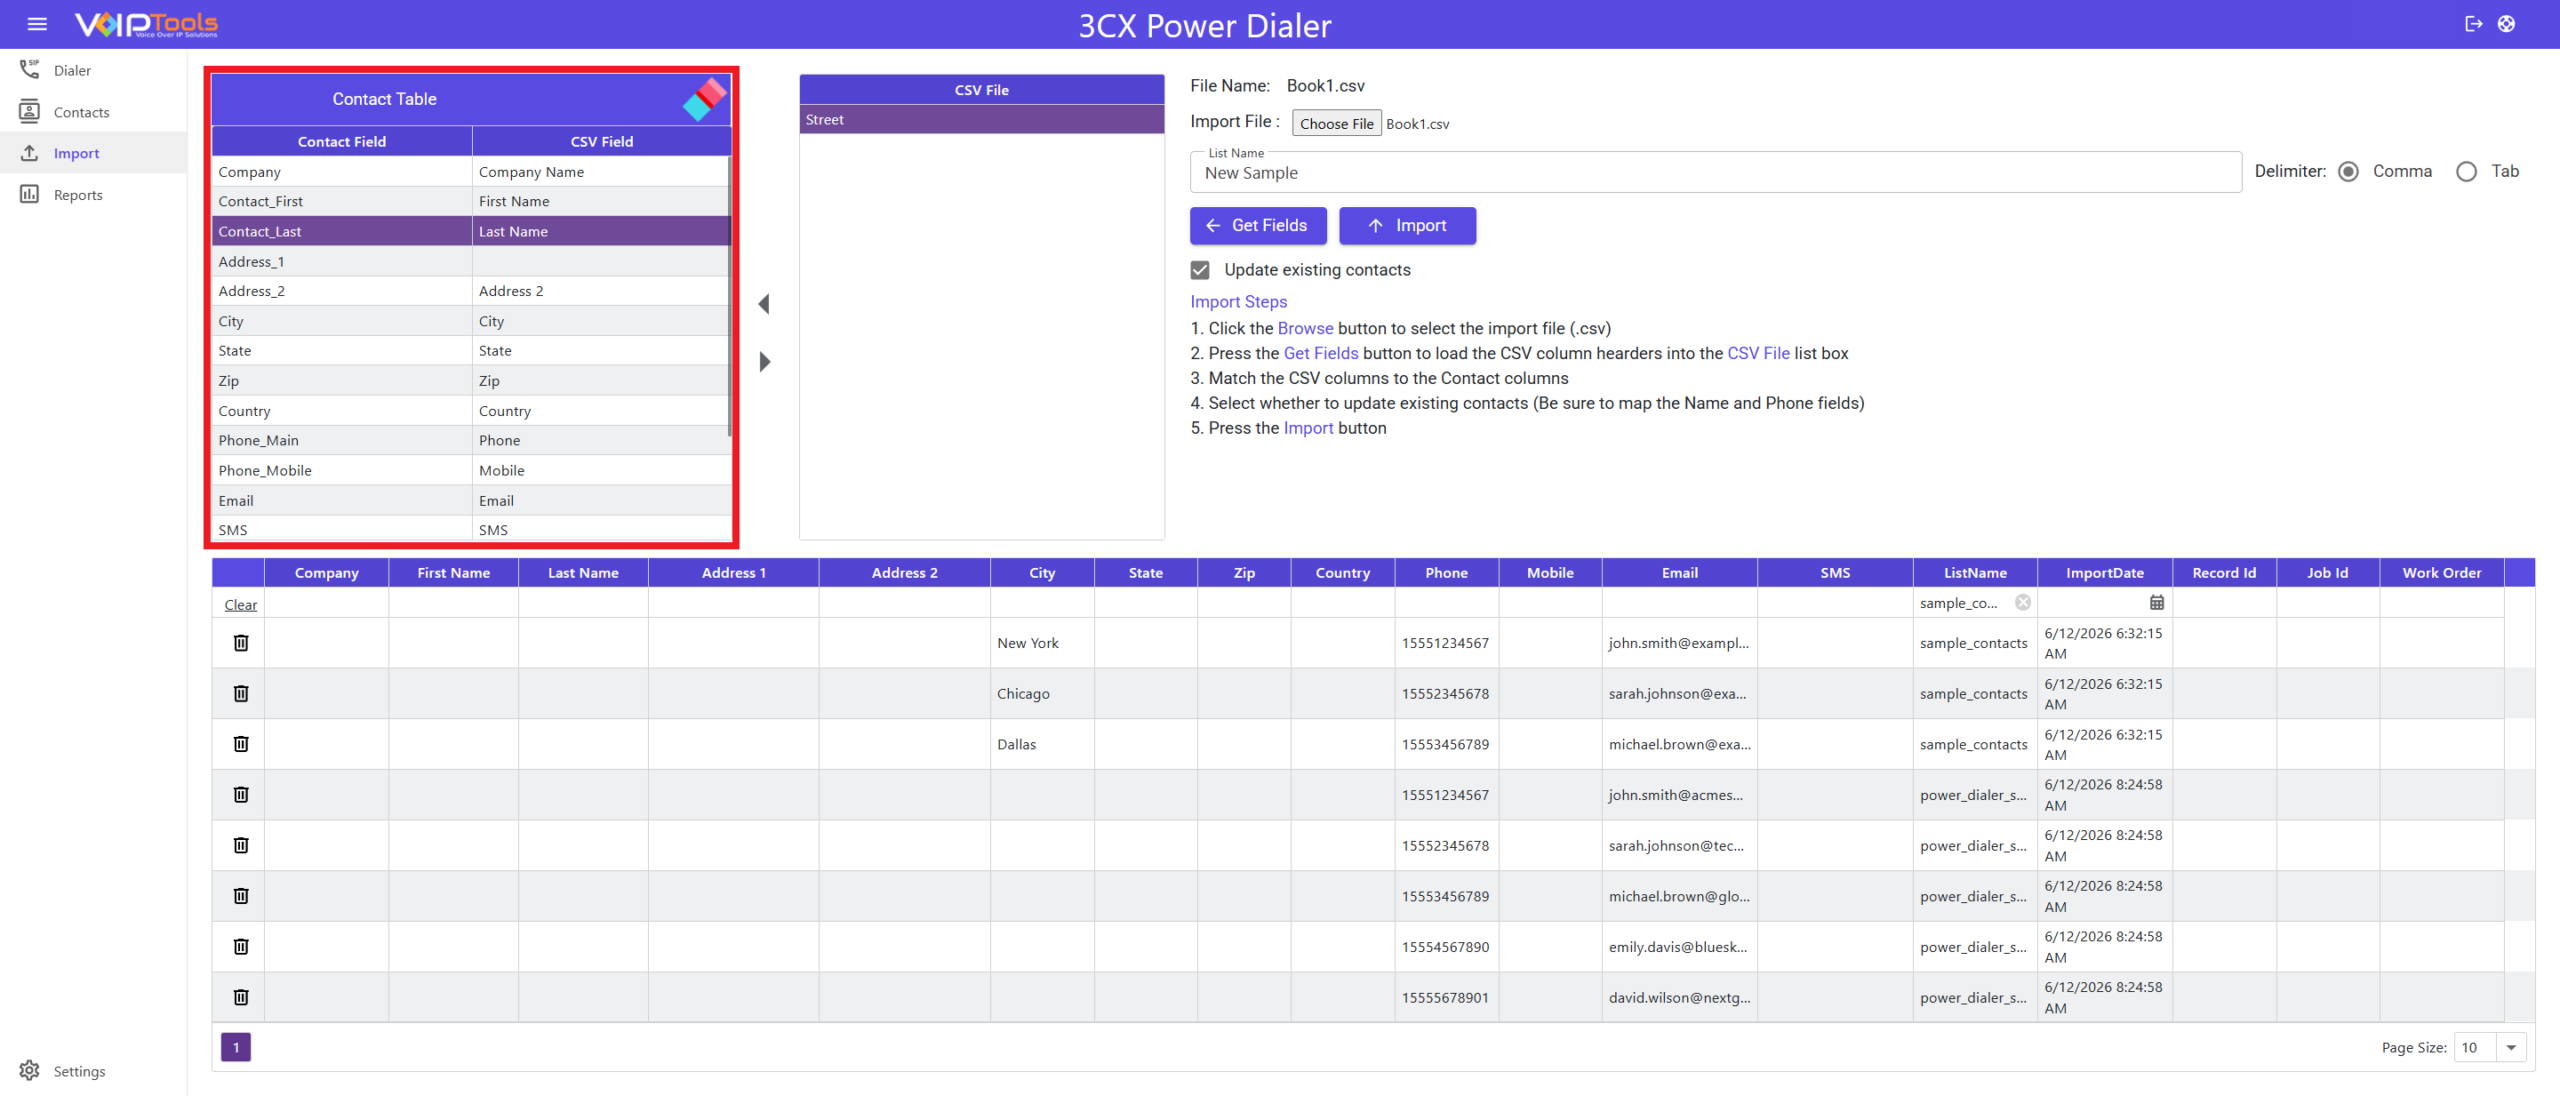
Be sure to map the Name and Phone fields.
- Check the Update existing contacts check box to overwrite existing contacts.
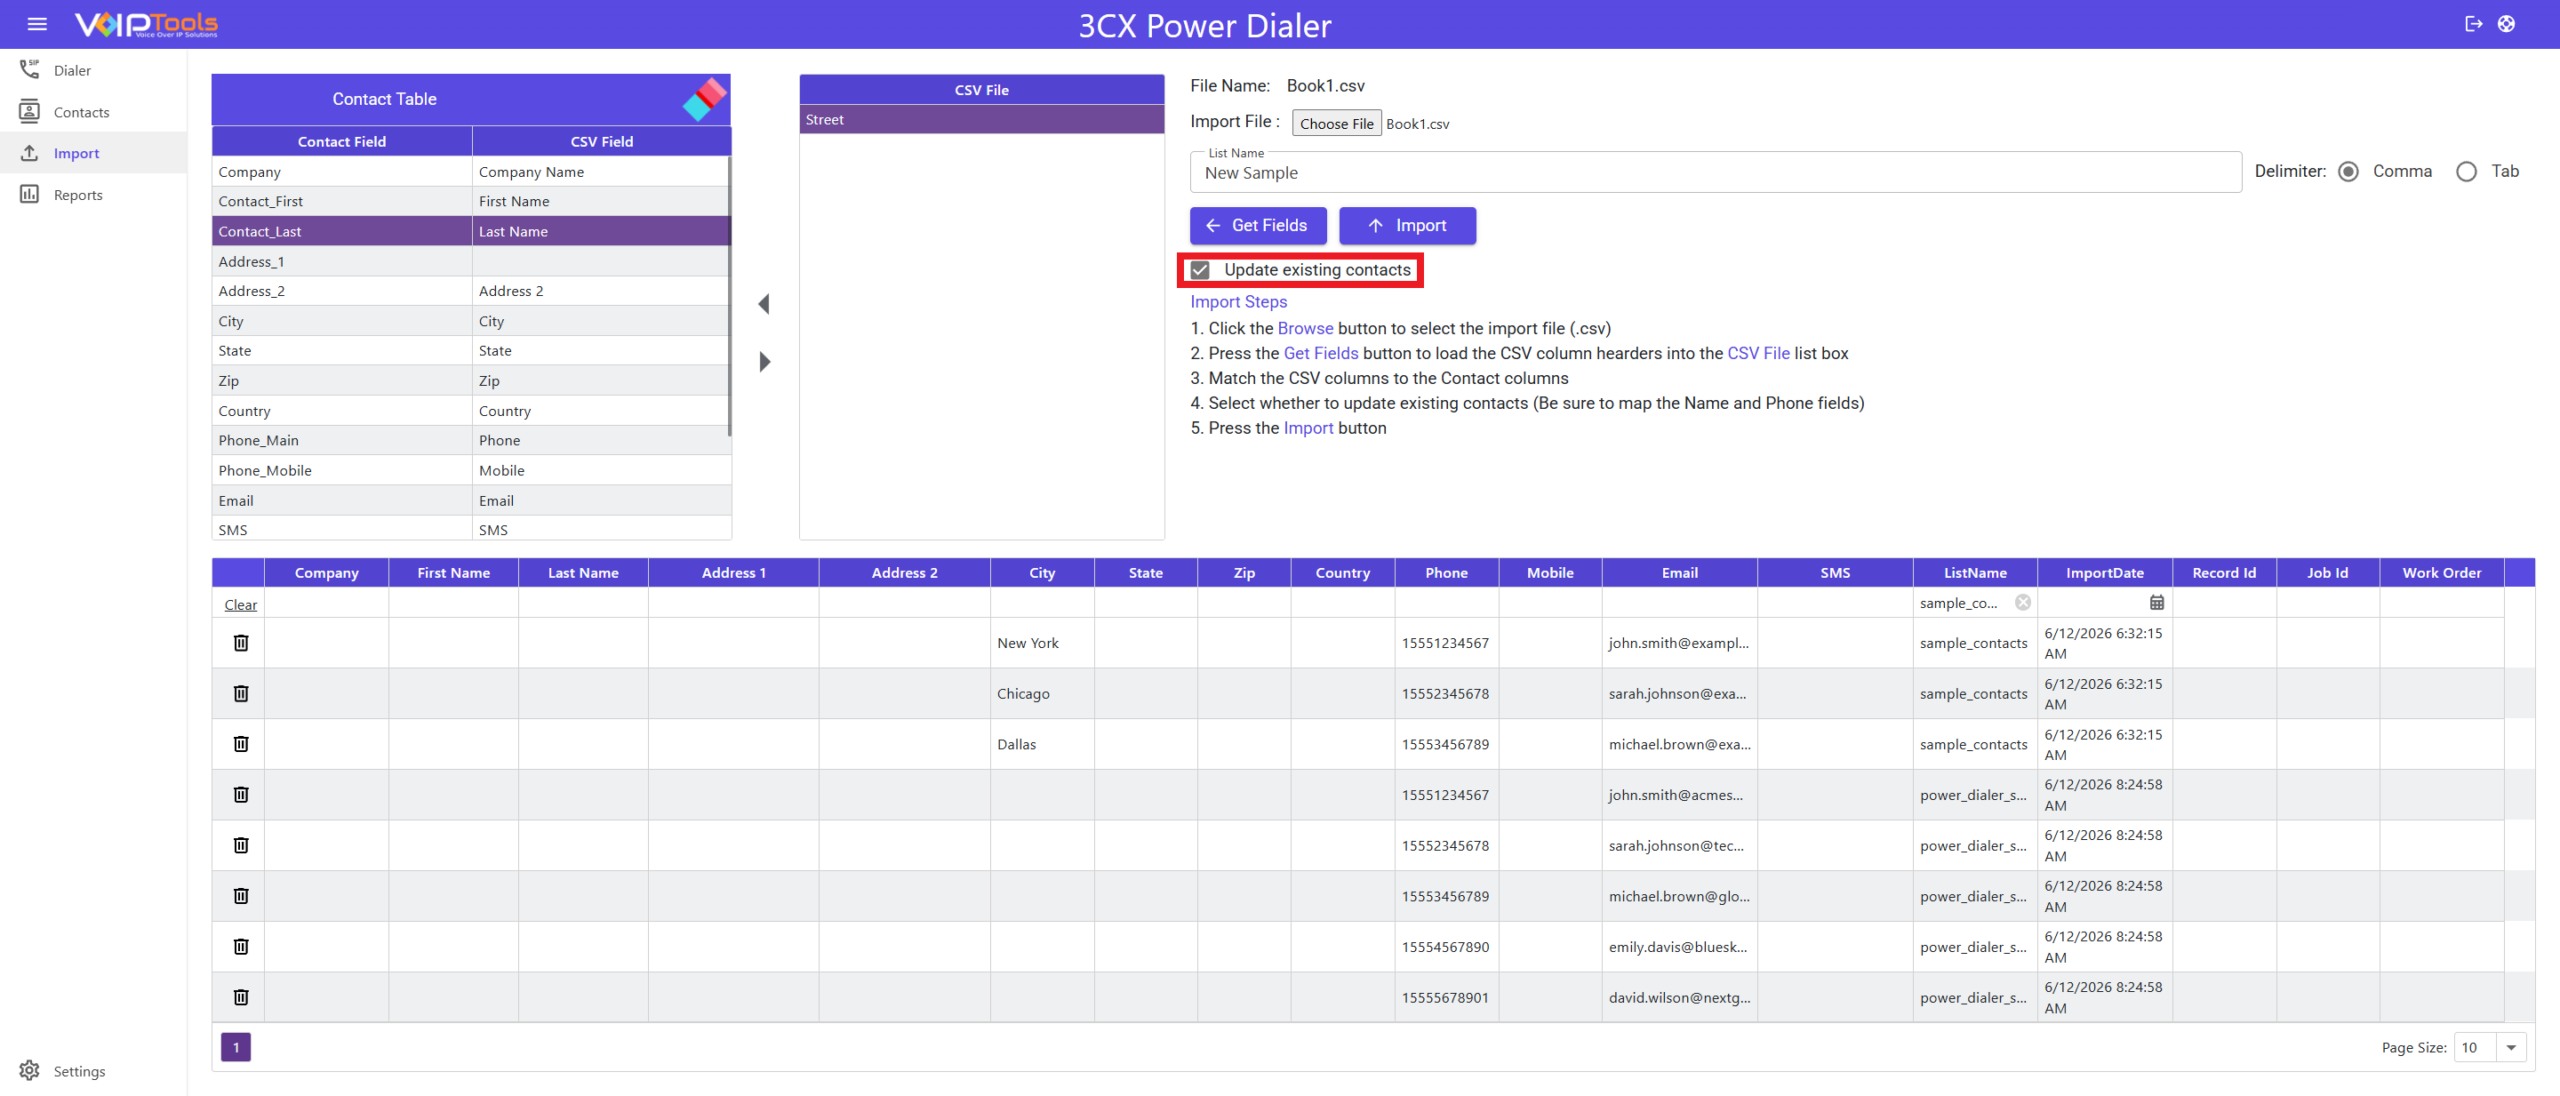
- Click the Import button to import all the contacts from the CSV file into the central repository of contacts.
Reports Menu #
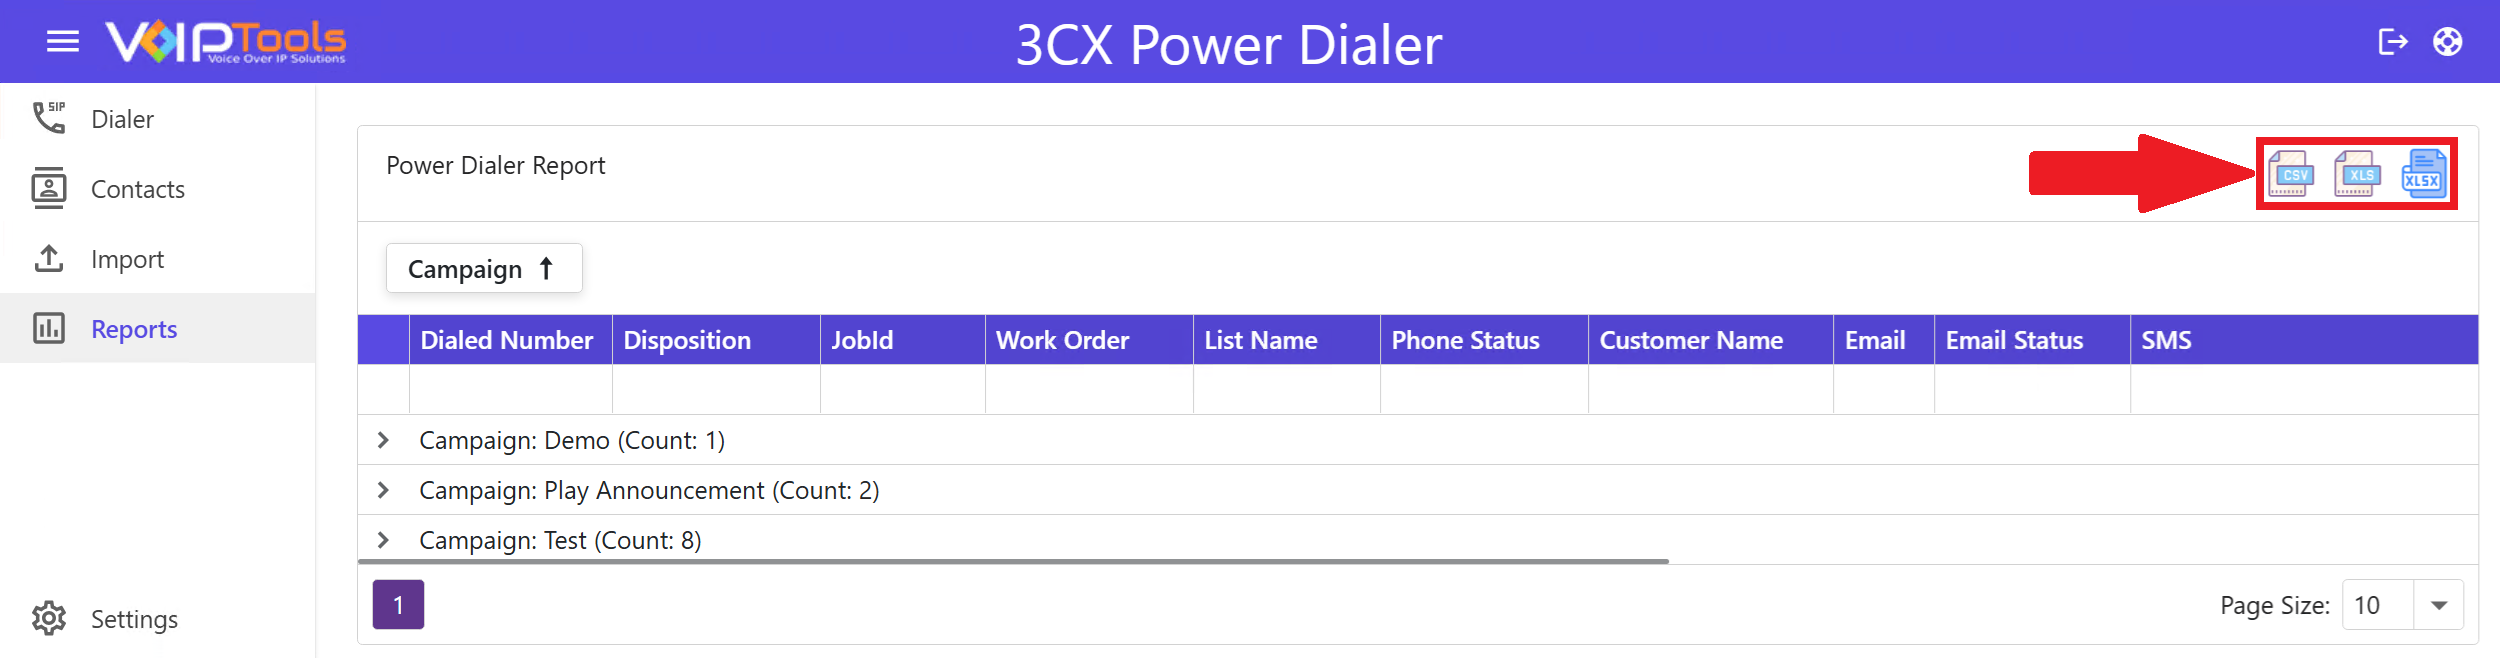
The Reports tab gives you a full log of every call made through Power Dialer of who was called, when, what happened, and more. You can also export the data for record-keeping or further analysis.

Field Definitions
| Field | Description |
|---|---|
| Campaign | The name of the campaign the call belongs to. |
| Dialed Number | The phone number that was called. |
| Disposition | The wrap-up code applied to the call. Only visible when both Power Dialer and the Wrap-up Codes Client are in use. |
| Job ID | The unique ID of the customer, pulled from the Contacts list. |
| Work Order | The work order associated with the call, as specified in the Contacts tab. |
| List Name | The contact list used for the campaign. |
| Phone Status | The result of the call — for example, Answered, Dialed, or Failed. |
| Customer Name | The name of the customer who was called. |
| The email address associated with the customer record. | |
| Email Status | Sent means the email was delivered successfully. Failed means it was not. |
| SMS | The SMS number associated with the customer record. |
| SMS Status | Sent means the SMS was delivered successfully. Failed means it was not. |
| Call Time | The date and time the call took place (MM/DD/YYYY, 12-hour format). |
| Company | The company name associated with the customer record. |
| Address | The street address of the customer or their company. |
| City | The city of the customer or their company. |
| State | The state of the customer or their company. |
| Zip Code | The zip code of the customer or their company. |
| Country | The country of the customer or their company. |
| Phone Attempts | How many times the system attempted to call this number. |
| Retry Call Time | The scheduled date and time for the next call attempt. |
| User Response | The response recorded from the customer during the call. |
Group Columns #
You can organize the available columns into logical groups to enhance the professional presentation of your data. By doing so, you achieve a more refined perspective on your data.
Follow the procedure to group the columns,
- To group data by a column, drag and drop the desired column header into the area above the table where the message “Drag a column header here to group by that column” appears.
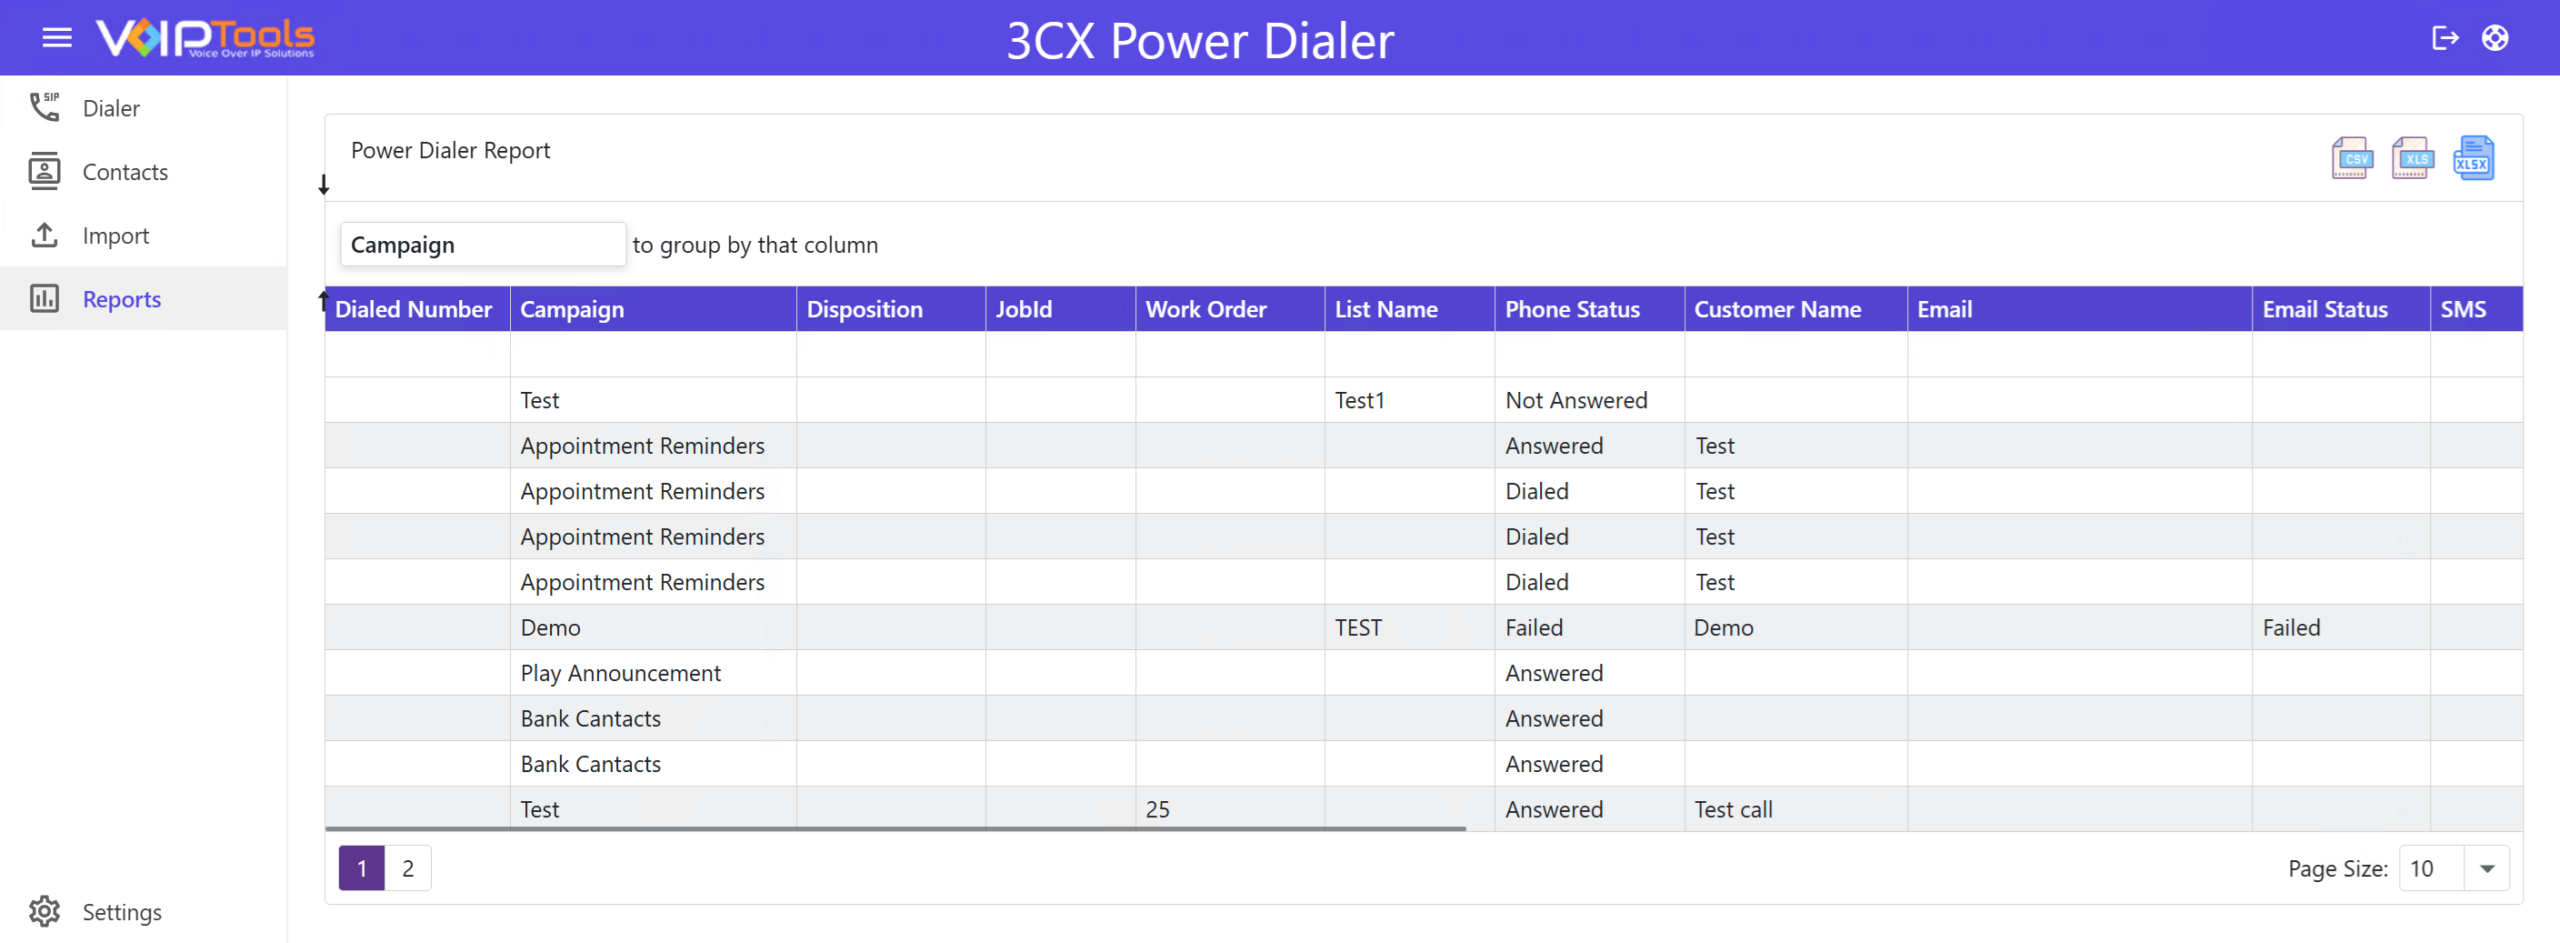
The Campaign column is grouped by default.
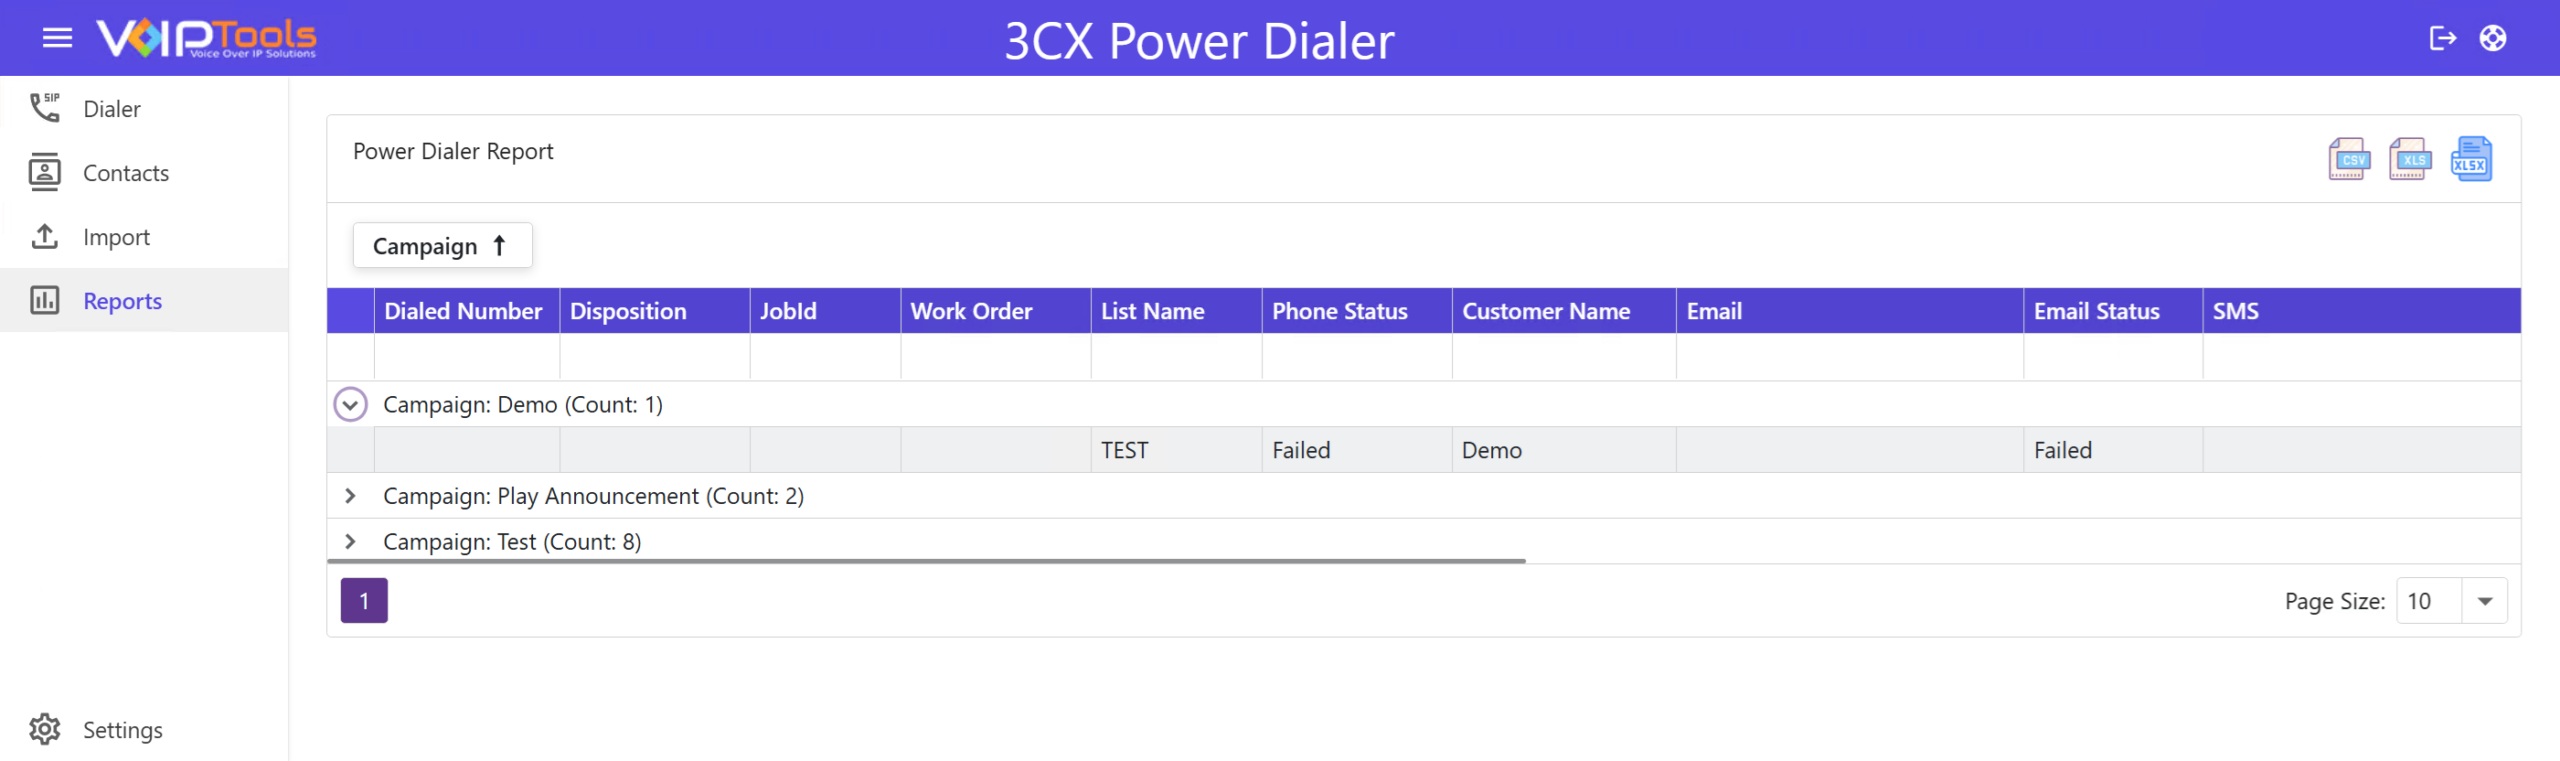
- Click the Expand icon to view your grouped data.
View calls in the campaign #
- Click the Expand icon of the desired campaign to view the calls made in the campaign.
Export the calls #
- To export the reports to your local device, click the desired file format at top of the page.