
Introduction #
Transform Customer Service with 3CX Survey Creator: Elevate Your Organization’s Performance
Revamp your customer service by harnessing the power of feedback from your callers. With our user-friendly web portal, you can effortlessly create personalized, automated surveys conducted over the phone. Discover valuable insights, pinpoint areas for improvement, and elevate the quality of your services. Every organization aspires to deliver exceptional service, and now you can too.
Introducing 3CX Survey Creator—the ultimate tool for gathering customer feedback through phone surveys. By leveraging this powerful solution, you can gauge your customers’ sentiments regarding the services provided by your organization. Uncover crucial areas where enhancements are needed, boost service quality, and evaluate the performance of your staff.
Start maximizing customer satisfaction with 3CX Survey Creator. Empower your organization to excel, amplify service quality, and measure success—all at the touch of a button. Experience the benefits of valuable customer feedback and propel your business forward.
What is 3CX Survey Creator? #
The 3CX Survey Creator generates phone-based automated surveys. Utilizing a web-based application, you have the ability to create surveys and link them to a dedicated Digital Receptionist (IVR). When engaging in a survey, you, as the caller, will be redirected to a 3CX Digital Receptionist, where a sequence of questions will be posed and your responses will be recorded in a SQL database.
Why choose 3CX Survey Creator? #
 |
WEB-BASED INTERFACE | Experience the convenience of 3CX Recording Manager’s web-based interface, effortlessly accessible through a user-friendly web portal. Simply log in with your 3CX extension and pin, and dive into a world of seamless control and management. |
 |
PERFORMANCE MEASUREMENT | Effortlessly gauge the performance and effectiveness of your team members, campaigns, or even your entire business process. Gain valuable insights that enable you to make informed decisions and drive continuous improvement. |
 |
TAILORED SURVEYS | Harness the power of multiple surveys within 3CX Recording Manager, allowing you to tailor your feedback collection to specific extensions and gather comprehensive data. Create and deploy surveys as needed, empowering you with the knowledge to enhance your organization’s operations. |
 |
INFORMATION COLLECTION | Uncover untapped potential by collecting and analyzing vital information through 3CX Recording Manager. Identify areas of improvement and elevate the quality of services provided by your organization, ensuring unparalleled customer satisfaction. |
How to use 3CX Survey Creator? #
To initiate the creation of a survey, you must access the 3CX Survey Creator web portal in your capacity as an administrator. Within this portal, you have the ability to generate inquiries, categorize them into surveys, and establish a connection between a survey and a designated extension within the 3CX system. By utilizing the Survey Creator, you gain the capability to construct a comprehensive repository of surveys and conveniently modify existing ones to enhance the precision of the gathered information. In your role as an agent, you possess the authority to redirect a customer’s ongoing call to a survey. Subsequently, once the customer actively engages in the survey and concludes the call, the survey outcomes become accessible for review by the administrator.
Prerequisites #
Before installing the 3CX Survey Creator, you need to ensure that your computer meets the minimum requirements mentioned below:
| PREREQUISITE | PURPOSE |
|---|---|
| 3CX Version V20 | 3CX Survey Creator is designed to work seamlessly with this version for enhanced features and performance. |
| Windows 10 or above / Windows Server 2012 or above | These operating systems provide the necessary environment for the application to run efficiently. |
| IIS Features and Configuration – VoIPTools | IIS is needed as a web server to host and manage web-based applications and services. |
| .NET Framework 4.7.2 (Web Installer) | This framework provides essential components for running and developing applications. |
| VoIPTools Universal Updater | This component is necessary for updates, ensuring the application remains current and functional. |
| VoIPTools Relay Service | It is used for proper integration and functionality of the 3CX Survey Creator within the 3CX environment. |
| Microsoft SQL Server 2016 or above (Including the free SQL Express edition) | 3CX requires Microsoft SQL Server 2016 or later for database management. |
| Static IP for VoIPTools and 3CX servers | This is to ensure proper two-way communication, both the 3CX server (Relay) and the VoIPTools server. Dynamically assigned IP addresses are not supported. Additionally, it is recommended to use HTTPS for secure communication, which requires a FQDN for SSL/TLS certificate validation between the VoIPTools server and the Relay. |
| Port number 5700 opened on your device | Port 5700 is a specific network port used by 3CX for communication purposes. Opening this port on the device’s firewall allows incoming and outgoing traffic to pass through, enabling the 3CX software to send and receive data over the network effectively. |
Installation overview #
 |
DOWNLOAD SOFTWARE | You can order the 3CX Survey Creator online at https://www.voiptools.com. Your order confirmation email will include your license key and a link to download the software. |
 |
INSTALL PREREQUISITES | You must install several prerequisites before installing the 3CX Survey Creator. The Advanced Installer identifies and installs these applications automatically. Click here to learn about the required prerequisites. |
 |
INSTALL 3CX SURVEY CREATOR | This User Guide contains step-by-step instructions to successfully install the 3CX Survey Creator. Begin by extracting the installer from the downloaded zip file (Step 1 above), then run the setup program named SurveyCreator.exe |
 |
LOGIN TO THE WEB APPLICATION | You can now log in to your software using the Extension and PIN. |
Step-by-Step Installation Procedure #
The following section guides you through a detailed walk-through of the installation process.
Step 1: Download 3CX Survey Creator #
Find the software download link in the Order Confirmation Email, or you can download the application by following the procedure,
- Open your browser and go to the VoIPTools official website or click here to get redirected to the website.
- Search for the Survey Creator Application and click the Download
 button to download your application.
Step 2: Install the Prerequisites #
Click on the software installer downloaded in Step 1. The installation wizard will automatically identify the prerequisites and assist you with each installation required to 3CX Survey Creator. It includes .NET Framework (Web Installer), SQL Server Express (Web Installer), and SQL Server Management Studio.
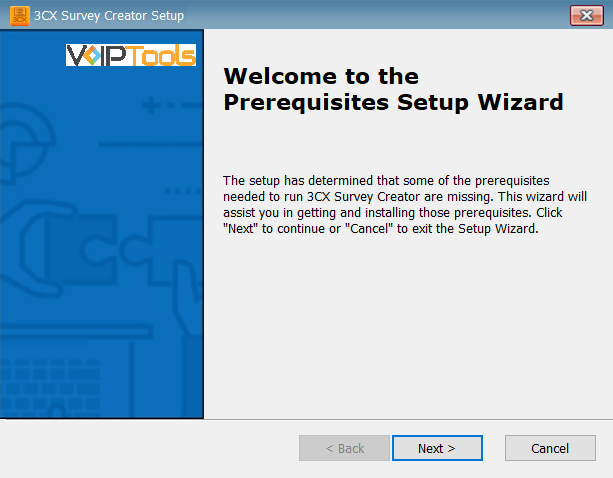
- Click the downloaded installer executable to launch the Prerequisites Setup Wizard and click Next.
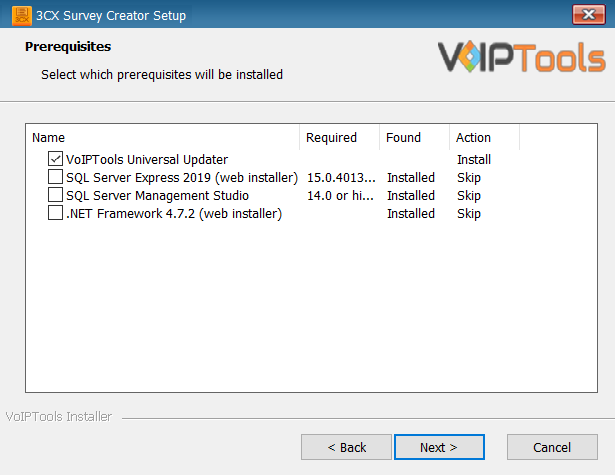
- In the Prerequisites window, install all the required prerequisites identified by the installer, or select/ unselect the applications based on your requirements and click Next to continue.
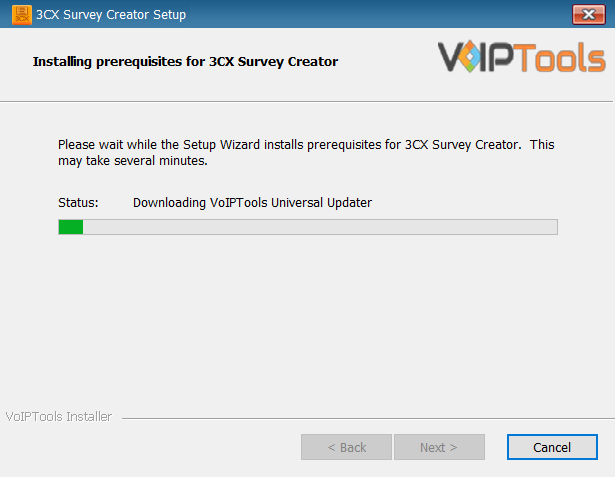
The installer will download and install the selected applications. It may take several minutes to complete.
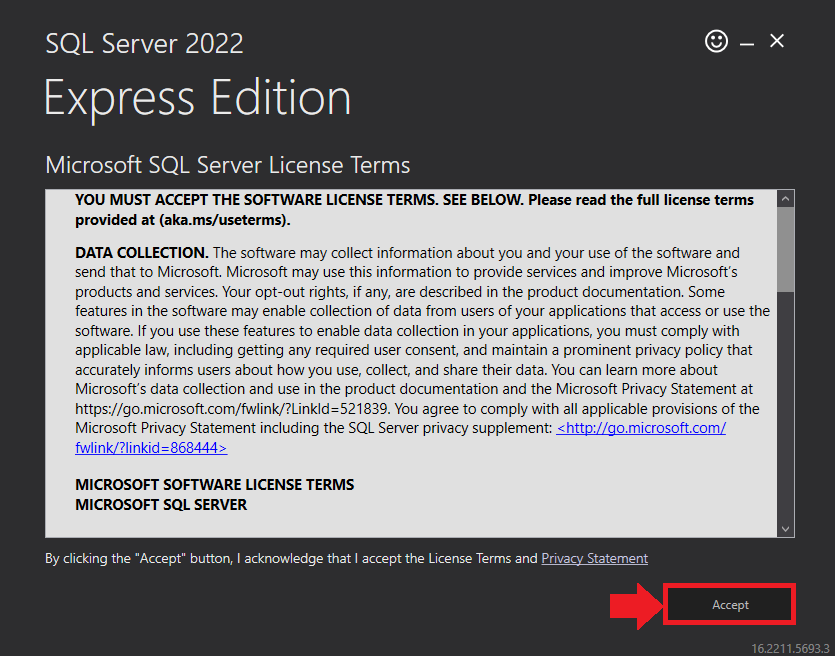
- In the Microsoft SQL Server License Terms click the Accept button to acknowledge the license terms and continue.
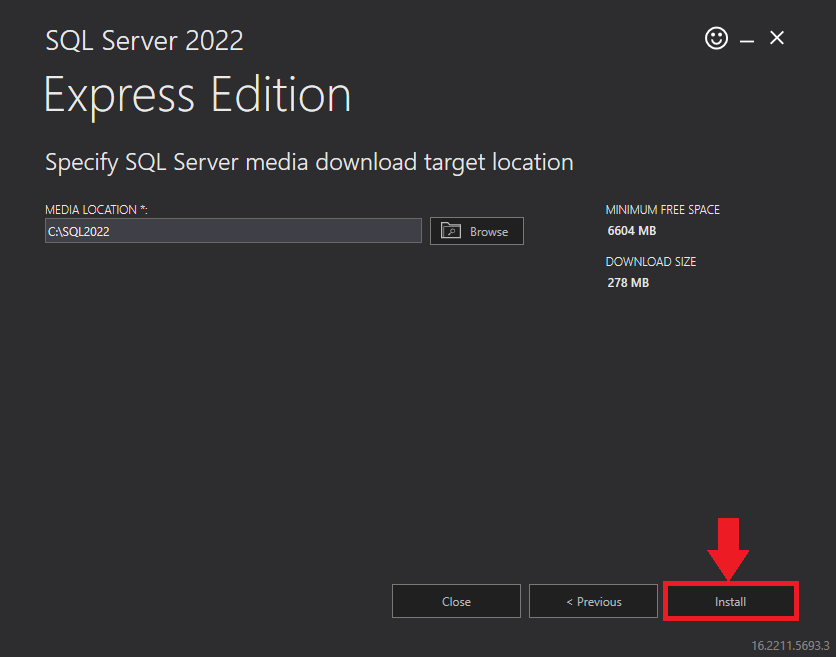
- This page appears if you do not have SQL Server Express preinstalled in your device.
- View the SQL Server Media target location in the Media Location field. If required, you can click the Browse button to change the location. Click Install to begin the installation of SQL Server Express.
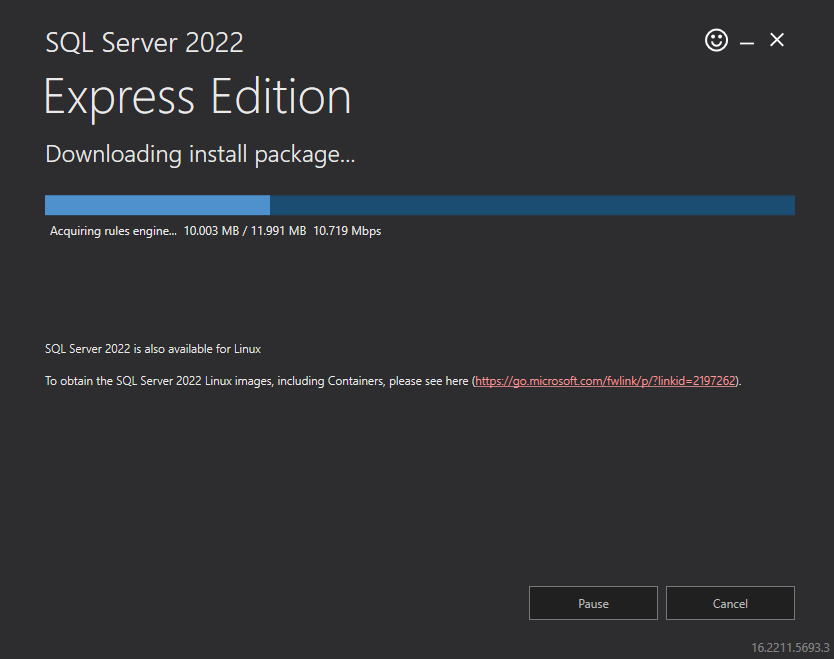
SQL server installation is in progress. This may take several minutes to complete.
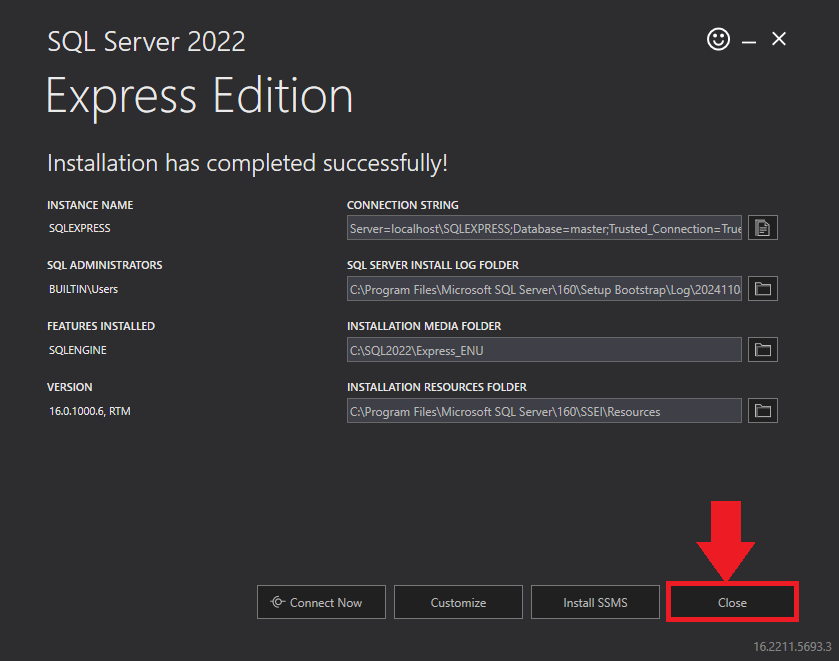
- Click the Close button once the prerequisites are installed.
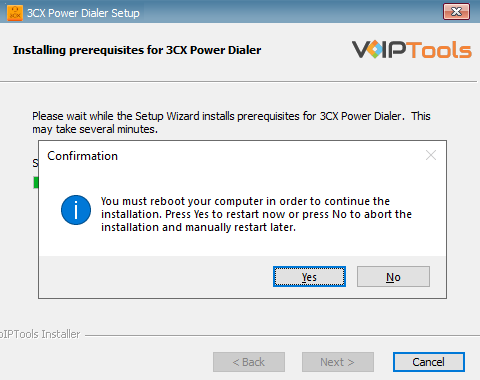
- Click Yes in the Confirmation Message Box to reboot the computer.
Step 3: Start the installation process #
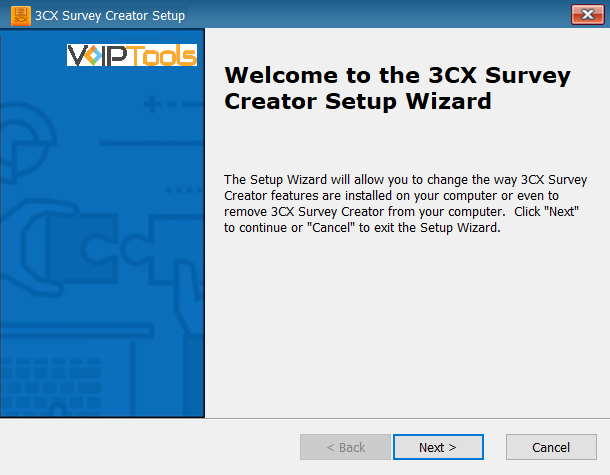
- Click Next on the 3CX Survey Creator Setup Wizard screen.
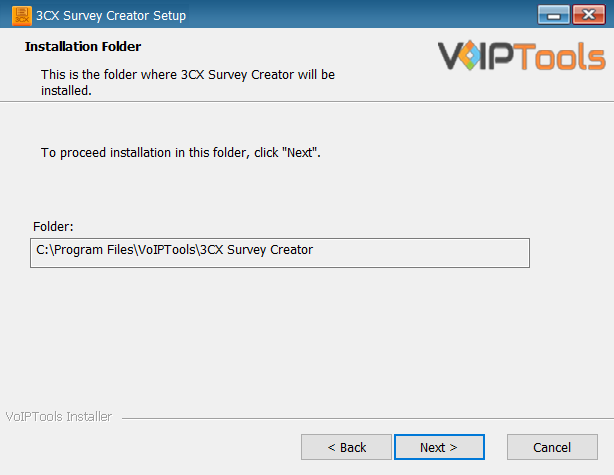
- On the Select Installation Folder window, the Folder field displays the path where the 3CX Survey Creator gets installed. You cannot change the location path.
- Click Next to continue with the installation.
Step 4: Test Relay Settings #
- In the 3CX Relay Services window, in the Relay Host field, enter the FQDN of your 3CX server.
NOTE:
Do not include https:// to the Relay host data.
- Enter 8801 in the Relay Port field.
- Enter the public key you copied from VoIPTools Relay services in the Public Key text field.
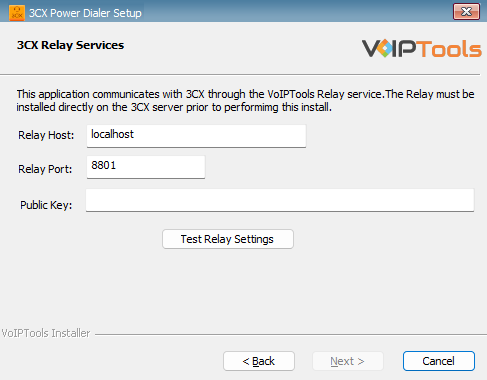
- Click the Test Relay Settings to confirm that ‘3CX Survey Creator’ can communicate with the Relay services running on the 3CX server.
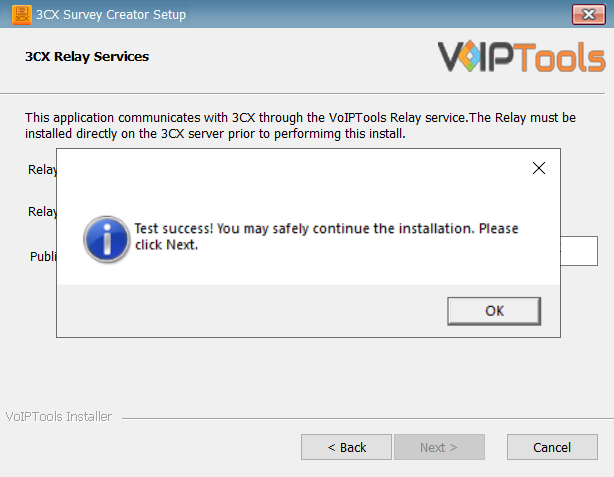
- If the ‘3CX Survey Creator’ is successfully able to communicate with the Relay services that run on the 3CX server, a Success message box appears. Click OK. If the test fails, you will not be able to continue until communication with the relay is established.
- Click Next to continue with the installation.
- You must set the Relay Port to 8801.
- If the Relay test fails, you cannot continue the installation until you establish communication with the Relay. If the test was unsuccessful:
- Confirm you have the correct firewall port open (default TCP 8801) on the 3CX server and the firewall protecting the 3CX server.
- Confirm that you have entered the correct FQDN for the 3CX server.
- Confirm that the 3CX Survey Creator and Relay use the same port and protocol.
Step 5: Configure the database #
When configuring the 3CX Survey Creator, select an existing Microsoft SQL Server instance in your environment. The database server can be a remote SQL Server, or a local instance running on the VoIPTools server.
You can set up the SQL database using SQL Authentication or Windows Integrated Authentication.
SQL Authentication #
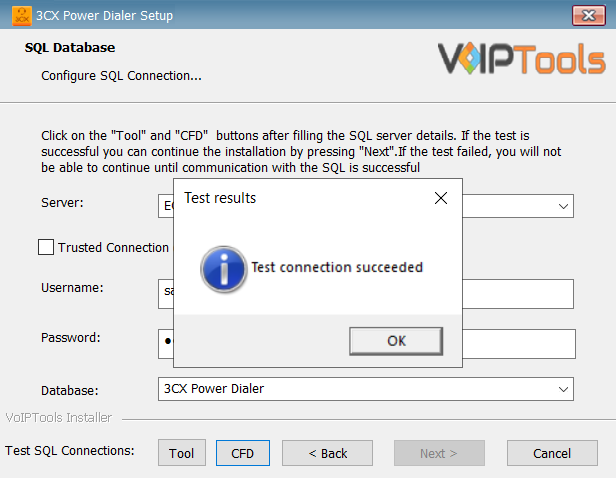
- Enter your server name in the Server field.
- If using the free SQL Express Edition, the default SQL Instance name is SQLExpress.
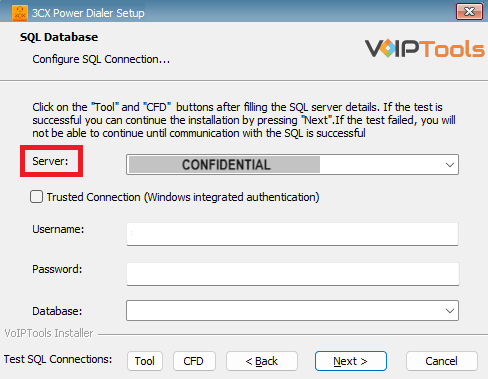
- If you want to use ‘SQL Authentication’, then install SQL Server in ‘Mixed‘ mode.
- If SQL Server is installed on a server other than the server where 3CX Exporter is installed, you will need to configure SQL Server to allow remote connections.
- Enter your credentials in the Username and Password fields.
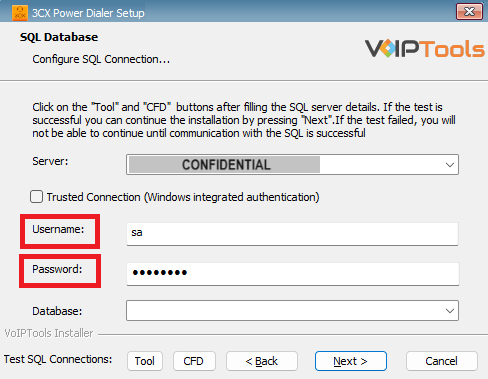
Make sure that you select a SQL Login that has sufficient permissions to alter the database and create SQL objects.
- Select or enter the 3CX Emergency Notifier in the Database dropdown.
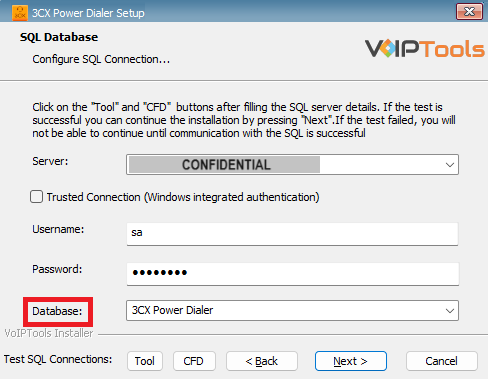
- In the Test SQL Connections section, click the Tool button to test the connection and click OK in the Test Results popup box.
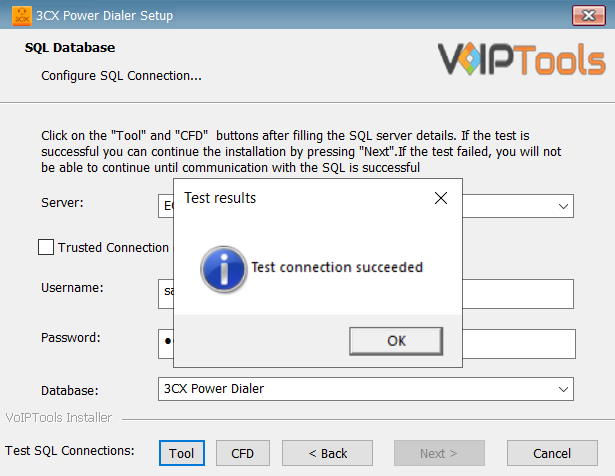
- Click the CFD button to confirm the 3CX connectivity with SQL Server and click OK on the Test Results message box.
- Click OK on the Test Results dialogue box.
Windows Integrated Authentication #
- To use Windows Integrated Authentication check the Trusted Connection (Windows integrated authentication) checkbox.
- The VoIPTools installer will create a local Windows user name as “VoIPToys” and give you sufficient rights to this user to create/update the SQL database.
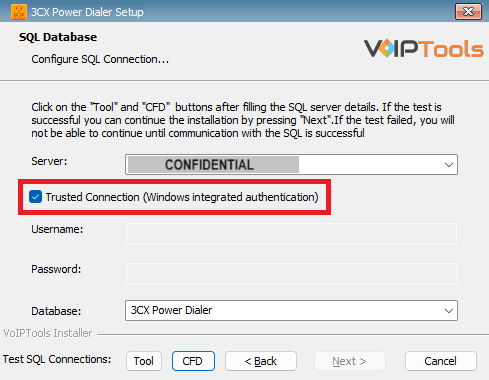
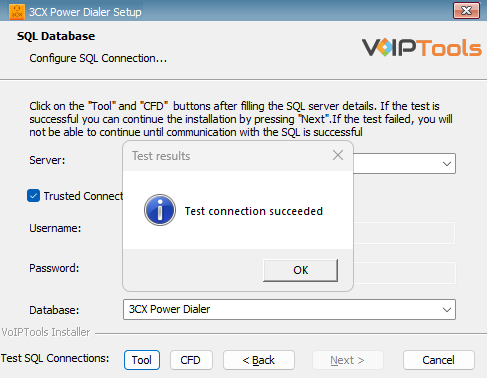
- In the Test SQL Connection section, click the Tool button to test the connection.
- Click the Next button which gets enabled when the database connection is successful.
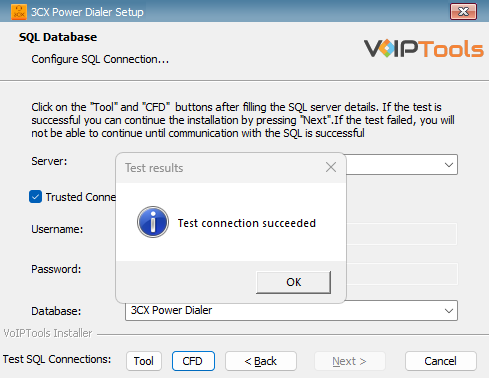
- Click the CFD button to confirm the 3CX connectivity with SQL Server and click OK on the Test Results message box.
- Click OK on the Test Results dialogue box.
We encourage you to use SQL Authentication rather than Windows authentication. Many of our tools leverage a Call Flow Designer (CFD) application running on the 3CX. Frequently our CFD applications require access to a SQL database. If the 3CX server and the database server are not in an Active Directory domain, Windows authentication will fail. To use SQL authentication, your SQL Server must be configured to run in “Mixed Mode”. If you installed SQL Server with one of our tools, we configure SQL in “Mixed Mode”.
Step 6: Installing 3CX Survey Creator #
- Click Install in the Ready to Install window.
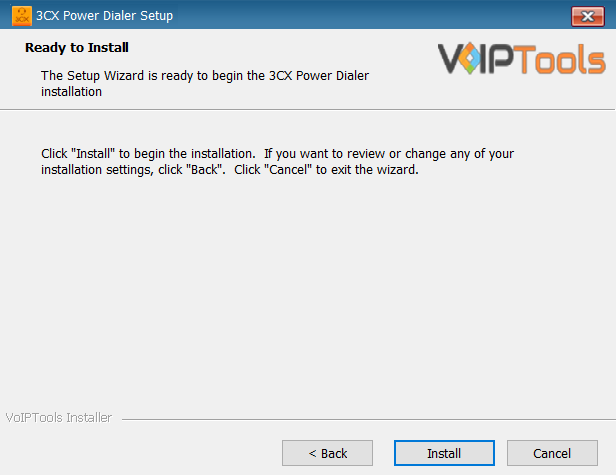
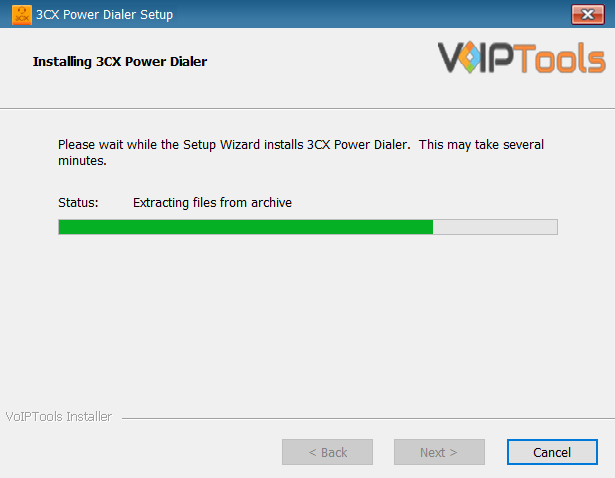
The application installation may take several minutes to complete.
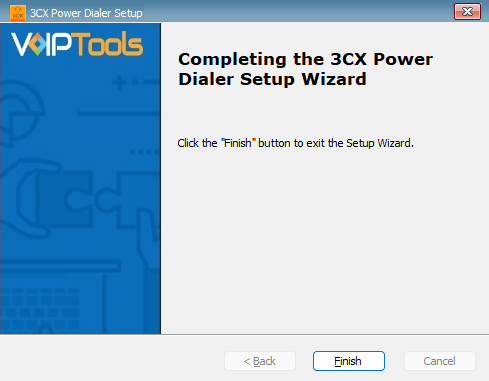
- Check the Launch 3CX Survey Creator checkbox and click Finish when the installation is complete.
Step 7: Login to the Web Application: #
Before you Start: Make sure you have registered with the VoIPTools Relay which grants access to the application.
Follow the procedure to register your software,
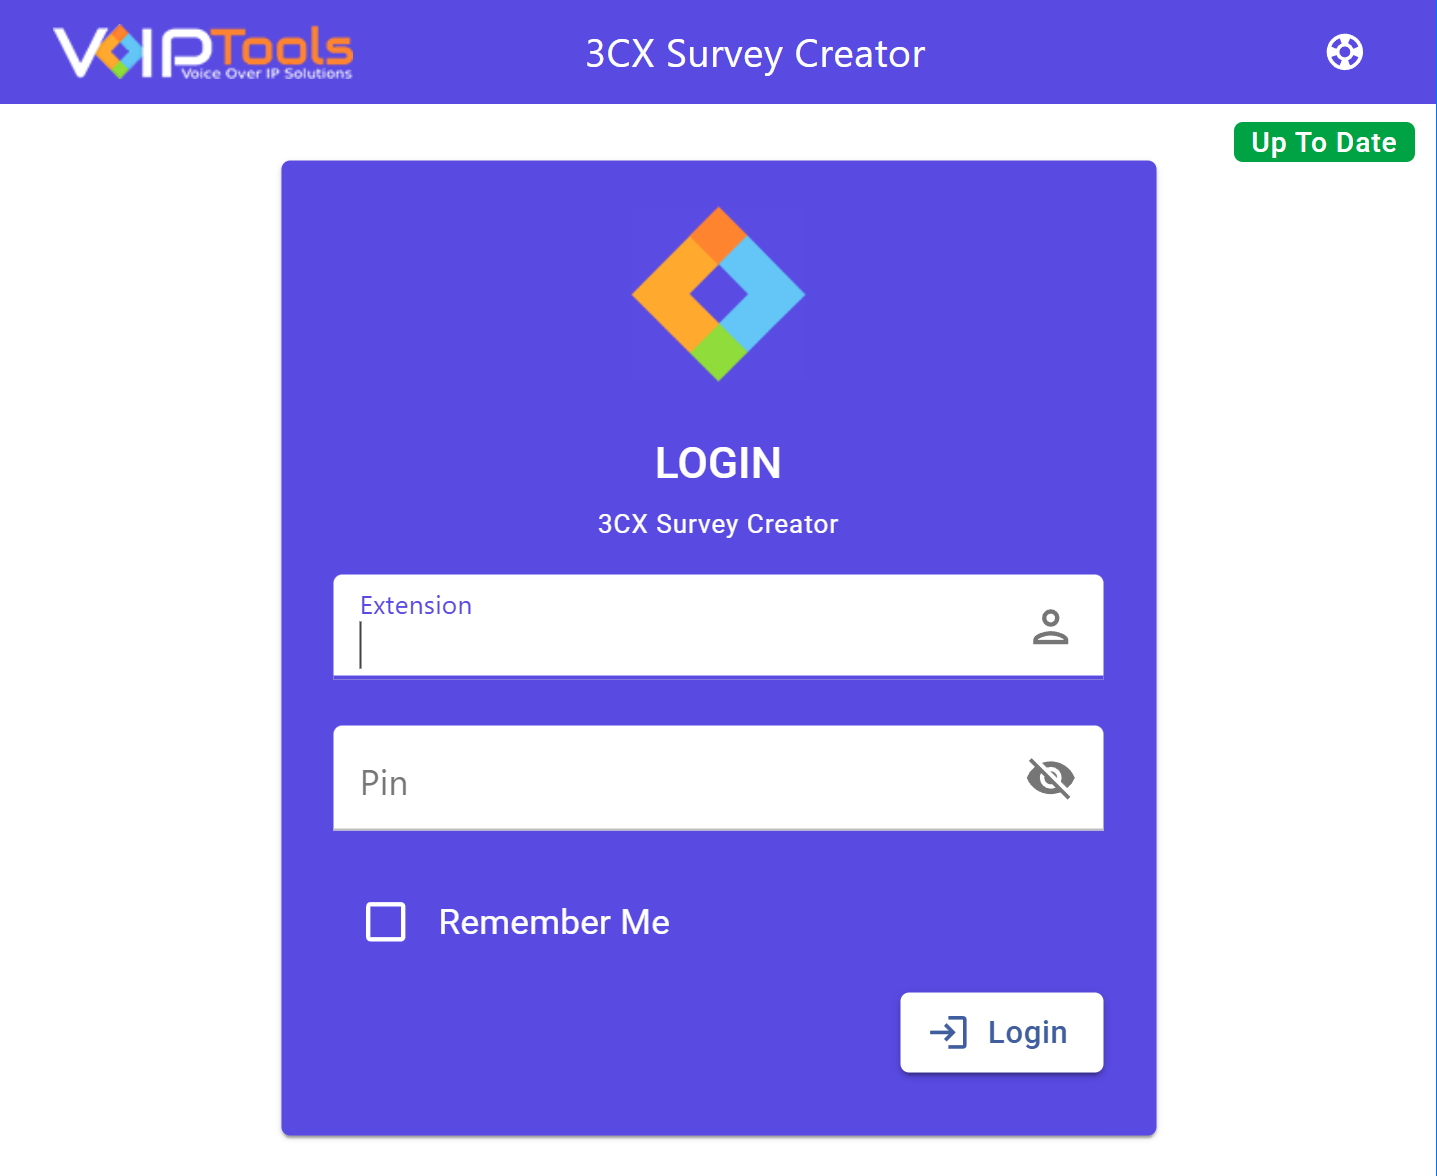
- Click the 3CX Survey Creator Desktop Icon to open the web application.
- On the Login page, do the following tasks,
- In the Extension field, enter your 3CX extension number.
- In the PIN field, enter your 3CX voicemail PIN.
- Click the Login button to log in to your account
Settings #
The Settings menu is the page where you configure 3CX Survey Creator. Use this page to set your connection details, schedule reports, choose a text to speech engine, configure email, manage role access, and customize branding.
| Section Name | Purpose of the section |
|---|---|
| General Settings | Connects the application to your VoIPTools Server and sets the display time zone and culture. |
| Scheduled Reports | Sends survey reports by email on a schedule you set. |
| TTS Settings | Configures the voice engine that reads survey prompts aloud. |
| Email Server | Configures the email server used to send reports and notifications. |
| Role Access Permissions | Manages page access and permissions for each user role. |
| Custom Branding | Configures the header title, logo, and colors used across the application. |
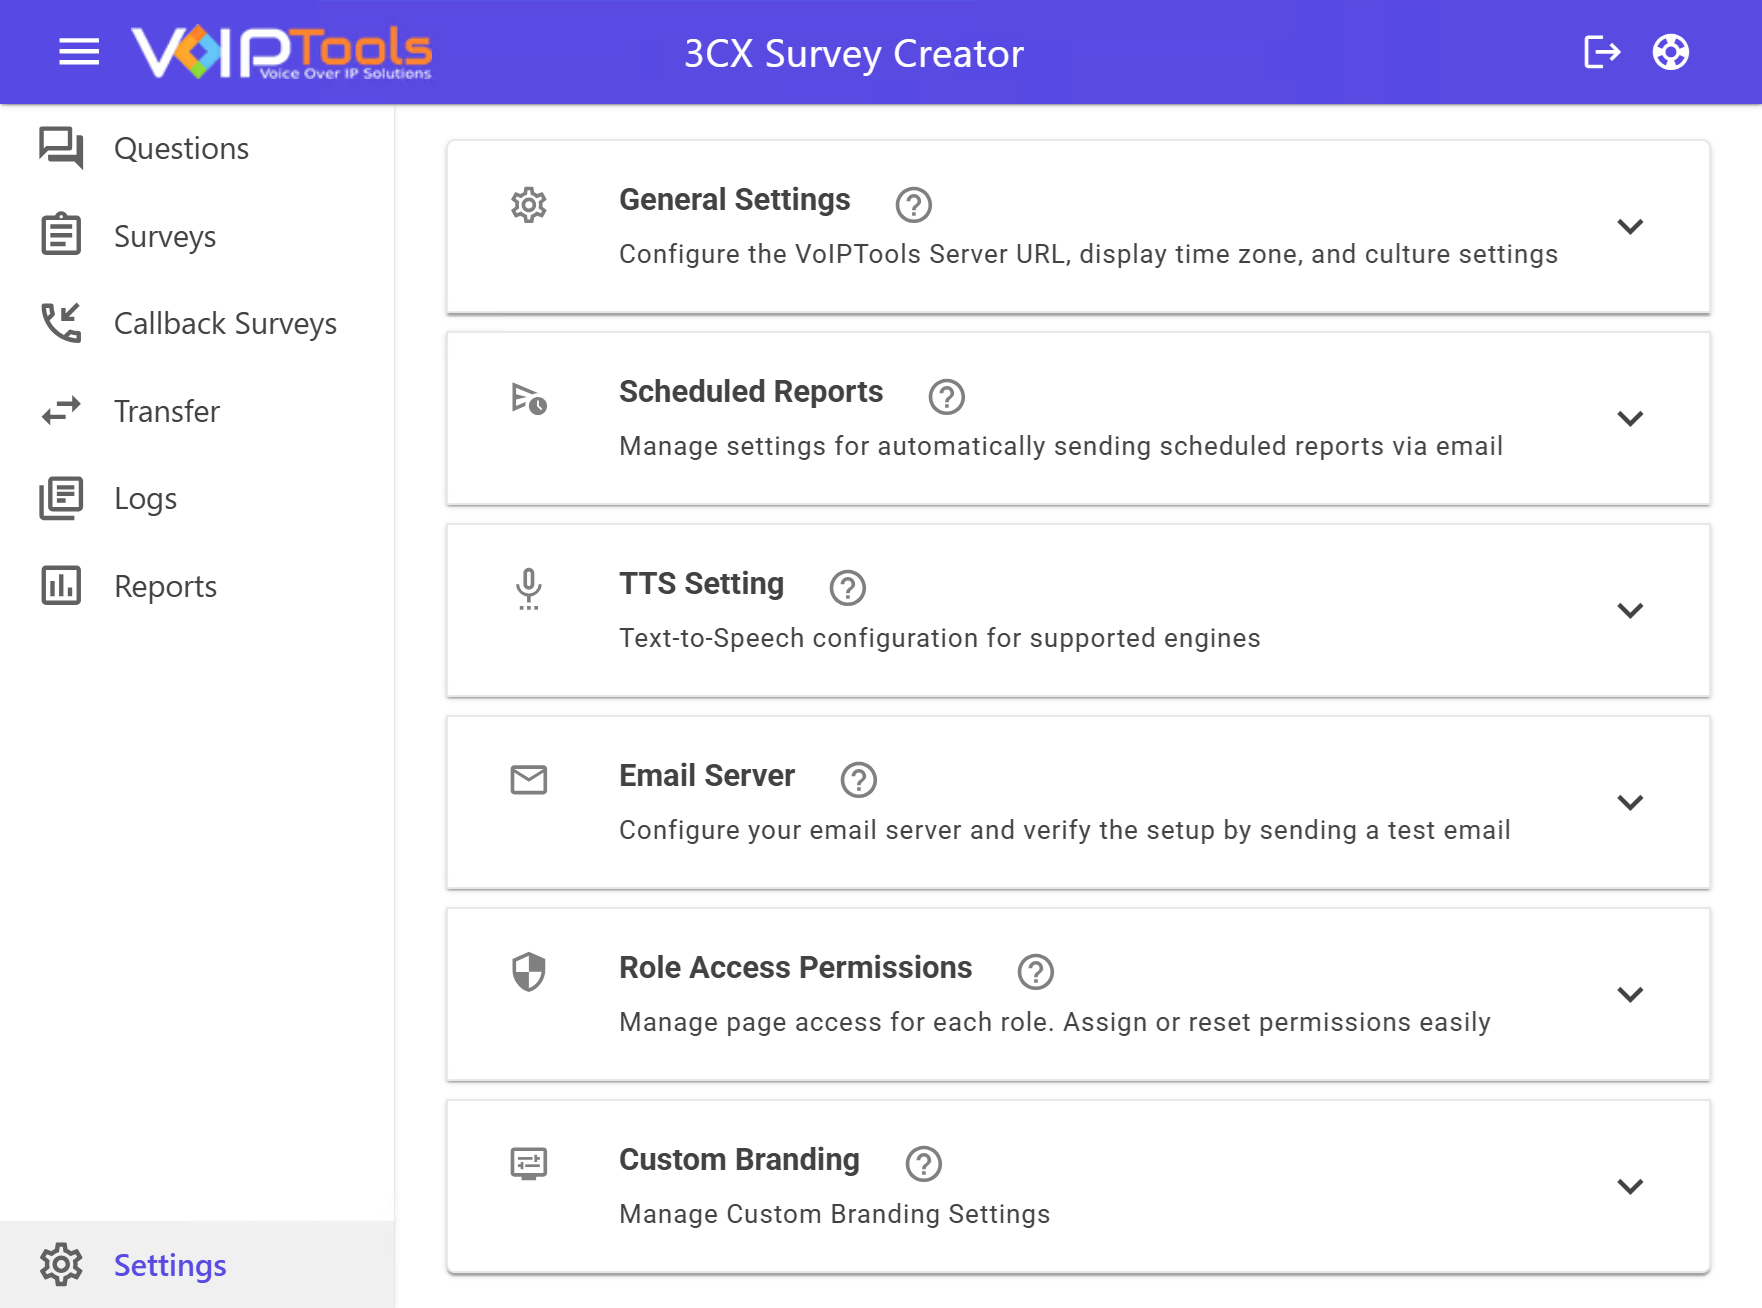 Figure 21: Settings Menu
General Settings #
The General Settings section is where you connect 3CX Survey Creator to your VoIPTools Server and set how dates and times appear on screen.
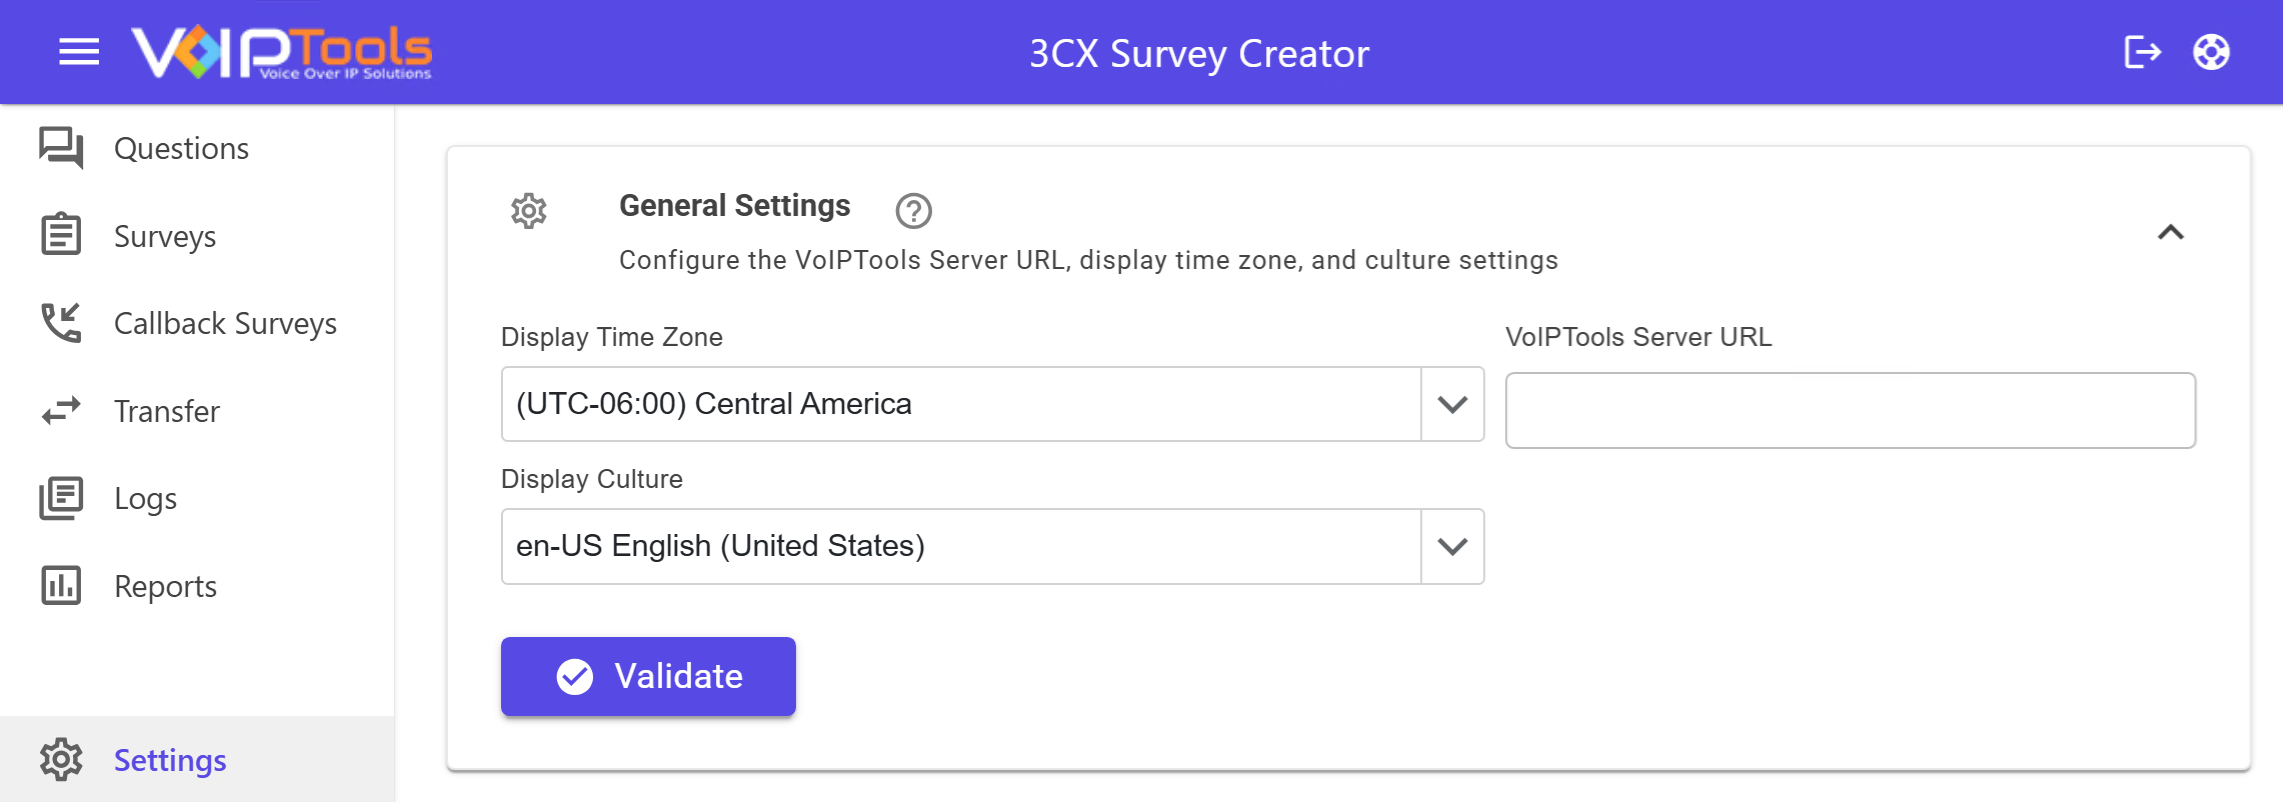 Figure 22: General Settings Section
Entering your settings #
- In the Settings menu, expand the General Settings section.
- In the VoIPTools Server URL field, enter the address of your VoIPTools Server. Use the format
https://FQDN:portorhttp://IPAddress:port. - In the Display Time Zone dropdown, select the time zone you want dates and times shown in.
- In the Display Culture dropdown, select your preferred format for how dates appear.
- Click Validate to confirm your VoIPTools Server URL makes a good connection.
NOTE:
- The FQDN (Fully Qualified Domain Name) can point to a private IP address for internal networks or a public IP address for external networks and hosting facilities. Make sure the URL can be reached from this machine.
- Display Time Zone is a global setting that applies to every user. It changes how times display and does not change stored data.
Field Definitions #
| Field | Description |
|---|---|
| VoIPTools Server URL | Address the 3CX Call Flow Designer uses to reach the VoIPTools Server. |
| Display Time Zone | Time zone used to display dates and times to users. A global setting that does not change stored data. |
| Display Culture | Format used to display dates on screen. |
Scheduled Reports #
Use the Scheduled Reports section to set up automatic emails for your survey reports.
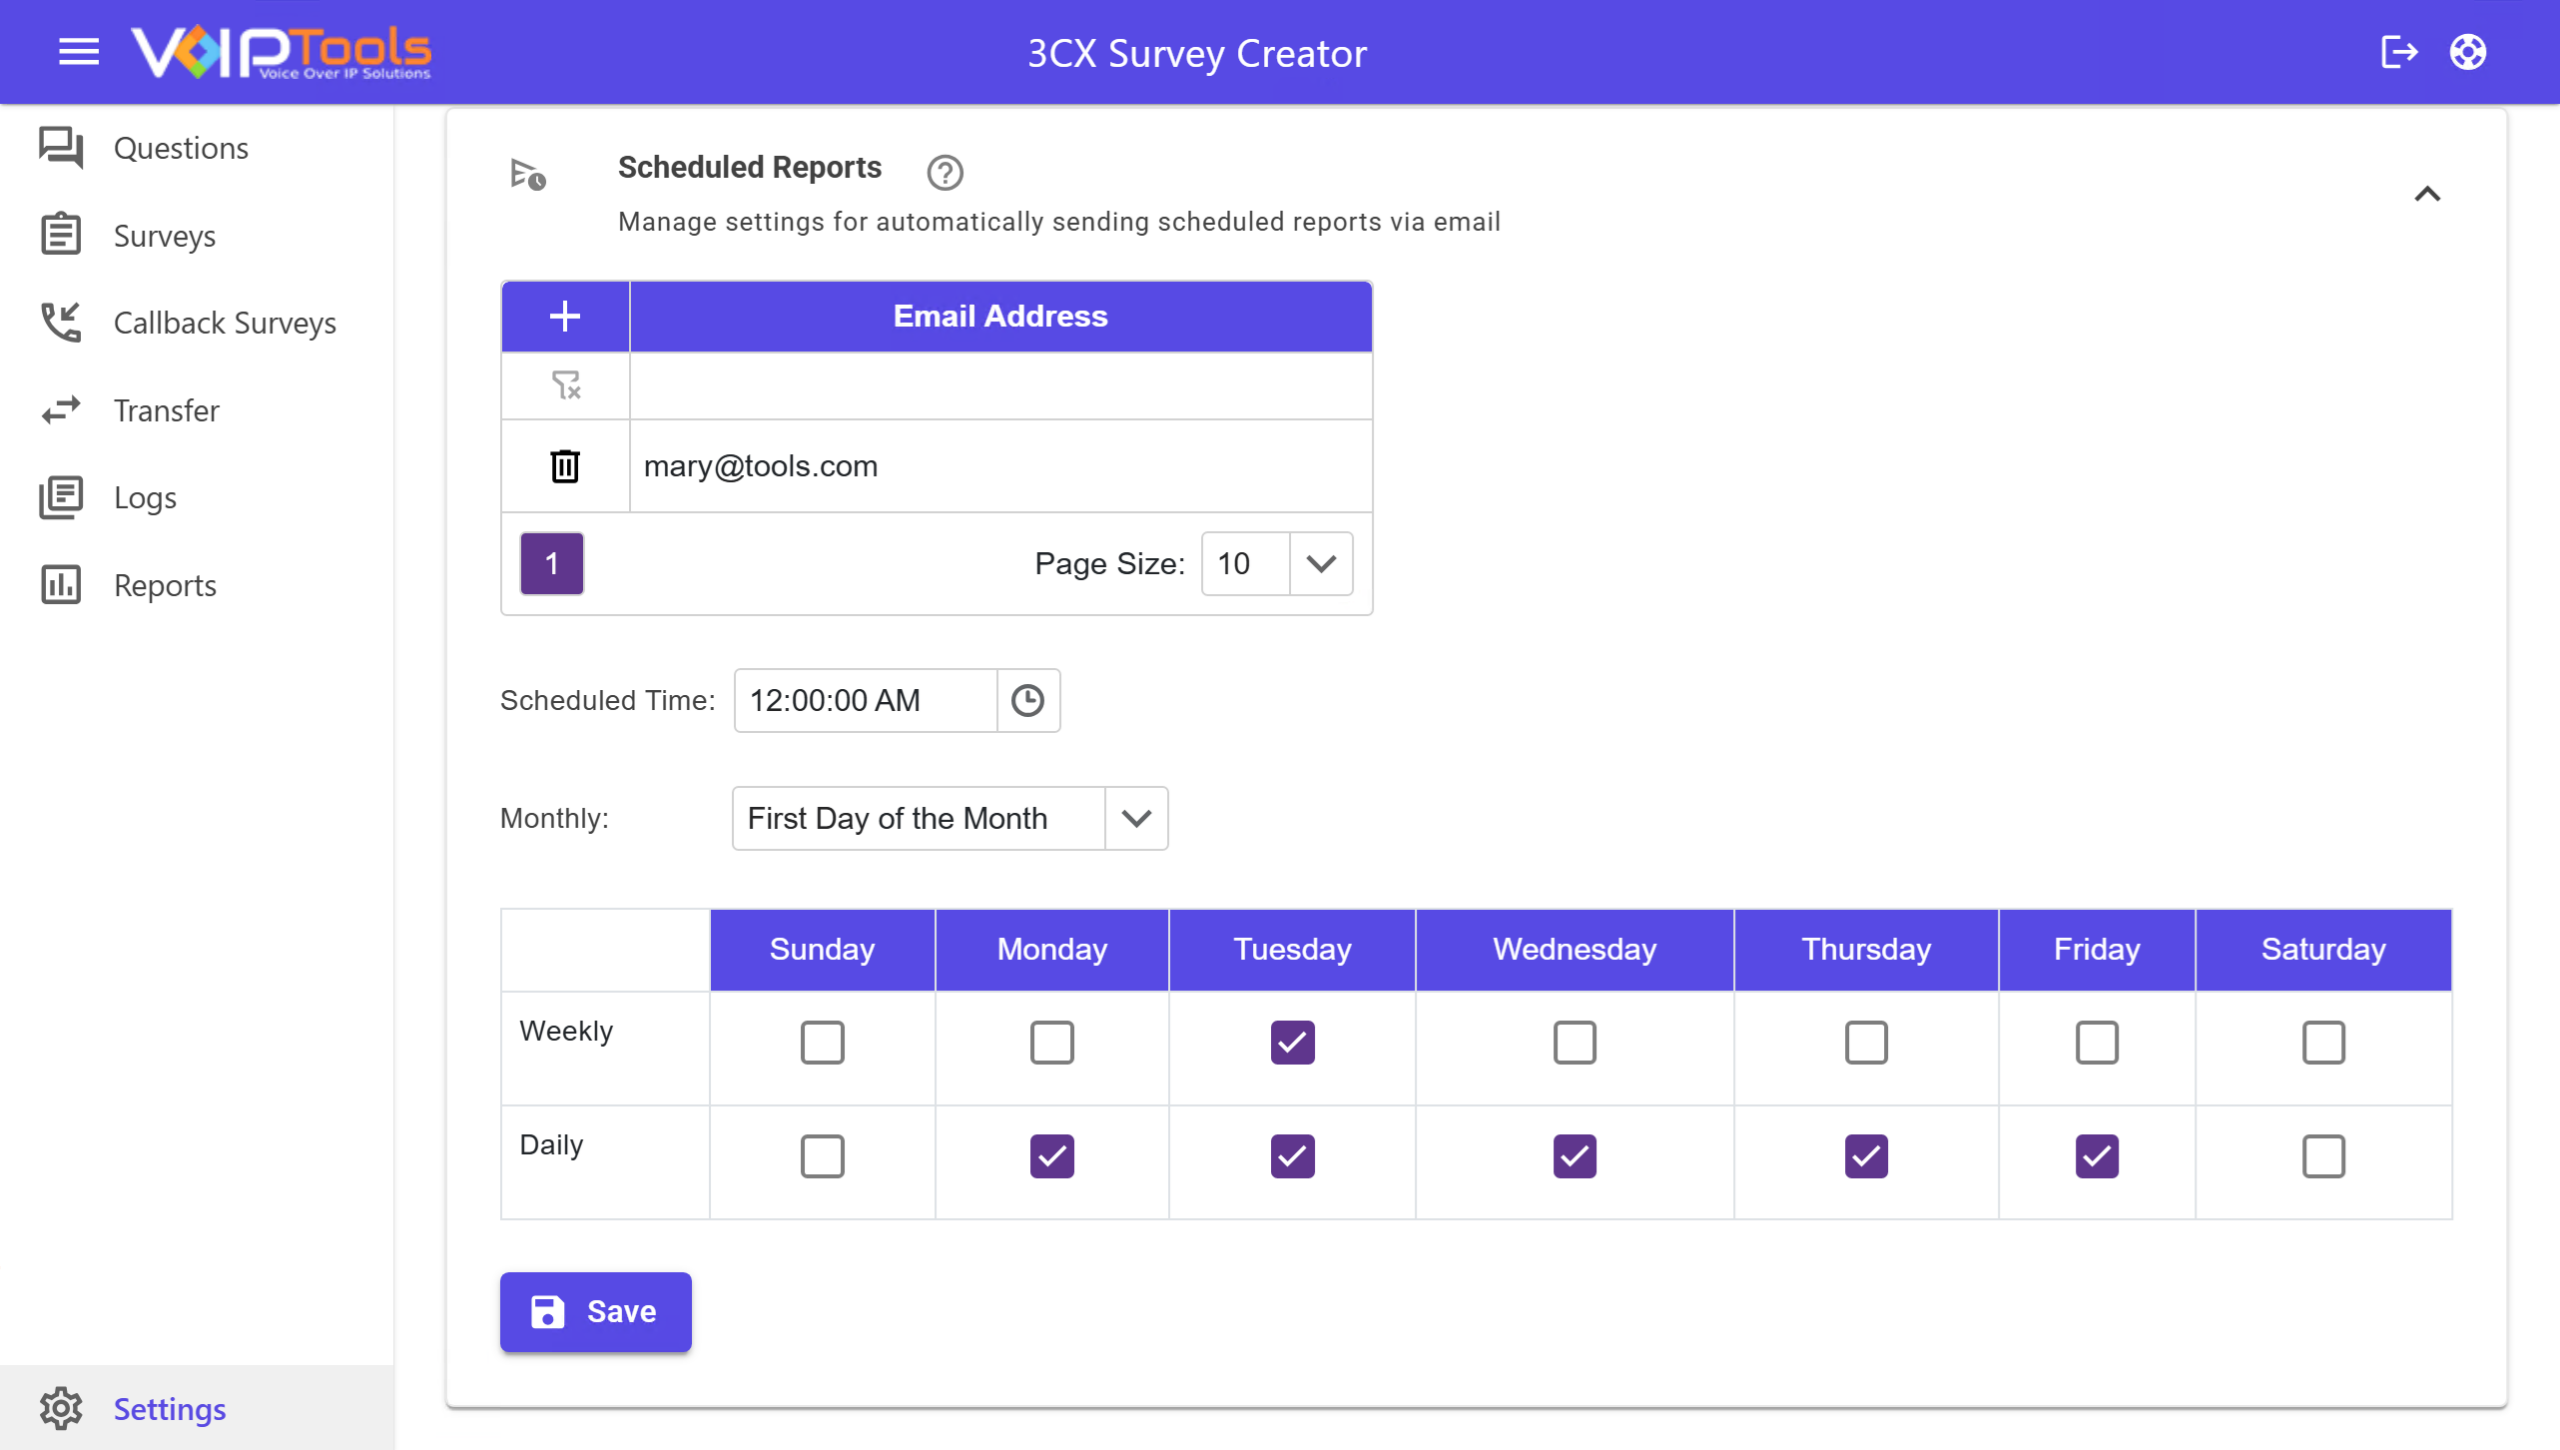 Figure 24: Scheduled Reports Section
Adding email addresses #
- Click the + icon to add a new row to the list.
- Type an email address in the Email Address field.
- To remove an address, click the trash icon next to that row.
Setting the scheduled time #
- In the Scheduled Time field, enter the time you want reports sent, or click the clock icon to choose a time.
Choosing a monthly option #
- In the Monthly dropdown, select whether reports go out on the first day or the last day of the month.
Setting your weekly and daily schedule #
The table below the monthly option lets you pick which days trigger a report.
- In the Weekly row, check each day you want a weekly report sent.
- In the Daily row, check each day you want a daily report sent.
NOTE:
The Weekly and Daily rows work on their own. A day checked in one row does not affect the other.
Saving your settings #
- Click Save to apply your changes.
TTS Settings #
The TTS Settings section lets you choose the voice engine that reads your survey prompts aloud. Select an option from the TTS Type dropdown, then fill in the fields for that engine.
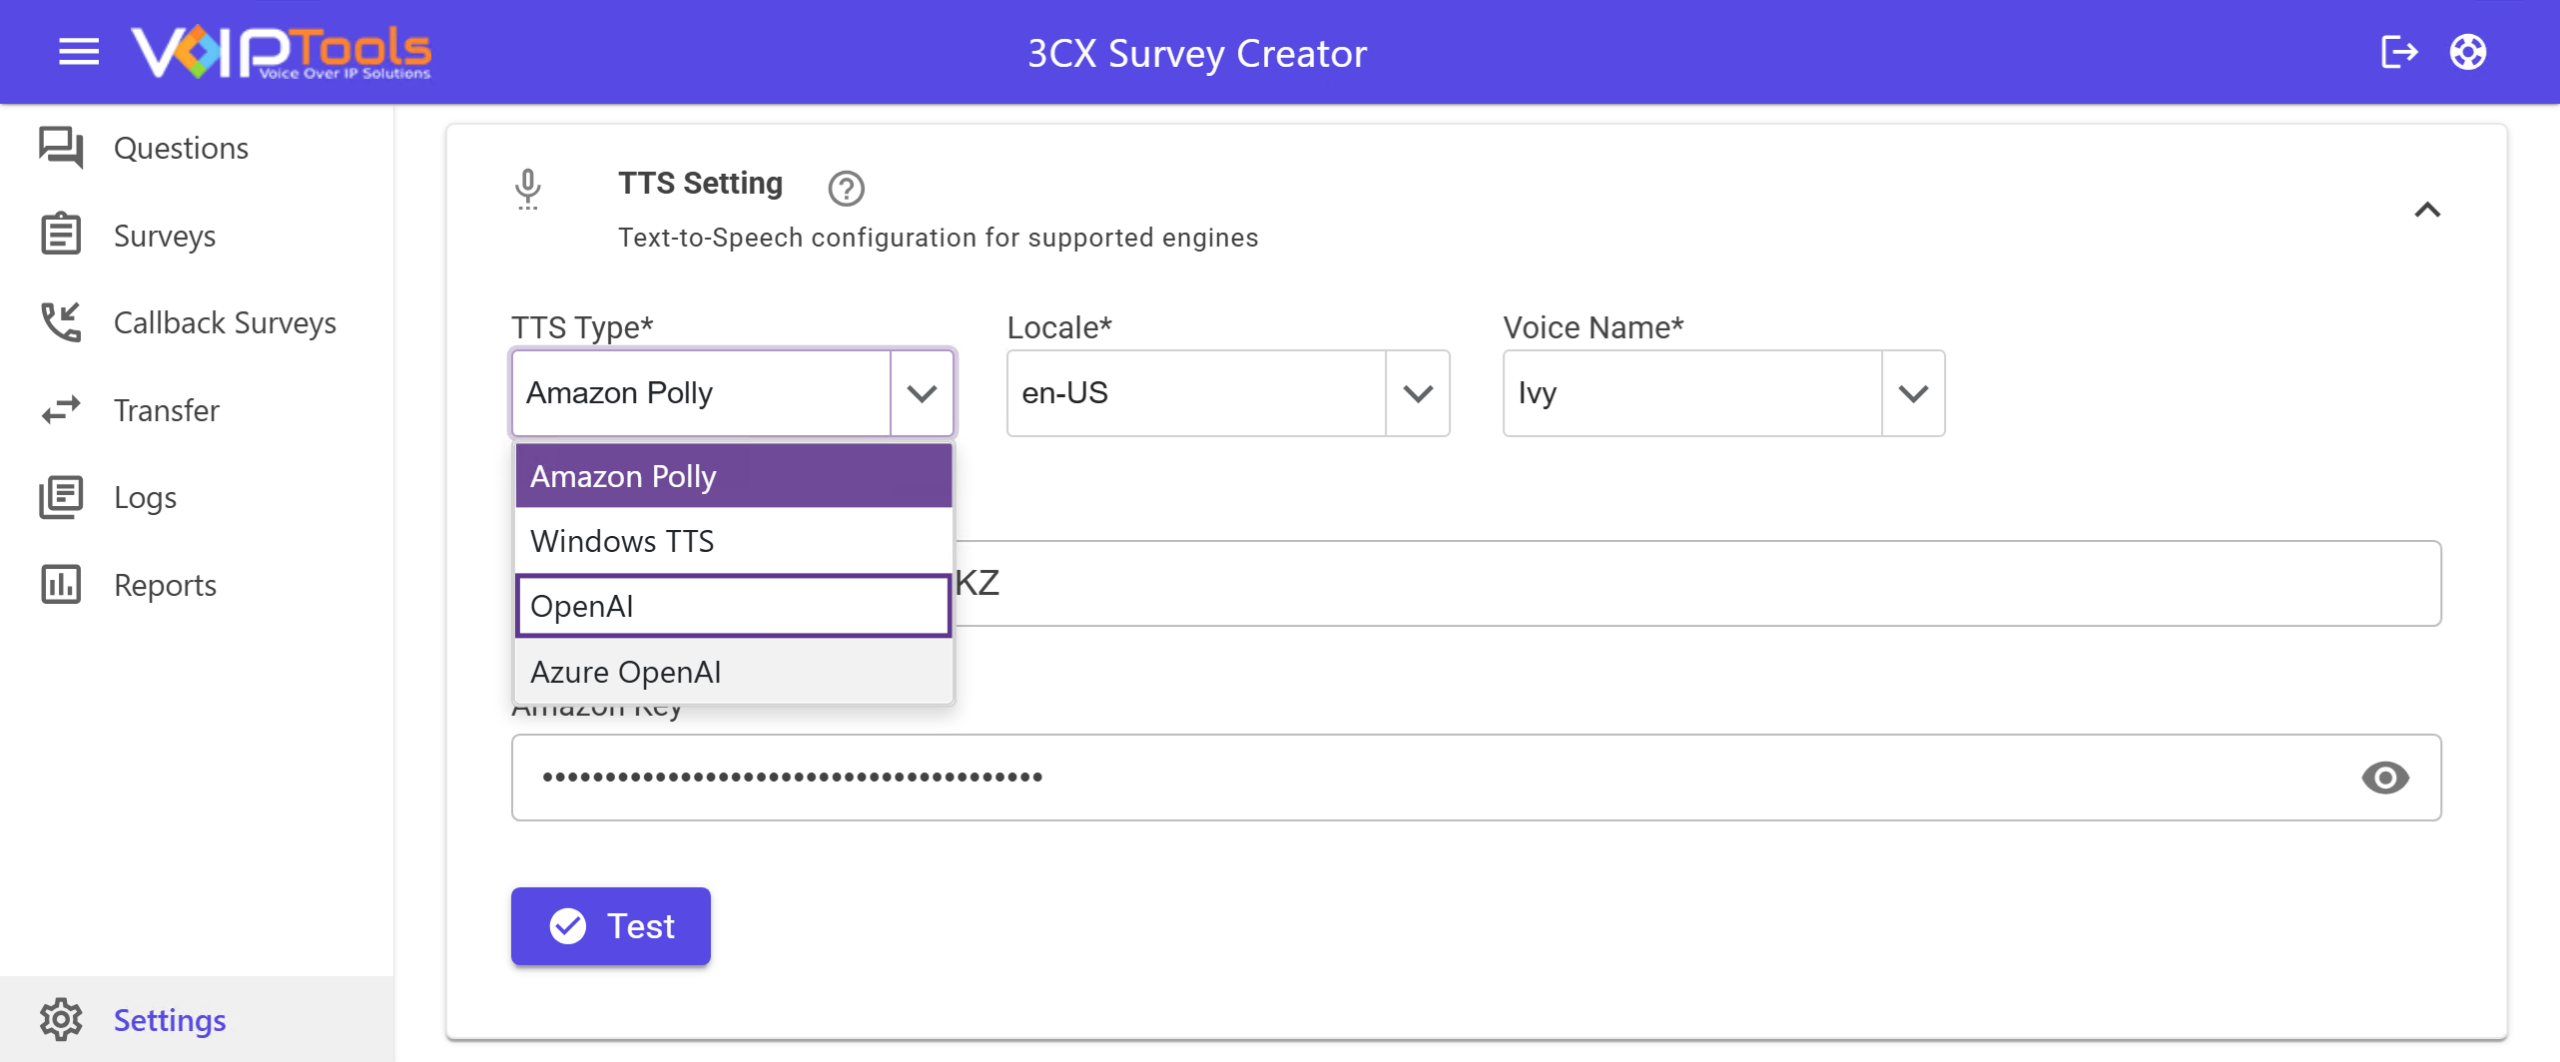 Figure 27: TTS Type Dropdown
Amazon Polly #
- In the Locale dropdown, select the language for the voice.
- In the Voice Name dropdown, select a voice. The voices shown depend on the locale you picked.
- In Amazon Id, enter your Amazon ID.
- In Amazon Key, enter your Amazon key.
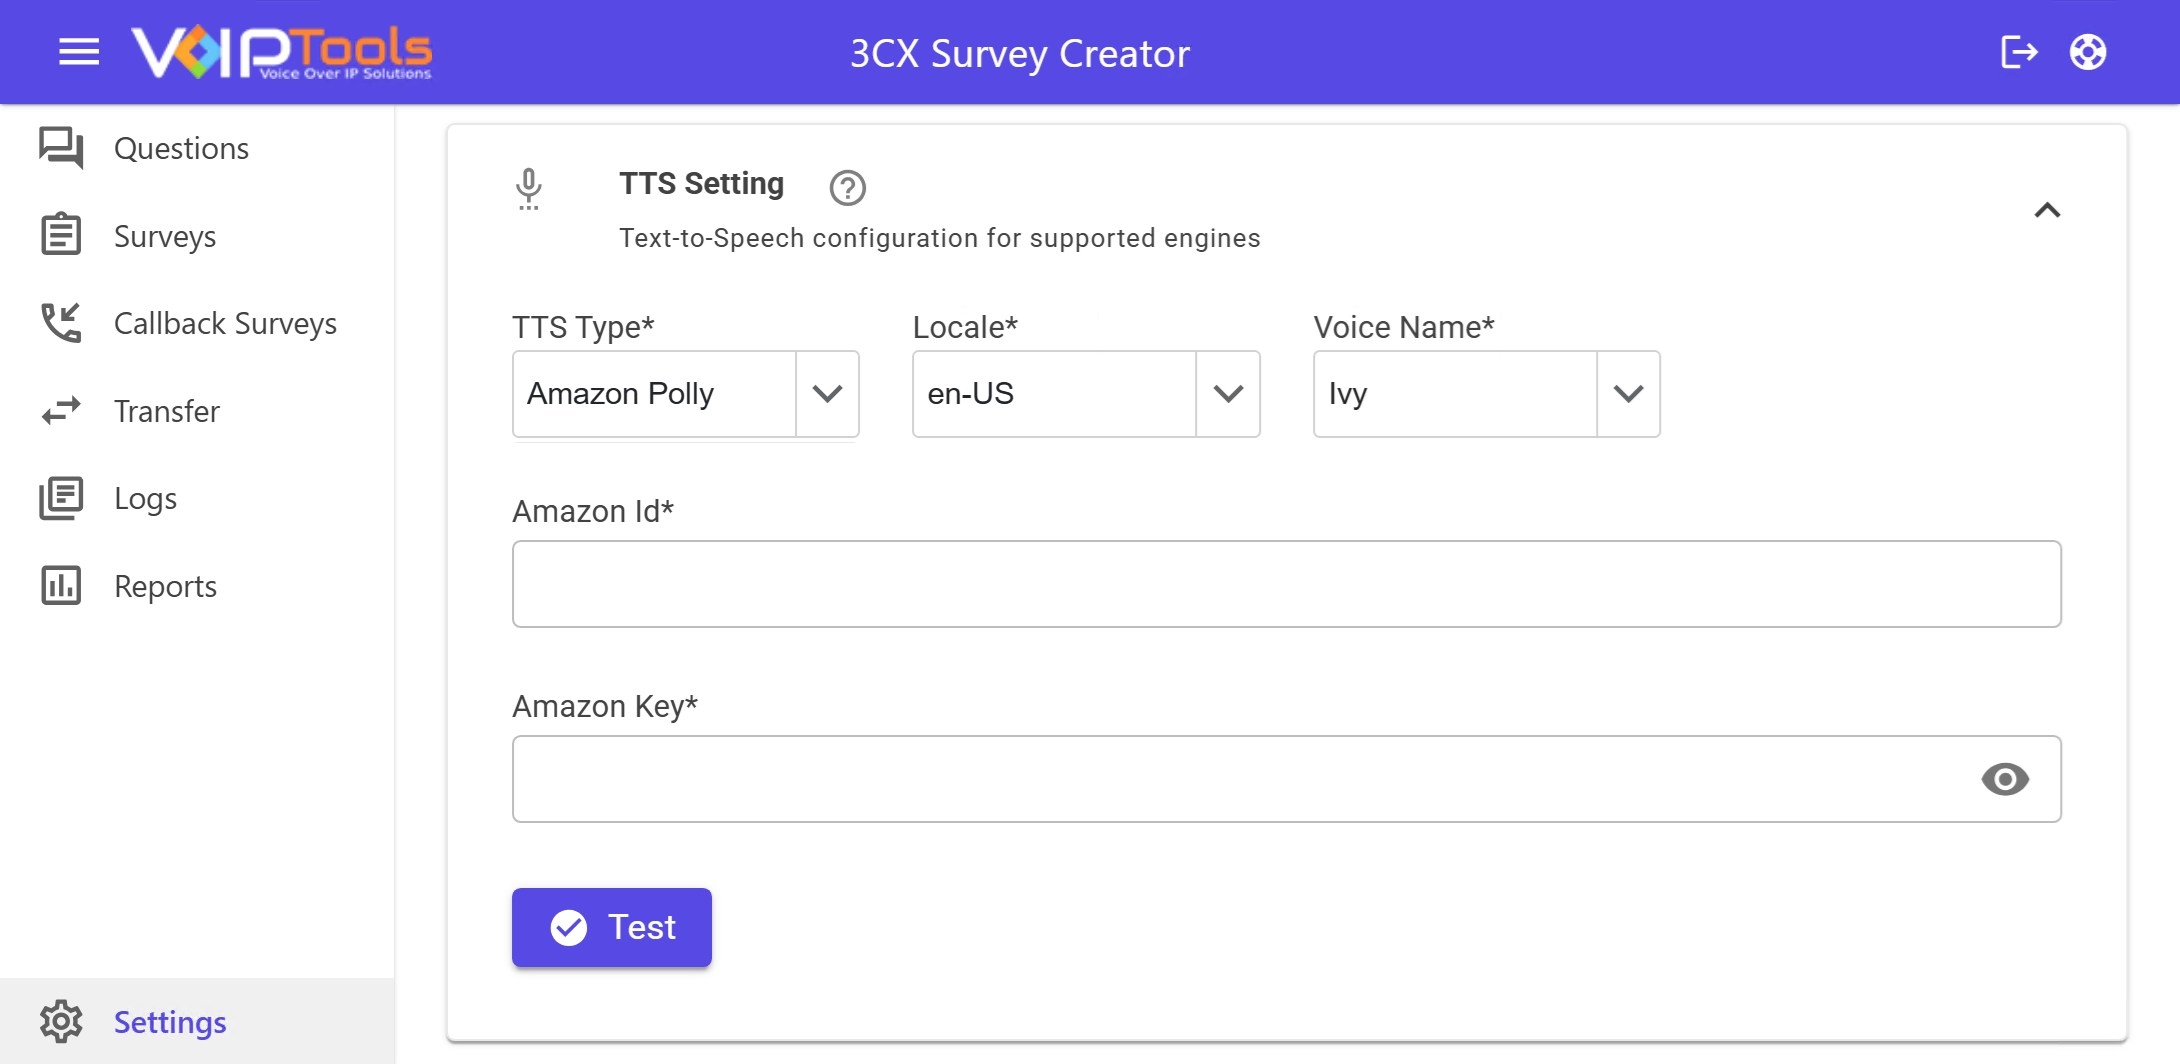 Figure 28: Amazon Polly Settings
Windows TTS #
- In the Locale dropdown, select the language for the voice.
- In the Gender dropdown, select Male or Female.
- In the Voice Name dropdown, select a voice installed on your computer.
- In the Volume dropdown, select how loud the voice should sound.
- In the Speech Rate dropdown, select how fast the voice should speak.
OpenAI #
- In the Voice Name dropdown, select one of the OpenAI voices.
- In the Model Name dropdown, select
tts-1ortts-1-hd. The HD option gives higher voice quality. - In the Speed dropdown, select the playback speed.
- In Model, enter the model name you want to use.
- In API Base Address, enter the main URL for the OpenAI API.
- In API Key, enter your OpenAI API key.
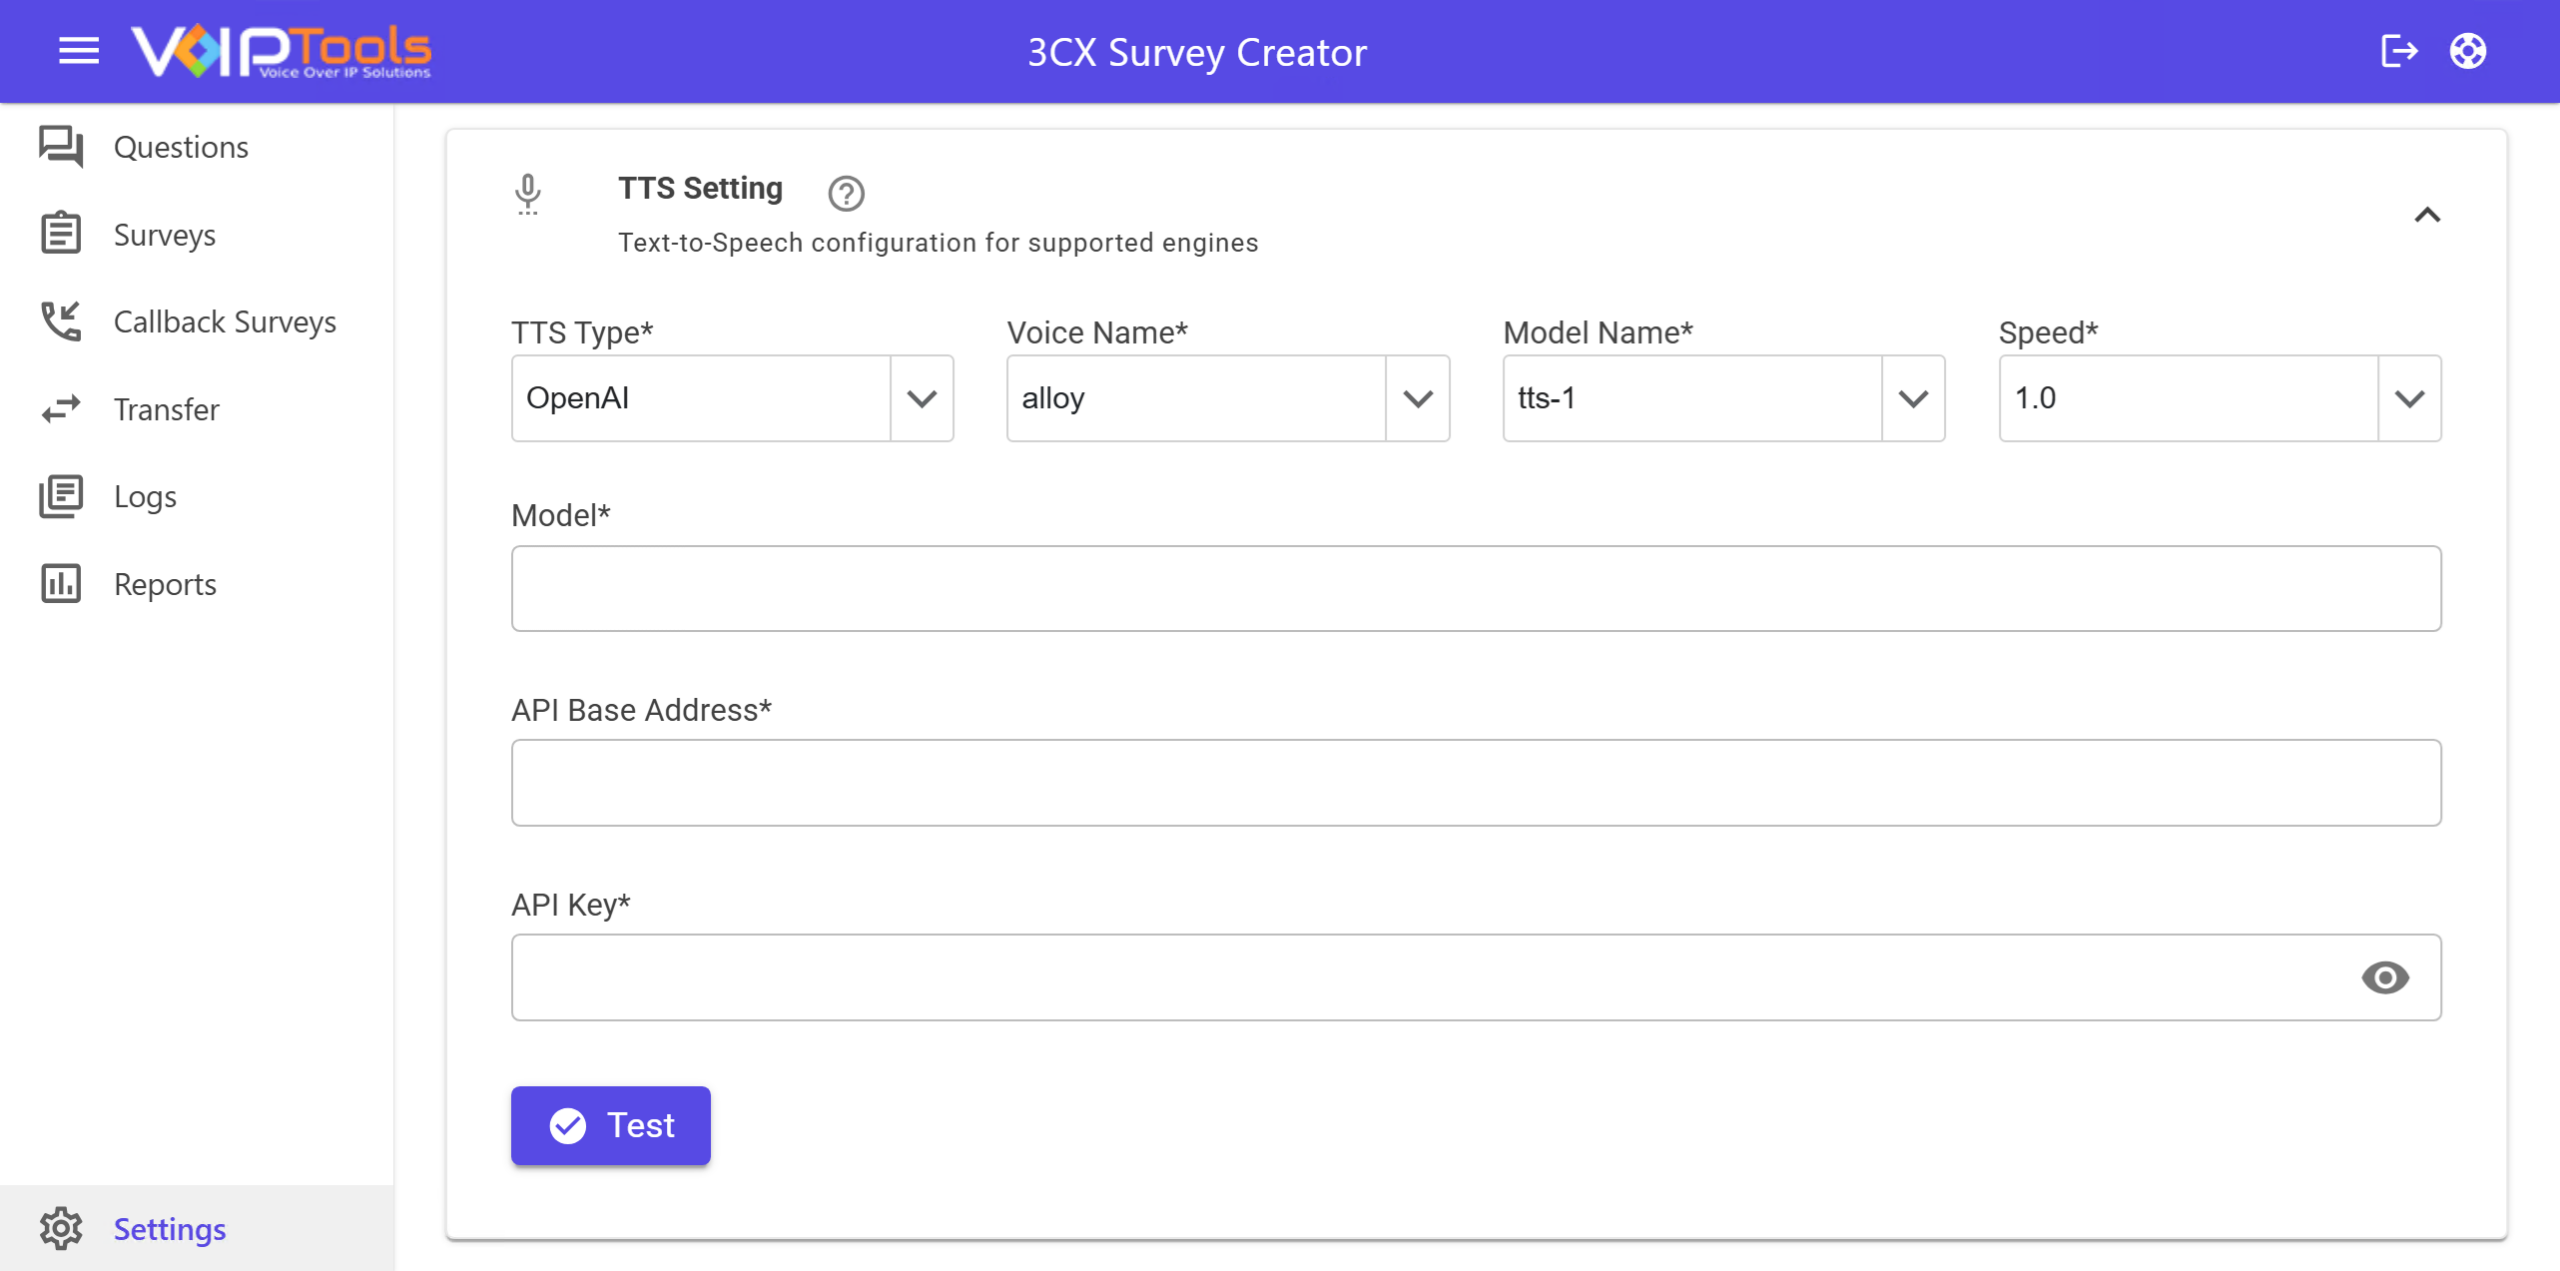 Figure 30: OpenAI Settings
Azure OpenAI #
- In the Model Name dropdown, select the model you deployed in Azure (
tts-1ortts-1-hd). - In the Language dropdown, select a locale, such as en-US.
- In the Voice Name dropdown, select a supported voice.
- In API Endpoint, enter the endpoint for your Azure OpenAI resource.
- In API Key, enter the key for your Azure OpenAI resource. You can find this in the Azure portal under your resource’s Keys and Endpoint section.
Testing your settings #
- Click Test to confirm your settings connect to the TTS service.
NOTE:
A green Success message confirms the credentials are valid and the test worked. A red Error message means the credentials are invalid and the API did not connect. Click OK to close either message, then check your entries and try again if needed.
Email Server #
Use the Email Server section to set up the server that sends your reports and notifications.
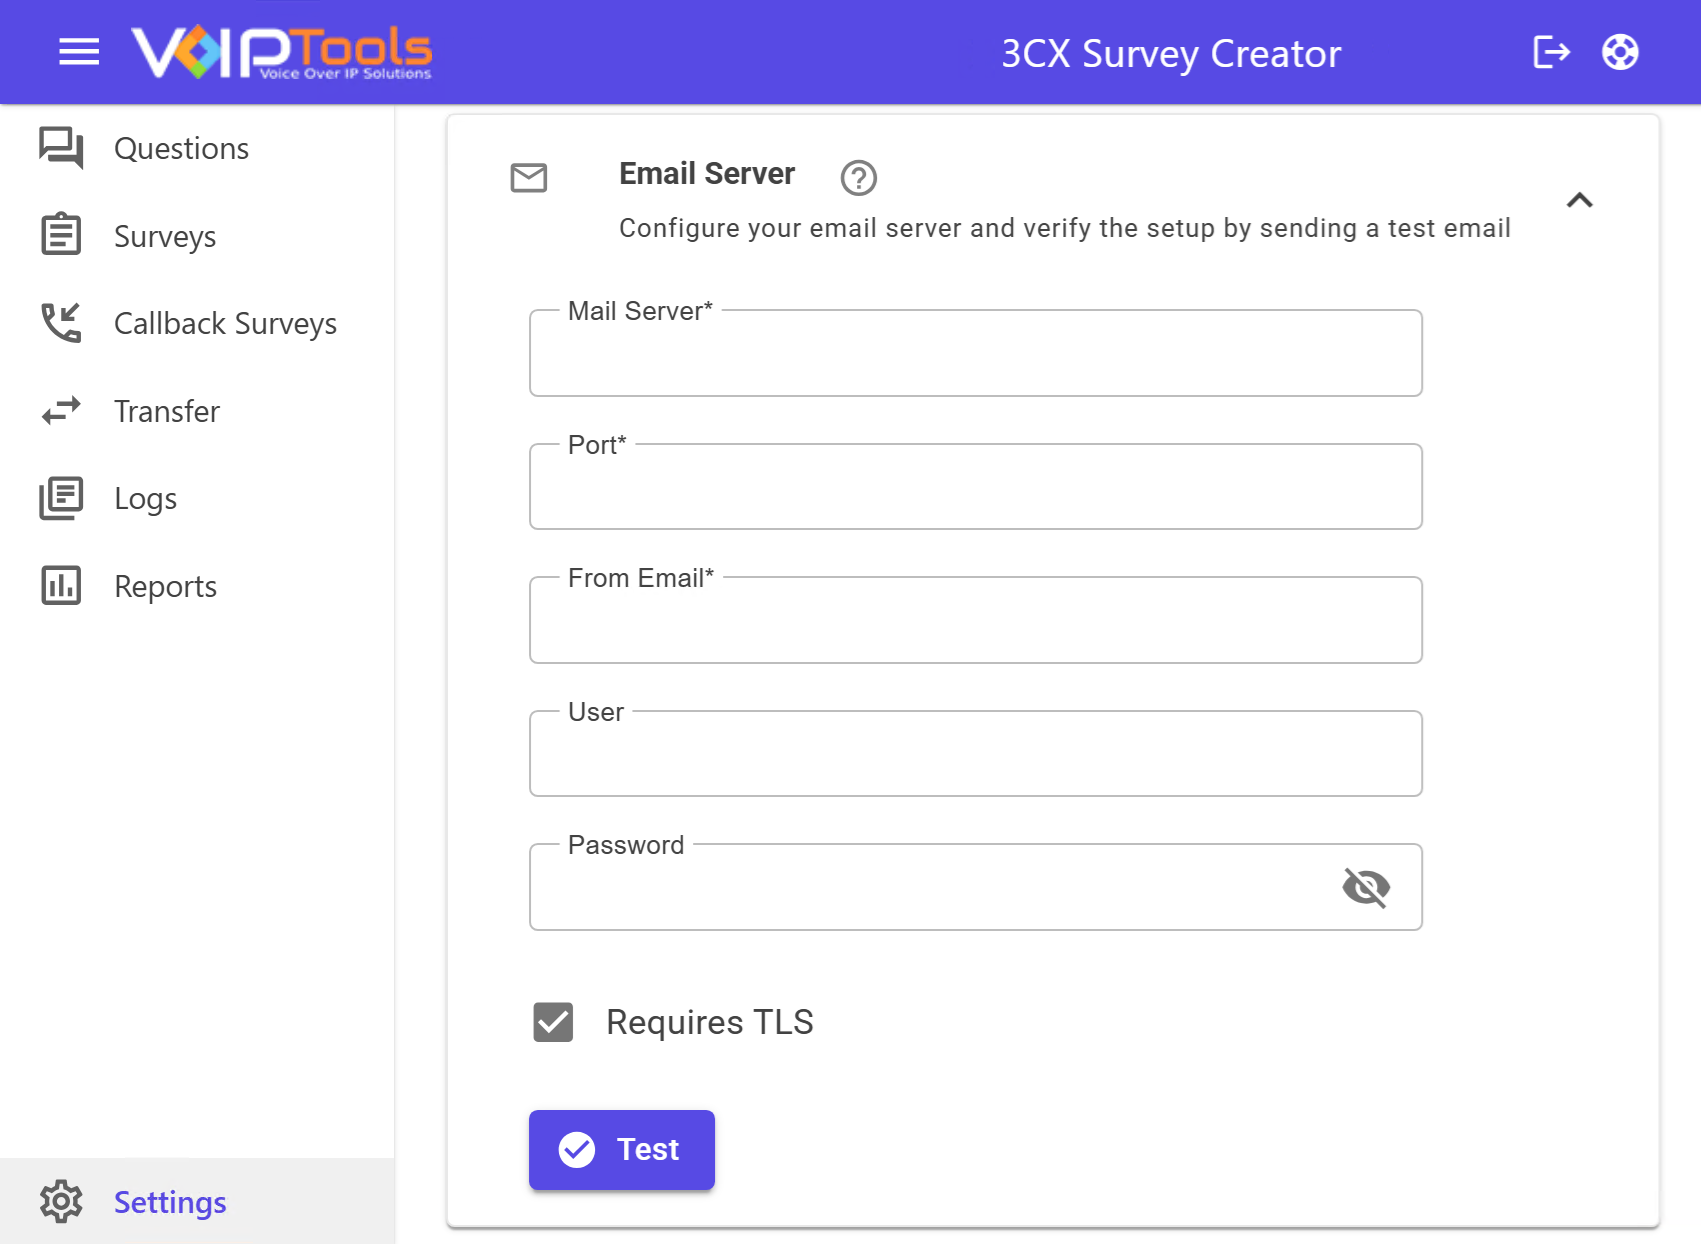 Figure 34: Email Server Section
Entering your server details #
- In Mail Server, enter the address of your email server. Use an IP address or a domain name (FQDN, or Fully Qualified Domain Name).
- In Port, enter the port number your mail server uses. Common ports are
25,465, or587. - In From Email, enter the address you want recipients to see as the sender.
- In User, enter the username or email used to sign in to the mail server.
- In Password, enter the password for that account.
- Check Requires TLS if your mail server needs a secure connection. Leave it unchecked if it does not.
Sending a test email #
- Click Test.
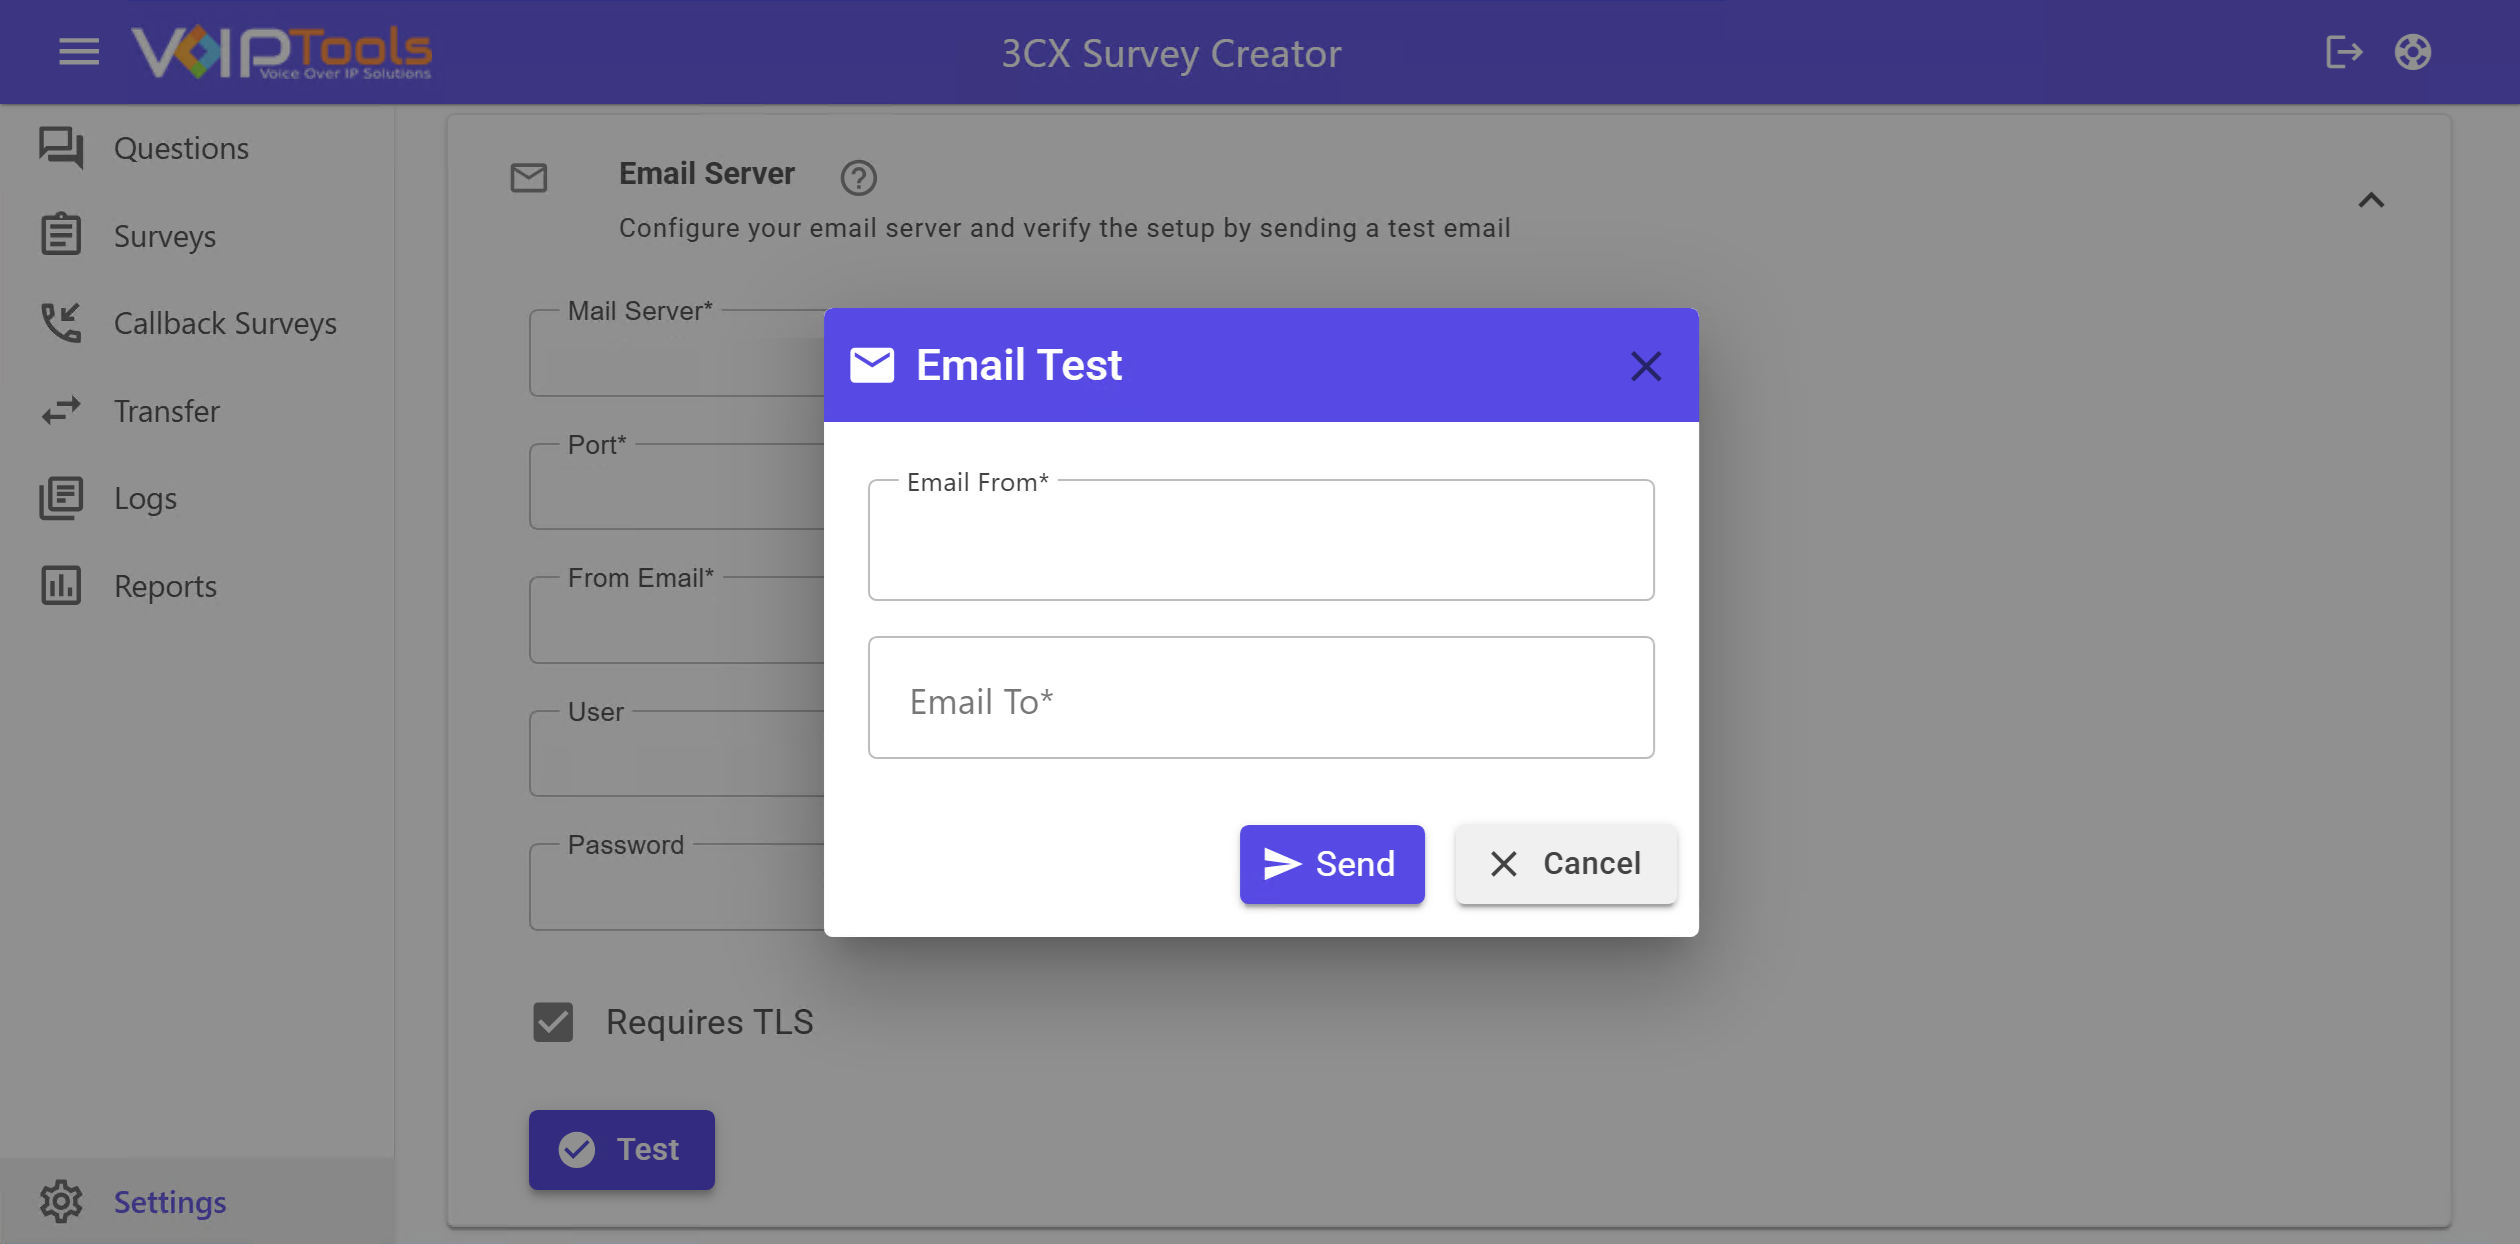 Figure 35: Email Test Window
- In the Email Test window, confirm or update Email From.
- In Email To, enter the address that should receive the test message.
- Click Send.
NOTE:
If the test works, a Success message confirms the mail sent. Click OK to close it.
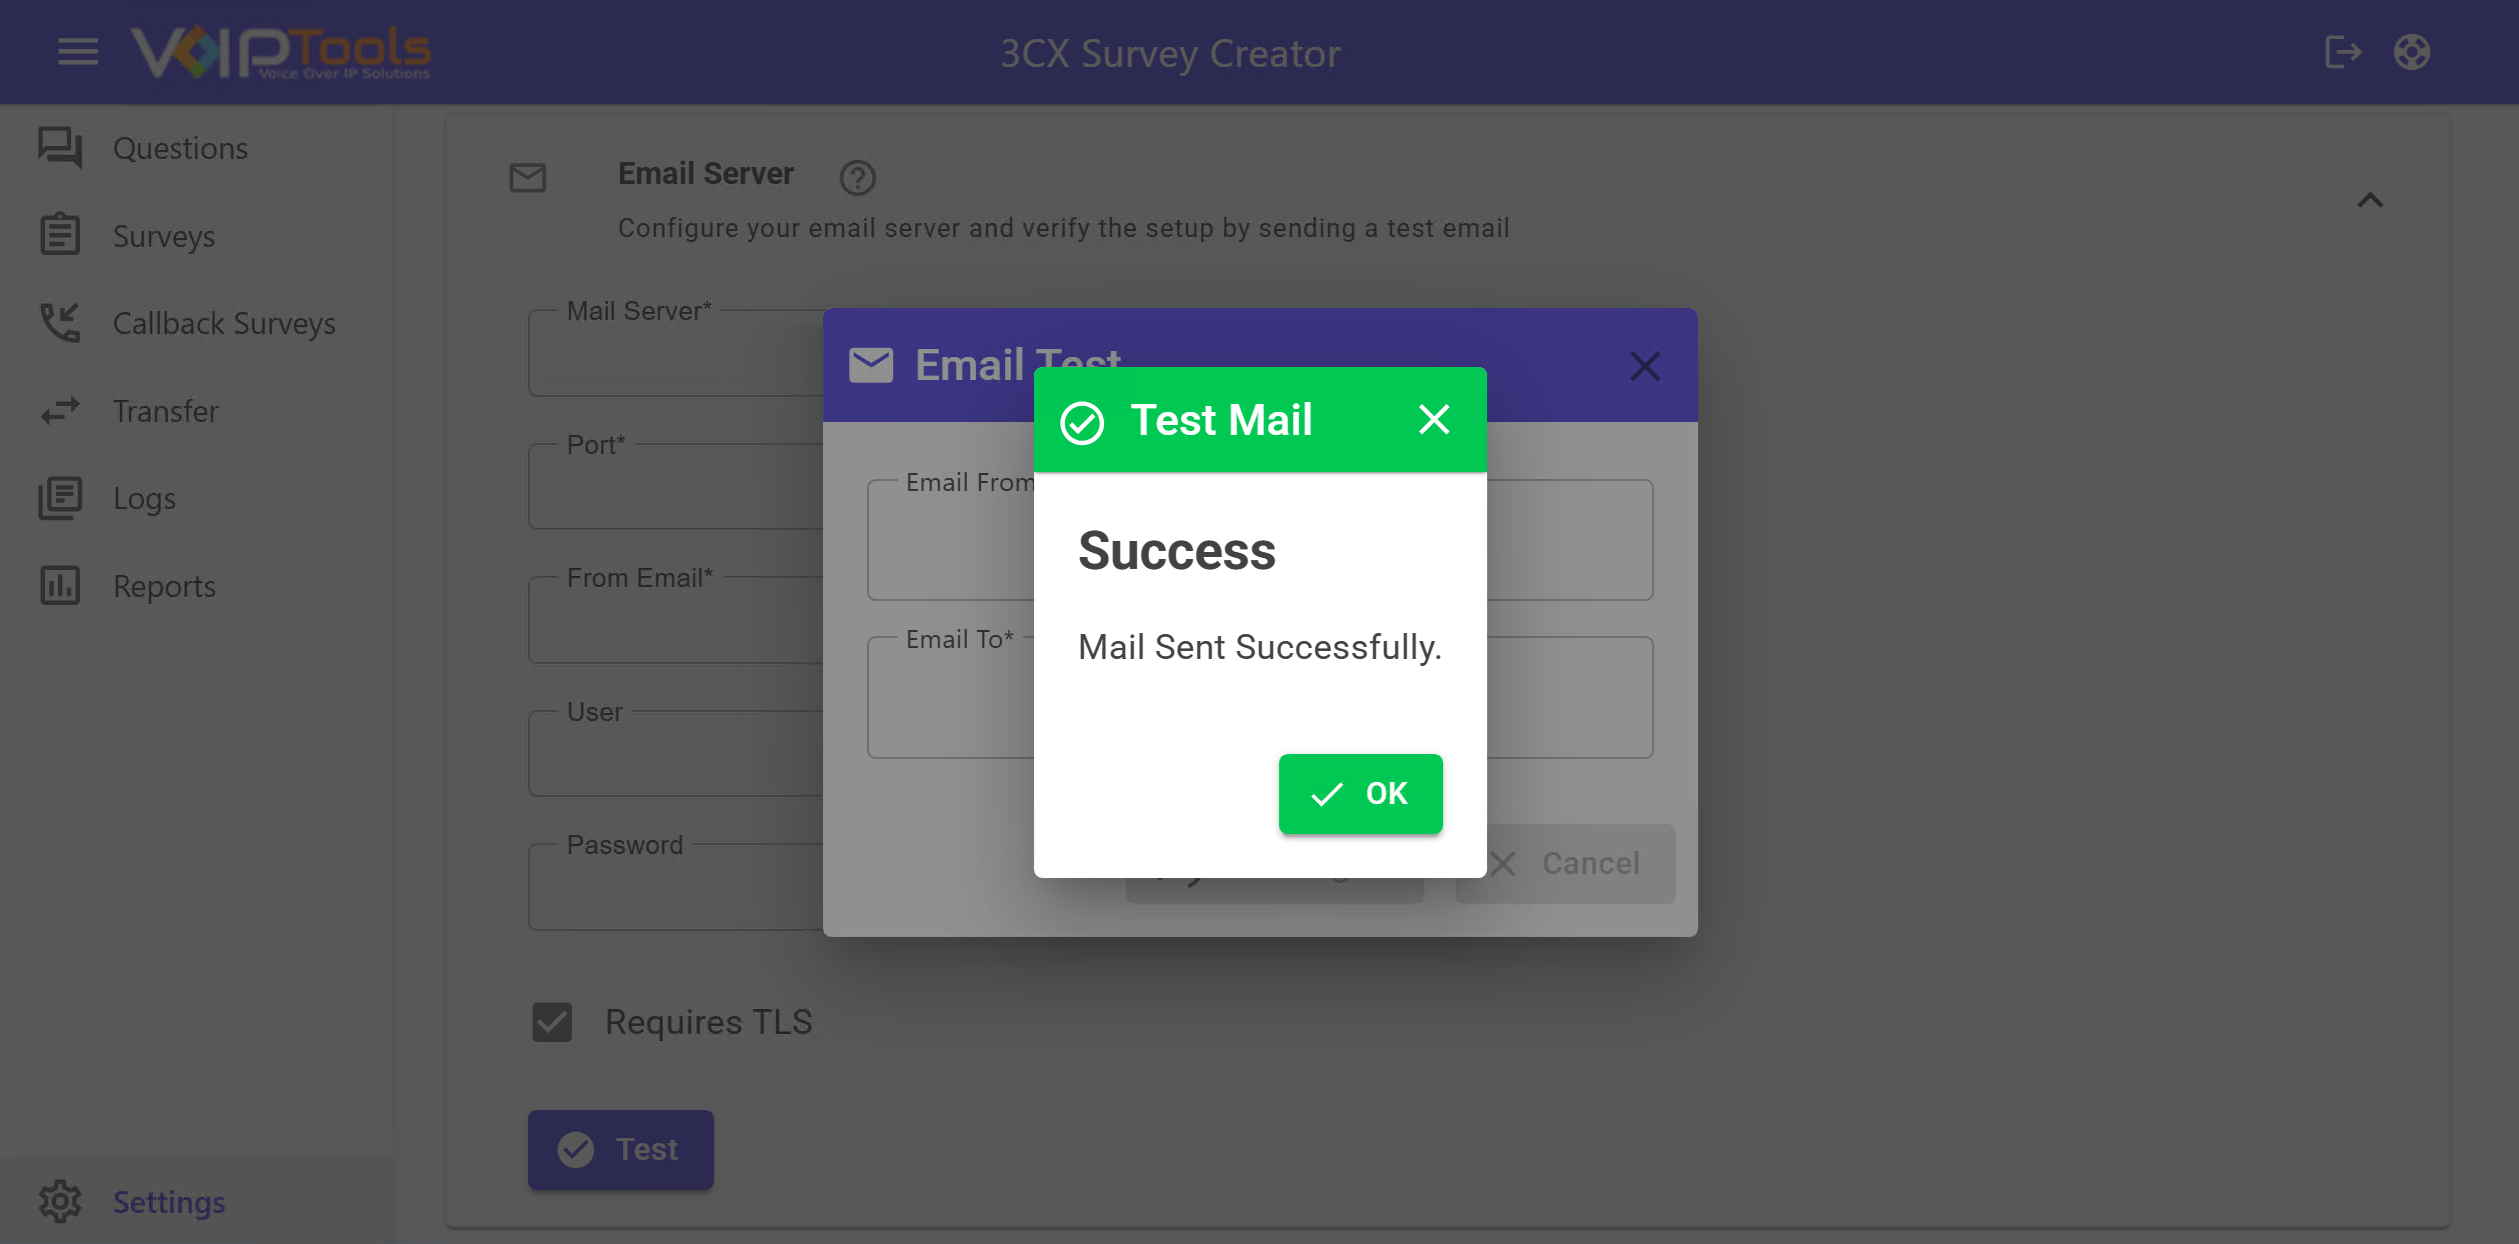 Figure 37: Test Email Success Message
Role Access Permissions #
Use Role Access Permissions to control which pages each role can open in the app.
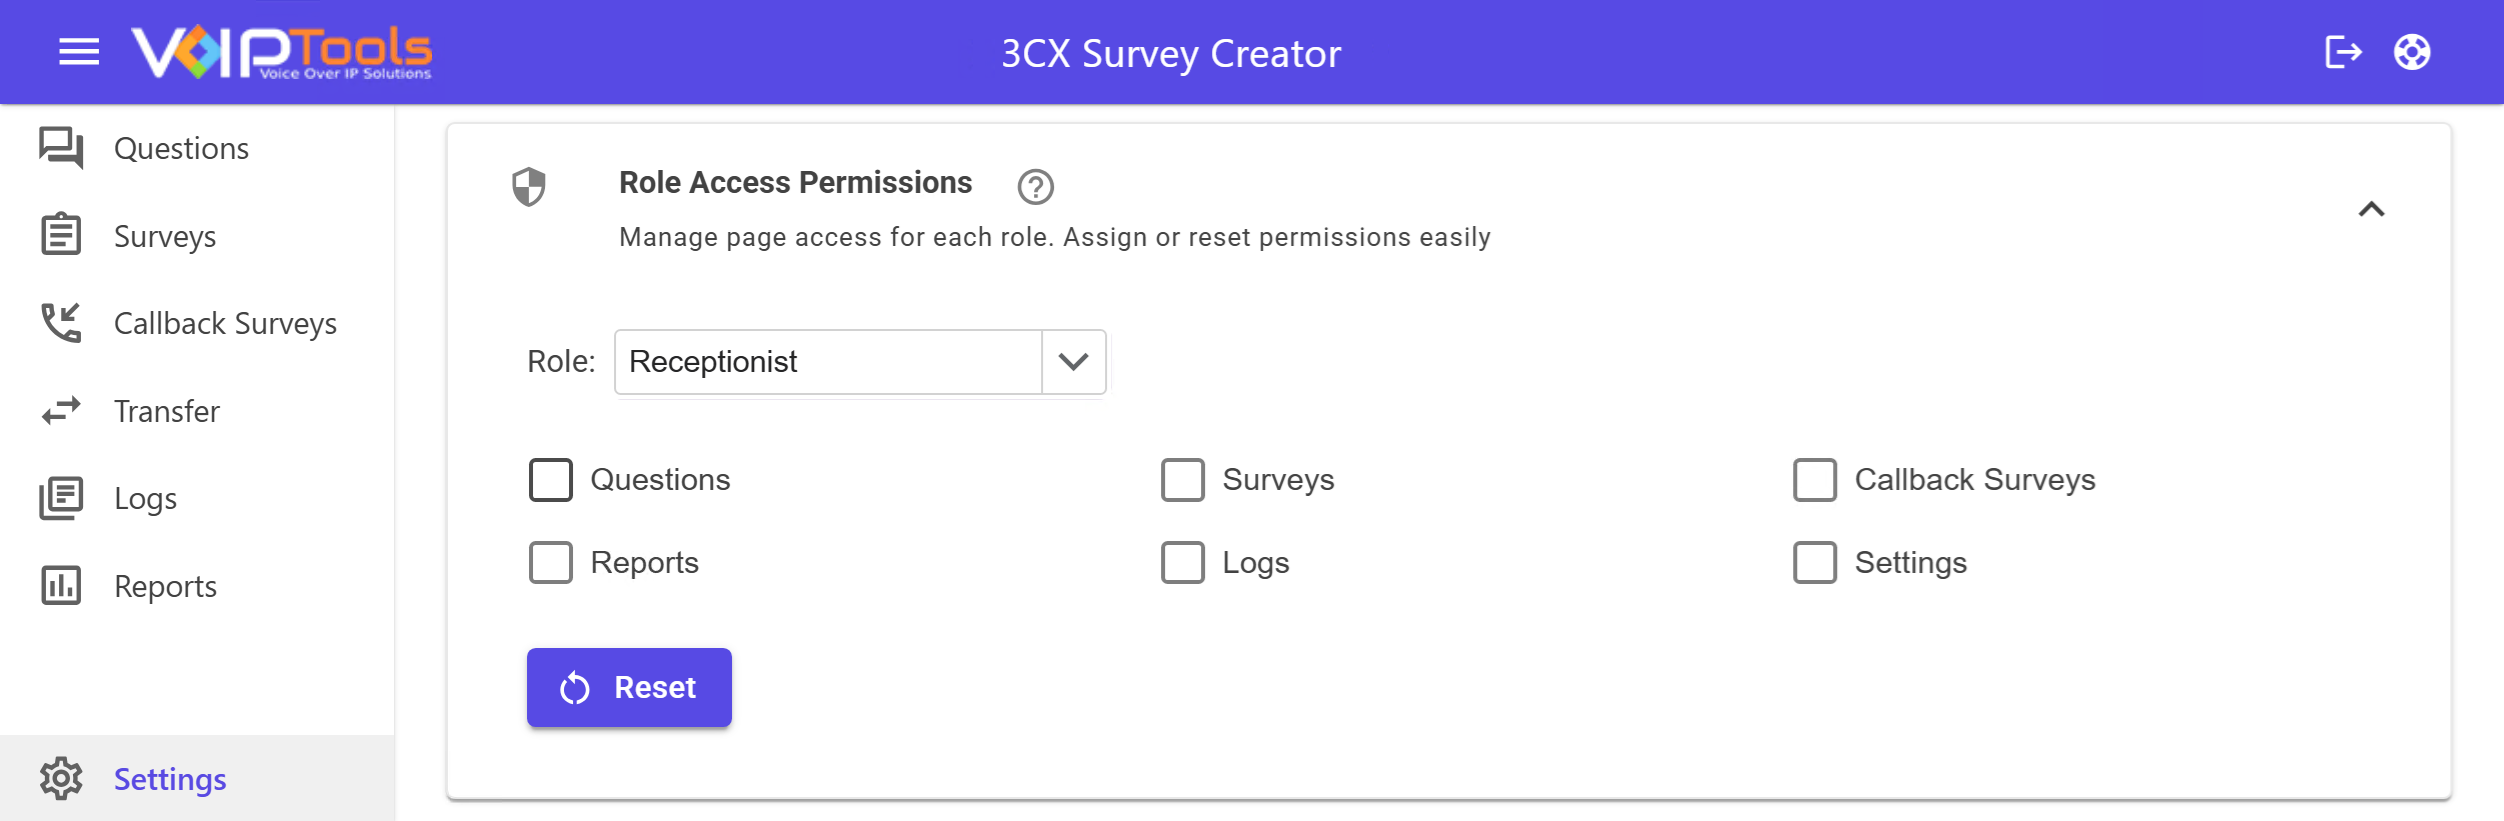 Figure 38: Role Access Permissions Section
Choosing a role #
- Click the Role dropdown and select a role, such as Receptionist, Supervisor, Department Administrator, Manager, Owner, System Administrator, or System Owner.
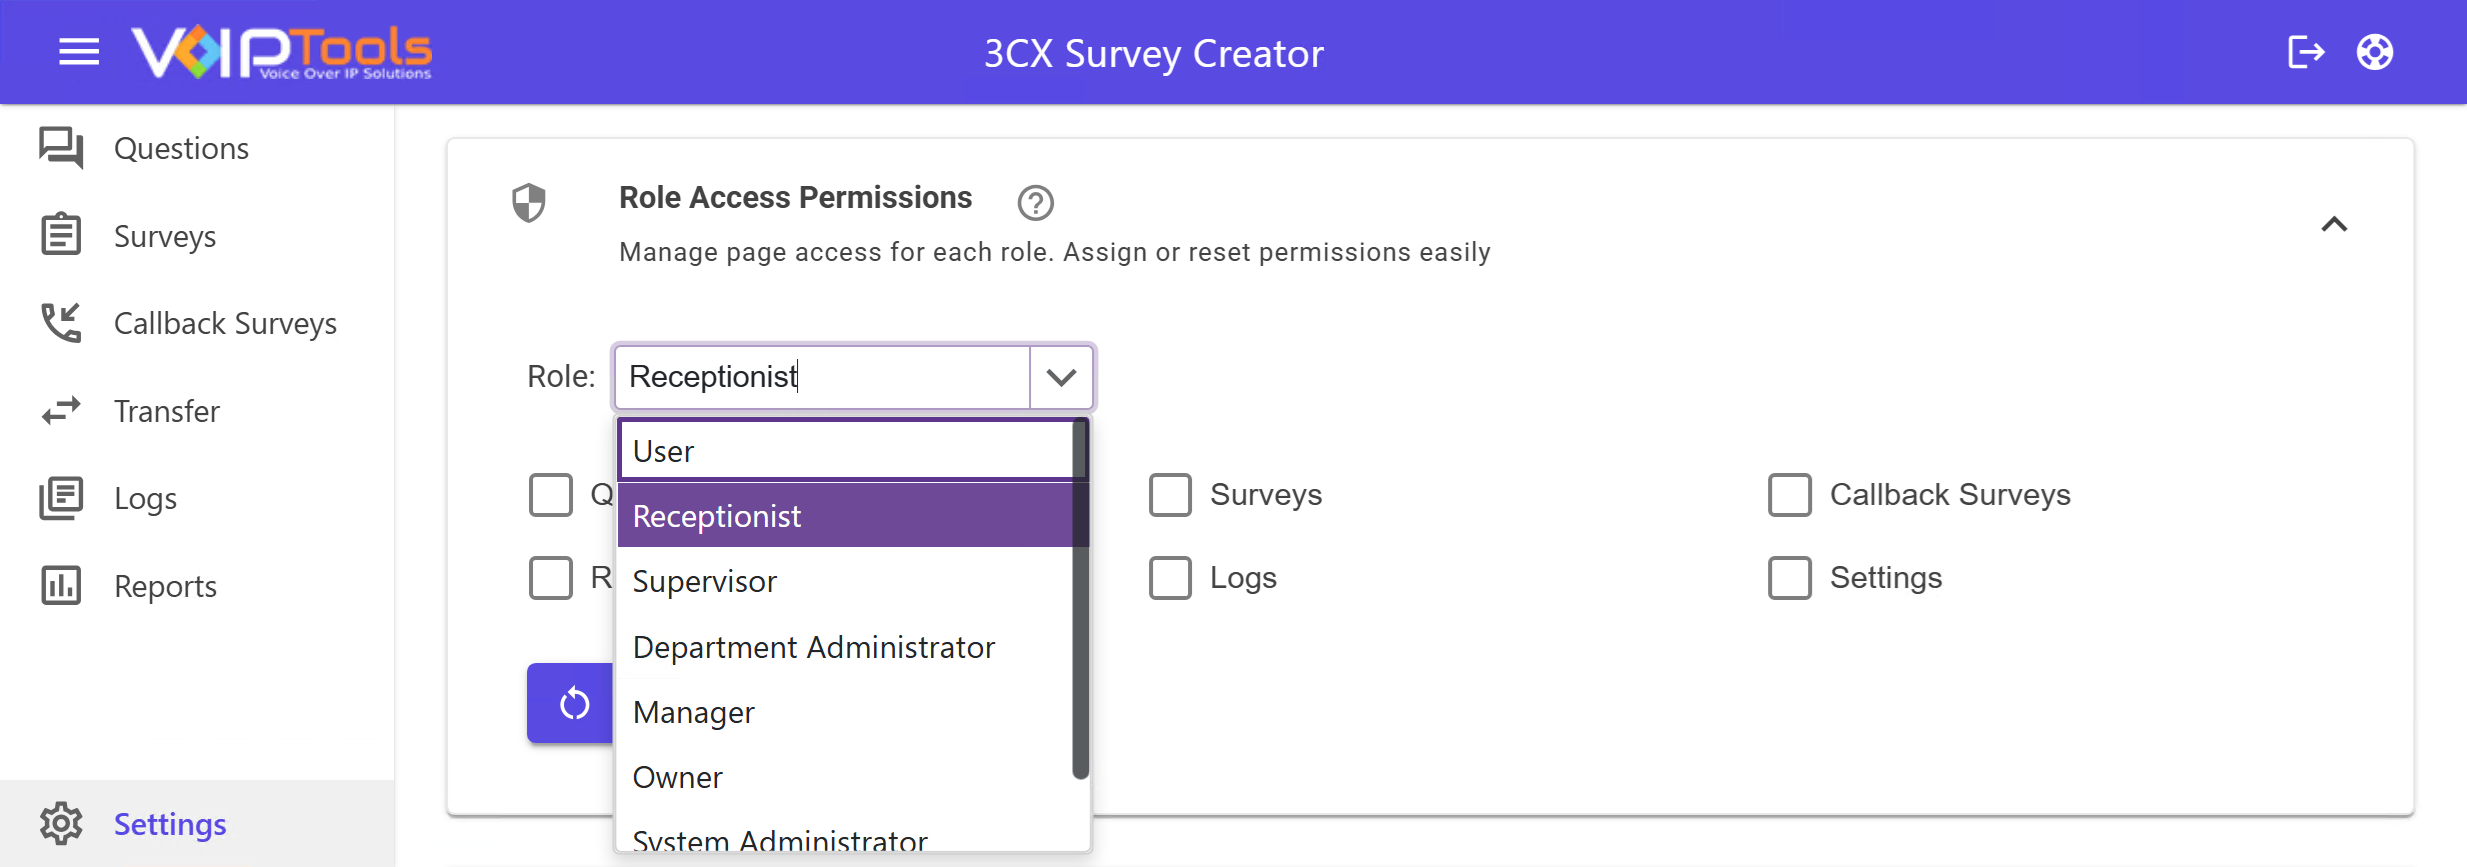 Figure 39: Role Dropdown Options
NOTE:
The checkboxes update to show what the selected role can access. Most roles come with page access already set. Receptionist and User start with every box unchecked, so no pages are open until you select them.
Setting page access #
- Check or uncheck Questions, Surveys, Callback Surveys, Reports, Logs, and Settings to control which pages the role can open.
NOTE:
System Administrator and System Owner work in a set way. Every box for these two roles stays checked and grey, so you cannot change their access.
Resetting a role’s access #
- Click Reset to undo changes and return the selected role to its original access.
Custom Branding #
Use Custom Branding to give the app your own look, with a custom title, logo, and color scheme.
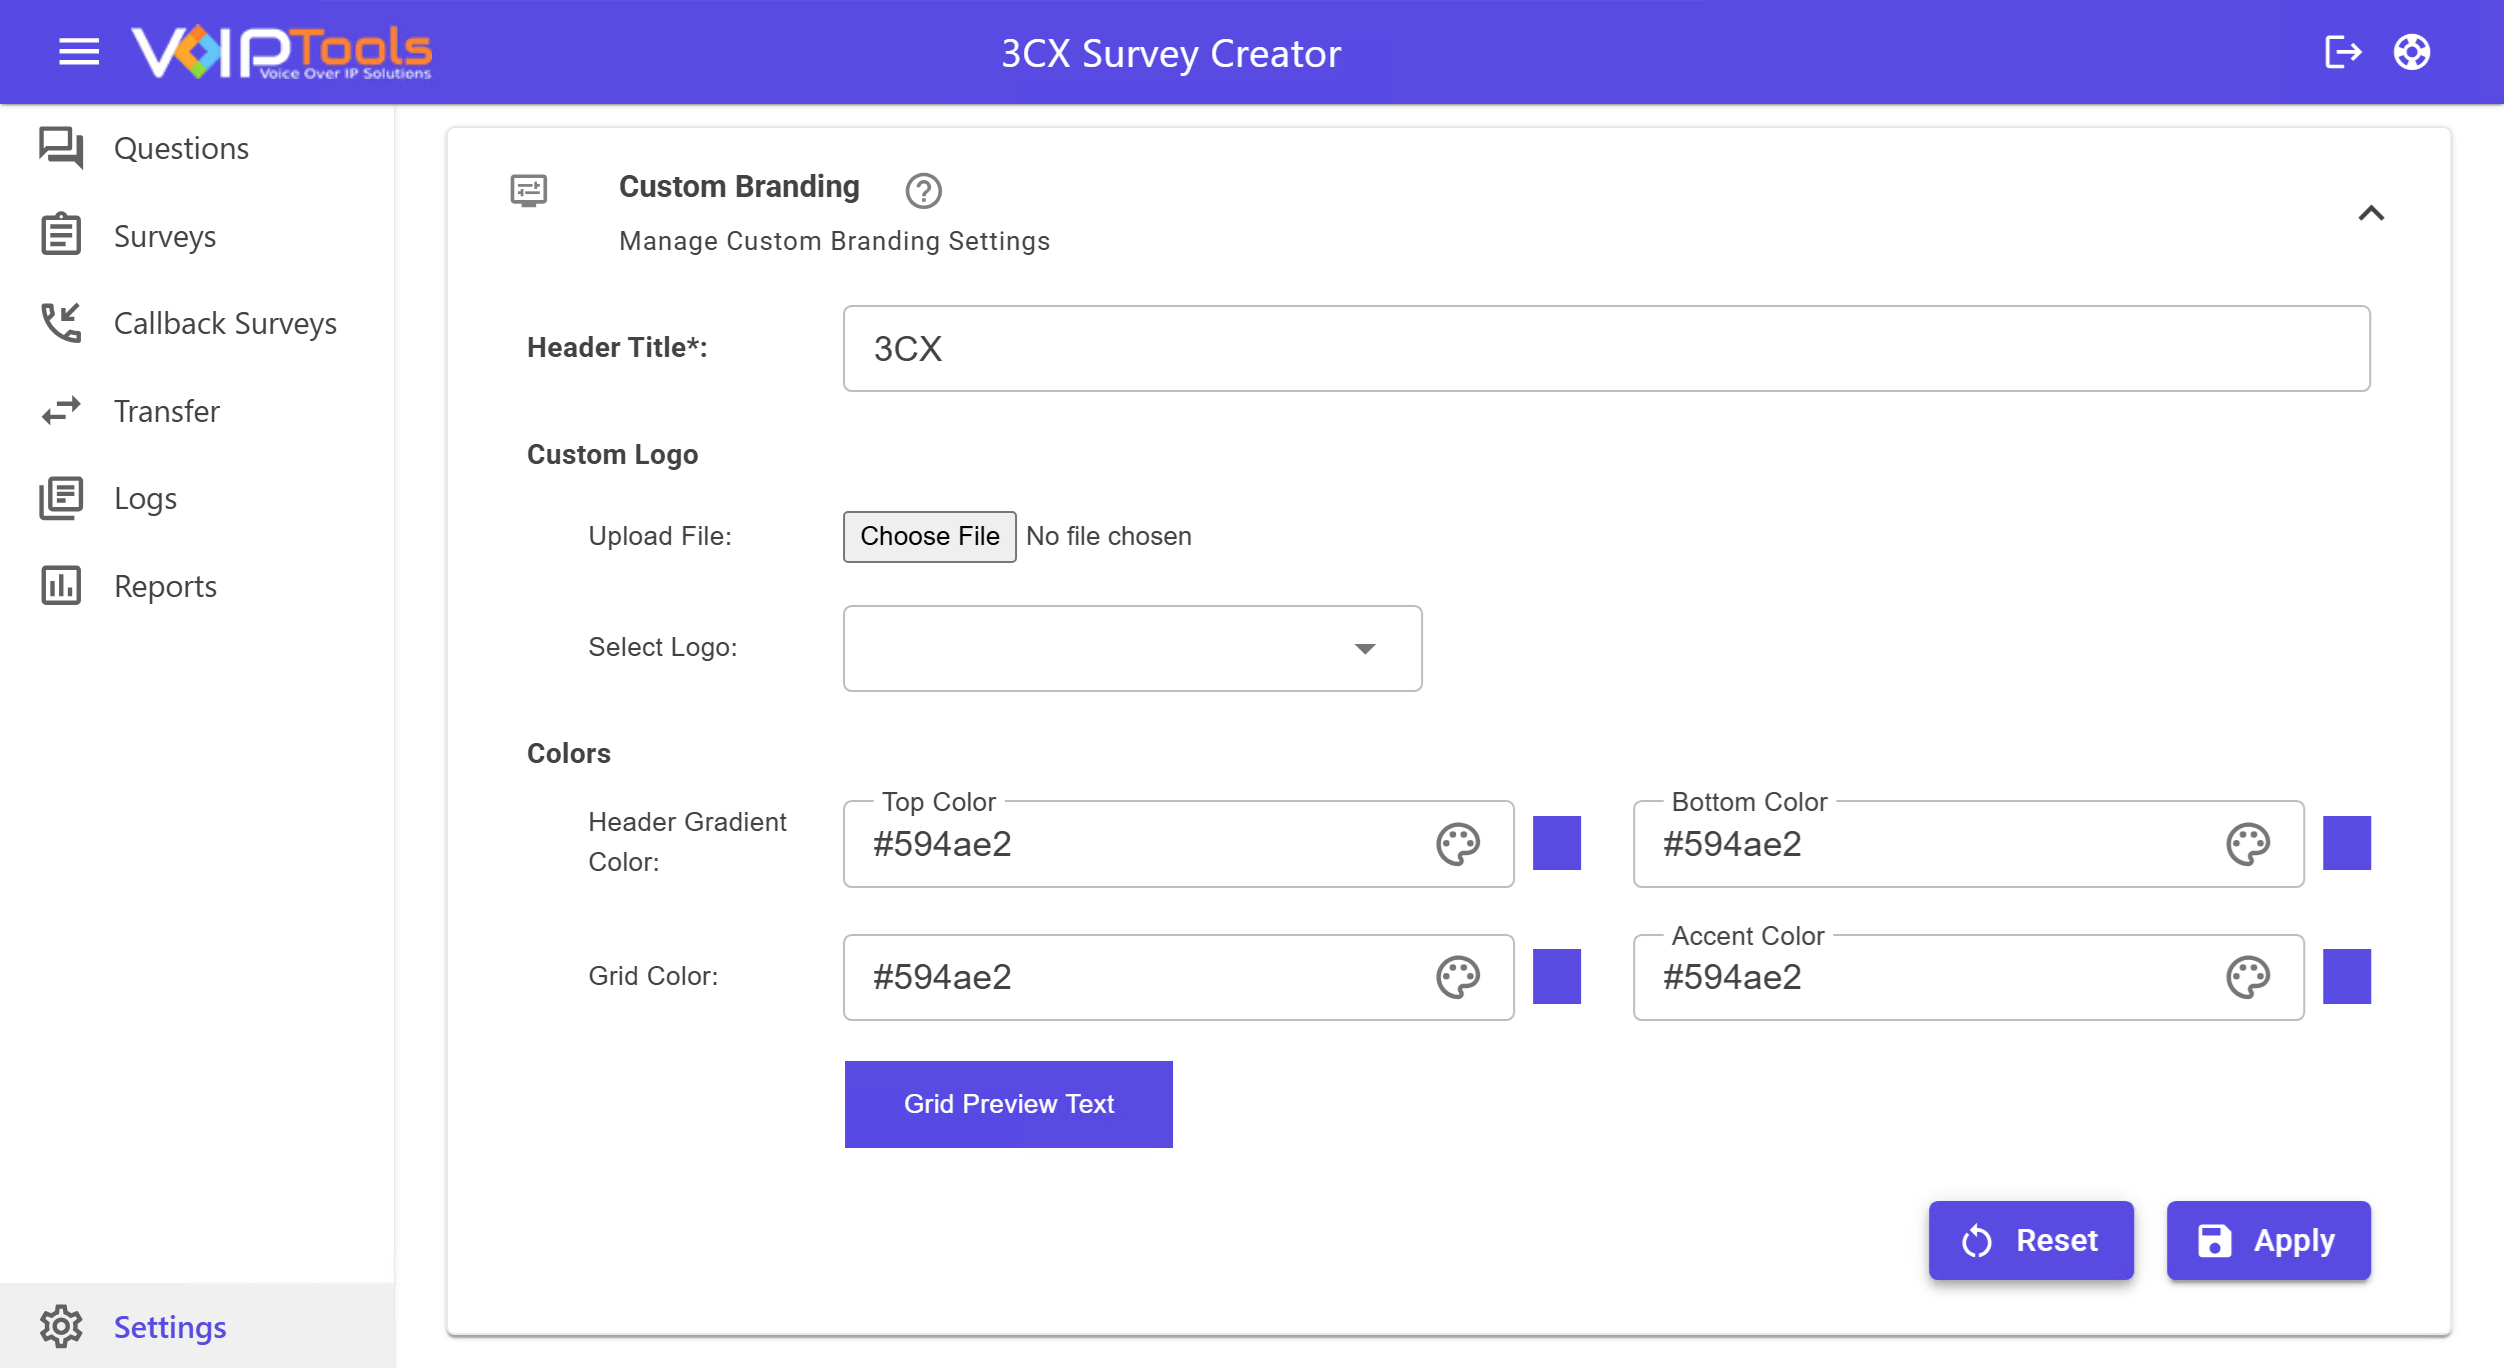 Figure 43: Custom Branding Section
Setting the header title #
- In the Header Title field, enter the title you want at the top of the page.
Adding a custom logo #
- Click Choose File to upload a logo from your computer.
- Or click the Select Logo dropdown to choose a logo you already uploaded.
Choosing your colors #
- In Header Gradient Color, enter or pick a Top Color and a Bottom Color for the header.
- In Grid Color, enter or pick a color for the grid background.
- In Accent Color, enter or pick a color for text headers across the app.
NOTE:
The Grid Preview Text box shows how your grid color and text look as you make changes.
Saving or undoing your changes #
- Click Apply to save your branding changes.
- Click Reset to return all colors to their defaults.
Questions #
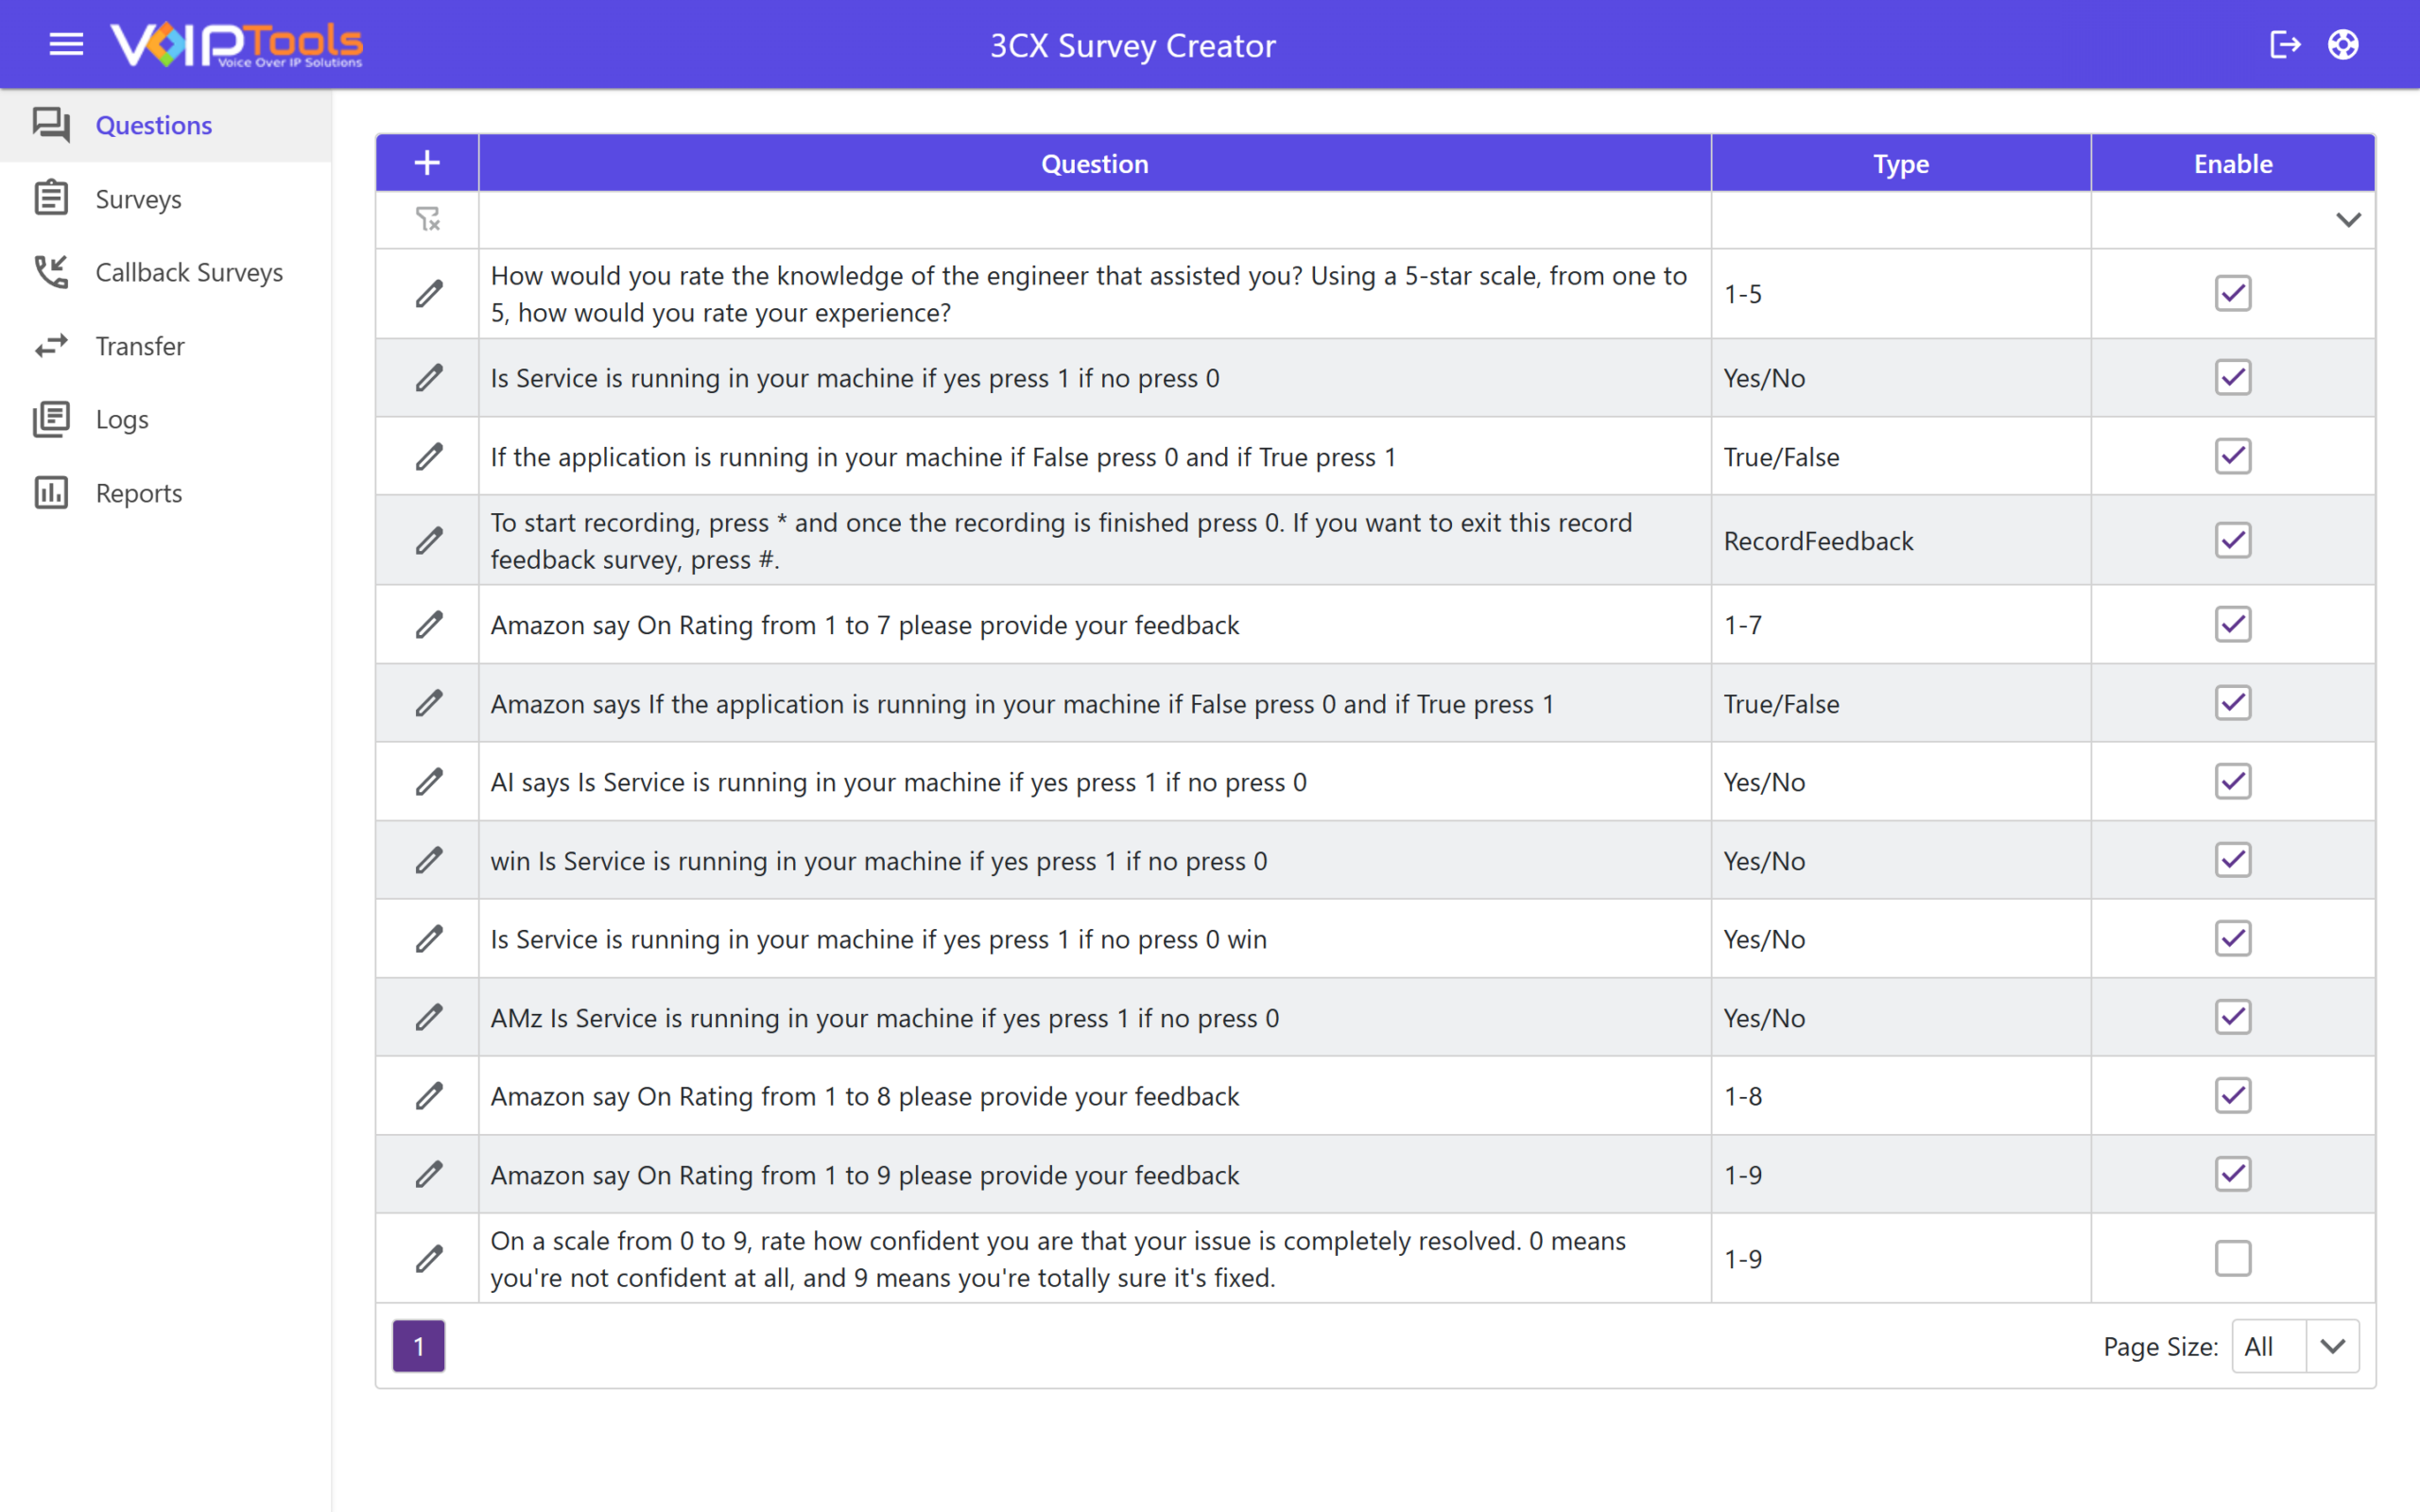
The Questions page is where you build and manage the survey prompts callers hear. Each row is a question, with its answer type and whether it is active.
Adding a question #
- Select the + icon above the Question column.
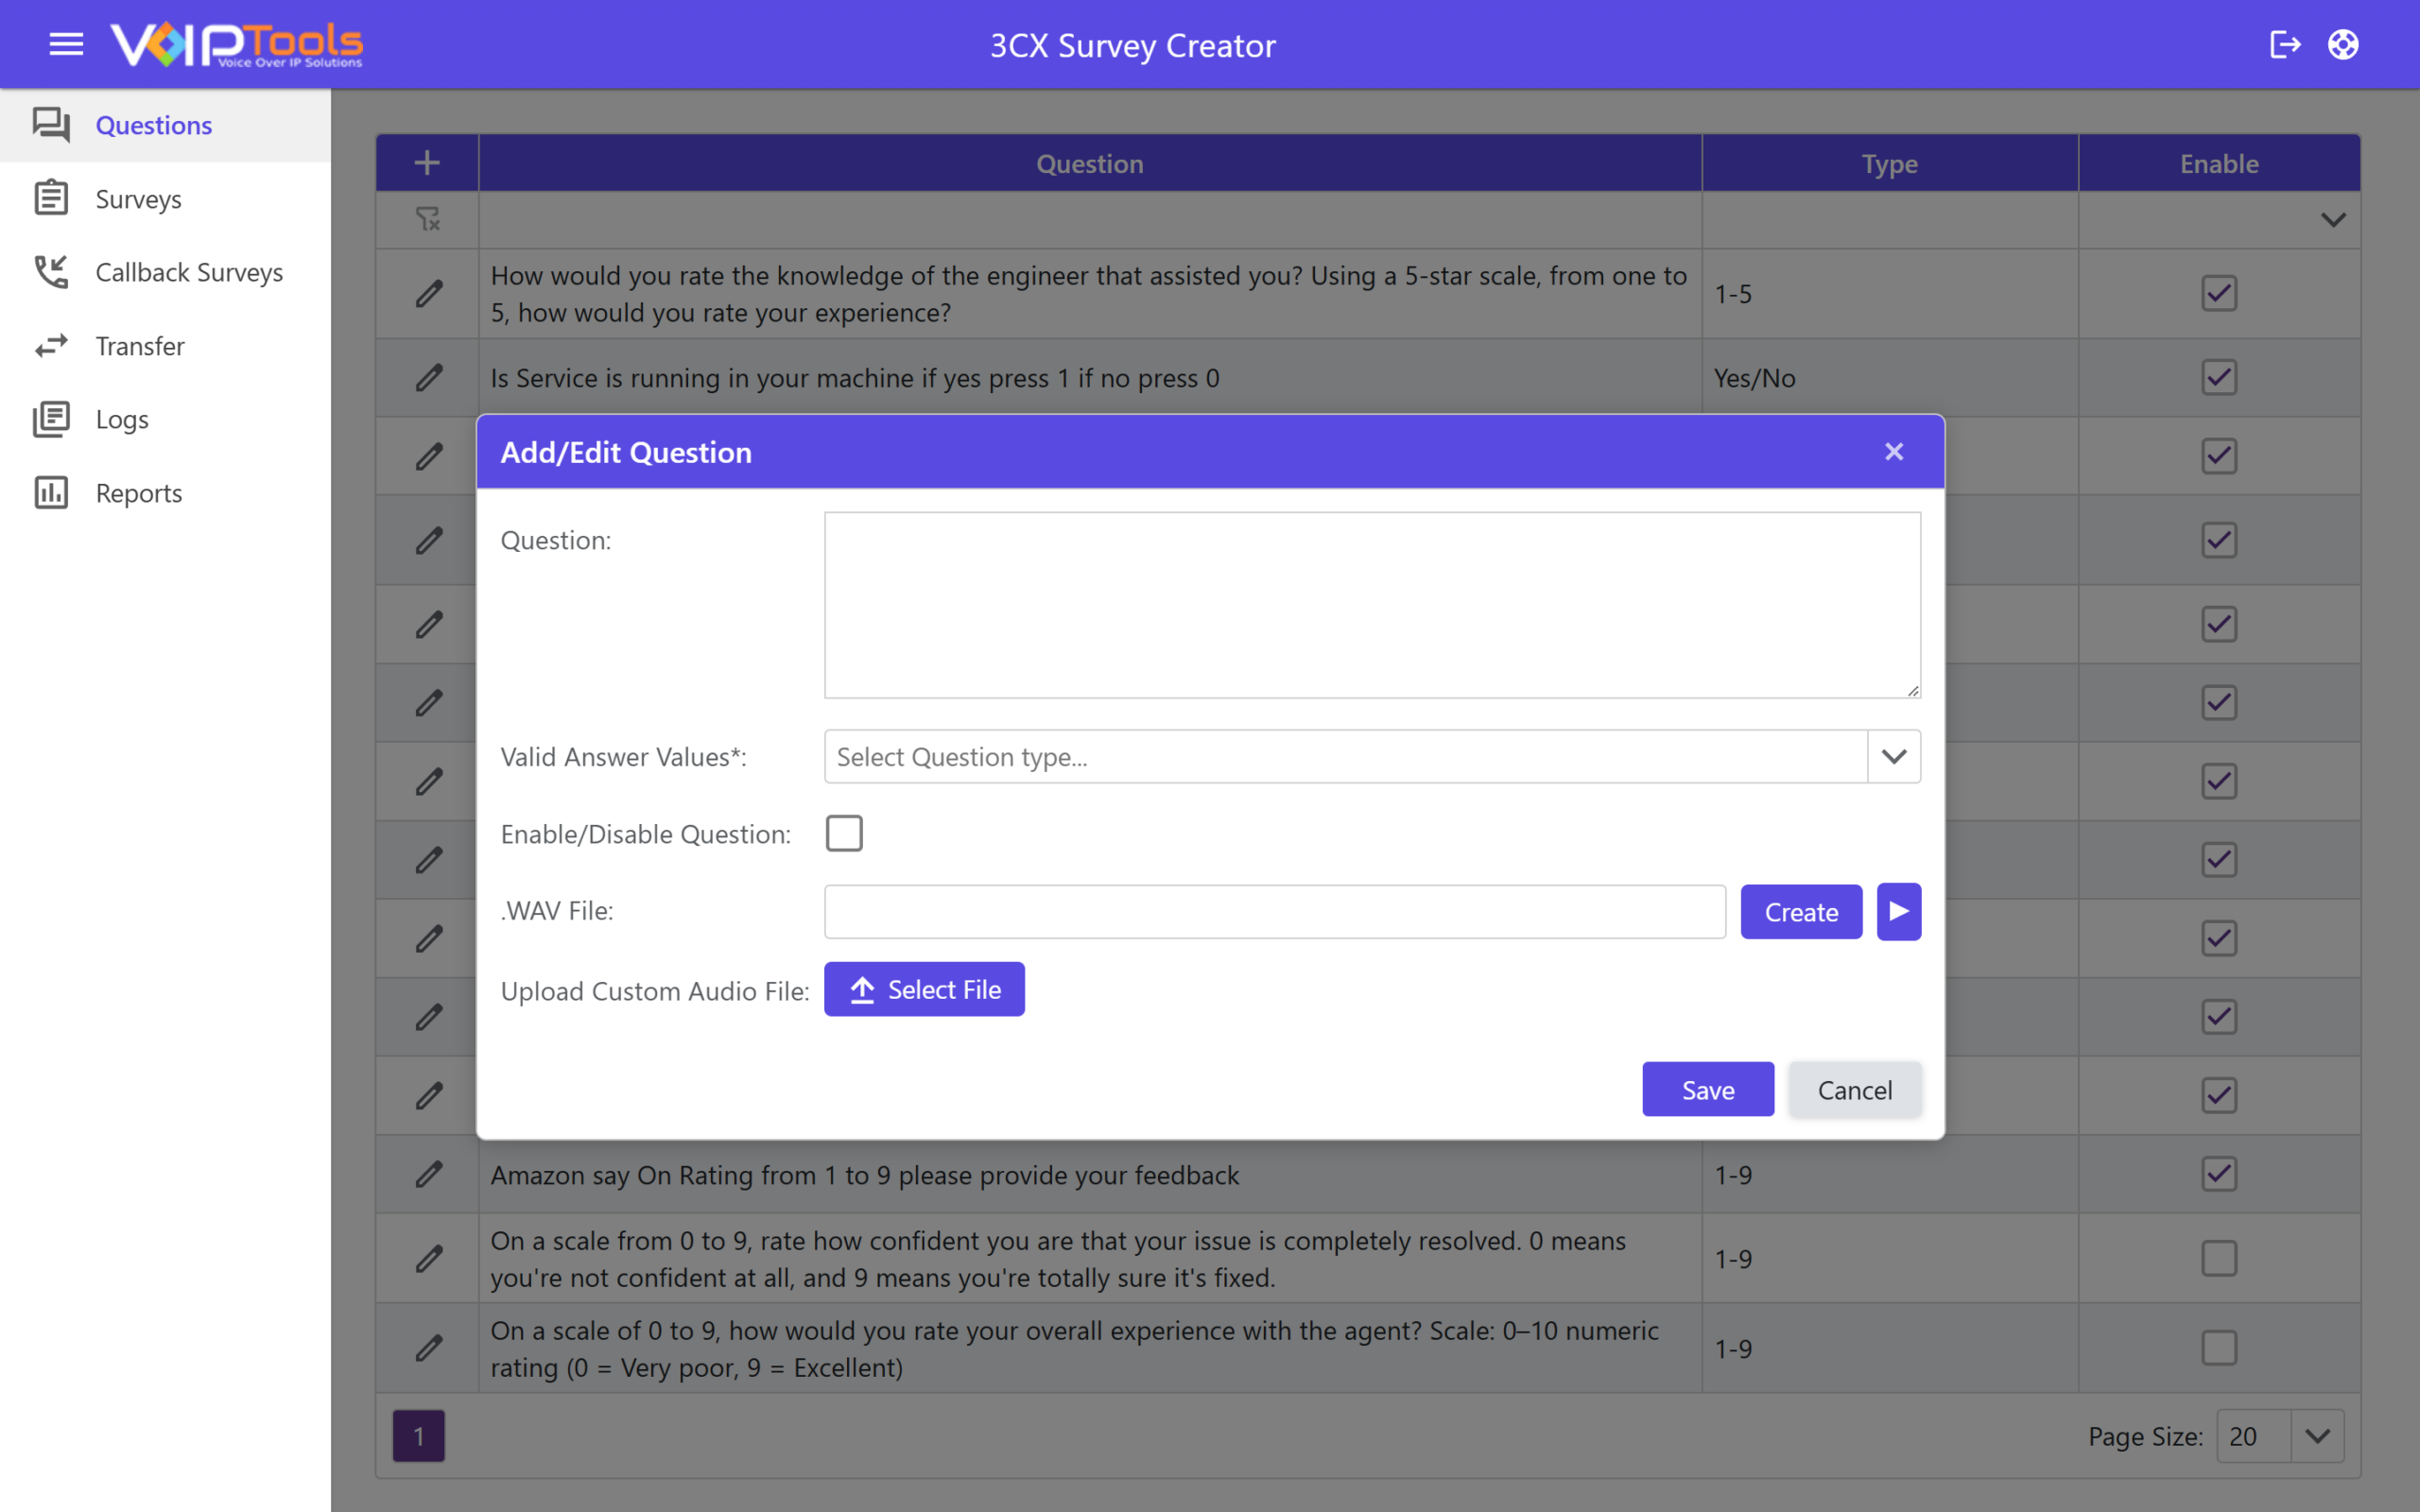
- In the Question field, type the prompt as you want it read to the caller.
- From the Valid Answer Values dropdown, choose the range of answers the caller can press, such as 1-9.
- Check Enable/Disable Question to make the question active.
Adding the audio for a question #
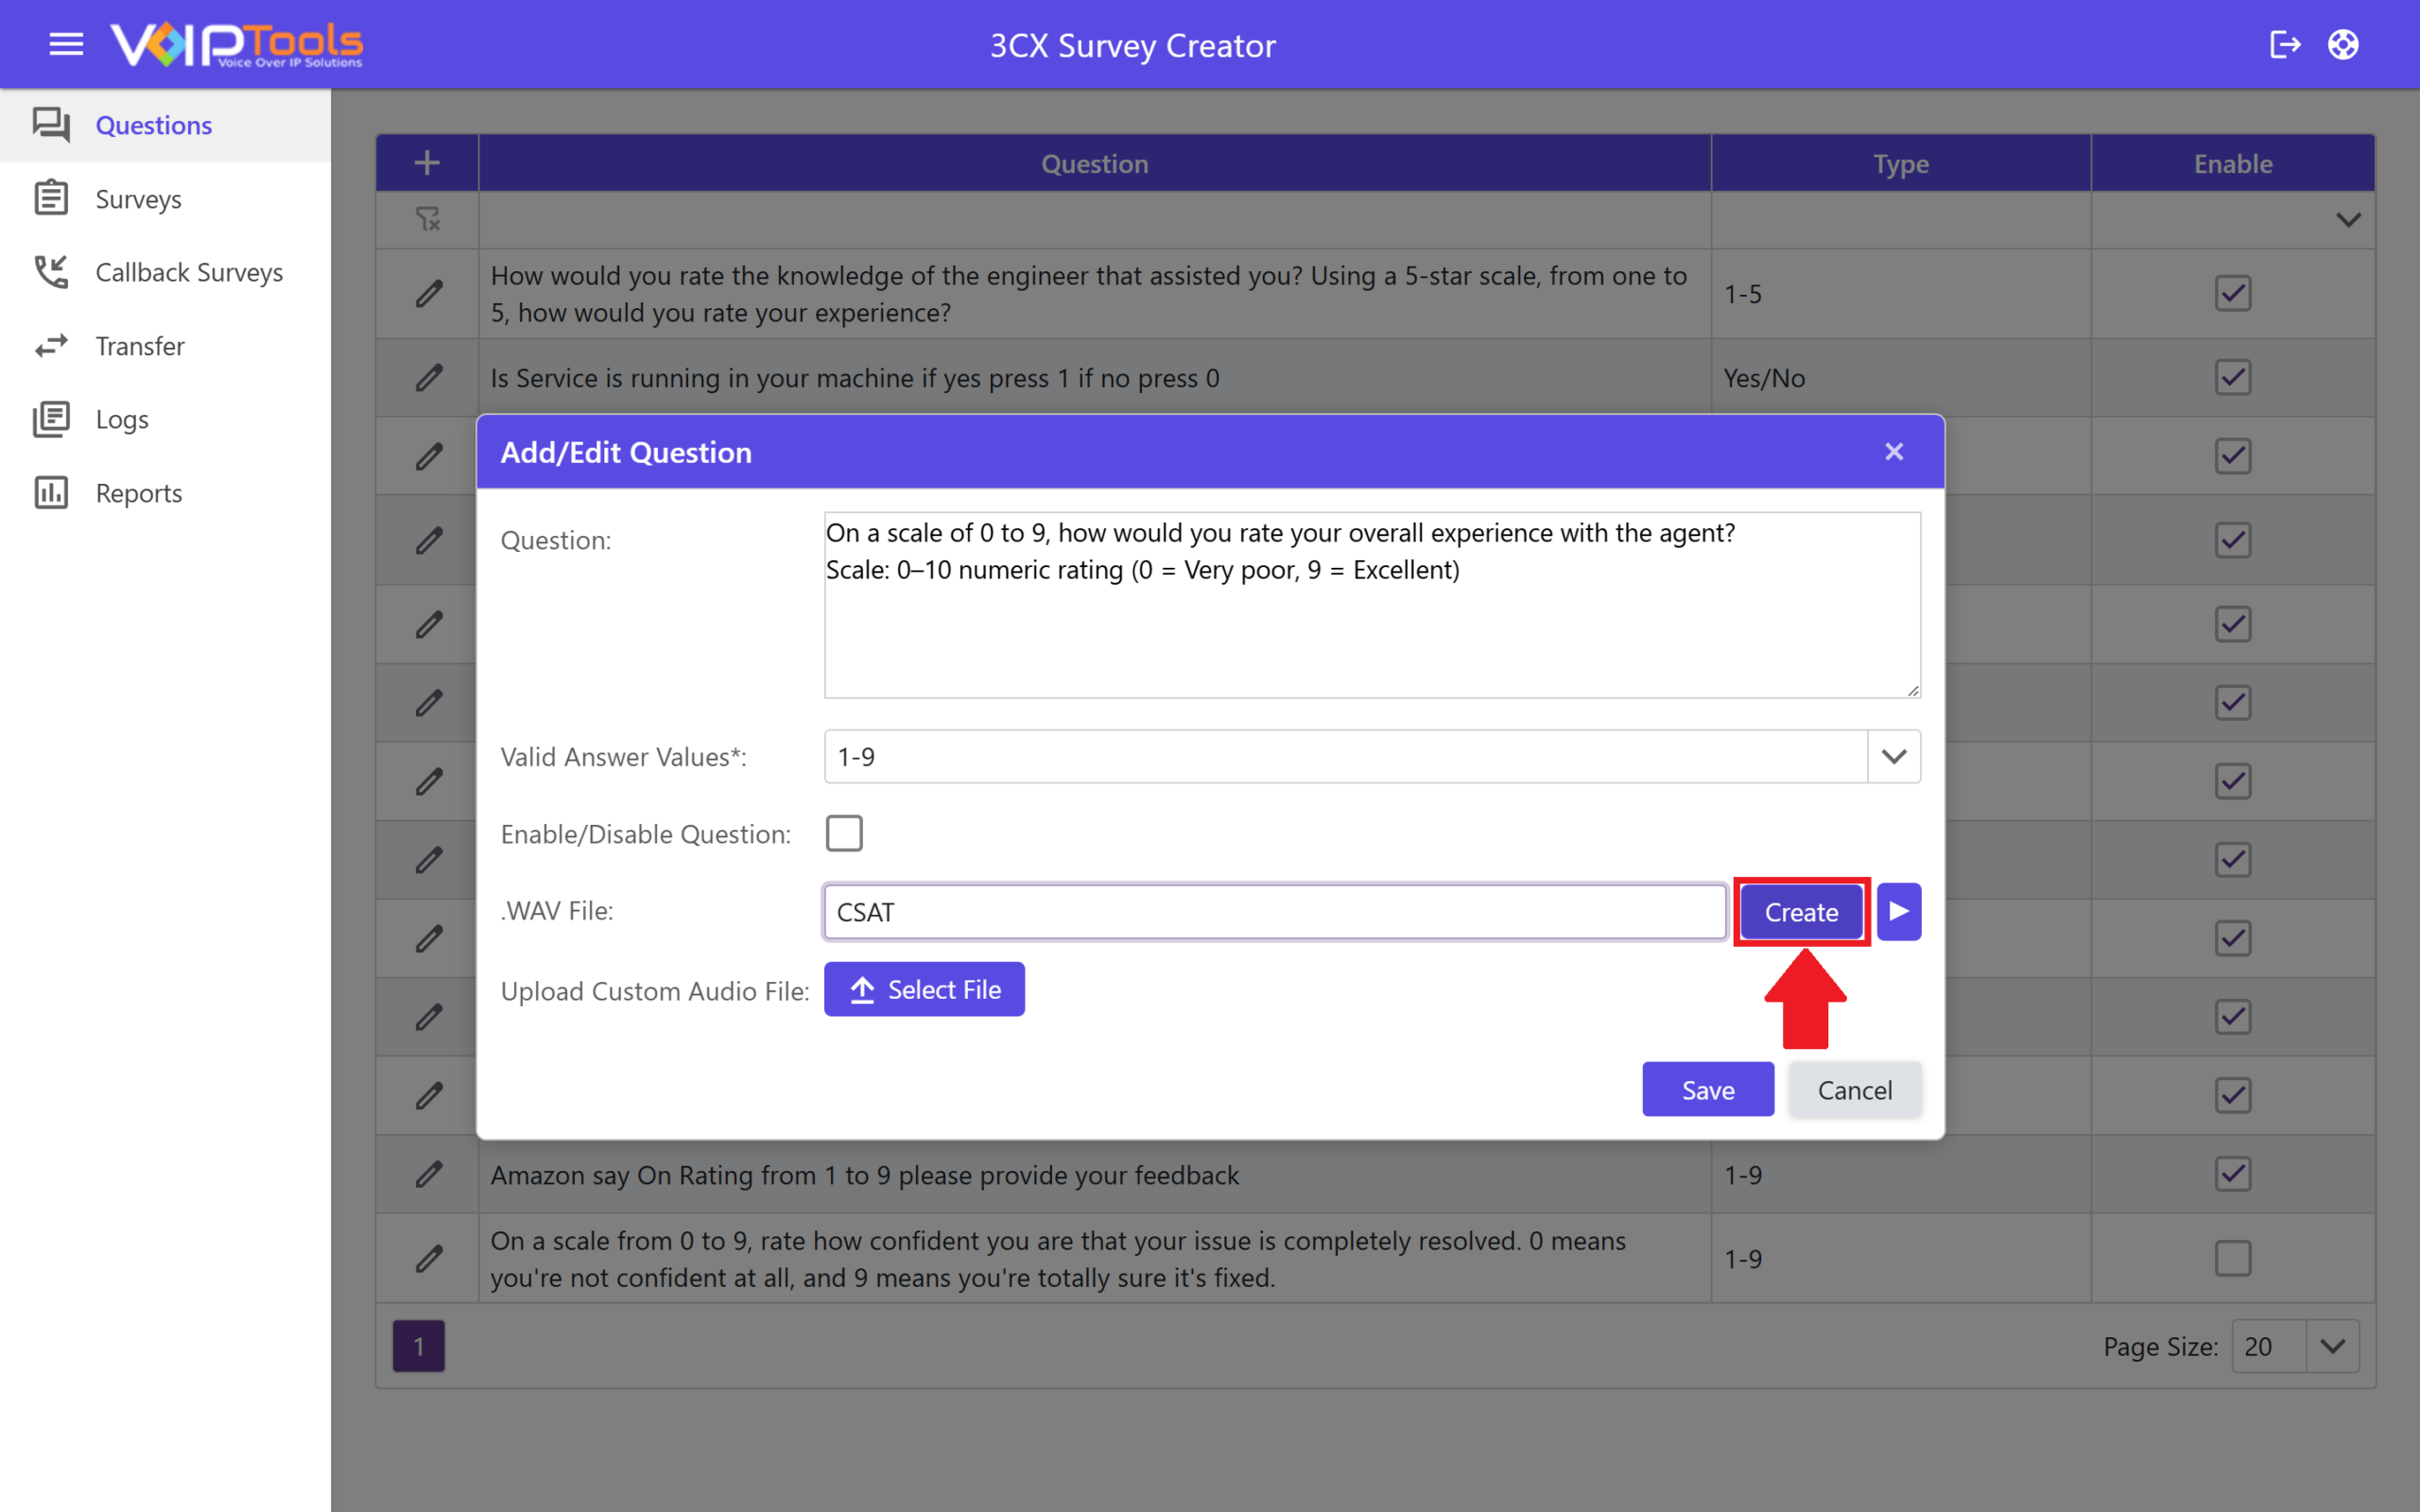
You can generate a voice recording of the question, or upload your own audio file.
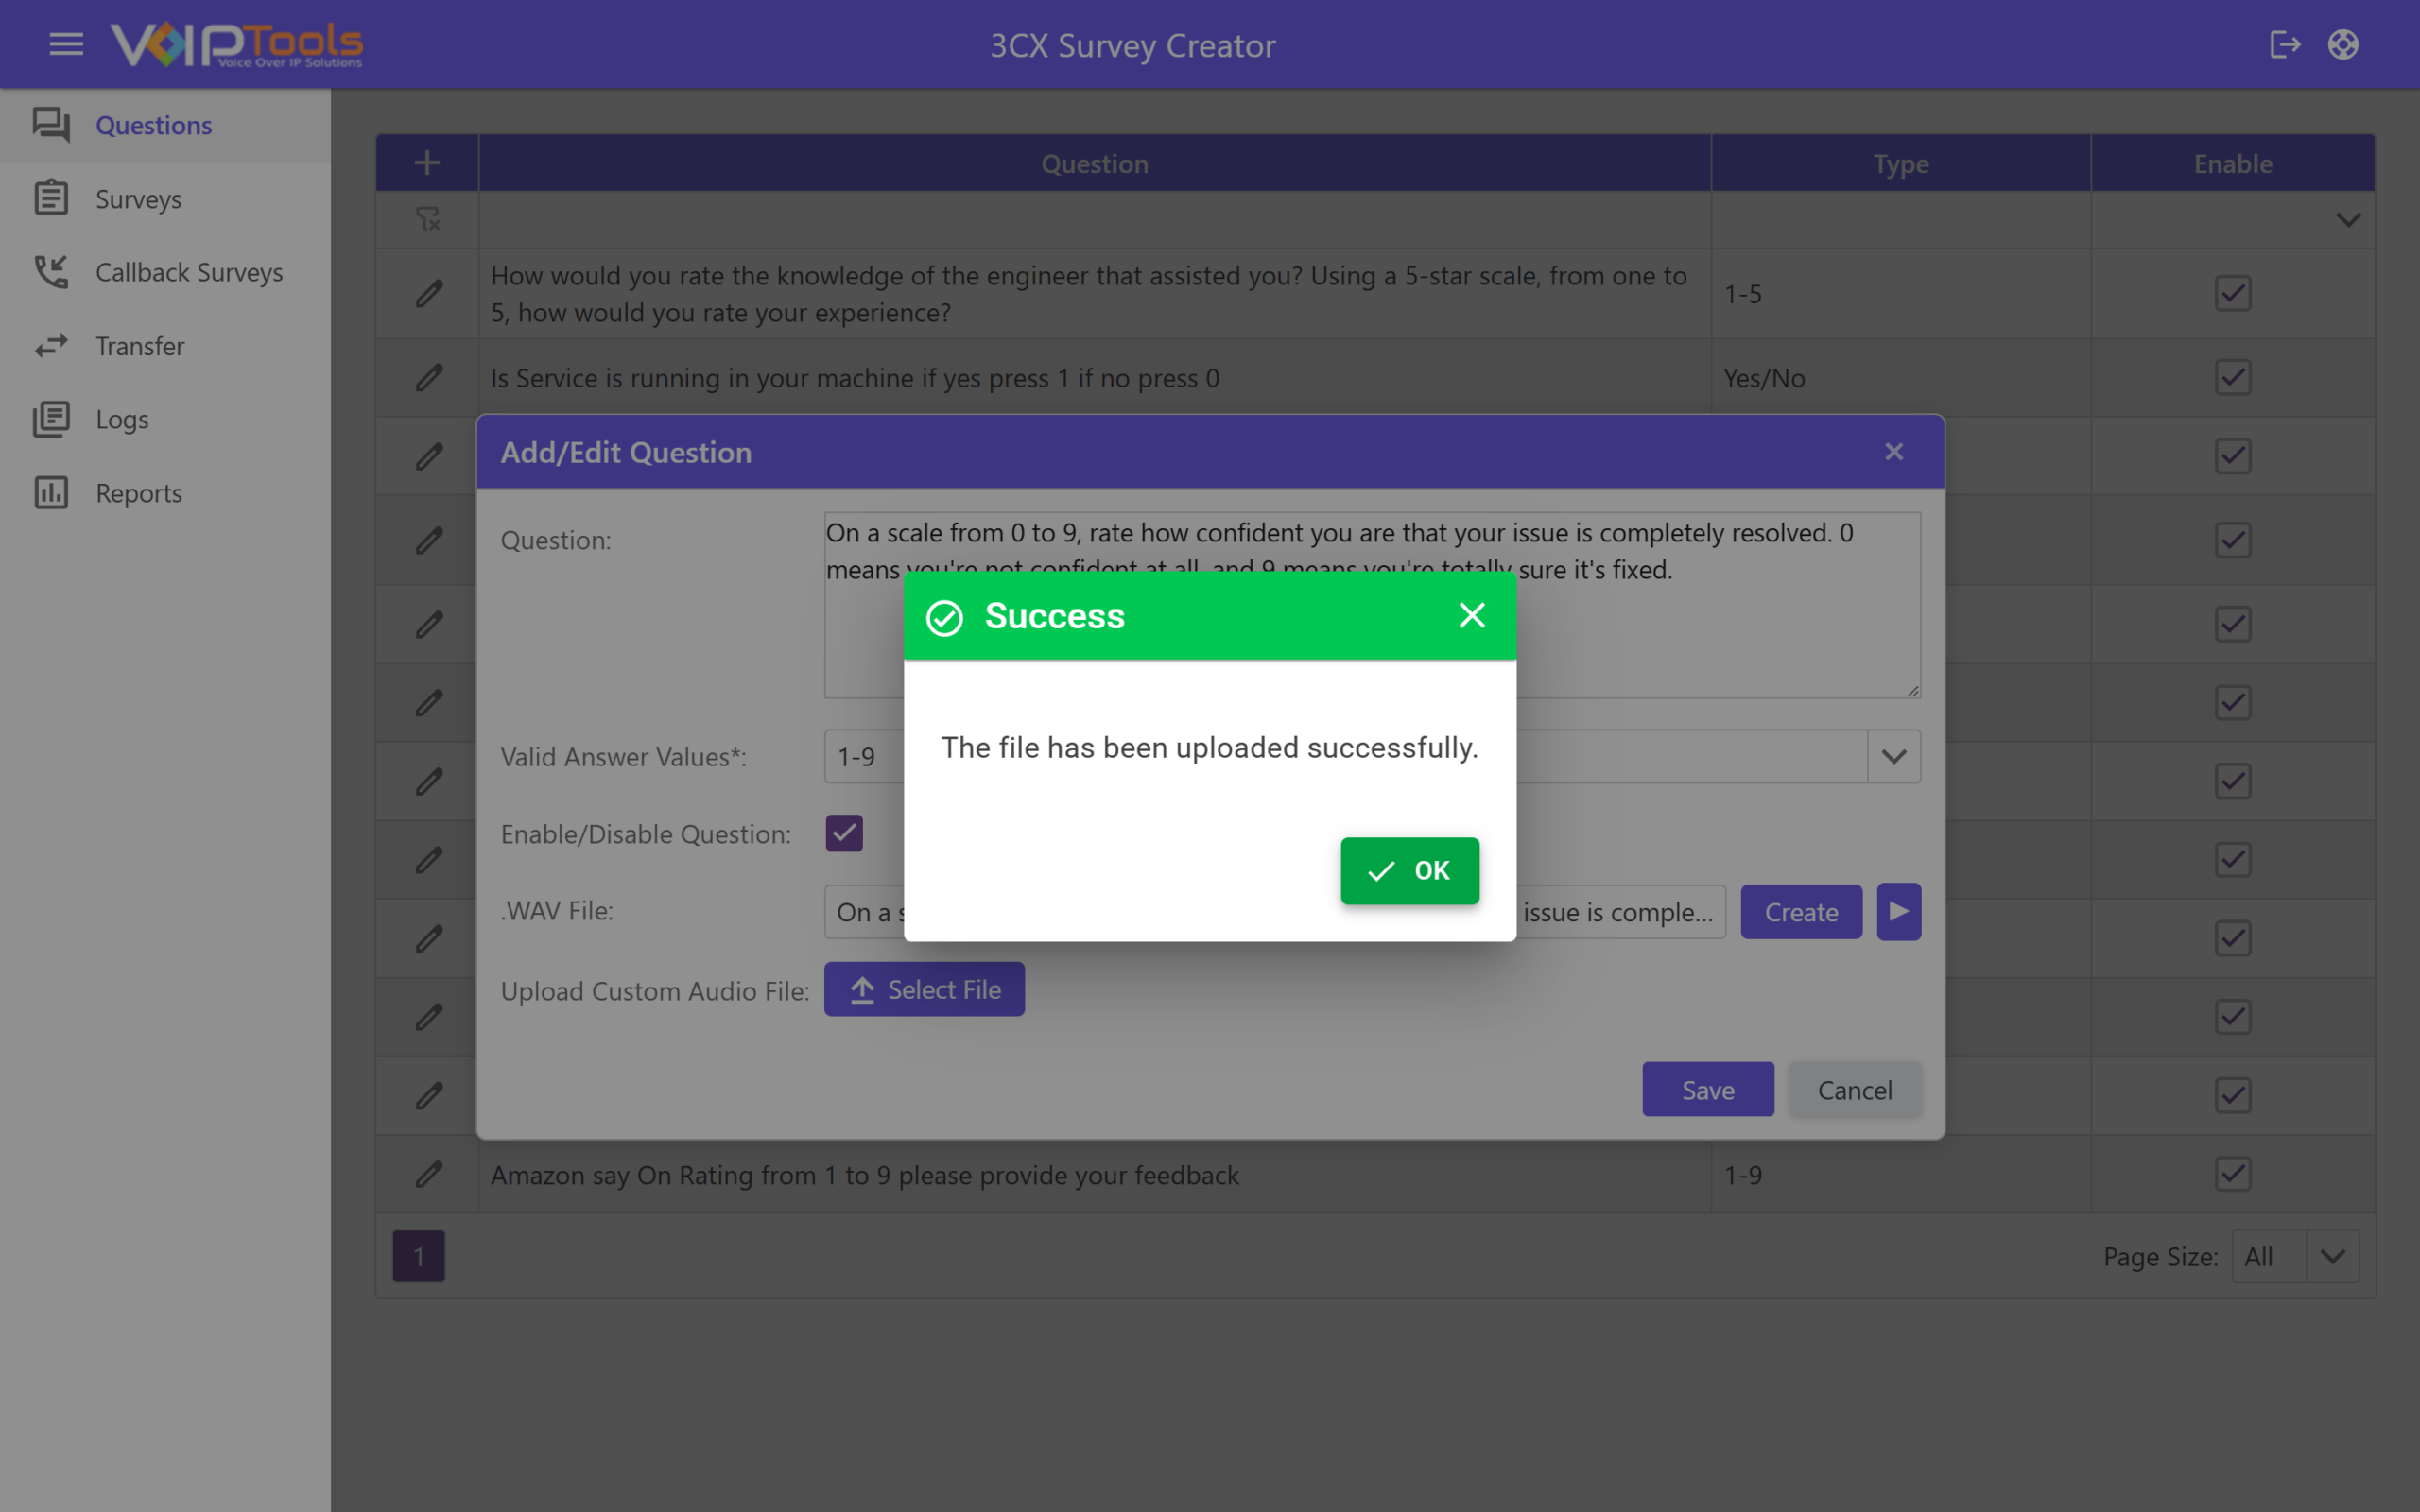
- In the .WAV File field, name the audio file.
- Select Create next to the .WAV File field to generate audio from the question text.
- Select the play icon to hear the recording.
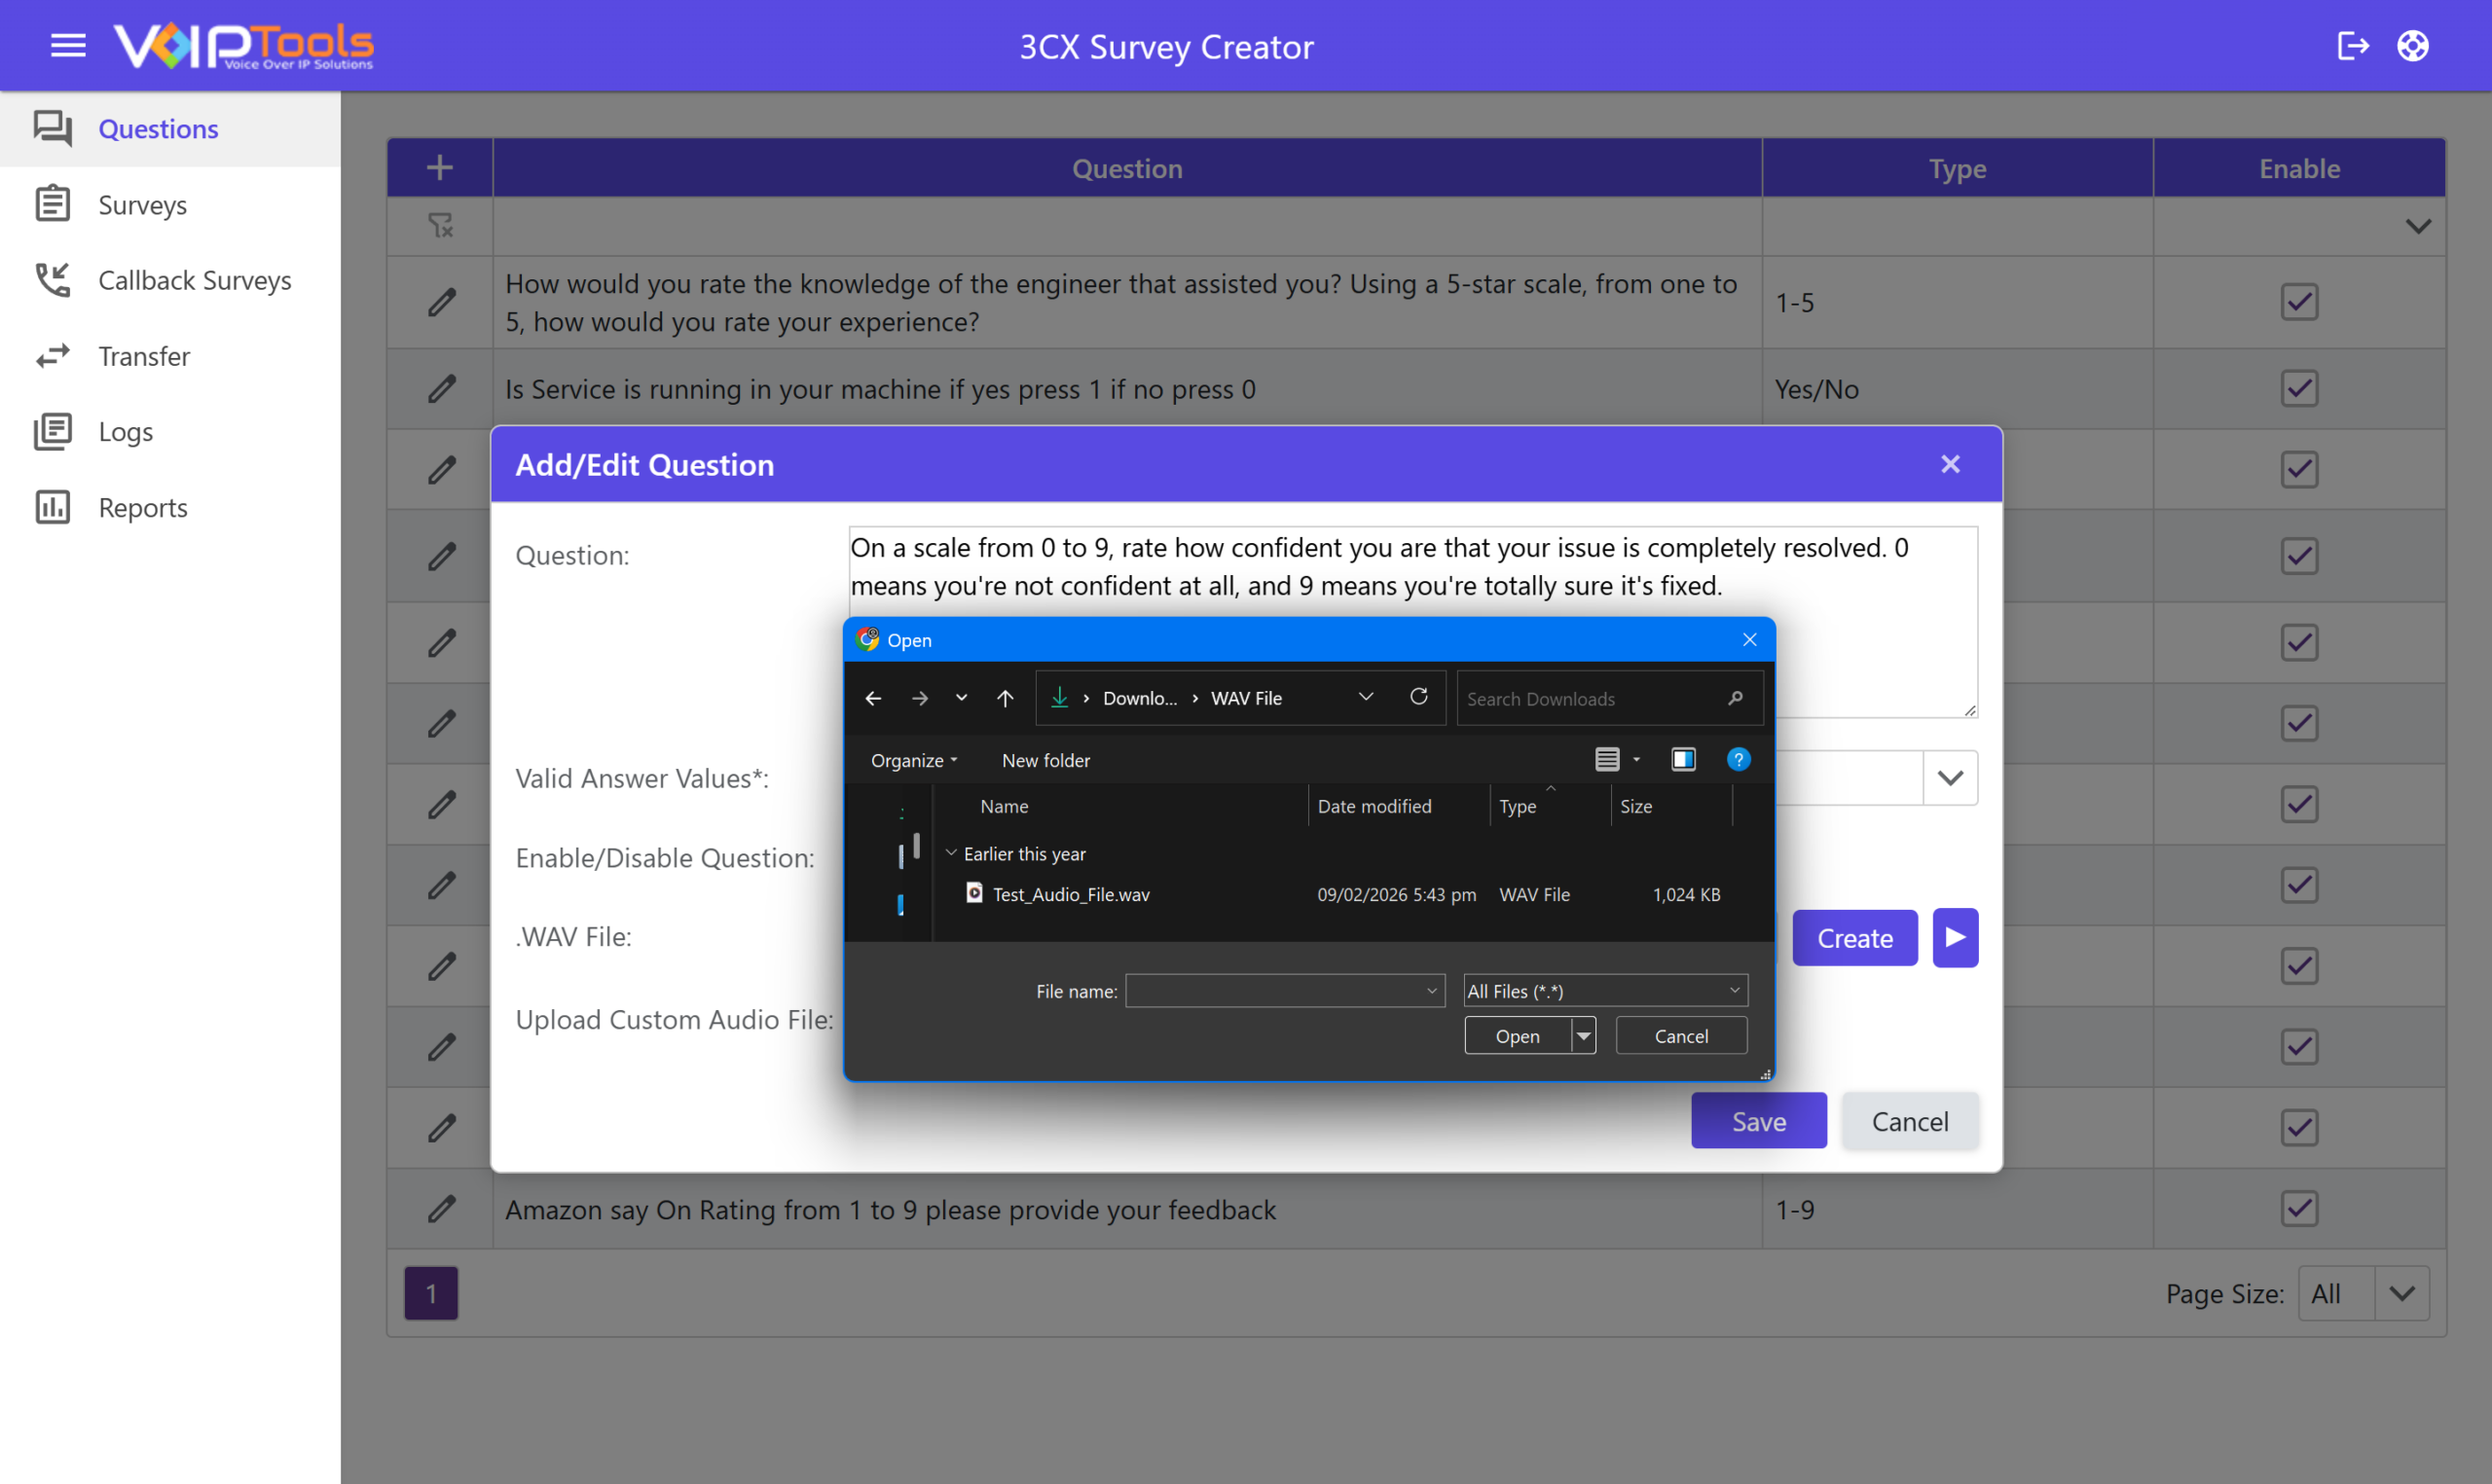
- To use your own recording instead, select Select File next to Upload Custom Audio File.
- Choose a .wav file from your computer and select Open.
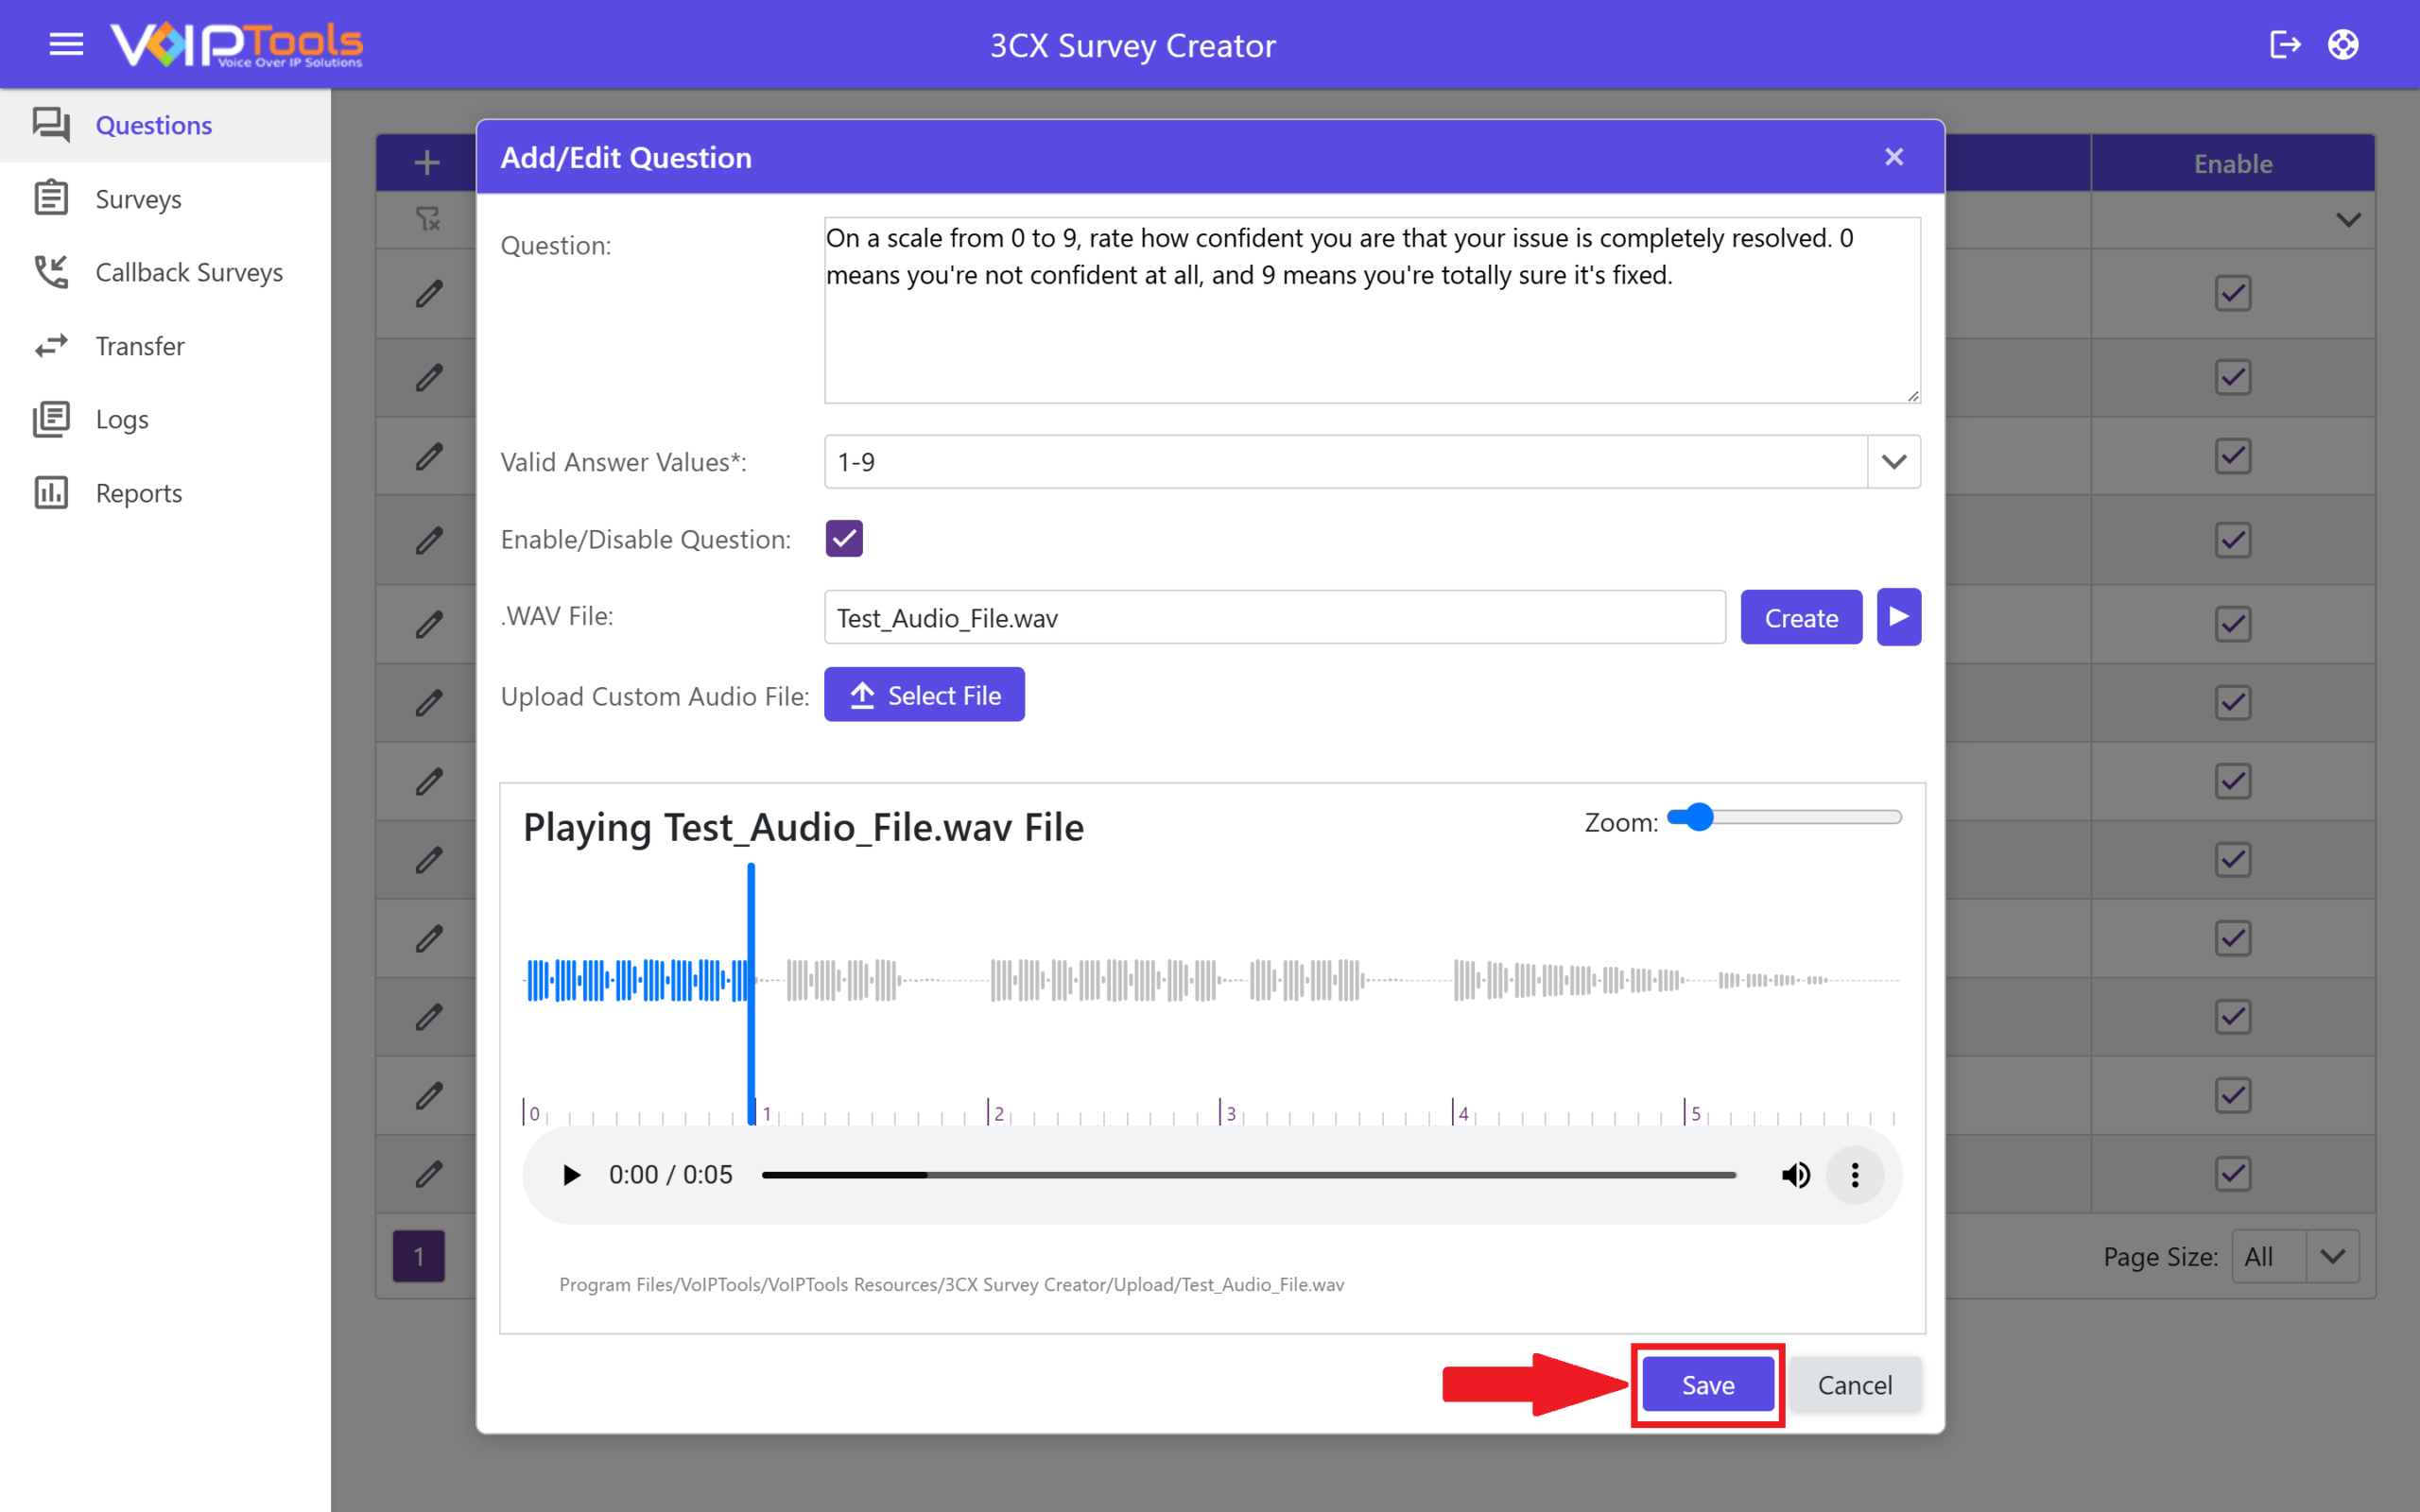
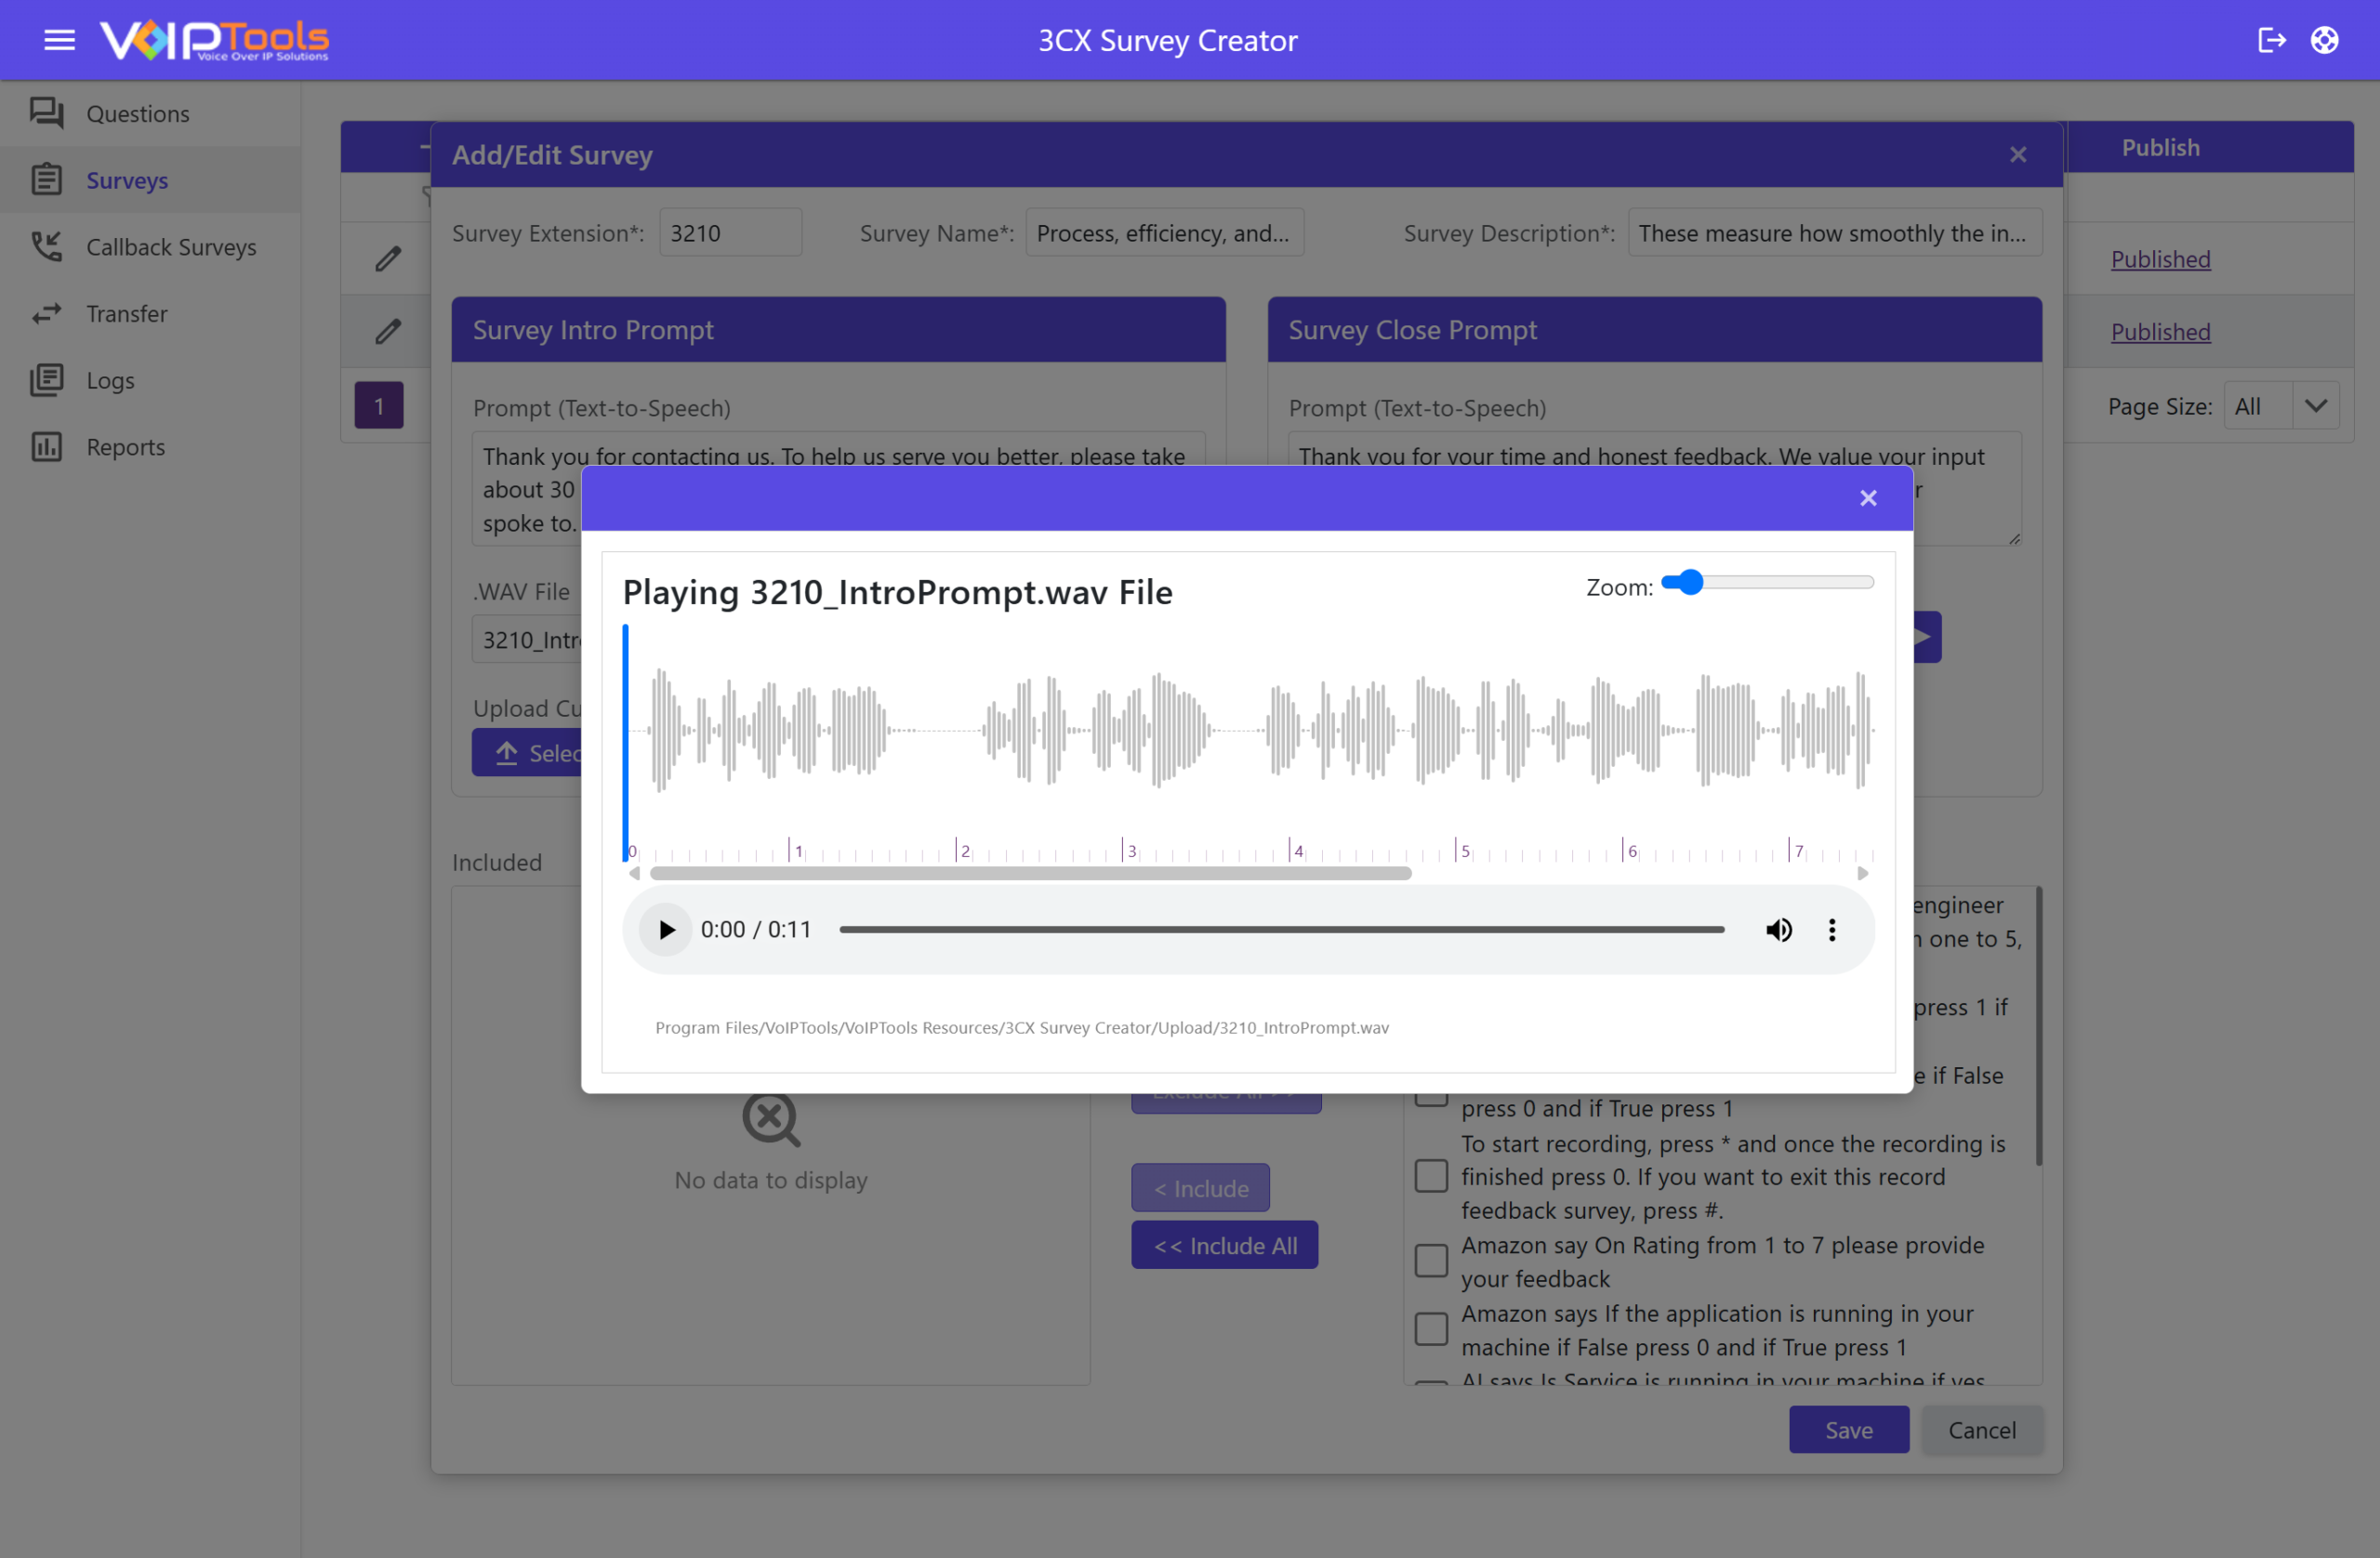
Once a file is loaded, a waveform appears so you can review the recording. Use the Zoom slider to see more or less detail, and the player controls below the waveform to play, check the time, and adjust volume.
Saving your question #
- Select Save to add the question to the list, or Cancel to discard your changes.
Surveys #
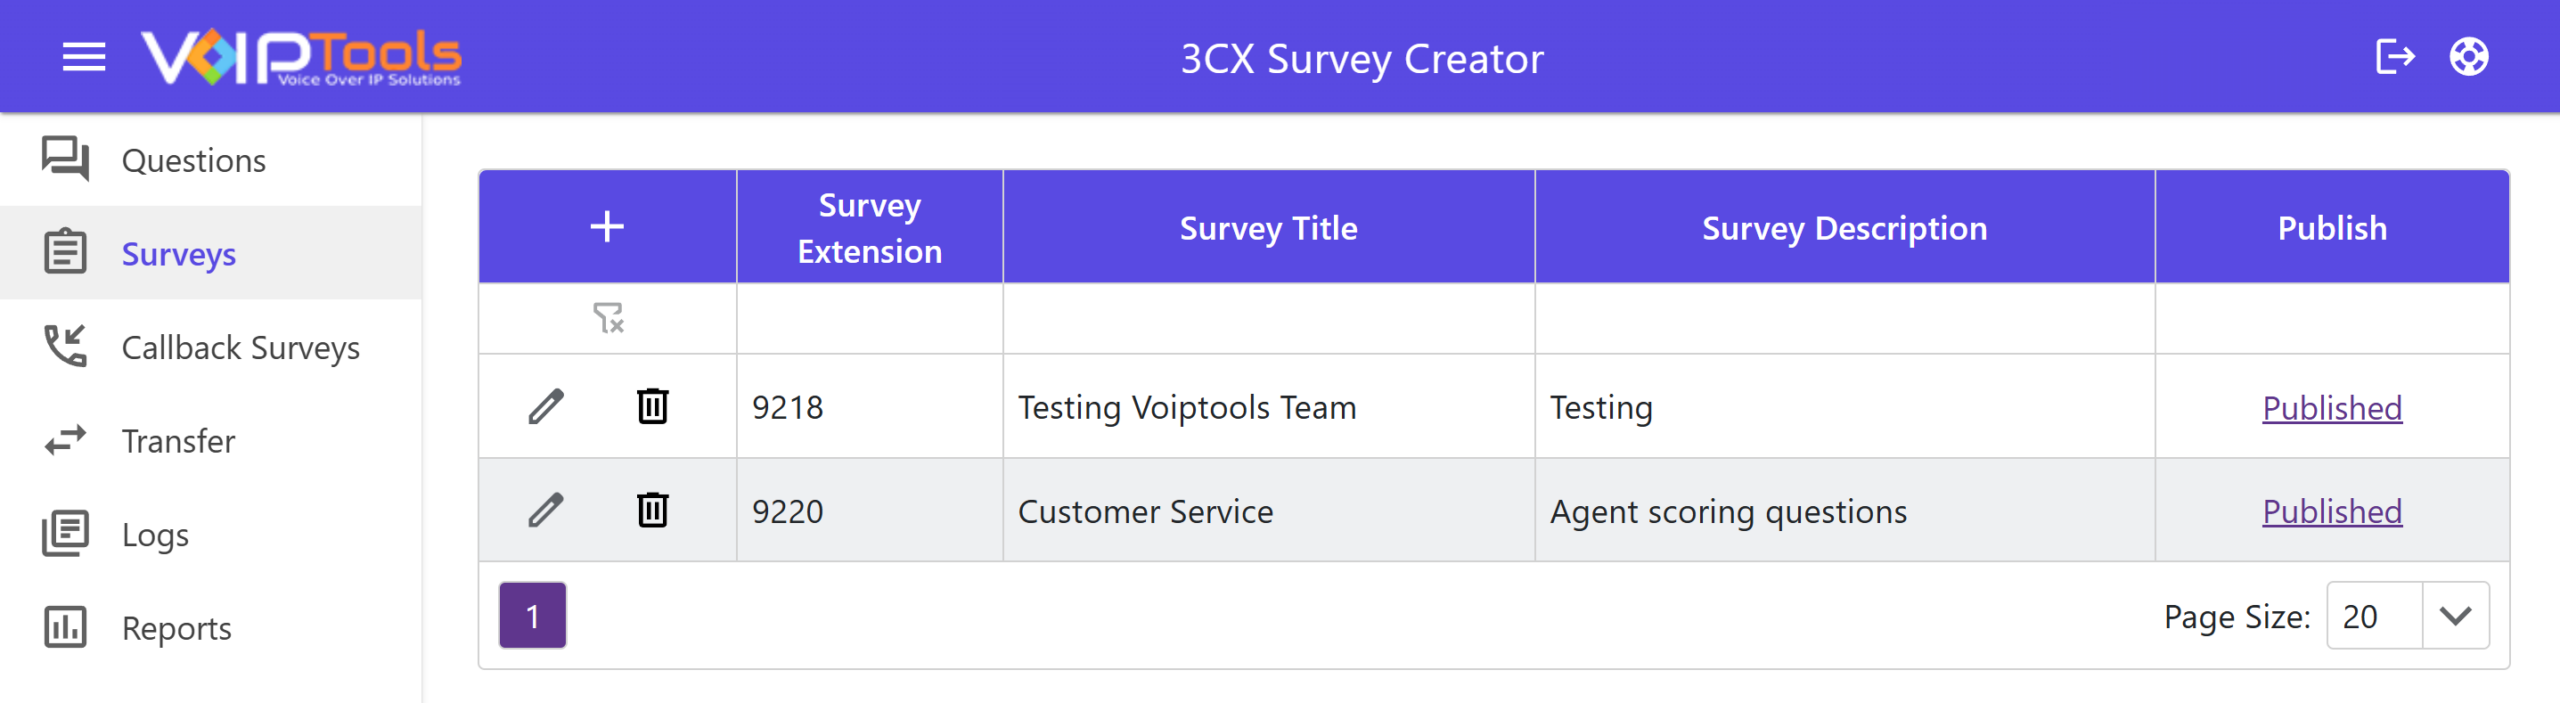
The Surveys page is where you build the surveys callers hear. Each survey pulls its questions from the list you set up on the Questions page.
Adding a survey #
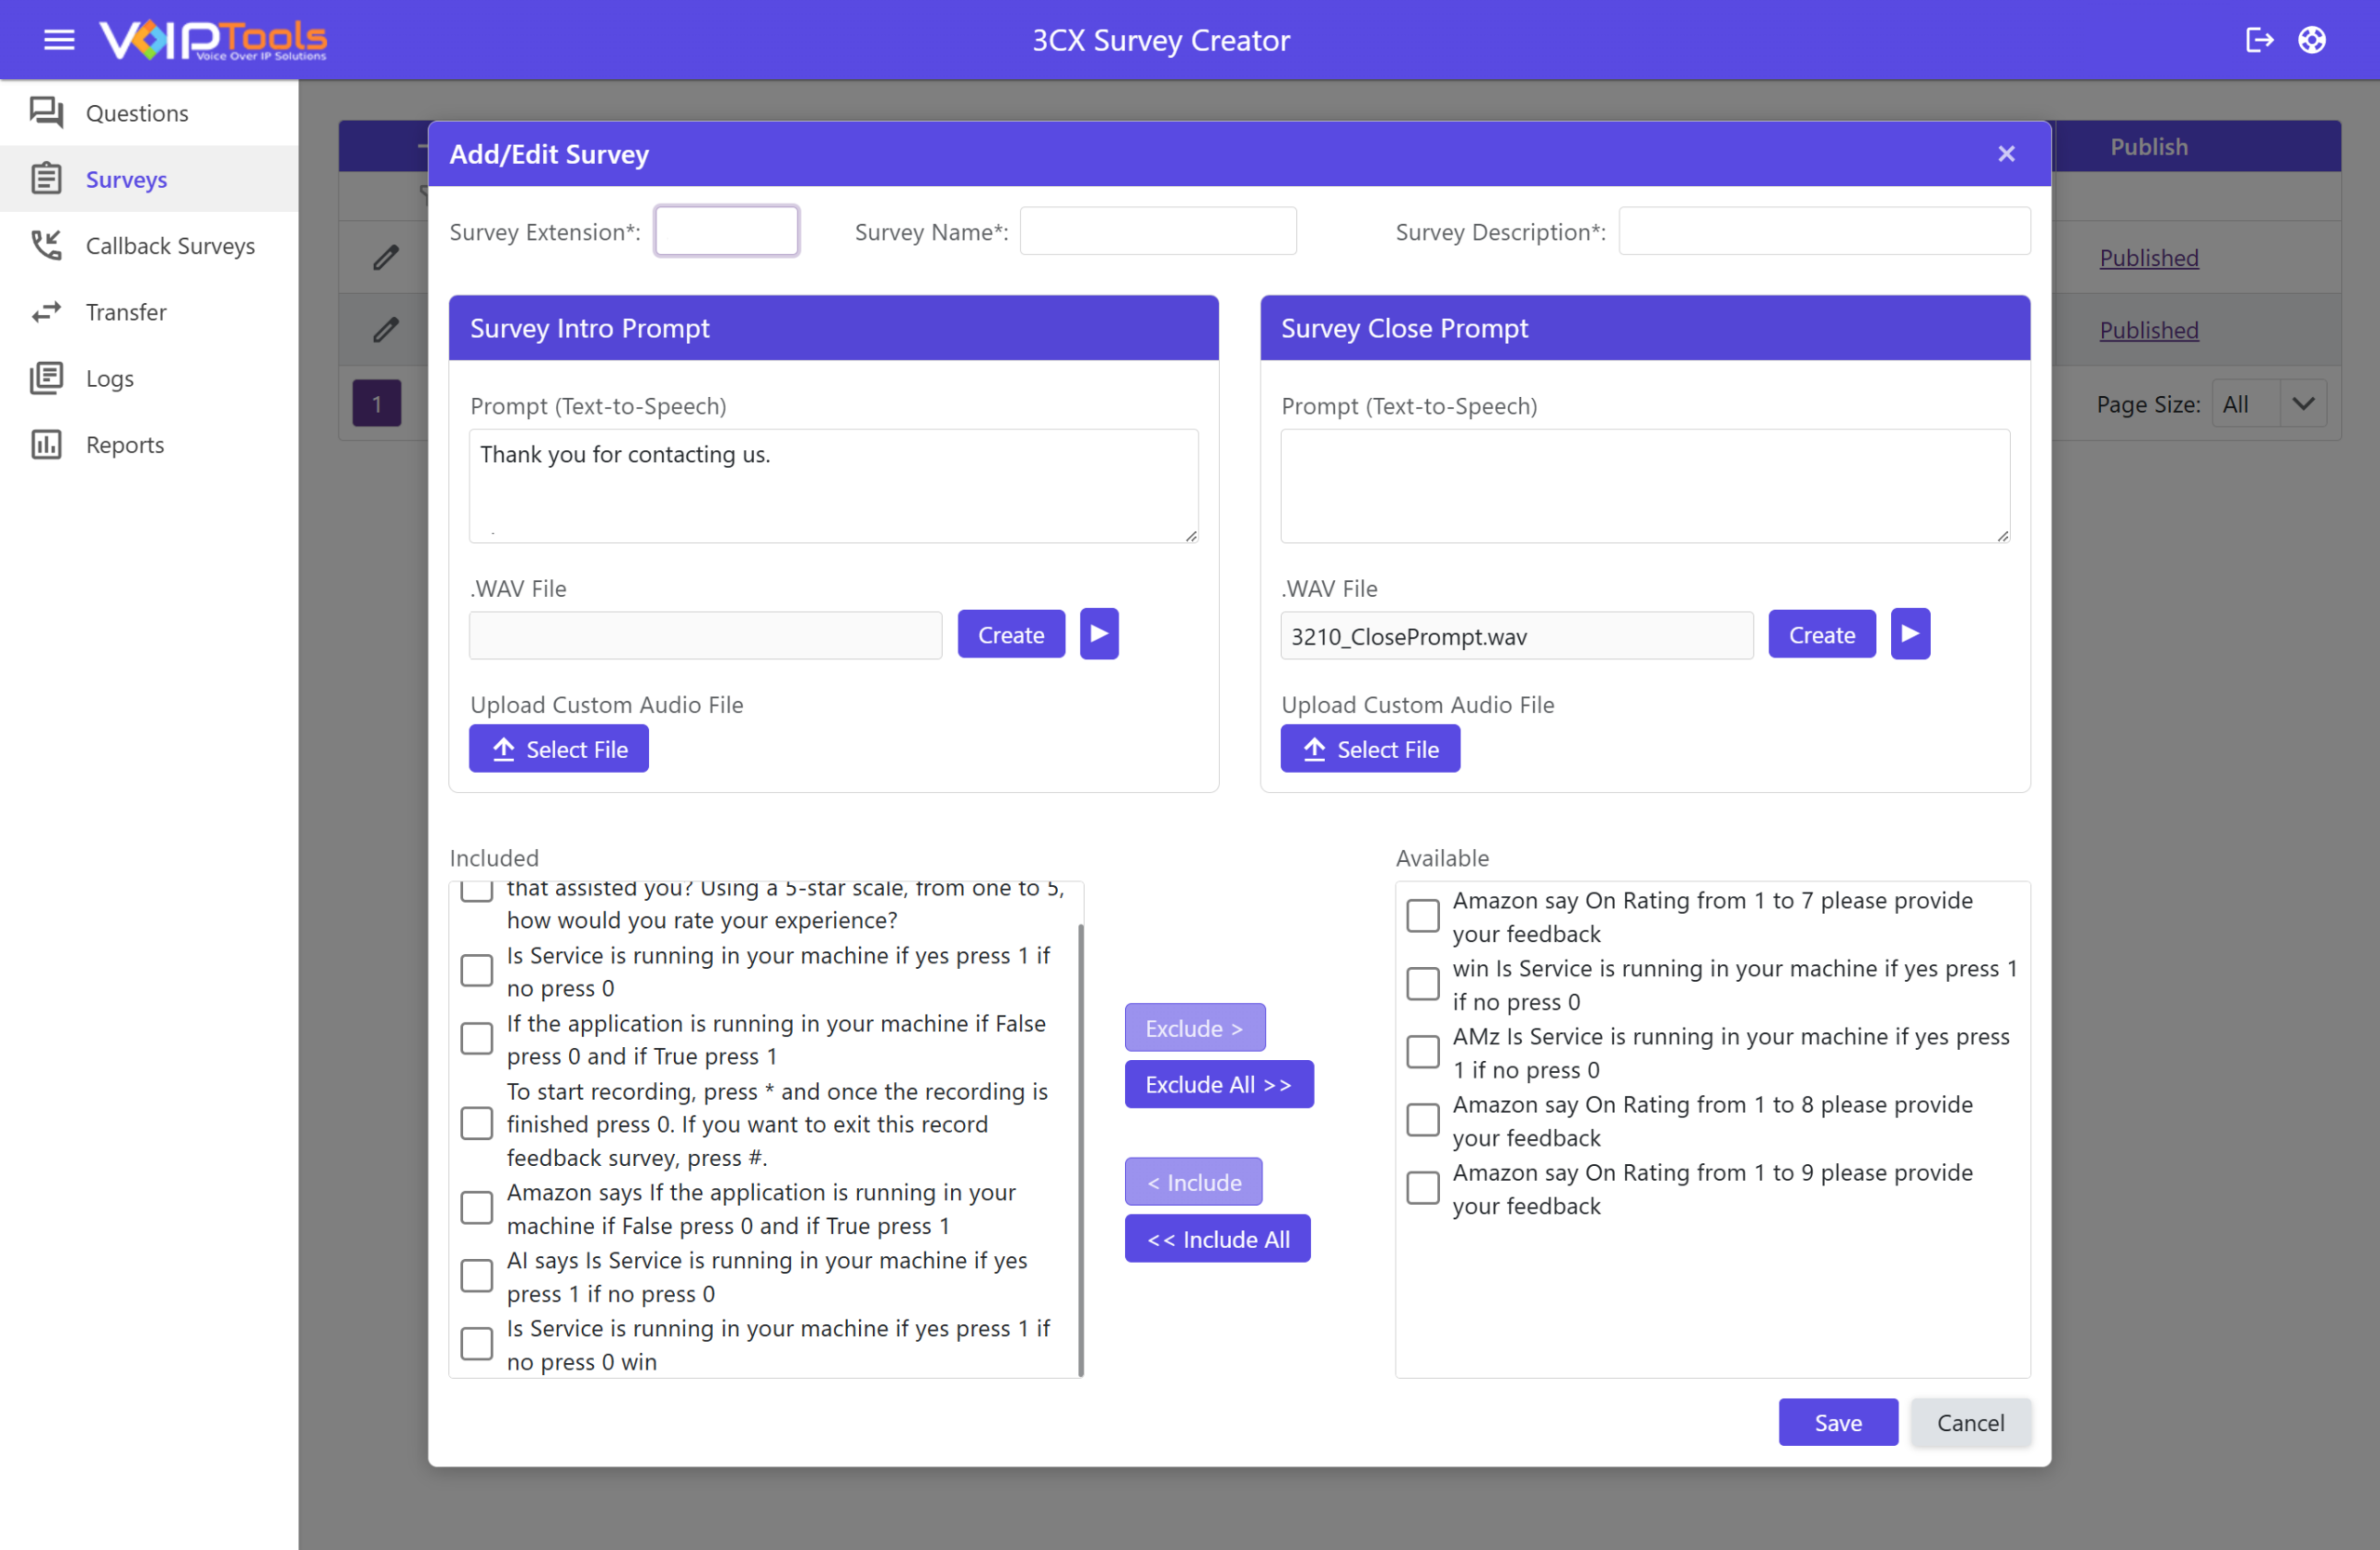
- Select the + icon above the Survey Extension column.
- In the Survey Extension field, enter the extension the survey runs on.
- In the Survey Name field, enter a name for the survey.
- In the Survey Description field, enter a short description.
Setting the intro and close prompts #
The intro prompt plays at the start of the survey, and the close prompt plays at the end.
- In the Survey Intro Prompt panel, type the greeting in the Prompt (Text-to-Speech) field.
- In the Survey Close Prompt panel, type the closing message in its Prompt (Text-to-Speech) field.
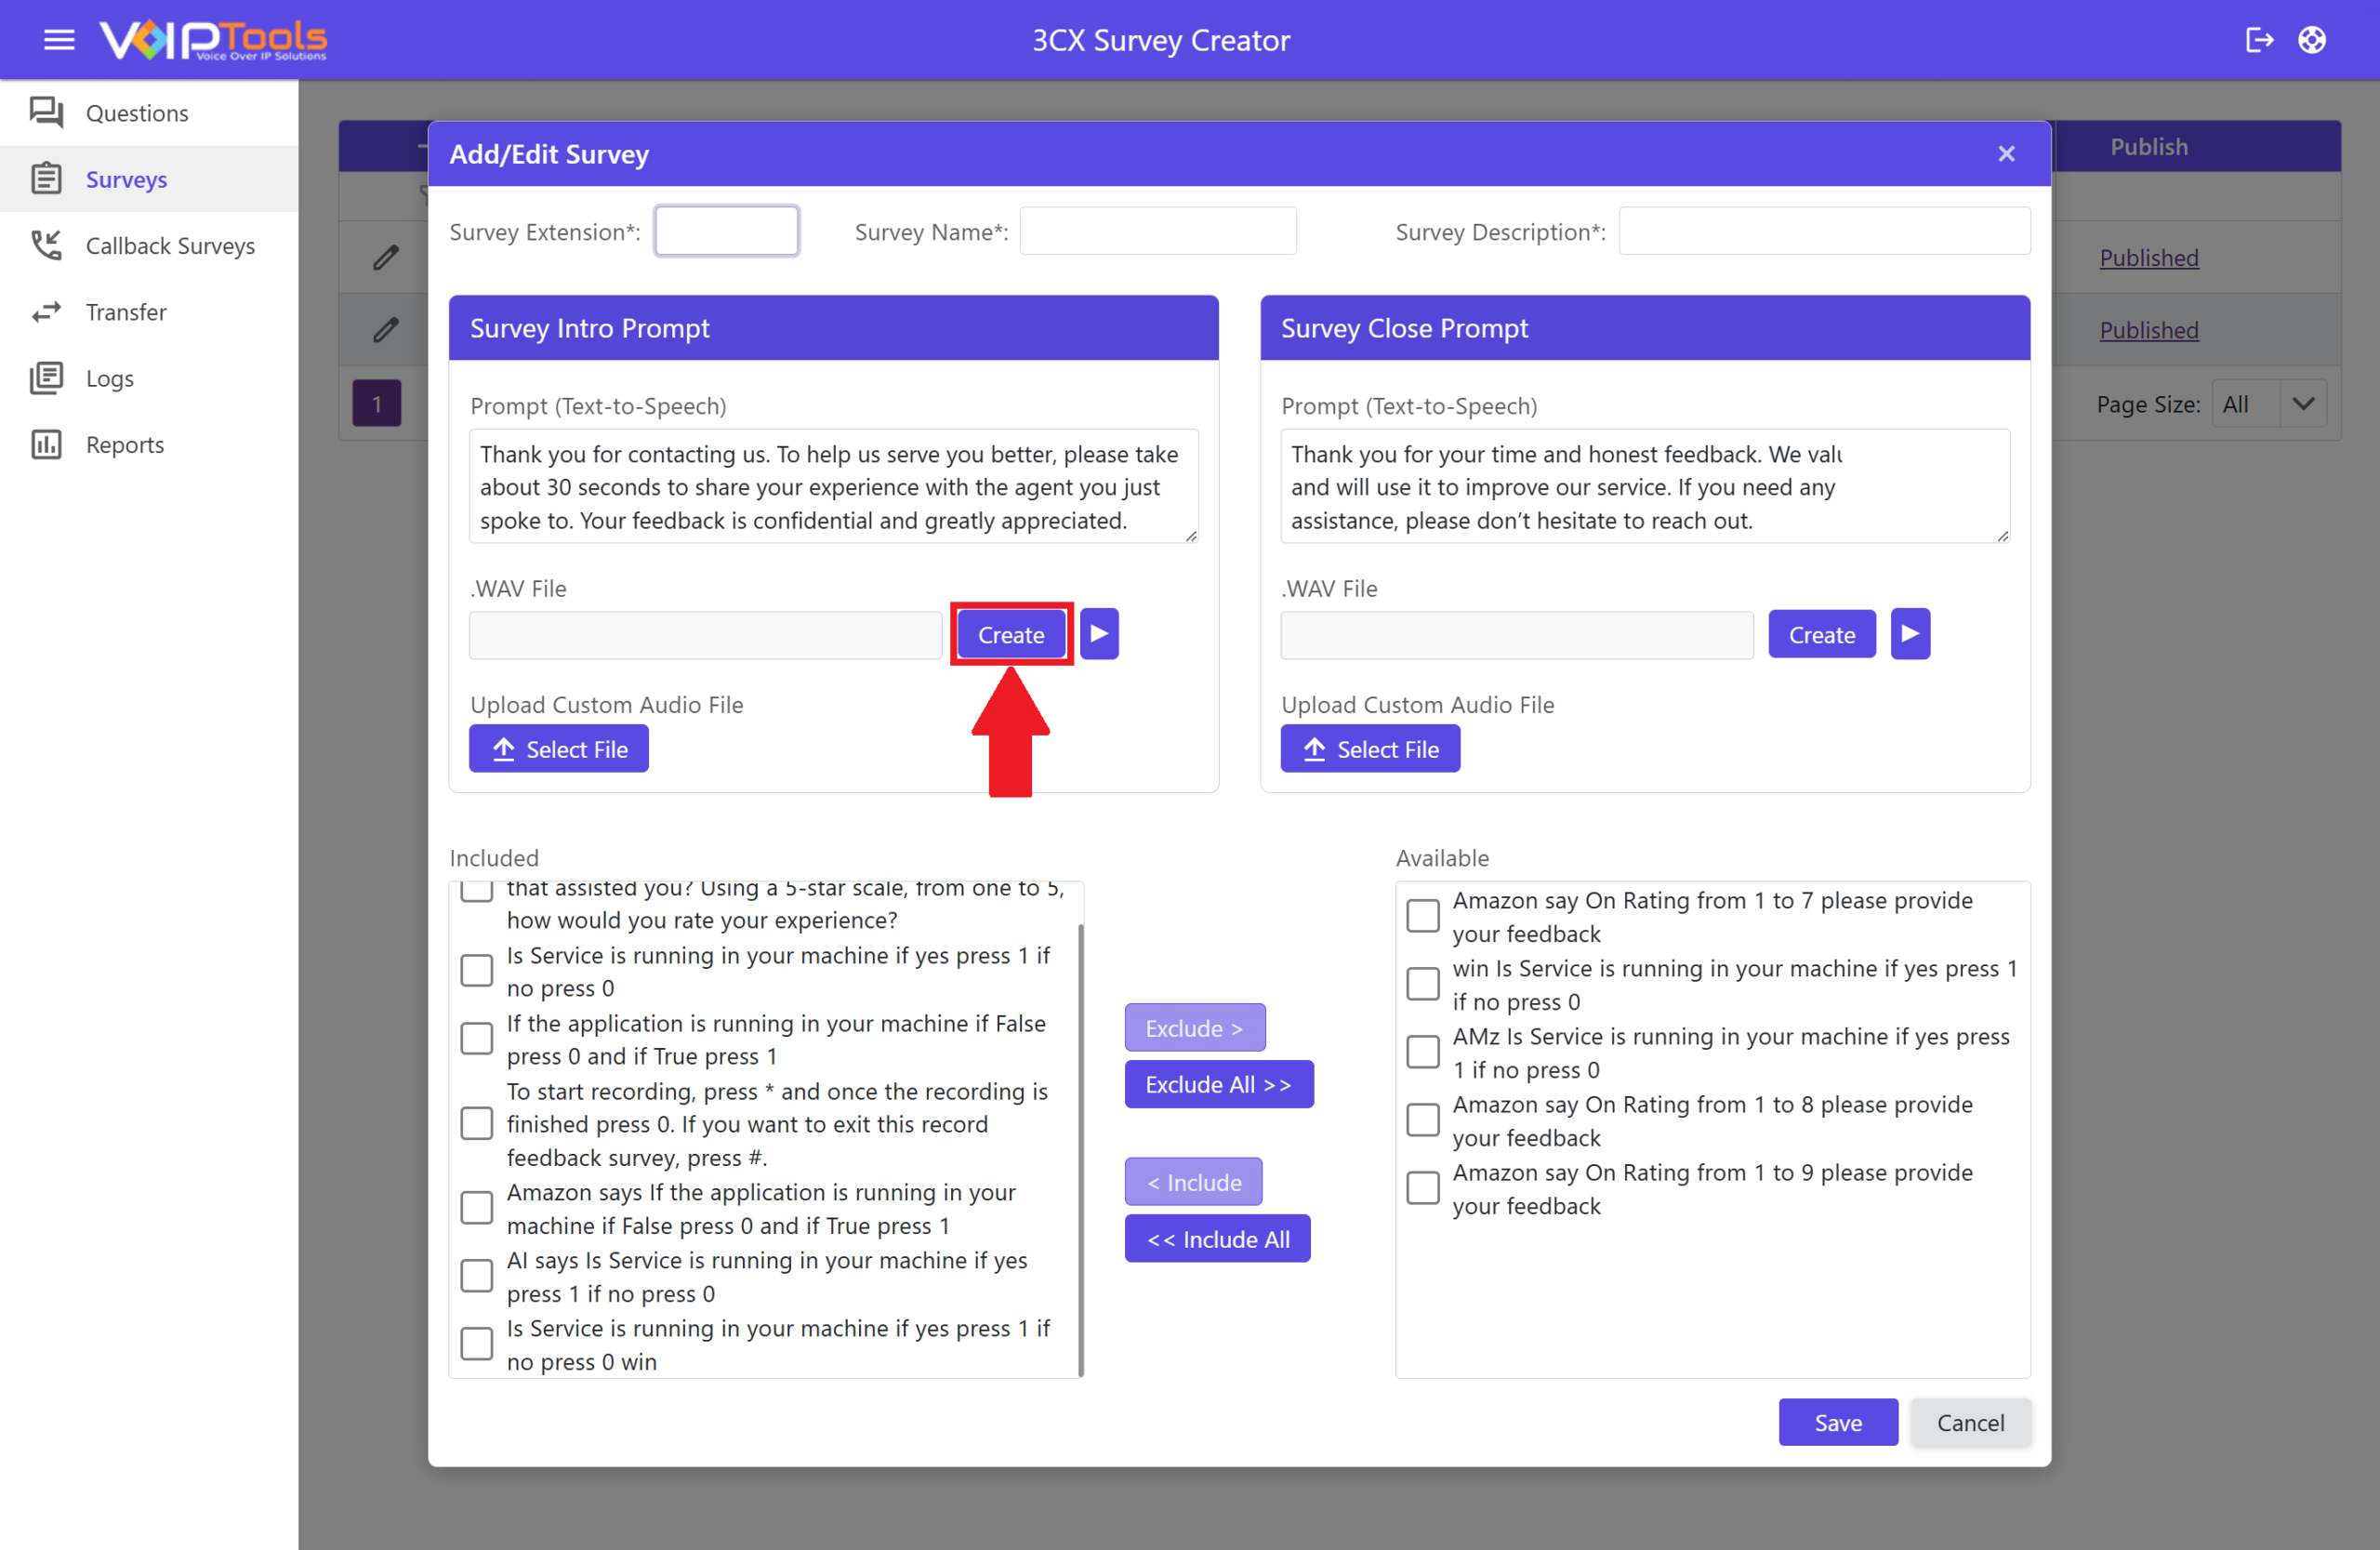
- Select Create next to a .WAV File field to generate audio from that prompt text.
- Select the play icon to hear the recording.
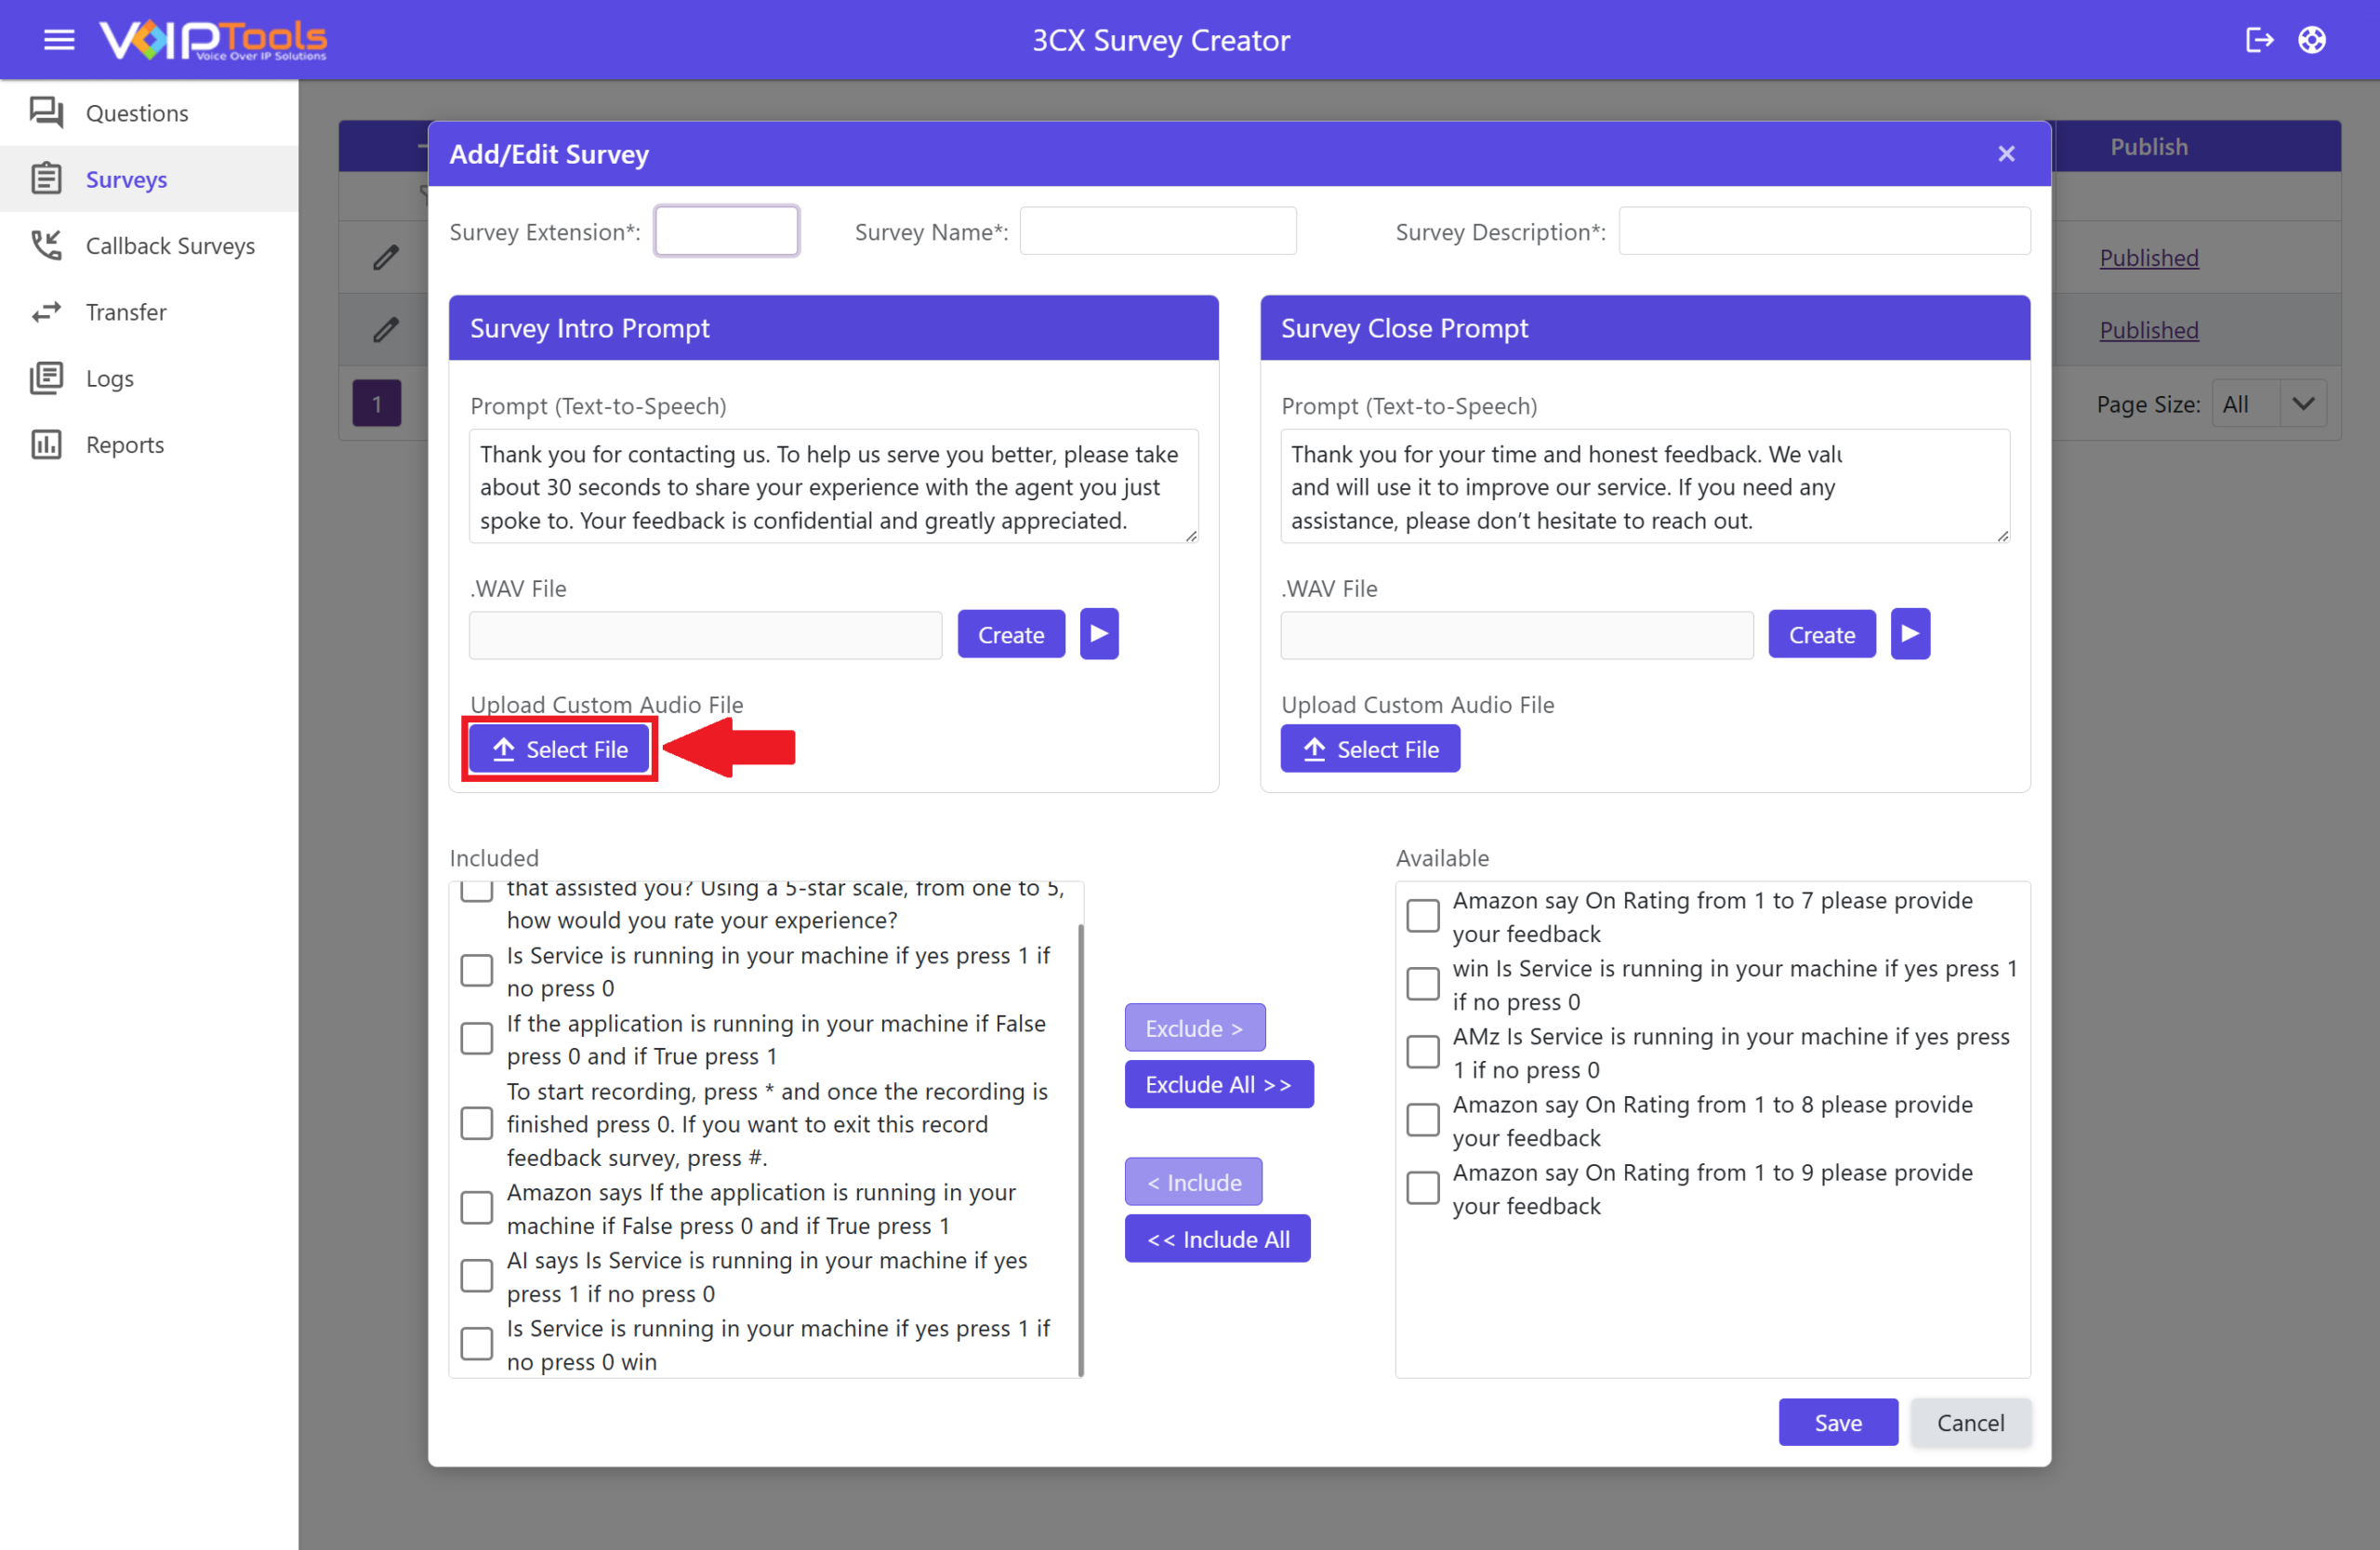
To use your own recording instead, select Select File under Upload Custom Audio File in either panel.
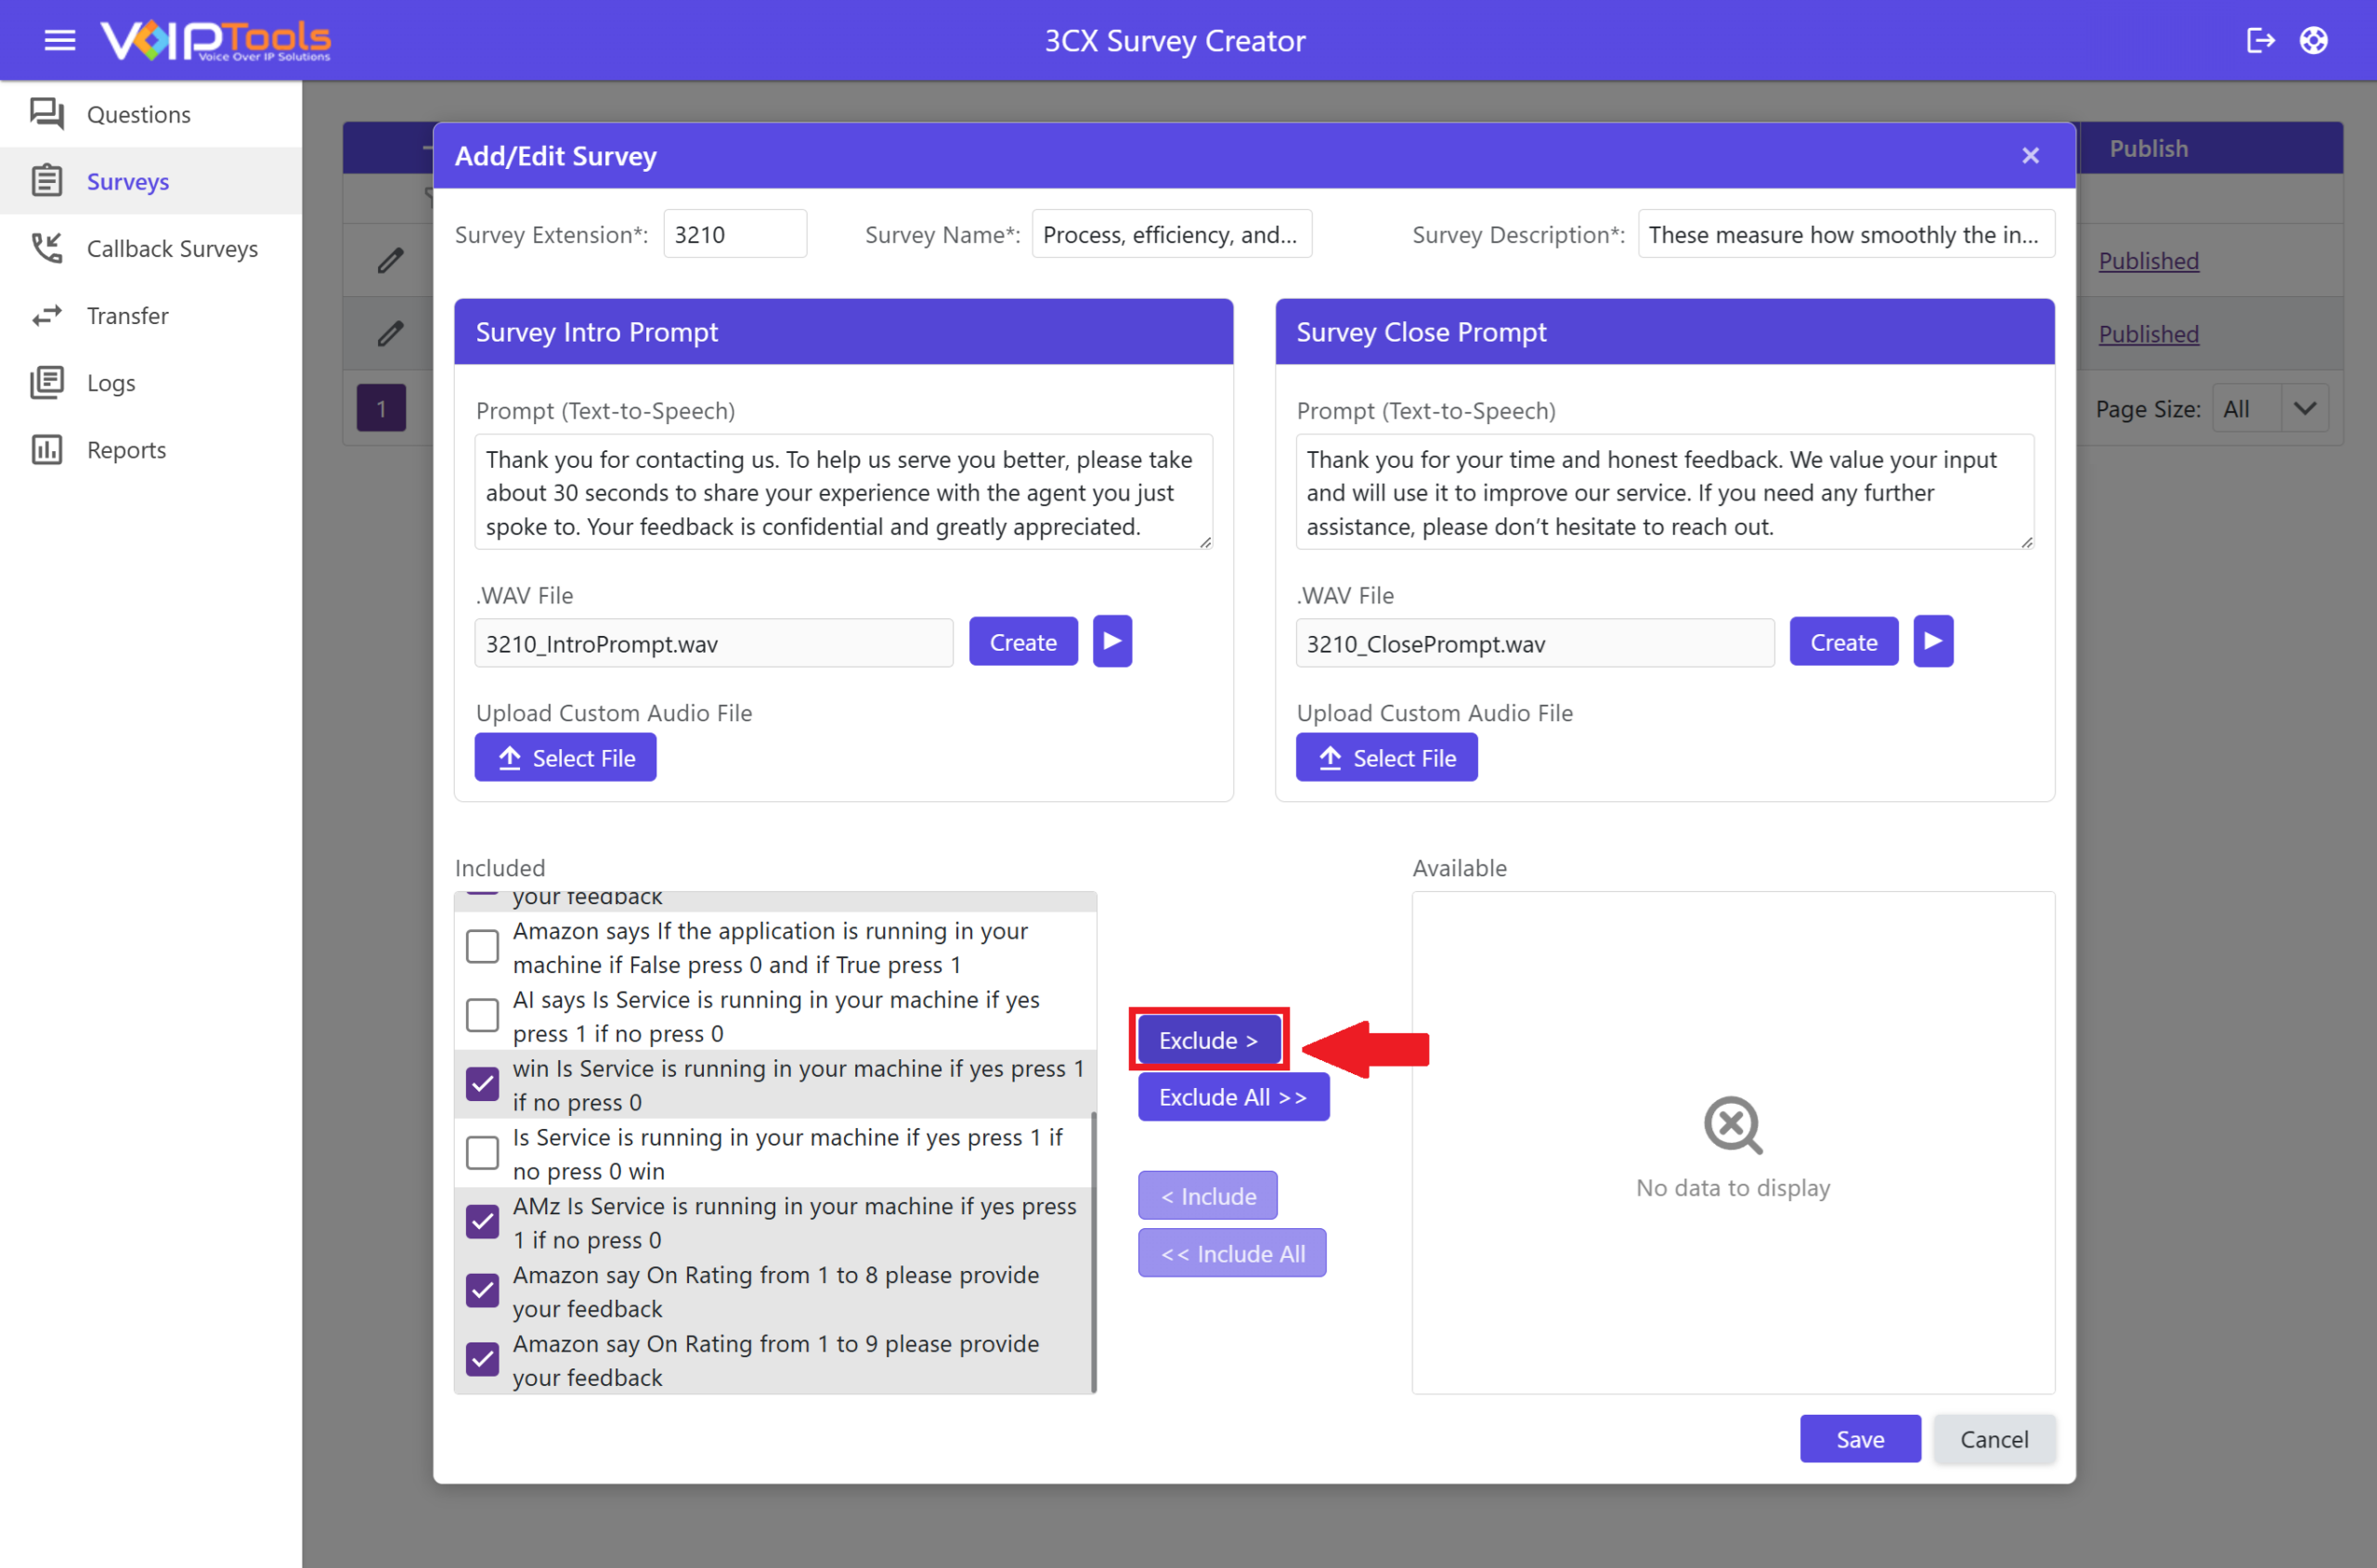
Choosing which questions to include #
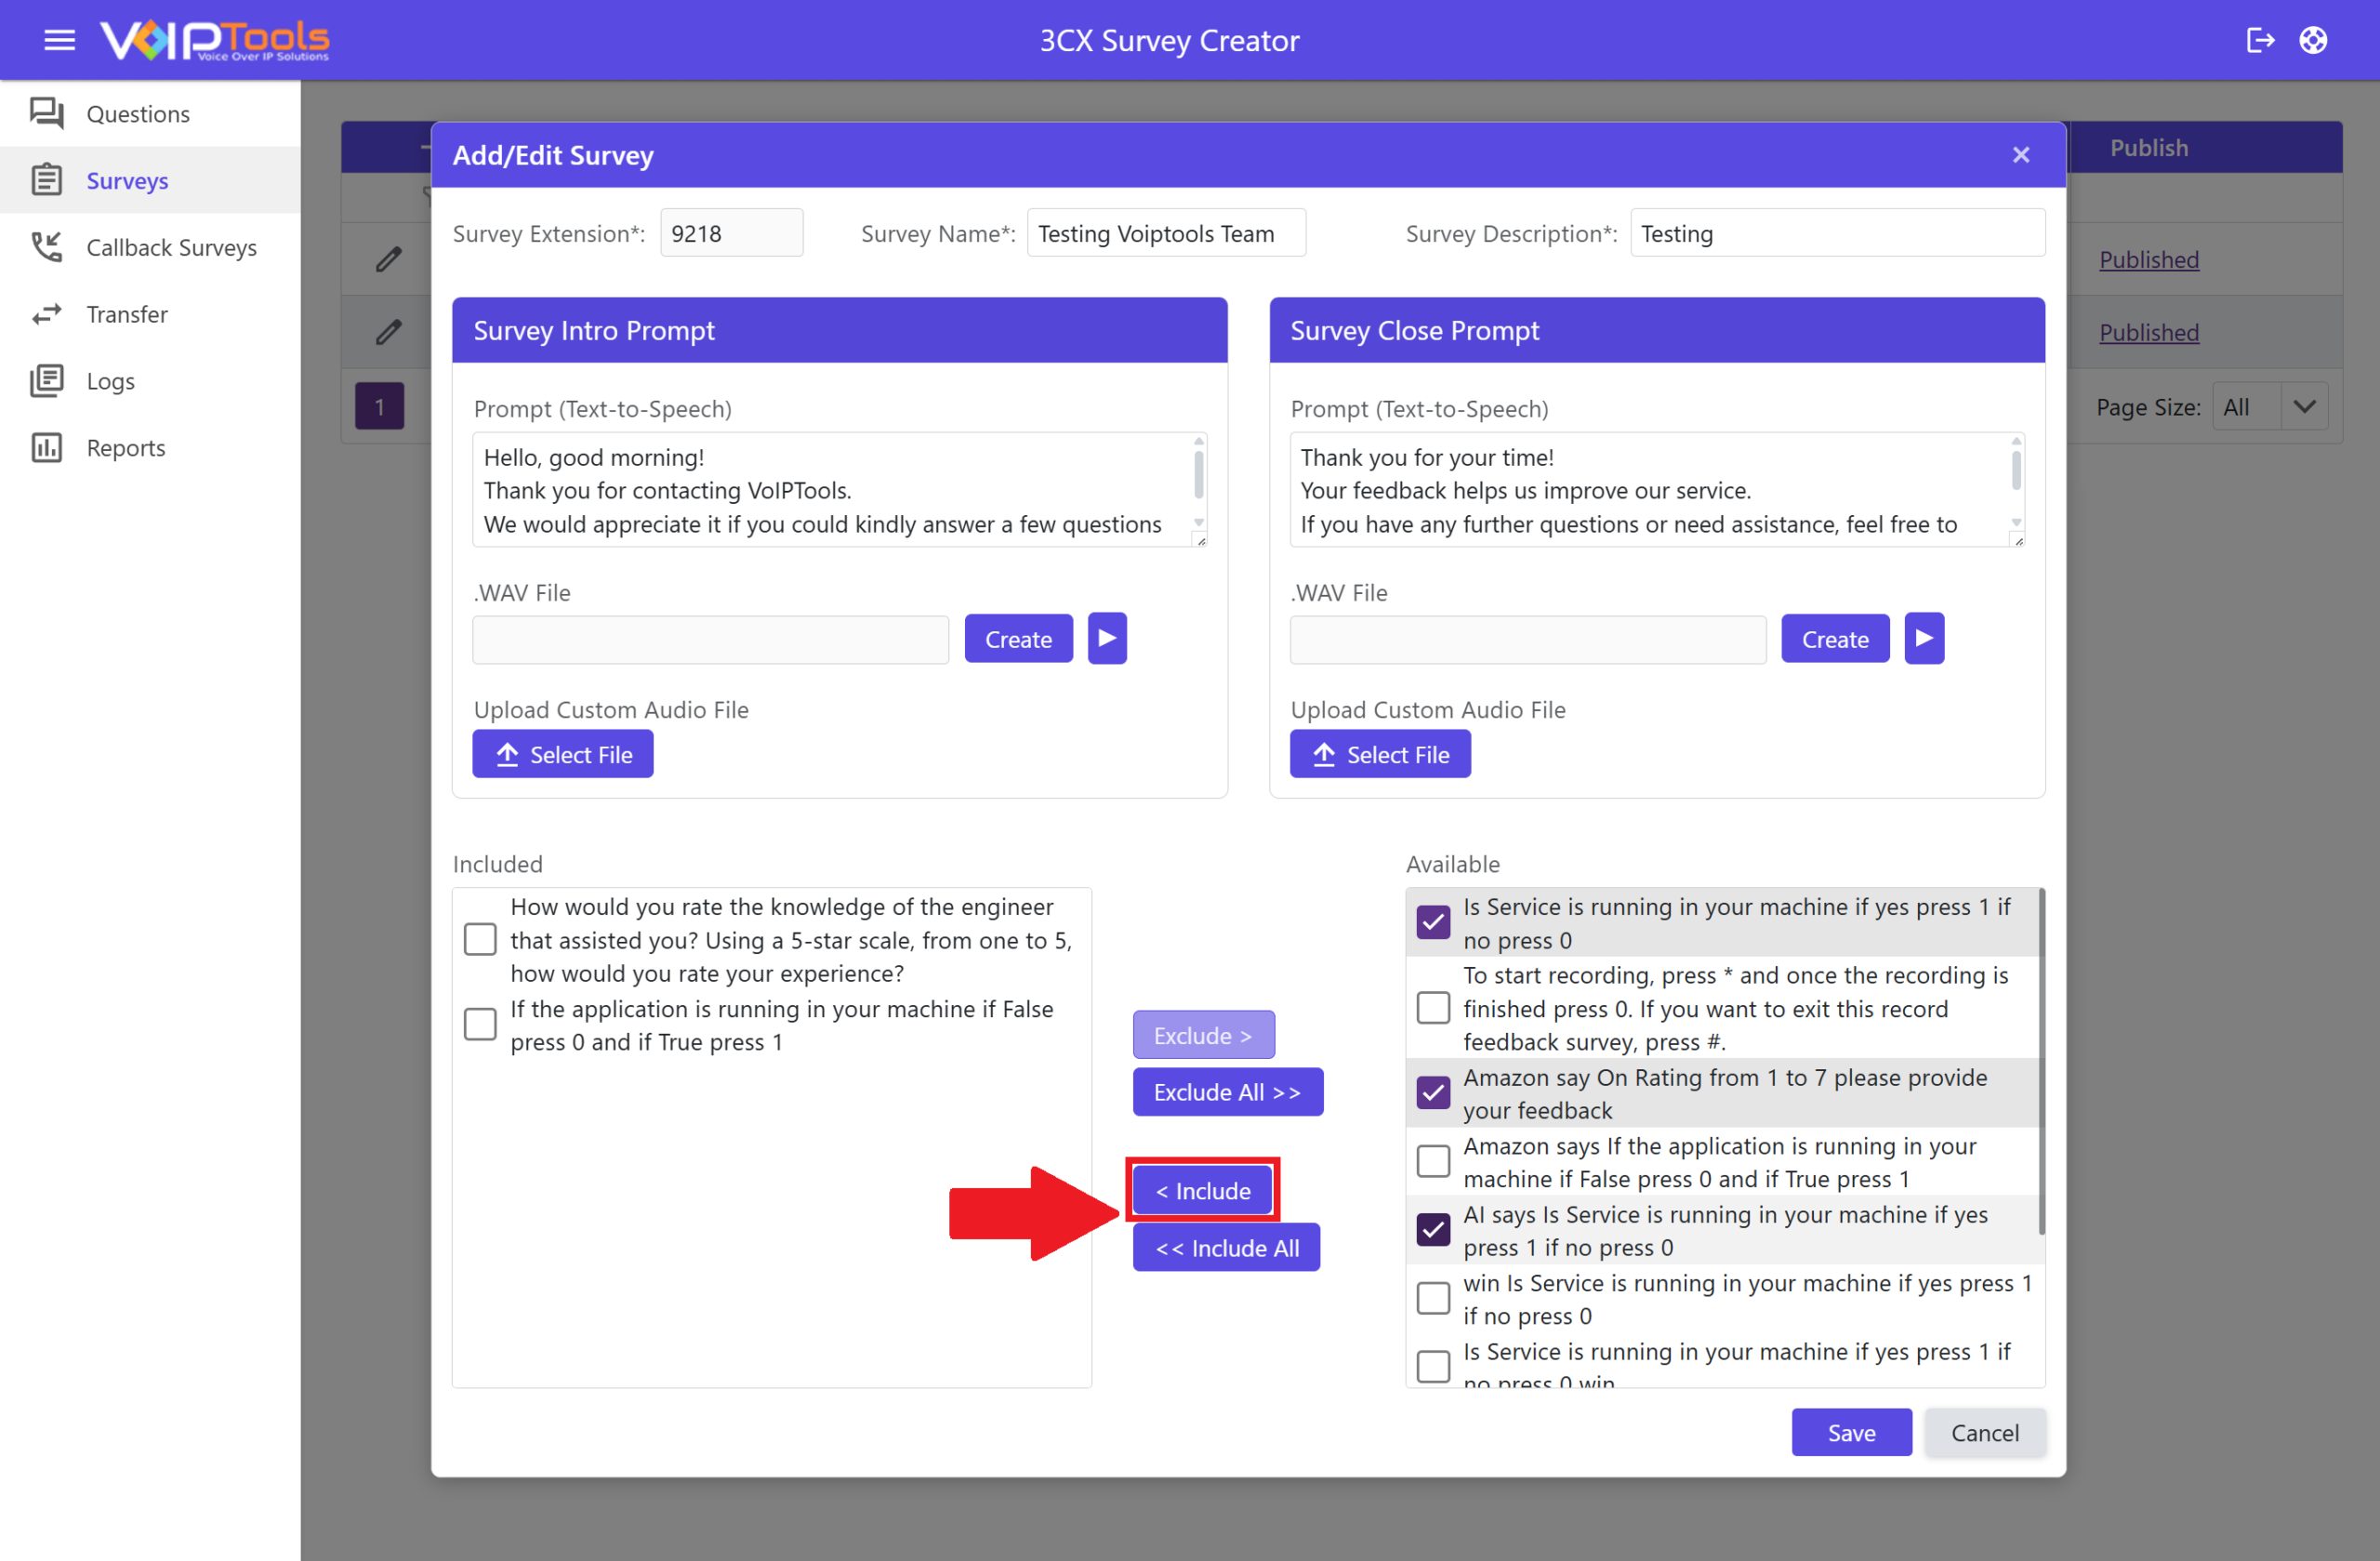
The Available list on the right holds every question you have not yet added. The Included list on the left holds the questions in this survey.
- Check a question in the Available list.
- Select < Include to move it into the survey, or << Include All to move every available question at once.
- To remove a question from the survey, check it in the Included list.
- Select Exclude > to move it back to Available, or Exclude All >> to move every included question at once.
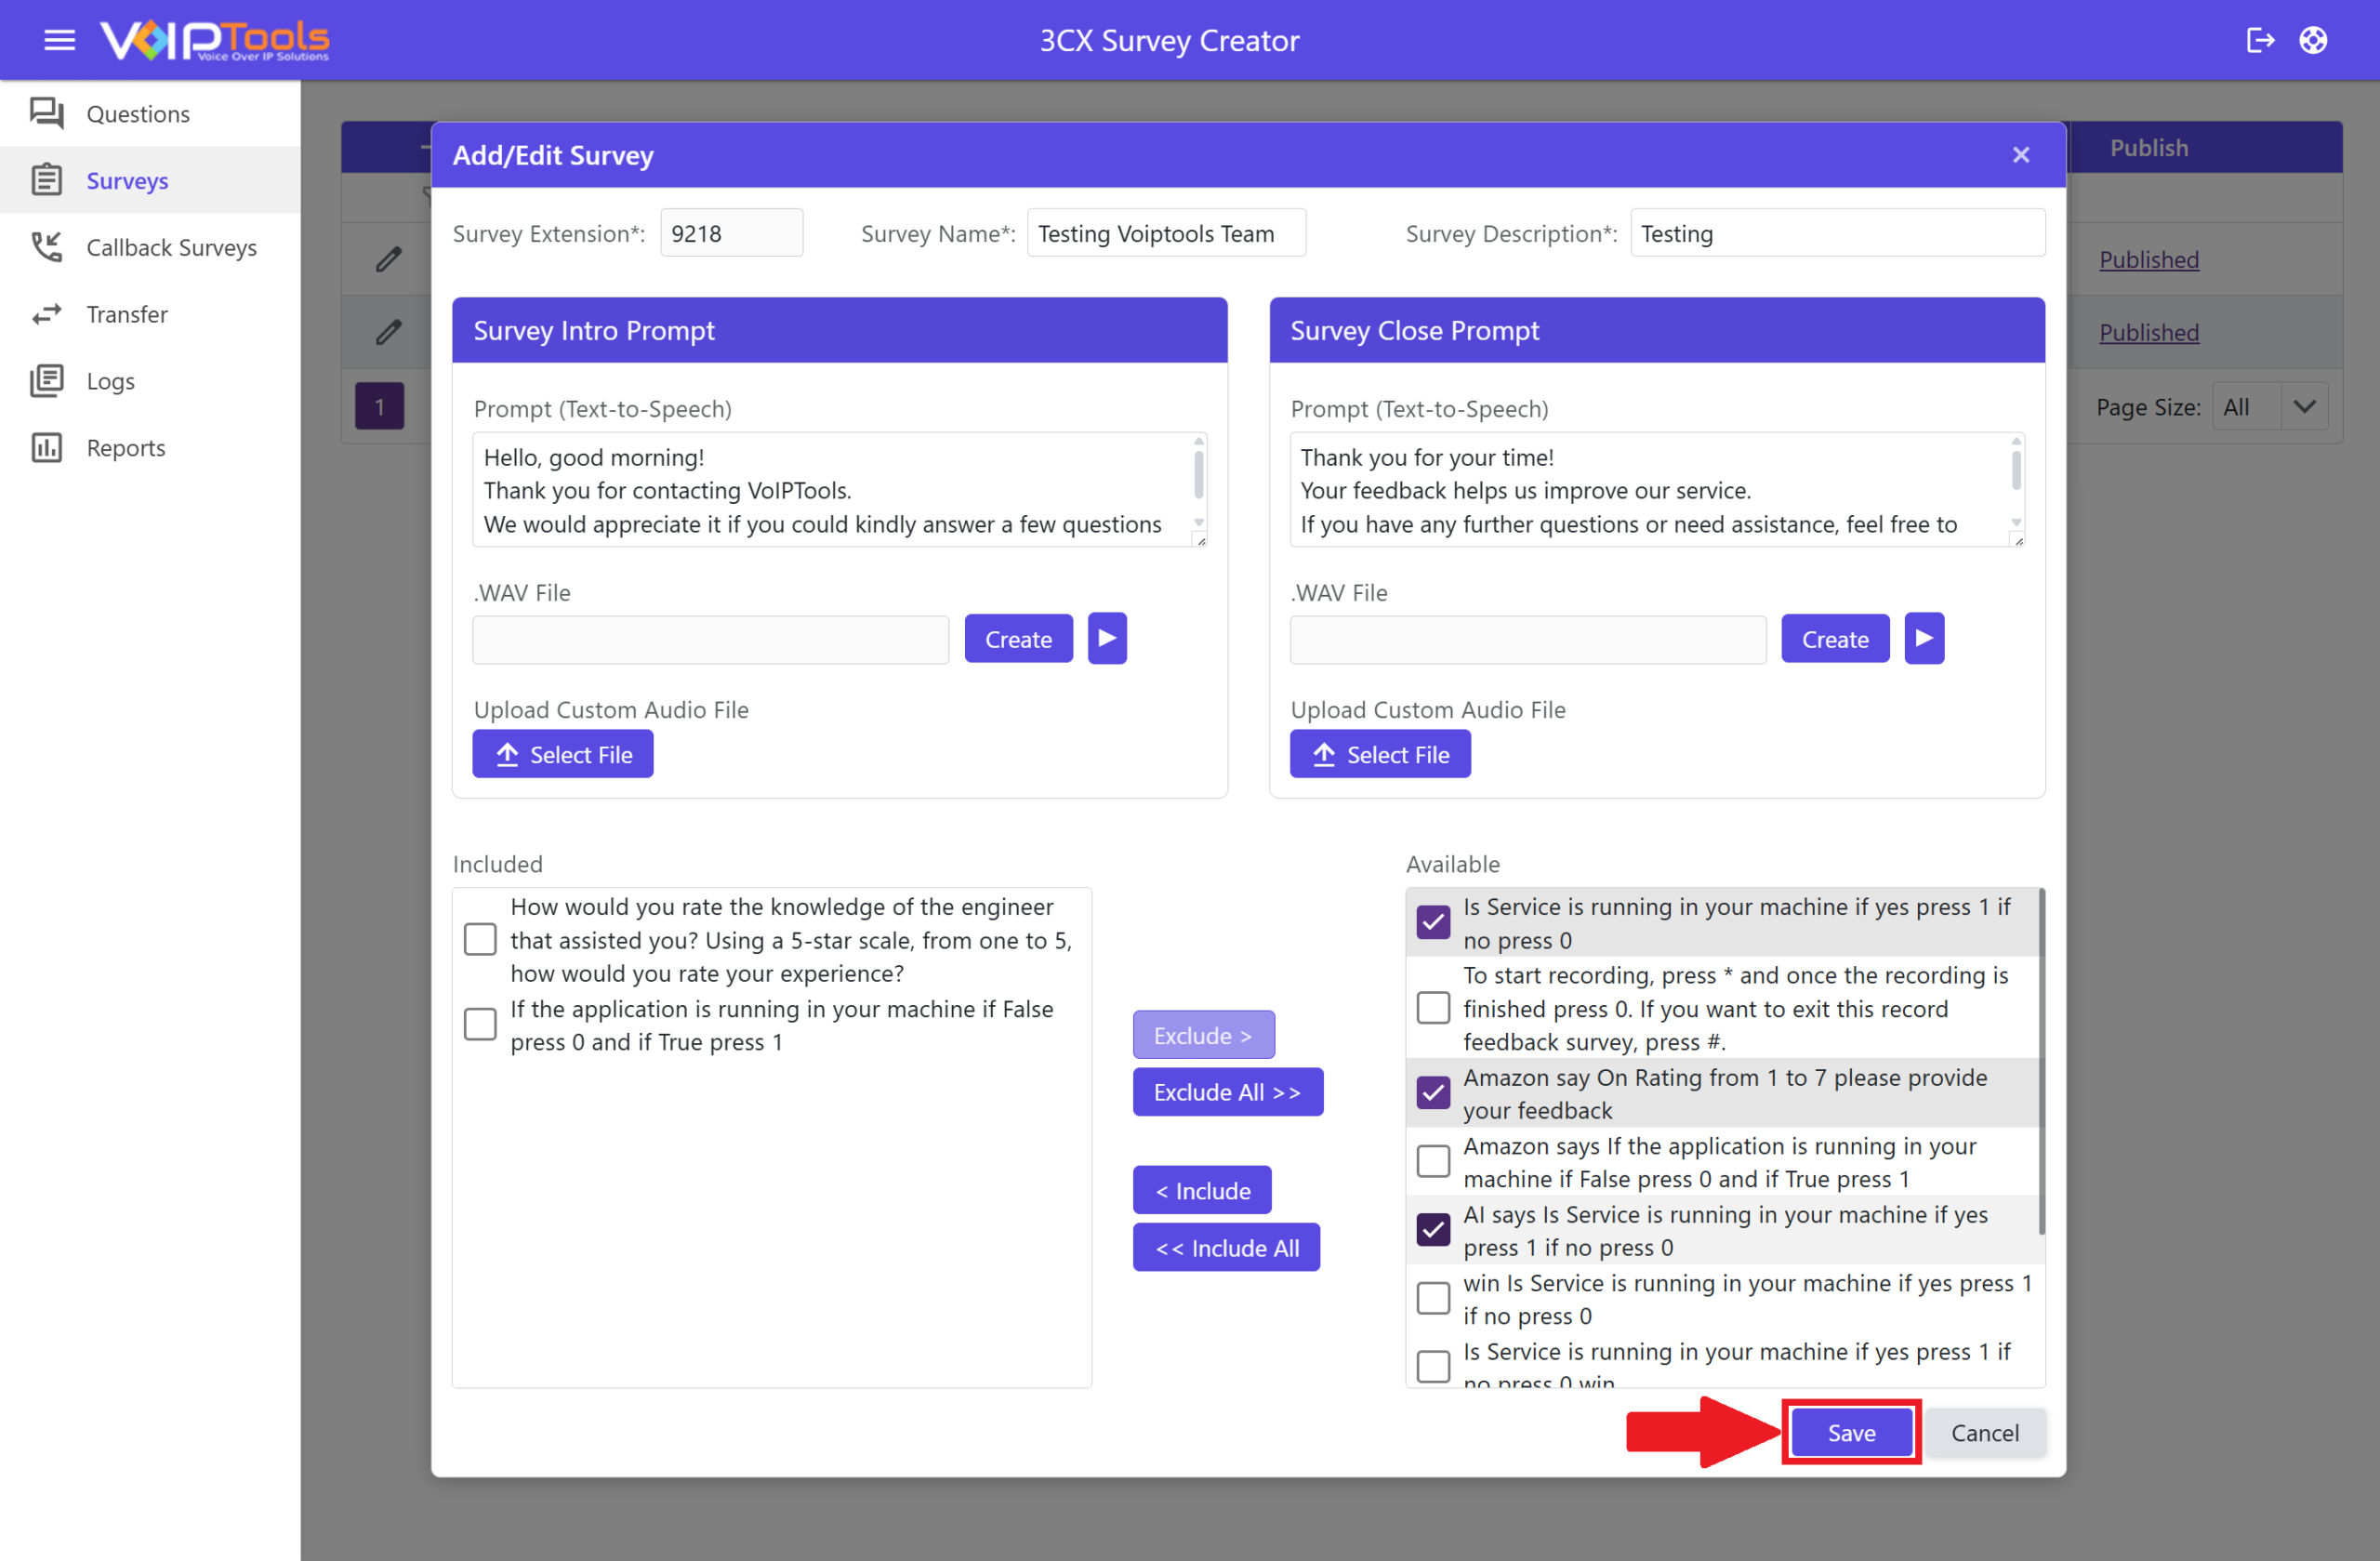
Saving your survey #
- Select Save to add the survey to the list, or Cancel to discard your changes.
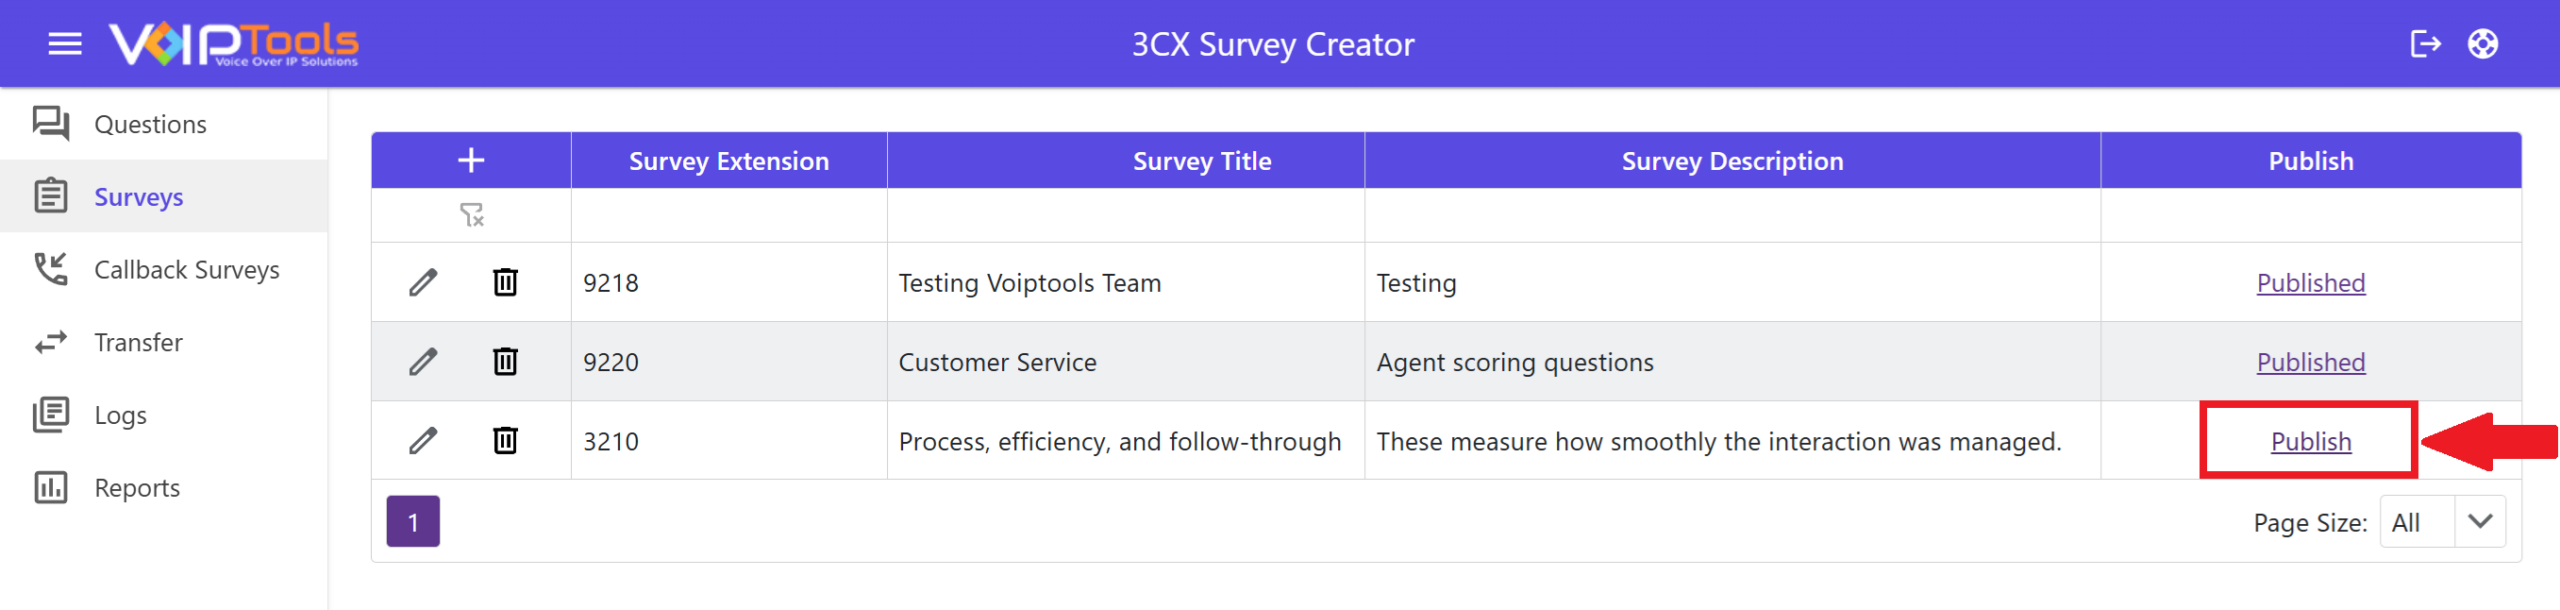
Publishing a survey #
A survey must be published before callers can use it. New survey added to the Surveys list that is not live will show an unpublished Publish link. The Publish column shows Published once it is on the 3CX server.
- Select Publish next to the survey you want to send to the 3CX server.
Callback Surveys #
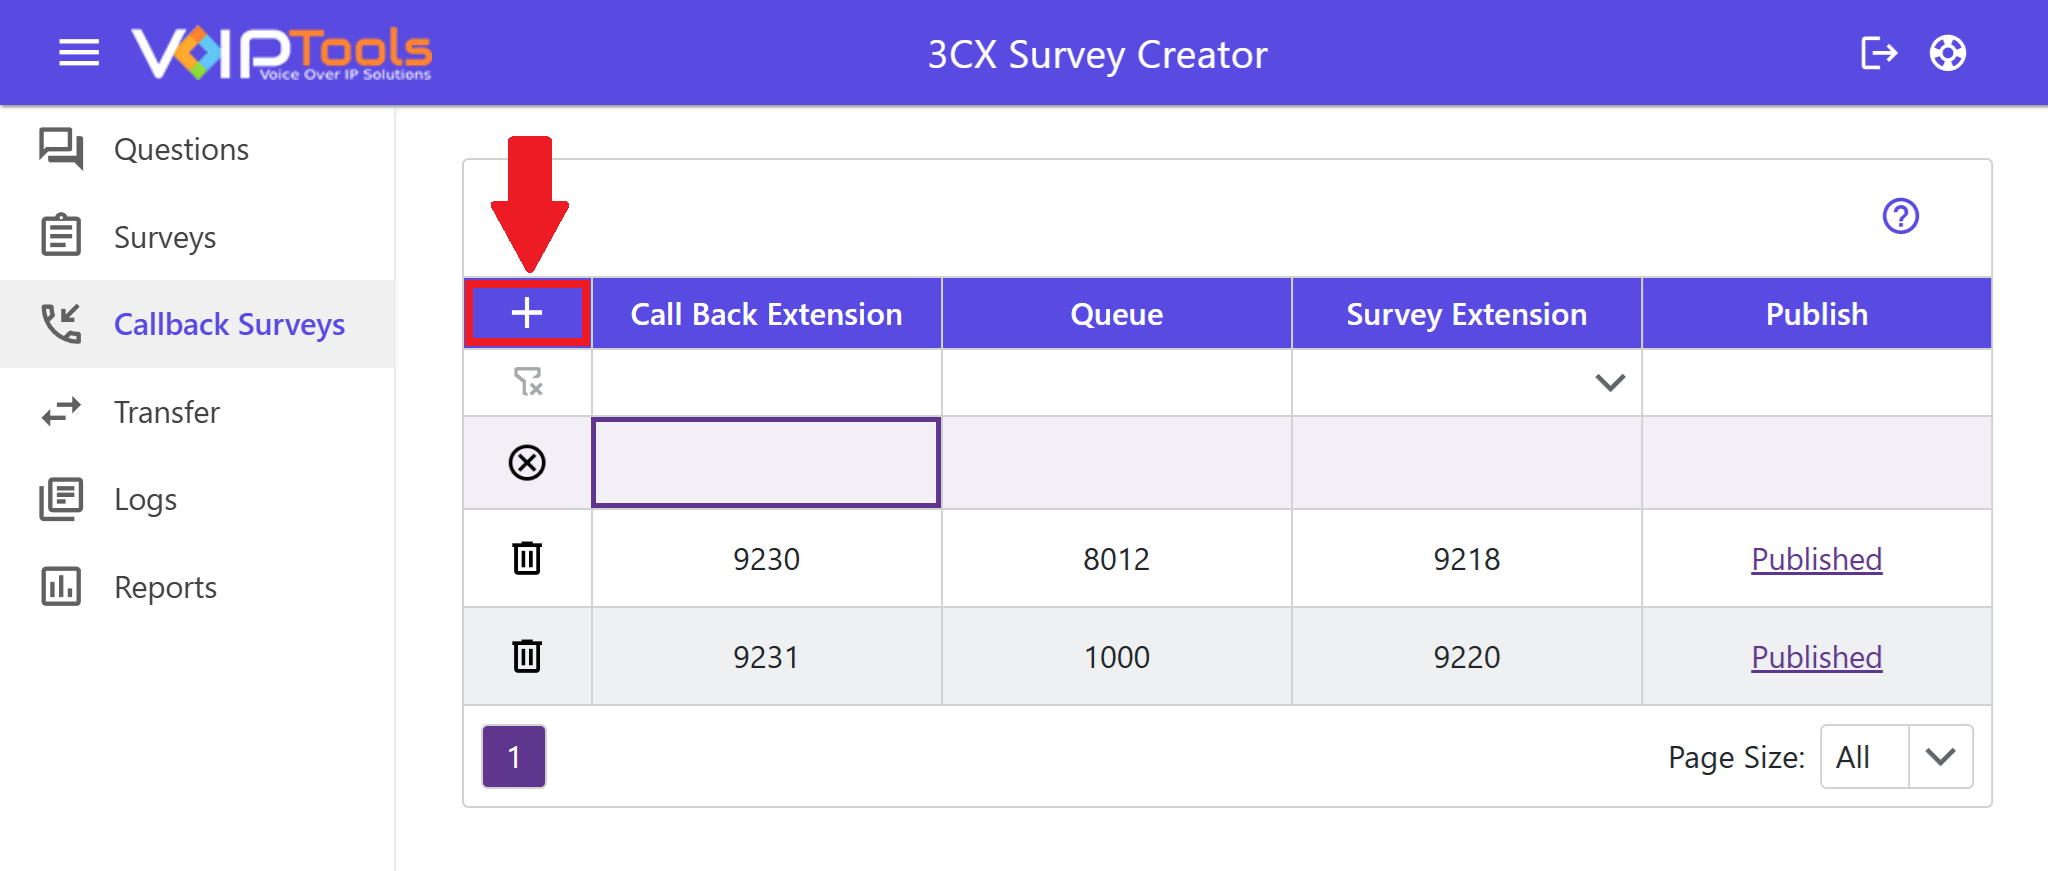
The Callback Surveys page connects a queue to a survey, so callers who get a callback hear that survey afterward.
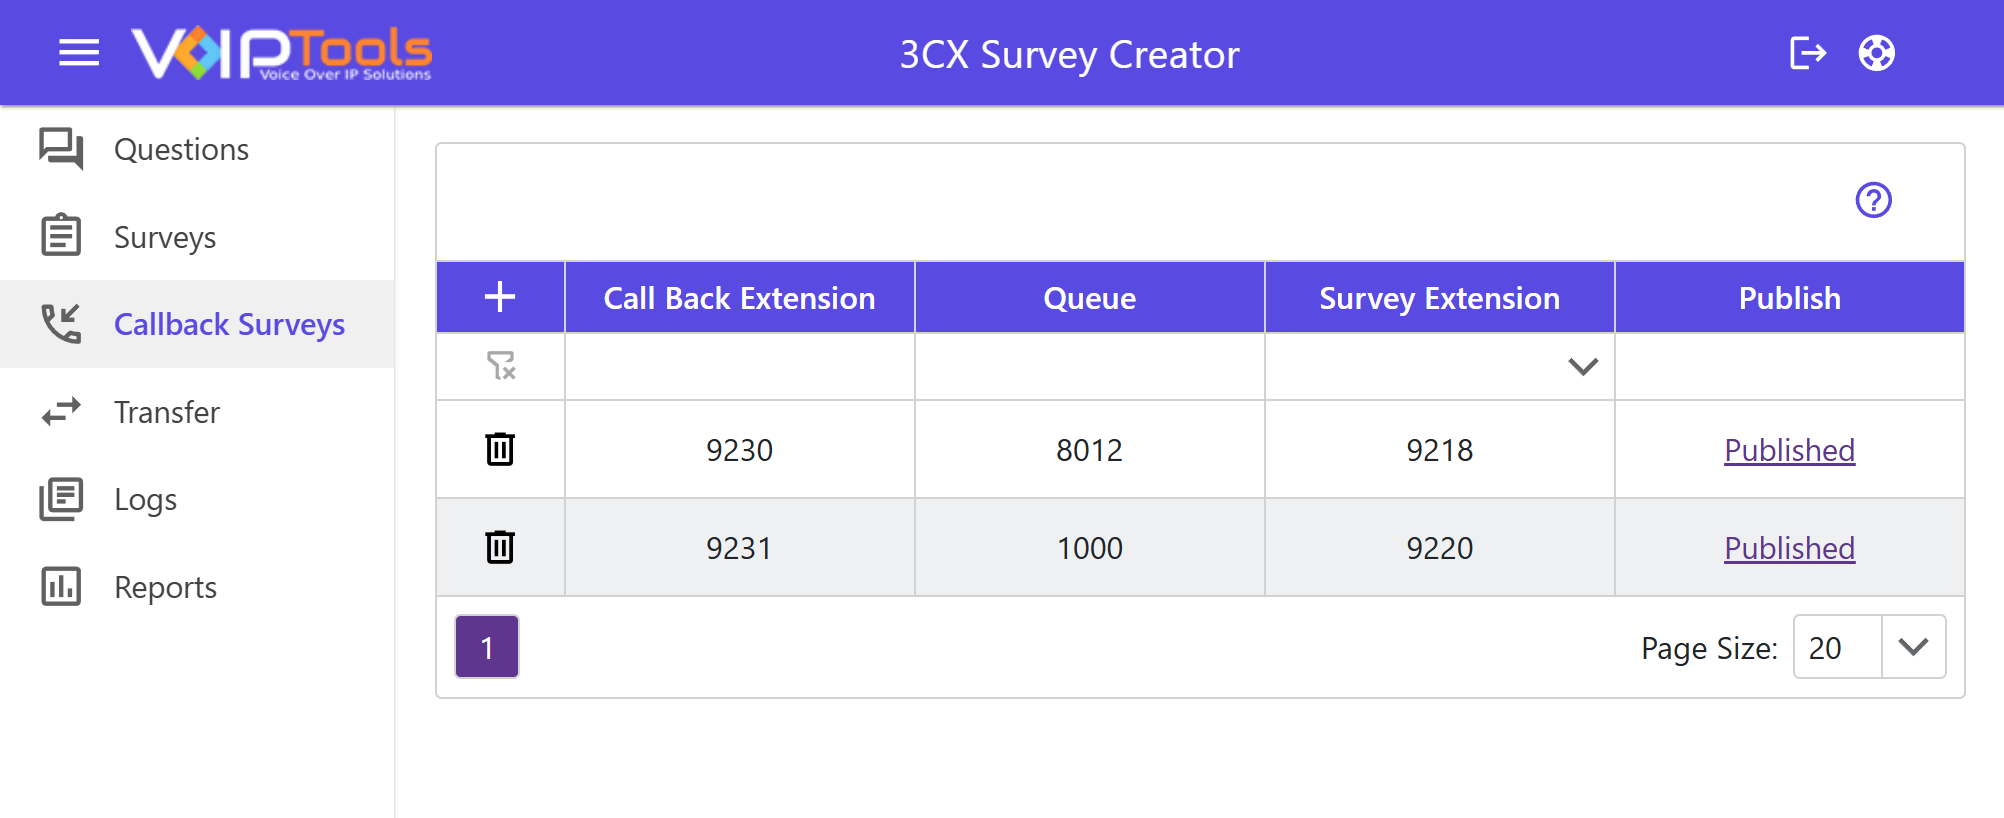
Adding a callback survey #
- Select the + icon above the Call Back Extension column.
- In the Call Back Extension field, enter the extension for the callback.
- From the Queue field, choose the queue this callback applies to.
- From the Survey Extension dropdown, choose the survey to play.
Removing an entry #
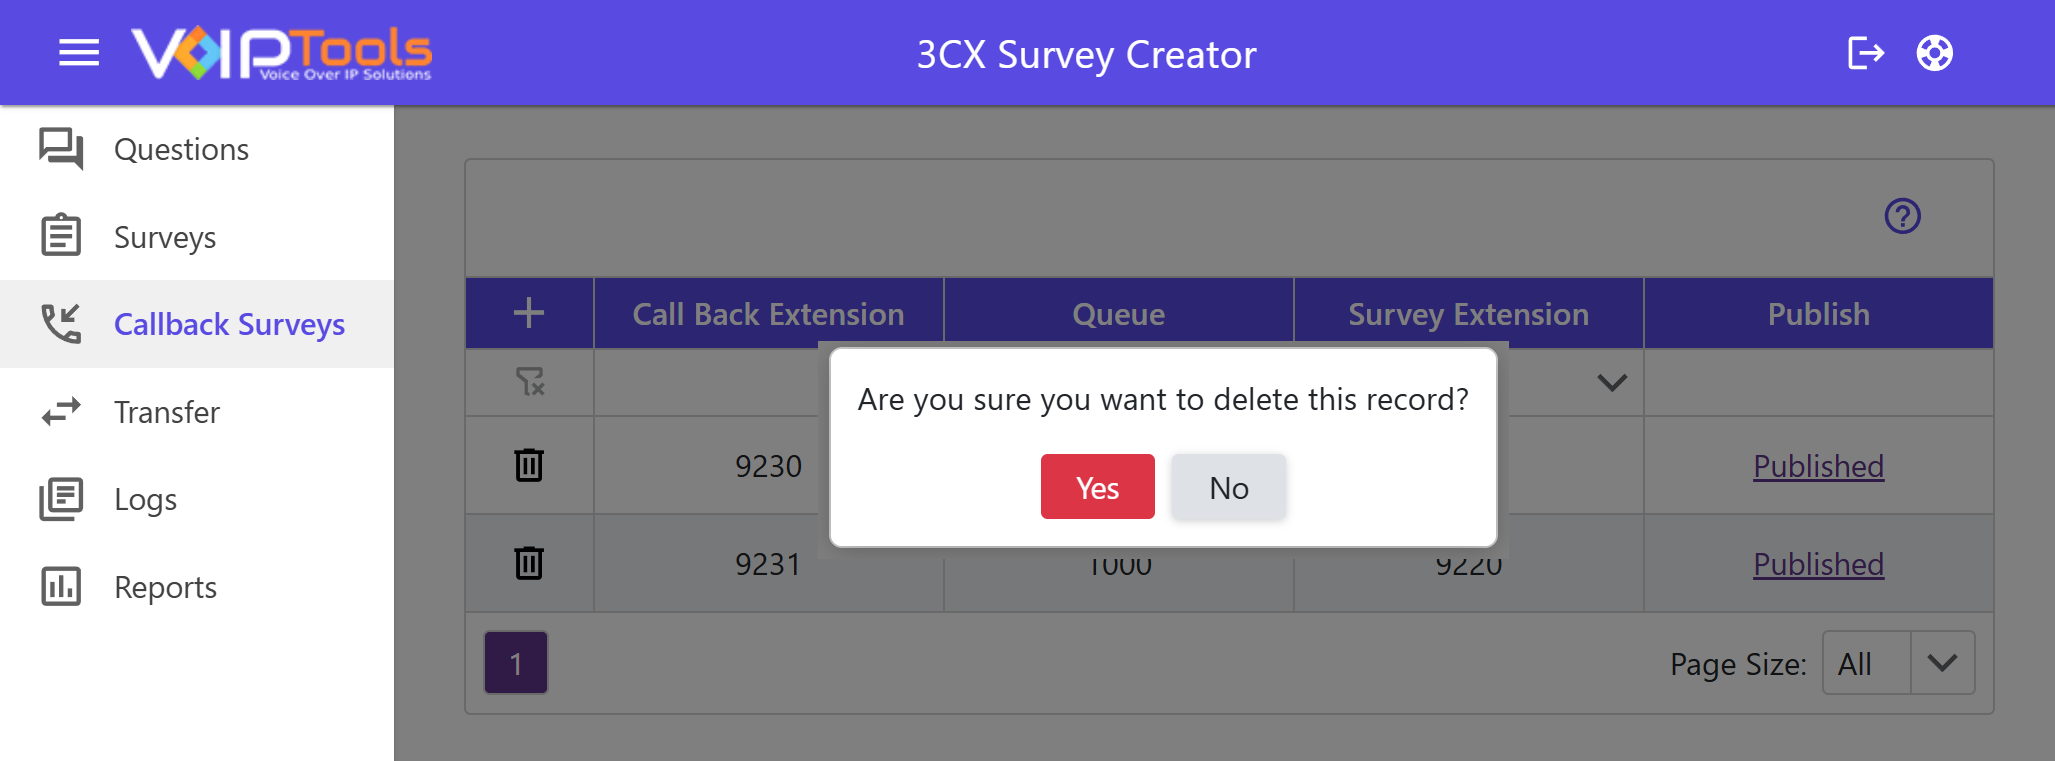
- Select the
 trash icon next to the row you want to remove.
 - Select Yes to confirm, or No to cancel.
Transfer #
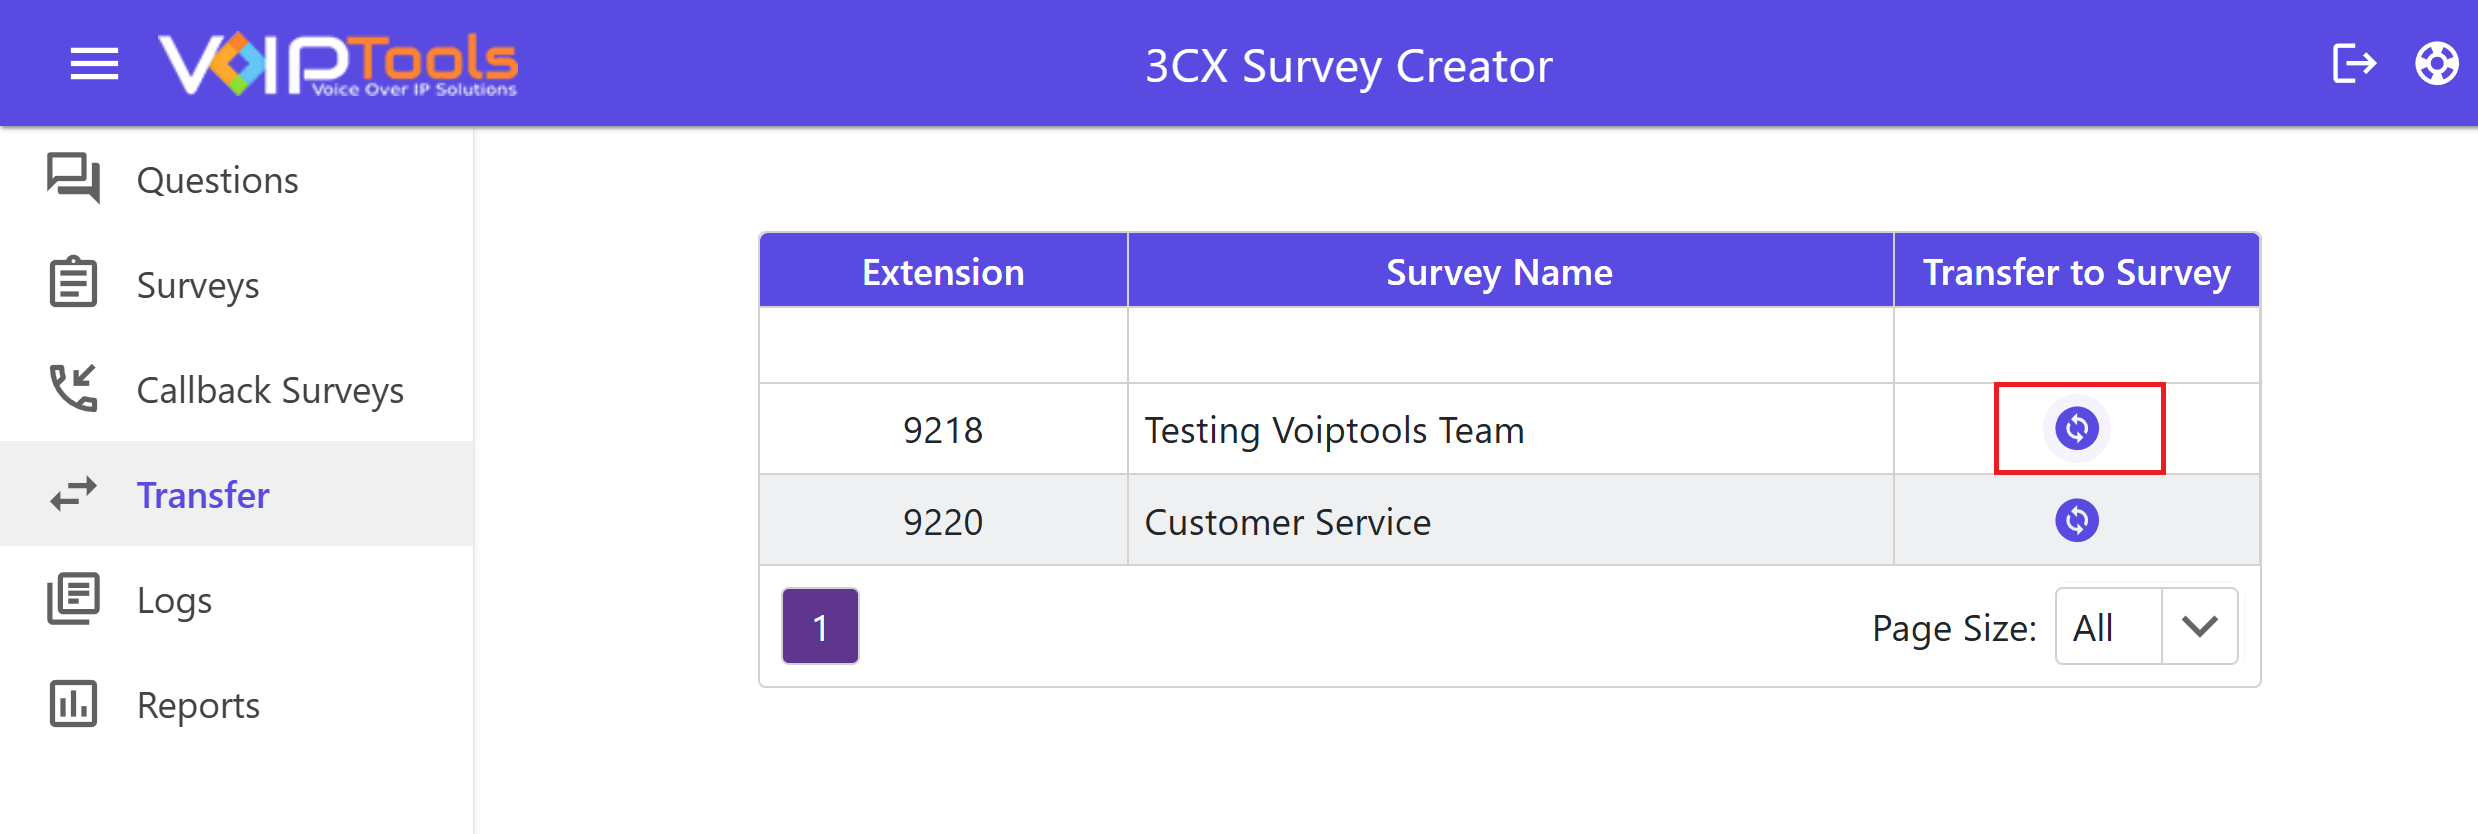
The Transfer page lets you send an active call straight into a survey, using the survey tied to each extension.
Transferring a call to a survey #
- Find the row for the extension you want, and check the Survey Name to confirm it is the survey you want to use.
- Select the transfer icon in the Transfer to Survey column for that row.
Logs Menu #
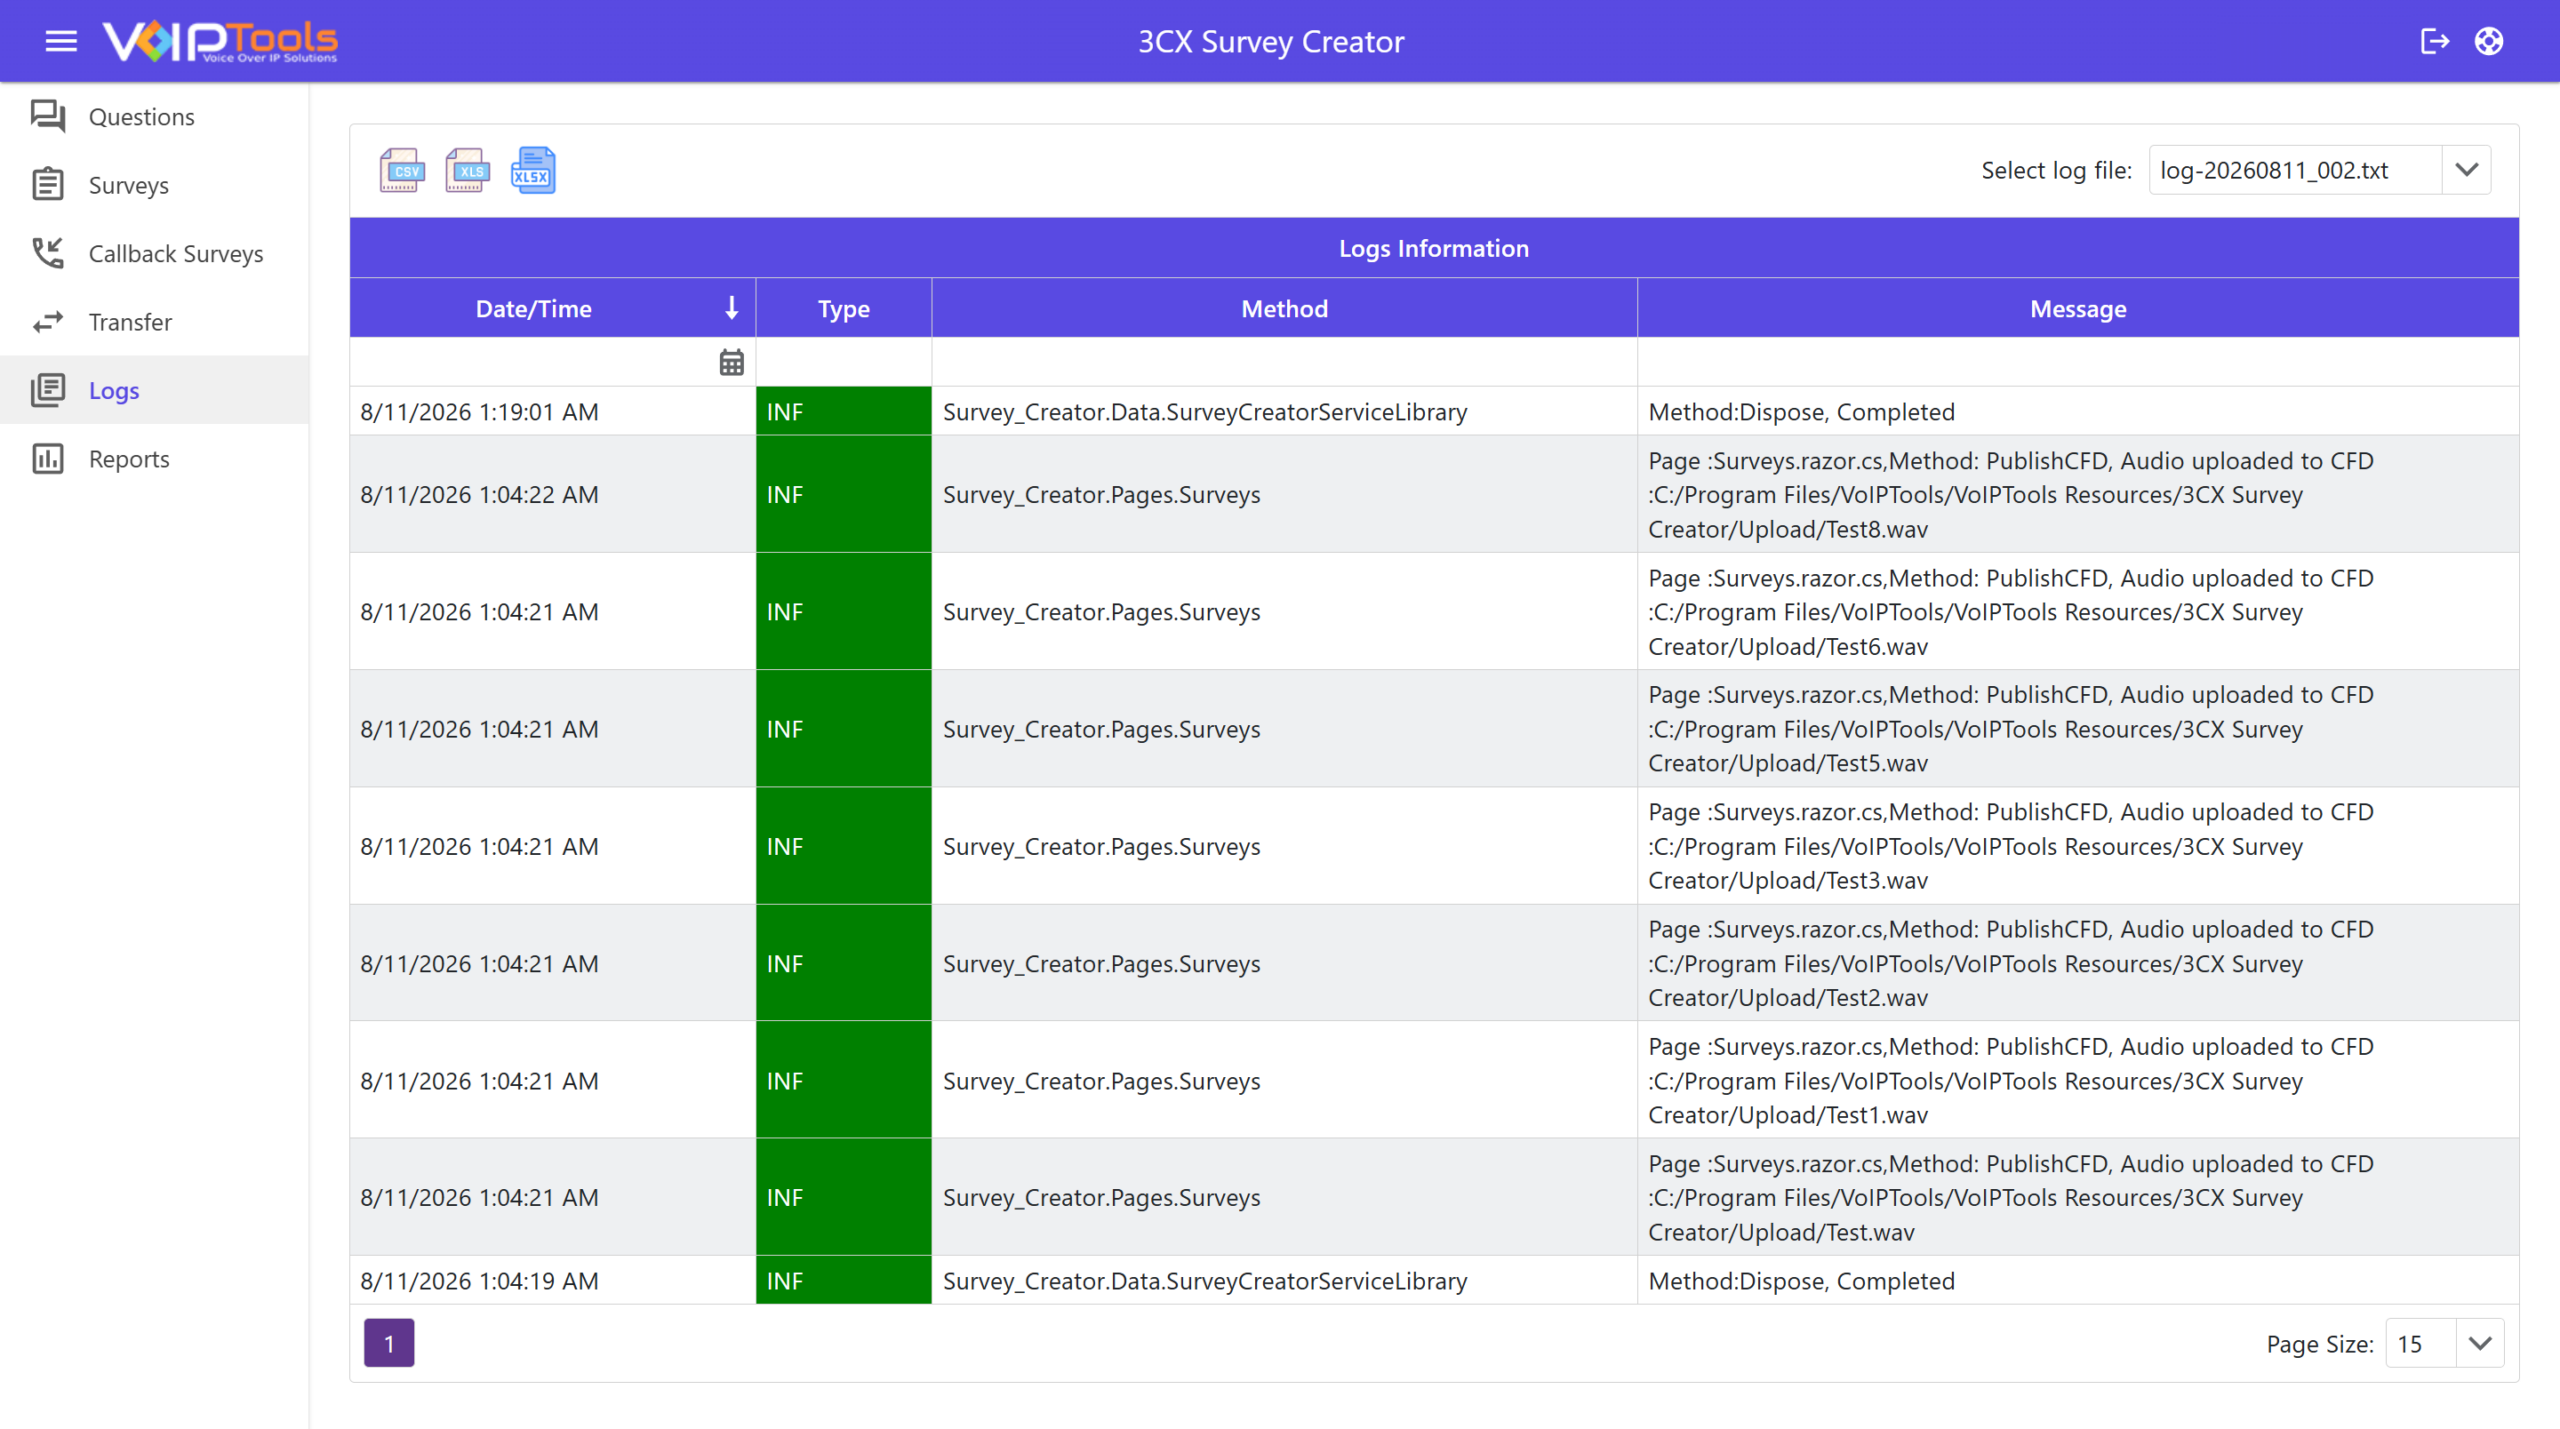
The Logs Menu lets you view the login and logout events of all the sessions along with ‘Date’ and ‘Time’ that is according to the time zone set in the ‘Web Portal’ tab in Settings menu.
Field Definitions
| Field | Definition |
|---|---|
| Logs Information Table | Displays system events and activity records used for monitoring, troubleshooting, and auditing. It helps users review application behavior, track system actions, and identify issues based on the selected log file. |
| Date/Time | Displays the date and time when the log event occurred based on the system-generated timestamp. |
| Type | Indicates the category or severity level of the log entry to help identify the nature of the event: INF = Informational (normal activity), WRN = Warning (potential issue), ERR = Error (system issue or failure). |
| Method | Displays the system component, process, or function where the log event originated. |
| Message | Shows detailed information about the recorded event, including actions performed, warnings, errors, or system responses. |
| Select Log File | Allows you to select a specific log file to view its recorded events. |
| Page Size | Defines the number of log entries displayed per page. |
Reports #
The Reports page holds three sections. Survey Results shows average scores, Custom Survey Results shows Yes/No counts over time, and Survey Logs lists every completed survey in detail.
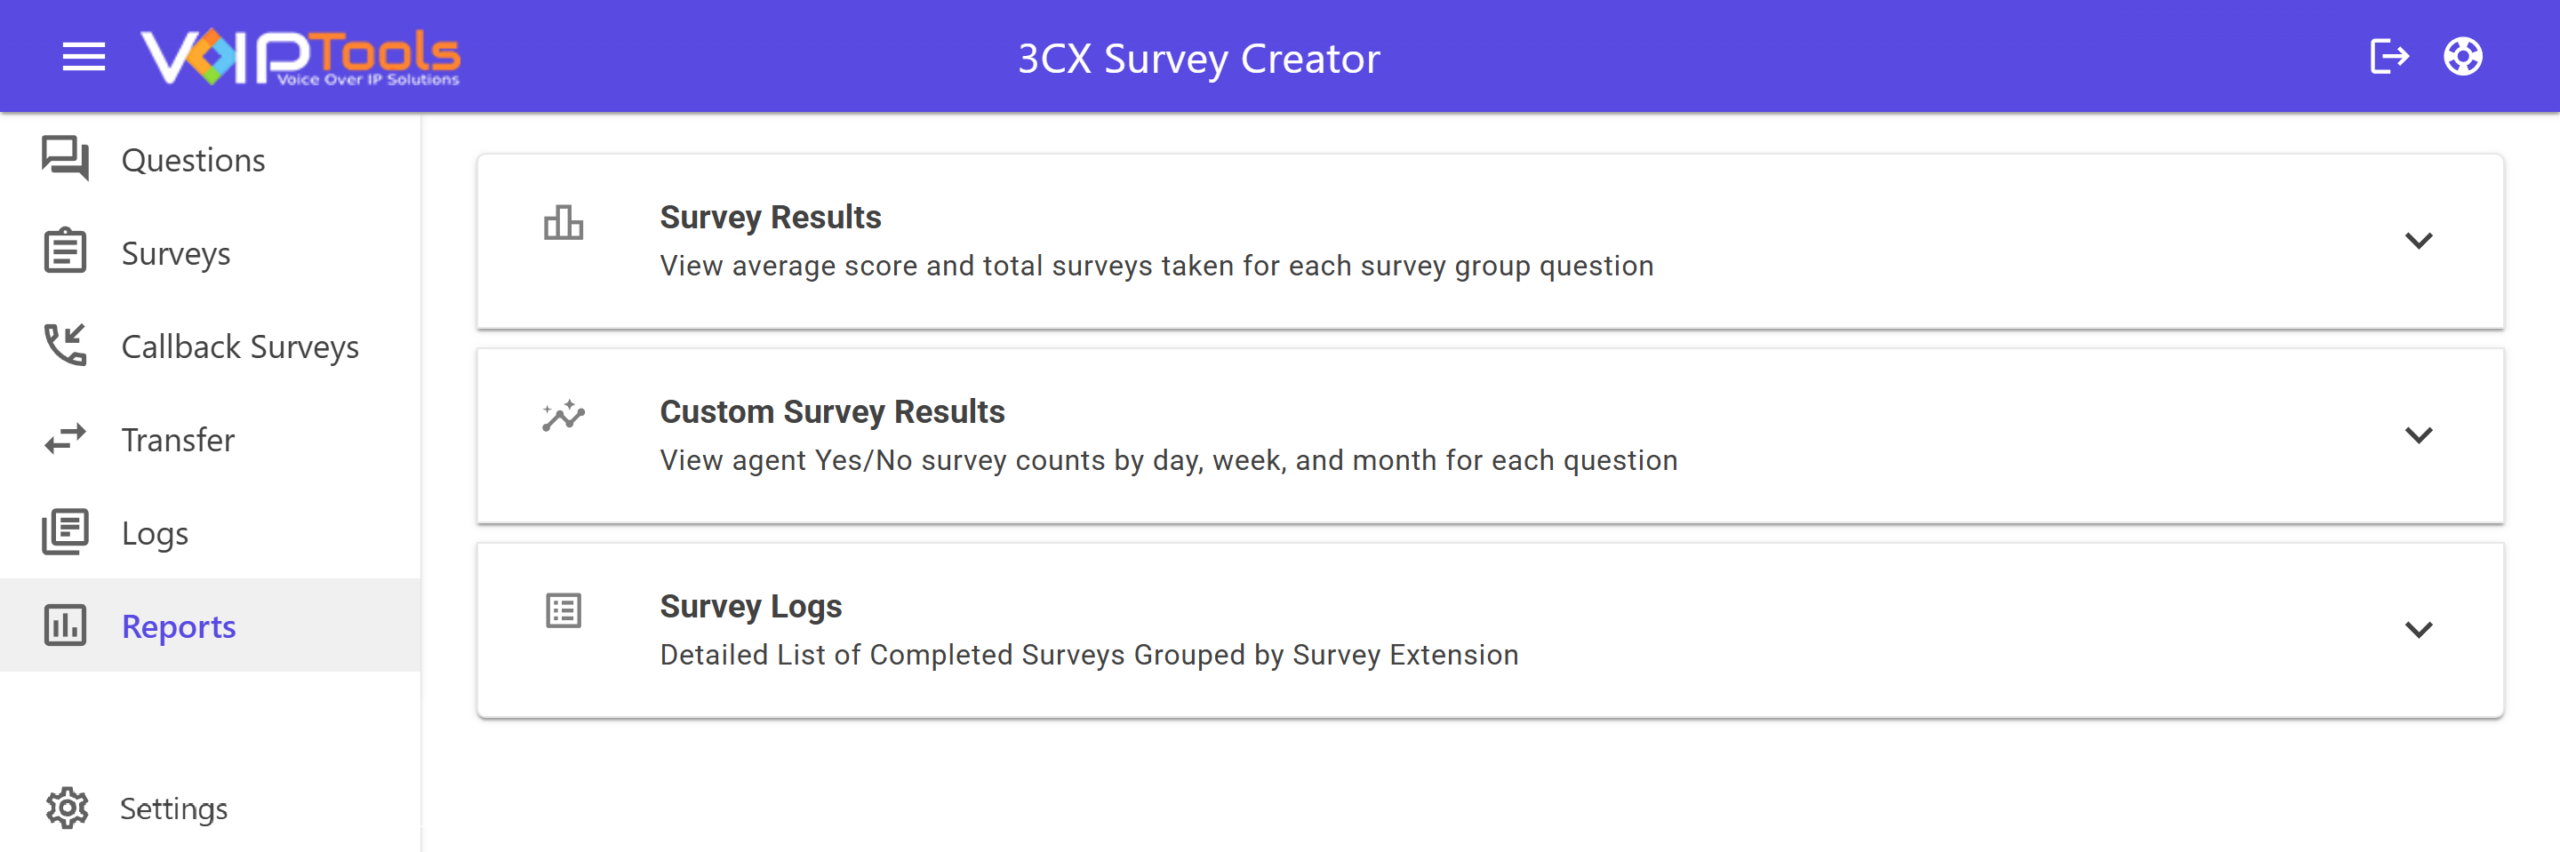
Opening a report #
- Select a tab, such as Survey Results, to expand it.
Survey Results #
This report shows the average score and total surveys taken for each survey group question.
- Enter a Start Date and End Date, or select the calendar icon to pick dates.
- Select Get Report to load the results.
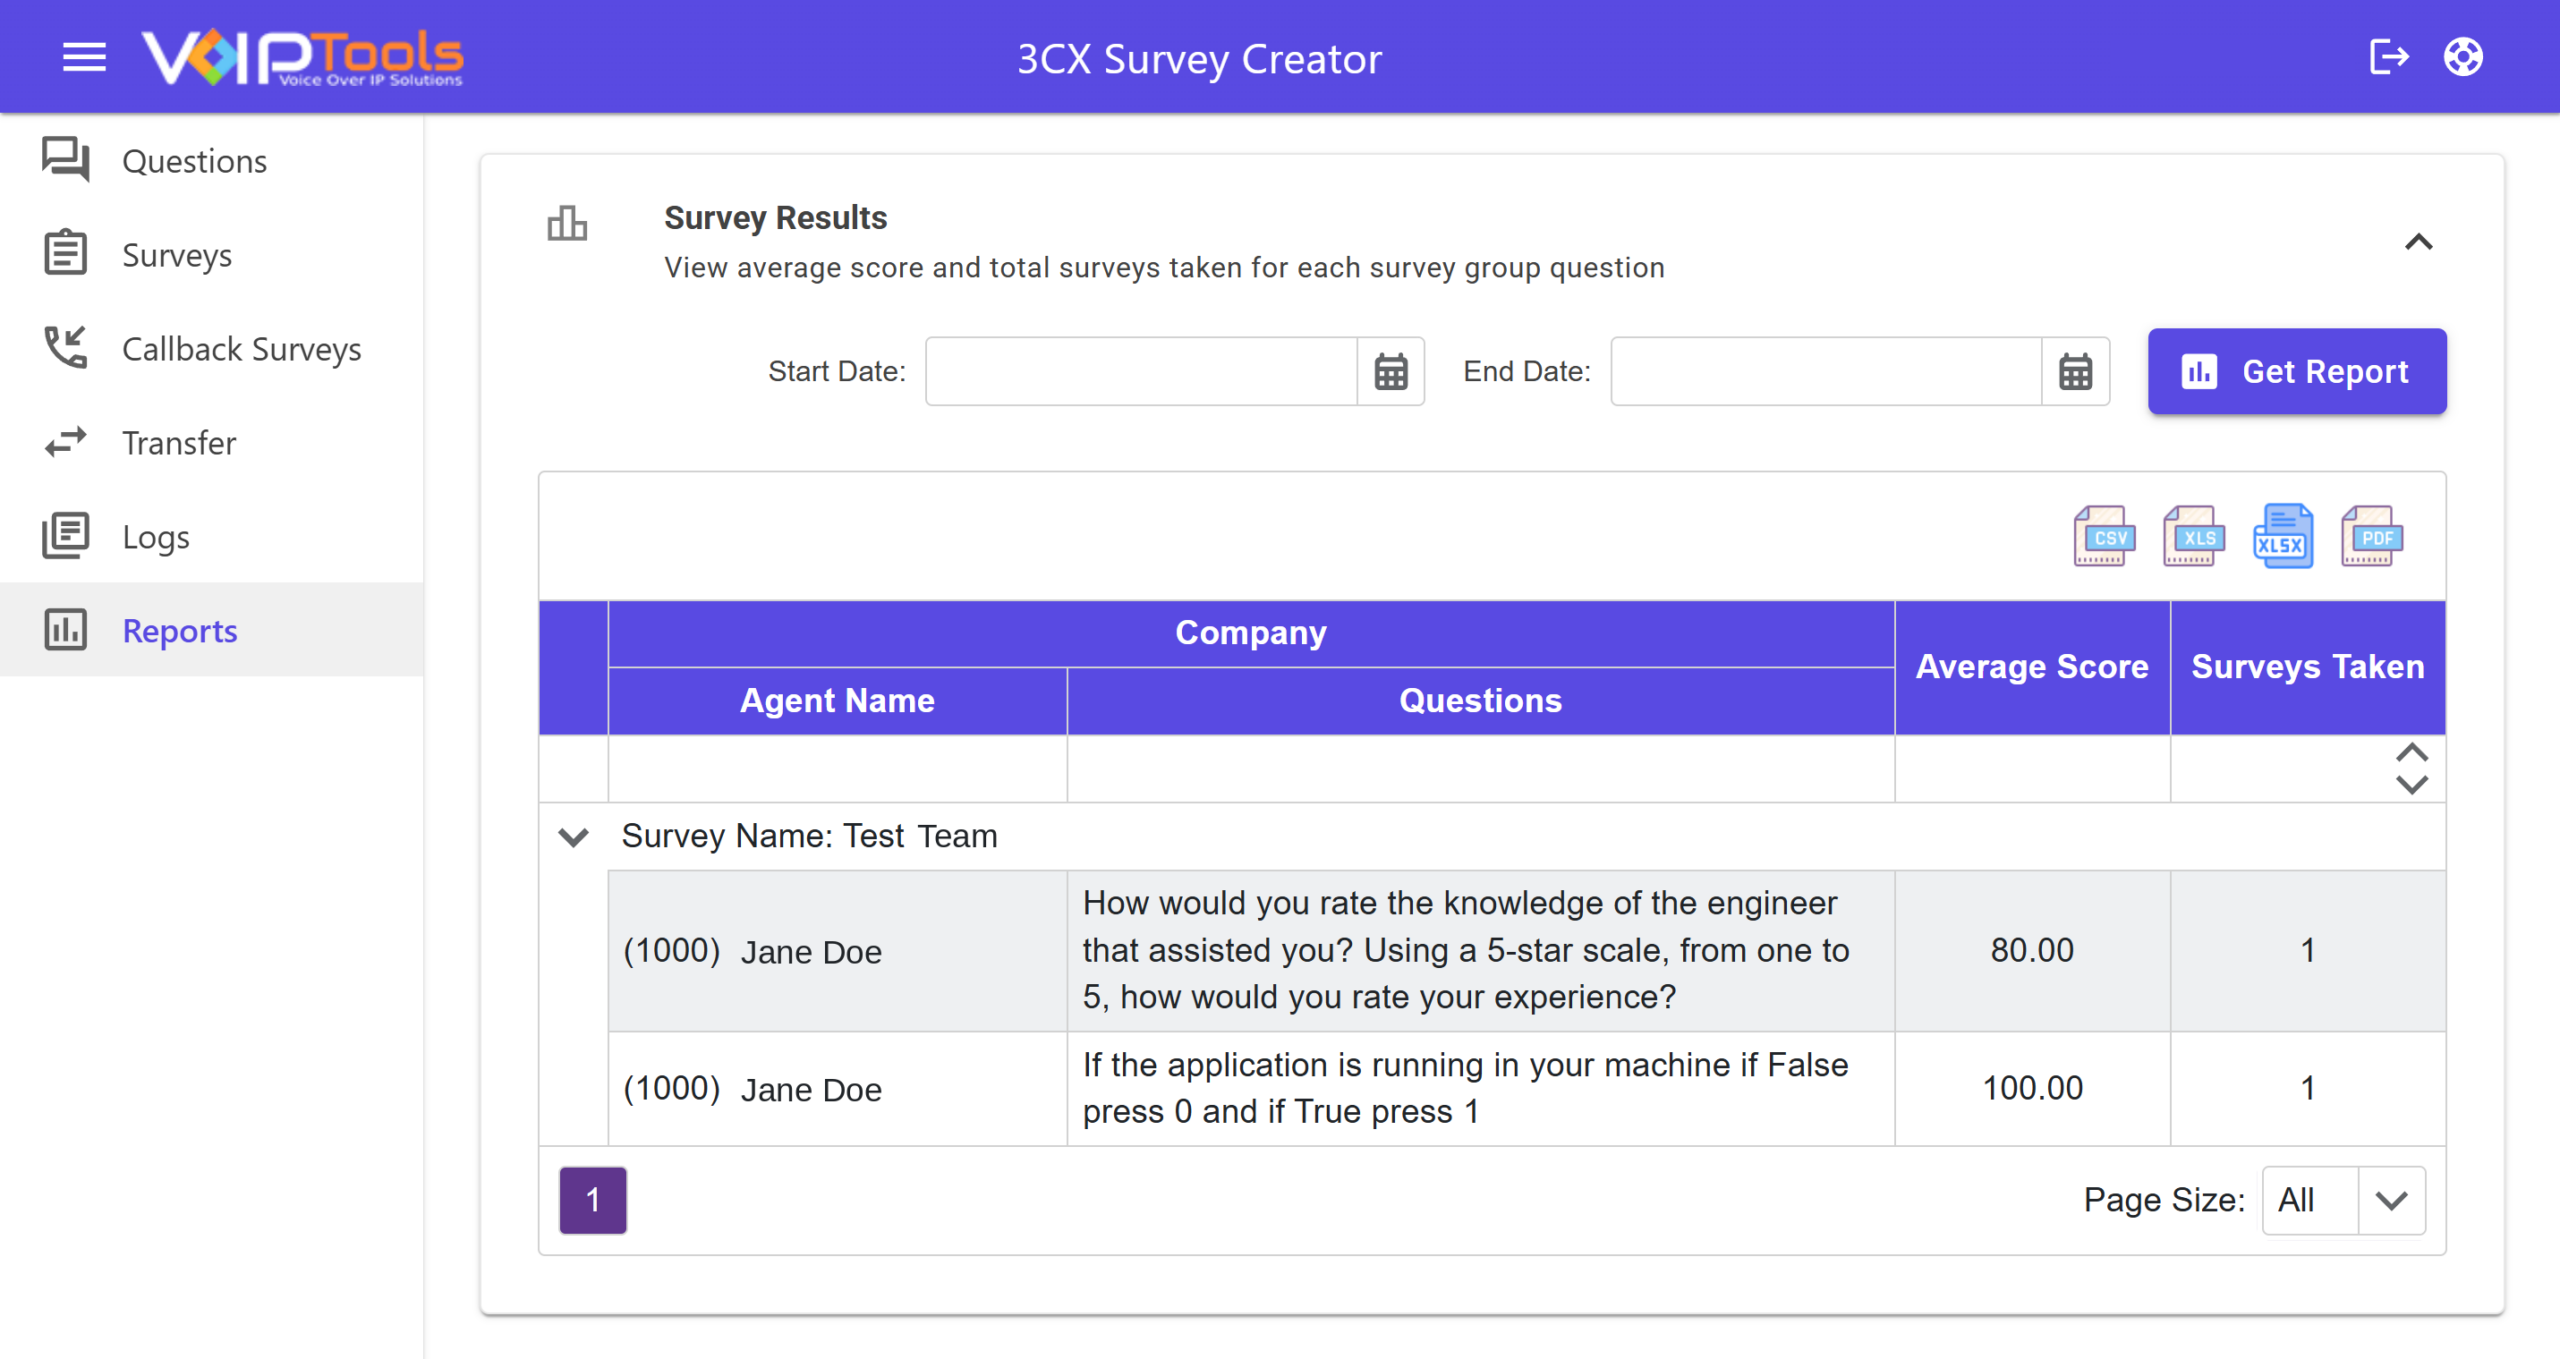
Results group by survey name. Select the arrow next to a survey name to show or hide its rows. Each row lists the agent, the question, the average score, and how many surveys were taken.
Exporting Survey Results #
- Select the CSV, XLS, XLSX, or PDF icon above the table to download the results in that format.
Custom Survey Results #
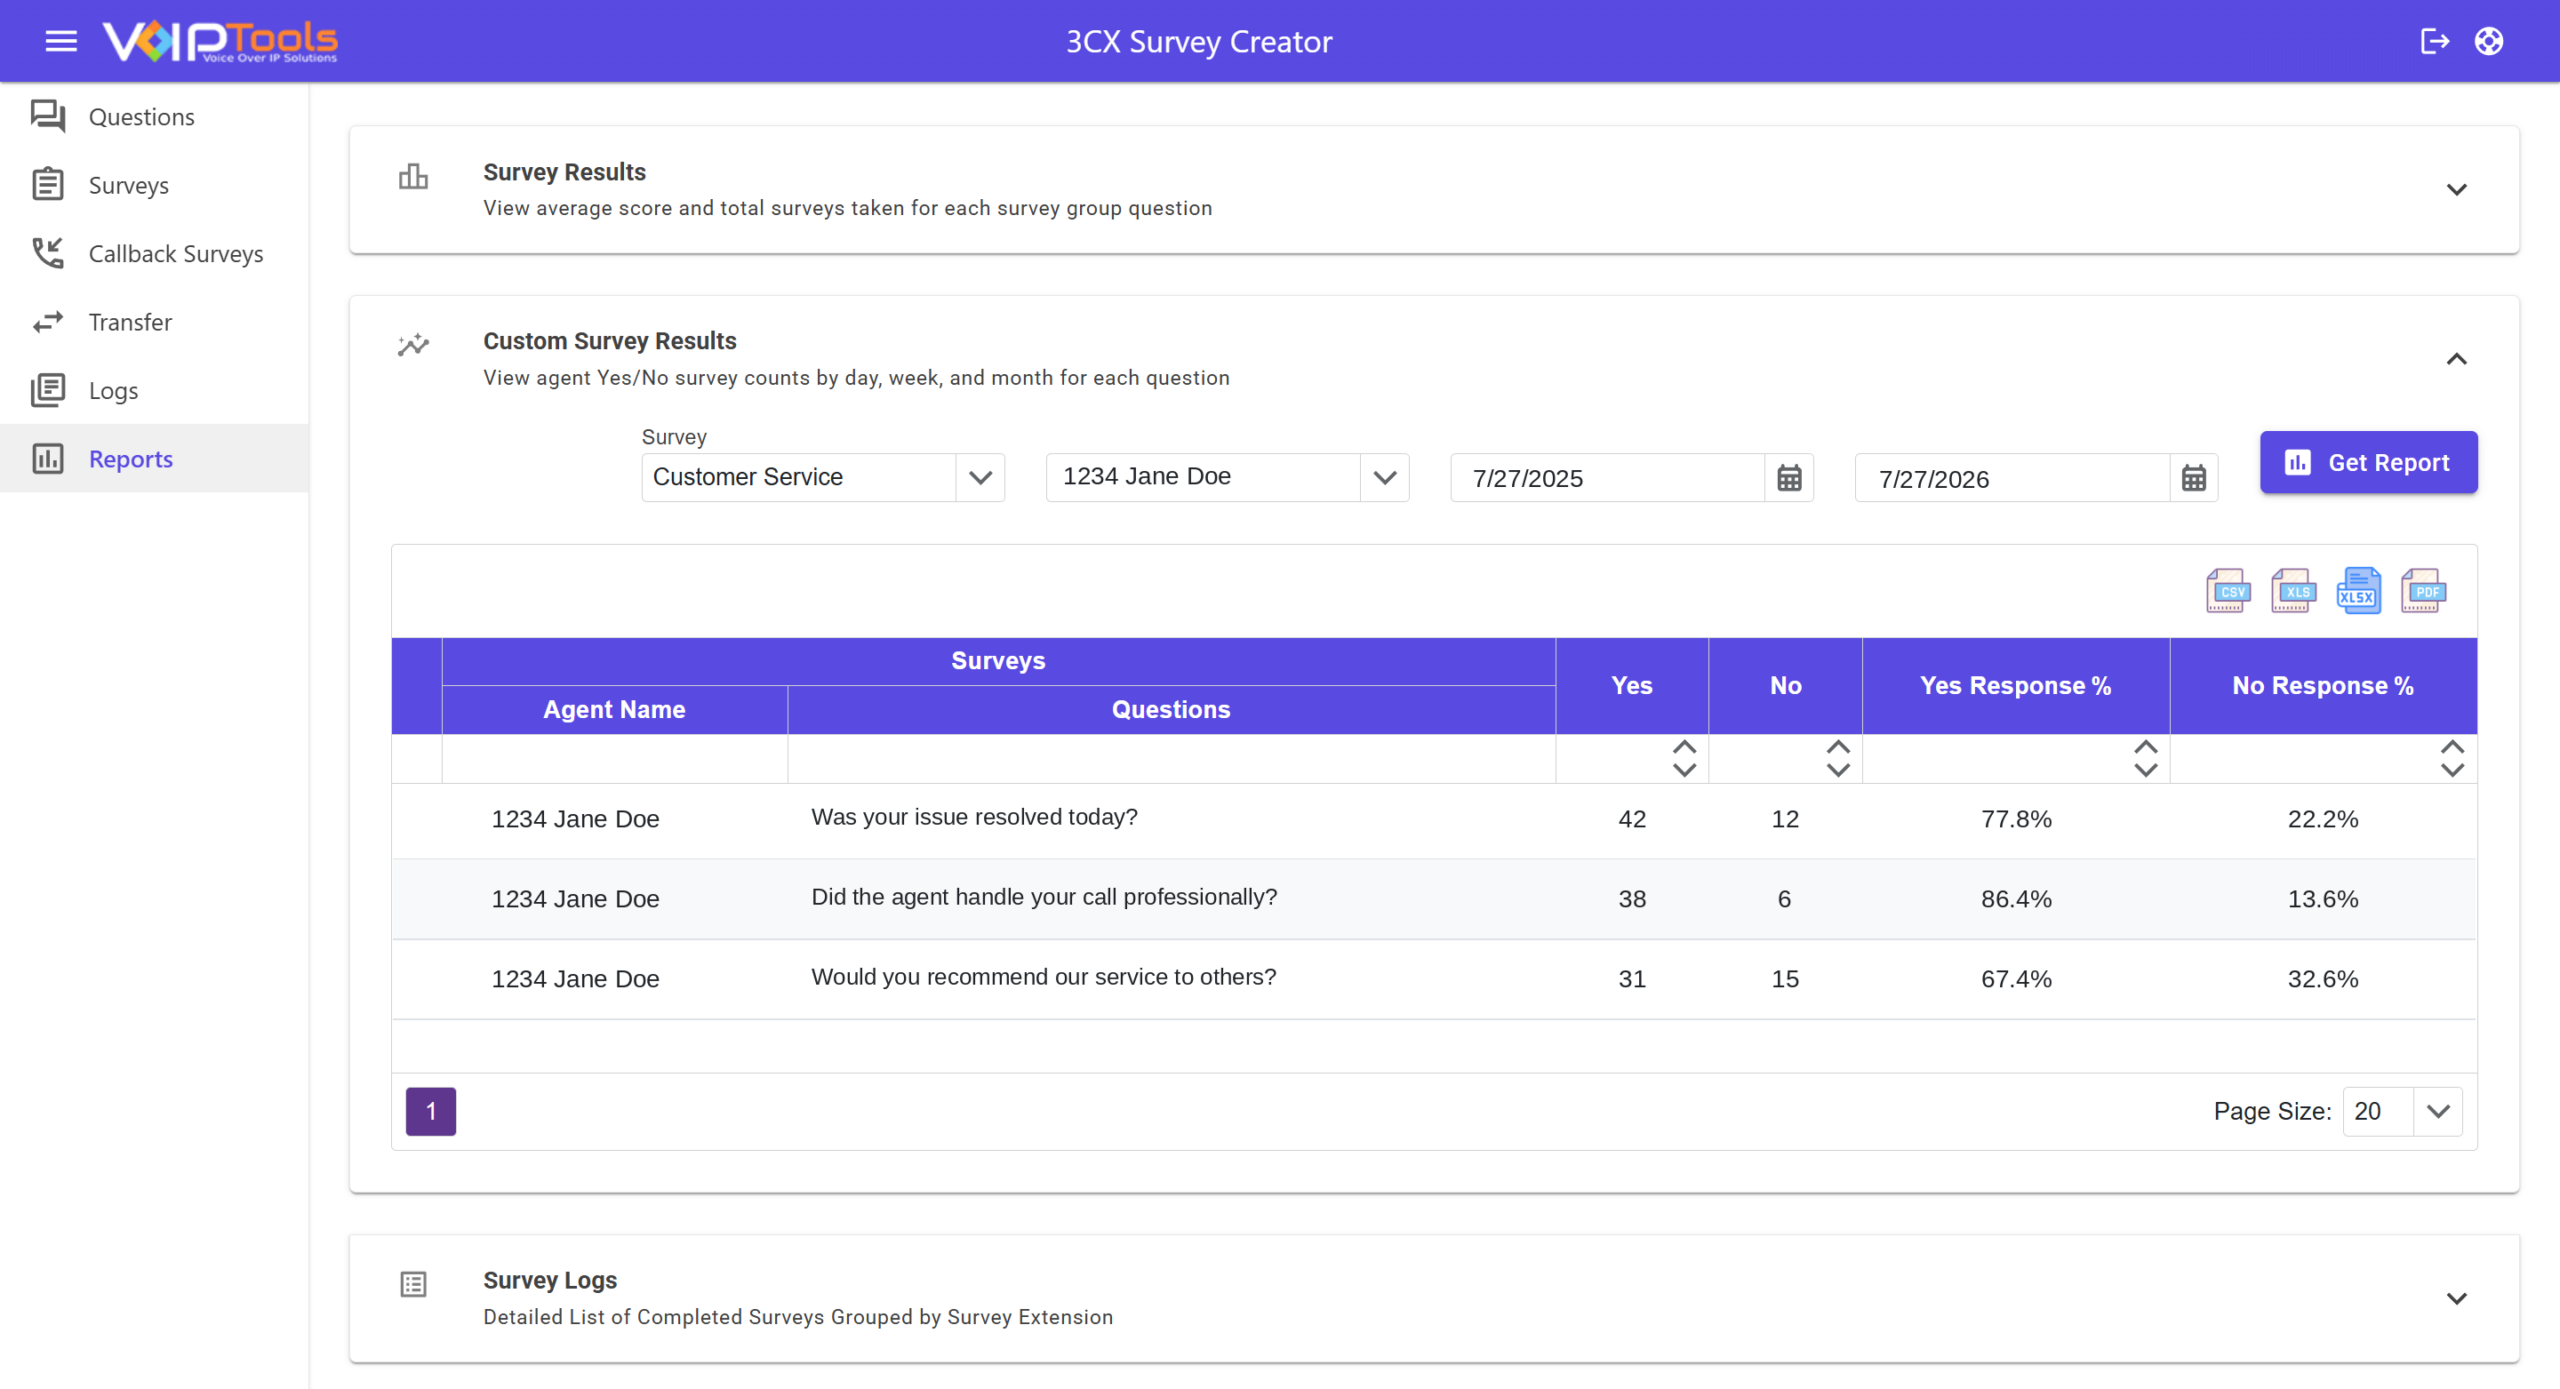
This report shows agent Yes/No survey counts by day, week, and month for each question.
- From the Survey dropdown, choose the survey you want.
- From the second dropdown, choose the agent.
- Enter a Start Date and End Date, or select the calendar icon to pick dates.
- Select Get Report to load the results.
Survey Logs #
This report gives you a detailed list of completed surveys, grouped by survey extension.
- From the Display Time Zone dropdown, choose the time zone for the dates shown.
- Enter a Start Date and End Date, or select the calendar icon to pick dates.
- Select Get Report to load the results.
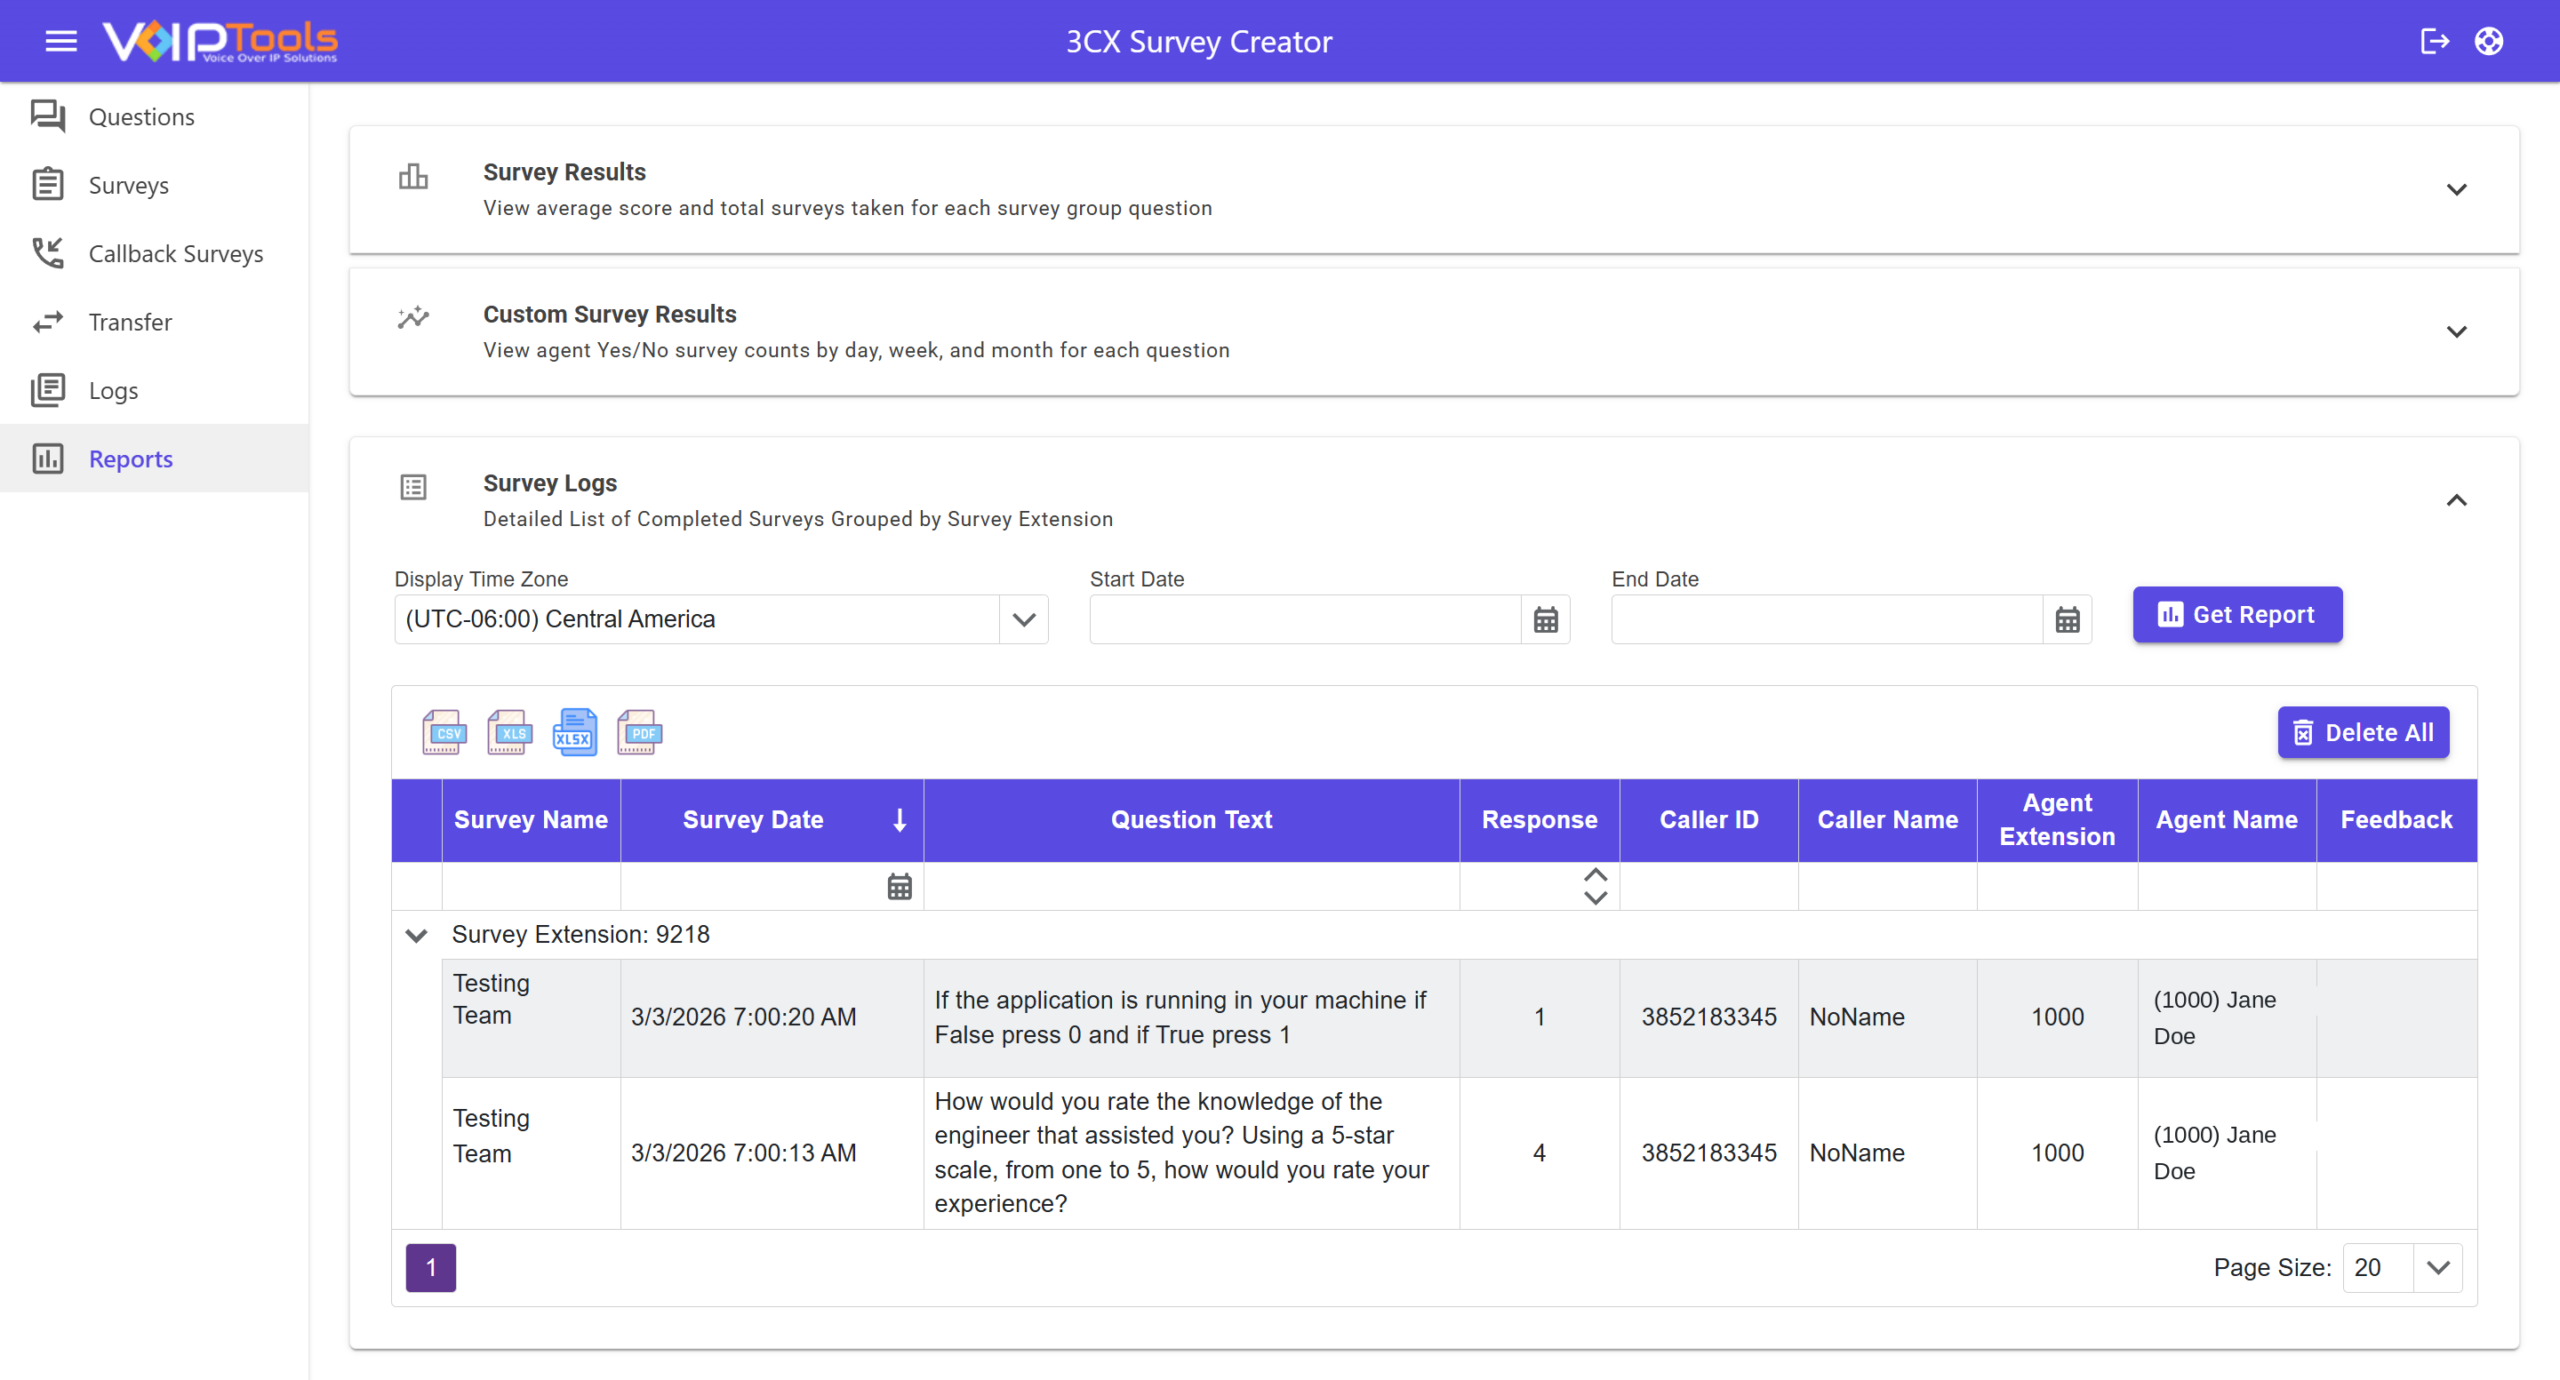
Results group by survey extension. Select the arrow next to an extension to show or hide its rows. Each row lists the survey name, date, question, response, caller details, and agent details.
Exporting or clearing Survey Logs #
- Select the CSV, XLS, XLSX, or PDF icon above the table to download the log in that format.
- Select Delete All to clear every log entry.
Generate Amazon Associate Product Advertising API Keys #
Click here to learn to create an Amazon Web Service account and generate Amazon Associate Product Advertising API KEYS.
