Introduction #
Boost Call Center Performance with 3CX Competitive Wallboard: Real-time Agent Rankings and Motivation
Discover the power of 3CX Competitive Wallboard for call center managers and agents. This web application offers real-time visual representations of agent performance and rankings, fostering healthy competition and driving productivity. Monitor agent performance, track rankings, and stay informed about progress towards quotas. Revolutionize call center management with this user-friendly tool that empowers managers and agents to achieve success.
What is 3CX Competitive Wallboard? #
The 3CX Competitive Wallboard is a renowned industry leaderboard that monitors real-time agent performance. It fosters healthy competition among agents by showcasing performance rankings for the day, week, and month. Managers have customization options to tailor displayed statistics and set quotas to drive productivity. Historical trend insights enable comprehensive reporting for informed decision-making. Agents can only access the displayed information, ensuring confidentiality and encouraging personal performance improvement based on peer benchmarks.
Why choose 3CX Competitive Wallboard? #
 | AGENT PERFORMANCE | Identify top-performing agents who have achieved the highest call volume and recognize diligent agents who have met their call targets for the current month, week, and day. |
 | MANAGEMENT VISIBILITY | Gain valuable insight into your team’s productivity as a manager. Identify top performers and those in need of support instantly, empowering you to optimize performance and make informed decisions in real-time. |
 | ENHANCED ACCOUNTABILITY | Access tangible and practical data instantly, enabling informed decision-making based on crucial performance metrics. |
 | AGENT STATUS | Monitor the availability and duration of phone status changes in real-time. |
Prerequisites #
Before installing 3CX Competitive Wallboard, you need to ensure that your computer meets the minimum requirements mentioned below:
- 3CX Version 18
- Windows 10 or above / Windows Server 2012 or above (64 bit)
- Microsoft SQL Server 2016 or above (Including the free SQL Express edition)
- Microsoft .Net 4.7.2
- VoIPTools’ 3CX Relay Service installed on the 3CX server.
- Microsoft Internet Information Server (IIS) 7.0 or above
- Install .NET Core SDK. For this, go to the link https://www.microsoft.com/net/download. From the Windows section, under .NET Core, select Download .NET Core SDK. Install the software on your VoIPTools server.
- Minimum of 8GB RAM.
- Static IP for VoIPTools and 3CX servers
- Port number 7250 opened on your device.
NOTE:
You need a Static IP for both VoIPTools and 3CX servers to ensure proper two-way communication, both the 3CX server (Relay) and the VoIPTools server. Dynamically assigned IP addresses are not supported. Additionally, it is recommended to use HTTPS for secure communication, which requires a FQDN for SSL/TLS certificate validation between the VoIPTools server and the Relay.
While installing SQL Server, ensure the following,
- Uninstall the previous versions of SQL Management Studio manually before installing the new version.
- Install it in “Mixed Mode” to include SQL Authentication, and install SQL Management Studio
- Installation on a domain controller may require additional assistance
- When installing IIS, be sure to install Basic Authentication, .Net Extensibility, and ASP.Net 4.X
Installation overview #
 | DOWNLOAD SOFTWARE | You can order 3CX Competitive Wallboard online at https://www.voiptools.com. Your order confirmation email will include your license key and a link to download the software. |
 | INSTALL PREREQUISITES | To install 3CX Competitive Wallboard, you must first install several prerequisites. These prerequisites encompass the installation of Microsoft Internet Information Server (IIS) and Microsoft SQL Server. |
 | INSTALL 3CX COMPETITIVE WALLBOARD | This User Guide contains step-by-step instructions to successfully install 3CX Competitive Wallboard. Begin by extracting the installer from the downloaded zip file, then run the setup program named CompetitiveWallboard.exe |
 | REGISTER YOUR SOFTWARE | You must register your license key to activate 3CX Competitive Wallboard. Your license key is included in your order confirmation email, and can also be found in your order history on our website. |
Step-by-Step Installation Procedure #
The following section will guide you through a detailed walkthrough of the installation process.
Step 1: Download 3CX Competetive Wallboard #
- Find the software download link in the Order Confirmation Email, or you can find it in your order history on our website and download the 3CX Competetive Wallboard application.
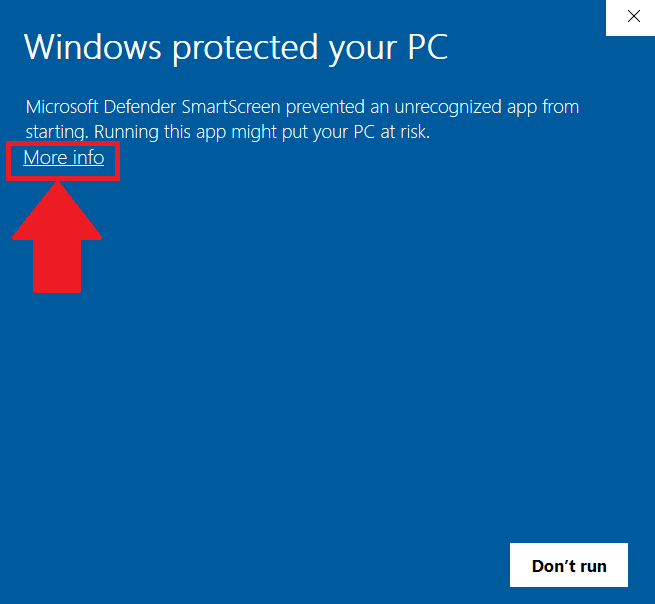
- In the Microsoft Defender SmartScreen, click the More Info option.
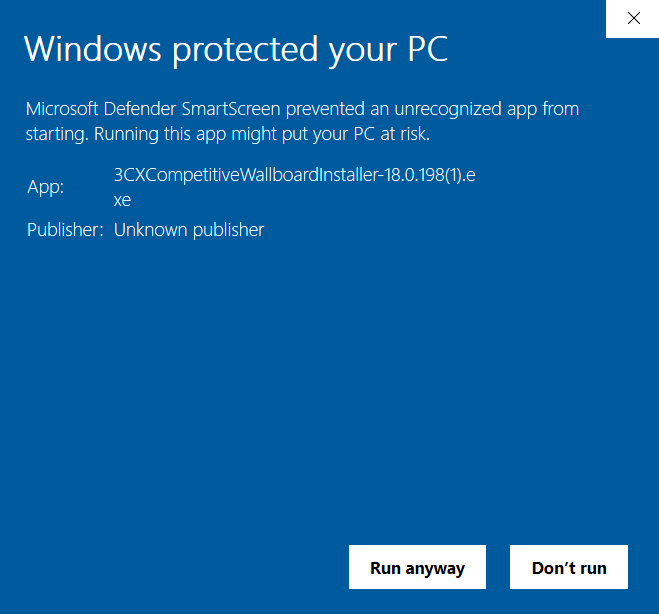
- Click the Run Anyway option to start the installation.
Step 2: Install Prerequisites #
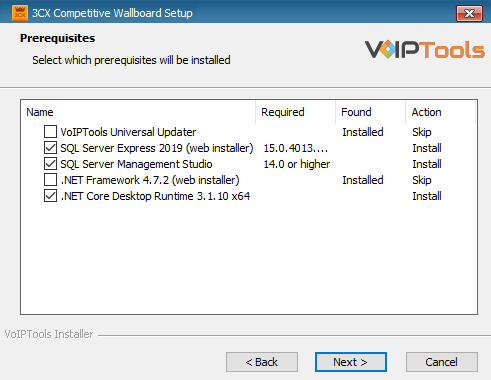
Click on the software installer that was downloaded in step 1 above. The installation wizard will automatically identify the needed prerequisites and assist you with the install of the prerequisites needed to run ‘3CX Competitive Wallboard’. These include .NET Framework (Web Installer), SQL Server Express (Web Installer) and, SQL Server Management Studio.
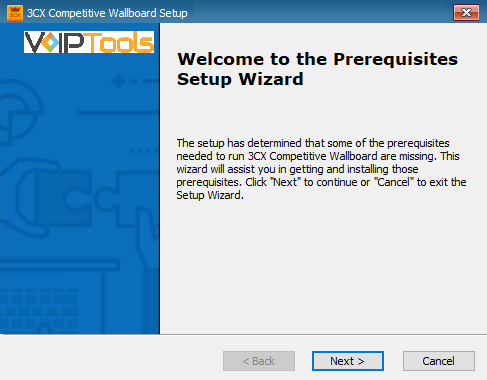
- Click the downloaded installer executable to launch the Prerequisites Setup Wizard and click Next.
- In the Prerequisites window, the installer will identify the missing prerequisites. It is important that you install all the required prerequisites. However, you can select/unselect the applications to be installed based on your unique requirements. Click Next to continue.
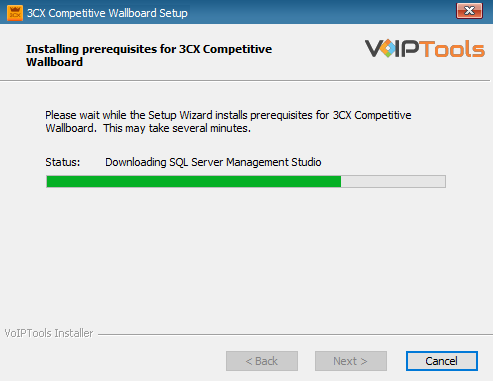
The installer will download and install the selected applications.
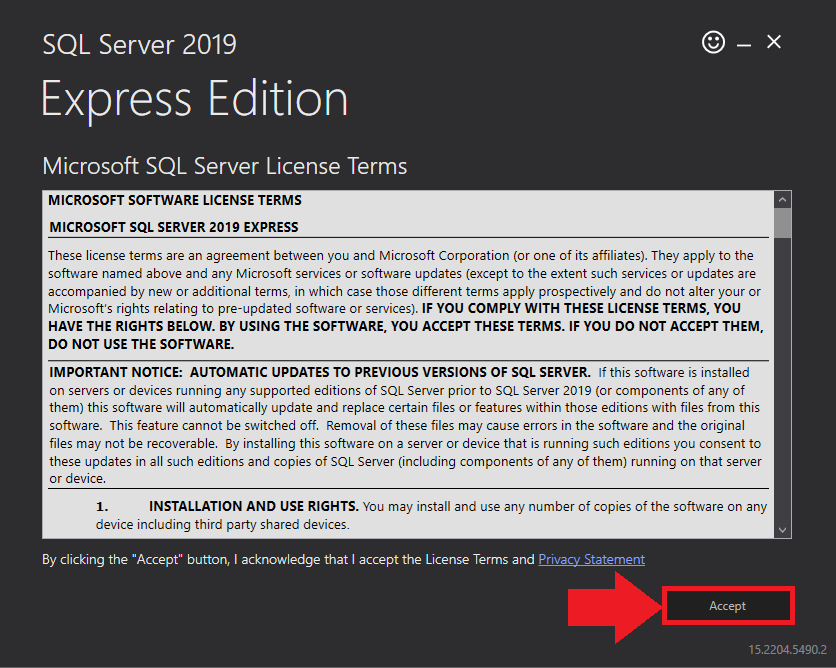
- In the Microsoft SQL Server License Terms click the Accept button to acknowledge the license terms and continue.
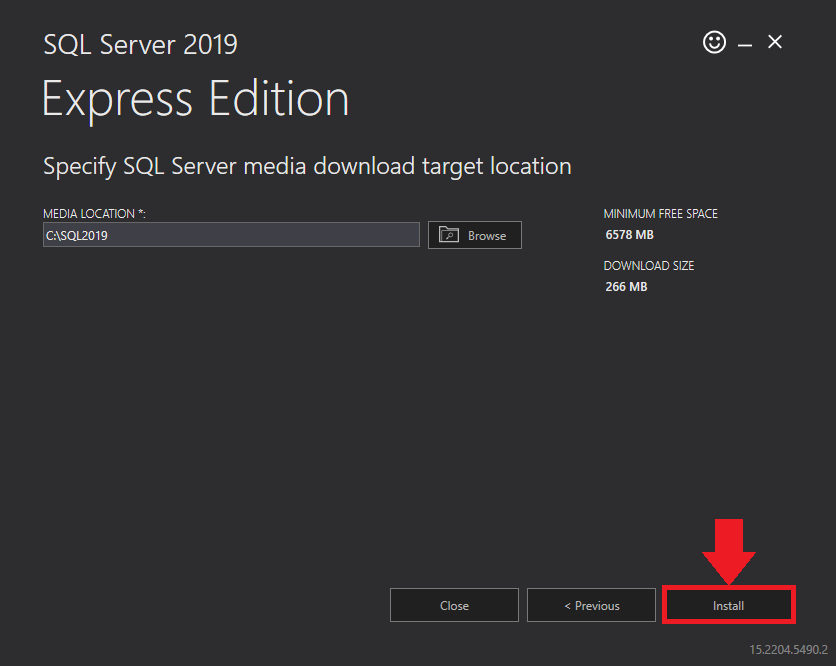
- This page appears if do not have SQL Server Express preinstalled in your device.
- View the SQL Server Media target location in the Media Location field. If required, you can click the Browse button to change the location. Click Install to begin the installation of SQL Server Express.
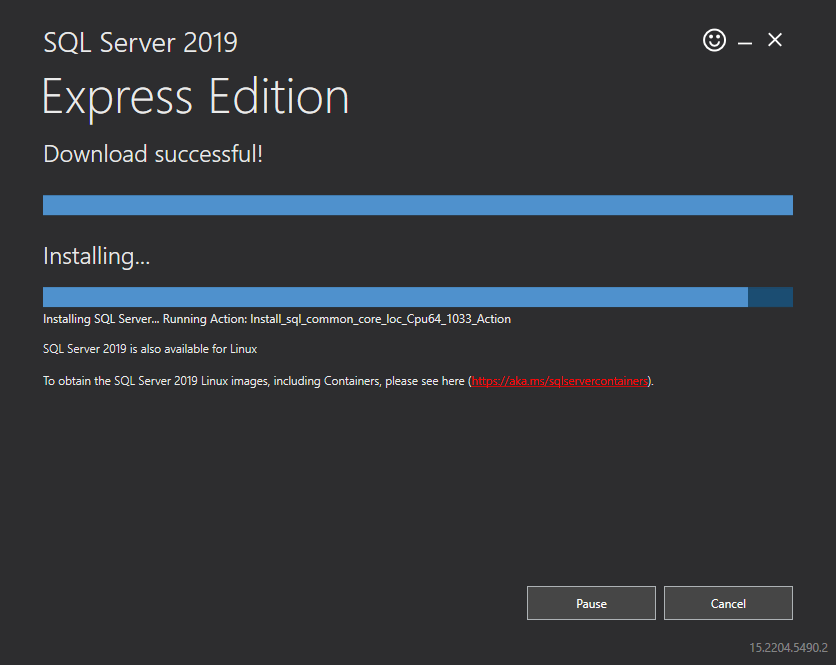
SQL server installation is in progress. This may take several minutes to complete.
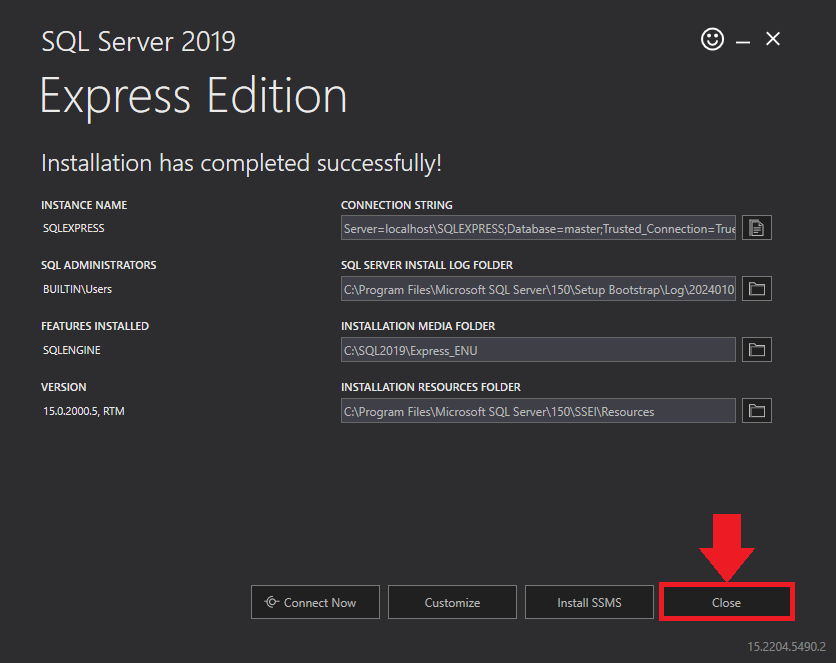
- Click the Close button once the prerequisites are installed.
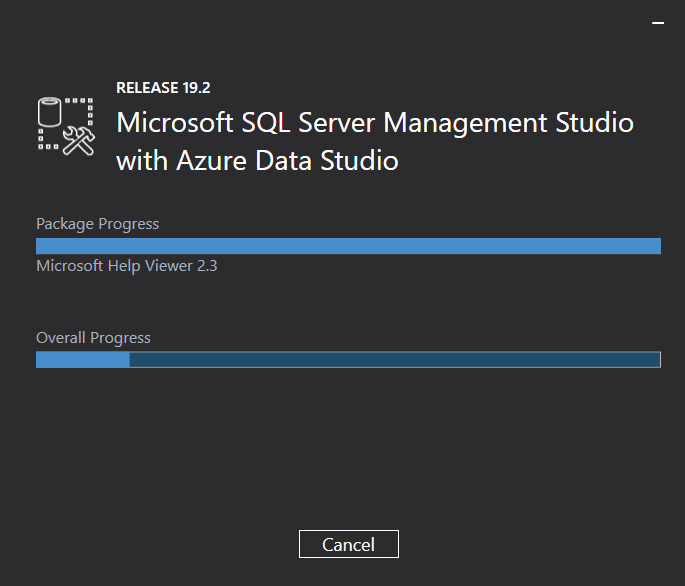
Microsoft SQL Management Studio installation is in progress. This may take several minutes to complete.
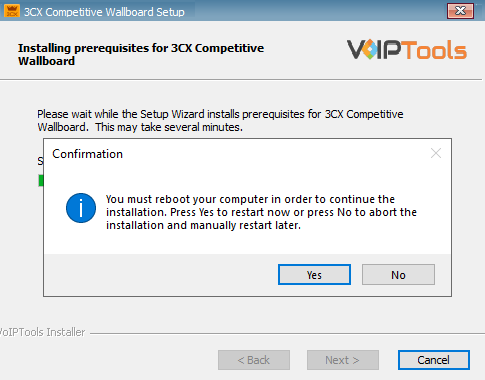
- During the installation of SQL Server Management Studio, you must reboot your computer. Click Yes to reboot the computer.
Step 3: Start the installation Process #
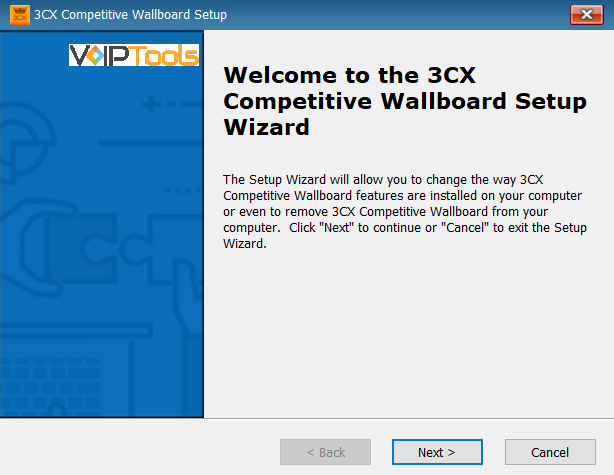
- After all the prerequisites are installed, the 3CX Competitive Wallboard Setup Wizard appears. Click Next to Continue.
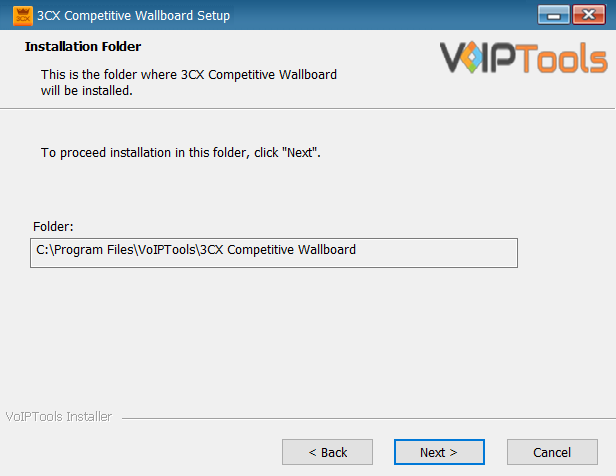
- On the Select Installation Folder window, the Folder field displays the location where the ‘3CX Competitive Wallboard’ will be installed. Note that you cannot change the path.
- Click Next to continue with the installation.
Step 4: Test Relay Settings #
- In the 3CX Relay Services window, in the Relay Host field, enter the FQDN of your 3CX server.
- Enter 8801 in the Relay Port field.
- Enter the public key you took from VoIPTools Relay services in the Public Key text area.
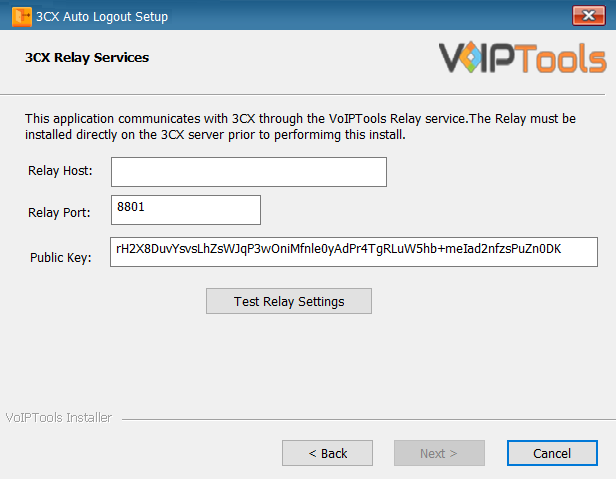
- Click the Test Relay Settings to confirm ‘3CX Auto Logout’ can communicate with the Relay services running on the 3CX server.
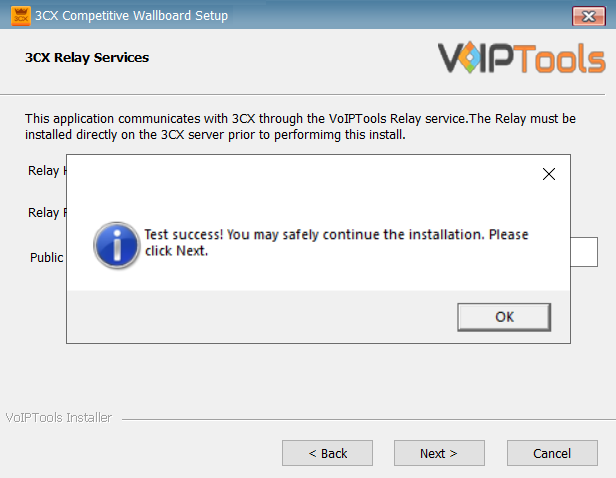
- If the ‘3CX Competitive Wallboard’ is successfully able to communicate with the Relay services that run on the 3CX server, a Success message box appears. Click OK. If the test fails, you will not be able to continue until communication with the relay is established.
- Click Next to continue with the installation.
- You must set the Relay Port to 8801.
- If the Relay test fails, you cannot continue the installation until you establish communication with the Relay. If the test was unsuccessful,
- Confirm you have the correct firewall port open (default TCP 8801) on the 3CX server and the firewall protecting the 3CX server.
- Confirm that you have entered the correct FQDN for the 3CX server.
- Confirm that the 3CX Auto Logout and Relay use the same port and protocol.
Step 5: Configure the database #
- When configuring 3CX Competitive Wallboard, select an existing Microsoft SQL Server instance in your environment. The database server can be a remote SQL Server, or a local instance running on the VoIPTools server.
We encourage you to use SQL Authentication rather than Windows authentication. Many of our tools leverage a Call Flow Designer (CFD) application running on the 3CX. Frequently our CFD applications require access to a SQL database. If the 3CX server and the database server are not in an Active Directory domain, Windows authentication will fail. To use SQL authentication, your SQL Server must be configured to run in “Mixed Mode”. If you installed SQL Server with one of our tools, we configure SQL in “Mixed Mode”.
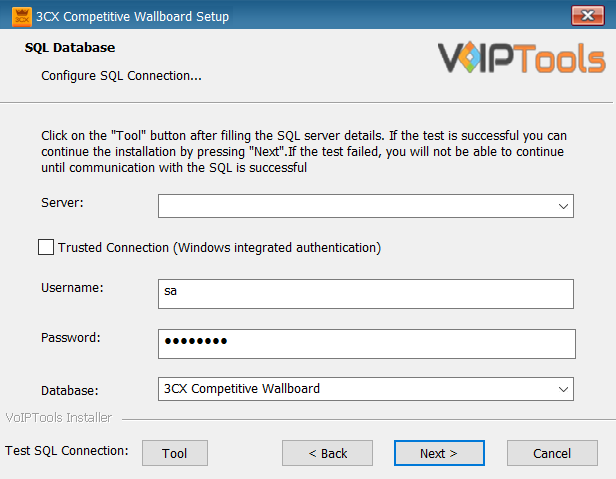
- To use SQL Authentication, be sure to uncheck the Trusted Connection checkbox.
- In the Username and Password fields, enter valid SQL login account credentials
- To use Windows Integrated Authentication (not recommended), check the Trusted Connection (Windows integrated authentication) checkbox.
- In the Database field, the installer will automatically display the default database name. We encourage you to use the default name. If you are upgrading or reinstalling 3CX Competitive Wallboard, select the existing database name from the list.
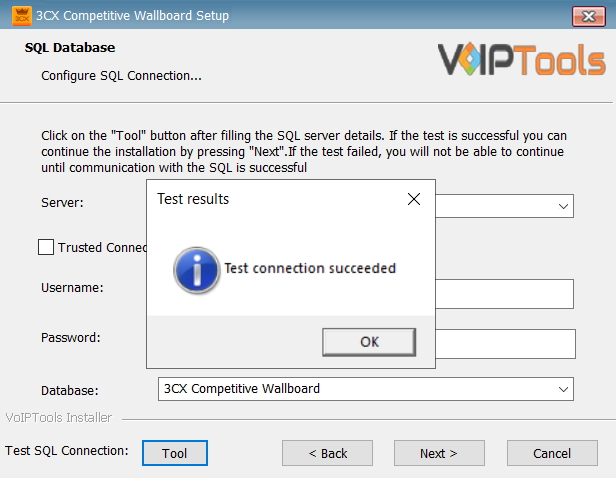
- Click the Test SQL Connection button to confirm connectivity to SQL Server and then click Next to continue.
Step 6: Installing 3CX Competitive Wallboard #
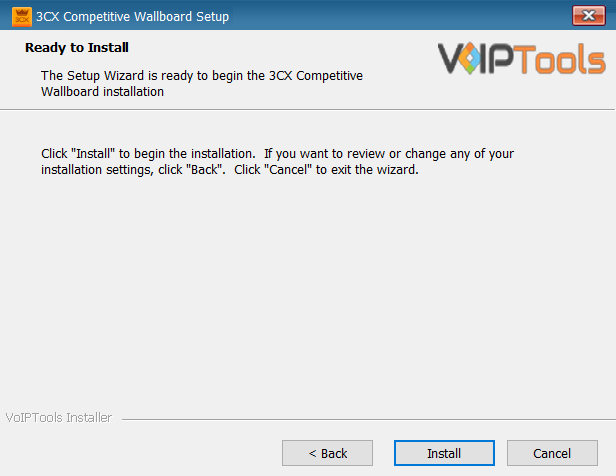
- In the Ready to Install window, click Install to start the installation of the ‘3CX Competitive Wallboard’.
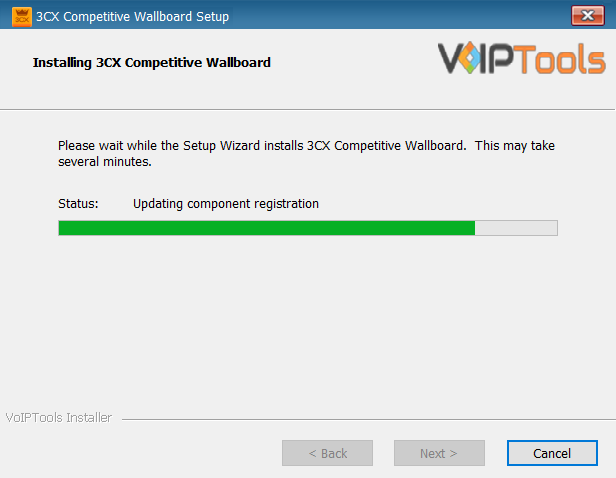
The application installation progresses. This may take several minutes to complete.
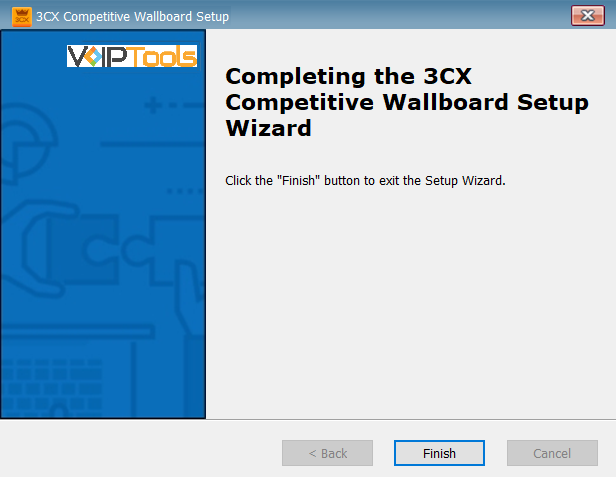
- Once the installation is complete, click Finish.
Step 7: Register your Software #
- Double-click the 3CX Competitive Wallboard
 desktop icon to open the web application.
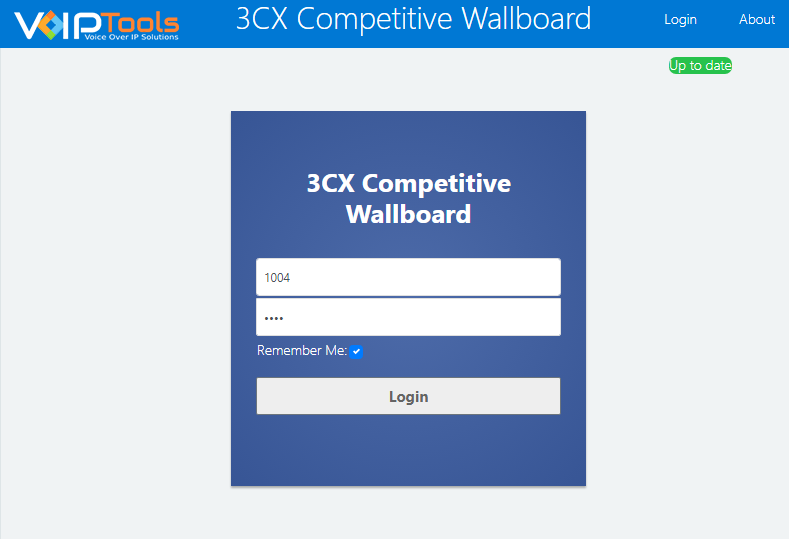
 - On the Login page, do the following tasks,
- In the Extension field, enter your 3CX extension number.
- In the PIN field, enter your 3CX voicemail PIN.
- Click the Login button to log in to your account.
NOTE:
When you first install the Wallboard, all users are treated as a “managers”. This gives you access to the settings pages where you configure the Wallboard extension group.
Once the extension group is created in 3CX and configured in the Wallboard, then you must be a member of any of the extension groups to access the wallboard, and you must be a manager of any of the extension groups to make changes to the wallboard configuration.
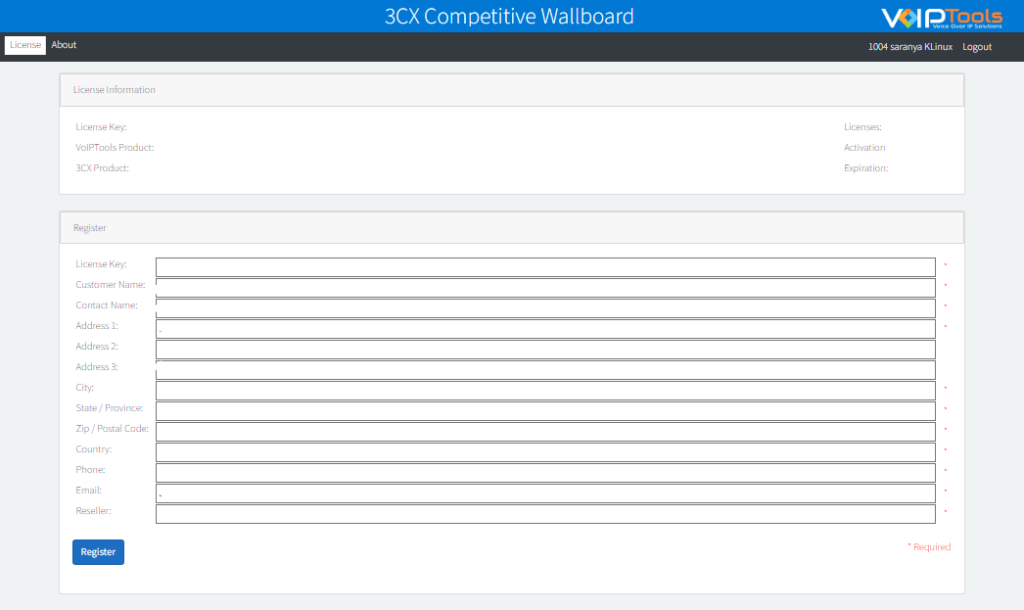
- In the License tab, enter your registration information in all the required fields (Note the red dot denotes a required field).
- Click the Register button.
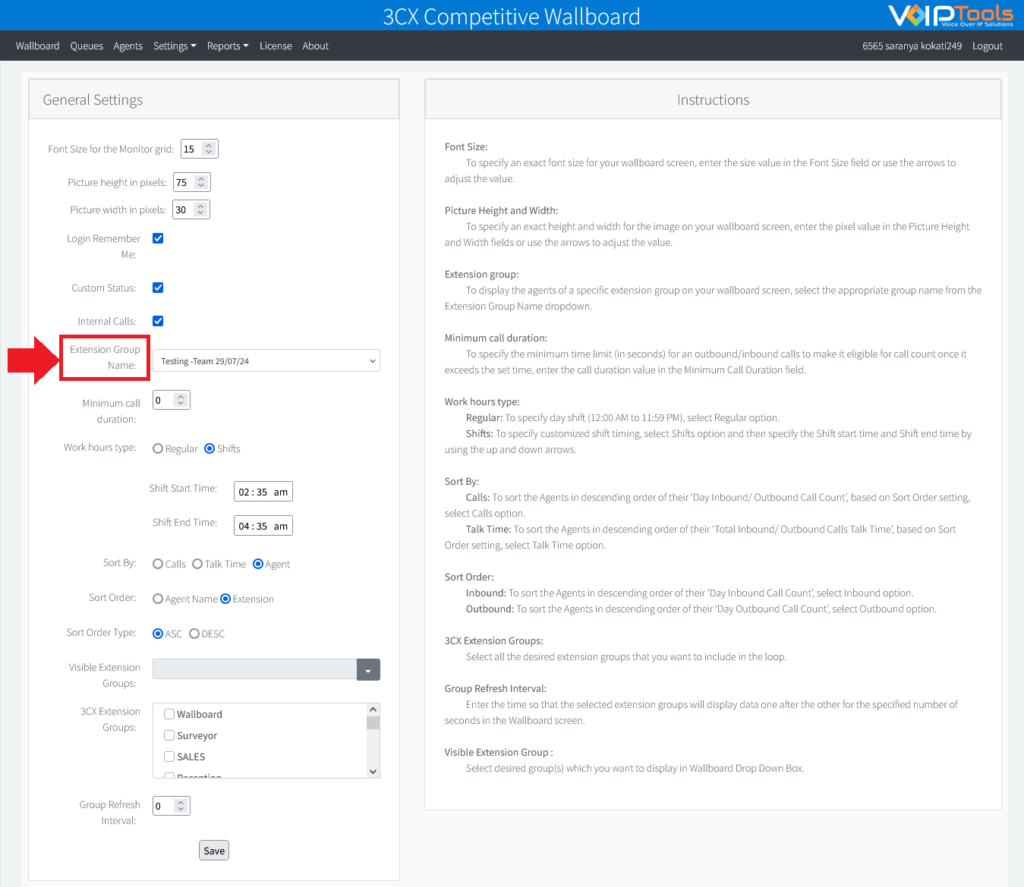
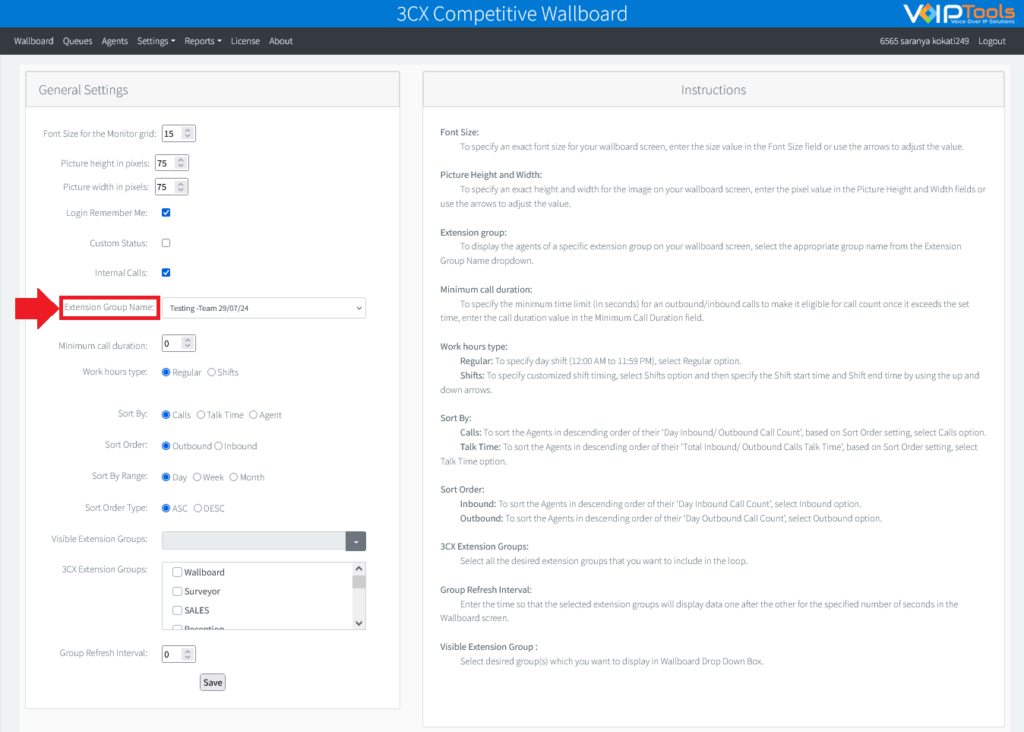
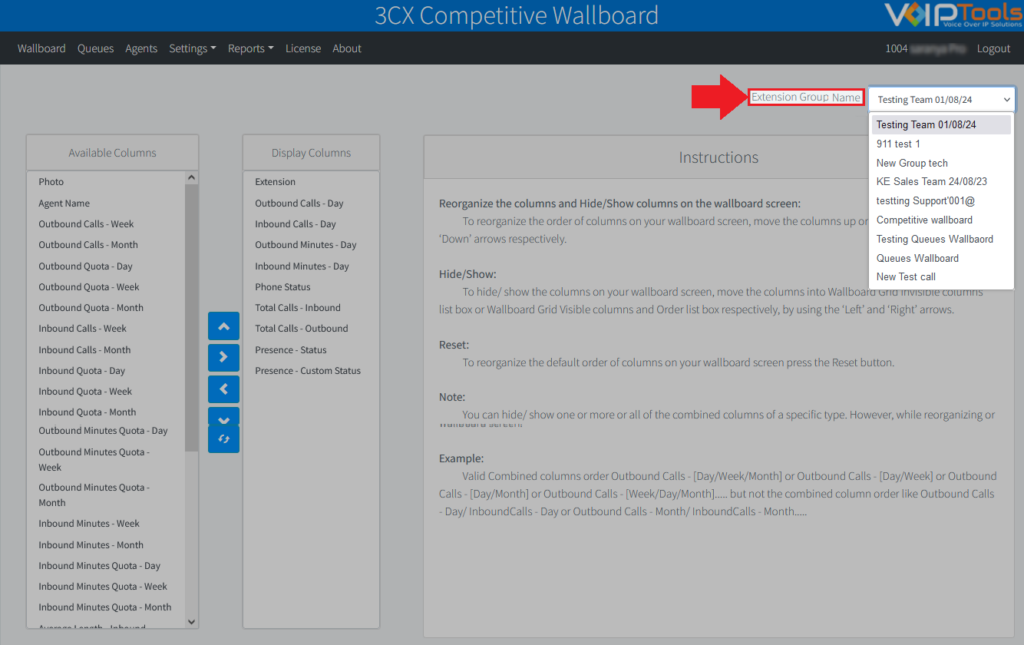
- In the Settings section and from the Extension Group Name dropdown list, select the desired extension group name you want to set as the default one. Click here to learn how to create a new extension group in 3CX.
You cannot view the _DEFAULT_ and Favorite groups created in 3CX Competitive Wallboard
You can view all the tabs if you are either a manager of any groups in the 3CX Console Management or have admin rights to the 3CX Console Management.
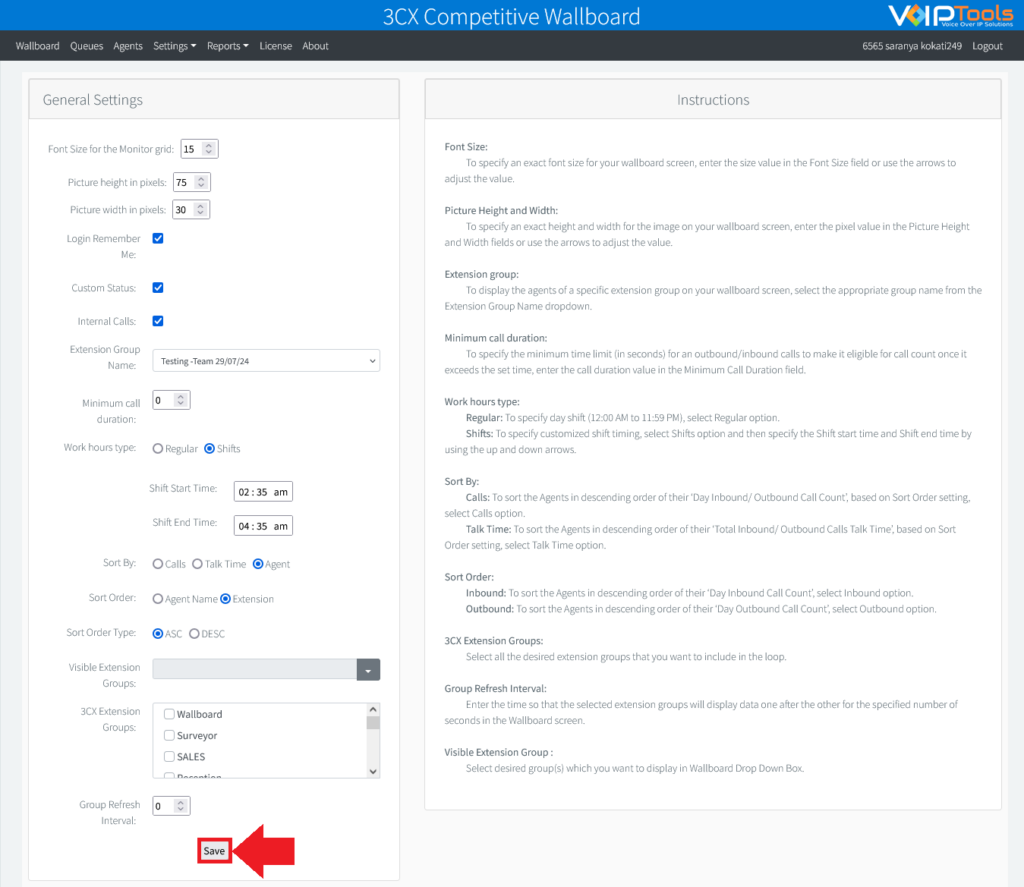
- At the footer of the page, click Save.
- The license key permits you to install the software on one computer. This is not free software.
- It is mandatory to select ‘Extension Group Name’ to continue accessing the other screens of the application. If you are an existing user, then you can continue accessing the application with the previously selected default extension group.
Web Portal #
To access the 3CX Competitive Wallboard web portal, click the Web Portal button on the configuration program, or click on the desktop icon that was created during the installation process (3CX Competitive Wallboard Web).
Login Rights #
3CX Competitive Wallboard lets users log in as Agents and as Managers. Separate logins for agents and managers serve to control access, bolster security, customize experiences, enforce accountability, and streamline usability. This approach restricts unauthorized access, safeguarding sensitive functions. Managers, who often require more advanced privileges, can access tailored tools and settings
Manager Rights #
As a manager, you can perform the following activities in the Wallboard application:
To view all the tabs, you must have one of the following rights: either be a manager of any groups in the 3CX Console Management or have admin rights to the 3CX Console Management.
- A manager can view and access data in all the menu options available in the Competitive Wallboard web portal.
As a manager, you can perform the following tasks,
- Activate/ Inactivate an agent.
- Add a new agent.
- Send a group message to your agents.
- Change the name of the existing agents.
- Upload new pictures or edit pictures of your agents.
- View an agent’s idle time during the shift hours of the day and since the latest call.
- View the current status of an agent and the time since the current status has been changed. View and export the complete status of your agents.
- View agent’s custom statuses.
- Set inbound and outbound day, week and month call quotas for any agent.
- Configure font size for the ‘Wallboard’ screen.
- Specify the 3CX Extension Group to monitor.
- Edit extension group.
- Set ‘Minimum Call Duration’ (in seconds) for an extension group so that a call can stand eligible for call count only after it reaches the set time.
- Set ‘Work hours type’ for an extension so that the calls made in the set working hours will stand eligible for call count.
- Set the ‘Sort Order’ setting for ‘Inbound’ or ‘Outbound’ calls in the ‘Wallboard’ screen to display the agents in descending order based on their inbound or outbound call count.
- Reorganize the order of columns in the wallboard screen except that the ‘Picture’ column is always the first one.
- Hide one or more columns in the wallboard screen except ‘Picture’ column.
- View and export call log reports in various formats.
- Customize the color, logo, and other elements to establish your brand identity.
Agent Rights #
As an ‘Agent’, you have the following rights:
- Agents can view only Wallboard, Queues and About screens.
- An agent cannot edit any data.
- Can view all the grid columns.

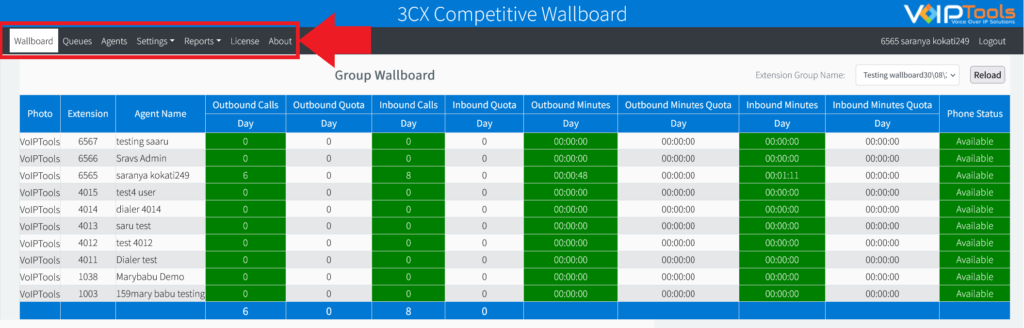
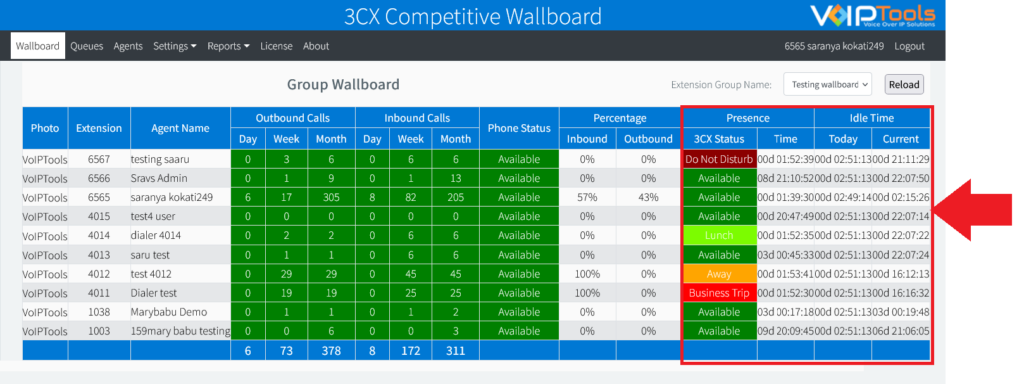
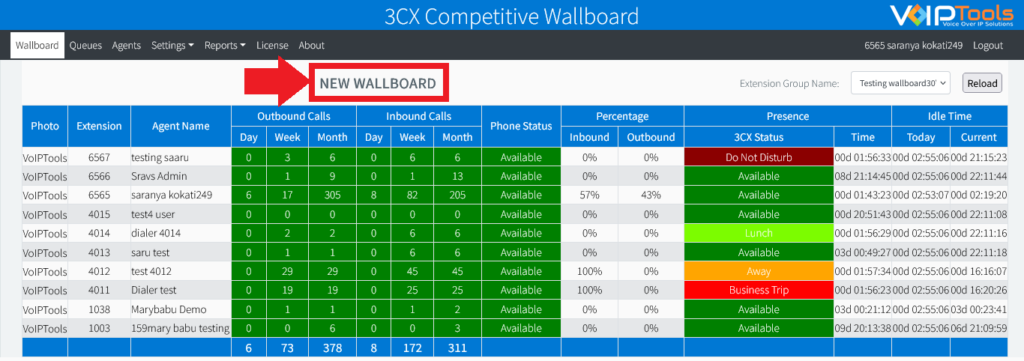
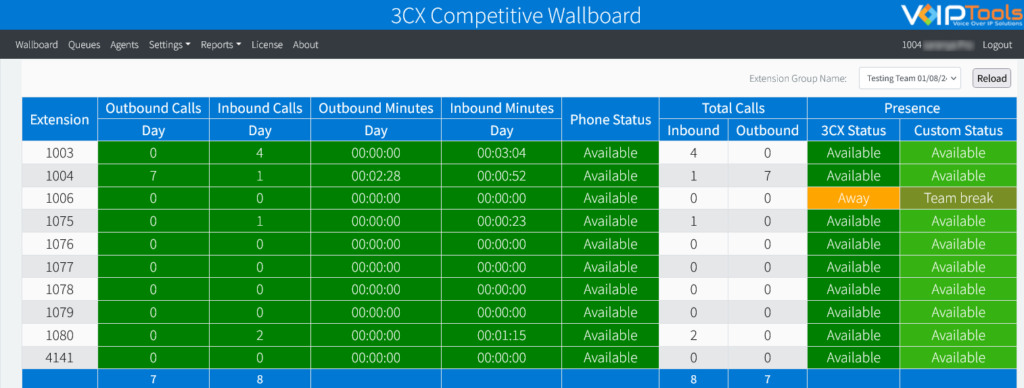
Wallboard #
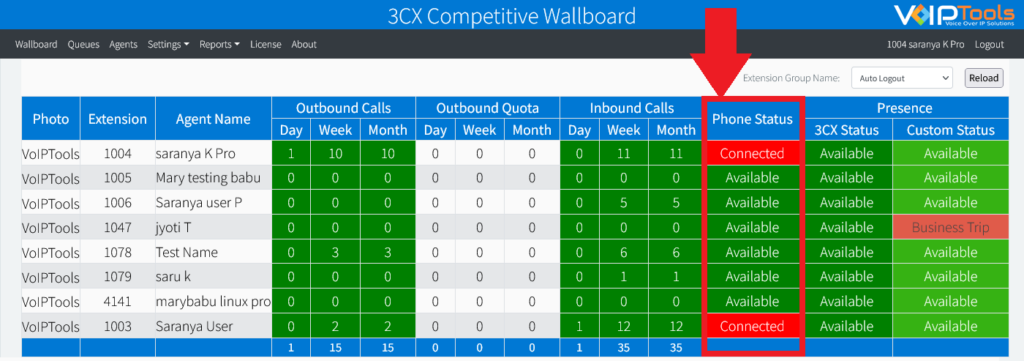
The Wallboard screen displays the list of all the active agents of the saved extension group and their current call statistics. Here, you can view which agent has made the most calls and who has met their call quotas.
Features of Wallboard Screen #

- The Wallboard screen can be viewed by agents who are assigned either ‘Manager,’ ‘3CX Admin’ or ‘Agent’ roles.
- The Wallboard screen displays data as per the selected Extension Group Name. In the Config Settings screen, if you have configured 3CX Extension Groups to display data according to the timer, then the Wallboard screen displays data of all the extension groups that are a part of the loop one after the other for a specified number of seconds.
In the Wallboard screen, once you select an extension group that is not a part of the loop, the loop will break and the Wallboard will display data related to the selected group only. If you want to restart the loop, then select an extension group that is a part of the loop.
- If you have configured a Group Message for desired extension group in the Agents screen, then the Wallboard screen displays the group message when you select that group from the Extension Group Name dropdown list.
- The Wallboard screen displays the list of all the agents associated to the group that you select from the Extension Group Name drop-down list.
- Depending on the Sort Order setting (Inbound/ Outbound) that you have selected in the Settings screen, the Wallboard screen displays the agent’s information in the following way:
- If the Sort Order setting is Outbound, then the agents will be displayed in descending order based on the outbound call count.
-
- If the Sort Order setting is Inbound, then the agents will be displayed in the descending order based on inbound call count.

-
- If the Sort Order setting is Outbound and if the daily outbound call count for any two agents is the same, then the agent with the highest Outbound Talk Time for the day will be displayed above the other agent.
- If the Sort Order setting is Inbound and if the daily inbound call count for any two agents is the same, then the agent with the highest Inbound Talk Time for the day will be displayed above the other agent.
- If an agent has not yet met their quota, their quota will be displayed in RED.
- Once the call quota is reached for any agent, the color will change to GREEN.
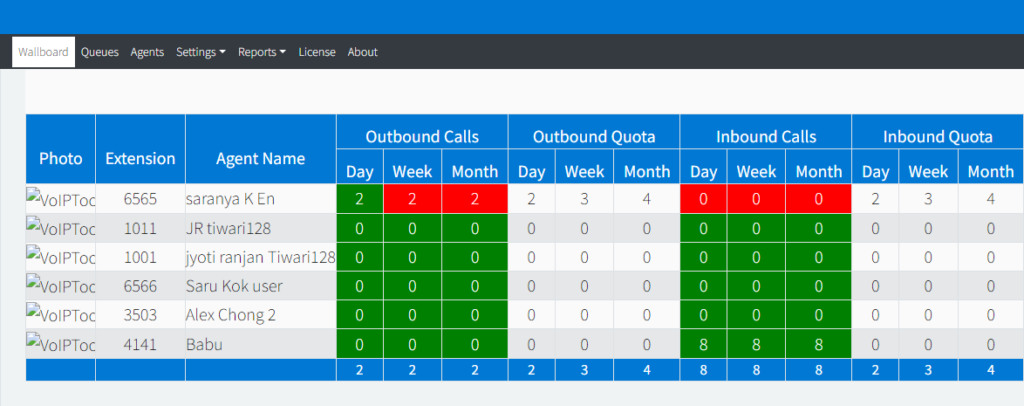
- The footer of the Wallboard screen displays the sum of outbound calls of all the agents per day/ week/ month, sum of inbound calls of all the agents per day/ week/ month, and the average percentage of answered inbound/ outbound calls of all the agents per day.
- The Wallboard screen displays Idle Time data only when you select Work hours type as Shifts in the Settings page. Idle Time is an active timer that runs to display the amount of idle time of an agent during shift hours.
- Presence displays the current Agent Status and the Time since the latest updated Agent Status in the ‘3CX Smart Phone’.
Columns Definition: #
| PICTURE | Displays the image for an agent. You can upload new or edit an existing image from Agents screen |
|---|---|
| EXTENSION | Extension number of an agent |
| AGENT NAME | Name of an agent |
| OUTBOUND CALLS | The Day reprsents the number of outbound calls made and answered by an agent for the day. The week represents the number of outbound calls made and answered by an agent for the week. The Month represents the number of outbound calls made and answered by an agent for the month. |
| OUTBOUND QUOTA | The Day represents the outbound call quota of an agent for the day. The Week represents the outbound call quota of an agent for the week. The Month represents the outbound call quota of an agent for the month. |
| INBOUND CALLS | The Day represents number of inbound calls attended by an agent for the day. The Week represents number of inbound calls attended by an agent for the week. The Month represents the number of inbound calls attended by an agent for the month. |
| INBOUND QUOTA | The Day represents the inbound call quota of an agent for the day. The Week represents the inbound call quota of an agent for the week. The Month represents the inbound call quota of an agent for the day. |
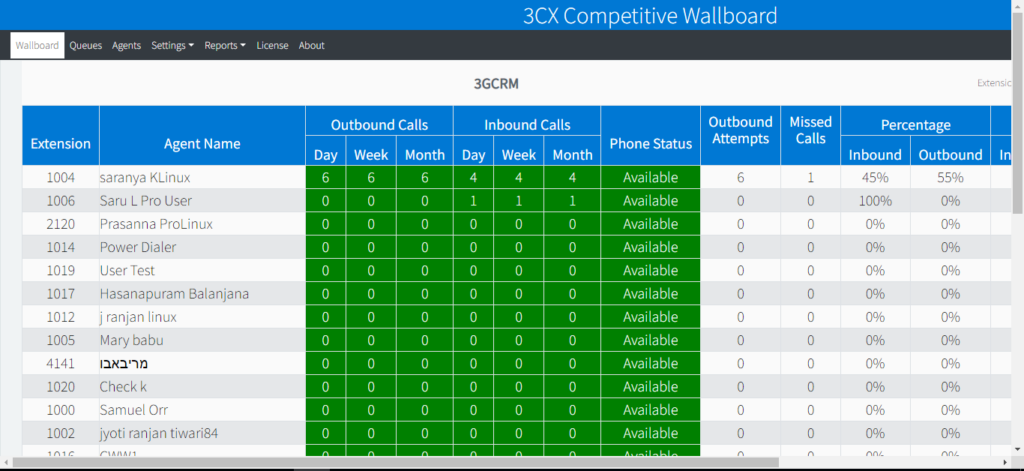
| OUTBOUND ATTEMPTS | Number of outbound call attempts made by an agent for the day |
| TALK TIME | Inbound represents the total talk time of all the answered inbound calls of an agent for the day. Outbound represents the total talk time of all the answered outbound calls of an agent for the day. Total represents the sum of Inbound Talk Time and Outbound Talk Time of an agent for the day. |
| AVERAGE LENGTH | Inbound represents the average inbound talk time of an agent for the day. Outbound represents the average outbound talk time of an agent for the day. |
| TOTAL CALLS | Inbound represents the number of answered inbound calls of an agent for the day. Outbound represents the number of answered outbound calls of an agent for the day. |
| MISSED CALLS BETA | Count of missed ‘inbound external queue calls’ by an agent. |
| PHONE STATUS | Status of a call for an agent while the call is in progress. The status is generally ‘dialing’, or ‘connected’. If the call disconnects then the call status is cleared |
| 3CX STATUS | The status of the agent’s 3CX’s phone management. |
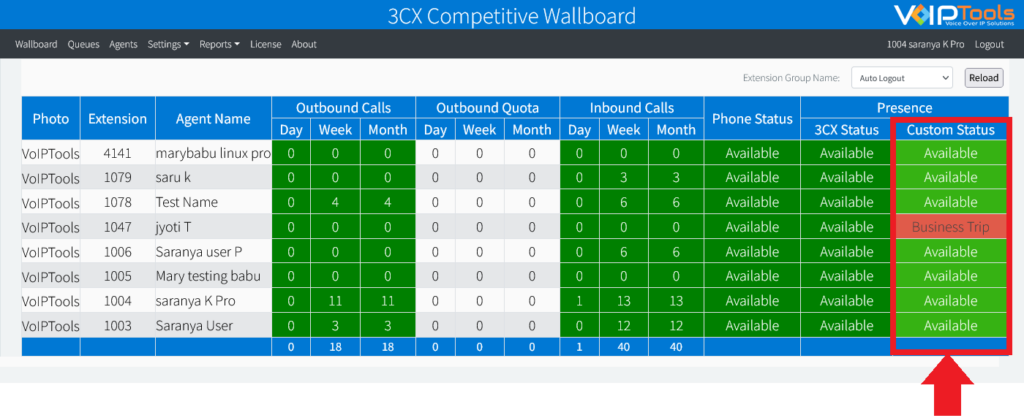
| CUSTOM STATUS | The status of the agent set and mapped in the 3CX Custom Presence. |
| PERCENTAGE | Inbound represents the percentage of inbound calls answered by an agent for the day. Outbound represents the percentage of outbound calls answered by an agent for the day |
| IDLE TIME | Idle Time is an active timer that runs to display the amount of idle time of an agent during shift hours. Current – Represents the amount of idle time since the latest call. Today – Represents the amount of idle time of an agent during the shift hours of the day. Usually, it is calculated as: (Total Shift Hours of the Day – Total Talk Time). |
| PRESENCE | Presence displays the current Agent Status and the time since the latest updated Agent Status. Status displays the current Agent Status. Time is an active timer that runs to display the time since the latest updated Status. When an agent changes the status in the ‘3CX Smart Phone’, the status is instantly updated in the Status column and the Time timer starts from zero. |
The Wallboard screen displays Idle Time data only when you select Work hours type as Shifts in the Settings page.
Queues #
The Queues screen displays various data related to Call Queues for the current day.
The data displayed is only about inbound external calls to the Call Queues.
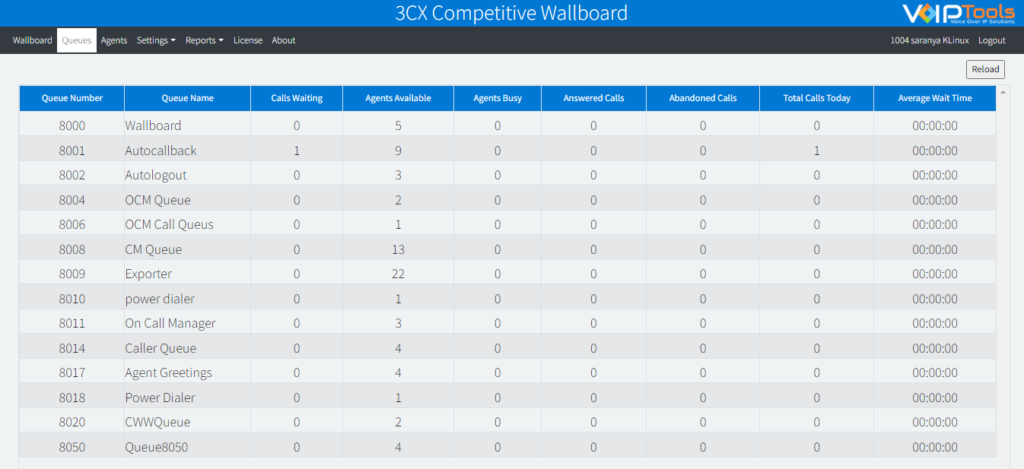
| QUEUE NUMBER | The Call Queue Numbers displayed in this column are retrieved from the 3CX Console Management. |
|---|---|
| QUEUE NAME | The Call Queue names displayed in this column are retrieved from the 3CX Console Management. |
| CALLS WAITING | Displays the number of calls to the specific Call Queue that are in ringing stage. |
| AGENTS AVAILABLE | Displays the number of agents that logged into the Call Queue and are ready to take the call. In other words, the value is calculated as: (No. of login agents in the Call Queue) – (No. of Agents On Call) |
| AGENTS BUSY | Displays the number of agents in the Call Queue that are active on call. |
| ANSWERED | Displays the number of calls attended in the Call Queue. |
| ABANDONED | Displays the number of calls unattended in the Call Queue. |
| TOTAL CALLS TODAY | Displays the total number of calls to the Call Queue. It is the combination of ‘Number of Calls Handled’ and ‘Number of Calls Lost’. |
| AVERAGE WAIT TIME | Displays the average value of ringing time of all the calls to the Call Queue. |
Agents #
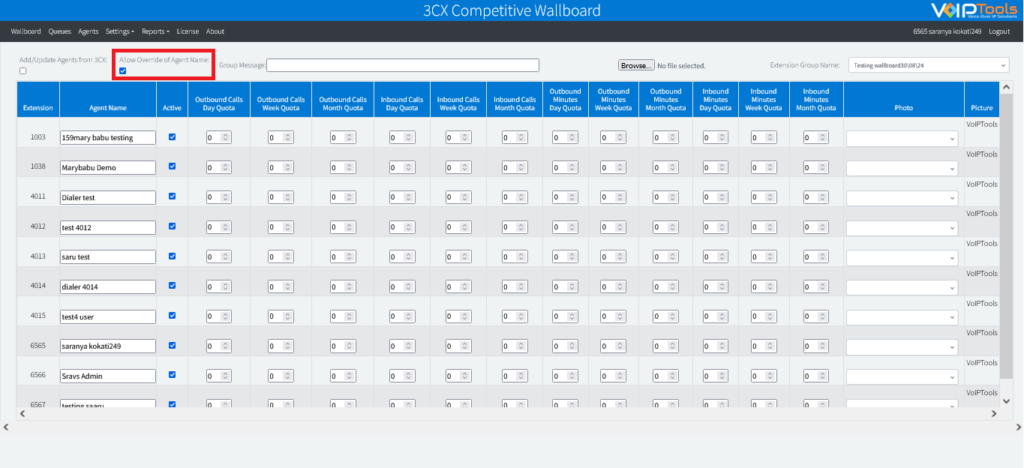
The Agents screen displays the information of all the active and inactive agents. As a manager, you can add/update an agent, activate/ inactivate an agent, set inbound and outbound call quotas, upload/ edit an image for an agent, change the agent’s name, and send group messages to your agents.
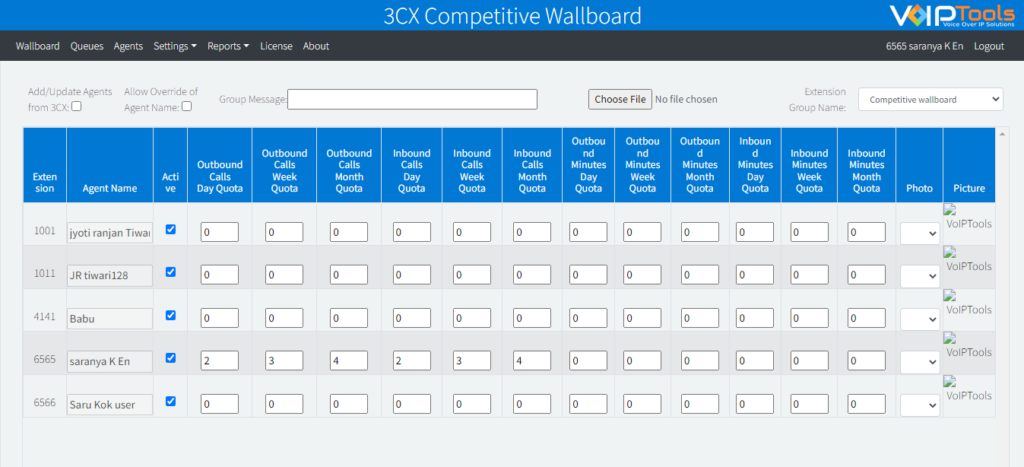
Add/ Update Agent #
- On the menu bar, click Agents.
- In the Agents screen, below tab bar, select Add/ Update Agent names from 3CX check box.
On checking the check box, the ‘Agents’ screen displays list of all the agents from 3CX.
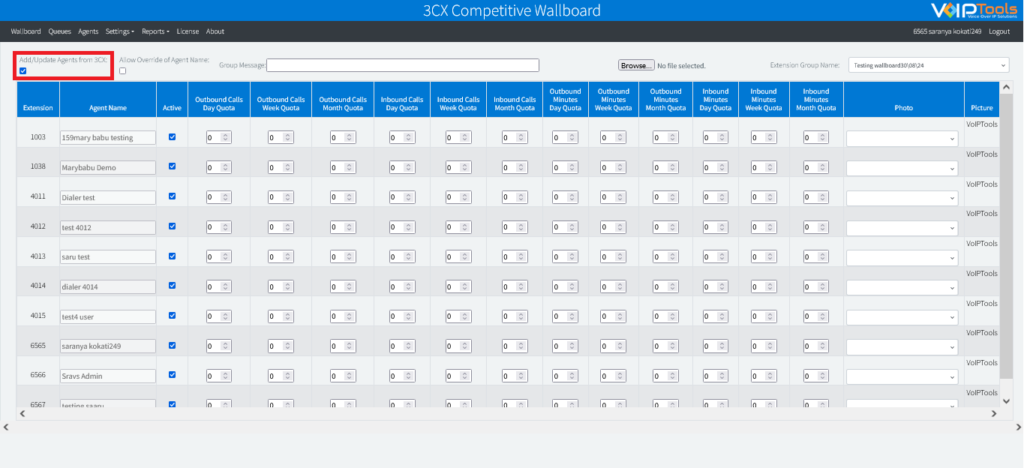
- Refresh the screen to see the updated names in the Agent Name column.
When you choose to update ‘Agent Names’ from 3CX, the system updates the values for all the Agents.
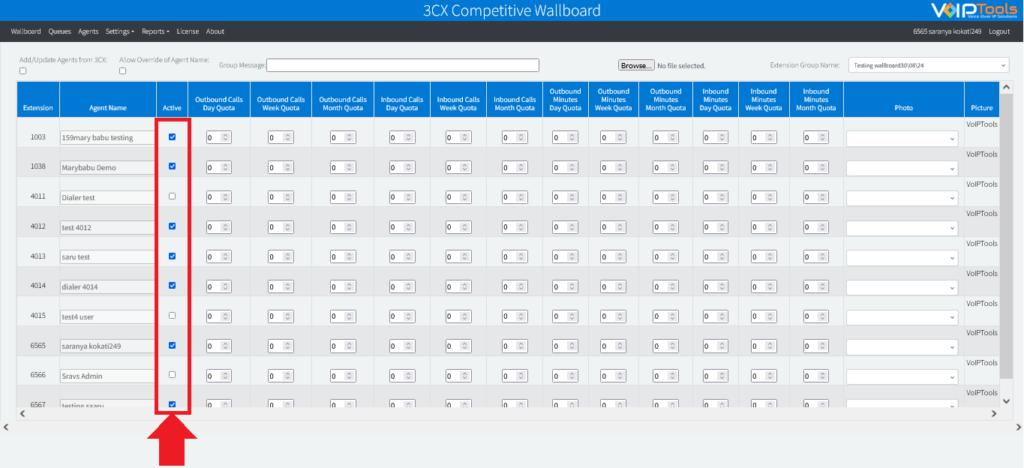
- Check the Active box to activate the desired agent.
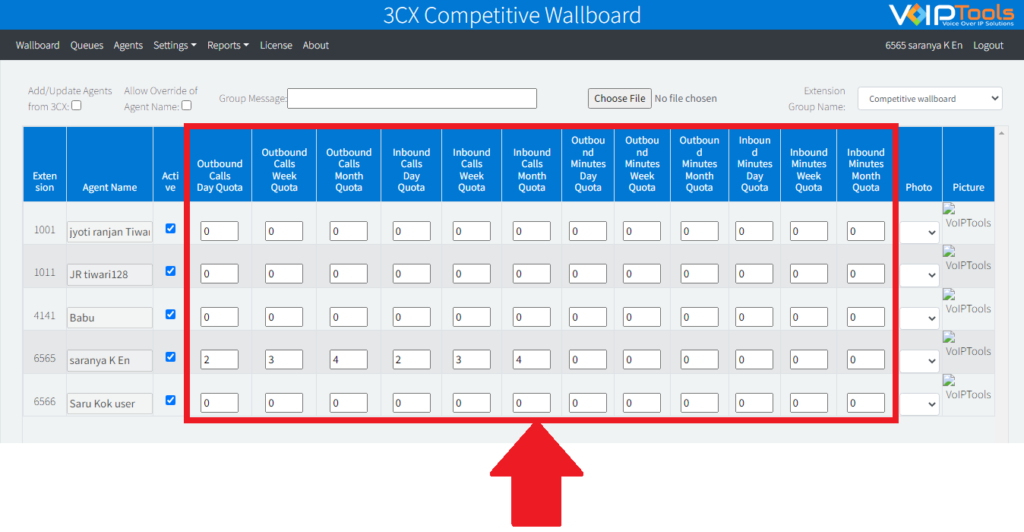
- In the Outbound Calls Day Quota text box, type the number of calls an agent must make each day to meet their quota.
- In the Outbound Calls Week Quota text box, type the number of calls an agent must make each week to meet their quota.
- In the Outbound Calls Month Quota text box, type the number of calls an agent must make each month to meet their quota.
- In the Inbound Calls Day Quota text box, type the number of calls an agent must attend each day to meet their quota.
- In the Inbound Calls Week Quota text box, type the number of calls an agent must attend each week to meet their quota
- In the Inbound Calls Month Quota text box, type the number of calls an agent must attend each month to meet their quota.
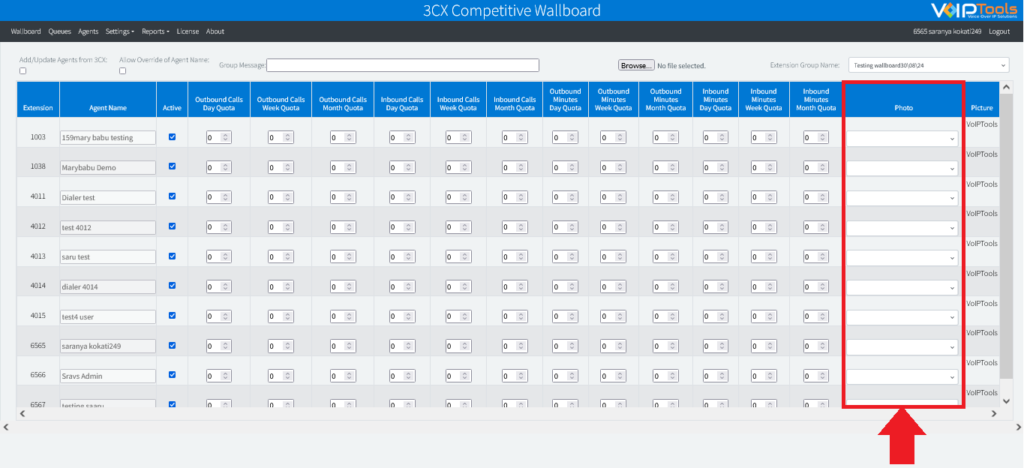
- From the Picture drop-down, select the image that you want to display for the agent.
- At the footer of the Agents screen, click Save changes to save the settings.
You can create multiple agents at one time, but make sure to click Save to commit all your changes to the database.
Activate Agent #
- In the Agents menu option, from the Active column, check the box beside the agent whom you want to activate.
- Click Save changes.
To check if the agent is successfully activated, you can confirm by displaying the wallboard screen. The agent should display in the list of monitored agents.
Inactivate Agent #
- In the Agents menu option, from the Active column, uncheck the box beside the agent whom you want to inactivate.
- At the footer of the Agents screen, click Save changes.
To confirm that the agent has been successfully inactivated, you can view the Wallboard screen. The inactivated agent should no longer display on the list of agents.
Edit Inbound/Outbound Quota #
You can edit the agent’s inbound/ outbound quotas for the day and month:
- Select the Agents menu option, and identify the record of the agent for whom you want to change the quota.
- If you want to edit inbound call quota, click Inbound Day Quota or Inbound Week Quota or Inbound Month Quota depending on the type of inbound quota that you want to edit.
- Similarly, if you want to edit outbound call quota, click Outbound Day Quota or Outbound Week Quota or Outbound Month Quota depending on the type of outbound quota that you want to edit.
- In the text field, type the new quota.
- Click Save changes to save the new quota.
Upload/Edit Picture #
You can edit the agent’s picture by selecting the image from the available list of pictures:
- Chose Agents from the menu
- Click the Choose File button to upload the profile pictures.
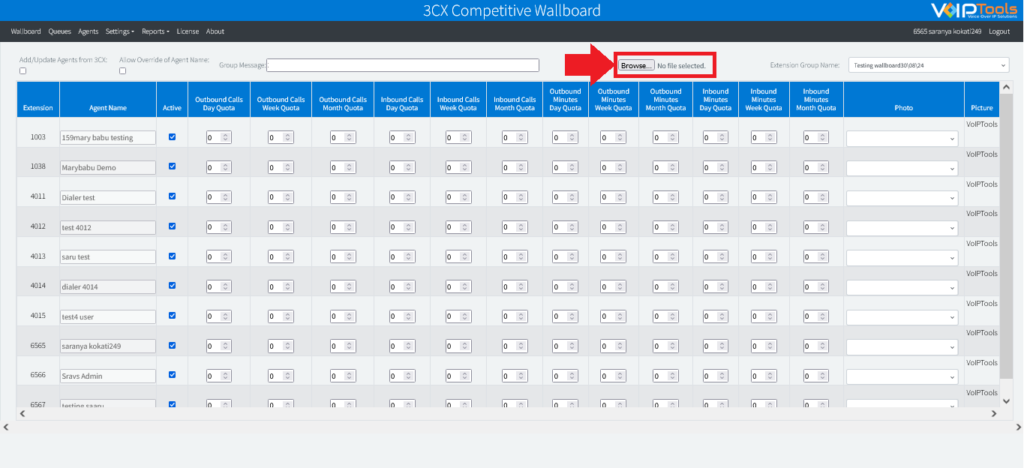
- Select the uploaded profile picture in the Photo dropdown list.
Change the Agent’s Name #
You can choose to change the agent’s name displayed in the 3CX Competitive Wallboard.
- To view Agent Name as updated in the Wallboard application, check Add/Update Agents from 3CX checkbox.
- To view Agent Name as updated in 3CX Console Management, check both Add/Update Agents from 3CX and Allow Override of Agent Name checkboxes.
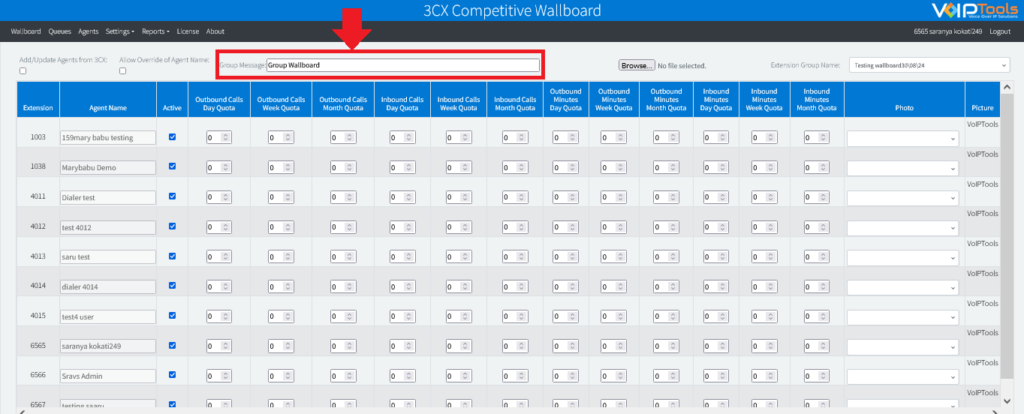
Send Group Message #
You can send a group message to the desired extension group.
- From the Extension Group Name dropdown list, select the desired extension group to which you want to send the message.
- In the Group Message field, enter the message that you want to send.

The group message is displayed on the wallboard.
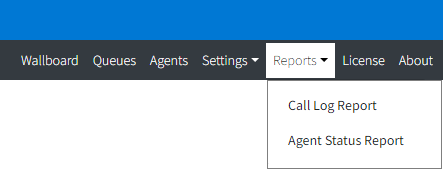
Reports #
The Reports enable you to export data in various formats and view Agent Status report.
Hover over the mouse on the Reports tab to display the following menu options:
- Call Log Report
- Agent Status Report
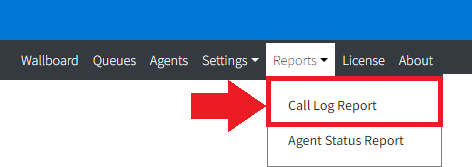
Call Log Report #
The Call Log Report screen enables you to export data in various formats. You can also export the reports for a particular extension.
Generate Call Log Report #
- Hover over the mouse on the Reports tab and from the dropdown menu, select Call Log Report.
- In the Time Zone dropdown, select the desired time zone to display the reports.
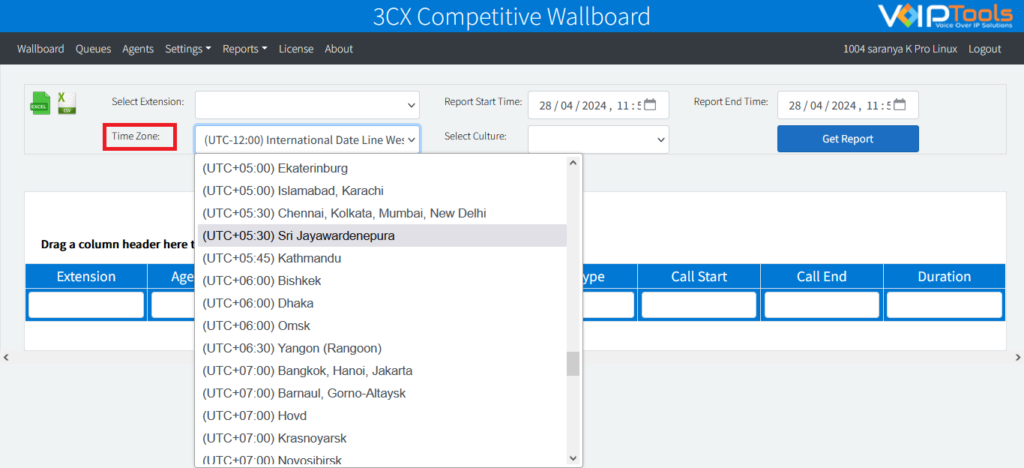
- In the Select Culture dropdown, select the culture.
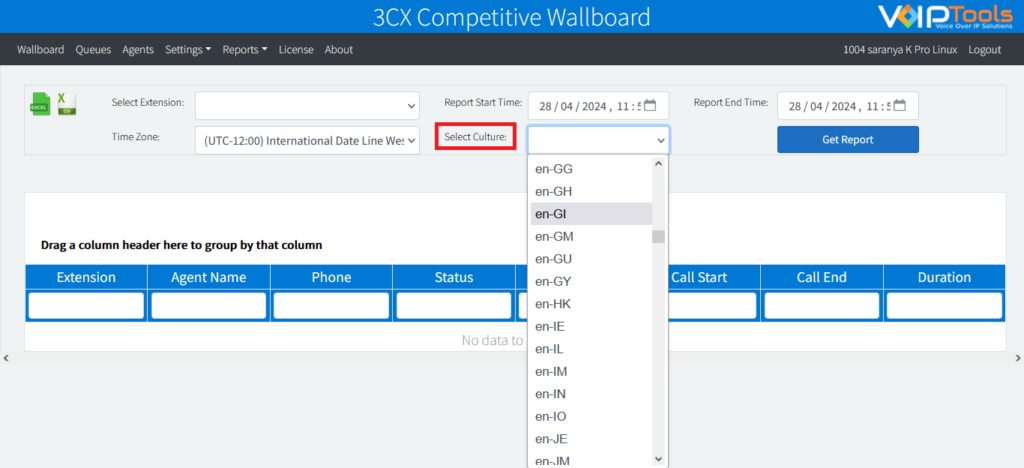
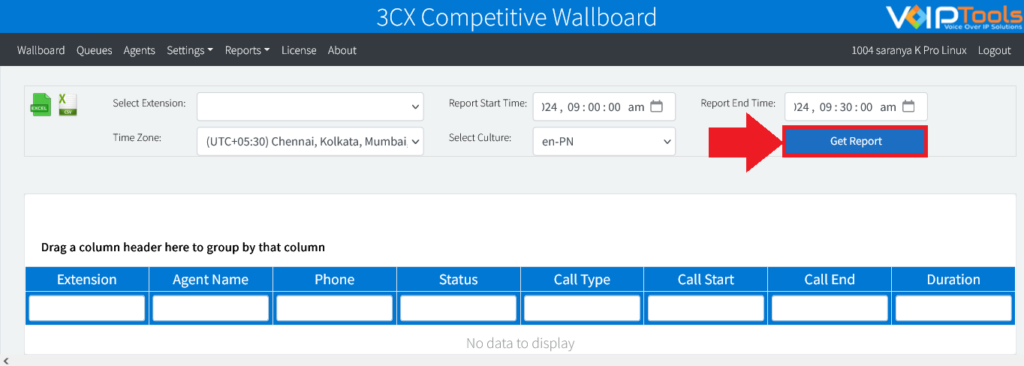
- Click the Get Report button to get your call logs reports.
Only the user with ‘Manager’ role can view ‘Reports’ screen.
You can view the data of call logs of all the agents.
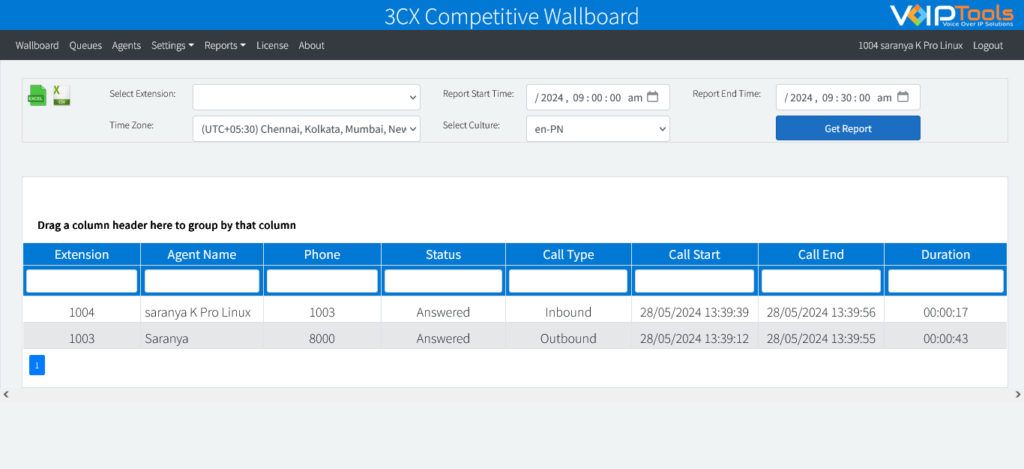
Call Log Report Column Definitions #
| Field Name | Field Definition |
|---|---|
| Extension | Extension involved in the call. |
| Agent Name | Name of the agent involved in the call. |
| Phone | The phone number of the user or agent involved in the call. |
| Status | The status of the call. |
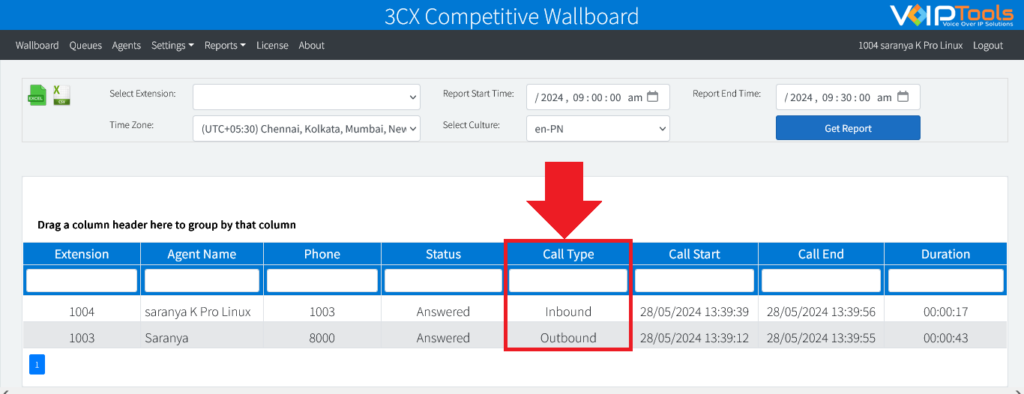
| Call Type | Indicates whether the call is an inbound or an outbound call. |
| Call Start | The date and time of start of the call. The format is DD/MM/YYYY HH:MM:SS. |
| Call End | The date and time of end of the call. The format is DD/MM/YYYY HH:MM:SS. |
| Duration | The total duration of the call. The format is HH:MM:SS. |
Export Call Log #
The Call Log Report screen displays list of all the calls placed by the agents. You can also view the list of call records for a specific day by selecting the desired date in Call Start and Call End date pickers. The log contains details including ‘Agent Name’, ‘Extension’, ‘Call Status’, ‘Call Duration’ etc. As a manager, you can export the data in xls and xlsx formats.
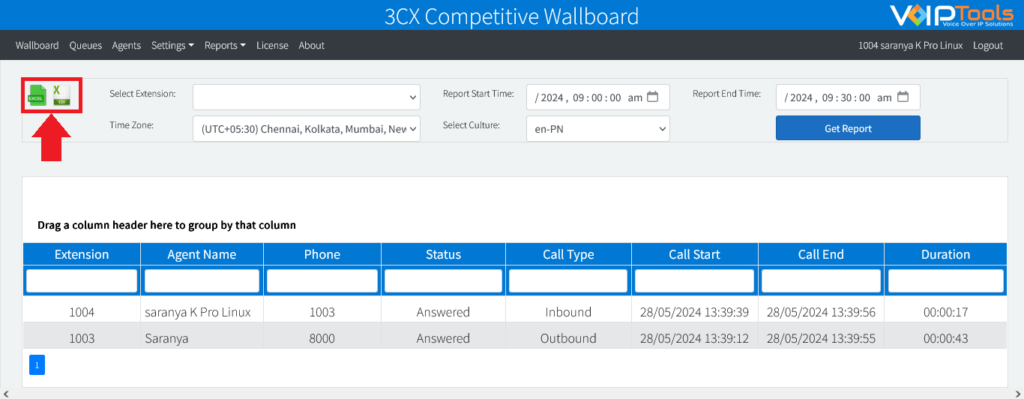
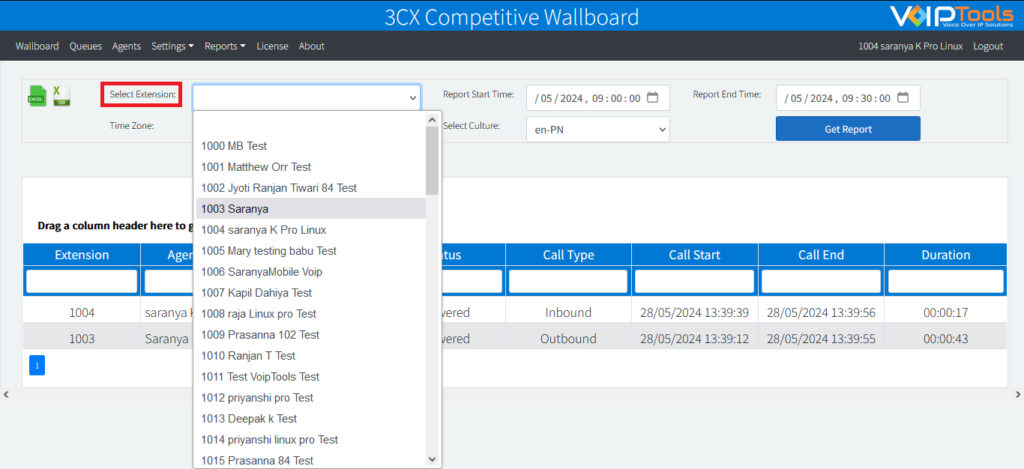
Get Report Based on Extension #
- From the Select Extension dropdown list, select the desired extension based on which you want to get the report.
- Click Get Report.
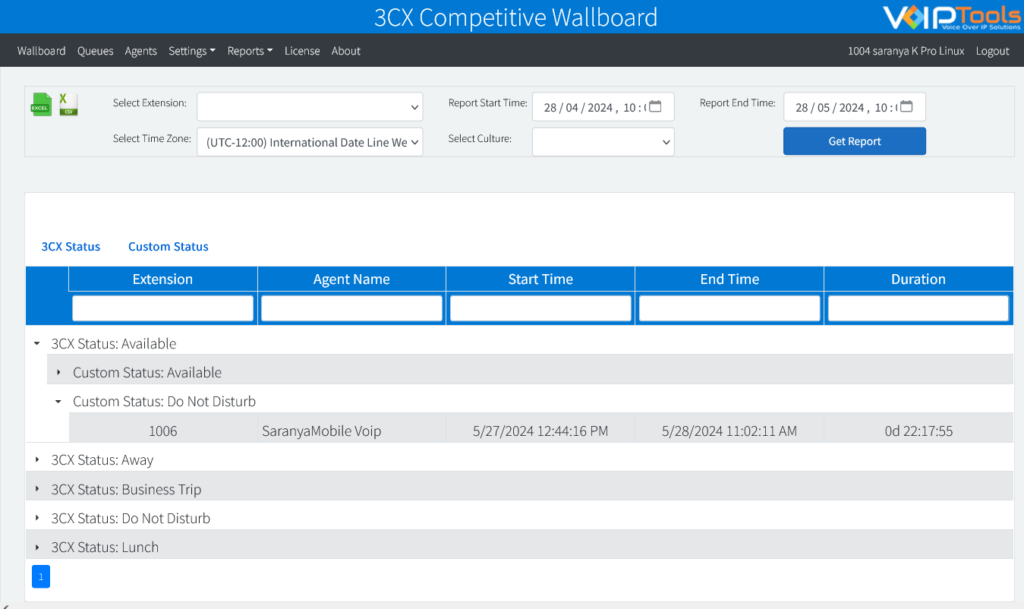
Agent Status Report #
The Agent Status Report screen displays the history of the ‘Agent Status’ for all the agents. When an agent changes the status in the ‘3CX Smart Phone’, the status is instantly updated in the web portal. The updated status can be seen in the Presence Status column of the Wallboard screen. Each incident of the change in Presence Status for an agent is recorded individually in the Agent Status Report.
Generate Agent Status Report: #
- Hover over the mouse on the Reports tab and from the dropdown menu, select Agent Status Report.

- In the Time Zone dropdown, select the desired time zone to display the reports.
- In the Select Culture dropdown, select the culture.
- Click the Get Report button to get your call logs reports.
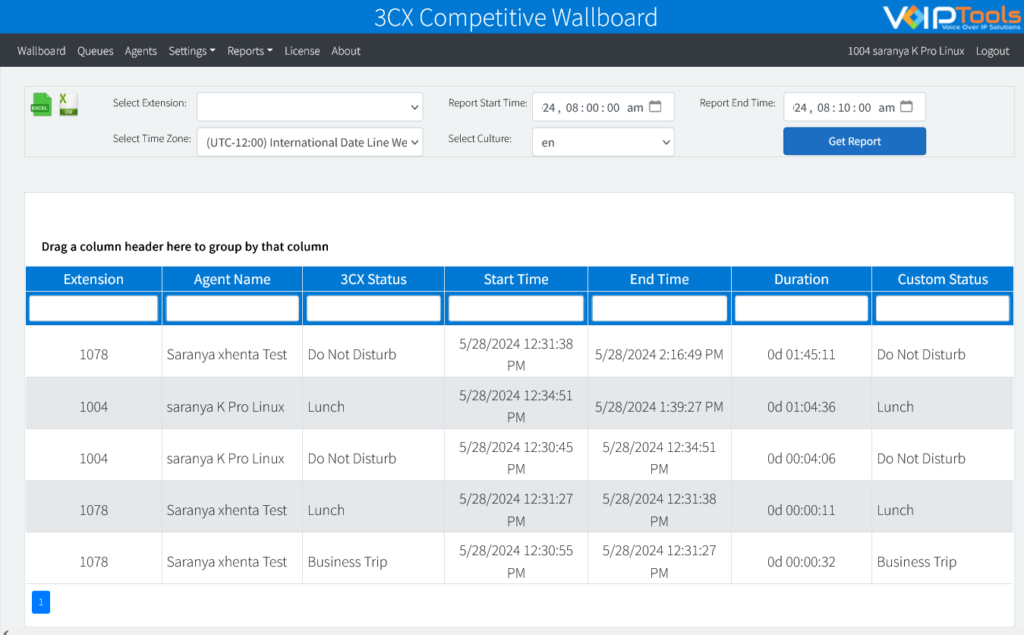
Agent Status Report Field Definitions: #
| Field Name | Field Definition |
|---|---|
| Extension | The extension number of the agent. |
| Agent Name | The name of the agent. |
| 3CX Status | Status of the agent in 3CX. |
| Start Time | The date and time of start of the status. The format is DD/MM/YYYY HH:MM:SS. |
| End Time | The date and time of end of the status. The format is DD/MM/YYYY HH:MM:SS. |
| Duration | The total duration of the call. The format is HH:MM:SS. |
| Custom Status | Custom status of the agent in as set in 3CX Custom Presence. |
Group Reports By Columns: #
You can organize the available columns into logical groups to enhance the professional presentation of your data. By doing so, you achieve a more refined perspective on your data.
Follow the procedure to group the columns,
- Drag and drop the desired column at the space provided above the column.
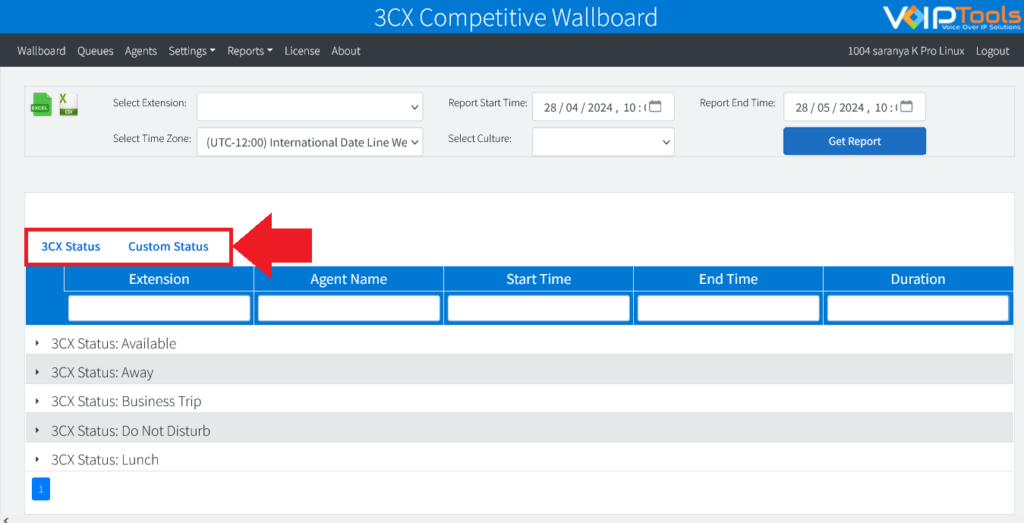
- Click the Expand
 button to expand the columns.
Settings #
The Settings screen enables you to configure general settings, grid column settings, and brand settings.
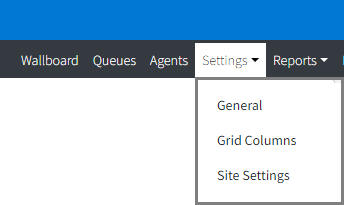
General settings #
In the General Settings screen you can do the following tasks,
- select the desired Extension Group Name for the Wallboard application
- Edit the dimensions of the agent’s picture.
- Reorganize column order.
- Control font size
- column availability (making a column visible/ invisible)
- sort inbound or outbound call data for agents
- Set minimum call duration in the Wallboard screen
- Set the working hours for your extensions.
- Display the custom presence status in the Wallboard screen.
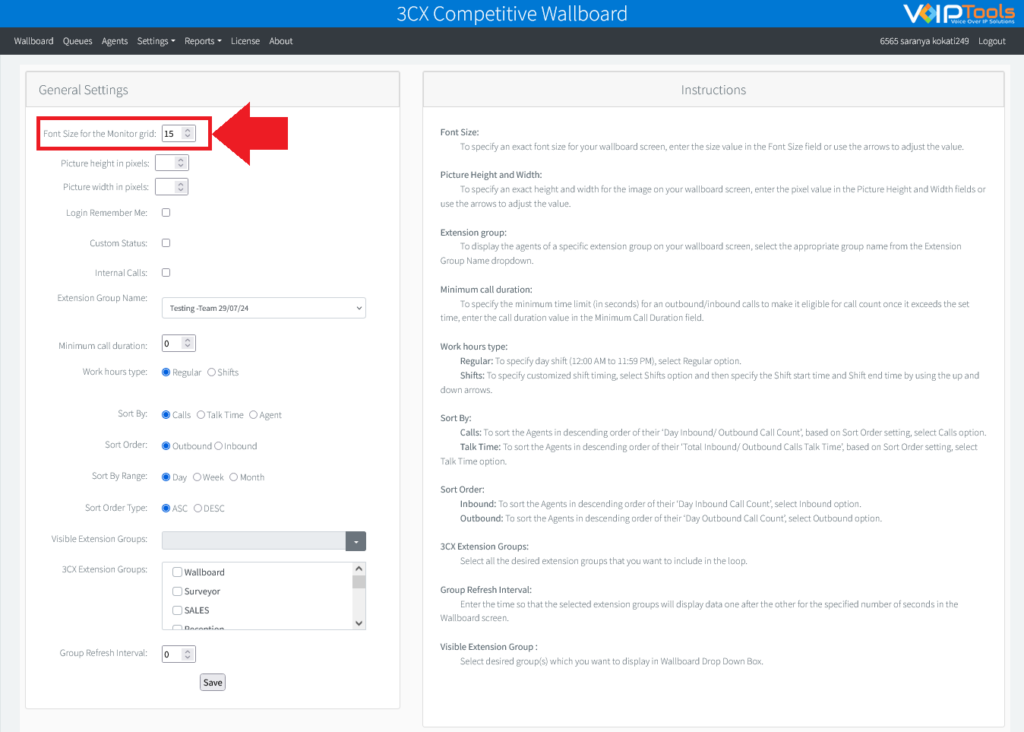
Edit Font Size #
You can increase or decrease the font size for the wallboard screen so that when you display the agent information on flat-screen TVs in prominent locations, the font will be visible to everyone from a farther distance.
Follow the procedure to adjust the wallboard font size,
- In the Font Size For The Monitor Grid box, do either of the following,
- Enter the value of the font size.
- Click the Up and Down arrows to adjust the font size.
- Click Save to save the font changes.
Edit Picture Height/ Width #
You can resize the height and width of the agent’s image on your wallboard screen.
- On the Settings menu option and in the Settings dialog box,
- To adjust the picture height:
- From the Picture height in pixels size box, enter the pixel value or use the up and down arrows to increase or decrease the height respectively.
- To adjust the picture width:
- From the Picture width in pixels size box, enter the pixel value or use the up and down arrows to increase or decrease the width respectively.
- To adjust the picture height:
- Click Save to save the new picture and resize the values.

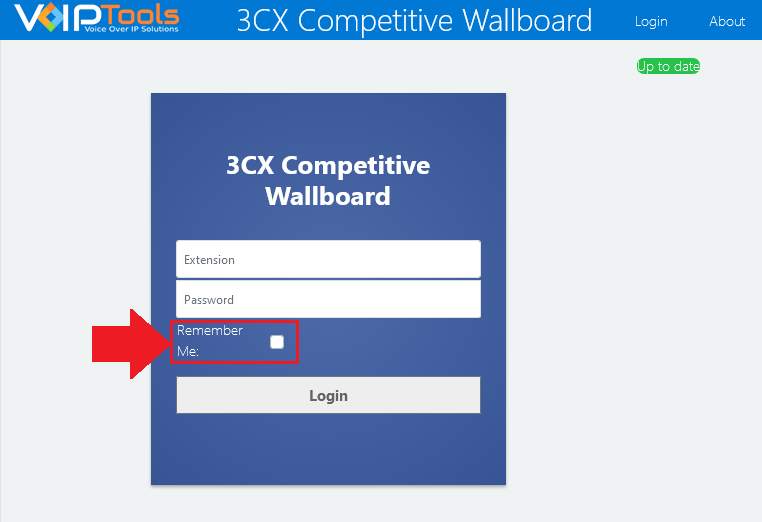
Save Your Login Credentials #
The Login Remember Me checkbox lets you to store login credentials for automatic login on subsequent visits, enhancing convenience but potentially posing security risks on shared devices. This feature may have security risks if your account is on a shared or a public device.
Follow the procedure to enable the Login Remember Me checkbox in the Login page,
- In the General Settings section, select the Login Remember Me box.
- Click the Save button to save your settings.
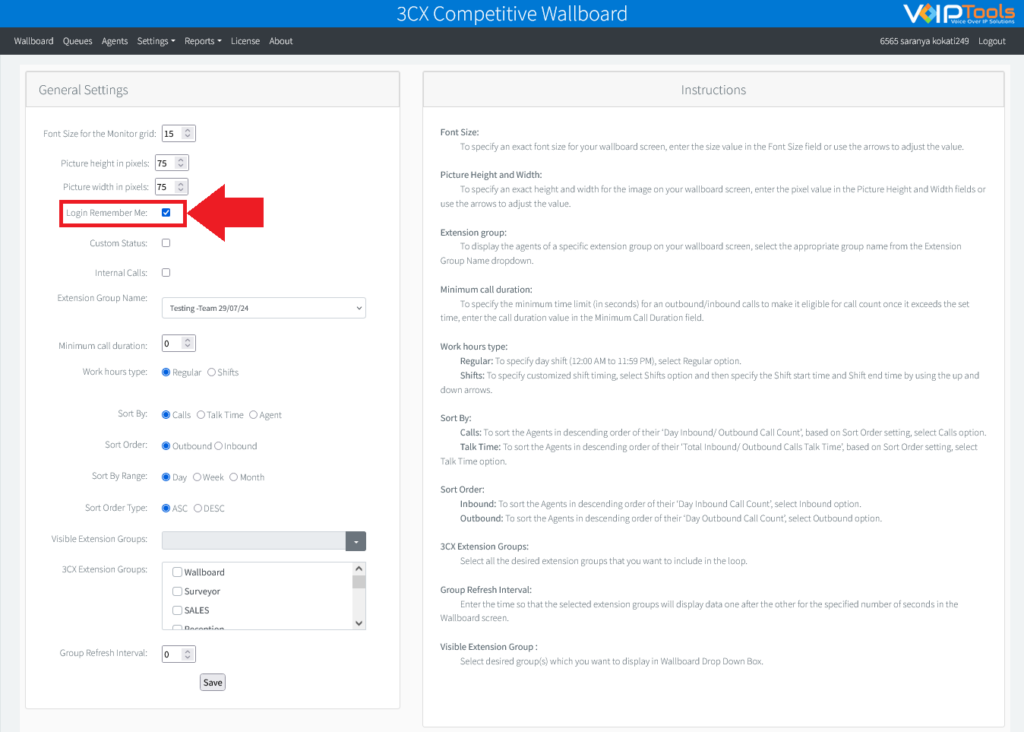
You can view the Login Remember Me checkbox in the login page,
Display Agent’s Custom Status #
You can see the agent’s custom status as mapped in the 3CX Custom Presence application. Follow the procedure to enable the agent’s custom status column,
- In the Settings menu, click the General Settings,
- Enable the Custom Status checkbox and click the Save button to save the settings.
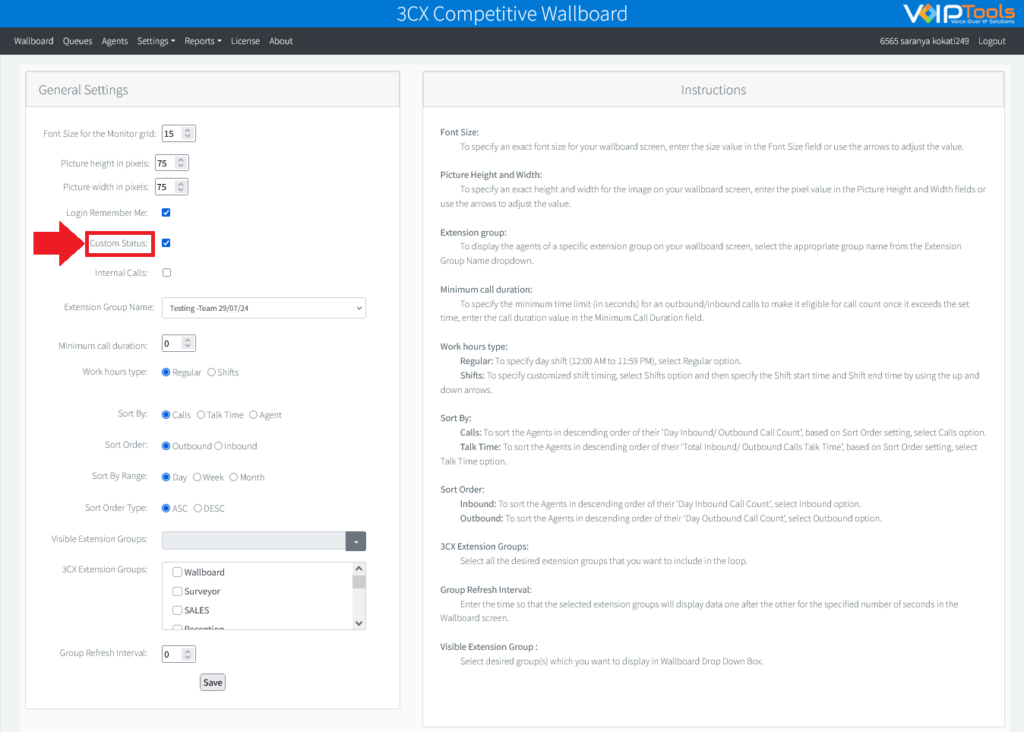
You can see the custom status of the agents in the Wallboard tab,
To access the Custom Status column, you need to install the 3CX Custom Presence on the same server and relay where you’ve set up the 3CX Competitive Wallboard.
CAUTION:
If you want to uninstall 3CX Custom Presence application on any case, follow the precautionary steps,
- Unselect the Custom Status checkbox (if you have it selected) and click the Save button.
- Proceed to uninstalling the Custom Presence Application.
This is done to avoid any service start issue for the Competitive Wallboard application.
Count Your Internal Calls #
The Internal Calls checkbox in Competitive Wallboard tracks calls between extensions. When an extension initiates a call to another extension, it’s recorded as an outbound call for the caller and an inbound call for the recipient. Data including Number of Inbound Calls, Number of Outbound Calls, Inbound Call duration, and Outbound Call duration are updated accordingly. However, agents can fulfill their inbound and outbound quotas by making internal calls. To exclude internal calls from KPIs, disable the Internal Calls checkbox.
Follow the procedure to count internal calls into the wallboard metrics,
- In the General Settings screen, enable the Internal Calls checkbox.
- Click the Save button to save your settings.
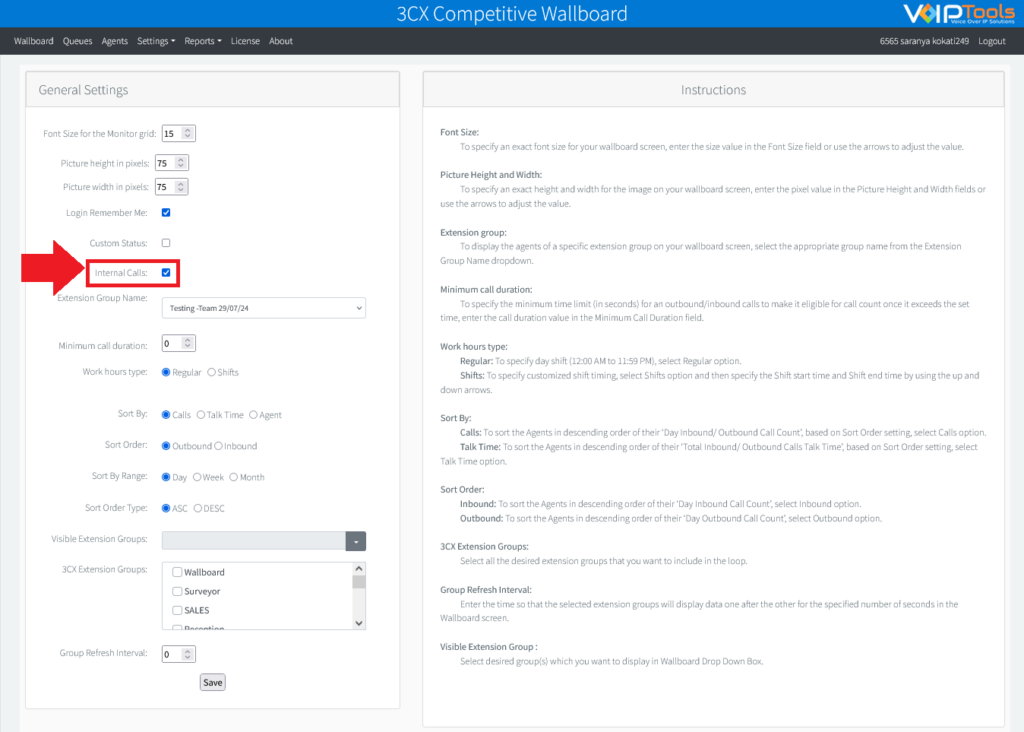
In the Wallboard tab, you can see the agents connected internally,
You can view the data of the internal calls made by the extensions in the Reports tab,
Edit Extension Group #
- When you log into the web portal for the first time, you should save an extension group from the Extension Group Name drop-down. Once you save the extension group, the wallboard screen automatically displays the active agents of that group.
- Once an extension group is selected, only the manager of the selected 3CX extension group can view and access the complete web portal, while the agents of that group can only view Wallboard and About screens.
- When you select a specific Extension Group Name in the Settings screen, the Extension drop-down in the Agents screen lists all the extensions assigned to that group.
Specify the 3CX extension group to monitor: #
The Extension Group Name dropdown lets you select the default extension group when you install 3CX Competitive Wallboard for the first time. Also, you get to see the extensions present in the selected group in the Agents tab.
Follow the procedure to select the desired extension group name,
- Select the desired group from the Extension Group Name drop-down.
- Click Save to save the selected extension group.
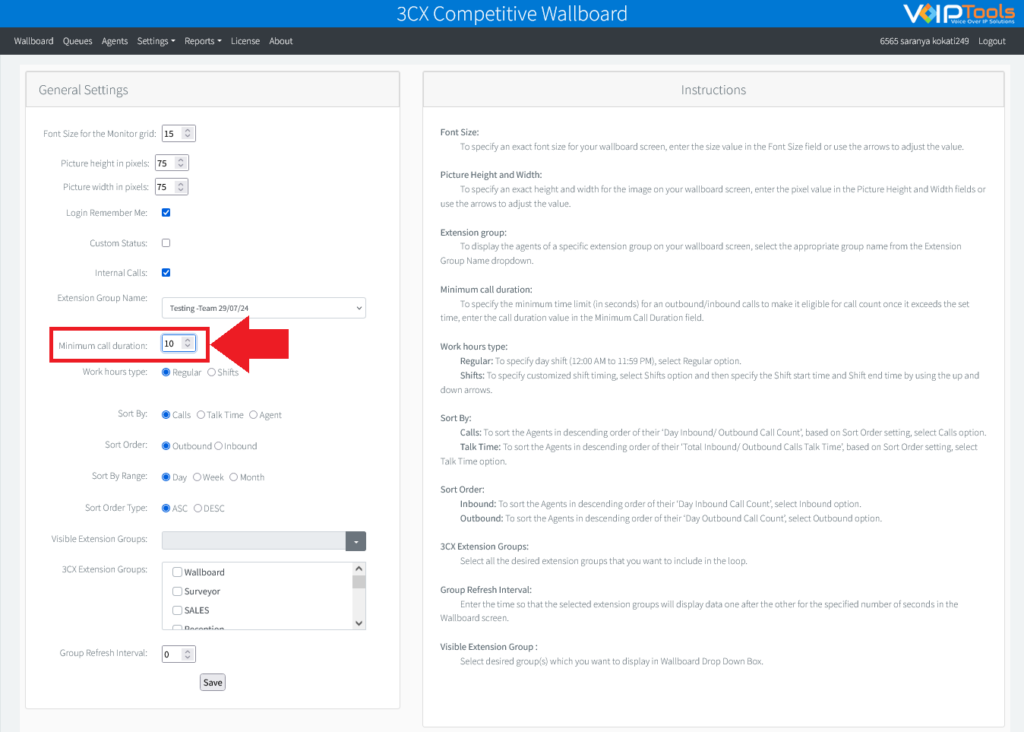
Set Minimum Call Duration #
- On the Settings dialog box, in the Minimum Call Duration field, enter the time (in seconds) so that the outbound call that exceeds the set time will be eligible for call count.
- Click the Save button to save the configuration.
Set Working Hours for an Extension #
Calls that are made only during the set Work hour type will stand eligible for call count for any agent.
- Set Regular Shift
- On the Settings dialog box, beside Work Hours Type: label, select the Regular option.
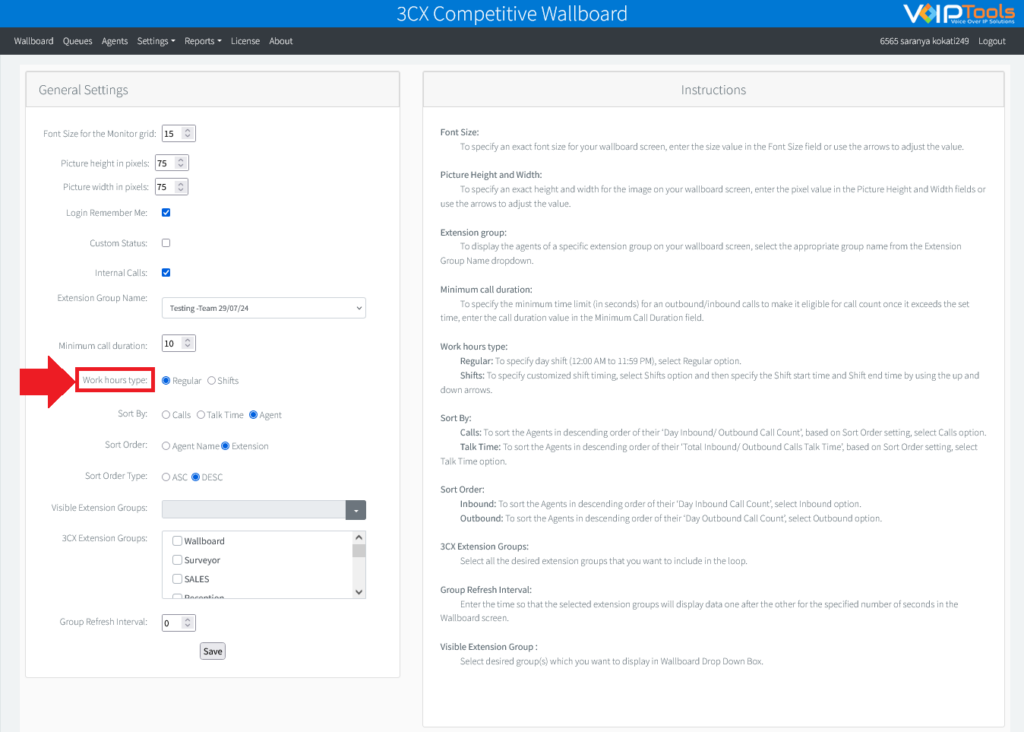
Regular shift is day shift and the timings are 12:00 AM to 11:59 PM
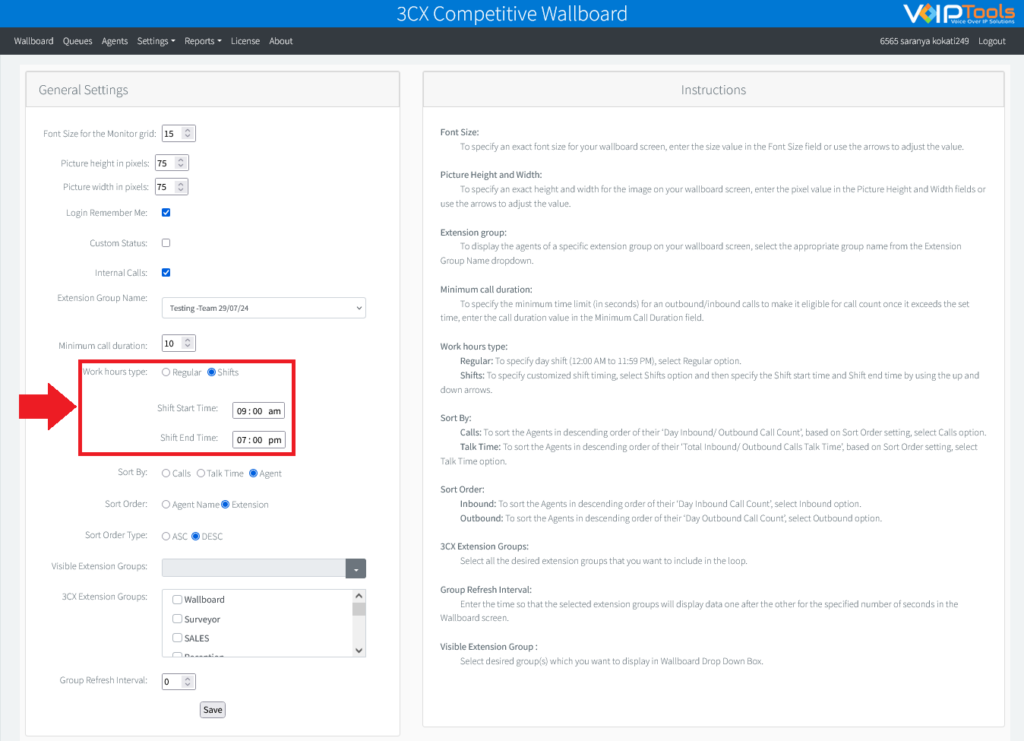
- Set Shift Timings
- Beside the Work hours type label, select Shifts option.
- In the Shift start time field, set the time from which the shift starts.
- In the Shift end time field, set the time at which the shift ends.
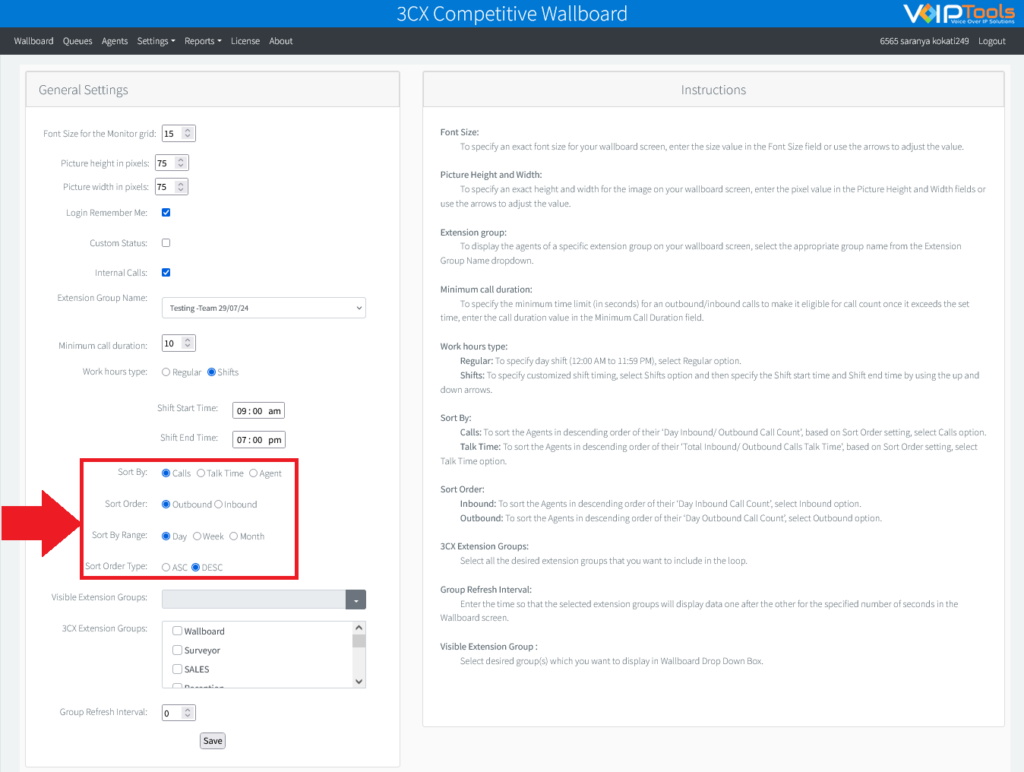
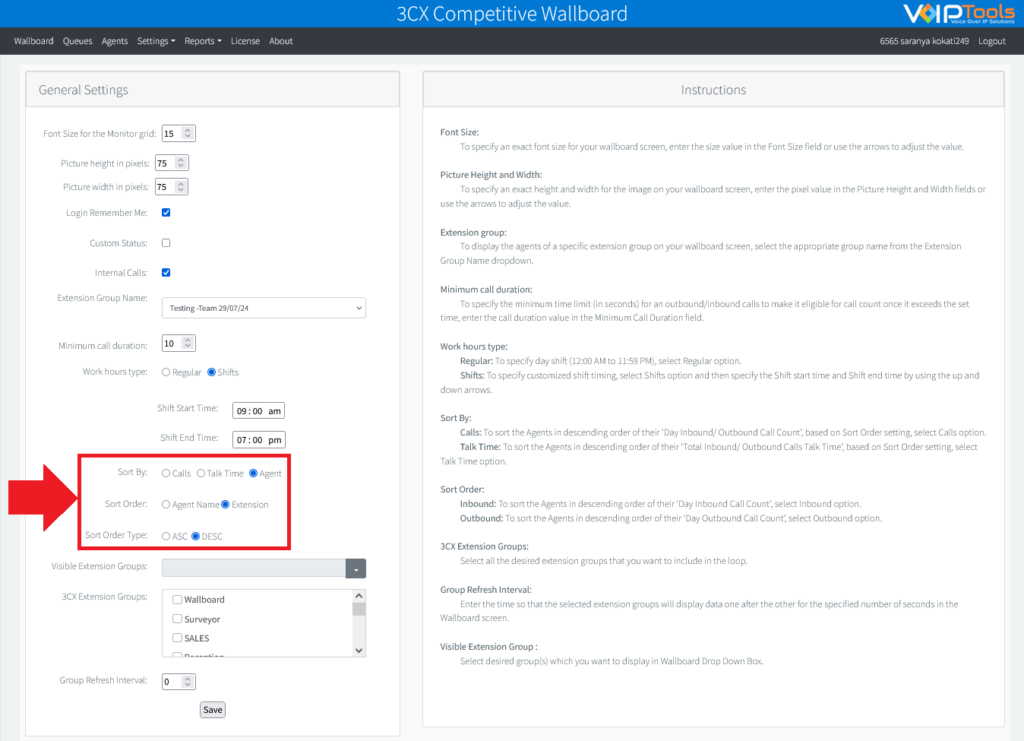
Sort Order Settings #
The Sort Order Settings feature is integral to call center management optimization. It facilitates sorting by call volume, talk time, and agent allocation.
Sort based on Number of Calls #
Based on the number of calls made by the extensions, the Wallboard screen displays the agents in the selected order.
| SORT ORDER | SORT BY RANGE | SORT ORDER TYPE | RESULT |
|---|---|---|---|
|
Outbound |
Day |
Ascending | Sort agents based on the highest number of outbound calls in a day to the lowest number of outbound calls in a day. |
| Descending | Sort agents based on the lowest number of outbound calls in a day to the highest number of outbound calls in a day. | ||
|
Week |
Ascending | Sort agents based on the lowest number of outbound calls in a week to the highest number of outbound calls in a week. | |
| Descending | Sort agents based on the highest number of outbound calls in a week to the lowest number of outbound calls in a week | ||
|
Month |
Ascending | Sort agents based on the lowest number of outbound calls in a month to the highest number of outbound calls in a month | |
| Descending | Sort agents based on the highest number of outbound calls in a month to the lowest number of outbound calls in a month | ||
|
Inbound |
Day |
Ascending | Sort agents based on the lowest number of inbound calls in a day to the highest number of inbound calls in a day. |
| Descending | Sort agents based on the highest number of inbound calls in a day to the lowest number of inbound calls in a day. | ||
|
Week |
Ascending | Sort agents based on the lowest number of inbound calls in a week to the highest number of inbound calls in a week. | |
| Descending | Sort agents based on the highest number of inbound calls in a week to the lowest number of inbound calls in a week | ||
|
Month |
Ascending | Sort agents based on the lowest number of inbound calls in a month to the highest number of inbound calls in a month | |
| Descending | Sort agents based on the highest number of inbound calls in a month to the lowest number of inbound calls in a month |
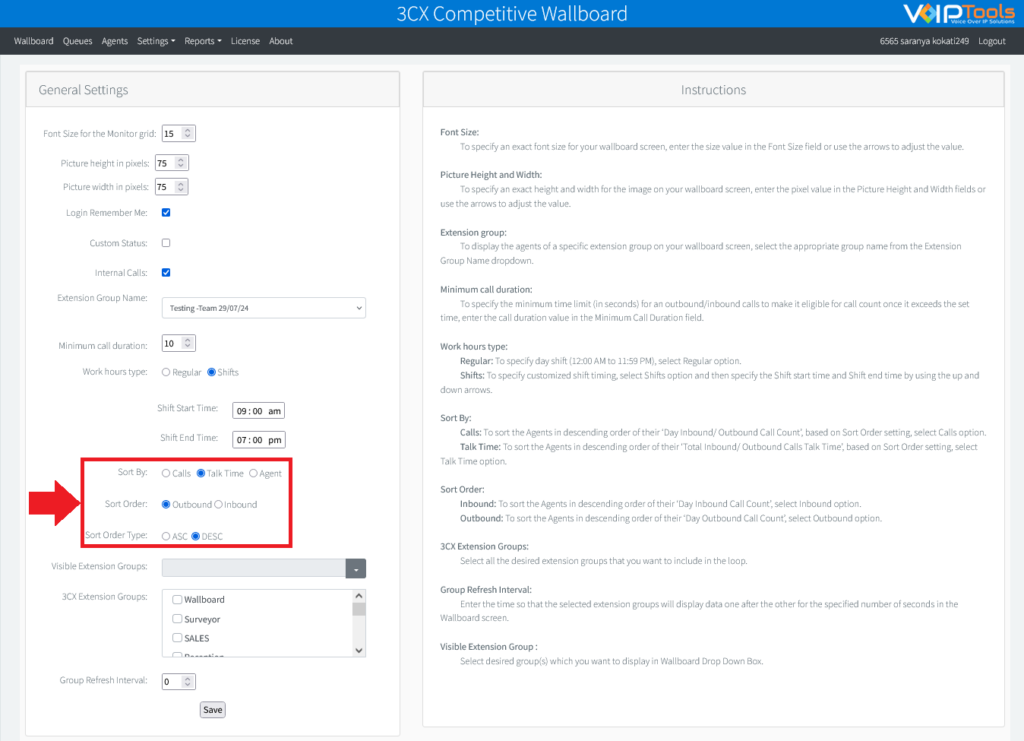
Sort By Call Duration #
Based on the call duration made by the extensions, the Wallboard screen displays the agents in the selected order.
| SORT ORDER | SORT ORDER TYPE | RESULT |
|---|---|---|
|
Outbound |
Ascending | Sort agents based on the lowest outbound call duration to the highest outbound call duration. |
| Descending | Sort agents based on the highest outbound call duration to the lowest outbound call duration. | |
|
Inbound |
Ascending | Sort agents based on the lowest inbound call duration to the highest inbound call duration. |
| Descending | Sort agents based on the highest inbound call duration to the lowest inbound call duration. |
Sort By Agent Name and Extension #
| SORT ORDER | SORT ORDER TYPE | RESULT |
|---|---|---|
|
Agent Name |
Ascending | Sort agents in ascending order using the agent’s name. |
| Descending | Sort agents in descending order using the agent’s name. | |
|
Extension |
Ascending | Sort agents in ascending order using their extension numbers. |
| Descending | Sort agents in descending order using their extension numbers. |
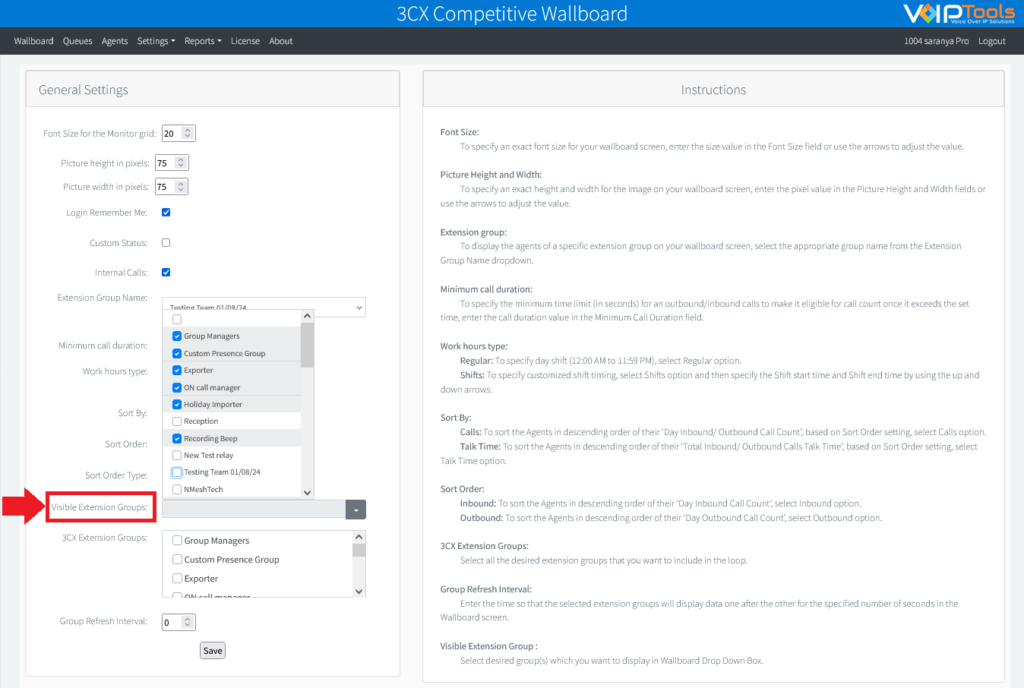
Extension Group Name Displayed on Wallboard #
- You can select the list of extension group names to display in the Wallboard screen.
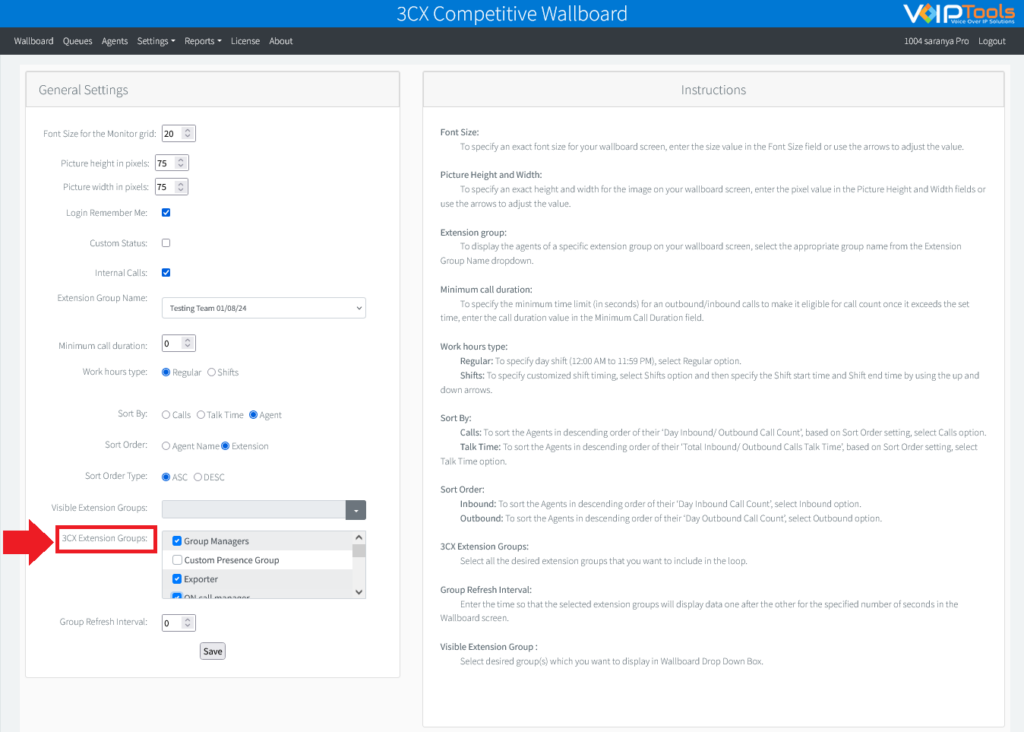
Looping 3CX Extension Groups for desired time #
You can view the data in the Wallboard screen as per the Extension Group Name configured in the Config Settings screen. However, if you want to view the data for the selected list of extension groups in a cycle, each group displaying data for every specified second, you can do it by configuring 3CX Extension Groups in the Config Settings screen.
- In the 3CX Extension Groups combo box, select all the desired extension groups that you want to include in the loop.
- In the Group Refresh Interval field, enter the time so that the selected extension groups will display data one after the other for the specified number of seconds in the Wallboard screen.
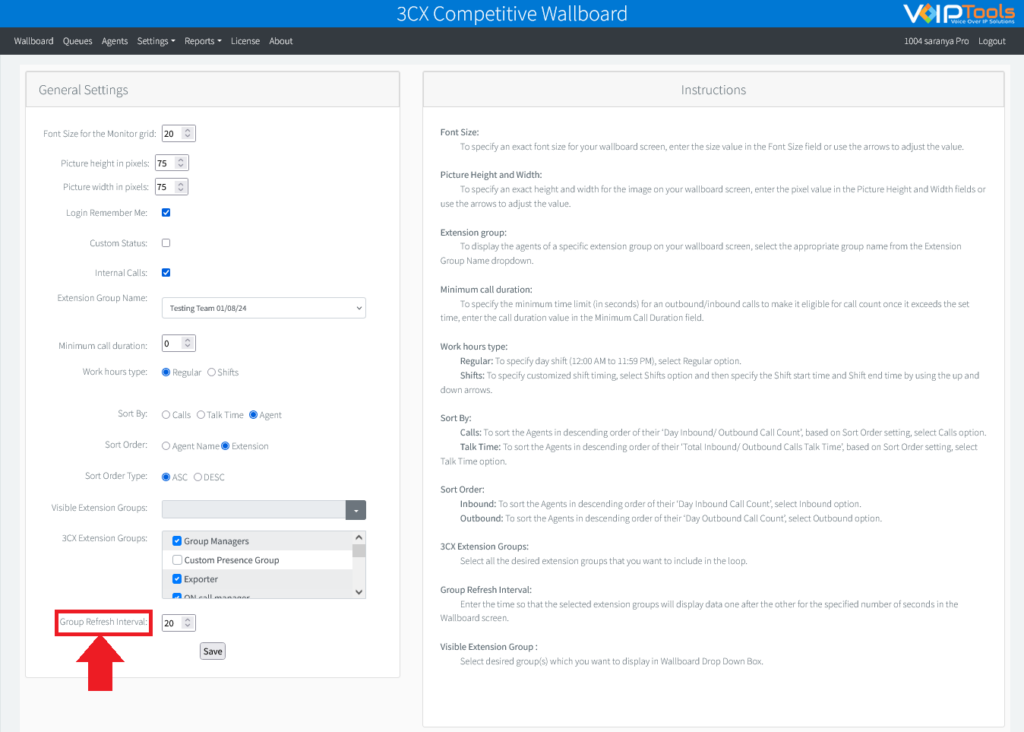
In the Wallboard screen, once you select an extension group that is not a part of the loop, the loop will break and the Wallboard will display data related to the selected group only. If you want to restart the loop, then select an extension group that is a part of the loop.
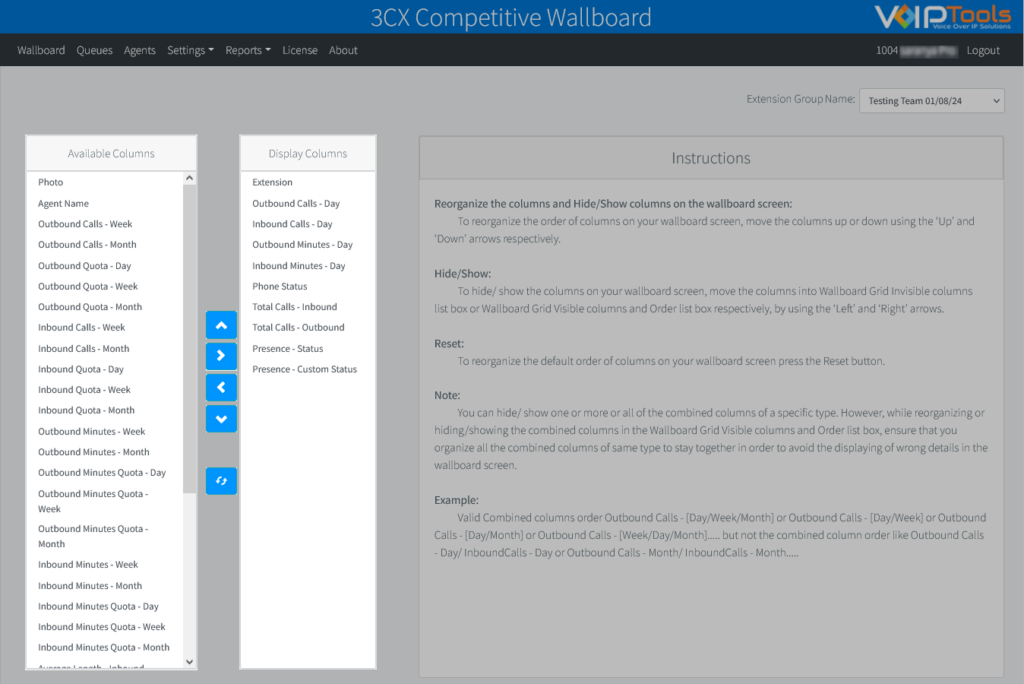
Grid Columns #
The Grid Column tab lets you customize the visibility and order of grid columns, enhancing the display of relevant information. This feature empowers Managers and Admins to tailor grid views for their groups, improving data accessibility, organization, and overall user experience by displaying only the most pertinent information.
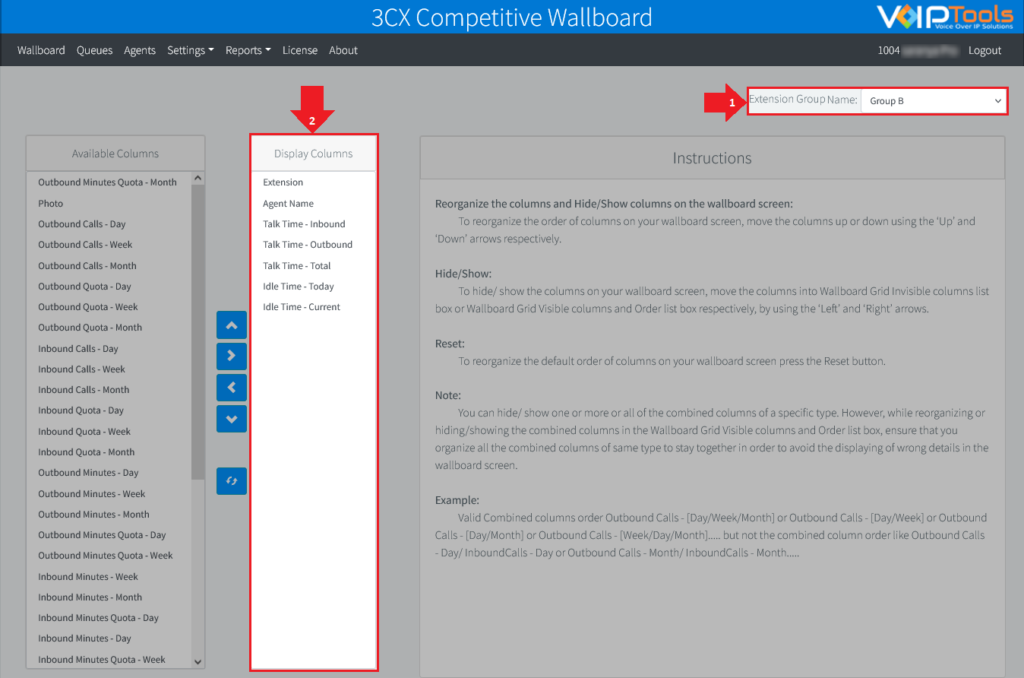
Reorganize the order of the columns for the Wallboard screen #
On the Settings dialog box, under Wallboard Grid Visible columns and Order list box, select the column that you want to reorganize in the wallboard screen and click the Left ![]() or the Right
or the Right ![]() button to move the column to the left or right-hand side respectively.
button to move the column to the left or right-hand side respectively.
Hide a Column #
- On the Settings dialog box, under the Display Columns list box, select the column to hide in the Wallboard screen.
- Click Left
 button to move it to the Available columns list box.
Show a Column #
- On the Settings dialog, under the Available columns box, select the column that you want to make visible on the Wallboard screen.
- Click the Right
 button to move it to the Display Columns list box.
Change the order of the Columns #
- Select the desired columns in the Display Columns list box.
- Click the Up
 button to move the columns up the list or click the Down
  button to move the columns down the list.
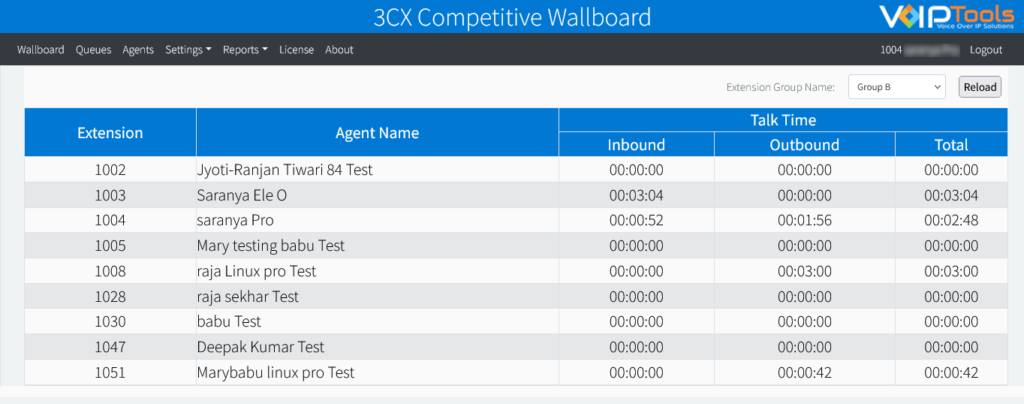
The following image shows the Wallboard tab for the configured grid coloums,
Grid Column Management: Roles and Group-Level Controls #
In the Competitive Wallboard application, Managers and Admins have control over grid columns via the Grid Columns settings. Here are three general cases that explain how grid column changes affect different user groups.
Case 1: Manager’s Grid Column Changes for Their Group #
When a Manager updates the grid columns, those changes apply to all members of their group. For example, if a Manager adjusts the grid settings, every user in that Manager’s group will see the updated columns.
Case 2: Managers Cannot Modify Other Groups’ Grid Columns #
A Manager can only modify the grid columns for their own group. However, if a Manager is also a member of another group, they can change the grid columns for that group as well.
Case 3: Admin’s Grid Column Changes Across All Groups #
When an Admin modifies the grid columns, the changes apply to the selected groups that the Admin is a part of. However, if the Admin is not a member of a particular group, the Admin cannot modify that group’s grid columns.
This ensures that each group maintains control over their own settings, while Admins have broader control across multiple groups.
Settings Grid Columns for Different Groups #
If you have Admin rights or manage multiple groups, you can set different grid columns for each group using the Group Select dropdown.
Case Study #
You are an Admin present in two groups or the Manager of two groups: Group A and Group B. You want to set different grid columns for each group.
- Select Group A in the Extension Group Name dropdown and configure the grid columns.
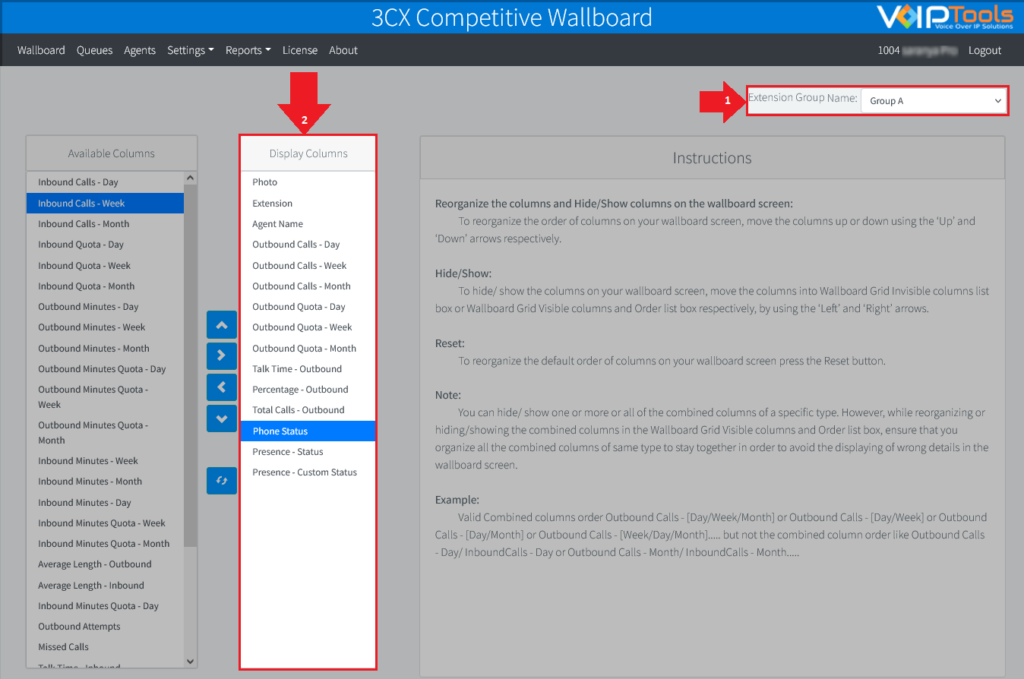
- Select Group B in the Extension Group Name dropdown and configure the grid columns.
You can now see different grid columns for Group A and Group B in the Wallboard tab,

Site Settings #
Site Settings enable you to customize branding settings for the application that include the following:
- Customize the gradient color of the ‘Application Header’
- Customize grid color in screens that display grid data
- Customize logo on the ‘Application Header’
- Customize ‘Header Title Prefix’ on the ‘Application Header’
Follow the procedure to customize your site,
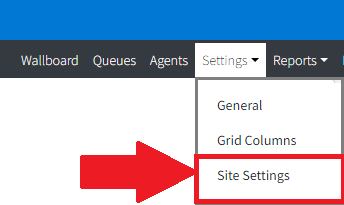
- Hover over the mouse on the Settings tab and from the drop-down menu, select Site Settings.
- Perform any of the following customizations and click the Apply
 button to save your settings.
Customize Application Title Header – Gradient Color #
- In the Header Colour section do the following,
- Select the top paint from the Top Colour color palette.
- Select the bottom paint from the Bottom Colour color palette.
- Click the Apply button to Save the settings.
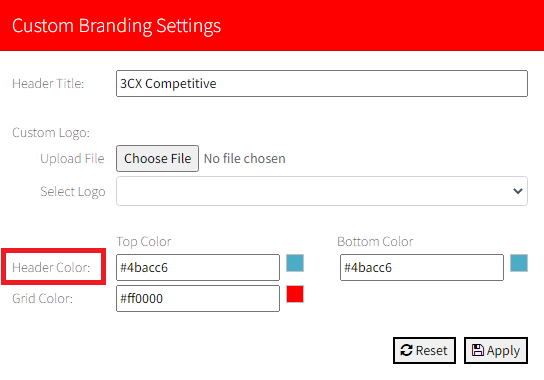
Customize Grid Color #
- From the Grid Color palette, select the color that you want to display for the grid in screens that display grid data
- Click the Apply button to save your settings.

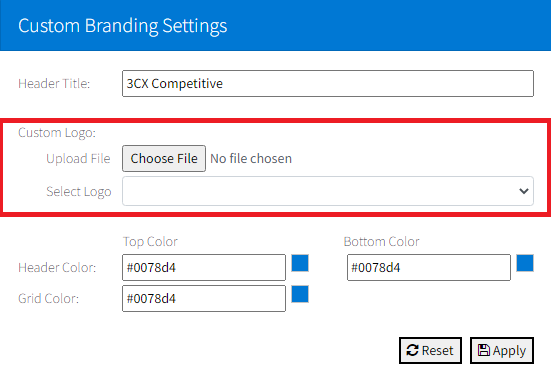
Customize Logo #
- If you are uploading the logo for the first time then,
- In the Custom Logo section, click Chose File button to choose a logo from your device.
- Select the uploaded logo from the Select Logo dropdown list.
- Click the Apply button to save your changes.
- If your have uploaded the logo,
- Select the uploaded logo from the Select Logo dropdown list.
- Click the Apply button to save your changes.
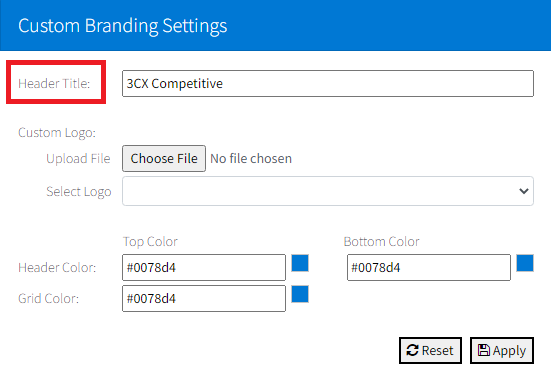
Customize ‘Header Title Prefix’ Text #
- In the Header Title field, enter the text that you want the application to display as a ‘prefix’ for the existing title in the application header.
- Click the Apply button to save the header title prefix.
3CX Extension Group #
A 3CX Extension Group is needed to identify which extensions should be monitored for outbound call activities. A Wallboard manager is created by assigning the ‘manager’ role to a specific extension in the extension group.
You can create an extension group and assign multiple extensions to it.
A single extension can exist in more than one extension group.
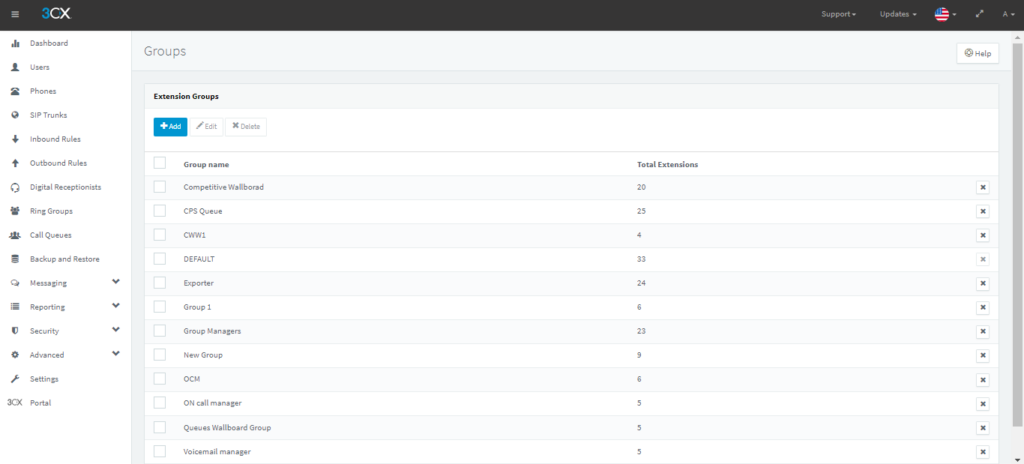
Create 3CX Extension Group #
- Log into 3CX Management Console as ‘Manager’
- On the left pane, Click the Users menu.
- Click the Groups tab on the top menu bar.
- Click the Add button to create a 3CX extension group.
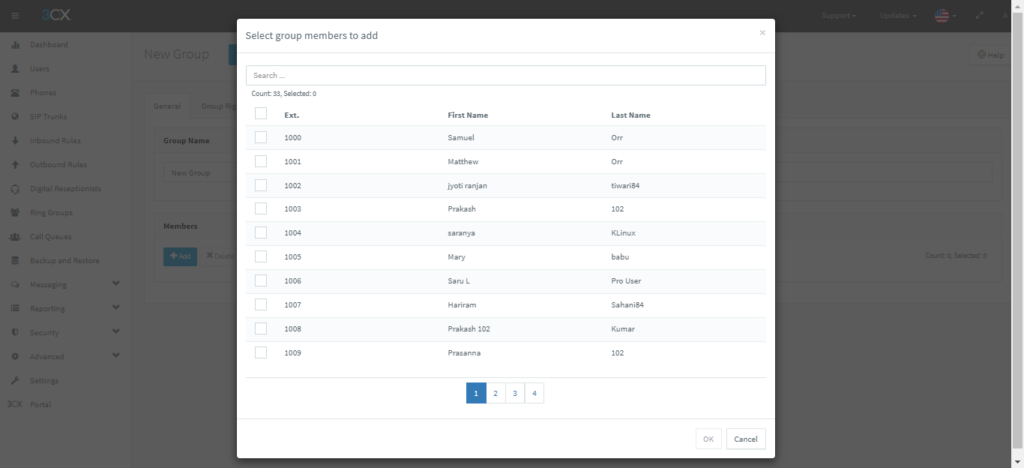
Assign Extensions to 3CX Extension Group #
- Log into the 3CX Management Console as Manager.
- On the left pane, click the Users menu.
- Click the Groups tab on the top menu bar and click Add button to create a 3CX extension group.
- In the Members section click the ADD button to assign extensions to the 3CX extension group.
Need Support? #
You get quick answers to most of your inquiries in our online manual. If you prefer direct contact, we offer various support channels, including phone, email, live chat, and our helpful VoIPTools forums.

24/7 Support Availability #
Rest assured, our dedicated team is here to assist you around the clock, every day of the year. Whether you’re based in the USA or India, we’re ready to provide prompt responses to your technical queries.

Windows Event Log for VoIPTools Applications and Services #
For troubleshooting any application errors, our Windows Event Log contains a comprehensive list of error messages, warnings, and informative notes related to all our VoIPTools applications and services. It’s a valuable resource to help you pinpoint and resolve any issues you may encounter.

Join Our Forum Community #
Are you looking to collaborate with other VoIPTools customers facing similar challenges? Our forum is the perfect platform to exchange ideas, solutions, and best practices. Join the conversation at: https://www.voiptools.com/community/

Real-Time Live Chat Assistance #
Got questions that need immediate answers? Our chat support team is available to assist you in real time. Just click on the Live Chat button located at the lower right corner of our website, and we’ll acknowledge your queries right away.

Efficient Email Support #
To ensure a thorough understanding of your concerns, email us at support@voiptools.com. Describe your issue in detail, and we’ll get back to you within one business day with the support you need.

Reach Us by Phone #
If you prefer to speak with a representative directly, you can reach us at +1 801-642-4655. Our attentive team is available to take your calls from 8:00 AM to 6:00 PM (Central Standard Time).
Comprehensive support services: #

Free Support #
If you’ve purchased our products through a VoIPTools Partner, rest assured that they provide first-level support at no additional cost. Partners have access to 100% free technical assistance and actively participate in the troubleshooting process.
VoIPTools customers enjoy access to our online manuals and receive support through emails (with responses within one business day) and live chat. However, please note that we do not provide remote server login assistance.

Paid Support #
For a more hands-on experience, consider our “Installation Support” package. Our expert support team can log in to your servers, and install and configure all our tools. This comprehensive service includes setting up SQL Server Express and Internet Information Server if necessary. We’ll work closely with you to tailor our applications to meet your requirements.
We’re committed to providing top-notch support to ensure your VoIPTools experience is smooth and hassle-free. Contact us today, and let us assist you in making the most of our powerful tools!
