Enhance Emergency Response and Safety with 3CX Emergency Notifier: Take Control of Your Notifications
Take control of emergency notifications with the powerful 3CX Emergency Notifier. This tool lets you manage all aspects of your emergency alerts, including content, recipients, and communication methods such as email, SMS text, and phone calls. It also lets you guide emergency responders to the precise crisis location effortlessly. Additionally, you can program panic buttons and continuous alarms on your phone for added security. Whether you oversee a small educational institution or a large campus, the ability to quickly identify 911 callers is crucial. The 3CX Emergency Notifier provides precise information to your responders, ensuring they know exactly where to go. This solution offers full control over 911 notifications, allowing you to customize content, recipients, and communication channels. It enhances safety, streamlines emergency response procedures, and is an indispensable tool for educational facilities and businesses with multiple buildings. Don’t miss out on this essential solution for effectively managing emergency notifications in your organization.
Ensure seamless communication with your chosen emergency responders by effortlessly sending them emails, texts, or phone calls.
REAL-TIME PRECISION
3CX Emergency Notifier offers real-time location information in emergency situations, allowing for immediate and accurate identification of the incident’s exact whereabouts. It enables swift identification of the incident’s specific floor, proximity to pillars, or even within cubicles.
SEAMLESS DISPATCH
The 3CX Emergency Notifier is designed to efficiently guide emergency responders to the accurate location. With its powerful capabilities, this tool enables the export of extension locations to your carrier, ensuring a reliable and effective emergency response system.
INSTANT EMERGENCY ALERT
Improve convenience and peace of mind with the 3CX Emergency Notifier. This device enables easy activation of an alarm by pressing a button on your phone, and simple deactivation with another button press. It empowers you to maintain control and swiftly respond to emergencies, all with a user-friendly interface.
ENHANCED INSIGHTS
Analyze the event log extensively to obtain valuable insights on sent notifications and the involved individuals. This will aid in enhancing your notes for future reference and better comprehension.
ONE TIME INSTALLATION
This product offers a simple and efficient installation process, enabling you to manage 911 notifications effectively via an intuitive web portal. Achieve complete control and tranquility with minimal effort by utilizing a user-friendly interface.
Before you begin with the installation steps mentioned in this guide, you need to ensure that your computer meets the minimum requirements mentioned below for installing the 3CX Emergency Notifier.
3CX Version V18 (Professional or Enterprise Version Only)
Windows 10 or above / Windows Server 2012 or above
Microsoft SQL Server 2016 or above (Including the free SQL Express edition)
You need a Static IP for both VoIPTools and 3CX servers to ensure proper two-way communication, both the 3CX server (Relay) and the VoIPTools server. Dynamically assigned IP addresses are not supported. Additionally, it is recommended to use HTTPS for secure communication, which requires a FQDN for SSL/TLS certificate validation between the VoIPTools server and the Relay.
NOTE:
While installing SQL Server, ensure the following,
Uninstall the previous versions of SQL Management Studio manually before installing the new version.
Install it in “Mixed Mode” to include SQL Authentication, and install SQL Management Studio
NOTE:
Since the add-on ‘3CX Emergency Notifier’ includes a CFD application, you will need to install either Pro or Enterprise version of 3CX
Windows 8 has a much better Text-To-Speech engine compared to Windows 7
When installing IIS, be sure to install Basic Authentication, .Net Extensibility, and ASP.Net 4.X
Several prerequisites must be installed before proceeding to the 3CX Emergency Notifier installation. Advance Installers identifies these prerequisites and automatically installs it.
This User Guide contains step-by-step instructions to successfully install the 3CX Emergency Notifier. Begin by extracting the installer from the downloaded zip file (Step 1 above), then run the setup program named EmergencyNotifierInstaller.exe
To ensure the authorization of your license key, it is necessary to complete the registration process. By registering with VoIPTools, you gain access to a range of benefits:
Find the software download link in the Order Confirmation Email, or you can find it in your order history on our website and download the 3CX Emergency Notifier application.
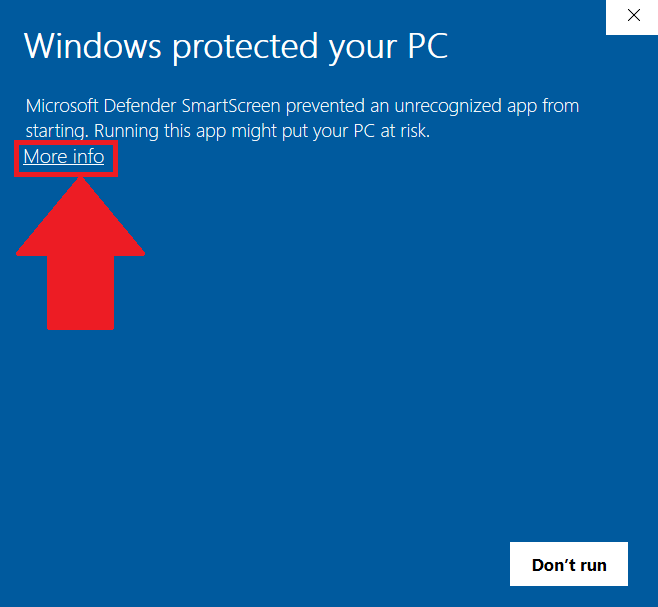
In the Microsoft Defender SmartScreen, click the More Info option.
Figure 1: Microsoft Defender: More info
Click the Run Anyway option to start the installation.
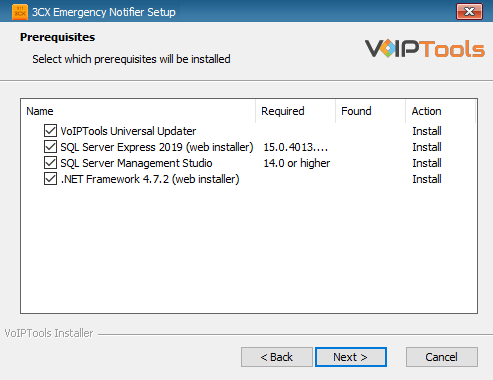
Click on the software installer downloaded in Step 1. The installation wizard will automatically identify the prerequisites and assist you with each installation required for the 3CX Emergency Notifier. It includes .NET Framework (Web Installer), SQL Server Express (Web Installer), and SQL Server Management Studio.
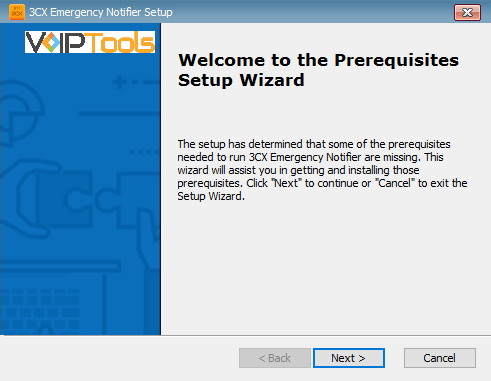
Click the downloaded installer executable to launch the Prerequisites Setup Wizard and click Next.
Figure 3: 3CX Emergency Notifier Setup Wizard
In the Prerequisites window, install all the required prerequisites identified by the installer, or select/ unselect the applications based on your requirements and click Next to continue.
Figure 4: Prerequisite Installation Selection
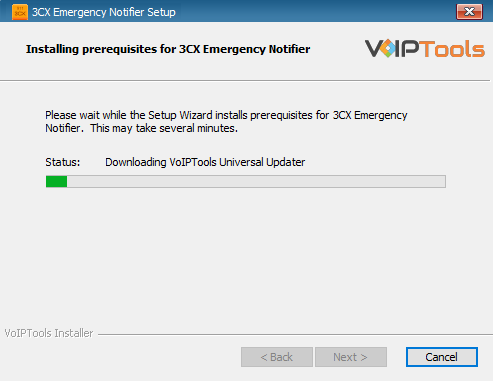
The installer will download and install the selected applications. It may take several minutes to complete.
Figure 5: Prerequisites Installation in progress
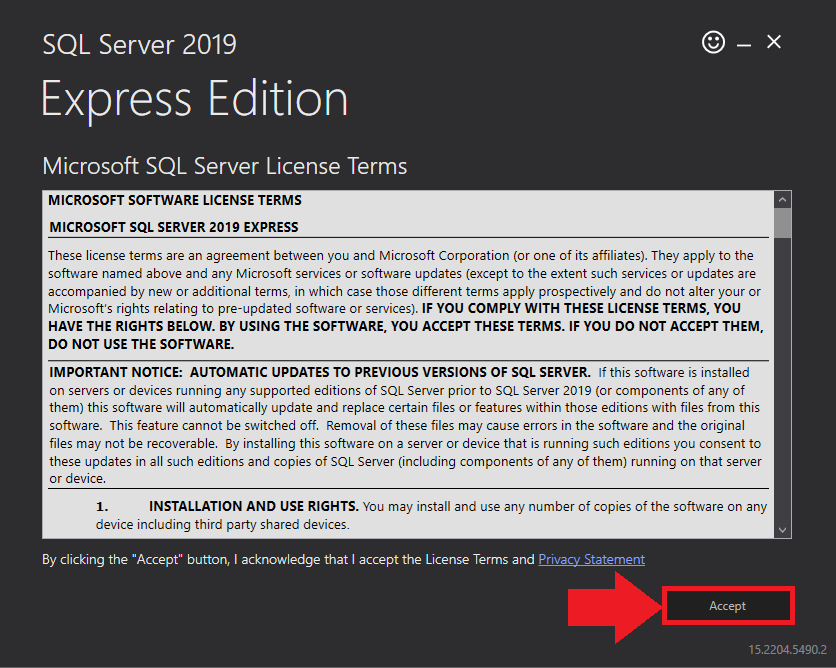
In the Microsoft SQL Server License Terms click the Accept button to acknowledge the license terms and continue.
This page appears if you do not have SQL Server Express preinstalled in your device.
Figure 6: SQL Server Express: Accept License Terms
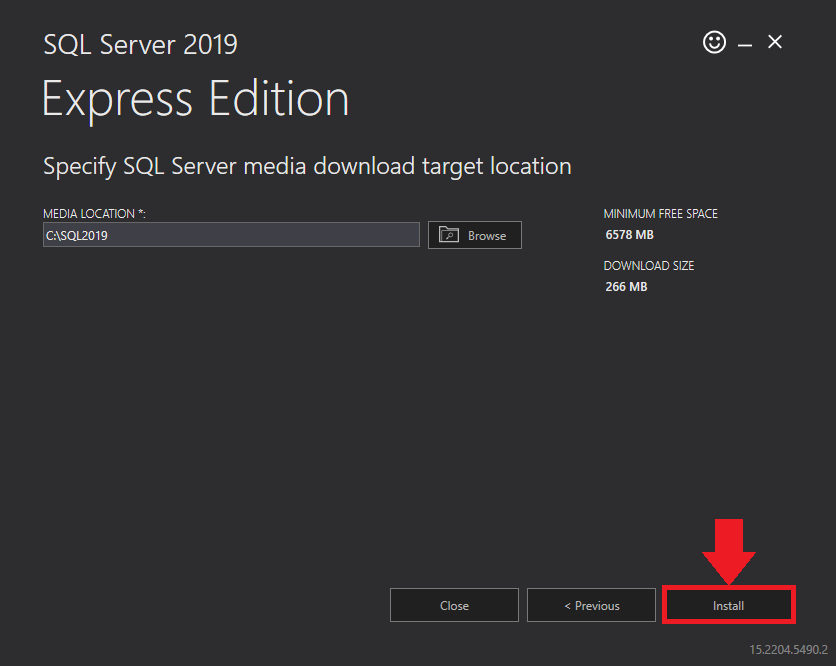
View the SQL Server Media target location in the Media Location field. If required, you can click the Browse button to change the location. Click Install to begin the installation of SQL Server Express.
Figure 7: SQL Server Express: Target Location
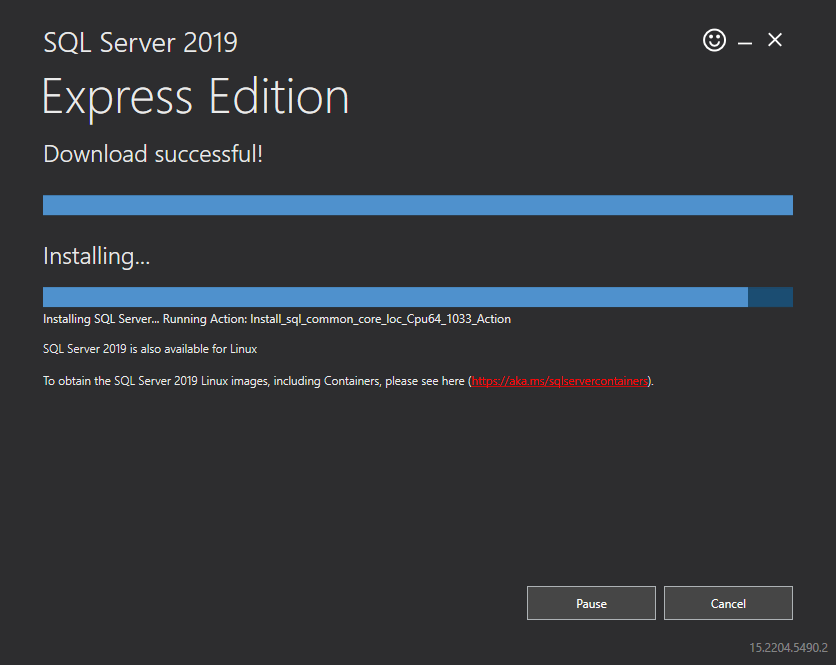
SQL server installation is in progress. This may take several minutes to complete.
Figure 8: SQL Server Installation In Progress
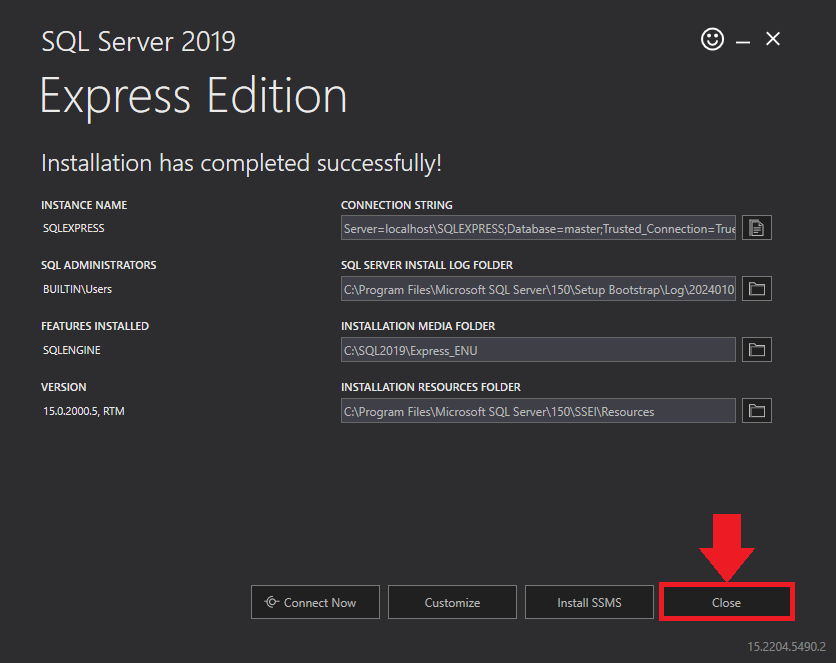
Click the Close button once the prerequisites are installed.
Figure 9: SQL Server Express: Installed Successfully
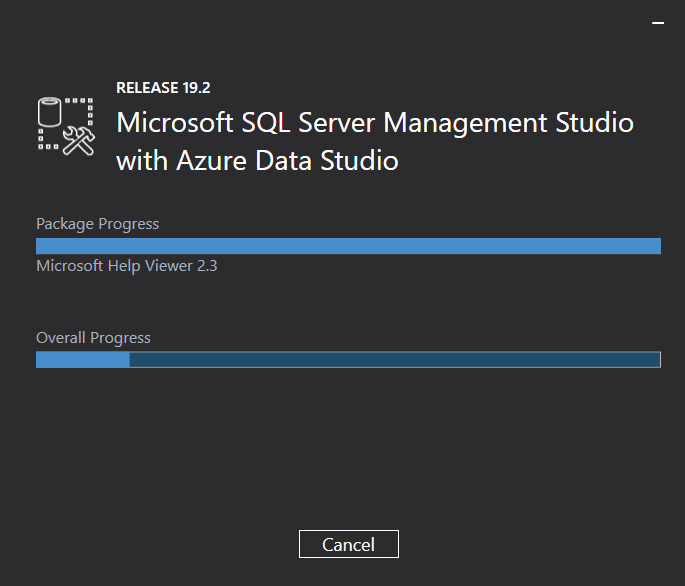
Microsoft SQL Management Studio installation is in progress. This may take several minutes to complete.
Figure 10: Microsoft SQL Server Management Studio: Installation in progress
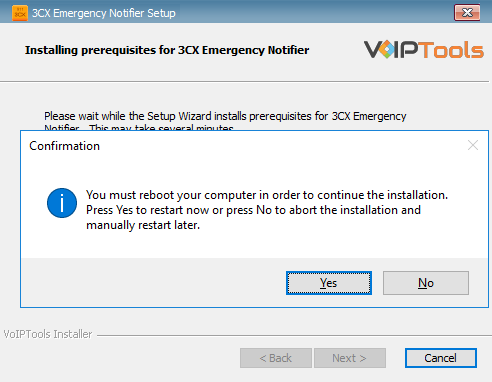
Click Yes in the Confirmation Message Box to reboot the computer.
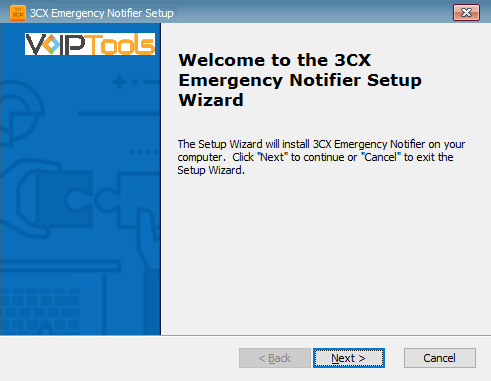
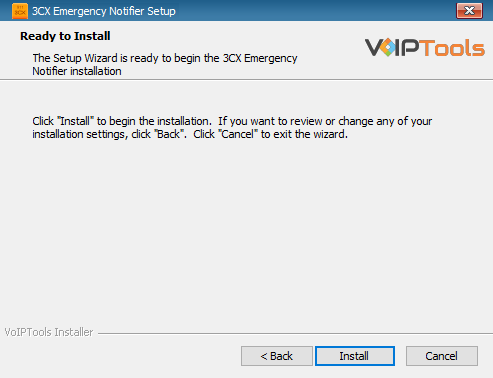
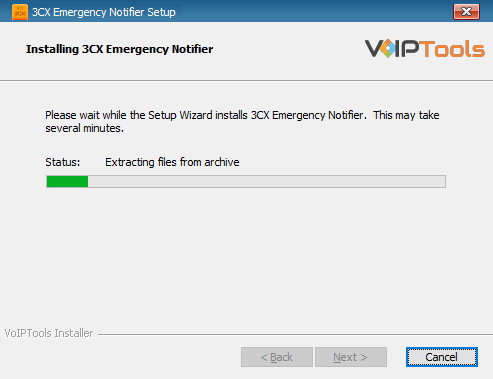
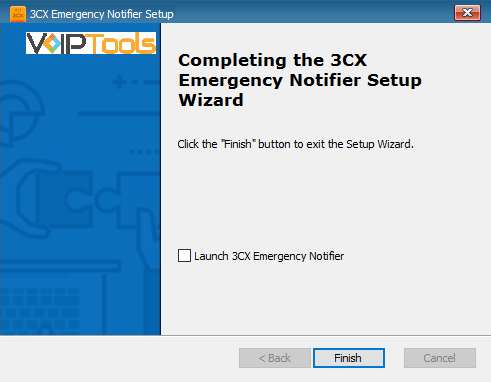
Click Next on the 3CX Emergency NotifierSetup Wizard screen.
Figure 12: Emergency Notifier Setup Wizard
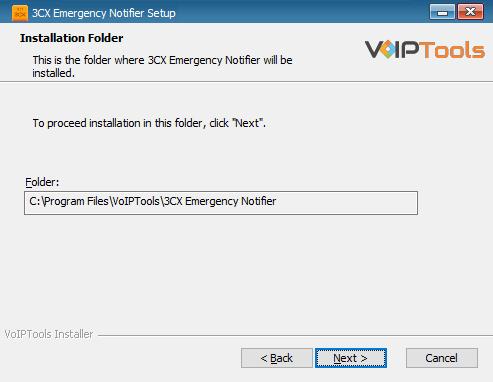
On the Select Installation Folder window, the Folder field displays the path where the 3CX Emergency Notifier gets installed. You cannot change the location path.
Click Next to continue
Figure 13: Emergency Notifier selects the installation folder
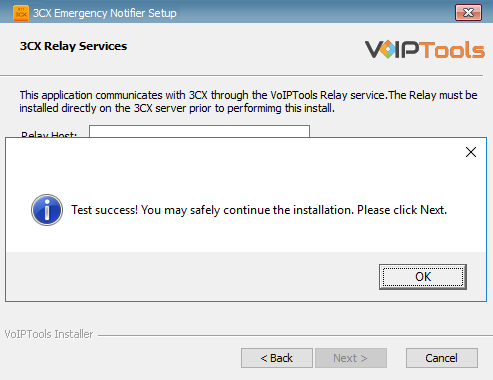
In the 3CX Relay Services window, in the Relay Host field, enter the FQDN of your 3CX server.
Enter 8801 in the Relay Port field.
Enter the JWT public key you took from VoIPTools Relay services in the Public Key text area. Click here to know more.
Figure 14: Configure Relay services
Click the Test Relay Settings to confirm that the ‘3CX Emergency Notifier’ can communicate with the Relay services running on the 3CX server.
If the ‘3CX Emergency Notifier’ is successfully able to communicate with the Relay services that run on the 3CX server, a Success message box appears. Click OK. If the test fails, you will not be able to continue until communication with the relay is established.
Figure 15: Test Relay Success
NOTE:
You must set the Relay Port to 8801.
If the Relay test fails, you cannot continue the installation until you establish communication with the Relay. If your Relay test failed then confirm the following conditions,
Confirm you have the correct firewall port open (default TCP 8801) on the 3CX server and the firewall protecting the 3CX server.
Confirm that you have entered the correct FQDN for the 3CX server.
Confirm that the 3CX Emergency Notifier and Relay use the same port and protocol.
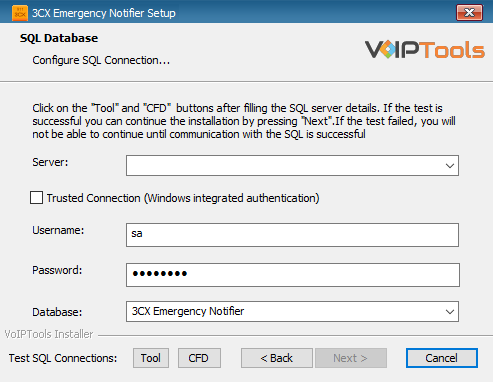
On the SQL Database window in the Server field, select the desired instance of SQL Server.
To use SQL Authentication, uncheck the Trusted Connection checkbox.
In the Username and Password fields, enter valid SQL login account credentials.
Figure 16: Configure SQL database
NOTE:
We recommend you use SQL Authentication rather than Windows authentication. Many of our tools leverage a Call Flow Designer (CFD) application running on the 3CX.Frequently our CFD applications require access to a SQL database. If the 3CX server and the database server are not in an Active Directory domain, Windows authentication will fail.
To use SQL Authentication, you must configure the SQL server to run in Mixed Mode. If you install SQL Server with our tools, we configure SQL in Mixed Mode.
To use Windows Integrated Authentication (not recommended), check the Trusted Connection (Windows integrated authentication) checkbox.
NOTE:
In the Database field, the installer will automatically display the default database name. We encourage you to use the default name. To upgrade or reinstall 3CX Emergency Notifier, select the current database name from the list.
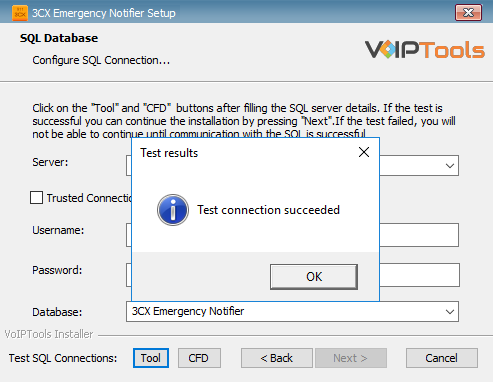
Click the Tool buttons to confirm connectivity to SQL Server. and click OK on the Test Results message box.
Figure 17: TOOL connection to database results
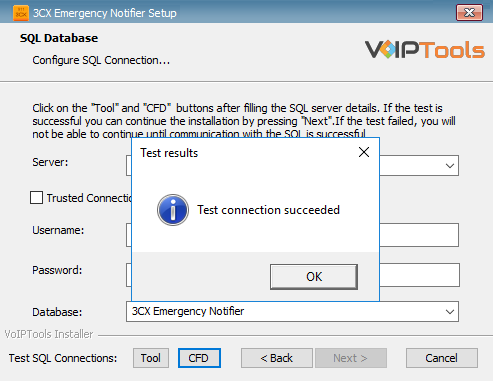
Click the CFD buttons to confirm connectivity to SQL Server and click OK on the Test Results message box.
Figure 18: CFD Test SQL connections results.
NOTE:
You can use the public IP or FQDN of the 3CX server to test the connectivity.
To ensure the authorization of your license key, it is necessary to complete the registration process. By registering with VoIPTools, you gain access to a range of benefits:
Key Replacement Assistance
In the unfortunate event of a lost license key, registering with VoIPTools lets us provide you with a replacement key promptly.
Product Updates and Reminders
By registering, you will receive timely notifications from VoIPTools regarding any product updates. Additionally, we will send reminders when your key is nearing its renewal date, ensuring uninterrupted access to our services.
Follow the procedure to register your software,
Click the 3CX Emergency Notifier desktop icon to launch the web application.
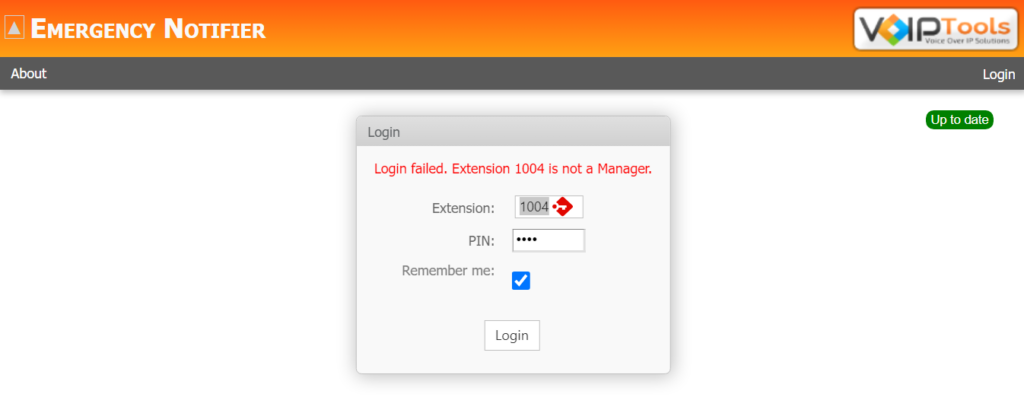
On the Login page, do the following tasks,
In the Extension field, enter your 3CX extension number.
In the PIN field, enter your 3CX voicemail PIN.
Click the Login button to log in to your account
Figure 22: 3CX Emergency Notifier Web Portal Login
NOTE:
You can login only as a Manager in 3CX Emergency Notifier.
Figure 23: Error Message when logged in using User credentialf
In the 3CX Emergency Notifier web portal, hover over the mouse on the Settings tab, and from the drop-down menu, select Emergency Notifier Settings.
Figure 24: Select – Emergency Notifier Settings
In the Settings screen, click the License tab
In the Registration section, enter your License Key and other details appropriately and click Registeto complete your registration.
Figure 25: 3CX Emergency Notifier Registration
Step 8: Check for default data in the database server #
To verify if you have successfully installed the 3CX Emergency Notifier application, you need to log into the database and check for default data in the basic tables.
Log into the SQL database.
In the Object Explorer accordion, expand Databases and then expand Tables
From the tables list
Open dbo.EmergencyNumbers table to see the emergency contact number “911”
Open dbo.Messages table to see message type for the emergency number as Email, SMS and Email Subject.
Open dbo.NotificationSettings table to see the emergency contact number “911”
Open dbo.Settings table to see the default database settings.
In addition to sending emergency notifications by phone, email, and SMS text, you can also receive notifications on your desktop.
The following instructions outline how to install the desktop notification application:
NOTE:
Before you launch the application, you must ensure Microsoft .Net Framework 4.6.1 (x86 and x64) is installed in your device. If the above component is already installed, you can launch the application. Otherwise, follow the instructions as outlined below to install the component.
The Desktop Notifications application receives events and client software updates from the VoIPTools server. You will need to configure your public facing and Windows firewalls to open ports 5600 TCP and 5610 TCP.
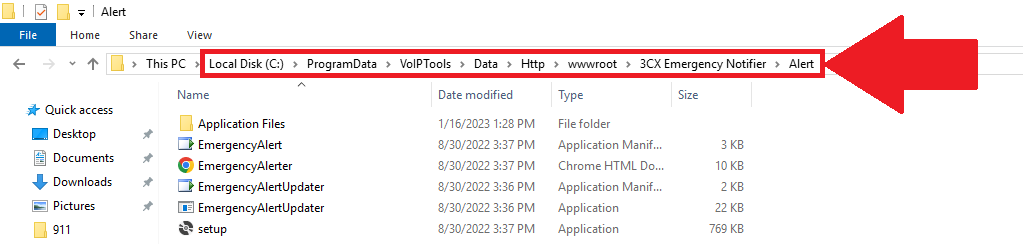
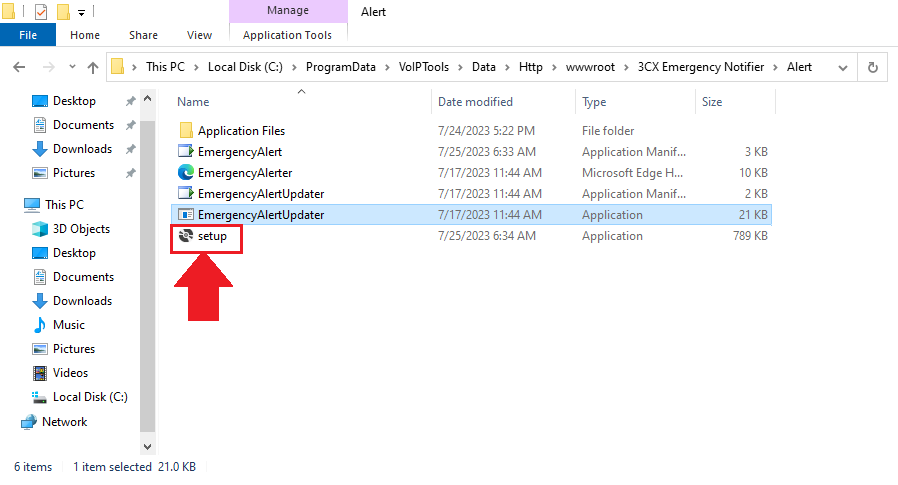
In the File Explorer, navigate to C:\\ProgramData\VoIPTools\Data\Http\wwwroot\3CX Emergency Notifier\Alert
Figure 26: Navigate to ‘3CX Emergency Notifier Alert’
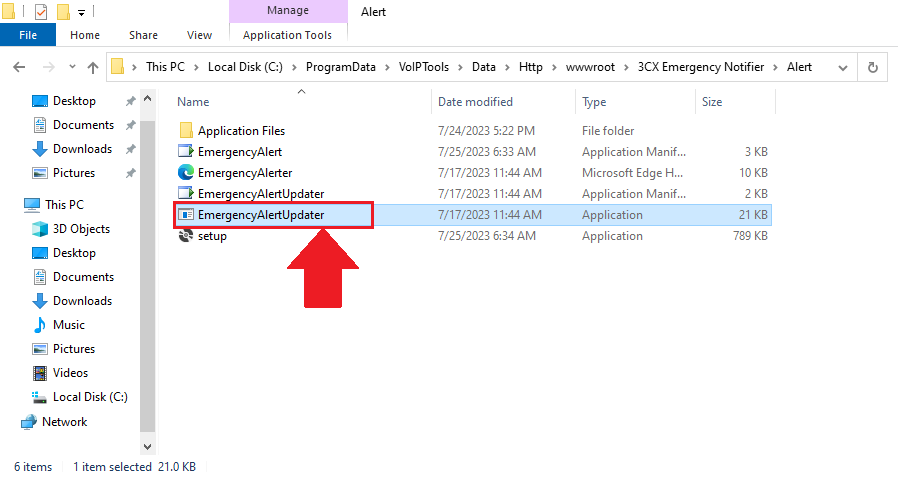
Double-click EmergencyAlertUpdater to display Emergency Alert URLUpdate popup.
Figure 27: Emergency Notifier Setup
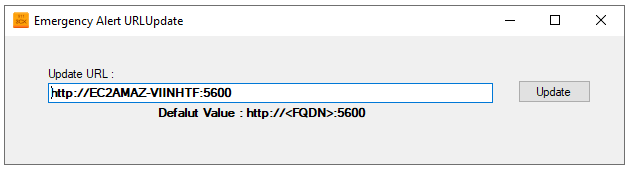
In the Emergency Alert URLUpdate popup, enter your URL in the format http://localhost:5600/Alert/EmergencyAlerter.htm and click Update.
Figure 28: Update the URL
NOTE:
It is important that your FQDN resolve to an IP address that is accessible by your client workstations. If, for example, your VoIPTools server is hosted in the cloud, the FQDN should resolve to the public IP address of your VoIPTools server. It may be necessary to update your DNS, or you can update the workstation’s Host file to map the FQDN to an accessible IP address.
To access the folder, ‘3CX Emergency Notifier’ ensure that you have full admin rights.
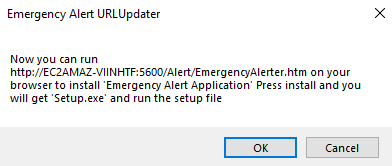
In the Emergency Alert Application Update URL popup, click OK.
Figure 29: URL to install prerequisites
Double-click Setup application.
Figure 30: Setup application
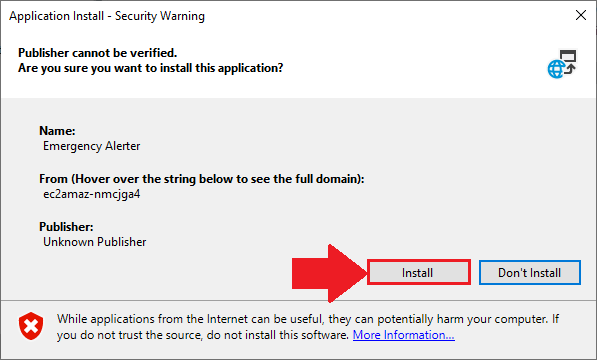
In the Application Install screen, click the Install button to start the installation.
Figure 31: Install button
The application starts to install. This may take a few minutes to install.
Figure 32: Installation in progress
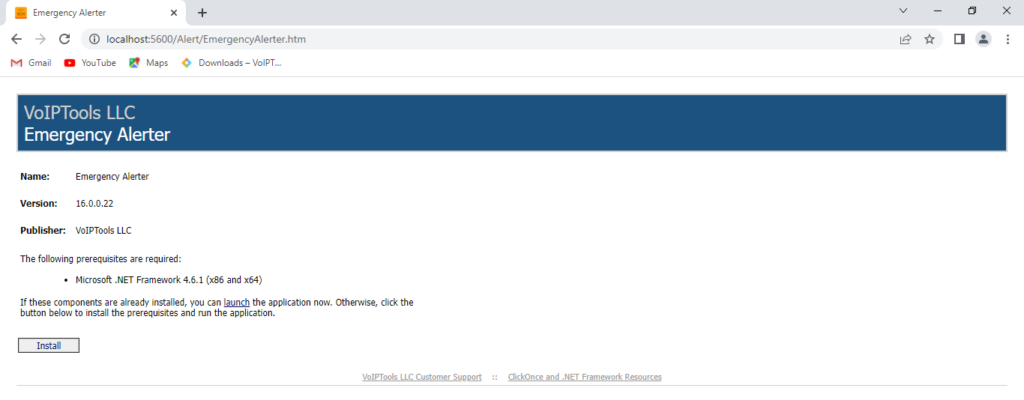
Open web browser and in the address bar, type the URL: http://localhost:5600/Alert/EmergencyAlerter.htm
NOTE:
Replace with your local host value in the place of URL mentioned above.
The following web page appears:
Figure 33: Install Prerequisites
Click Install to install the prerequisites.
On the taskbar and in the notification area, click the Show Hidden Icons icon to display notification area overflow
Figure 34: Show hidden icons: Notification Area Overflow
In the notification area overflow, right-click on the Emergency Alerts icon and in the right click menu, click Preferences.
Figure 35: Notification area overflow: Emergency Alerts: Preferences
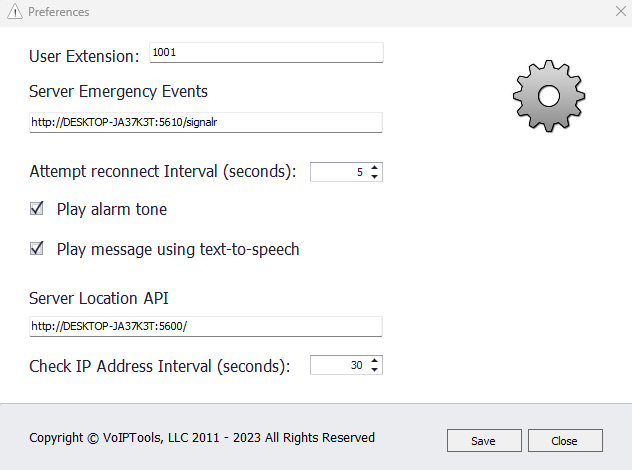
In the Preferences screen and in the Server URL field, enter the URL:
NOTE:
In the URL mentioned above, replace it with your FQDN value.
You must enter /signalr at the end of the URL.
Figure 36: Server URL
Click Save to save the url and then click Close to close the Preferences screen.
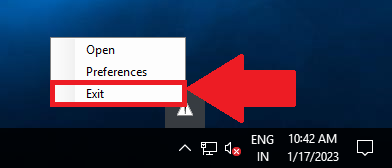
In the notification area overflow, right-click on the Emergency Alertsicon and in the right click menu, click Exit to exit from the Emergency Alerts.
Figure 37: Notification area overflow: Emergency Alerts: Exit
On the desktop, click the 3CX Emergency Notifier icon to launch the application.
NOTE:
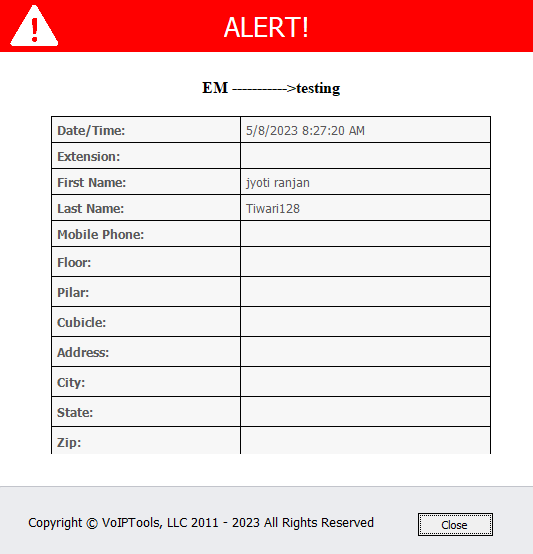
Emergency Notifier gives you an desktop alert whenever you recieve a call to the emergency number. The ALERT popup has the following details,
To access the 3CX Emergency Notifier web portal, click the Web Portal button on the Configuration application, or click on the 3CX Emergency Notifier Web desktop icon created during the installation process.
The 3CX Emergency Notifier is accessible only by the Manager extensions. This is done to enhance security by controlling access to sensitive information.
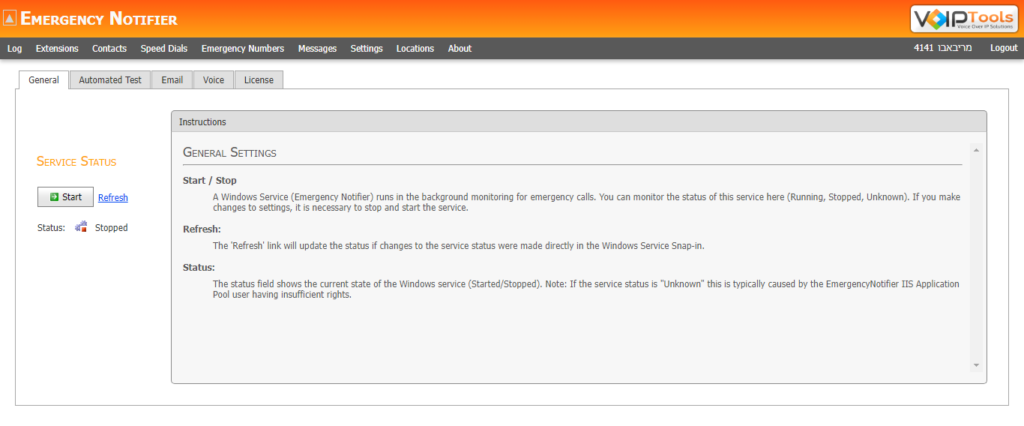
A windows Service (3CX Emergency Notifier) runs in the background monitoring for emergency calls. You can monitor the status of this service here (Running, Stopped, Unknown).
Refresh
Link will update the status if changes to the service status were made directly in the Windows Service Snap-in.
Status
Shows the current state of the Windows service (Started/ Stopped).
Figure 41: Configure General Settings
NOTE:
If you make changes to ‘Settings’, it is necessary to stop and start the service.
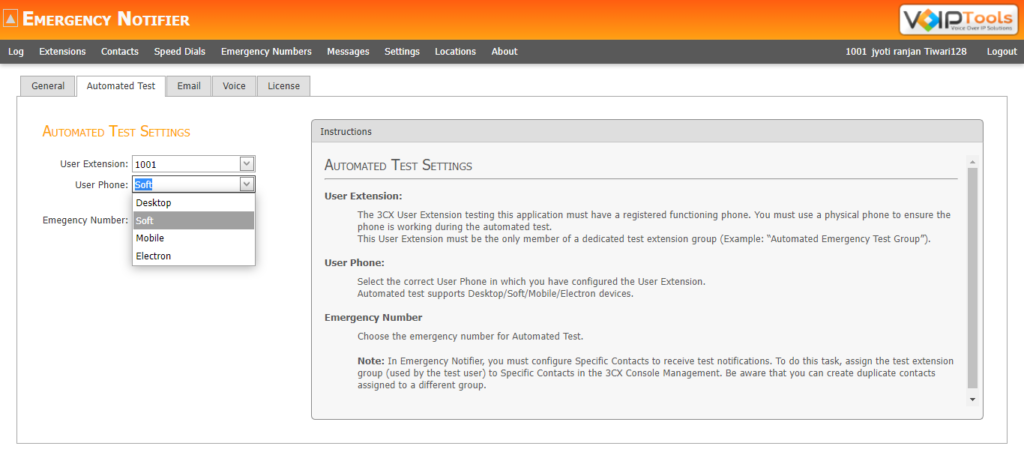
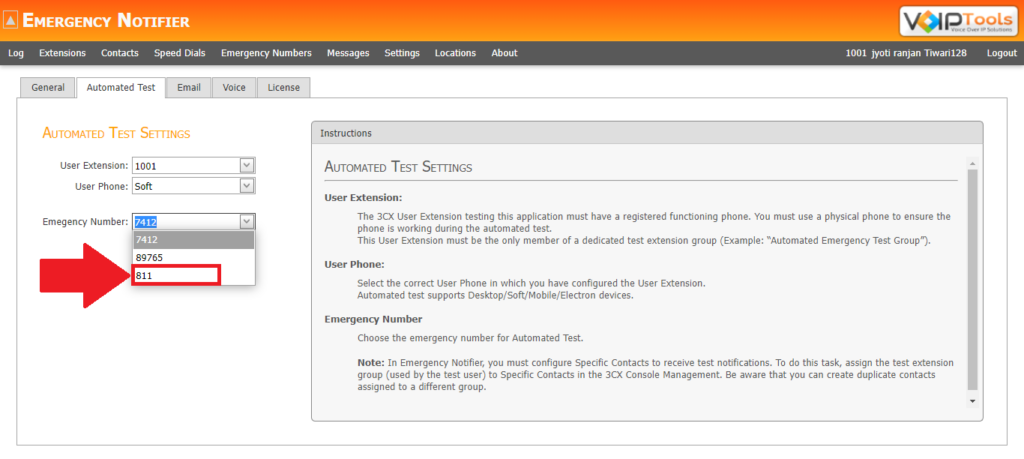
Follow the procedure to configure the automated test settings,
In the User Extension field, enter the extension number having a registered functioning phone.
NOTE:
You must ensure the use of a physical phone to test the working of the 3CX Emergency Notifier
The User Extension must be a member of a dedicated test extension group.
In the User Phone list, select the type of phone that you have configured the User Extension.
Figure 42: Select user’s phone
NOTE:
Automated Test supports Desktop phone, soft phone, mobile phone and electron phone.
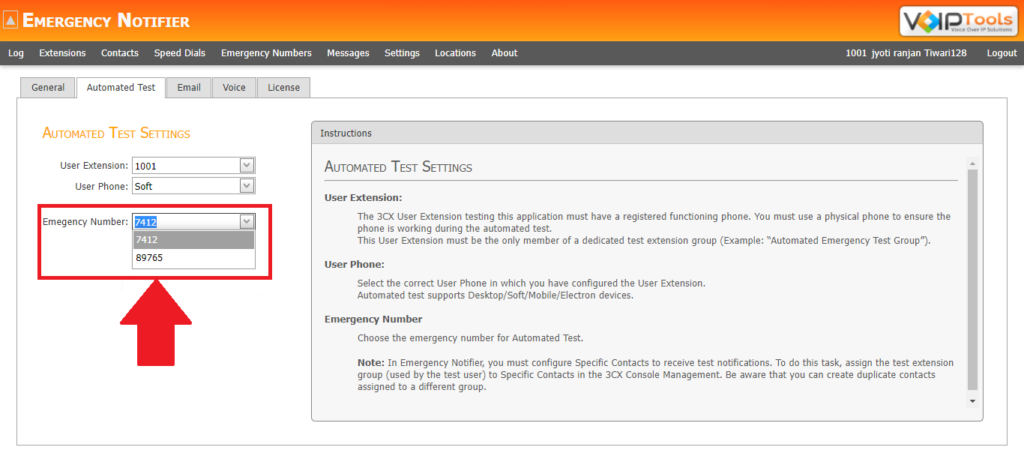
In the Emergency Number field, enter the emergency number for Automated Test.
NOTE:
The emergency number entered must be valid and published in the 3CX Management Console, ensuring you can make and receive calls using that number.
Figure 43: Select the emergency number
NOTE:
You must configure specific contacts to recieve test notifications. Click here to know how to configure contacts to recieve test notifications in the 3CX Console Management.
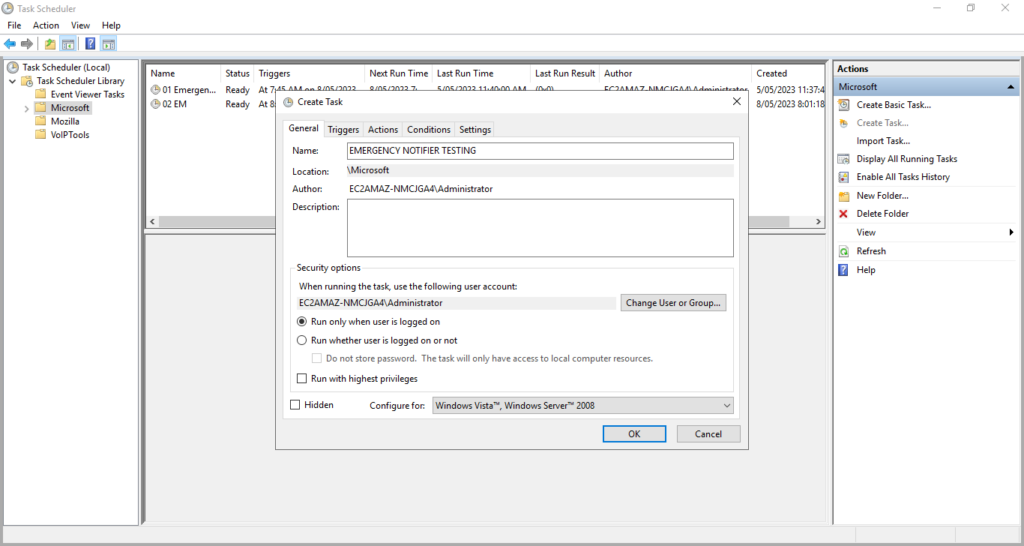
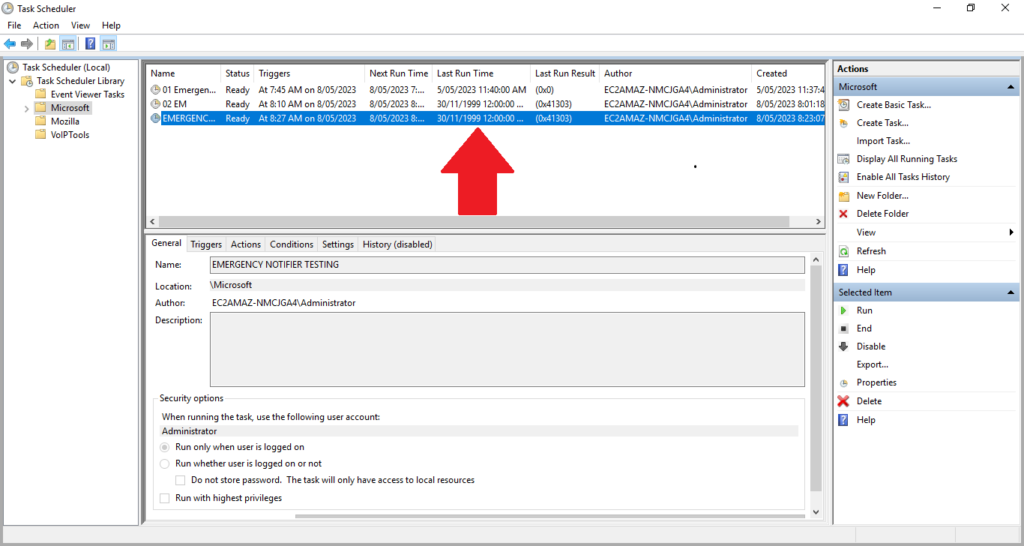
You can schedule an automated test using the Task Scheduler. Follow the procedure to schedule an automated test,
In your device, open the Task Scheduler application.
In the Task Scheduler Library dropdown right-click the Microsoft folder.
Click the Create Task option to create a schedule.
Figure 51: Create Task
On the General tab, in the Name field, enter a name for the task.
Figure 52: General tab
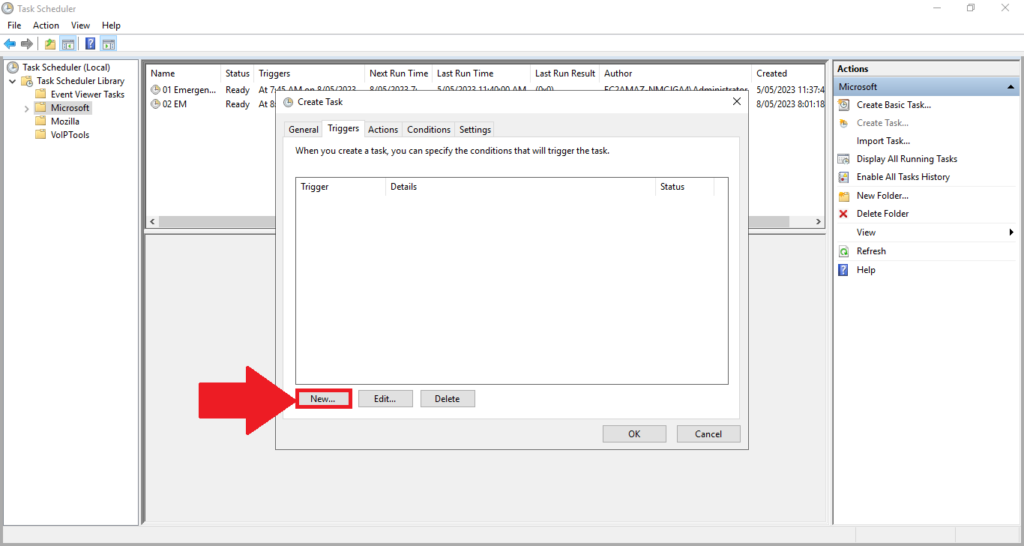
In the Triggers tab click the New button to create a new trigger.
Figure 53: Add a new trigger
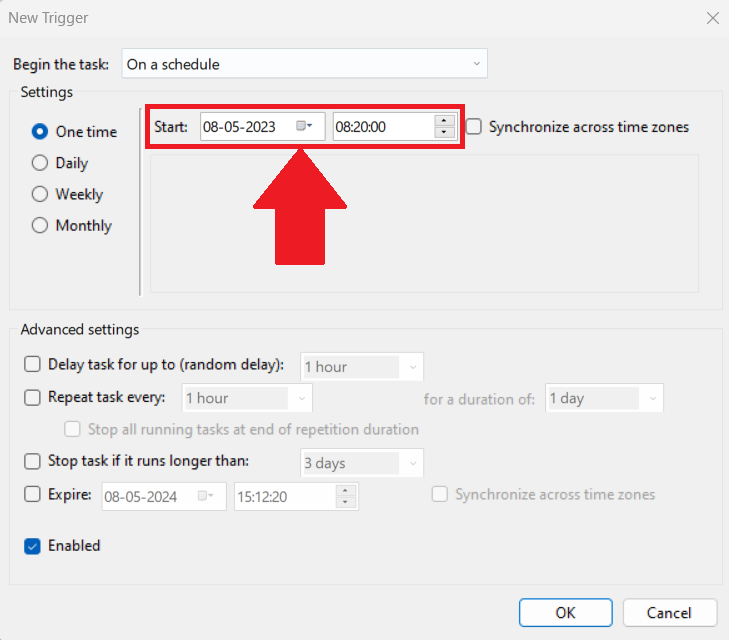
In the Start field, set the date and time at which you want to start the automated test and click the OK button.
Figure 54: Start schedule
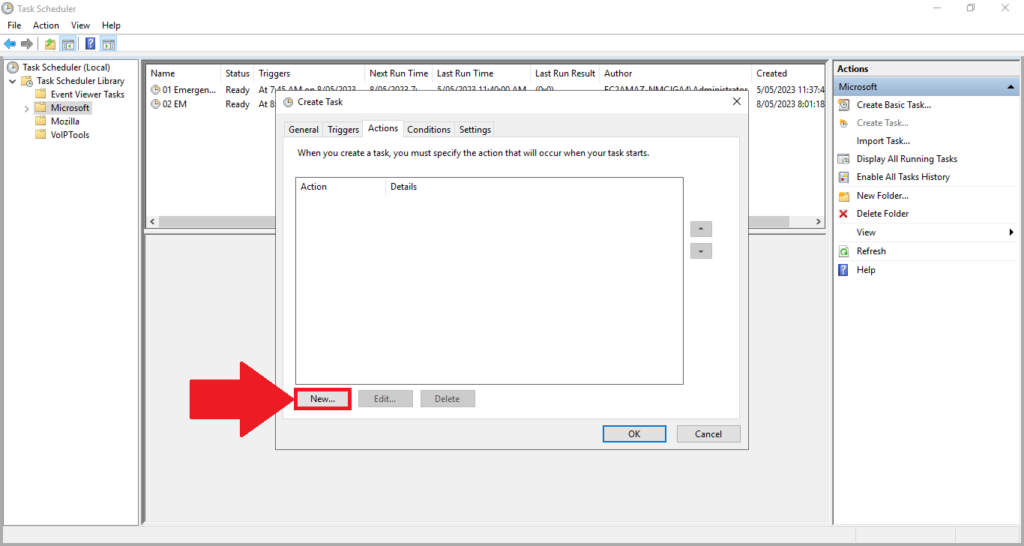
In the Action tab, click the New button.
Figure 55: Actions tab
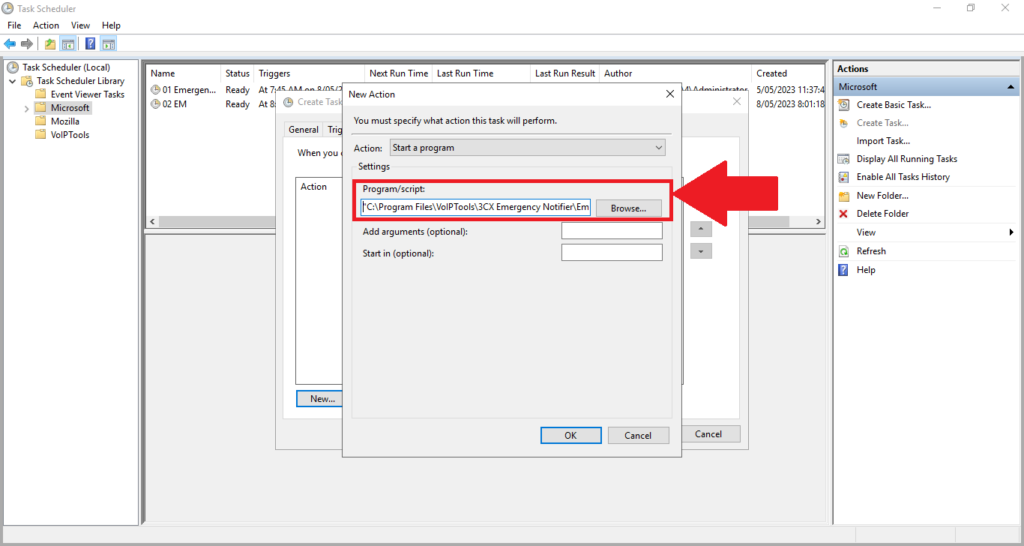
In the Programme/Script field, click the Browse button enter the file location and click the OK button. The default file path is “C:\Program Files\VoIPTools\3CX Emergency Notifier\EmergencyNotifierTestIVR\EmergencyNotifierTestIVR.exe.”
The Email tab lets you set up and configure the email server settings, including the server address, port number, authentication credentials, and reply email addresses. It aims to enable seamless communication between the 3CX Phone System and the designated email server for sending notifications.
Follow the procedure to configure the email server settings,
In the Email tab, under the Email Server section, in the Server field, enter the IP address or Fully Qualified Domain Name (FQDN) of your email server.
Examples: 192.168.1.20 or mail.mydomain.com
In the Port field, enter the SMTP Port number.
The default port number is 25.
In the From Email field, enter the reply email addresses for email and SMS notifications.
In the To Email field, enter the email address that receives your test email. This field is only used for testing.
In the Authentication section, enter Username and Password.
Click the Test button to test if Email Server is able to communicate with 3CX Phone System.
The 3CX Emergency Notifier is capable of initiating phone calls to your designated contacts and delivering a pre-recorded or dynamically generated message. In the case of a dynamically generated message, it can include specific details about the extension from which the emergency call was made. To provide you with greater flexibility, the following settings enable you to customize certain characteristics of the voice utilized for the dynamic recording.
Select TTS Type: Windows TTS if you want to create dynamic play files by using the voices installed in your computer.
Select the preferred culture in the Locale dropdown.
From the Voice Name drop-down list, select the voice that you want to use for dynamic recordings. Usually, this field displays all of the voices installed on the computer.
From the Gender dropdown, select Male or Female so that the Emergency Notifier will play the .wav file in a male or female voice.
From the Volume drop-down list, select the volume that you want to apply for your recording.
From the Speech Rate drop-down list, select the desired speech rate to adjust the speed of the speech.
Click the Test button to test your settings or click the Save button to save your settings.
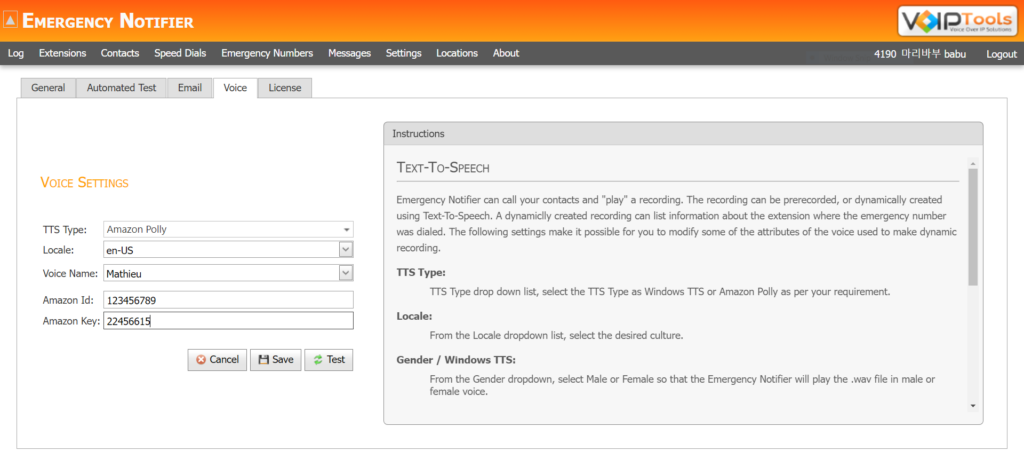
Select TTS Type as Amazon Polly if you want to create a self Identification Message (.wav file) using Amazon Web Services.
Select the preferred culture in the Locale dropdown.
In the Voice Name drop-down list, select the voice for dynamic recordings. Usually, this field displays all of the voices installed on the computer.
In the Amazon Id and Amazon Key fields, enter valid details. To learn how to create an Amazon Web Services (AWS) account and generate an AWS access key ID and secret key ID, click here.
Click the Test button to test your settings or click the Save button to save your settings.
Figure 60: Voice Settings – Amazon Polly
NOTE:
The TTS functionality works only with the Emergency Number and it does not works with Speed Dial numbers.
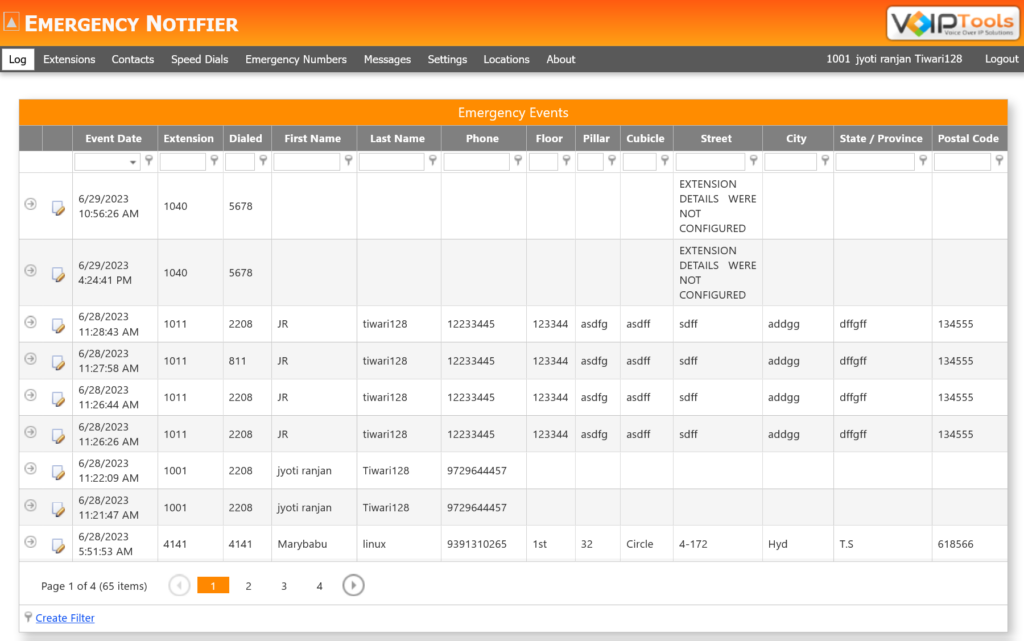
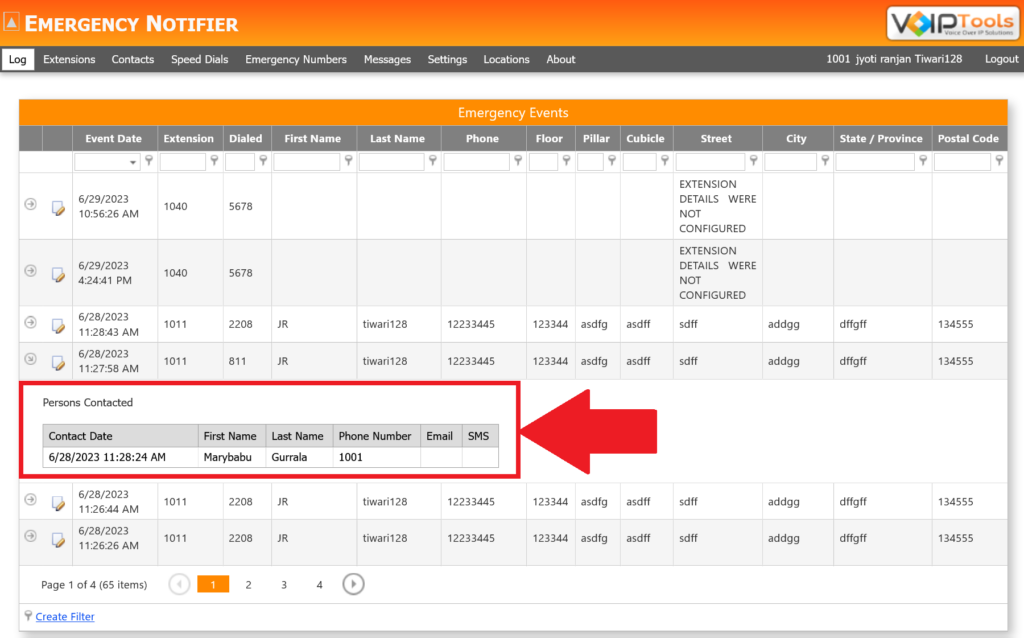
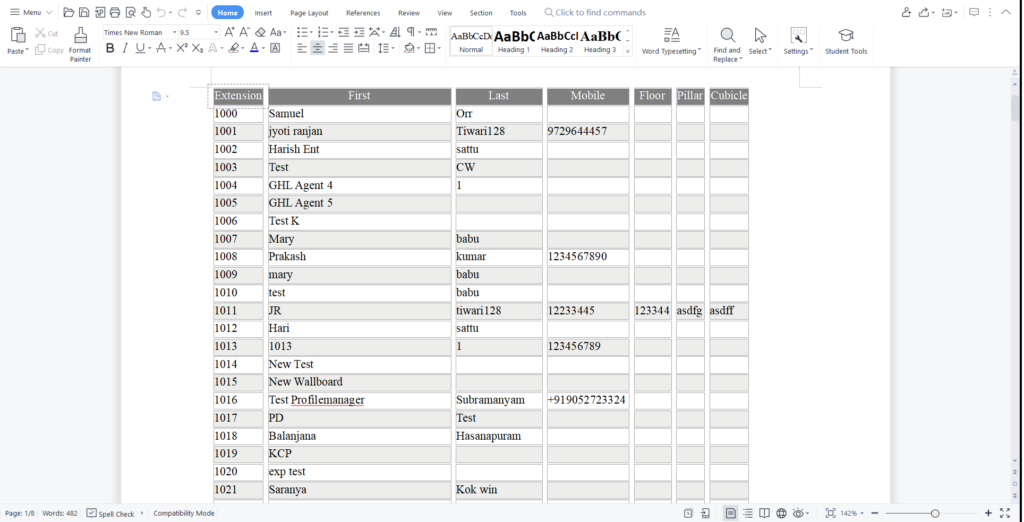
The Log screen presents a comprehensive inventory of all event logs recorded from the moment you installed the 3CX Emergency Notifier. This valuable information encompasses the precise date and time of each event, along with essential details such as extension, phone number, floor, pillar, cubicle, street, city, state/province, and postal code.
Figure 67: Log Screen
You can also click the Expand button to view the persons contacted by the extension.
Figure 68: View persons contacted by the extension
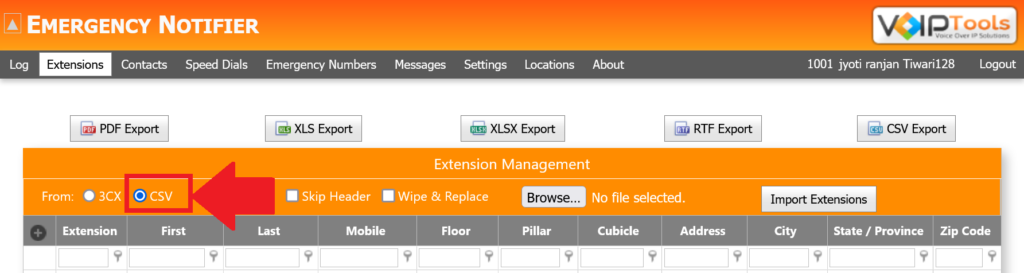
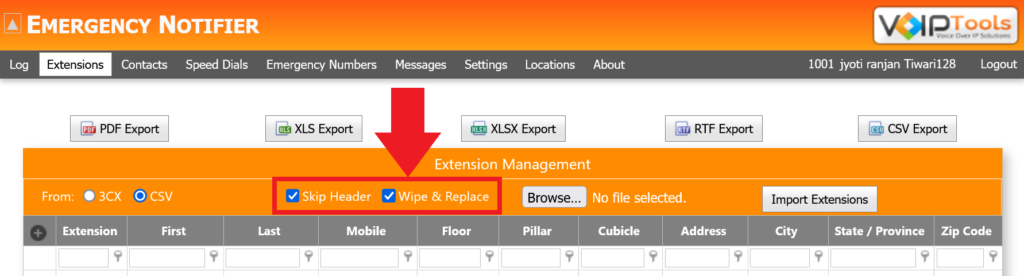
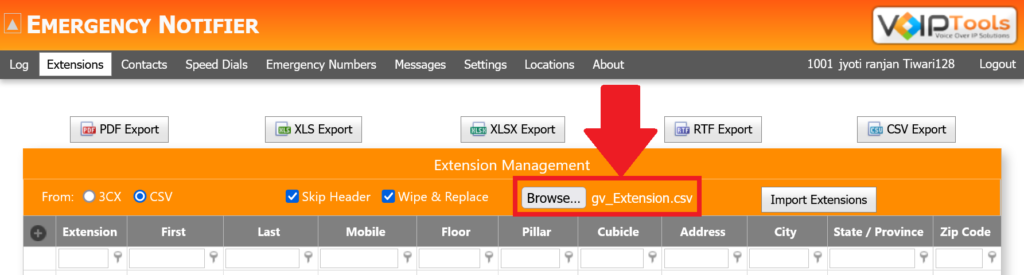
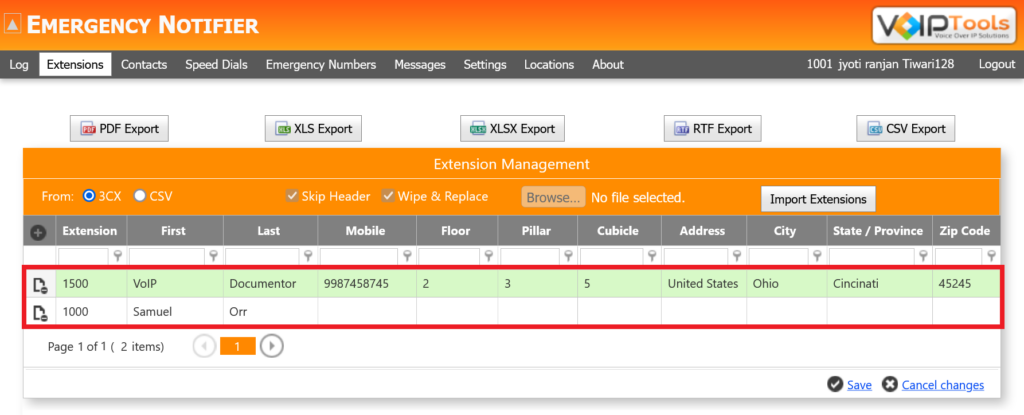
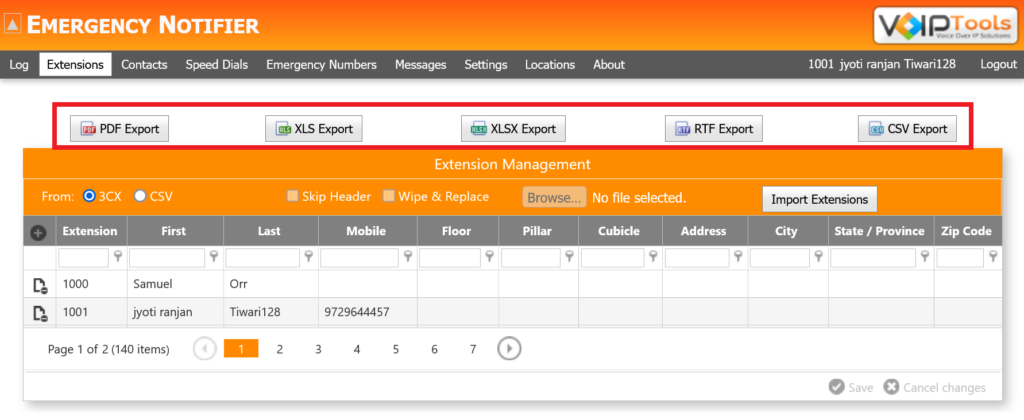
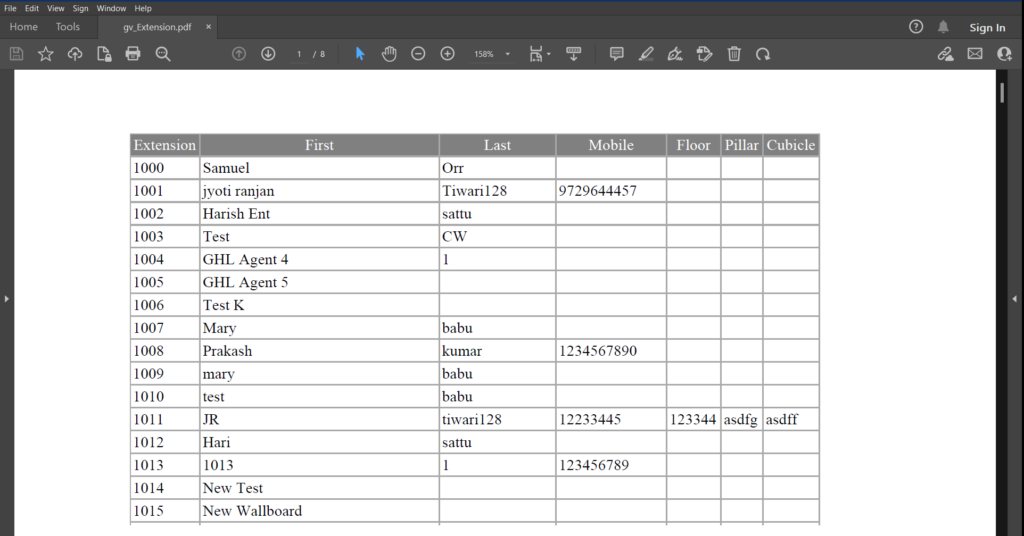
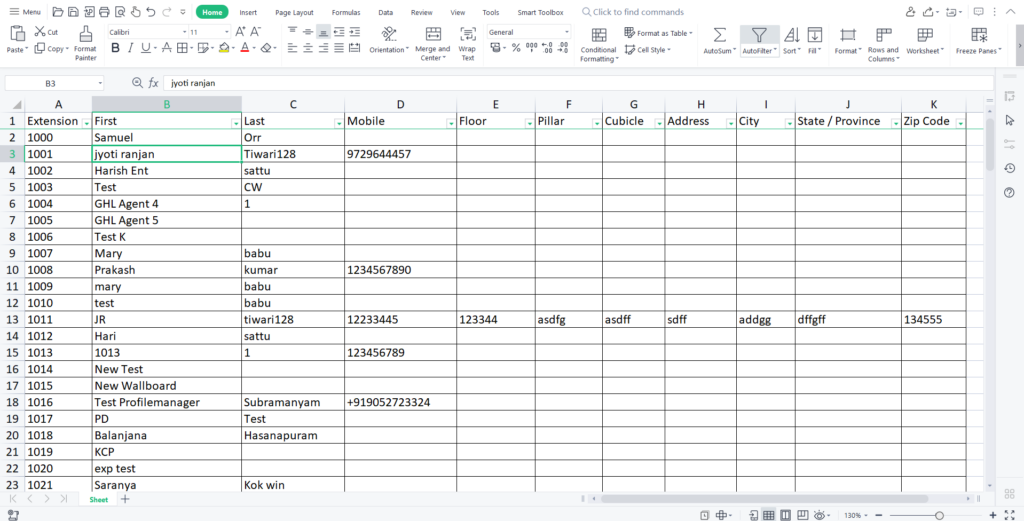
In the Extensions screen, you have the ability to import extensions from either the 3CX phone system or a CSV file, as well as export the extension records in various formats such as PDF, XLS, XLSX, RTF, or CSV.
In the Extension screen, you can do the following tasks,
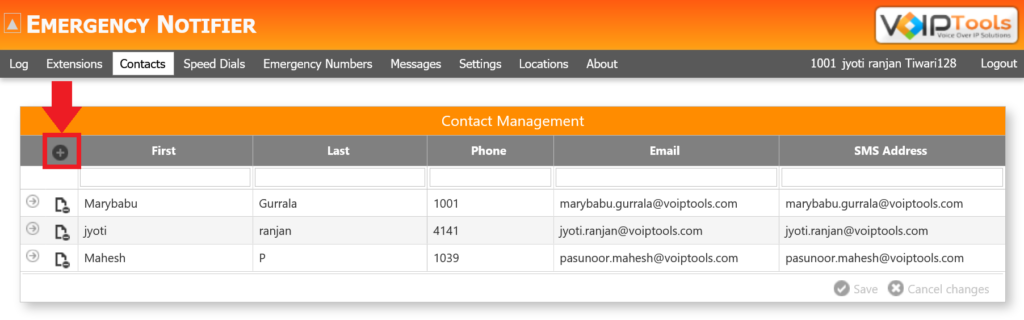
The purpose of this feature is to enable you, as the user, to add and save new contacts or delete existing contacts. This feature empowers you to enter multiple contact details, including First Name, Last Name, Phone Number, Email Address, and SMS Address. Furthermore, you have the option to include extension groups for each contact.
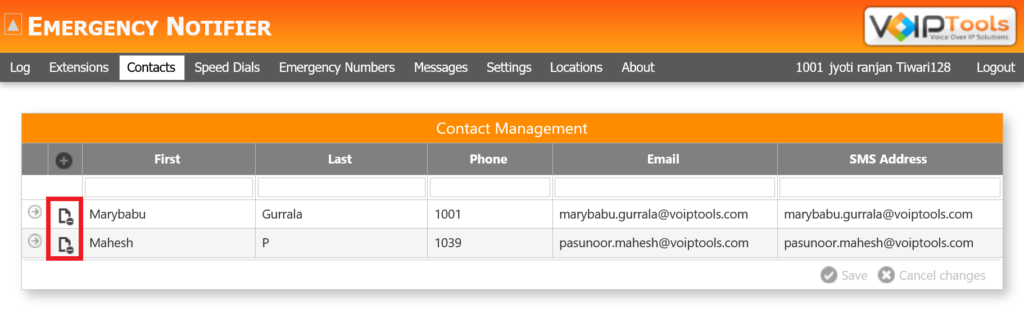
In the Contacts screen, click Add to add a new contact.
Figure 81: Contacts screen – Add button
In the First field, enter the First Name of the contact.
In the Last field, enter the Last Name of the contact.
In the Phone field, enter the Phone Number of the contact.
In the Email field, enter the valid Email Address of the contact.
In the SMS Address field, enter the valid SMS Address of the contact.
Figure 82: Contacts screen – Contact details
Click the Expand button to add extension groups.
In the Extension Group box, click Add to add a new extension group.
Click Save to save the extension group.
Click Save to save the contact.
Figure 83: Contacts screen – Add extension group to contacts
NOTE:
Group managers receive notifications for speed dial and emergency number calls made by their group members, but not for calls made by members of other groups. This system ensures confidentiality and efficient notifications.
NOTE:
You can create multiple contacts (batch edits) before you save the data.
When you receive a call within a ‘Speed Dial’ group, you will immediately be notified via both email and SMS, allowing for flexible communication options. To specify your preferred notification type for the speed dial group, simply indicate your choice by selecting the corresponding check boxes for email and/or SMS.
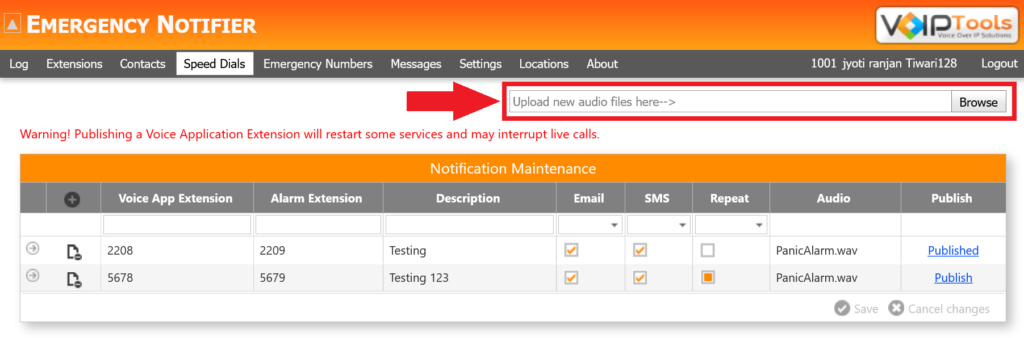
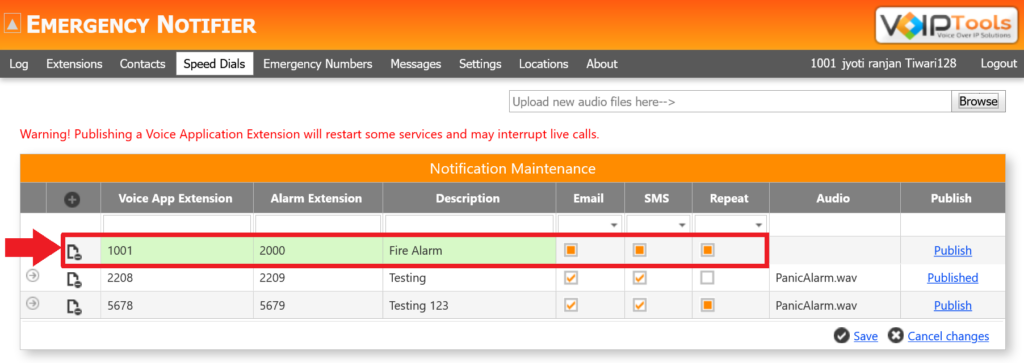
You have access to two manually created CFD extensions, each with its own unique identification number: the ‘Voice App Extension’ and the ‘Alarm Extension.’ The ‘Voice App Extension’ has been seamlessly integrated into the phone system to ensure a smooth connection between incoming calls and their respective contacts. Once a contact answers the call, the ‘Voice App Extension’ internally activates the corresponding ‘Alarm Extension,’ which in turn triggers the playback of a customized audio file specifically tailored to the contacted individual.
NOTE:
Only the ‘Voice App Extension’ is accessible to you as a customer, while the ‘Alarm Extension’ remains strictly confidential.
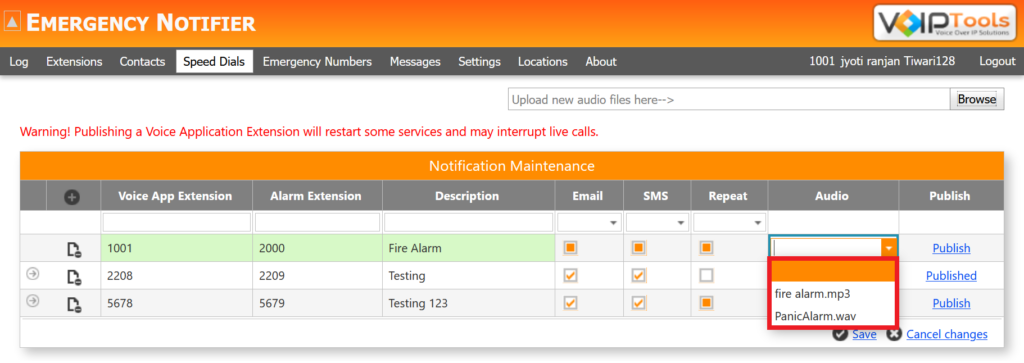
From the Audio drop-down, select the uploaded audio file. This file will play as the alarm for the speed dial call.
NOTE:
If you have not selected any audio file in the Audio field then, the ‘SMS’ notification that you set for the extension in the Messages tab plays as voice file for all the extensions that received the notification.
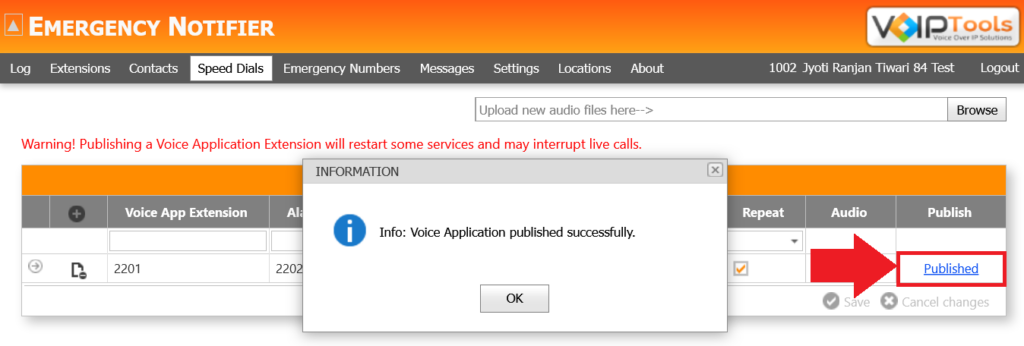
Click the Publish link to create ‘Voice App Extension’ and ‘Alarm Extension’ in the PBX system
Figure 89: Create speed dial – select the audio file
NOTE:
Once you publish the speed dial, ‘Voice App Extension’ and ‘Alarm Extension’ will be created in the PBX system with the name same as that of ‘Description’ you mentioned for the speed dial, extended by the terms ‘Notification’ and ‘Alarm’ for ‘Voice App Extension’ and ‘Alarm Extension’ respectively.
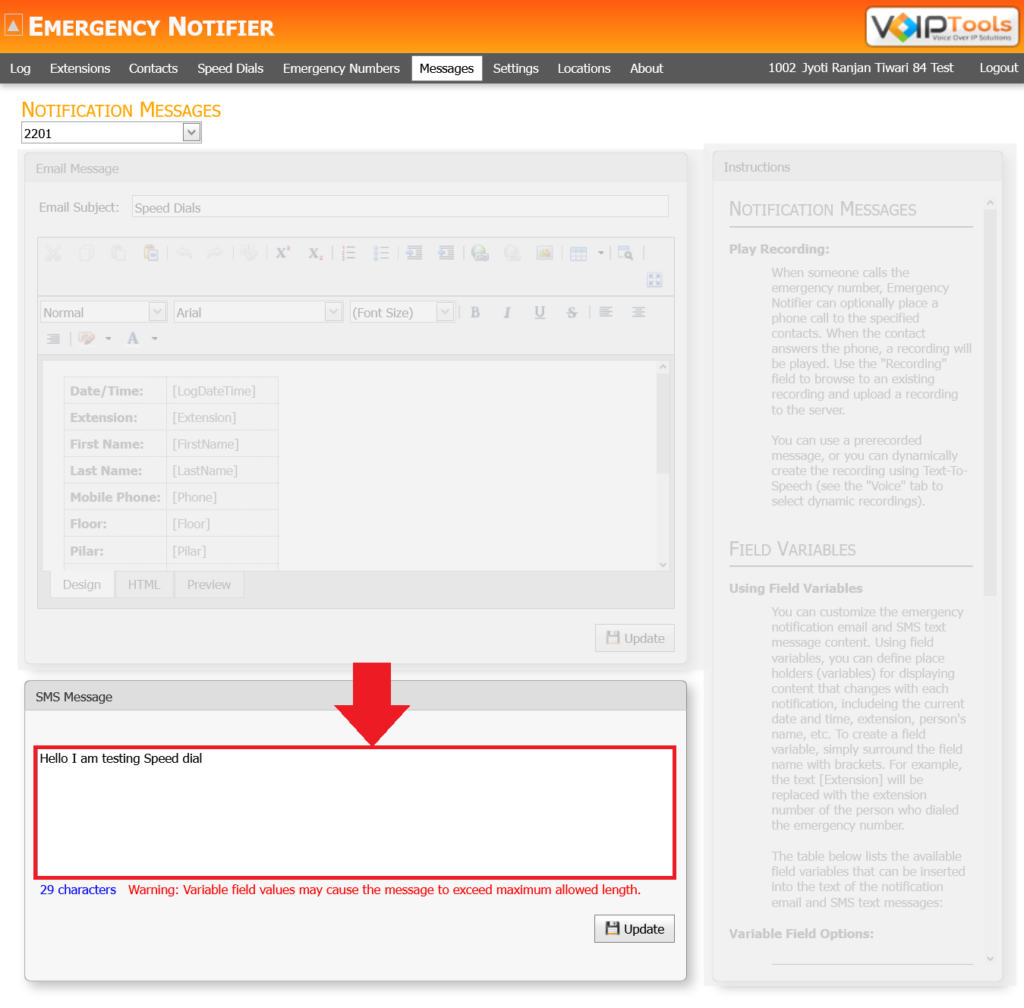
If you have not selected any audio file in the Audio field then, the ‘SMS’ notification that you set for the extension in the Messages tab plays as voice file for all the extensions that received the notification. Follow the procedure to set the SMS message as audio for speed dials.
In the top menu click the Messages tab.
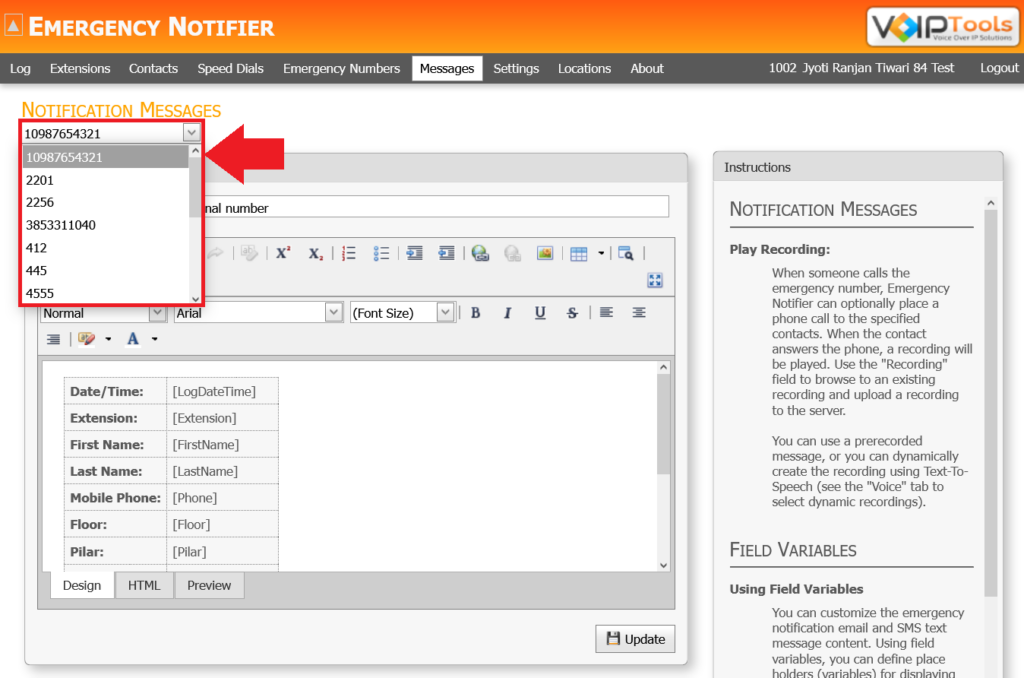
On the Messages screen, below the Notification Messages, select the speed dial extension from the Extension drop-down.
Figure 93: Extension Dropdown
In the SMS section, enter the SMS you want to play as audio.
Figure 94: SMS Text
Click the Update button to save the SMS message.
Figure 95: SMS Updated Popup
Switch to Speed Dials tab and click the Publish button to publish the speed dial.
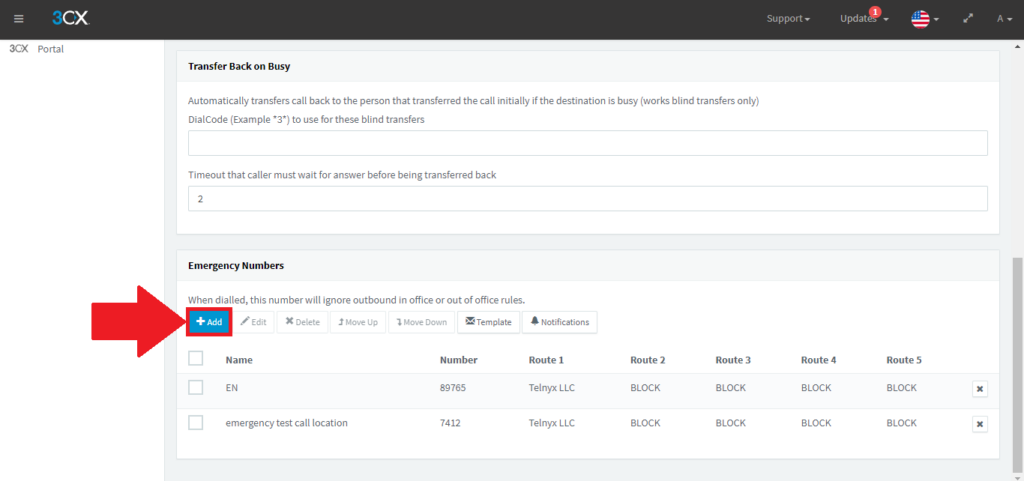
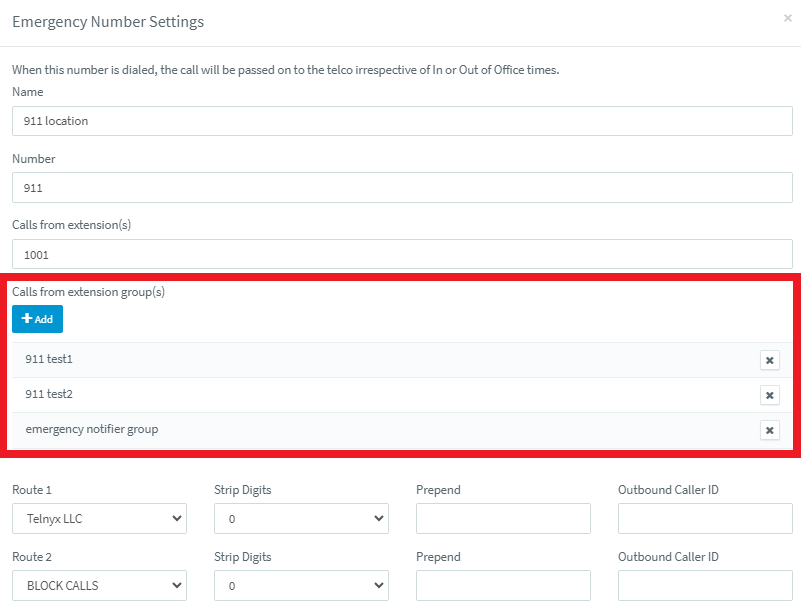
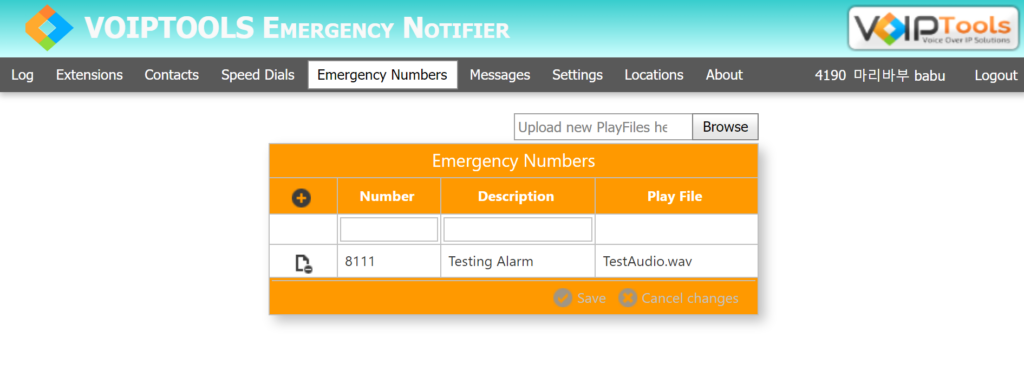
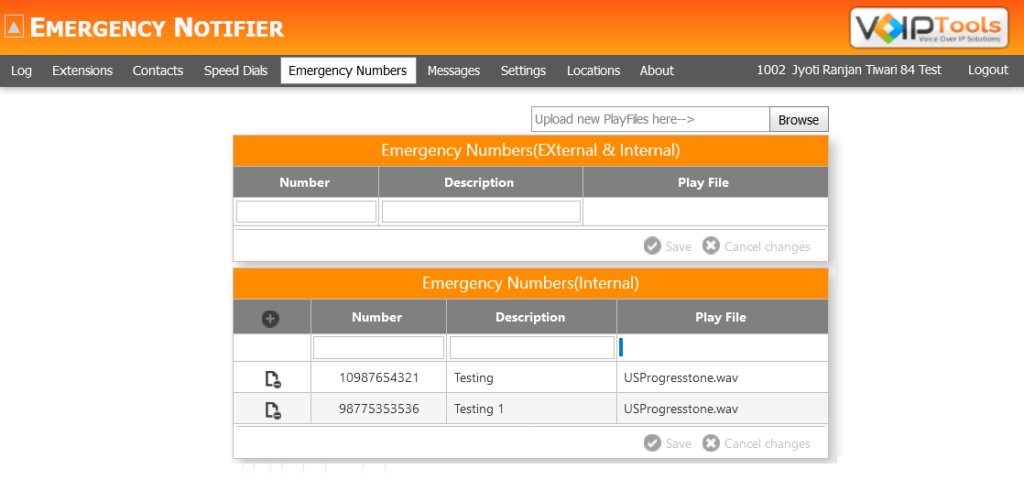
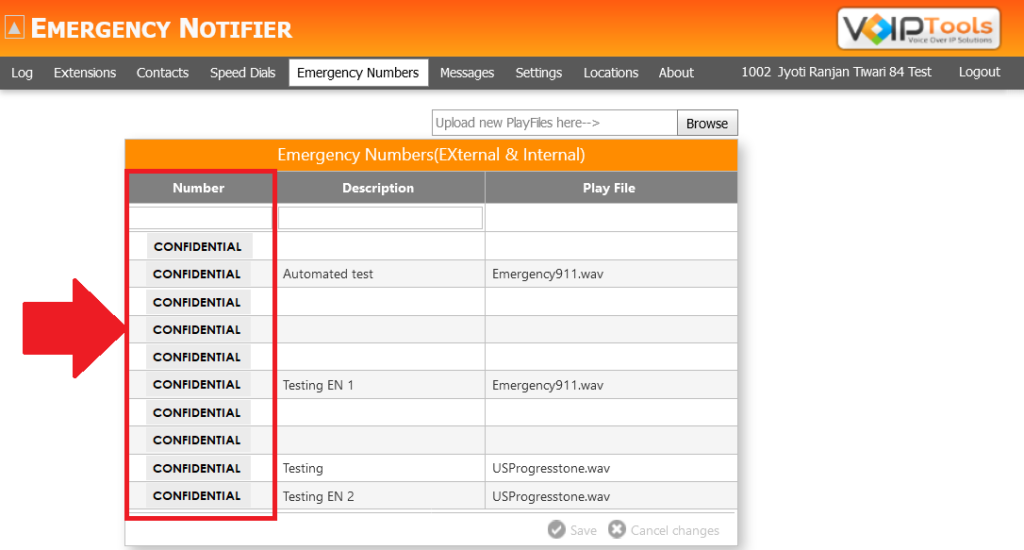
When an emergency call is initiated, the system immediately dispatches a notification to all the extensions within the designated extension group linked to that particular emergency number. To obtain a comprehensive inventory of all emergency numbers, simply navigate to the Emergency Numbers screen.
The Emergency Numbers screen has two sections,
Section Name
Purpose
External Numbers
Displays the list of external numbers that are published in 3CX Console Management.
Internal Numbers
Displays the list of internal numbers that are created within the 3CX Emergency Notifier application for testing purposes.
Figure 100: Emergency Numbers tab Overview
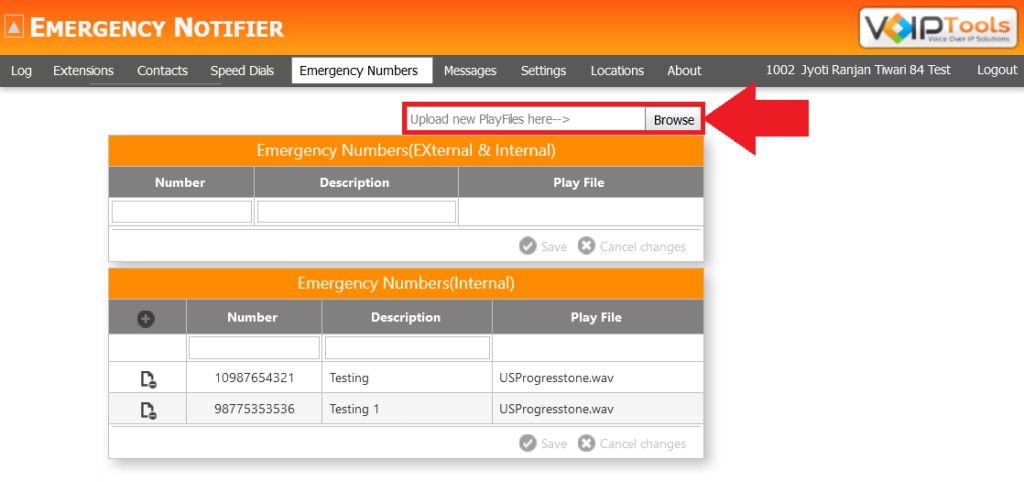
Upload Audio Files to an Existing Emergency Number #
Before proceeding with the following instructions, make sure you have the audio file in .WAV format in your local device.
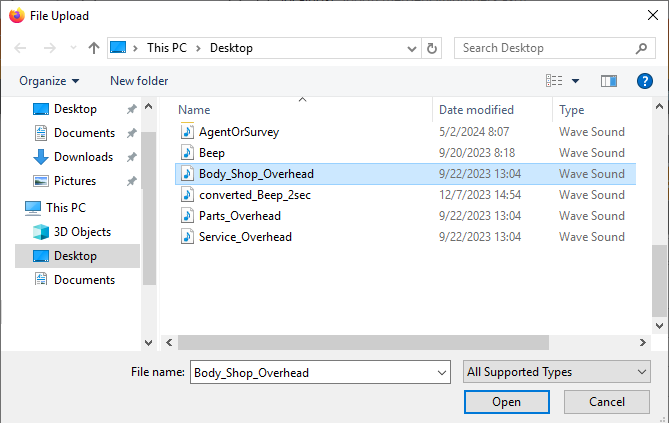
Click the Browse button to upload an audio file.
NOTE:
You can upload only .WAV audio file type. Click the link to access 3CX’s audio file conversion feature to convert your audio files into .WAV format.
If you have not selected any audio file in the ‘Play File’ field then, the ‘SMS’ notification that you set for the extension will play as voice file for all the extensions that received the notification.
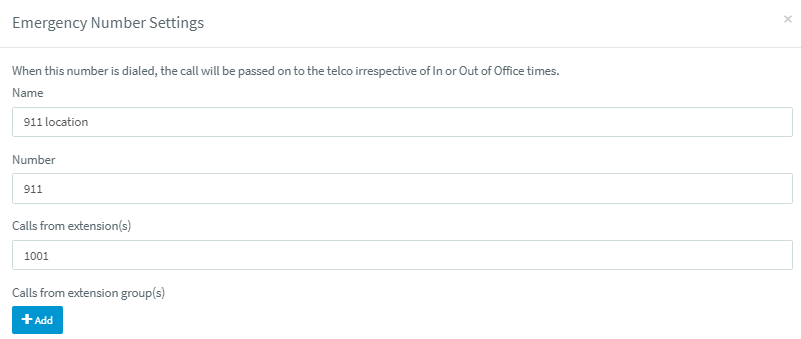
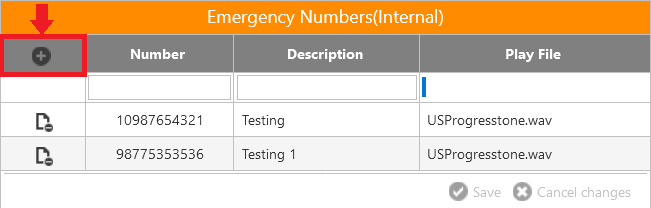
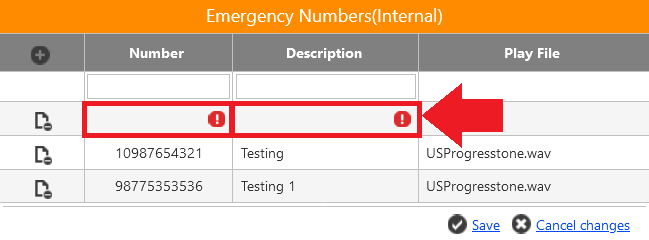
The internal emergency number is a random number that is created only for the internal testing purposes. Follow the procedure to create a new internal emergency number.
Click the Add button.
Figure 105: Add Button to Add New Internal Emergency Number
Enter a random number in the Number field and a short description in the Description field.
The Number and Description fields cannot be empty.
Figure 106: Details of Internal Emergency Number
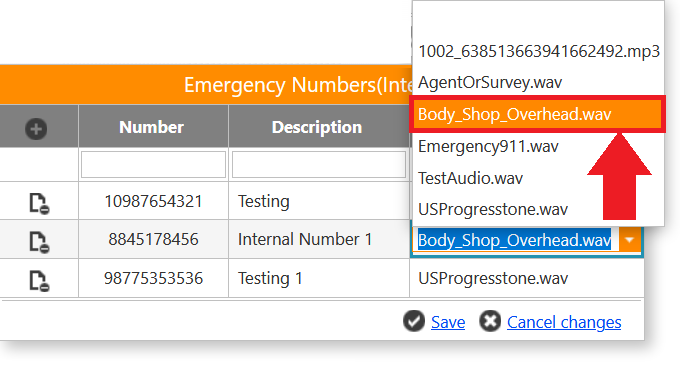
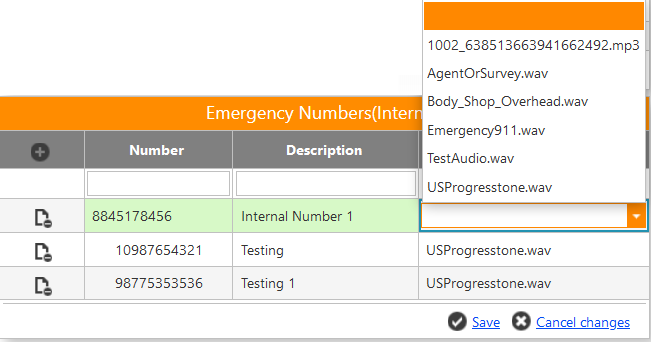
Double click the Play File filed to open the audio list and select the desired audio for the internal emergency number.
Figure 107: Audio File for Internal Emergency Number
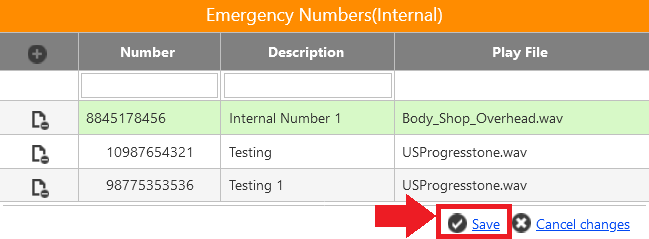
Click the Save button to save your internal emergency number.
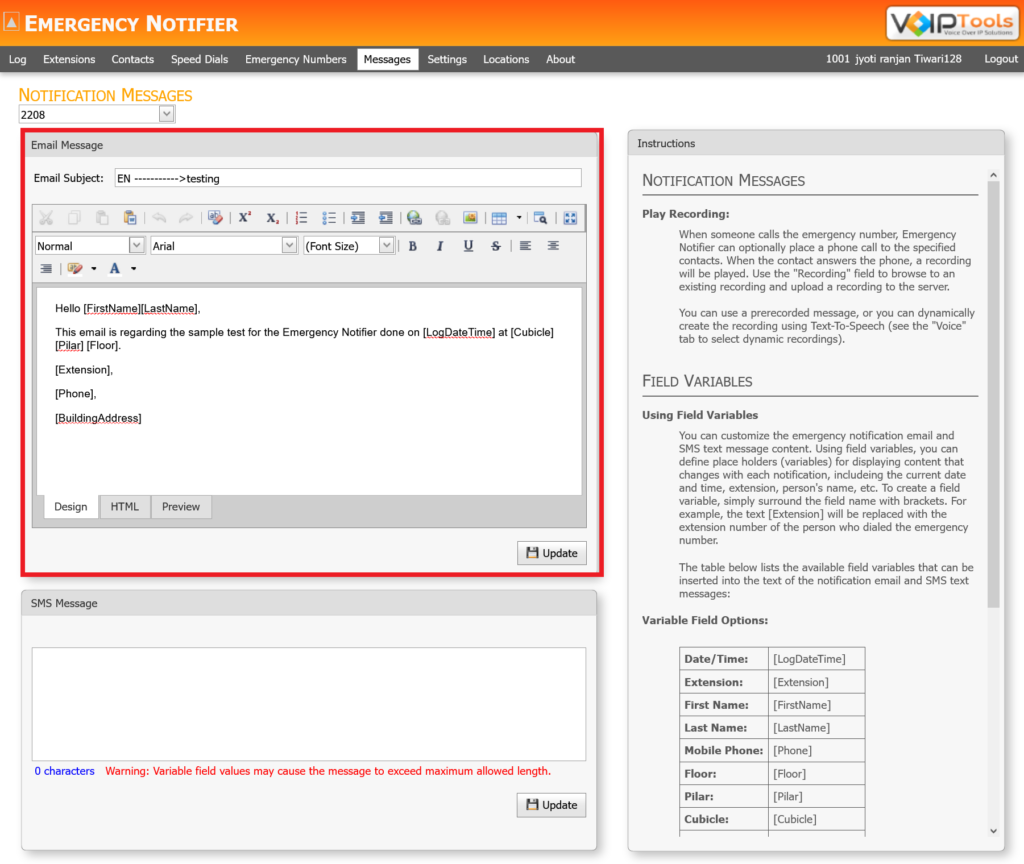
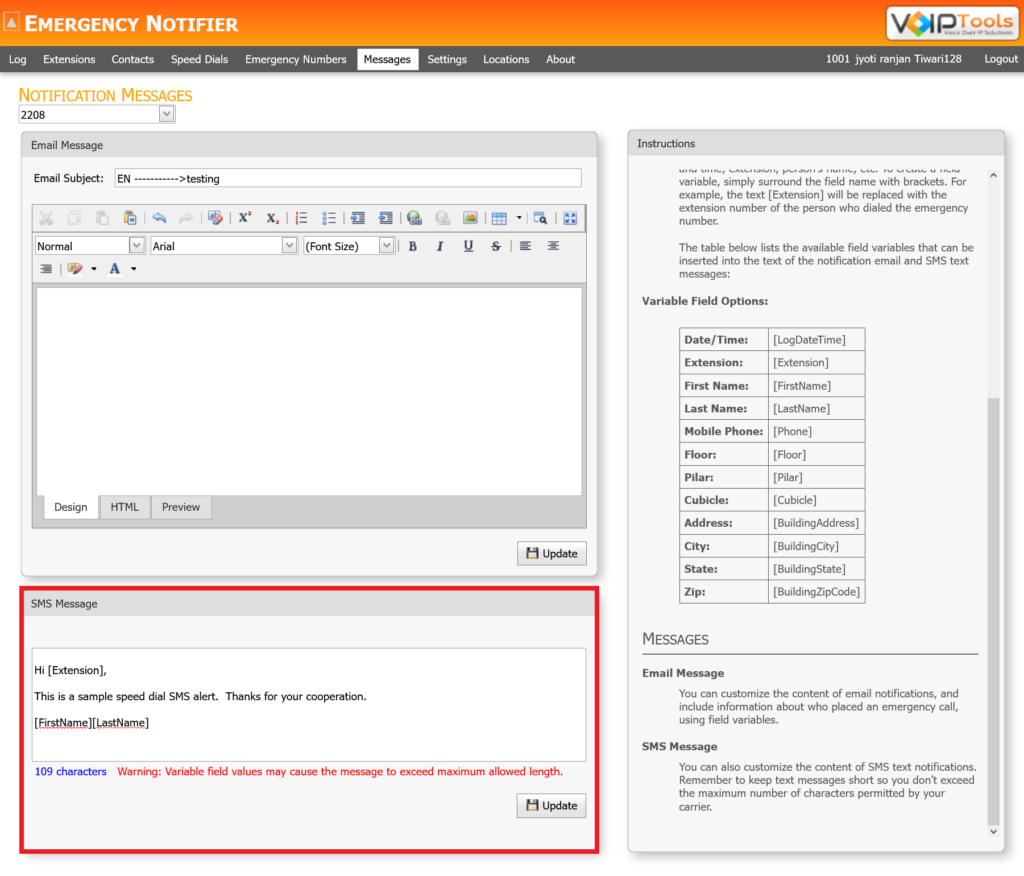
The Messages screen empowers you to compose and send email and SMS notifications specifically targeted at a designated speed dial group or emergency contact. This interface allows you to actively generate a new email or SMS message, or make modifications to an existing one, as per your requirement.
In the Messages screen, under Notification Messages, select the extension from the Extension drop-down to send the email notification
In the Email Subject field, enter the subject of the email.
In the Design editor, enter the email content to notify the selected speed dial group or emergency number. You can also use in-built Field Variables to draft an email.
In the Messages screen, under Notification Messages, select the extension from the Extension drop-down to send the SMS notification
In the SMS Message text area, enter the SMS content to notify the selected speed dial group or emergency number. You can also use in-built Field Variables to draft your SMS.
You can personalize the content of emergency notification emails and SMS text messages. By utilizing field variables, you can establish designated placeholders (variables) that display dynamic content for each notification, such as the current date and time, extension number, individual’s name, and more.
To generate a field variable, enclose the field name within brackets. For instance, the field variable “[Extension]” will be substituted with the specific extension number of the individual who initiated the emergency call.
Below is a table enumerating the field variables that are accessible for insertion into the text of the notification emails and SMS text messages:
[LogDateTime]
Date and time at which message was drafted.
[Extension]
Extension number to whom the message is sent.
[FirstName]
First name of the extension.
[LastName]
Last name of the extension
[Phone]
Name of the state in which the building is located.
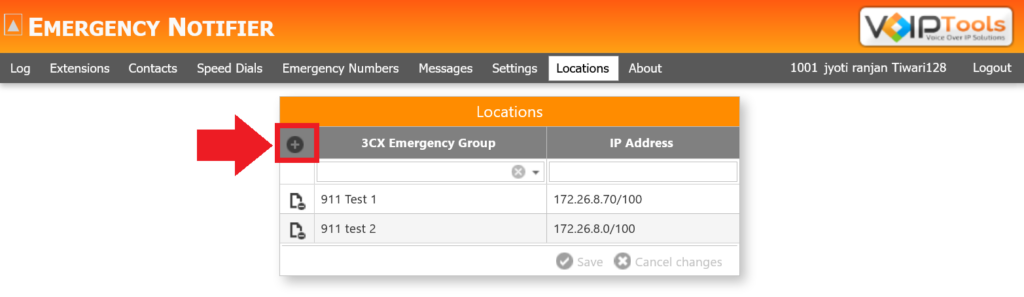
The ‘Locations’ screen grants you the capability to create a location (building) by linking an IP address range to the designated group. As a user transitions from one location to another, the ‘3CX Emergency Notifier’ promptly modifies the group by taking into account the phone’s IP address.
You can perform the following tasks in the Locations screen,
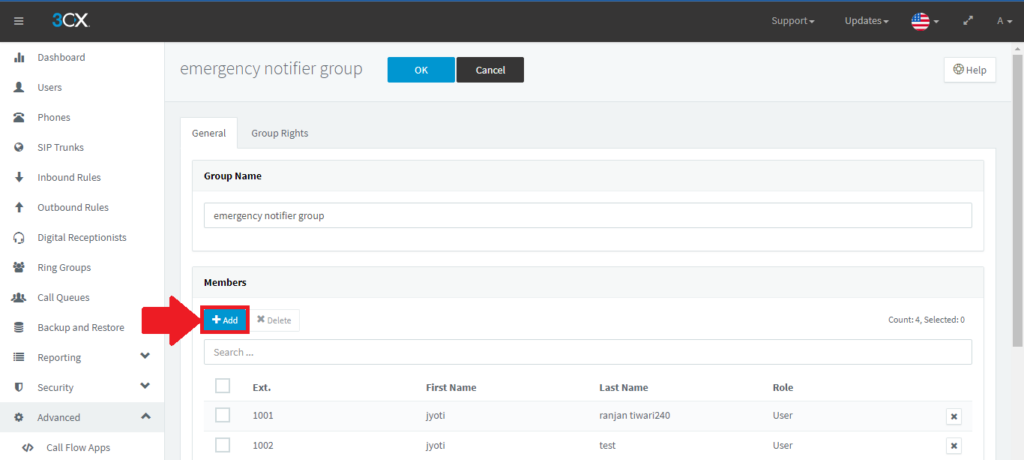
On the 3CX Console Management in the left side pane, click the Users menu.
Figure 111: 3CX Left Side Pane – Users Menu
In the Users screen, click the Groups tab.
Figure 112: Groups tab
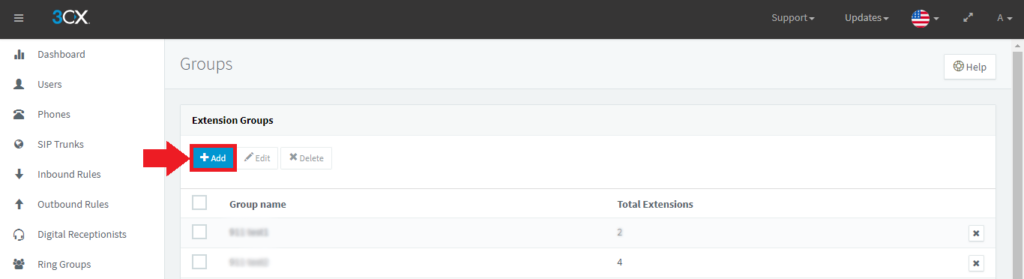
In the Extension Groups section, click the Add button to add a new extension group.
Figure 113: Add button to add new extension group
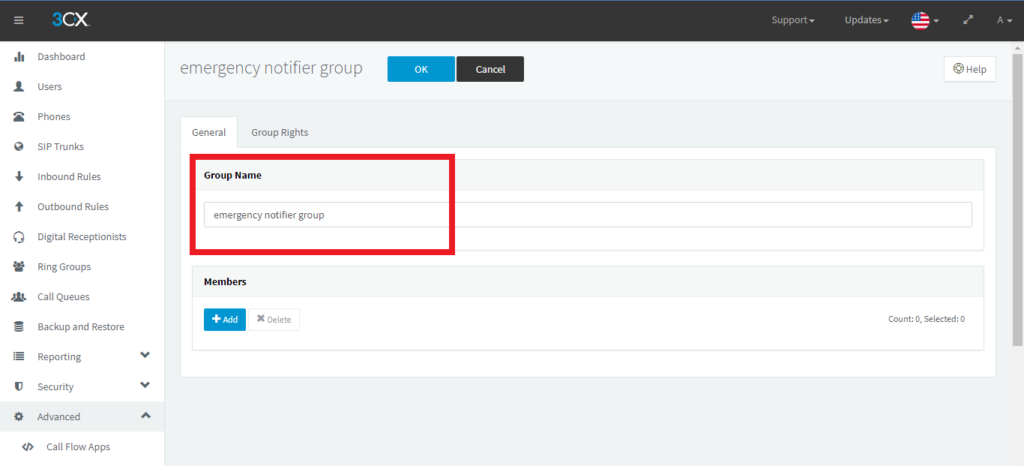
Enter a group name in the Group Name field.
Figure 114: Group Name field
In the Members section, click the Add button and select the desired member extensions to the group.
NOTE:
An extension can be associated with only one group at a time. If you add the same extension to another group, it will not work.
For instance, let’s consider an example: Extension 5555 is initially part of Building A. If you decide to add extension 5555 to Building B, the system will automatically transfer its location from Group A to Group B. This ensures that an extension is always linked to a single group, preventing duplication or conflicting assignments.
Figure 115: Adding Group Members
Click here to create a new emergency number and continue with the procedure.
On the 3CX Emergency Notifier in the Locations screen, click the Add button.
Figure 116: Locations screen – Add button
From the 3CX Emergency Group dropdown, select the group created in 3CX to add the IP address range.
Figure 117: Locations screen – Add group
NOTE:
‘3CX Emergency Notifier’ retrieves the ‘Emergency Group’ details from ‘3CX Management Console’ and displays them in the ‘3CX Emergency Group’ dropdown list.
In the IP Address field, enter the IP Address range in either of the two supporting formats as mentioned in the example below:
Format 1: 192.168.5.0/24 which means that the IP range is from 192.168.5.0 to 192.168.5.24
Format 2: 192.168.5.0-192.168.5.24 which means that the IP range is from 192.168.5.0 to 192.168.5.24
Click Save at the footer of the page to save your data.
Figure 118: Locations screen – 3CX Emergency Group’ and Associate ‘IP Address Range
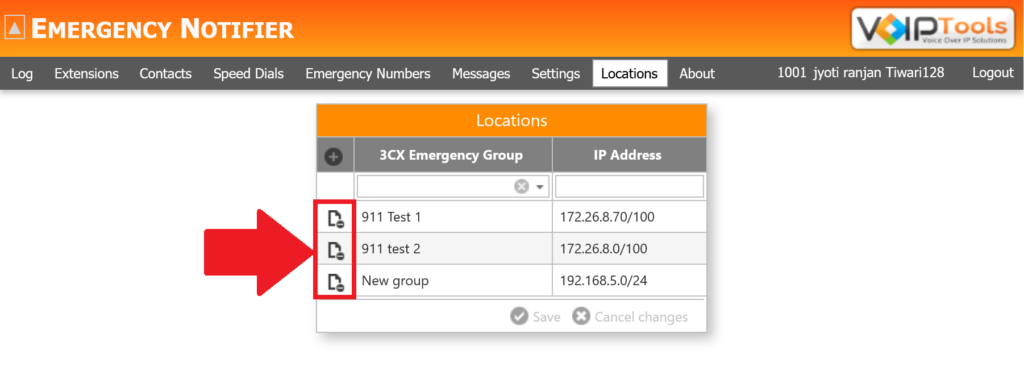
Follow the procedure to delete existing locations,
In the Locations screen, click the Delete button beside the 3CX Emergency Group column to delete the desired location.
In the Delete Confirmation popup click OK to confirm your deletion.
Click Save to save your changes.
Figure 119: Delete location
Associate a single IP address with a different location within a subnet #
To associate a specific single IP address with a different location within a subnet, you must divide the IP address range and allocate them to their respective locations.
Assuming you have a subnet mask with the range 192.168.5.0 – 192.168.5.254 and you wish to associate the particular IP address 192.168.5.100 with a distinct location, follow these steps:
Establish a location for the IP address range 192.168.5.0 – 192.168.5.99.
Create a separate location for the IP address 192.168.5.100.
Generate another location for the IP address range 192.168.5.101 – 192.168.5.254.
By dividing the IP address range and allocating the specific addresses to their respective locations, you can effectively associate a particular IP address with a different location within the subnet.
NOTE:
You can use the IP range available from 1 to 255
Generate Amazon Associate Product Advertising API Keys #
Click here to know how to create an Amazon Web Services account and generate Amazon Web Services Access Key IDs and Secret Key IDs.
You get quick answers to most of your inquiries in our online manual. If you prefer direct contact, we offer various support channels, including phone, email, live chat, and our helpful VoIPTools forums.
Rest assured, our dedicated team is here to assist you around the clock, every day of the year. Whether you’re based in the USA or India, we’re ready to provide prompt responses to your technical queries.
Windows Event Log for VoIPTools Applications and Services #
For troubleshooting any application errors, our Windows Event Log contains a comprehensive list of error messages, warnings, and informative notes related to all our VoIPTools applications and services. It’s a valuable resource to help you pinpoint and resolve any issues you may encounter.
Are you looking to collaborate with other VoIPTools customers facing similar challenges? Our forum is the perfect platform to exchange ideas, solutions, and best practices. Join the conversation at: https://www.voiptools.com/community/
Got questions that need immediate answers? Our chat support team is available to assist you in real time. Just click on the Live Chat button located at the lower right corner of our website, and we’ll acknowledge your queries right away.
To ensure a thorough understanding of your concerns, email us at support@voiptools.com. Describe your issue in detail, and we’ll get back to you within one business day with the support you need.
If you prefer to speak with a representative directly, you can reach us at +1 801-642-4655. Our attentive team is available to take your calls from 8:00 AM to 6:00 PM (Central Standard Time).
If you’ve purchased our products through a VoIPTools Partner, rest assured that they provide first-level support at no additional cost. Partners have access to 100% free technical assistance and actively participate in the troubleshooting process.
VoIPTools customers enjoy access to our online manuals and receive support through emails (with responses within one business day) and live chat. However, please note that we do not provide remote server login assistance.
For a more hands-on experience, consider our “Installation Support” package. Our expert support team can log in to your servers, and install and configure all our tools. This comprehensive service includes setting up SQL Server Express and Internet Information Server if necessary. We’ll work closely with you to tailor our applications to meet your requirements.
We’re committed to providing top-notch support to ensure your VoIPTools experience is smooth and hassle-free. Contact us today, and let us assist you in making the most of our powerful tools!


NOTE:


 to launch the web application.
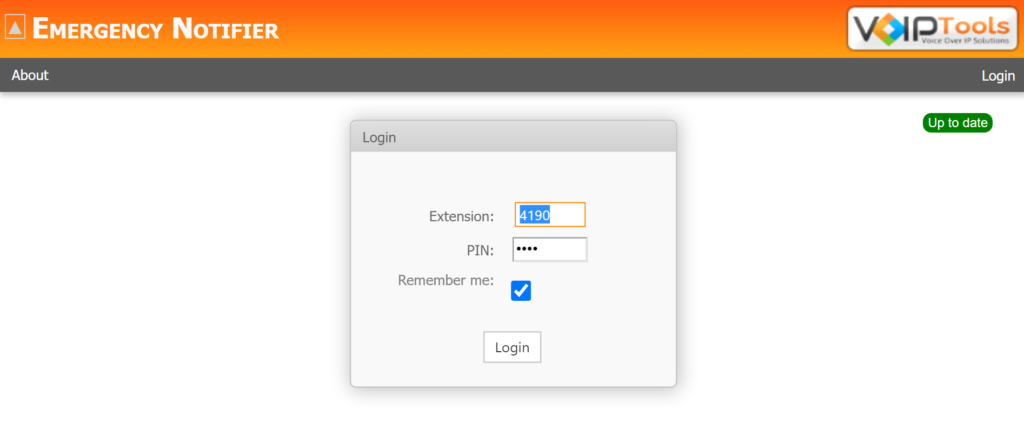

 to complete your registration.
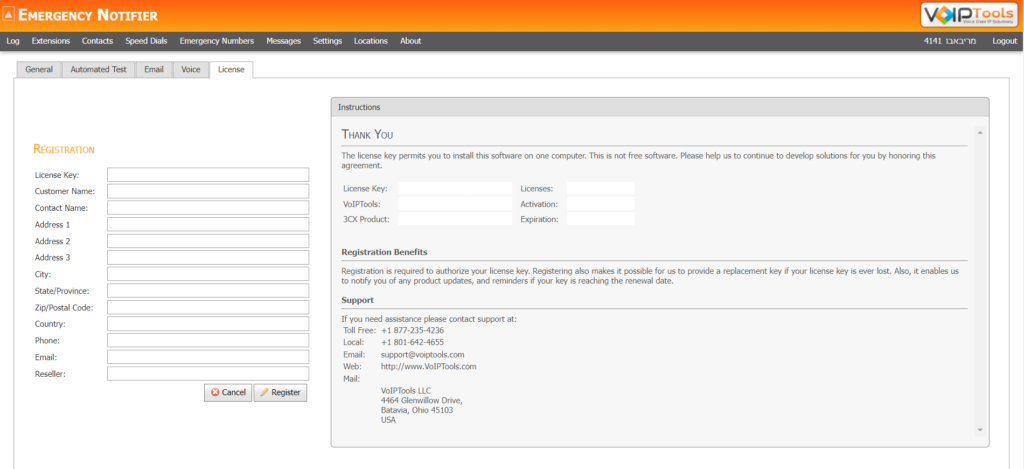

 icon to display notification area overflow
 Emergency Alerts icon and in the right click menu, click Preferences.
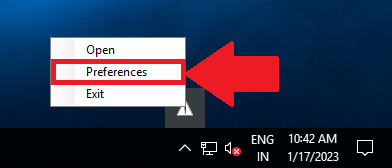
NOTE:


 option.
 application.
 button to save the data.
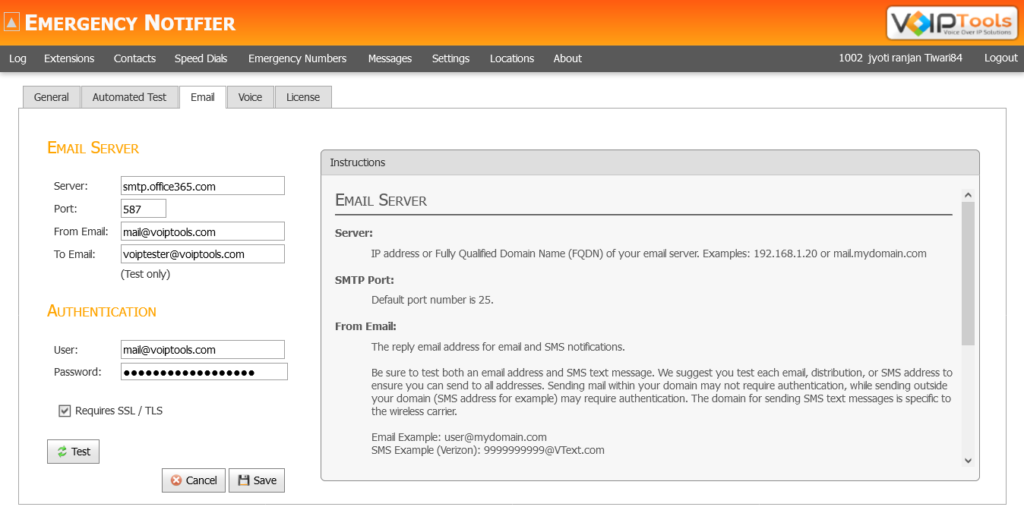
 button to test your settings or click the Save
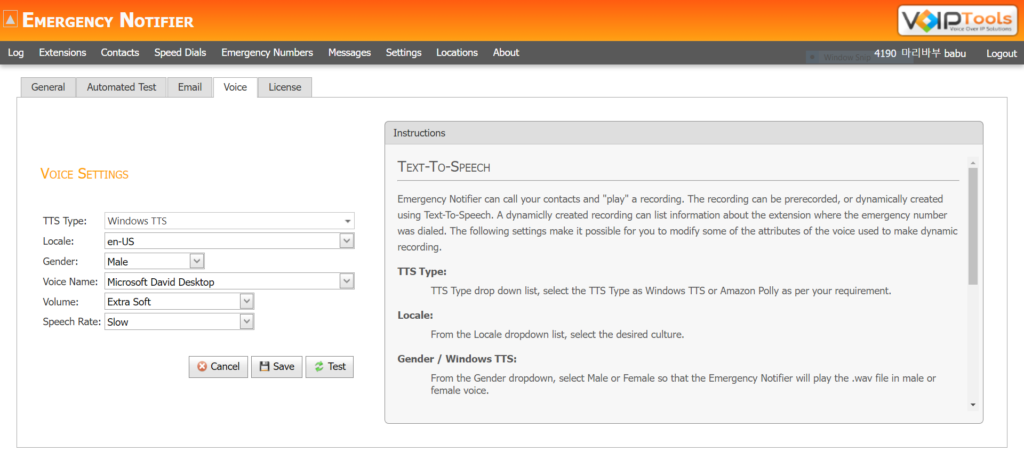
NOTE:


 to save the imports.
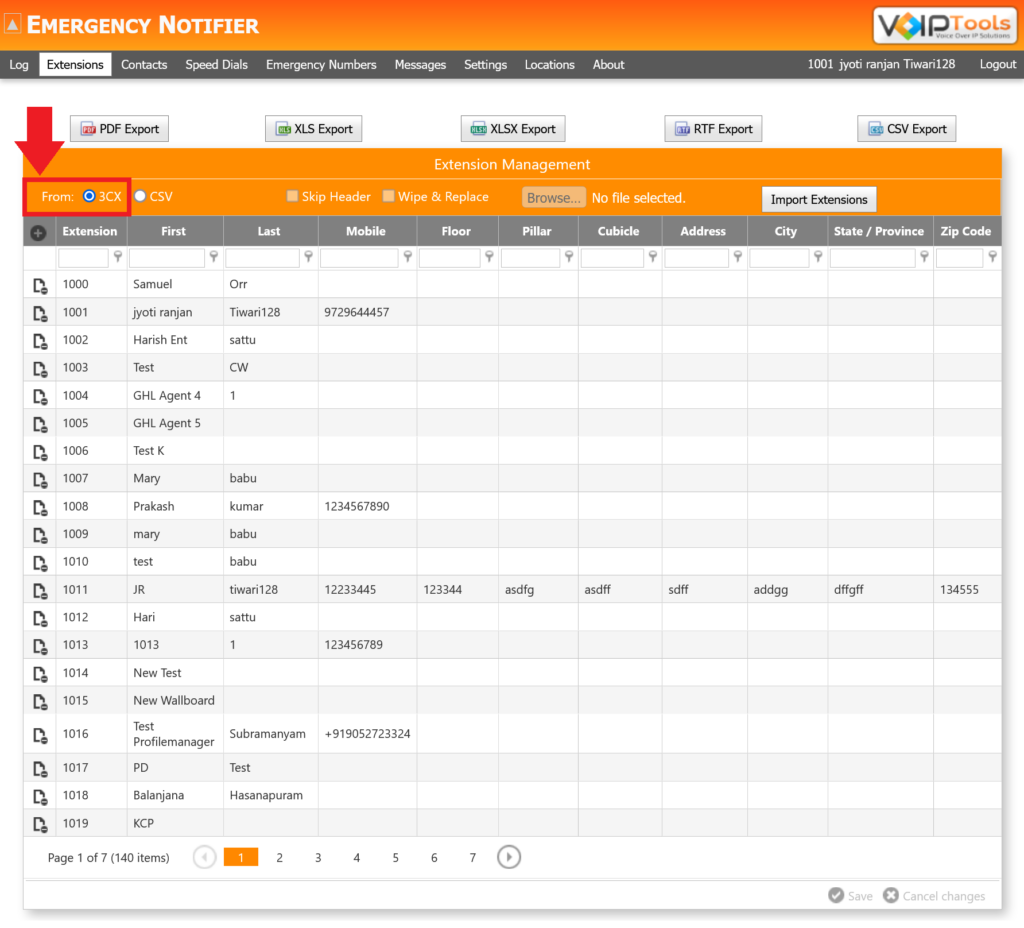
 button to add a new extension.
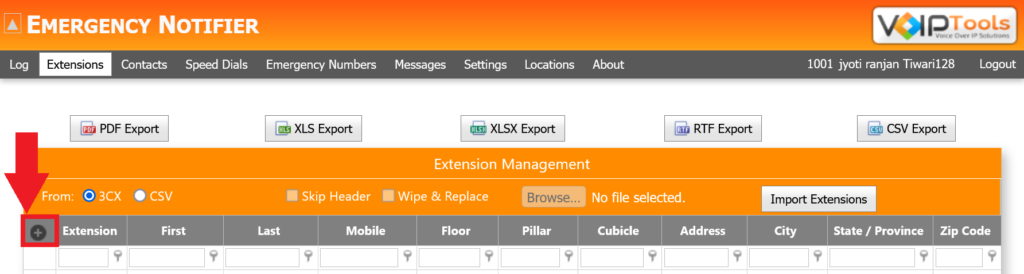
 button beside the extension you want to delete.
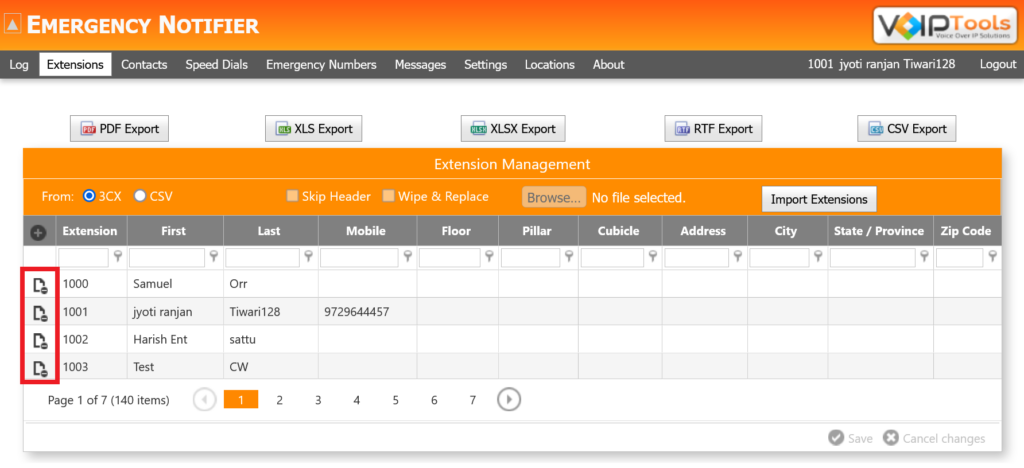
 button to save your changes.
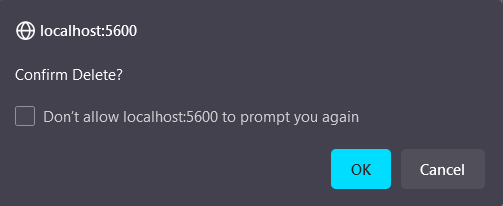

 button to add extension groups.
 to add a new extension group.
 to save the extension group.
 to save the contact.
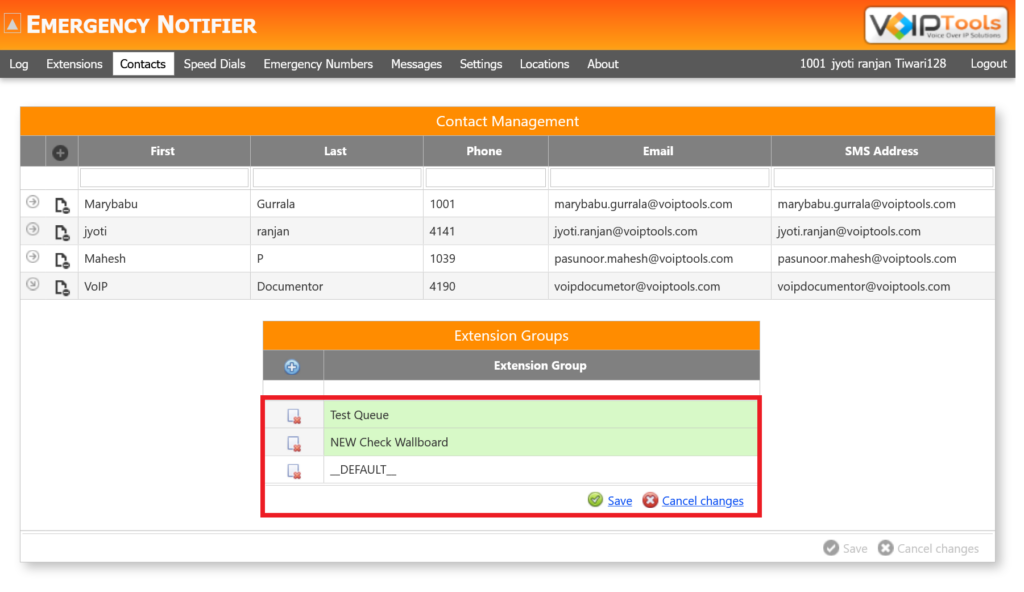
 button beside any notification that you want to add a contact.
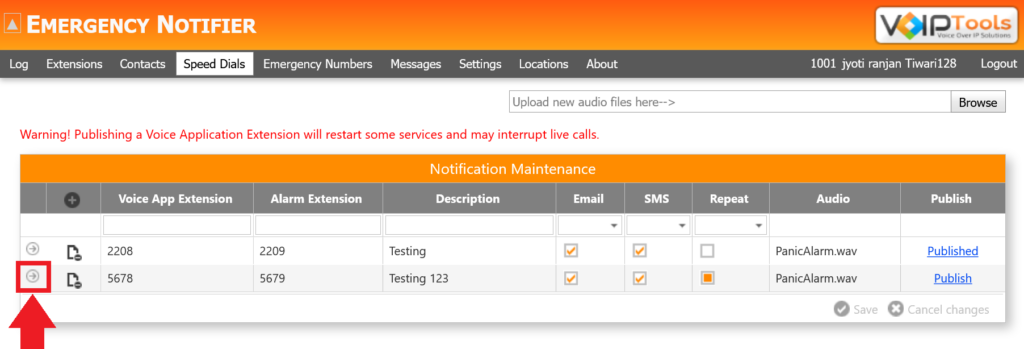
 icon.
icon.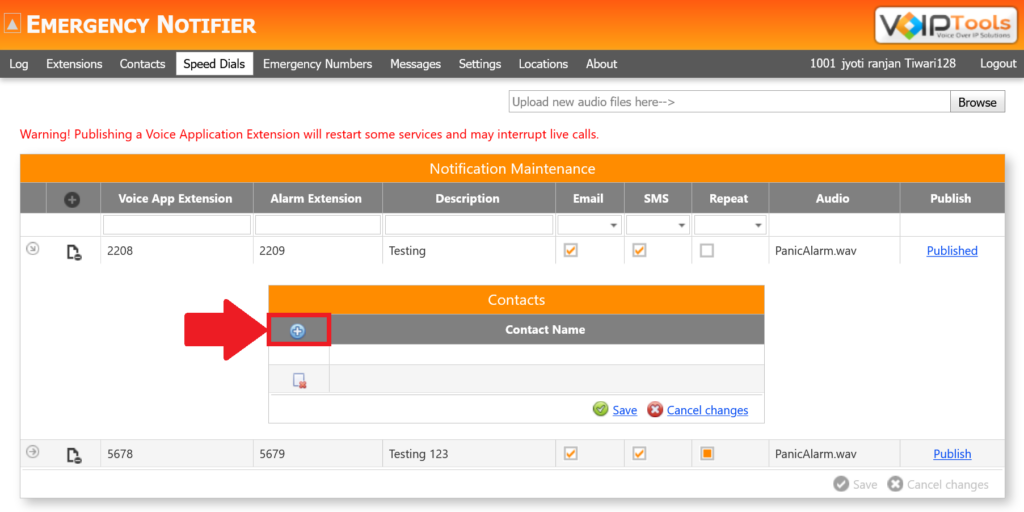
 to save the contact.
 button to save the SMS message.
 button beside the VoIP App Extension column to delete an item.
 to save your changes.
 button to delete the contacts and click OK in the Delete confirmation popup.
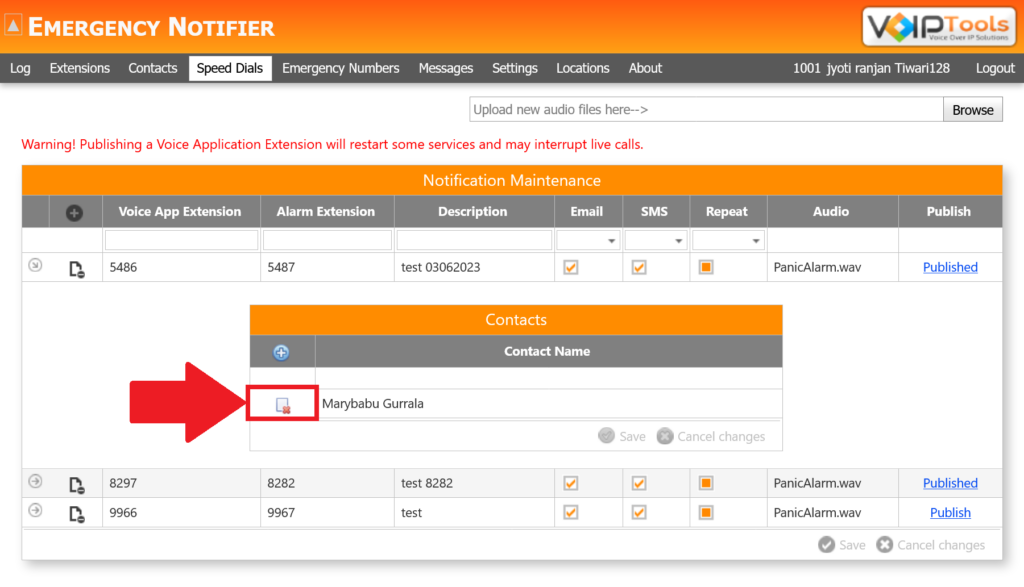
 menu.
menu.
 tab.
tab.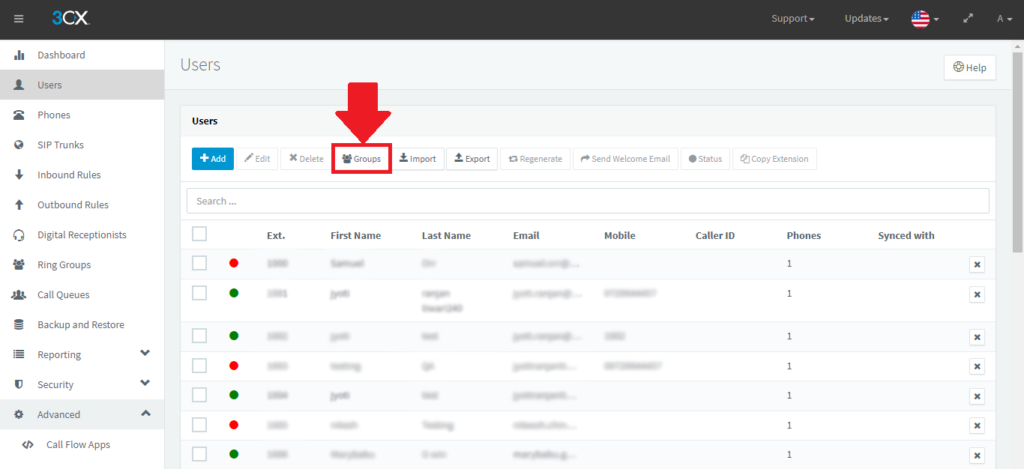

 at the footer of the page to save your data.
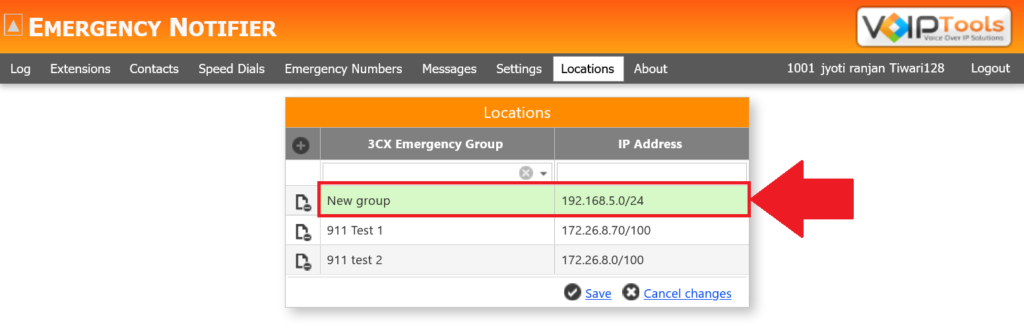


