Effortlessly Sync and Manage 3CX Data with 3CX Exporter for Real-Time Custom Reports.
Experience seamless synchronization and effortless data management with 3CX Exporter. This tool enables you to sync your 3CX data and Call Detail Records (CDR) files with popular databases like Microsoft SQL Server or MySQL. Let this Windows service work in the background, ensuring your external database remains in harmony with your 3CX system. Gain instant access to real-time information and generate custom reports for your business. Say goodbye to manual hassles and hello to streamlined operations with 3CX Exporter.
The 3CX Exporter automates the export of Call Detail Records (CDR) from 3CX’s internal PostgreSQL database to Microsoft SQL Server or MySQL. This Windows service runs efficiently in the background, maintaining synchronization between the external database and the data in 3CX.
Discover the capabilities of 3CX Exporter, which enables you to generate customized reports using well-known reporting tools. Effortlessly store data in SQL or MySQL, opening up numerous opportunities for data analysis and reporting requirements.
REMOTE CDR ACCESS
Accessing CDR files from a cloud-hosted 3CX server can be challenging. Fortunately, our Exporter provides a simplified solution by utilizing our Relay. This enables you to easily access CDR files remotely, eliminating any difficulties. Embrace seamless file retrieval with our user-friendly solution.
EFFORTLESS DATABASE SYNC
Achieve smooth synchronization between your external database and 3CX using this efficient Windows service. This service operates automatically in the background, ensuring that your data stays consistently up-to-date.
EASY ARCHIEVING
Efficiently archive historical information using 3CX Exporter. Effectively categorize and structure vital data from your 3CX system, enabling convenient retrieval as required.
Optimize your workflow using 3CX Exporter, a user-friendly tool that automates the export of Call Detail Records. Specify your preferred export frequency during installation, and let the tool handle the remaining tasks. Additionally, you benefit from the convenience of adjusting both the export frequency and database settings as needed, granting you seamless control over your data management.
Before installing 3CX Exporter, you need to ensure that your computer meets the minimum requirements mentioned below:
3CX Version V18
Windows 10 or above
Microsoft SQL Server 2016 or above (Including the free SQL Express edition), or MYSQL
Windows Server 2012 (64-bit) or above
.Net 4.7.2
If you are installing 3CX Exporter in a server other than 3CX Server, then you should install ‘C++ 2010 redistribution package (X86)’ in the 3CX Server. You can install it from this link.
3CX Relay Service
Static IP for VoIPTools and 3CX servers
Installation on a domain controller may require additional assistance
NOTE:
You need a Static IP for both VoIPTools and 3CX servers to ensure proper two-way communication, both the 3CX server (Relay) and the VoIPTools server. Dynamically assigned IP addresses are not supported. Additionally, it is recommended to use HTTPS for secure communication, which requires a FQDN for SSL/TLS certificate validation between the VoIPTools server and the Relay.
You can order 3CX Exporter online at https://www.voiptools.com. Your order confirmation email will include your license key and a link to download the software.
Several prerequisites must be installed before installing the 3CX Exporter. These prerequisites include Microsoft Internet Information Server (IIS) and Microsoft SQL Server
This User Guide contains step-by-step instructions to successfully install 3CX Exporter. Begin by extracting the installer from the downloaded zip file (Step 1 above), then run the setup program named Exporter.exe
You must register your license key to activate 3CX Exporter. Your license key is included in your order confirmation email, and can also be found in your order history on our website.
NOTE:
While installing SQL Server, ensure the following,
Uninstall the previous versions of SQL Management Studio manually before installing the new version.
Install it in “Mixed Mode” to include SQL Authentication, and install SQL Management Studio
NOTE:
When installing IIS, be sure to install Basic Authentication, .Net Extensibility, and ASP.Net 4.X
Find the software download link in the Order Confirmation Email, or you can find it in your order history on our website and download the 3CX Exporter application.
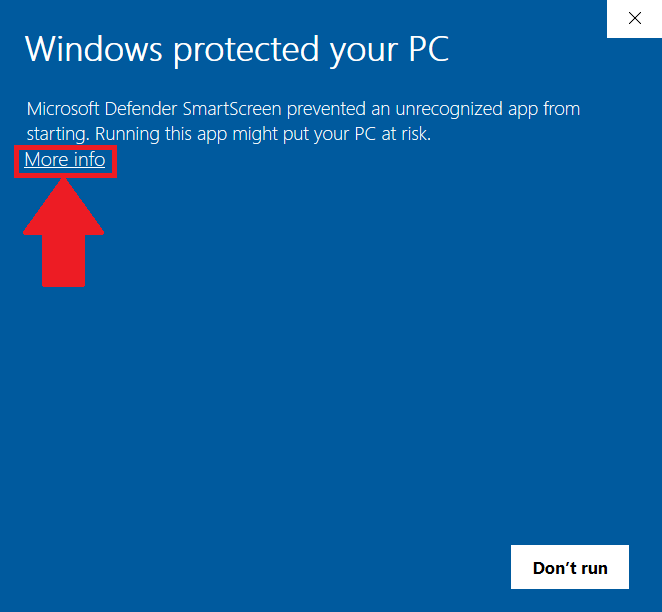
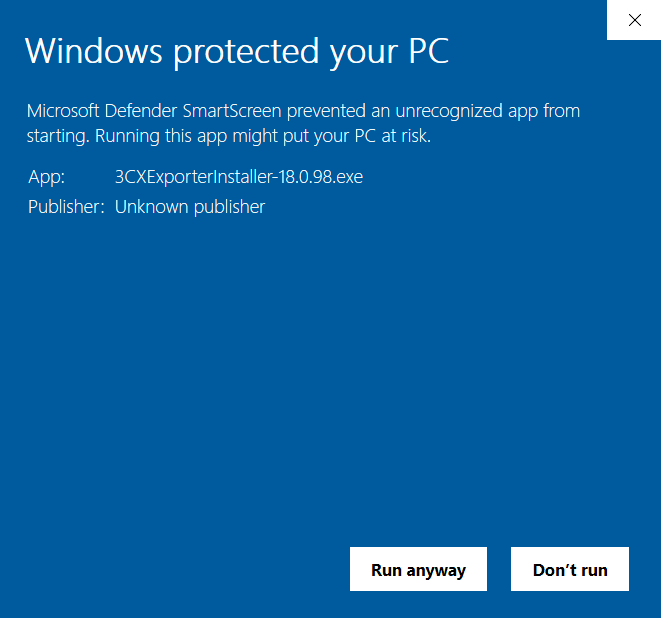
In the Microsoft Defender SmartScreen, click the More Info option.
Figure 1: Windows Defender Screen
Click the Run Anyway option to start the installation.
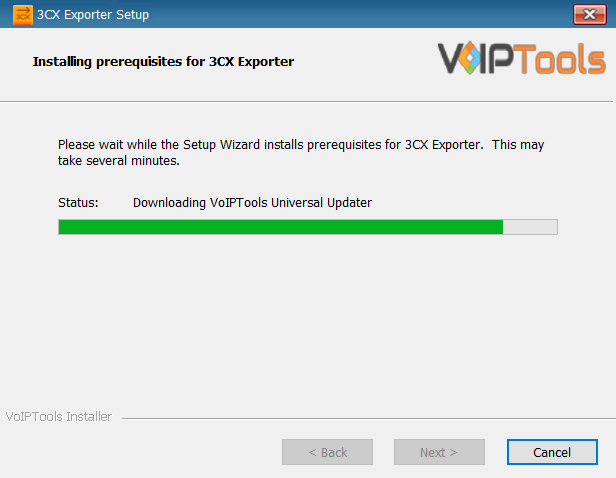
Click on the software installer that was downloaded in step 1 above. The installation wizard will automatically identify the needed prerequisites and assist you with the installation of the prerequisites needed to run ‘3CX Exporter’. These include .NET Framework (Web Installer), SQL Server Express (Web Installer), and SQL Server Management Studio.
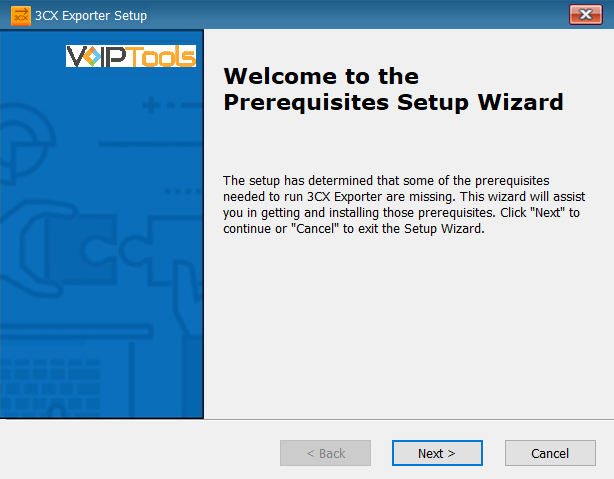
Click the downloaded installer executable to launch the Prerequisites Setup Wizard and click Next.
Figure 3: Prerequisites Setup Wizard
In the Prerequisites window, the installer will identify the missing prerequisites. It is important that you install all the required prerequisites. However, you can select/unselect the applications to be installed based on your unique requirements. Click Next to continue.
Figure 4: Select Prerequisites to Install
The installer will download and install the selected applications.
Figure 5: Prerequisites Installation in progress
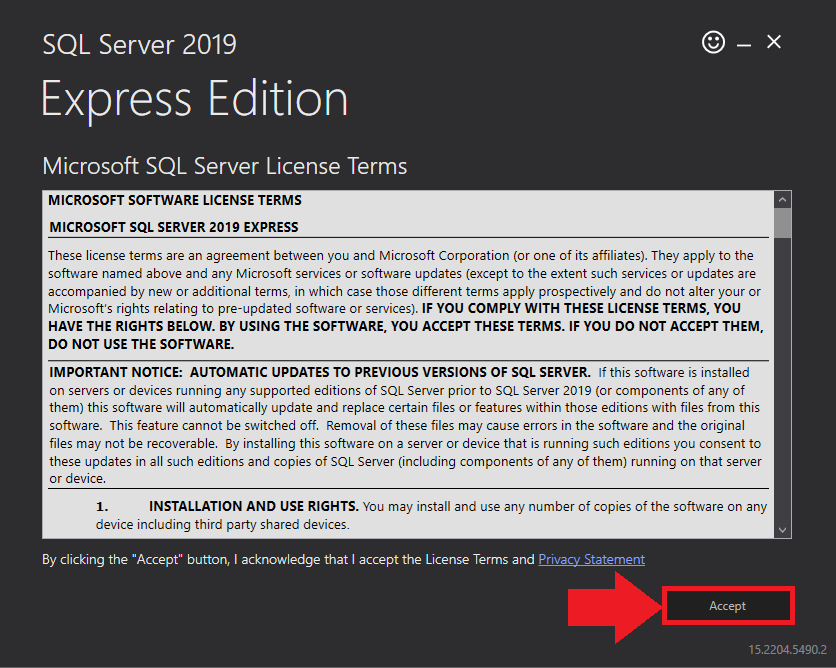
In the Microsoft SQL Server License Terms click the Accept button to acknowledge the license terms and continue.
This page appears if you do not have SQL Server Express preinstalled in your device.
Figure 6: SQL Server Express: Accept License Terms
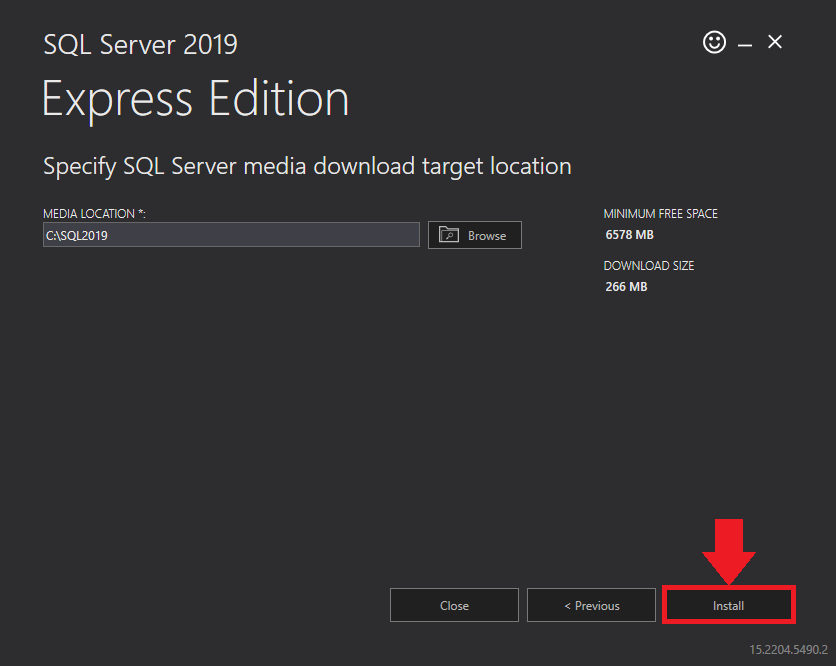
View the SQL Server Media target location in the Media Location field. If required, you can click the Browse button to change the location. Click Install to begin the installation of SQL Server Express.
Figure 7: SQL Server Express: Target Location
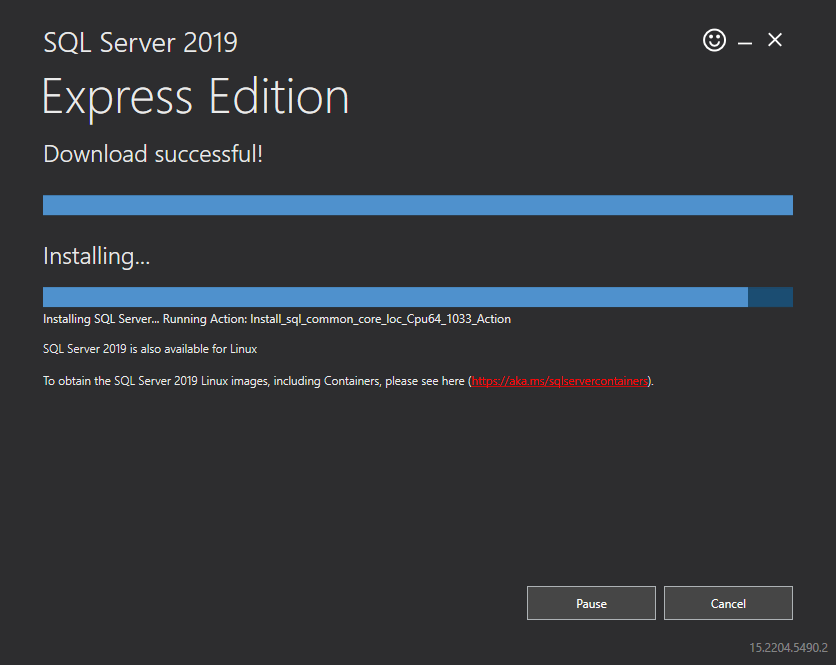
SQL server installation is in progress. This may take several minutes to complete.
Figure: SQL Server Installation In Progress
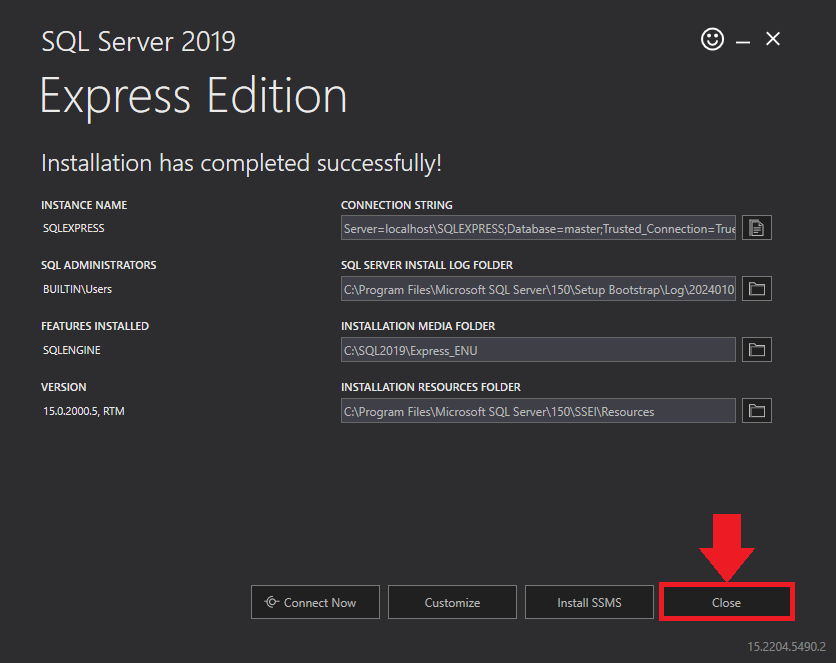
Click the Close button once the prerequisites are installed.
Figure 8: SQL Server Express: Installed Successfully
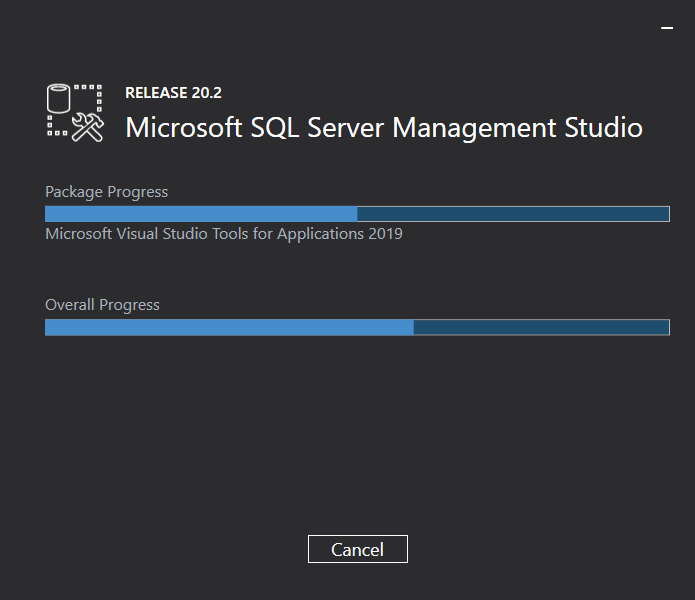
Microsoft SQL Management Studio installation is in progress. This may take several minutes to complete.
Figure 9: Microsoft SQL Server Management Studio: Installation in progress
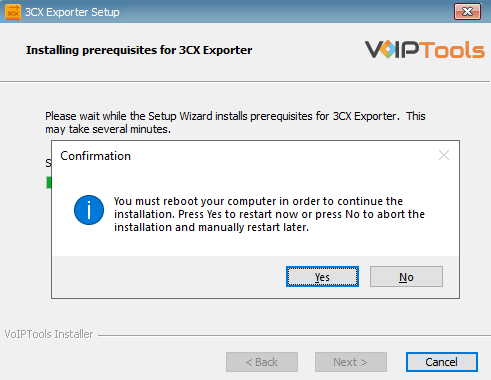
In the confirmation message box, click Yes to reboot the computer.
Figure 10: SQL Server Express: Reboot your computer
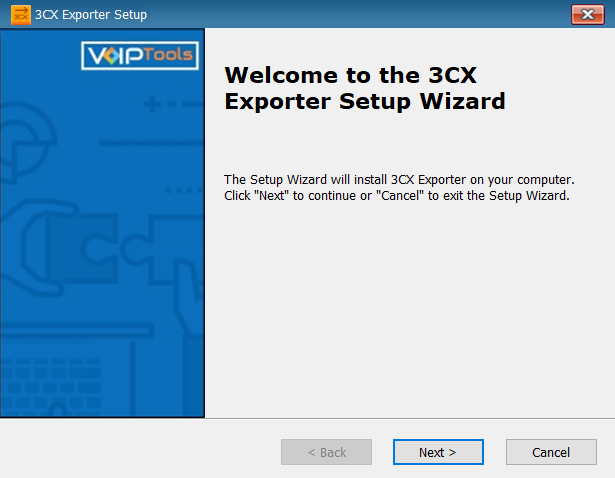
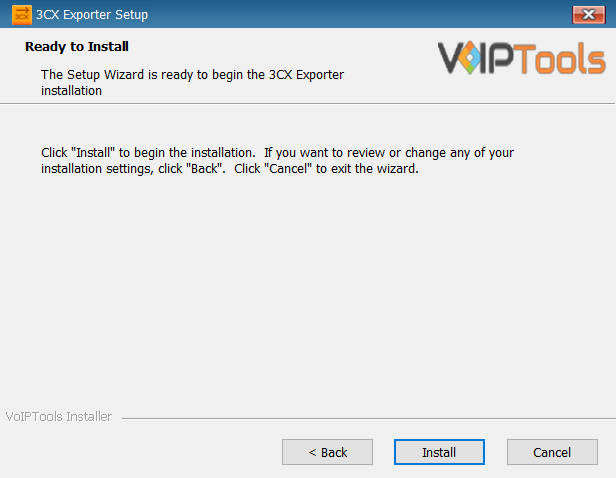
After all the prerequisites are installed, the 3CX Exporter Setup Wizard appears. Click Next to Continue.
Figure 11:3CX Exporter Setup Wizard
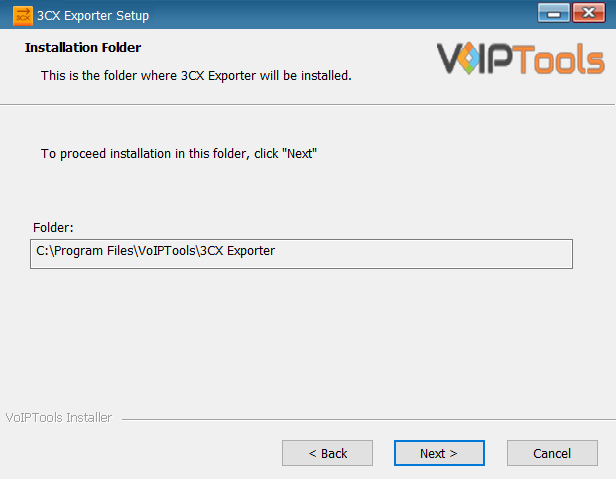
On the Select Installation Folder window, the Folder field displays the location where the ‘3CX Exporter’ will be installed. Note that you cannot change the path.
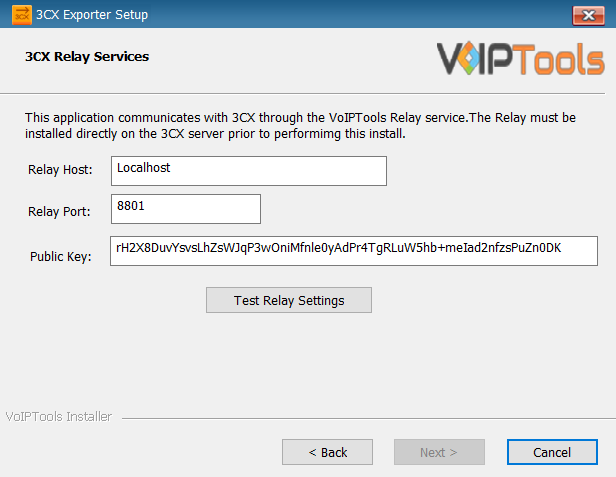
In the 3CX Relay Services window, in the Relay Host field, enter the FQDN of your 3CX server.
Enter 8801 in the Relay Port field.
Enter the public key you took from VoIPTools Relay services in the Public Key text area.
Figure 13: Configure Relay services
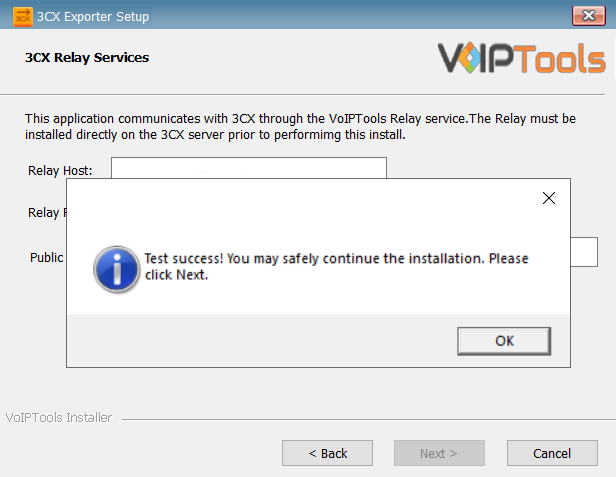
Click the Test Relay Settings to confirm ‘3CX Exporter’ can communicate with the Relay services running on the 3CX server.
If the ‘3CX Exporter’ is successfully able to communicate with the Relay services that run on the 3CX server, a Success message box appears. Click OK. If the test fails, you will not be able to continue until communication with the relay is established.
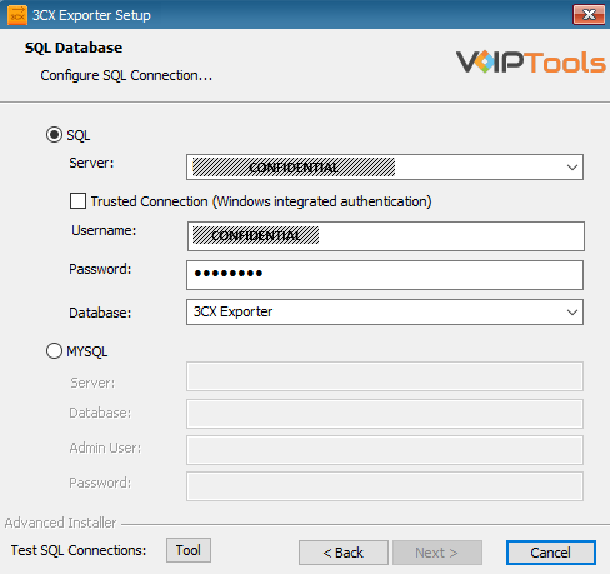
If using the free SQL Express Edition, the default SQL Instance name is SQLExpress.
NOTE:
If you want to use ‘SQL Authentication’, then install SQL Server in ‘Mixed‘ mode.
If SQL Server is installed on a server other than the server where 3CX Exporter is installed, you will need to configure SQL Server to allow remote connections.
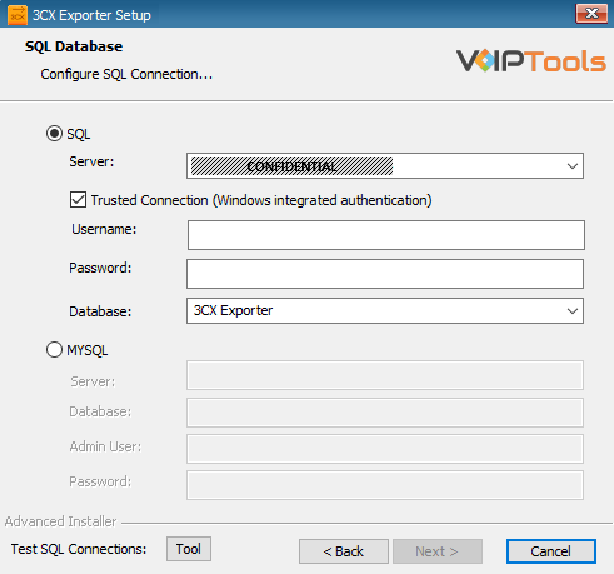
Enter your credentials in the Username and Password fields.
NOTE:
Make sure that you select a SQL Login that has sufficient permissions to alter the database and create SQL objects.
Select or enter 3CX Exporterin the Database dropdown.
Figure 15: Configuring SQL database
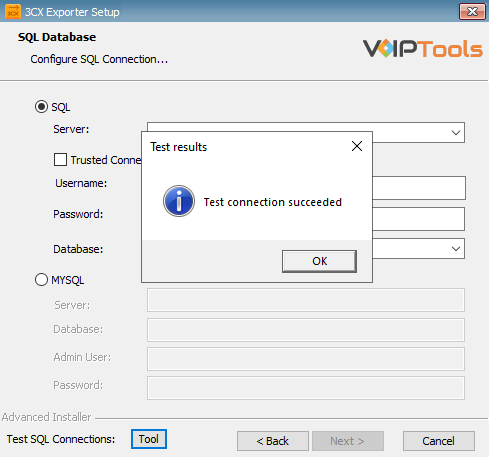
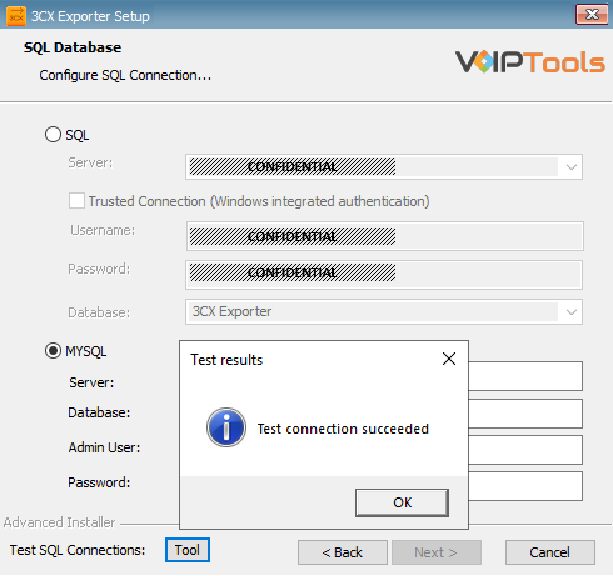
In the Test SQL Connections section, click the Tool button to test the connection.
Figure 16: SQL Authentication – Test Connection Success
To use Windows Integrated Authentication check the Trusted Connection (Windows integrated authentication) checkbox.
The VoIPTools installer will create a local Windows user name as “VoIPToys” and give you sufficient rights to this user to create/update the SQL database.
Figure 17: Windows Integrated Authentication
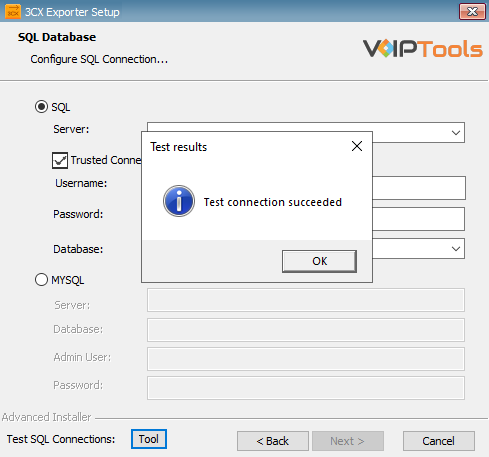
In the Advanced Installer section, click the Tool button to test the connection.
Figure 18: Windows Integrated Authentication – Test Connection Success
NOTE:
We recommend you use SQL Authentication rather than Windows authentication. Many of our tools leverage a Call Flow Designer (CFD) application running on the 3CX.Frequently our CFD applications require access to an SQL database. If the 3CX server and the database server are not in an Active Directory domain, Windows authentication will fail.
To use SQL Authentication, you must configure the SQL server to run in Mixed Mode. If you install SQL Server with our tools, we configure SQL in Mixed Mode.
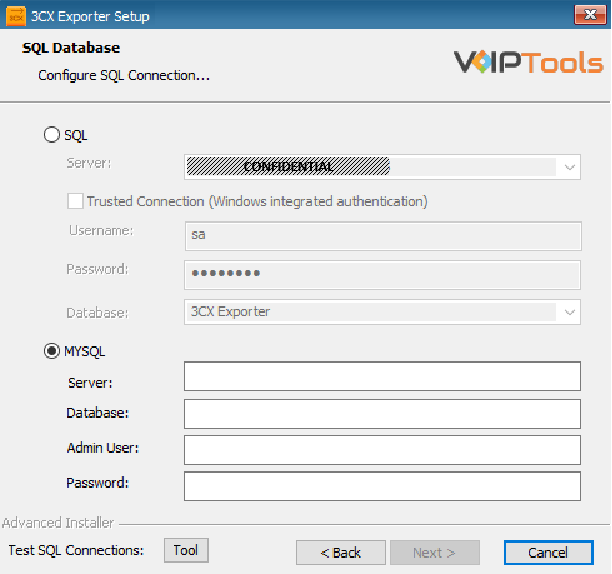
Click the MySQL radio box to use the MySQL database.
Enter the name of the server in the Server field.
Enter the name of the database in the Database field.
Enter your credentials in the Admin User and the Password fields.
Figure 18: Configuring MySQL Server
Click the Tool button to test the connection.
Figure 19: MySQL Connection Test Successful Message Box
NOTE:
The first time you install 3CX Exporter, DO NOT enter a database name. Choose Select or enter a database name and leave the database name blank. The installer will create the SQL database automatically and apply the necessary permissions. If upgrading 3CX Exporter from a previous version, select the existing database from the list.
To ensure the authorization of your license key, it is necessary to complete the registration process. By registering with VoIPTools, you gain access to a range of benefits:
Key Replacement Assistance
In the unfortunate event of a lost license key, registering with VoIPTools lets us provide you with a replacement key promptly.
Product Updates and Reminders
By registering, you will receive timely notifications from VoIPTools regarding any product updates. Additionally, we will send reminders when your key is nearing its renewal date, ensuring uninterrupted access to our services.s
Double-click the 3CX Exporter Icon to open the web application.
On the Login page, do the following tasks,
In the Extension field, enter your 3CX extension number.
In the PIN field, enter your 3CX voicemail PIN.
Click the Login button to log in to your account.
Figure 23: Login Page
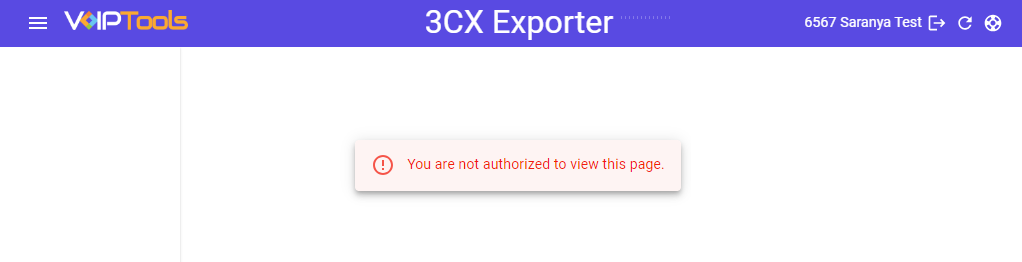
NOTE:
Access to the 3CX Exporter application is limited to Manager accounts. If you attempt to log in as a User, access will be denied, and the following image will be displayed.
Figure 24: User Login Restriction
Enter your license in the License Key field and other mandatory pieces of information and click the Registerbutton to complete your software registration.
Figure 24: Register Software
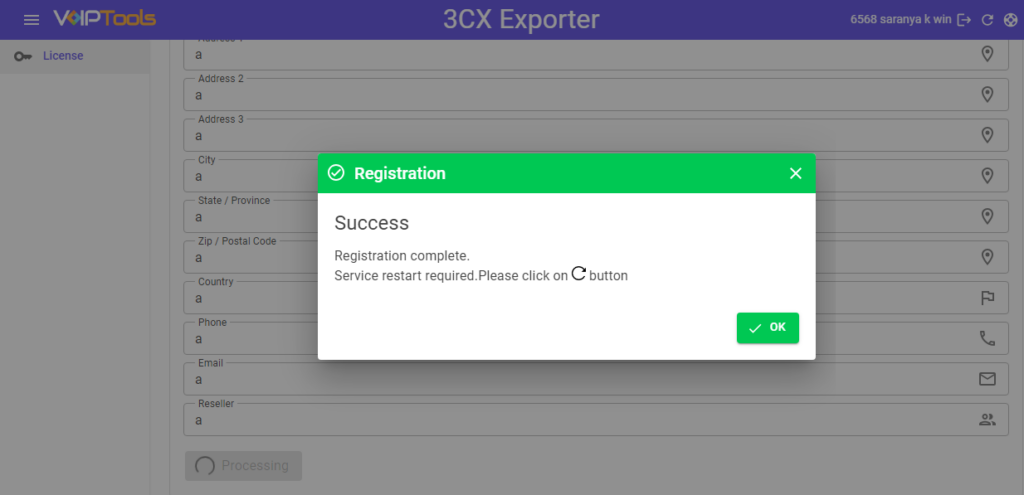
You will get a Success message box when your registration is successful. Now you can view the Settings tab in the left side panel.
Figure 25: Success Message Box
NOTE:
It is essential to re-register the Exporter application because the framework application has transitioned from Windows to Blazer.
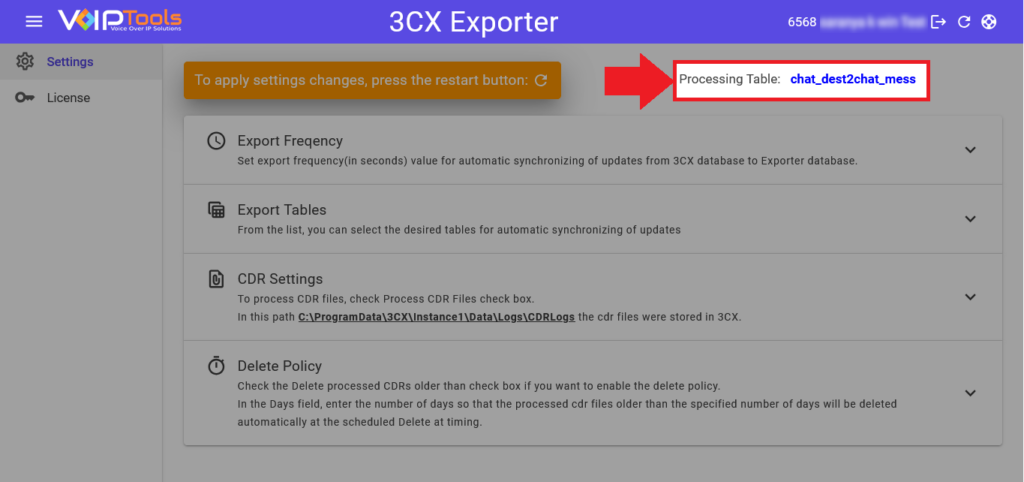
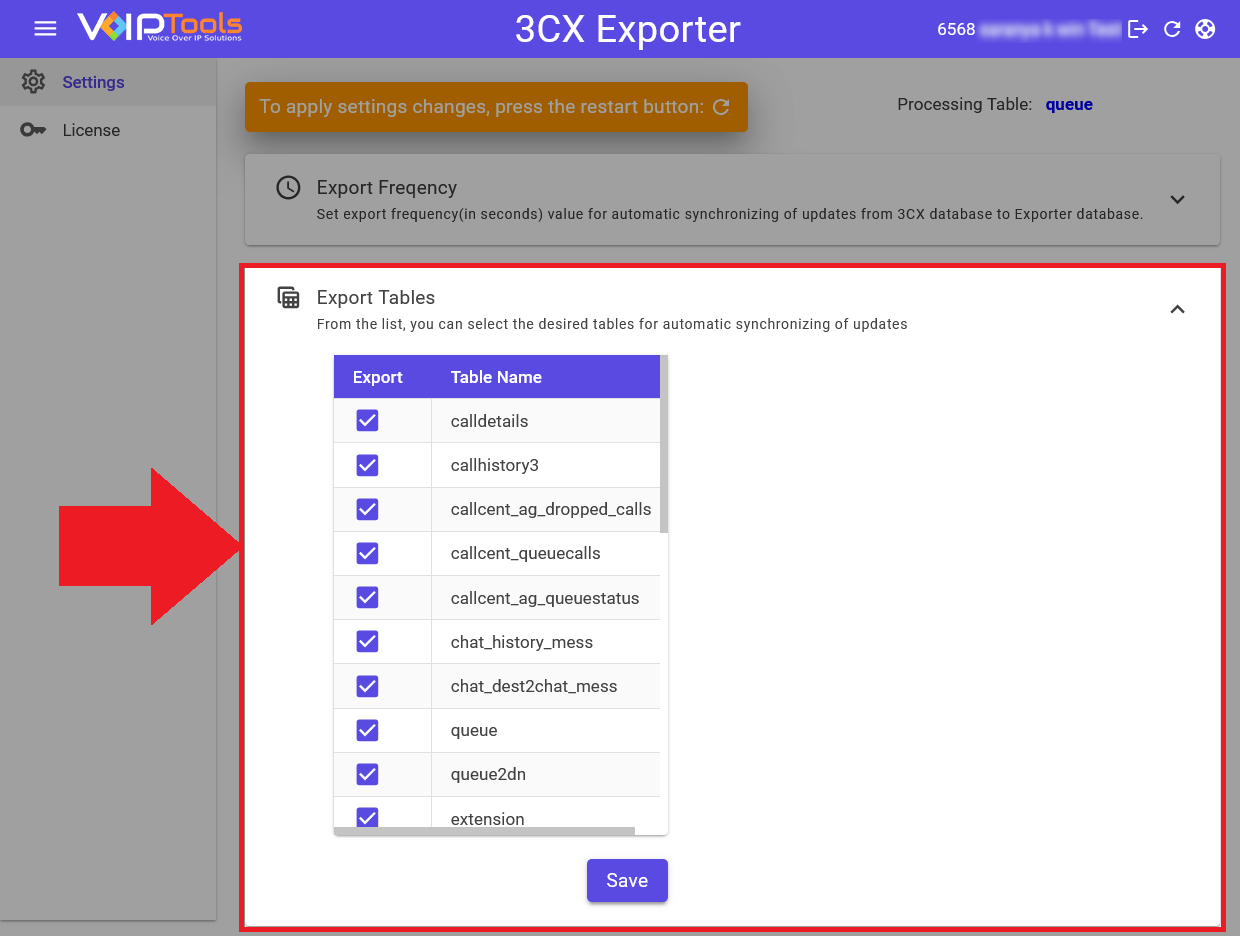
The Processing Table displays the real-time updates on the status of data being exported from 3CX to external databases such as Microsoft SQL Server or MySQL. This feature helps users monitor which table is currently being processed and ensures visibility over the export progress.
For example, if there are 30,000 records in the “Call Process” table, the exporter will complete the processing of all 30,000 records before moving to the next table.
Shows which table is currently being exported
The current table in process is visible, allowing users to see the table in progress.
Frequency of updates
Export operations now have a desired frequency interval between tables. After each table is processed, the exporter waits for a set interval before processing the next table.
Real-time monitoring:
Users can check which table is actively being processed and ensure that exports are happening smoothly without bottlenecks or delays.
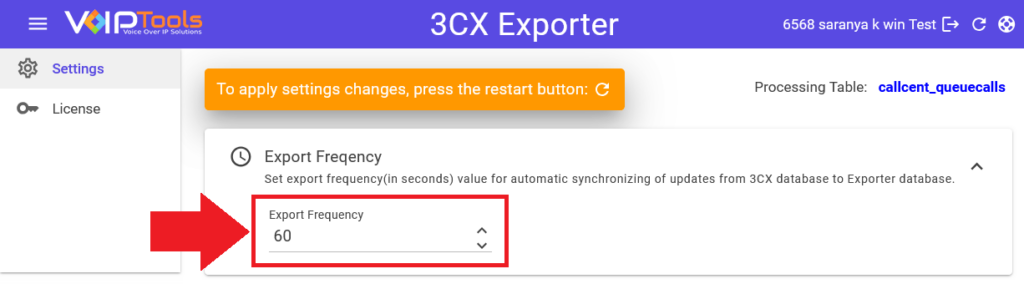
In the Export Frequency section, you can define how often you want to export tables to the database. This setting controls the automatic synchronization of updates from the 3CX database to the Exporter database.
To set the export frequency, follow the procedure,
In the Settings menu, expand the Export Frequency section.
In the Export Frequency field, set the frequency (in seconds).
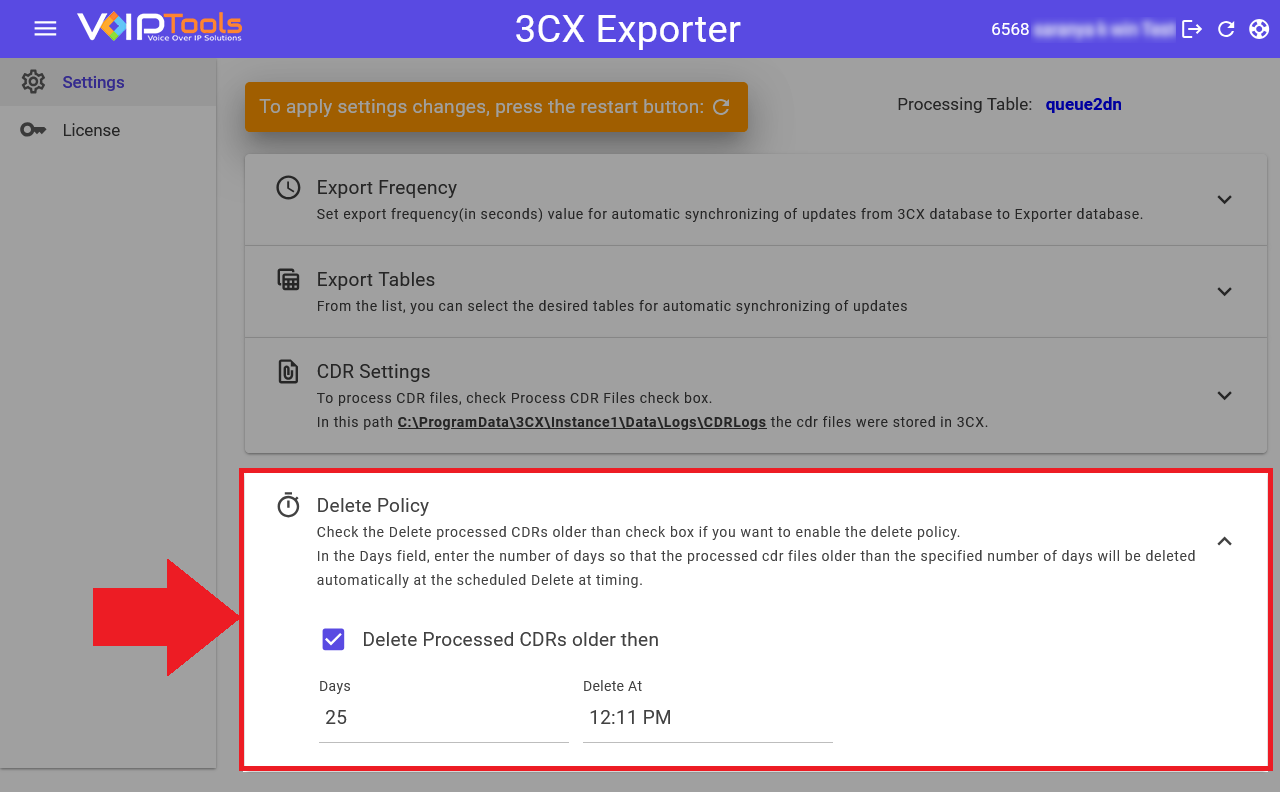
The CDR Settings section lets you manage and process your CDR (Call Detail Record) files within the 3CX Console. By configuring the CDR Settings and Delete Policy, you can streamline the storage and maintenance of your call records. This ensures that older processed CDR files are automatically deleted, saving you time and resources.
The Delete Policy section lets you configure the automatic deletion of processed CDR (Call Detail Record) files that are older than a specified number of days at a scheduled time. This allows for the management and maintenance of CDR data, ensuring that older records are regularly removed to free up storage space and maintain system efficiency.
Follow the procedure to configure the delete policy for the CDR files,
In the Settings menu, expand the Delete Policy section.
Check the Delete processed CDRs older than the check box to enable the delete policy.
In the Days field, enter the number of days to delete the the processed CDR files older than the specified number of days automatically at the scheduled Delete At time.
In the Delete at time box, enter the time using the up and down arrows to delete the processed CDR files older than the specified number of days at the scheduled time.
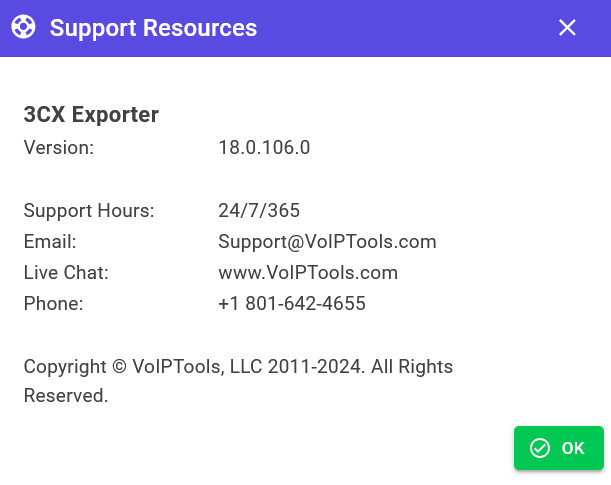
The Support Resources screen displays the version number of the application and the contact information of VoIPTools. Click on the link to learn about the comprehensive support provided by VoIPTools.
Click the Support Resources button on the top right of the application to open the Support Resources screen.
Figure 33: Support Resources button
The following image shows the Support Resources screen,
Besides extracting data directly from the 3CX PostgreSQL database, Exporter efficiently exports Call Detail Records (CDR) as text files. These CDR files encapsulate valuable call information, encompassing participants, durations, and the call chain. While not as extensive as the PostgreSQL database, the CDR files offer a more user-friendly data structure. If the CDR files fulfill your data requirements, it’s advisable to prioritize their use over accessing the PostgreSQL database.
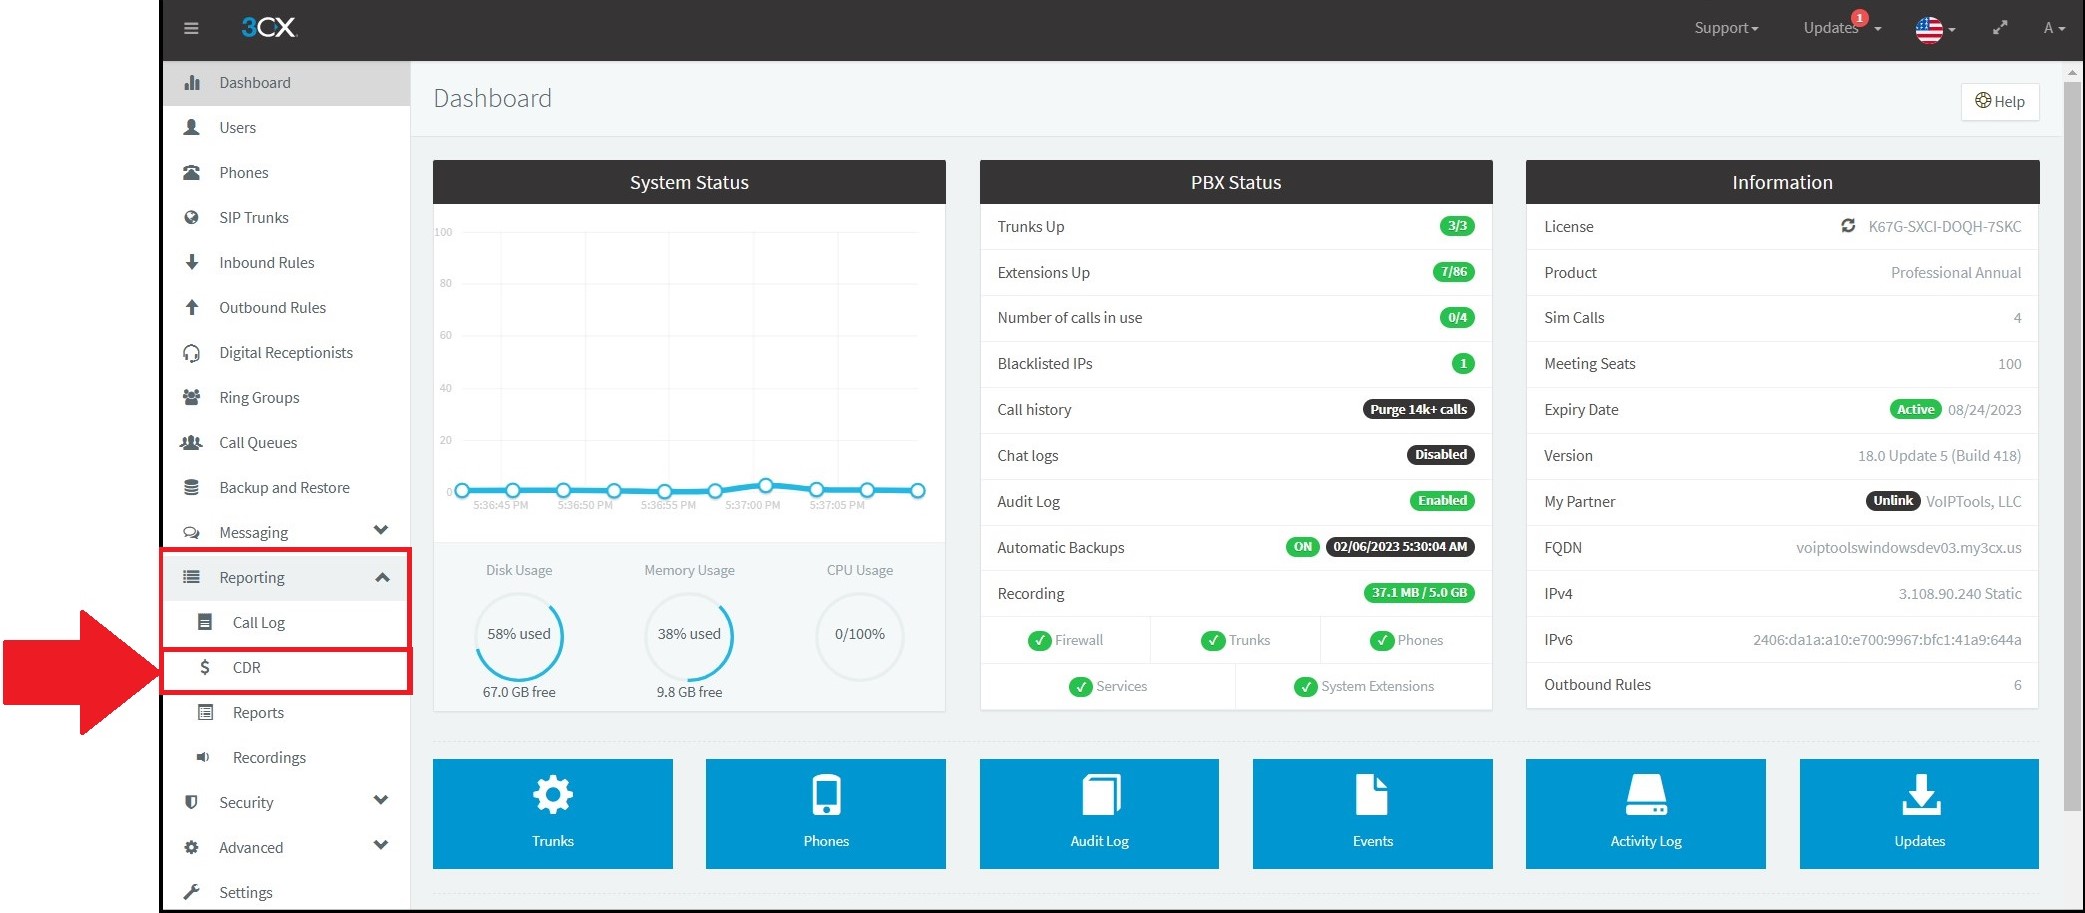
Follow the procedure to configure 3CX to create these CDR files,
Log in to the 3CX Management Console with valid credentials.
On the left navigation pane, select Reporting from the menu.
In the Reporting dropdown, select the $CDR icon to display the CDR Settings screen.
Figure 34: Settings menu
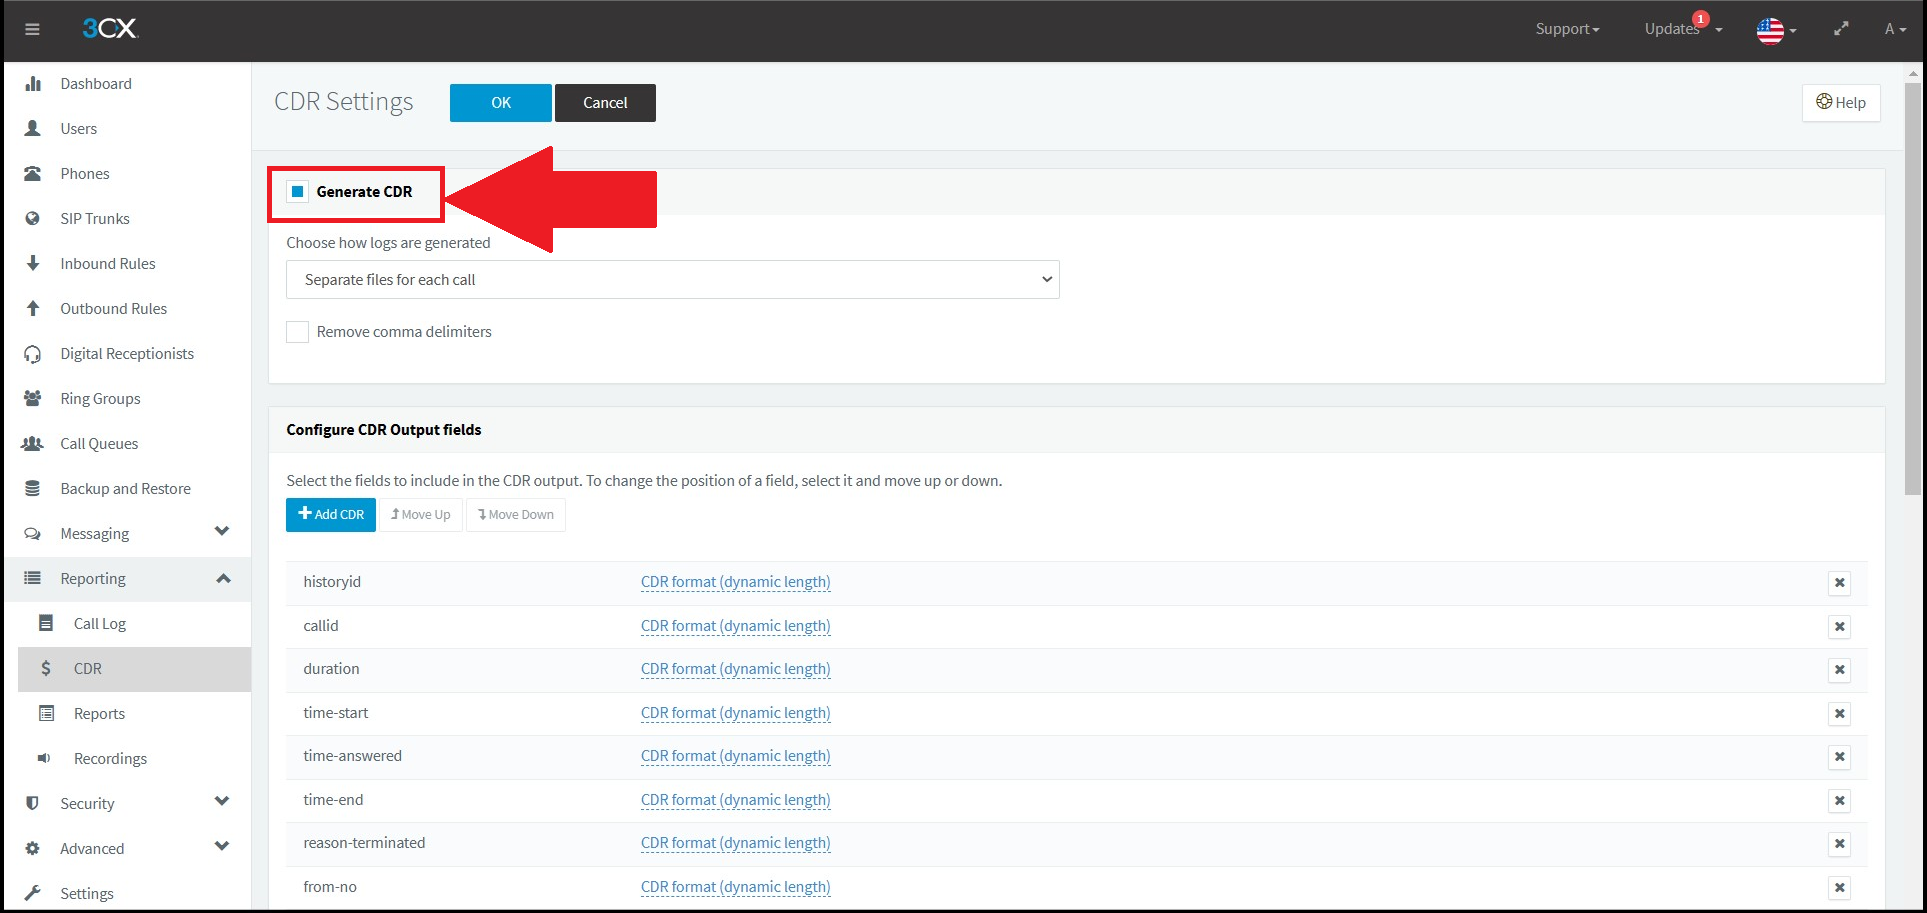
Check the Generate CDR checkbox.
Figure 35: Generate CDR box
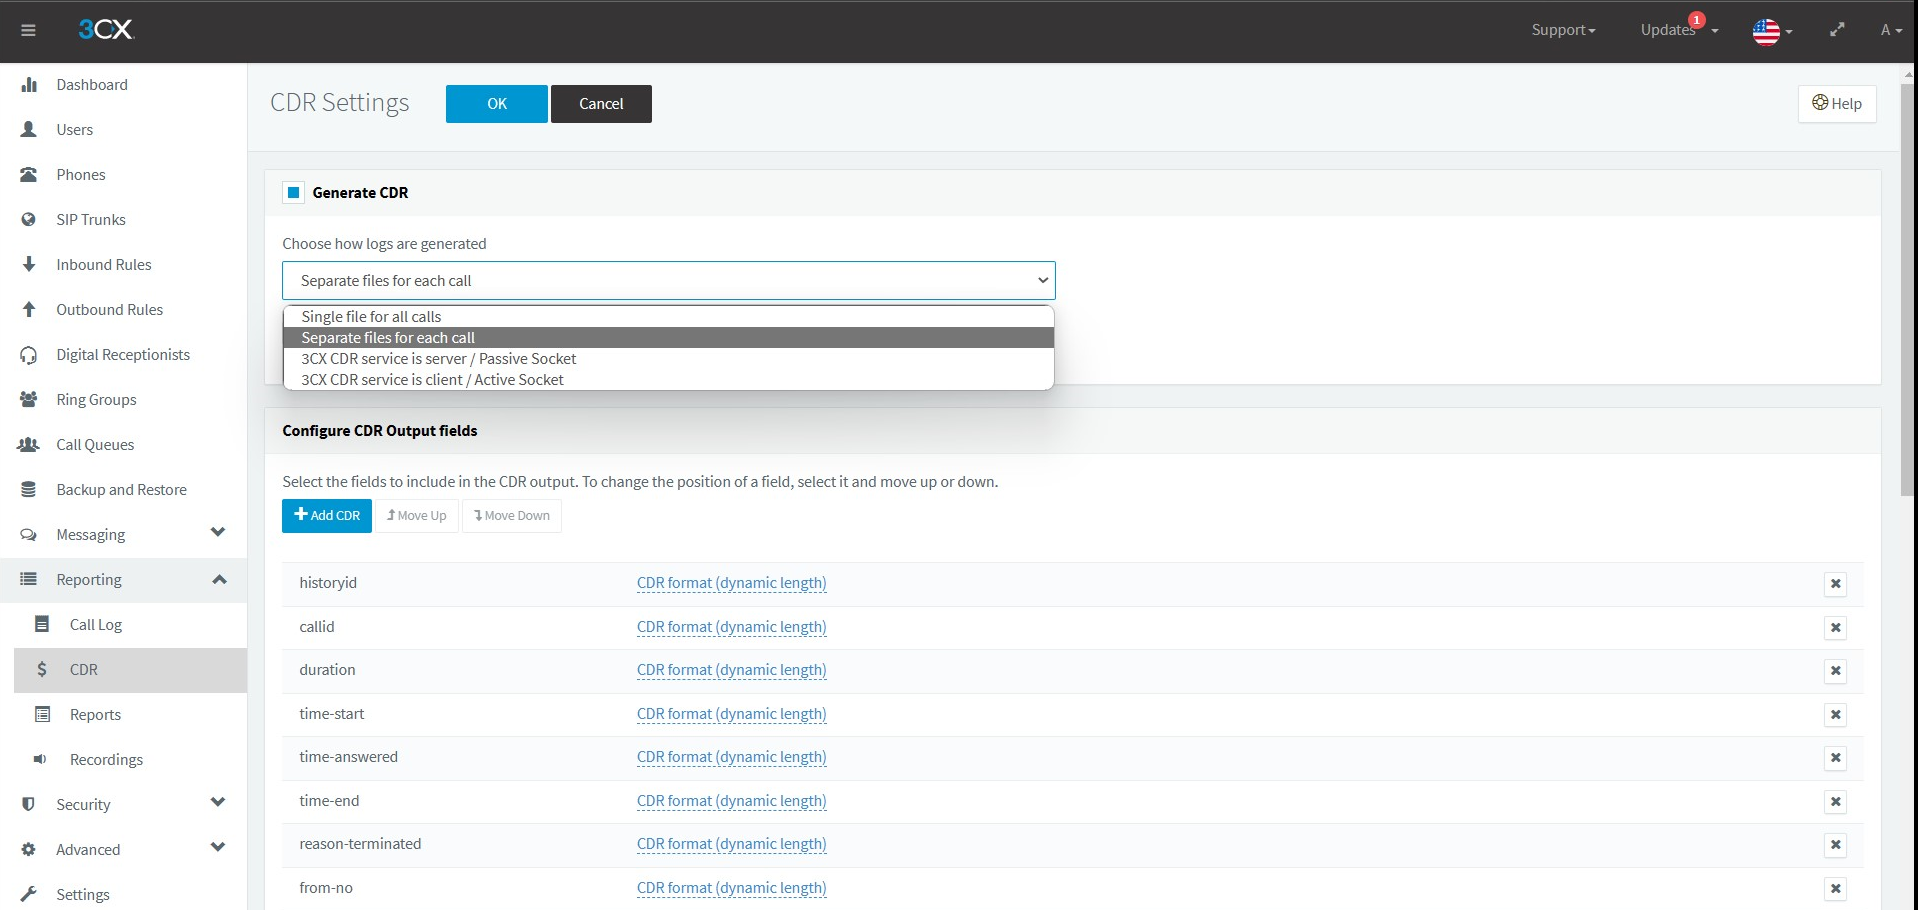
Select Separate files for each call from the combo box.
NOTE:
It is important that you configure 3CX to save each call as an individual file.
Figure 36: Configure 3CX to automatically create CDR files
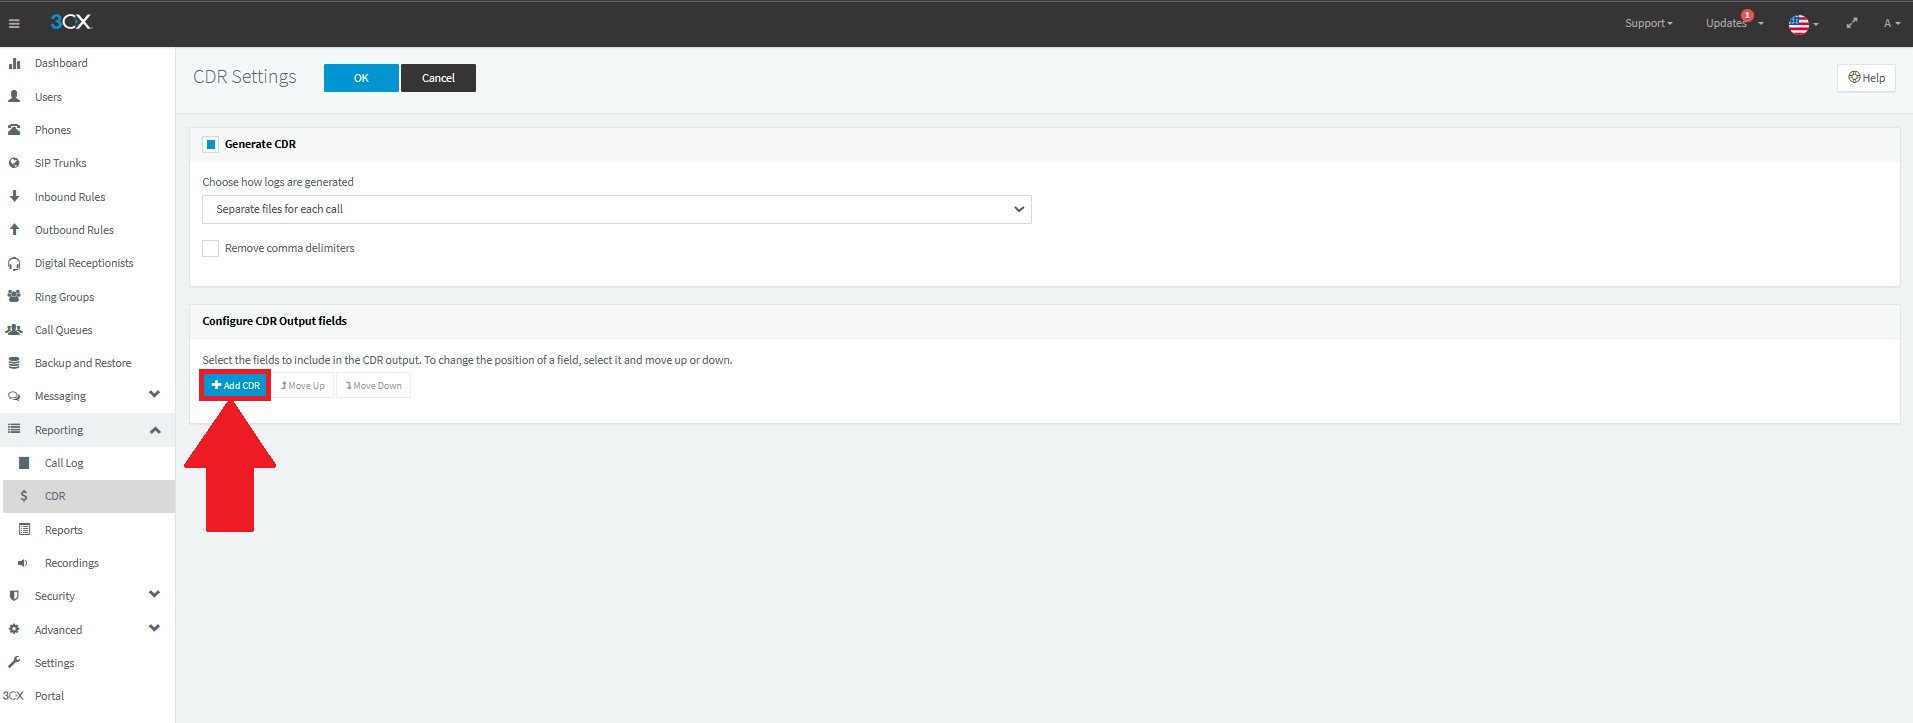
Under the Configure CDR Output fields section, click the Add CDR button.
Figure 37: Add CDR
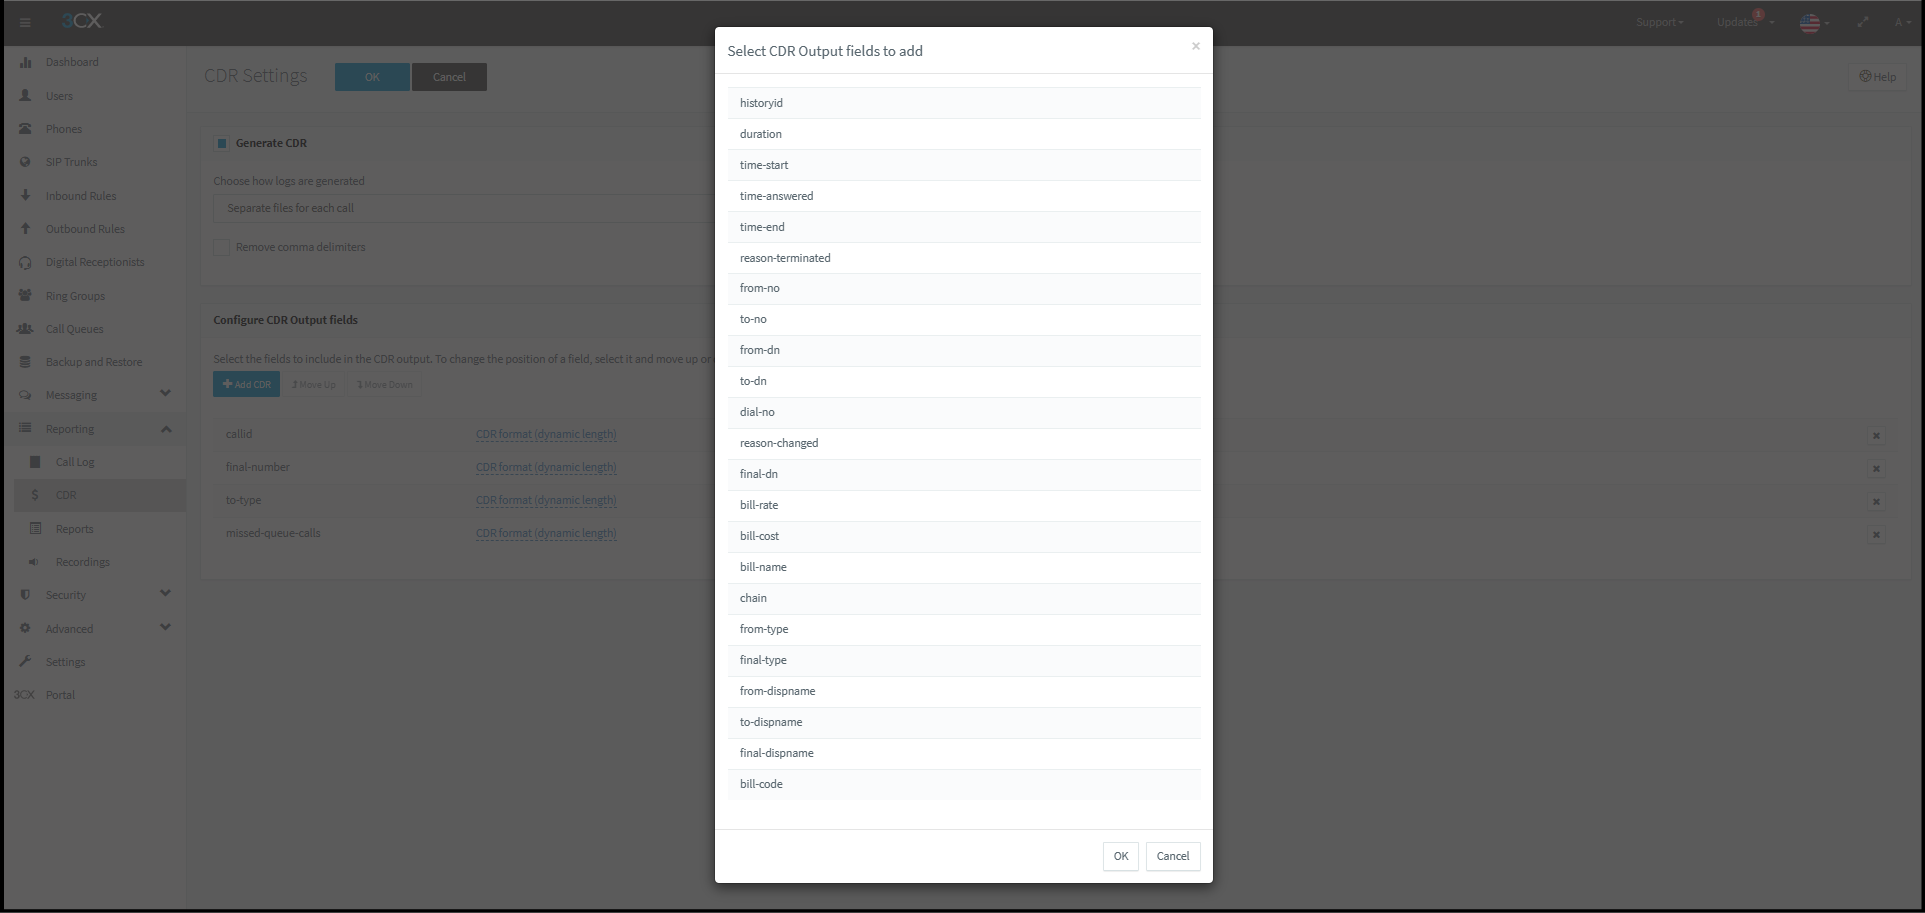
In the Select CDR Output fields to add pop-up, you can see a list of CDR Output fields that need to be added to the CDR table.
Select all the fields by holding down the shift button and clicking on each field, then press OK to add all the fields.
Figure 38: Select the CDR output field
NOTE:
Be sure not to remove any fields from the list or change the order of the fields. Exporter expects all the fields to be exported in the default order. Therefore, order is important. Below is a list of all the fields in the proper order.
Scroll down to confirm all the new CDR Output fields are added to the list. To know the list of supported output fields and what they mean, click here.
Once you have added all the CDR fields, Scroll up to the top of the screen. Next to CDR Settings, press OK to save your changes.
Once you have successfully configured 3CX to automatically create CDR files, all the CDR data from then on will be exported into the Exporter database.
NOTE:
Exporter will place the CDR data extracted from the 3CX CDR files into the table named cdr. Click the link to learn how to view the 3CX CDR files.
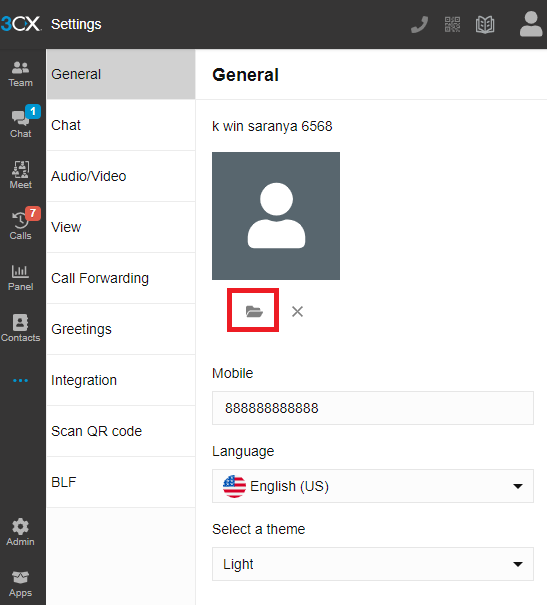
Follow the procedure to upload images to the DN table,
Open your 3CX Electron Phone application.
In the left side menu, click the General tab.
Click the Image Upload icon to upload an image from your local device.
Figure 40: Upload icon
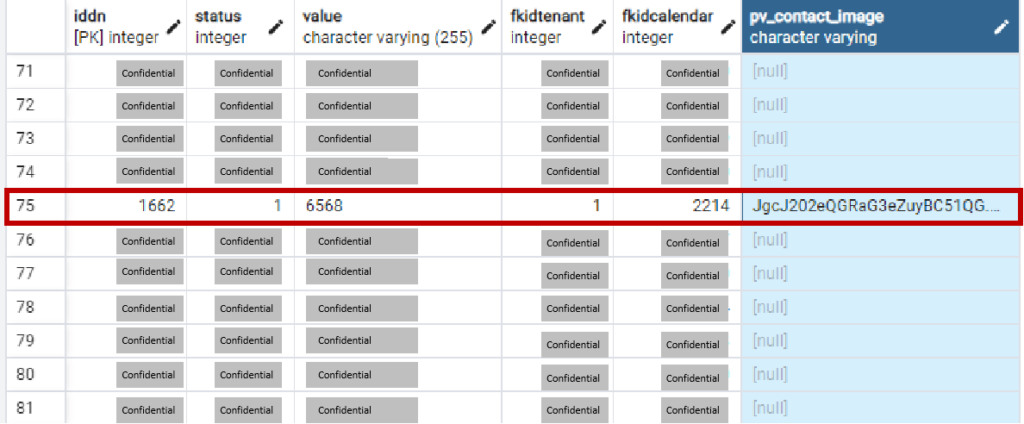
Open your database application and you can see the image added to the extension in the Pv_Contact_Image column.
Figure 41: Image added to the database
NOTE:
The pv_contact_image column in your database will be visible if there is an image associated with at least one extension in the 3CX Electron Phone application.
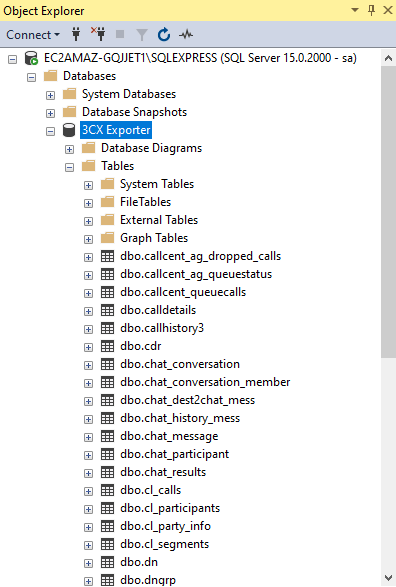
To view the exported data in the Microsoft SQL Server database, install the SQL Server Management Studio and follow the instructions below:
Connect to Microsoft SQL Server database server with valid credentials.
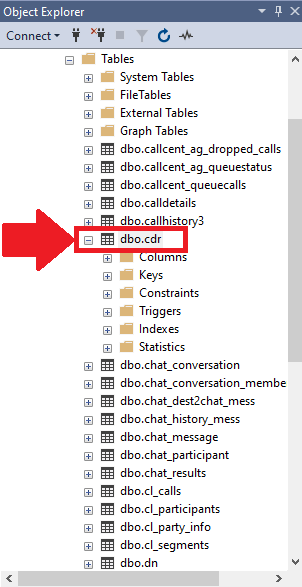
Under the Object Explorer navigation pane, expand Databases, and then expand 3CX Exporter and Tables to see the dbo.cdr table.
Figure 44: dbo.cdr Table
Right-click to open the Right Click menu and click on the Execute option to view the new CDR Output fields that you added through the 3CX Management Console.
Figure 45: New CDR Output fields added to the dbo.cdr table in the database server
You get quick answers to most of your inquiries in our online manual. If you prefer direct contact, we offer various support channels, including phone, email, live chat, and our helpful VoIPTools forums.
Rest assured, our dedicated team is here to assist you around the clock, every day of the year. Whether you’re based in the USA or India, we’re ready to provide prompt responses to your technical queries.
Windows Event Log for VoIPTools Applications and Services #
For troubleshooting any application errors, our Windows Event Log contains a comprehensive list of error messages, warnings, and informative notes related to all our VoIPTools applications and services. It’s a valuable resource to help you pinpoint and resolve any issues you may encounter.
Are you looking to collaborate with other VoIPTools customers facing similar challenges? Our forum is the perfect platform to exchange ideas, solutions, and best practices. Join the conversation at: https://www.voiptools.com/community/
Got questions that need immediate answers? Our chat support team is available to assist you in real time. Just click on the Live Chat button located at the lower right corner of our website, and we’ll acknowledge your queries right away.
To ensure a thorough understanding of your concerns, email us at support@voiptools.com. Describe your issue in detail, and we’ll get back to you within one business day with the support you need.
If you prefer to speak with a representative directly, you can reach us at +1 801-642-4655. Our attentive team is available to take your calls from 8:00 AM to 6:00 PM (Central Standard Time).
If you’ve purchased our products through a VoIPTools Partner, rest assured that they provide first-level support at no additional cost. Partners have access to 100% free technical assistance and actively participate in the troubleshooting process.
VoIPTools customers enjoy access to our online manuals and receive support through emails (with responses within one business day) and live chat. However, please note that we do not provide remote server login assistance.
For a more hands-on experience, consider our “Installation Support” package. Our expert support team can log in to your servers, and install and configure all our tools. This comprehensive service includes setting up SQL Server Express and Internet Information Server if necessary. We’ll work closely with you to tailor our applications to meet your requirements.
We’re committed to providing top-notch support to ensure your VoIPTools experience is smooth and hassle-free. Contact us today, and let us assist you in making the most of our powerful tools!


NOTE:


 to open the web application.
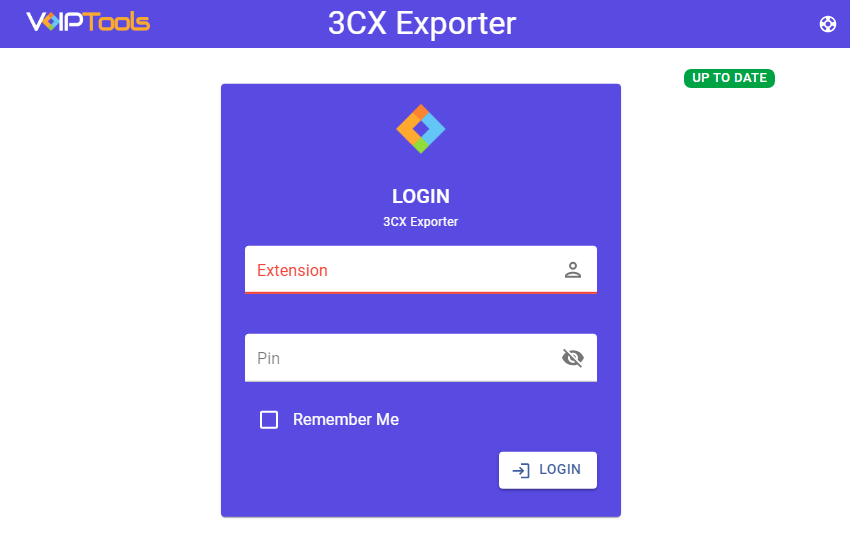
 button to complete your software registration.
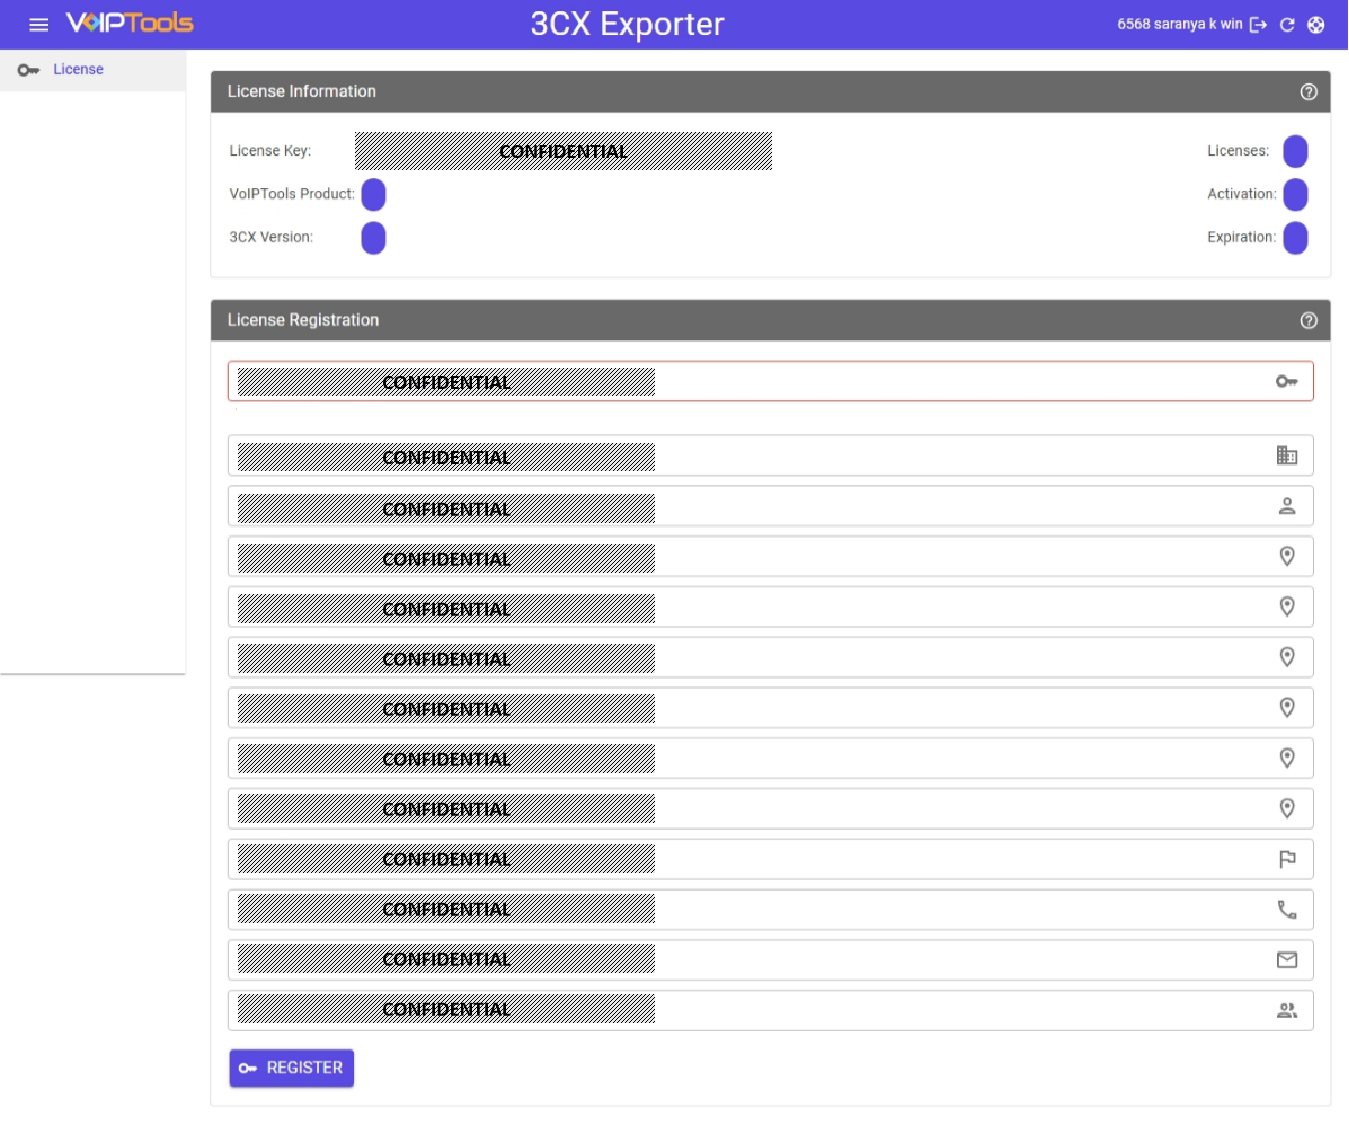
NOTE:


 button to save your settings.
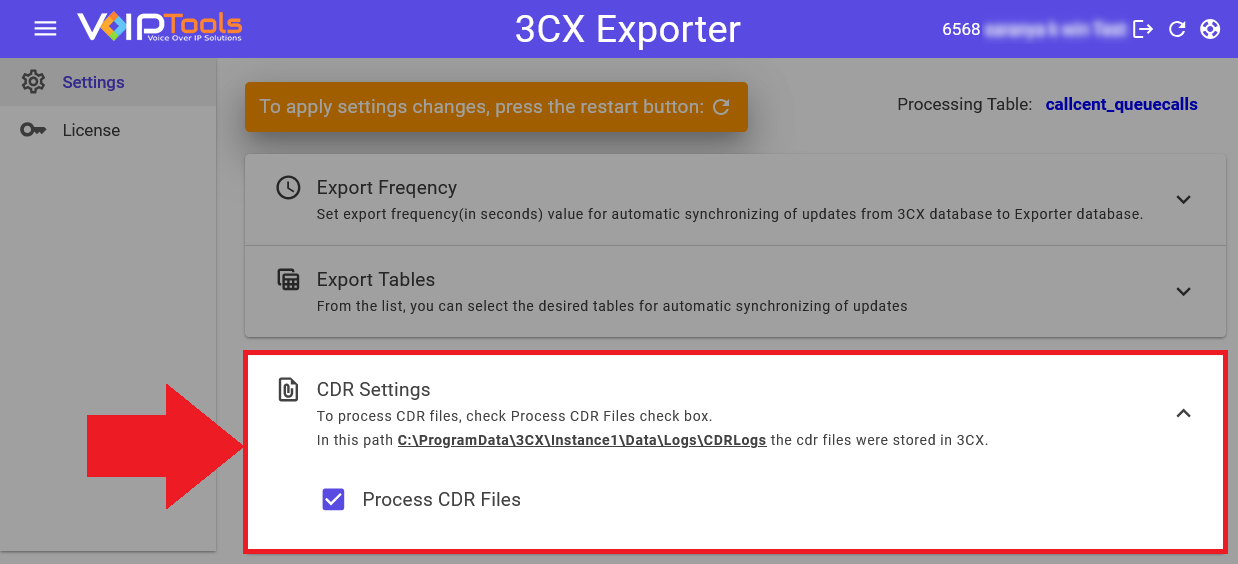


 icon to upload an image from your local device.