Introduction #
3CX On Call Manager is a great solution for after-hours office calls. This tool seamlessly integrates with 3CX, simplifying automated after-hours notifications. Forget about expensive answering services. Create recurring on-call schedules for your staff, choose live answering or voicemail options, and customize employee notifications via phone, email, or SMS with 30 escalation levels. Say goodbye to updating forwarding numbers or using support cell phones. With 3CX On Call Manager, set up schedules easily, manage them on a user-friendly web portal, and handle after-hours support
Common Challenges Faced when Handling On-call Requests #
 |
COSTLY BURDEN | Handling on-call requests can pose significant financial challenges, especially for large companies with multiple departments, due to the high costs associated with the traditional system. |
 |
TIME-CONSUMING SPREADSHEETS | Handling your answering service using intricate spreadsheets can become burdensome and time-consuming, particularly when considering factors such as sick leaves and other variables. |
 |
INEFFICIENT NOTIFICATIONS | Notifying the appropriate individuals promptly can be challenging, resulting in delays and possible miscommunication that could affect vital operations and decision-making. |
 |
UNRESPONSIVE STAFF CHALLENGES | Handling on-call requests becomes problematic when staff members fail to respond, leading to potential service disruptions and difficulties in promptly resolving issues. |
| TRACKING PERFORMANCE AND SLA | Monitoring and tracking Service Level Agreements (SLAs) and staff performance can be a challenging and time-consuming task, making it hard to uphold consistent service standards and identify improvement areas. | |
 |
CHOOSING BETWEEN VOICEMAIL AND LIVE ANSWER | Choosing between voice mail and live answering services can be a challenging decision due to the differing limitations and drawbacks of each option, which might not align with your particular requirements and customer expectations. |
Why On Call Manager? #
 |
CONNECT WITH 3CX SYSTEM | Effortlessly integrate the 3CX On Call Manager to streamline automated notifications and empower exceptional customer service. Connect seamlessly with your current 3CX system and revolutionize communication methods. |
 |
COST-EFFECTIVE SCALABILITY | Farewell to rising costs! The On Call Manager differs from other answering services by providing unlimited notification groups. You can now expand your operations without concerns about extra charges. |
 |
UNLIMITED VOICEMAIL | Ensure you never miss a message again by utilizing unlimited voicemail boxes. Organize and access your voicemails with ease, guaranteeing that all essential messages are accounted for and promptly attended to. |
 |
SIMPLIFIED CALENDAR-BASED SCHEDULING | Streamline scheduling with the calendar-based recurring schedule feature. Say goodbye to manual forwarding rule adjustments, phone passing between colleagues, and cumbersome spreadsheets. Efficiently manage on-call agent availability, saving time and reducing potential errors. |
 |
MULTIPLE ESCALATION CHANNELS | Enhance escalation capabilities through diverse communication channels for prompt handling of urgent matters. Utilize SMS, email, and phone calls to instantly escalate important issues, ensuring timely and efficient delivery of critical notifications to the appropriate recipients. |
 |
SECURE USER ROLES | Ensure control and security through customizable roles. Grant administrative privileges solely to managers, protecting schedules and preventing unauthorized changes by agents. |
 |
INSIGHTFUL EVENT LOGS | Enhance operational efficiency using comprehensive event logs. Monitor support requests during non-business hours, ensure adherence to service level agreements, and assess staff performance efficiently for informed decision-making. |
 |
EFFORTLESS ON-CALL SCHEDULES | Efficiently establish recurring on-call schedules, removing the necessity for frequent call forwarding rule updates or the shared use of on-call cell phones within your team. Sustain a seamless and consistent schedule without interruptions. |
 |
EFFECTIVE NOTIFICATION HANDLING | Achieve prompt response rates by implementing a notification escalation system for unanswered calls. Employ up to 30 escalation levels with multiple contacts assigned to each level, ensuring critical calls are always attended to. |
 |
FLEXIBLE CALL HANDLING | Improve customer experience through adaptable call handling. Direct callers to a queue initially for personalized service. If agents are busy, seamlessly switch to voicemail to capture crucial messages. |
How It Works #
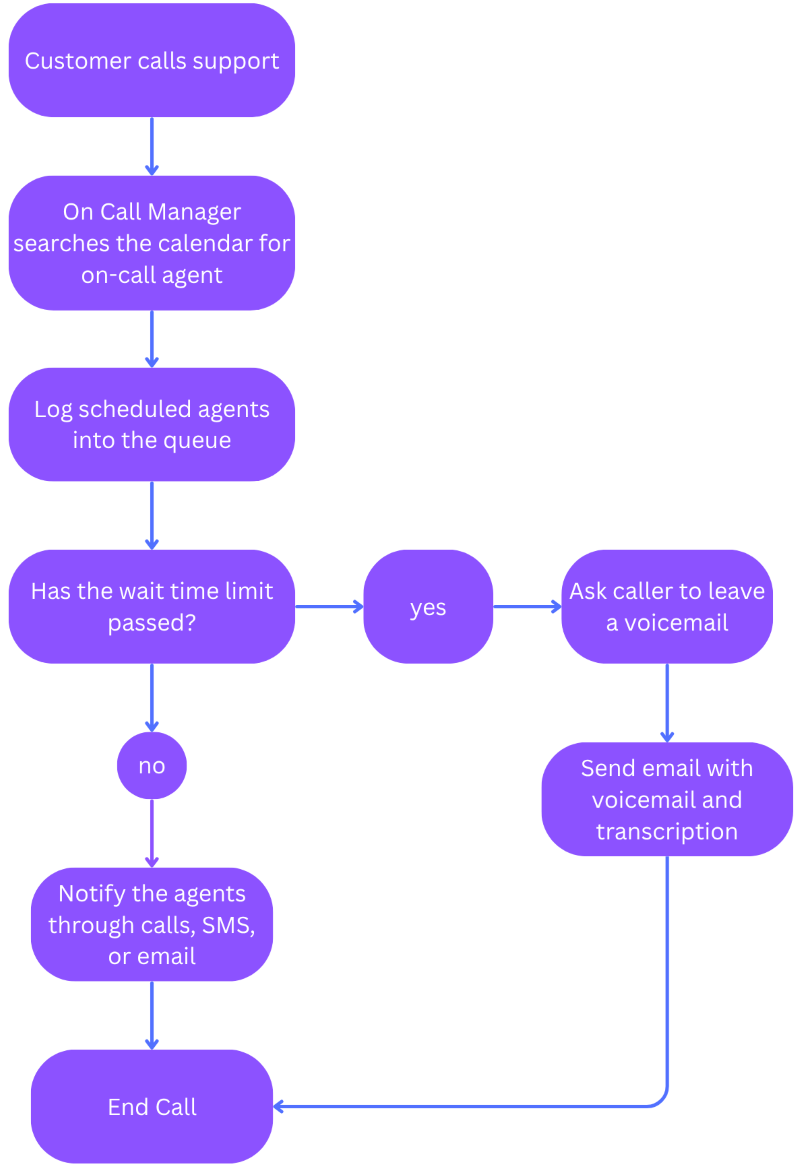
When customers are directed to a support queue, 3CX On Call Manager actively searches a calendar to identify the designated agent responsible for handling after-hours support calls. The software seamlessly logs the assigned agents into the queue, ensuring efficient management. In cases where the maximum queue hold time is exceeded, the caller will be prompted to leave a voicemail. 3CX On Call Manager promptly notifies your staff about the newly generated support request, employing various communication channels. In addition to initiating phone calls to your staff, this program facilitates the transmission of text messages and emails. These notifications contain a comprehensive package, comprising the customer’s voicemail recording and a text transcription for convenient reference by your team.
Prerequisites #
Before installing 3CX On Call Manager, you need to ensure that your computer meets the minimum requirements mentioned below:
| PREREQUISITE | PURPOSE |
|---|---|
| 3CX Version V20 | 3CX On Call Manager is designed to work seamlessly with this version for enhanced features and performance. |
| Windows 10 or above / Windows Server 2012 or above | These operating systems provide the necessary environment for the application to run efficiently. |
| IIS Features and Configuration – VoIPTools | IIS is needed as a web server to host and manage web-based applications and services. |
| .NET Framework 4.7.2 (Web Installer) | This framework provides essential components for running and developing applications. |
| VoIPTools Universal Updater | This component is necessary for updates, ensuring the application remains current and functional. |
| VoIPTools Relay Service | It is used for proper integration and functionality of the 3CX Competitive Wallboard within the 3CX environment. |
| Microsoft SQL Server 2016 or above (Including the free SQL Express edition) | 3CX requires Microsoft SQL Server 2016 or later for database management. |
| Static IP for VoIPTools and 3CX servers | This is to ensure proper two-way communication, both the 3CX server (Relay) and the VoIPTools server. Dynamically assigned IP addresses are not supported. Additionally, it is recommended to use HTTPS for secure communication, which requires a FQDN for SSL/TLS certificate validation between the VoIPTools server and the Relay. |
| Port number 5550 opened on your device | Port 5550 is a specific network port used by 3CX for communication purposes. Opening this port on the device’s firewall allows incoming and outgoing traffic to pass through, enabling the 3CX software to send and receive data over the network effectively. |
NOTE:
- When installing SQL Server, we recommend you install it in “Mixed Mode” to include SQL Authentication, and install SQL Management Studio
- When installing IIS, be sure to install Basic Authentication, .Net Extensibility, and ASP.Net 4.X
Installation overview #
 |
DOWNLOAD SOFTWARE | You can order 3CX On Call Manager online at https://www.voiptools.com. Your order confirmation email will include your license key and a link to download the software. |
 |
INSTALL PREREQUISITES | You must install several prerequisites before installing the 3CX On Call Manager. The Advanced Installer identifies and installs these applications automatically. Click here to learn about the required prerequisites. |
 |
INSTALL 3CX ON-CALL MANAGER | This User Guide contains step-by-step instructions to install 3CX On Call Manager. Begin by extracting the installer from the downloaded zip file (Step 1 above), then run the setup program named OnCallManager.exe |
 |
LOG IN TO THE WEB APPLICATION | You can now log in to the web application using the extension number and the PIN. |
Step By Step Installation Procedure #
The following section guides you through a detailed walk-through of the installation process:
Step 1: Download 3CX On Call Manager #
Find the software download link in the Order Confirmation Email, or you can download the application by following the procedure,
- Open your browser and go to the VoIPTools official website, or click here to be redirected.
- Search for the On Call Manager Application and click the Download
 button to download the application.
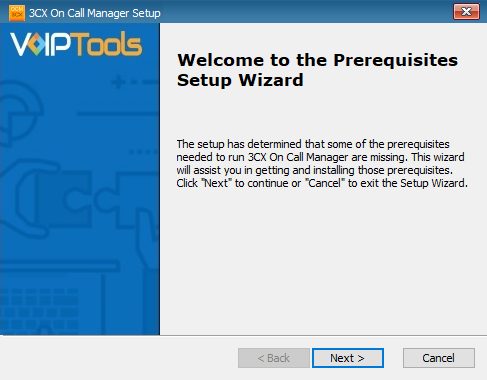
Step 2: Install the Prerequisites #
Click on the software installer that was downloaded in step 1 above. The installation wizard will automatically identify the needed prerequisites and assist you with the installation of the prerequisites needed to run ‘3CX On Call Manager’.
-
- Click the downloaded installer executable to launch the Prerequisites Setup Wizard and click Next.
-
- In the Prerequisites window, the installer will identify the missing prerequisites. You can select/unselect the applications to be installed and click Next to continue.
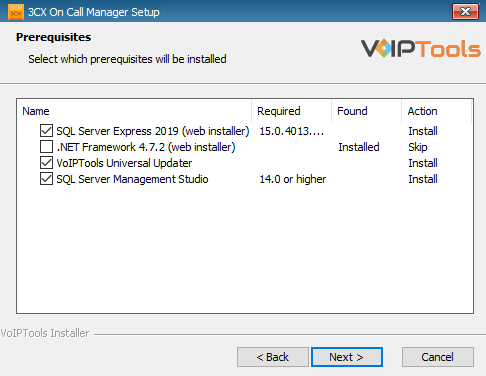
The installer will download and install the selected applications.
-
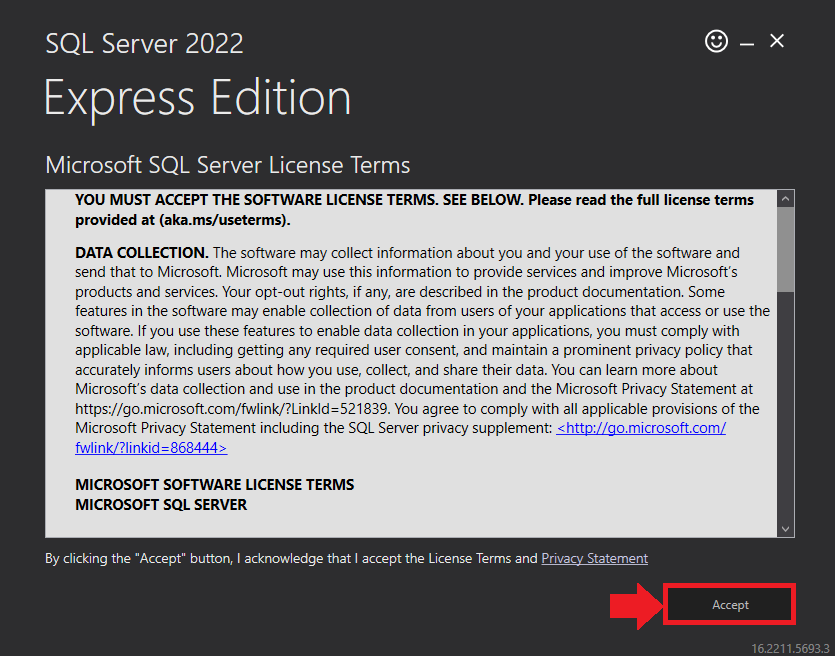
- In the Microsoft SQL Server License Terms click the Accept button to acknowledge the license terms and continue.
-
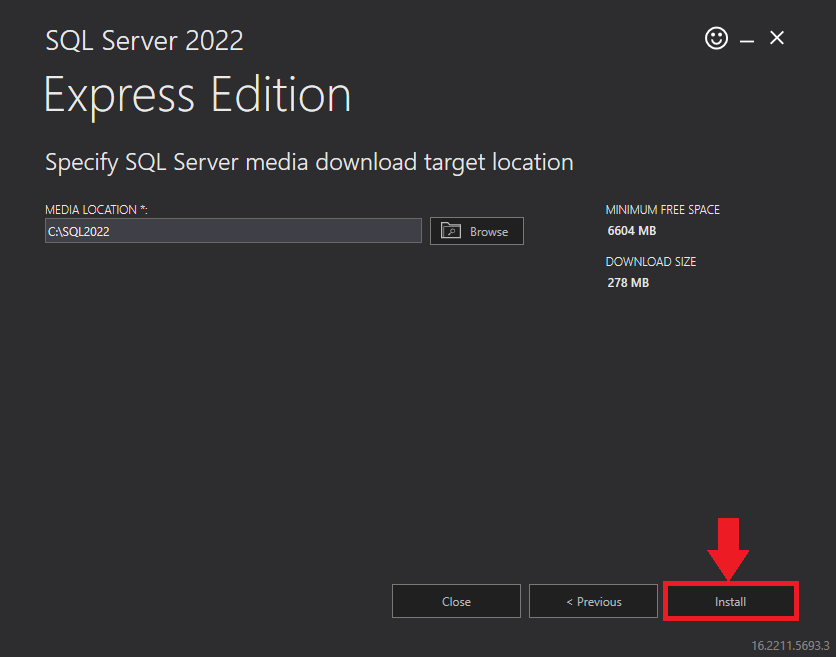
- This page appears if you do not have SQL Server Express preinstalled in your device.
-
- In the Microsoft SQL Server License Terms click the Accept button to acknowledge the license terms and continue.
-
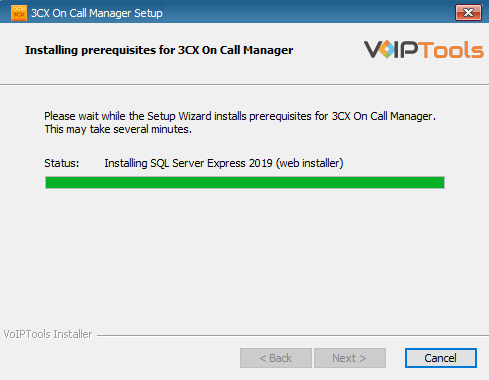
- View the SQL Server Media target location in the Media Location field. If required, you can click the Browse button to change the location. Click Install to begin the installation of SQL Server Express.
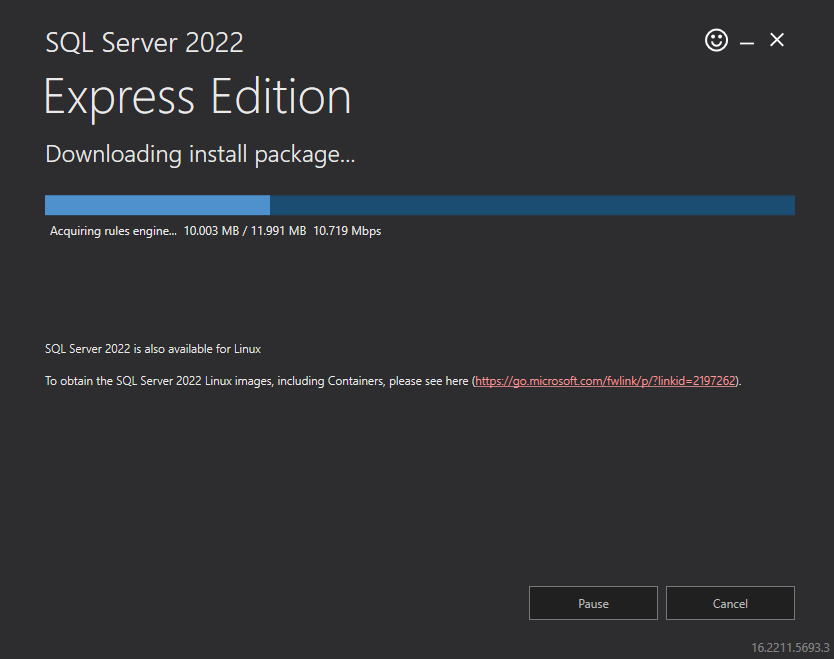
SQL server installation is in progress. This may take several minutes to complete.
-
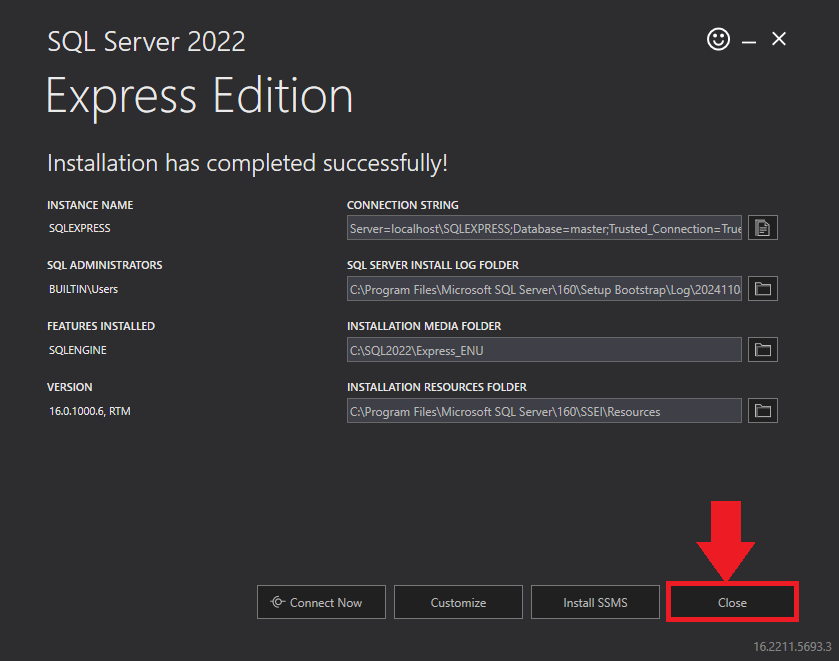
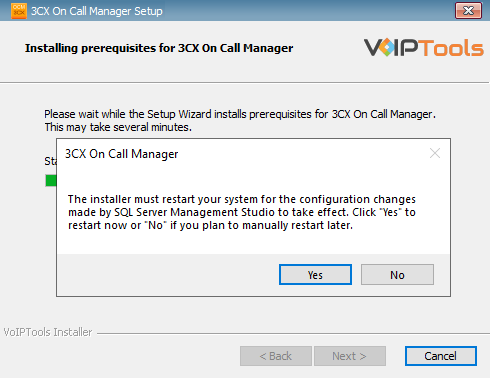
- Click the Close button once the prerequisites are installed.
-
- In the confirmation message box, click Yes to reboot the computer.
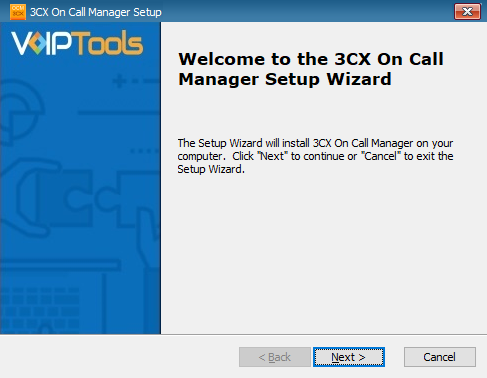
Step 3: Start the installation process #
-
- After all the prerequisites are installed, the 3CX On Call Manager Setup Wizard appears. Click Next to Continue.
-
- On the Select Installation Folder window, the Folder field displays the location where the ‘3CX On Call Manager’ will be installed. Note that you cannot change the path.
-
- Click Next to continue.

Step 4: Test Relay Settings #
-
- In the 3CX Relay Services window, in the Relay Host field, enter the FQDN of your 3CX server.
-
- Enter 8801 in the Relay Port field.
-
- Enter the public key you took from VoIPTools Relay services in the Public Key text area.
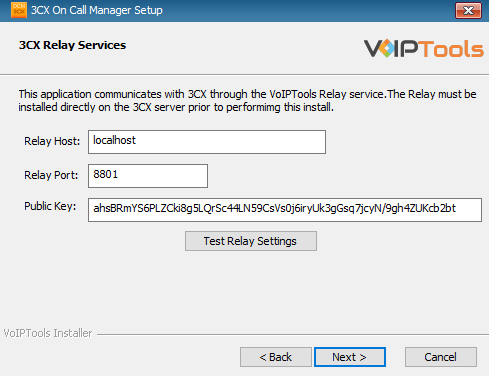
-
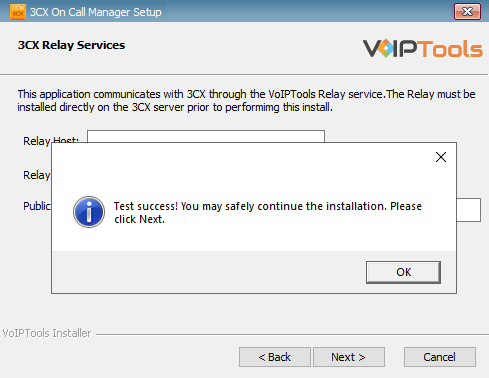
- Click the Test Relay Settings to confirm ‘3CX On Call Manager’ can communicate with the Relay services running on the 3CX server.
-
- If the ‘3CX On Call Manager’ is successfully able to communicate with the Relay services that run on the 3CX server, a Success message box appears. Click OK. If the test fails, you will not be able to continue until communication with the relay is established.
-
- Click Next to continue with the installation.
- You must set the Relay Port to 8801.
- If the Relay test fails, you cannot continue the installation until you establish communication with the Relay. If the test was unsuccessful,
- Confirm you have the correct firewall port open (default TCP 8801) on the 3CX server and the firewall protecting the 3CX server.
- Confirm that you have entered the correct FQDN for the 3CX server.
- Confirm that the 3CX On Call Manager and Relay use the same port and protocol.
Step 5: Configure the database #
When configuring the 3CX On Call Manager, select an existing Microsoft SQL Server instance in your environment. The database server can be a remote SQL Server, or a local instance running on the VoIPTools server.
You can set up the SQL database using SQL Authentication or Windows Integrated Authentication.
SQL Authentication #
- Enter your server name in the Server field.
- If using the free SQL Express Edition, the default SQL Instance name is SQLExpress.
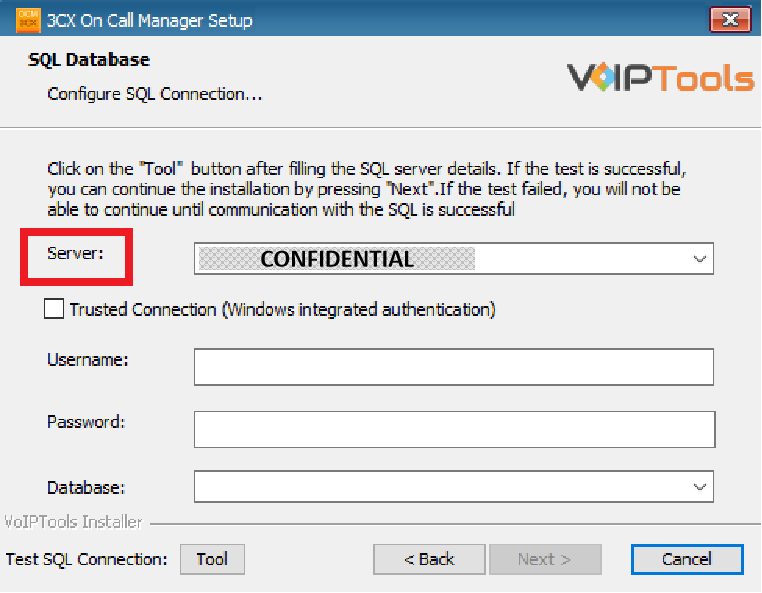
- If you want to use ‘SQL Authentication’, then install SQL Server in ‘Mixed’ mode.
- If SQL Server is installed on a server other than the server where 3CX Exporter is installed, you will need to configure SQL Server to allow remote connections.
- Enter your credentials in the Username and Password fields.
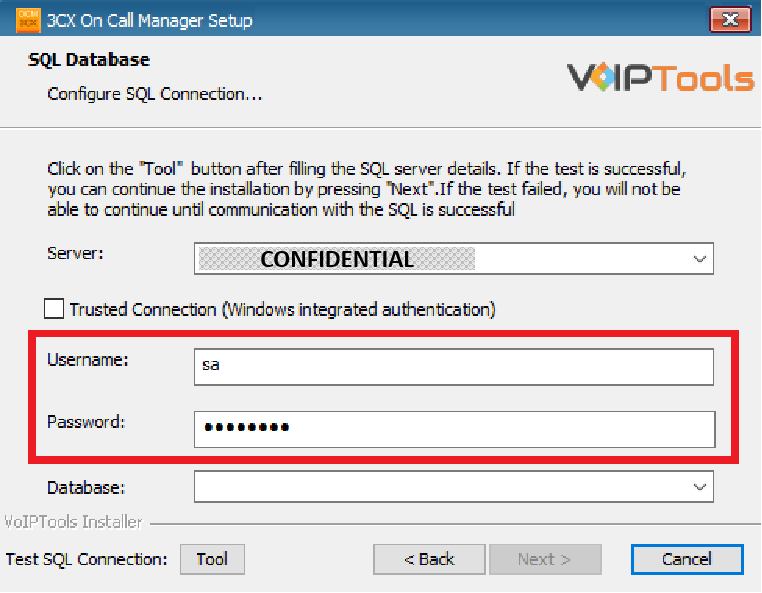
Make sure that you select a SQL Login that has sufficient permissions to alter the database and create SQL objects.
- Select or enter the 3CX Queue Notifier in the Database dropdown.
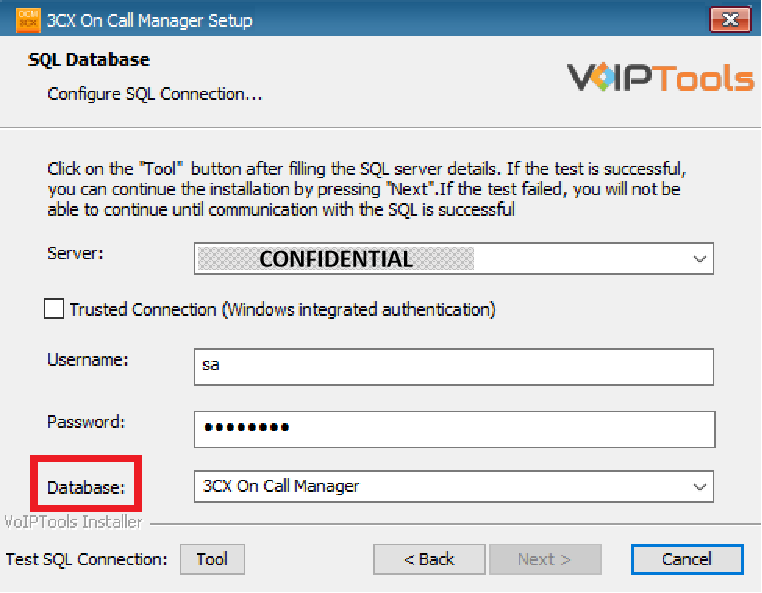
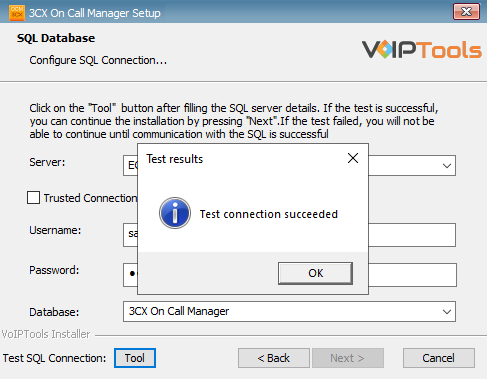
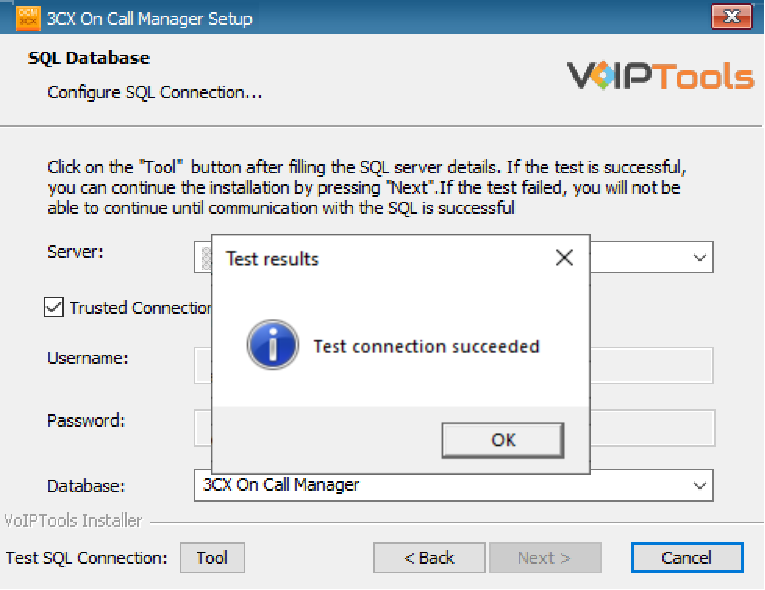
- In the Test SQL Connections section, click the Tool button to test the connection and click OK in the Test Results popup box.
Windows Integrated Authentication #
- To use Windows Integrated Authentication check the Trusted Connection (Windows integrated authentication) checkbox.
- The VoIPTools installer will create a local Windows user name as “VoIPToys” and give you sufficient rights to this user to create/update the SQL database.
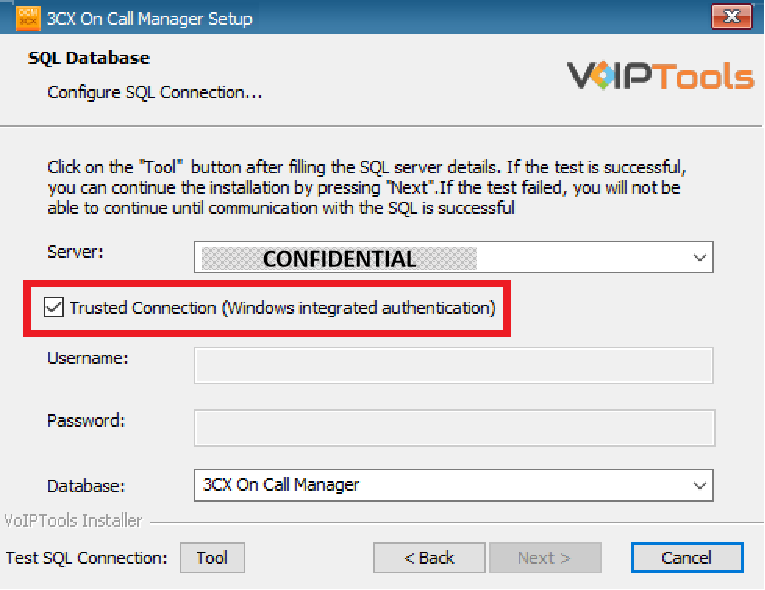
- In the Test SQL Connection section, click the Tool button to test the connection.
- Click the Next button which gets enabled when the database connection is successful.
We encourage you to use SQL Authentication rather than Windows authentication. Many of our tools leverage a Call Flow Designer (CFD) application running on the 3CX. Frequently our CFD applications require access to a SQL database. If the 3CX server and the database server are not in an Active Directory domain, Windows authentication will fail. To use SQL authentication, your SQL Server must be configured to run in “Mixed Mode”. If you installed SQL Server with one of our tools, we configure SQL in “Mixed Mode”.
Step 6: Installing 3CX On Call Manager #
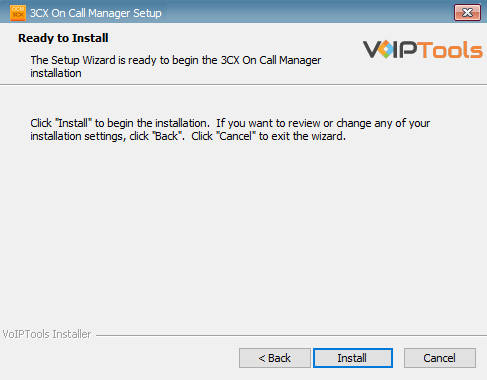
- In the Ready to Install window, click Install to start the installation of the ‘3CX On Call Manager’.
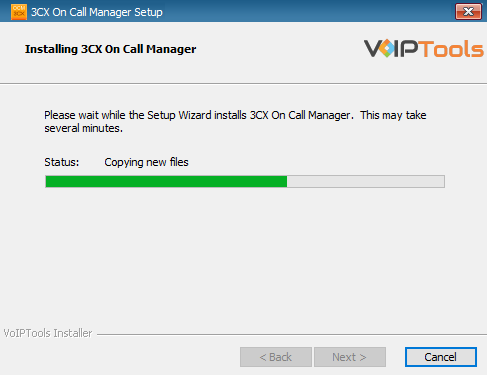
The application installation progresses. This may take several minutes to install.
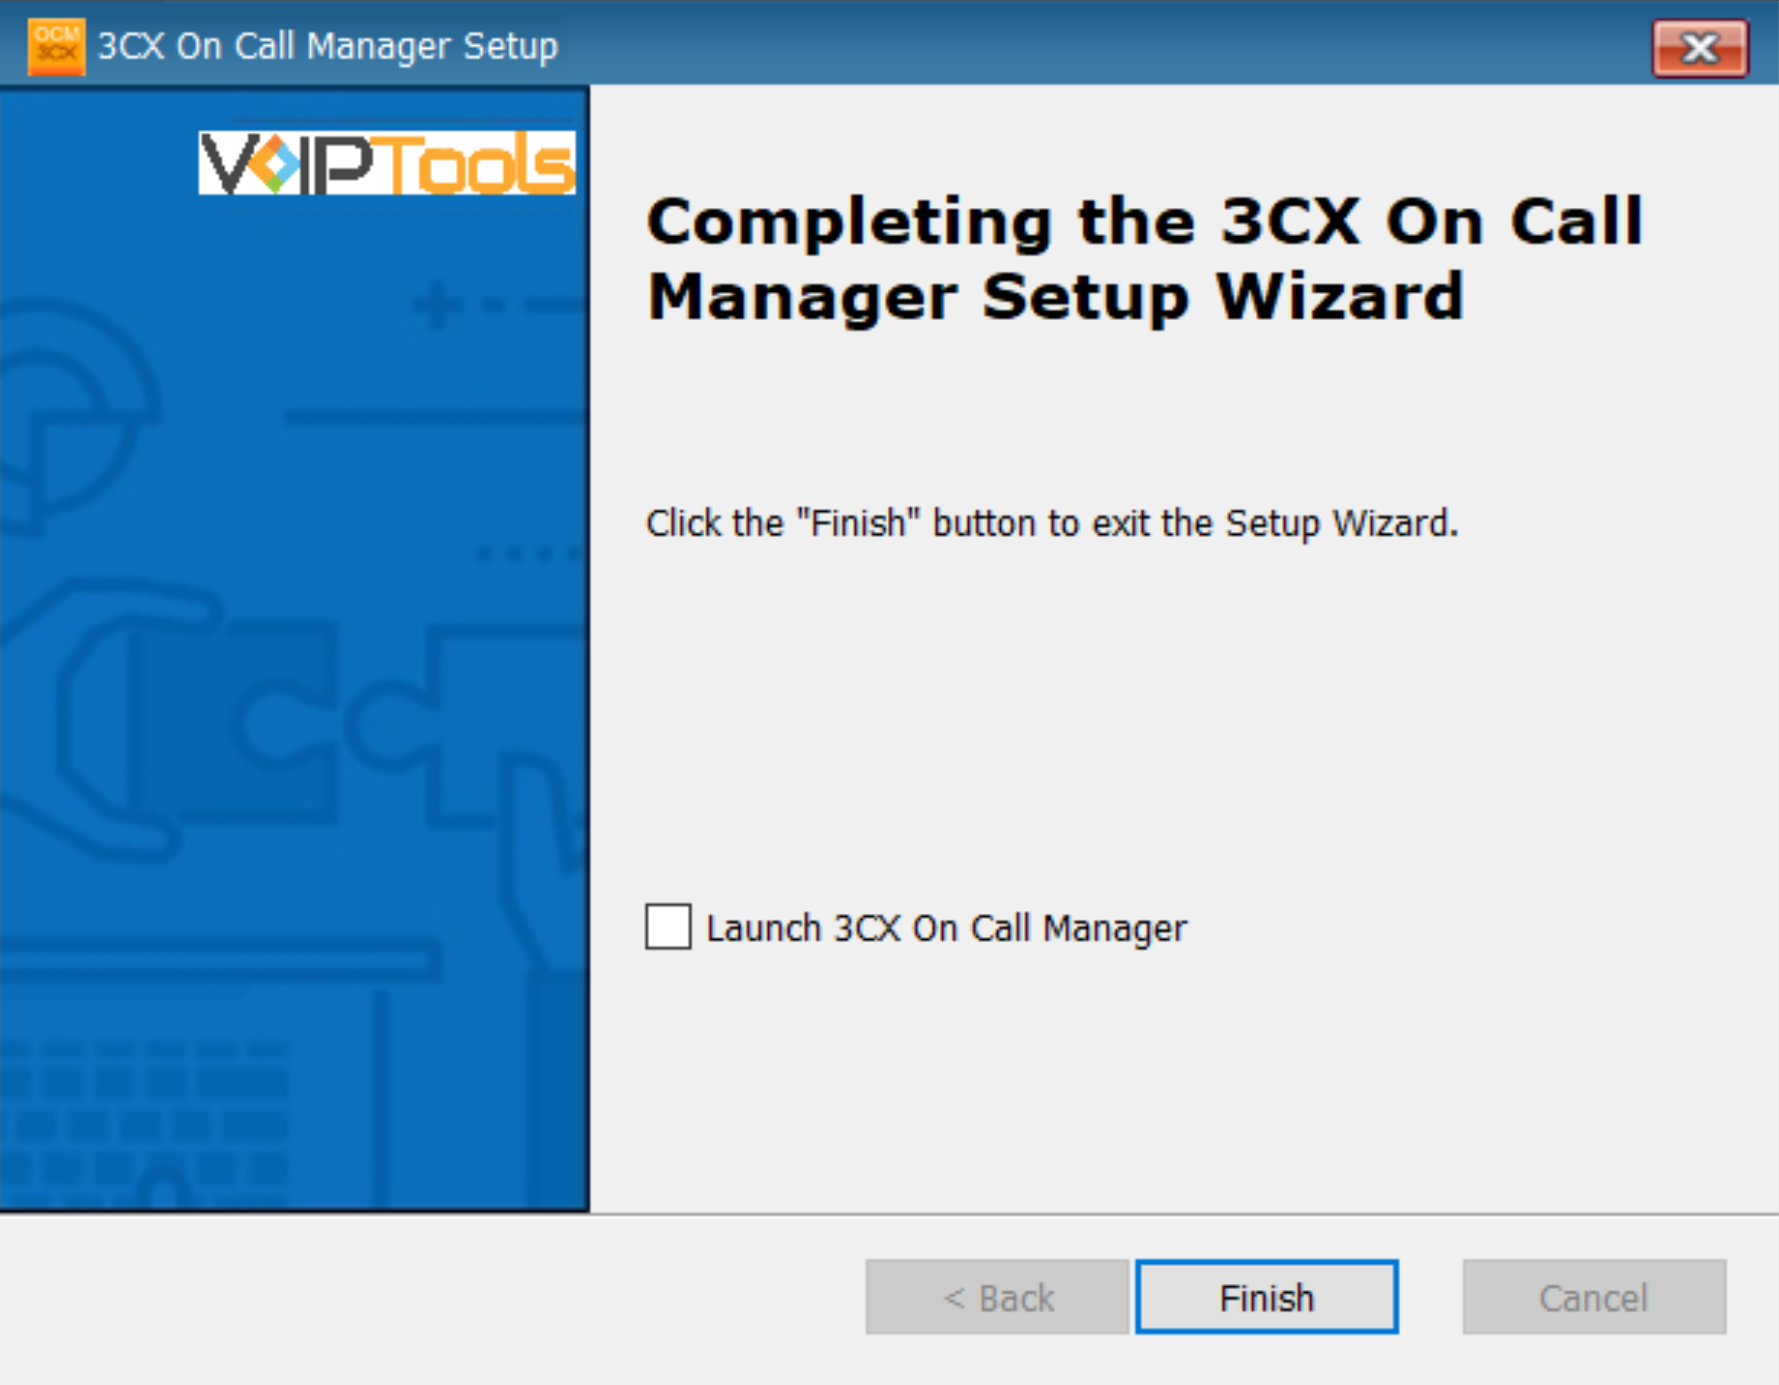
- Once the installation is complete, click the Finish button.
Step 7: Log In to the Web Application #
- Double-click the 3CX On Call Manager desktop icon
 to open the web application.
 - In the Login page, do the following tasks:
- In the Extension field, enter your 3CX extension number.
- In the PIN field, enter your 3CX voicemail PIN.
- Click the Login button to log in to your account.

Web Portal #
To access the ‘3CX On Call Manager’ web portal, click the Web Portal button on the configuration program, or click on the desktop icon that was created during the installation process (‘3CX On Call Manager’ Web).
Login Privileges #
As a Manager, you can have access to all the pages of the application.

As an Agent, you can only access the ‘Events’ page.

Settings Menu #
The Settings Menu is where you manage how 3CX On Call Manager works. Each section controls a different part of the app, such as calls, notifications, appearance, and access. Click a section to open it and change its settings.
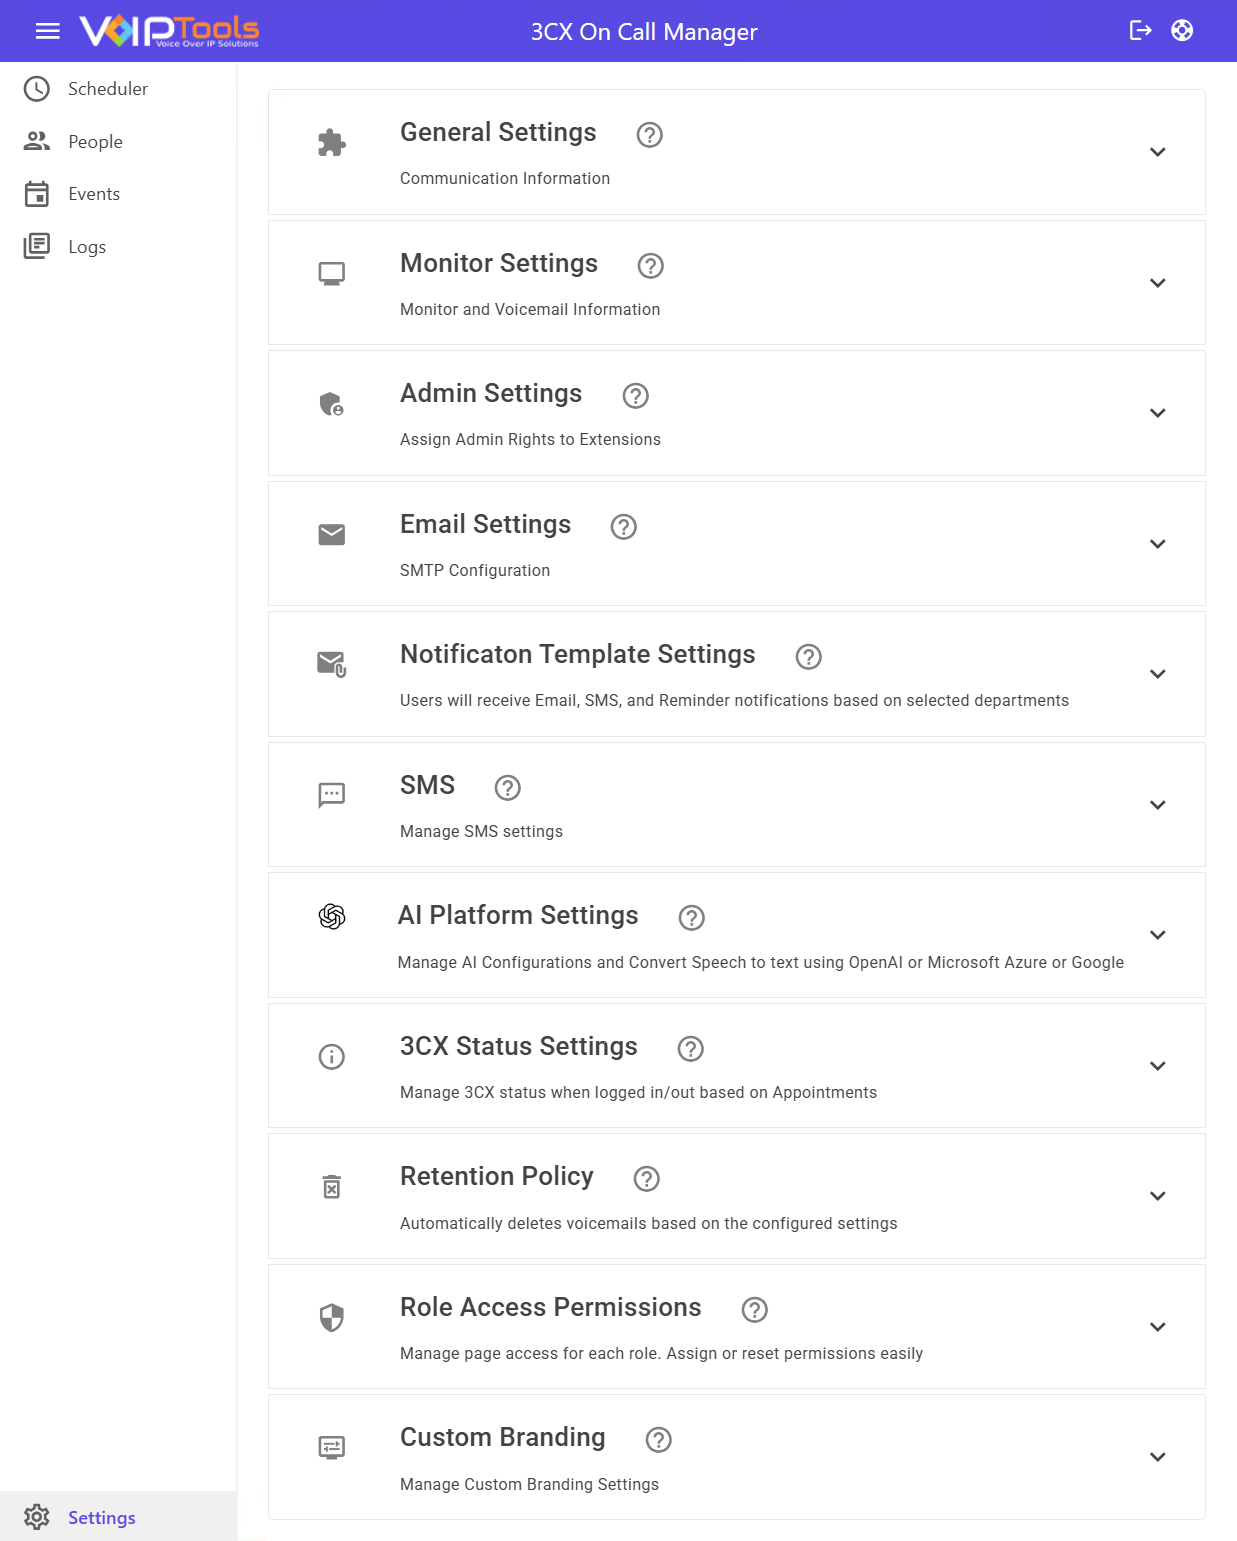
| General Settings | Set up how the system contacts people during an on-call event. You can define how many times the system should try to reach each person, how long it should wait between attempts, how many escalation levels to use, which language format to apply, and any dialing digits needed to place outbound calls. |
| Monitor Settings | Define how the system handles incoming calls and monitors voicemail extensions. Here you can choose whether calls go to voicemail or first go through a queue, and set the prompts that are played to on-call agents when a new voicemail is detected or when a voicemail has already been heard. |
| Admin Settings | Control which extensions have full administrator access to the application. Admin users can view and manage all pages and departments. This setting overrides any role assigned in 3CX. |
| Email Settings | Set up the mail server used to send email notifications. Here you can enter the server address, port, sender email address, login details, and secure connection settings. A Test button is available so you can confirm that the email setup is working. |
| Notification Template Settings | Customize the content of email, SMS, and reminder notifications sent to on-call staff. You can set different templates for each department and use dynamic fields, such as caller name, extension, and call duration, to automatically personalize each message. |
| SMS | Select your preferred SMS carrier and enter the required credentials to enable SMS delivery for scheduled appointment notifications. You can choose Email, Skyetel, or Twilio. |
| AI Platform Settings | Connect 3CX On Call Manager to an AI service such as OpenAI, Microsoft Azure, or Google to turn voicemail recordings into text. Enter the required API details and select the model settings you want to use for a transcription. |
| 3CX Status Settings | Change the presence status of extensions based on their scheduled work hours. Set a login status for when an agent starts a shift and a logout status for when the shift ends. |
| Retention Policy |
Set rules to delete old voicemails from the 3CX system and the SQL database. You can choose how many days to keep each voicemail and set the time of day when deletion runs. |
| Role Access Permissions | Set what each user role can see and do in the application. You can change permissions for roles such as System Administrator, Department Manager, and User, or restore the default settings at any time. |
| Custom Branding | Customize the look of the application to match your organization. You can add a logo, choose colors for the header and grid, and set an accent color for text headings. Apply or reset your changes as needed. |
General Settings #
The General Settings tab puts you in complete control of call escalation logic, ensuring no alert is missed. You can customize reliability by setting the exact number of Contact Attempts and the necessary waiting time between them before escalating a call to the next person. For efficiency and consistency, this tab also lets you apply a consistent Culture for date/time formatting and uses Prepend Digits to guarantee successful call routing within your 3CX system.
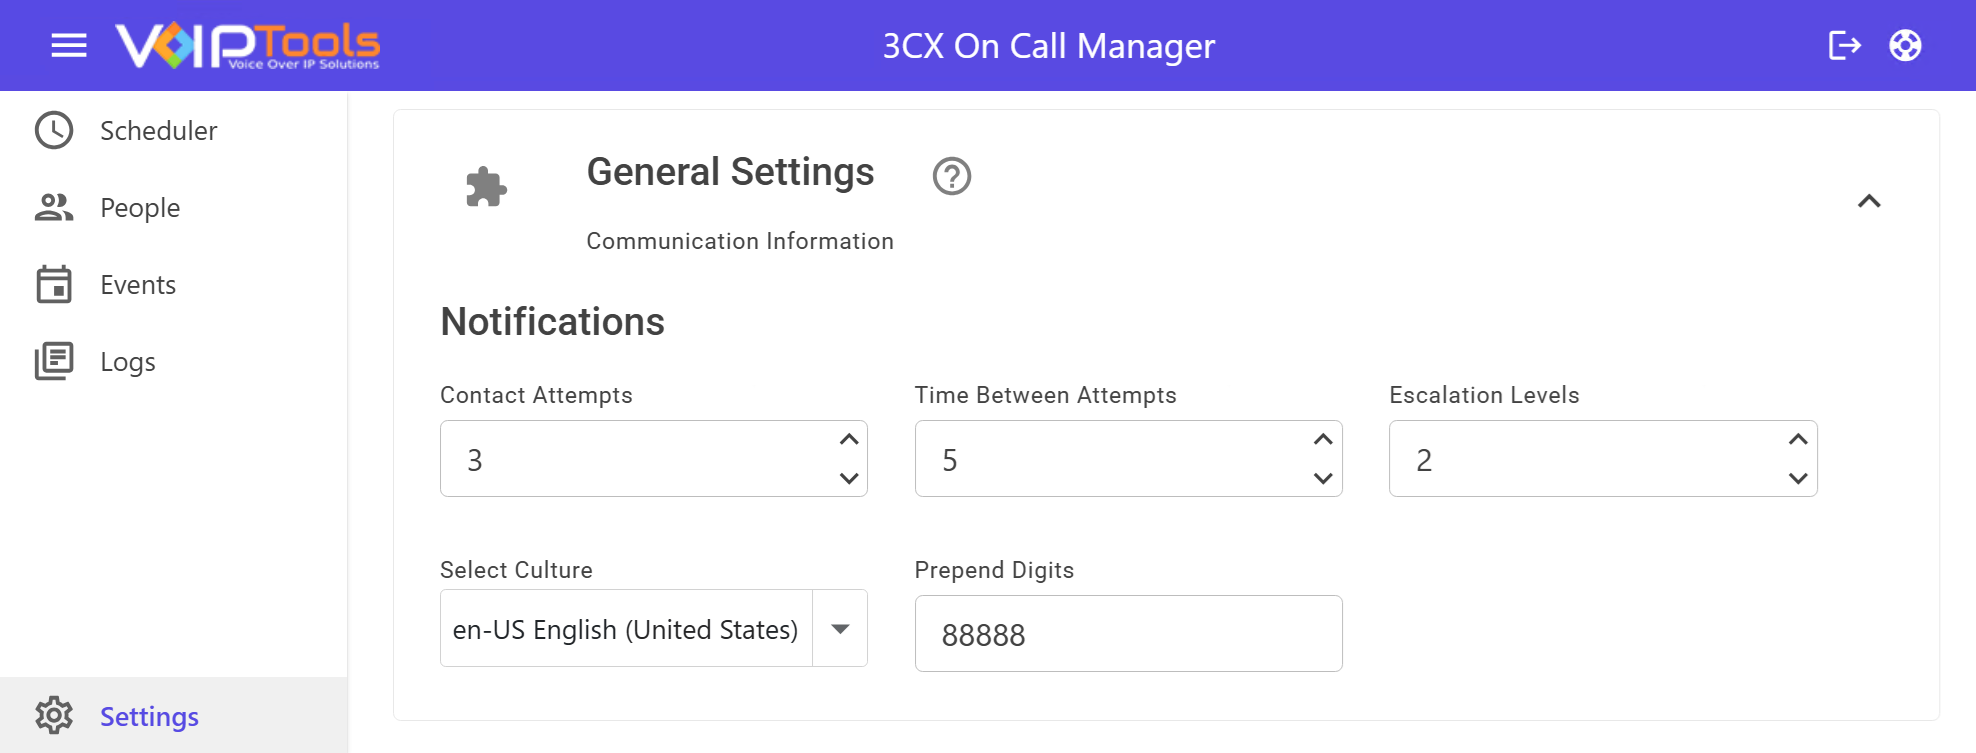
The General Settings Notifications has the following menu options:
| Contact Attempts | The number of times the system will try to reach a person before moving on to the next escalation level. |
| Time Between Attempts | The number of minutes the system waits before making the next contact attempt. |
| Escalation Levels |
The maximum number of escalation levels the system will go through before stopping. How escalation works: The system contacts the first person in the list up to the number of contact attempts you set. If there is no response, it moves to the next person and repeats the process until it reaches the last escalation level. |
| Select Culture | Choose the language and regional format that the application should use for displaying dates and times. |
| Prepend Digits | Enter any digits that must be added before an outbound number is dialed. This helps the call match your 3CX outbound rules and route through the correct trunk. |
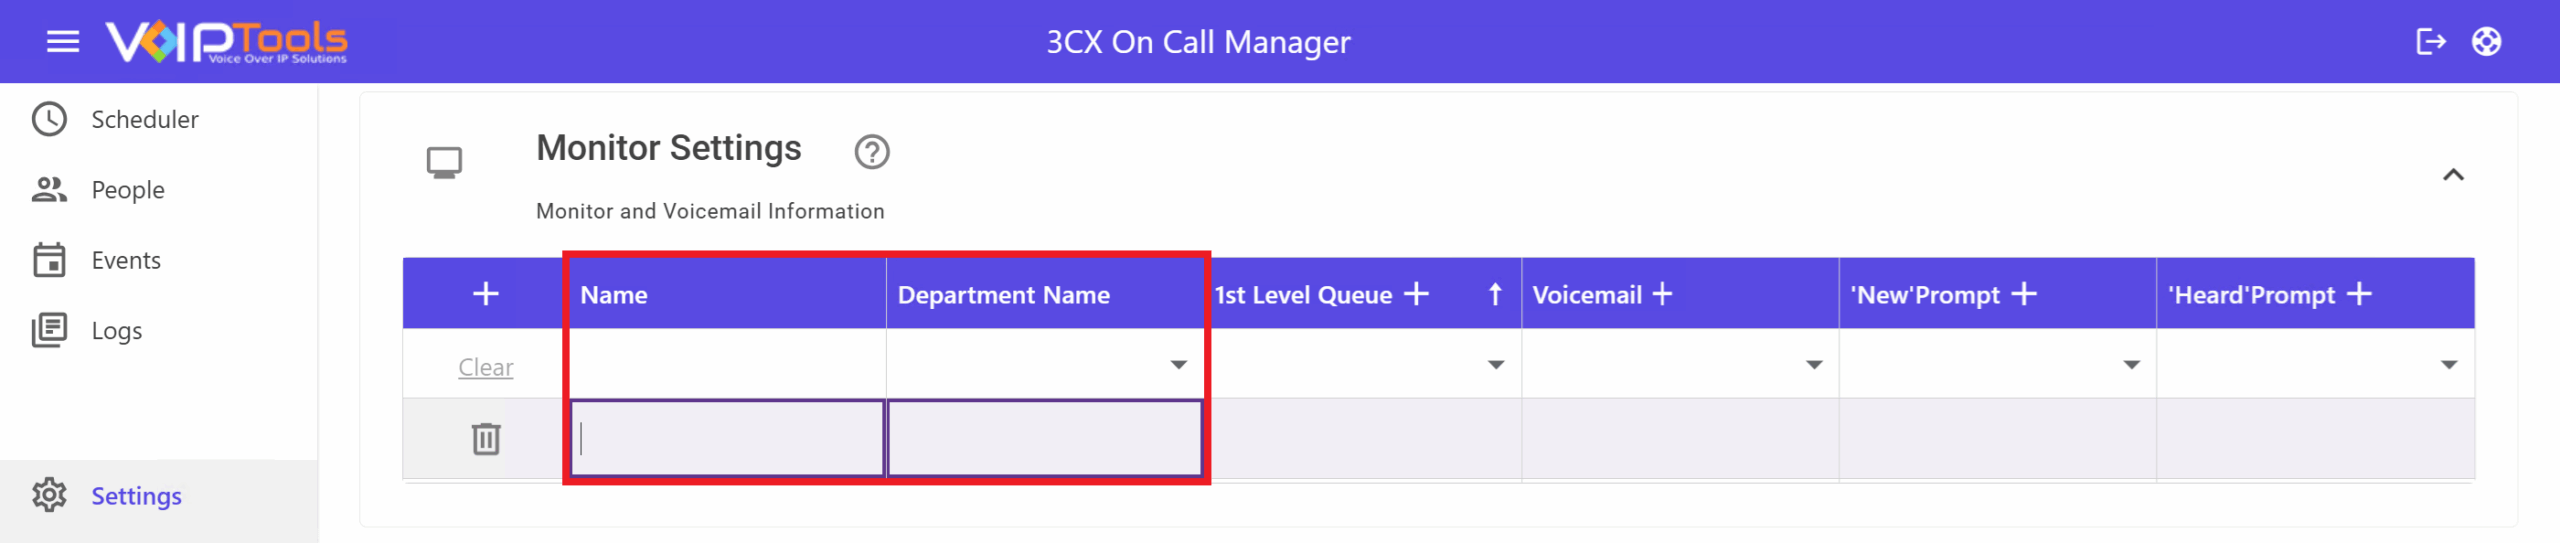
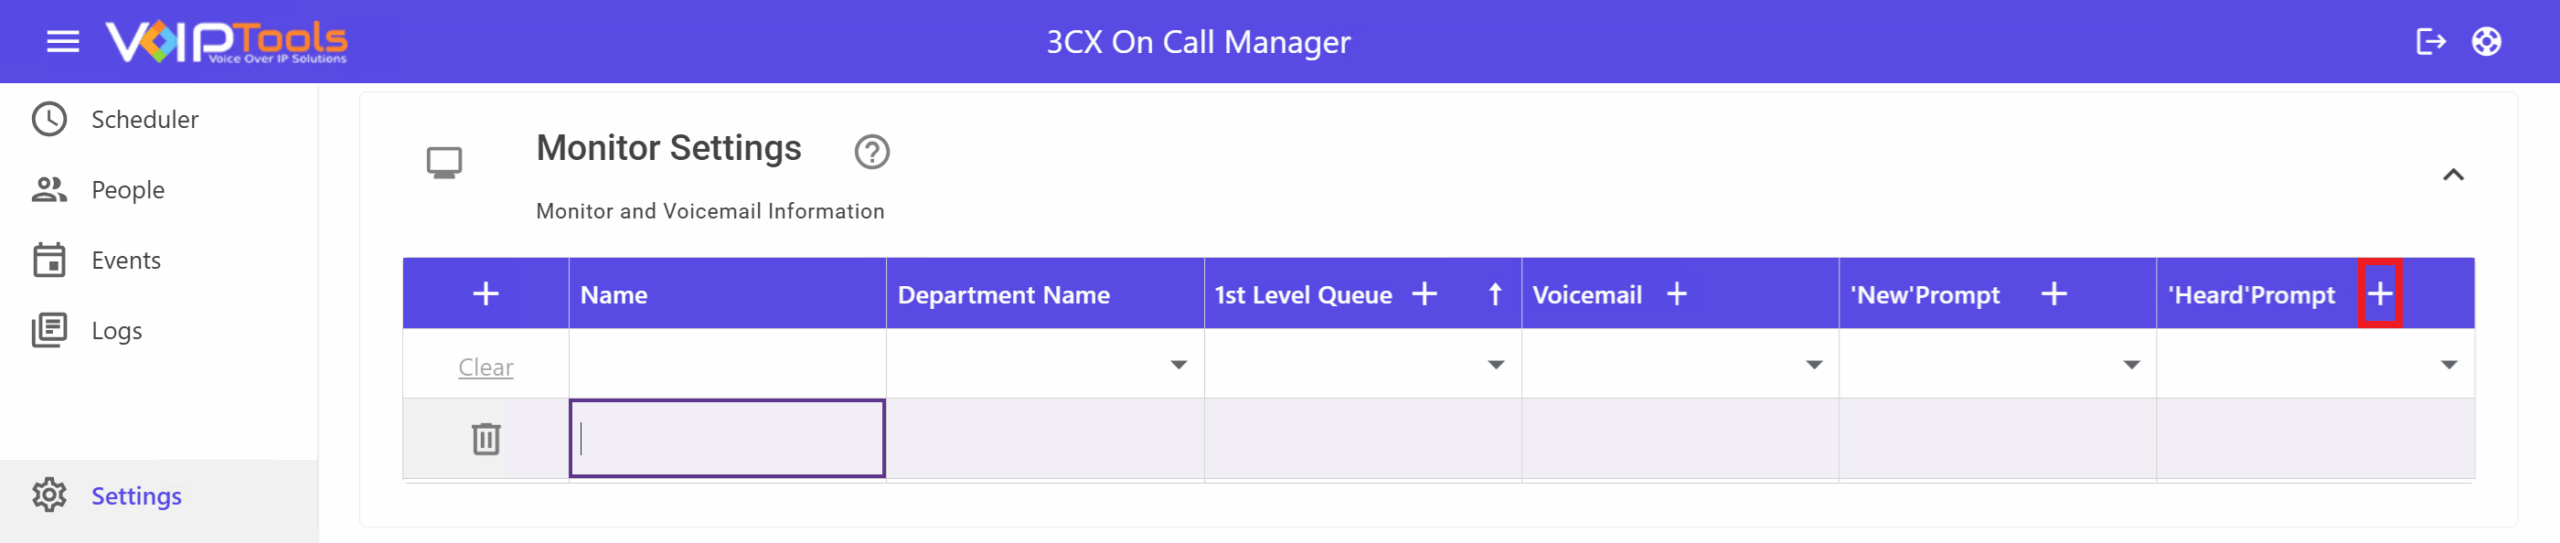
Monitor Settings #
The Monitor Settings enables you to define how 3CX On Call Manager handles incoming calls for a mailbox or queue. You can route calls directly to voicemail, or send them to a queue first and move to voicemail if the queue is not answered within the allowed time.
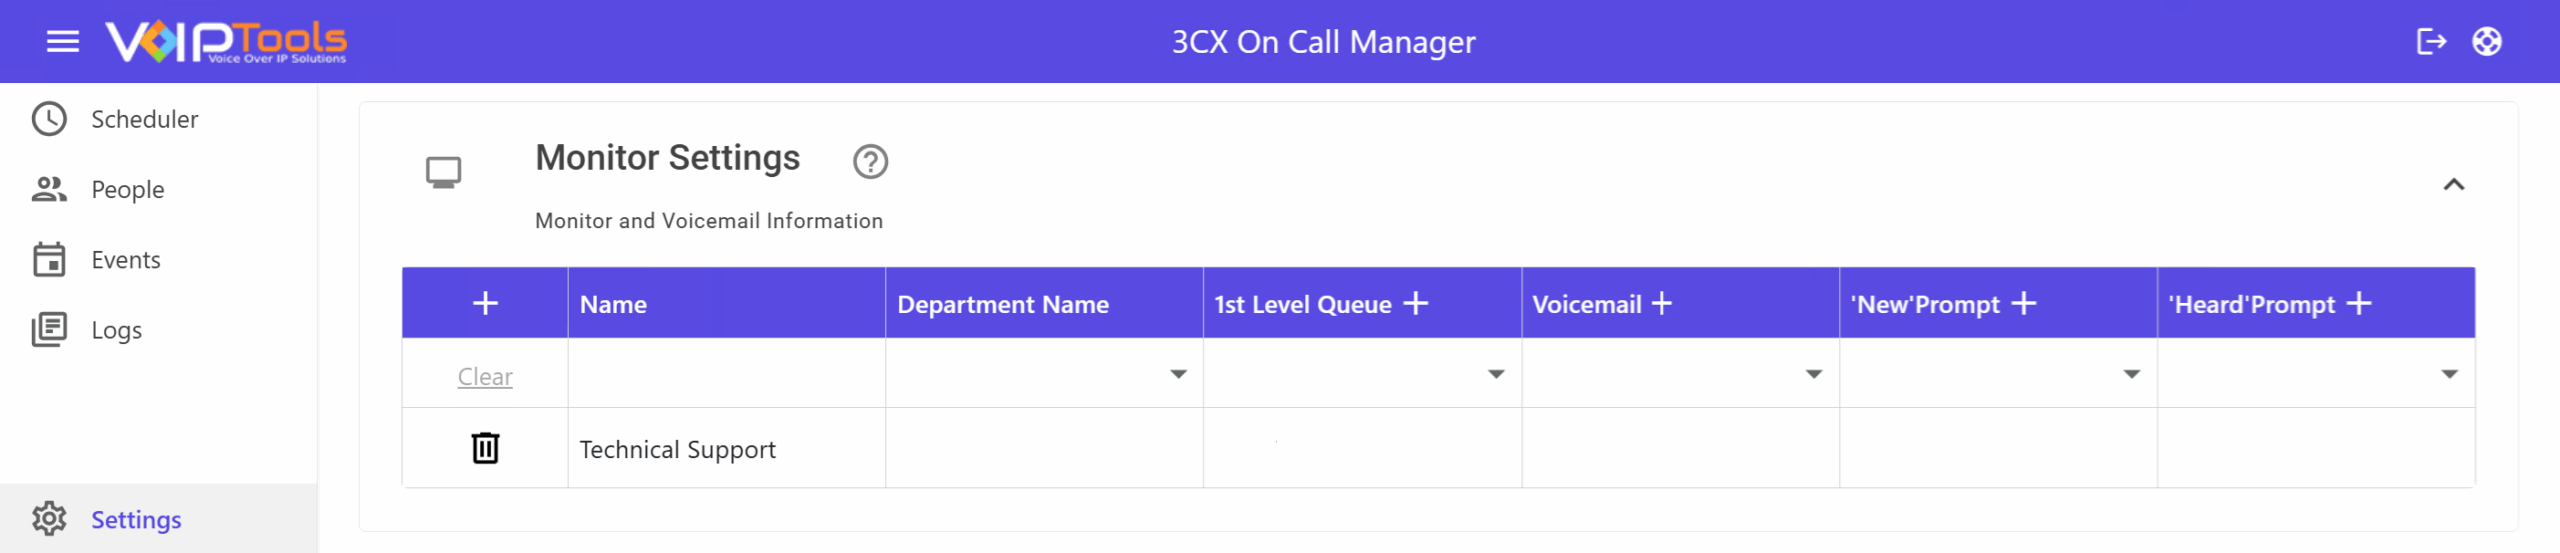
Field Definition #
| Name | Identifies the monitor entry. It appears in the Scheduler when you select a schedule to update. |
| Department Name | Selects the department linked to the monitor entry. |
| 1st Level Queue | Optional queue used before voicemail. 3CX On Call Manager can place the correct agents in the queue based on the schedule. |
| Voicemail | The mailbox being watched for new messages. |
| New Prompt | Prompt used when a new voicemail is received. |
| Heard Prompt | Prompt used after the voicemail has already been heard. |
Call flow #
A monitored call usually follows one of these paths:
-
Inbound call → Digital Receptionist → Voicemail.
-
Inbound call → Digital Receptionist → Queue → Voicemail.
- Use a 1st Level Queue when you want the caller to reach an active agent before voicemail.
- Use the New Prompt to notify the on-call agent that a new voicemail is waiting.
- Use the Heard Prompt to notify earlier contacts after the voicemail has been checked.
Adding a New Monitor #
Click the + button in the Monitor Settings table to add a new row, then fill in the Name and Department Name field to identify your monitor. This name will appear in the Scheduler screen when assigning on-call schedules.
Adding New First Level Queue: #
A 1st Level Queue is a call queue where inbound calls are sent first, giving callers a chance to reach a live agent before going to voicemail.
Step 1: Click the + icon next to the 1st Level Queue column header.
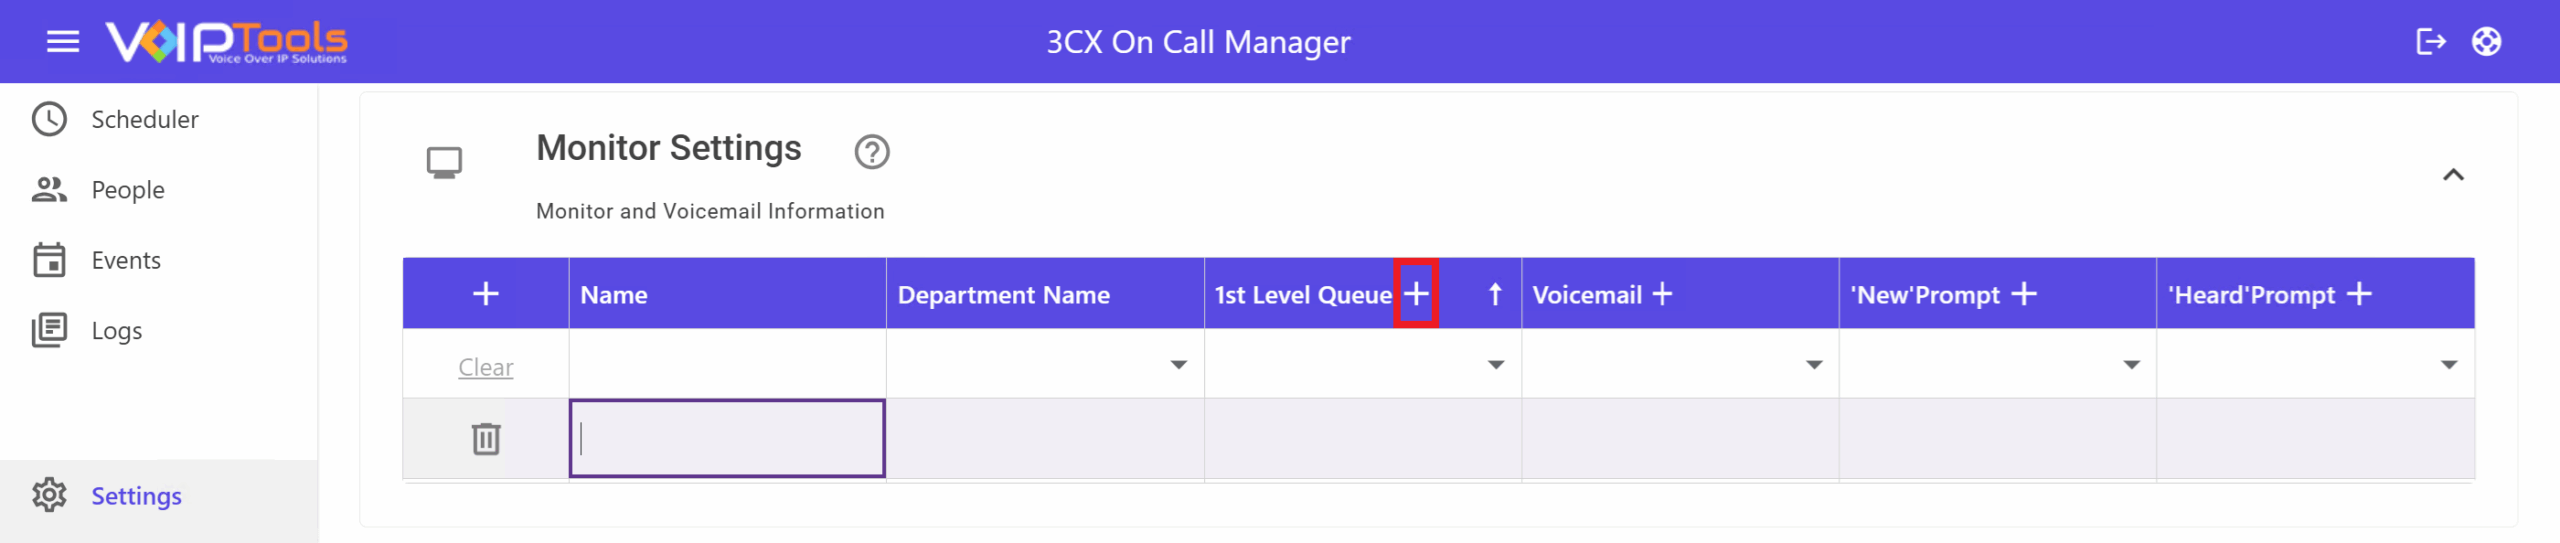
Step 2: In the Create New Queue popup, enter:
- Queue Name: a label for this queue
- Fallback Extension: the extension calls are sent to if the queue is unanswered

Step 3: Click Save.
Note: This feature requires the Pro Edition of 3CX and uses Remote Agents.
You can see your new queue added to the First Level Queue dropdown.
Add New Voicemail #
The Voicemail column specifies which extension 3CX On Call Manager monitors for new messages typically an after-hours support line.
Step 1: Click the + icon next to the Voicemail column header.
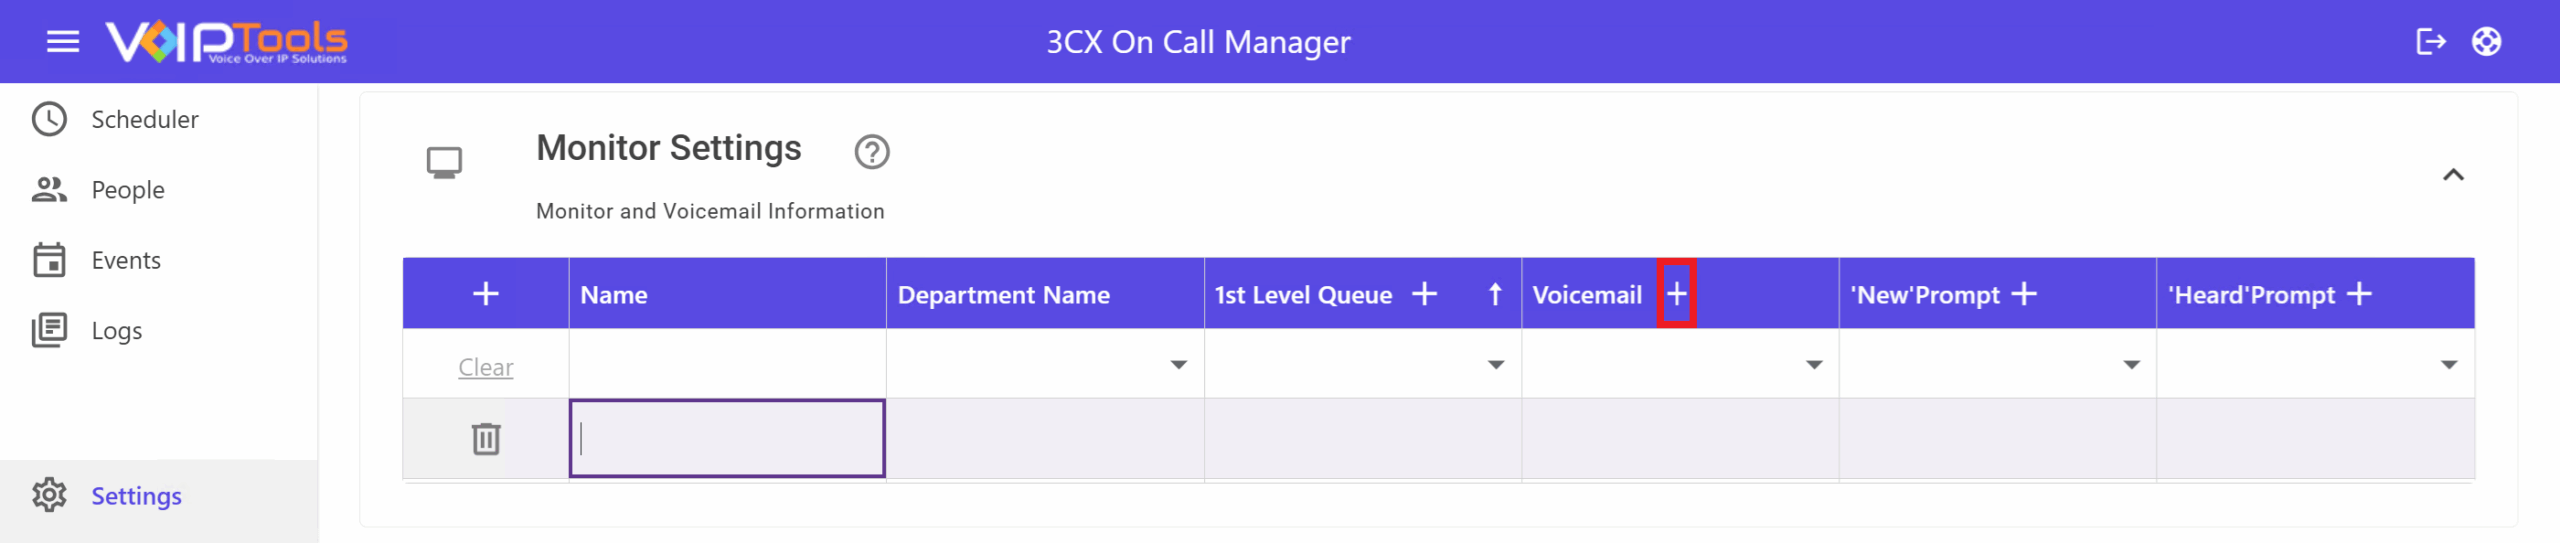
Step 2: In the Create New Extension popup, enter the First Name and Last Name of the extension owner.

Step 3: Click Save.
You can see your new extension is now added to the Voicemail dropdown.
Add New IVR to the ‘New’ or ‘Heard’ Prompt Dropdown #
A ‘New’ Prompt plays when a fresh voicemail arrives, alerting the on-call agent and transferring them to the voicemail box.
New Prompt #
Step 1: Click the + icon next to either the ‘New’ Prompt column header.
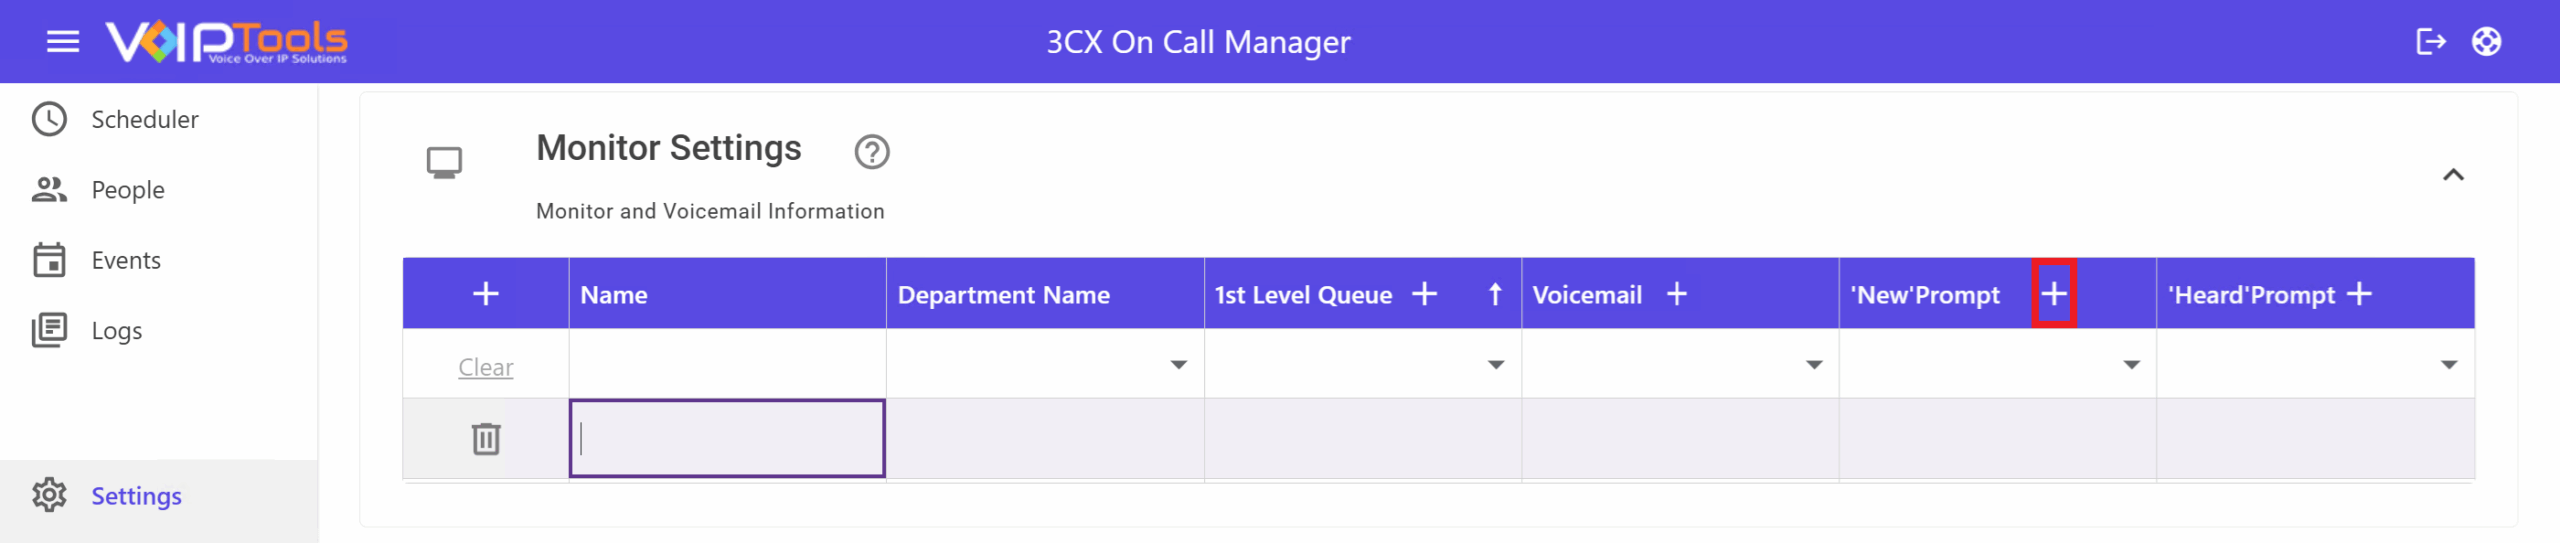
Step 2: In the Create New Digital Receptionists popup, enter an IVR Name (a label for this automated message).

Step 3: Click Save.
You can now see the IVR added to the New Prompt dropdown.
Add New IVR to the Heard Prompt Dropdown #
Step 1: Click the + icon next to the ‘Heard’ Prompt column header.
Step 2: Enter the IVR Name.
Step 3: Click Save.
You can now see the IVR added to the New Prompt dropdown.
Methods to Handle Incoming Calls #
There are two approaches to handling incoming calls,
-
- Without using the 1st level queue feature
-
- Using the 1st level queue feature
Without Using the ‘1st Level Queue’ Feature #
The 3CX On Call Manager handles incoming calls without using a First Level Queue by following a simpler call flow process.
How it works
- The call reaches the Digital Receptionist.
This is the automated greeting that answers incoming calls. - If no agent is available, the call goes straight to voicemail.
- After the voicemail is left, the normal notification process begins and the on-call agents are notified.
This setup works well when calls do not need to wait for an available agent.
Using the ‘1st Level Queue’ Feature
When 3CX On Call Manager handles incoming calls using a First Level Queue, this method gives callers a chance to wait for an available agent before being sent to voicemail.
How it works
- The call reaches the Digital Receptionist.
- The call is passed to a CFD Notification application.
CFD (Call Flow Designer) is a tool that automates call routing tasks. - The system checks the on-call schedule.
- Scheduled agents are automatically logged into the queue.
- If an agent is available, the caller waits in the queue until someone answers.
- If the maximum queue wait time is reached, the call is sent to voicemail.
- Once the voicemail is left, the normal notification process begins.
Benefits of Using a First Level Queue:
| Better caller experience | Callers can wait for an available agent instead of being sent directly to voicemail. |
| Automatic Agent Login | Only scheduled on-call agents are logged into the queue. |
| Voicemail Fallback | If nobody answers in time, the caller can still leave a voicemail for follow-up and agents can respond later. |
Using First Level Queues is optional. This feature uses ‘Remote Agents’ which is only available in the Pro Edition of 3CX.
You can insert special characters in the Department Name column.
How the Monitors Settings changes settings in 3CX Console Management
| Change in the Monitors Settings | Result in the 3CX Console Management |
|---|---|
| Create a CFD, Voicemail Monitor, or Queue Monitor | Updated in the respective list in the 3CX Phone Management Console. |
| Creating Log In/ Out CFD | The respective CFDs gets published in the Call Queues list of the 3CX Management Console. |
| Creating 1st Level Queue | The respective queue monitor gets created in the ‘Call Queues’ list. |
| Creating a Voicemail | The respective voicemail monitor extension gets created in the Extensions list. |
| Creating a New Prompt digital receptionist | The respective call queues gets automatically published in the New Prompt list. |
| Creating the Heard Prompt digital receptionist | The respective call queues gets automatically published in the Heard Prompt list. |
- As an Admin, you can view and create monitors for all the groups.
- As a Manager, you can view and create monitors for only those groups to which you are the manager.
Admin Settings #
Use this section to give someone full access in 3CX On Call Manager. When an extension is selected here, that user becomes an Admin and can access every page and every department in the app.
If all extensions remain unchecked, users will access screens based on their default 3CX role permissions.
Assigning Admin Rights
Checking a box next to a person’s name gives them Admin rights. This means they can access every page and department in the entire application.
-
In Admin Settings, look through the list of extensions.
-
Check the box next to each extension you want to make an Admin.
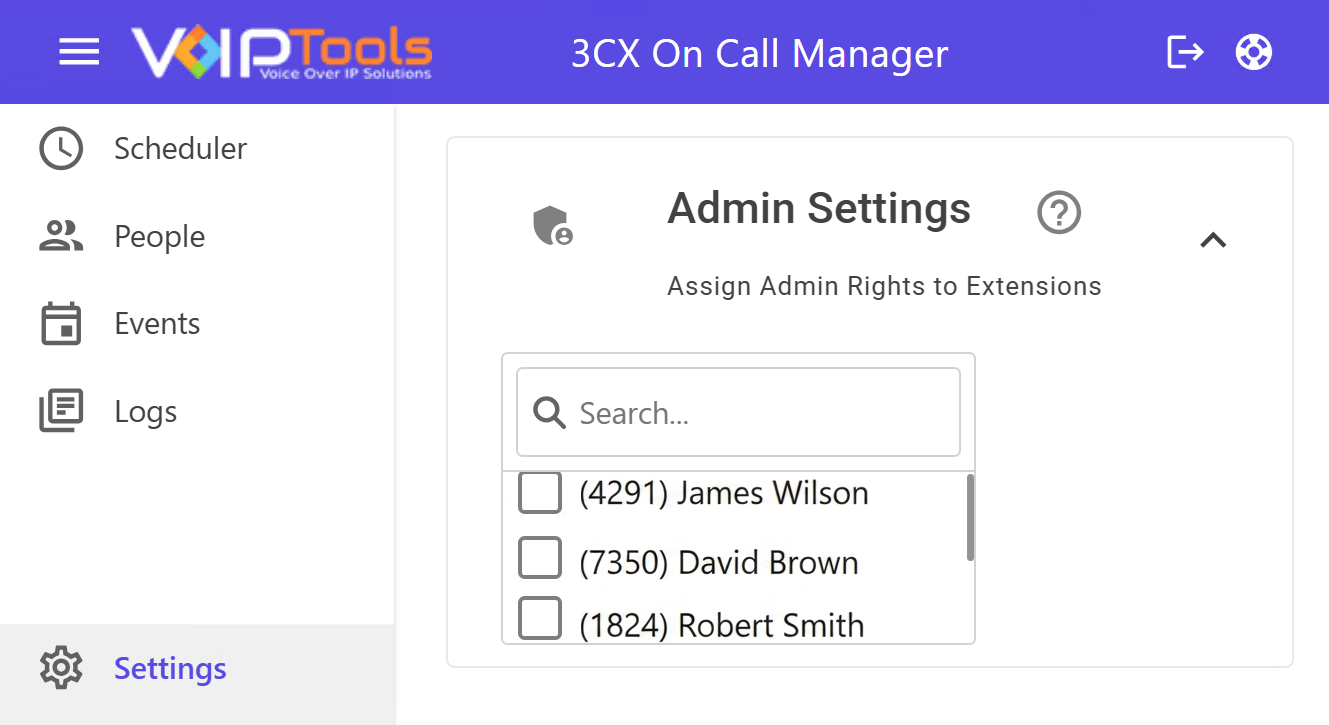
This setting is powerful. Even if someone is just a “User” or “Receptionist” in your main 3CX system, checking their name here gives them full Admin powers inside this specific app.
Email Settings #
Use this screen to connect 3CX On Call Manager to your email server and send voicemail notifications.
Follow the procedure to design your email templates,
Mail Server
-
Enter your Email Server address. You can use a domain name such as
smtp.gmail.comor an IP address such as192.168.1.20. -
Enter the Port your mail server uses. Port 25 is the default, and Gmail or Google Workspace usually uses 587.
-
Enter the Email From address. Recipients will see this address in the message header.
-
Enter an optional Email Subject. If you leave it as Test Email, that subject will be used for the test message.
-
Enter an Alternative Email if you want all voicemails sent to one inbox. Leave it blank to send messages to the voicemail owner.
-
Select Requires Authentication if your mail server needs a username and password.
-
Enter the User and Password for the email account.
-
Select Requires TLS if your mail server requires a secure connection.
-
Click Test to send a test email and confirm the settings are correct.

Notification Template Settings #
Use this section to change the email, SMS, and reminder messages sent by 3CX On Call Manager.
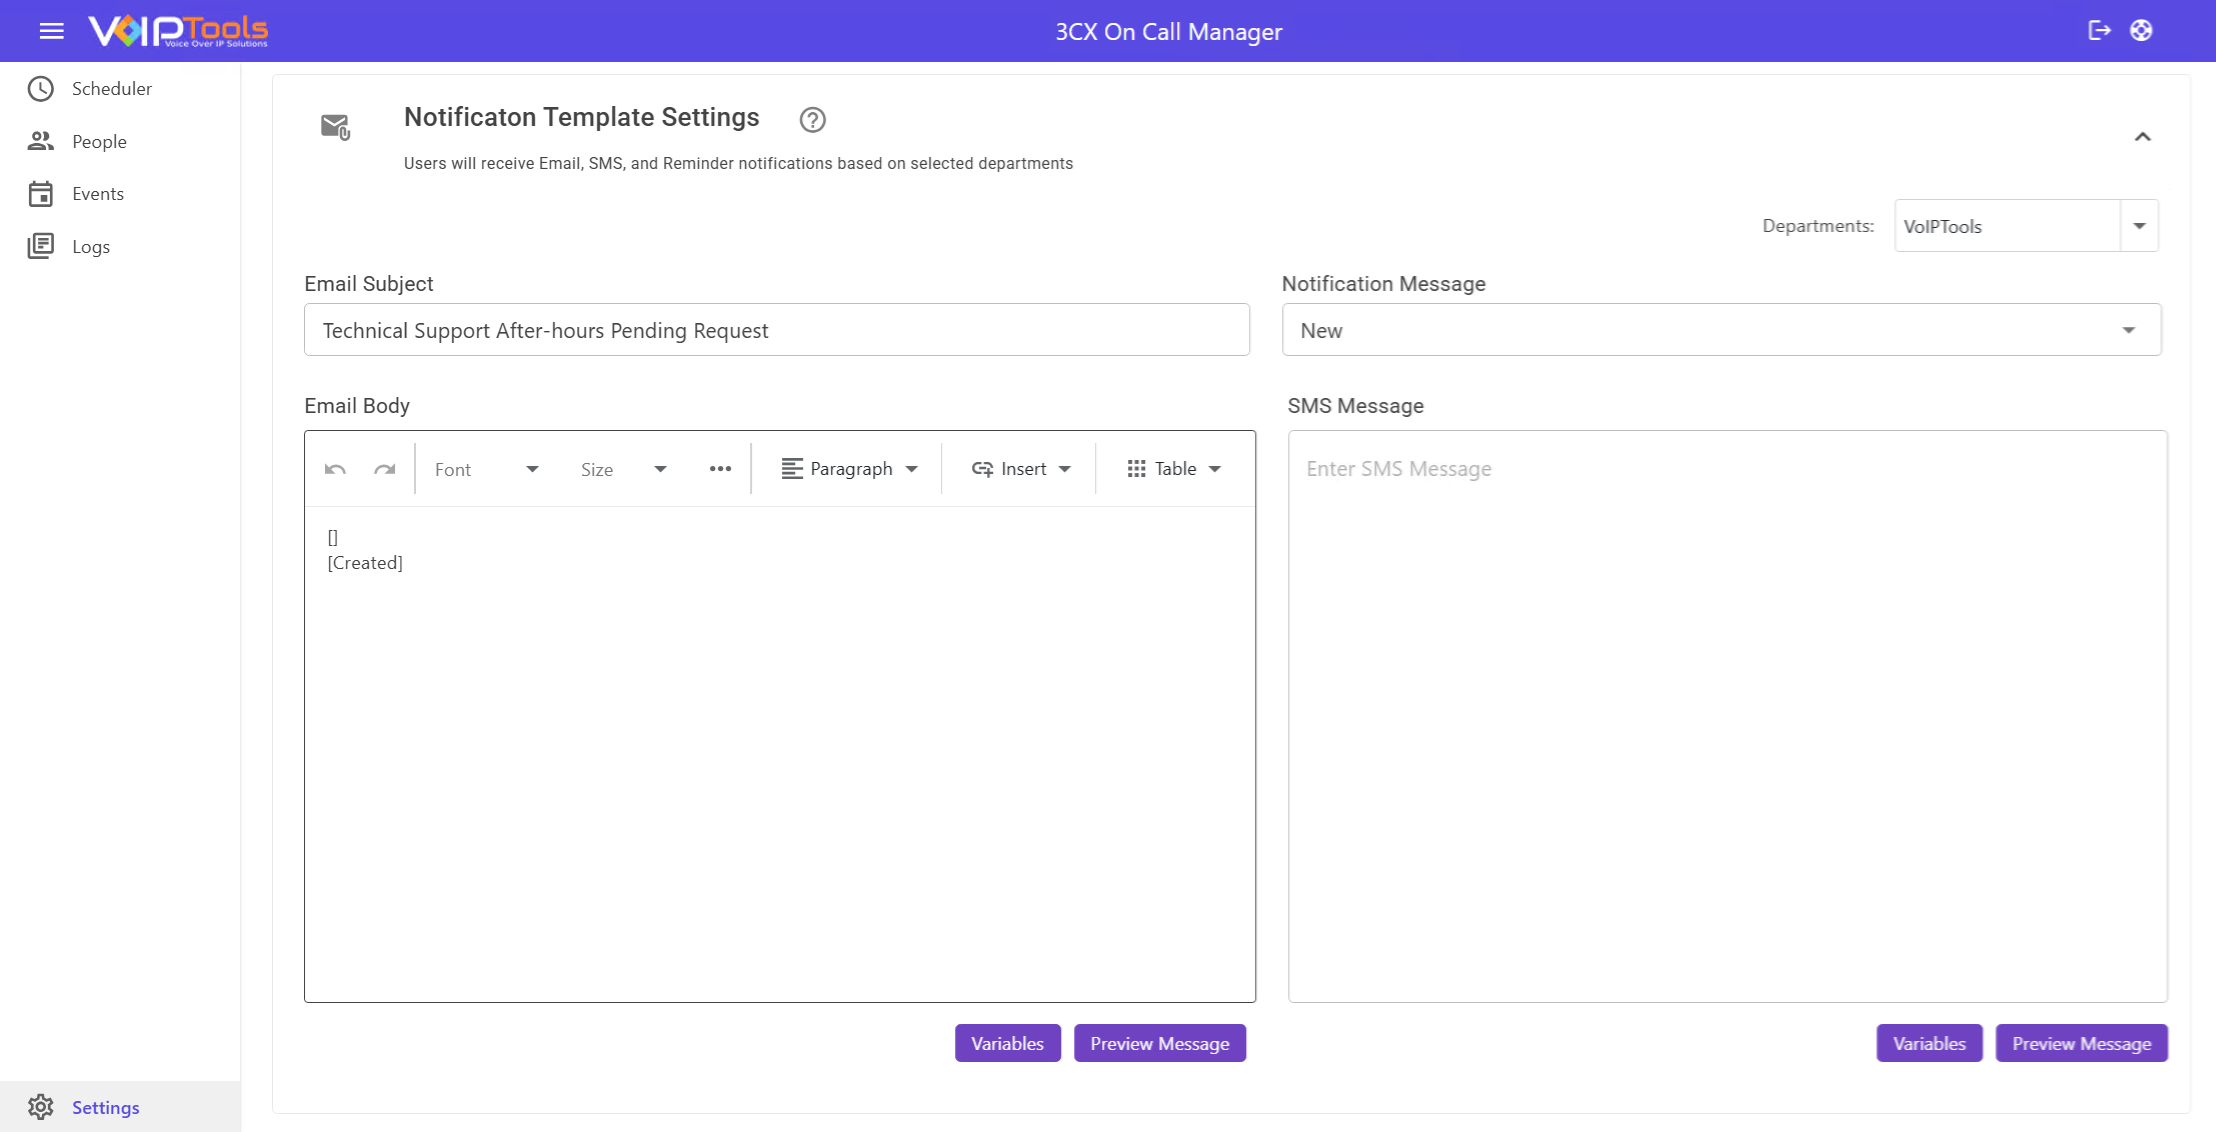
Departments
Pick a department from the Departments drop-down list to see its message settings.
Each department can have its own email subject, notification message, and SMS message.
If a department does not have its own template, the system uses the default template for All Departments.
Variables
Use variables to insert live data into your Email and SMS templates. Select a variable and click Copy to place it in your message.
For example, [Caller] inserts the caller’s phone number into the notification.
These variables help you personalize messages without typing the same details every time.
Using Field Variables
Field variables let you add dynamic details like the caller name, extension, date, or transcript.
Type the field name inside brackets. For example, [Extension] inserts the caller’s extension number.
The following table lists the available field variables that can be inserted into the text of the notification email, SMS, and reminder messages.
| [Notify] | Name of the resource who is notified |
| [Caller] | Telephone number of the caller |
| [CallerName] | Name of the caller |
| [Duration] | Call length. |
| [Created] | The date and time at which the voicemail is created. |
| [Heard] | Indicates whether the voicemail notification is heard. If the voicemail is heard, the value is “Heard,” and if not heard the value is “NULL.” |
| [FileName] | Name of the audio file attached in the mail. |
| [Monitor] | Monitoring status. |
| [Extension] | Extension number. |
| [Transcript] | Message text. |
Messages
-
Use the Email Body box to write the email notification text.
-
Use the SMS Message box for short text alerts.
-
Use the Reminder Message area to edit reminder emails sent on schedule.
Preview Message
Click Preview Message to see how the notification will look before it is sent.
SMS #
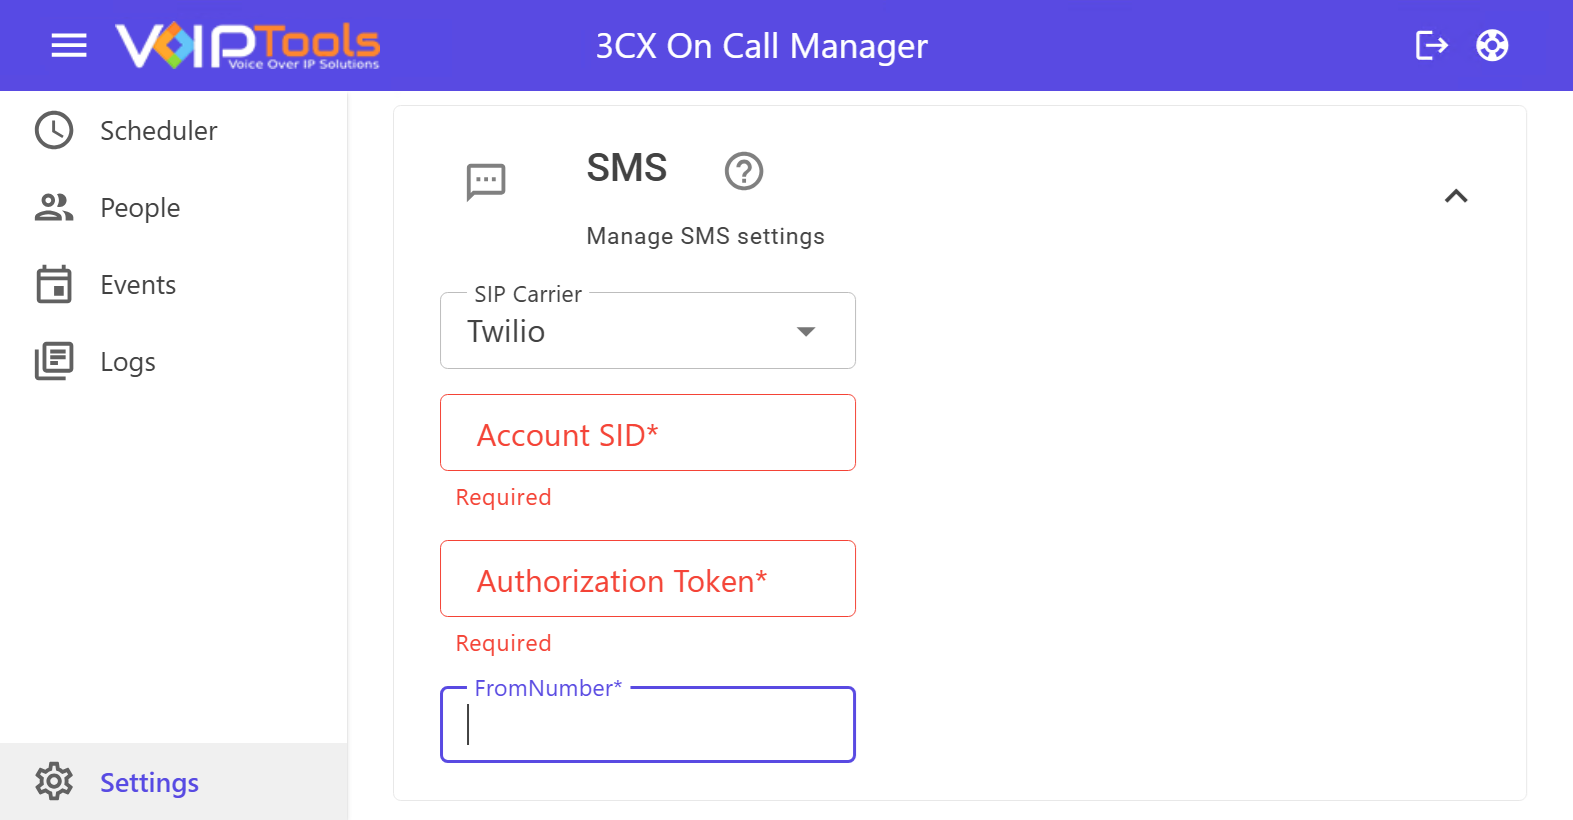
Use this section to choose how you want SMS notifications delivered by selecting a SIP Carrier from the dropdown. Your three options are Email, Skyetel, and Twilio. This feature ensures updates, improves appointment management, and provides flexibility with customizable delivery options.
Send SMS Notifications via Email #
Chose the email option from the SIP Carrier dropdown. No extra setup needed. SMS notifications will be delivered to the email addresses of your scheduled appointment recipients.
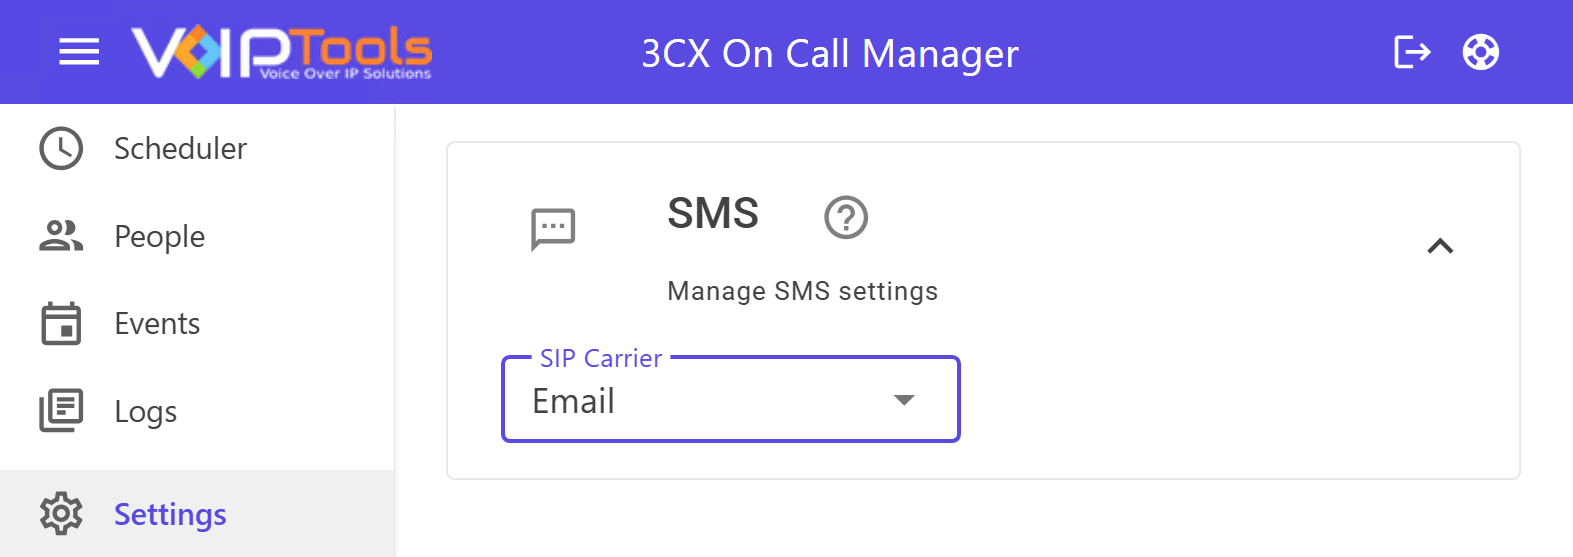
Results: The SMS notifications for scheduled appointment recipients is now sent through email.
Send SMS Notifications via Skyetel #
Select Skyetel from the dropdown and fill in the following fields:
| Field | What to Enter |
|---|---|
| Base URL | The main endpoint URL provided by Skyetel. |
| SID | Your Skyetel Service ID used to identify your account. |
| Secret | Your Skyetel authentication key. Keep this private. |
| From Number | The phone number recipients will see as the SMS sender. |
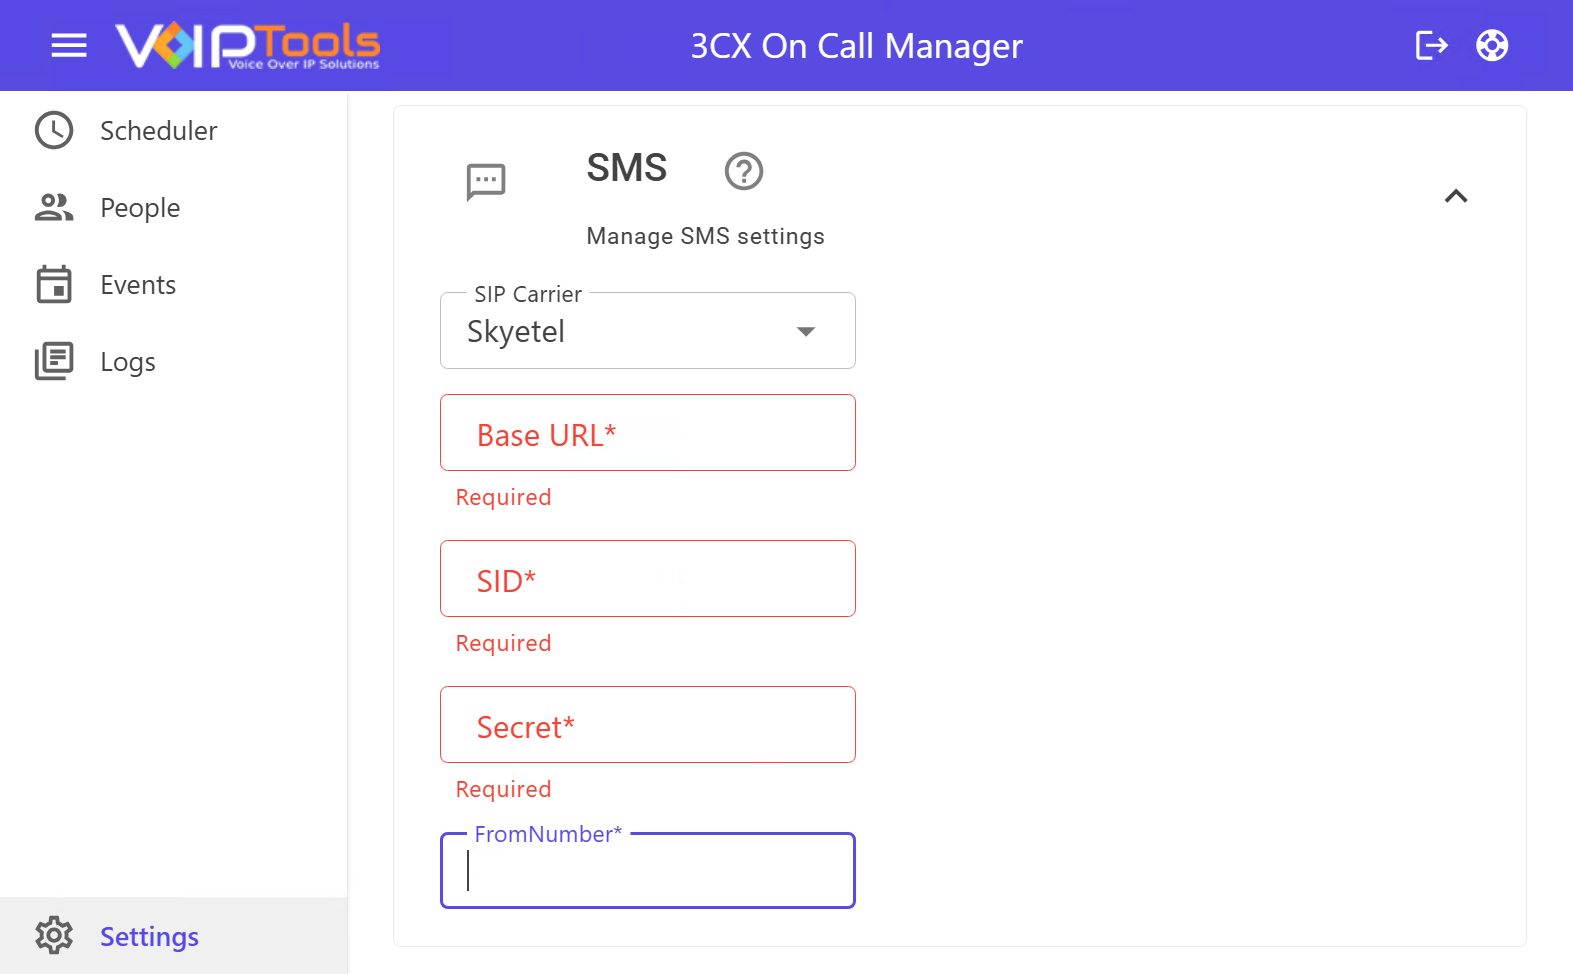
Results: The SMS notifications for scheduled appointment recipients is now sent through Skyetel.
Send SMS Notifications via Twilio #
Select Twilio from the dropdown and fill in the following fields:
| Field | What to Enter |
|---|---|
| Account SID | Your unique Twilio account identifier. |
| Authorization Token | Your Twilio security token — keep this private. |
| From Number | The Twilio-registered number used to send SMS messages. |
Tip: All fields marked Required must be filled in before SMS delivery will work. Once saved, the system will automatically use your selected carrier for all appointment notifications.
AI Platform Settings #
Use this section to set up speech transcription for voicemail recordings in 3CX On Call Manager. Stop letting voicemails sit unread. With AI Platform Settings, 3CX On Call Manager automatically converts recorded voicemails into clear, readable text so your team gets the information they need faster, without ever having to press play.
Speech Transcription: Check the Speech Transcription box to unlock the power of AI-driven voice-to-text conversion. Then simply choose your preferred AI provider from the Select AI Service dropdown and you’re ready to go.
Microsoft Azure
Leverage the reliability and enterprise-grade power of Microsoft Azure for seamless and accurate transcriptions.
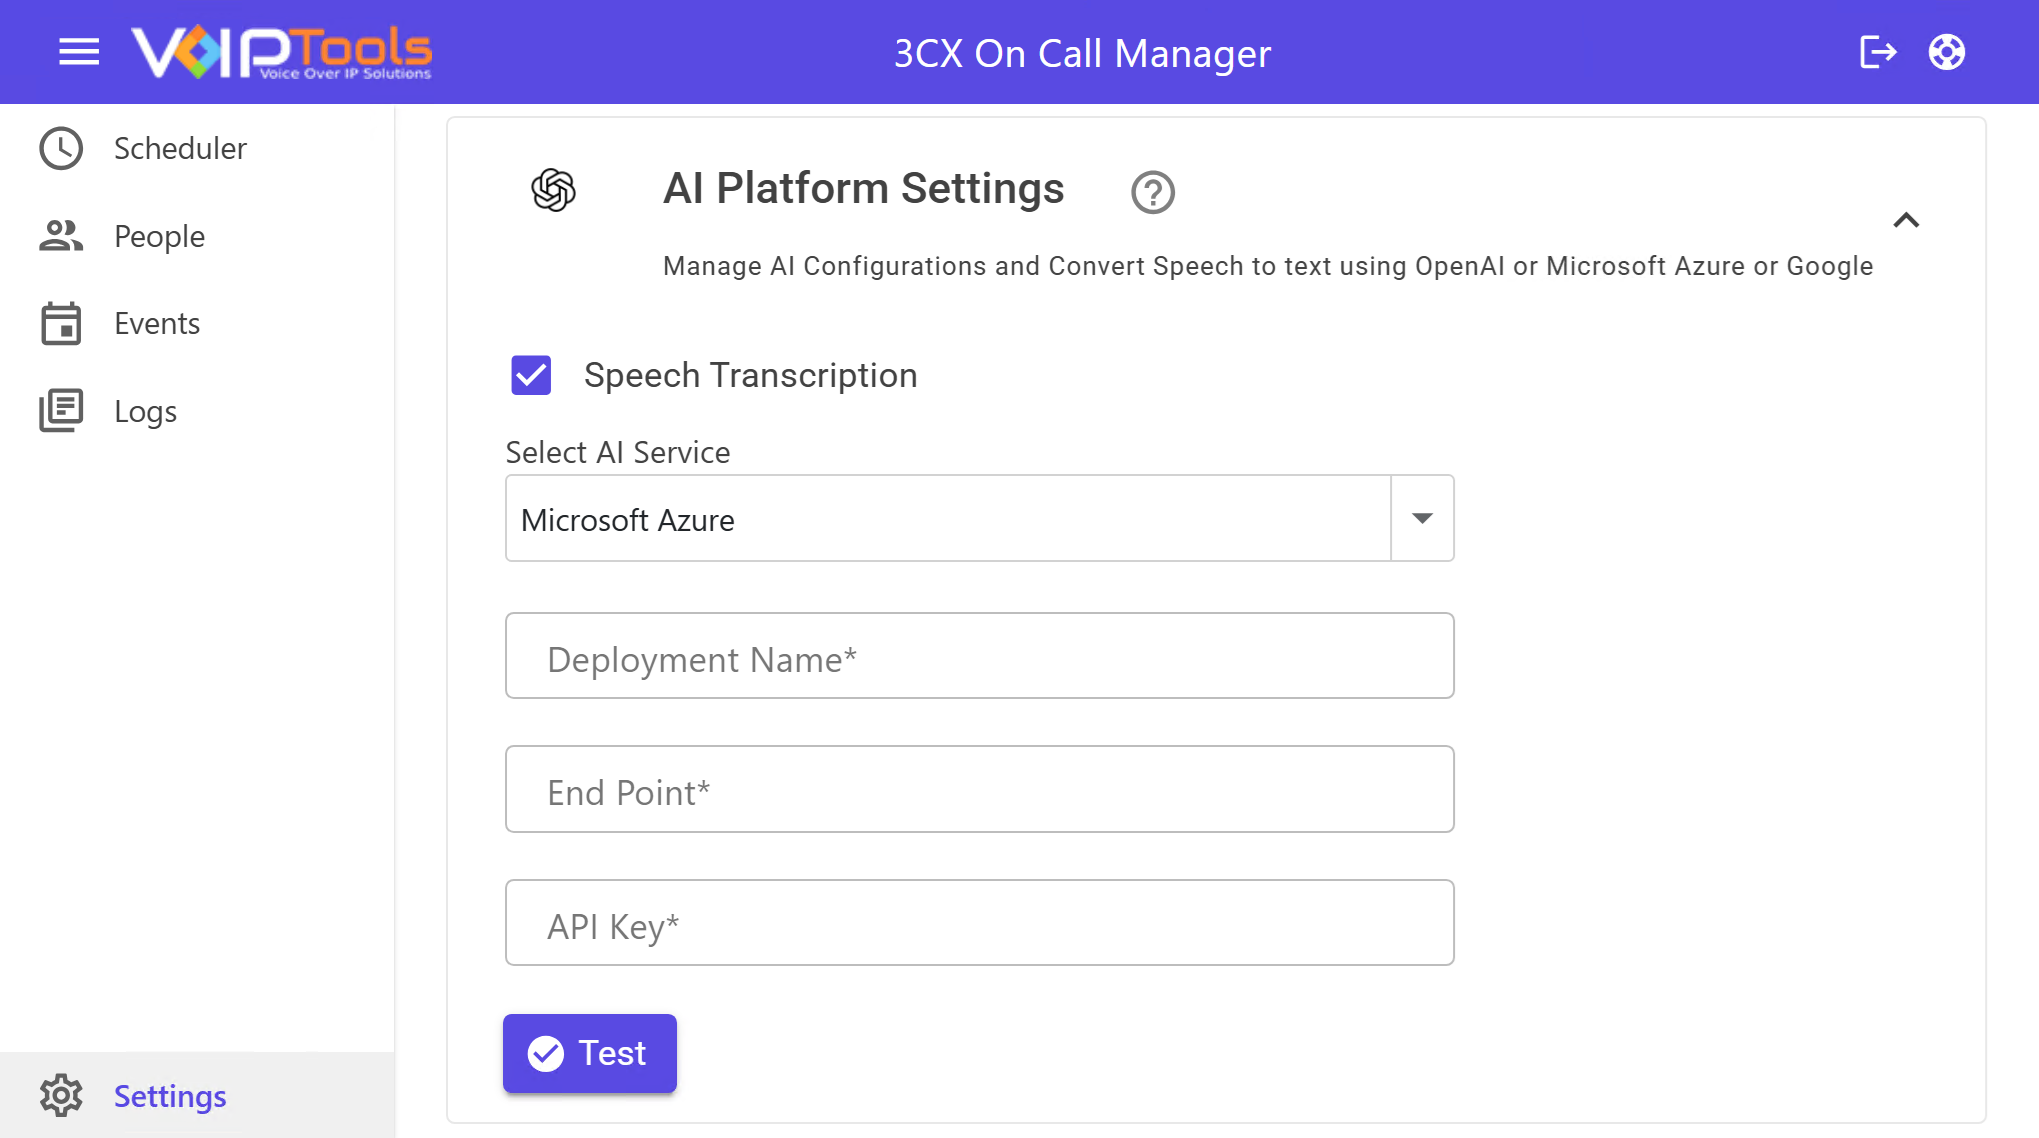
| Field | What to Enter |
|---|---|
| Deployment Name | Your Azure model name. |
| End Point | The full URL of your Azure transcription deployment. |
| API Key | Your Azure API key. Your secure key to fast, enterprise-quality transcription. Keep it private. |
OpenAI
Tap into the cutting-edge intelligence of OpenAI to deliver fast, natural-sounding transcriptions your team will love.
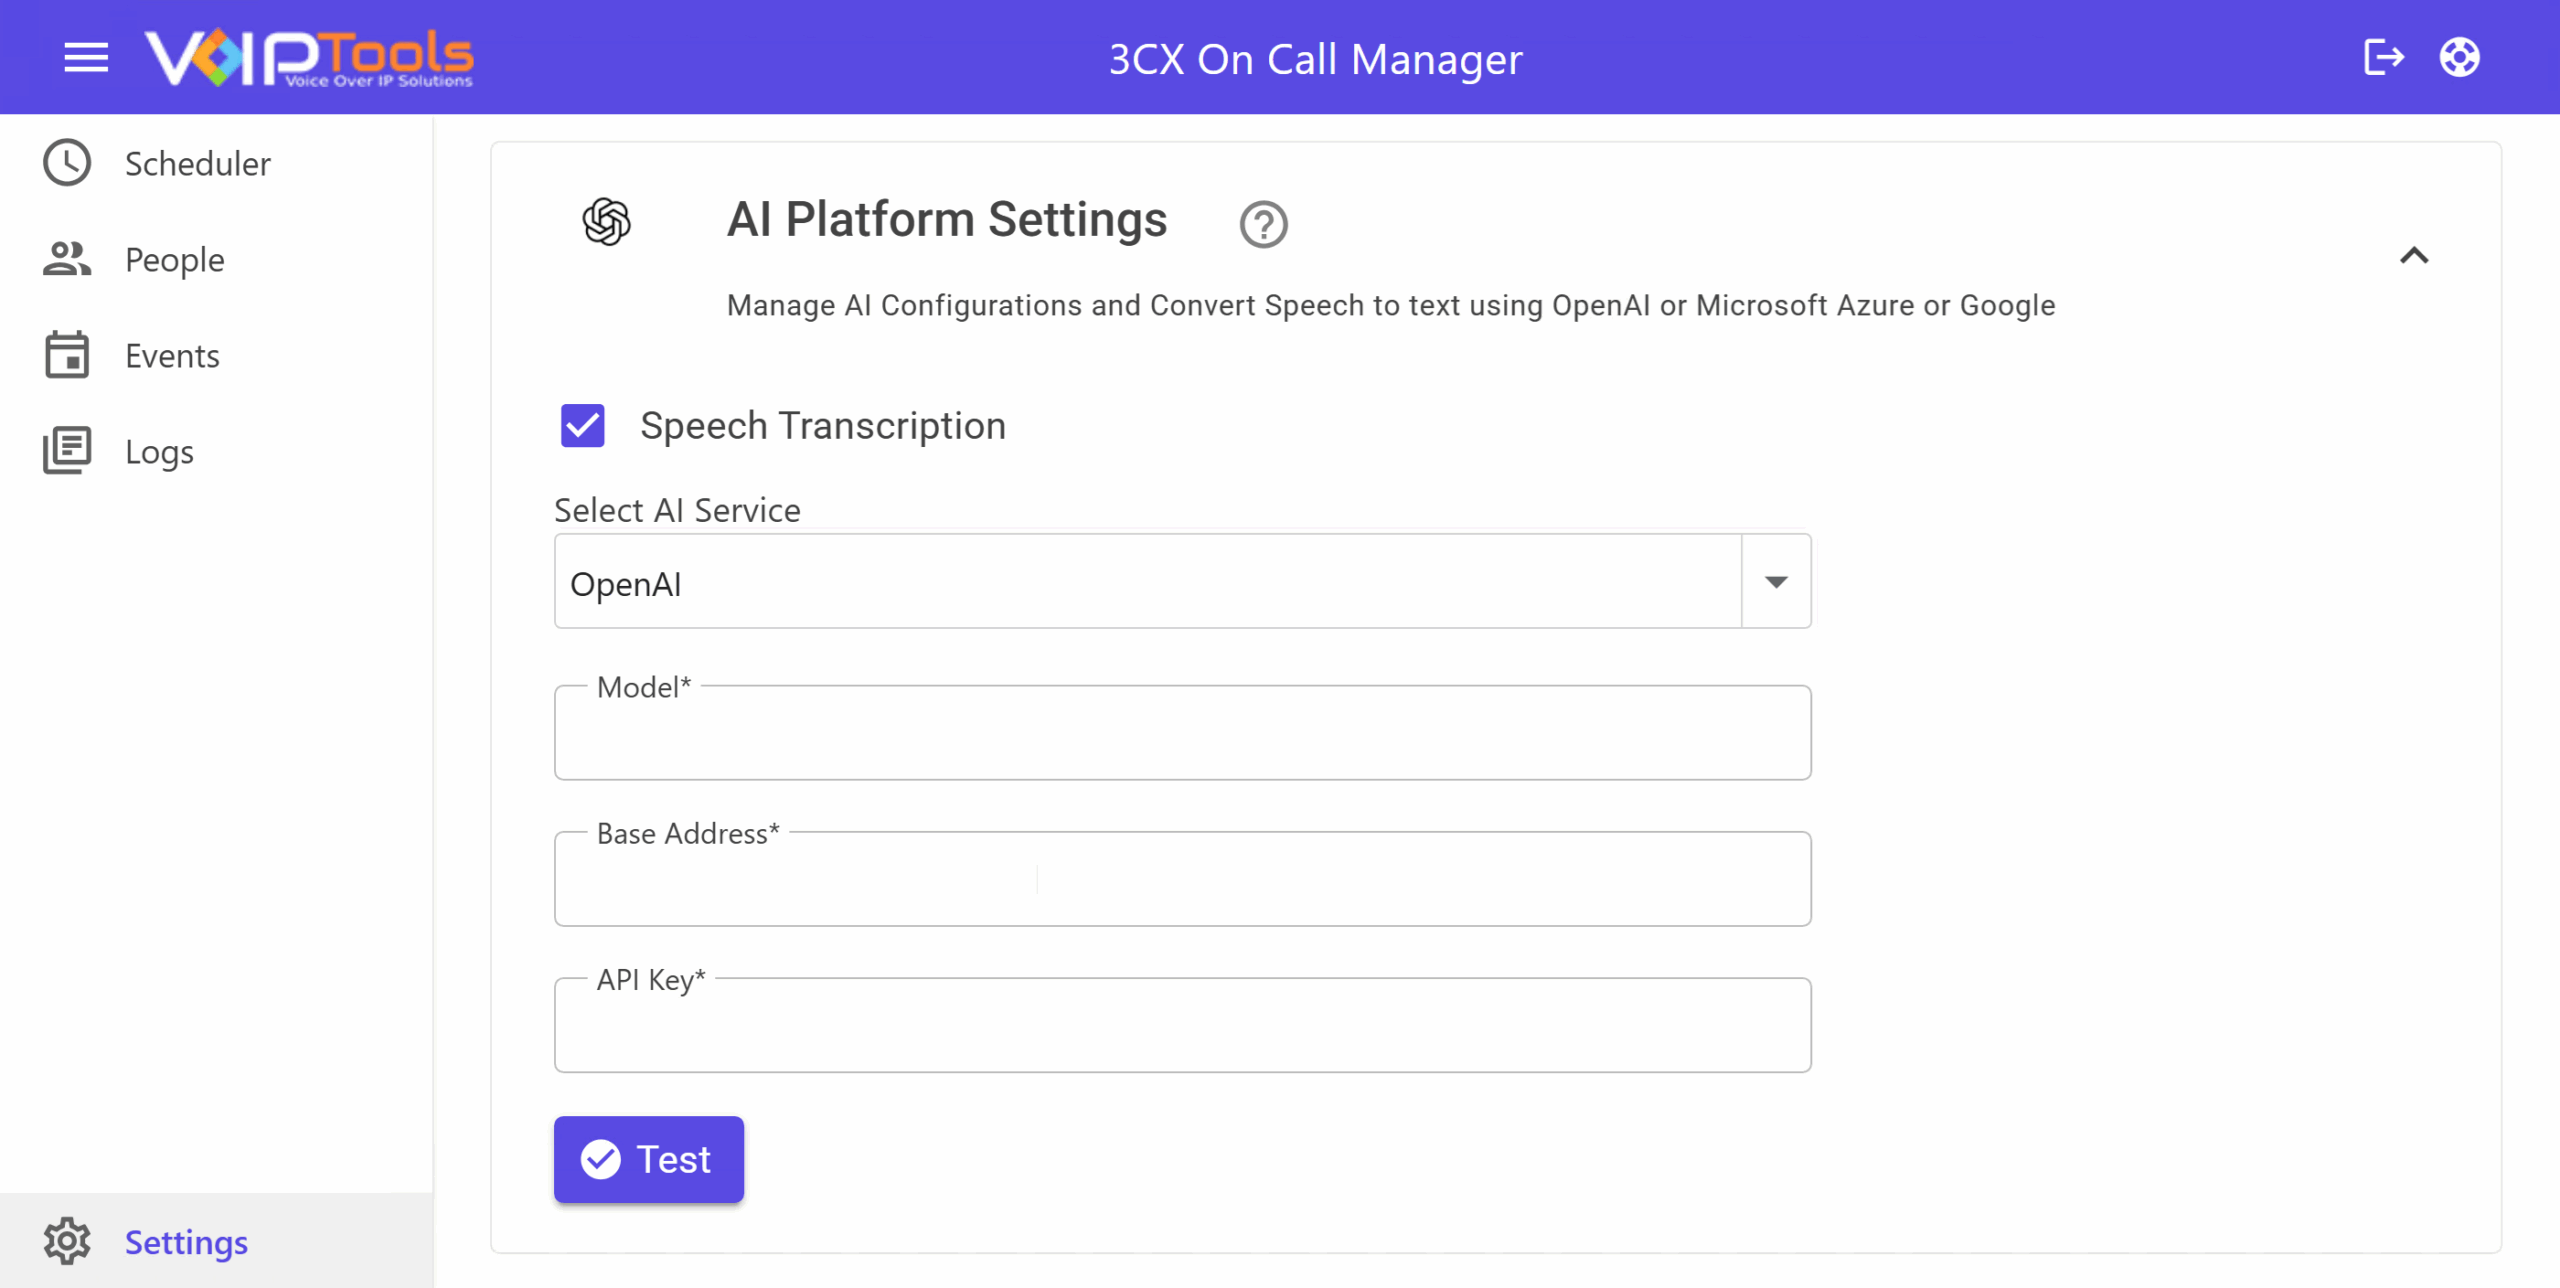
| Field | What to Enter |
|---|---|
| Model | The OpenAI model for transcription. Defaults to o3-mini. |
| Base Address | The base URL for OpenAI’s API found in your OpenAI account settings. |
| API Key | Your OpenAI API key. The key to smarter, faster voicemail processing. Keep it secure. |
Put Google’s world-class speech recognition to work for your team with flexible, scalable cloud-based transcription.
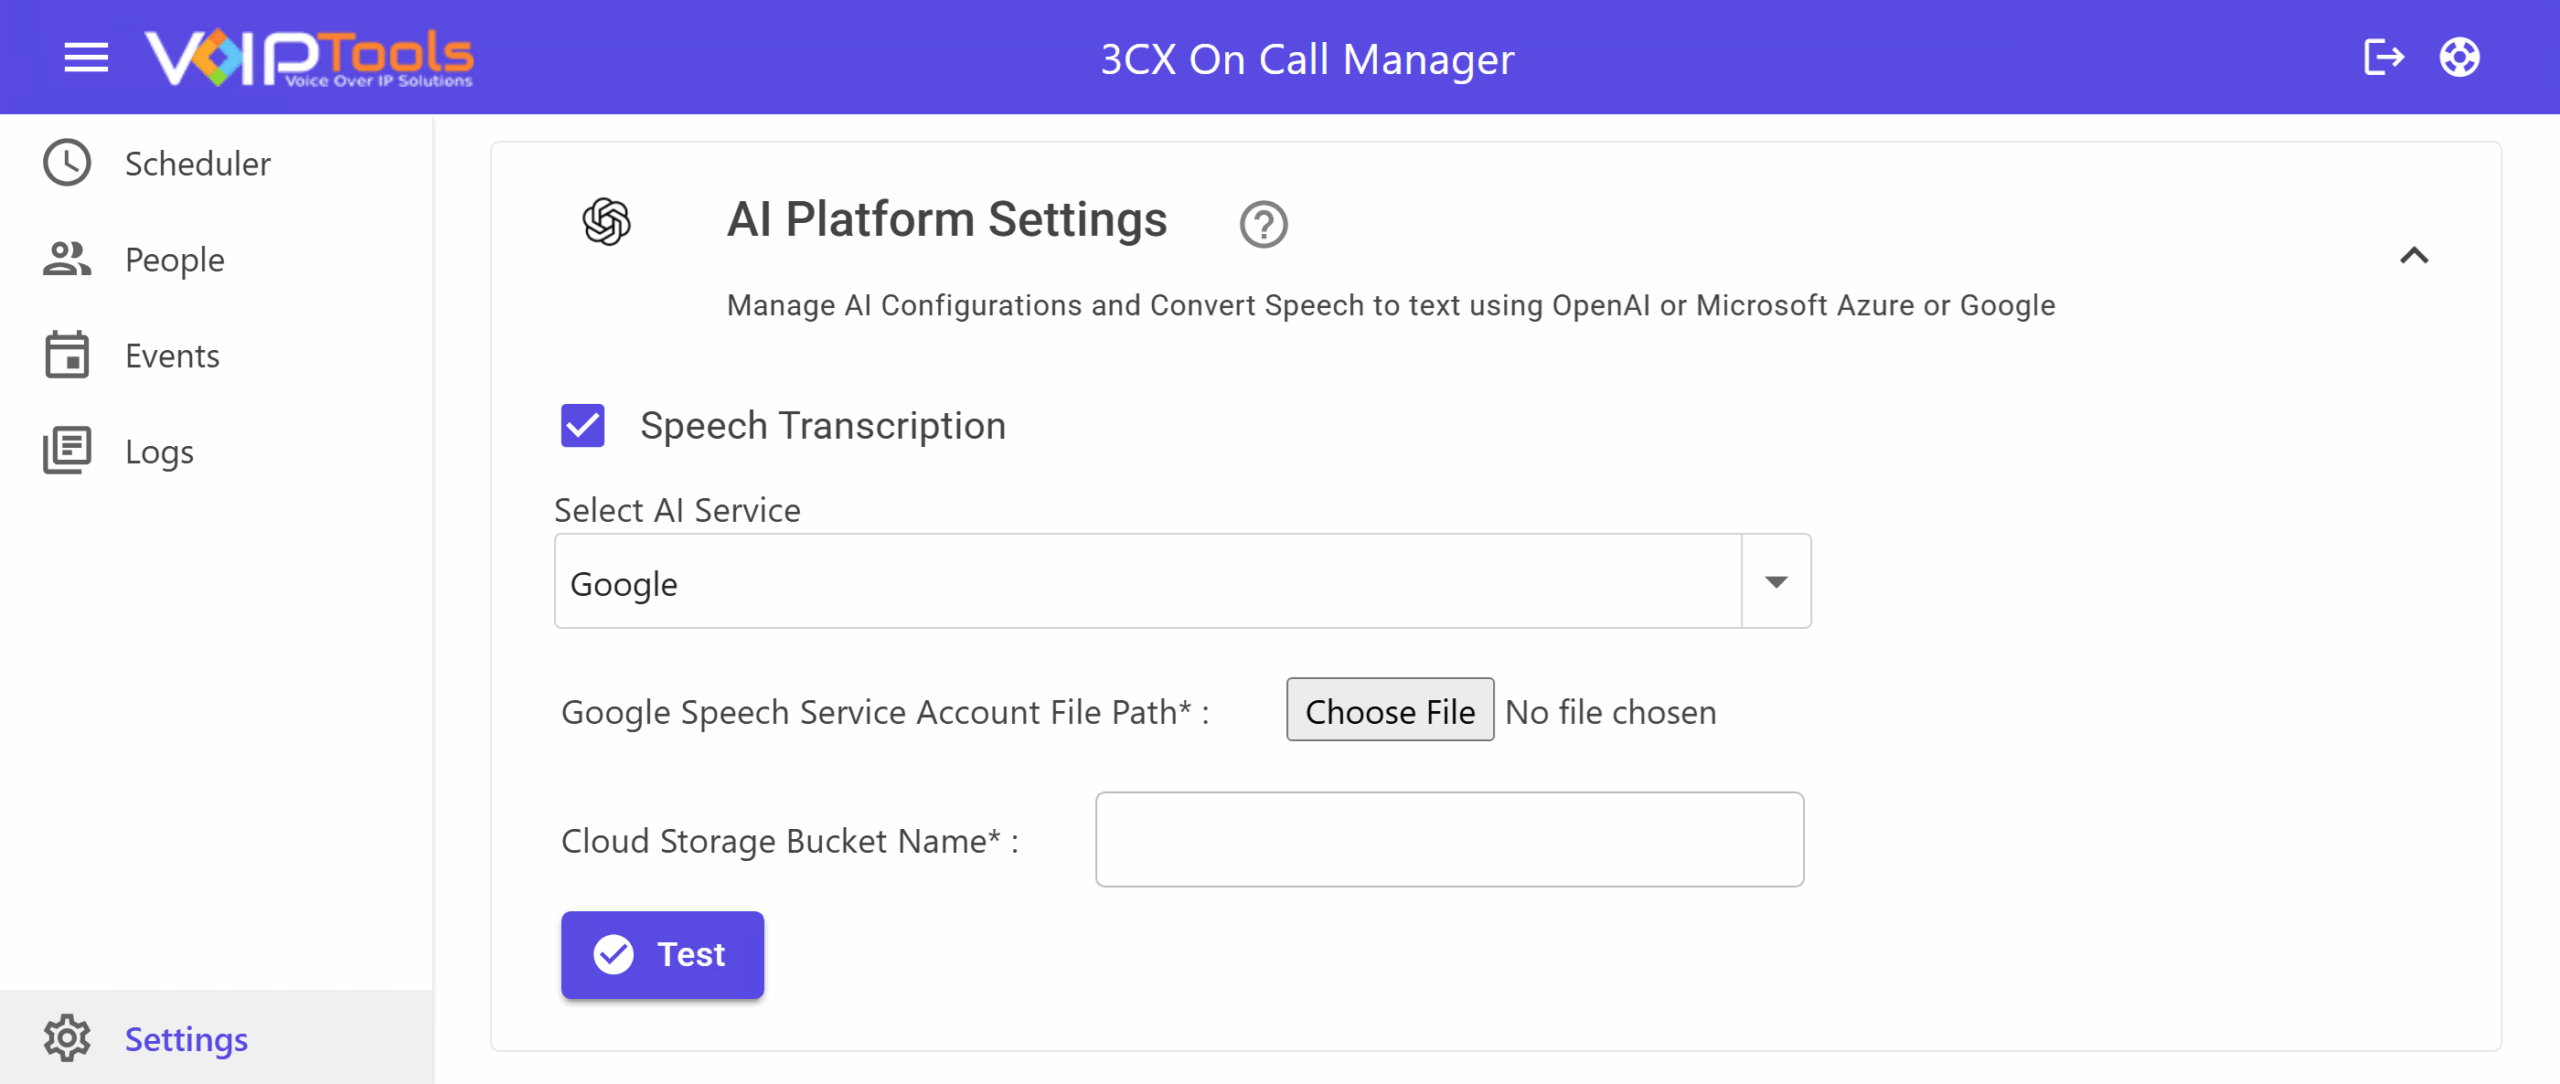
| Field | What to Enter |
|---|---|
| Google Speech Service Account File Path | Upload the JSON credentials file from your Google Cloud Console — your gateway to Google’s powerful speech engine. |
| Cloud Storage Bucket Name | The name of your Google Cloud Storage bucket, used to securely and temporarily hold audio files during transcription. |
Smart Processing Built In: Audio files 60 seconds or under are transcribed instantly using the local file. Longer files are seamlessly uploaded to your bucket, transcribed in the cloud, and automatically cleaned up — no manual steps required.
Google Speech to Text is billed monthly based on total audio duration, with a minimum charge of 15 seconds per file — making it a cost-effective solution for teams of any size. For full pricing details, visit cloud.google.com/speech-to-text/pricing.
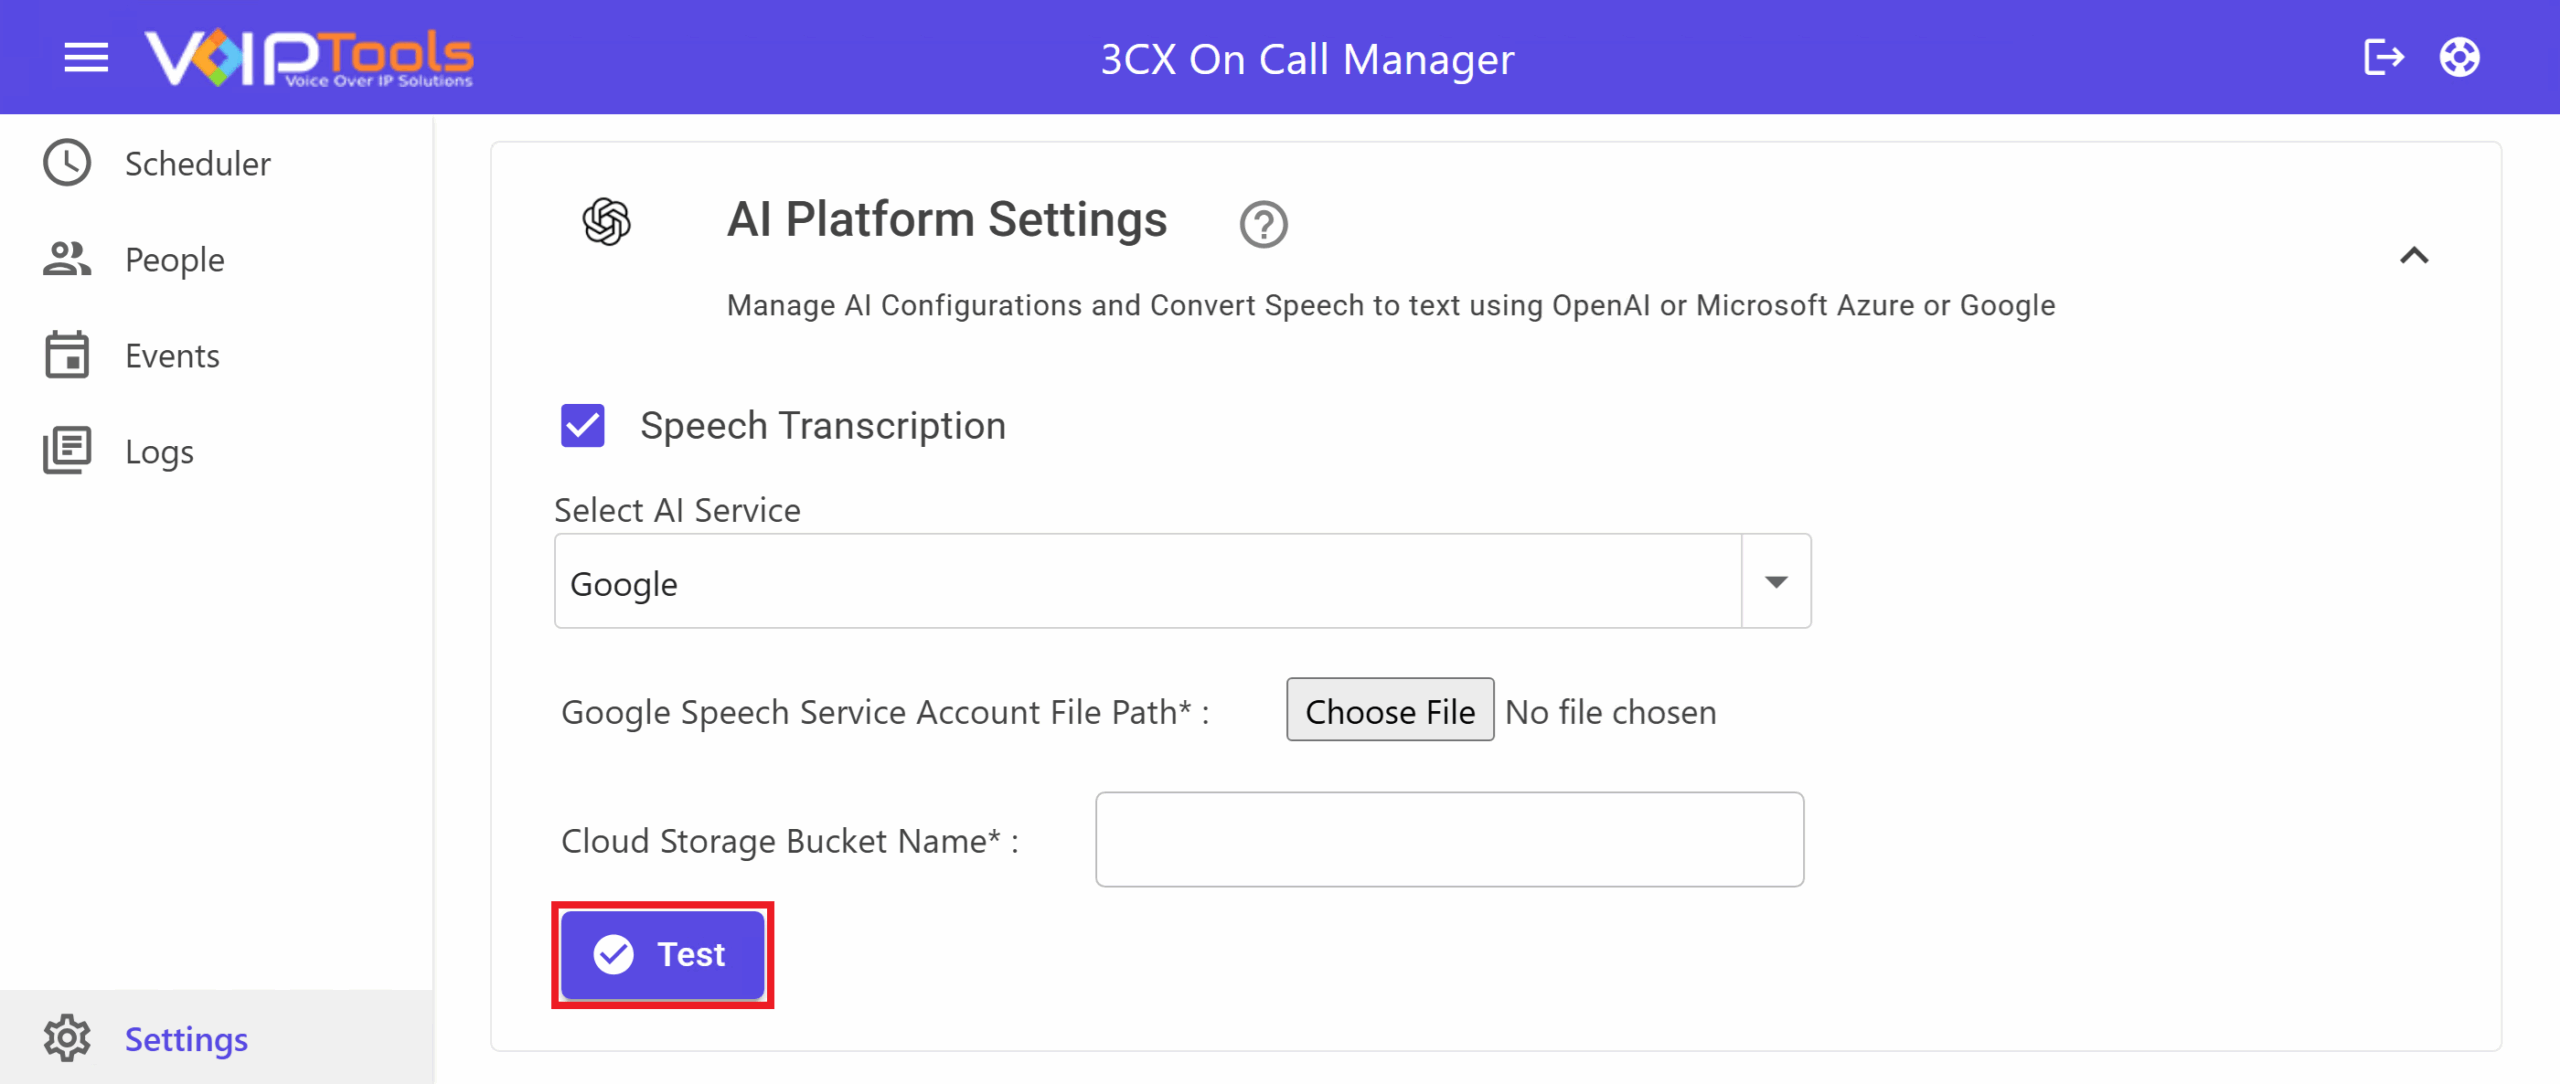
Once your preferred service is configured, click Test to verify everything is connected and ready. In just a few clicks, your team gains a smarter, faster way to stay on top of every voicemail — without missing a beat.
- The On Call Manager uses your local file copy to transcribe the audio file if its duration is up to 60 seconds; or uses google cloud storage if the duration is beyond 60 seconds with the help of cloud storage buckets. Once the file is transcribed successfully in the google cloud, the On Call Manager deletes the file from the storage bucket. You must enter the correct Google Cloud Credentials and the Cloud Storage Bucket name where your recordings are stored
- Cloud Speech-to-Text is priced monthly based on the amount of audio successfully processed by the service, measured in increments rounded up to 15 seconds. For more details regarding pricing please go through this link:
3CX Status Settings #
Keep your team’s availability always accurate. Use this feature to update each extension’s presence status in 3CX based on their scheduled appointments, so no one has to remember to change it manually.
Step 1: Check the Enable Status box to activate automatic status updates.
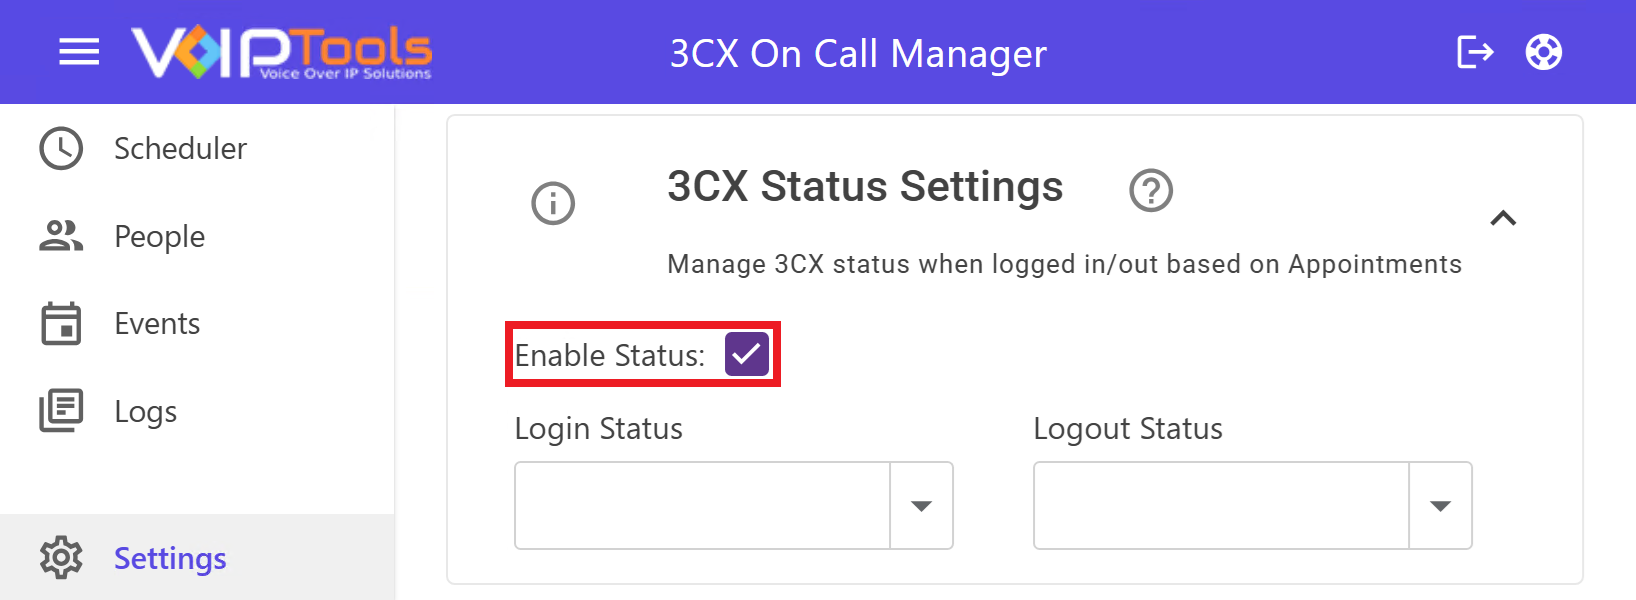
Step 2: In the Login Status dropdown, select the status that should appear when an agent’s scheduled shift begins.
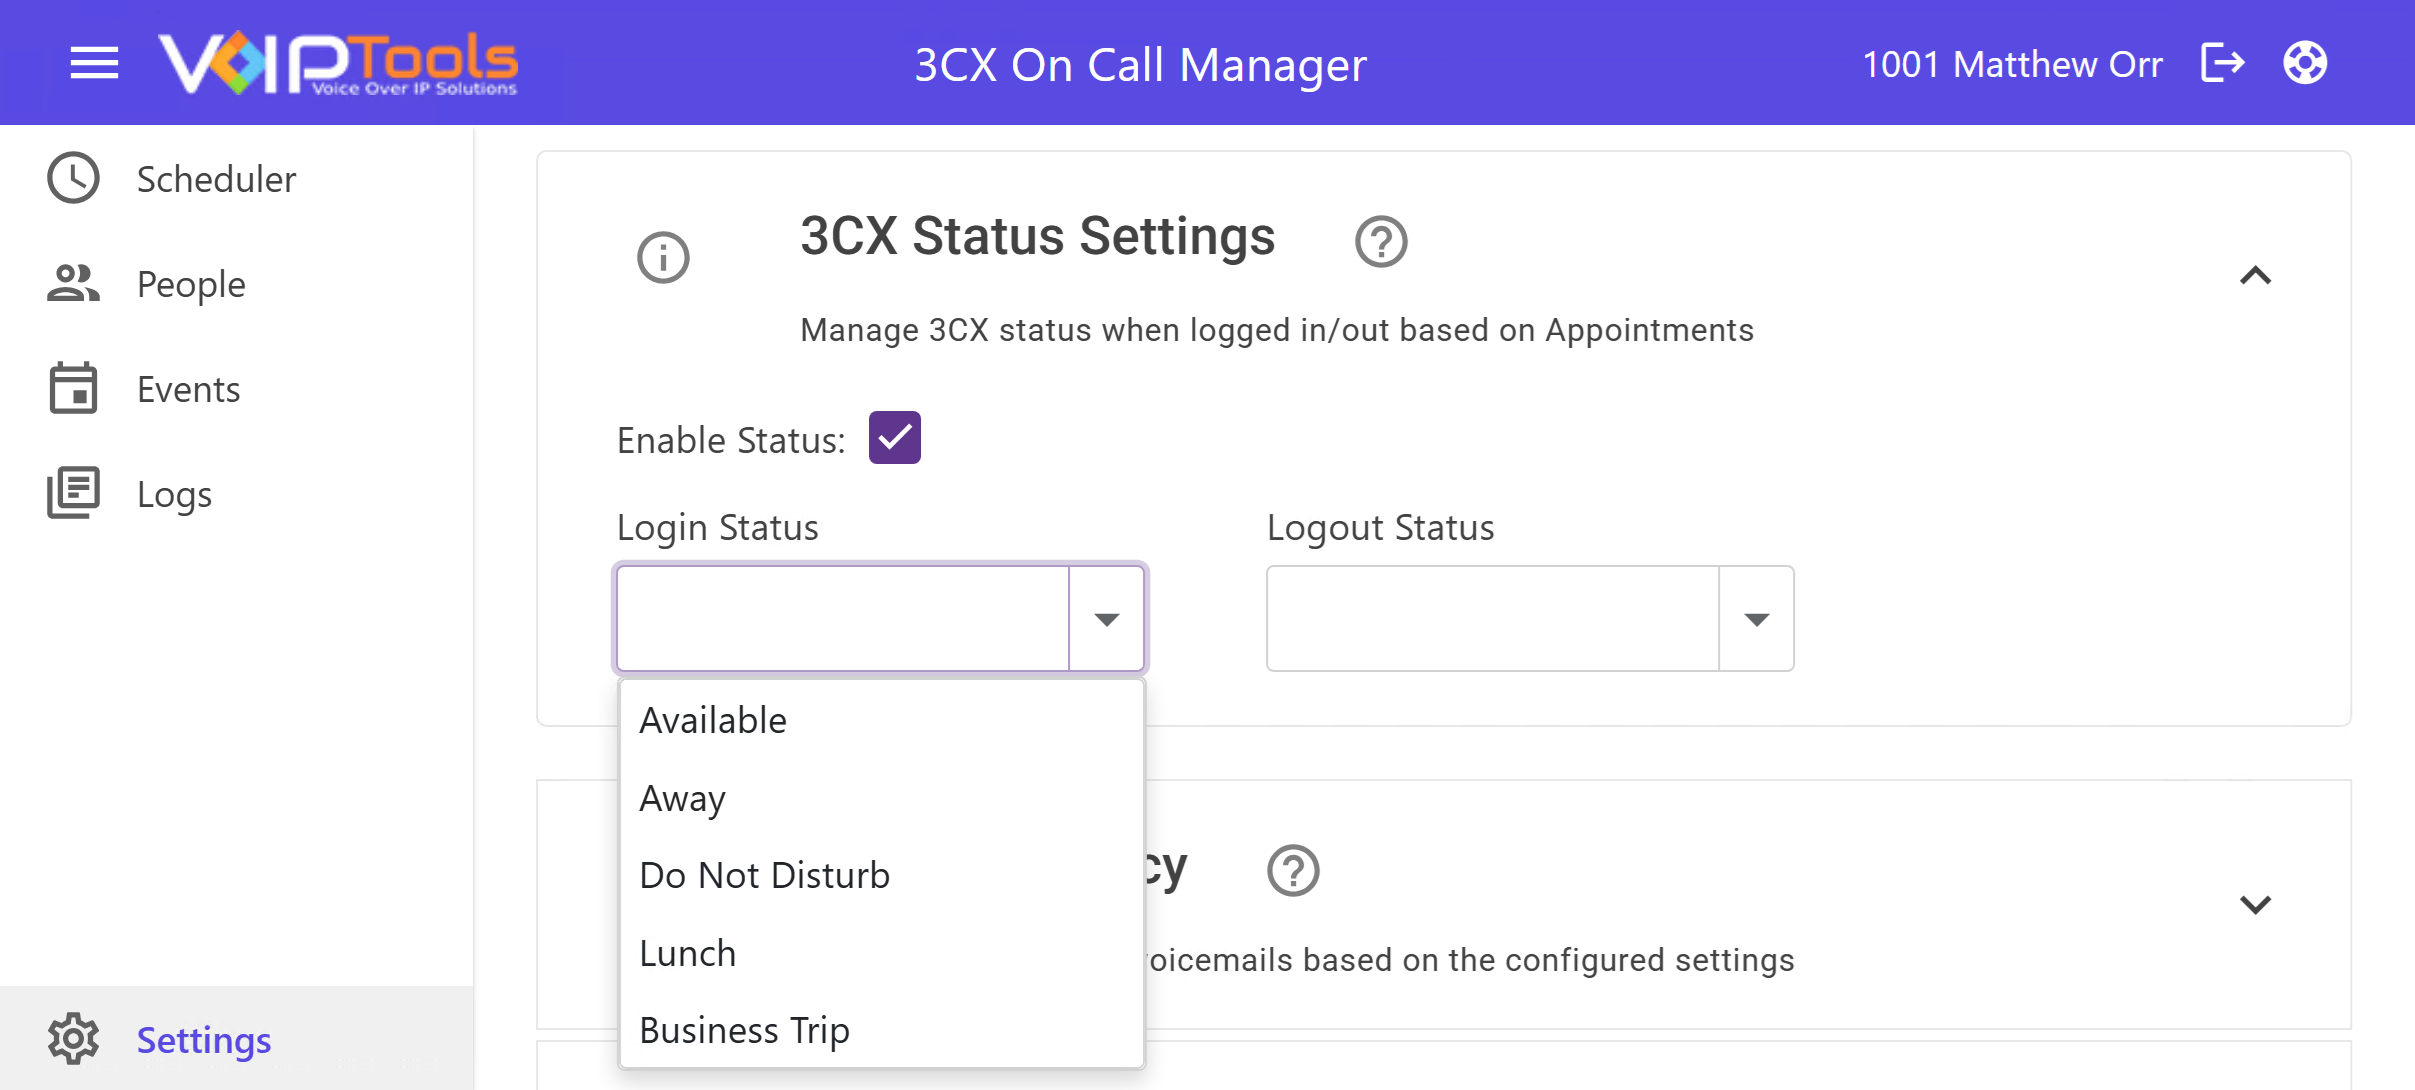
Step 3: In the Logout Status dropdown, select the status that should appear when their shift ends.
Both the Login Status and Logout Status dropdowns share the same list of status options. Simply choose the one that best fits each extension one for when the agent comes on duty and a different one for when they go off.
Retention Policy #
Never worry about storage piling up again. Use this feature to clean up old voicemails from monitored extensions, the ones set up in your Monitor Settings, on a schedule you control.
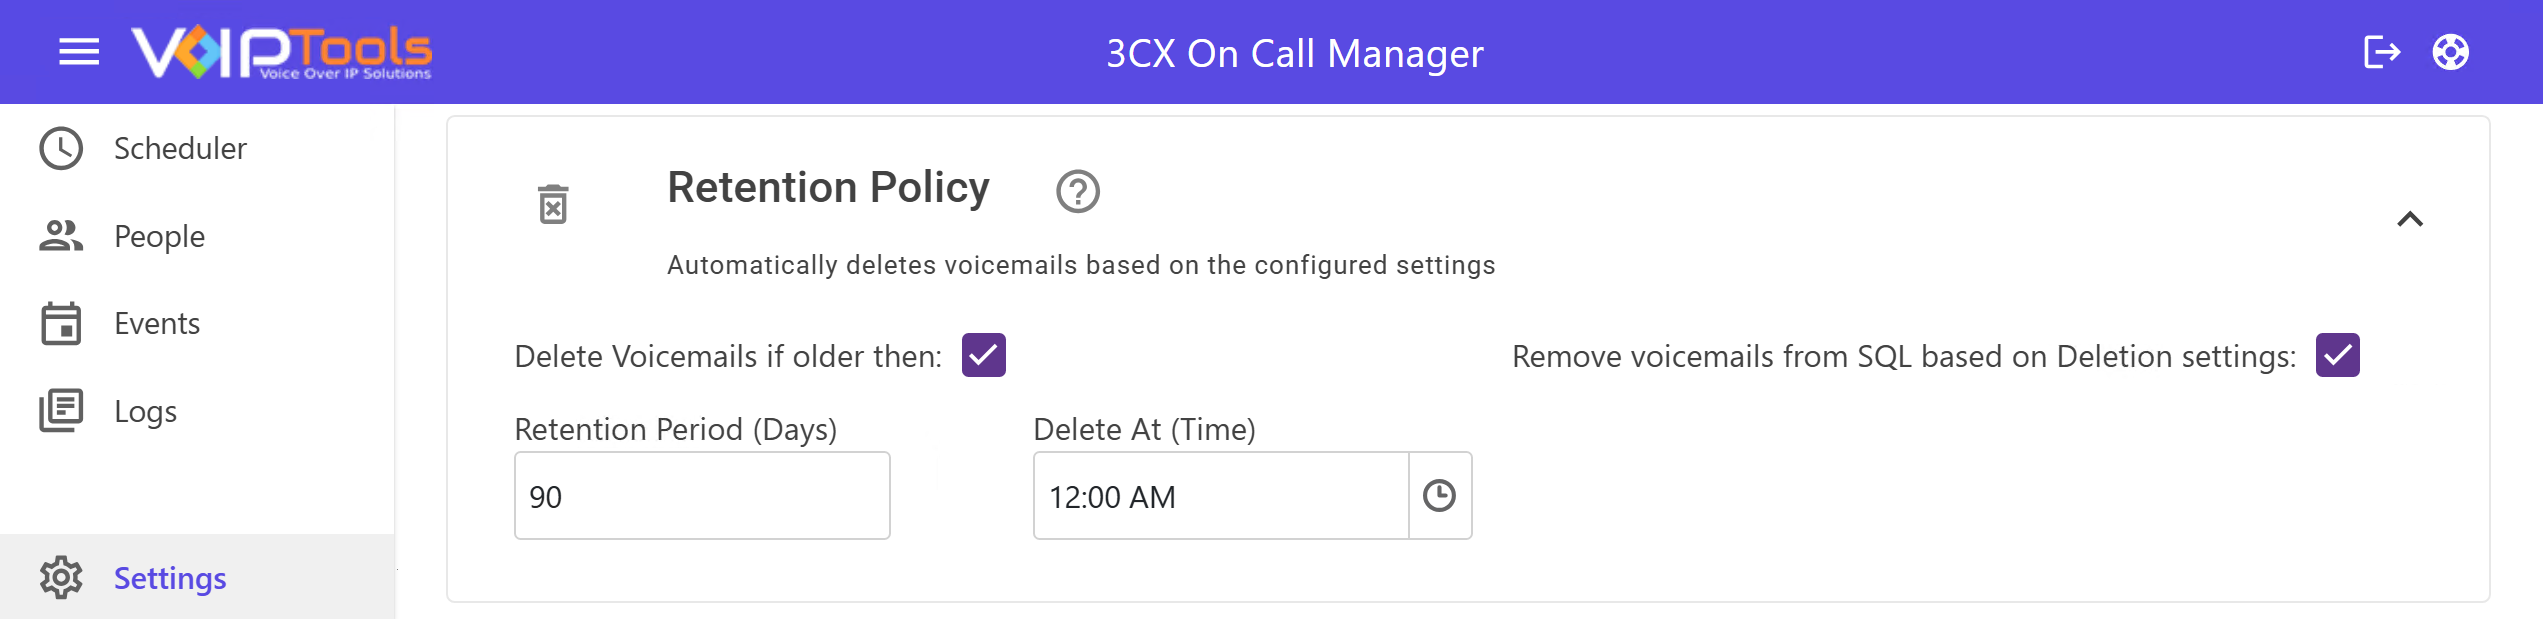
Step 1: Check Delete Voicemails if older than to enable automatic voicemail deletion.
Step 2: In the Retention Period (Days) field, enter the number of days you want to keep voicemails. For example, entering 90 means any voicemail older than 90 days will be deleted automatically.
Step 3: In the Delete At (Time) field, set the time of day you want the cleanup to run. For example, 12:00 AM runs it quietly overnight.
Step 4: Check Remove voicemails from SQL based on Deletion settings if you also want the voicemail records wiped from the database. SQL is simply where the app stores its data behind the scenes.
Role Access Permissions #
Manage page access for each role. Assign or reset permissions easily.
This is where you control what each type of user can see and do in the application. Select a role, check the pages they should have access to, and you’re done.
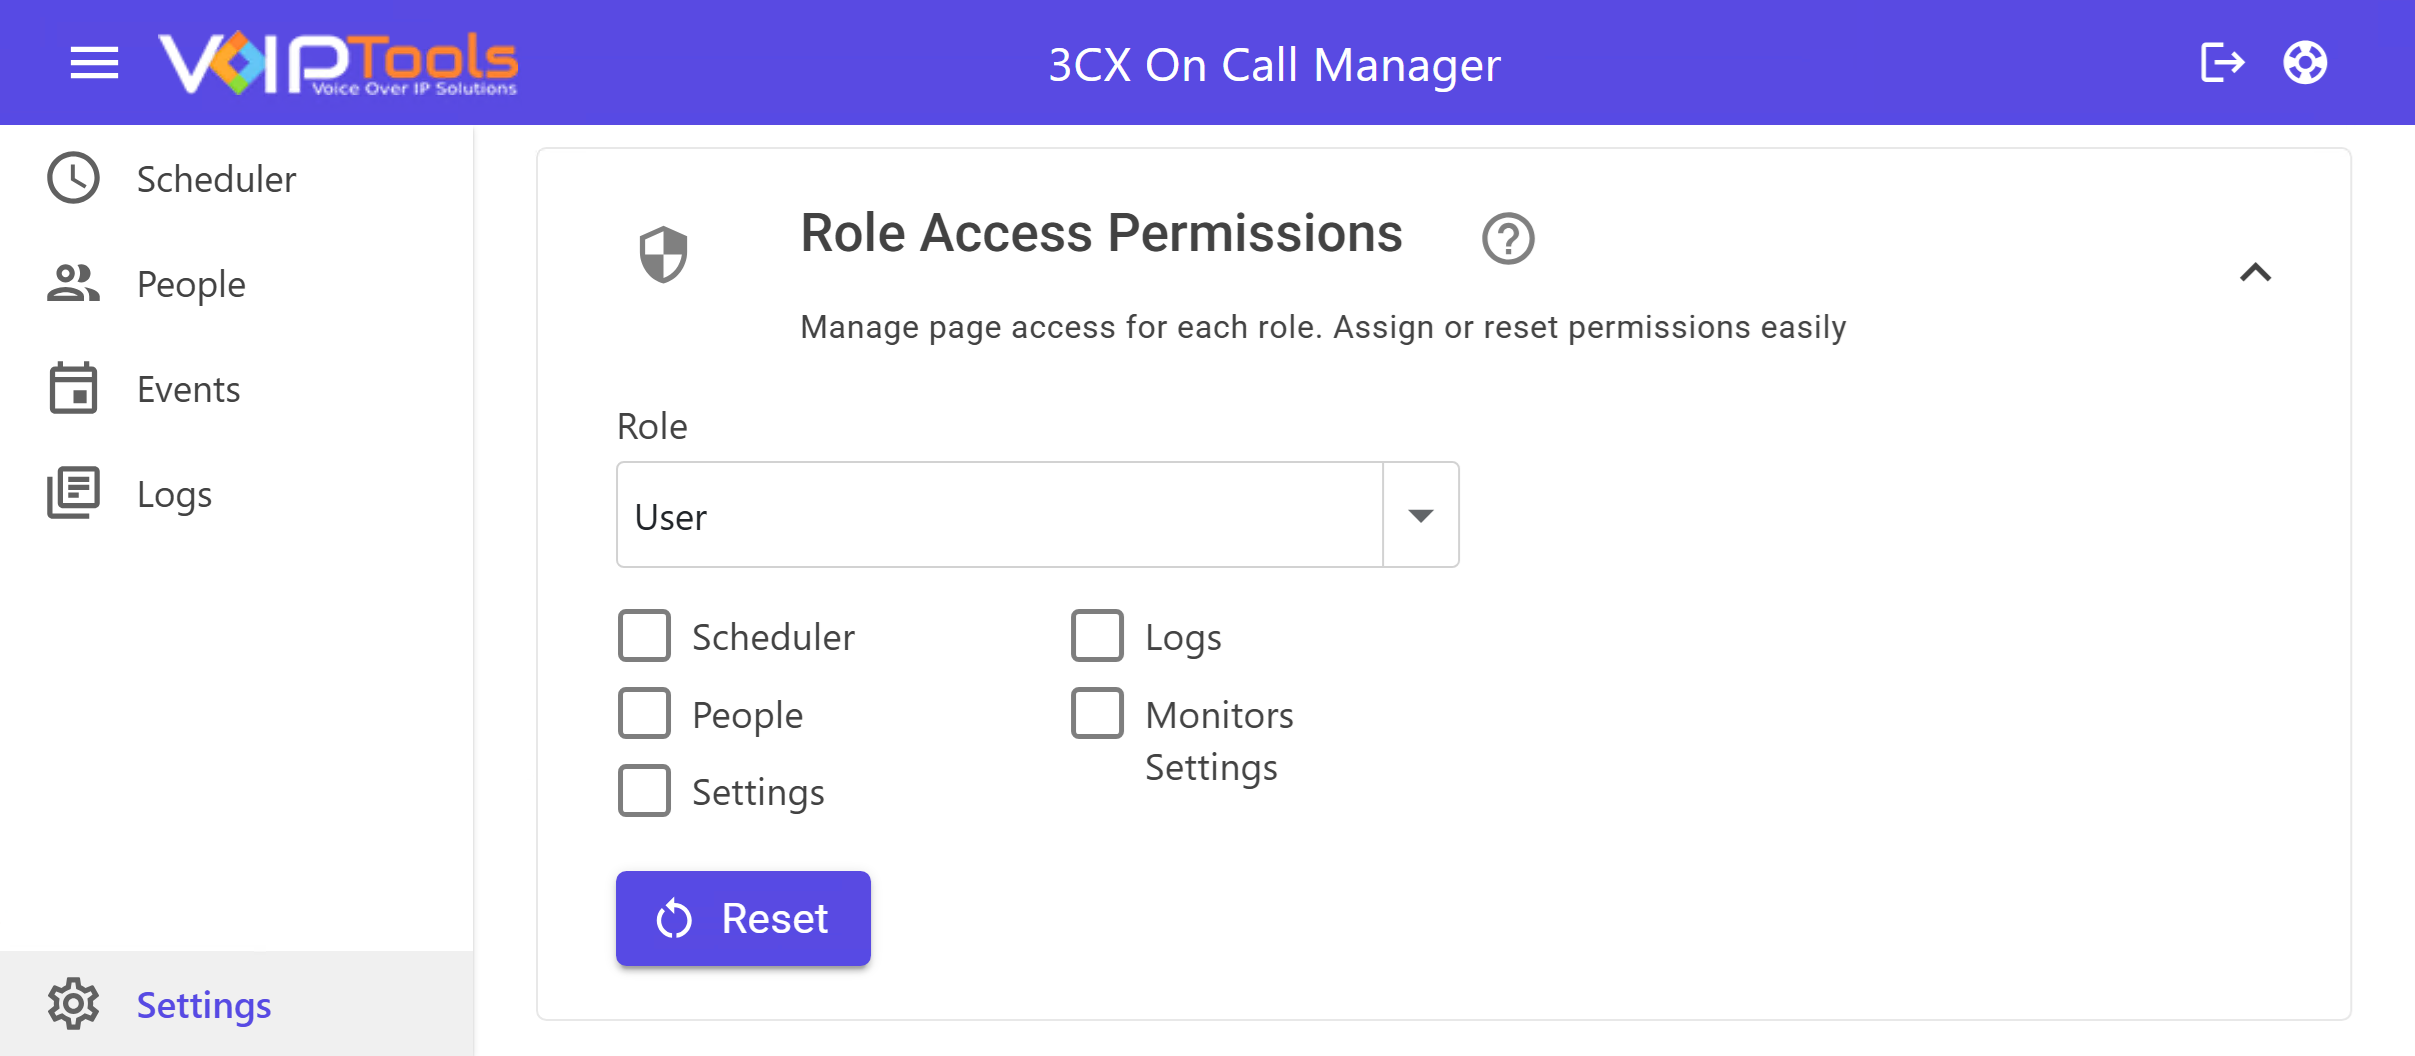
Step 1: From the Role dropdown, select the role you want to configure. Available roles are:
- User
- Receptionist
- Supervisor
- Department Administrator
- Manager
- Owner
- System Administrator
- System Owner
Step 2: Check the pages this role should be able to access:
| Permission | What It Unlocks |
|---|---|
| Scheduler | Access to the Scheduler page |
| People | Access to the People page |
| Logs | Access to the Logs page |
| Monitor Settings | Access to the Monitor Settings page |
| Settings | Access to the Settings page |
Step 3: Click Reset at any time to restore the role’s default permissions.
Default Permissions by Role #
| Role | Default Access |
|---|---|
| System Administrator / System Owner | Full access to all pages |
| Department Administrator / Manager / Owner / Supervisor | Scheduler, People, Events, Logs, Monitor Settings |
| User / Receptionist | Scheduler, Events (read-only) |
Custom Branding Tab #
The Custom Branding tab allows you to personalize the site’s look by setting the header title, logo, gradient colors, and grid color. You can upload your logo and choose custom colors to match your brand or style. You also have the option to reset to defaults or apply changes for a consistent, professional appearance.
Follow the procedure to customize your site:
-
In the Left Side Panel click the Settings menu.
-
Click to expand the Custom Branding tab.
-
Perform any of the following customizations and click the
 Apply button to save your settings.
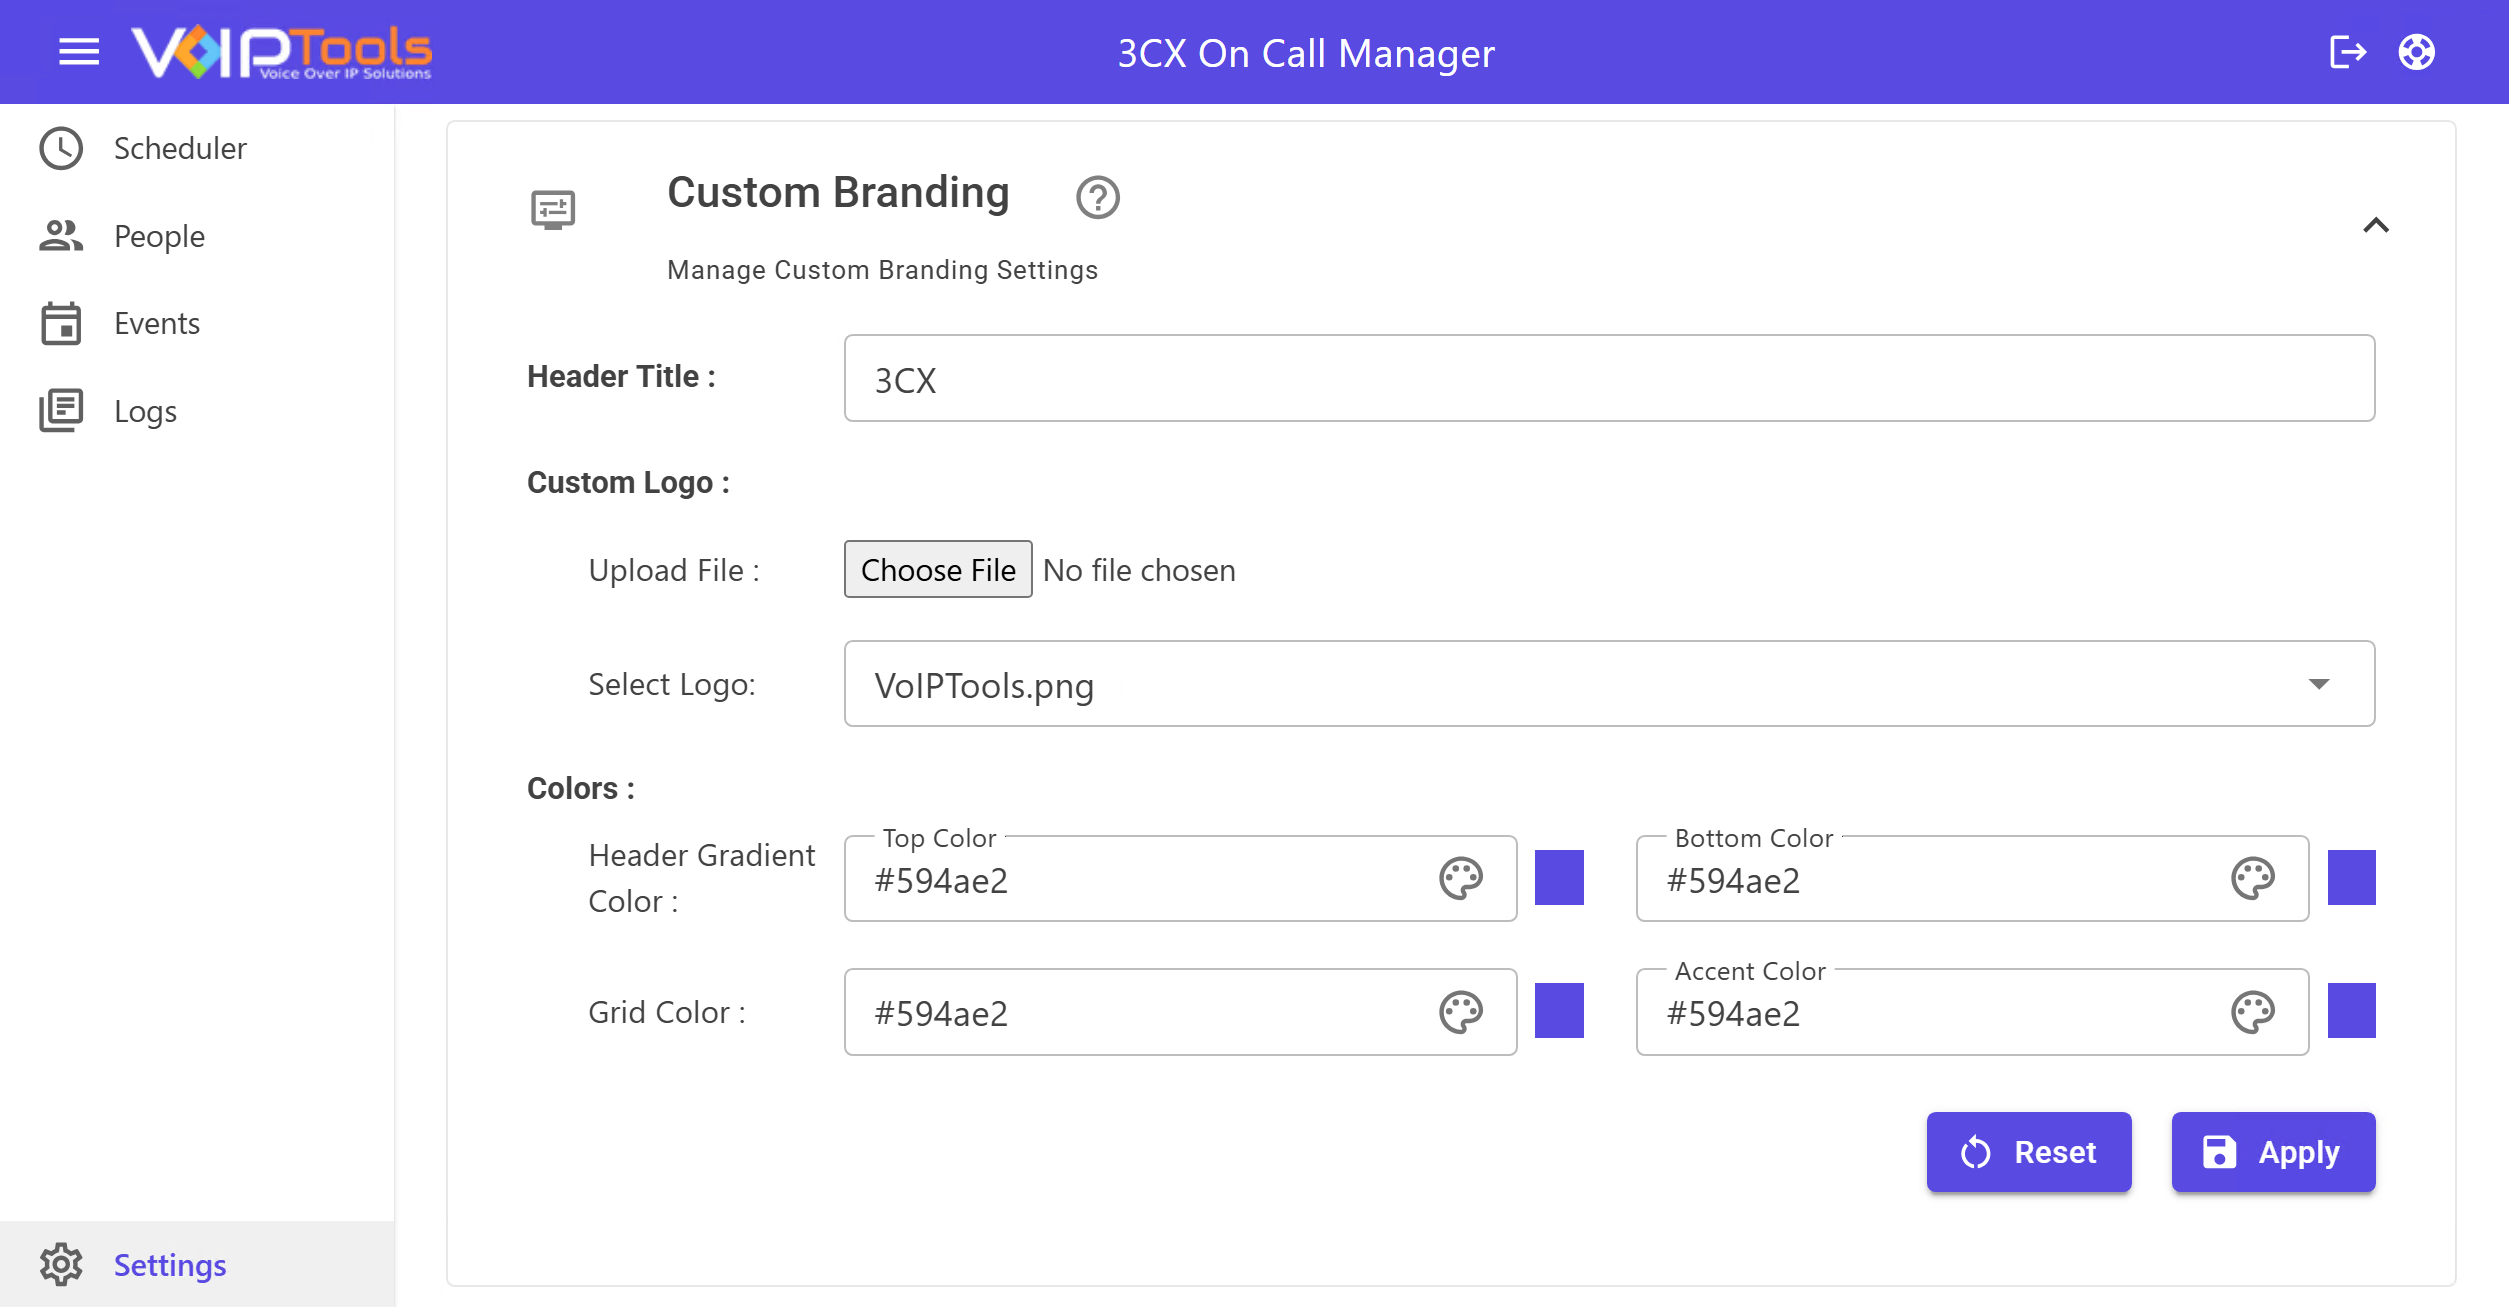
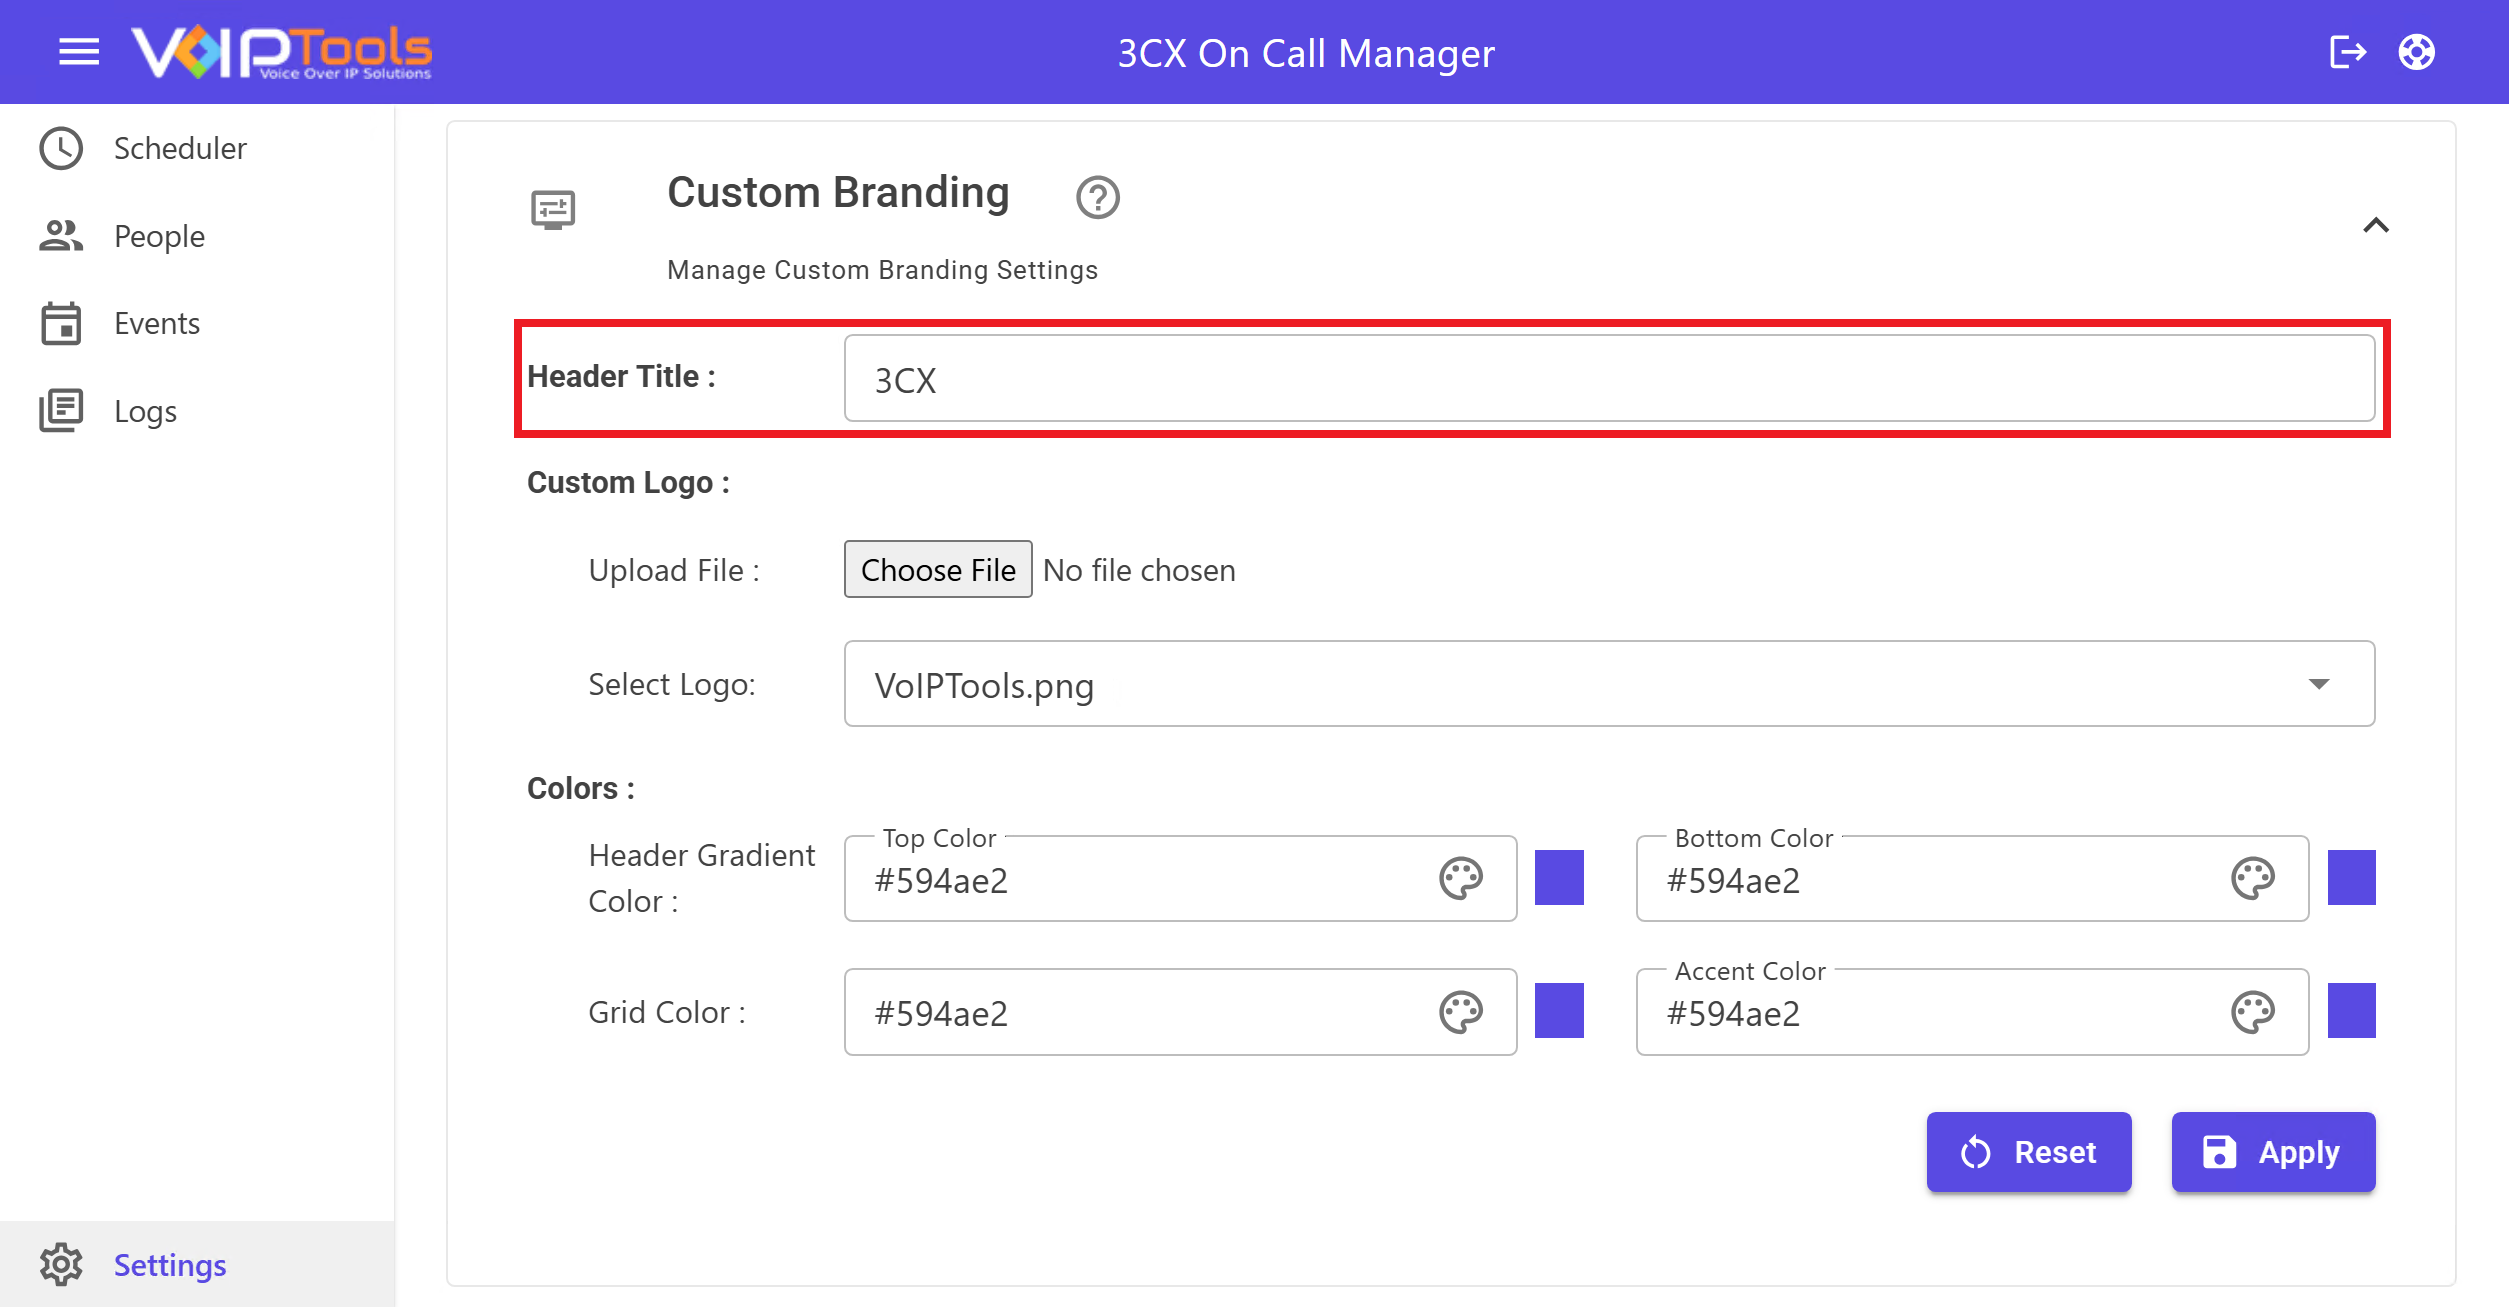
Customize ‘Header Title Prefix’ Text #
-
Click inside the Header Title input box.
-
Type your desired title (e.g., your company name or department).
-
This title will be displayed prominently in the header.
Customize Logo #
-
In the Custom Logo section, click the “Choose File” button to choose a logo from your device.
-
Select the uploaded logo from the “Select Logo” dropdown list.
-
Click the
Apply button to save your changes.
Customize Colors #
You can personalize the application’s color scheme using the following options:
| Header Gradient Color | Choose top and bottom colors to create a gradient effect in the header. |
| Grid Color | Pick a color for the background of all grids in the application. |
| Accent Color | Select a color for text headers throughout the interface. |
-
Click the color picker next to each setting.
-
Choose your preferred color or enter a hex code (e.g., #594ae2).
-
The preview will update to reflect your choices.
When you’re satisfied with the set up, click the Apply button to save and apply your custom branding changes to the application interface.
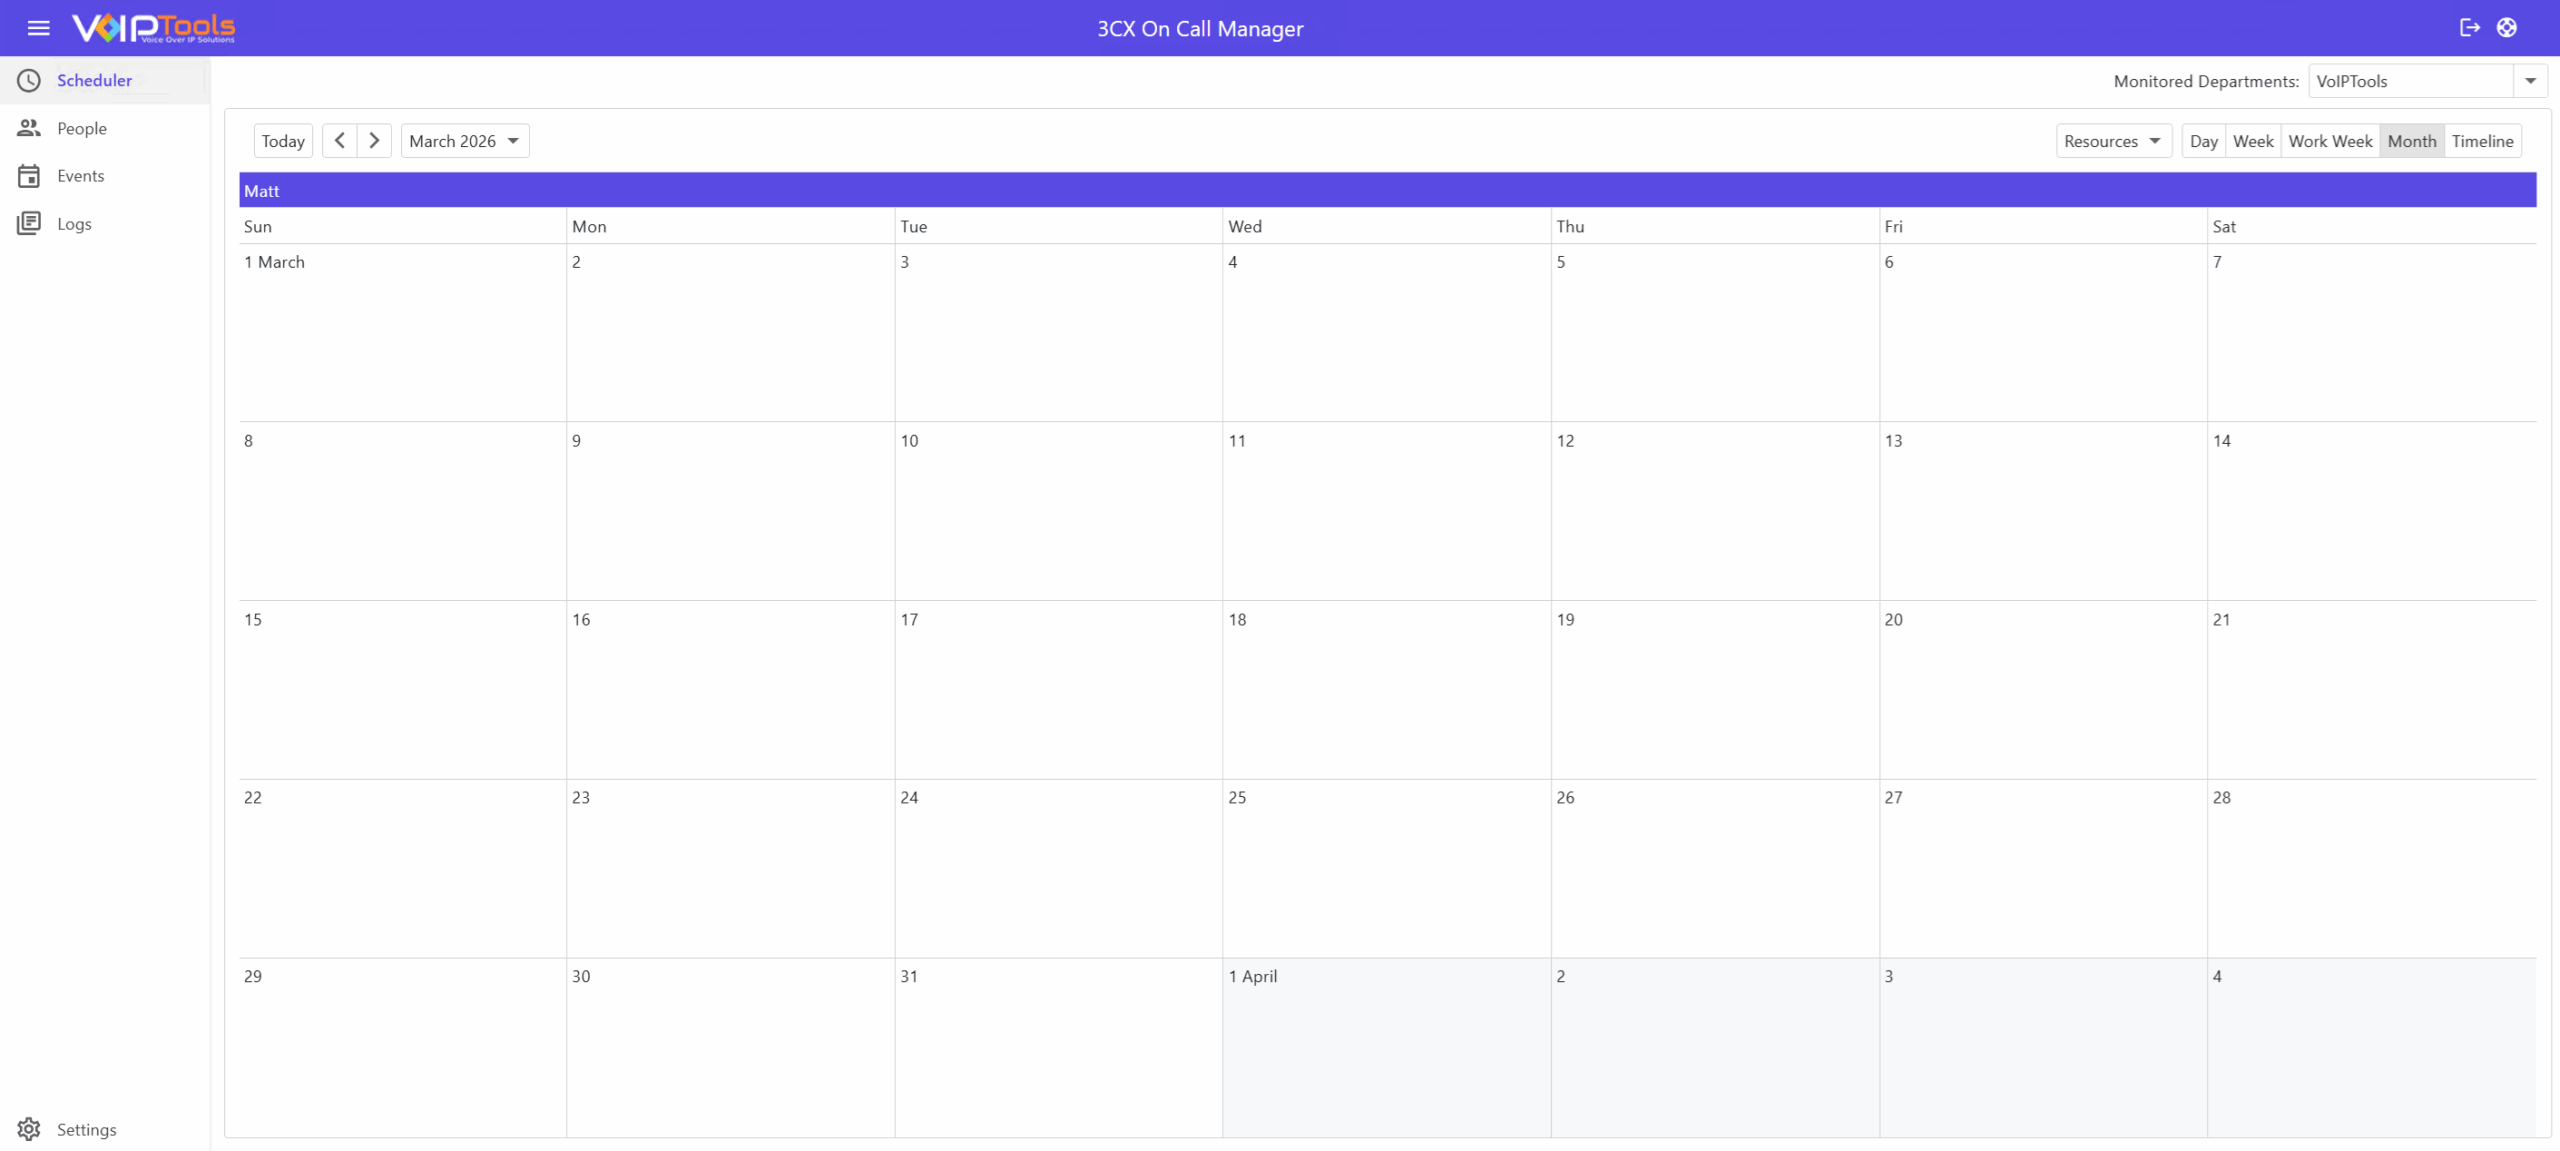
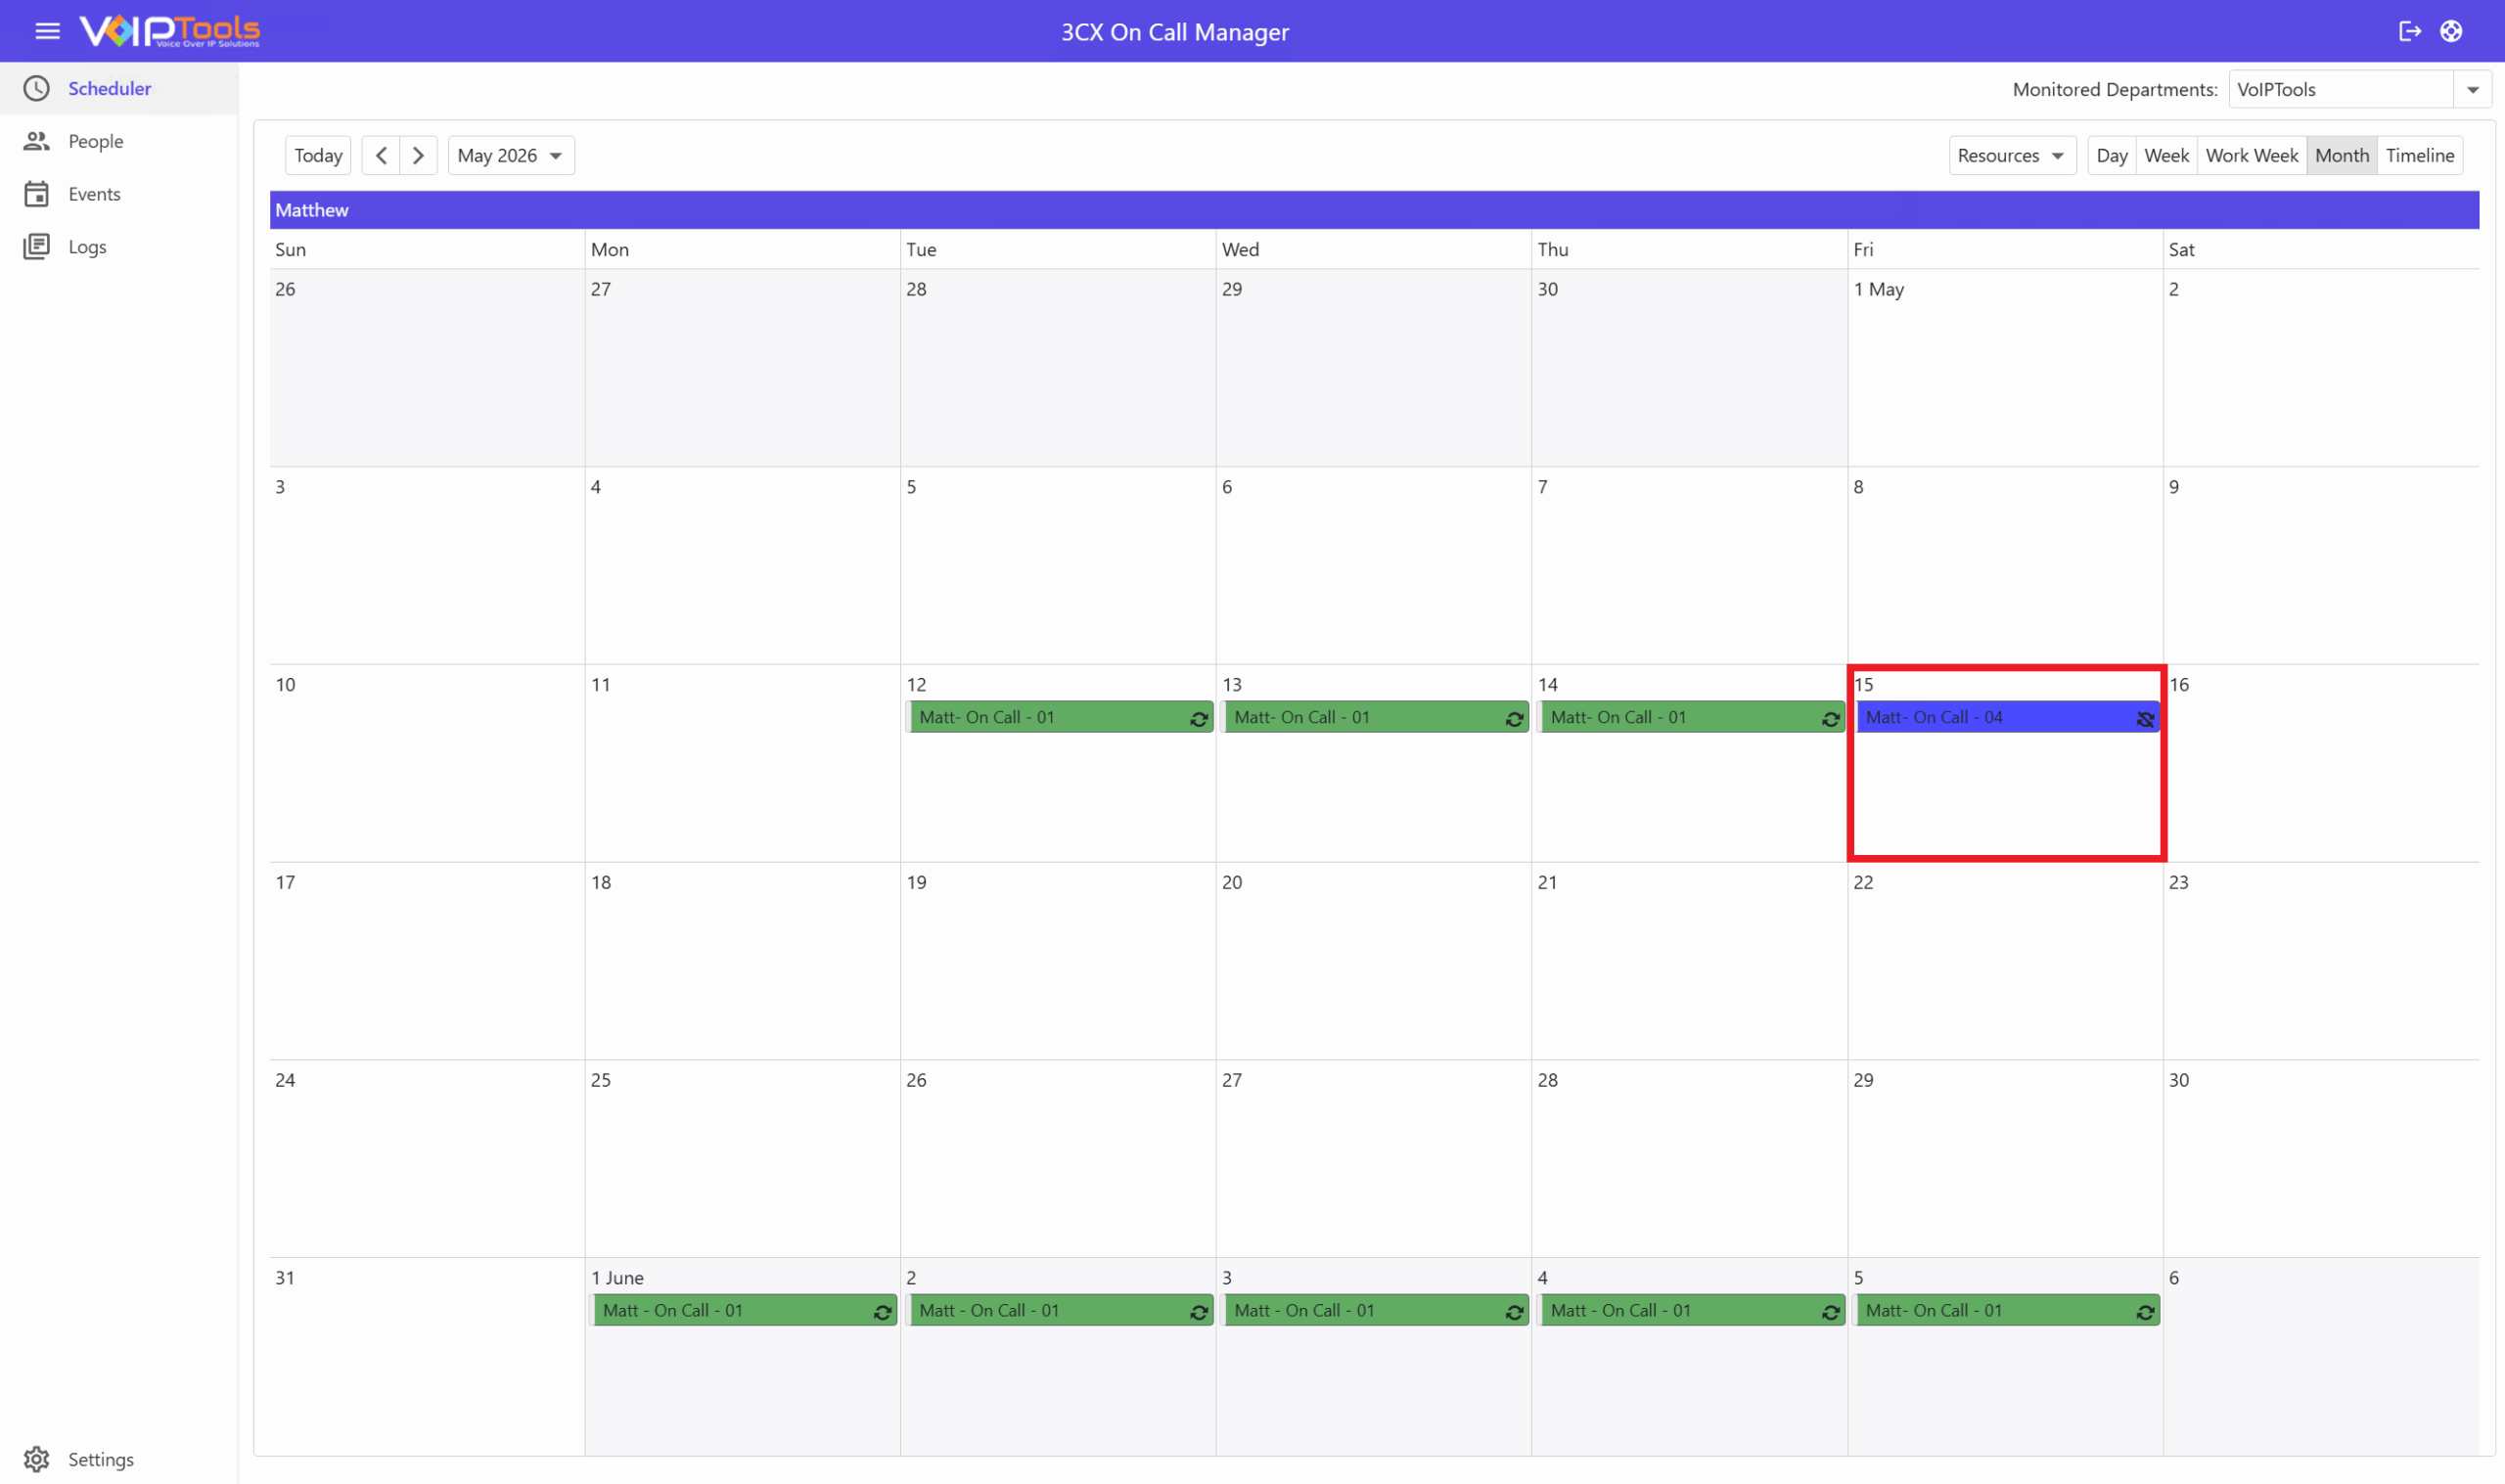
Scheduler #
The Scheduler screen enables you to control visible resource count, view resource appointments for a specific date and in desired calendar format, create new appointments and edit/ delete existing appointments, set levels for resources, and set reminders for appointments and events.
Default View #
Managers can only view and create schedules for their own departments. Admins have full access to all departments.
Scheduler Controls #

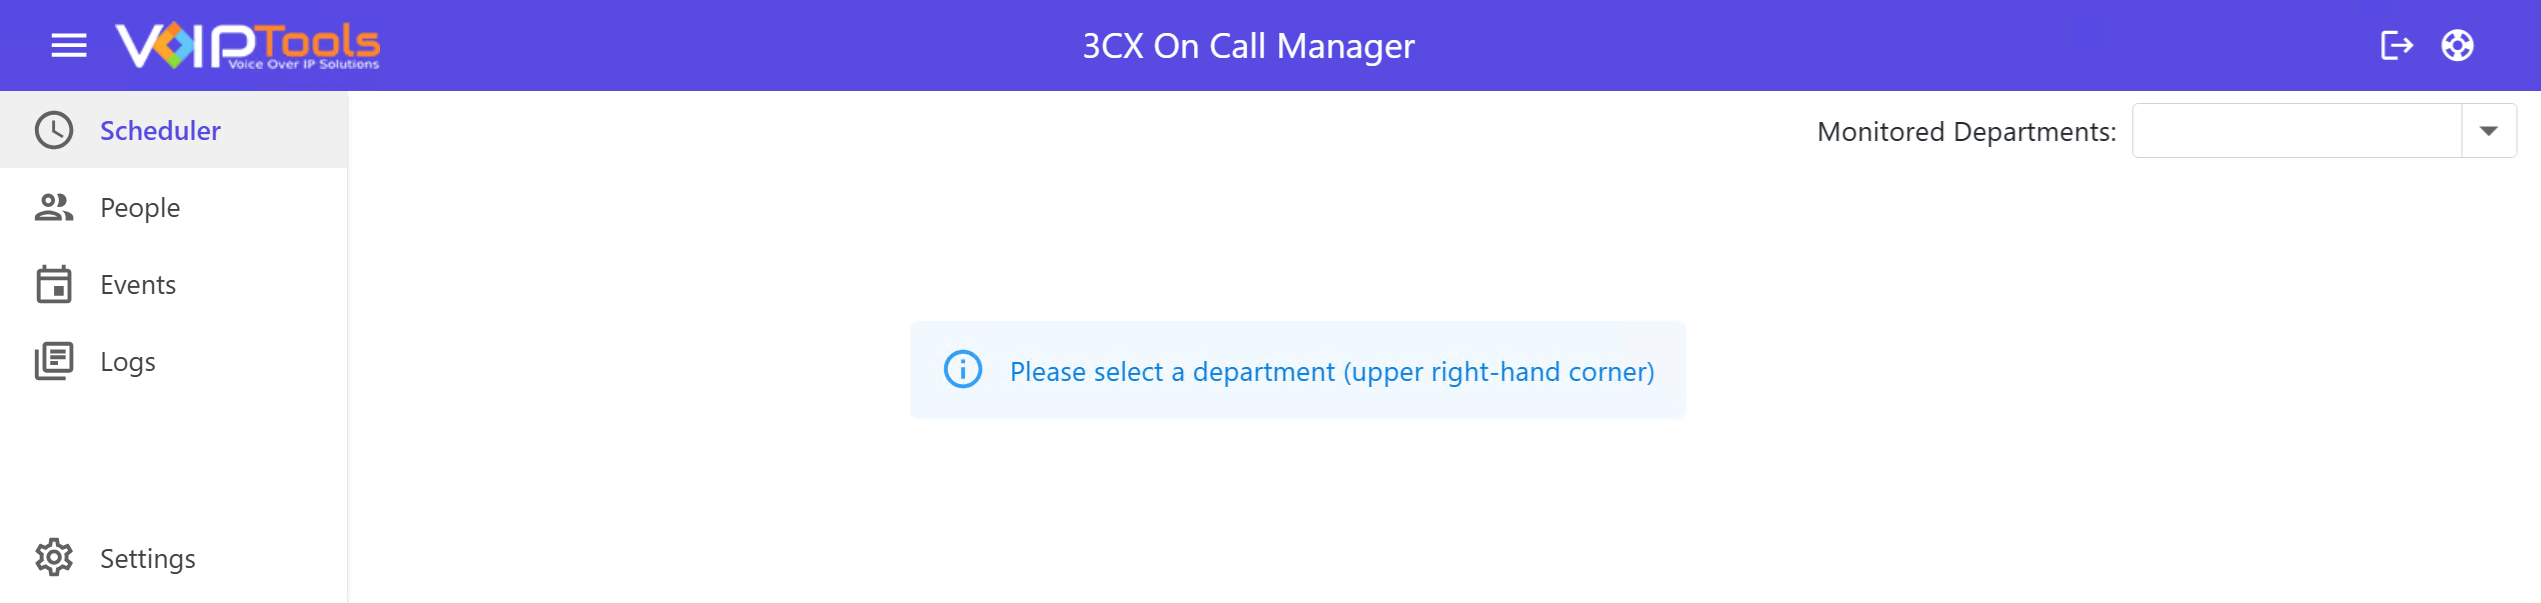
Monitored Departments
| Control | What It Does |
|---|---|
| Monitored Departments dropdown | Filters the calendar to show only the selected department’s resources and appointments. |
Date Navigation
| Control | What It Does |
|---|---|
| Today | Jumps the calendar back to today’s date instantly. |
| ◀ | Goes to the previous time period (e.g., previous week if you’re in Week view). |
| ▶ | Goes to the next time period. |
| Month/Date Dropdown |
Click to jump directly to a specific month or date. |
Calendar Formats
You can select the appropriate tab to view the scheduled appointments of the visible resources in various calendar formats like Day, Work Week, Week, Month or Timeline.
| Day | Displays all appointments for a single selected day, displayed in a side-by-side hourly timeline |
| Work Week | Displays all appointments in the work week (Monday-Friday) format. |
| Week | Displays all appointments in a weekly (Sunday-Saturday) format. |
| Month | Displays all appointments in a monthly format. |
| Timeline | Displays all appointments in a timeline format. |
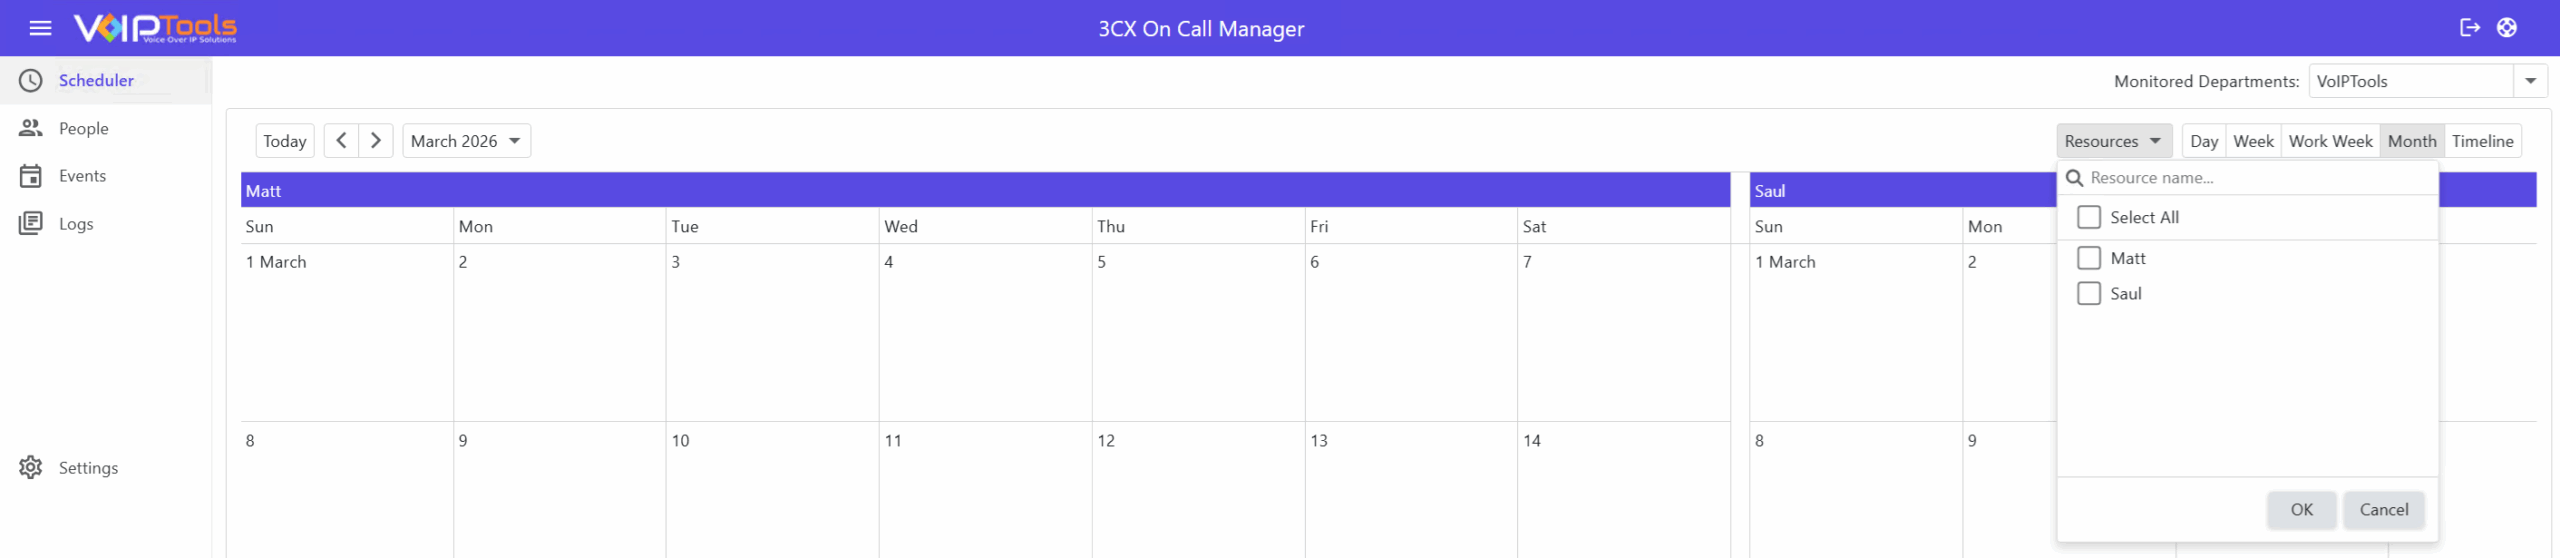
Resource list #
Filters which resources are displayed on the calendar. The available options in this dropdown are limited to the members who belong to the selected Monitored Department will appear.
Creating an Appointment #
Setting up a nonrecurring appointment
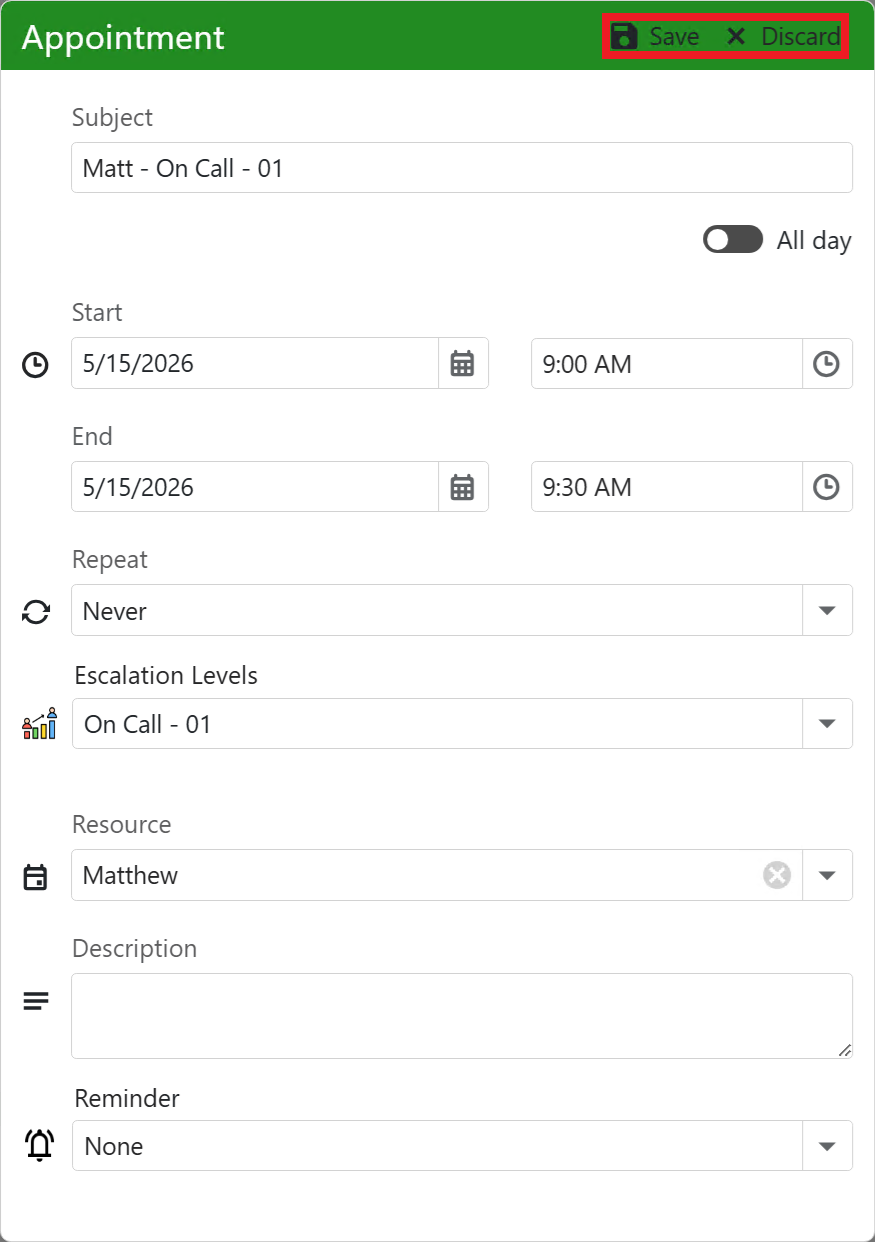
To add a new on-call appointment, click on any empty time slot on the calendar. The Appointment popup will appear.
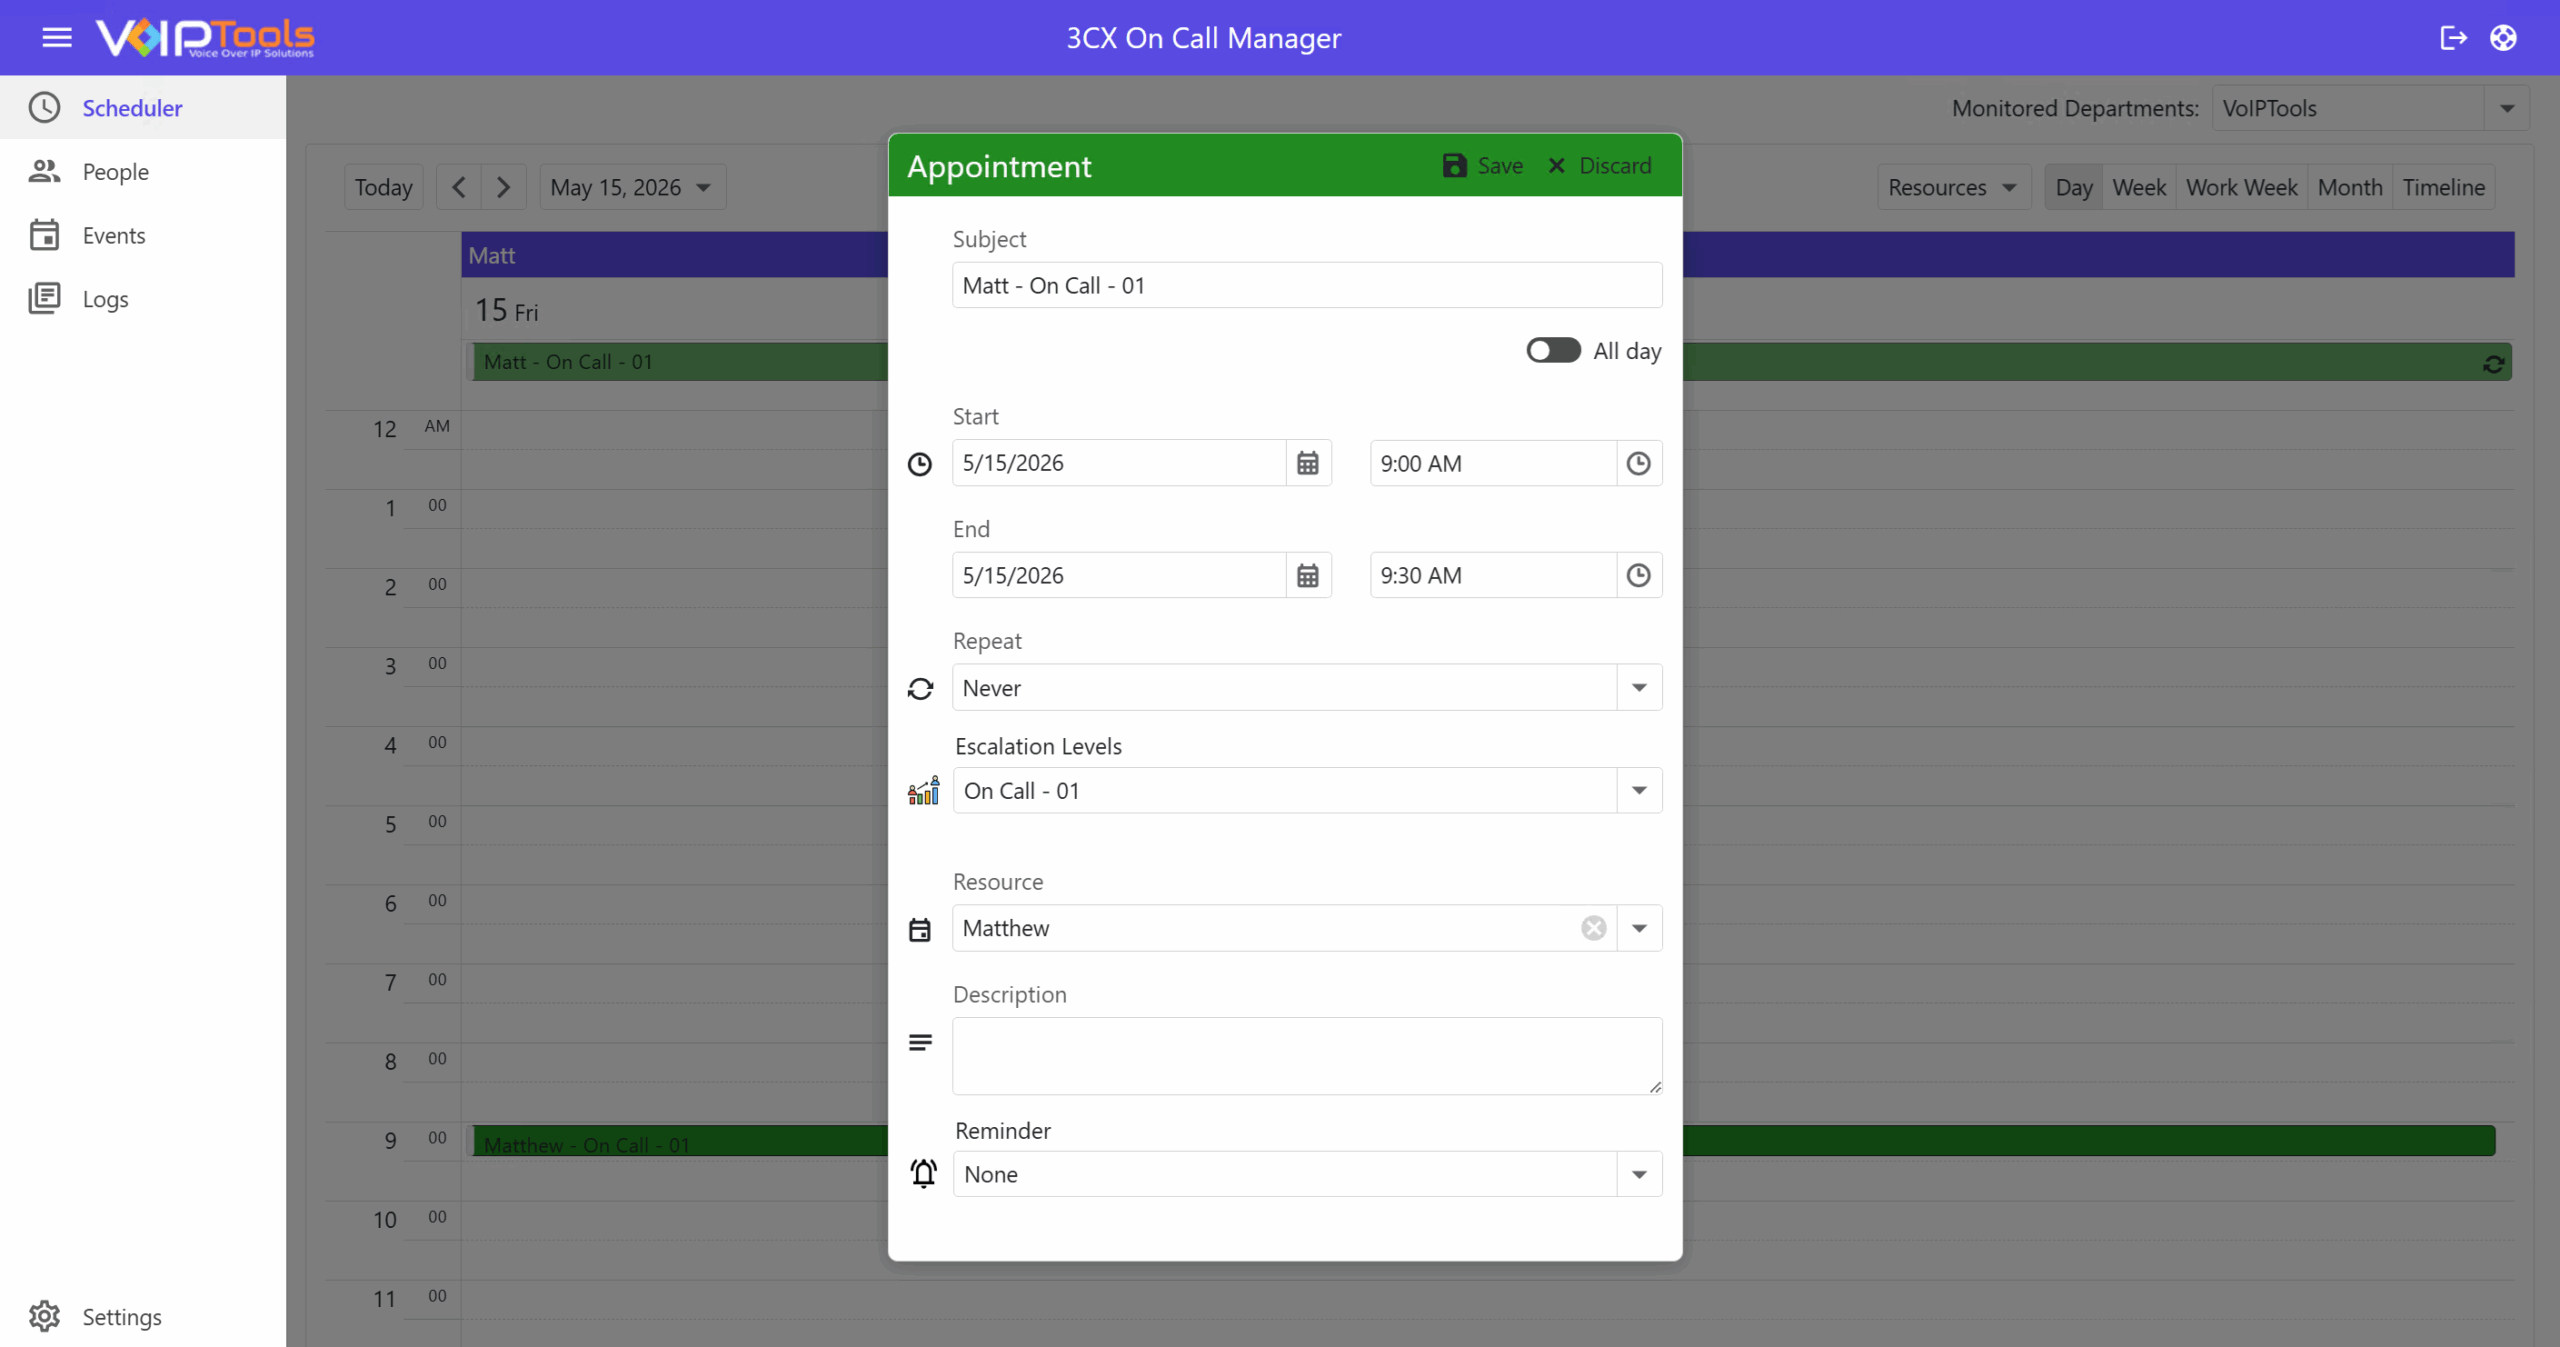
Field Definitions
Field Definitions
| Field | What to Enter |
|---|---|
| Subject | A short label for the appointment (e.g., Matt – On Call – 01). |
| All Day | Toggle this on if the appointment covers the entire day. The time fields will disappear once enabled. |
| Start | The date and time the on-call shift begins. |
| End | The date and time the on-call shift ends. |
| Repeat | How often the appointment recurs — choose Never, Daily, Weekly, Monthly, or Yearly. Defaults to Never for a one-time appointment. |
| Escalation Levels | The escalation level assigned to this appointment (e.g., On Call – 01). |
| Resource | The team member this appointment is for. Select their name from the dropdown. |
| Description | Optional notes about the appointment. |
| Reminder | Set a reminder notification. Select None if no reminder is needed. |
Saving or Discarding #
Step 1: Fill in the required fields above. For a non-recurring appointment, the Start and End date and time are on the same day.
Step 2: Click Save to confirm the appointment, or Discard to cancel without saving.
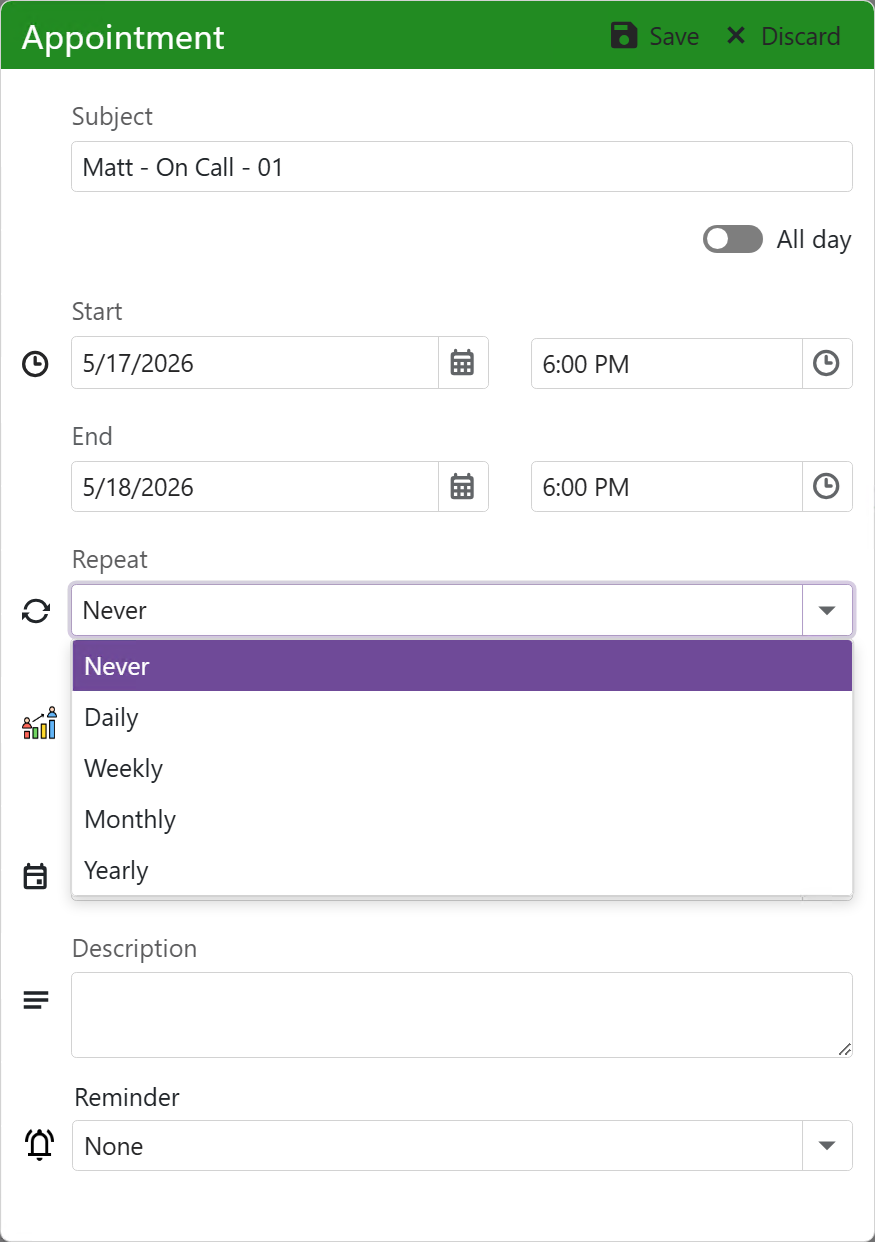
Setting Up a Recurring Appointment #
To make a recurring appointment, use the Repeat dropdown and select how often it should recur:
| Option | What It Does |
|---|---|
| Never | One-time appointment only. |
| Daily | Repeats every day or every set number of days. |
| Weekly | Repeats on selected days each week. |
| Monthly | Repeats on a specific date or day each month. |
| Yearly | Repeats on a specific date or day each year. |
Editing or Deleting an Existing Appointment #
Click an existing appointment in the calendar to open a quick summary popup.
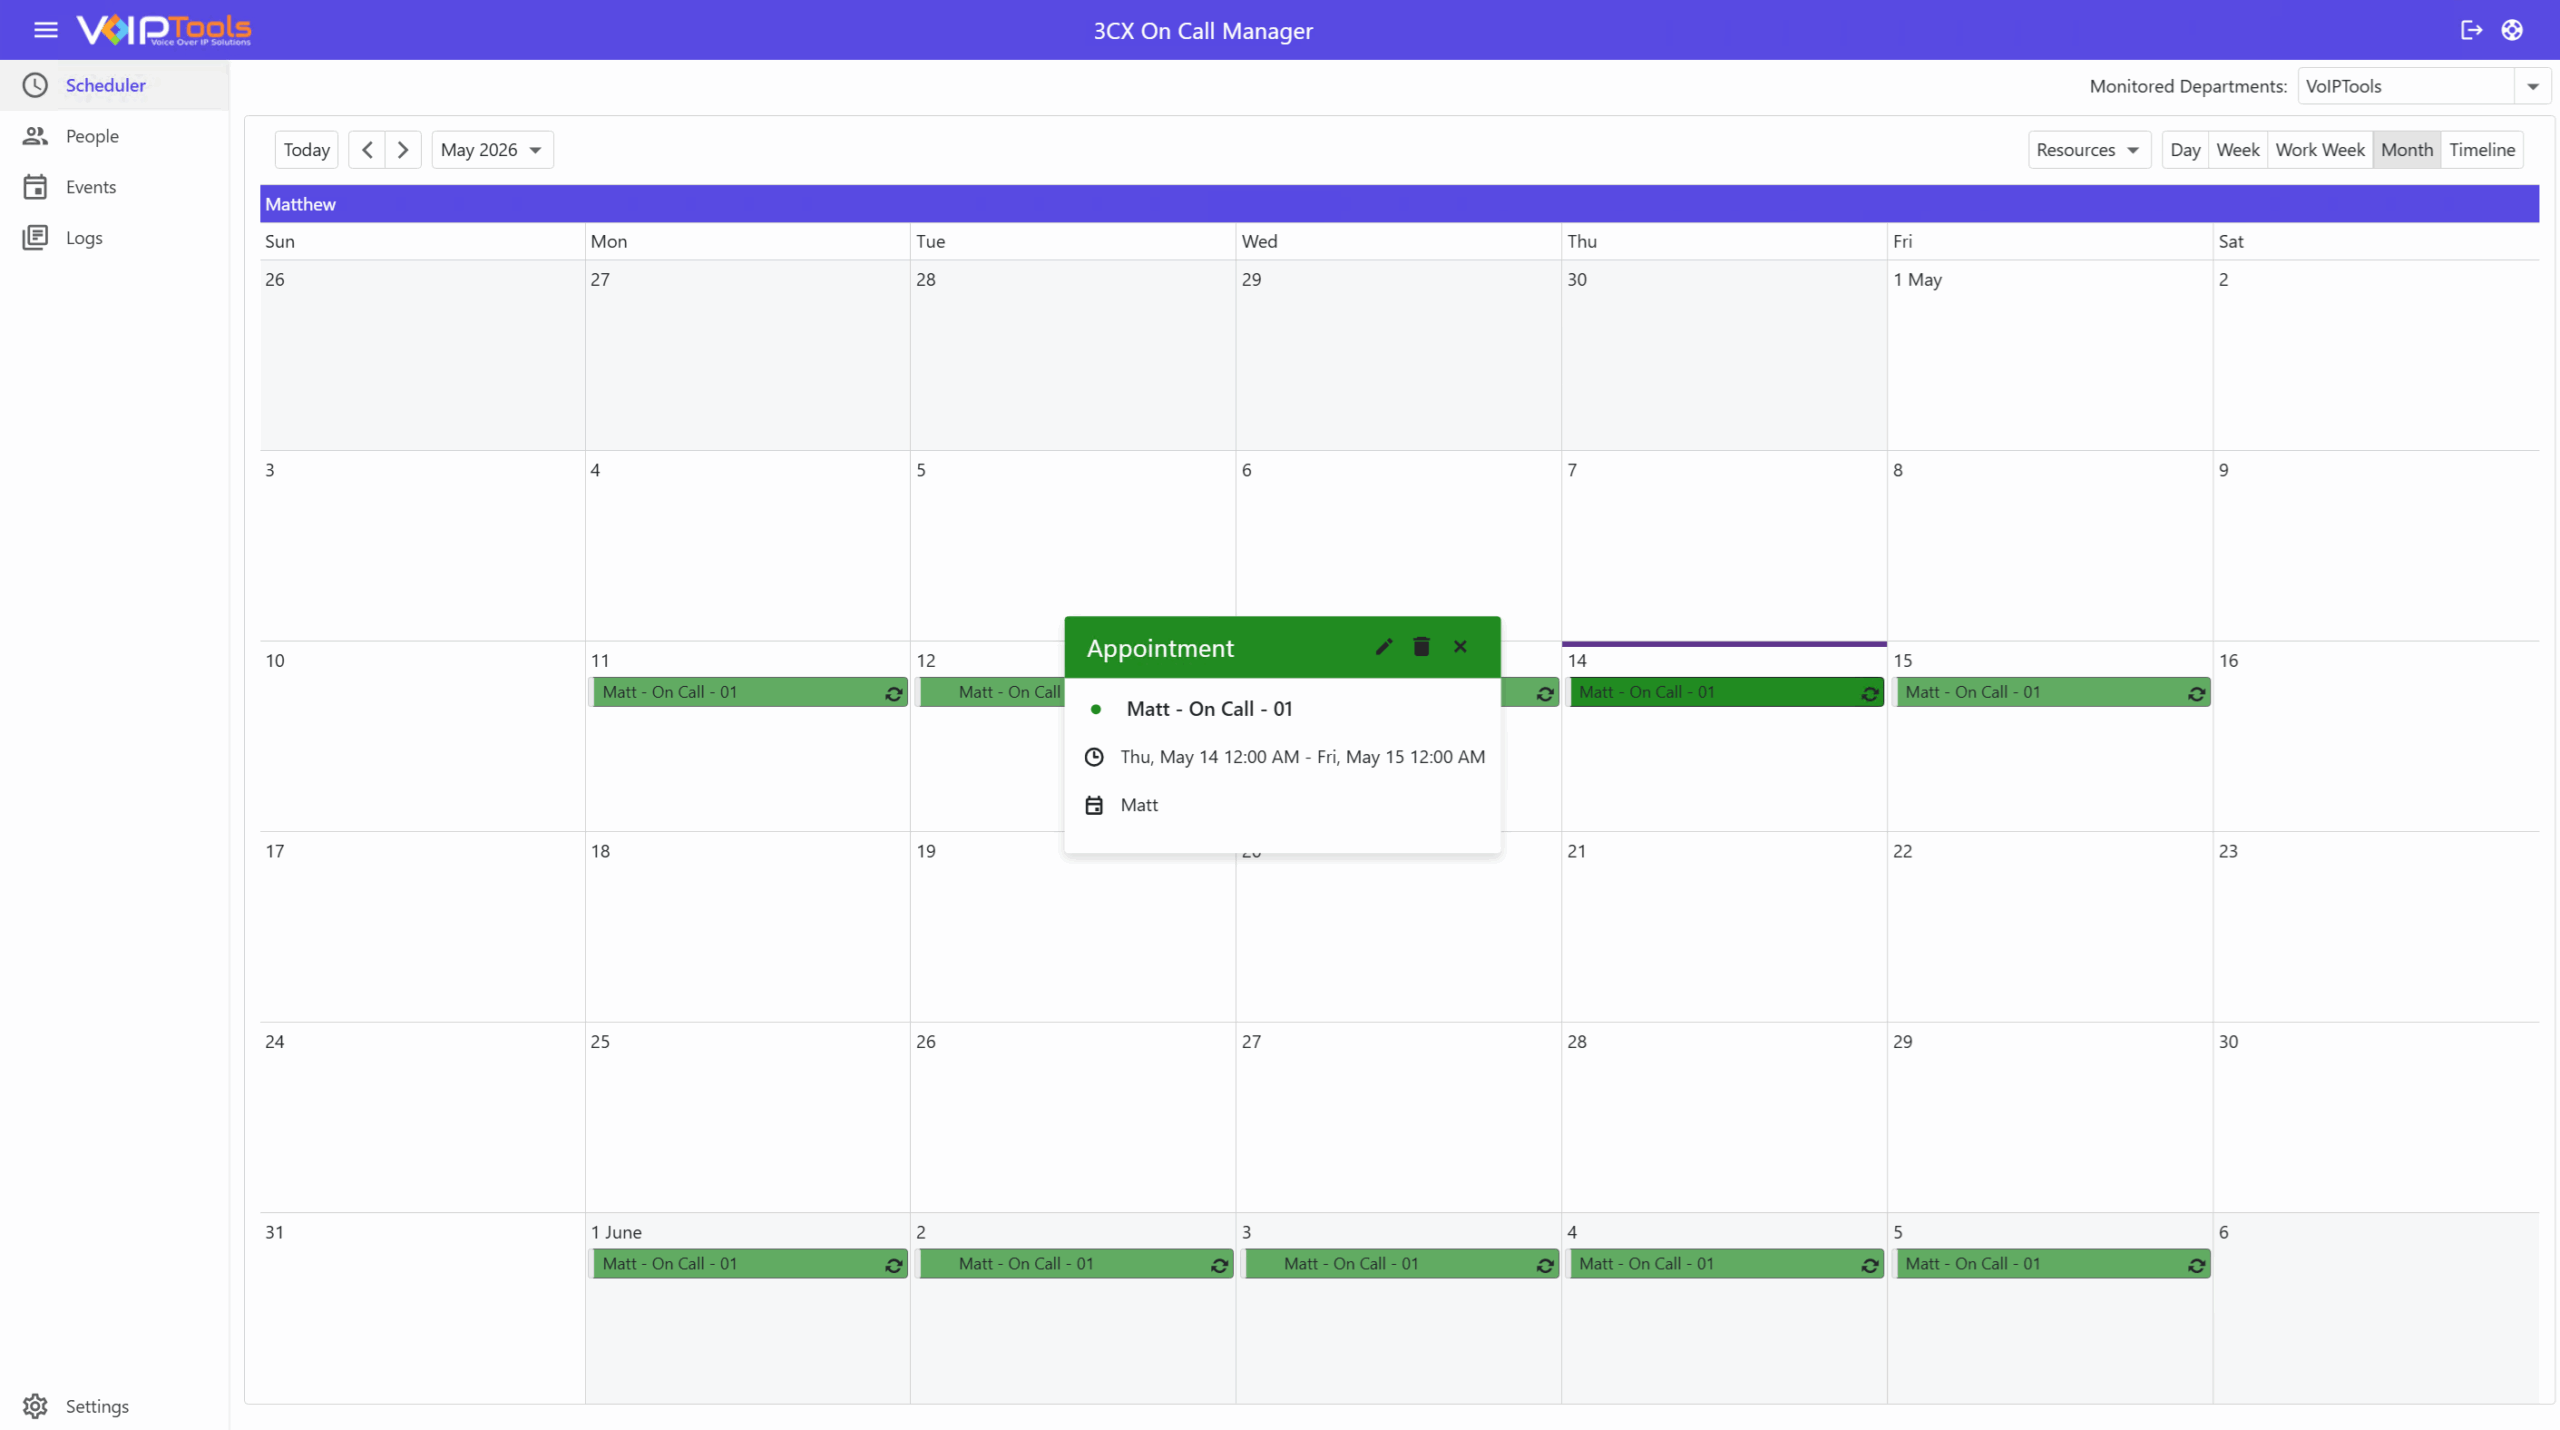
From there, you can:
- Click the edit
 icon to open and change the appointment details.
 - Click the
 trash icon to delete the appointment.
 - Click X to close the popup without making changes.
Recurring appointments display a repeat icon on the calendar entry to show that the appointment is part of a series.
Set Escalation Levels #
Use Escalation Levels to assign a resource to a specific on-call level. This helps the scheduler show each resource at the right priority.
Assign a level #
-
Open the appointment menu and choose New Appointment or Edit Appointment.
-
Select the desired level in Escalation Levels.
-
Choose the resource in Resource.
-
Click Save.
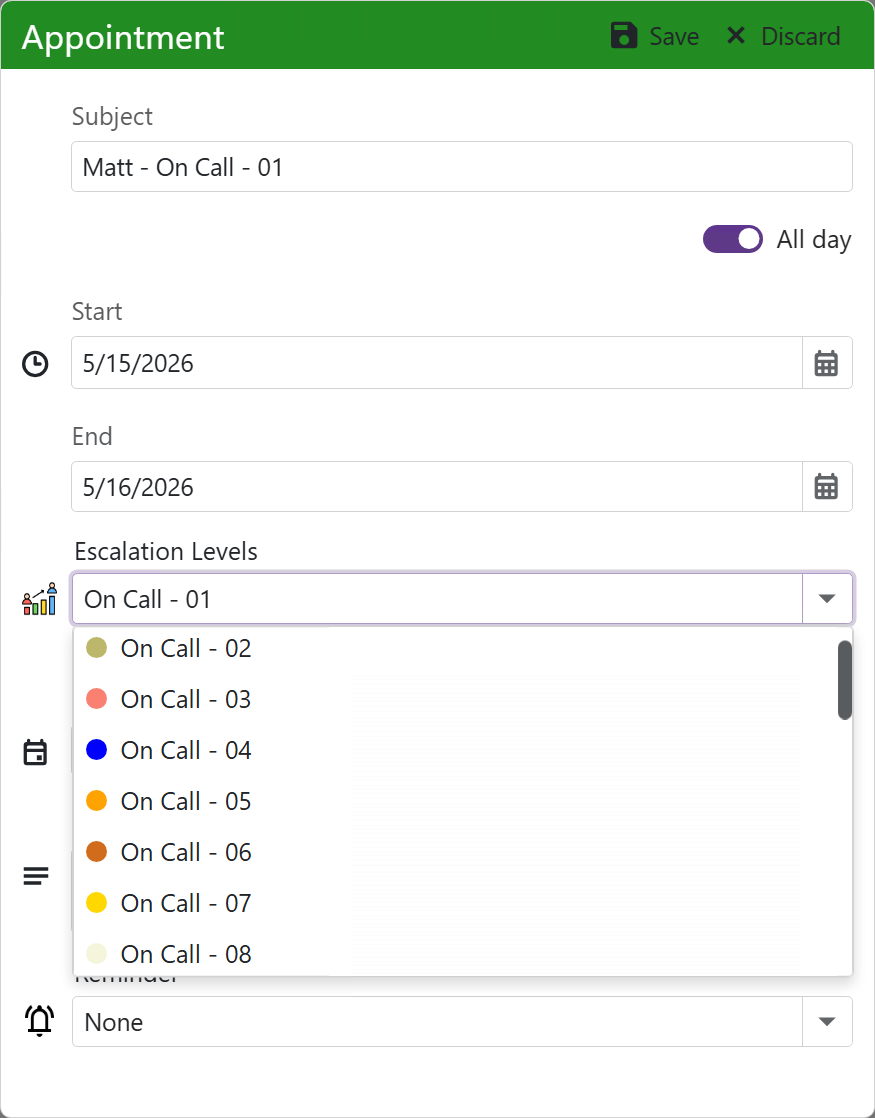
What you will see #
Resources assigned to different escalation levels appear in different colors on the Scheduler.
Set Reminders #
Use Reminder to alert a resource before an event or appointment starts.
Add a reminder #
-
Open New Appointment or Edit Appointment.
-
Select the Reminder option.
-
Choose when the reminder should be sent.
-
Click Save.

People #
The People page is where you add and manage agents in each department. It also lets you choose how each agent is notified when a new voicemail comes in, and when it has already been heard.
What you can do #
-
Add people using the + button in the top-left corner of the table.
-
Set notification methods for New voicemail alerts.
-
Set notification methods for Heard voicemail alerts.
-
Remove a person using the
trash icon in their row.
Who can use it #
Field definitions #
Notification options #
The table has two notification groups: New and Heard.
Add a person #

-
Click the + button in the People table.

Figure 67: Department Field -
Select a Department from the dropdown.
-
Enter the person’s Extension.
-
Enter the person’s Name.
-
Enter the person’s Mobile number.
-
Enter the person’s Email address.
-
Enter the person’s SMS Address.
-
Choose the notification methods for New and Heard.
Set voicemail alerts #
-
In the New section, check the checkboxes to choose how the person should be notified when a voicemail is received.
-
In the Heard section, check the checkboxes to choose how the person should be notified after the voicemail has been heard.
Events #
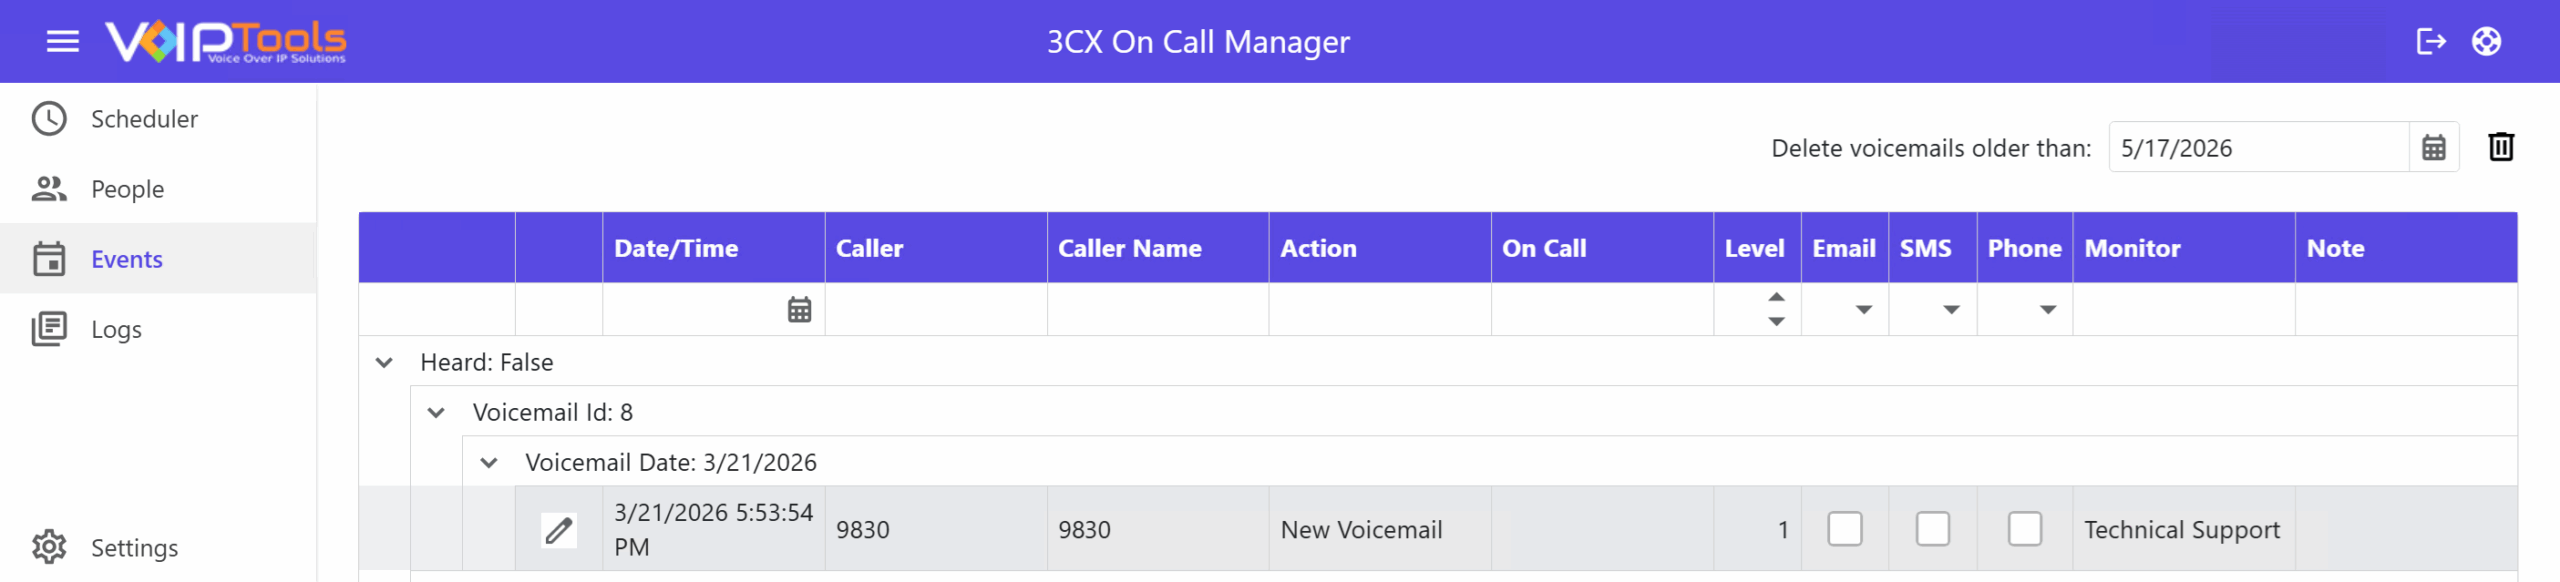
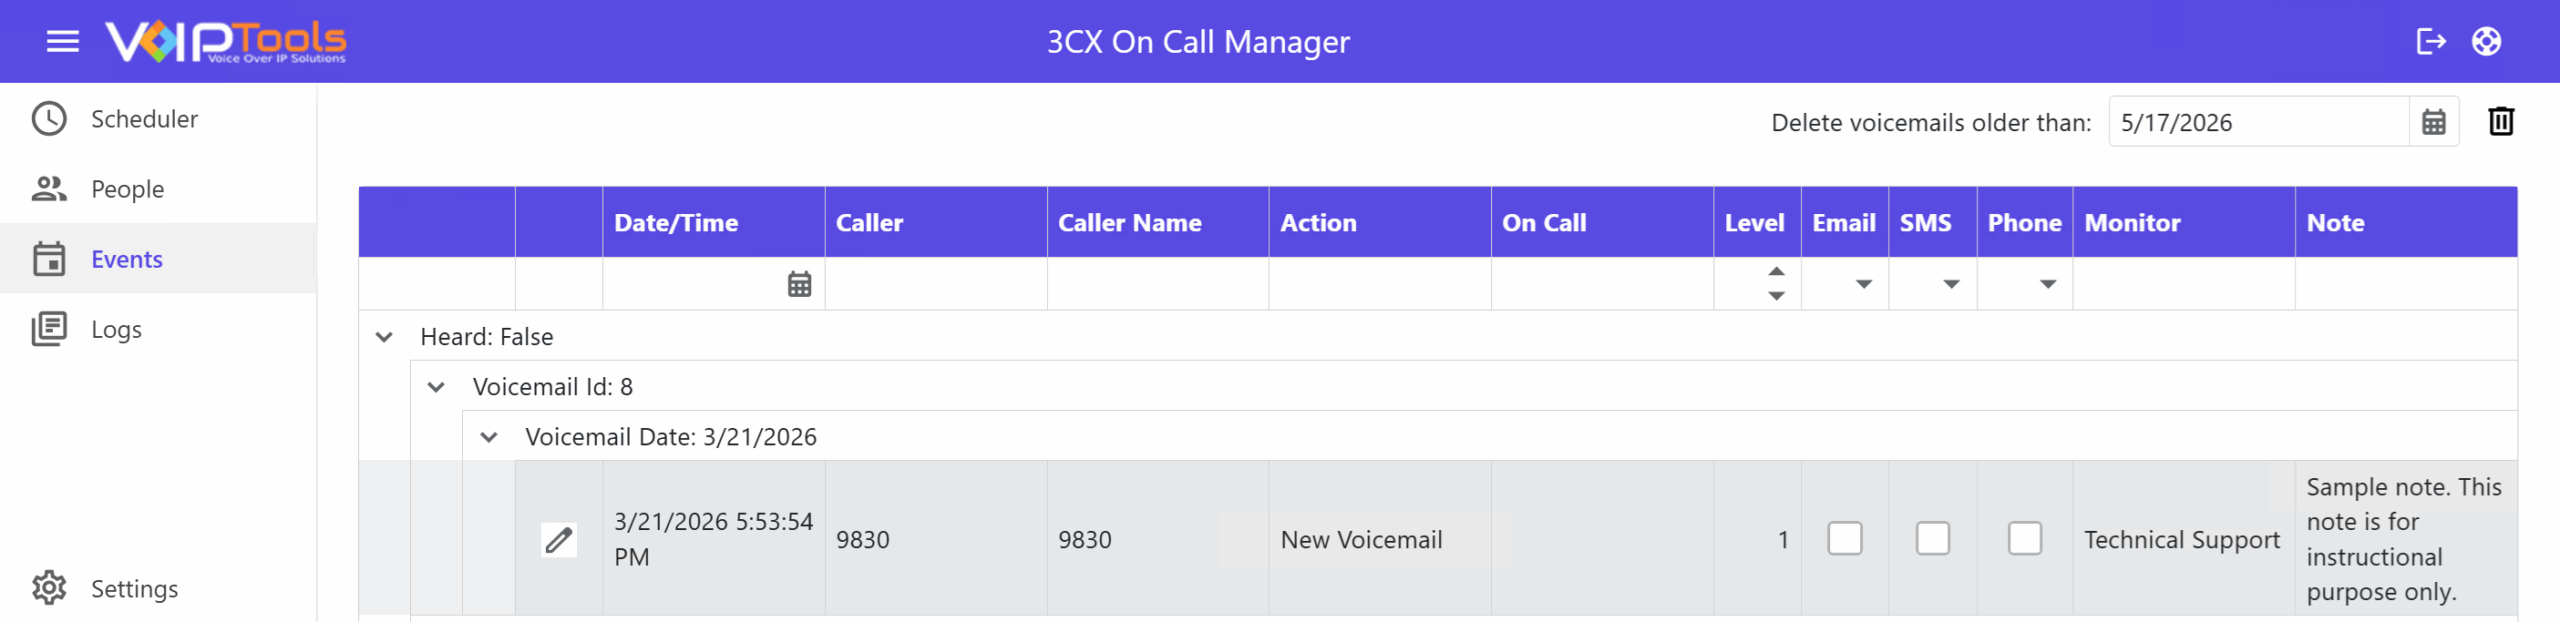
The Events page shows you every incoming voicemail event across all monitored extensions who called, when, whether it was heard, and how agents were notified. It’s your go-to screen for tracking agent responsiveness, monitoring SLA performance, and adding notes to specific calls.

Field Definitions #
| Field | Description |
|---|---|
| Date/Time | The date and time the call was received, in MM/DD/YYYY and 12-hour format. |
| Caller | The phone number of the person who called. |
| Caller Name | The name of the caller, if available. |
| Action | The status of the voicemail — for example, New Voicemail. |
| On Call | The agent who was on duty when the call came in. |
| Level | The escalation level assigned to the notification attempt. |
| Checked when the agent was notified by email. | |
| SMS | Checked when the agent was notified by SMS. |
| Phone | Checked when the agent was notified by phone call. |
| Monitor | The monitored extension associated with the call — for example, Technical Support. |
| Transcription | A text version of the voicemail, available when transcription is enabled. |
| Note | A free-text field for adding your own notes about the call. |
Viewing Call Events #
Step 1: Click the arrow next to Heard: False to see unheard voicemails, or Heard: True to see ones that have been listened to.
Step 2: Click the arrow next to any Voicemail Id to expand it and reveal the voicemail date.
Step 3: Click the arrow next to the Voicemail Date to see the individual call entries underneath.
Adding or Editing a Note #
Step 1: Click the edit icon (✏️) on any call entry to open its detail view.
Step 2: Scroll down to the Note field and type your note.
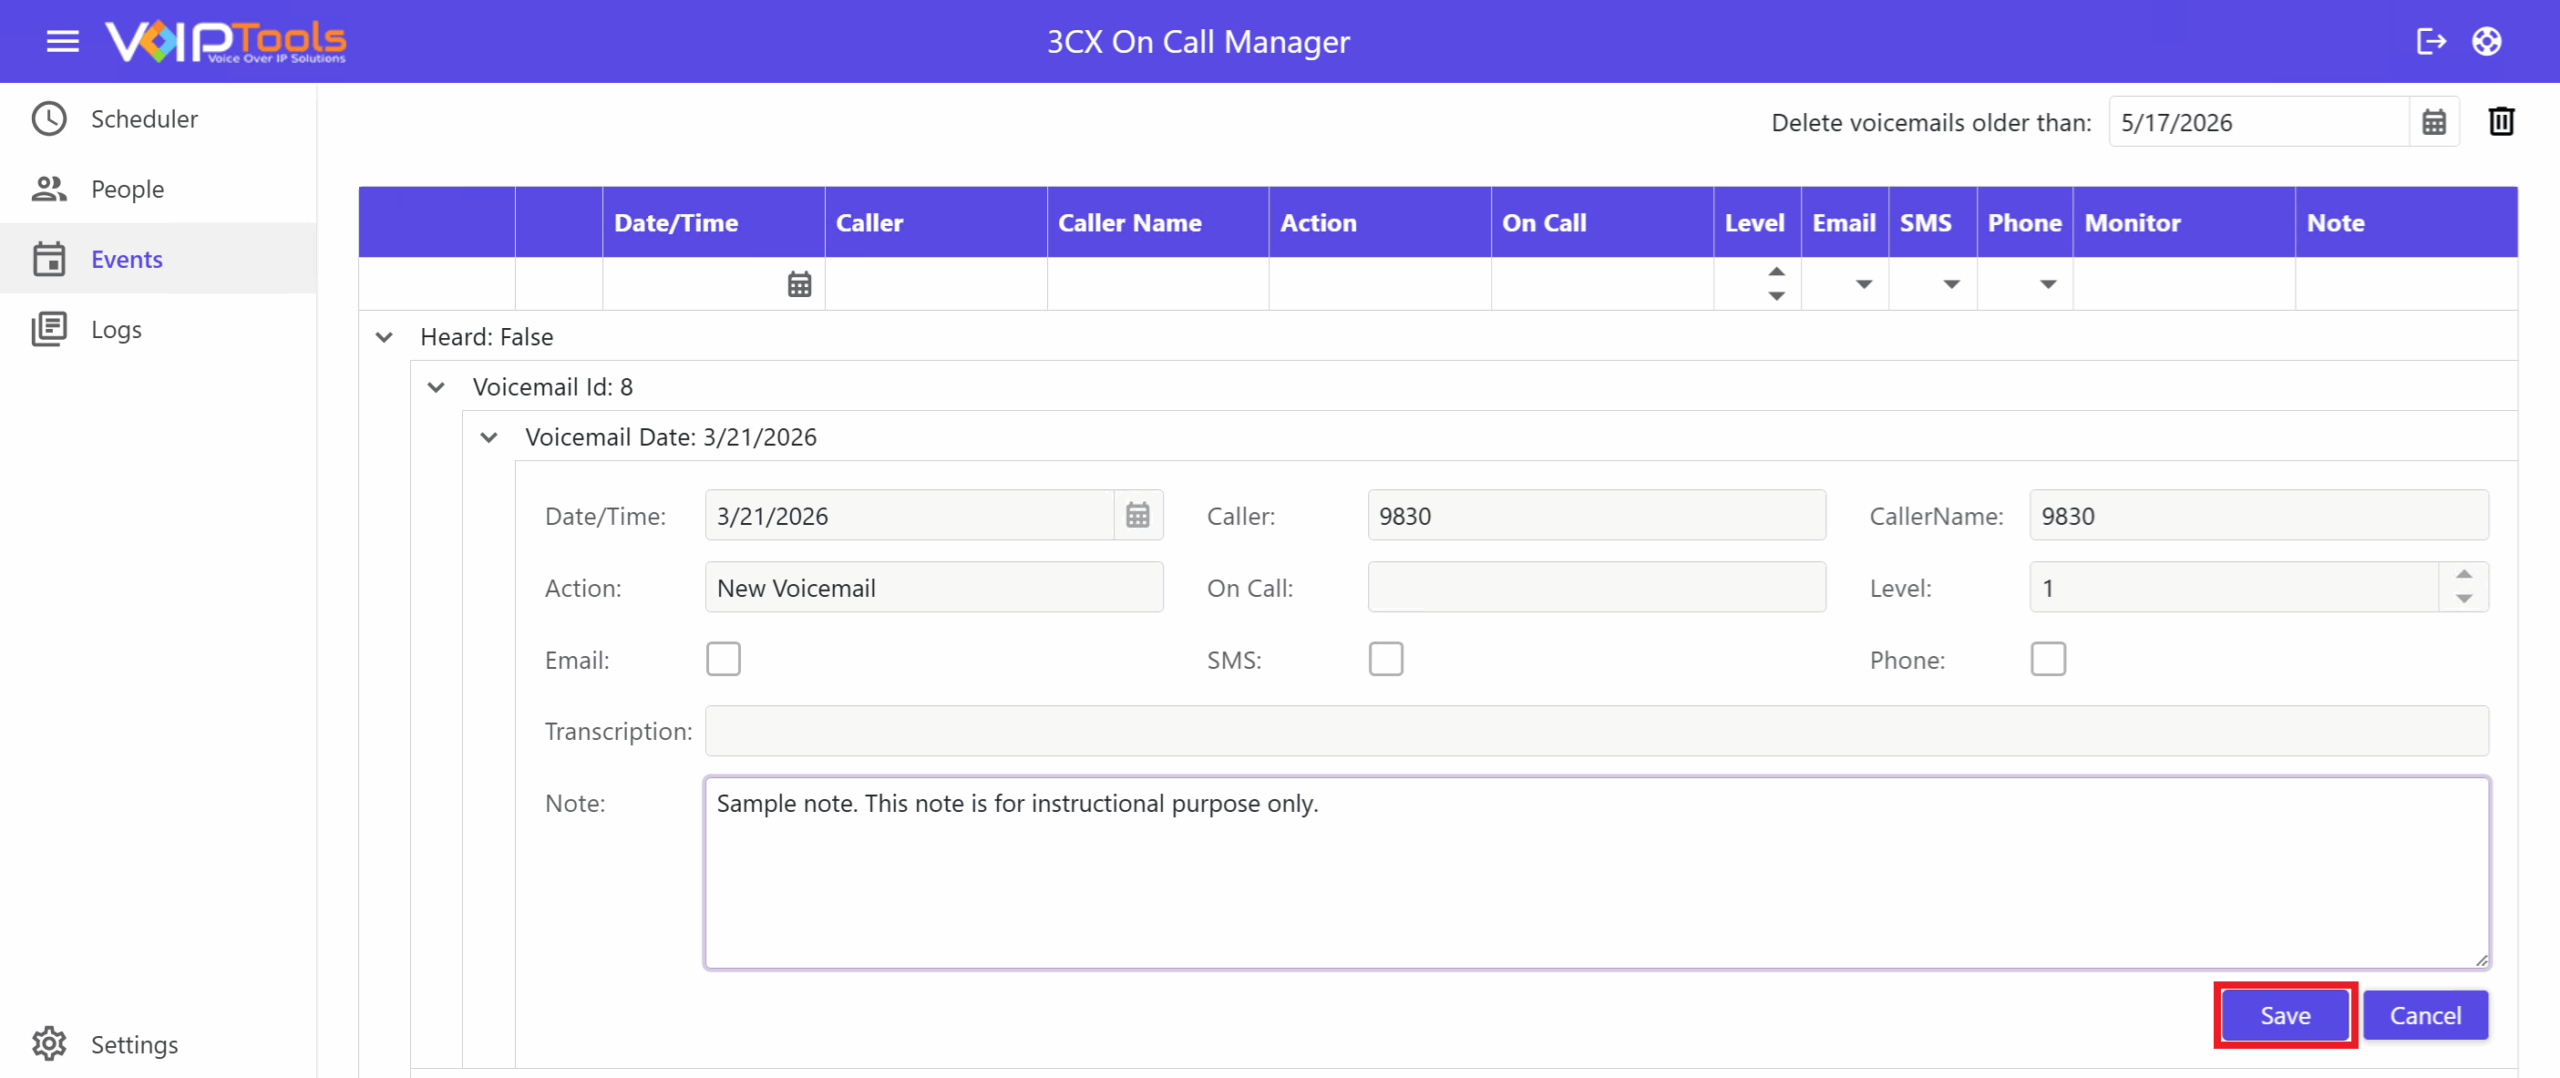
Step 3: Click Save. Your note will appear in the Note column of the call entry.
Deleting Old Voicemails #
Use the Delete voicemails older than date field in the top right to set a cutoff date. Click the trash ![]() icon next to it to remove voicemails older than that date.
icon next to it to remove voicemails older than that date.
Logs #
The Logs menu is your go-to place when you want to see exactly what the system has been doing. Think of it as a running diary of every action 3CX On Call Manager performs from processing appointments to sending notifications. It’s handy when something doesn’t go as expected and you need to figure out why.
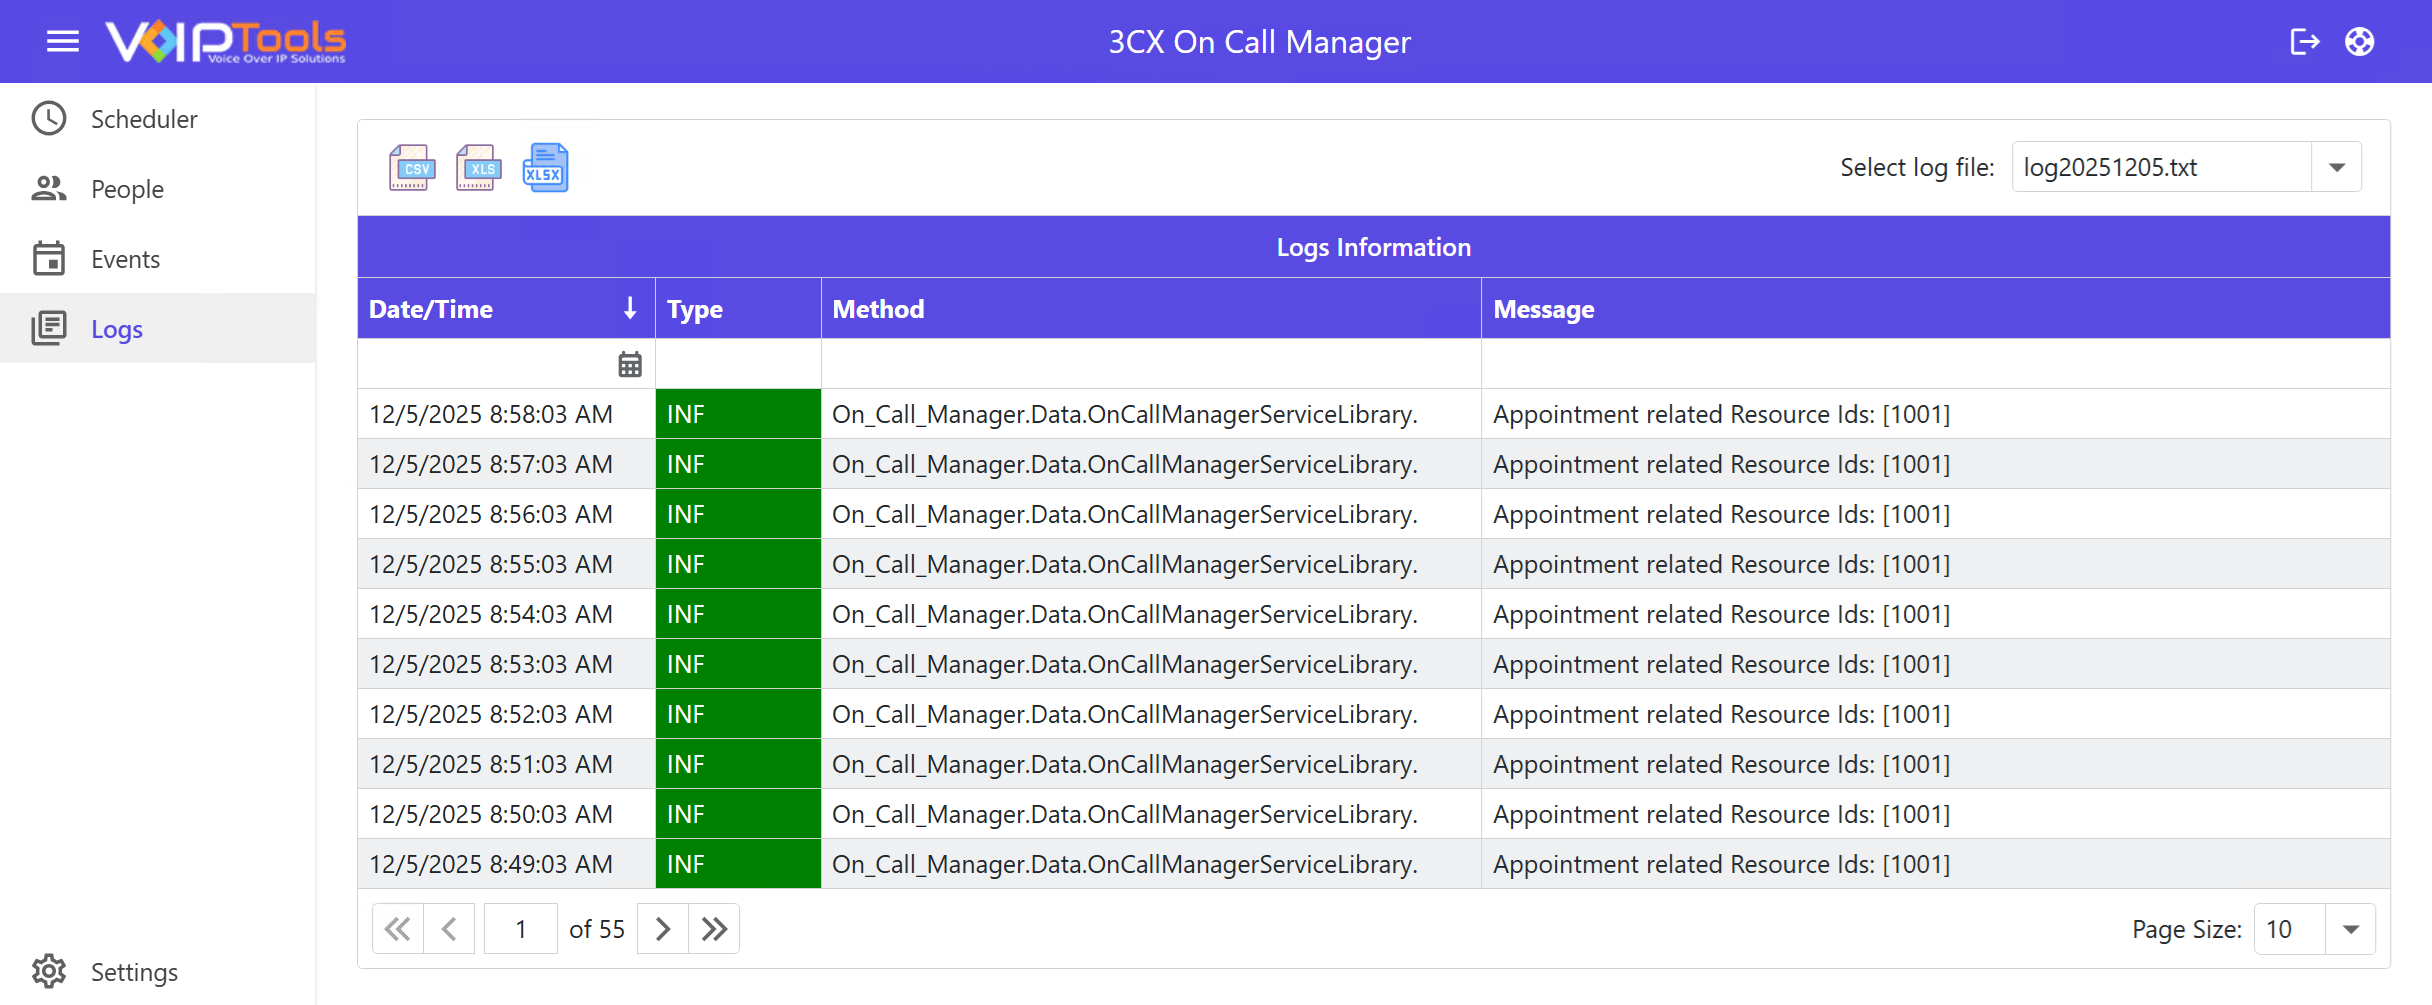
What You’ll See #
Each row in the Logs Information table represents one system event, with three key details:
| Column | What It Tells You |
|---|---|
| Date/Time | Exactly when the event happened. |
| Type | The kind of event. For example, INF (green) means it’s just a normal informational update, nothing to worry about. |
| Method | The internal process that triggered the event. |
| Message | A plain description of what happened. |
Selecting a Log File #
Use the Select log file dropdown in the top right to switch between log files from different dates. Each file is named by date. For example, log20251205.txt covers December 5, 2025.Figure: Logs – Select Log File Dropdown
Exporting Logs #
Need to share or archive the data? Click any of the export icons in the top left to download the log in your preferred format: CSV, XLS, or XLSX.
Browsing Through Entries #
Use the pagination controls at the bottom to move through pages of log entries, and adjust the Page Size dropdown on the bottom right to control how many rows appear at once.
