Introduction #
Streamline Your Communication and Boost Productivity with 3CX Auto Call Back
With 3CX Auto Call Back, you can leverage its capabilities to eliminate missed opportunities and save valuable time when trying to reach an unavailable colleague. This feature actively monitors your colleague’s availability and automatically establishes a connection between both of you at the right moment.
No more waiting endlessly or making repeated attempts to get in touch. 3CX Auto Call Back optimizes your communication workflow, letting you focus on your tasks without interruptions, and ensures that you connect with your colleague’s extension as soon as they are available for a conversation.
Why chose 3CX Auto Call Back? #
 | OPT IN FEATURE | Take control of your extension and decide whether to opt in for automated callbacks. You have the flexibility to customize your preferences and availability, empowering you to receive automatic callbacks based on your chosen settings. |
 | UPLOAD RECORDINGS | Elevate the quality of your recordings by uploading pre-recorded messages. This feature lets you deliver a professional and crystal-clear sound, meeting the expectations of your audience and maintaining a high level of professionalism in your audio content. |
 | WEB-BASED APPLICATION | You can access our web-based application from anywhere and at any time, ensuring convenient availability to cater to your needs. You can stay connected and productive regardless of your location and maximize your productivity with ease. |
 | EASY-TO-USE INTERFACE | The user-friendly interface simplifies the configuration and management of call-back settings. Set up and modify call-back parameters effortlessly, ensuring a hassle-free experience for both administrators and users. |
How does Auto Call Back work? #
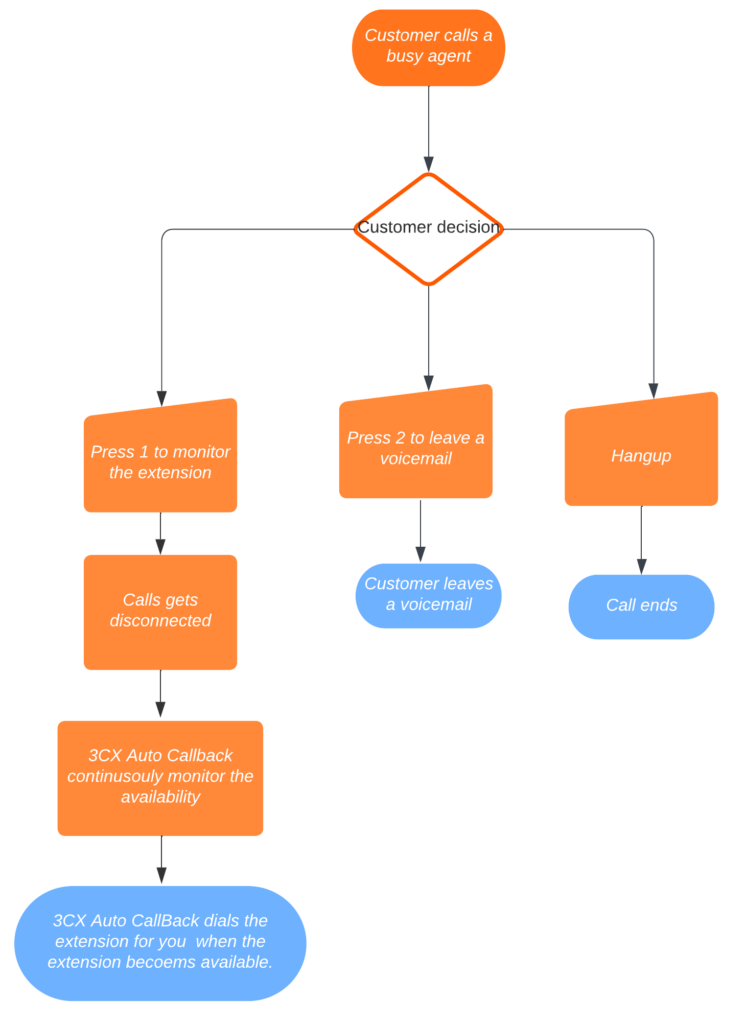
- Configure an extension to forward calls to the Auto Call Back Call Flow Designer (CFD) application when busy.
- When the extension is called when busy, the CFD application plays the following message,
- The extension you dialed is currently unavailable. To monitor this extension call it back back automatically when it becomes available Press 1.
- To leave a voicemail for this extension, Press 2.
- Or hang up.
- If you Press 1, when the call gets disconnected, the 3CX Auto Call Back service will continuously monitor the availability of the busy extension.
- When the extension becomes available, the 3CX Auto Call Back service will automatically dial the extension for you.
Prerequisites #
Before installing 3CX Auto Call Back, you need to ensure that your computer meets the minimum requirements mentioned below:
- 3CX Version 18 Professional or Enterprise Edition.
- Windows 10 or above/ Windows Server 2012 or above.
- SQL Server 2016 and above (including the free SQL Express edition).
- Internet Information Server.
- Static IP for VoIPTools and 3CX servers
- Port number 7850 opened on your device.
NOTE:
You need a Static IP for both VoIPTools and 3CX servers to ensure proper two-way communication, both the 3CX server (Relay) and the VoIPTools server. Dynamically assigned IP addresses are not supported. Additionally, it is recommended to use HTTPS for secure communication, which requires a FQDN for SSL/TLS certificate validation between the VoIPTools server and the Relay.
NOTE:
While installing SQL Server, ensure the following,
- Uninstall the previous versions of SQL Management Studio manually before installing the new version.
- Install it in “Mixed Mode” to include SQL Authentication, and install SQL Management Studio
Installation overview #
 | DOWNLOAD SOFTWARE | You can order 3CX Auto Callback online at https://www.voiptools.com. Your order confirmation email will include your license key and a link to download the software. |
 | INSTALL PREREQUISITES | There are a number of prerequisites that must be installed prior to installing the 3CX Auto Callback. These prerequisites include Microsoft Internet Information Server (IIS) and Microsoft SQL Server |
 | INSTALL 3CX AUTO CALLBACK | This User Guide contains step-by-step instructions to successfully install 3CX Auto Callback. Begin by extracting the installer from the downloaded zip file (Step 1 above), then run the setup program named AutoCallBackInstaller.exe |
 | REGISTER YOUR LICENSE KEY | You must register your license key to activate 3CX Auto Callback. Your license key is included in your order confirmation email, and can also be found in your order history on our website. |
Step-by-step Installation Procedure #
The following section guides you through a detailed walk-through of the installation process.
Step 1: Download 3CX Auto CallBack #
- Find the software download link in the Order Confirmation Email, or you can find it in your order history on our website and download the 3CX Auto Call Back application.
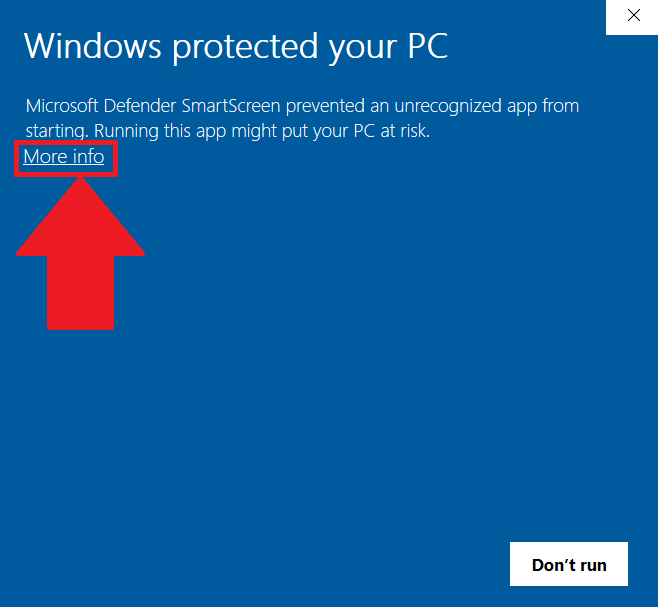
- In the Microsoft Defender SmartScreen, click the More Info option.
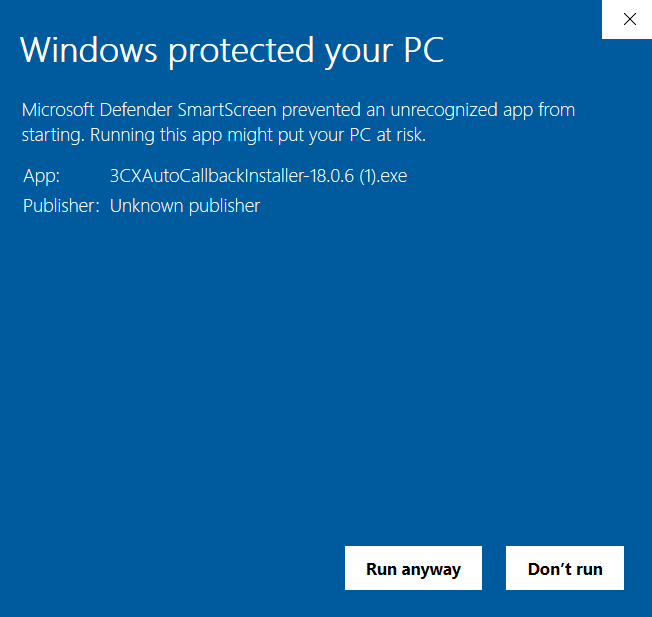
- Click the Run Anyway option to start the installation.
Step 2: Install the Prerequisites #
Click on the software installer downloaded in Step 1. The installation wizard will automatically identify the prerequisites and assist you with each installation required to 3CX Auto CallBack. It includes .NET Framework (Web Installer), SQL Server Express (Web Installer), and SQL Server Management Studio.
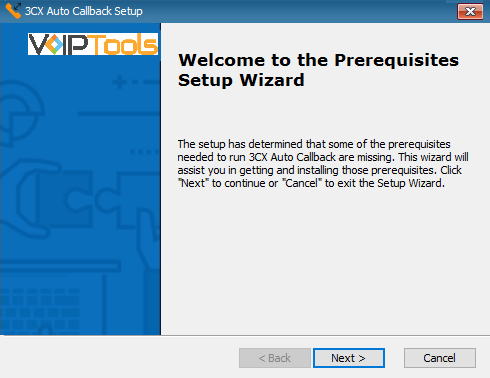
- Click the downloaded installer executable to launch the Prerequisites Setup Wizard and click Next.
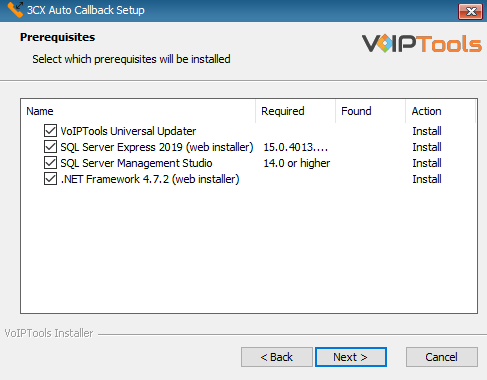
- In the Prerequisites window, install all the required prerequisites identified by the installer, or select/ unselect the applications based on your requirements and click Next to continue.
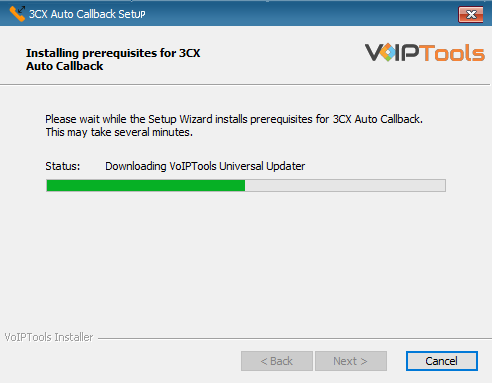
The installer will download and install the selected applications. It may take several minutes to complete.
- In the Microsoft SQL Server License Terms click the Accept button to acknowledge the license terms and continue.
- This page appears if you do not have SQL Server Express preinstalled in your device.
- View the SQL Server Media target location in the Media Location field. If required, you can click the Browse button to change the location. Click Install to begin the installation of SQL Server Express.
SQL server installation is in progress. This may take several minutes to complete.

- Click the Close button once the prerequisites are installed.
Microsoft SQL Management Studio installation is in progress. This may take several minutes to complete.
- Click Yes in the Confirmation Message Box to reboot the computer.
Step 3: Start the installation process #
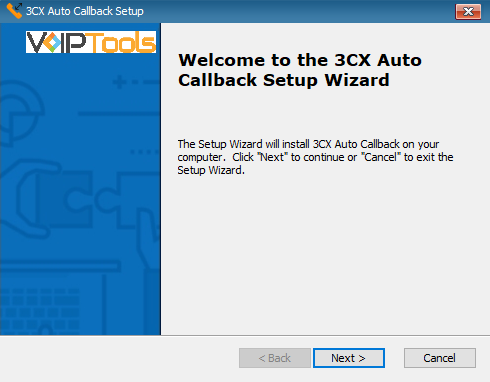
- Click Next on the 3CX Auto Callback Setup Wizard screen.
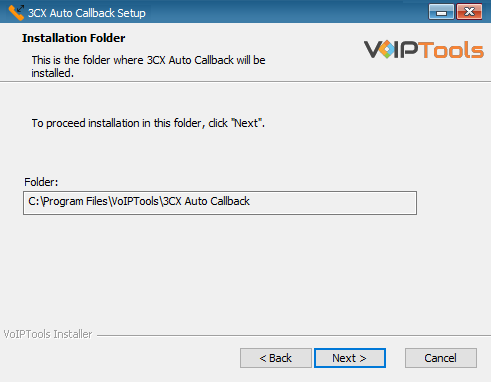
- On the Select Installation Folder window, the Folder field displays the path where the 3CX Auto Callback gets installed. You cannot change the location path.
- Click Next to continue.
Step 4: Test Relay Settings #
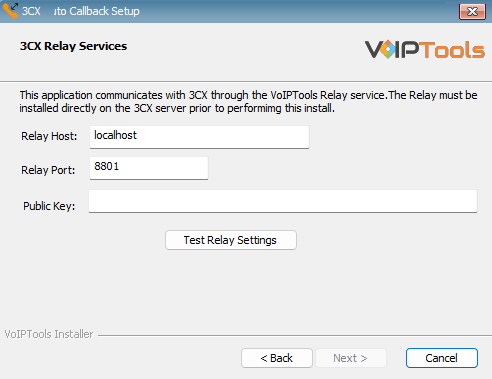
- In the 3CX Relay Services window, in the Relay Host field, enter the FQDN of your 3CX server.
- Enter 8801 in the Relay Port field.
- Enter the public key you took from VoIPTools Relay services in the Public Key text area.
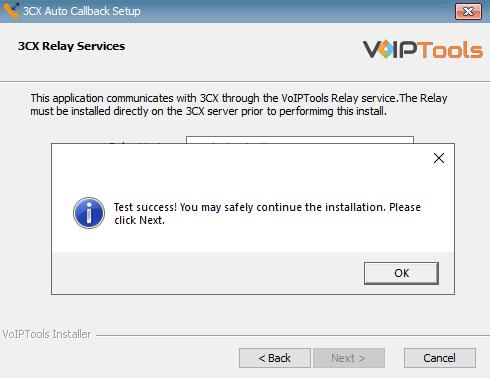
- Click the Test Relay Settings to confirm 3CX Auto Call Back can communicate with the Relay services running on the 3CX server.
- If the 3CX Auto Call Back is successfully able to communicate with the Relay services that run on the 3CX server, a Success message box appears. Click OK. If the test fails, you will not be able to continue until communication with the relay is established.
- Click OK in the Success message box and click Next to continue with the installation.
NOTE:
- You must set the Relay Port to 8801.
- If the Relay test fails, you cannot continue the installation until you establish communication with the Relay. Confirm the following if the test was unsuccessful:
- Confirm you have the correct firewall port open (default TCP 8801) on the 3CX server and the firewall protecting the 3CX server.
- Confirm that you have entered the correct IP address / FQDN for the 3CX server.
- Confirm that the 3CX Auto Callback and Relay use the same port and protocol.
Step 5: Configure the database #
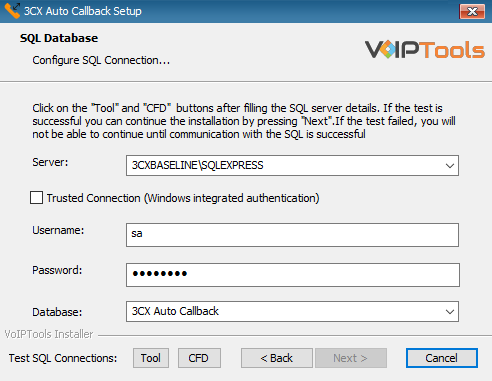
When configuring 3CX Auto Callback, select an existing Microsoft SQL Server instance in your environment. The database server can be a remote SQL Server or a local instance running on the VolPTools server.
- On the SQL Database window in the Server field, select the desired instance of SQL Server.
- To use SQL Authentication, uncheck the Trusted Connection checkbox.
- In the Username and Password fields, enter valid SQL login account credentials.
NOTE:
- We recommend you use SQL Authentication rather than Windows authentication. Many of our tools leverage a Call Flow Designer (CFD) application running on the 3CX. Frequently our CFD applications require access to a SQL database. If the 3CX server and the database server are not in an Active Directory domain, Windows authentication will fail.
- To use SQL Authentication, you must configure the SQL server to run in Mixed Mode. If you install SQL Server with our tools, we configure SQL in Mixed Mode.
- To use Windows Integrated Authentication (not recommended), check the Trusted Connection (Windows integrated authentication) checkbox.
NOTE:
In the Database field, the installer will automatically display the default database name. We encourage you to use the default name. To upgrade or reinstall 3CX Auto Callback, select the current database name from the list.
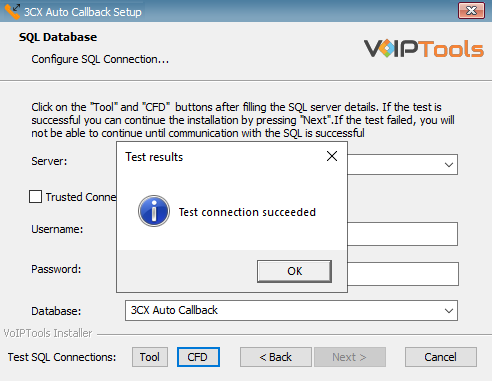
- Click the Tool buttons to confirm connectivity to SQL Server. and click OK on the Test Results message box.
- Click the CFD buttons to confirm connectivity to SQL Server and click Ok on the Test Results message box.
- Click OK on the Test Results dialogue box.
Step 6: Installing 3CX Auto Callback #
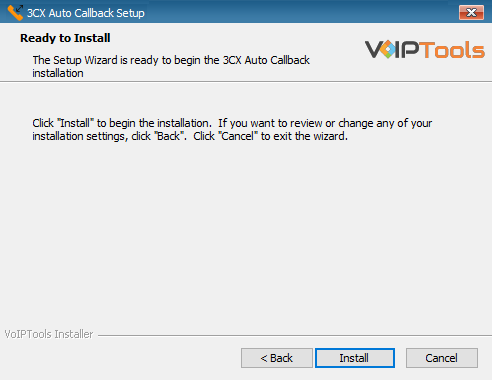
- Click Install in the Ready to Install window.
The application installation may take several minutes to complete.
- Check the Launch 3CX Auto Callback checkbox and click Finish when the installation is complete.
Step 7: Register your Software (License screen) #
To ensure the authorization of your license key, it is necessary to complete the registration process. By registering with VoIPTools, you gain access to a range of benefits:
| Key Replacement Assistance | In the unfortunate event of a lost license key, registering with VoIPTools lets us provide you with a replacement key promptly. |
| Product Updates and Reminders | By registering, you will receive timely notifications from VoIPTools regarding any product updates. Additionally, we will send reminders when your key is nearing its renewal date, ensuring uninterrupted access to our services. |
Follow the procedure to register your software,
- Double-click the Auto Call Back desktop icon
 to open the web application.
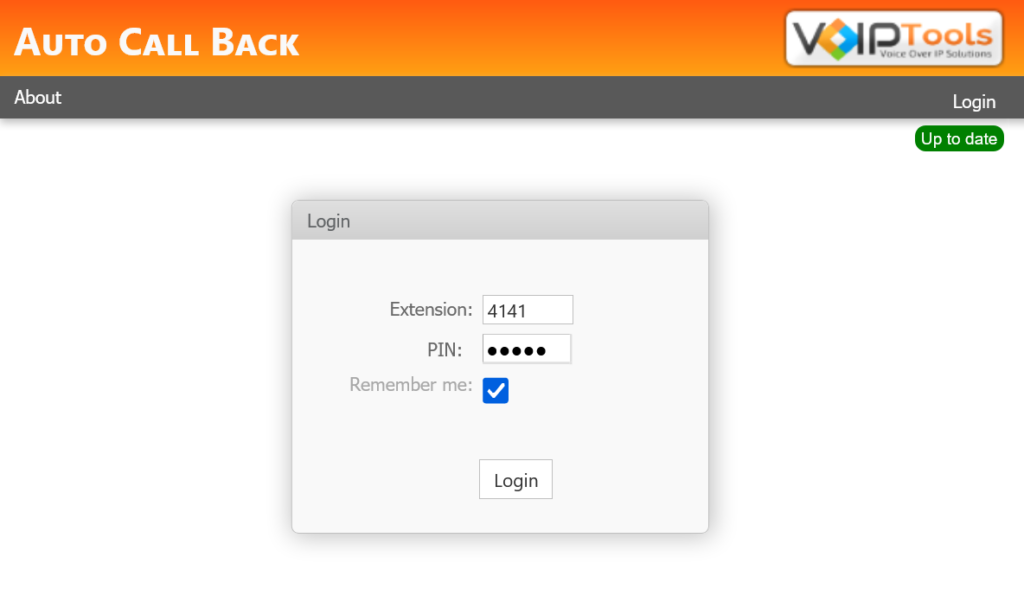
 - On the Login page, do the following tasks,
- In the Extension field, enter your 3CX extension number.
- In the PIN field, enter your 3CX voicemail PIN.
- Click the Login button to log in to your account.
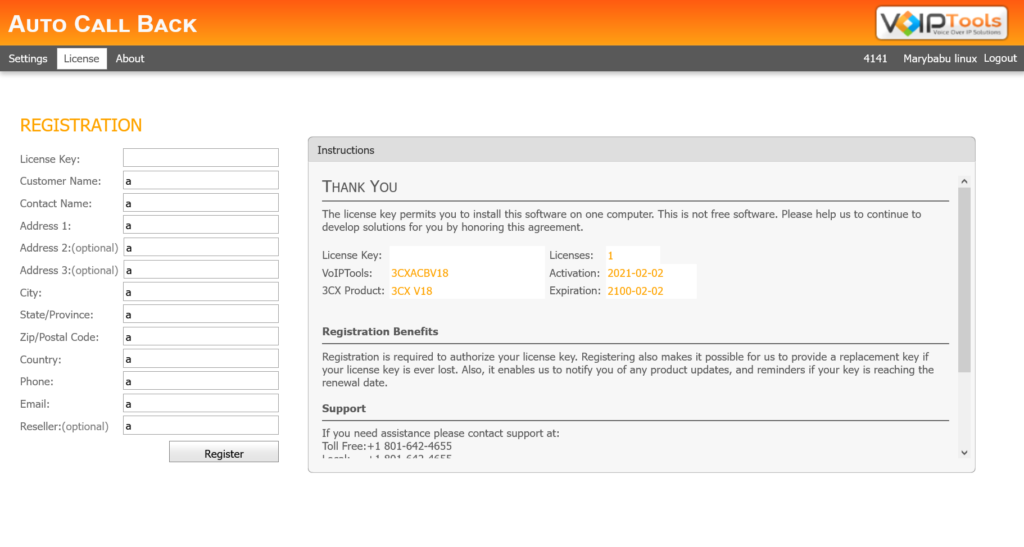
- On the top menu, click the License tab.
- In the License Key field, enter the valid license key and enter the appropriate details in all the other fields of the page.
- Click Register to register your license.
NOTE:
The license key permits you to install this software on one computer. This is not free software.
Web Portal #
To access the ‘3CX Auto Call Back’ web portal, click on the desktop icon that was created during the installation process (‘3CX Auto Call Back’ Web).
NOTE:
Only a user with ‘Manager’ privilege can log-in to the application.
Settings Screen #
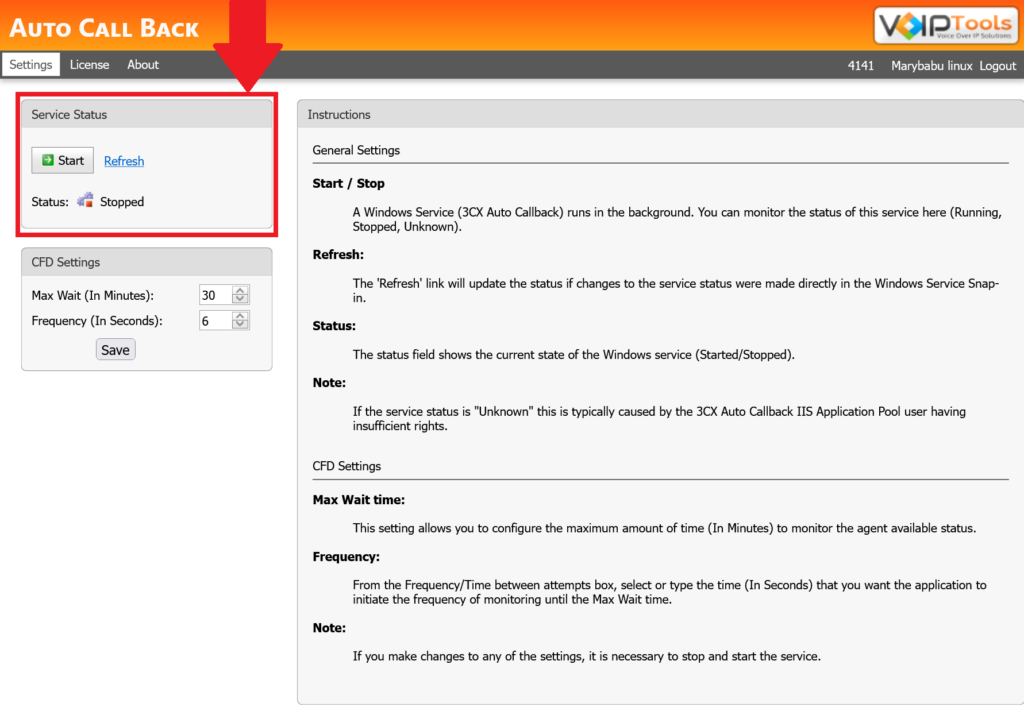
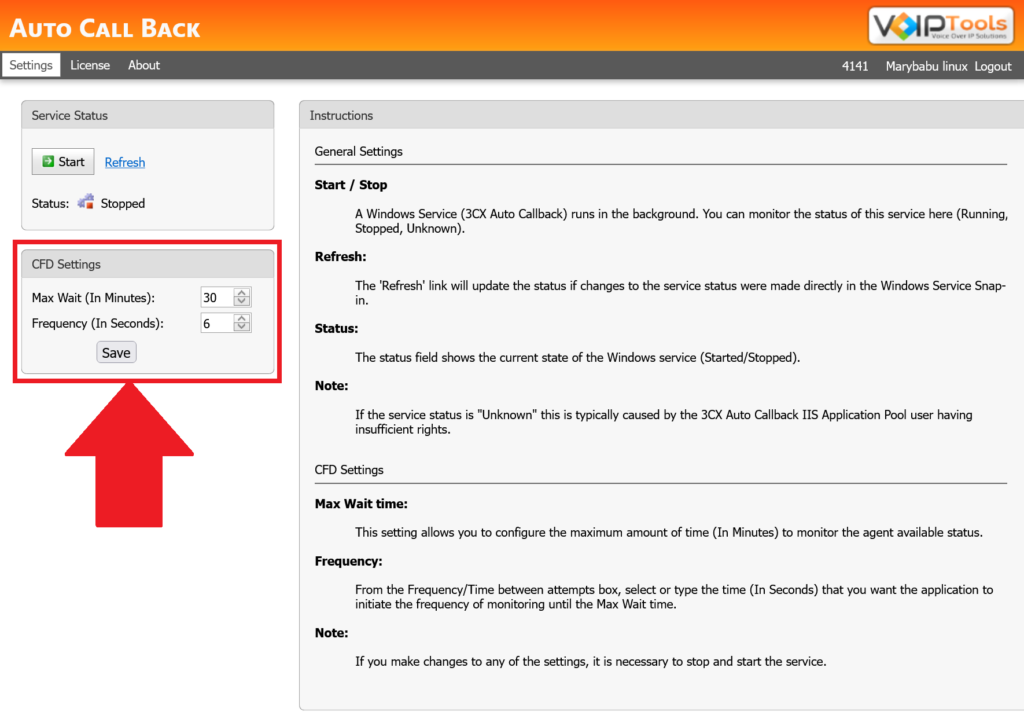
The Settings screen enables you to monitor the status of the ‘3CX Auto Call Back’ service (Running, Stopped, Unknown), that runs in the background. You can also configure CFD settings such as ‘Max Wait Time’ and ‘Frequency’. If you make changes to any of the settings, it is necessary to stop and start the service
Service Status #
- To start or stop a service, click Start/ Stop button.
- Click the Refresh link to update the status if changes to the service status were made directly in the Windows Service Snap-in.
- To know the current state of Windows Service (started/stopped), view the Status field.
NOTE:
If the service status is “Unknown”, this is typically caused by the 3CX Auto Call Back IIS Application Pool user having insufficient rights.
CFD Settings #
- In the Max Wait (In Minutes) field, configure the maximum amount of time (In Minutes) to monitor the agent available status.
- In the Frequency (In Seconds) field, select the time (In Seconds) that you want the application to initiate the frequency of monitoring until the Max Wait Time.
- Click Save. A confirmation message box appears, click OK.
NOTE:
If you make changes to any of the settings, it is necessary to stop and start the service.
3CX Console Management: Configure CFD to Extensions #
The following section guides you on how to configure CFD to Extensions in ‘3CX Console Management
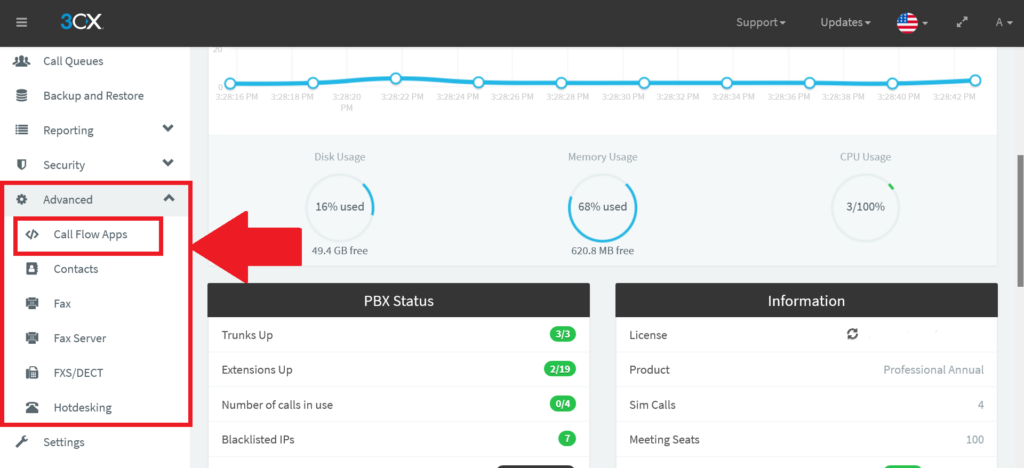
- Login to 3CX Console Management with valid credentials.
- In the left side panel, click the Advanced
 menu.
menu. - Click the Call Flow Apps
 option in the Advanced menu to view the CallBack CFD file that is automatically created.
Make calls automatically #
To make calls automatically using Auto Call Back feature, follow the procedure,
- Click the Users
 menu in the left side panel.
 - Click the extension you want to apply the CallBack feature and click the Forwarding Rules tab.
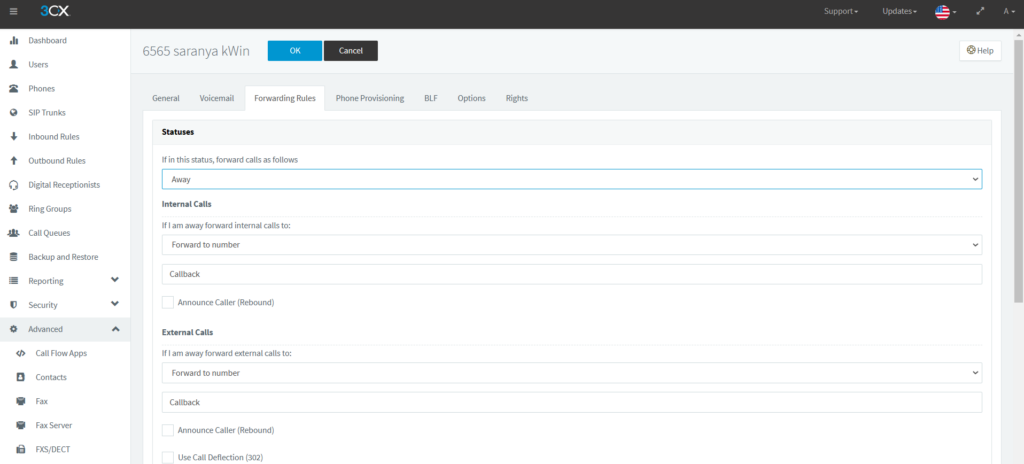
- On the Statuses section, in the If In This Status, Forward Calls As Follows list, select your status,
- When you set the status as Away, follow the procedure,
- In the Internal Calls section, do the following,
- Select the Forward To Number option in the list.
- Enter CallBack in the text area.
- In the External Calls section, do the following,
- Select the Forward To Number option in the list.
- Enter CallBack in the text area.
- In the Internal Calls section, do the following,
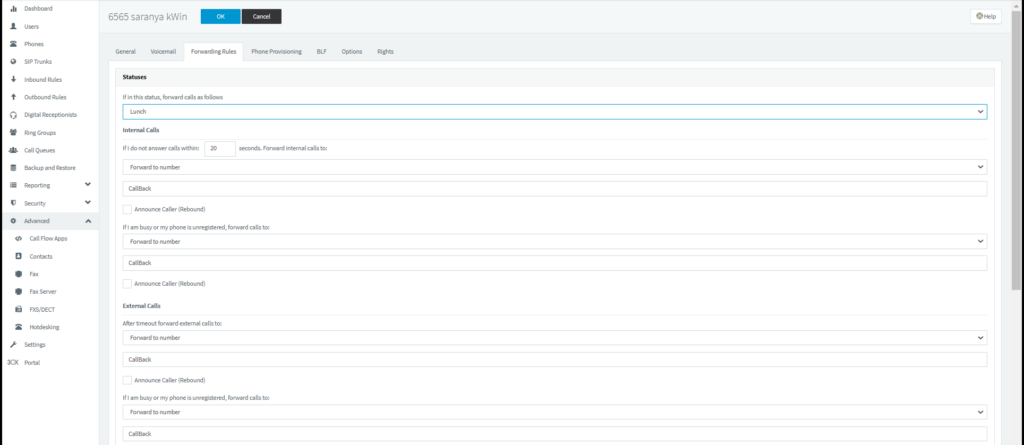
- When you set the status as Lunch, follow the procedure,
- In the Internal Calls section, do the following,
- Select the Forward To Number option in the list.
- Enter CallBack in the text area.
- In the If I Am Busy Or My Phone Is Unregistered, Forward Calls To sub-section,
- Select the Forward To Number option In the list.
- Enter CallBack in the text area.
- In the Internal Calls section, do the following,
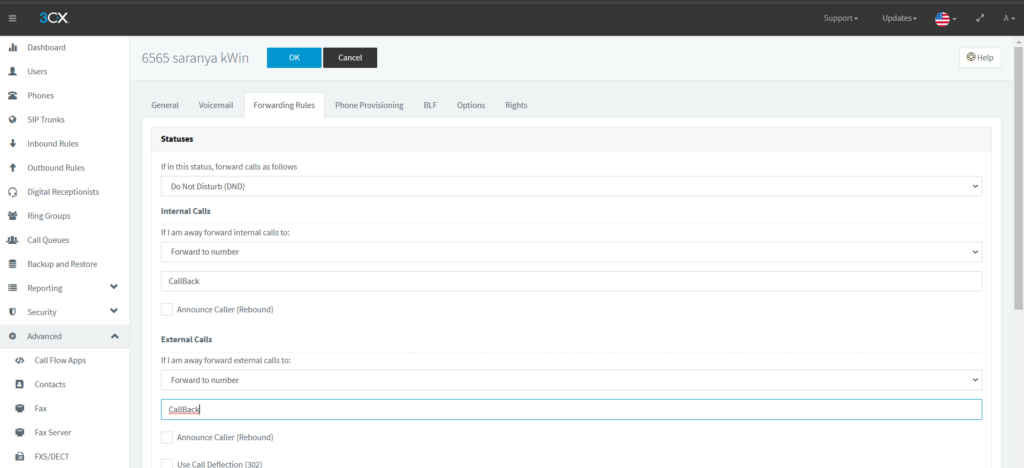
- When you set the status as Do Not Disturb, follow the procedure,
- In the Internal Calls section, do the following,
- Select the Forward to Number in the list.
- Enter Callback in the text area.
- In the External Calls section, do the following,
- Select the Forward to Number in the list.
- Enter Callback in the text area.
- In the Internal Calls section, do the following,
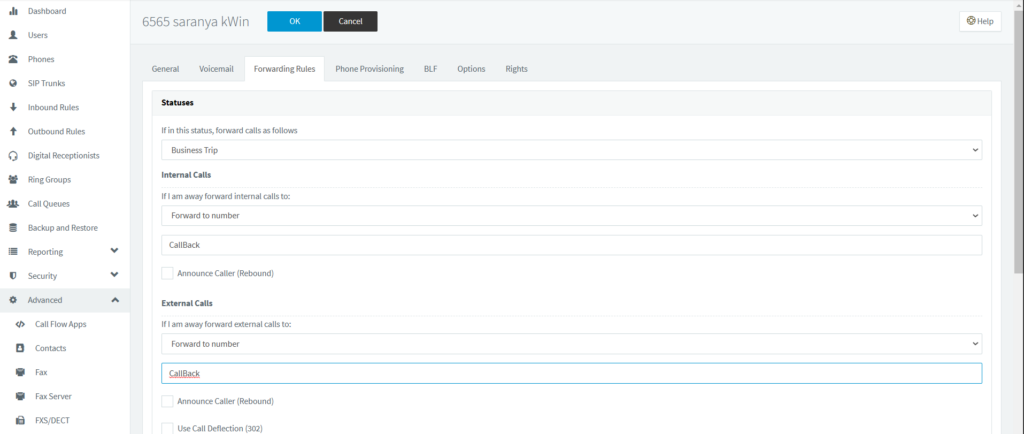
- When you set the status as Business Trip, follow the procedure,
- In the Internal Calls section, do the following,
- Select the Forward to Number option from the list.
- Enter CallBack in the text area.
- In the External Calls section, do the following,
- Select the Forward to Number option from the list.
- Enter Callback in the text area.
- In the Internal Calls section, do the following,
- Scroll up and click OK to save the changes.
Need Support? #
You get quick answers to most of your inquiries in our online manual. If you prefer direct contact, we offer various support channels, including phone, email, live chat, and our helpful VoIPTools forums.
24/7 Support Availability #
Rest assured, our dedicated team is here to assist you around the clock, every day of the year. Whether you’re based in the USA or India, we’re ready to provide prompt responses to your technical queries.

Windows Event Log for VoIPTools Applications and Services #
For troubleshooting any application errors, our Windows Event Log contains a comprehensive list of error messages, warnings, and informative notes related to all our VoIPTools applications and services. It’s a valuable resource to help you pinpoint and resolve any issues you may encounter.

Join Our Forum Community #
Are you looking to collaborate with other VoIPTools customers facing similar challenges? Our forum is the perfect platform to exchange ideas, solutions, and best practices. Join the conversation at: https://www.voiptools.com/community/

Real-Time Live Chat Assistance #
Got questions that need immediate answers? Our chat support team is available to assist you in real time. Just click on the Live Chat button located at the lower right corner of our website, and we’ll acknowledge your queries right away.

Efficient Email Support #
To ensure a thorough understanding of your concerns, email us at support@voiptools.com. Describe your issue in detail, and we’ll get back to you within one business day with the support you need.

Reach Us by Phone #
If you prefer to speak with a representative directly, you can reach us at +1 801-642-4655. Our attentive team is available to take your calls from 8:00 AM to 6:00 PM (Central Standard Time).
Comprehensive support services: #

Free Support #
If you’ve purchased our products through a VoIPTools Partner, rest assured that they provide first-level support at no additional cost. Partners have access to 100% free technical assistance and actively participate in the troubleshooting process.
VoIPTools customers enjoy access to our online manuals and receive support through emails (with responses within one business day) and live chat. However, please note that we do not provide remote server login assistance.

Paid Support #
For a more hands-on experience, consider our “Installation Support” package. Our expert support team can log in to your servers, and install and configure all our tools. This comprehensive service includes setting up SQL Server Express and Internet Information Server if necessary. We’ll work closely with you to tailor our applications to meet your requirements.
We’re committed to providing top-notch support to ensure your VoIPTools experience is smooth and hassle-free. Contact us today, and let us assist you in making the most of our powerful tools!
