Revolutionize Your Call Center Operations with Surveyor: The Future of Campaign Management and Customer Engagement
The 3CX Surveyor is an advanced web-based “preview” dialer designed to revolutionize your call center’s campaign management. With Surveyor, you easily make impactful outbound calls to your contacts, ensuring high-touch interactions and exceptional results. Manage campaigns, assign agents to phone lists, and personalize interactions with script-reading capabilities. Gain valuable insights through web-based performance reports to optimize your call center operations. 3CX Surveyor provides detailed customer profiles, an integrated mini CRM, and the tools to treat customers like family, empowering your team to build strong relationships, ensure customer satisfaction, and drive sales.
The 3CX Surveyor is a web-based “preview” dialer designed for the 3CX platform. Empower your agents to conduct personalized outbound calls, manage campaigns efficiently, use survey scripts, and generate performance reports. Manually import contacts into the tool and seamlessly integrate it with 3CX PBX for Windows. Agents can work from home or the office using the user-friendly web interface and 3CX softphone. Optimize your outbound calling processes with 3CX Surveyor for remarkable results.
Effectively engage your clients with captivating, personalized scripts tailored to their needs and preferences. Our user-friendly web-based system enables seamless script management and customization for exceptional customer interactions.
SEAMLESS MONITORING
Efficiently monitor customer service progress with our integrated mini CRM. Track and evaluate customer interactions seamlessly to deliver personalized experiences and exceptional support.
REAL-TIME INSIGHTS
Gain access to comprehensive and real-time insights through powerful web-based performance reports on survey data. Utilize simple yet robust analyses to reveal valuable trends and patterns, empowering data-driven decisions that propel your business forward.
CAMPAIGN OPTIMIZATION
Efficiently organize and optimize your campaigns by assigning agents to targeted phone lists and equipping them with survey scripts. Empower your team to conduct impactful outreach, ensuring valuable feedback and driving superior campaign results with confidence
HIGH-TOUCH OUTBOUND CALLS
Establish profound connections with your contacts through our personalized and “high-touch” outbound calls. Our solution empowers your agents to confidently build rapport and foster relationships, guaranteeing that every interaction leaves a positive and enduring impact.
Before you begin with the installation steps mentioned in this guide, you need to ensure that your computer meets the minimum requirements mentioned below for installing a 3CX Surveyor.
PREREQUISITE
PURPOSE
3CX Version V20
3CX Surveyor is designed to work seamlessly with this version for enhanced features and performance.
Windows 10 or above / Windows Server 2012 or above
These operating systems provide the necessary environment for the application to run efficiently.
IIS is needed as a web server to host and manage web-based applications and services.
.NET Framework 4.7.2 (Web Installer)
This framework provides essential components for running and developing applications.
VoIPTools Universal Updater
This component is necessary for updates, ensuring the application remains current and functional.
VoIPTools Relay Service
It is used for proper integration and functionality of the 3CX Surveyor within the 3CX environment.
Microsoft SQL Server 2016 or above (Including the free SQL Express edition)
3CX requires Microsoft SQL Server 2016 or later for database management.
Static IP for VoIPTools and 3CX servers
This is to ensure proper two-way communication, both the 3CX server (Relay) and the VoIPTools server. Dynamically assigned IP addresses are not supported. Additionally, it is recommended to use HTTPS for secure communication, which requires a FQDN for SSL/TLS certificate validation between the VoIPTools server and the Relay.
8 GB RAM
You need a minimum of 8 GB RAM to ensure that the 3CX Surveyor, along with other necessary applications (like VoIPTools, IIS, SQL Server, and .NET Framework), can run smoothly and efficiently
Port number 5800 opened on your device
Port 5800 is a specific network port used by 3CX for communication purposes. Opening this port on the device’s firewall allows incoming and outgoing traffic to pass through, enabling the 3CX software to send and receive data over the network effectively.
NOTE:
When installing SQL Server, we recommend you install it in “Mixed Mode” to include SQL Authentication, and install SQL Management Studio
When installing IIS, be sure to install Basic Authentication, .Net Extensibility, and ASP.Net 4.X
Installation on a domain controller is not supported.
DOWNLOAD SOFTWARE
You can order 3CX Surveyor online at https://www.voiptools.com. Your order confirmation email will include your license key and a link to download the software.
INSTALL PREREQUISITES
You must install several prerequisites before installing the 3CX Surveyor. The Advanced Installer identifies and installs these applications automatically. Click here to learn about the required prerequisites.
INSTALL 3CX SURVEYOR
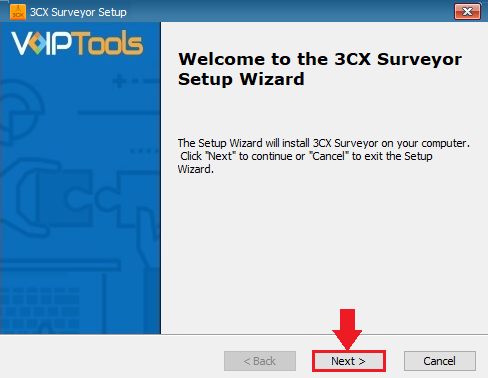
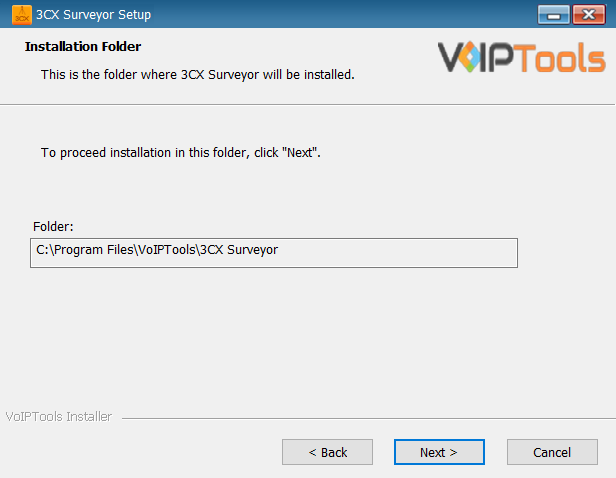
This User Guide contains step-by-step instructions to successfully install 3CX Surveyor. Begin by extracting the installer from the downloaded zip file (Step 1 above), then run the setup program named Surveyor.exe
LOG IN TO THE WEB APPLICATION
You can now log in to the web application using the extension number and the PIN.
Click on the software installer that was downloaded in Step 1 above. The installation wizard will automatically identify the needed prerequisites and assist you with the installation of the prerequisites needed to run the 3CX Surveyor.
Click the downloaded installer executable to launch the Prerequisites Setup Wizard and click Next.
Figure 1: Prerequisite Setup Wizard
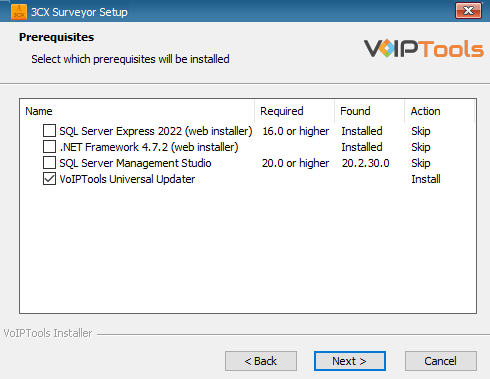
In the Prerequisites window, the installer will identify the missing prerequisites. You must install all the required prerequisites. However, you can select/unselect the applications to be installed based on your unique requirements and click Next to continue.
Figure 2: Prerequisites Selection Window
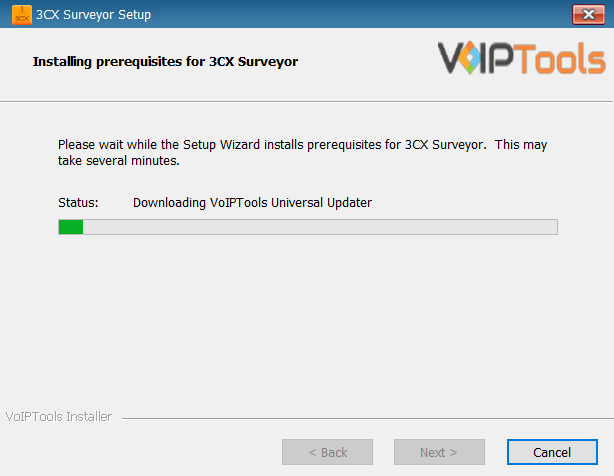
The installer will download and install the selected applications.
Figure 3: Prerequisites Installation in progress
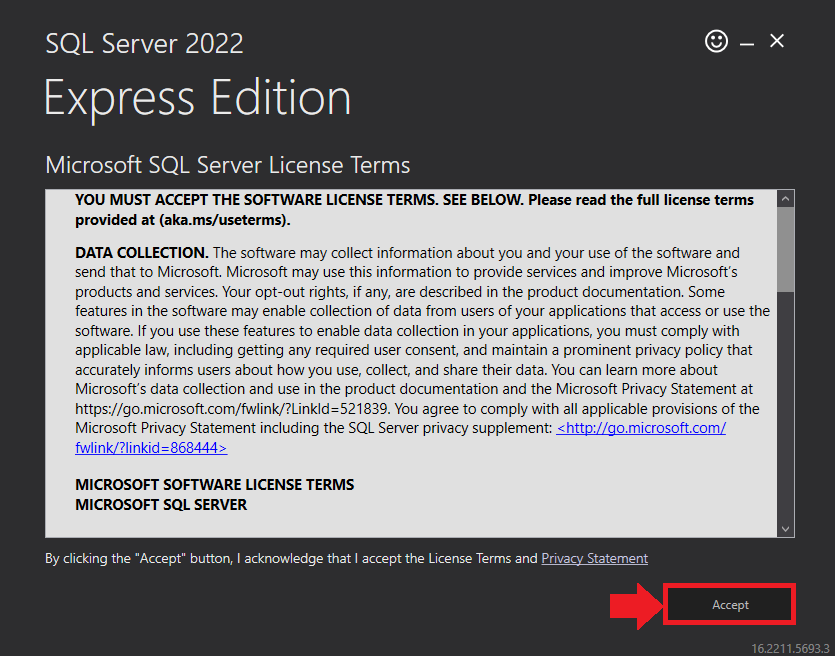
In the Microsoft SQL Server License Terms click the Accept button to acknowledge the license terms and continue.
This page appears if you do not have SQL Server Express preinstalled in your device.
Figure 4: SQL Server Express: Accept License Terms
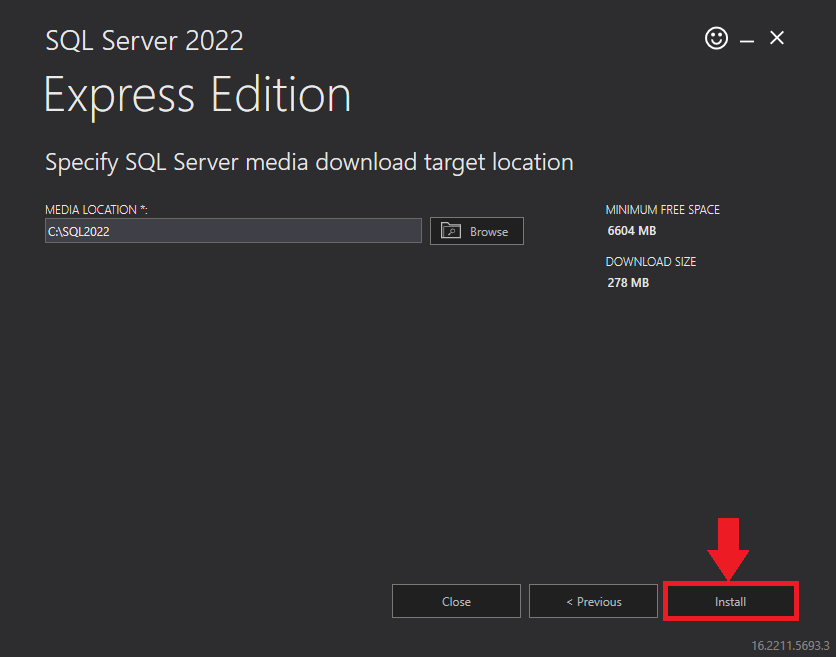
View the SQL Server Media target location in the Media Location field. If required, you can click the Browse button to change the location. Click Install to begin the installation of SQL Server Express.
Figure 5: SQL Server Express: Target Location
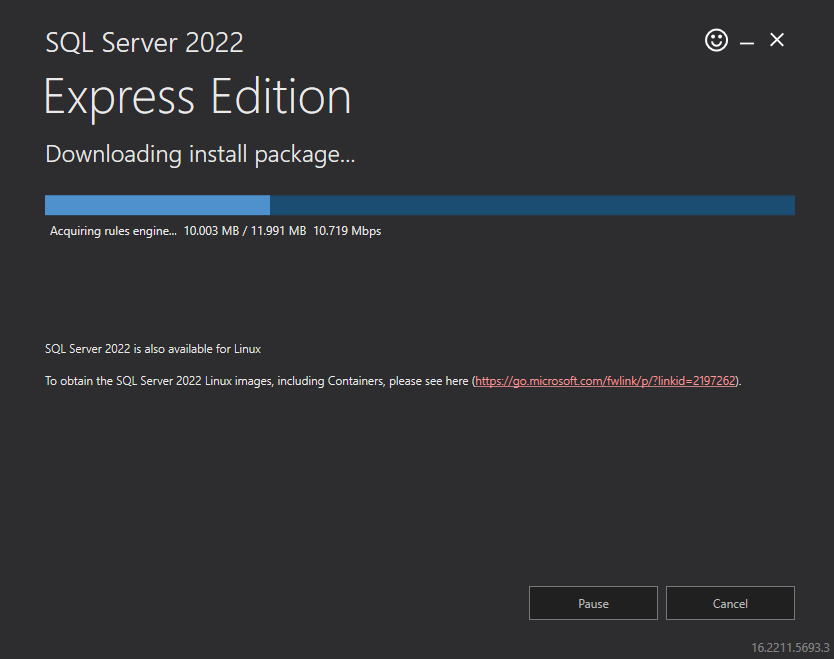
SQL server installation is in progress. This may take several minutes to complete.
Figure 6: SQL Server Installation In Progress
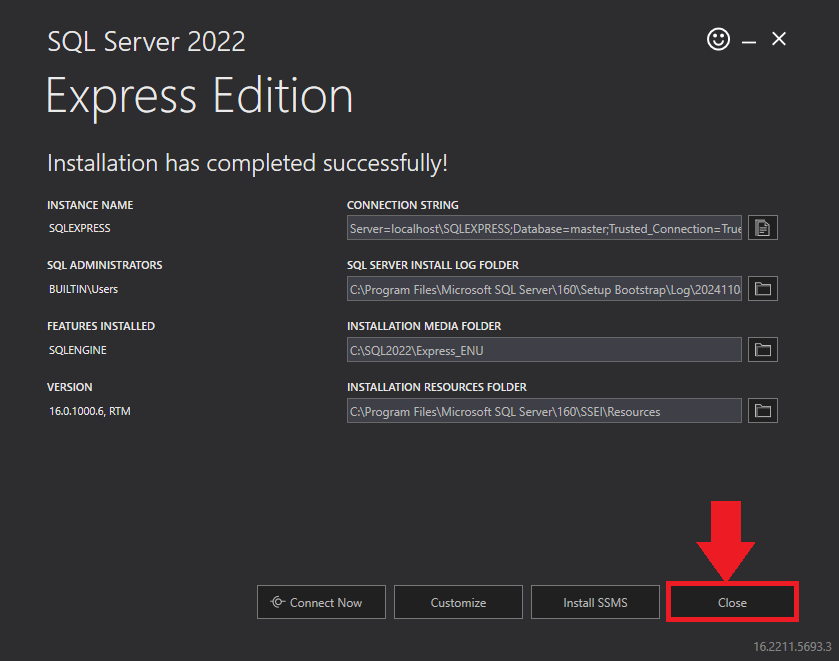
Click the Close button once the prerequisites are installed.
Figure 7: SQL Server Express: Installed Successfully
In the Confirmation Message box, click OK to reboot the computer.
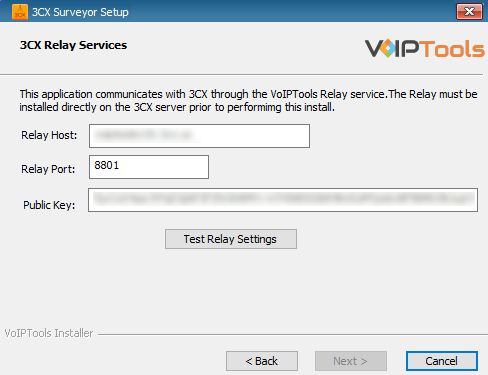
In the 3CX Relay Services window, in the Relay Host field, enter the FQDN of your 3CX server.
Enter 8801 in the Relay Port field.
Enter the public key you took from VoIPTools Relay services in the Public Key text area.
Figure 11: Test Relay Settings
Click the Test Relay Settings to confirm 3CX Surveyor can communicate with the Relay services running on the 3CX server.
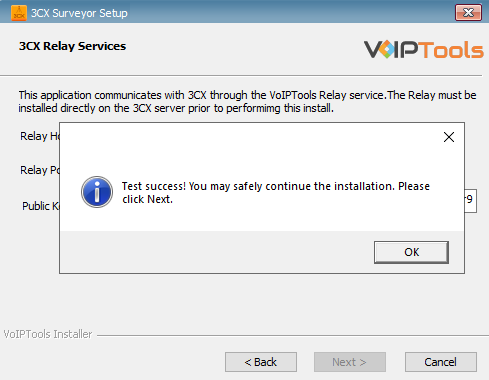
If the 3CX Surveyor successfully communicates with the Relay services that run on the 3CX server, a Success message box appears. Click OK. If the test fails, you will not be able to continue until communication with the relay is established.
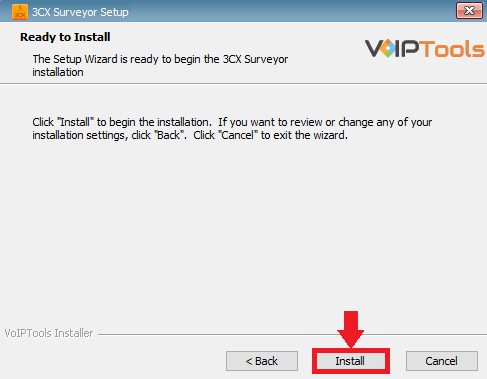
Click Next to continue with the installation.
Figure 12: Relay Test Successful Message
NOTE:
You must set the Relay Port to 8801.
If the Relay test fails, you cannot continue the installation until you establish communication with the Relay. Confirm the following if the test was unsuccessful:
Confirm you have the correct firewall port open (default TCP 8801) on the 3CX server and the firewall protecting the 3CX server.
Confirm that you have entered the correct FQDN for the 3CX server.
Confirm that the 3CX Surveyor and Relay use the same port and protocol.
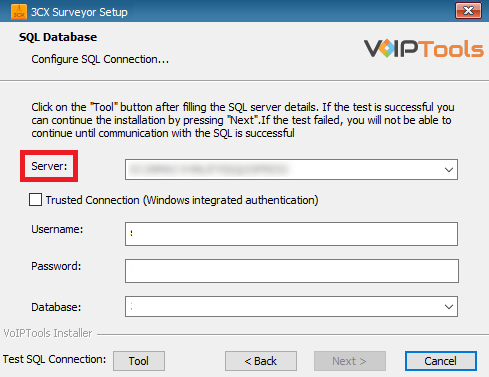
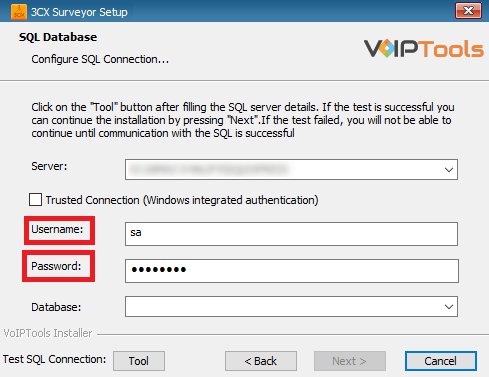
When configuring the 3CX Surveyor, select an existing Microsoft SQL Server instance in your environment. The database server can be a remote SQL Server, or a local instance running on the VoIPTools server.
You can set up the SQL database using SQL Authentication or Windows Integrated Authentication.
If using the free SQL Express Edition, the default SQL Instance name is SQLExpress.
Figure 13: Server Field
NOTE:
If you want to use ‘SQL Authentication’, then install SQL Server in ‘Mixed‘ mode.
If SQL Server is installed on a server other than the server where 3CX Exporter is installed, you will need to configure SQL Server to allow remote connections.
Enter your credentials in the Username and Password fields.
Figure 14: Database Credentials
NOTE:
Make sure that you select a SQL Login that has sufficient permissions to alter the database and create SQL objects.
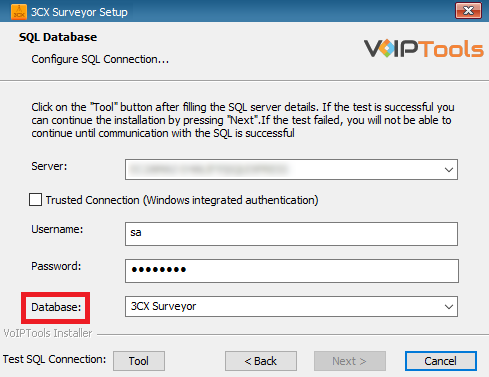
Select or enter the 3CX Surveyorin the Database dropdown.
Figure 15: Database Dropdown
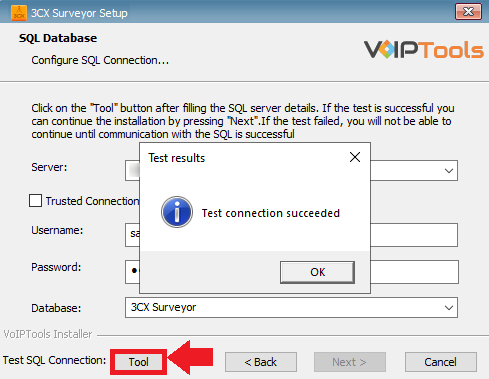
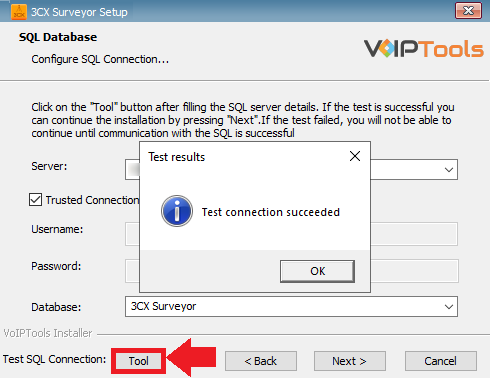
In the Test SQL Connections section, click the Tool button to test the connection and click OK in the Test Results popup box.
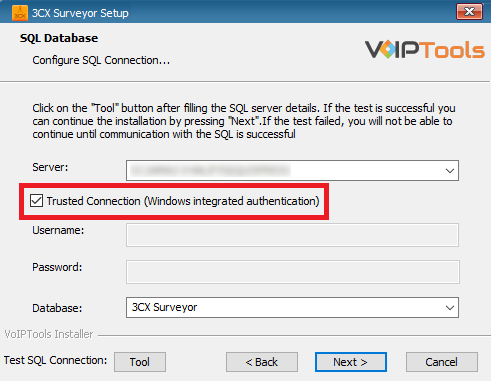
To use Windows Integrated Authentication check the Trusted Connection (Windows integrated authentication) checkbox.
The VoIPTools installer will create a local Windows user name as “VoIPToys” and give you sufficient rights to this user to create/update the SQL database.
Figure 17: Trusted Connection Checkbox
In the Test SQL Connection section, click the Tool button to test the connection.
Click the Next button which gets enabled when the database connection is successful.
Figure 18: Trusted Connection – Test Successful
NOTE:
We encourage you to use SQL Authentication rather than Windows authentication. Many of our tools leverage a Call Flow Designer (CFD) application running on the 3CX. Frequently our CFD applications require access to a SQL database. If the 3CX server and the database server are not in an Active Directory domain, Windows authentication will fail. To use SQL authentication, your SQL Server must be configured to run in “Mixed Mode”. If you installed SQL Server with one of our tools, we configure SQL in “Mixed Mode”.
Login privileges in 3CX Surveyor ensure secure, role-based access to the system. Managers have full access to configure settings and oversee operations, while Agents are limited to specific functionalities like the Wallboard screen. These privileges enhance security, streamline workflows, provide tailored experiences, and enable efficient user and role management.
You can log in to the 3CX Surveyor as a Manager and as an Agent. An Agent has access only to the
Figure 23: Wallboard screen Agent view
As a Manager, you have access to all the tabs in the 3CX Surveyor.
Figure 24: Wallboard Screen Manager view
To learn how to assign roles to the agents in the 3CX Console Management, click here.
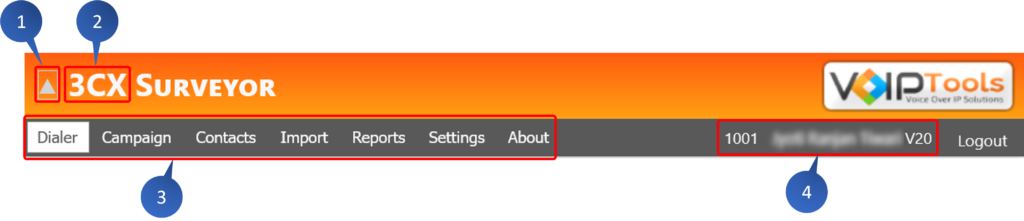
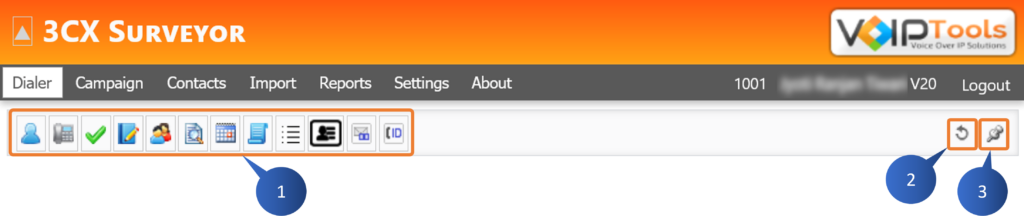
The Dialer Menu streamlines campaign management, call operations, and agent workflows, enhancing communication efficiency and improving customer engagement.
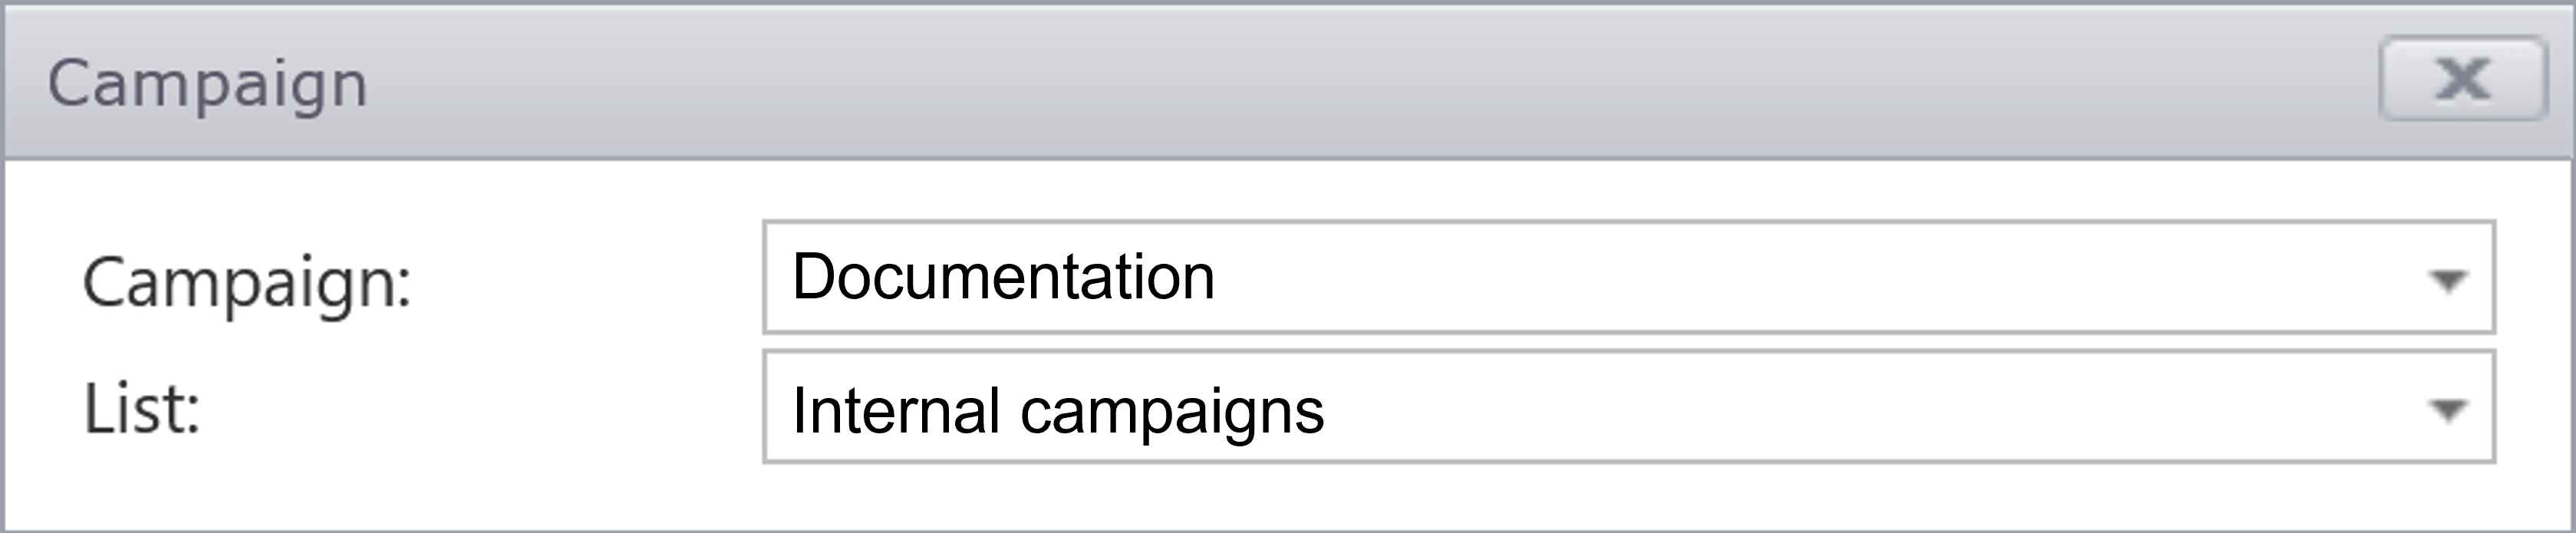
Campaign menu
The Campaign Menu lets you create, organize, and manage campaigns, assign agents, configure scripts, and streamline campaign coordination.
Contact menu
The Contacts Menu manages contacts, updates details, sets preferences, tracks interaction history, and enhances communication and database accuracy.
Questions menu
[content]
Import menu
The Import menu helps you upload, map, and organize contacts from a CSV file into the central repository efficiently.
Reports menu
The Reports menu provides insights into campaigns, agent activity, and customer interactions, aiding decision-making, strategy optimization, and performance improvement.
Settings menu
The Settings menu offers customization for functionality, security, and branding, including General Settings for operations and Site Settings for visuals.
About menu
The About menu provides software version, company details, and support contact, ensuring easy access to version verification and assistance. Click the link to know more about the VoIPTools support.
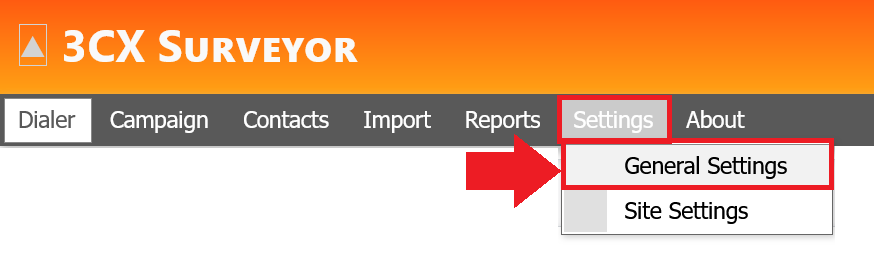
The Settings menu in the 3CX Surveyor portal provides comprehensive customization options to enhance both functionality and branding. It consists of two sections: General Settings, which optimize usability, security, and operational efficiency, and Site Settings, which allow for visual customization of the application’s branding, improving user experience and alignment with your brand.
Figure: Settings Menu Dropdown
General Settings
The General Settings allow customization of culture, access, wait times, session expiry, and automatic CSV imports for enhanced efficiency.
Site Settings
Site Settings allow you to customize the application’s branding, including header colors, grid colors, logo, and title prefix.
The General Settings section allows you to customize various aspects of the 3CX Surveyor portal to enhance usability and security. You can adjust culture settings, manage portal access, set wait times between contact retries, define session expiry times, and enable automatic CSV imports for streamlined contact management. These settings improve operational efficiency, ensure data consistency, and allow for a tailored user experience, ultimately optimizing the functionality of the portal for campaign and user management.
The Widget Tab allows you to customize the Dialer screen by selecting desired widgets, improving accessibility and user experience.
General
The General tab customizes culture, access, wait times, session expiry, and imports, enhancing usability, security, and operational efficiency.
Controls
The Controls tab manages role-based access, customizes control items, and allows permission assignments, enhancing security, efficiency, and application clarity.
Dispositions
The Disposition tab categorizes call outcomes, improving clarity, follow-up efficiency, and decision-making for better customer interactions and satisfaction.
Lookups
The Lookups tab manages preset values, standardizing data entry, improving consistency, reporting, and user experience, while controlling available selections.
The Widget Tab lets you select the desired widgets to display on the Dialer screen. With this feature, you can customize your interface by choosing which widgets to include, enhancing your user experience and allowing for quick access to relevant tools and information. This flexibility ensures that you can tailor the Dialer menu to meet your specific needs and preferences.
Before you start, make sure you have logged in with Manager credentials and navigated to the Widgets tab in the General Settings under the Settings menu.
Select the desired widget in the Enable column.
Click the Save button.
Figure: Configure Widgets
Results: The selected widgets are updated on the Dialer screen according to your preferences. This customization allows you to rearrange, add, or remove widgets, ensuring that the interface reflects your workflow and enhances your efficiency.
The General tab provides tools to customize culture settings, manage portal access, set wait times, define session expiry, and enable automatic CSV imports. These features enhance usability, security, and efficiency, streamline contact data management, and ensure organized operations within the 3CX Surveyor portal for improved campaign and user management.
The General section enables you to customize culture settings, manage portal access, set contact wait times, and define session expiry time, enhancing usability, security, and operational efficiency in the 3CX Surveyor portal.
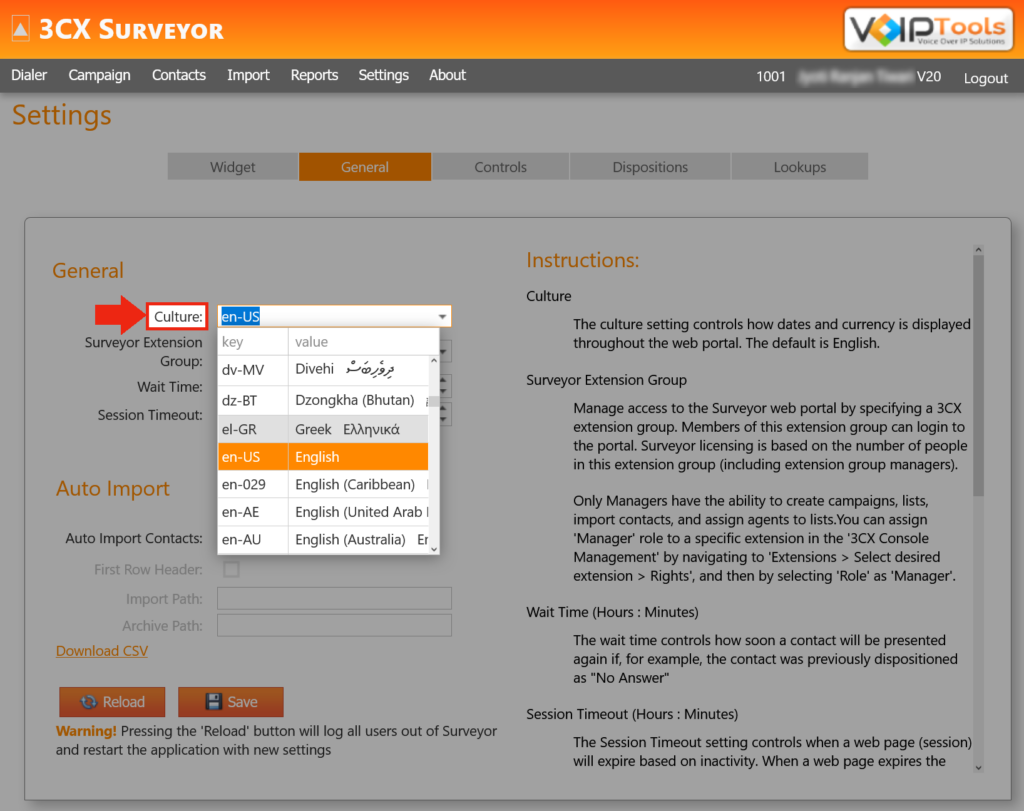
You can utilize the culture settings to control the display format of dates and currency across the web portal. By default, these settings are configured to English, however, they can be adjusted to suit your specific preferences.
Before you start, make sure you have logged in with Manager credentials and navigated to the General tab in the General Settings under the Settings menu.
Click to open the Culture dropdown.
Select the desired culture and click the Save button.
Figure: General Section – Culture Dropdown
Results: You have changed the display culture of the 3CX Surveyor web application.
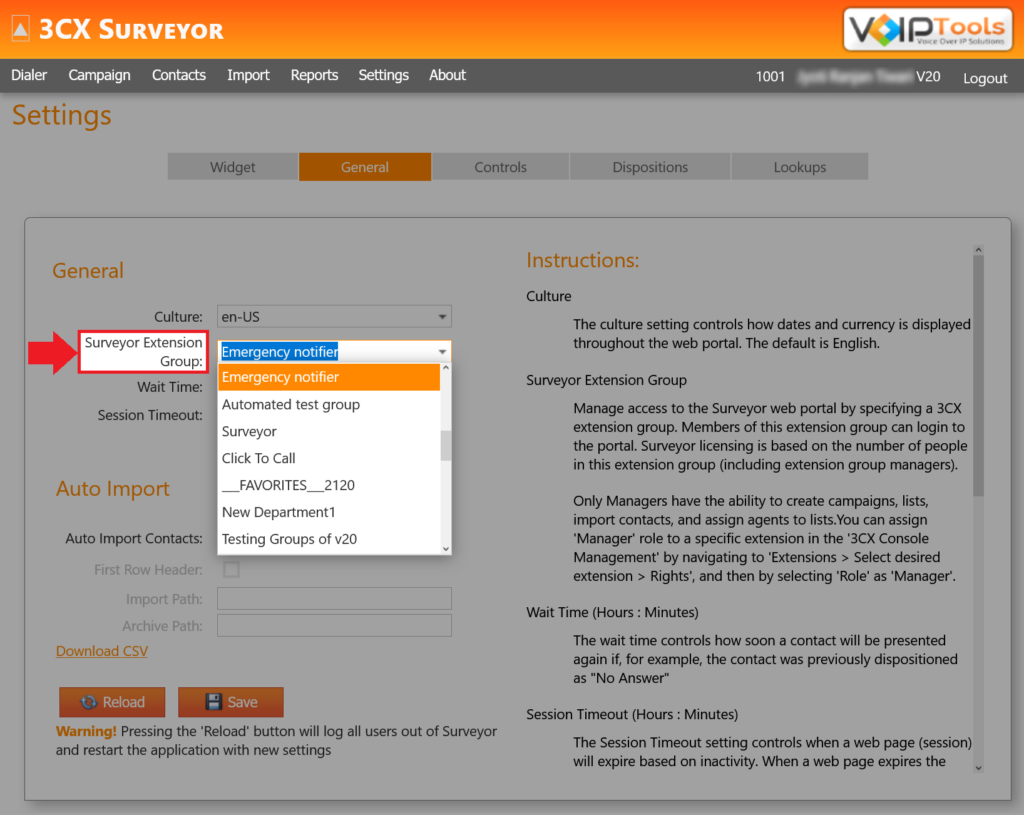
The Surveyor Access Management feature lets you control access to the Surveyor web portal by designating a 3CX extension group. With this feature, you can ensure that only members of this specific extension group have permission to log in to the portal, and Surveyor licensing is aligned with the total number of members in this group, including extension group managers.
This feature also grants the following capabilities to Managers within the extension group:
Creating campaigns
Managing and importing contact lists
Assigning agents to lists
NOTE:
To assign the Manager role to a specific extension,
Before you start, make sure you have logged in with Manager credentials and navigated to the General tab in the General Settings under the Settings menu.
Click to open the Survey Extension Group dropdown.
Select the desired extension group and click the Save button.
Figure: General Section – Surveyor Extension Group
Results: The members of the selected group are granted access to log in to the Surveyor web portal. Additionally, Surveyor licensing will be calculated based on the number of individuals in the chosen extension group, including both members and any assigned group managers.
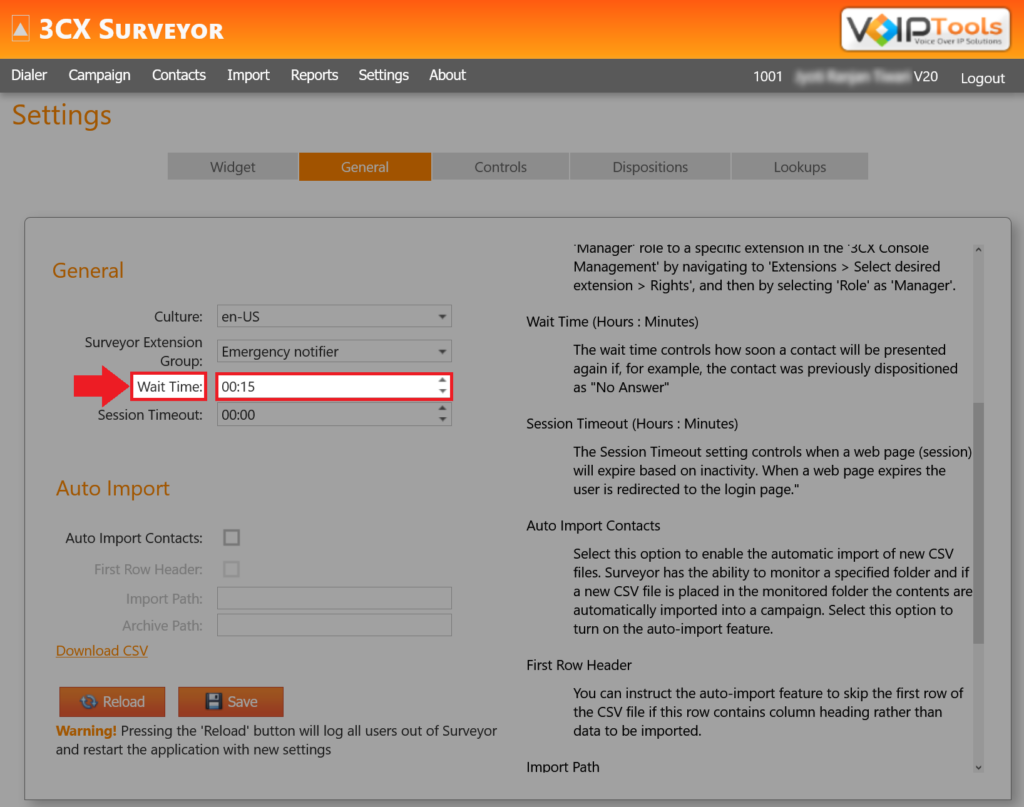
The Wait Time feature lets you set a specific interval before a contact is presented again after receiving a previous disposition, such as No Answer. This setting enables efficient contact management by controlling reattempt timing, helping to prevent immediate retries and improve engagement opportunities on subsequent contact attempts.
Before you start, make sure you have logged in with Manager credentials and navigated to the General tab in the General Settings under the Settings menu.
On the General section in the Wait Time field, set the desired wait time.
Click the Save button.
Figure: General Section – Wait Time Dropdown
Results: The contacts who were previously dispositioned with outcomes like “No Answer” will not be immediately reattempted. Instead, they reappear in the system for follow-up only after the specified waiting period has elapsed.
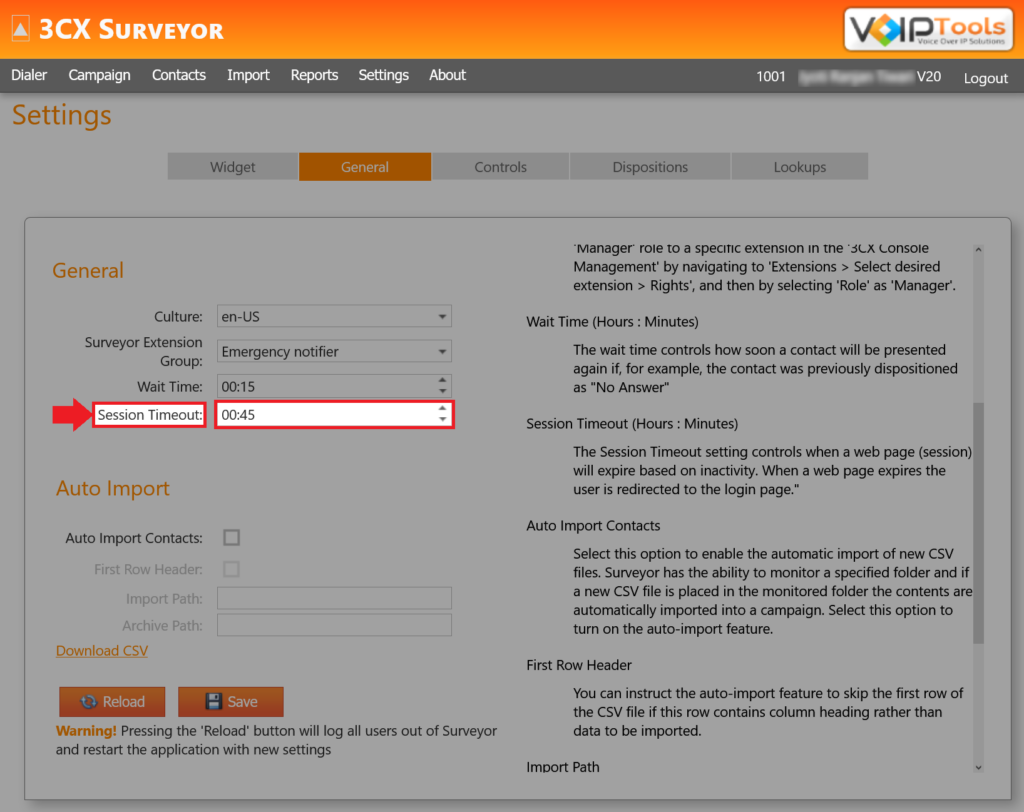
The Session Timeout feature lets you manage the web page session expiration based on user inactivity.
With this feature, you can automatically terminate a session after a specified period, enhancing security by minimizing the risk of unauthorized access. When a session expires, users are redirected to the login page and must reauthenticate to regain access to the portal.
Before you start, make sure you have logged in with Manager credentials and navigated to the General tab in the General Settings under the Settings menu.
On the General section in the Session Timeout field, set the desired session expiry time.
Click the Save button.
Figure: General Section – Session Timeout Field
Results: The user session expires after the set period of inactivity. This means that if a user does not interact with the web portal within the specified time frame, their session gets terminated automatically and the user will be redirected to the login page, requiring them to re authenticate to continue using the portal.
Auto Import Section – Enable Automatic Import of New CSV Files #
The purpose of the Automatic Import feature is to streamline the process of importing contact data into campaigns by enabling Surveyor to monitor a designated folder for new CSV files. When a new file is detected, its contents are automatically imported, reducing the need for manual intervention and ensuring that the campaign data is always up to date.
Benefits:
Automating contact data entry processes saves time.
Integrating new information enhances campaign effectiveness.
Minimizing human error improves data accuracy and reliability.
The Auto Import feature lets you automate CSV file imports, skip header rows, set archive paths, and download templates for proper data formatting in campaigns.
Before you start, make sure you have logged in with Manager credentials and navigated to the General tab in the General Settings under the Settings menu.
NOTE:
Before initiating the auto-import process for your CSV files, download and use the sample CSV file to ensure proper formatting of your files.
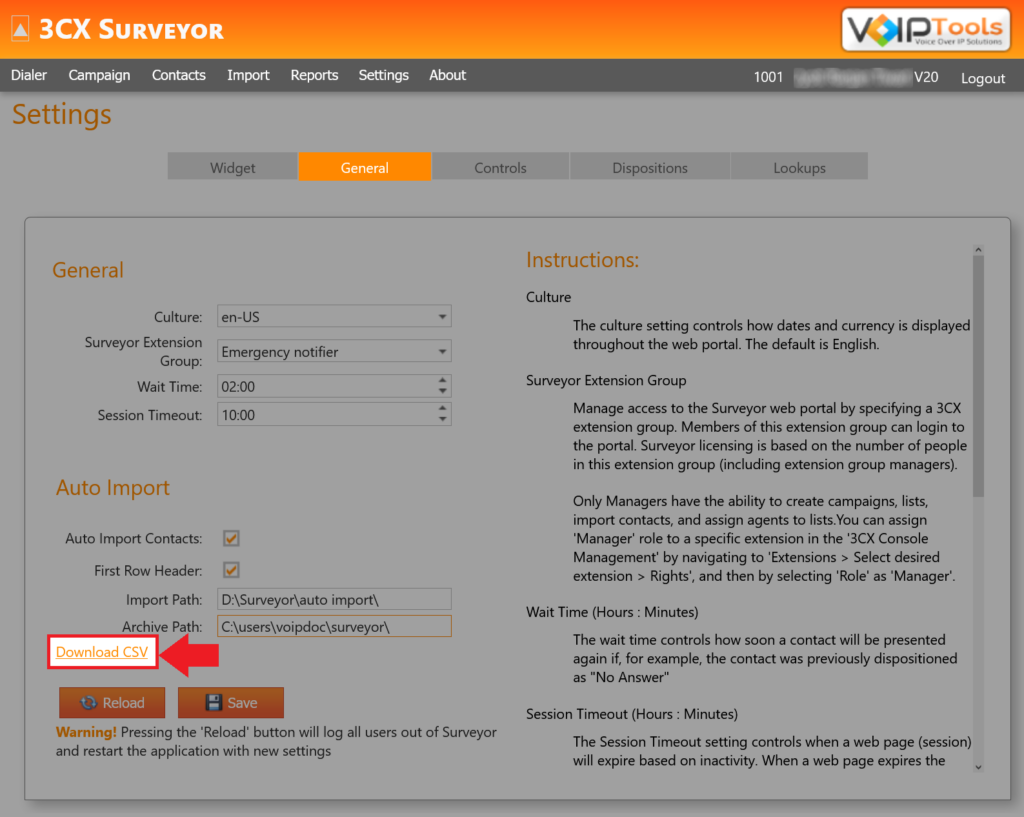
Figure: Download Sample CSV Link
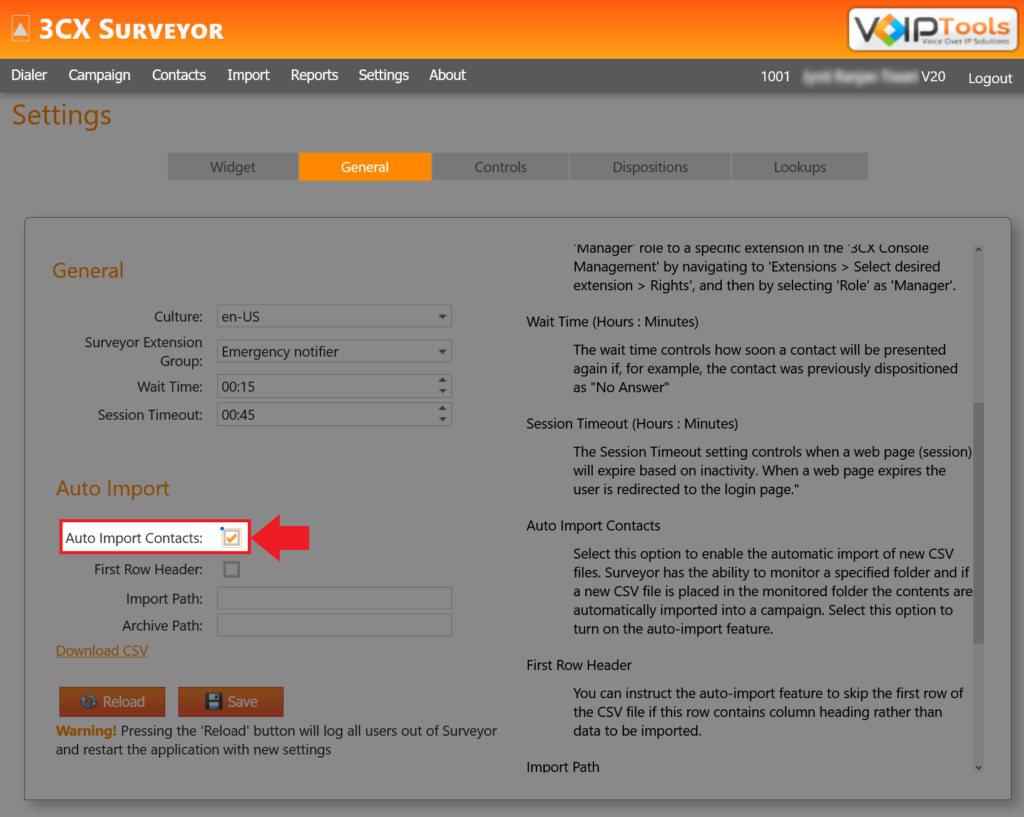
In the Auto Import section, select the Auto Import Contacts box to enable the auto import feature.
Figure: Auto Import Contacts Box
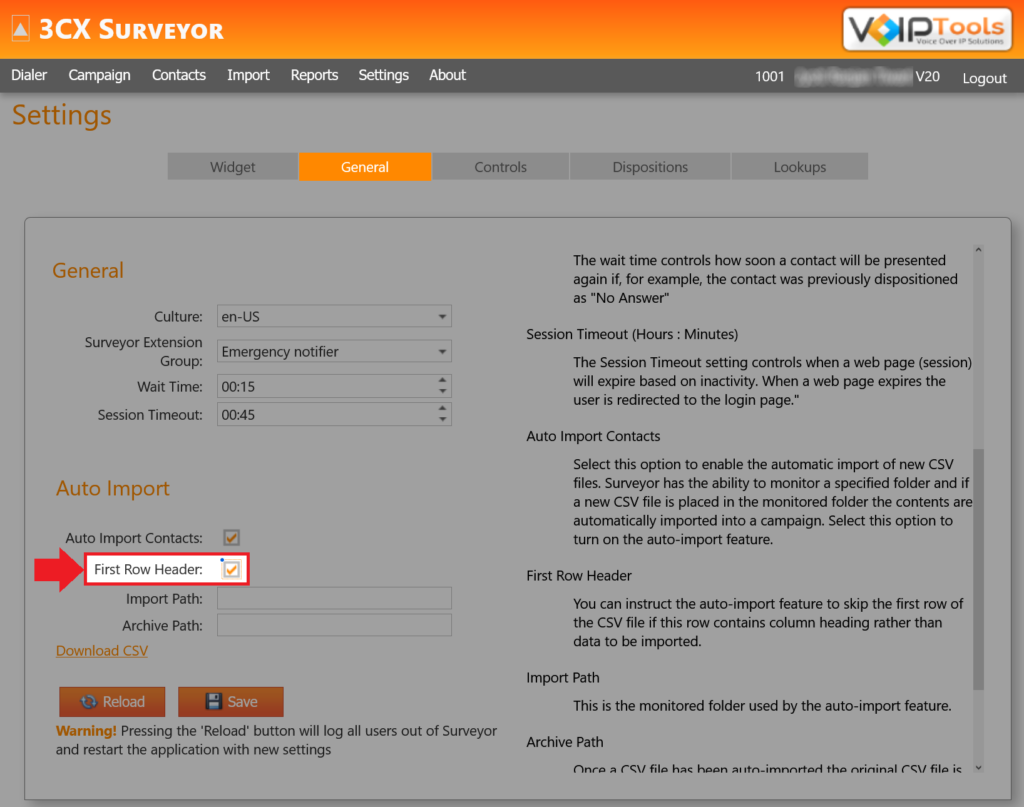
Select the First Row Header box to skip the first row if your CSV file contains header as first row.
Figure: First Row Header Box
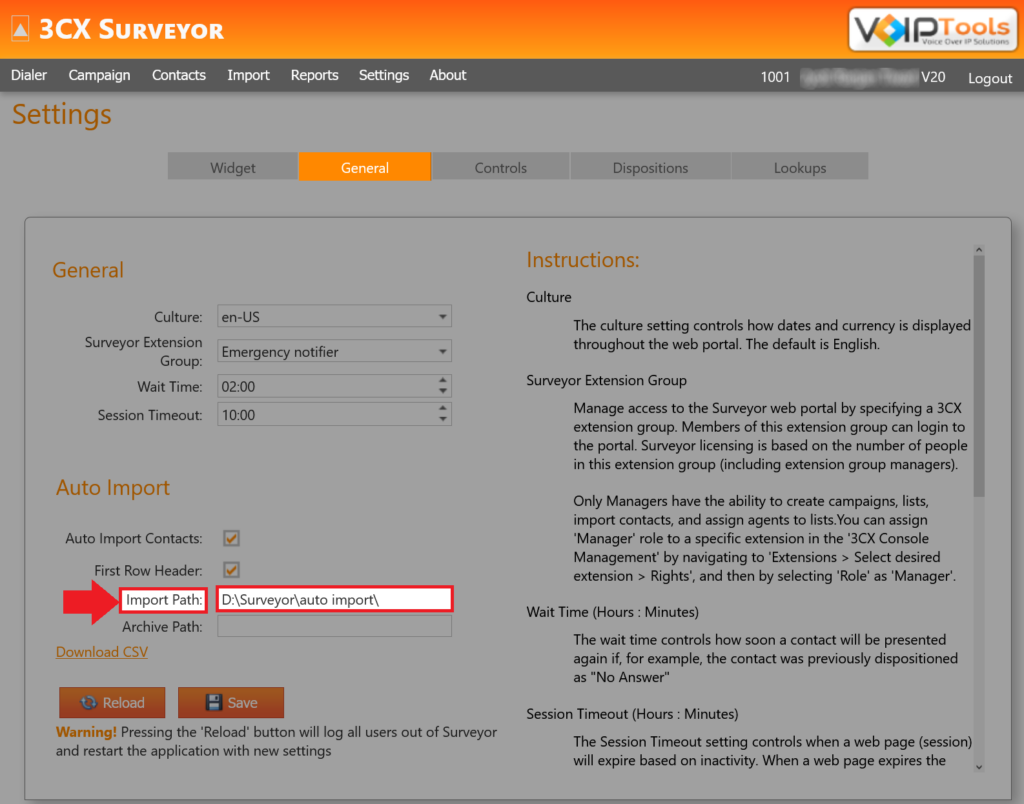
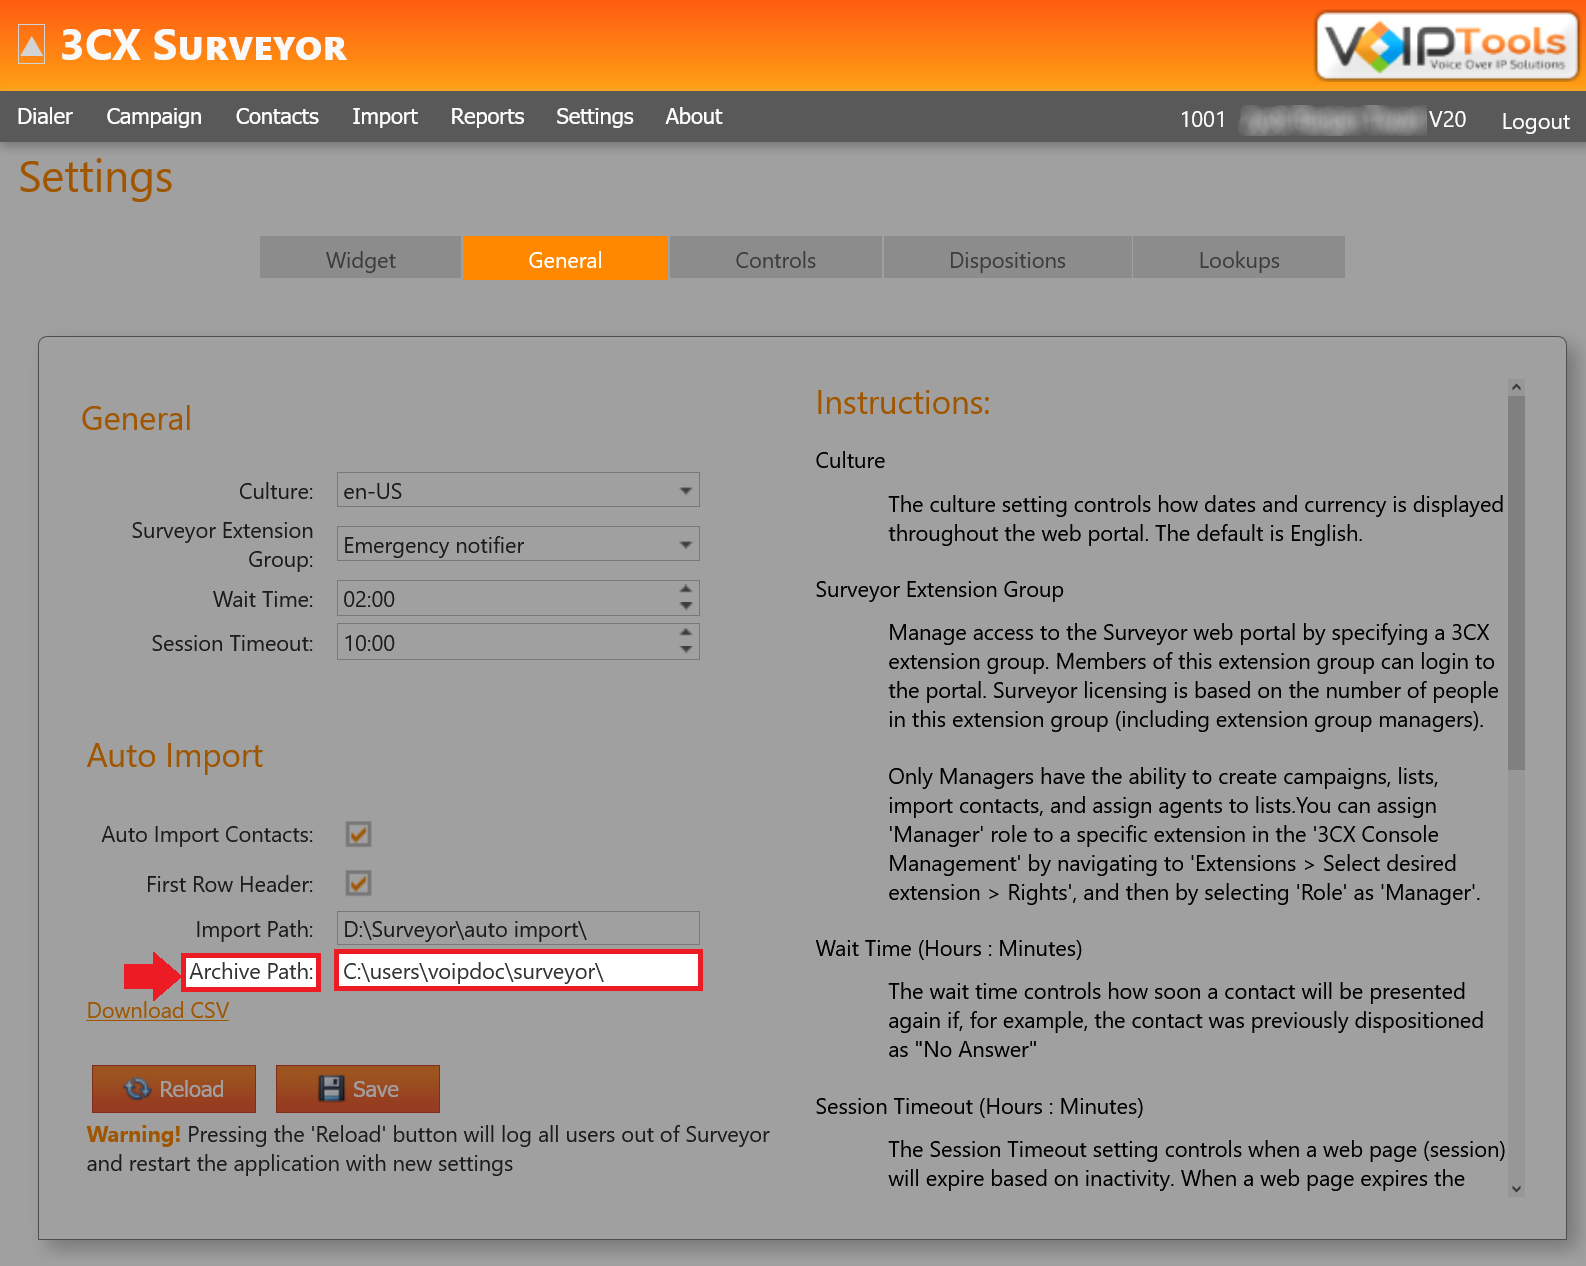
Enter the import path data in the Import Path field to specify where Surveyor monitors for new CSV files.
Figure: Import Path Field
Enter the archive path in the Archive Path field to move the imported CSV files after processing.
Click the Save button to save your changes.
Figure: Archive Path Field
Results: The Surveyor automatically monitors the designated folder for new CSV files. Once a new file is placed in the specified import path, the system imports the contact data from that file into the designated campaign. Additionally, imported CSV files will be moved to the specified archive path, keeping your import folder organized.
The Controls tab enables role-based access management and customization of control items in the 3CX Surveyor portal. It allows administrators to assign permissions for viewing or editing controls to specific user groups and modify control labels for clarity, enhancing security, workflow efficiency, and application customization.
Displays the language culture in which the information is displayed.
Screen
Indicates the menu where the control item is present.
Label Name
Indicates the label of the control item. Label name cannot be changed.
Label Text
Indicates the name of the control item. You can change the name of the control item.
Control Name
Name of the control item
Admins
To allow admins to view the control items, check the box. To restrict their access, simply leave the box unchecked.
Managers
To allow the managers to view the control items, check the box. To restrict their access, simply leave the box unchecked.
Users
To allow the users to view the control items, check the box. To restrict their access, simply leave the box unchecked.
Grant Permission to Users to Edit a Control Item #
This feature allows organizations to control data access by assigning permissions to specific user groups, such as Admins, Managers, and Users. By enabling role-based access, it enhances data security, supports workflow efficiency, and ensures accountability, allowing only authorized users to modify designated data within the application.
Before you start, make sure you have logged in with Manager credentials and navigated to the Controls tab in the General Settings under the Settings menu.
The following instructions enable administrators to grant an agent permission to access a restricted control.
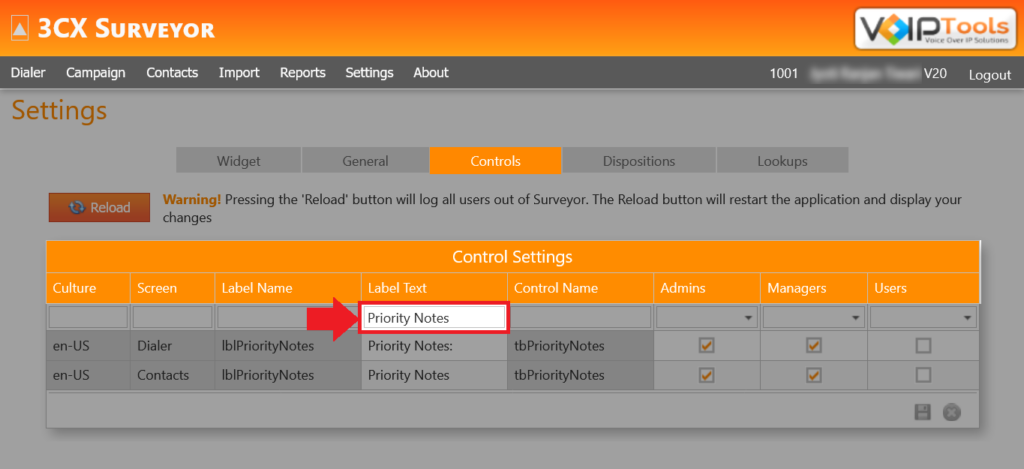
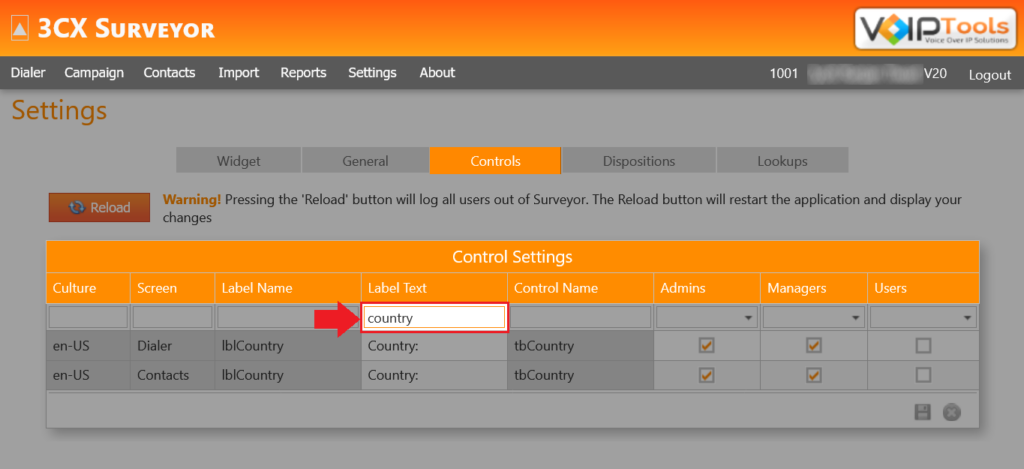
Search for the control item in the Label Text field.
Figure: Label Text Field
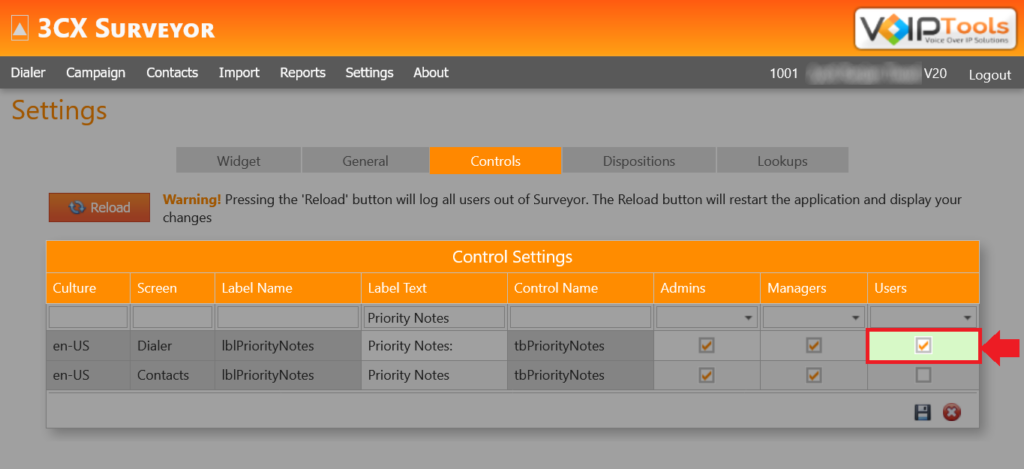
Check the Users box to give access to that control item.
Figure: Control Item Access
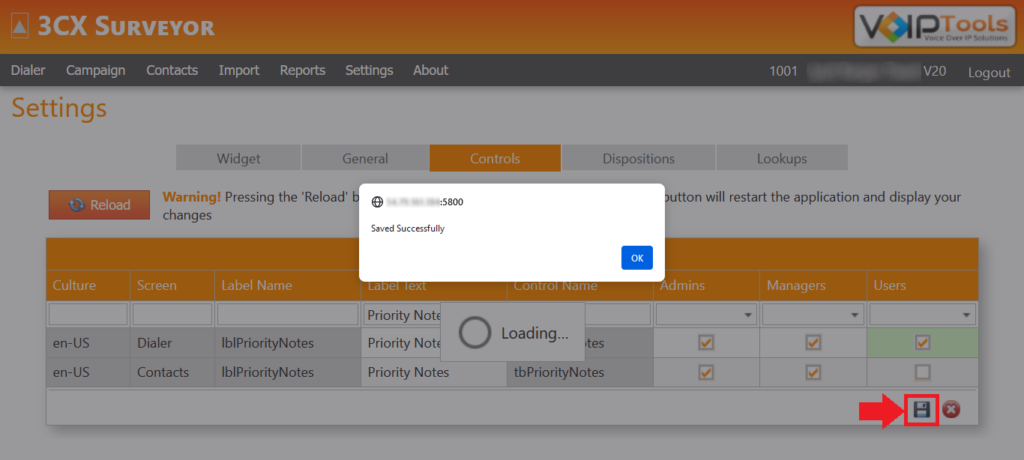
Click the Save button to save the action.
Figure: Control Access Actions Saved
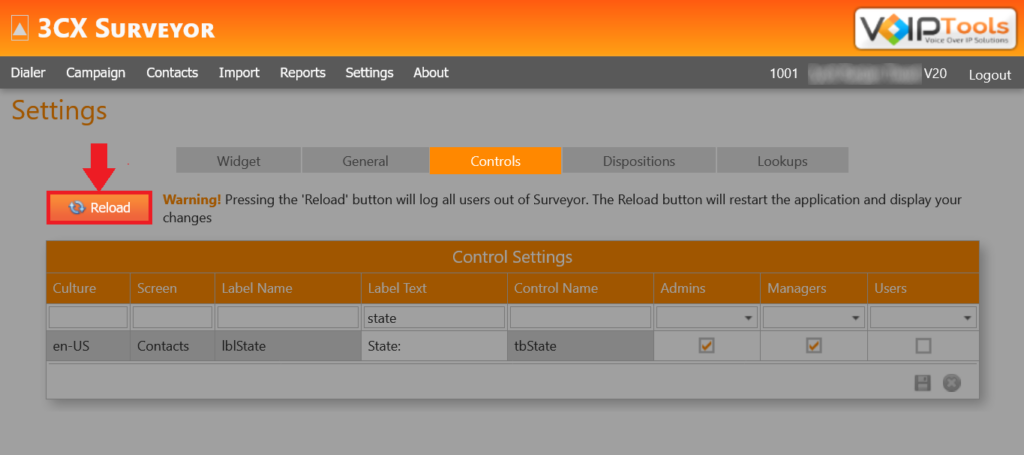
Click the Reload button to apply the saved actions.
Figure: Reload Button
Results: The agent can access the restricted control item.
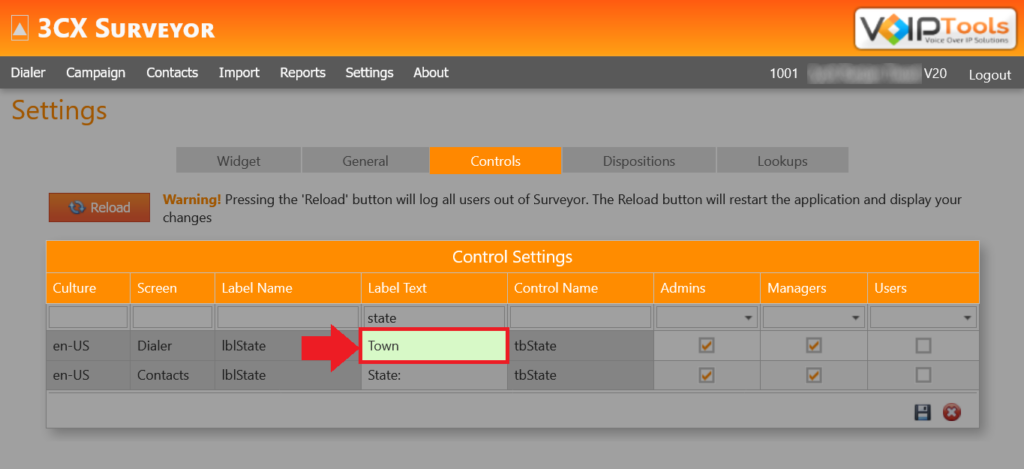
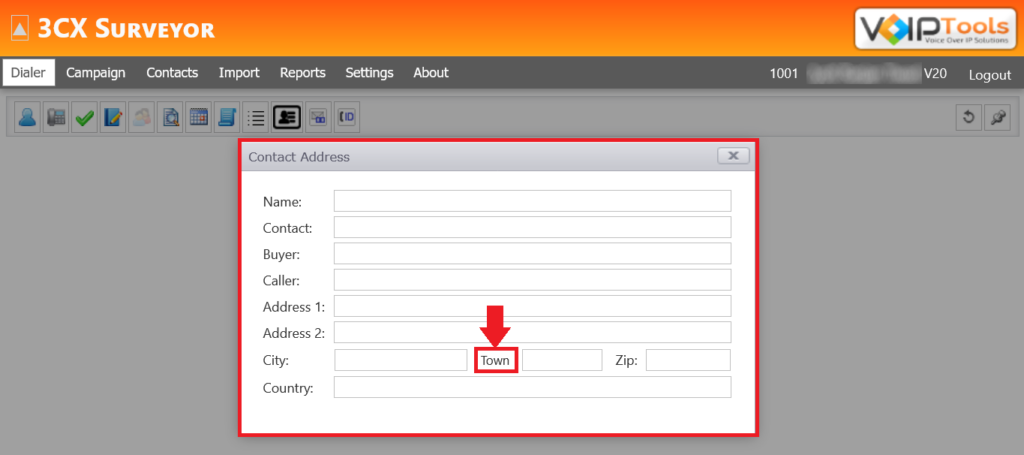
You can modify the label text of specific controls, enhancing customization and clarity within the application. By editing labels, you can ensure that control names are relevant and meaningful, aiding user navigation and alignment with organizational terminology.
Before you Begin: Make sure you have logged in with Manager credentials and navigated to the Controls tab in the General Settings under the Settings menu.
Search for the control item in the Label Text field.
Figure: Change Label Text – Label Text Field
Double-click on the Label Text and edit the label text of the control item.
Figure: Edit the Label Text
Click the Save button to save your actions.
Figure: Label Text Saved Popup
Click the Reload button to apply the saved actions.
Figure: Edit Label Text – Reload Button
Results: The name of the control item is changed.
NOTE:
To view the edited label, you have to set the Culture to en-US in the General tab under the General Settings. For step-by-step instructions, click here.
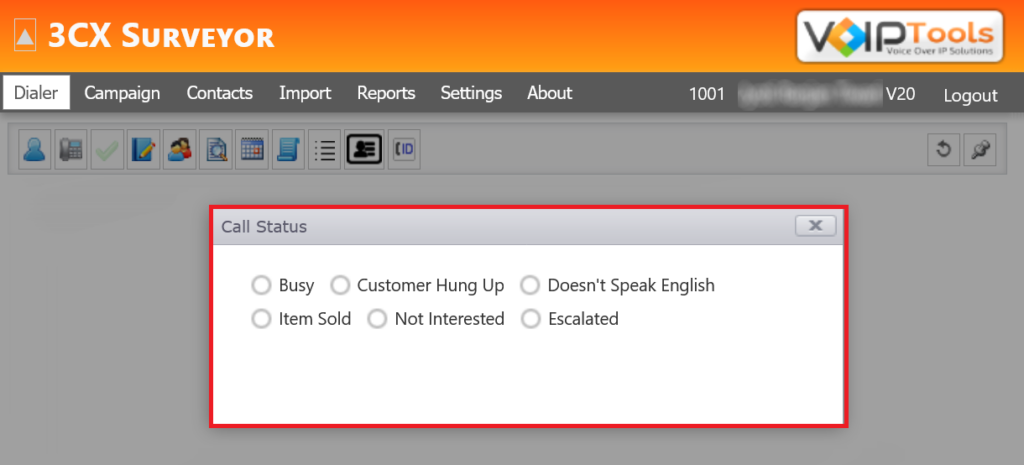
The Disposition tab categorizes call outcomes like ‘Busy’ or ‘Not Interested,’ improving clarity, reporting, and agent workflows. Adding new dispositions enhances call tracking and follow-up efficiency, enabling better decision-making for managers and ultimately leading to improved customer interactions and satisfaction through accurate categorization of call results.
This section guides you to add a new widget to the Call Status widget in the Dialer menu.
Before you start, make sure you have logged in with Manager credentials and navigated to the Dispositions tab in the General Settings under the Settings menu.
Click the Add button.
Figure: Add New Disposition – Add Button
Enter the name of the disposition in the Description field.
Figure: Add New Disposition – Disposition Details
You can select the Allow Retry box to let the agent try calling again if the first attempt was busy.
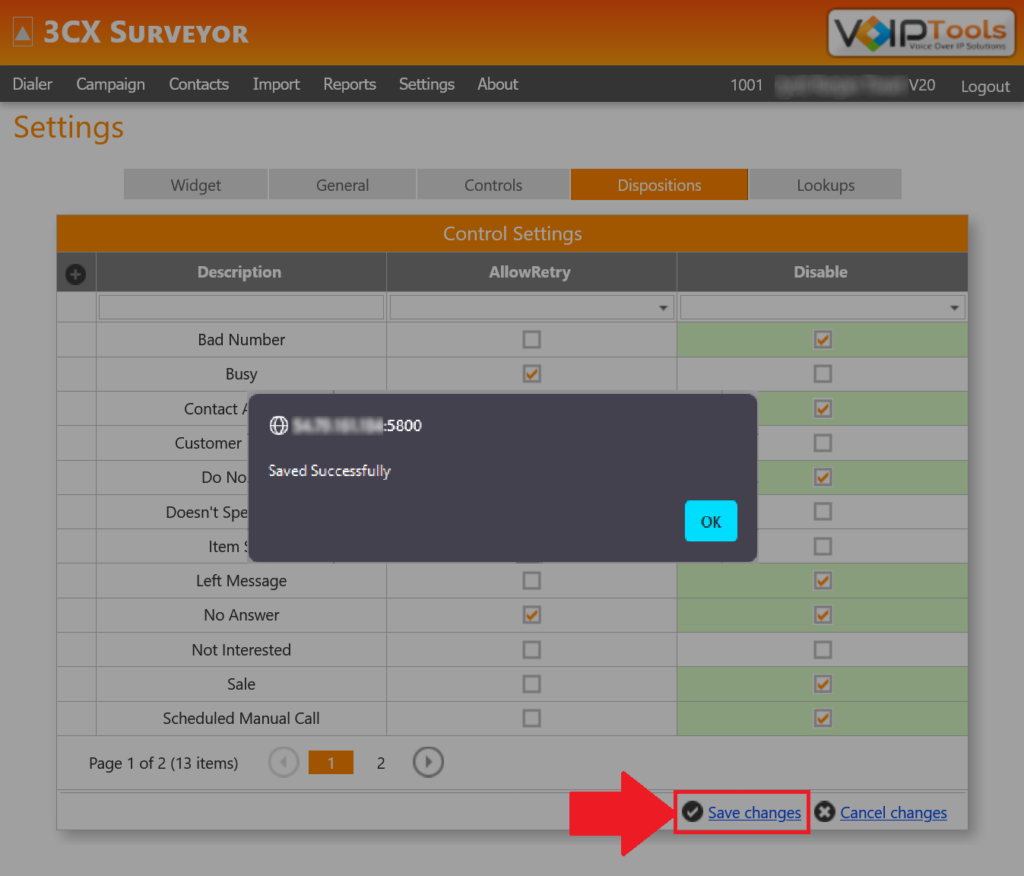
Click the Save Changes button to save your changes.
Figure: Add New Disposition – Allow Retry Box
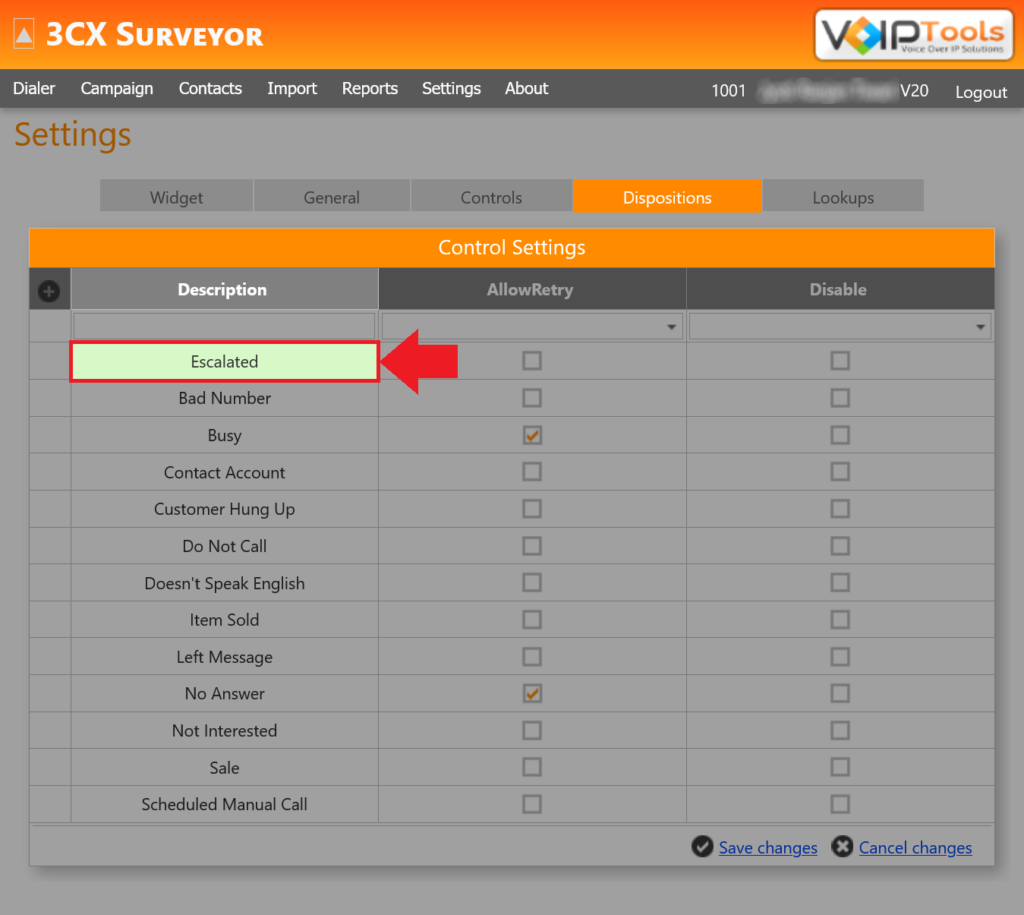
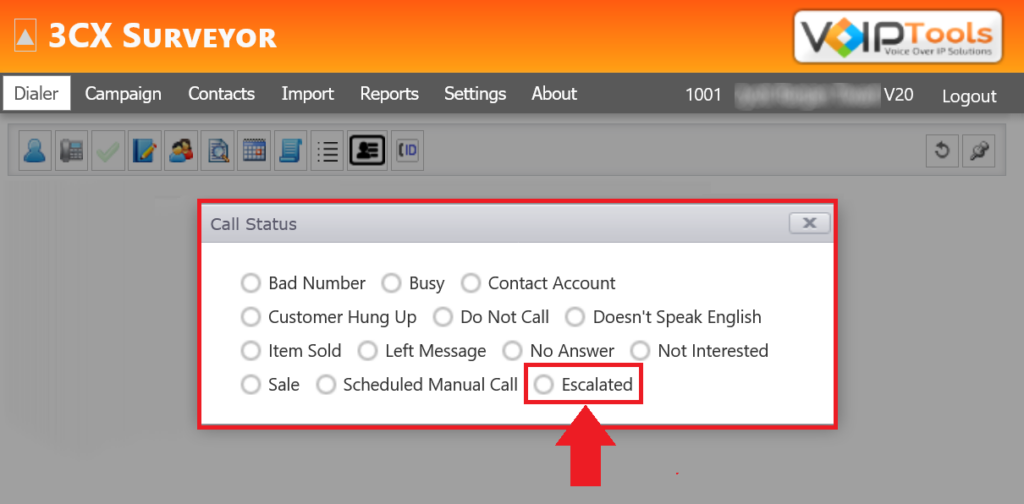
Results: The new disposition gets added to Call Status widget in the Dialer menu.
Figure: Add New Disposition – Sample Disposition Output
NOTE:
3CX Surveyor supports batch edits and hence, you may edit one or more dispositions before you save them.
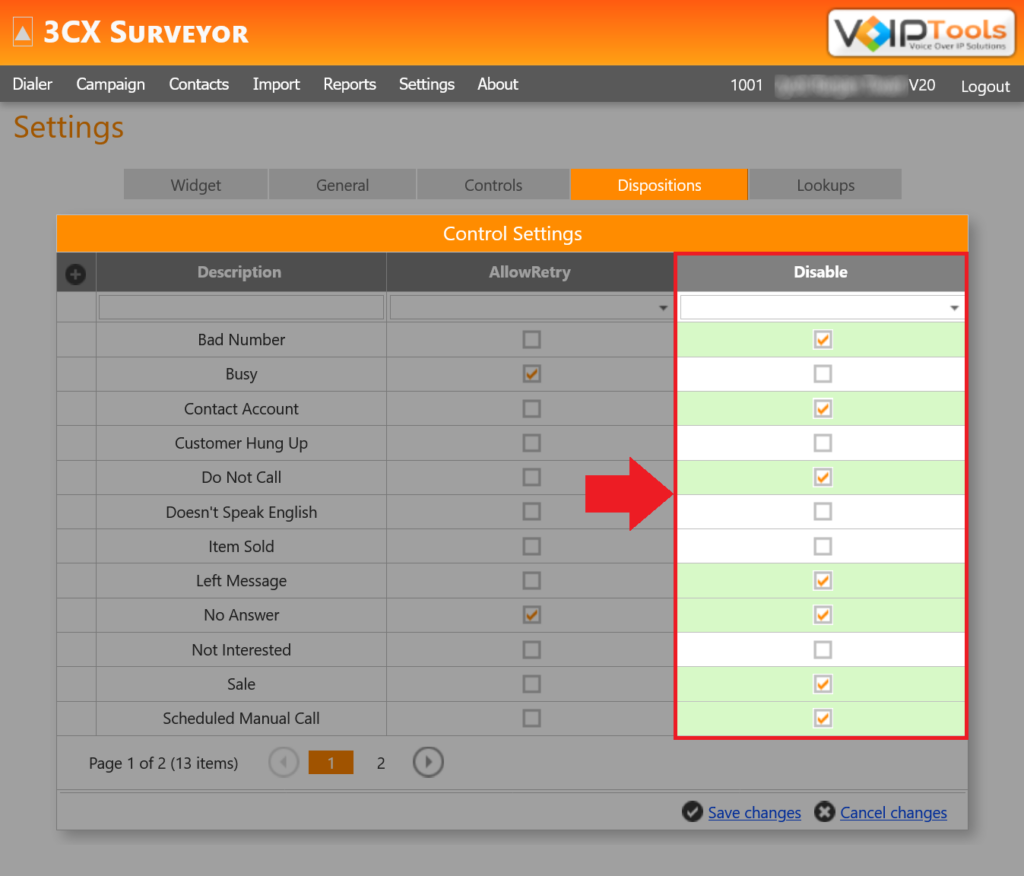
This section guides you to disable an existing disposition from the Call Status widget in the Dialer menu.
Before you start, make sure you have logged in with Manager credentials and navigated to the Dispositions tab in the General Settings under the Settings menu.
Select the Disable box for the dispositions you want to disable from the application.
The Lookups tab in lets you centrally manage preset values, such as “Buying Status” or “Customer Status,” to standardize data entry. You can customize options to improve user experience, ensure data consistency, enhance reporting capabilities, and control available selections, creating a streamlined and flexible application setup.
It is used to group different settings under specific labels, such as “Buying Status,” “BTC,” “Class,” or “Customer Status.”
It organizes entries into logical groups so that similar items can be managed together.
For instance, all entries related to “Buying Status” might reflect a customer’s purchasing behavior, while “BTC” could relate to different time segments of a day.
Lookup Value
This column provides an abbreviated or coded value representing the specific option within each LookupType category.
Examples include “NB,” “NVB,” and “VB” under the “Buying Status” type.
These coded values are likely used internally within the system for quick reference or to set specific conditions. This makes it easier to programmatically access specific settings without using long descriptive text.
Lookup Display
This column shows the human-readable description of each LookupValue. This text is what users or system operators see on the user interface, making it easy to understand what each code stands for.
It translates coded values from the LookupValue column into plain language, improving usability by making settings understandable at a glance.
Disable
This column is a checkbox column that lets you disable certain lookup entries.
The administrators can disable specific lookup entries, preventing them from being used or displayed in the interface. This provides control over which options are available or active without permanently deleting them.
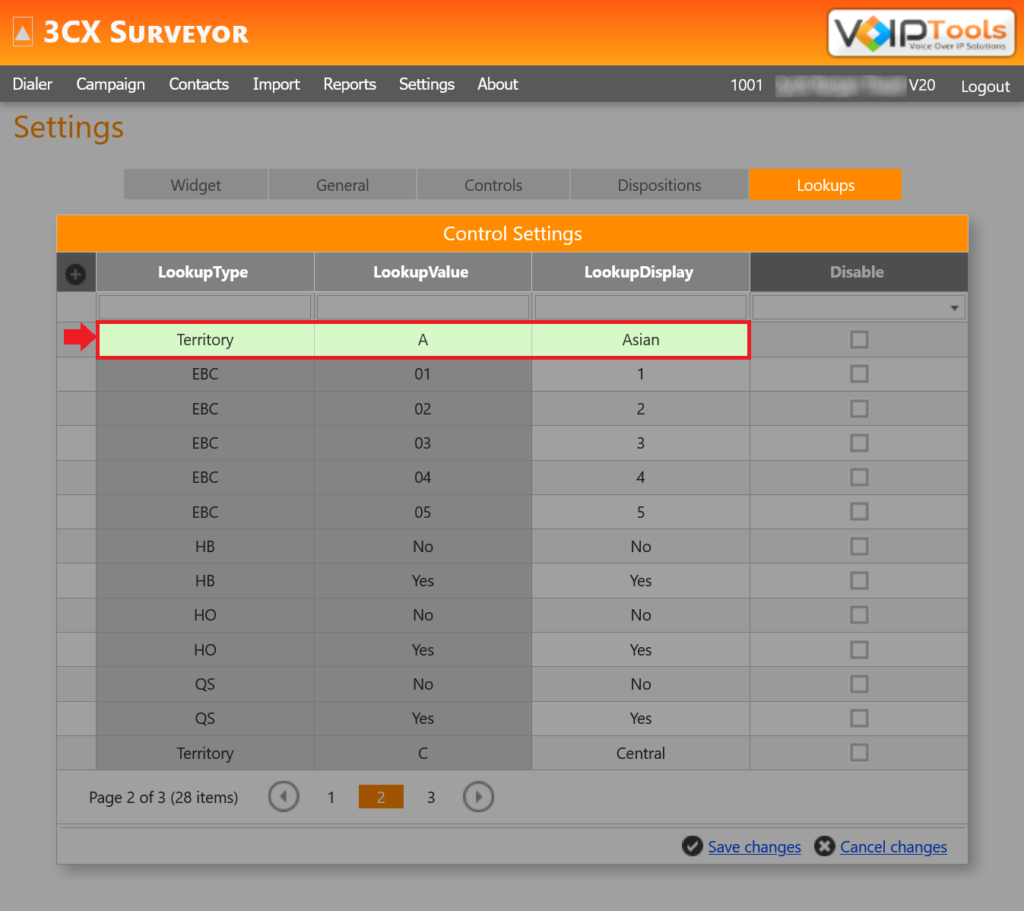
The following instructions set guides you to add new lookup entries in the Lookups tab. By specifying a lookup type, value, and display text, administrators create standardized options for various fields, enhancing data consistency and user experience across the platform.
Before you start, make sure you have logged in with Manager credentials and navigated to the Lookups tab in the General Settings under the Settings menu.
Click the Add button.
Figure: Add a Lookup – Add Button
In the Lookup Type field, enter the lookup type.
In the Lookup Value field, enter the lookup value.
In the Lookup Display field, enter the lookup text to display.
Figure: Add a Lookup – Lookup Details
Click Save Changes to save the new lookup.
Figure: Add a Lookup – Save Changes Button
Results: The new lookup gets added in the web application.
The following instructions guides you to disable a specific lookup’s display text in the Lookups tab of 3CX Surveyor settings, ensuring updated, accurate information is saved.
Before you start, make sure you have logged in with Manager credentials and navigated to the Lookups tab in the General Settings under the Settings menu.
Search for the lookups to display.
Select the Disable box for the lookups to disable.
Click Save Changes button.
Figure: Disable Lookups
Results: The selected lookups get disabled in the web application.
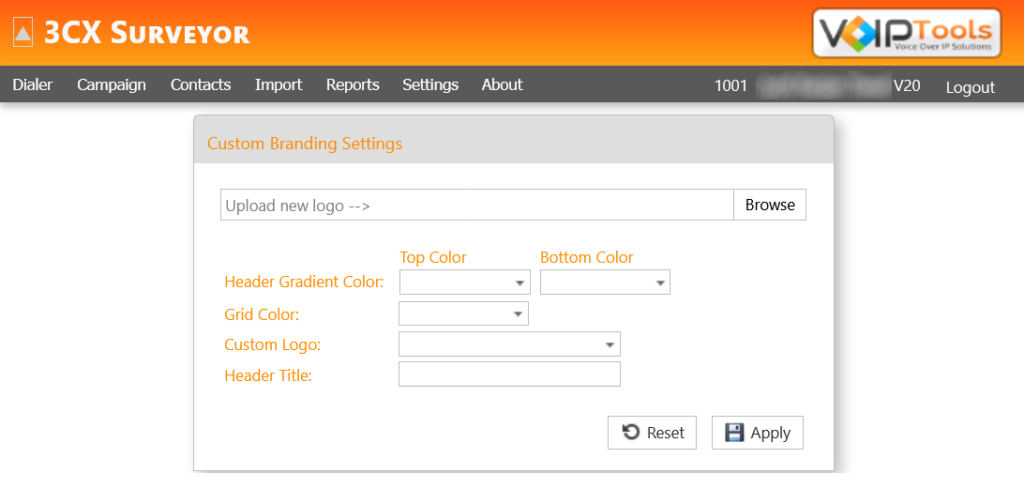
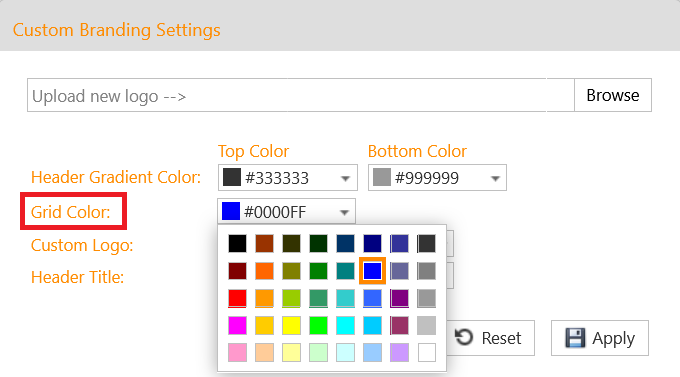
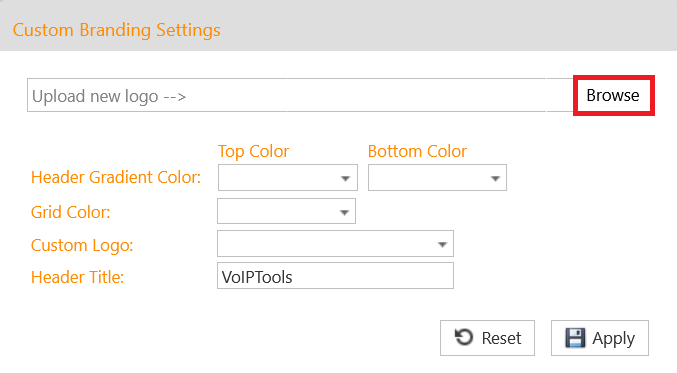
The Site Settings allow you to customize the branding of the web application, providing flexibility in visual presentation. These settings enable you to change the gradient color of the Application Header, modify the grid color for data display screens, upload a custom logo, and set a header title prefix. These customizations enhance the user experience by aligning the application’s appearance with your brand identity, making the interface more visually appealing and consistent with organizational standards.
Site Settings enable you to customize branding settings for the application that includes the following:
Customize the gradient color of the Application Header.
Customize grid color in screens that display grid data.
Customize the logo on the Application Header.
Customize Header Title Prefix on the Application Header.
Figure: Site Settings – Overview
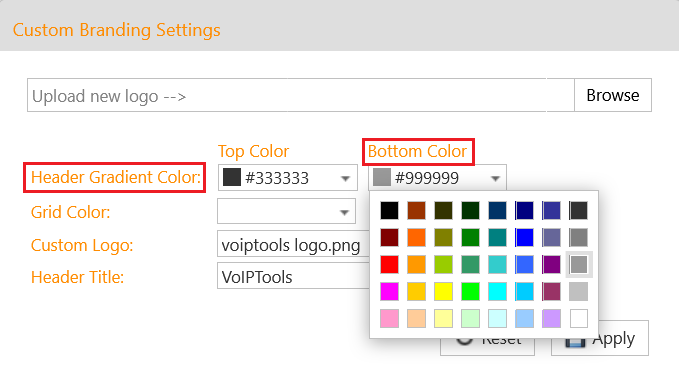
Customize Application Title Header – Gradient Color#
The following instructions guides you to change the title color of the Surveyor web application.
Before you start, make sure you have logged in with Manager credentials and navigated to the Site Settings in the Settings menu.
Select the top paint from the Top Colour color palette.
Figure: Header Gradient Color – Top Color
Select the bottom paint from the Bottom Colour color palette.
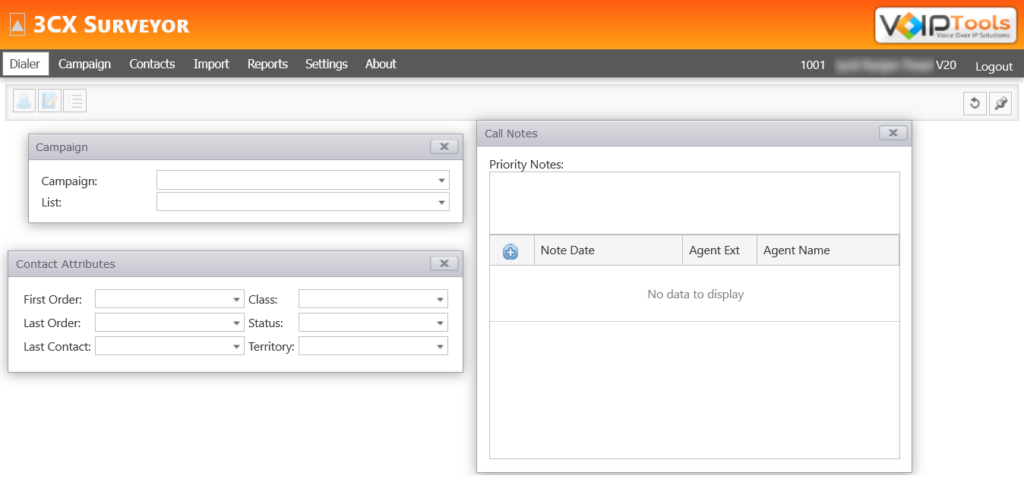
The Dialer Menu allows you to manage campaigns, initiate calls, and streamline communication workflows using various widgets. You can control caller IDs, schedule callbacks, assess contact attributes, and update contact information. This feature simplifies call operations, optimizes targeting, and enhances agent efficiency, improving overall campaign success and customer engagement.
The Campaign widget enables you to manage campaigns, select call lists, and initiate calls for assigned agents efficiently.
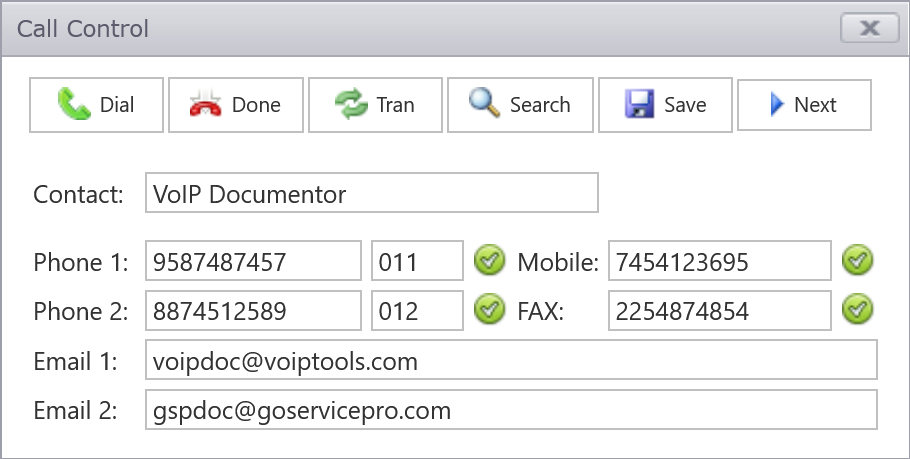
Show Call Control
In the Call Control widget, you can automatically see the contact number of the first contact in the campaign list.
Call Status
Call Status widget lets you select one of the dispositions from the available dispositions list.
Call Notes
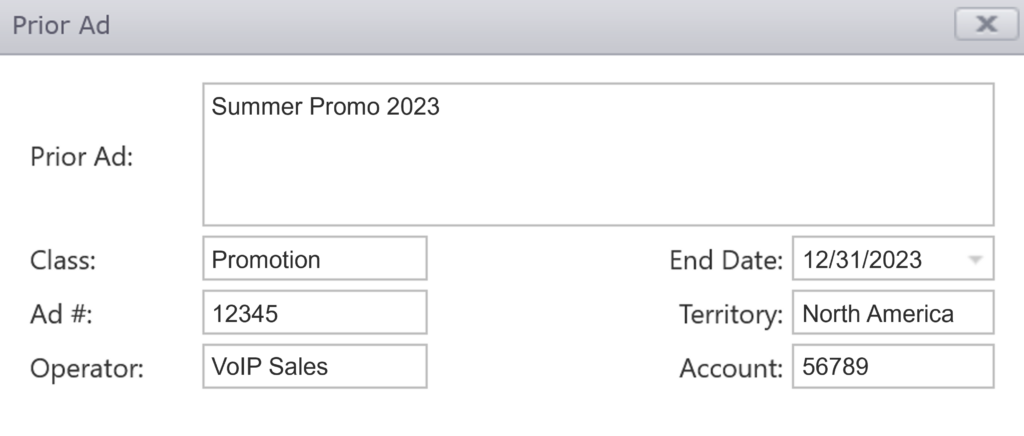
Prior Ad
The Prior Ad widget allows users to retrieve, reference, or duplicate details of a previous advertisement, enabling easy reuse, validation, customization, or historical tracking of campaigns.
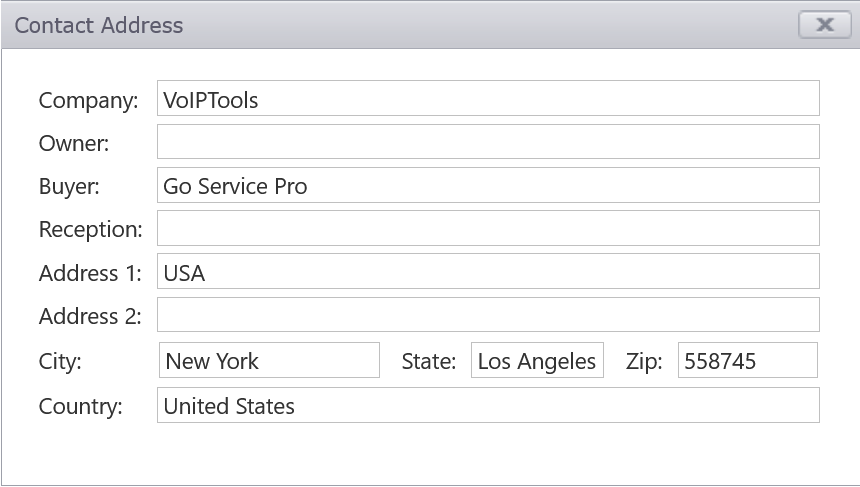
Address
Contact Address widget displays address details of the contact in the call.
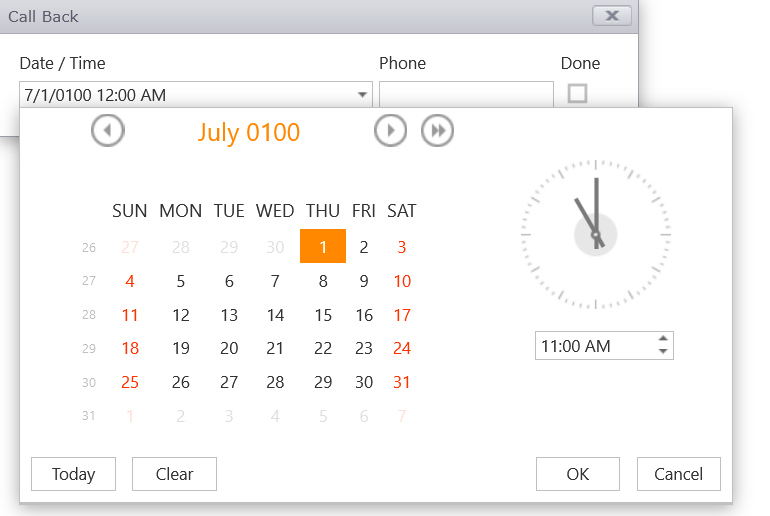
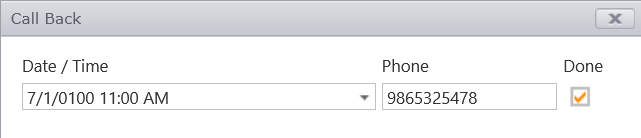
Call Back
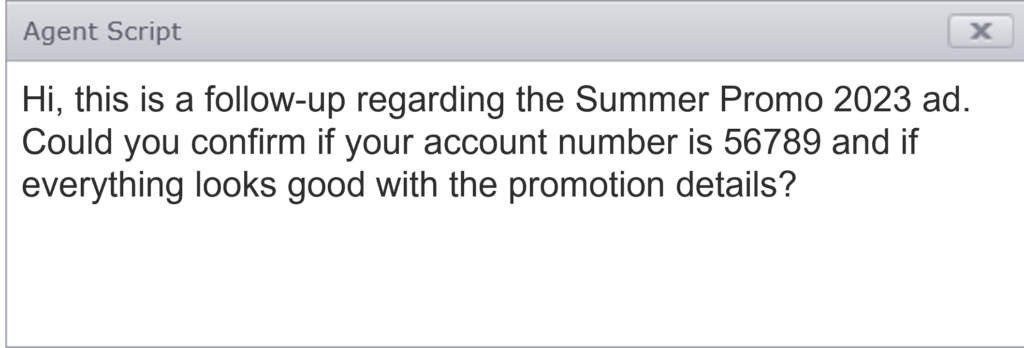
Agent Script
Agent Script widget displays the information specific for the agent.
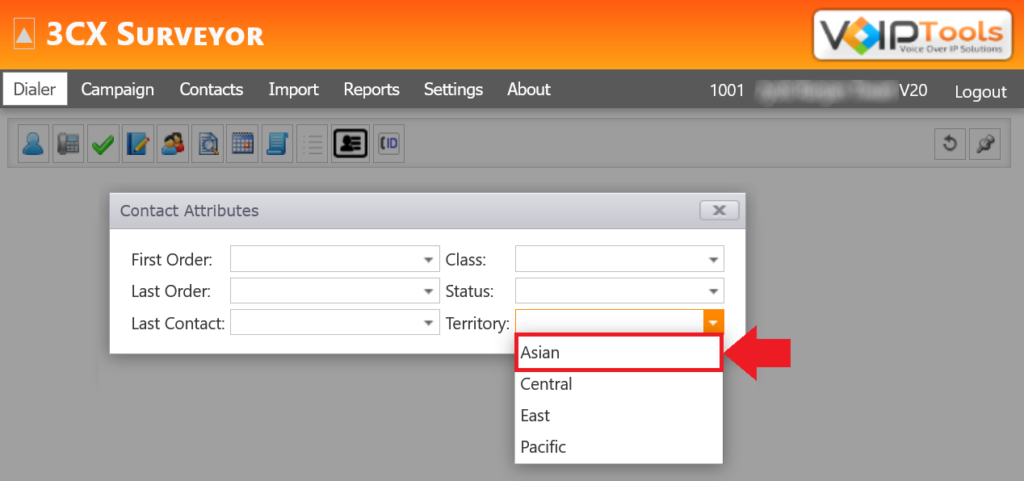
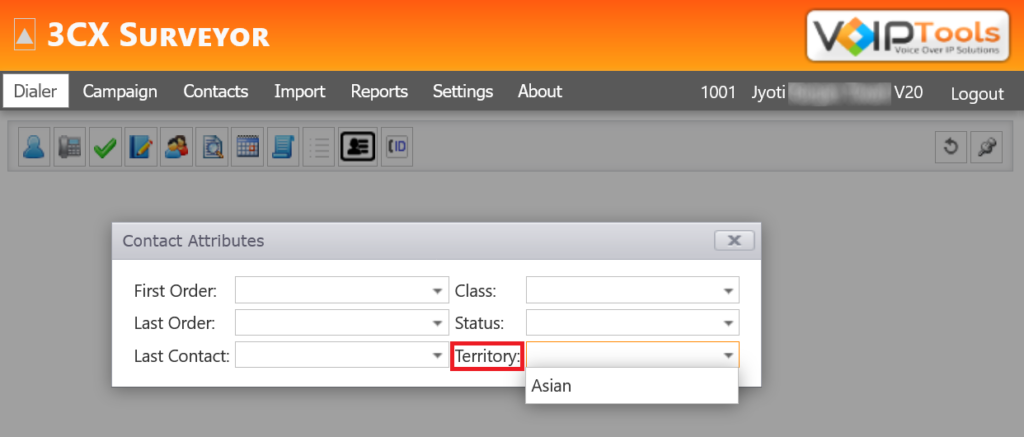
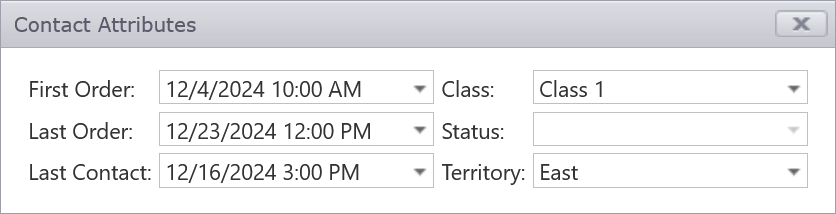
Attributes
The Contact Attributes widget displays sales information such as order history, contact details, status, class, and territory for contacts.
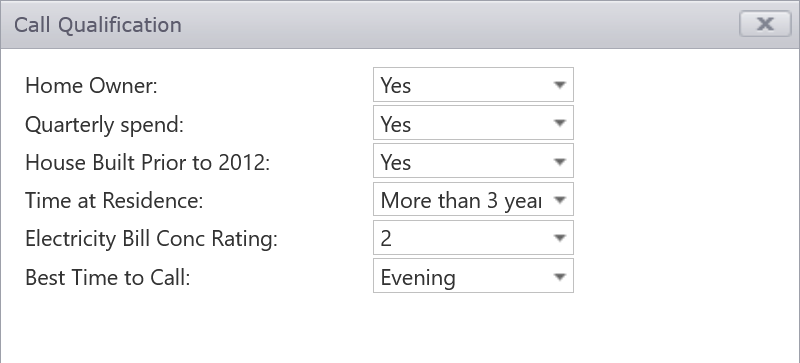
Qualification Script
The Call Qualification widget assesses prospects’ eligibility based on key attributes, enabling efficient targeting, data collection, and optimized call timing to maximize campaign success.
Auto Voicemail
Caller ID
The Caller ID widget allows you to manage and update outbound caller IDs for logged-in users’ extensions in 3CX.
The Prior Ad widget allows users to retrieve, reference, or duplicate details of a previous advertisement, enabling easy reuse, validation, customization, or historical tracking of campaigns.
Call Back widget lets you schedule a call back according to the customer’s preferred timings. If you are working on a call and if the call back scheduled time arrive, the dialer waits till you have finished the call and click the Dialer button, the call will be dialed to the Call Back number. The number you mentioned in the Phone field, that number copy it and dial the call through the dialer and once the call finished you need to check the done box to mark the end of the call and hit the save button and the next call will appear..
In the Date/ Time drop-down, select the appropriate date and time.
Figure: Call Back Widget – Date and Time Dropdown
In the Phone field, enter the phone number to which you need to call back.
Once the call back has been performed successfully, check the Done box to know in future that the call back for the customer has been performed.
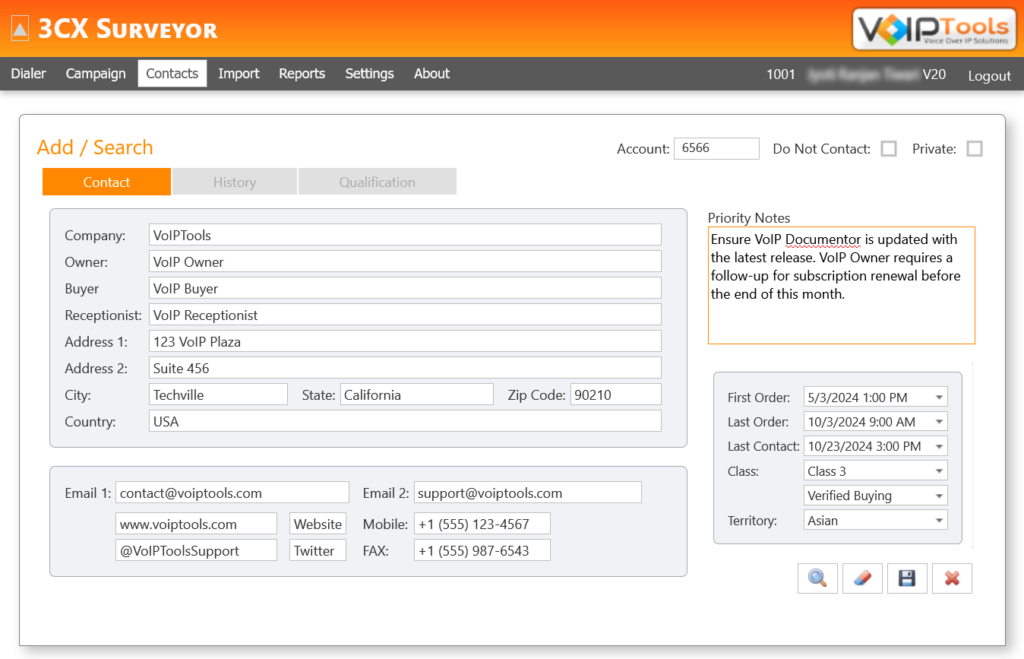
All the sales information related to the contact will be populated in the Contact Attributes widget. From here, you can know what the contact’s first order, last order, last contact details, class, status and territory are.
Figure: Contacts Attributes Widget
To learn to modify the details of the Contact Attributes widget, click here.
The Call Qualification widget assesses prospects’ eligibility based on key attributes, enabling efficient targeting, data collection, and optimized call timing to maximize campaign success.
Auto Voicemail widget enables you to access the ‘Play’ and ‘Send’ features in sync with the ‘Auto Voicemails’ screen of the ‘3CX Auto Voicemail’ application. Auto Voicemail widget enables your staff to automatically play prerecorded voice messages when connected to a customer’s voicemail box. For more information, you can refer Auto Voicemail manual.
NOTE:
To view Auto Voicemail widget, you need to install ‘3CX Auto Voicemail’ application.
This section guides you to play the voicemail associated with customer’s voicemail box.
Before you Begin: Make sure you have logged in with Manager credentials, navigated to the Dialer menu and opened the Auto Voicemail widget. Also ensure you have installed Auto Voicemail application.
Select the desired voicemail.
Click the Play button.
Results: The built-in media player opens to play the selected voicemail.
This section guides you to send the voicemail to the customers during a call.
Before you Begin: Make sure you have logged in with Manager credentials, navigated to the Dialer menu and opened the Auto Voicemail widget. Also ensure you have installed Auto Voicemail application.
Select the desired voicemail.
Click the Send button.
Results: The desired voicemail is now sent to the customer on call.
Caller ID widget enables you to work in sync with the ‘Caller IDs’ menu of the ‘3CX Caller ID’ application. From here, you can update Outbound Caller ID for logged-in user’s extension, revert back to agent default Caller ID, and manually update Outbound Caller ID for logged-in user’s extension. For more information, you can refer Caller ID manual.
NOTE:
To view Caller ID widget, you need to install ‘3CX Caller ID’ application.
Update Outbound Caller ID for Logged-in User’s Extension #
From the Numbers drop down, select the franchise whose extension you want to apply to your outbound caller ID.
Figure: Caller ID Widget – Numbers Dropdown
Results: Once applied, the system displays the successfully updated message and the desired franchise would apply to the outbound caller ID.
Reverting a CallerID for an agent will revert it back to the ‘Agent Caller ID’ (specified in the Agents tab). If the agent is not assigned any Caller ID, then the application takes ‘Default CallerID’ (specified in the Settings tab) of the extension group to which the agent belongs to.
Beside Numbers drop down, click the Revert button.
Figure: Caller ID Widget – Revert Icon
NOTE:
Every agent must have a default Caller ID (Agents tab) else Caller ID will not be reverted.
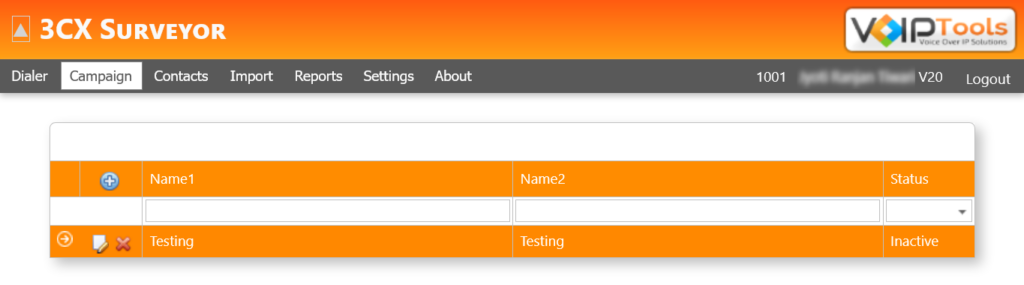
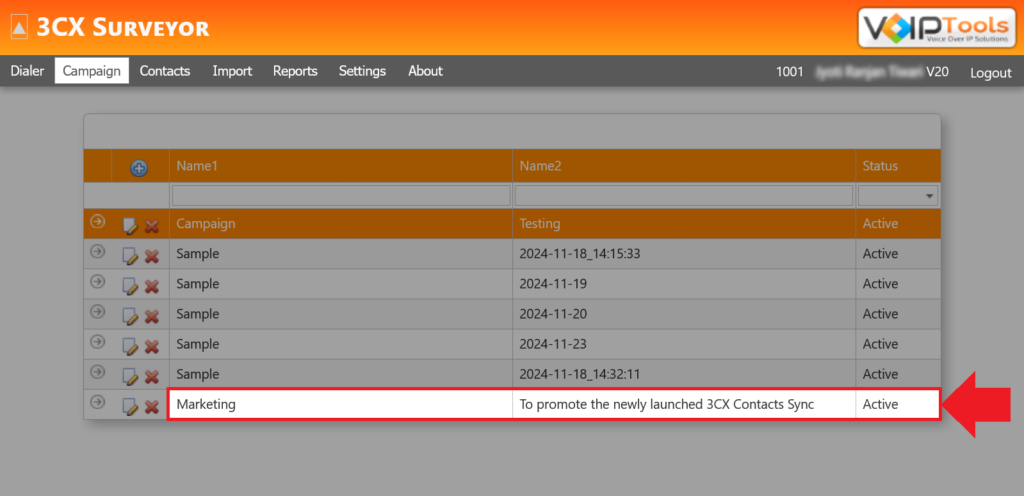
The Campaign Menu enables you to efficiently manage campaigns by creating and organizing them, adding campaign lists, and assigning agents. You can configure campaign details, set statuses, define timeframes, include agent scripts, and manage contact lists. This feature ensures streamlined coordination and execution of your targeted campaigns with ease and professionalism.
This section guides you to add a campaign list to the existing campaigns.
Before you start: Make sure you have logged in with Manager credentials and navigated to the Campaign Menu in the menu bar. You must have created a campaign first before adding a campaign list. Refer the earlier section to learn how to add a campaign.
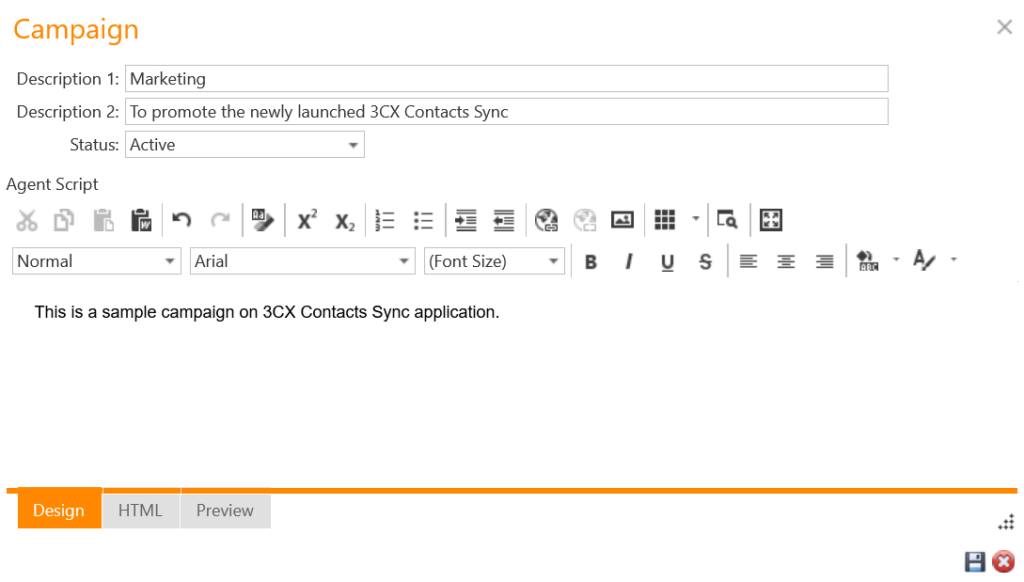
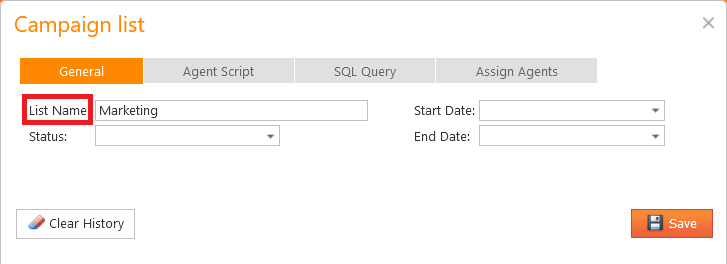
Step 2: General Section – Add General Details of the Campaign List #
Enter the name of the campaign list in the List Name field.
Figure: General Section – List Name Field
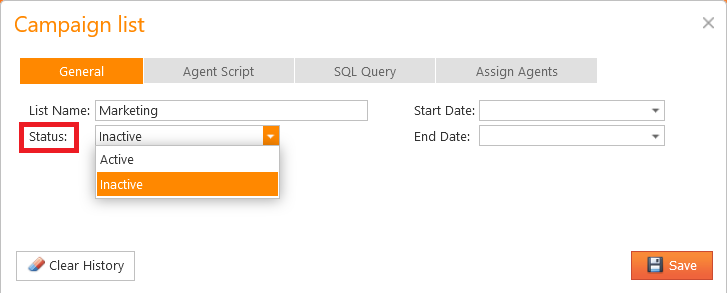
In the Status dropdown,
Set the status to Active to activate the campaign.
Set the status to Inactive to inactivate the campaign.
Figure: General Section – Status Dropdown
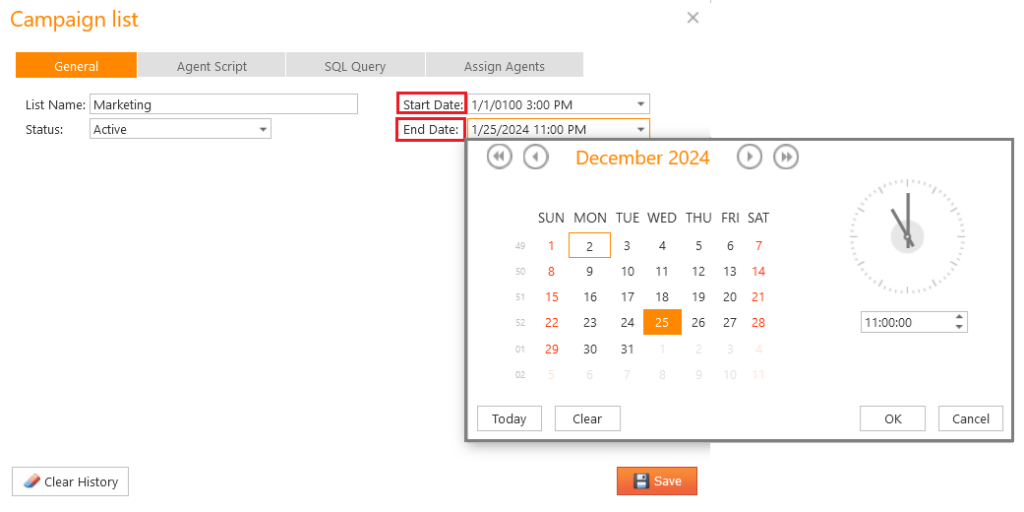
Set the Start Date and End Date from the Calendar dropdown.
Figure: General Section – Date and Time Dropdown
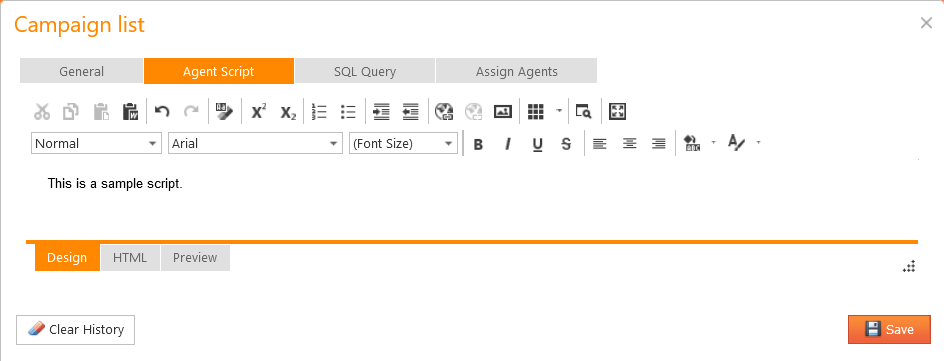
Step 3: Agent Script Section – Add Agent Script to Campaign List #
Enter the script for the agent using the inbuilt word processor.
Figure: Agent Script Section
Step 4: SQL Query Section – Add SQL Query to Campaign List #
The SQL Query section displays the list of contacts involved in the campaign list. The list is exported from the Contacts menu. You can add new contacts in this section.
Click the Add icon.
Figure: SQL Query Section – Add Button
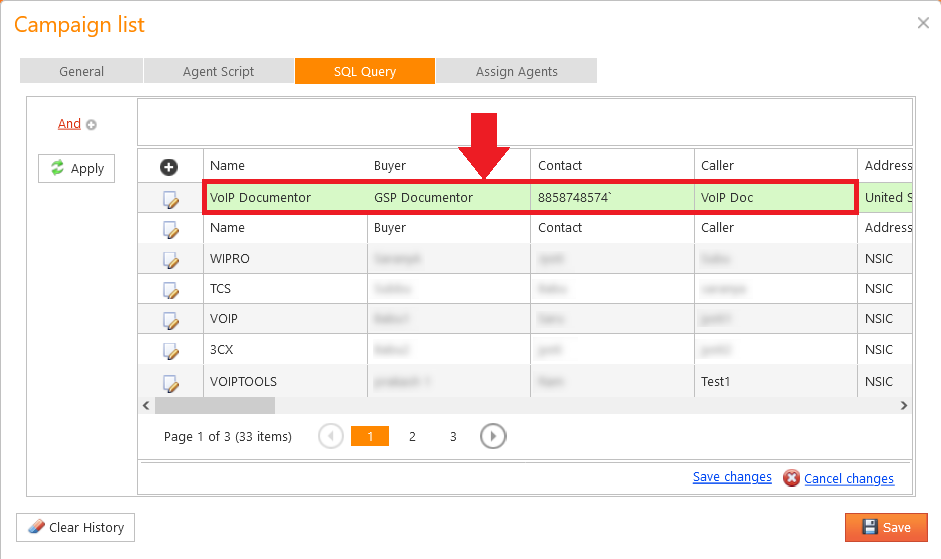
Enter the contact details.
Figure: SQL Query Section – Contact Details
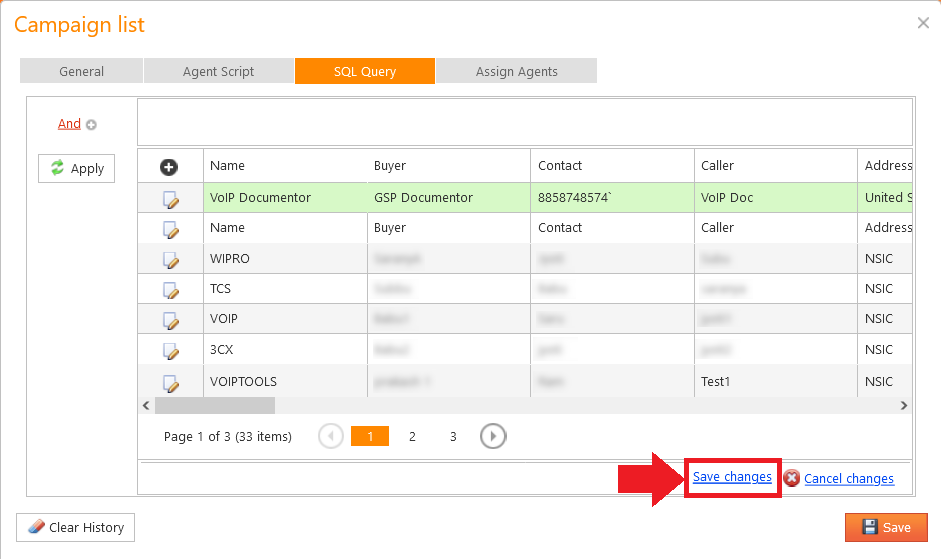
Click the Save Changes text.
Figure: SQL Query Section – Save Changes Text
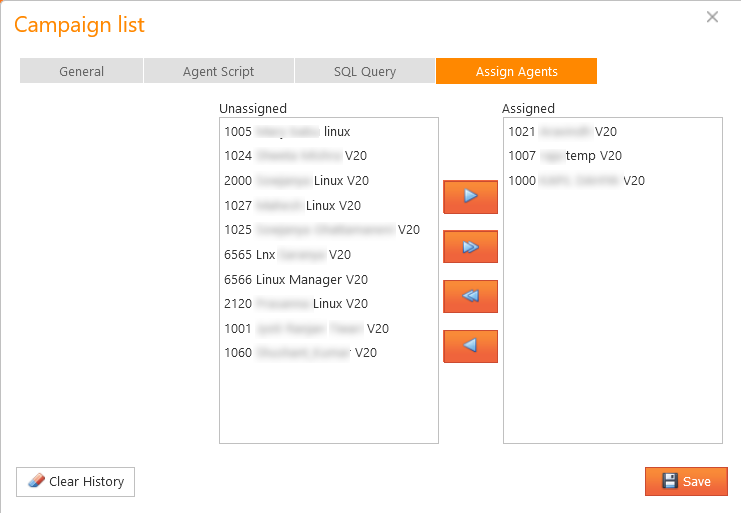
Step 5: Assign Agents Section – Add or Remove Agents to the Campaign List #
The Assign Agents tab lets you assign specific agents to a campaign list. The Unassigned list box shows agents in the Surveyor Extension Group, defined in the In the General tab under the Settings menu.
To assign agents, select them from the Unassigned list box and move them to the Assigned list box.
Assign Agent
Lets you assign a selected agent for the campaign.
Unassign Agent
Lets you remove a selected agent from the campaign.
Assign All
Lets you assign all the available agents to the campaign.
Unassign All
Lets you remove all the assigned agents in the campaign.
his section guides you to delete the existing survey question.
Before you Begin: Make sure you have logged in with Manager credentials and have navigated to the Add/Edit Questions section under the Questions menu.
Click the Delete icon besides the desired question.
Click OK in the confirmation popup.
NOTE:
You cannot delete a question after it has been added to a survey group. First, remove the question from the survey group, then proceed with deletion. Click here to learn how to include or exclude questions from a survey group.
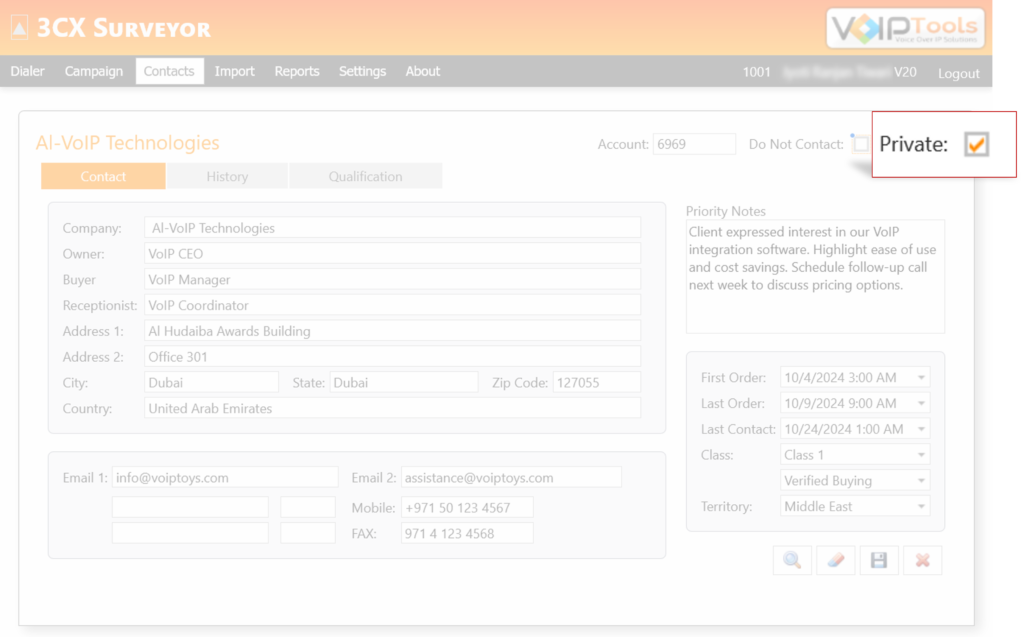
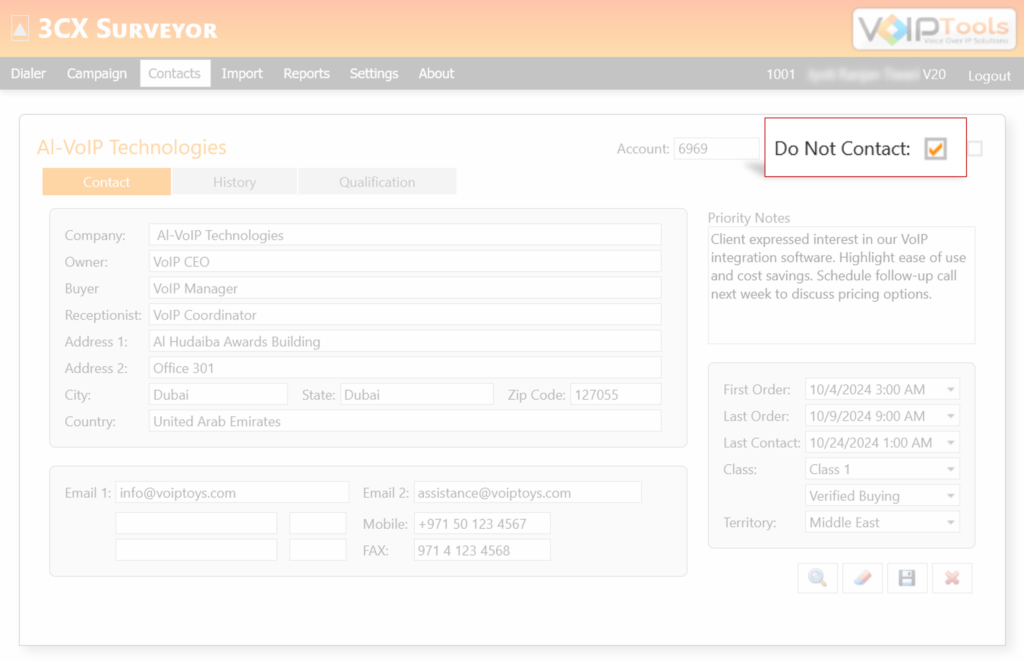
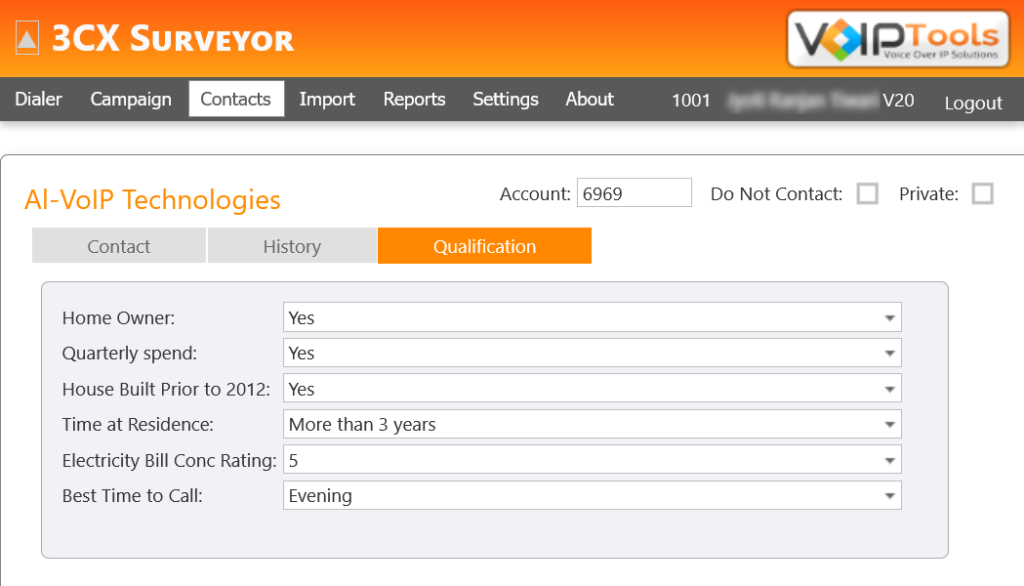
The Contacts Menu in 3CX Surveyor provides a centralized platform to manage, organize, and update contact information efficiently. It enables users to search, add, delete, or edit contacts, ensuring accurate and streamlined database management. The menu also supports advanced features such as setting contacts as private or in “Do Not Disturb” mode. Additionally, the History Tab records interaction notes for better customer insights, while the Qualification Tab displays comprehensive contact details, enhancing overall communication and operational efficiency.
The Contacts Tab enables you to manage contact information effectively within the 3CX Surveyor. You can search for, add, delete, or update contact details with ease. This feature streamlines database management, ensures accurate information retrieval, and provides a user-friendly interface for maintaining a centralized repository of contact data.
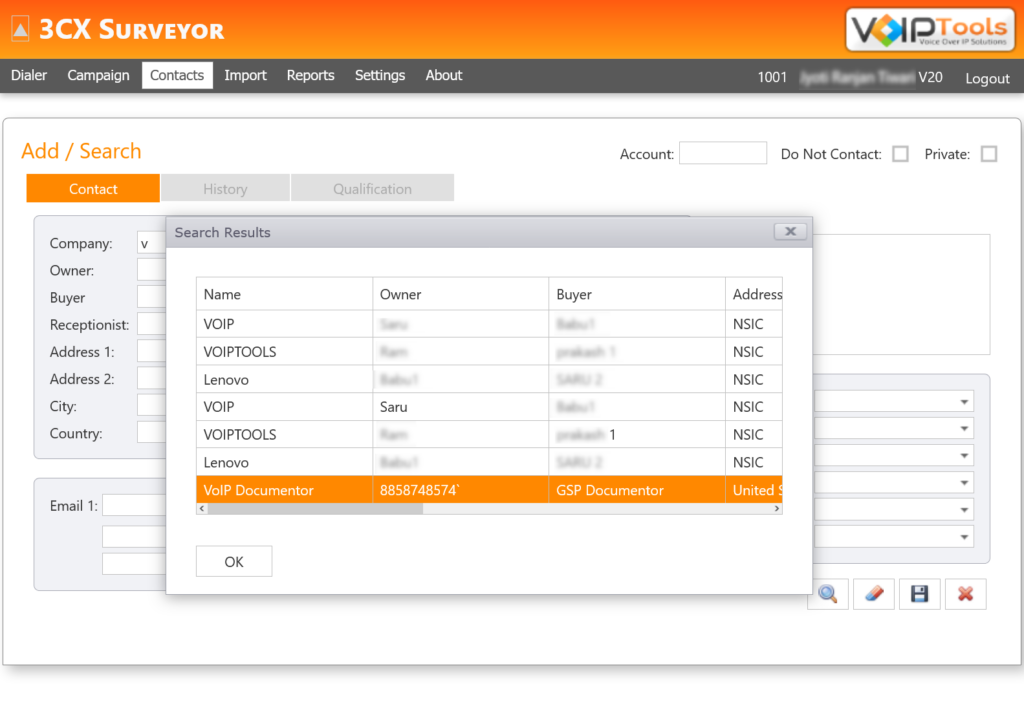
Type appropriate information anywhere in the field and click the Search button. 3CX Surveyor finds the person from the database and populates the information in all the fields.
Delete Contact
Search for the contact that you want to delete and click the Delete Contact button to delete the contact.
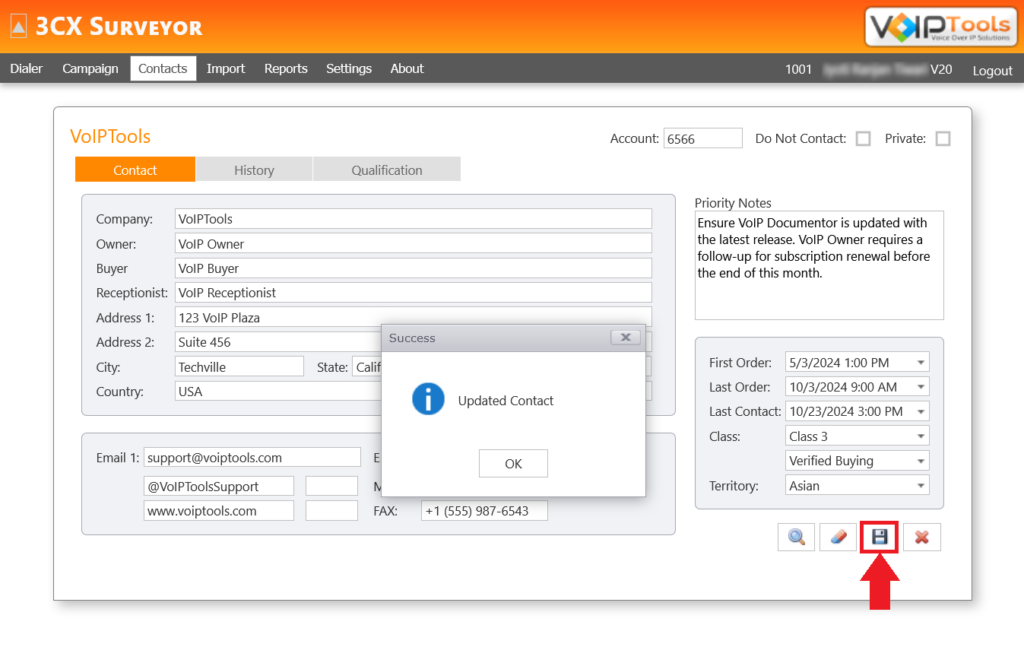
Save
Click the Save button to save the changes you made to the contact.
Clear Contact
Click the Clear Contact button to clear the contact details in the Contact tab.
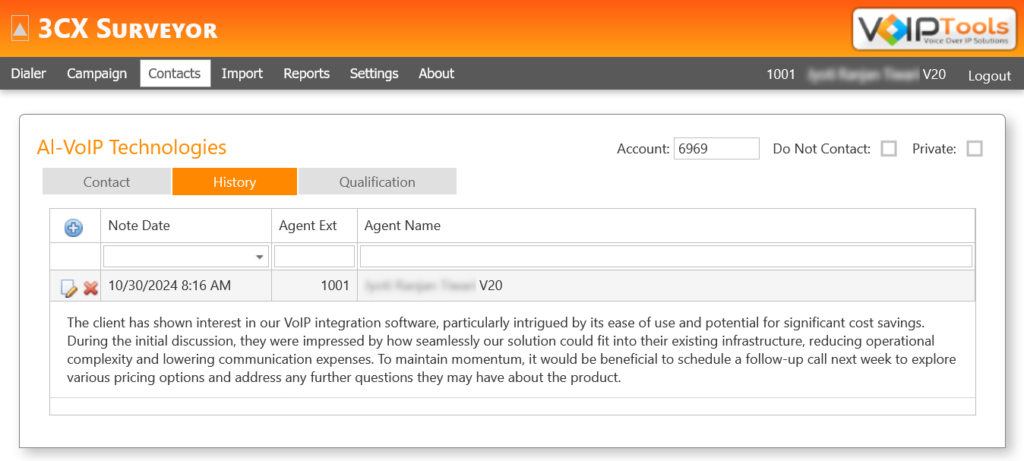
The History screen allows you to record notes about various conversations your company had with a specific contact over time. You can record important information like commitments or services you provided so that when the customer calls you, you can quickly look into notes to know if you can perform something on their behalf to achieve great customer satisfaction. It provides a great way to understand your customer even before you start talking to them.
This section guides you to add new notes for a contact.
Before you Start: Make sure you have logged in with the Manager Rights and have navigated to the History tab under the Contacts menu. Also, ensure you have searched or created the contact before writing notes. Click here to know to create/search a contact.
Click the Add icon.
Figure: Add Notes – Add Icon
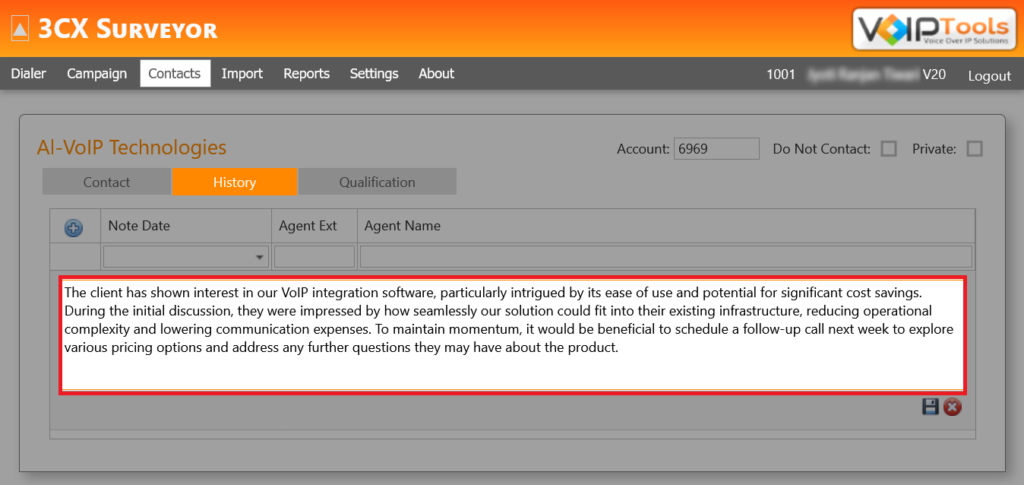
Enter the notes in the Notes field and click the Save icon.
Figure: History Tab – Notes Field
Results: The note gets updated with other information regarding the notes.
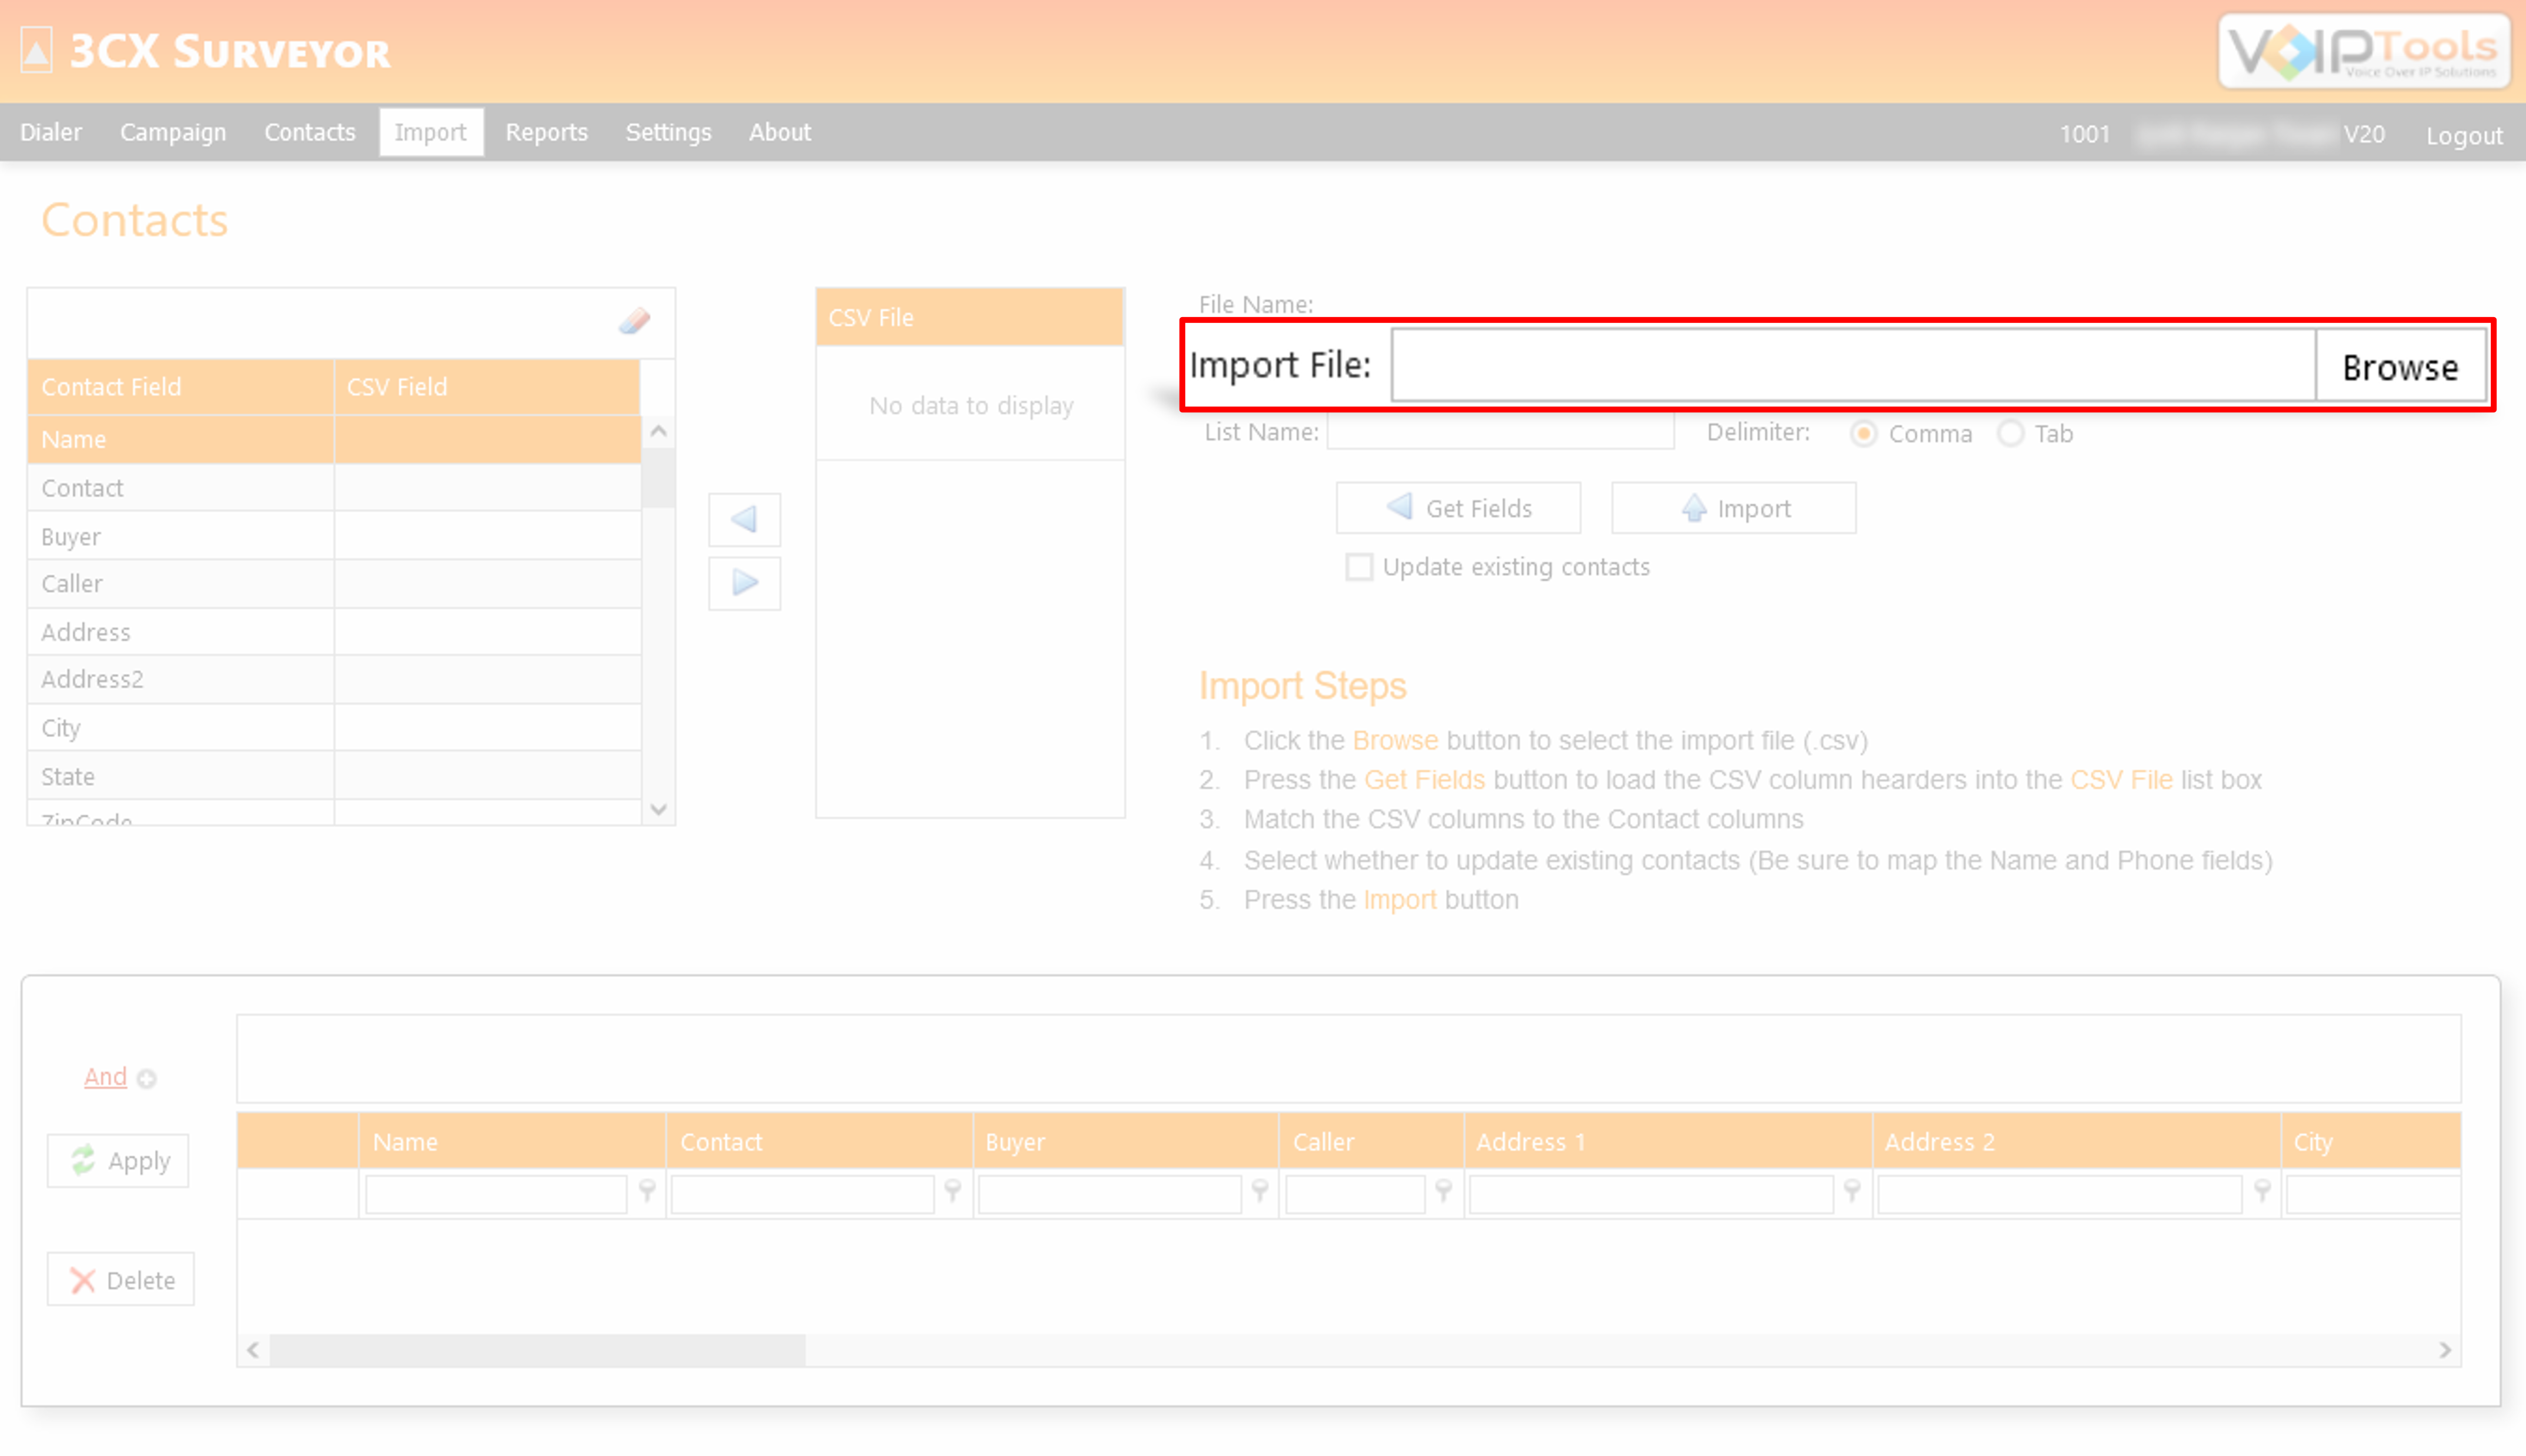
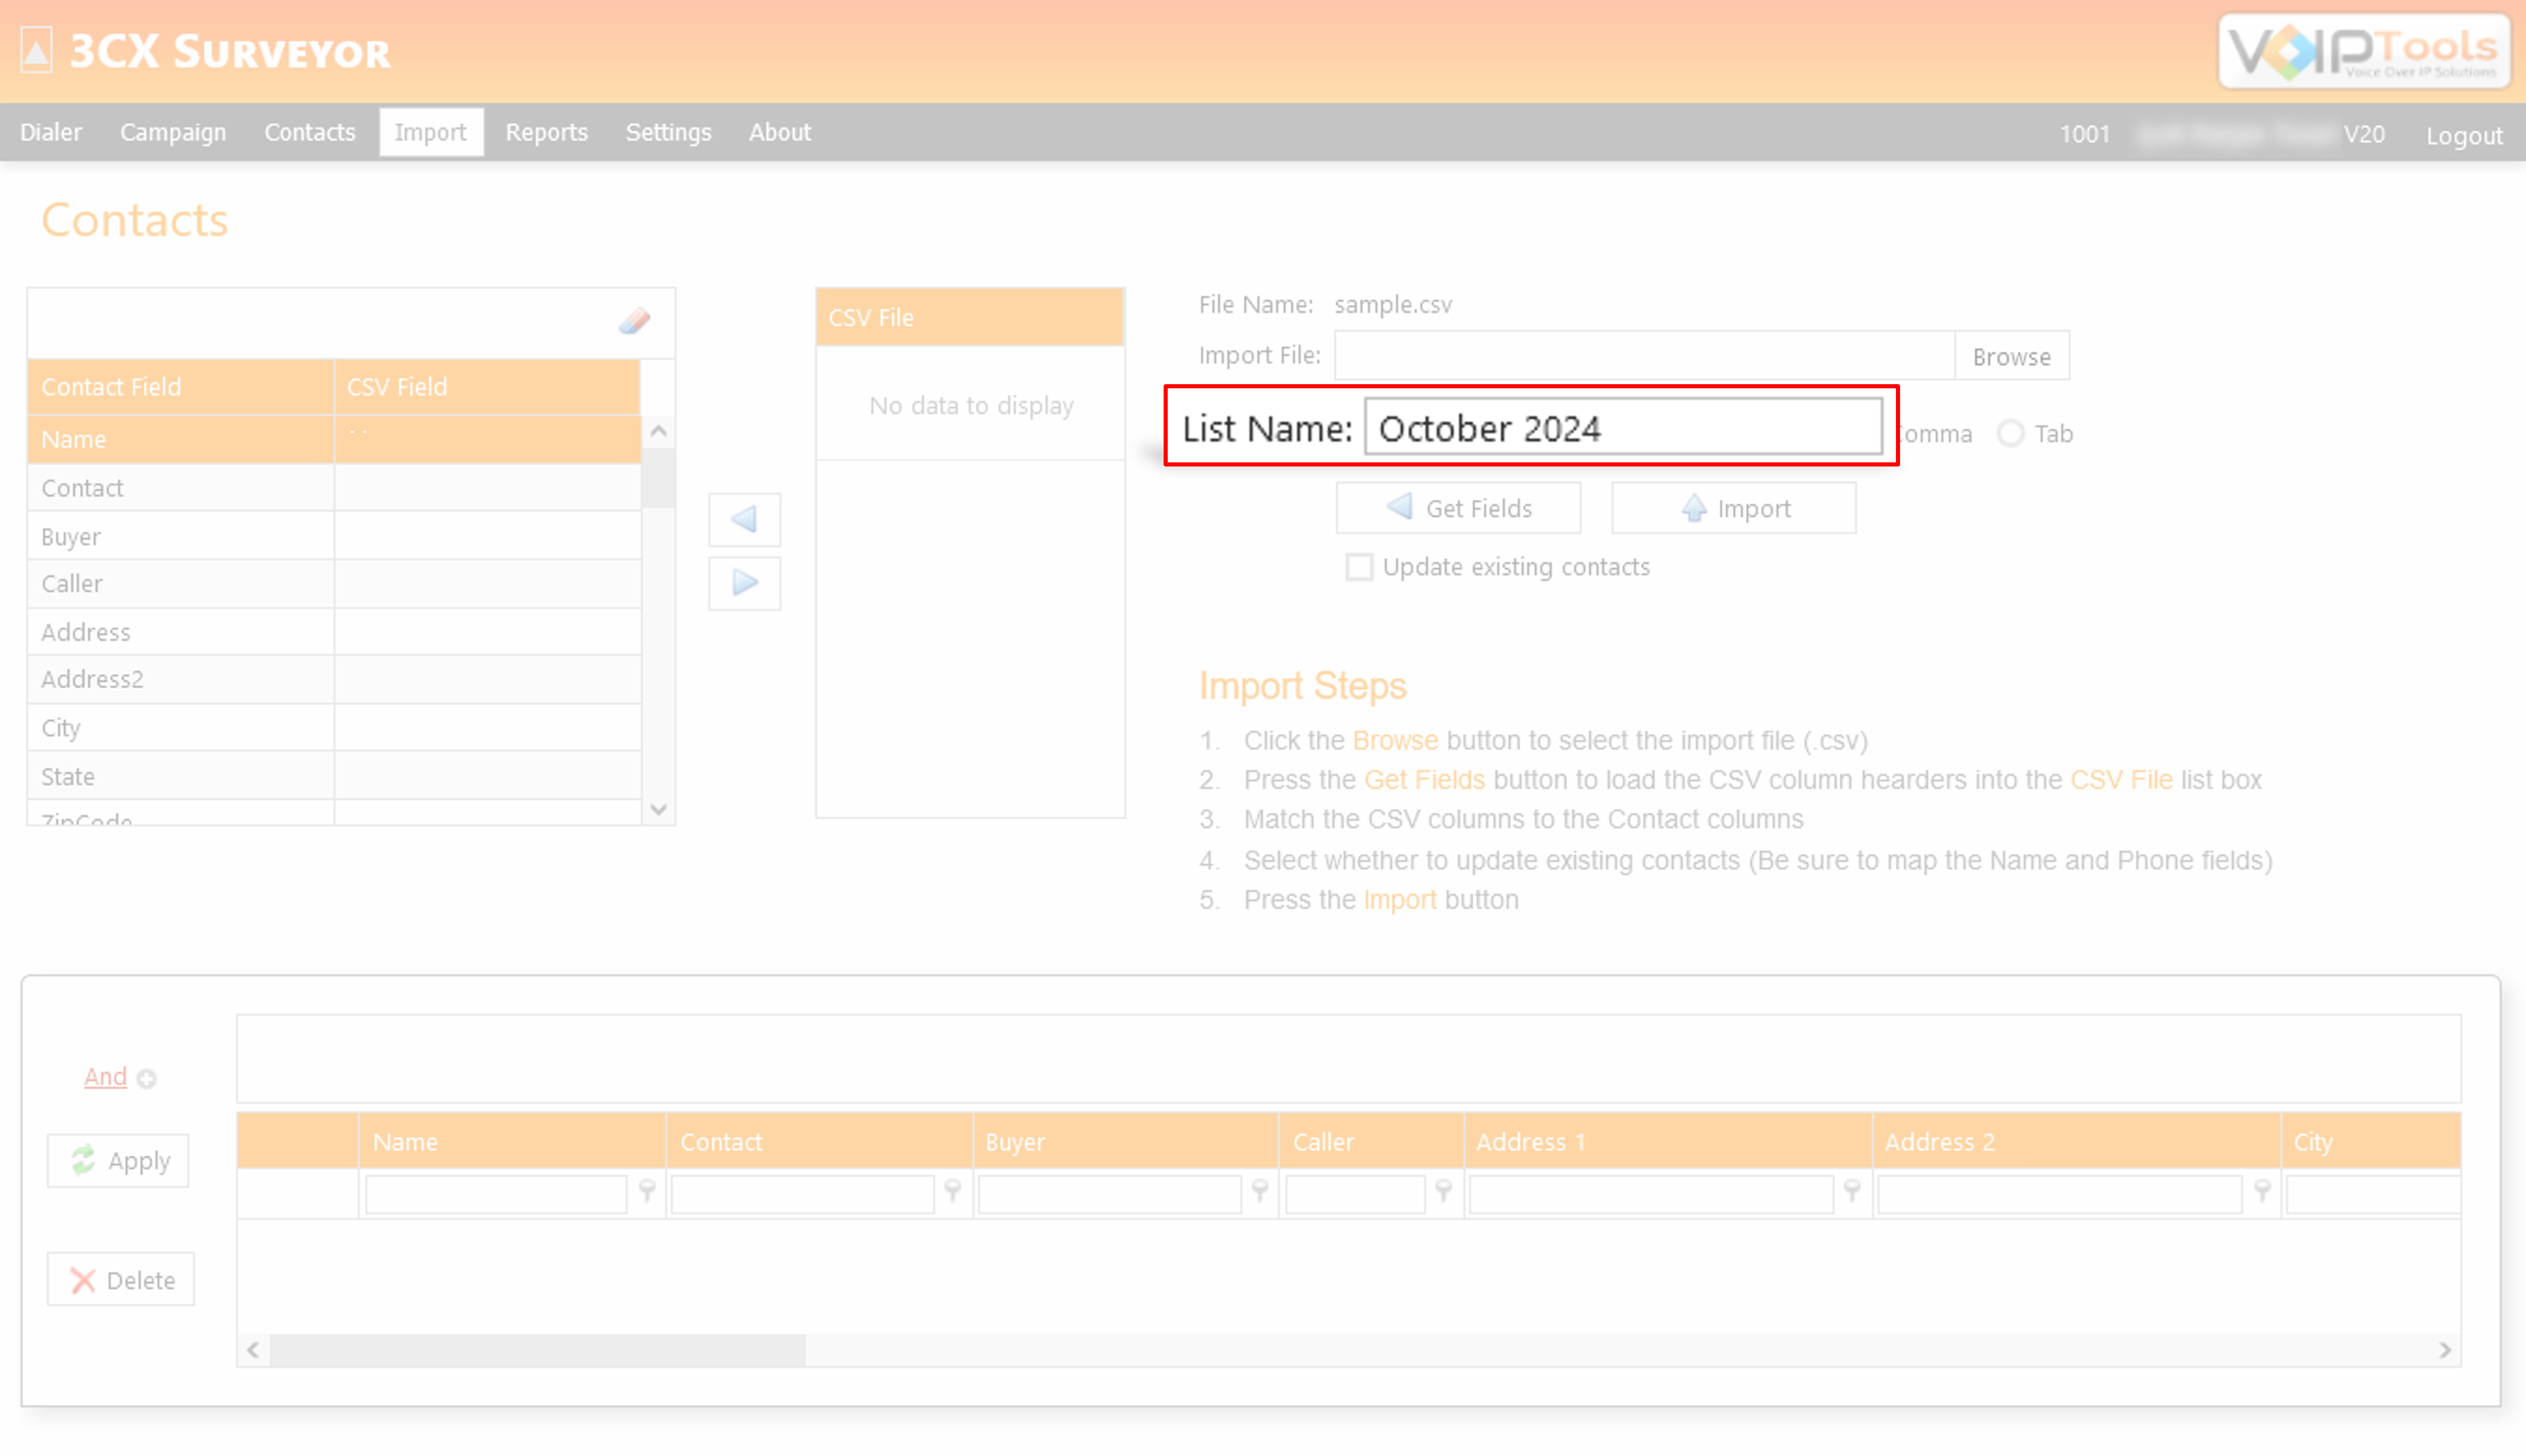
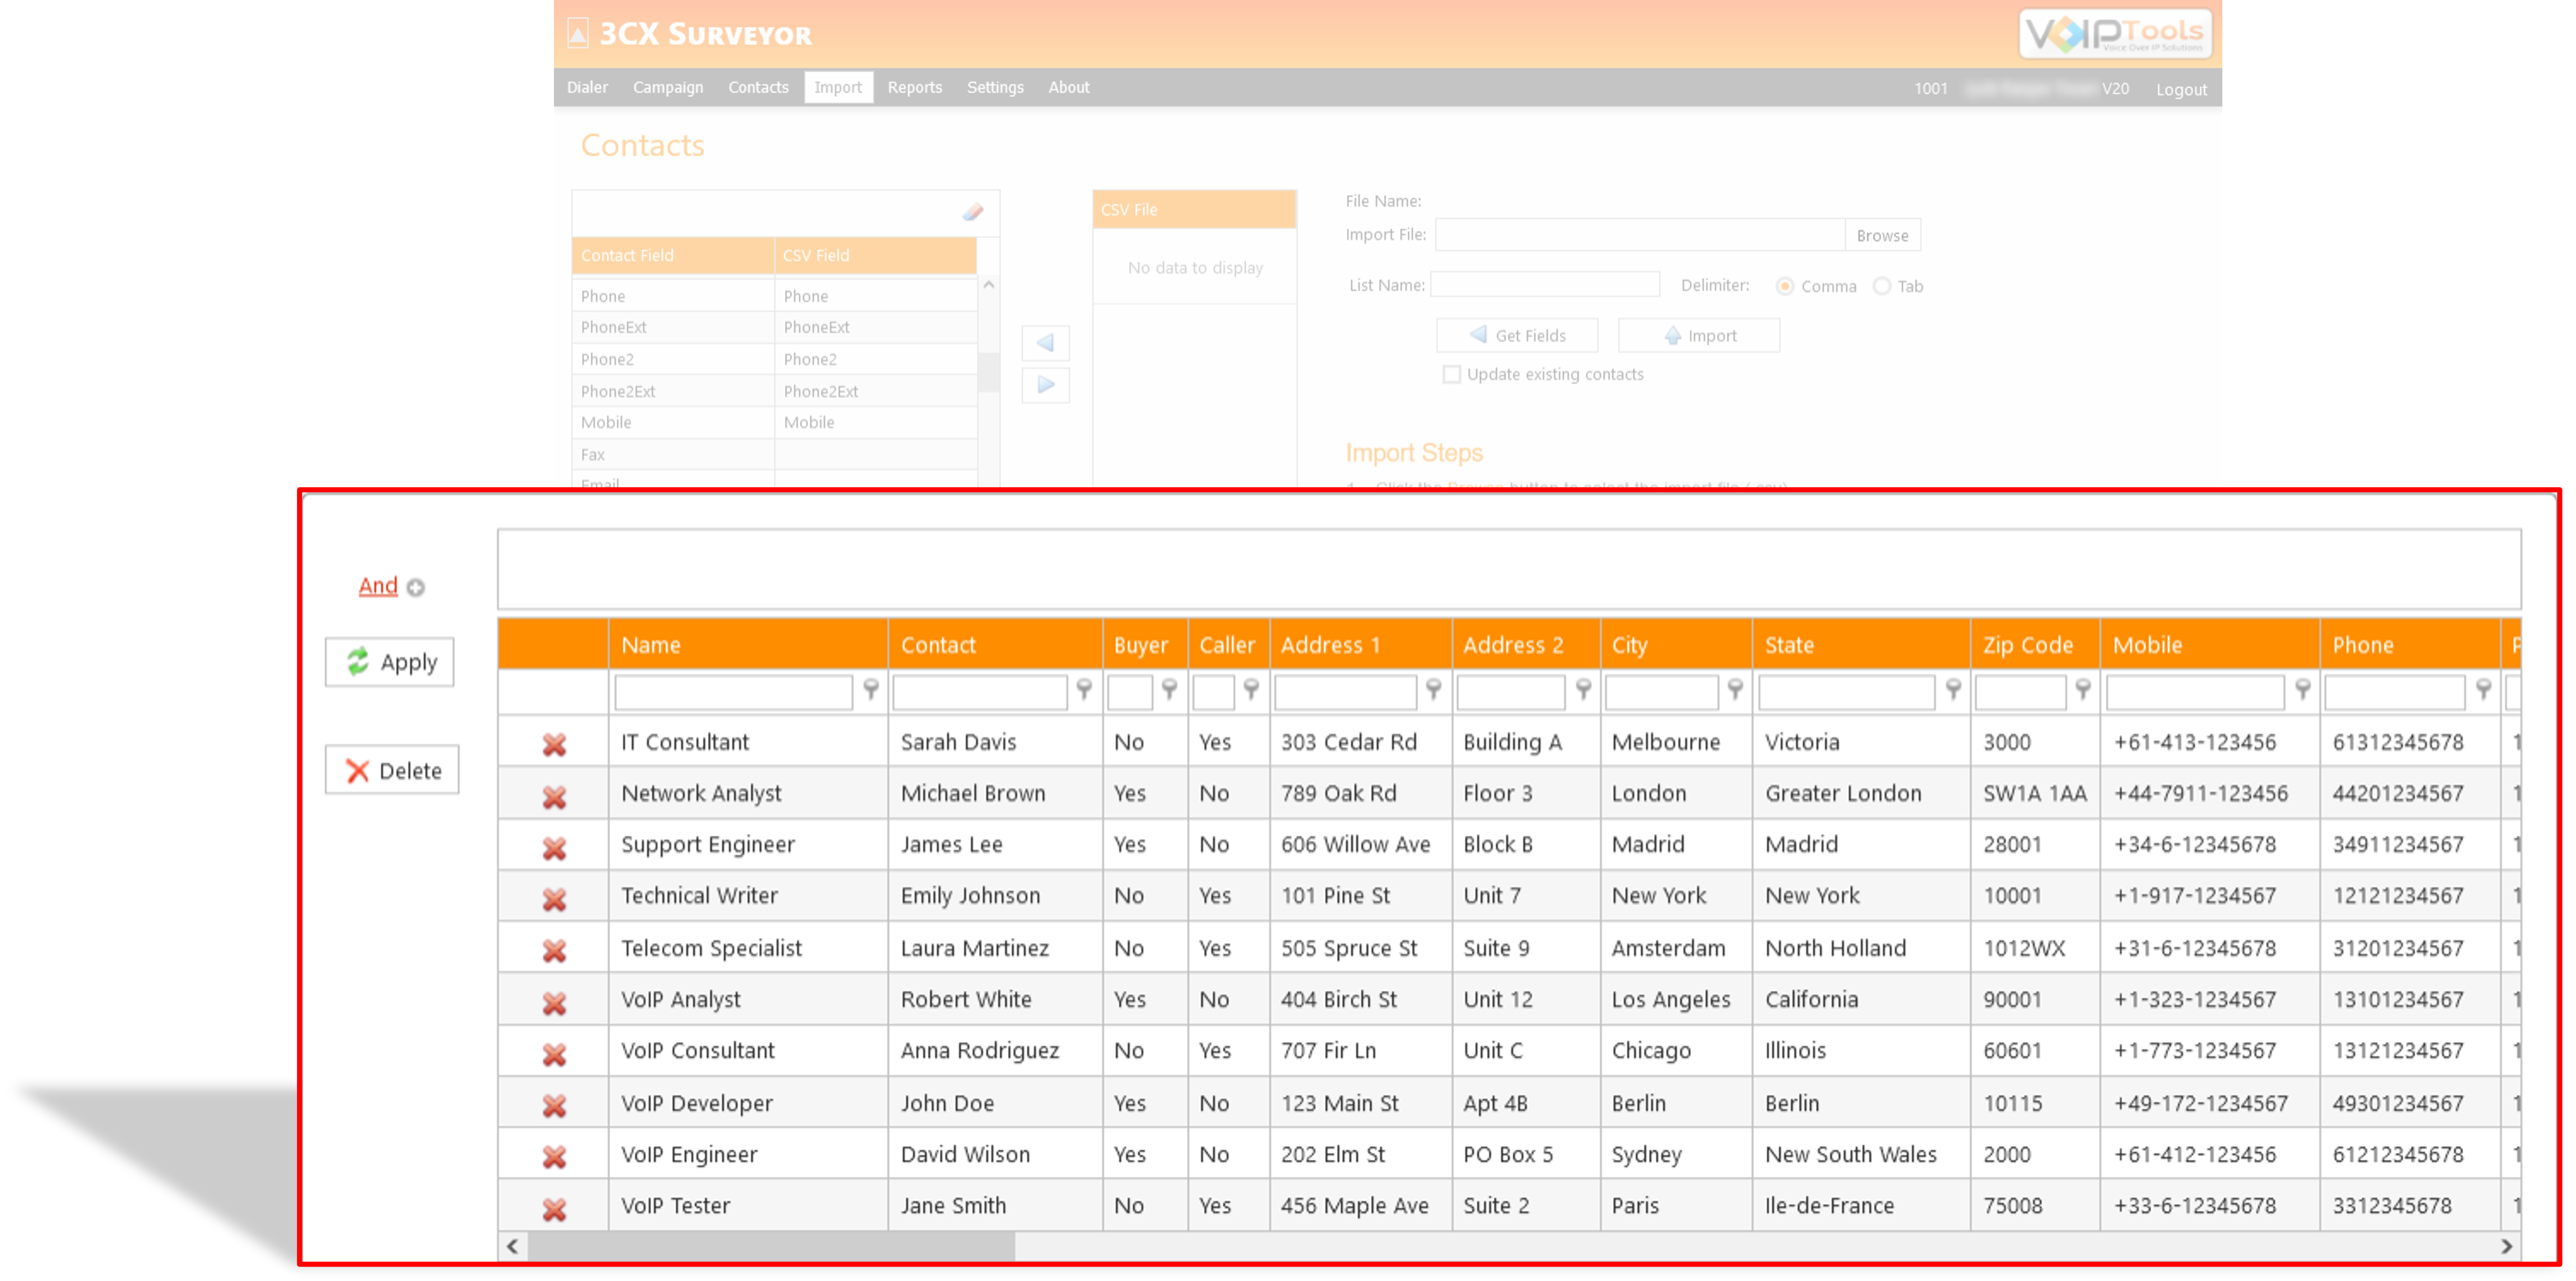
The Import menu enables you to efficiently upload and organize contact information from a CSV file into the central repository. By providing tools to map data fields, manage duplicates, and specify delimiters, it ensures accurate and streamlined data integration, enhancing your ability to maintain an updated contact database.
This section guides you to import contacts from a .CSV file in your local device.
Before you Start: Make sure you have logged in with the Manager Rights and have navigated to the Import menu in the menu bar and have a existing .CSV file in your device.
Click the Browse button and browse the CSV file from your local device.
Figure: Import Contacts – Browse Button
Enter a name for contact list in the Contact List field.
Figure: Import Contacts – List Name Field
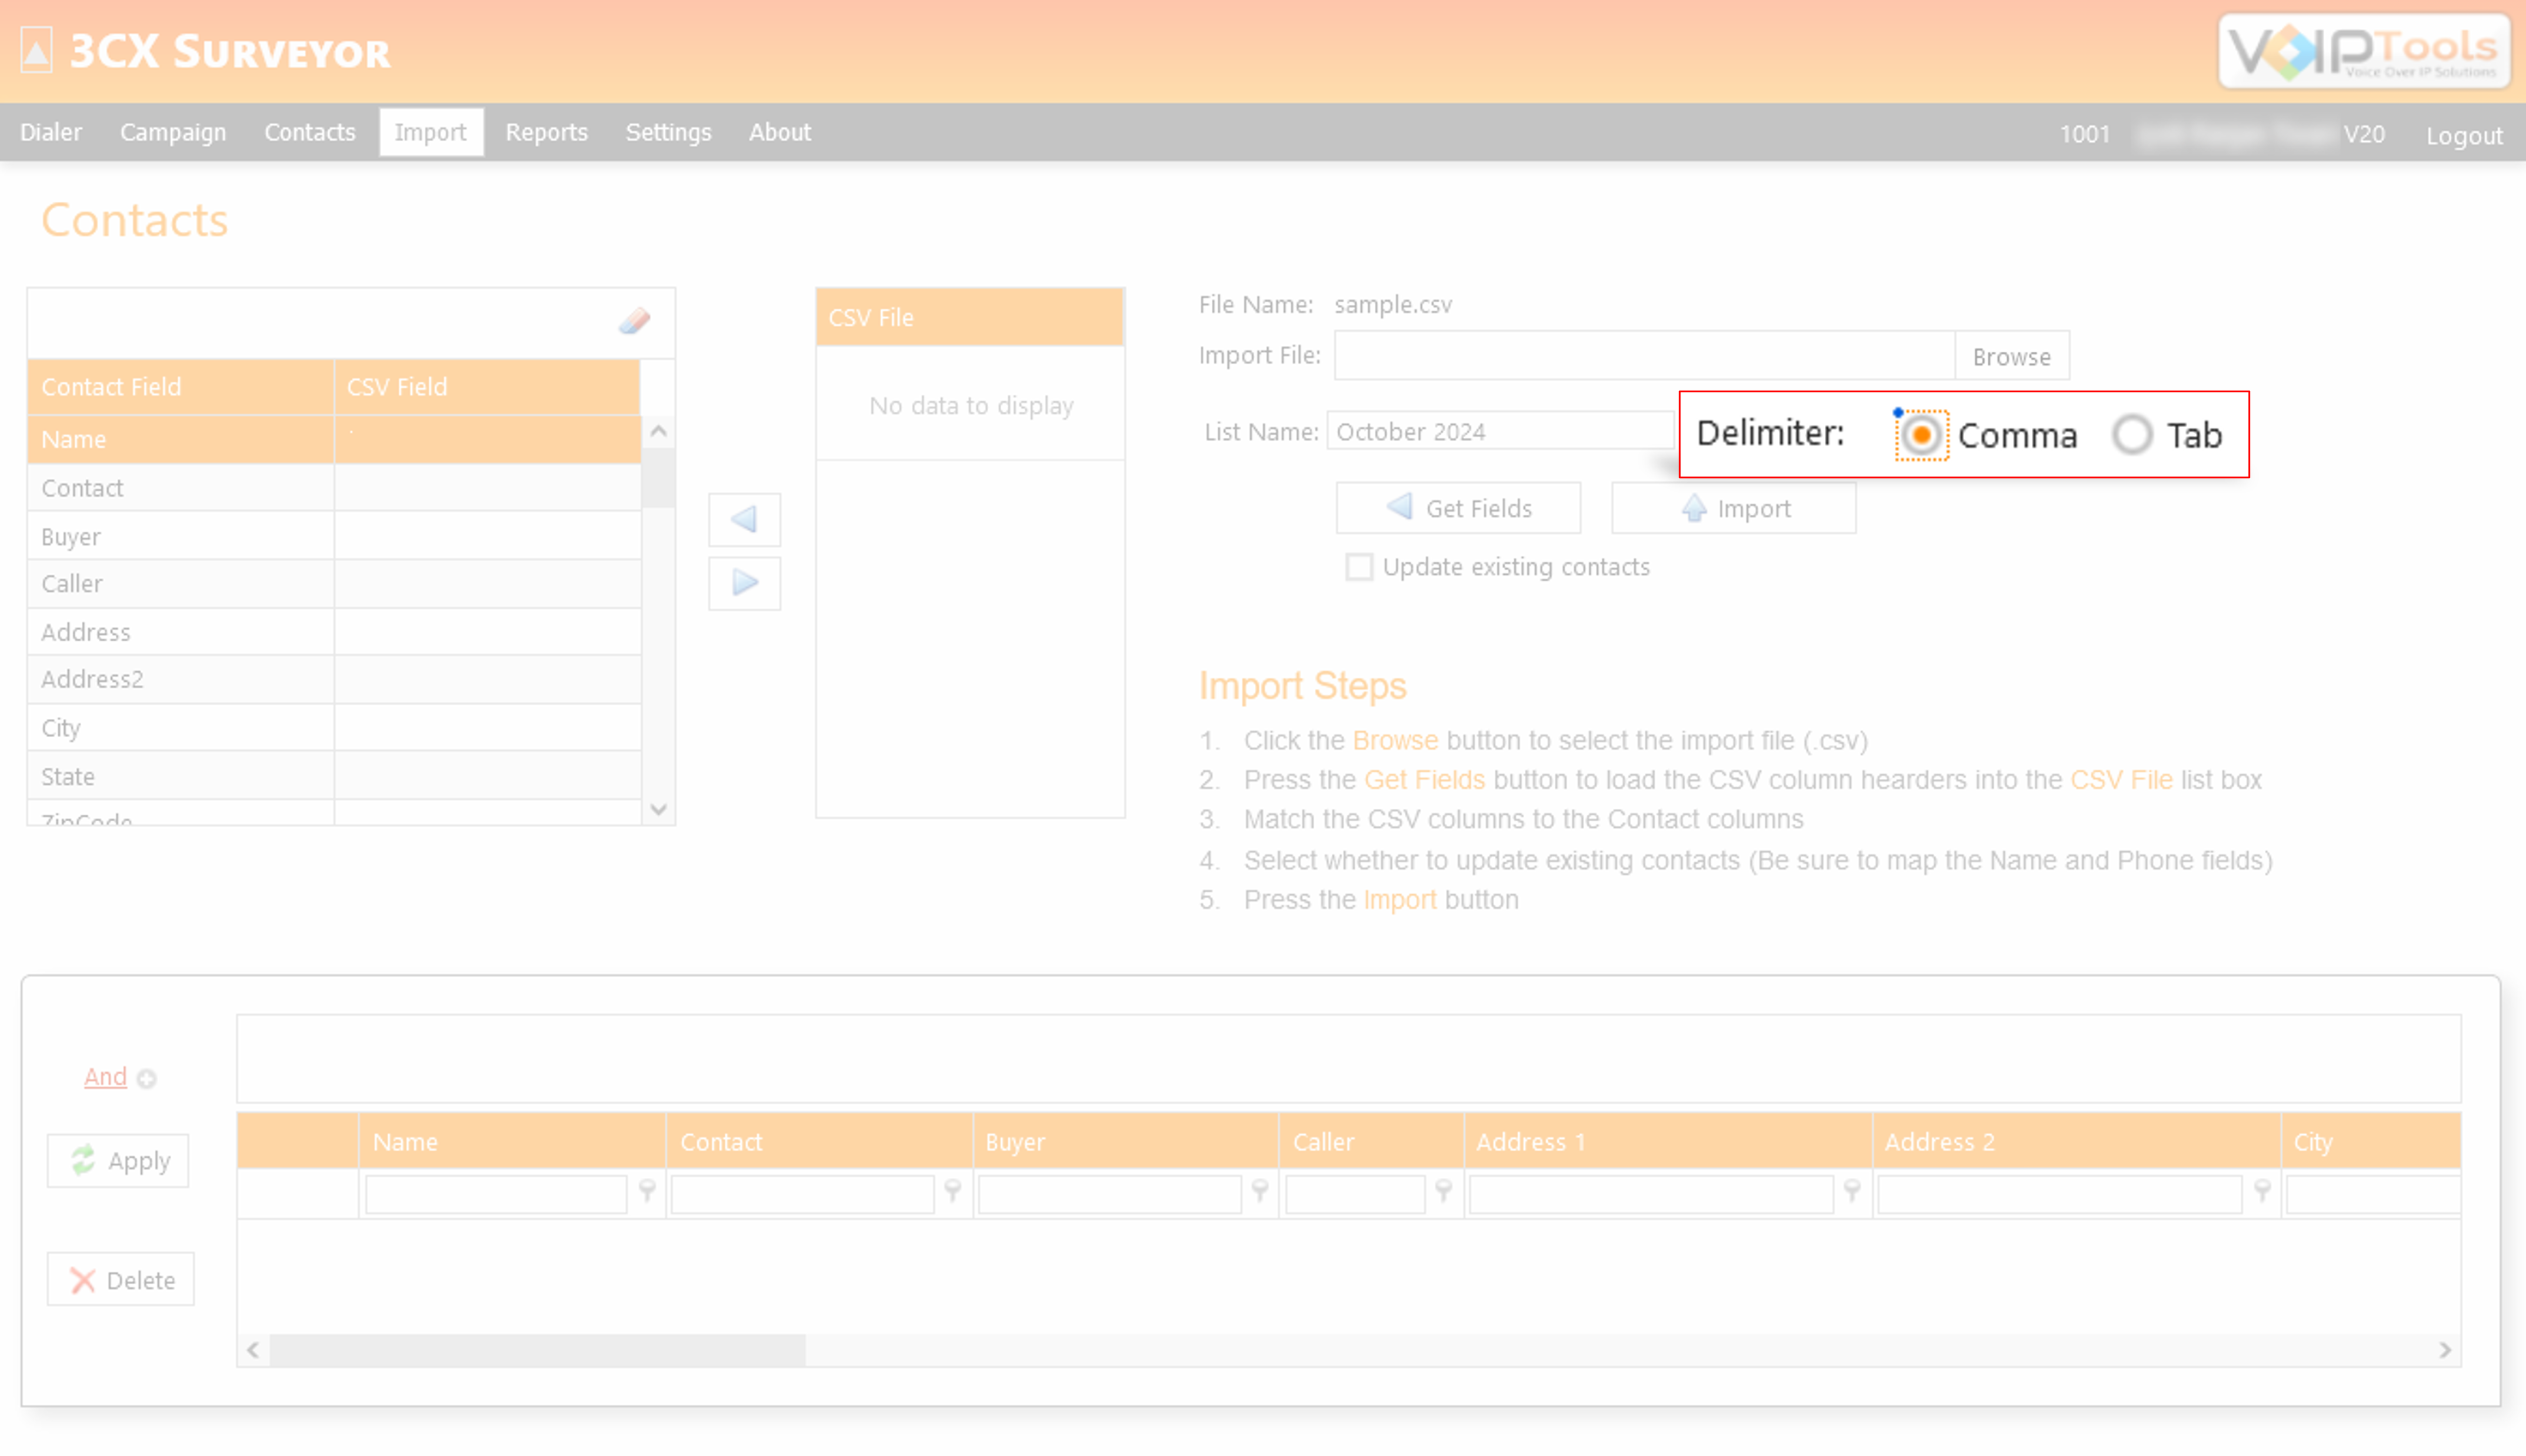
Select the Delimiter type.
Select Comma if the data in your CSV file is separated by commas.
Select Tab if the data in your CSV file is separated by tab spaces.
Figure: Import Contacts – Delimited Type
Click the Get Field icon to load the CSV column headers into the CSV File list box.
Figure: Import Contacts – Get Field Icon
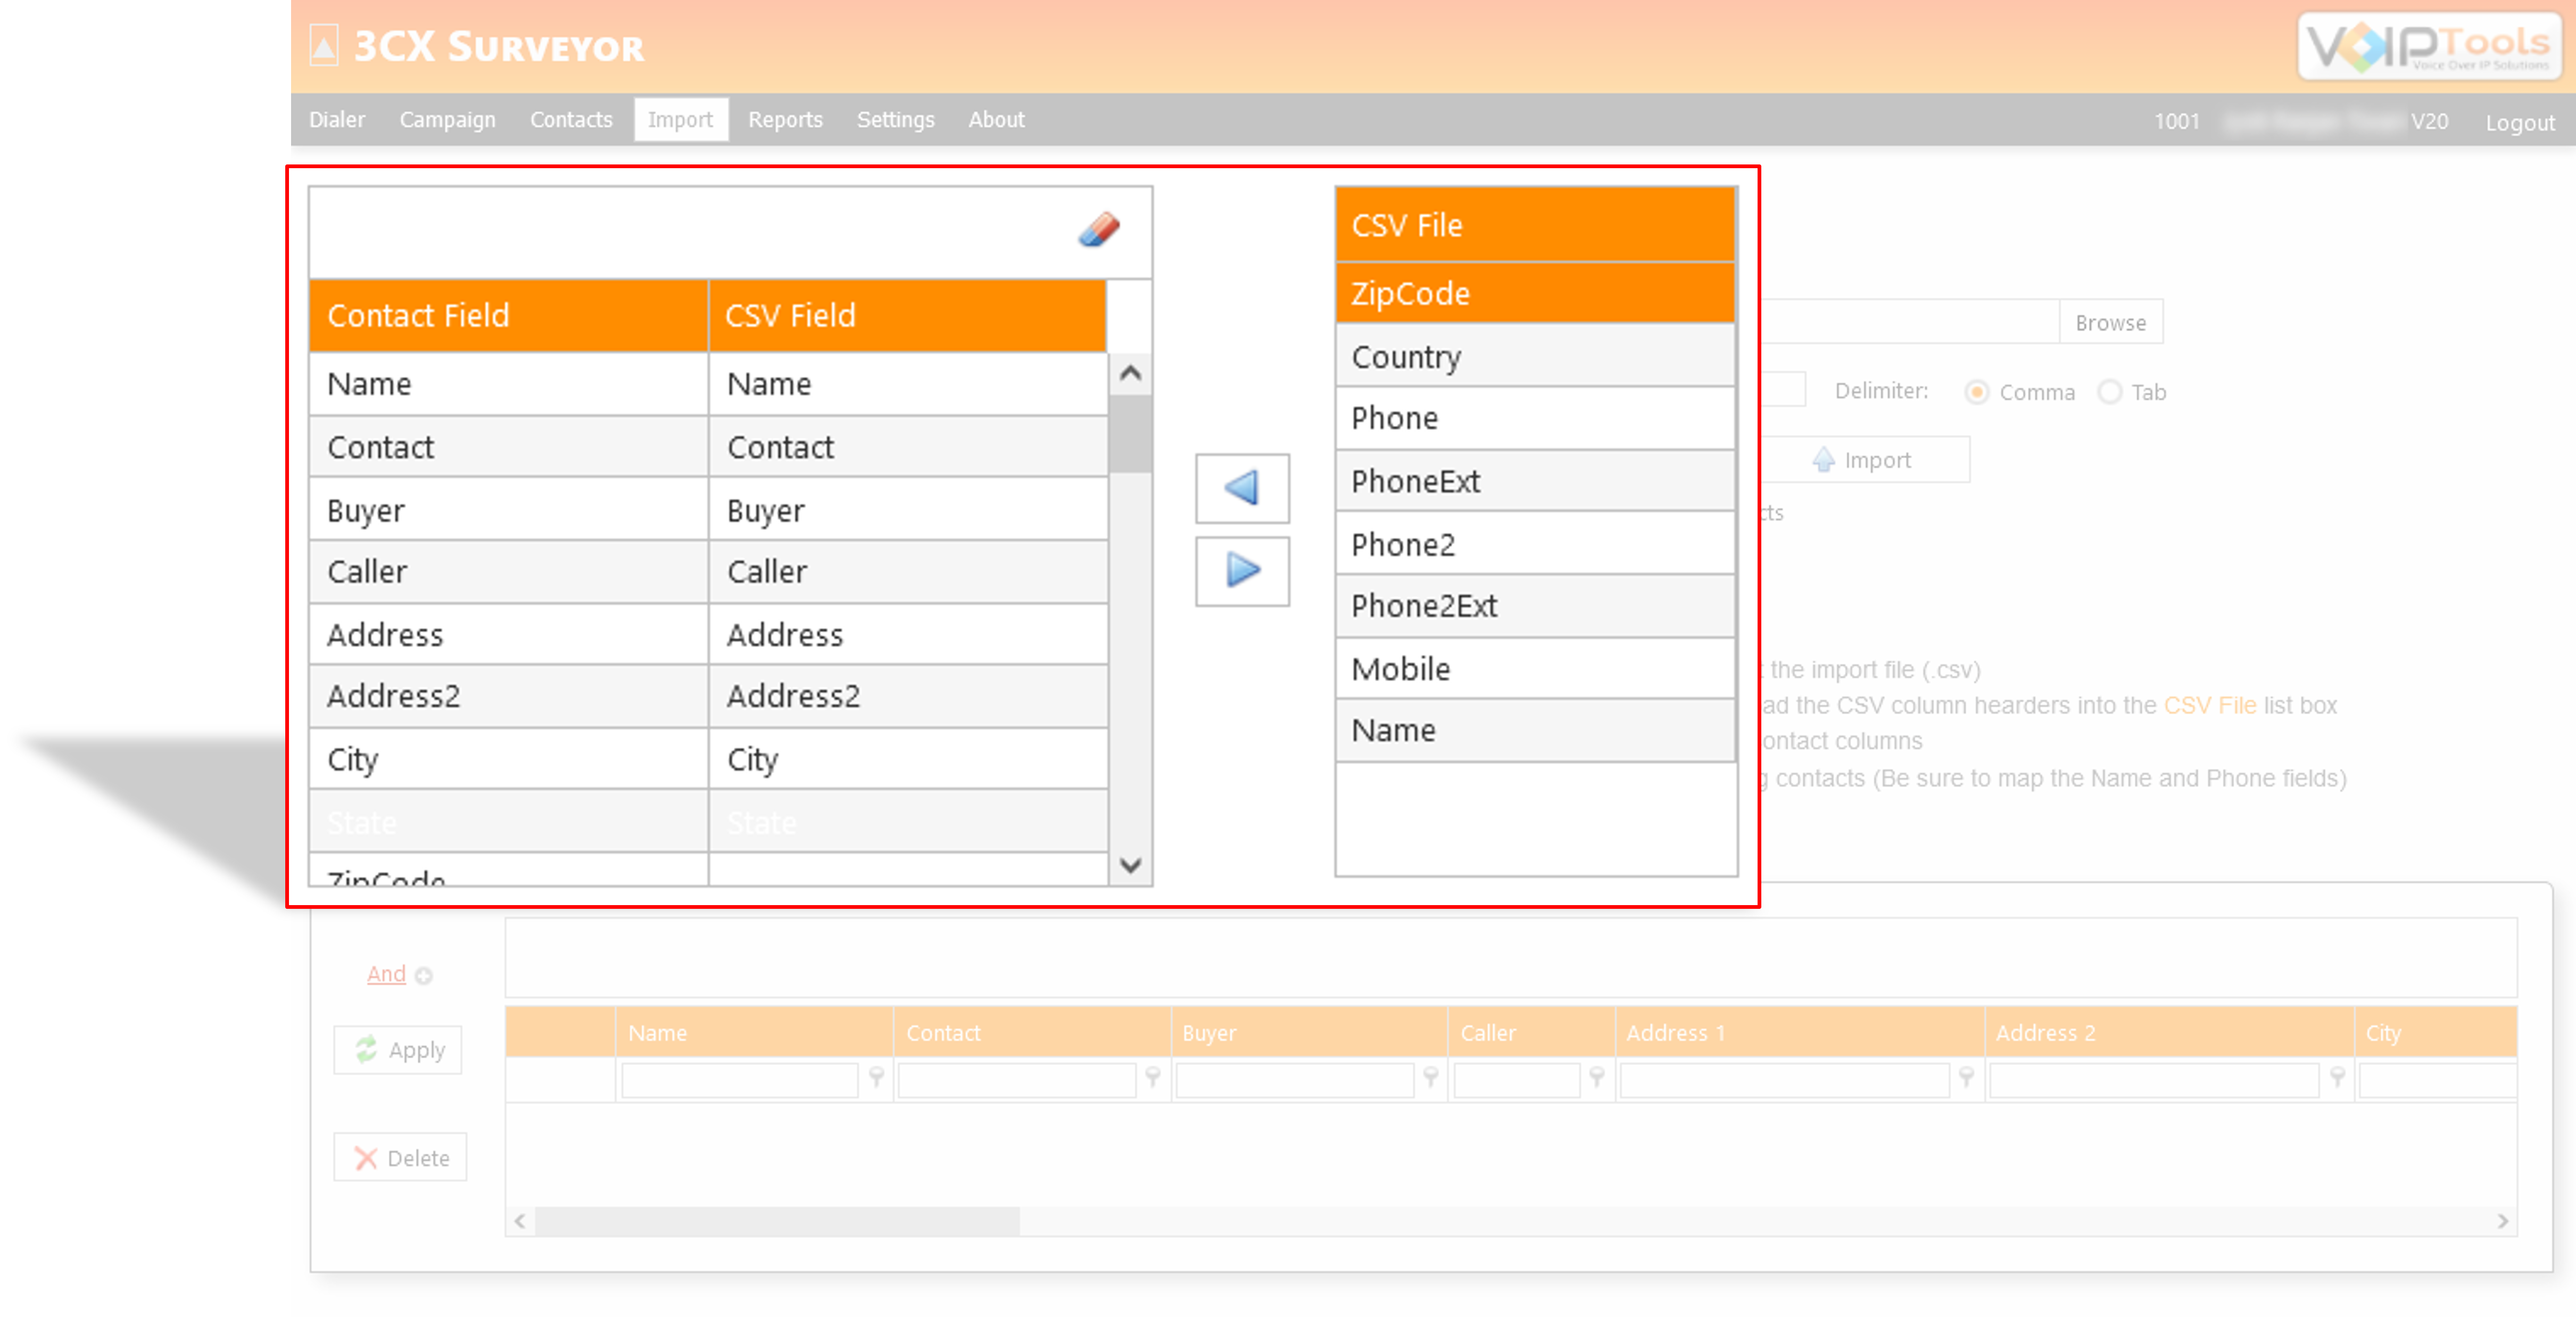
Move each column from the CSV File list box into the CSV Field list box by appropriately using buttons such that the columns in the CSV Field list box will match those of the Contact Field list box.
Figure: Import Contacts – CSV Fields Matching
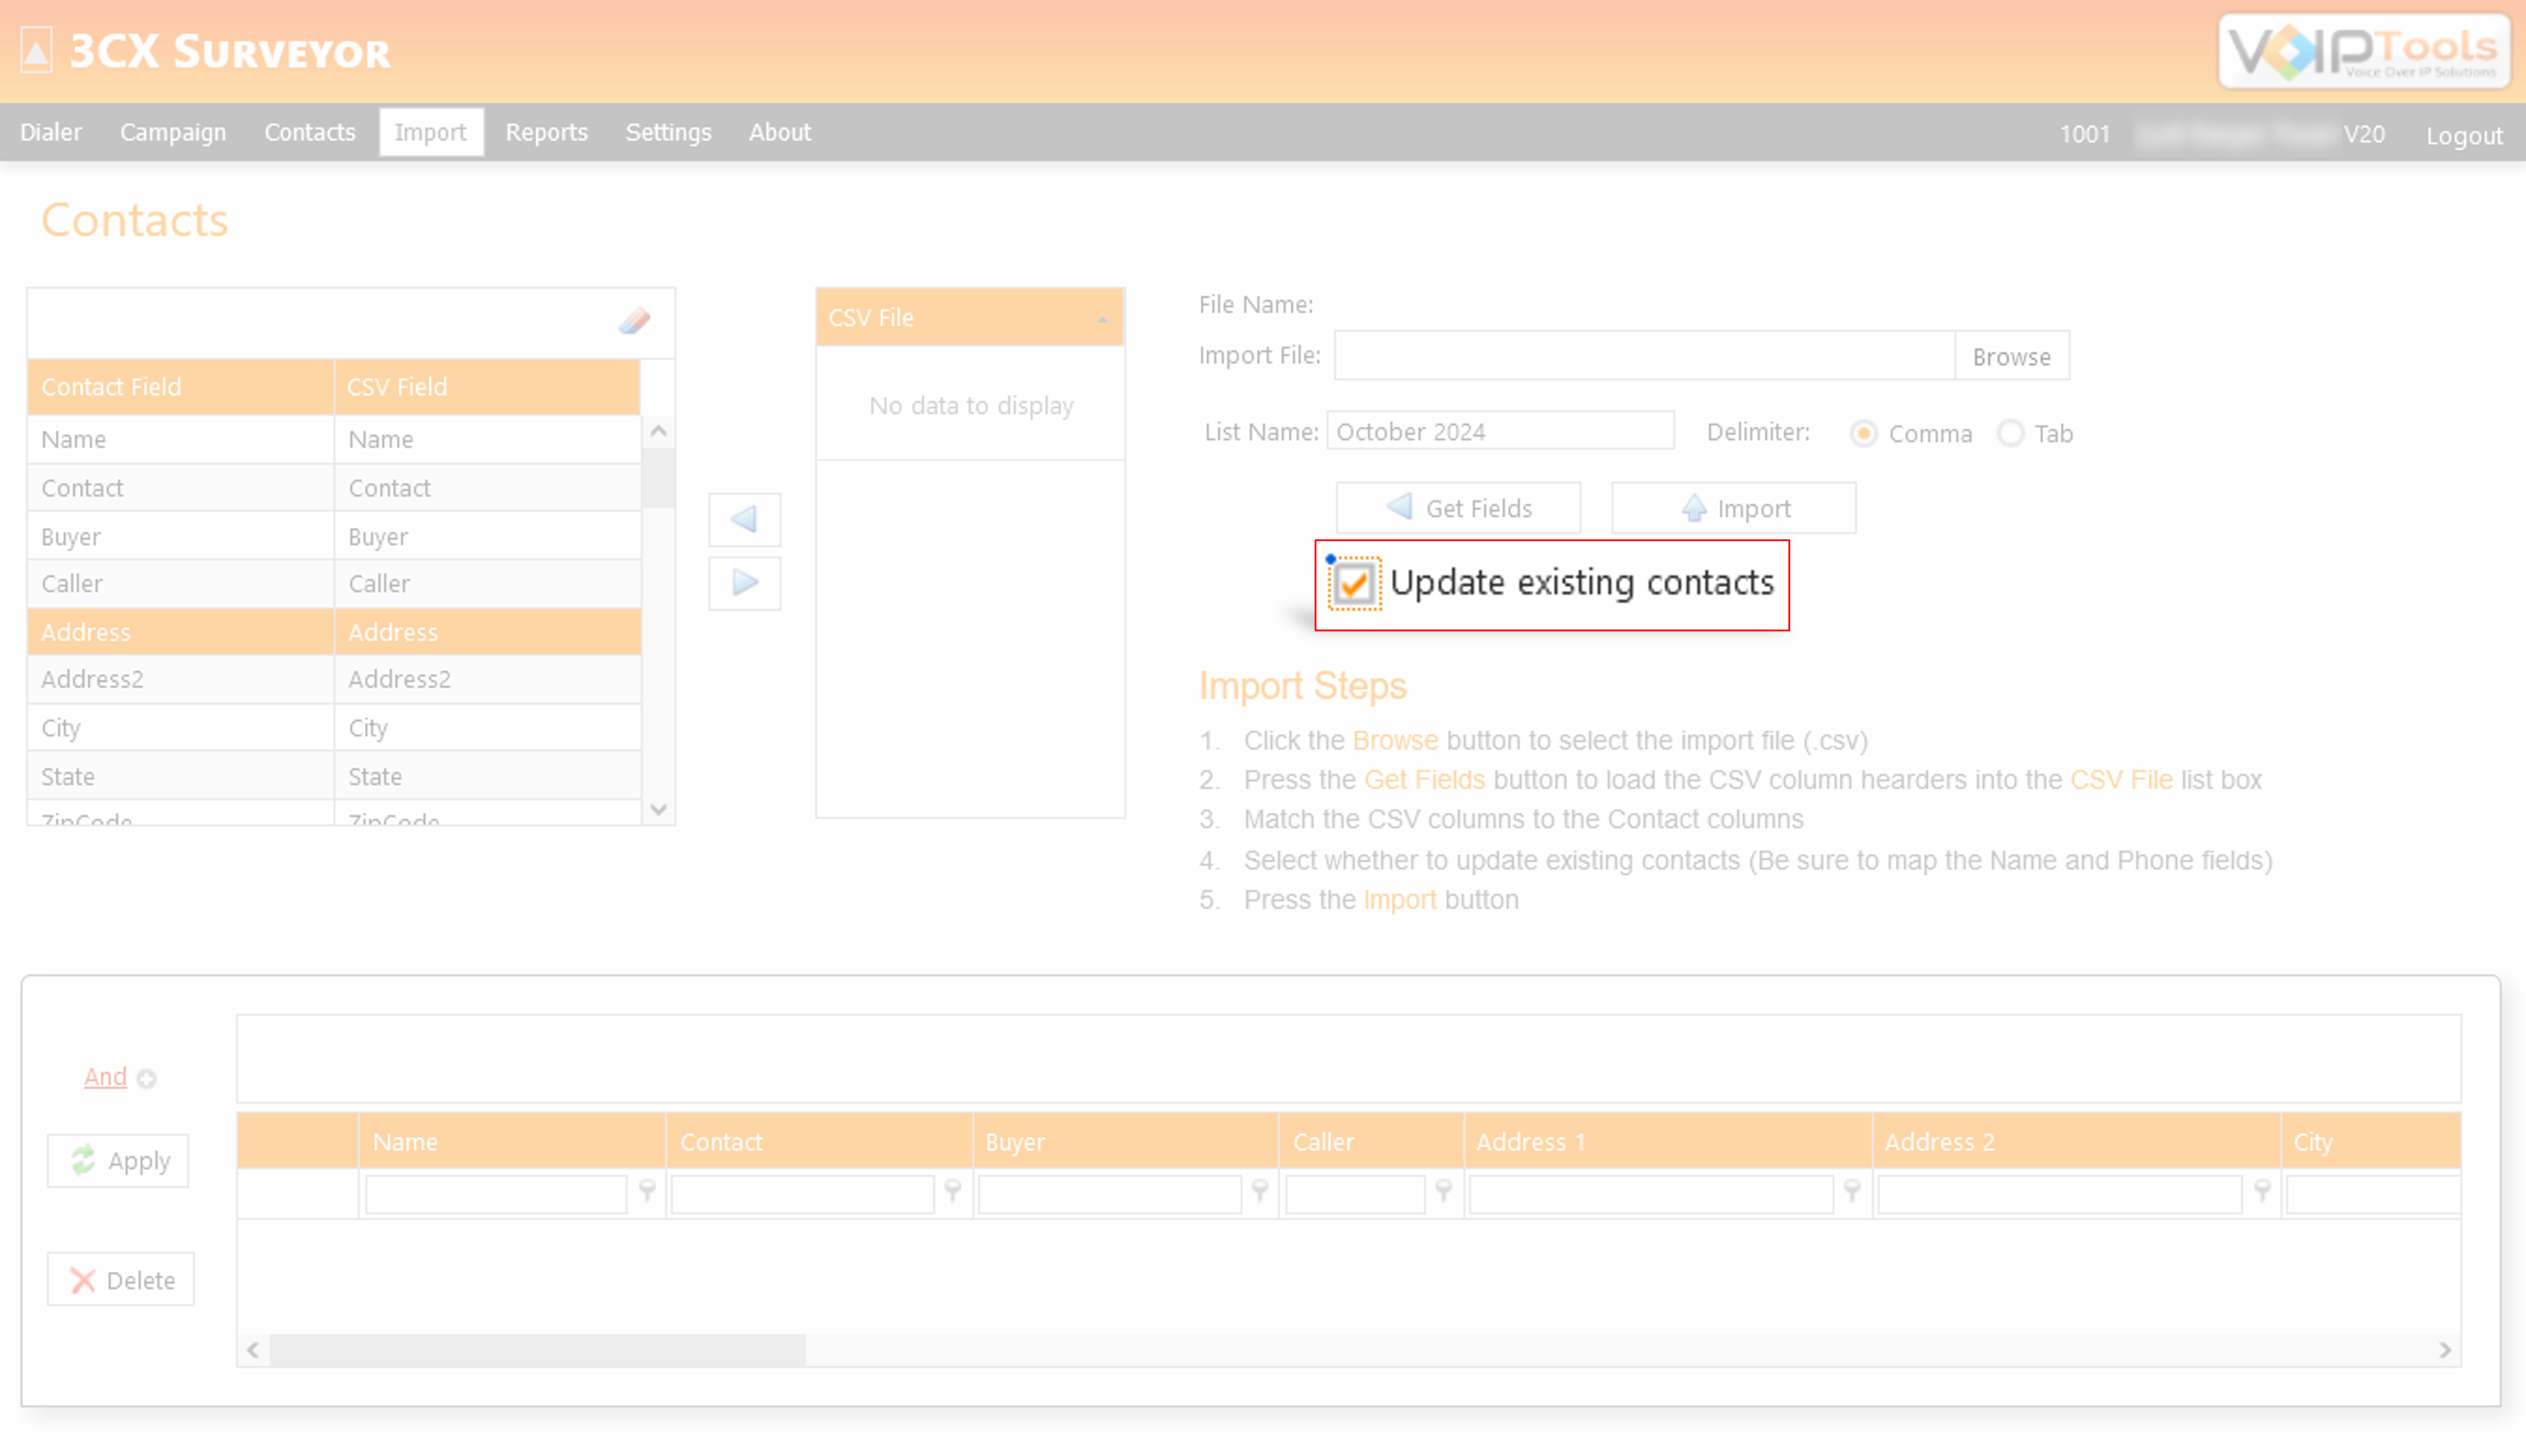
Select the Update Existing Contacts box to overwrite existing contacts.
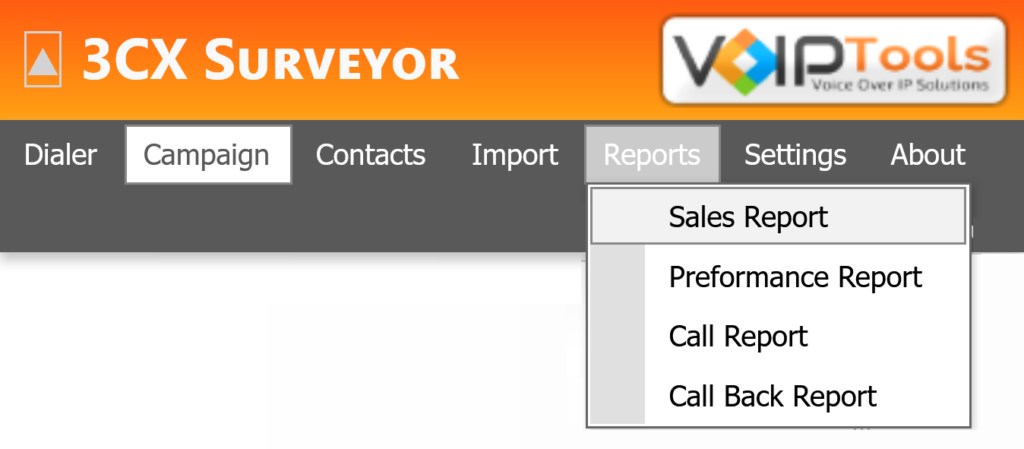
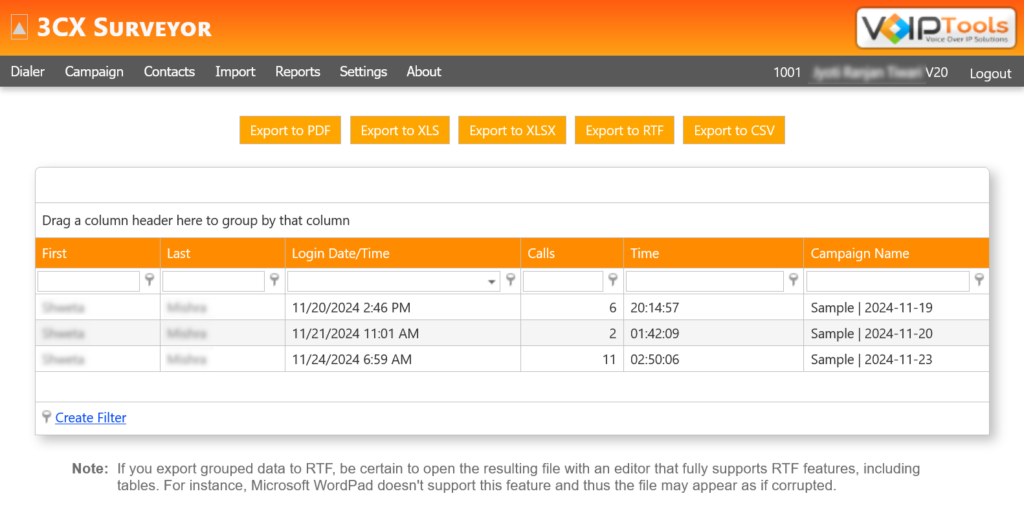
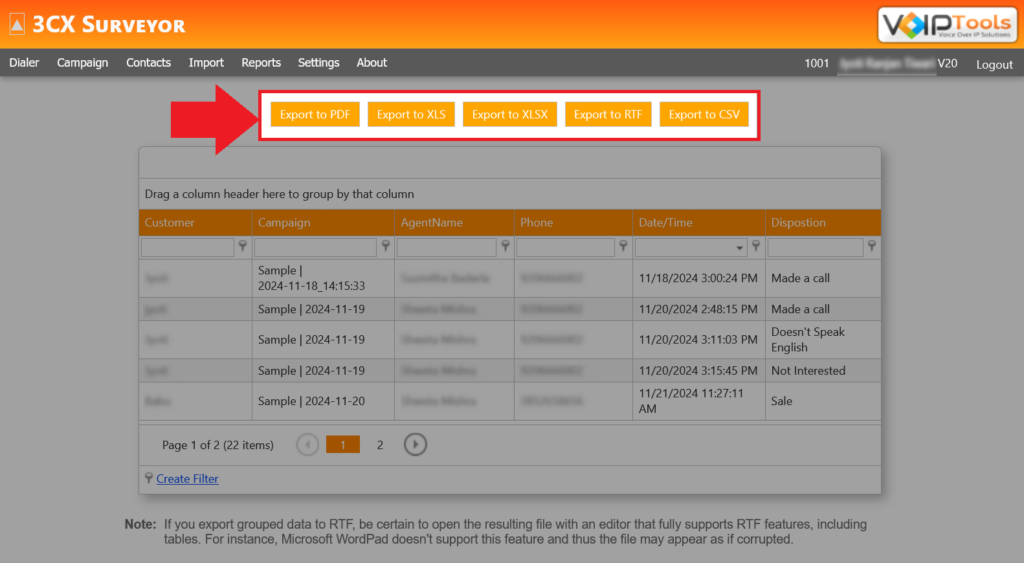
The Reports Menu provides access to various report types, including Sales, Performance, Call, and Call Back Reports. Each report offers valuable insights into different aspects of your business operations, such as campaign performance, agent activity, customer interactions, and callback efficiency. By grouping columns, analyzing trends, and exporting data, you can make informed decisions, optimize strategies, and improve performance. This streamlined process enhances data visibility, supporting better management and operational efficiency across your organization.
Figure: Reports Menu Dropdown
Report Name
Purpose
Sales Report
The Sales Reports screen tracks campaign performance, analyzes sales data, enables grouping, and exports insights for informed decision-making.
Performance Report
The Performance Reports screen provides insights into agent activities, enabling analysis, monitoring, optimization, and export of performance data.
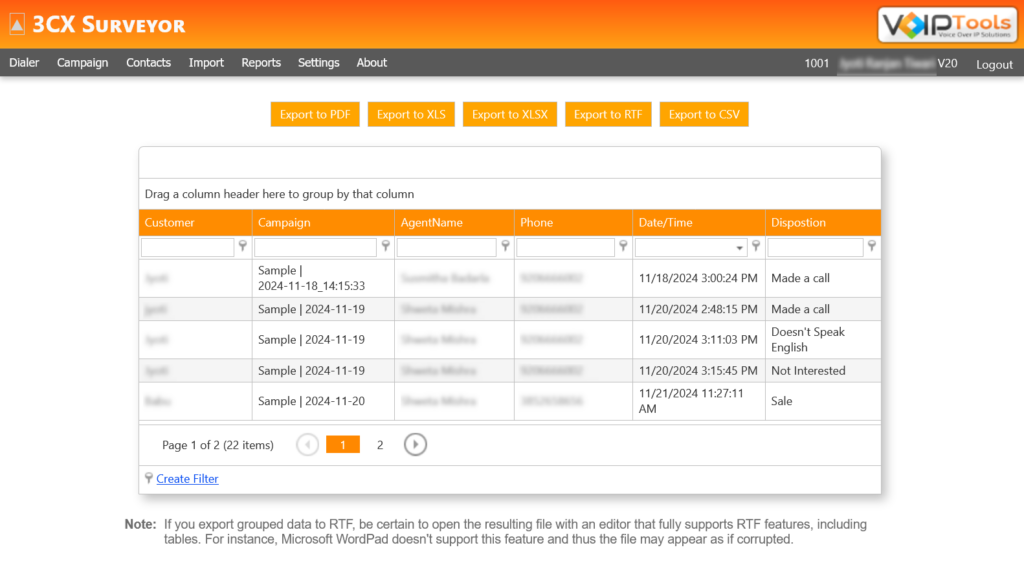
Call Report
The Call Reports screen tracks customer interactions, analyzes call outcomes, evaluates agent performance, and supports exporting and grouping data.
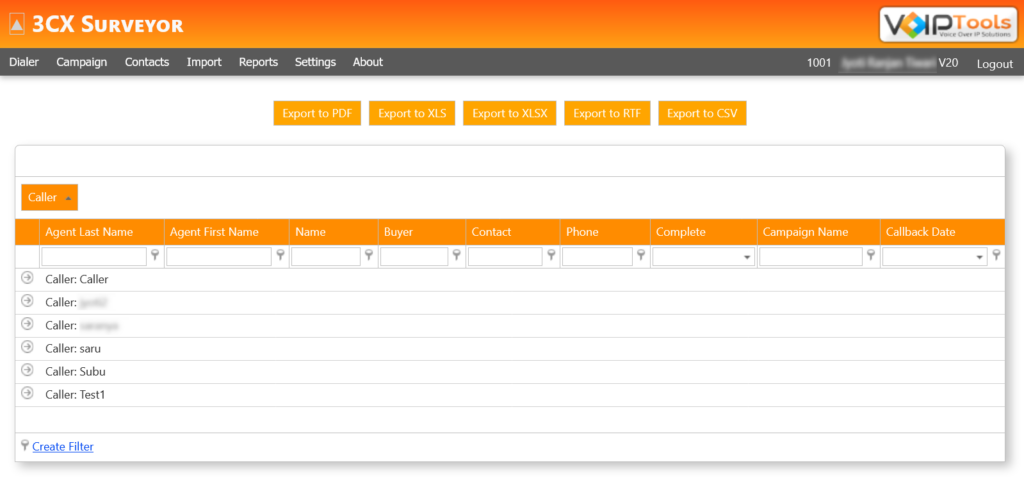
Call Back Report
The Call Back Reports screen tracks callback activities, monitors performance, and enables analysis through column grouping and data export.
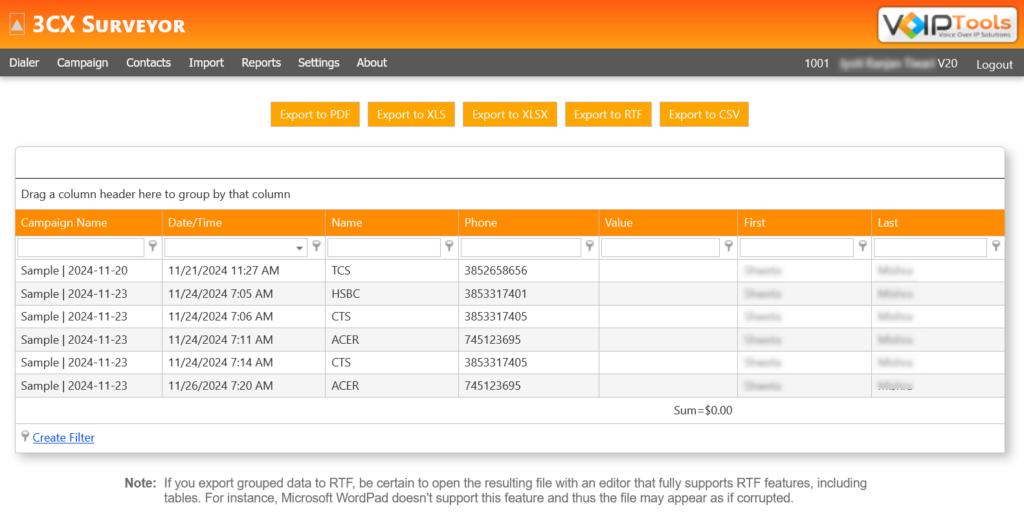
The Sales Reports screen offers detailed insights into sales campaign performance, allowing you to track company interactions, sales values, and key contacts. It helps you analyze trends, group data for better clarity, and export information for further review, facilitating informed decision-making and enhancing overall business strategies.
This section guides you to export the sales report in various file formats to you local device.
Before you Start: Make sure you have logged into the application with manager rights and have navigated to the Sales Reports screen under the Reports menu.
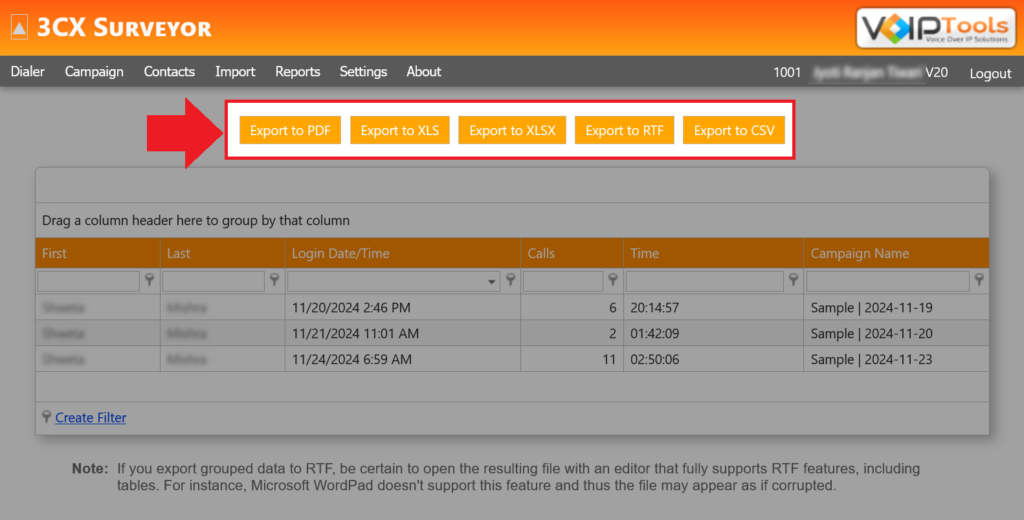
Click any of the desired format to export to your local device.
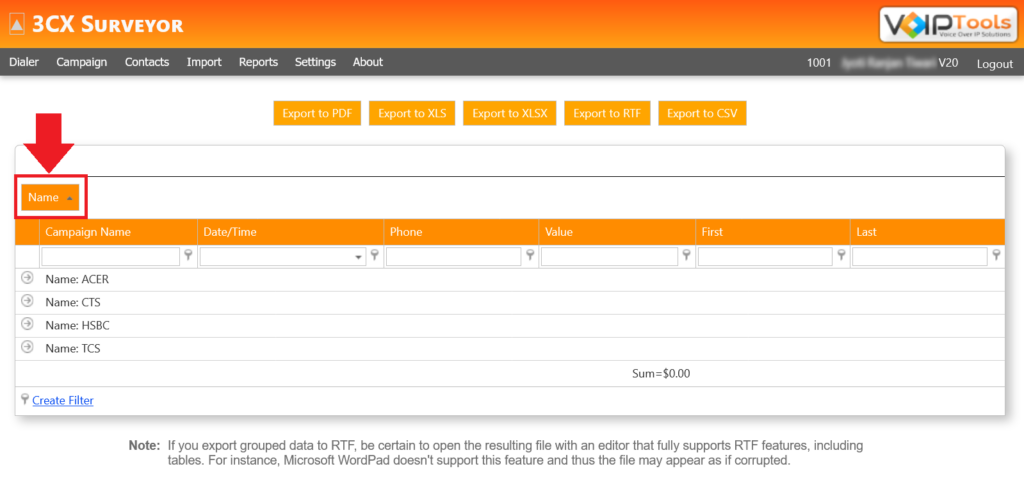
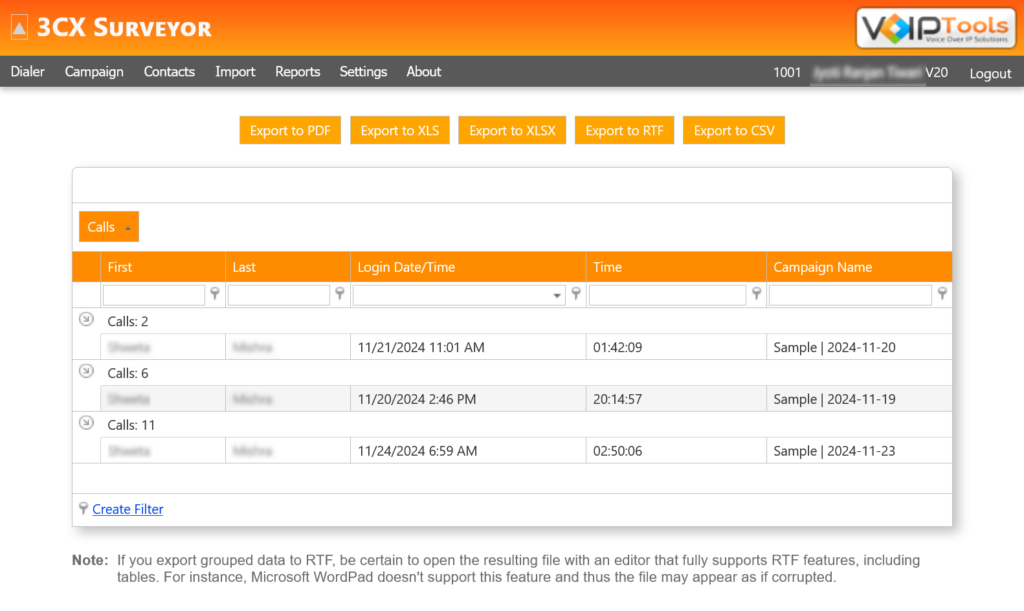
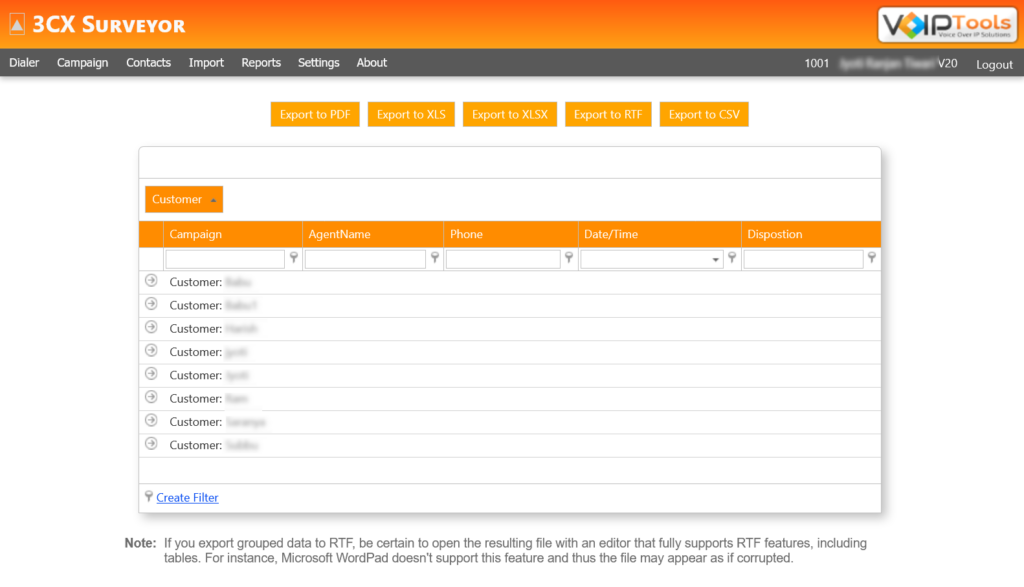
Grouping columns in a report organizes data into logical sections, enhancing readability, enabling comparisons, and simplifying analysis by presenting related information cohesively.
This section guides you to group the columns of the sales reports.
Before you Start: Make sure you have logged into the application with manager rights and have navigated to the Sales Reports screen under the Reports menu.
Drag and drop any of the available columns into the space provided above the columns.
Figure: Sales Report – Columns Grouped
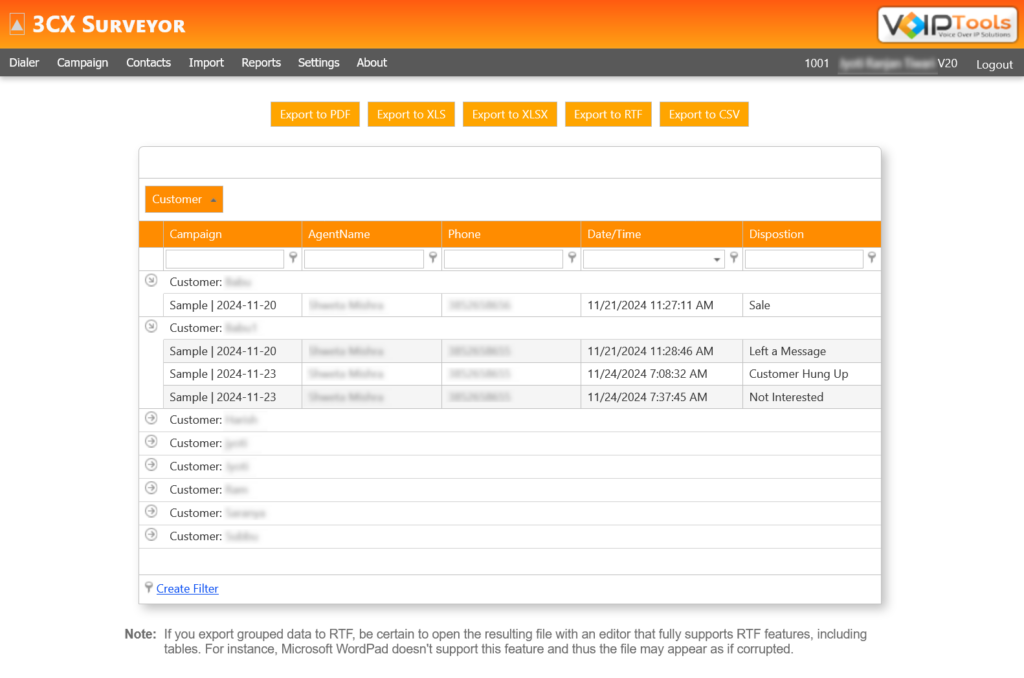
Click the Expand icon to expand the grouped items.
Figure: Sales Report – Columns Expanded
Results: You have grouped the columns in the Sales Reports screen.
NOTE:
The grouped columns do not reflect in the exported files.
The Performance Reports screen offers a comprehensive view of agent activities, including call volume, durations, and campaign involvement. It enables detailed analysis, effective monitoring, and informed decision-making to optimize performance and ensure operational efficiency. Users can group columns for better organization and export data in various formats for further review.
This section guides you to export the performance report in various file formats to you local device.
Before you Start: Make sure you have logged into the application with manager rights and have navigated to the Performance Reports screen under the Reports menu.
Click any of the desired format to export to your local device.
Grouping columns in a report organizes data into logical sections, enhancing readability, enabling comparisons, and simplifying analysis by presenting related information cohesively.
This section guides you to group the columns of the performance reports.
Before you Start: Make sure you have logged into the application with manager rights and have navigated to the Performance Reports screen under the Reports menu.
Drag and drop any of the available columns into the space provided above the columns.
Figure: Performance Report – Columns Grouped
Click the Expand icon to expand the grouped items.
The Call Reports screen provides detailed records of customer interactions, including call dates, times, dispositions, and agent involvement. It enables tracking and analysis of call outcomes, facilitating performance evaluation, campaign effectiveness assessment, and operational improvement. Users can organize data through column grouping and export reports in various formats for detailed review.
This section guides you to export the performance report in various file formats to you local device.
Before you Start: Make sure you have logged into the application with manager rights and have navigated to the Call Reports screen under the Reports menu.
Click any of the desired format to export to your local device.
Grouping columns in a report organizes data into logical sections, enhancing readability, enabling comparisons, and simplifying analysis by presenting related information cohesively.
This section guides you to group the columns of the call reports.
Before you Start: Make sure you have logged into the application with manager rights and have navigated to the Call Reports screen under the Reports menu.
Drag and drop any of the available columns into the space provided above the columns.
Figure: Call Report – Columns Grouped
Click the Expand icon to expand the grouped items.
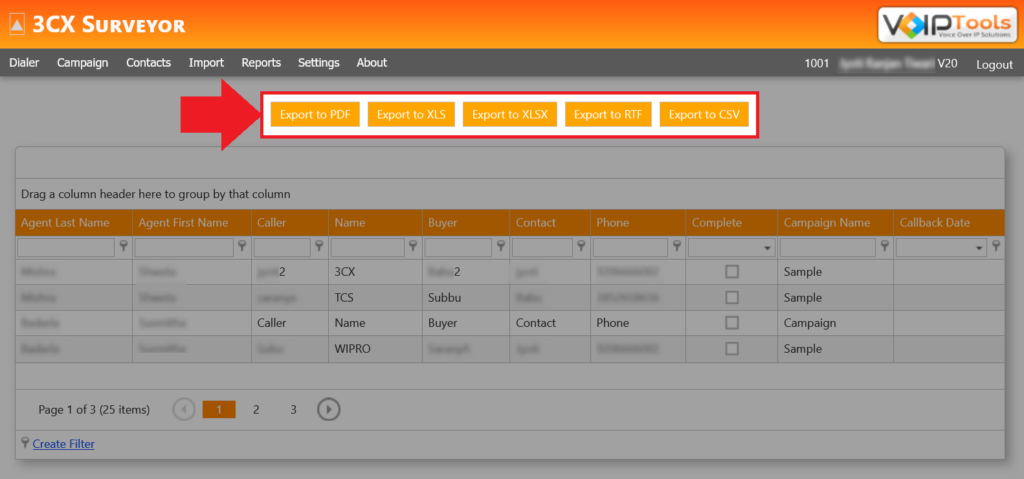
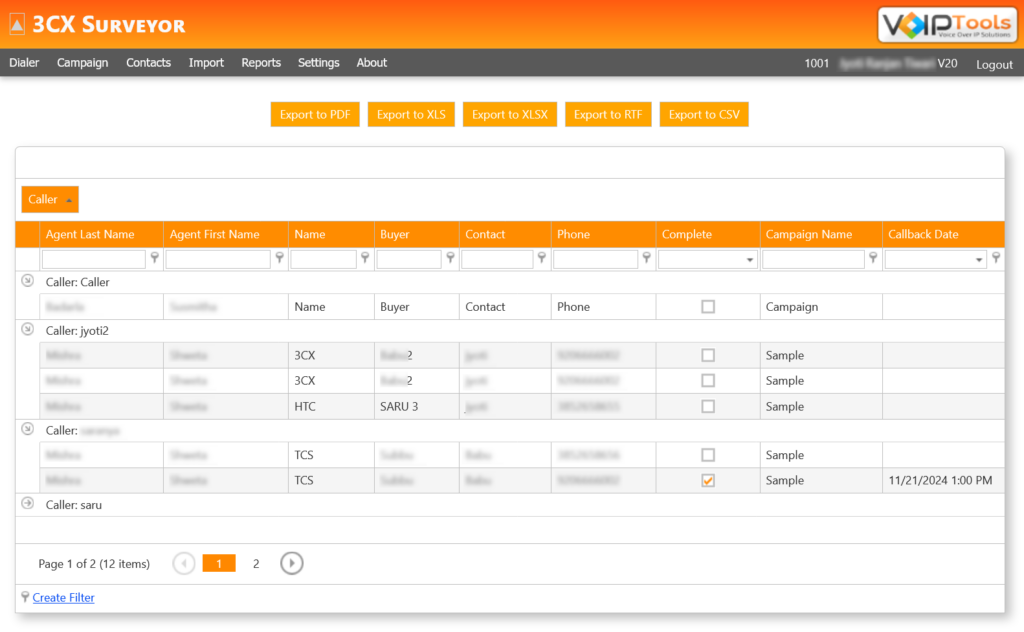
The Call Back Reports screen provides detailed information about callback activities, including caller, buyer, and agent details, as well as callback status and campaign association. It helps monitor callback performance, ensures follow-up actions, and supports analysis through column grouping and data export for effective campaign and agent management.
This section guides you to export the performance report in various file formats to you local device.
Before you Start: Make sure you have logged into the application with manager rights and have navigated to the Call Back Reports screen under the Reports menu.
Click any of the desired format to export to your local device.
Grouping columns in a report organizes data into logical sections, enhancing readability, enabling comparisons, and simplifying analysis by presenting related information cohesively.
This section guides you to group the columns of the Call Back reports.
Before you Start: Make sure you have logged into the application with manager rights and have navigated to the Call Back Reports screen under the Reports menu.
Drag and drop any of the available columns into the space provided above the columns.
Figure: Call Back Report – Columns Grouped
Click the Expand icon to expand the grouped items.
This section guides you to export the Survey report in various file formats to you local device.
Before you Start: Make sure you have logged into the application with manager rights and have navigated to the Survey Reports screen under the Reports menu.
Click any of the desired format to export to your local device.
Grouping columns in a report organizes data into logical sections, enhancing readability, enabling comparisons, and simplifying analysis by presenting related information cohesively.
This section guides you to group the columns of the Survey reports.
Before you Start: Make sure you have logged into the application with manager rights and have navigated to the Survey Reports screen under the Reports menu.
Drag and drop any of the available columns into the space provided above the columns.
Figure: Sales Report – Columns Grouped
Click the Expand icon to expand the grouped items.
Figure: Sales Report – Columns Expanded
Results: You have grouped the columns in the Survey Reports screen.
NOTE:
The grouped columns do not reflect in the exported files.
The About menu provides essential information about the application, including the version number, company details, and contact information for support. It serves as a reference to verify the software version you are using and facilitates easy access to customer support for assistance or inquiries.
You get quick answers to most of your inquiries in our online manual. If you prefer direct contact, we offer various support channels, including phone, email, live chat, and our helpful VoIPTools forums.
Rest assured, our dedicated team is here to assist you around the clock, every day of the year. Whether you’re based in the USA or India, we’re ready to provide prompt responses to your technical queries.
Windows Event Log for VoIPTools Applications and Services #
For troubleshooting any application errors, our Windows Event Log contains a comprehensive list of error messages, warnings, and informative notes related to all our VoIPTools applications and services. It’s a valuable resource to help you pinpoint and resolve any issues you may encounter.
Are you looking to collaborate with other VoIPTools customers facing similar challenges? Our forum is the perfect platform to exchange ideas, solutions, and best practices. Join the conversation at: https://www.voiptools.com/community/
Got questions that need immediate answers? Our chat support team is available to assist you in real time. Just click on the Live Chat button located at the lower right corner of our website, and we’ll acknowledge your queries right away.
To ensure a thorough understanding of your concerns, email us at support@voiptools.com. Describe your issue in detail, and we’ll get back to you within one business day with the support you need.
If you prefer to speak with a representative directly, you can reach us at +1 801-642-4655. Our attentive team is available to take your calls from 8:00 AM to 6:00 PM (Central Standard Time).
If you’ve purchased our products through a VoIPTools Partner, rest assured that they provide first-level support at no additional cost. Partners have access to 100% free technical assistance and actively participate in the troubleshooting process.
VoIPTools customers enjoy access to our online manuals and receive support through emails (with responses within one business day) and live chat. However, please note that we do not provide remote server login assistance.
For a more hands-on experience, consider our “Installation Support” package. Our expert support team can log in to your servers, and install and configure all our tools. This comprehensive service includes setting up SQL Server Express and Internet Information Server if necessary. We’ll work closely with you to tailor our applications to meet your requirements.
We’re committed to providing top-notch support to ensure your VoIPTools experience is smooth and hassle-free. Contact us today, and let us assist you in making the most of our powerful tools!


NOTE:


 button to download your application.
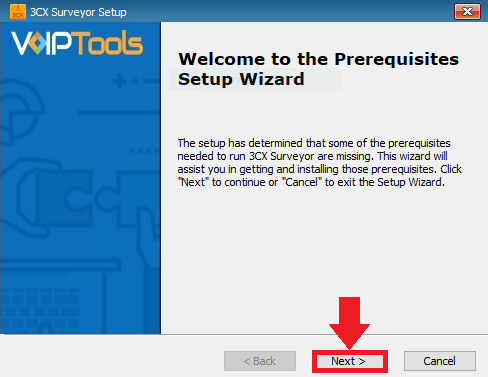
 to open the web application.
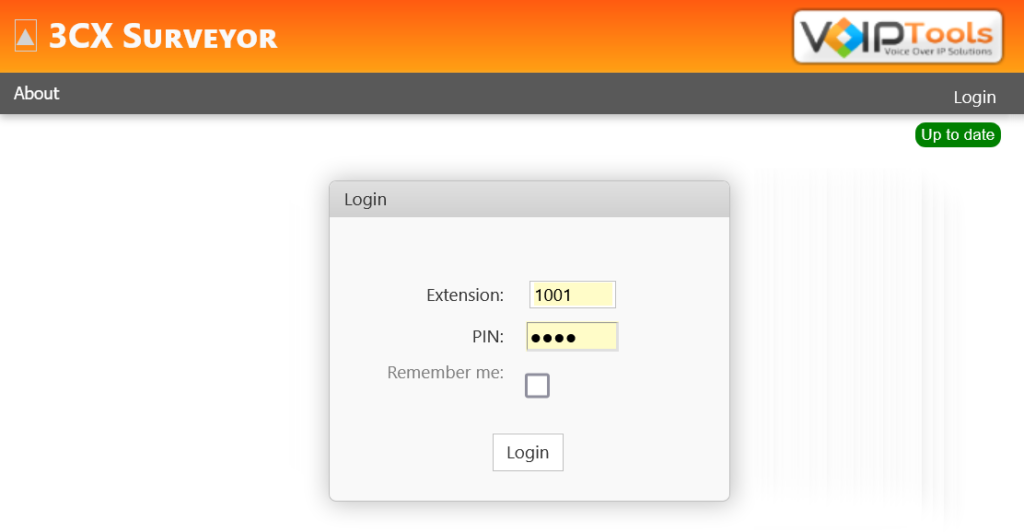


 button.
NOTE:
 button to apply the saved actions.
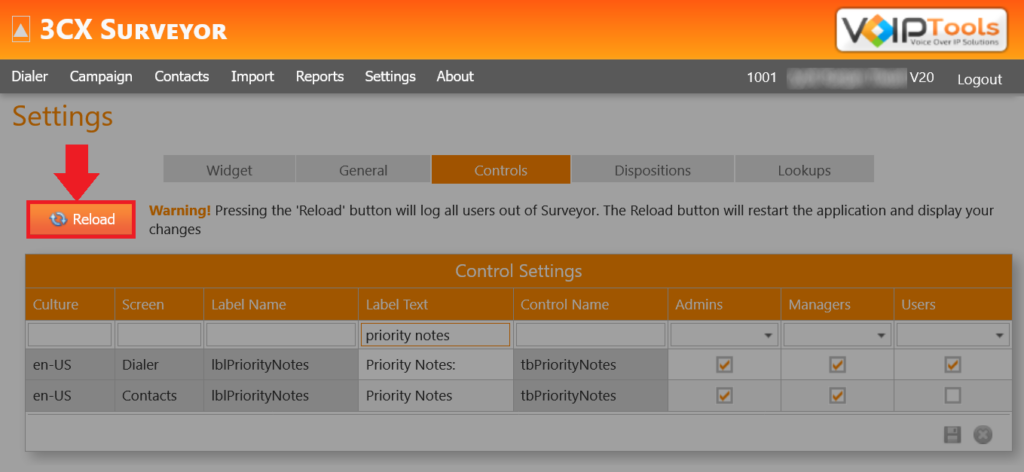

 button to save your actions.
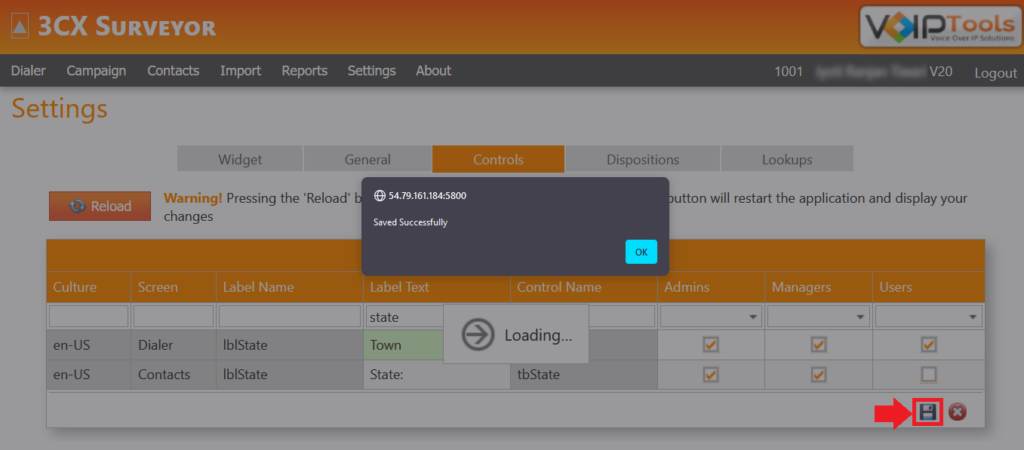
NOTE:
 button.
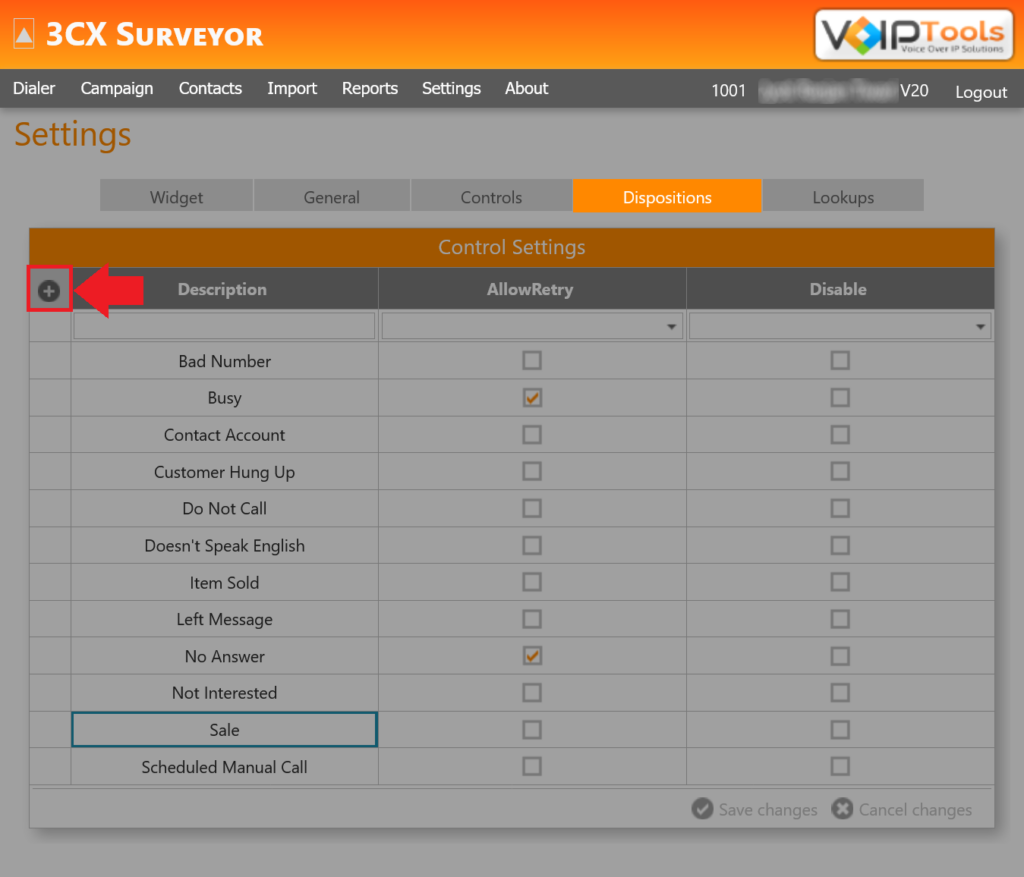
 button to save your changes.
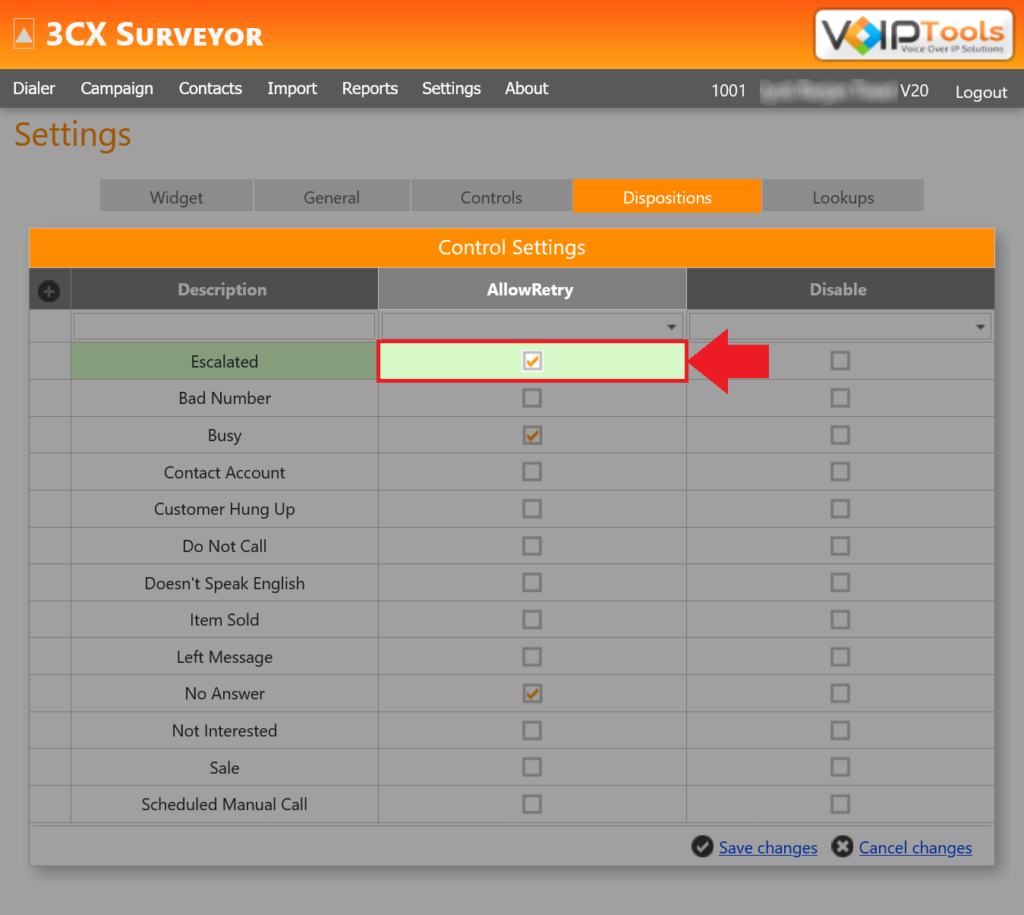
 button.
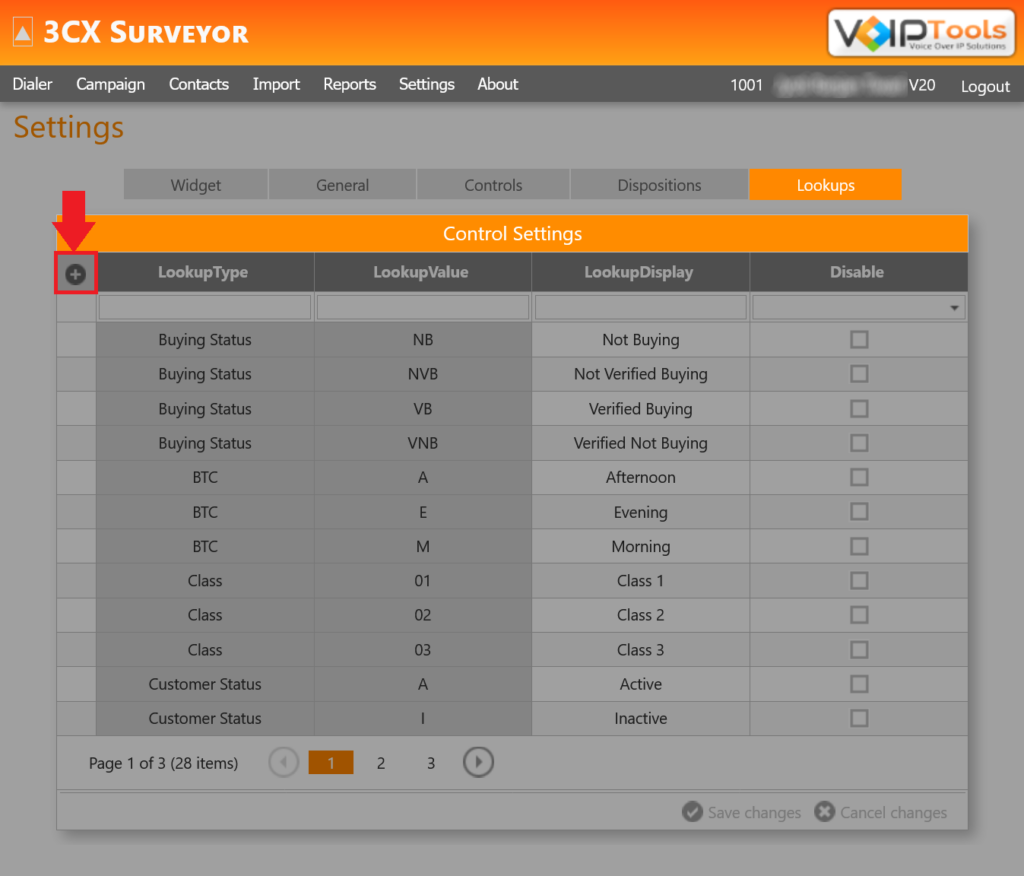
 to save the new lookup.
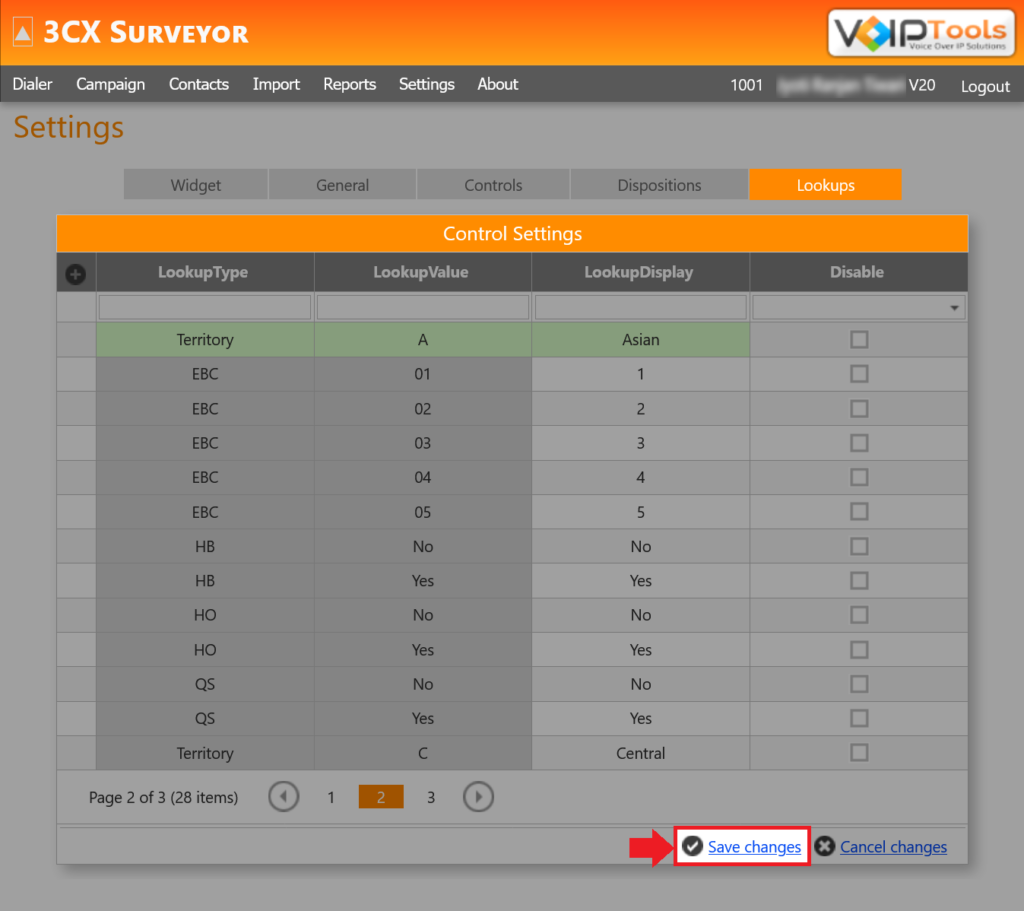


 icon in the Call Control widget.
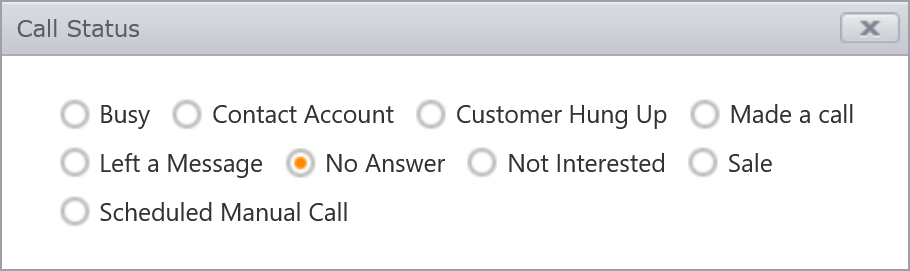
 button.
 button.
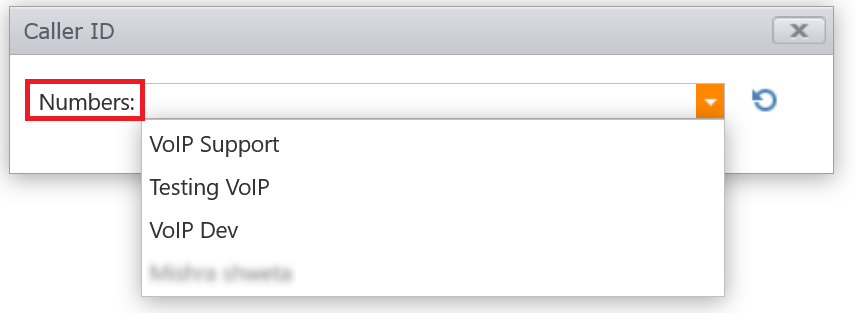
 button.
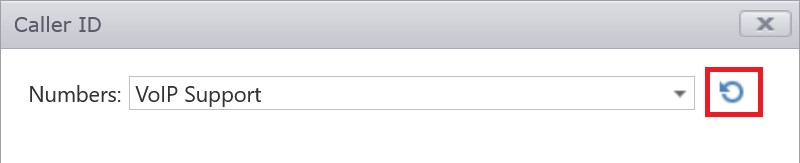
 icon.
icon.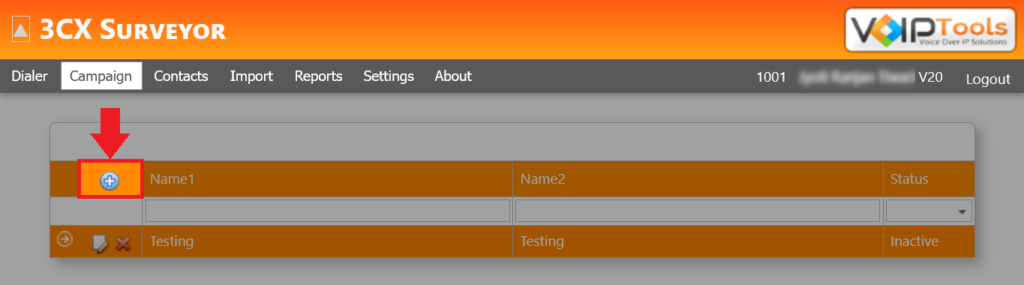
 icon.
icon.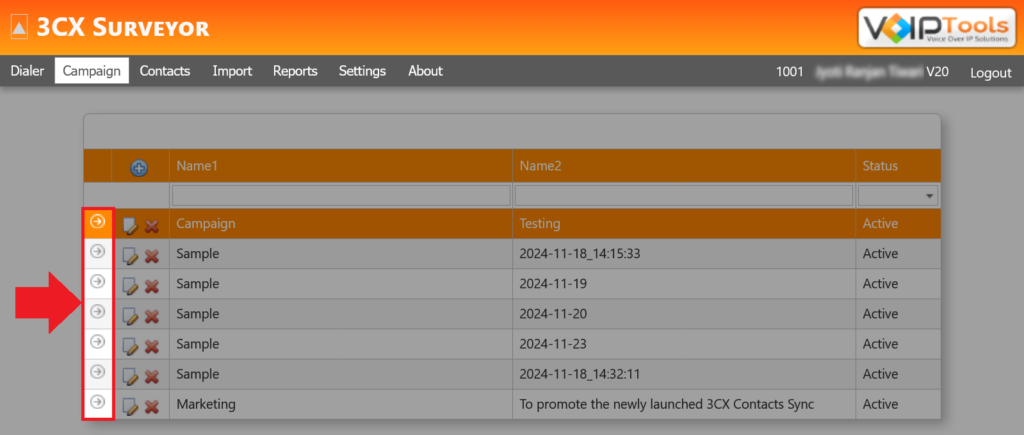
 icon.
icon.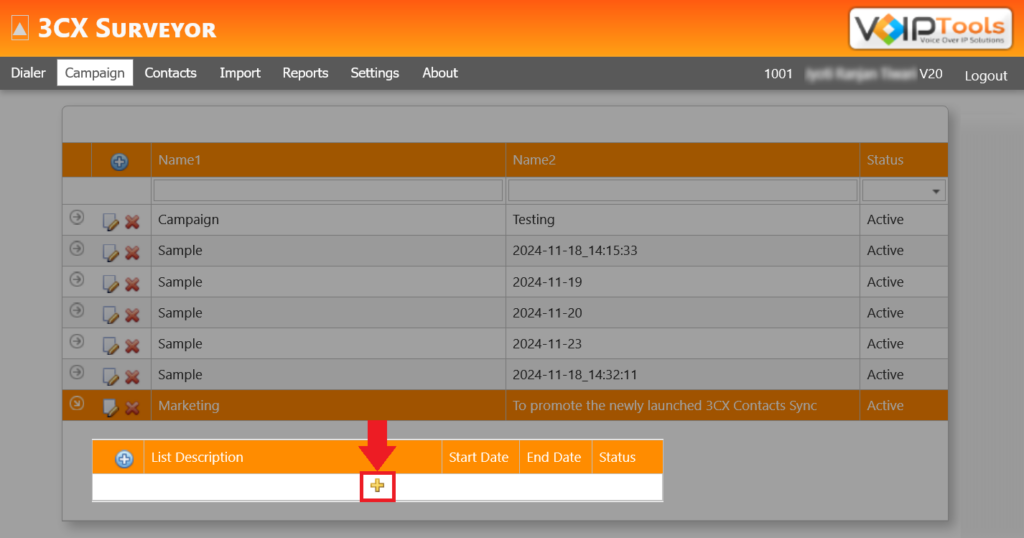
 icon.
icon.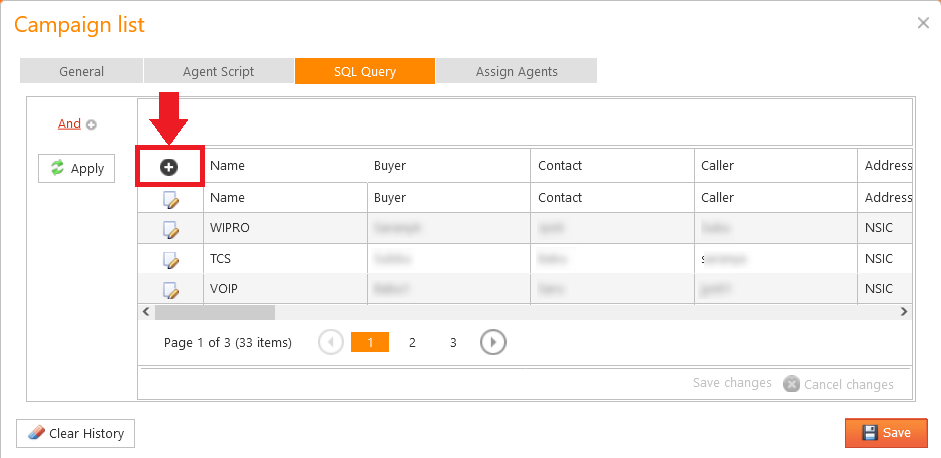


 icon.
icon. icon for the desired question to open the Add/Edit Questions popup.
 icon besides the desired question.
 button. 3CX Surveyor finds the person from the database and populates the information in all the fields.


 icon.
icon.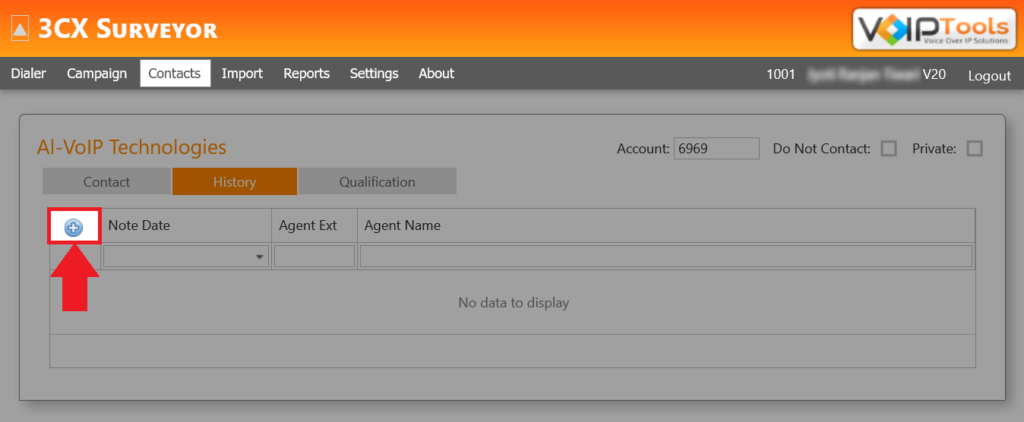
 button to import all the contacts from the CSV file into the central repository of contacts.
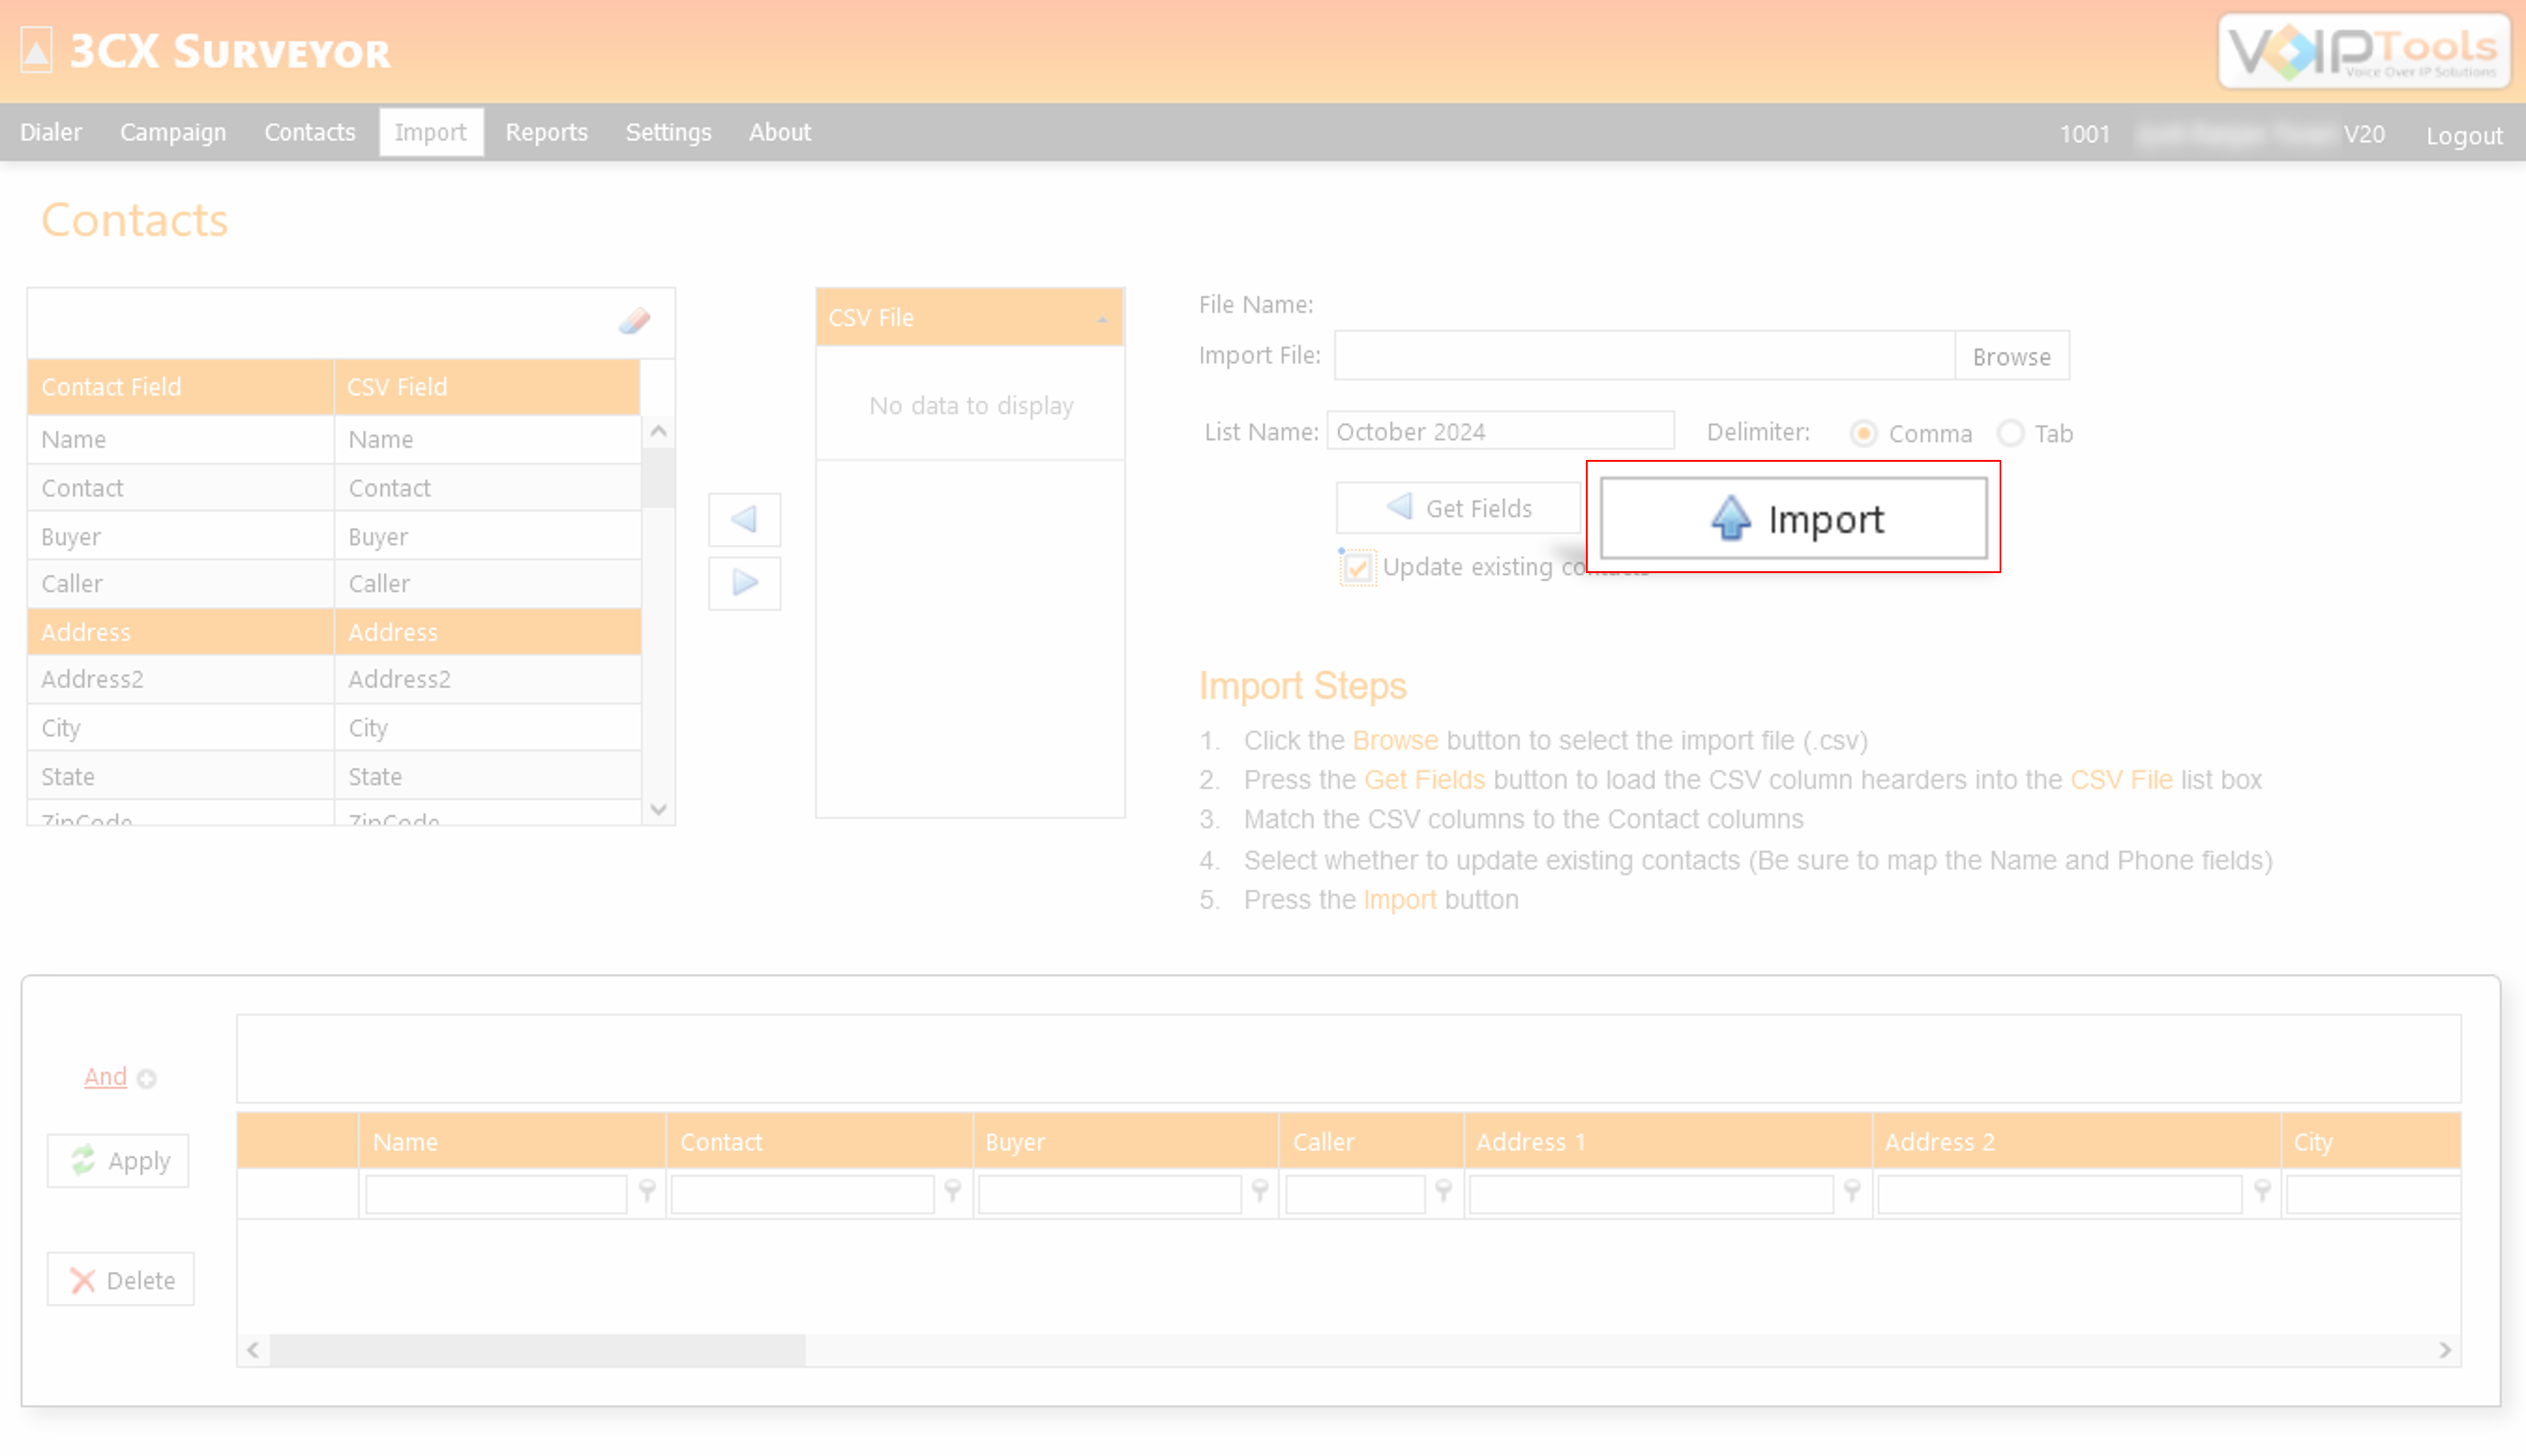

 icon to expand the grouped items.


