3CX On Call Manager is a great solution for after-hours office calls. This tool seamlessly integrates with 3CX, simplifying automated after-hours notifications. Forget about expensive answering services. Create recurring on-call schedules for your staff, choose live answering or voicemail options, and customize employee notifications via phone, email, or SMS with 30 escalation levels. Say goodbye to updating forwarding numbers or using support cell phones. With 3CX On Call Manager, set up schedules easily, manage them on a user-friendly web portal, and handle after-hours support
Common Challenges Faced when handling on-call Requests #
COSTLY BURDEN
Handling on-call requests can pose significant financial challenges, especially for large companies with multiple departments, due to the high costs associated with the traditional system.
TIME-CONSUMING SPREADSHEETS
Handling your answering service using intricate spreadsheets can become burdensome and time-consuming, particularly when considering factors such as sick leaves and other variables.
INEFFICIENT NOTIFICATIONS
Notifying the appropriate individuals promptly can be challenging, resulting in delays and possible miscommunication that could affect vital operations and decision-making.
UNRESPONSIVE STAFF CHALLENGES
Handling on-call requests becomes problematic when staff members fail to respond, leading to potential service disruptions and difficulties in promptly resolving issues.
TRACKING PERFORMANCE AND SLA
Monitoring and tracking Service Level Agreements (SLAs) and staff performance can be a challenging and time-consuming task, making it hard to uphold consistent service standards and identify improvement areas.
CHOOSING BETWEEN VOICEMAIL AND LIVE ANSWER
Choosing between voice mail and live answering services can be a challenging decision due to the differing limitations and drawbacks of each option, which might not align with your particular requirements and customer expectations.
Effortlessly integrate the 3CX On Call Manager to streamline automated notifications and empower exceptional customer service. Connect seamlessly with your current 3CX system and revolutionize communication methods.
COST-EFFECTIVE SCALABILITY
Farewell to rising costs! The On Call Manager differs from other answering services by providing unlimited notification groups. You can now expand your operations without concerns about extra charges.
UNLIMITED VOICEMAIL
Ensure you never miss a message again by utilizing unlimited voicemail boxes. Organize and access your voicemails with ease, guaranteeing that all essential messages are accounted for and promptly attended to.
SIMPLIFIED CALENDAR-BASED SCHEDULING
Streamline scheduling with the calendar-based recurring schedule feature. Say goodbye to manual forwarding rule adjustments, phone passing between colleagues, and cumbersome spreadsheets. Efficiently manage on-call agent availability, saving time and reducing potential errors.
MULTIPLE ESCALATION CHANNELS
Enhance escalation capabilities through diverse communication channels for prompt handling of urgent matters. Utilize SMS, email, and phone calls to instantly escalate important issues, ensuring timely and efficient delivery of critical notifications to the appropriate recipients.
SECURE USER ROLES
Ensure control and security through customizable roles. Grant administrative privileges solely to managers, protecting schedules and preventing unauthorized changes by agents.
INSIGHTFUL EVENT LOGS
Enhance operational efficiency using comprehensive event logs. Monitor support requests during non-business hours, ensure adherence to service level agreements, and assess staff performance efficiently for informed decision-making.
EFFORTLESS ON-CALL SCHEDULES
Efficiently establish recurring on-call schedules, removing the necessity for frequent call forwarding rule updates or the shared use of on-call cell phones within your team. Sustain a seamless and consistent schedule without interruptions.
EFFECTIVE NOTIFICATION HANDLING
Achieve prompt response rates by implementing a notification escalation system for unanswered calls. Employ up to 30 escalation levels with multiple contacts assigned to each level, ensuring critical calls are always attended to.
FLEXIBLE CALL HANDLING
Improve customer experience through adaptable call handling. Direct callers to a queue initially for personalized service. If agents are busy, seamlessly switch to voicemail to capture crucial messages.
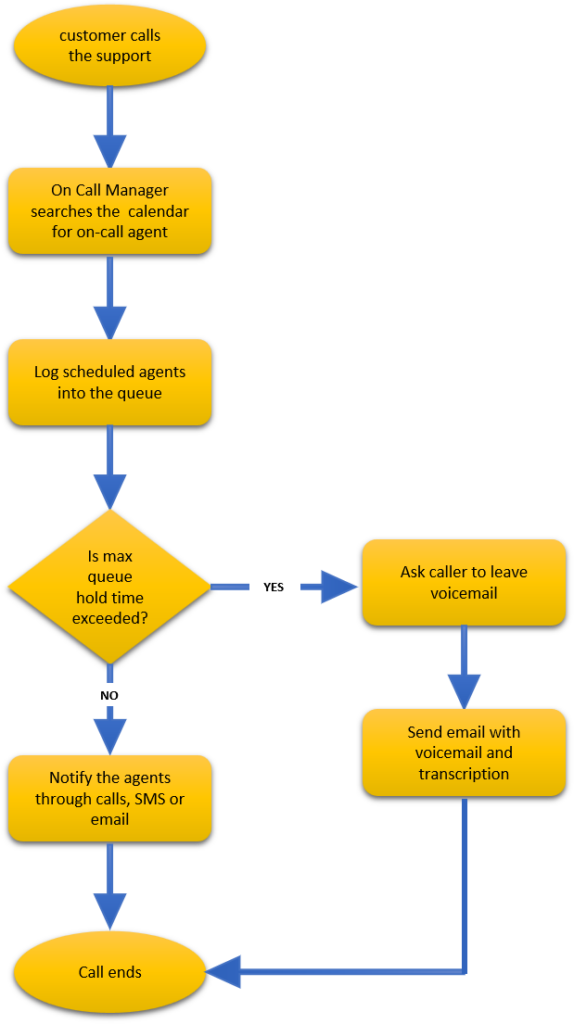
When customers are directed to a support queue, 3CX On Call Manager actively searches a calendar to identify the designated agent responsible for handling after-hours support calls. The software seamlessly logs the assigned agents into the queue, ensuring efficient management. In cases where the maximum queue hold time is exceeded, the caller will be prompted to leave a voicemail. 3CX On Call Manager promptly notifies your staff about the newly generated support request, employing various communication channels. In addition to initiating phone calls to your staff, this program facilitates the transmission of text messages and emails. These notifications contain a comprehensive package, comprising the customer’s voicemail recording and a text transcription for convenient reference by your team.
You can order 3CX On Call Manager online at https://www.voiptools.com. Your order confirmation email will include your license key and a link to download the software.
There are a number of prerequisites that must be installed prior to installing the 3CX On Call Manager. These prerequisites include Microsoft Internet Information Server (IIS) and Microsoft SQL Server
This User Guide contains step-by-step instructions to successfully install 3CX On Call Manager. Begin by extracting the installer from the downloaded zip file (Step 1 above), then run the setup program named OnCallManager.exe
You must register your license key to activate 3CX On Call Manager. Your license key is included in your order confirmation email, and can also be found in your order history on our website.
Find the software download link in the Order Confirmation Email, or you can find it in your order history on our website and download the 3CX On Call Manager application.
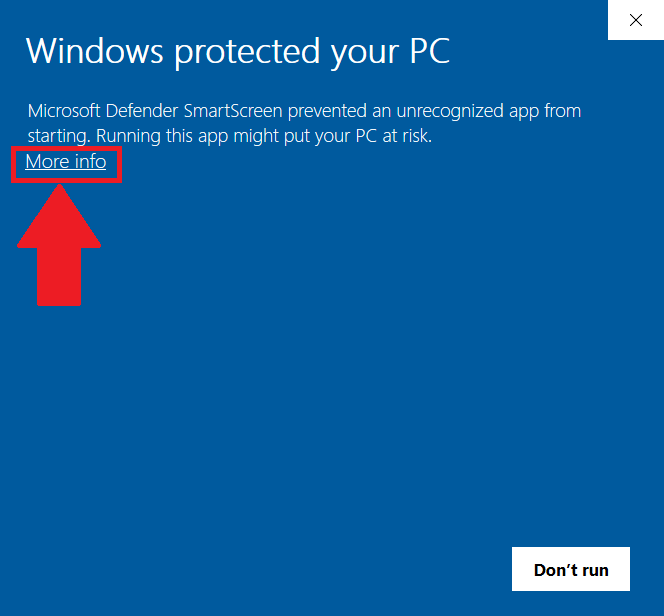
In the Microsoft Defender SmartScreen, click the More Info option.
Figure 1: Microsoft Defender: More info
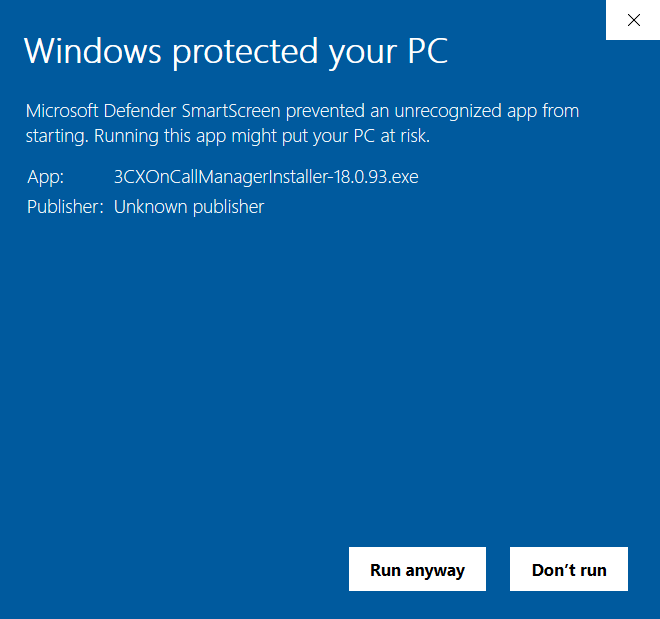
Click the Run Anyway option to start the installation.
Click on the software installer that was downloaded in step 1 above. The installation wizard will automatically identify the needed prerequisites and assist you with the install of the prerequisites needed to run ‘3CX On Call Manager’. These include .NET Framework (Web Installer), SQL Server Express (Web Installer) and, SQL Server Management Studio.
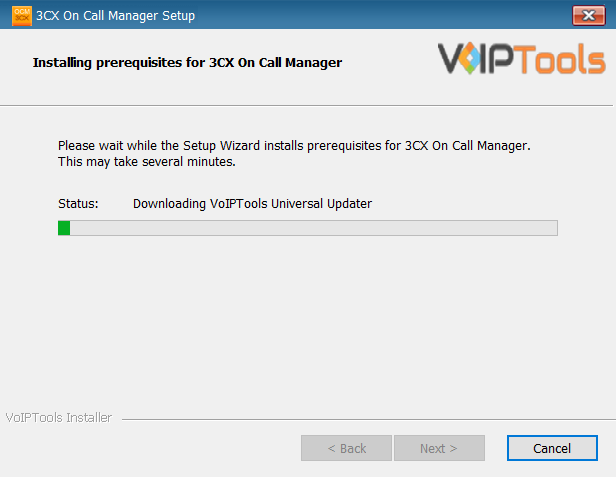
Click the downloaded installer executable to launch the Prerequisites Setup Wizard and click Next.
Figure 3: Prerequisites Setup Wizard
In the Prerequisites window, the installer will identify the missing prerequisites. It is important that you install all the required prerequisites. However, you can select/unselect the applications to be installed based on your unique requirements. Click Next to continue.
Figure 4: Select Prerequisites to Install
The installer will download and install the selected applications.
Figure 5: Prerequisites Installation in progress
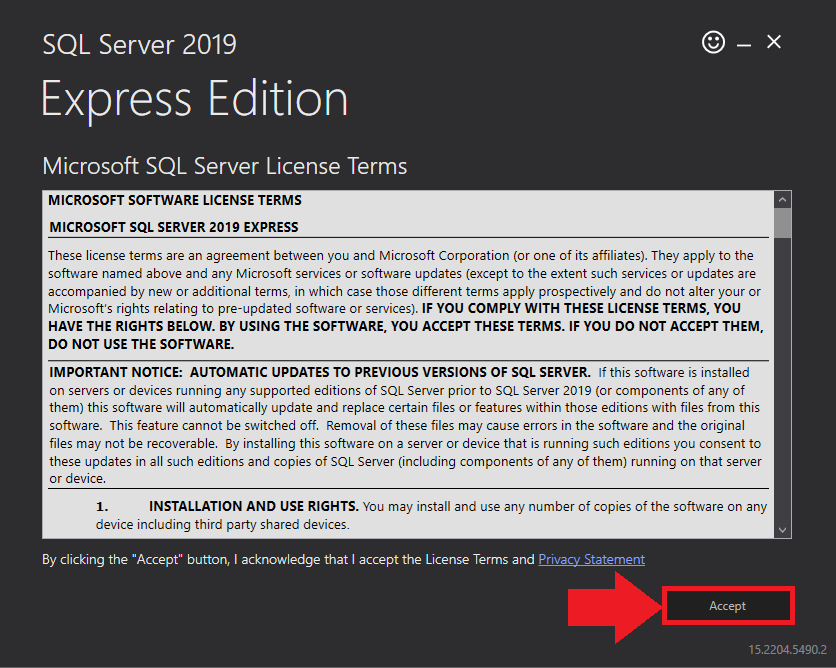
In the Microsoft SQL Server License Terms click the Accept button to acknowledge the license terms and continue.
This page appears if you do not have SQL Server Express preinstalled in your device.
Figure 6: SQL Server Express: Accept License Terms
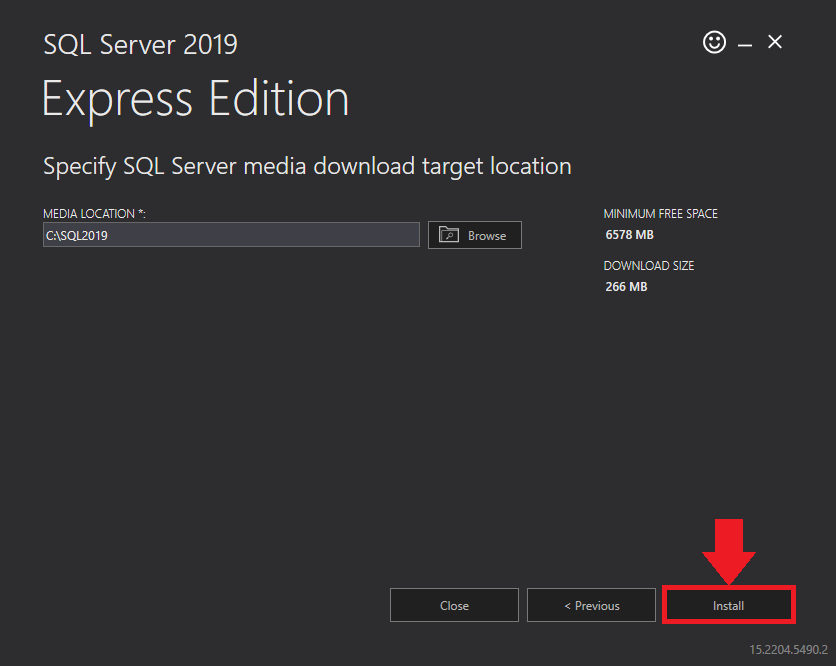
View the SQL Server Media target location in the Media Location field. If required, you can click the Browse button to change the location. Click Install to begin the installation of SQL Server Express.
Figure 7: SQL Server Express: Target Location
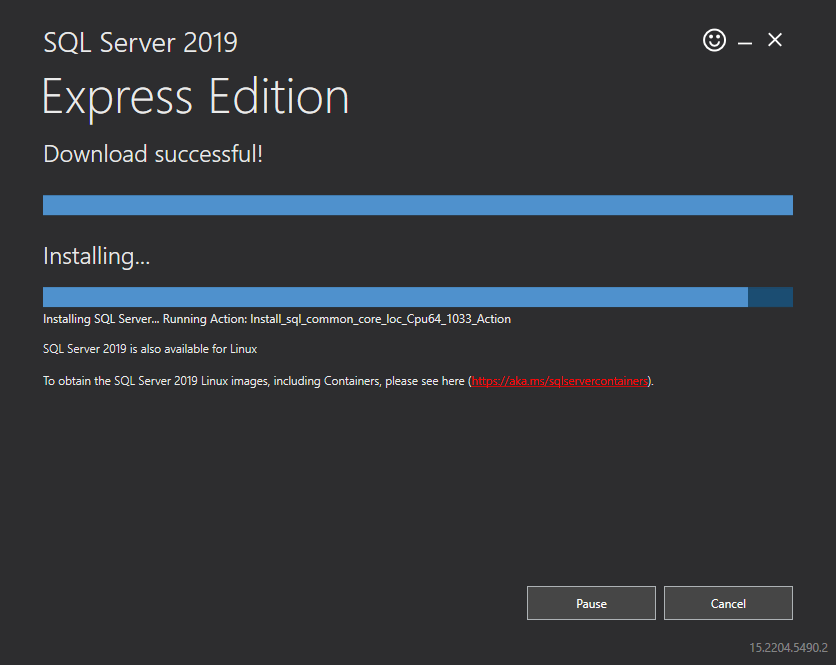
SQL server installation is in progress. This may take several minutes to complete.
Figure: SQL Server Installation In Progress
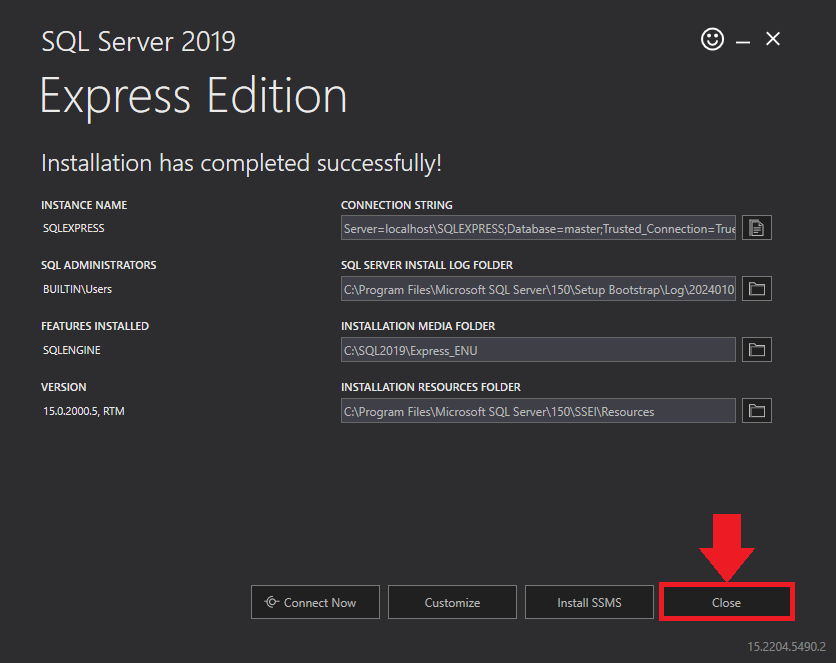
Click the Close button once the prerequisites are installed.
Figure 8: SQL Server Express: Installed Successfully
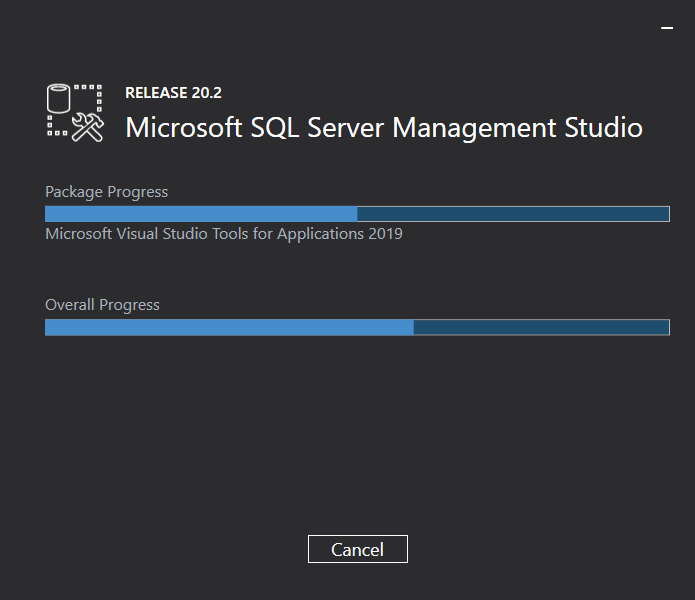
Microsoft SQL Management Studio installation is in progress. This may take several minutes to complete.
Figure 9: Microsoft SQL Server Management Studio: Installation in progress
In the confirmation message box, click Yes to reboot the computer.
Figure 10: SQL Server Express: Reboot your computer
After all the prerequisites are installed, the 3CX On Call Manager Setup Wizard appears. Click Next to Continue.
Figure 11: 3CX On Call Manager Setup Wizard
On the Select Installation Folder window, the Folder field displays the location where the ‘3CX On Call Manager’ will be installed. Note that you cannot change the path.
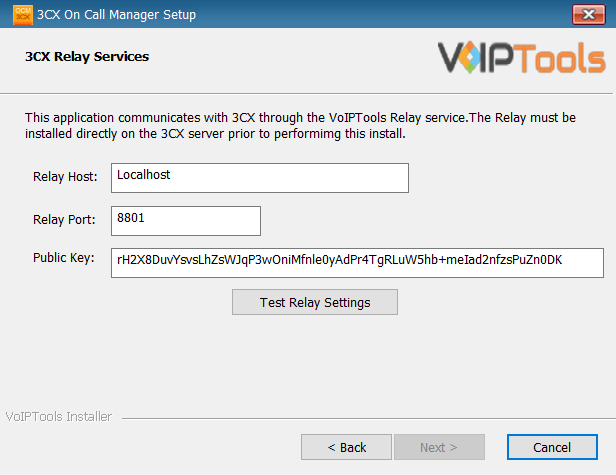
In the 3CX Relay Services window, in the Relay Host field, enter the FQDN of your 3CX server.
Enter 8801 in the Relay Port field.
Enter the public key you took from VoIPTools Relay services in the Public Key text area.
Fig 13: Configure Relay services
Click the Test Relay Settings to confirm ‘3CX On Call Manager’ can communicate with the Relay services running on the 3CX server.
If the ‘3CX On Call Manager’ is successfully able to communicate with the Relay services that run on the 3CX server, a Success message box appears. Click OK. If the test fails, you will not be able to continue until communication with the relay is established.
Click Next to continue with the installation.
Fig 14: Test Relay Success
NOTE:
You must set the Relay Port to 8801.
If the Relay test fails, you cannot continue the installation until you establish communication with the Relay. If the test was unsuccessful,
Confirm you have the correct firewall port open (default TCP 8801) on the 3CX server and the firewall protecting the 3CX server.
Confirm that you have entered the correct FQDN for the 3CX server.
Confirm that the 3CX On Call Manager and Relay use the same port and protocol.
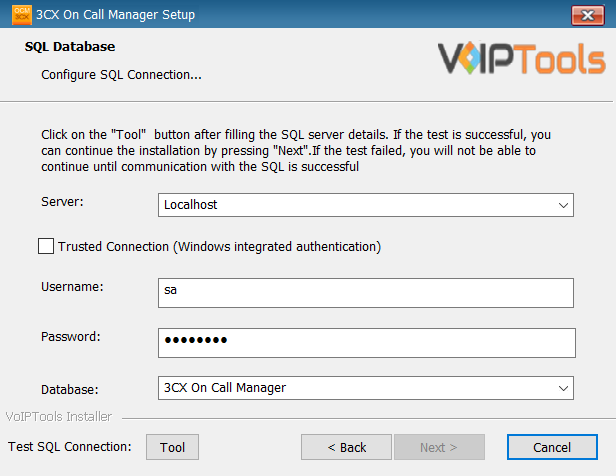
When configuring 3CX On Call Manager, select an existing Microsoft SQL Server instance in your environment. The database server can be a remote SQL Server or a local instance running on the VoIPTools server.
On the SQL Database window, in the Server field, select the desired instance of SQL Server
NOTE:
We encourage you to use SQL Authentication rather than Windows authentication. Many of our tools leverage a Call Flow Designer (CFD) application running on the 3CX. Frequently our CFD applications require access to a SQL database. If the 3CX server and the database server are not in an Active Directory domain, Windows authentication will fail. To use SQL authentication, your SQL Server must be configured to run in “Mixed Mode”. If you installed SQL Server with one of our tools, we configure SQL in “Mixed Mode”.
Figure 15: SQL Authentication
To use SQL Authentication, be sure to uncheck the Trusted Connection checkbox.
In the Username and Password fields, enter valid SQL login account credentials.
To use Windows Integrated Authentication (not recommended), check the Trusted Connection (Windows integrated authentication) checkbox.
In the Database field, the installer will automatically display the default database name. We encourage you to use the default name. If you are upgrading or reinstalling 3CX On Call Manager, select the existing database name from the list.
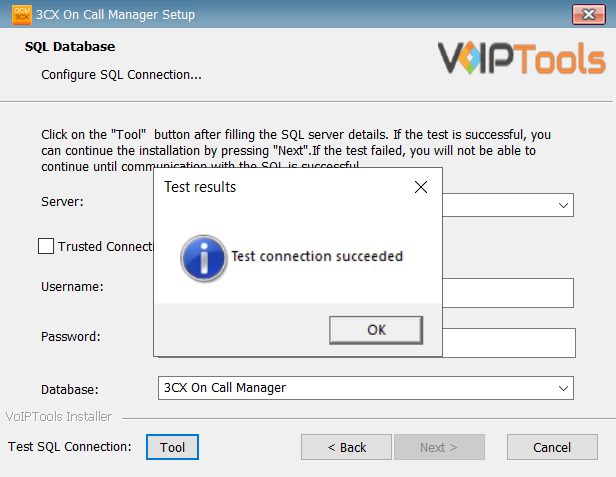
Click the Test SQL Connection button to confirm connectivity to SQL Server and then click Next to continue.
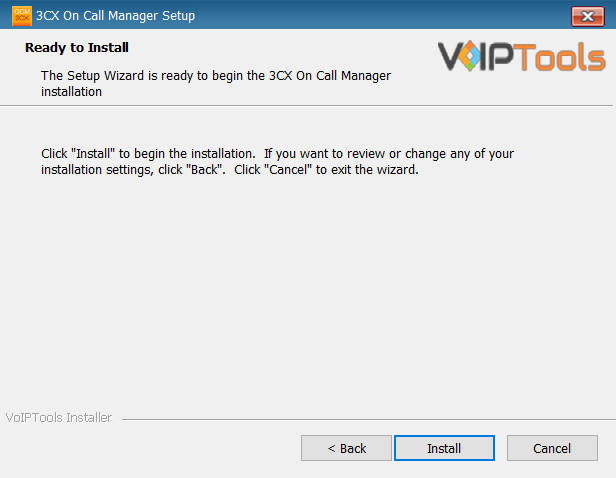
In the Ready to Install window, click Install to start the installation of the ‘3CX On Call Manager’.
Figure 17: Install 3CX On Call Manager
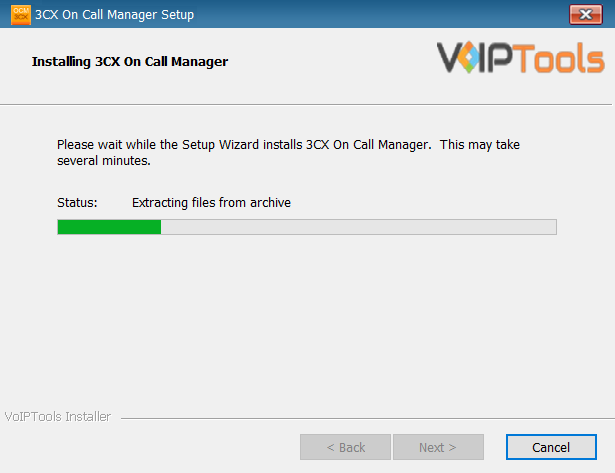
The application installation progresses. This may take several minutes to install.
Figure 18: Installation of ‘3CX On Call Manager’ in Progress
Once the installation is complete, check Launch 3CX On Call Manager check box and then click Finish. The 3CX On Call Manager configuration screen opens. If you want to simply close the installer without opening the configuration screen, then simply uncheck Launch 3CX On Call Manager check box and then click Finish
To ensure the authorization of your license key, it is necessary to complete the registration process. By registering with VoIPTools, you gain access to a range of benefits:
Key Replacement Assistance
In the unfortunate event of a lost license key, registering with VoIPTools lets us provide you with a replacement key promptly.
Product Updates and Reminders
By registering, you will receive timely notifications from VoIPTools regarding any product updates. Additionally, we will send reminders when your key is nearing its renewal date, ensuring uninterrupted access to our services.
Follow the procedure to register your software,
Double-click the 3CX On Call Manager desktop icon to open the web application.
In the Login page, do the following tasks,
In the Extension field, enter your 3CX extension number.
In the PIN field, enter your 3CX voicemail PIN.
Click the Login button to log in to your account.
Figure 20: 3CX On Call Manager Web Portal Login
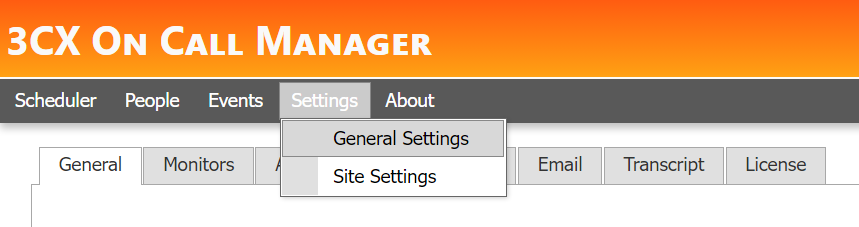
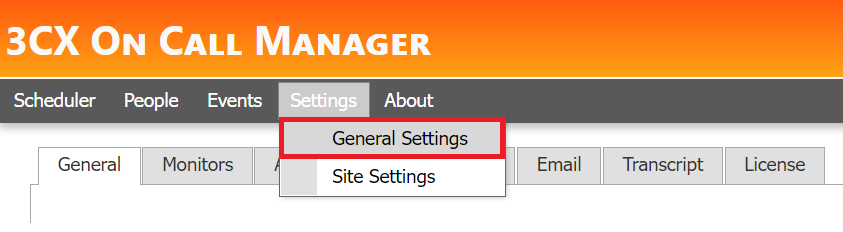
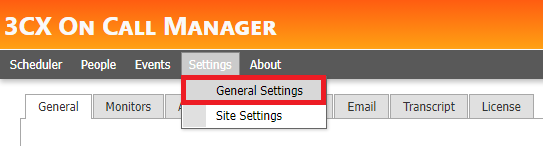
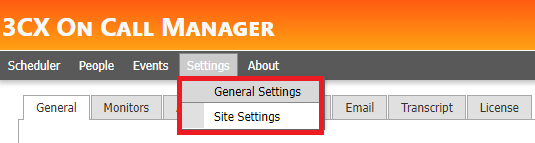
On the Web Application, in the top menu, click the Settings tab to display the settings dropdown.
Figure 21: Settings menu
Click the General Settings option from the dropdown.
Figure 22: General Settings
In the General Settings screen, select the License menu.
Enter details in all the fields and click Registerto complete your registration.
Figure 23: Register software
NOTE:
The license key permits you to install this software on one computer. This is not free software.
To access the ‘3CX On Call Manager’ web portal, click the Web Portal button on the configuration program, or click on the desktop icon that was created during the installation process (‘3CX On Call Manager’ Web).
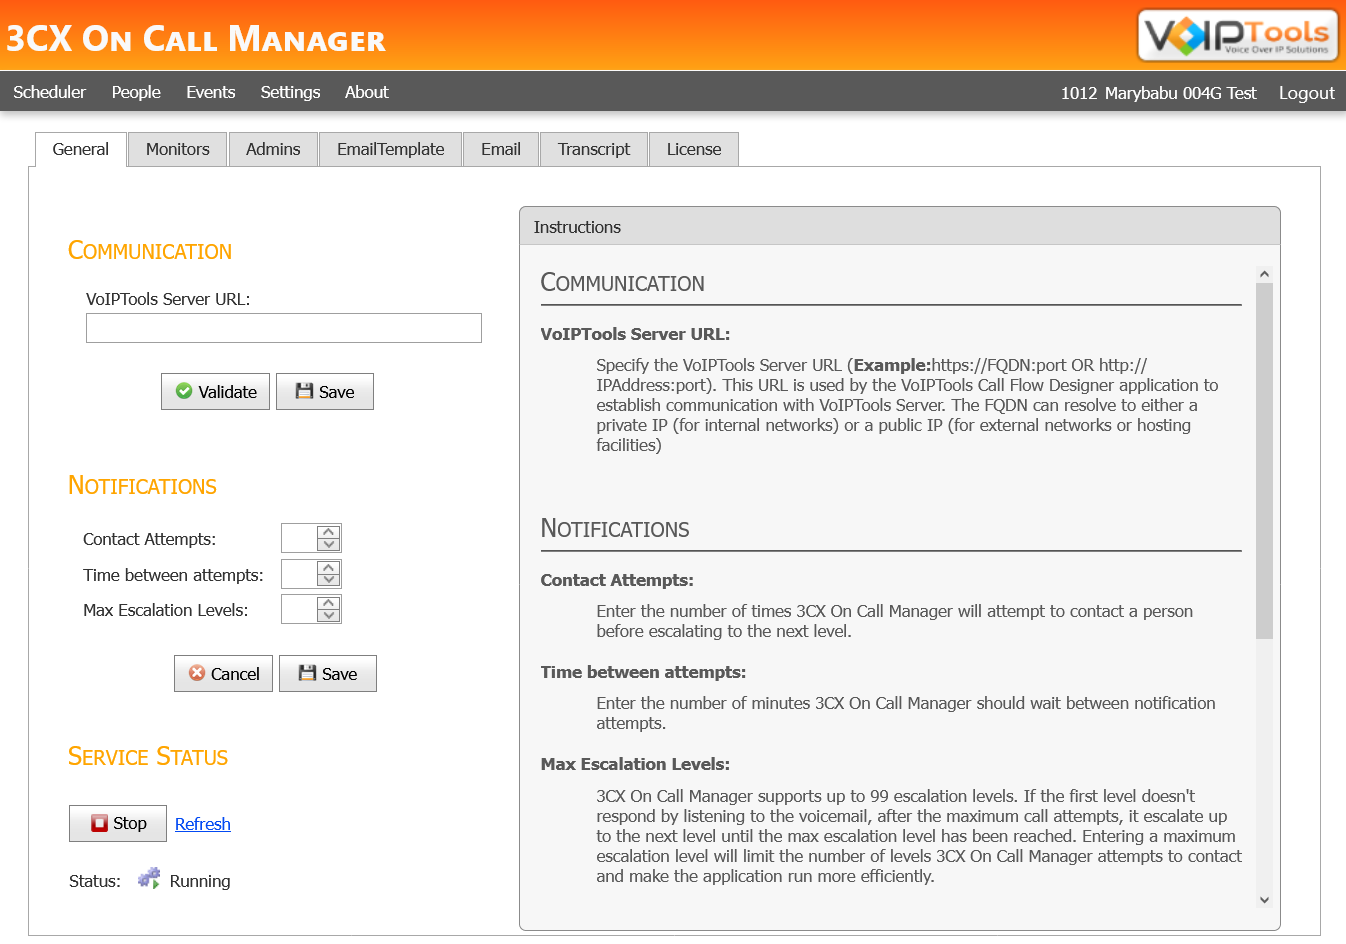
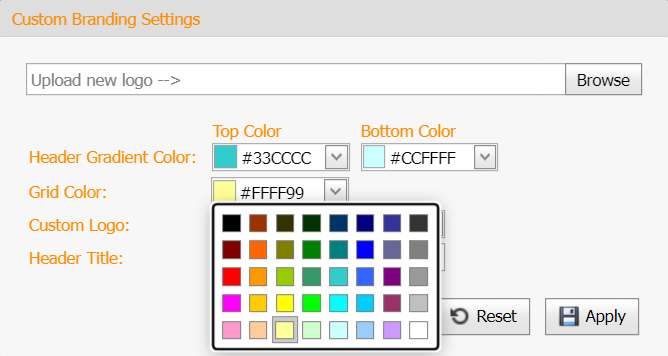
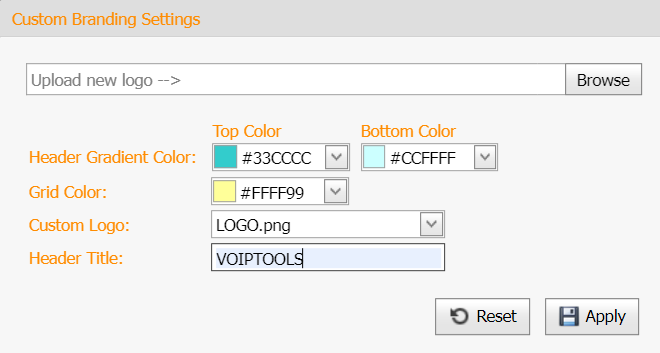
The General Settings screen enables you to register the software, configure notifications, create 1st level queues, create voicemails, create monitor extensions, control who can access configuration screens, configure email server and configure voicemail to text transcription.
Figure 27: Settings menu: General Settings
The General Settings tab has the following menu options,
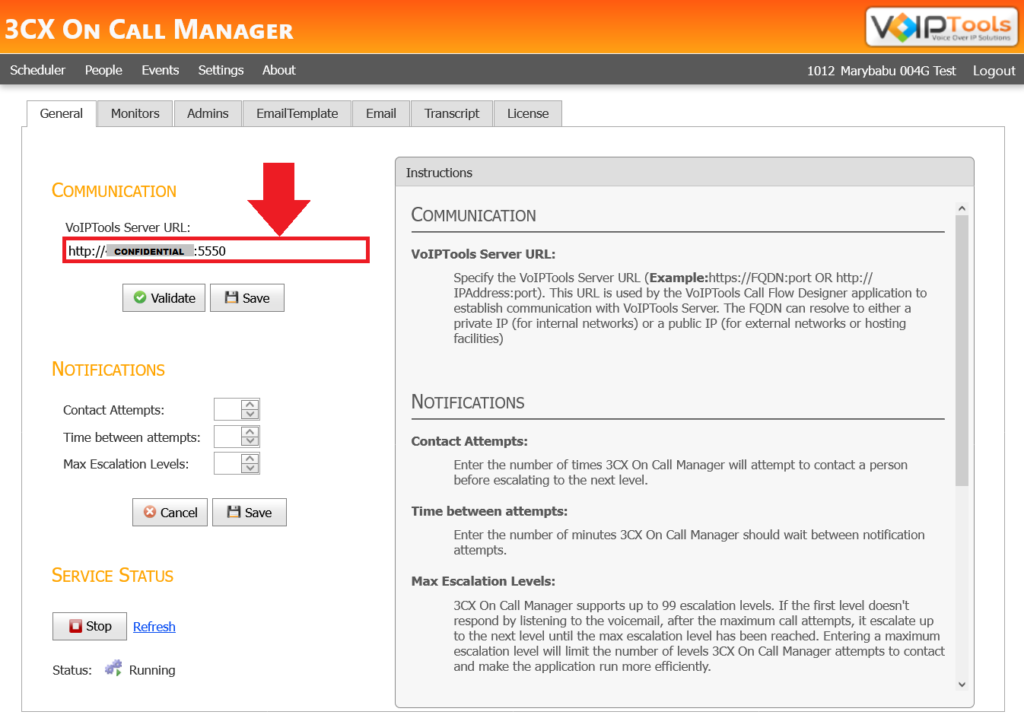
The primary purpose of specifying the VoIPTools Server URL is to ensure that the VoIPTools Call Flow Designer application can establish a secure and reliable communication link with the VoIPTools Server. This URL can either be in the following formats,
HTTPS URL using a Fully Qualified Domain Name (FQDN) and port (https://FQDN:port)
For example, https://voiptools.example.com:5550
HTTP URL using an IP address and port (e.g., http://IPAddress:5550).
In the Contact Attempts box, select or type the number of contact attempts.
From the Time between attempts box, select or type the time (in minutes) you want 3CX On Call Manager to wait between the ‘contact attempts’.
From the Max Escalation Levels box, select or type the number of escalation levels
Click Save to save the changes.
Figure 30: Setting Notifications
NOTE:
3CX On Call Manager supports up to 30 escalation levels.
CONTACT ATTEMPTS
The number of times you want the 3CX On Call Manager to attempt to contact a person before escalating to the next level.
TIME BETWEEN ATTEMPTS
The time (in minutes) for which you want 3CX On Call Manager to wait between notification attempts.
MAX ESCALATION LEVELS
Number of escalation levels you want 3CX On Call Manager to escalate. If the first level does not respond by listening to the voicemail, after the maximum call attempts, it escalates up to the next level until the max escalation level has been reached. Entering a maximum escalation level will limit the number of levels 3CX On Call Manager attempts to contact and make the application run more efficiently.
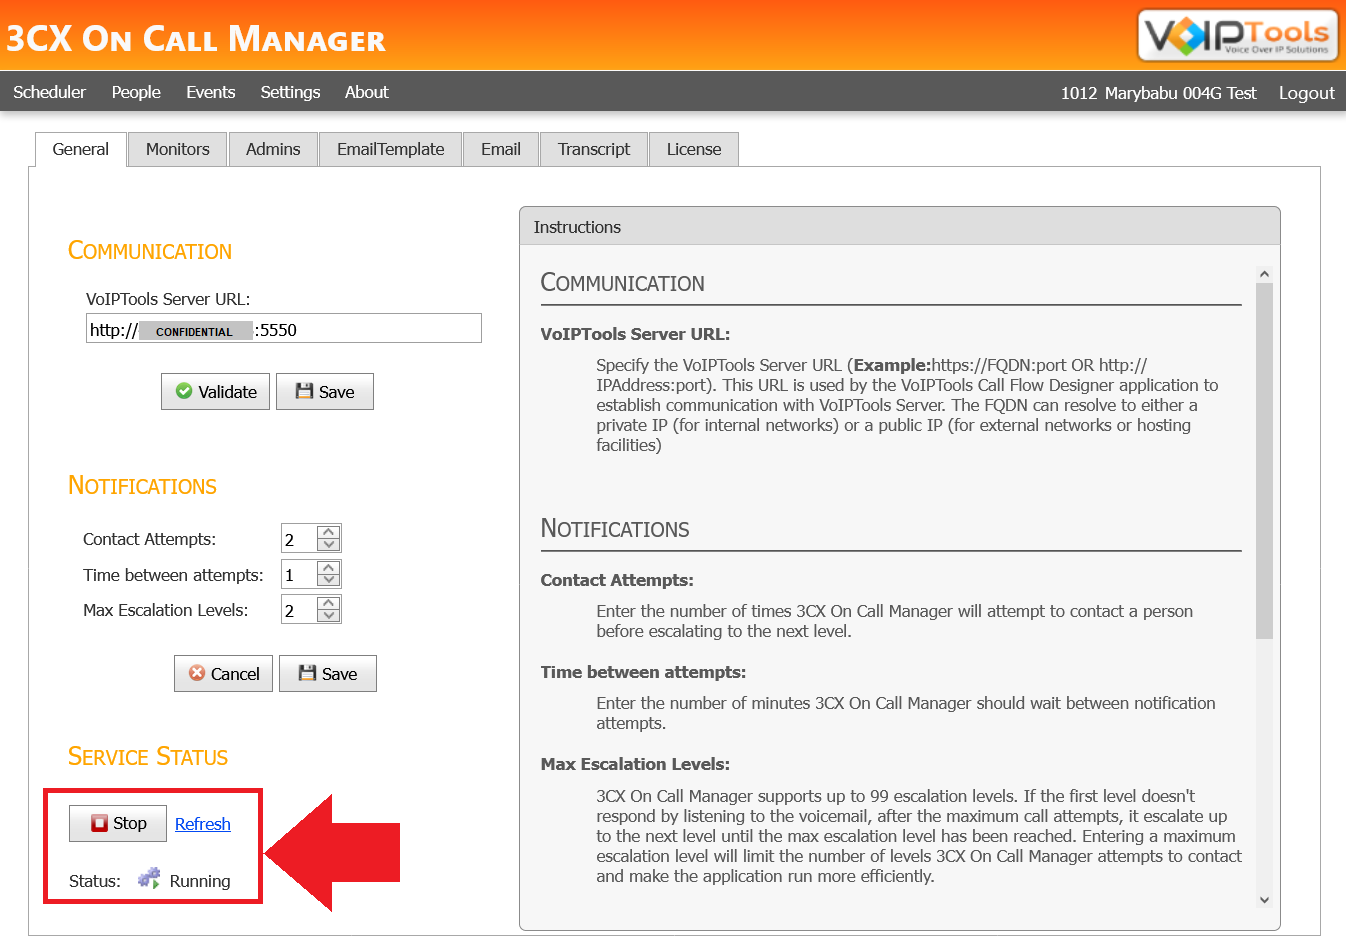
To start or stop a service, click Start/ Stop button.
Click Refresh link to update the status if changes to the service status were made directly in the Windows Service Snap-in.
Figure 31: Start/Stop a service
NOTE:
If the service status is “Unknown”, this is typically caused by the 3CX On Call Manager IIS Application Pool user having insufficient rights.
START/STOP
A Windows Service (3CX On Call Manager) runs in the background monitoring for new voicemails. You can monitor the status of this service here (Running, Stopped, Unknown). If you make changes to the Contact Attempts, or Time between attempts settings it is necessary to stop and start the service. This should happen automatically when you press the Save button.
REFRESH
The ‘Refresh’ link will update the status if changes to the service status were made directly in the Windows Service Snap-in.
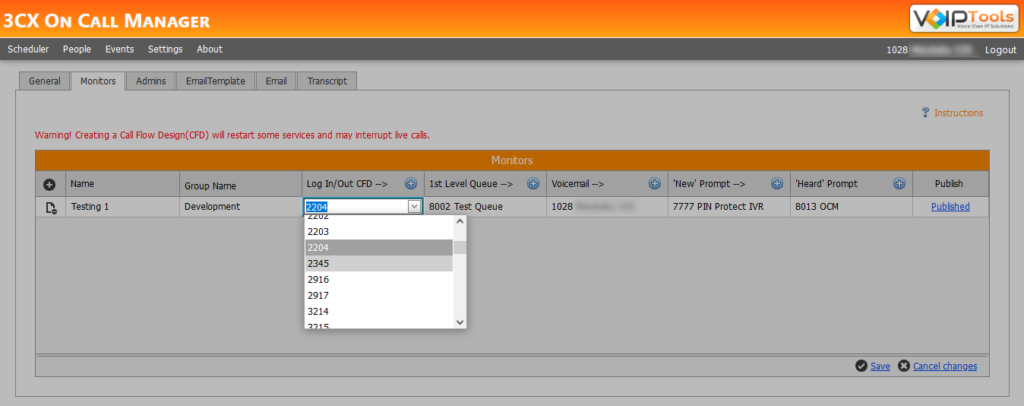
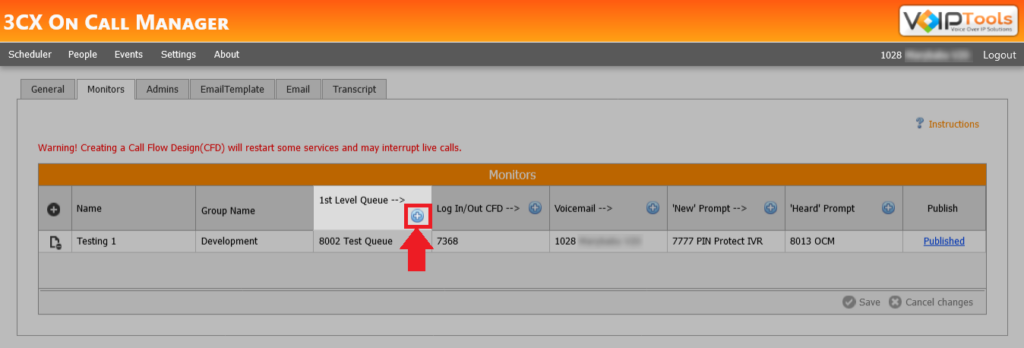
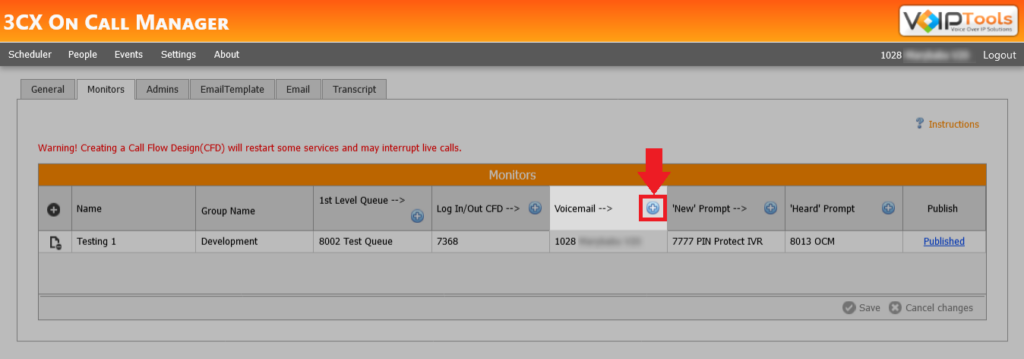
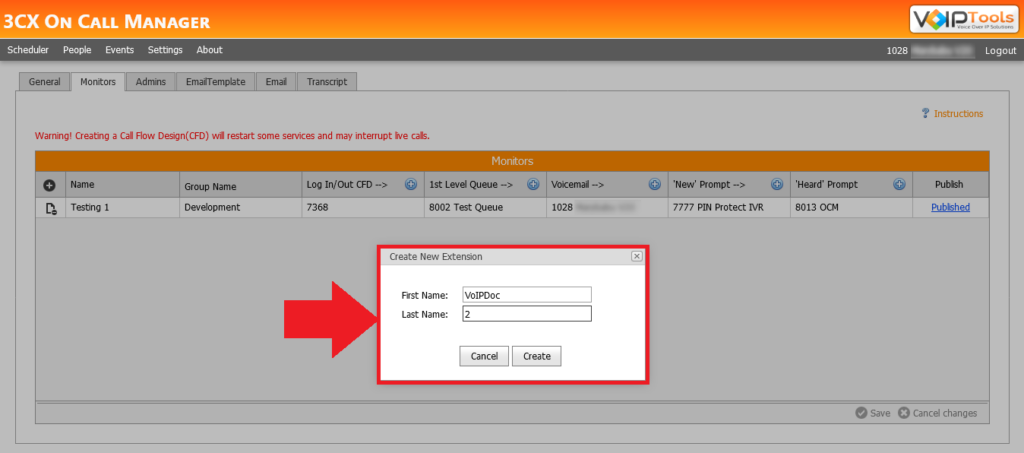
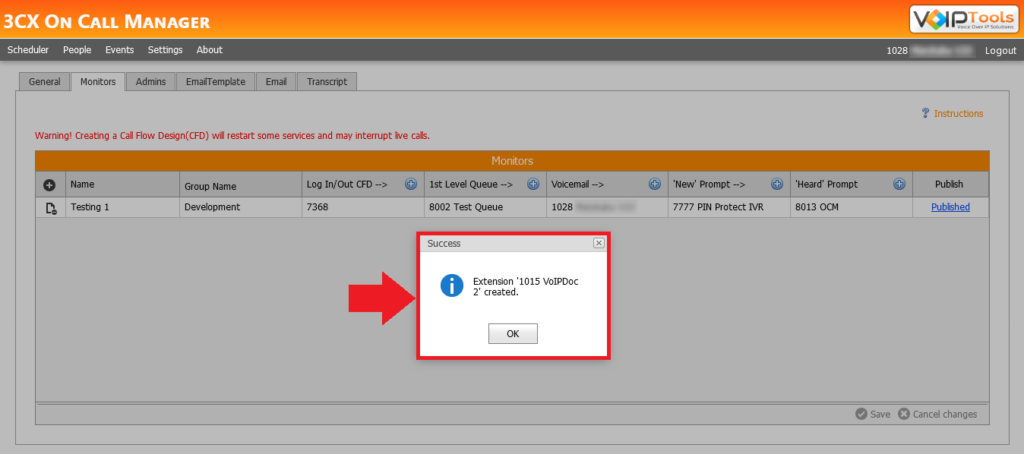
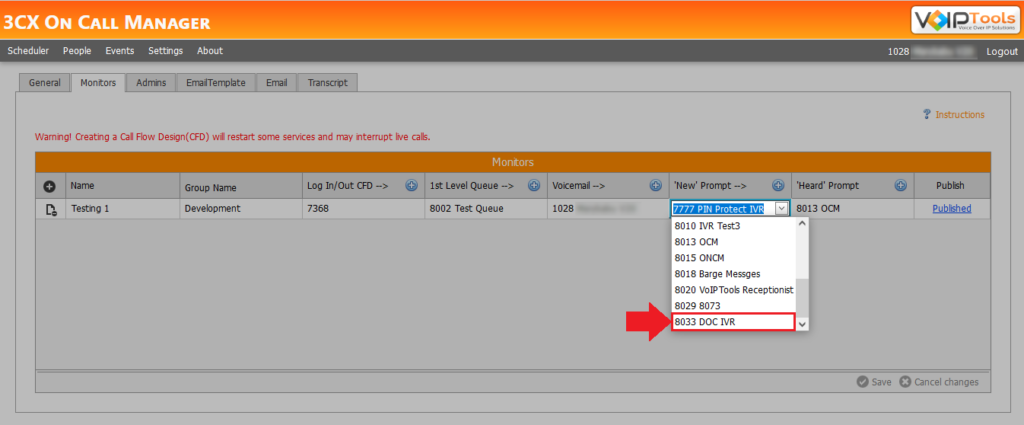
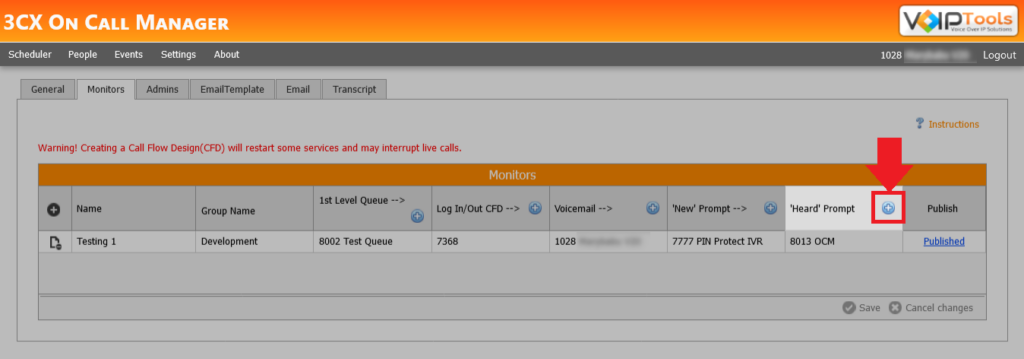
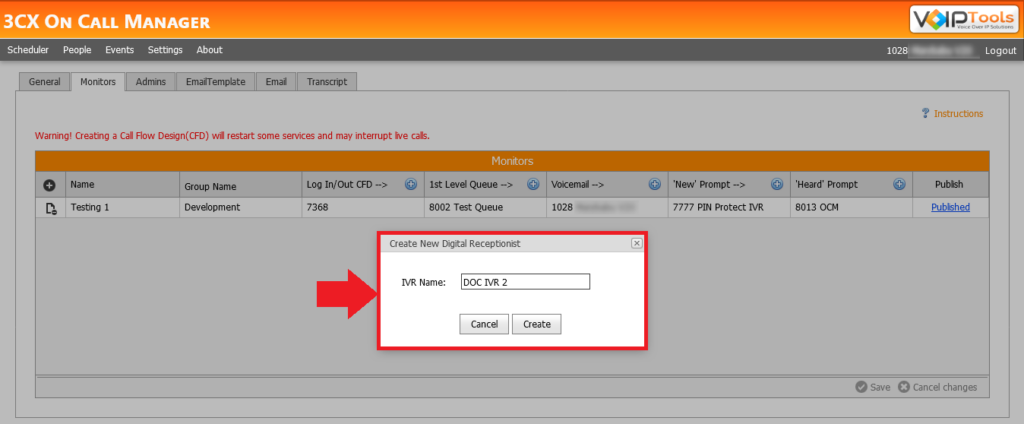
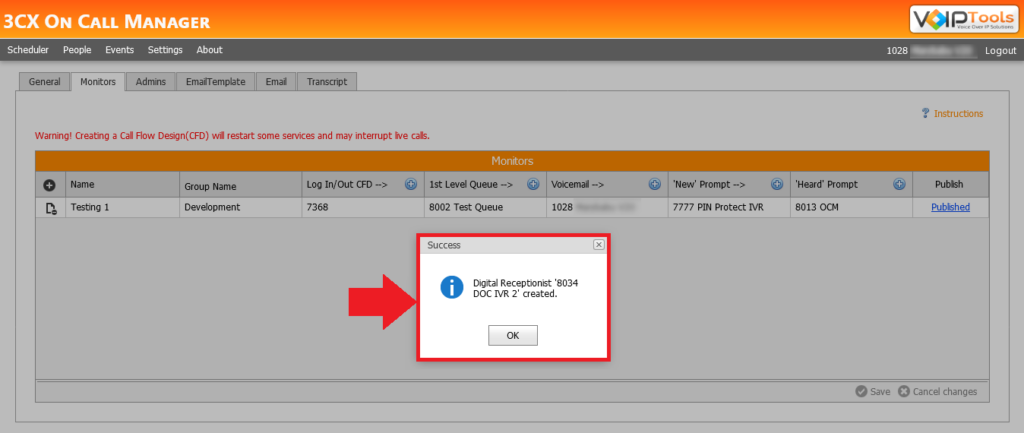
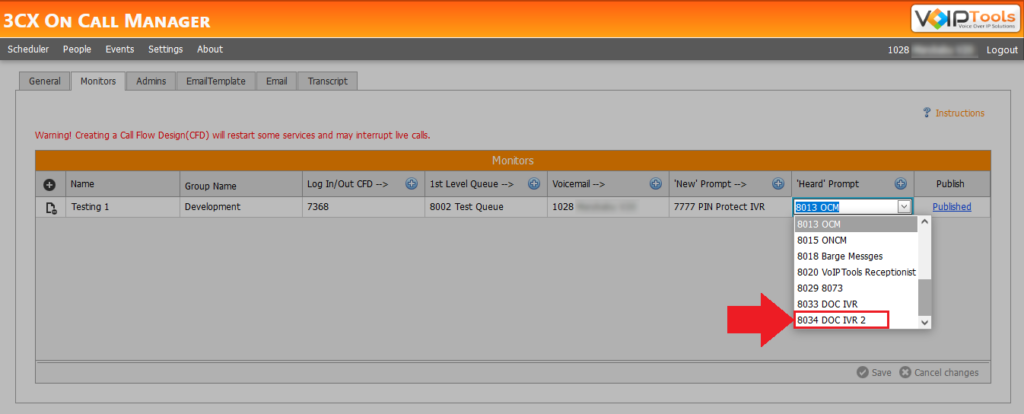
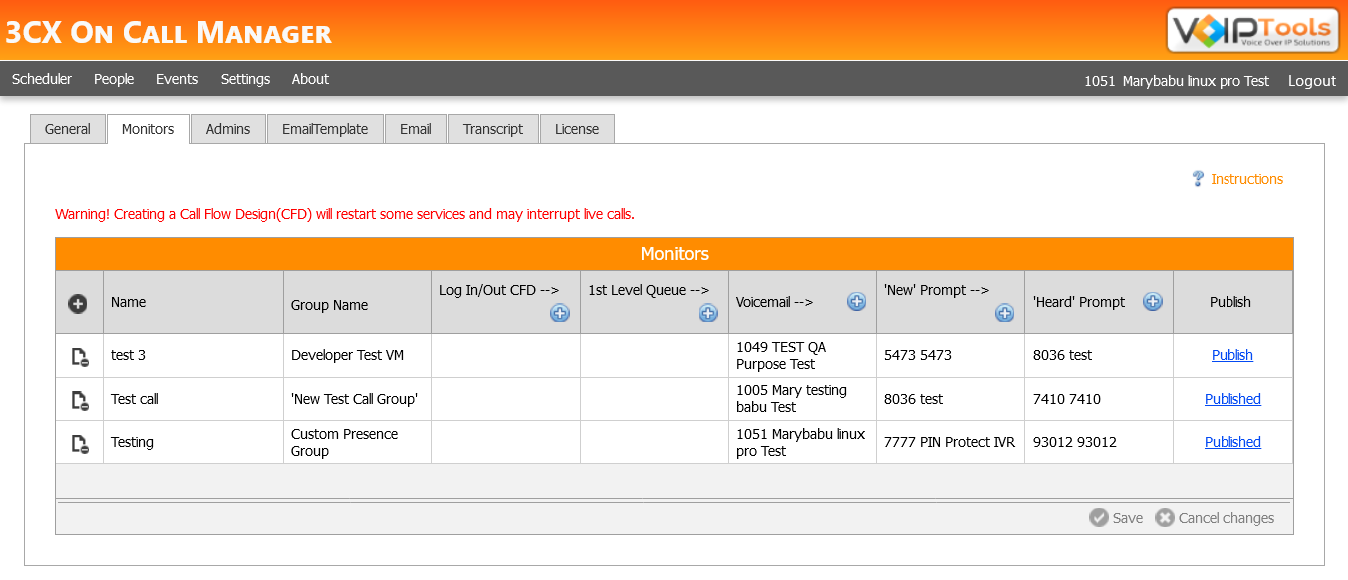
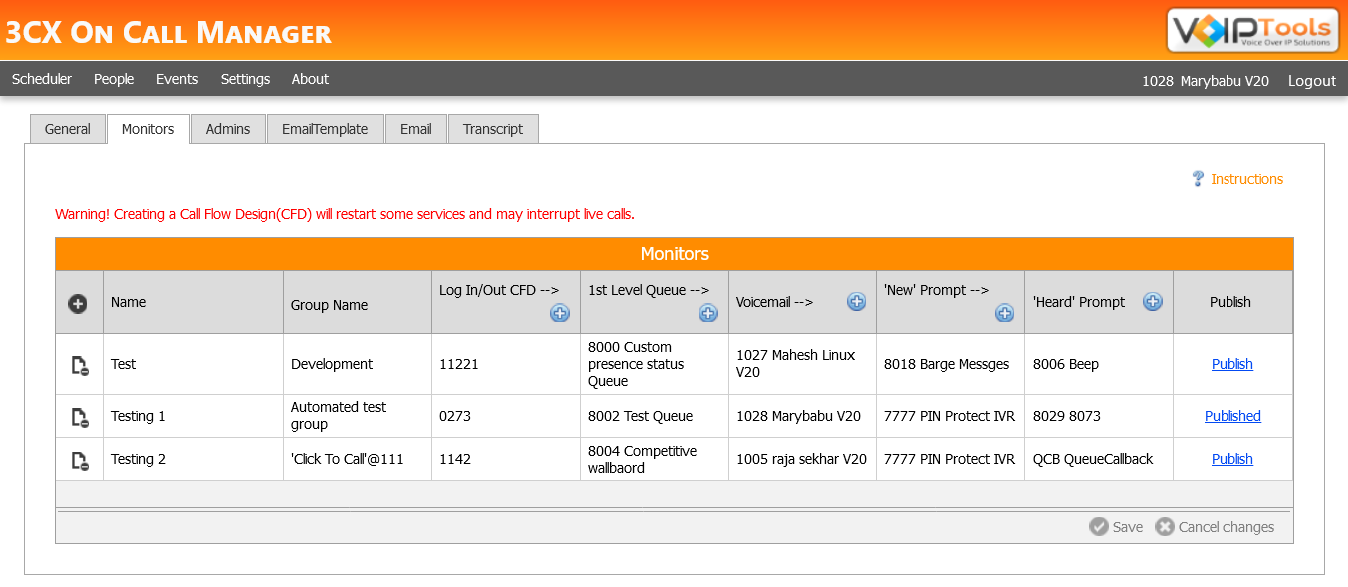
The Monitors screen defines how 3CX On Call Manager processes inbound calls. Click here to know the field definitions on the Monitor screen. You can do the following tasks in the Monitors tab,
A label that is used to identify the monitor. It is displayed in the combo box on the ‘Scheduler’ screen when selecting which schedule you want to update.
LOG IN/ OUT CFD
3CX On Call Manager includes a separate program that creates special CFD extensions (Call Queues) capable of looking up who is scheduled to be on call and logging the appropriate agents into the assigned queue. Once the CFD application is created, you can select this extension from the list of Call Queues in the combo box.
NOTE
To use the same CFD extension on two distinct servers with static IP addresses, it is necessary to republish the CFD extension on the new server.
NOTE
You must use only published CFDs in the Log In/ Out CFD field.
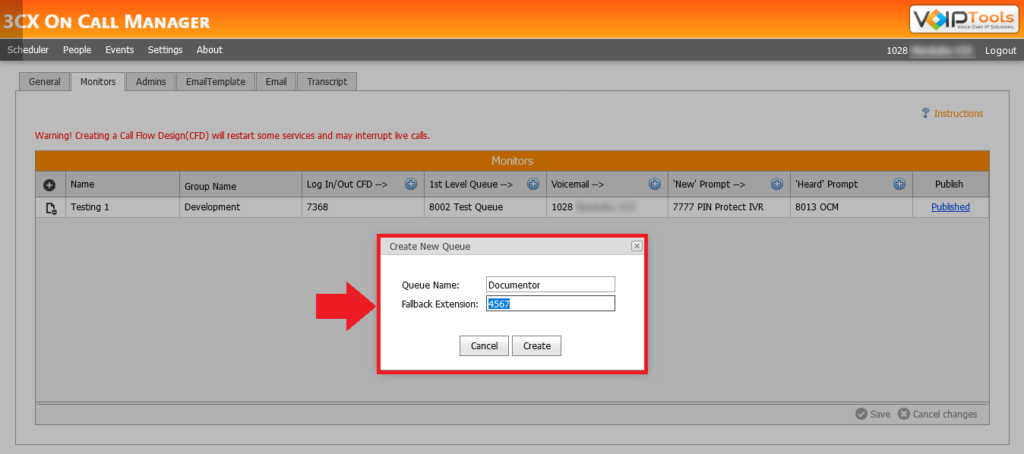
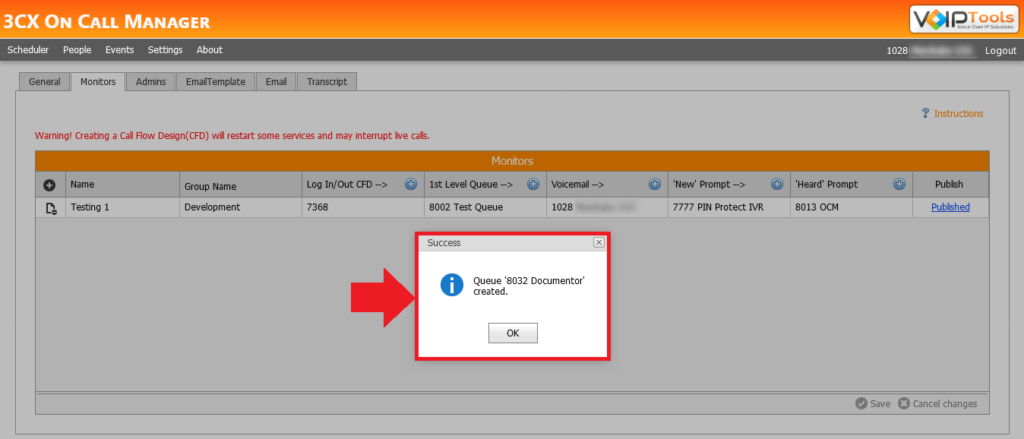
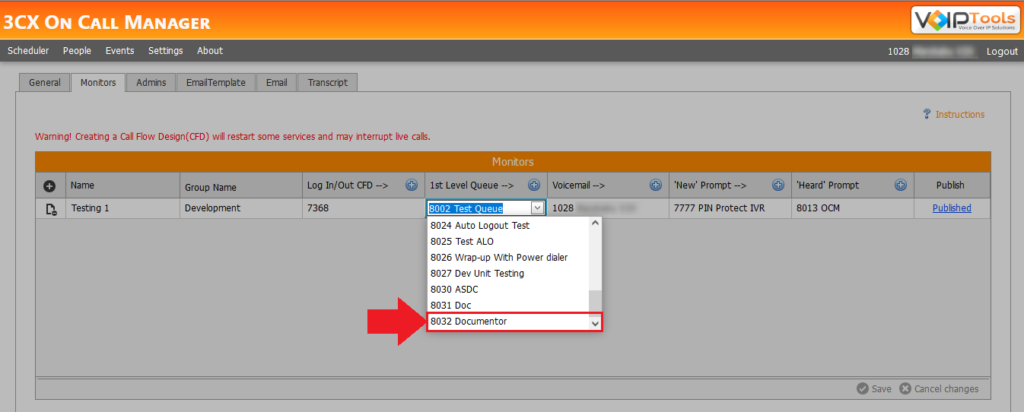
1ST LEVEL QUEUE
The queue to which the inbound calls are first sent.
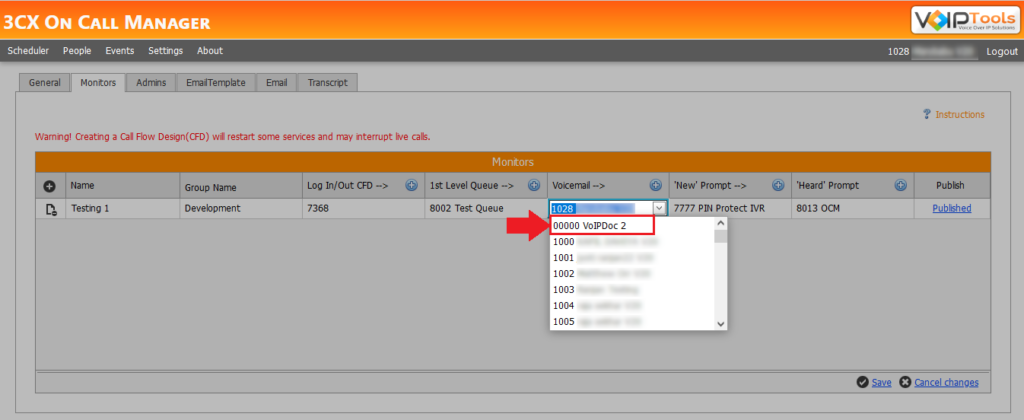
VOICEMAIL
This is the monitored voicemail extension. It is a 3CX extension (with voicemail enabled) typically created specifically for receiving after-hours support requests. 3CX On Call Manager will monitor this extension for new voicemails and notify the agents on call.
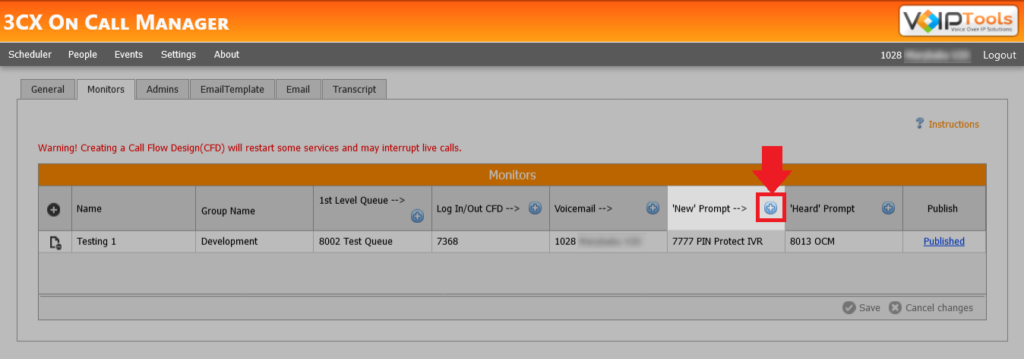
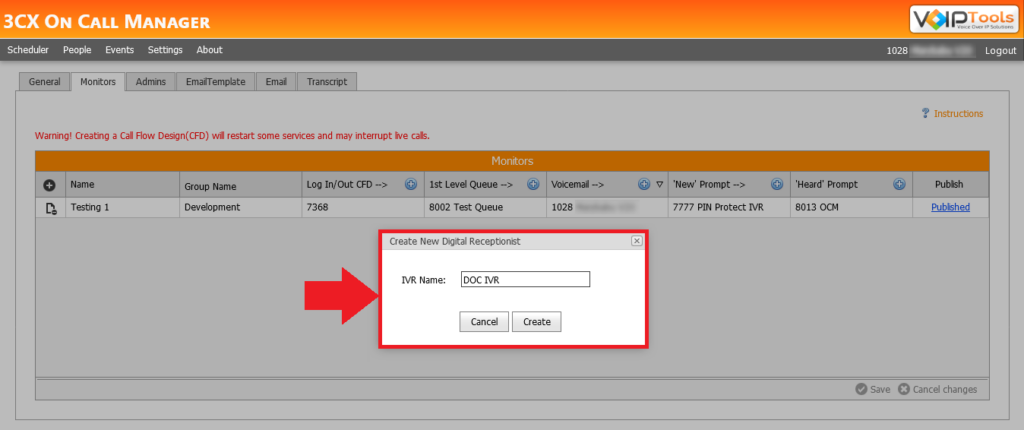
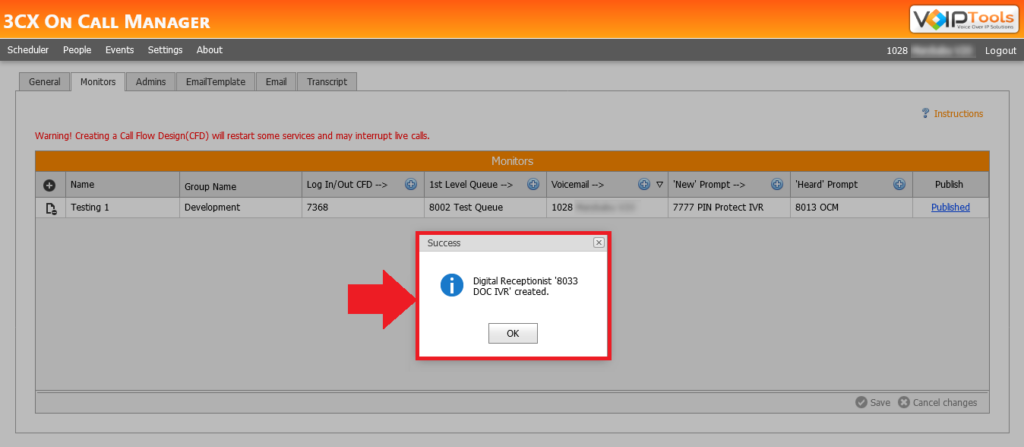
NEW PROMPT
When a new voicemail is received in a monitored voicemail box, 3CX On Call Manager will call (if configured to do so) the scheduled employee(s) and connect them to the digital receptionist. The digital receptionist’s prompt informs that a request has been received and then automatically transfers the agent to the 3CX Voicemail extension. Then agent will need to login to the voicemail box in order to listen to the voicemail.
HEARD PROMPT
After a monitored voicemail has been heard, assuming you selected to be notified by phone, 3CX On Call Manager will call all the agents previously notified to let them know the voicemail has been heard. This digital receptionist typically plays the recorded prompt that explains the message has been heard and then hangs up.
The 3CX On Call Manager handles incoming calls without using a First Level Queue by following a simpler call flow process.
When a call comes in, it first reaches the Digital Receptionist.
The Digital Receptionist acts as a virtual receptionist, answering and possibly directing the call.
If there is no direct agent available, the call is directly forwarded to voicemail.
Once the voicemail is left, the traditional notification process starts, notifying the on-call agents.
This flow focuses on efficiency when agents may not be immediately available, ensuring the call is quickly processed and the agents are notified through voicemail, without using queues or holding the caller in the process
Figure 32: Inbound Call Pattern without ‘1st Queue Level’ Feature
When 3CX On Call Manager handles incoming calls using a First Level Queue, the call flow becomes more interactive and gives the caller a higher chance of reaching an agent before being sent to voicemail. Read further to know how it works,
The incoming call first reaches the Digital Receptionist, where it can play a greeting or give options.
The call is then passed to a CFD Notification (Call Flow Designer) application, which checks the on-call schedule and logs the appropriate agents into the queue.
If an agent is available and logged into the First Level Queue, the call is transferred to the queue, and the caller can wait for an agent to answer.
If the caller exceeds the maximum hold time set for the queue, they are forwarded to voicemail, where the traditional notification process begins.
Benefits of Using a First Level Queue:
Improved Caller Experience
The caller waits in a queue, which reassures them that their call may be answered soon by an agent, rather than immediately going to voicemail.
Automatic Agent Login
The system automatically logs the scheduled agents into the queue just before the call is transferred, ensuring only on-call agents are handling the queue.
Fallback to Voicemail
If the hold time exceeds the defined limit, the caller is still routed to voicemail, ensuring the issue isn’t lost and agents can respond later.
When a new person login On Call Managers log them as manager. Thus in Admin menu you can set specific agents as managers and let them modify the schedules and other settings.
NOTE:
if you do not select any extension then, all the extensions in the list will play ‘Admin’ role and all of them will have complete access to the application
In the Settings screen click Admins tab.
Under the Admins section and from the list of available extensions, check all the checkboxes to whom you want to assign the ‘Manager’ role.
Click Save to save your admins.
Figure 35: General Settings: Admins screen
NOTE:
If you do not wish to restrict who has access to the configuration screens, simply leave all extensions unchecked and everyone will have access to the configuration screens.
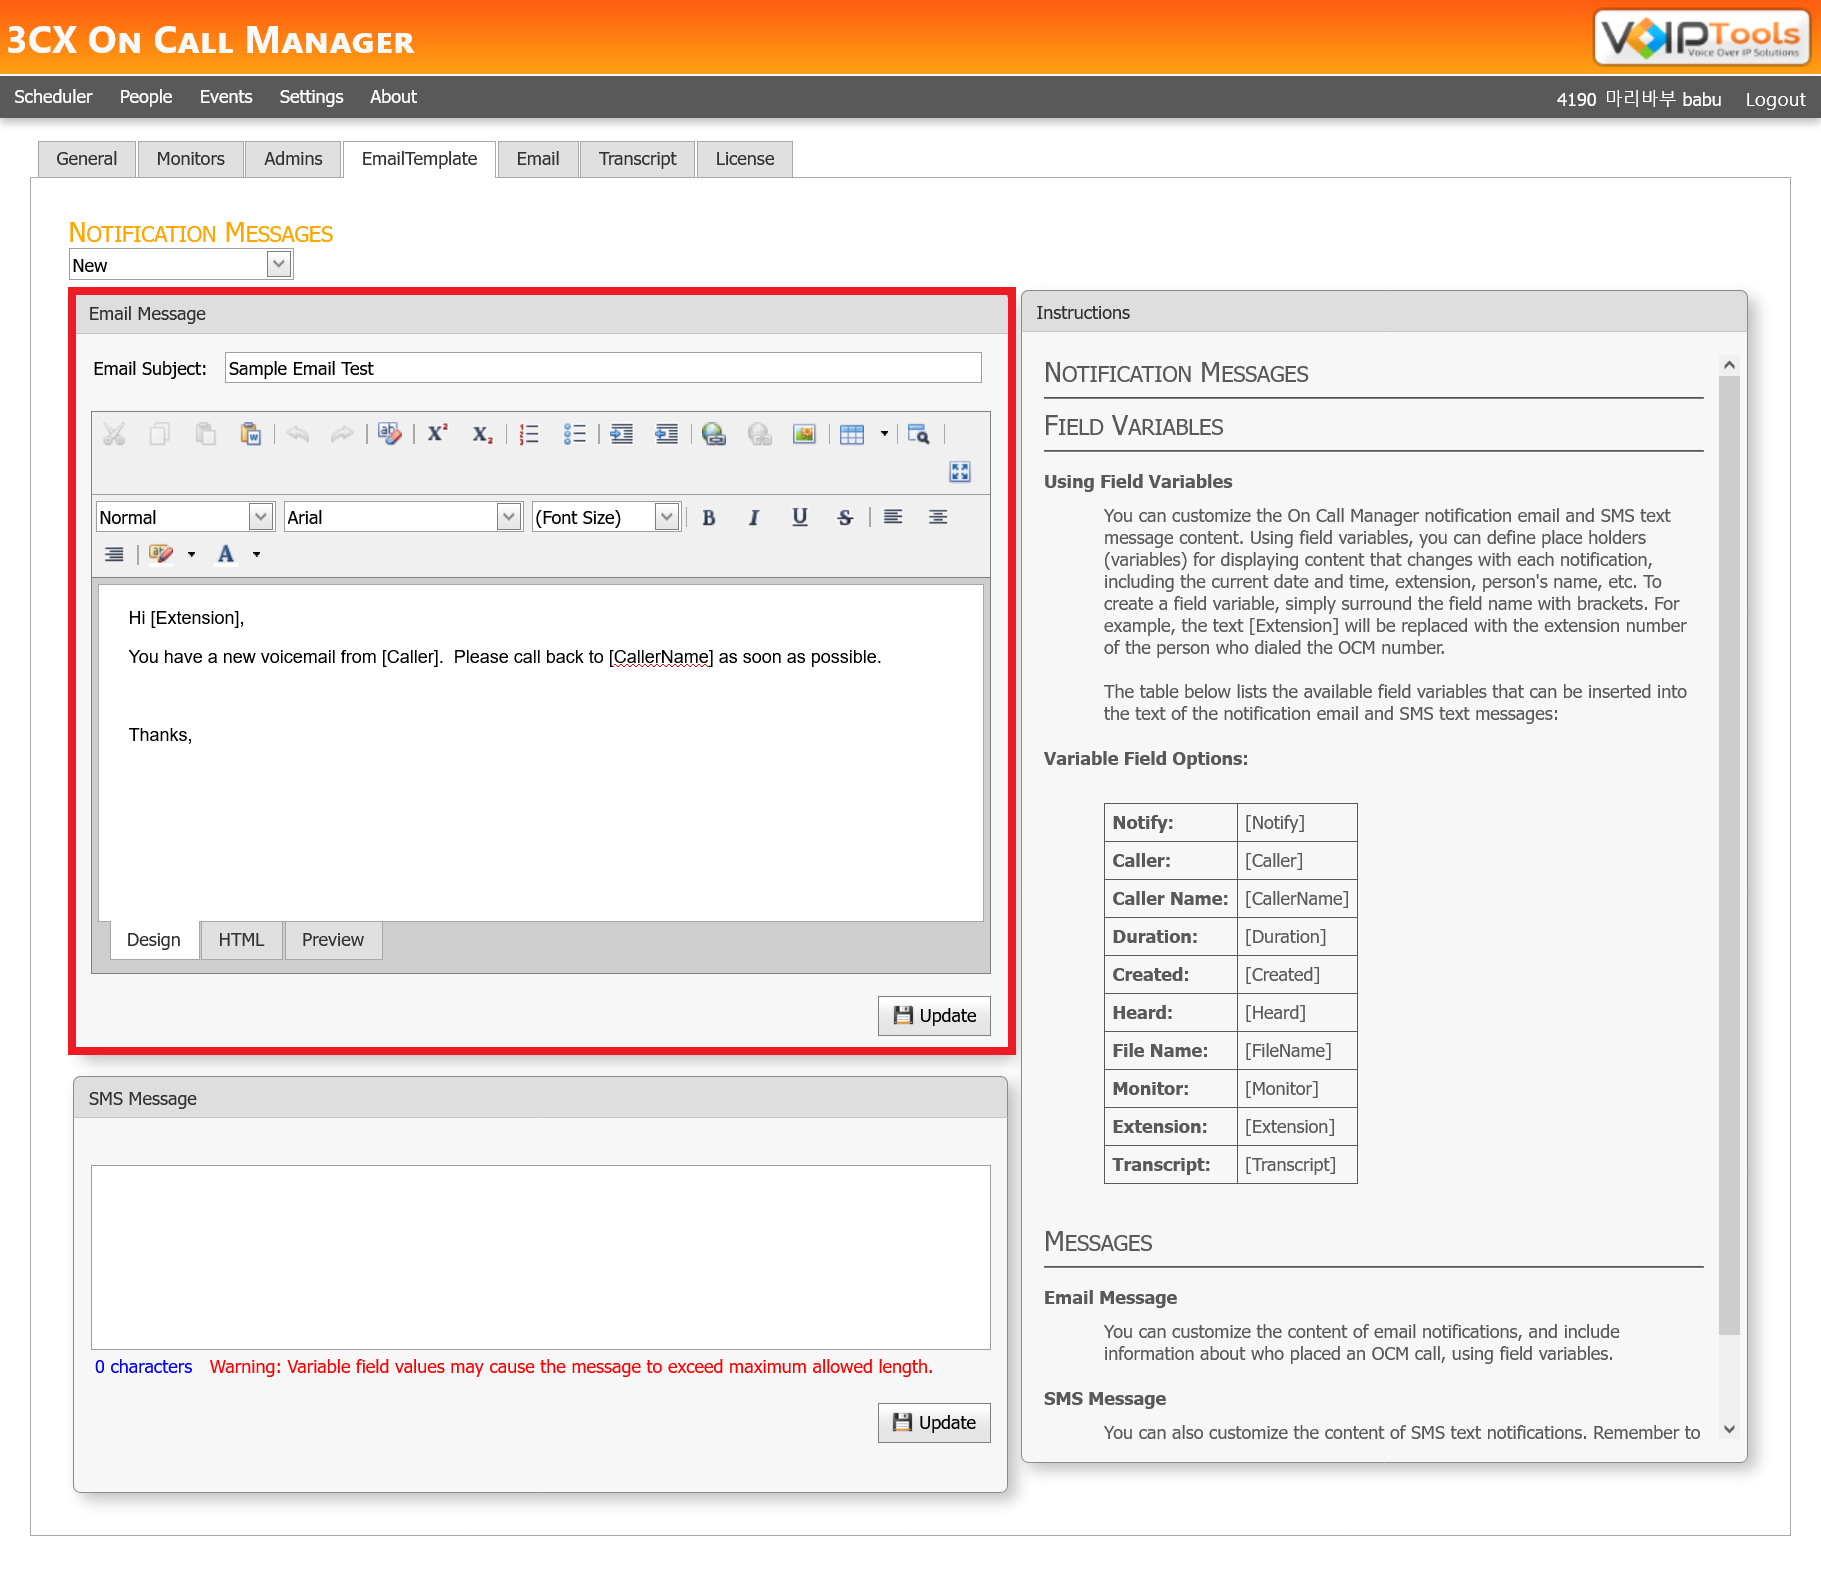
The Email Template empowers you to craft your email and SMS messages, which are subsequently dispatched as New or Heard prompts to the designated recipients. This can be achieved through manual input or by utilizing our comprehensive range of field variables integrated within the system.
Follow the procedure to design your email templates,
Under the General Settings screen, on the Email Template menu, in the dropdown, select either of the following,
New: Design emails or SMS messages for the New Prompt.
Heard: Design emails or SMS messages for the Heard Prompt.
Figure 36: Notification messages dropdown
Enter your notification message in the Email Messages or SMS messages sections.
Click the Update button to save your customized notification.
You can customize the On Call Manager notification email and SMS text message content. Using field variables, you can define placeholders (variables) for displaying content that changes with each notification, including the current date and time, extension, person’s name, etc. To create a field variable, simply surround the field name with brackets. For example, the text (Extension} will be replaced with the extension number of another person who dialled the OCM number.
The following table lists the available field variables that can be inserted into the text of the notification email and SMS text messages.
[Notify]
Name of the resource who is notified
[Caller]
Telephone number of the caller
[CallerName]
Name of the caller
[Duration]
Duration of the call
[Created]
The date and time at which the voicemail is created.
[Heard]
Indicates whether the voicemail notification is heard. If the voicemail is heard, the value is “Heard,” and if not heard the value is “NULL.”
[FileName]
Name of the audio file attached in the mail.
[Extension]
Extension of the person who scheduled on-call for the resources.
[Transcript]
Transcript of the voicemail. The transcript is available if you enable the Speech Transcriptions in the Transcriptions menu
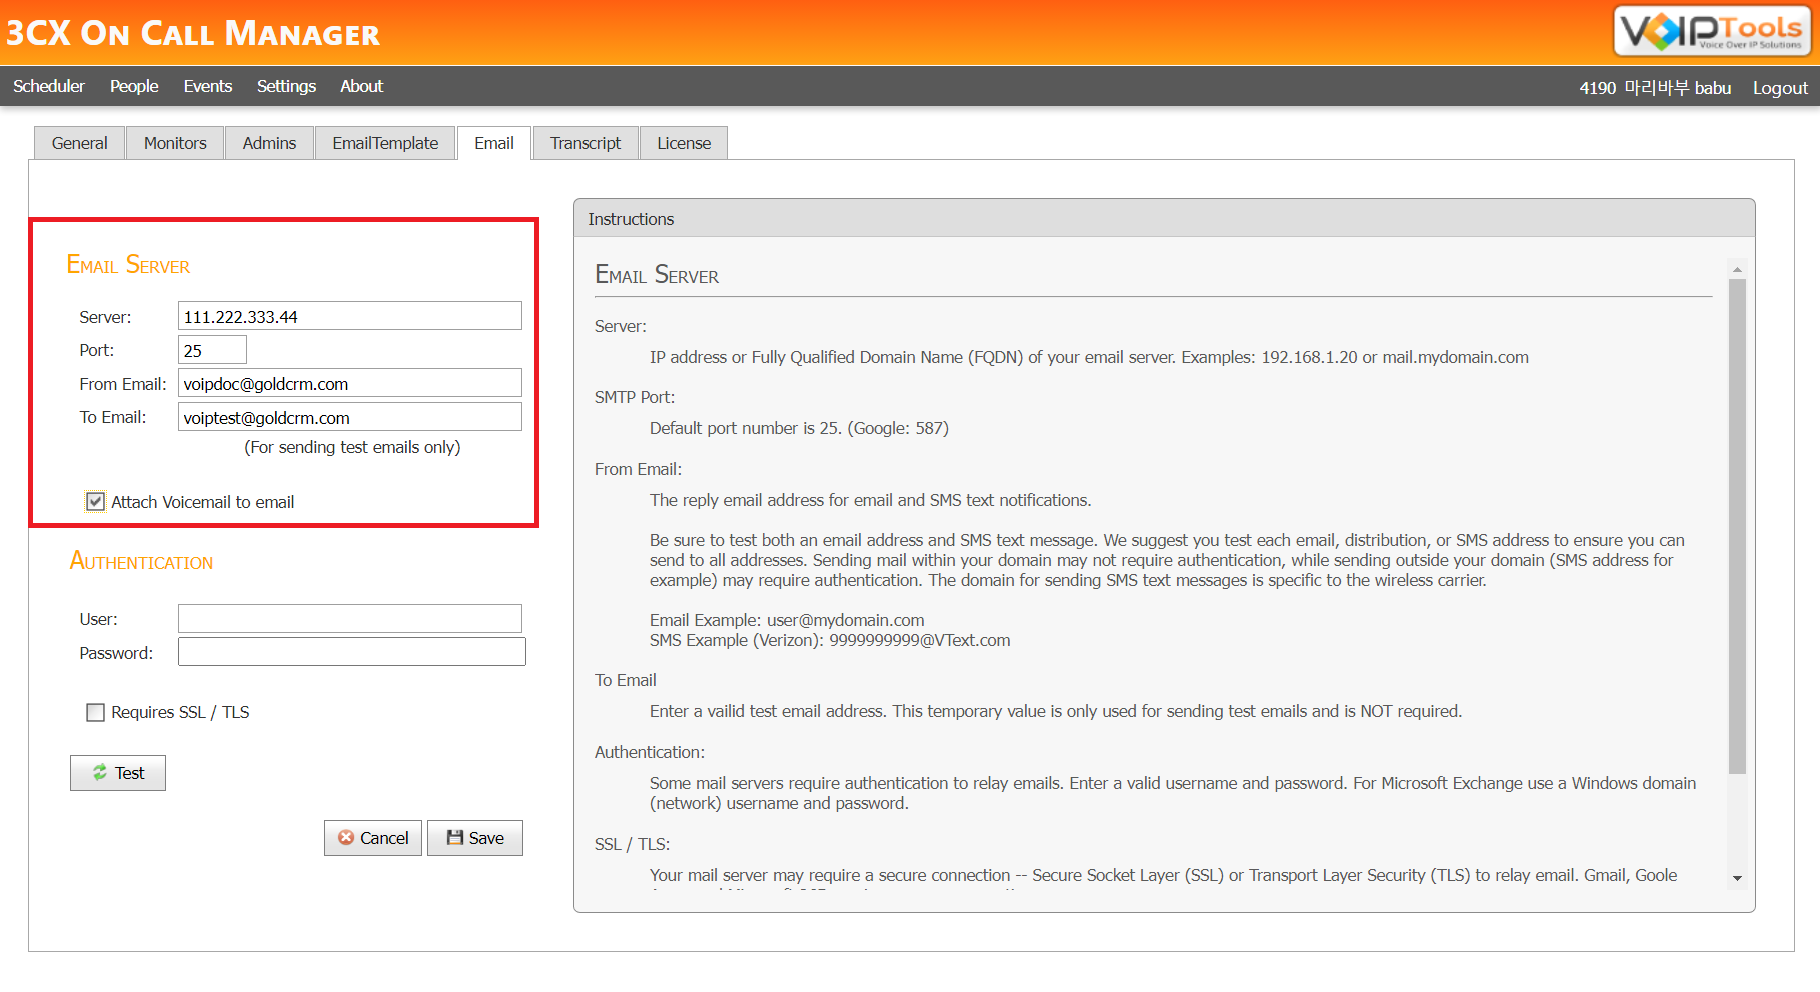
In the Email Server section, you must enter your email details to transfer the data through the SMTP protocol.
In the Server field, enter IP address or ‘Fully Qualified Domain Name’ (FQDN) of your email server.
In the Port field, enter the appropriate port number. The default port number is 25. (For Google: 587).
n the From Email field, enter reply email address for email and SMS text notifications.
In the To Email field, enter valid test email address.
Check Attach Voicemail to email box to attach the voicemail to the specified email.
Click Save to save your email server details..
Figure 38: Configure Email Server settings
SERVER
IP address or Fully Qualified Domain Name (FQDN) of your email server. Examples 192.168.1.20 or mail.mydomain.com
SMTP PORT
Default port is 25. (Google: 587)
FROM EMAIL
The reply email address for email and SMS text notifications.
Be sure to test both an email address and SMS text message. VoIPTools suggests you to test each mail, distribution, or SMS address to ensure you can send to all addresses. Sending mail within your domain may not require authentication, while sending outside your domain (SMS address for example) may require authentication. The domain for sending SMS text messages is specific to the wireless carrier.
TO EMAIL
This is a temporary valid test email address that is only used for sending test emails and is NOT required.
Some mail servers require authentication to relay emails. Follow the procedure to configure the Authentication settings,
Under the Authentication section, in the User field, enter a valid username. For Microsoft Exchange, use a Windows domain (network) username.
In the Password field, enter a valid password.
Check Requires SSL/ TLS box if your server requires a secure connection to relay email.
Click the Test button to test whether your SMTP settings are correct. (For this, you need to enter a valid email address in the To Email field and press the Test button).
Click Save to save your authentication details.
Figure 39: Configure Authentication settings
USER NAME
For Microsoft Exchange, use Windows domain (network) password
PASSWORD
For Microsoft Exchange, use windows domain (network) password
SSL/TLS
Your mail server may require a secure connection. – Secure Socket Layer (SSL) or Transport Layer Security (TLS) to relay email. Gmail, Google Apps, and Microsoft 365 require a secure connection.
TEST BUTTON
You can test whether your SMTP settings are correct by entering an email address in the ‘To Email’ field and pressing the ‘Test’ button.
The Transcript screen performs voicemail-to-text transcription. 3CX On Call Manager sends voice transcriptions to VoIPTools servers where we process the audio based on various providers on the back end.
Click the Speech Transcriptions box to enable the text-to-speech feature.
Figure 40: Speech Transcriptions box
Enter the path of the JSON file which has account credentials in the Google Speech Service Account File Path field.
NOTE:
VoIPTools uses Google Could Speech to Text for transcriptions of voicemails. You get a JSON file which has account credentials when you create a Google Cloud Account.
Enter your cloud bucket name in the Cloud Storage Bucket Name field.
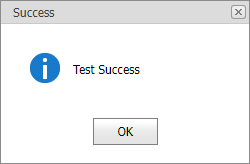
Click the Test Credentials button to verify your credentials and click OK in the Success message box.
Figure 41: Test Success message box
In the Culture dropdown list, select the desired option. The default option is English-US.
Figure 42: Culture dropdown
Click the Save button to save your settings and click OK in the confirmation box.
Figure 43: Save Completed message box.
NOTE:
The On Call Manager uses your local file copy to transcribe the audio file if its duration is up to 60 seconds; or uses google cloud storage if the duration is beyond 60 seconds with the help of cloud storage buckets. Once the file is transcribed successfully in the google cloud, the On Call Manager deletes the file from the storage bucket. You must enter the correct Google Cloud Credentials and the Cloud Storage Bucket name where your recordings are stored
Cloud Speech-to-Text is priced monthly based on the amount of audio successfully processed by the service, measured in increments rounded up to 15 seconds. For more details regarding pricing please go through this link:
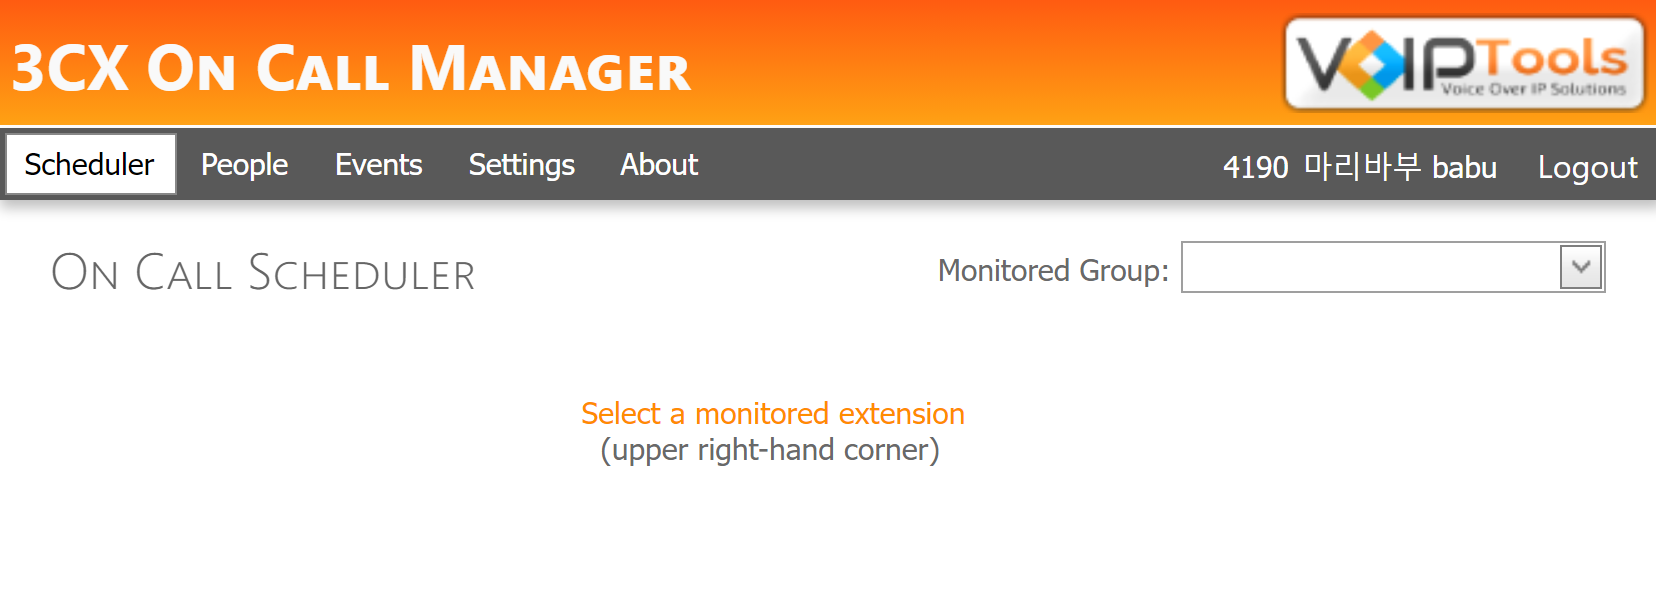
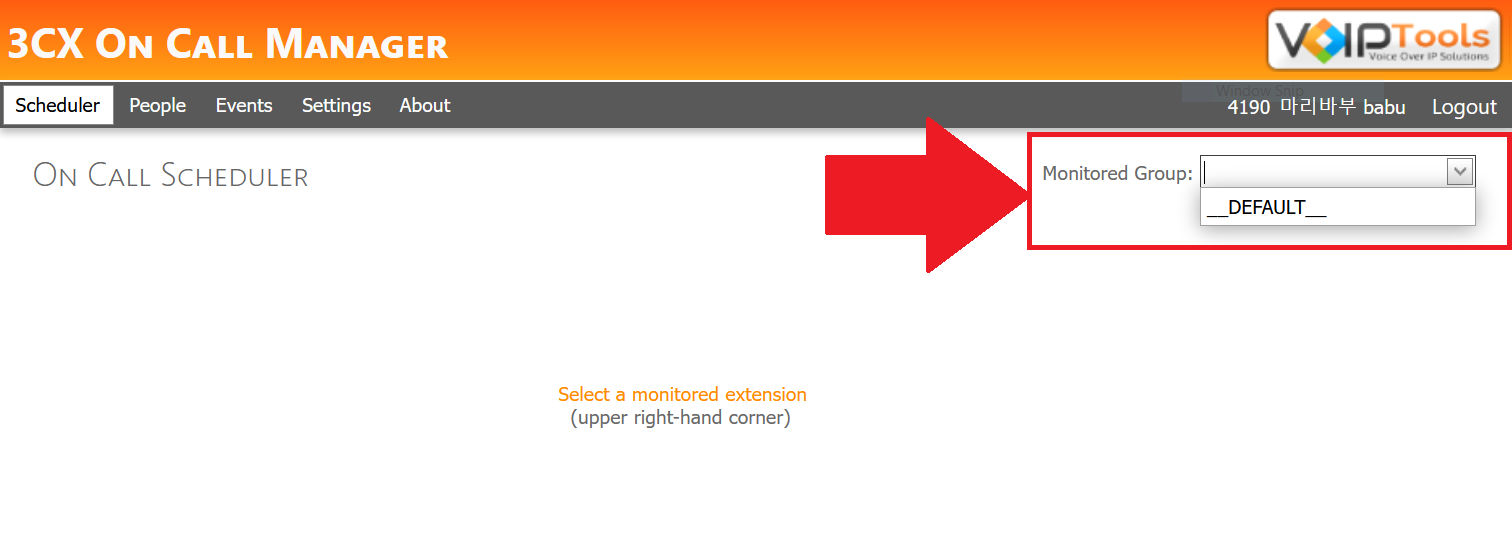
The Scheduler tab does not display any Monitored Groups by default.
NOTE:
As a ‘Manager’, you can view and create schedulers only for those groups to which you are manager while as an ‘Admin’, you can create and view for all the groups.
The default view of the Scheduler tab when no monitored group is selected,
Figure 50: Default view of Scheduler tab with any Monitored Group selected
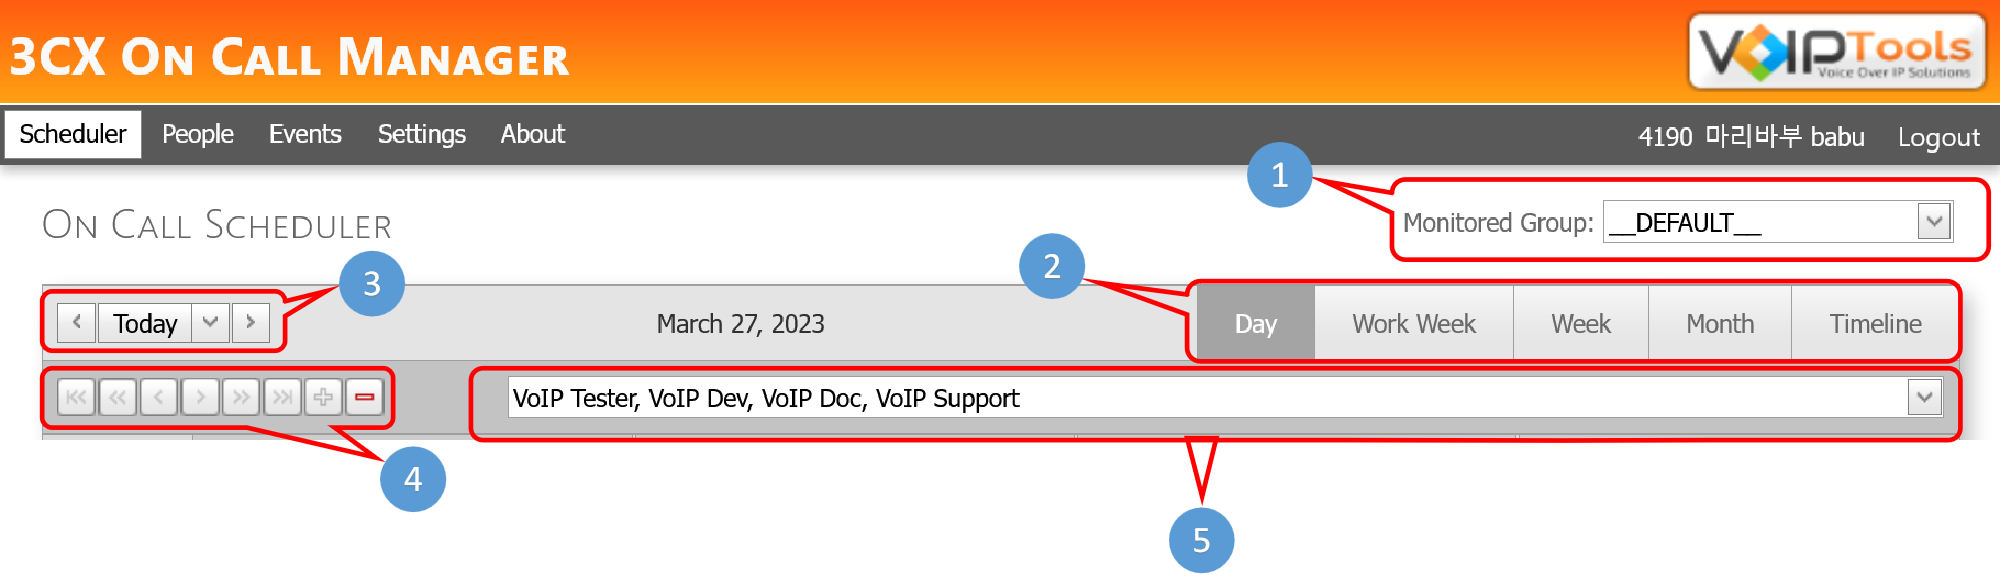
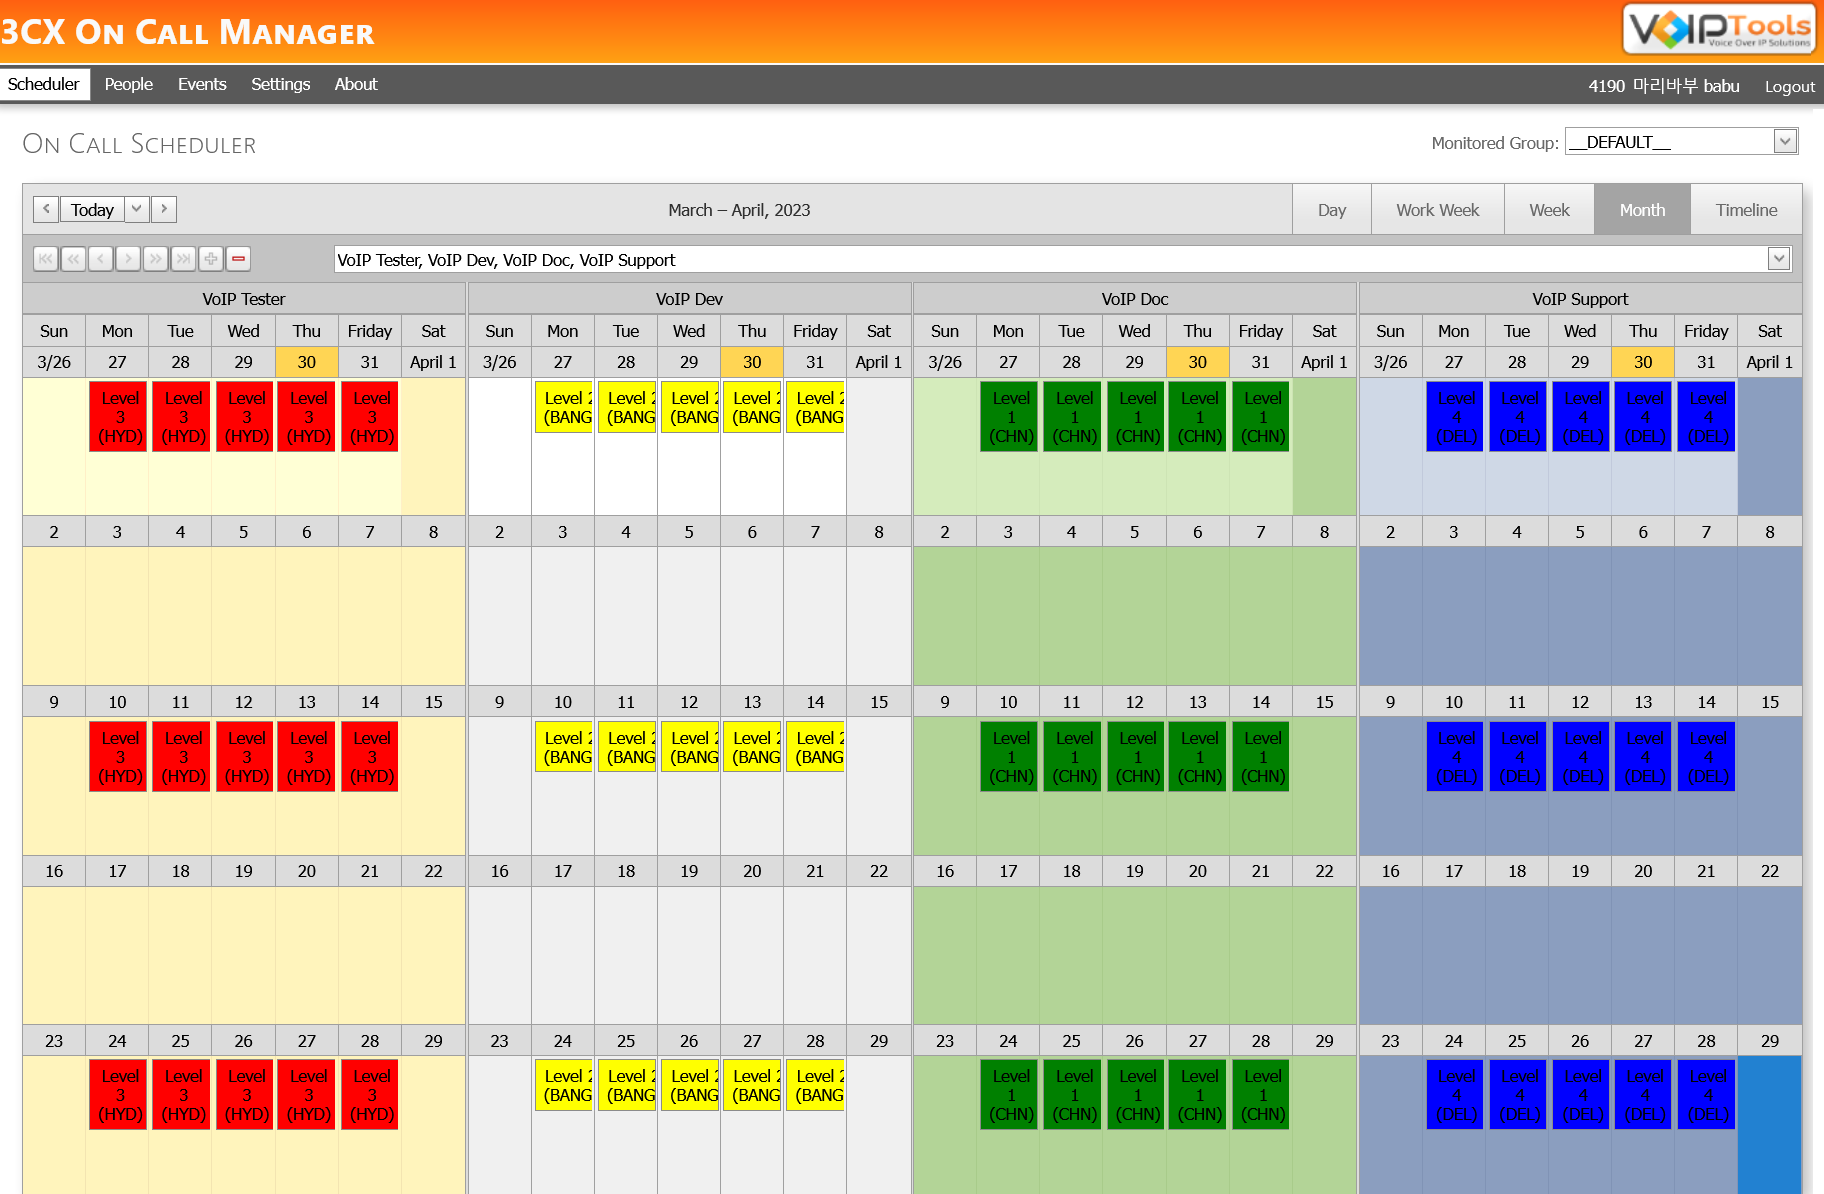
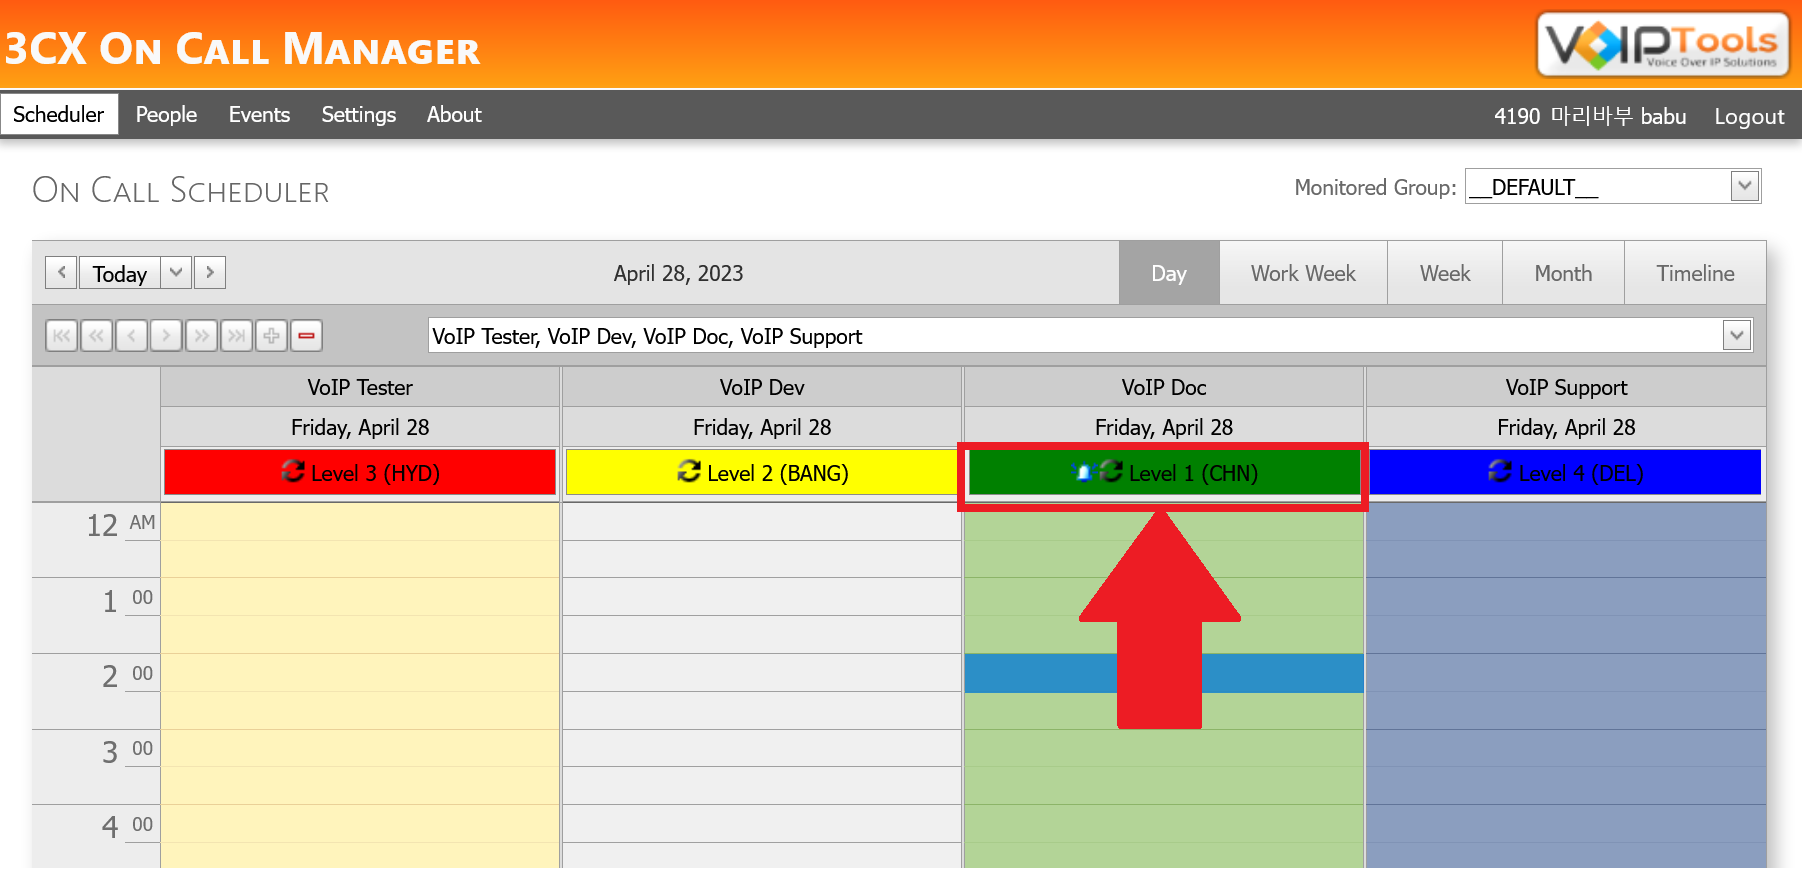
On the right-hand side of the ‘Calendar’ header, you can select the appropriate tab to view the scheduled appointments of the visible resources in various calendar formats like Day, Work Week, Week, Month or Timeline.
Day
displays all the visible resource appointments for a specific date in day format.
Work Week
displays all the visible resource appointments in the work week (Monday-Friday) format.
Week
displays all the visible resource appointments in a weekly (Sunday-Saturday) format.
Month
displays all the visible resource appointments in a monthly format.
Timeline
displays all the visible resource appointments in a timeline format.
The Day Selection buttons let you select the desired time frame to schedule events/appointments for your resources.
Previous
Takes you to the previous sheet of the selected time frame. For example, if you have selected Week in the Calendar Formats, the Previous button button takes you to the previous week.
Next
Takes you to the next sheet of the selected time frame. For example, if you have selected Week in the Calendar Formats, the Next button button takes you to the next week.
Go To Date
Lets you to select the specific date that you want to schedule the events.
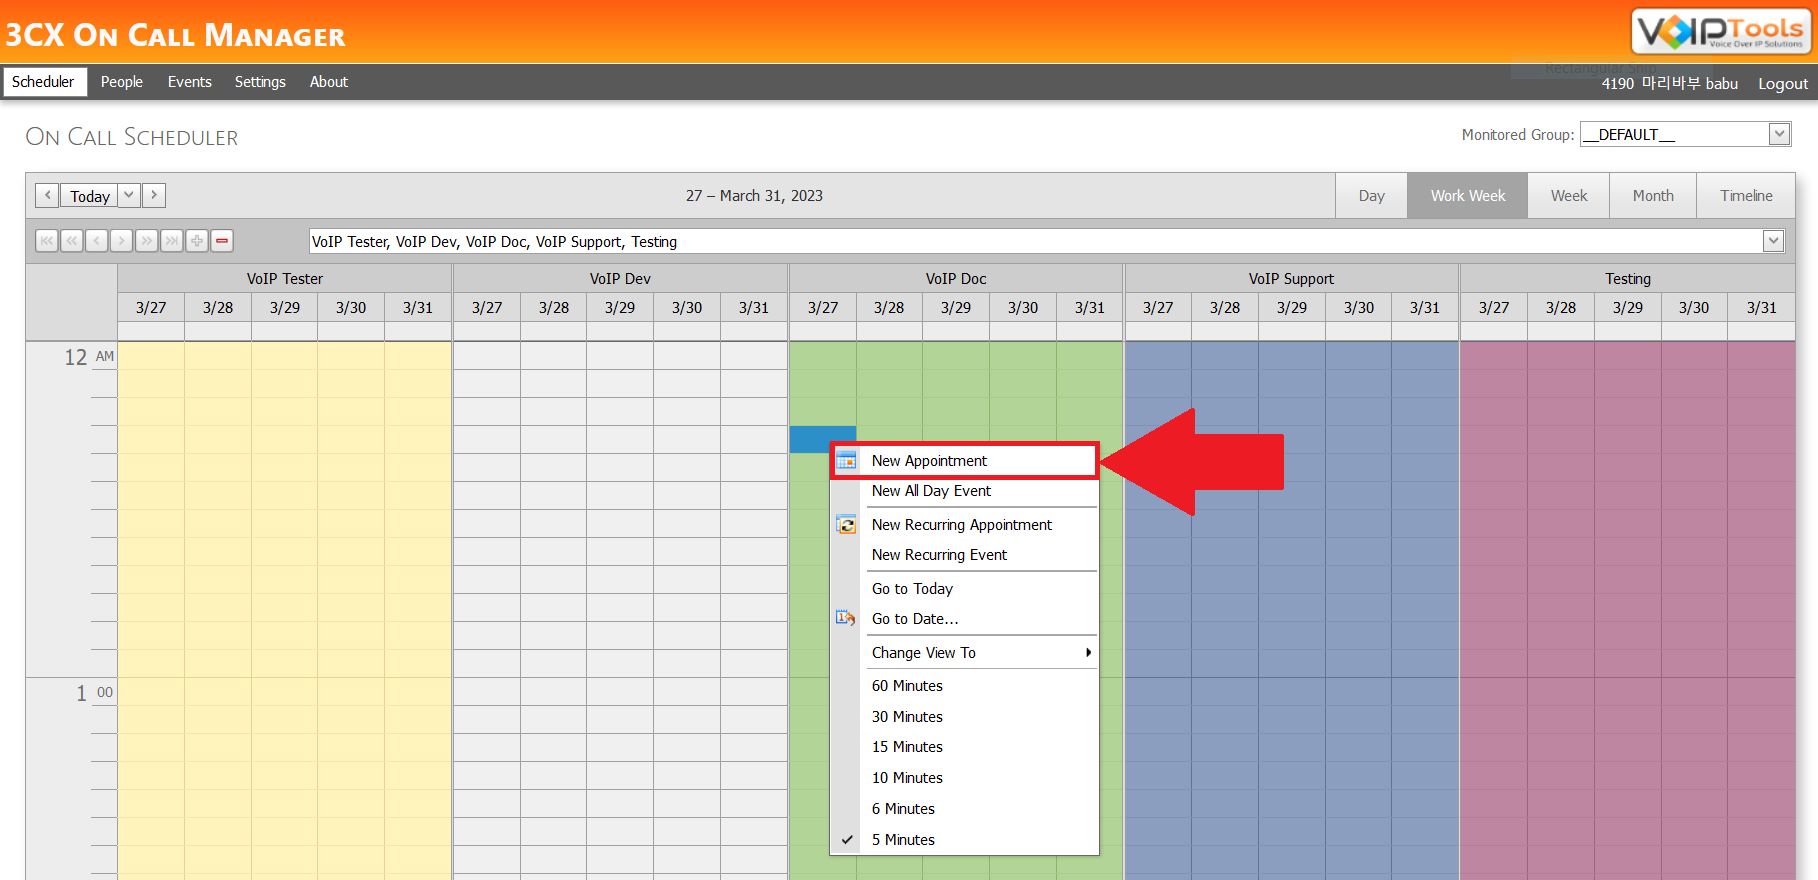
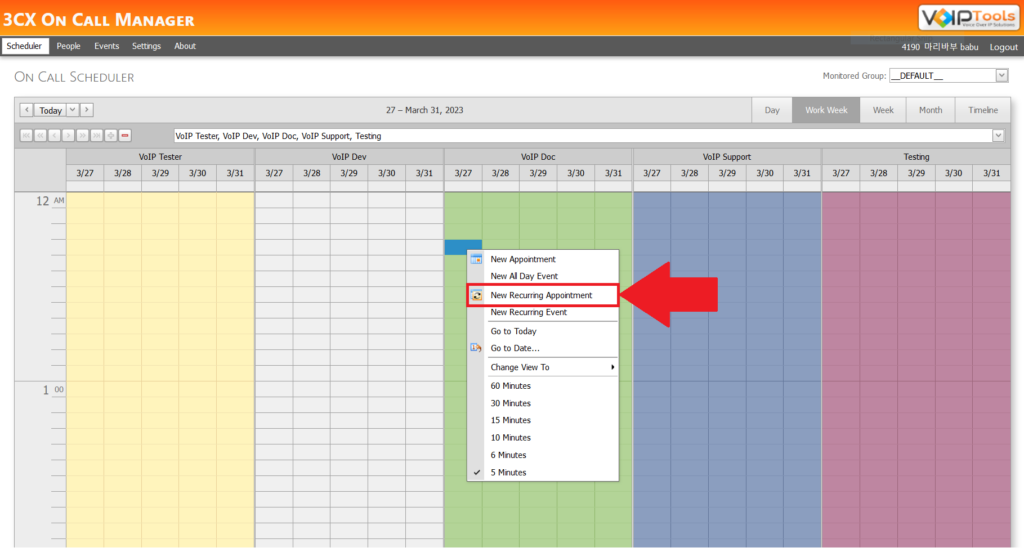
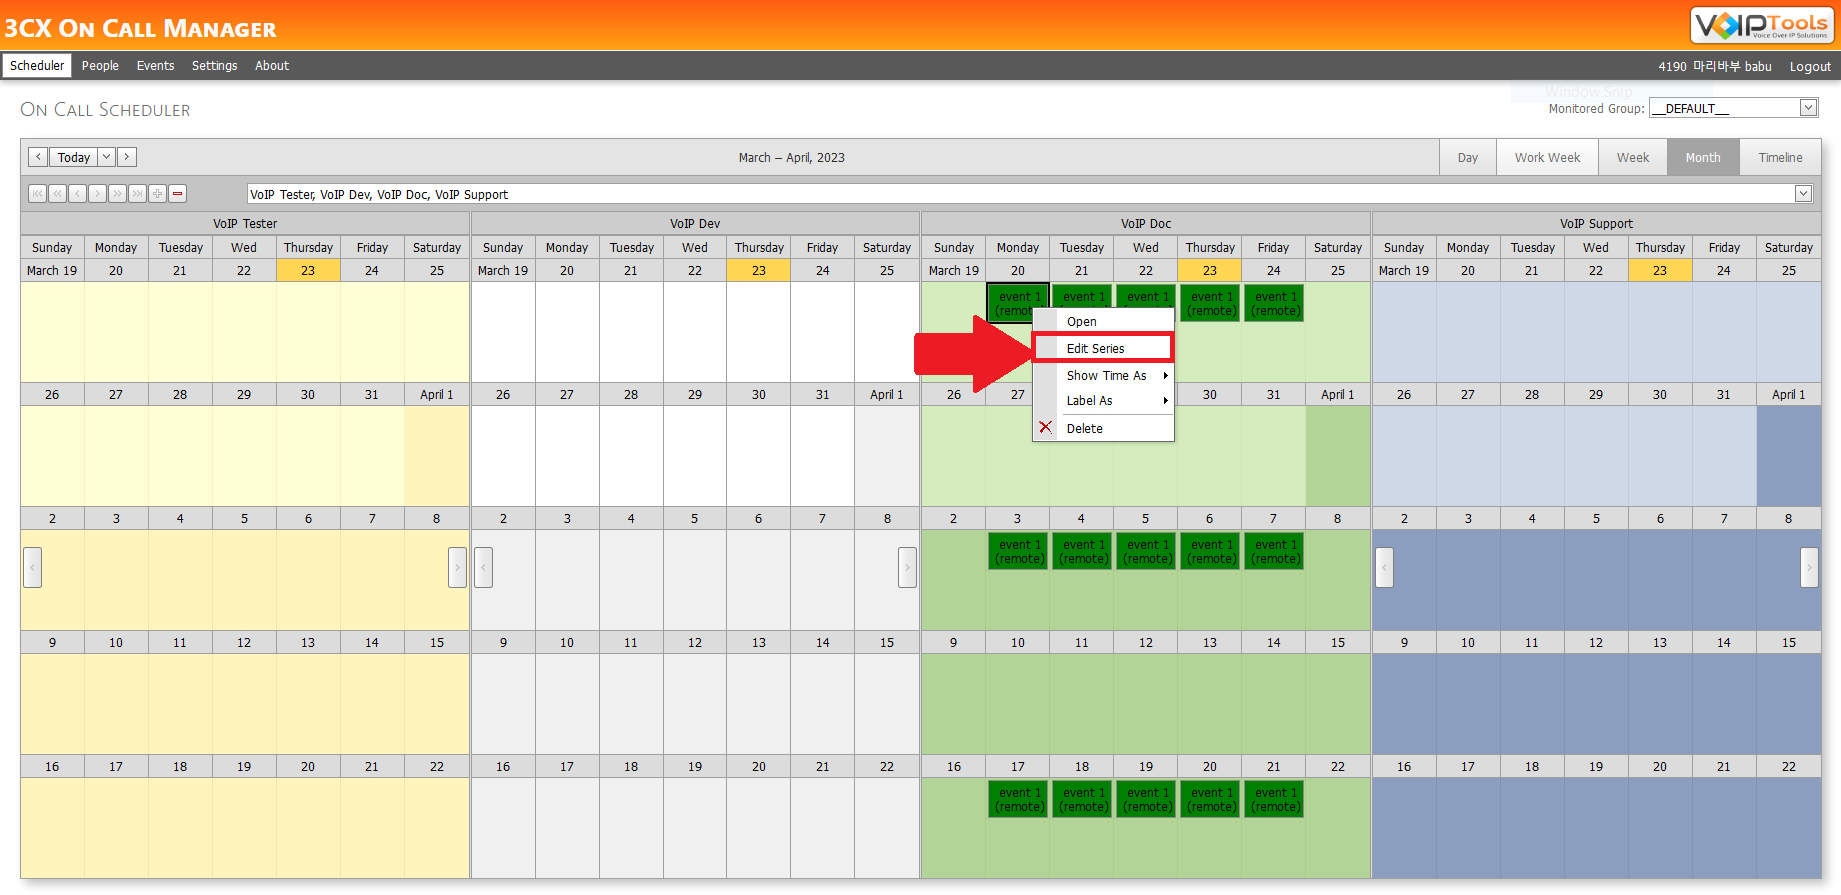
You can right click anywhere on the grids to open the right click menu. Read further to know the definitions of each options.
Figure 56: Right Click menu options
NEW APPOINTMENT
Select this option to create new appointment for a resource
NEW ALL-DAY EVENT
Opens an Appointment dialog box with All Day Event box checked
NEW RECURRING APPOINTMENT
Opens an Appointment dialog box with Recurring box checked.
NEW RECURRING EVENT
Opens Event dialog box to create a new event for a resource
GO TO TODAY
Opens Scheduler screen in “Today’s” date
GO TO DATE…
Opens Go To Date box that enables you to select specific date and calendar format in which you want to view the Scheduler screen
CHANGE VIEW TO
Lets you select the desired calendar format.
60 MINUTES
Enables you to view the Scheduler screen that divides the grid to show time interval in terms of 60 minutes. Similarly, you can view the grid in other time divisions like 30 minutes, 15 minutes, 10 minutes, 6 minutes or 5 minutes.
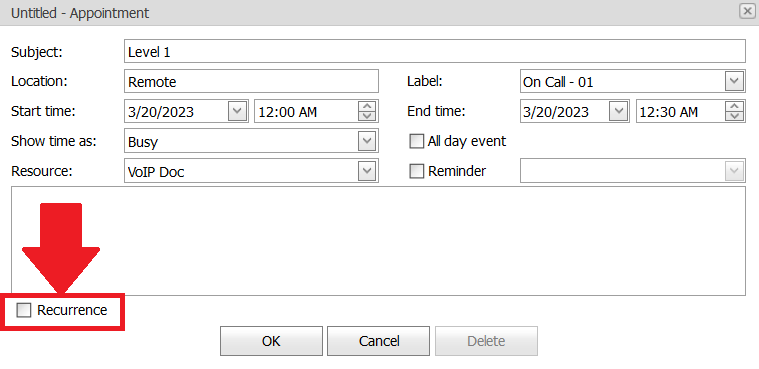
Non Recurring appointments create appointments for the resources only for the specified date and time. Follow the procedure to create a non-recurring appointment,
In the Right Clickmenu, click the New Appointment option.
Figure 59: Right Click menu – New Appointment
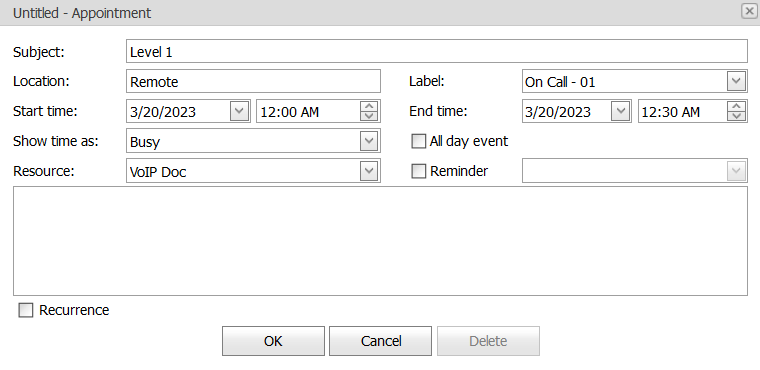
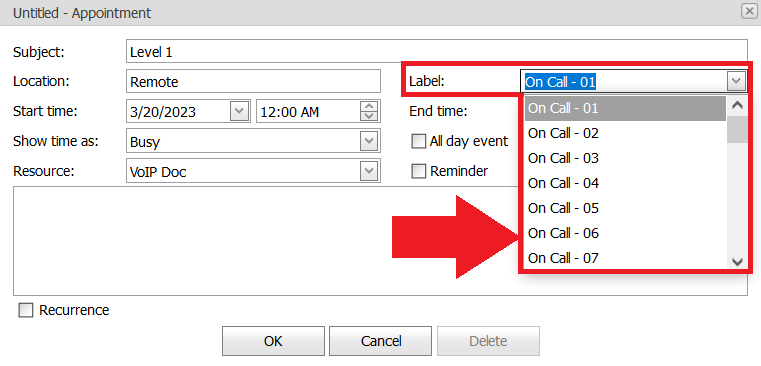
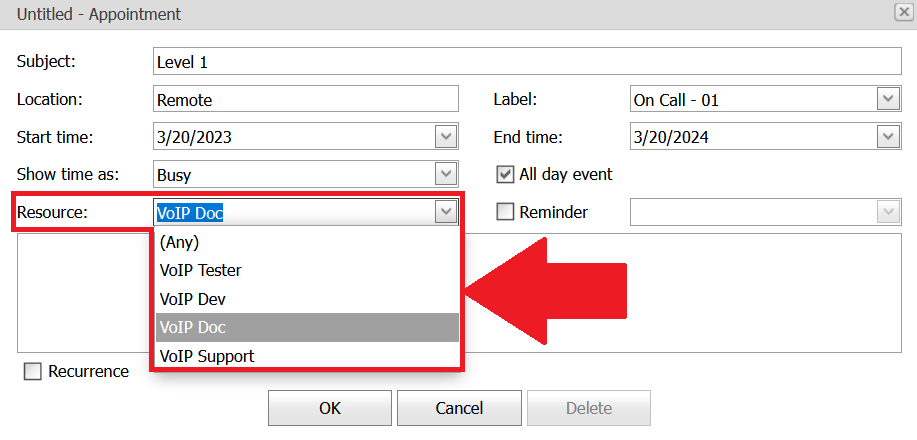
Enter the required details in the New Appointment box.
Click the OK button to save your appointment.
gure 60: Create a new appointment
SUBJECT
Brief description of the appointment
LOCATION
Location of the agent for whom you are creating the appointment
LABEL
Escalation evel in which you want to place the agent
START TIME
The date and time from which the ‘On Call’ time starts for the agent
END TIME
The date and time at which the ‘On Call’ time ends for the agent
SHOW TIME AS
Specifies the work status of the agent as busy, free, tentative, out of the office or working elsewhere. Show time as is valid for Start time to End time
ALL DAY EVENT
If the schedule is for the complete day, then check the All day event box. If you check this box, you will observe that the time selection box (from ‘Start time’) will disappear.
RESOURCE
Select the agent from the dropdown for whom you are creating the appointment.
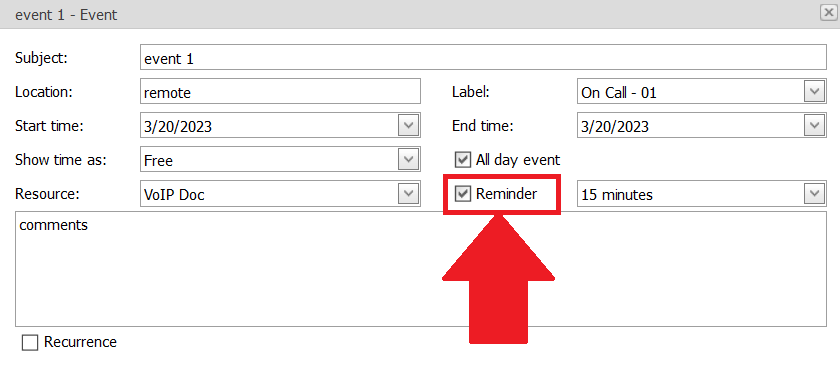
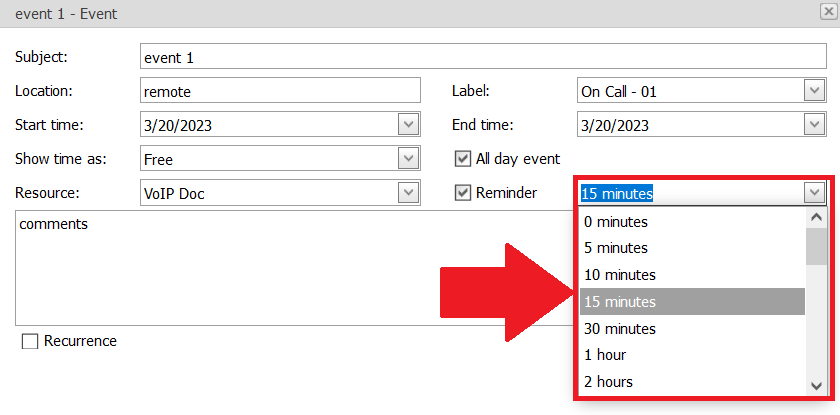
REMAINDER
Check this box if you want to remind the appointment to the agent. You can select the time from the dropdown so the agent receives the reminder message after the specified time.
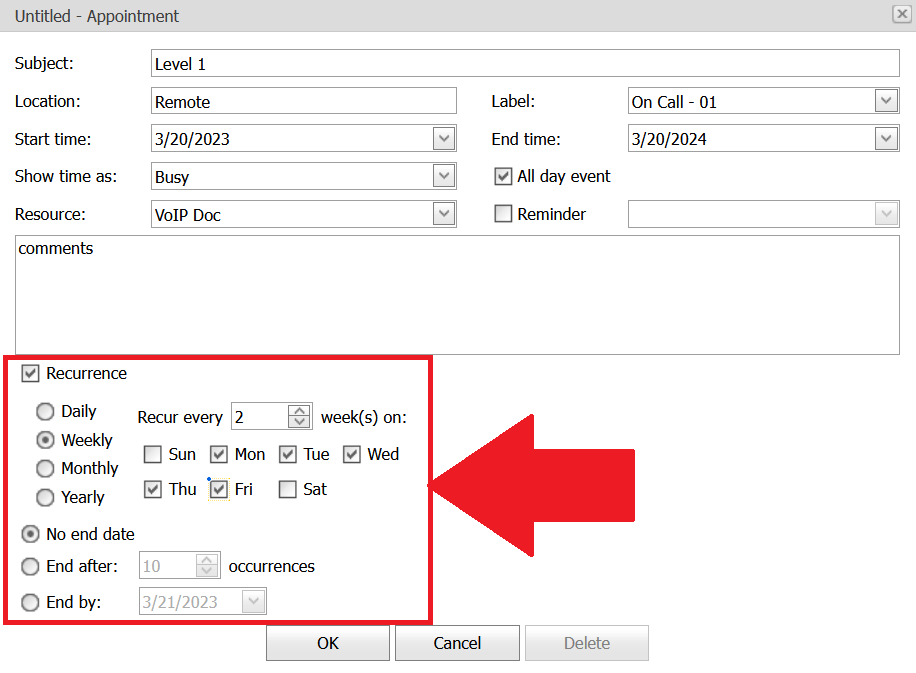
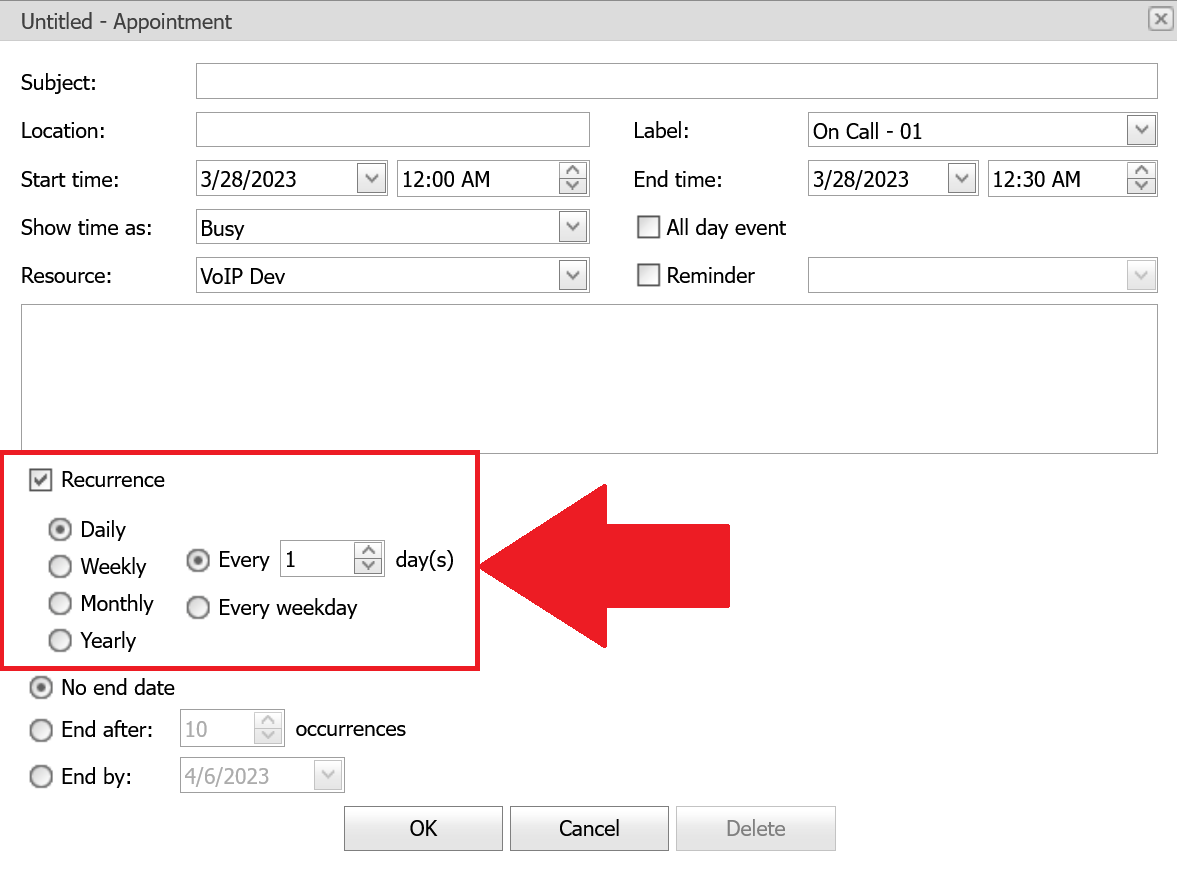
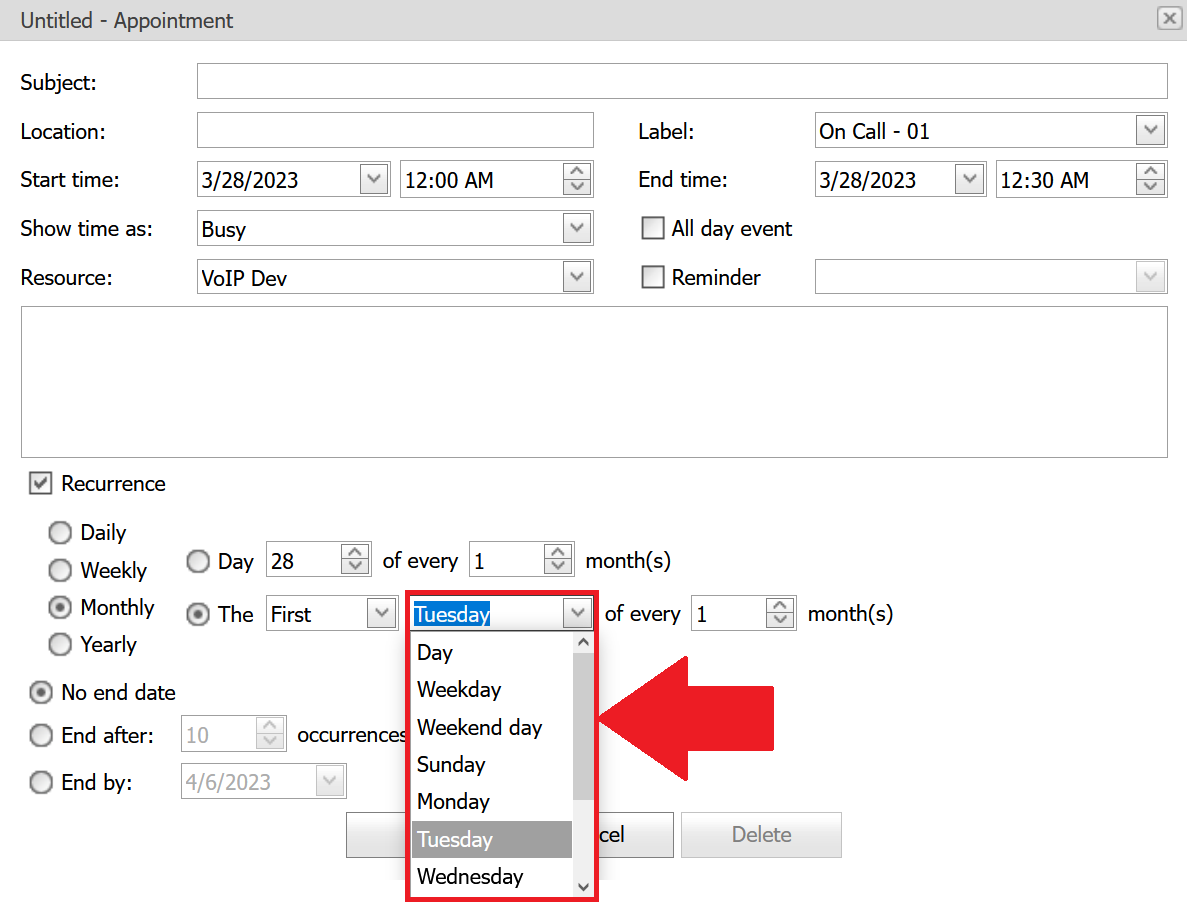
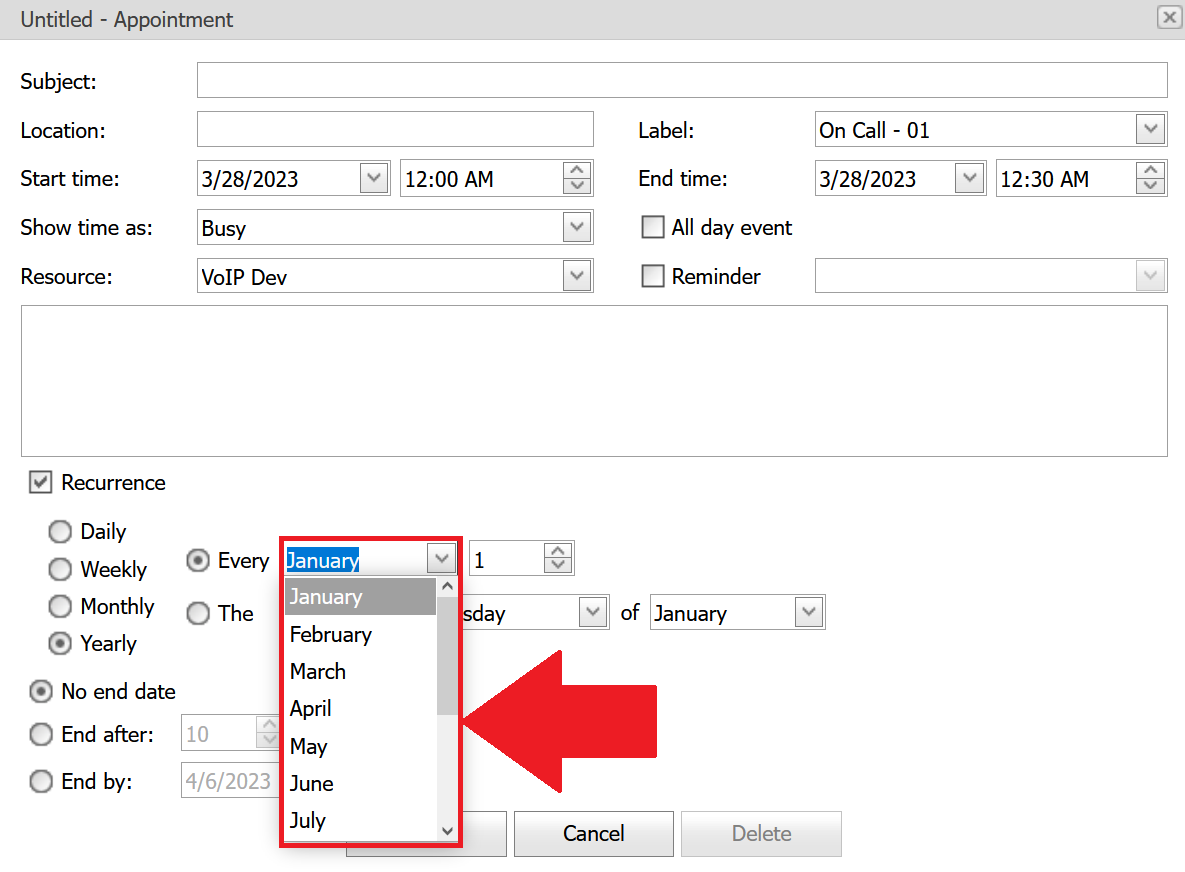
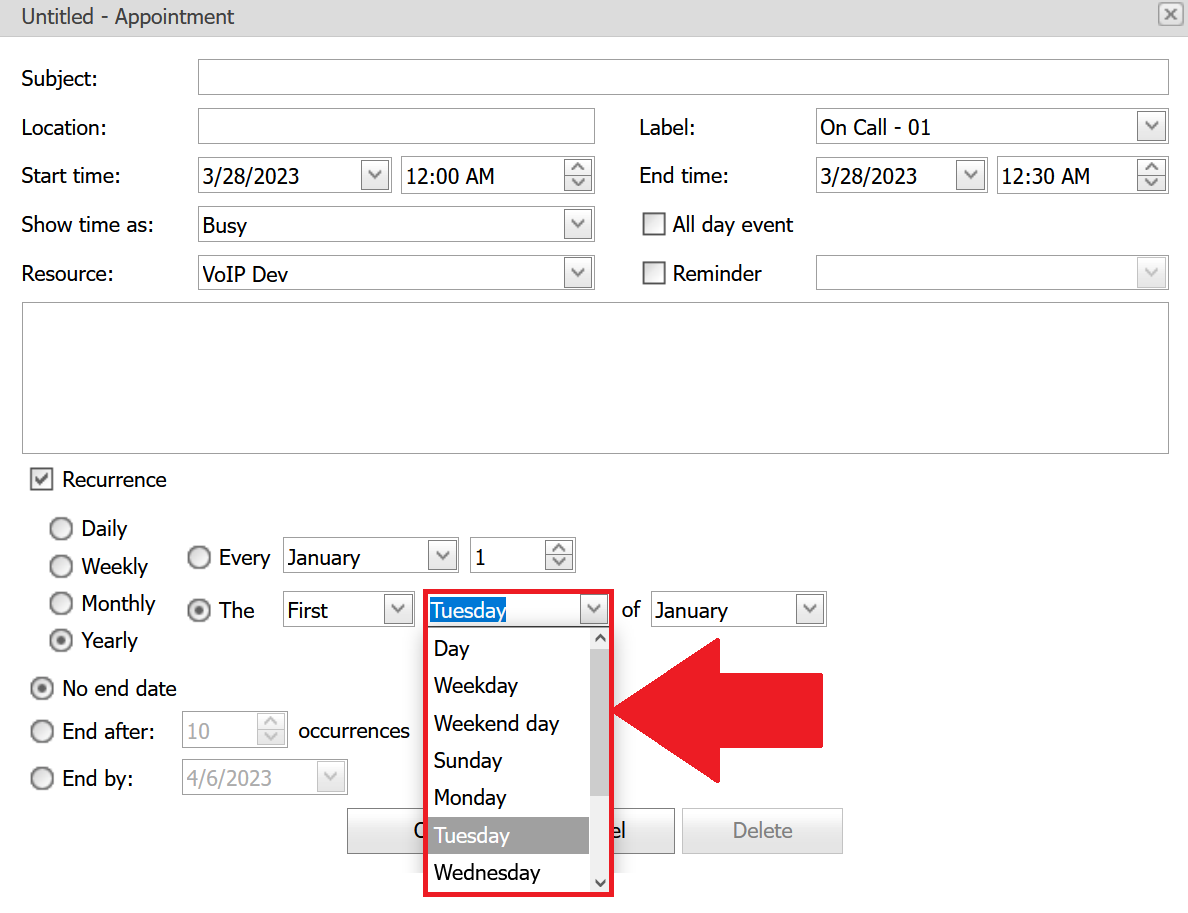
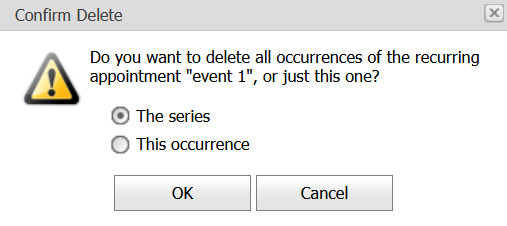
RECURRENCE
If you want the appointment to recur, check the Recurrence box. From the available options select the appropriate value (Daily, Weekly, Monthly, Yearly, Every—day(s) or Every weekday) for the appointment to recur.
NO END DATE
Select this option if you do not want to stop the recurrence of the appointment.
END AFTER
Select the appropriate number from the drop-down so that the appointment recurrence will occur for the specified number of times.
END BY
Select this option and select the appropriate date from the ‘Date’ drop-down so that the appointment recurrence will end by the specified date.
Select the No End Date radio button to stop the recurrence after a set period or unselect the No End Date radio button for continuous recurrence of appointments.
Click the OK button to save the recurring appointment.
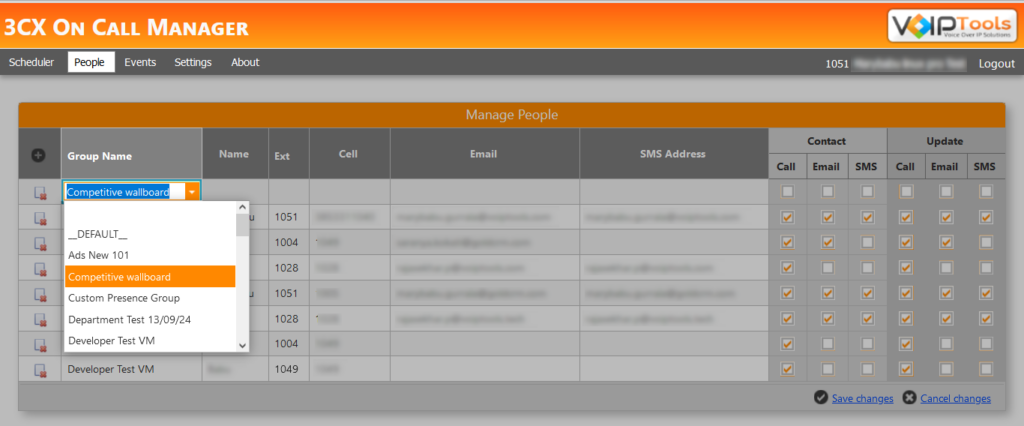
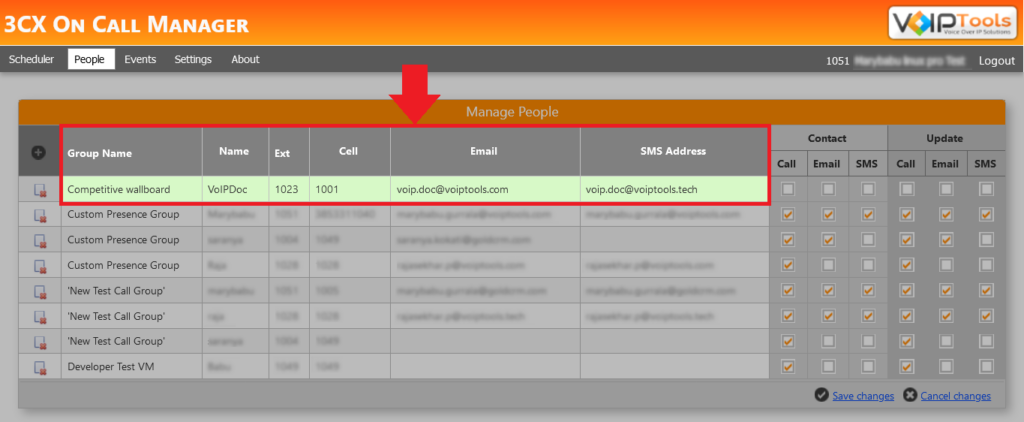
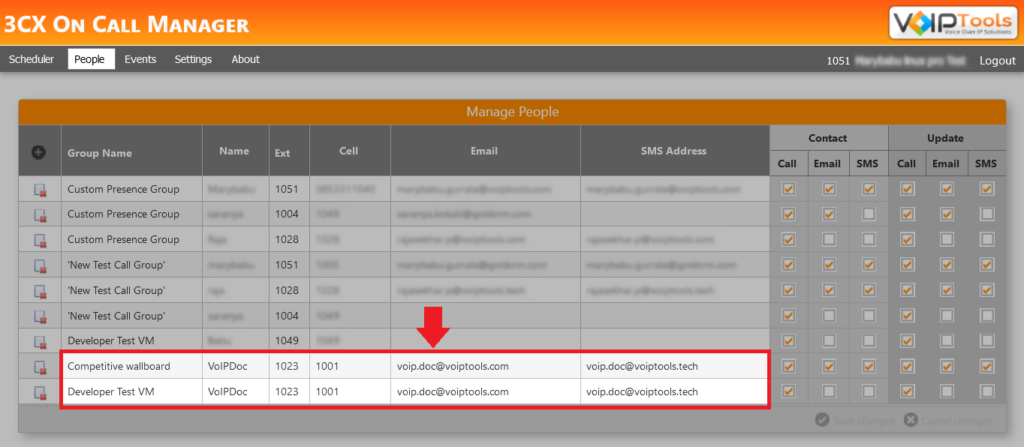
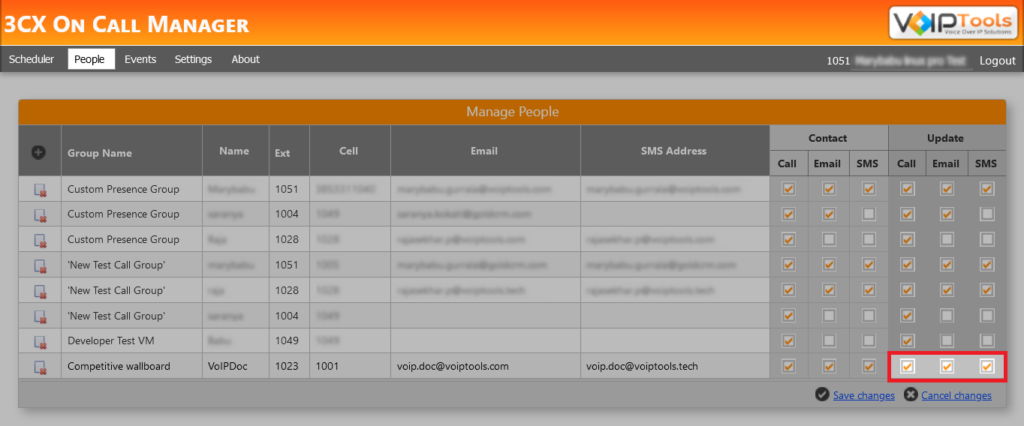
The People tab lets you identify the resources (agents) available to be on call and how they are to be notified. The assumption is that these resources are employees and you have the right to get the cell phone carrier of your employees.
You can do the following taks in the people screen,
A group created in 3CX which has agents for attending the calls.
Name
Name of the resource from the Group assigned for the call.
Extension
Extension of the resource
Cell
Cellphone number of the resource
Email SMS Address
The SMS address of the resource.
NOTE: To send SMS via email, the cellphone carrier must support the SMS gateway.
Contact Decides how an employeemust be notified when a new call comes in.
Call
Plays the New Prompt audio to the resource through call using the cellphone number provided.
Email
Plays the New Prompt audio to the resource through Email using the Email addres provided.
SMS
Plays the New Prompt audio to the resource through SMS using the SMS addres provided.
Update Decides how an agent must be notified when a call has been answered by some other person. This is useful when multiple agents are available for a call.
Call
Plays the Heard Prompt audio to the resource through call using the cellphone number provided.
Email
Plays the Heard Prompt audio to the resource through Email using the Email addres provided.
SMS
Plays the Heard Prompt audio to the resource through SMS using the SMS addres provided.
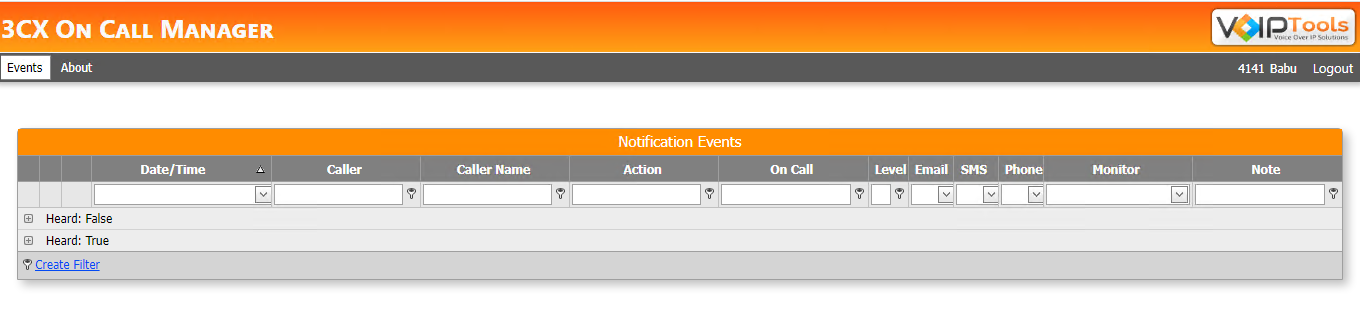
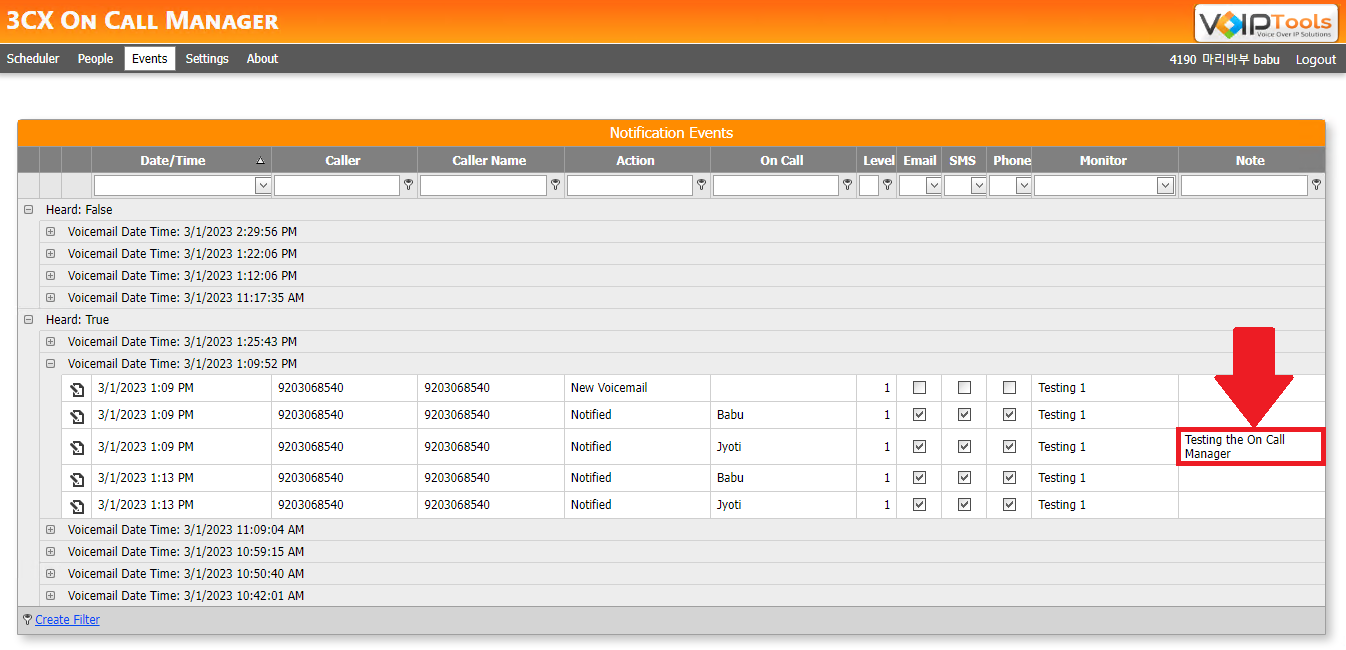
The Events tab is a call log that lets you know the incoming calls that were heard and that were not heard. You can view the call logs of all the ‘On Call’ events for all the monitored extensions between the agents and the customers. The details of every event include date/ time, caller extension, caller name, action, notification type, monitor extension, and notes.
You can perform the following tasks in the events tab,
You get quick answers to most of your inquiries in our online manual. If you prefer direct contact, we offer various support channels, including phone, email, live chat, and our helpful VoIPTools forums.
Rest assured, our dedicated team is here to assist you around the clock, every day of the year. Whether you’re based in the USA or India, we’re ready to provide prompt responses to your technical queries.
Windows Event Log for VoIPTools Applications and Services #
For troubleshooting any application errors, our Windows Event Log contains a comprehensive list of error messages, warnings, and informative notes related to all our VoIPTools applications and services. It’s a valuable resource to help you pinpoint and resolve any issues you may encounter.
Are you looking to collaborate with other VoIPTools customers facing similar challenges? Our forum is the perfect platform to exchange ideas, solutions, and best practices. Join the conversation at: https://www.voiptools.com/community/
Got questions that need immediate answers? Our chat support team is available to assist you in real time. Just click on the Live Chat button located at the lower right corner of our website, and we’ll acknowledge your queries right away.
To ensure a thorough understanding of your concerns, email us at support@voiptools.com. Describe your issue in detail, and we’ll get back to you within one business day with the support you need.
If you prefer to speak with a representative directly, you can reach us at +1 801-642-4655. Our attentive team is available to take your calls from 8:00 AM to 6:00 PM (Central Standard Time).
If you’ve purchased our products through a VoIPTools Partner, rest assured that they provide first-level support at no additional cost. Partners have access to 100% free technical assistance and actively participate in the troubleshooting process.
VoIPTools customers enjoy access to our online manuals and receive support through emails (with responses within one business day) and live chat. However, please note that we do not provide remote server login assistance.
For a more hands-on experience, consider our “Installation Support” package. Our expert support team can log in to your servers, and install and configure all our tools. This comprehensive service includes setting up SQL Server Express and Internet Information Server if necessary. We’ll work closely with you to tailor our applications to meet your requirements.
We’re committed to providing top-notch support to ensure your VoIPTools experience is smooth and hassle-free. Contact us today, and let us assist you in making the most of our powerful tools!


NOTE:


 to open the web application.
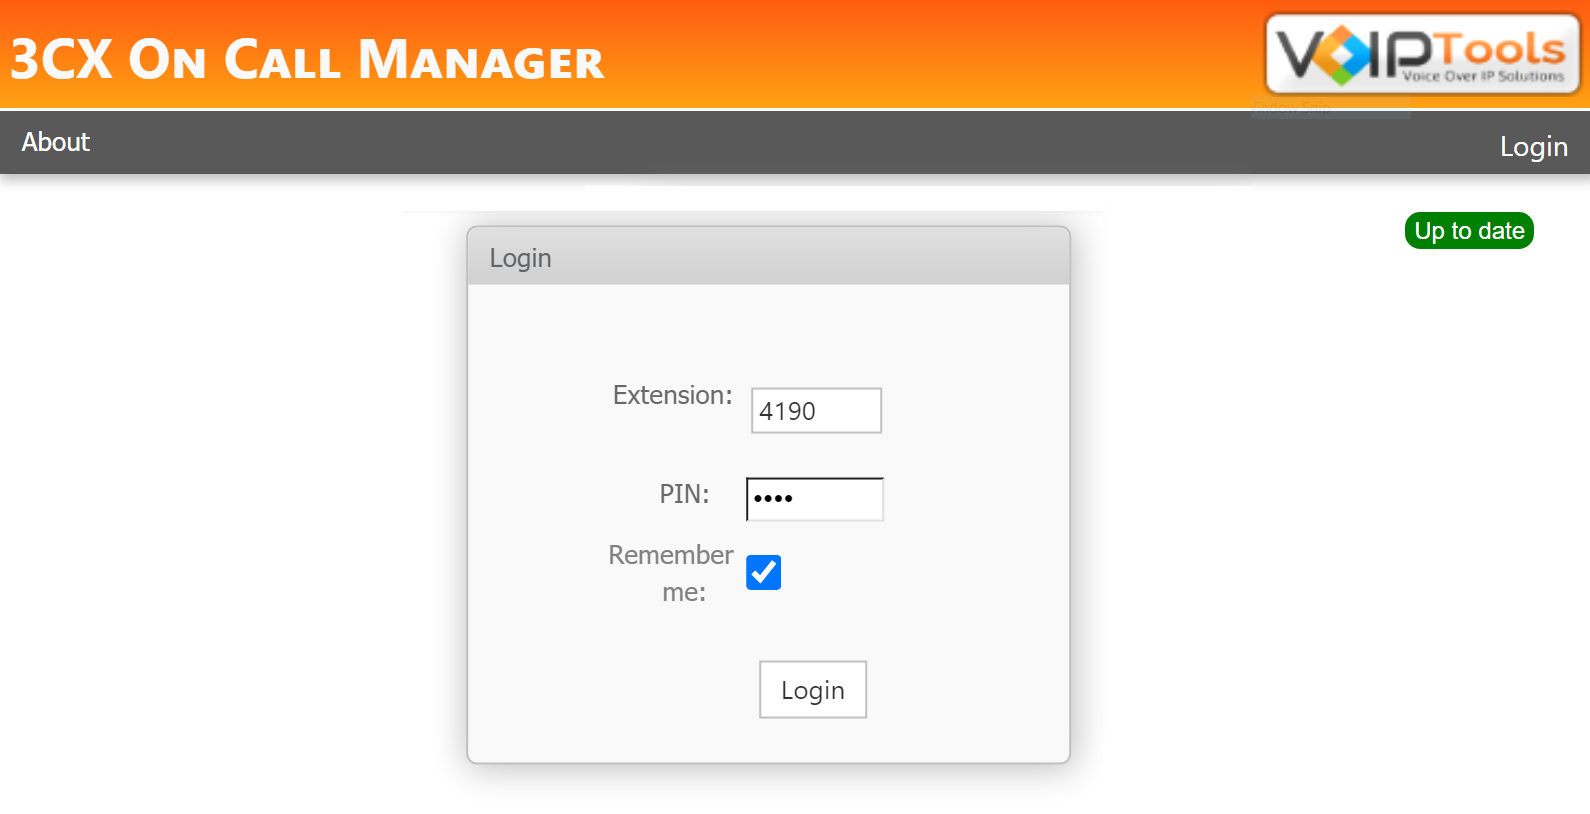
 to complete your registration.
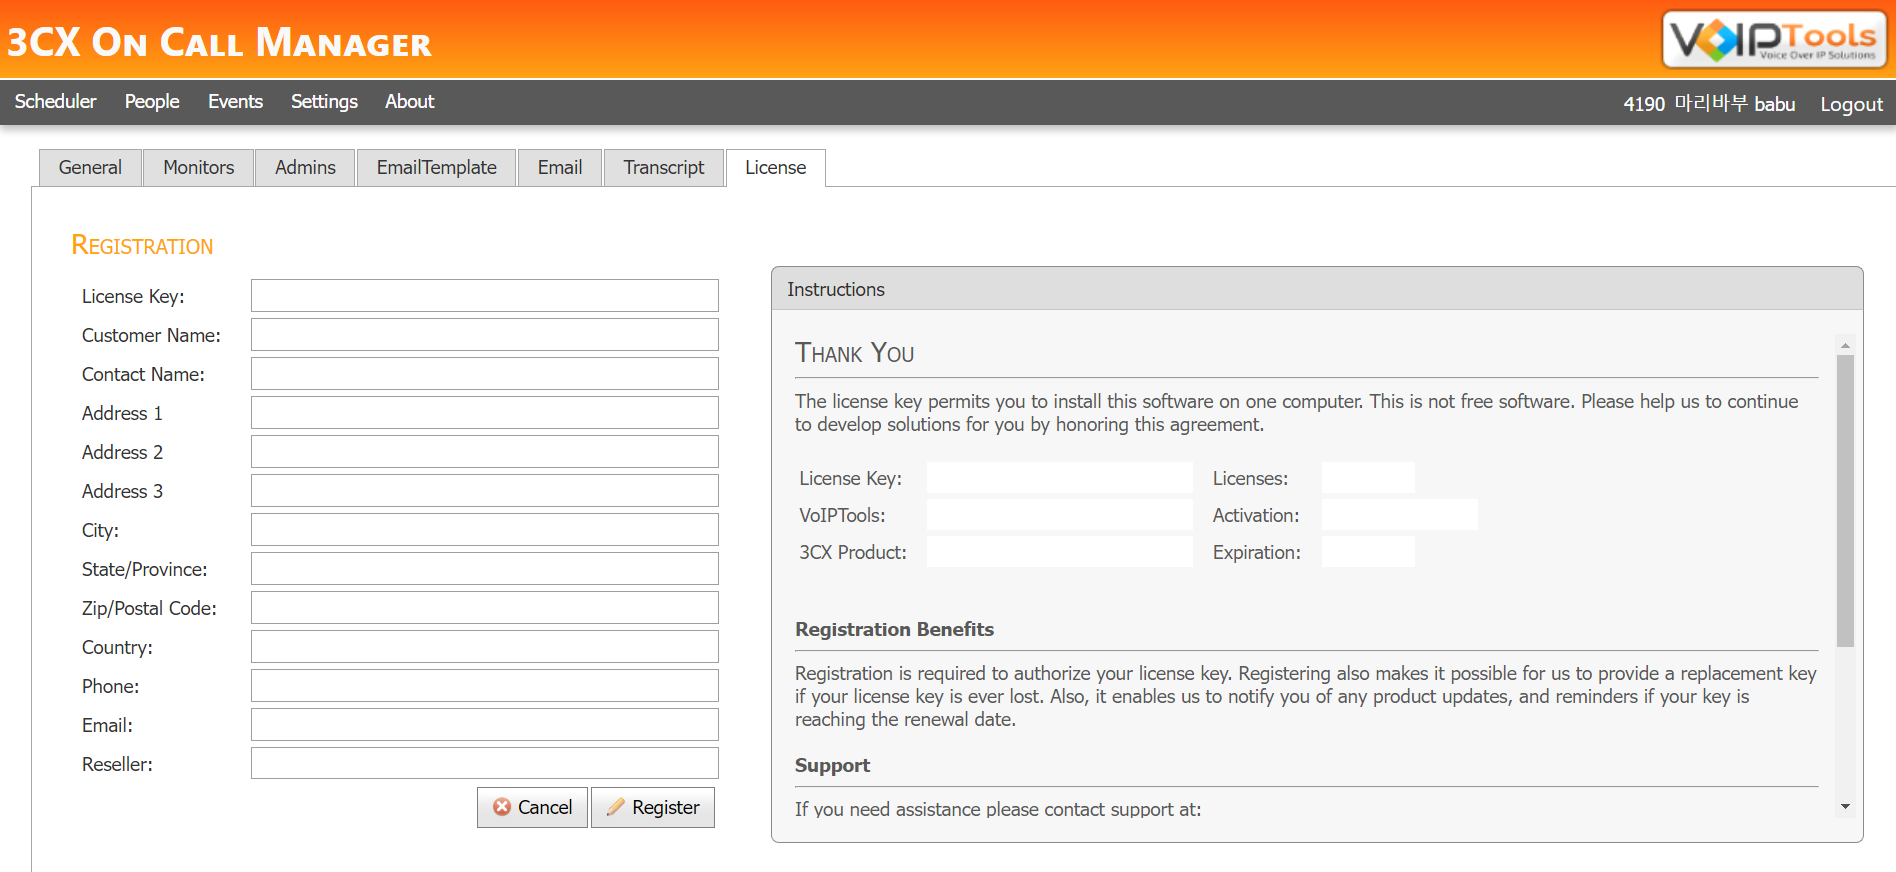


 to save the changes.
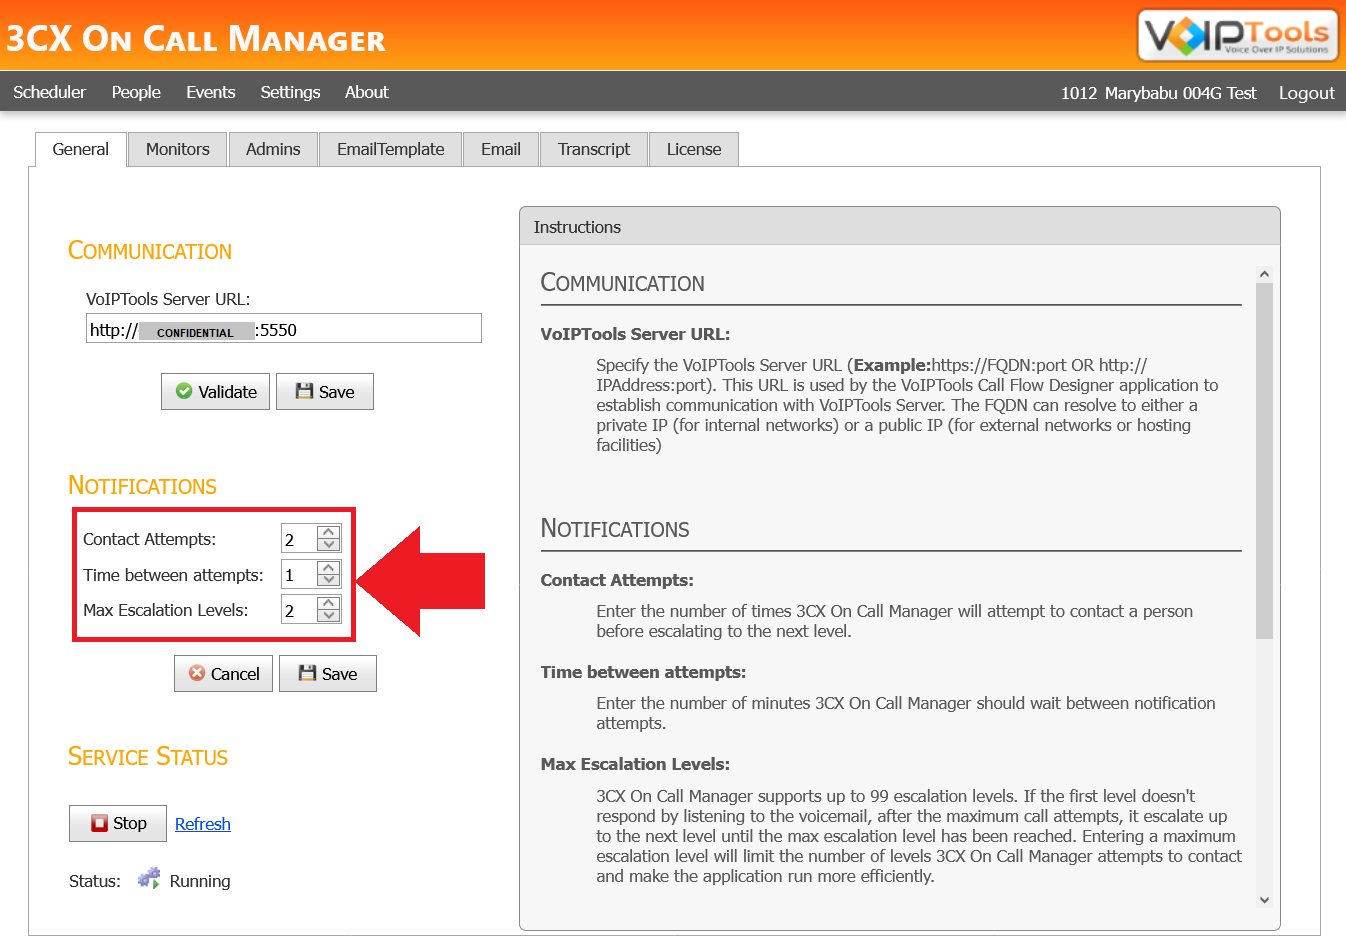
 button to add a new monitor.
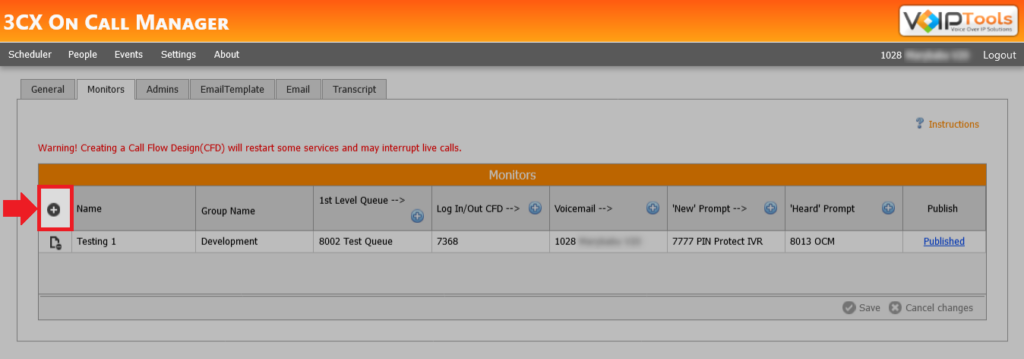
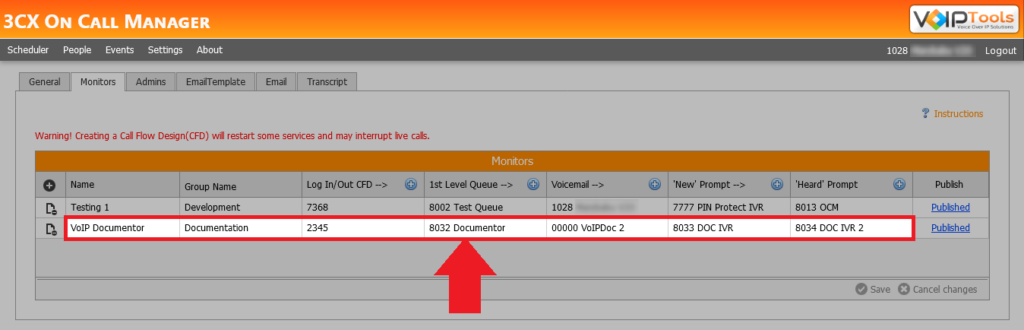
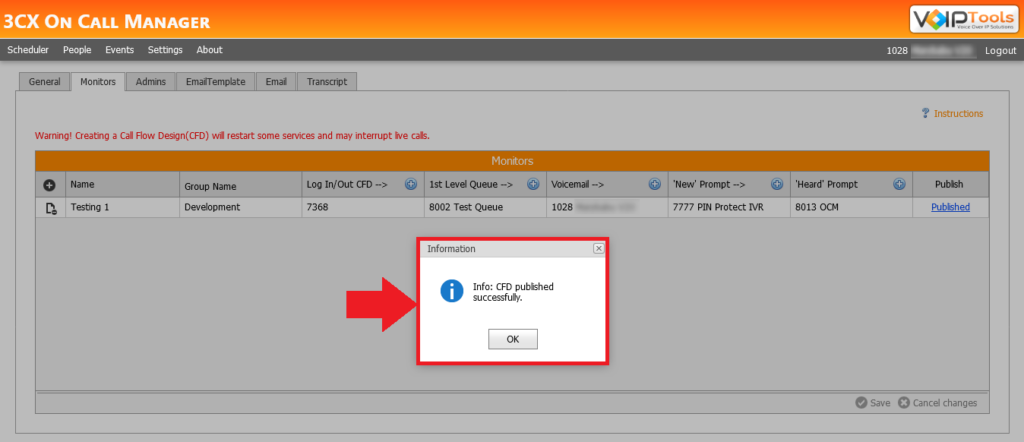
 button to publish your monitor. Read further to learn about each column.
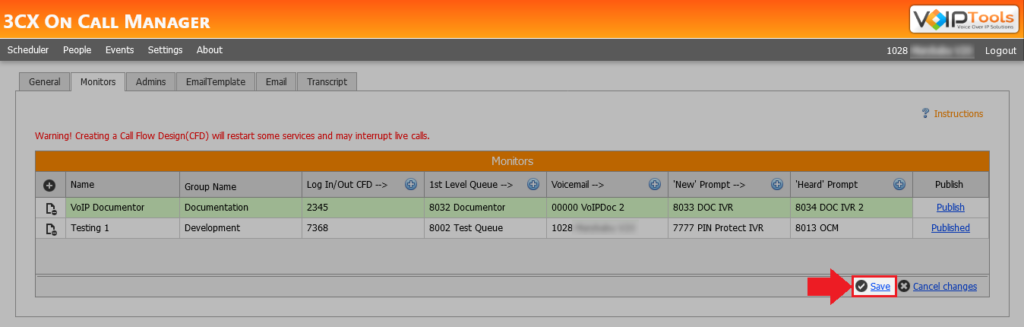
 button.
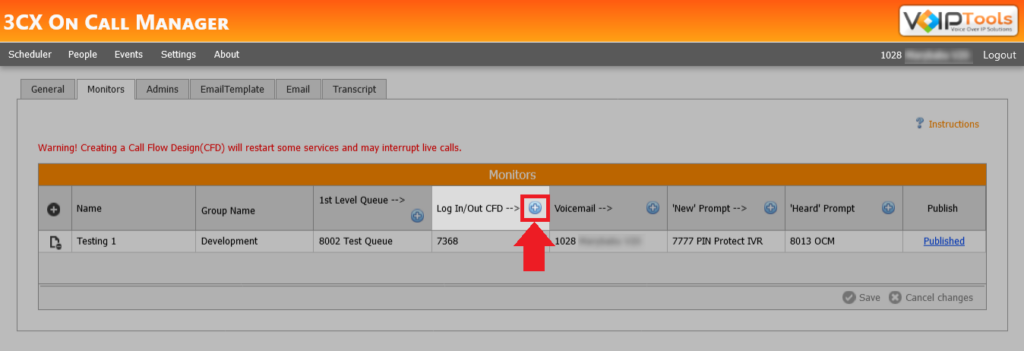

 to save your admins.
NOTE:

 button to test whether your SMTP settings are correct. (For this, you need to enter a valid email address in the To Email field and press the Test button).


 option.

 button.
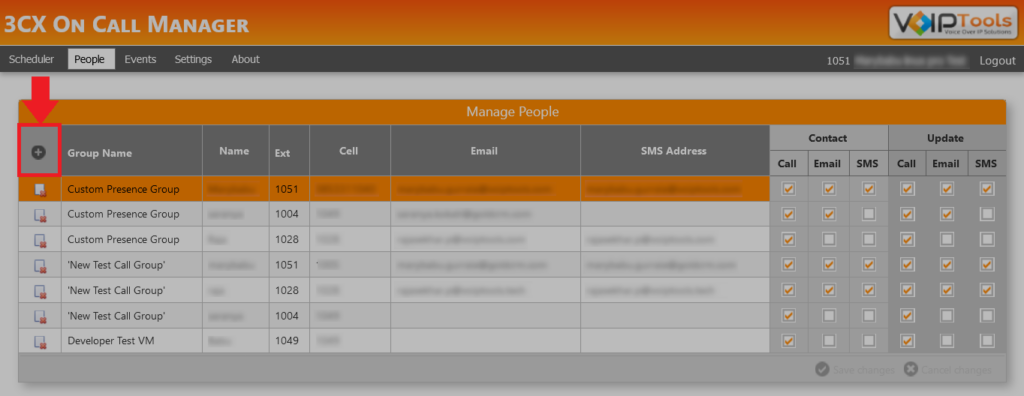
 to save your changes.
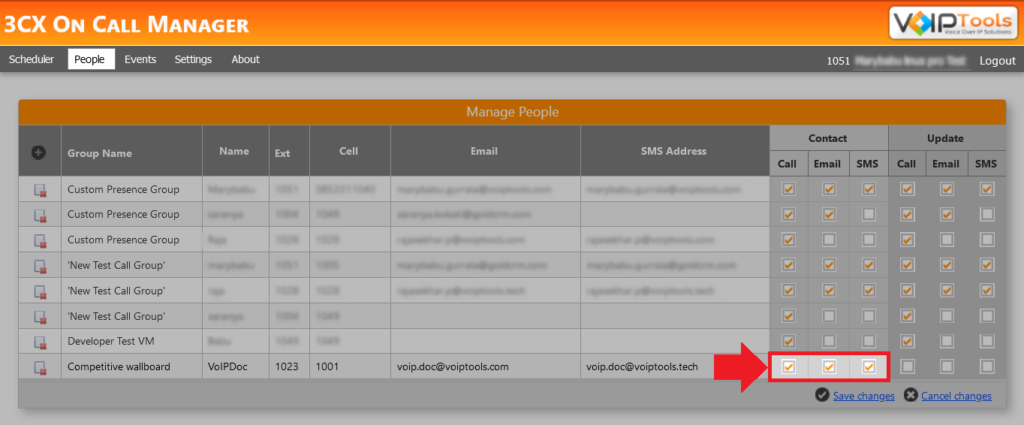
 to view the list of unattended calls or click Heard True
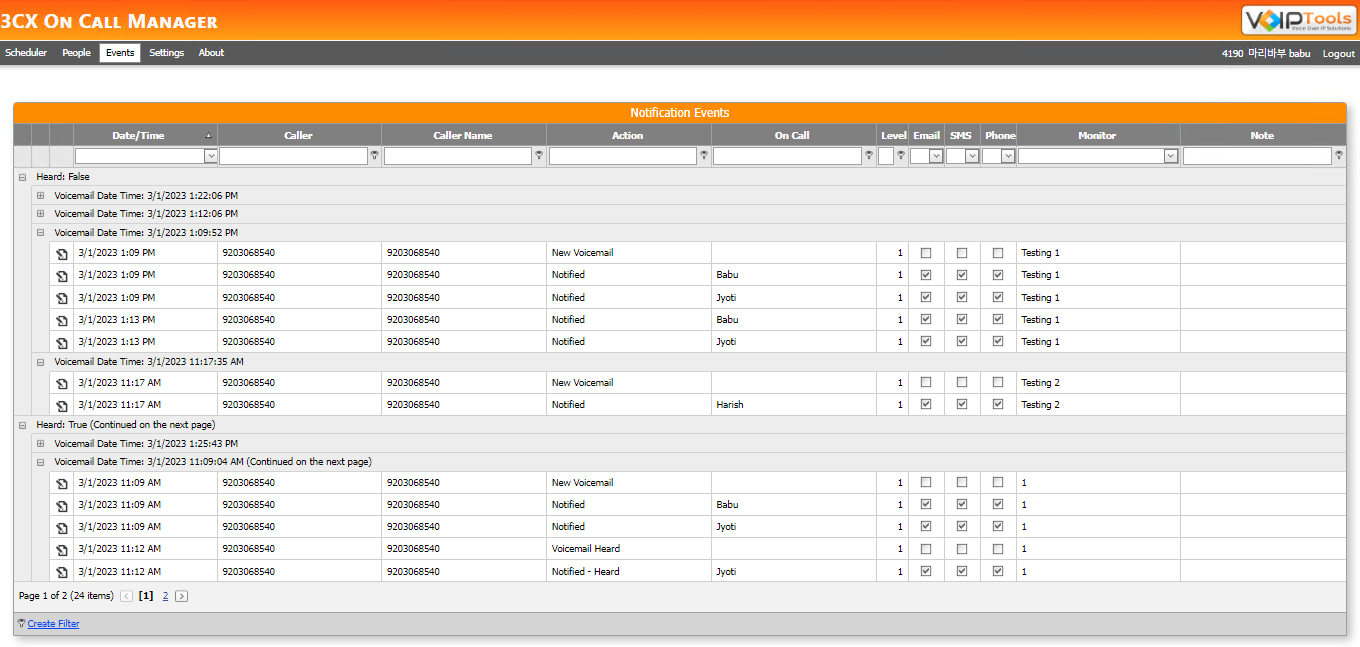
 to view and edit an event. Read further to know the field definitions.
 to view the list of unattended calls or click Heard True
  icon to insert a note to the event and click Save
  to save the note.
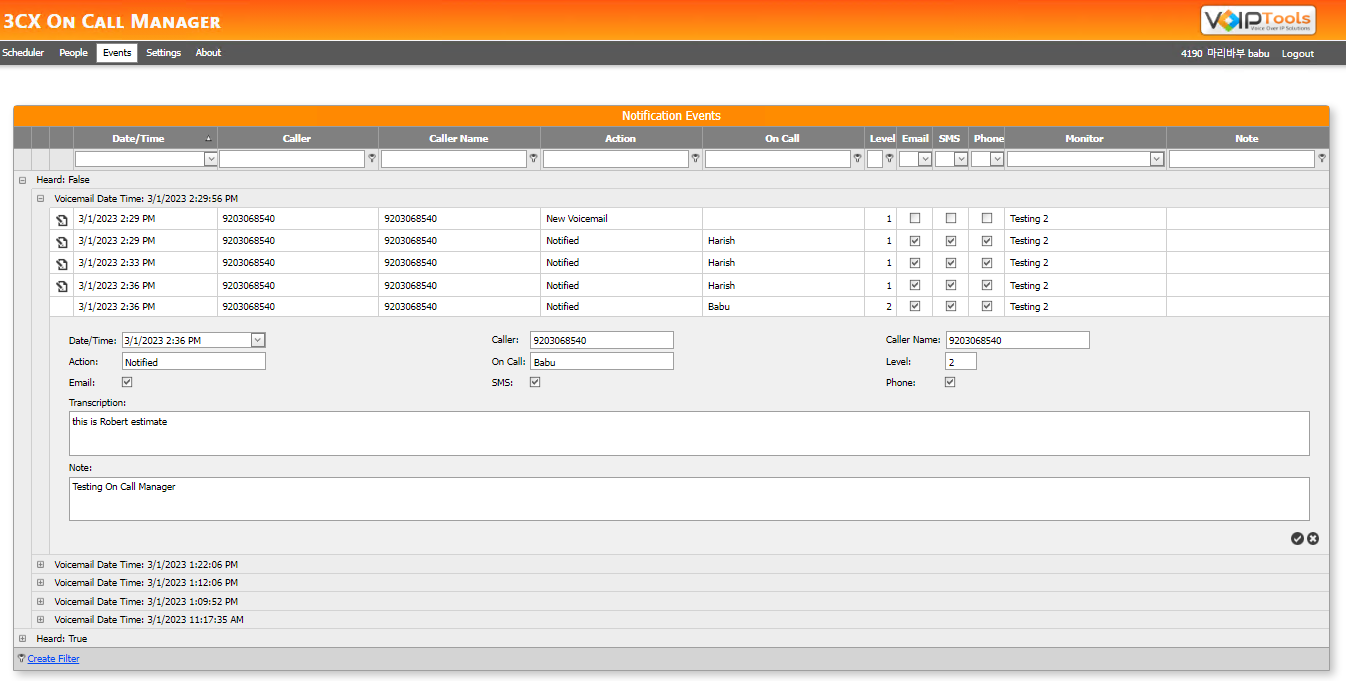


