Introduction #
3CX Recording Manager helps you manage disk space efficiently by archiving phone recordings as MP3 files, which use far less storage than WAV files. It offers automated compression, secure backups to another location, and a retention policy that automatically deletes recordings older than a set date that keeps storage optimized and organized.
Discover the Power of Recording Manager #
3CX Recording Manager is a powerful plugin for your 3CX/PBX system that lets you easily manage and organize call recordings through a user-friendly web portal. It supports ad-hoc recording for individual calls, monitoring of specific extensions, and full system-wide recording.
Why choose Recording Manager? #
Smart recording made simple with 3CX Recording Manager
 |
SIMPLIFIED EXPERIENCE | Simplified Recording Journey. Enjoy an effortless experience from start to finish. Easily navigate, locate, and organize all your recordings with confidence. |
 |
EASY ORGANIZATION | Take control of your audio records. Easily locate, listen to, and organize recordings instantly, ensuring an efficient and seamless management experience. |
 |
HASSLE-FREE INSTALLATION | Enjoy a simplified installation and update process with 3CX Recording Manager. Setting up the system and keeping it up to date is made easy, saving you time and effort. |
 |
BROWSER COMPATABILITY | Benefit from seamless compatibility with popular browsers such as Internet Explorer, Google Chrome, Firefox, and Safari. Access your recordings with any of these browsers without any compatibility issues. |
 |
CONVENIENT ACCESS | Access your recordings conveniently from your PC, MAC, or smartphone. Whether you’re in the office, at home, or on the go, you can easily access and manage your recordings without limitations. |
 |
SERVER SPACE OPTIMIZATION | Remove outdated recordings effortlessly to free up valuable server space. Keep your recording storage optimized and avoid unnecessary clutter. |
 |
EXTENSION CONTROL | Effortlessly manage recorded extensions through the user-friendly web portal. Easily assign, modify, or remove extensions, making extension management a breeze. |
 |
STREAMLINED ADMINISTRATION | Streamline your administration tasks with the integrated 3CX Login Database. Manage user access and permissions efficiently, ensuring a smooth and secure recording management process. |
 |
USE FREE MICROSOFT TOOLS | Enjoy a seamless purchasing experience with 3CX Recording Manager. Take advantage of free tools from Microsoft to facilitate your purchase, making it quick, convenient, and cost-effective. |
How to Install Recording Manager #
Make the most of 3CX Recording Manager’s powerful features, you must understand the straightforward yet essential steps for its setup and usage. This user-friendly software only needs to be installed once, guaranteeing convenient access to its extensive recording capabilities.
Prerequisites #
You must ensure that your computer satisfies the minimum requirements specified below to install 3CX Recording Manager before you begin with the installation steps mentioned in this guide,
| PREREQUISITE | PURPOSE |
|---|---|
| 3CX Version V20 | 3CX Recording Manager is designed to work seamlessly with this version for enhanced features and performance. |
| Windows 10 or above / Windows Server 2012 or above | These operating systems provide the necessary environment for the application to run efficiently. |
| VoIPTools Universal Updater | This component is necessary for updates, ensuring the application remains current and functional. |
| VoIPTools Relay Service | It is used for proper integration and functionality of the 3CX Recording Manager within the 3CX environment. |
| Microsoft SQL Server 2019 or above (Including the free SQL Express edition) | 3CX requires Microsoft SQL Server 2019 or later for database management. |
| Port number 5500 opened on your device | Port 5500 is a specific network port used by 3CX for communication purposes. Opening this port on the device’s firewall allows incoming and outgoing traffic to pass through, enabling the 3CX software to send and receive data over the network effectively. |
| Static IP for VoIPTools and 3CX servers | This is to ensure proper two-way communication, both the 3CX server (Relay) and the VoIPTools server. Dynamically assigned IP addresses are not supported. Additionally, it is recommended to use HTTPS for secure communication, which requires a FQDN for SSL/TLS certificate validation between the VoIPTools server and the Relay. |
| HTML5 Audio Support | To play recordings within the browser. |
NOTE :
- When you install SQL Server, we recommend that you install it in ‘Mixed Mode’ to include SQL Authentication and install SQL Management Studio.
- When you install IIS, make sure to install Basic Authentication, .Net Extensibility, and ASP.Net 4.X.
Installation overview #
 |
DOWNLOAD SOFTWARE | You can order 3CX Recording Manager online at https://www.voiptools.com. Your order confirmation email will include your license key and a link to download the software. |
 |
INSTALL PREREQUISITES | You must install several prerequisites before installing the 3CX Recording Manager. The Advanced Installer identifies and installs these applications automatically. Click here to learn about the required prerequisites. |
 |
INSTALL 3CX RECORDING MANAGER | This User Guide contains step-by-step instructions to successfully install 3CX Recording Manager. Begin by extracting the installer from the downloaded zip file (Step 1 above), then run the setup program named RecordingManagerInstaller.exe |
 |
CONFIGURE DESKTOP APPLICATION | The 3CX Recording Manager Configuration application lets you configure the recording path, archive path, email server settings, and time zone, import existing records, set retention policy, and connect to the web portal. |
Step-by-step Installation Procedure #
The following section guides you through a detailed walk-through of the installation process.
Step 1: Download Software #
Find the software download link in the Order Confirmation Email, or you can download the application by following the procedure:
- Open your browser and go to the VoIPTools official website or click here to get redirected to the website.
- Search for the 3CX Recording Manager and click the Download
 icon to download your application.
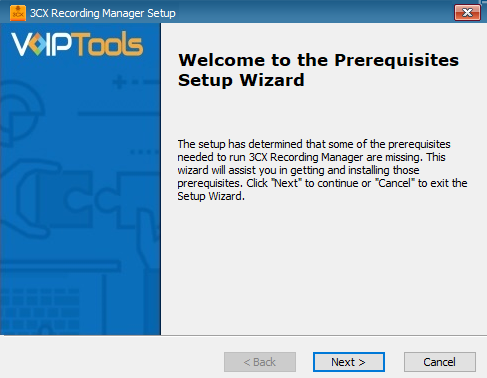
Step 2: Install Prerequisites #
Click on the software installer that was downloaded in step 1 above. The installation wizard will automatically identify the needed prerequisites and assist you with the install of the prerequisites needed to run ‘3CX Recording Manager’. These include .NET Framework (Web Installer), SQL Server Express (Web Installer) and, SQL Server Management Studio.
- Click the downloaded installer executable to launch the Prerequisites Setup Wizard and click Next.
- In the Prerequisites window, the installer will identify the missing prerequisites. You must install all the required prerequisites. However, you can select/unselect the applications to be installed based on your unique requirements. Click Next to continue.
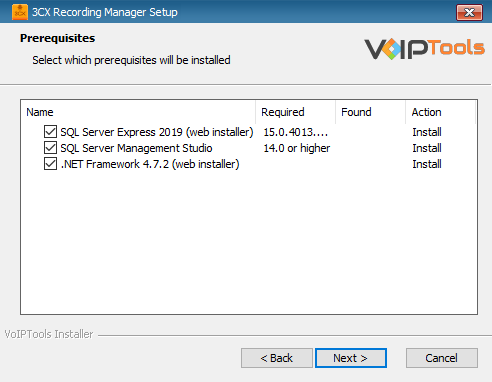
The installer will download and install the selected applications.

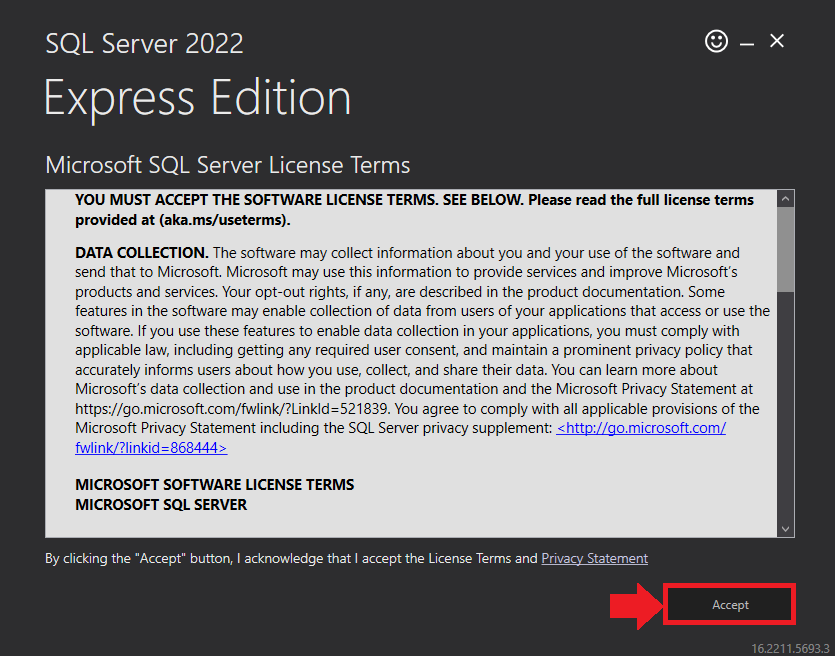
- In the Microsoft SQL Server License Terms click the Accept button to acknowledge the license terms and continue.
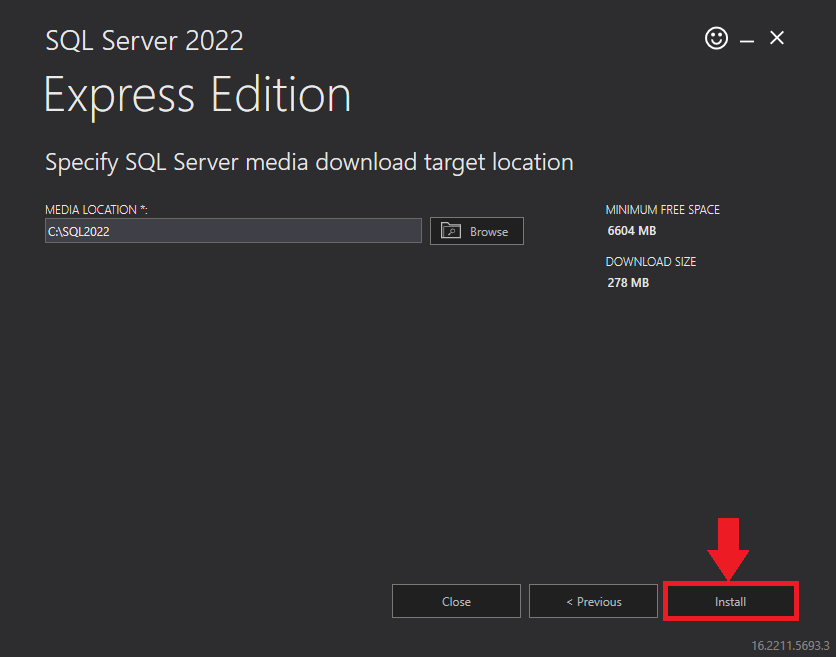
- This page appears if you do not have SQL Server Express preinstalled in your device.
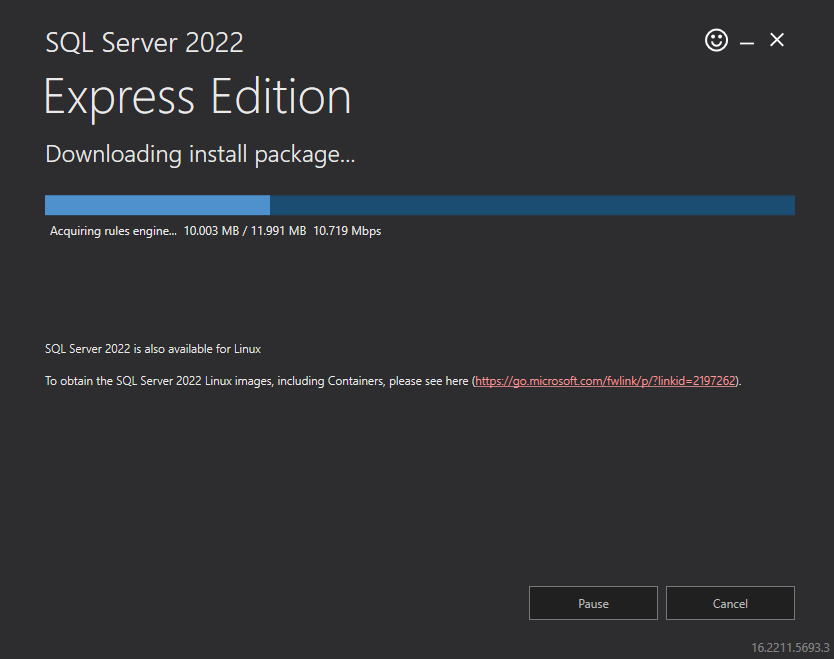
- View the SQL Server Media target location in the Media Location field. If required, you can click the Browse button to change the location. Click Install to begin the installation of SQL Server Express.
SQL server installation is in progress. This may take several minutes to complete.
- Click the Close button once the prerequisites are installed.
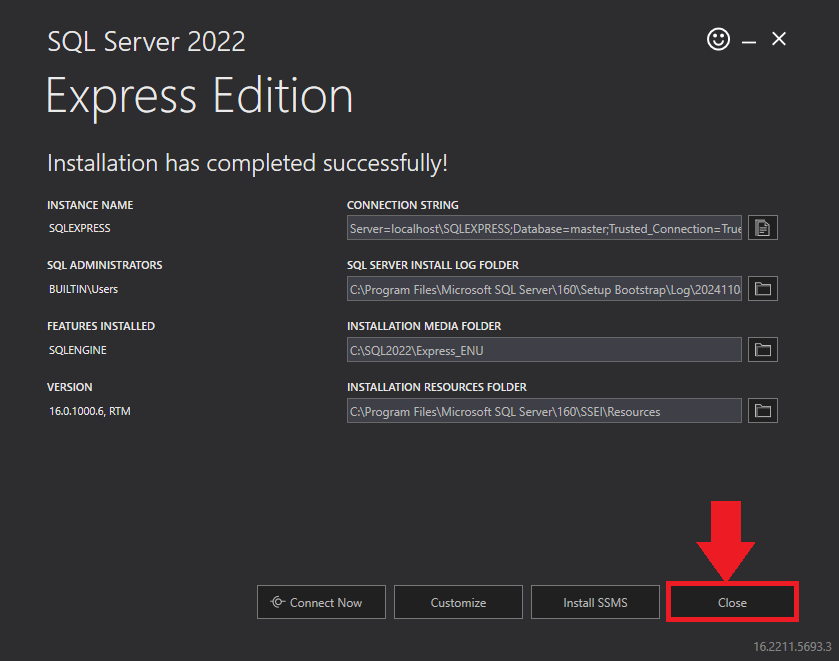
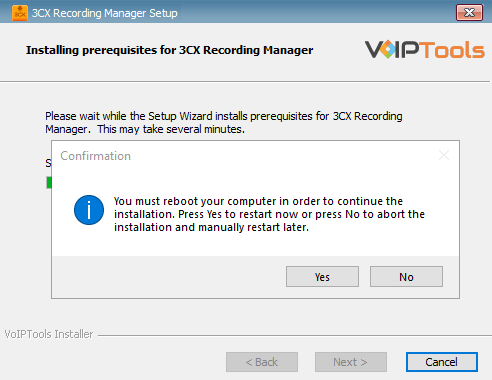
- In the confirmation message box, click Yes to reboot the computer.
Step 3: Start the installation process #
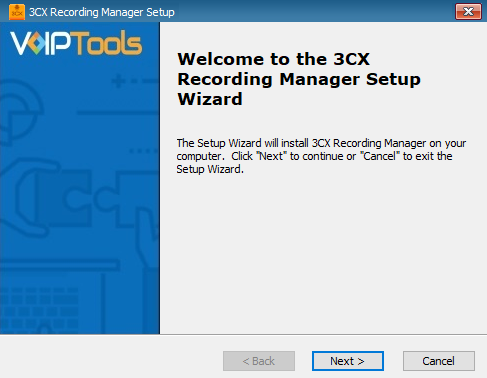
- After all the prerequisites are installed, the 3CX Recording Manager Setup Wizard appears. Click Next to Continue.
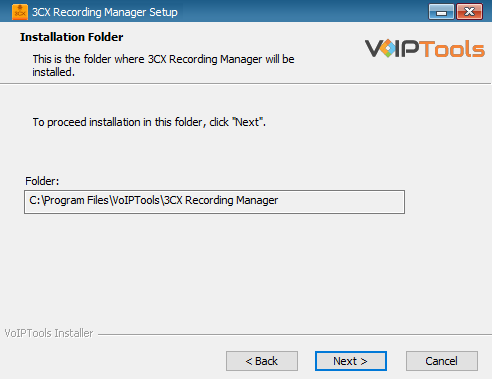
- On the Select Installation Folder window, the Folder field displays the location where the ‘3CX Recording Manager’ will be installed. Note that you cannot change the path.
- Click Next to continue with the installation.
Step 4: Test Relay Settings #
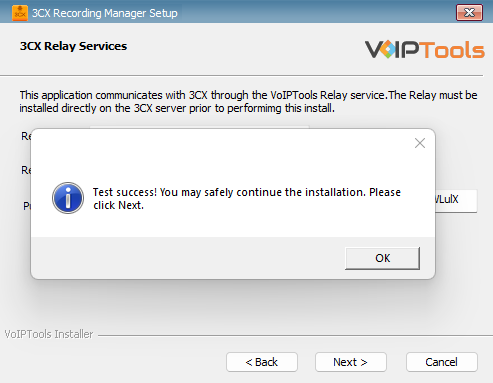
- In the 3CX Relay Services window, in the Relay Host field, enter the FQDN of your 3CX server.
- Enter 8801 in the Relay Port field.
- Enter the public key you took from VoIPTools Relay services in the Public Key text area.

4. Click the Test Relay Settings to confirm ‘3CX Recording Manager’ can communicate with the Relay services running on the 3CX server.
5. If the ‘3CX Recording Manager’ is successfully able to communicate with the Relay services that run on the 3CX server, a Success message box appears. Click OK. Click Next to continue with the installation.
If the test fails, you will not be able to continue until communication with the relay is established. If the test was unsuccessful:
- confirm you have the correct firewall port open (default TCP 8801) on the 3CX server and the firewall protecting the 3CX server.
- confirm that you have entered the correct FQDN for the 3CX server.
- confirm that 3CX Recording Manager and the Relay are using the same port and protocol.
Step 5: Configure the database #
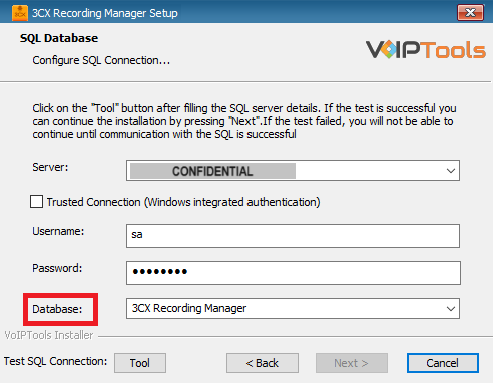
When configuring the 3CX Recording Manager, select an existing Microsoft SQL Server instance in your environment. The database server can be a remote SQL Server, or a local instance running on the VoIPTools server.
You can set up the SQL database using SQL Authentication or Windows Integrated Authentication.
SQL Authentication #
-
- Enter your server name in the Server field.
-
- If using the free SQL Express Edition, the default SQL Instance name is SQLExpress.
-
- Enter your server name in the Server field.

- If you want to use ‘SQL Authentication’, then install SQL Server in ‘Mixed’ mode.
- If SQL Server is installed on a server other than the server where 3CX Exporter is installed, you will need to configure SQL Server to allow remote connections.
-
- Enter your credentials in the Username and Password fields.
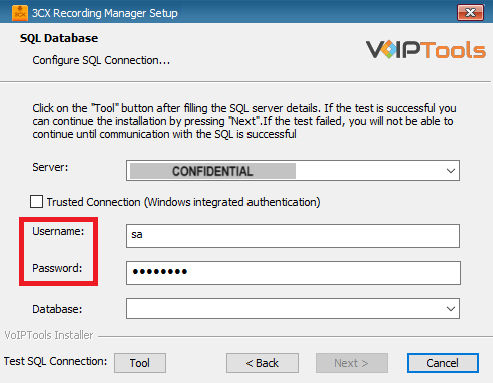
Make sure that you select a SQL Login that has sufficient permissions to alter the database and create SQL objects.
-
- Select or enter the 3CX Recording Manager in the Database dropdown.
-
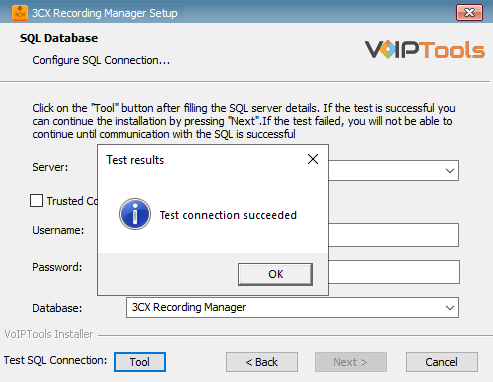
- In the Test SQL Connections section, click the Tool button to test the connection and click OK in the Test Results popup box.
Windows Integrated Authentication #
- To use Windows Integrated Authentication check the Trusted Connection (Windows integrated authentication) checkbox.
- The VoIPTools installer will create a local Windows user name as “VoIPTools” and give you sufficient rights to this user to create/update the SQL database.
- In the Test SQL Connection section, click the Tool button to test the connection.
- Click the Next button which gets enabled when the database connection is successful.
We encourage you to use SQL Authentication rather than Windows authentication. Many of our tools leverage a Call Flow Designer (CFD) application running on the 3CX. Frequently our CFD applications require access to a SQL database. If the 3CX server and the database server are not in an Active Directory domain, Windows authentication will fail. To use SQL authentication, your SQL Server must be configured to run in “Mixed Mode”. If you installed SQL Server with one of our tools, we configure SQL in “Mixed Mode”.
Step 6: Installing 3CX Recording Manager #
-
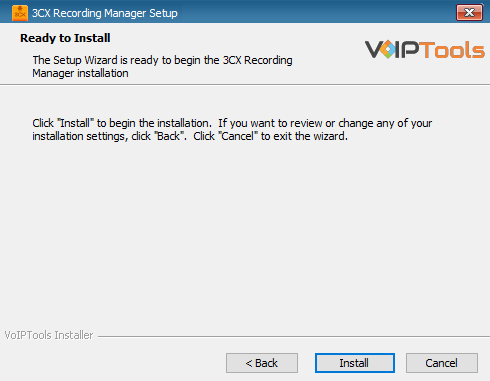
- In the Ready to Install window, click Install to start the installation of the ‘3CX Recording Manager’.
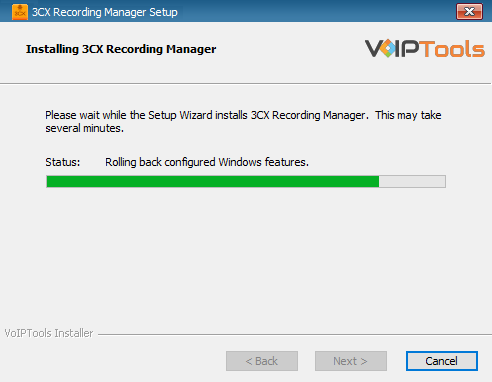
The application installation is in progress. It may take several minutes to complete.
-
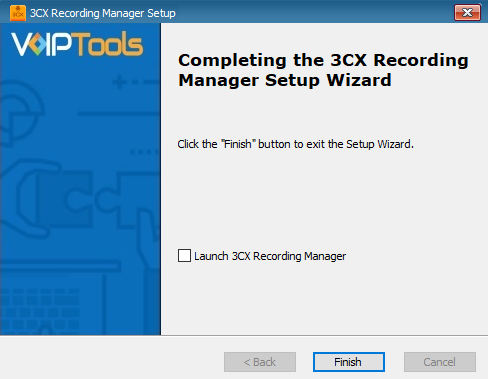
- Once the installation is complete, check Launch 3CX Recording Manager check box and then click Finish. The 3CX Recording Manager configuration screen opens. If you want to simply close the installer without opening the configuration screen, then simply uncheck Launch 3CX Recording Manager check box and then click Finish.
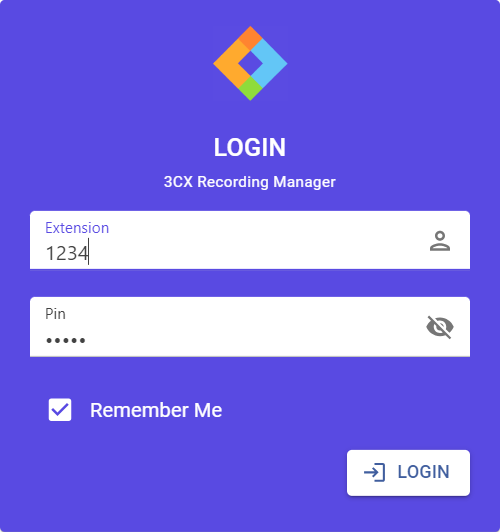
Step 7: Login to Web Portal #
When connecting to the web portal, you will be asked to provide login credentials.
- Double-click the 3CX Recording Manager Shortcut icon in your desktop to open the web application.
- In the Extension field, enter your 3CX extension number.
- In the PIN field, enter pin.
- Click the Login button to login to your account.
Getting Started with the Web Application #
Overview #
This section helps you to understand the user interface of 3CX Recording Manager.

|
Left Side Panel Adjust | Lets you view the left side panel in expanded view or in a compact view |
|
Brand Logo | You can replace the default logo with your company logo in the Site Settings. |
|
Title Header Prefix | You can replace the default header prefix with your company header prefix in the Site Settings. |
|
Left Side Panel Menus | Lets you access Recording Manager menu options. |
 |
Logout Button | Logs you out of the web application. |
 |
Support Resources Button | Opens the Support Resources screen. |
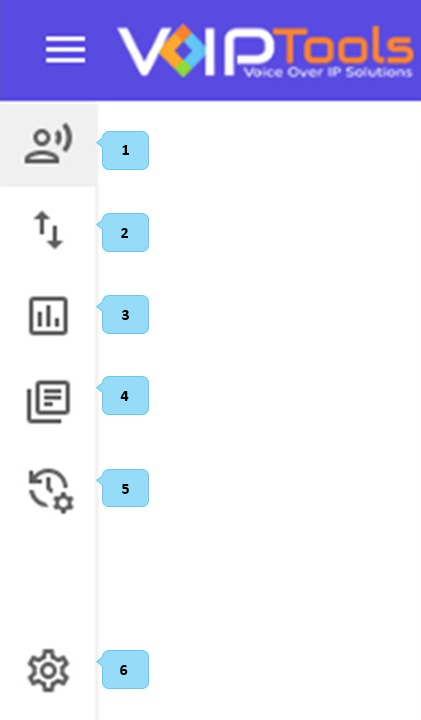
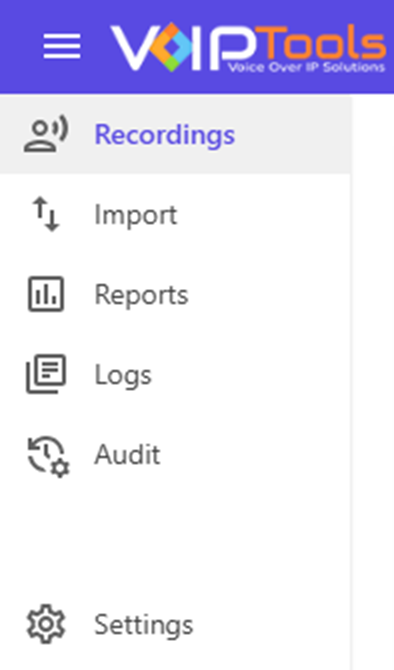
Menu Options #
 |
Recordings | It lets you manage recorded files by identifying tampered recordings, updating scores, adding notes, playing, downloading, and exporting audio. |
 |
Import | It lets you import existing 3CX recordings into the Recording Manager, manage archives, and ensure accurate date and time information. |
 |
Reports | It lets you select the extensions for which you want to automate call recording for both incoming and outgoing calls. |
 |
Log Entries | It lets you view the login and logout events of all the sessions along with date and time that is according to the time zone set in Recordings menu. |
 |
Audit | It lets you import and manage your 3CX and VoIPTools license keys, ensuring proper registration and displaying relevant license details. |
 |
Settings Menu | It lets you manage retention policies, email settings, secret digits, AI configurations, recording movers, and customize site settings efficiently. |
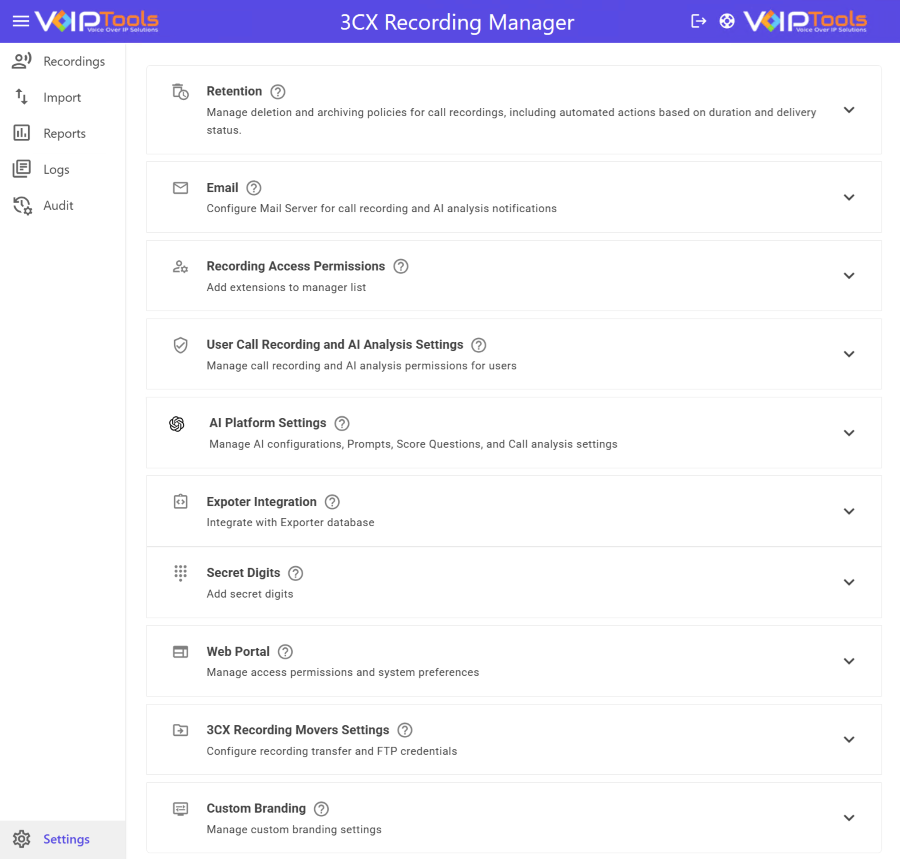
Settings Menu #
The Settings Menu provides a comprehensive interface for configuring various aspects of 3CX Recording Manager. It allows users to manage retention policies, email notifications, secret digits, AI integrations, and recording movers, while also offering customization options for the web portal. These settings enhance functionality, optimize performance, and improve user control.
| Retention Tab | This tab lets users automatically delete, archive, or convert recordings to MP3, manage deletion based on age or email, and archive files at a specified location with configurable deletion schedules. |
| Email Tab | This tabs lets users set scheduled email MP3 versions of recordings to the initiator, and optionally to a central address, with the option to include AI transcriptions or new notes, while supporting secure mail servers and test emails for verification. |
| Recording Access Permissions Tab | This tab lets users access only their own recordings, while managers can view team recordings, with roles assignable per department for precise control. |
| User Call Recording and AI Analysis Settings Tab | This tab lets users manage call recording and AI transcription per extension, with options to auto-record calls, enable transcriptions, apply settings to all users, and save or cancel changes as needed. |
| AI Platform Settings Tab | This tab lets users configure AI call analysis and transcription using OpenAI or Azure, set models, scoring, and manage detailed evaluation settings for smarter, targeted insights. |
| Exporter Integration | This tab allows Recording Manager to connect to the Exporter database and retrieve call details to enhance recording information. |
| Secret Digits Tab | It lets users protect outbound calling by hiding special prefixes used by external apps, preventing agents from dialing directly and ensuring secure, controlled call handling in recordings and displays. |
| Web Portal Tab | It lets users search, play, download, email, score, and manage recordings with role-based permissions, AI tools, notes, imports, reports, and customizable time zone and display settings from a secure and centralized interface. |
| 3CX Recording Movers Tab | It lets users automate and schedule the export of call recordings to an FTP server, with filters by queue, department, or ring group, and options for daily or real-time transfer of inbound and outbound calls. |
| Custom Branding Tab | It lets you customize site appearance, including headers, logos, and color schemes for a personalized user interface. |
Retention Tab #
The Retention tab manages disk space by automatically deleting old recordings or converting them to MP3. It allows configuring deletion policies, archiving options, and retention settings for recordings, including specifying deletion times and paths. It also controls whether deleted recordings’ database entries should be retained and supports only recording inbound external calls for selective retention.
In short, you conserve disk space, automate recording management, and streamline compliance with customizable deletion policies.
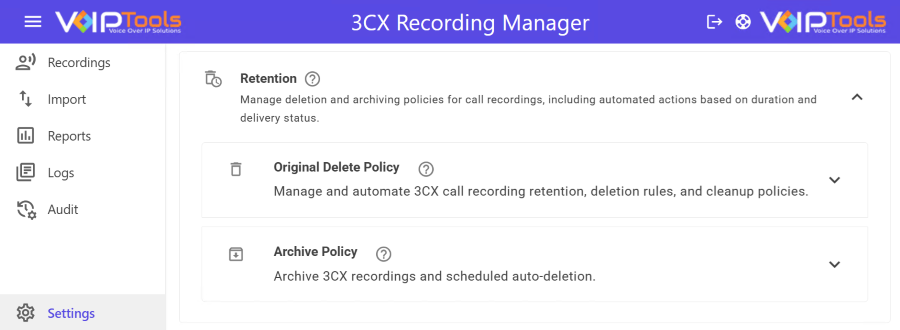
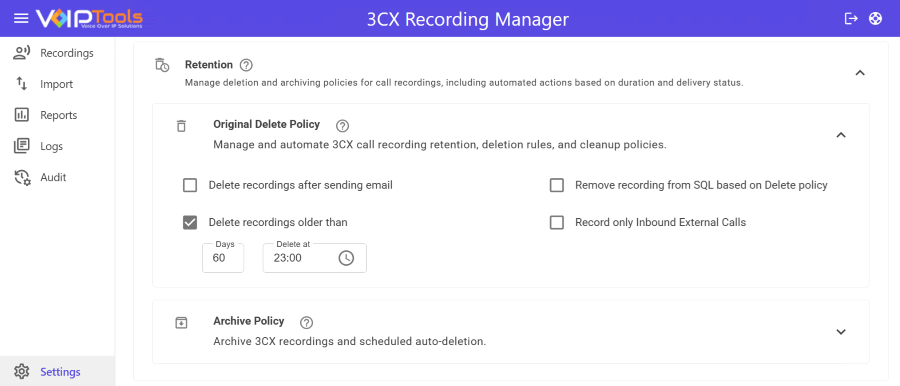
Delete Policy #
This section contains various checkboxes that let you control the deletion policy of 3CX Recording Manager.
| CHECKBOX | PURPOSE |
| Delete Recording After Sending Email |
Set automatic rules to delete old or emailed recordings, control when deletions occur, manage database cleanup, and limit recording to inbound external calls for efficient storage and privacy.
When you select this option, exercise caution. There is no guarantee that spam filters will not block the email or that the receiving mail server will not exceed the maximum attachment size permitted. |
| Delete Recordings Older Than |
Select this option if you desire the 3CX Recording Manager to autonomously remove recordings that surpass a designated number of days. 1. Enter the number of days in the Days field.
The system compares the current date with the date of recording creation and deletes all recordings that are older than the selected number of days. This setting applies to all recordings created by any extension. The system deletes recordings once a day at the specified time, except for recordings deleted after email, which are immediately removed. If you choose to archive recordings, the archived version of the recordings will not be deleted. |
| Remove Recording From SQL Based On Delete Policy | This setting allows you to control whether database records for deleted recordings should be deleted from SQL. When the records are deleted from SQL, all historical information for the recording will be removed from the web portal. |
| Record Only Inbound External Calls | When you select this option, 3CX Recording Manager records only inbound external calls. |
Archive Policy #
This section contains various options that let you control the archive policy of 3CX Recording Manager.
| STEP NUMBER | TASK DONE | OUTCOME |
 |
Select the Archive checkbox |
Check the Archive box to automatically create a compressed (MP3) copy of all recordings and save them to a separate archive location. Once checked, two additional fields will appear:
|
 |
Select the Archive and Delete checkbox |
Check the Archive and Delete box if you want the system to automatically move recordings to the archive location and then remove them from the original recording path. When enabled, the system will copy each recording file from the original recording folder to the archive folder, then delete the original file from the recording path to free up space. |
 |
Select the Delete Archives Older Than box |
Check the Delete Archives Older Than box to automatically delete archived recordings after a set number of days. Once checked, fill in the following fields:
By default, 3CX Recording Manager runs using the local VoIPTools user account. If you save archives to another server, you must either give VoIPTools access to that folder or update the service and IIS app pool to use a user with the right permissions. |
 |
Enter the path location in the Archive Path field |
Enter the full folder path where archived recordings will be saved (e.g., C:\Users). Click Test to verify the path is accessible, or click Move to relocate existing archives to the new path. |
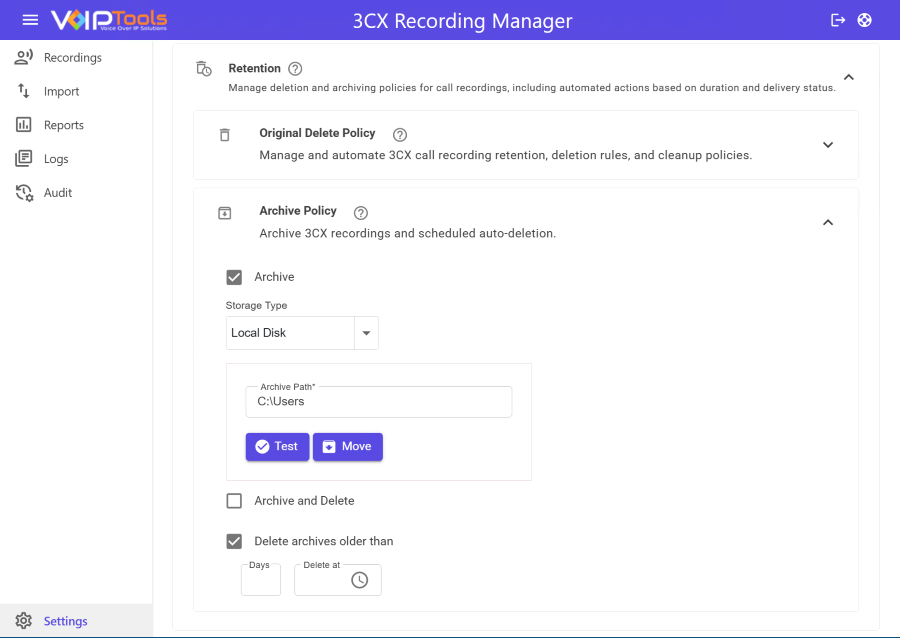
- If Archive Policy is disabled, recordings that have reached the Delete Recordings Older Than time limit will be saved to the Default Archive Path before deletion.
- If Archive Policy is enabled, those same recordings will instead be saved to the Archive Path you specified in this section.
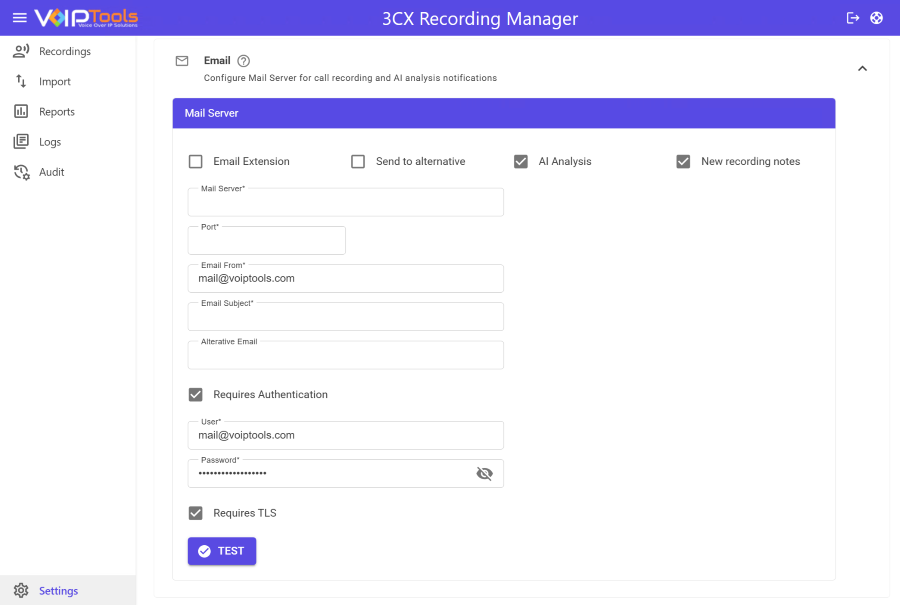
Email Tab #
The Email tab in 3CX Recording Manager enables automated email notifications for call recordings, AI analysis results, and recording notes. Proper configuration ensures timely delivery of insights and alerts to relevant stakeholders boosting responsiveness and operational efficiency
You have four options to choose from:
-
- Email Extension
- Email Recordings to the Recording Owner
- Email the AI Analysis
- Email the Recording Notes
Due to potentially large size of the recording files, 3CX Recording Manager initially creates a duplicate of each recording and then converts it to the .MP3 format before sending it via email. The .MP3 version of the recording is typically about one-seventh the size of the original file. However, this conversion process does result in a slight decrease in audio quality. Nevertheless, unless the recording has been deleted according to the retention policy, by the owner, or by an administrator, the original recording remains accessible for listening or downloading through the web portal.
Field Definitions #
| Mail Server | IP address or Fully Qualified Domain Name (FQDN) of your email server. Examples: smtp.gmail.com or 192.168.1.20 |
| SMTP Port | Simple Mail Transfer Port. Default port number is 25. For Gmail / Google Apps use port 587 |
| Email From | Sender address (e.g., mail@voiptools.com). Identifies the source of notifications for easy filtering |
| Email Subject | Custom subject line. Personalizes email headers for clarity and branding |
| Alt. Email | Alternate email to send all the emails to a single email address. |
| New Recording Notes | Send an email to the owner of the recording and their manager when a new note is added. |
| Requires Authentication | Check this option if your mail server requires authentication to relay emails. Enter a valid username and password. For Microsoft Exchange use a Windows domain (network) username and password. For Google Apps use your Google Apps email address and password |
| SSL / TLS | Select this option if your mail server requires a secure connection — Secure Socket Layer (SSL) or Transport Layer Security (TLS) to relay email. Gmail, Google Apps, and Microsoft 365 require a secure connection. |
Sending an email notification #
The user needs to configure the necessary information
Step 1: Open the Email tab, in the Email Server field, enter the IP address or Fully Qualified Domain Name (FQDN) of your email server.
-
- Examples: smtp.office365.com or 192.168.1.20.
Step 2: In the Port field, enter the port number.
-
- The default value is 25.
-
For Gmail/ Google Apps, use port 587.
Step 3: In the Email From field, enter the sender’s email address.
-
- Your SMTP server may require a valid email address.
-
- For example, you can use the mail@voiptools.com format.
Step 4: In the Email Subject field, enter the subject of your email.
- You can check the New Recording Notes box to automatically send emails to the recording owner and the owner’s manager whenever a new note is added and Email AI Analysis checkbox to send the AI generated agent feedback and agent scores.
Step 5: Under the Mail Server section, choose which types of email notifications to enable:
| Option | Description |
|---|---|
| Email Extension | Sends the recording to the person who initiated the call. |
| Send to Alternative | Sends notifications to an alternate email address instead of or in addition to the default. |
| AI Analysis | Includes AI-generated call insights and agent scores in the email. |
| New Recording Notes | Sends an email to the recording owner and their manager whenever a new note is added to a recording. |
Step 6: Refer to the Field Definition for Requires Authentication checkbox and Requires SSL checkbox and click the Test button.
- Once the test is successful, emails will now be sent based on your selections.
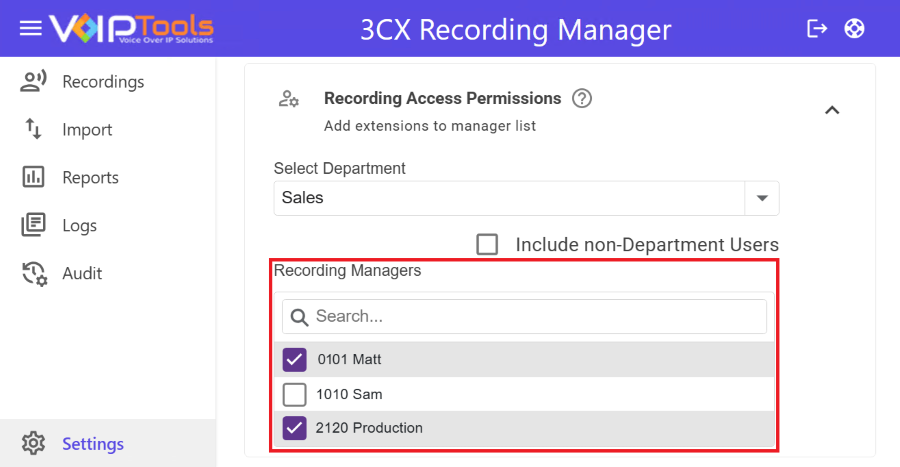
Recording Access Permissions Tab #
The Recording Access Permissions tab allows you to manage access to call recordings based on departmental roles. You can assign “Manager” or “User” roles per department, enabling customized permissions for accessing recordings. This ensures secure, role-specific access, where managers oversee departmental recordings and users access only their own.
This section guides you to add extensions to manager list.
Before you start: Make sure you have logged with Manager credentials and have navigated to the Recording Access Permissions tab in the Settings menu.
-
- Select the desired department in the Select Department dropdown.
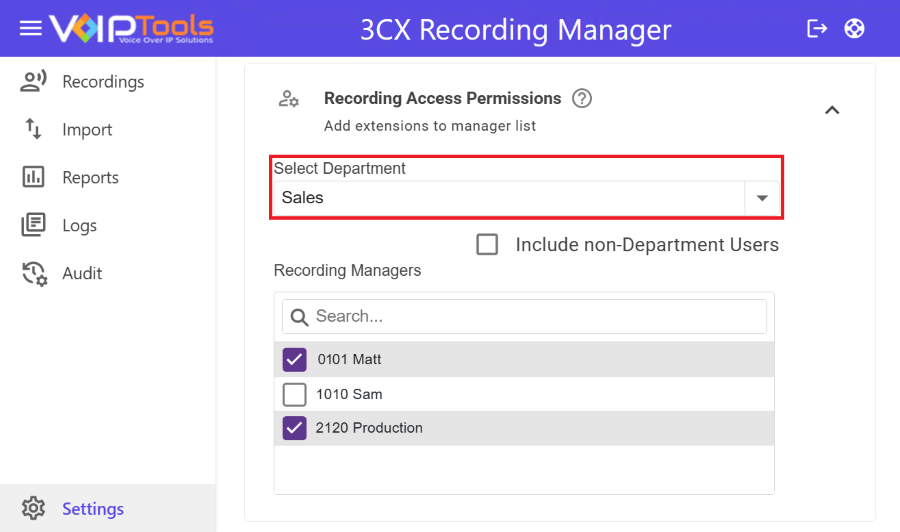
-
- You can select the Include Non-Department Users box to display the users of other departments.

-
- Select the extensions from the Recording Managers list.
User Call Recording and AI Analysis Settings #
The User Call Recording and AI Analysis Settings tab lets you manage call recording and AI analysis settings for each user in one place. Simply turn recording and AI analysis on or off using checkboxes next to each user’s name. All settings are organized in a single, easy-to-use table.

-
- Go to the User Call Recording and AI Analysis Settings tab.
- Find the user by extension or name.
- Check the box under Call Recordings to enable recording.
- Check the box under AI Analyze to allow AI to review the calls.
- Click Save to apply your changes.
AI Platform Settings #
The AI Platform Settings section allows administrators to configure and manage AI-powered features for call recording analysis. These settings enhance evaluation accuracy, automate scoring, and personalize insights using AI models and prompts.

AI Service Configuration #
The AI Service Configuration section lets you set up and manage API access and AI models used for call transcription and analysis. This is where you connect 3CX Recording Manager to your preferred AI service either OpenAI or Microsoft Azure and configure how recordings are processed.
General Settings #
Enable MP3 Transcription Mode: This option is enabled by default. When turned on, recordings are automatically converted to MP3 format before being sent for transcription. MP3 files are significantly smaller than WAV files, which means faster uploads, lower bandwidth usage, and reduced processing time especially useful in high call volume environments. While this can be turned off if WAV files are preferred, it is recommended to leave it enabled for better overall performance.
Enable Diarization Transcription Mode: When enabled, the system automatically identifies and separates different speakers within a recorded conversation. Each speaker’s dialogue is labeled and displayed separately in the Transcription section, accessible through Recordings → Edit. This helps users quickly follow conversations, review agent responses, and understand customer intent without listening to the full recording.
Note: Speaker identification is based on audio patterns and may not be 100% accurate in all cases, particularly when mono files are used, voices overlap, background noise is present, or multiple speakers have similar voice characteristics.
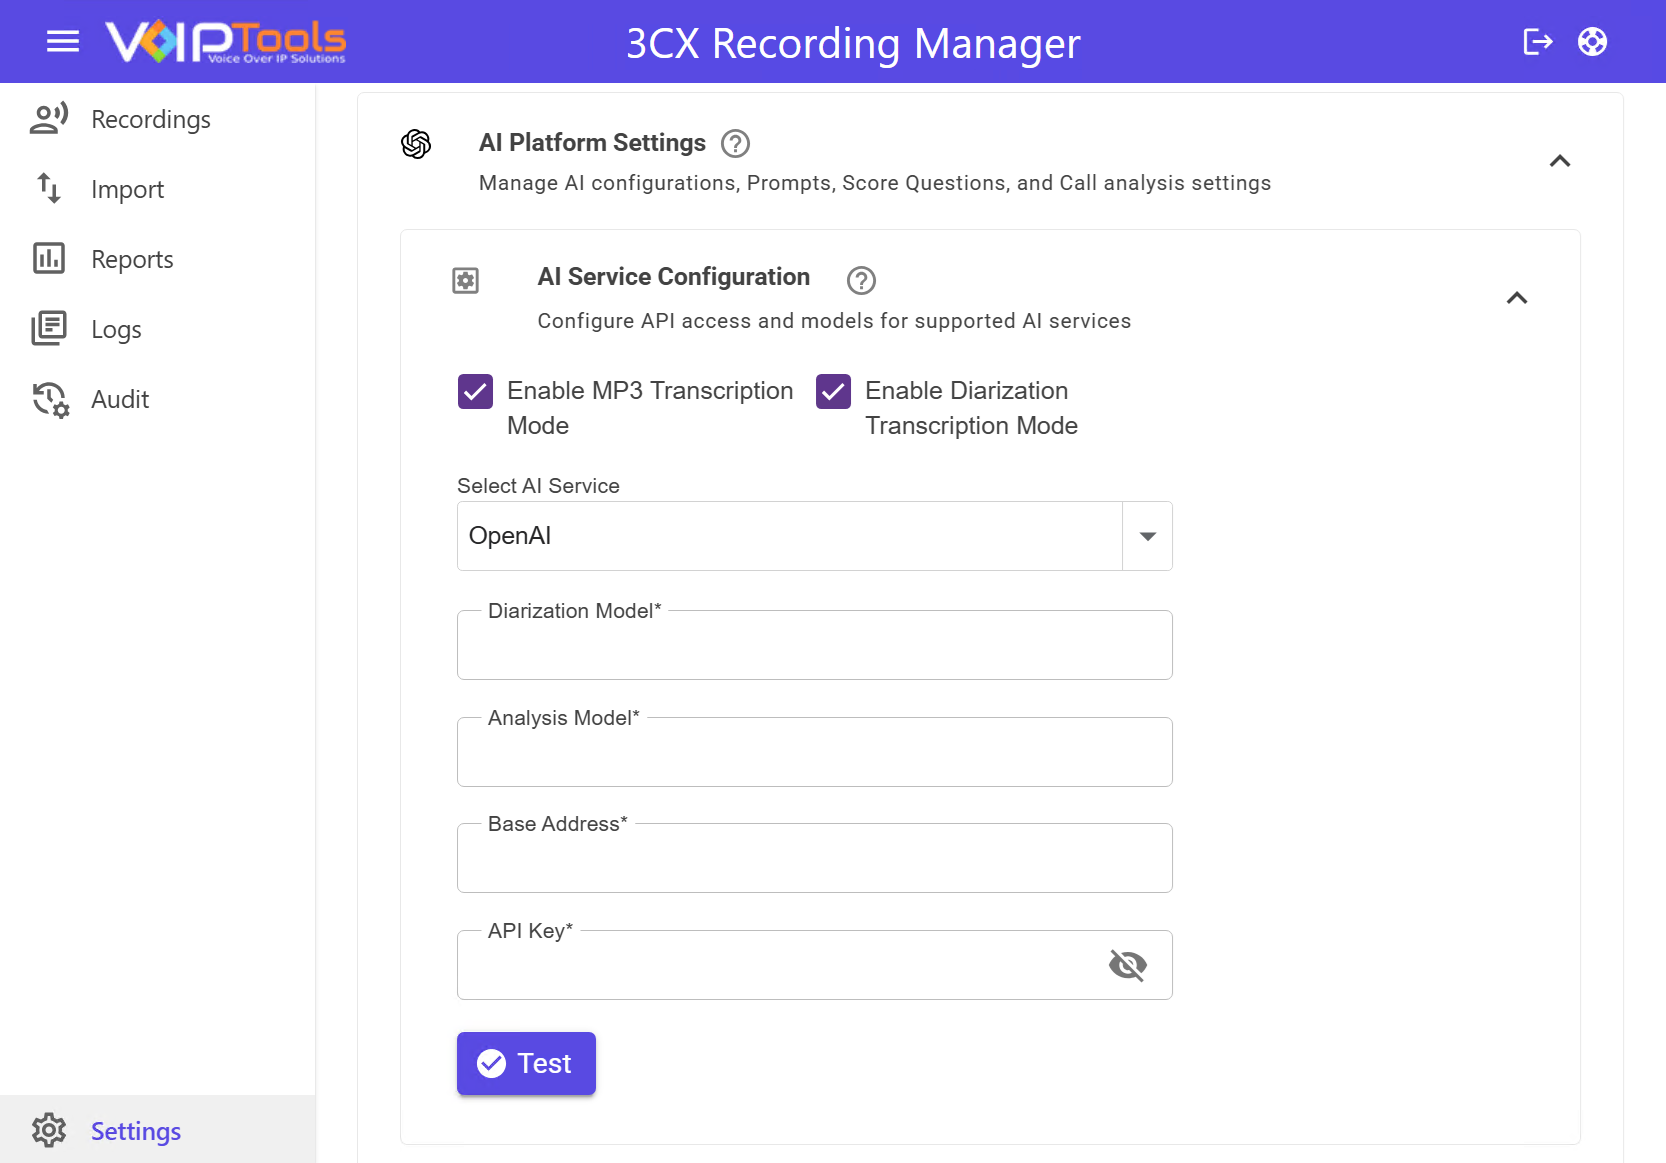
The checkbox toggles between the Transcription Model and the Diarization Model.
Step 1: Choose Your AI Service #
- Click the dropdown under Select AI Service
- Pick your provider (OpenAI or Microsoft Azure OpenAI)
Step 2: Fill in Transcription Details #
OpenAI Settings #
| Field | Description |
|---|---|
| Diarization Model | The OpenAI model used for speaker-separated audio transcription. |
| Transcription Model | The OpenAI model used for standard audio transcription. |
| Analysis Model | The OpenAI model used for generating call analysis and chat completions. |
| Base Address | The base URL used to access OpenAI’s API, required for all AI processing and integration. |
| API Key | Your OpenAI API key used for authentication. Keep this secure to prevent unauthorized access. |
Microsoft Azure Settings #
Transcription Section (Voice-to-text processing)
| Field | Description |
|---|---|
| Deployment Name | The model name of your Azure OpenAI deployment for transcription. |
| End Point | The full endpoint URL of the Azure deployment for transcription. |
| API Key | The Azure API key from your Azure OpenAI resource, required for authentication. |
Step 3: Fill in Analysis Details #
- Repeat the same steps as above for the Analysis section
Step 4: Test Your Setup #
- Click the purple Test button
- If everything is correct, the system will confirm it’s working
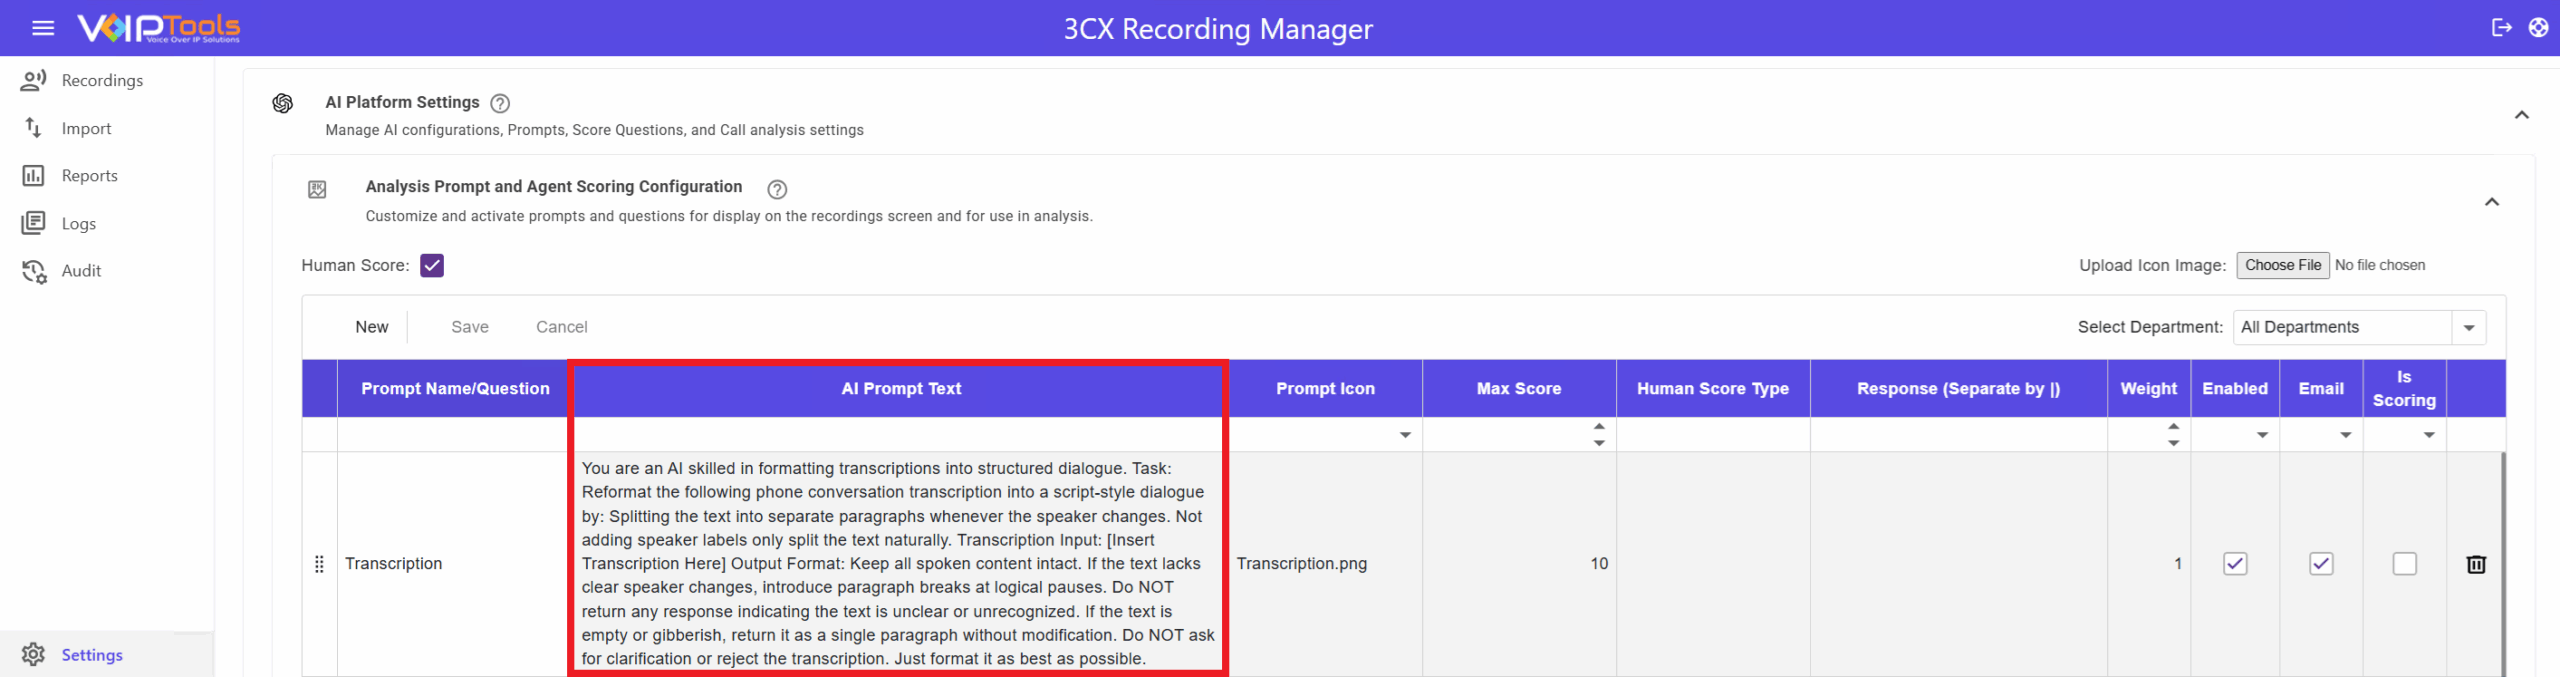
Agent Scoring Questions and AI Prompt Configuration #
In the Agent Scoring Questions and AI Prompts section, you can manage the specific questions and prompts that guide the AI’s analysis. By tailoring these to your business needs, you ensure a focused evaluation of agent performance. This customization fosters better training opportunities and enhances overall service quality. This section lets you create and manage questions that help assess how well agents perform during calls. You can also use AI to score answers automatically or allow human reviewers to score them manually.
Add New AI Question and Prompt #
This section guides you on how to add an AI question and an AI prompt.
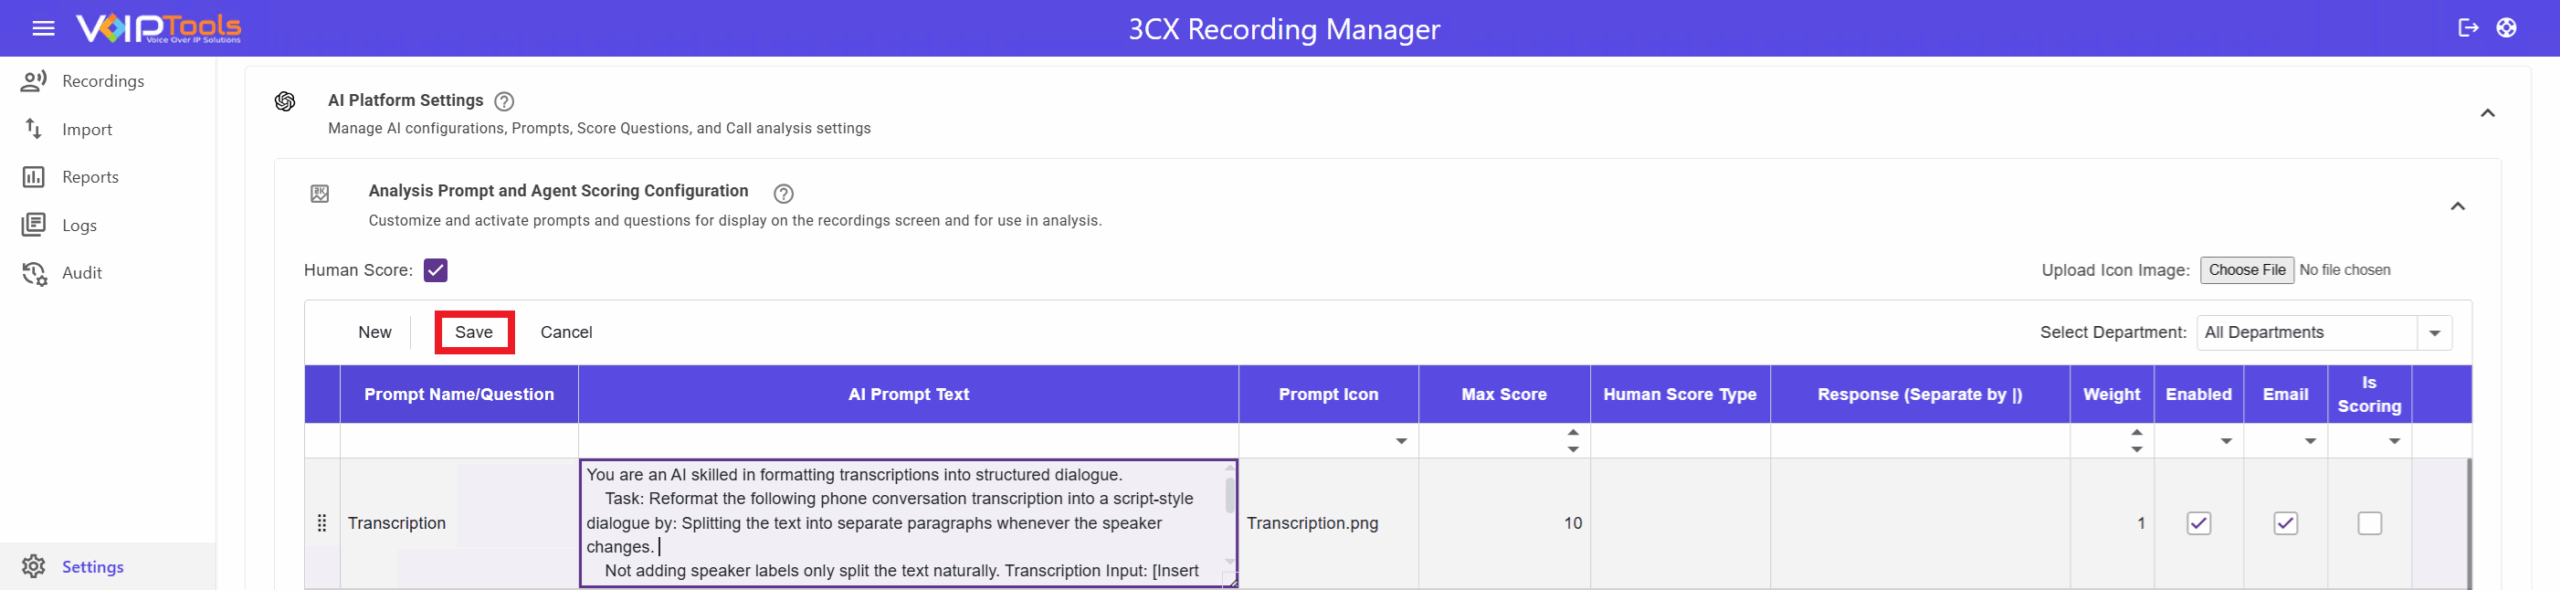
- In the Agent Scoring Questions / AI Prompts section click the New button.
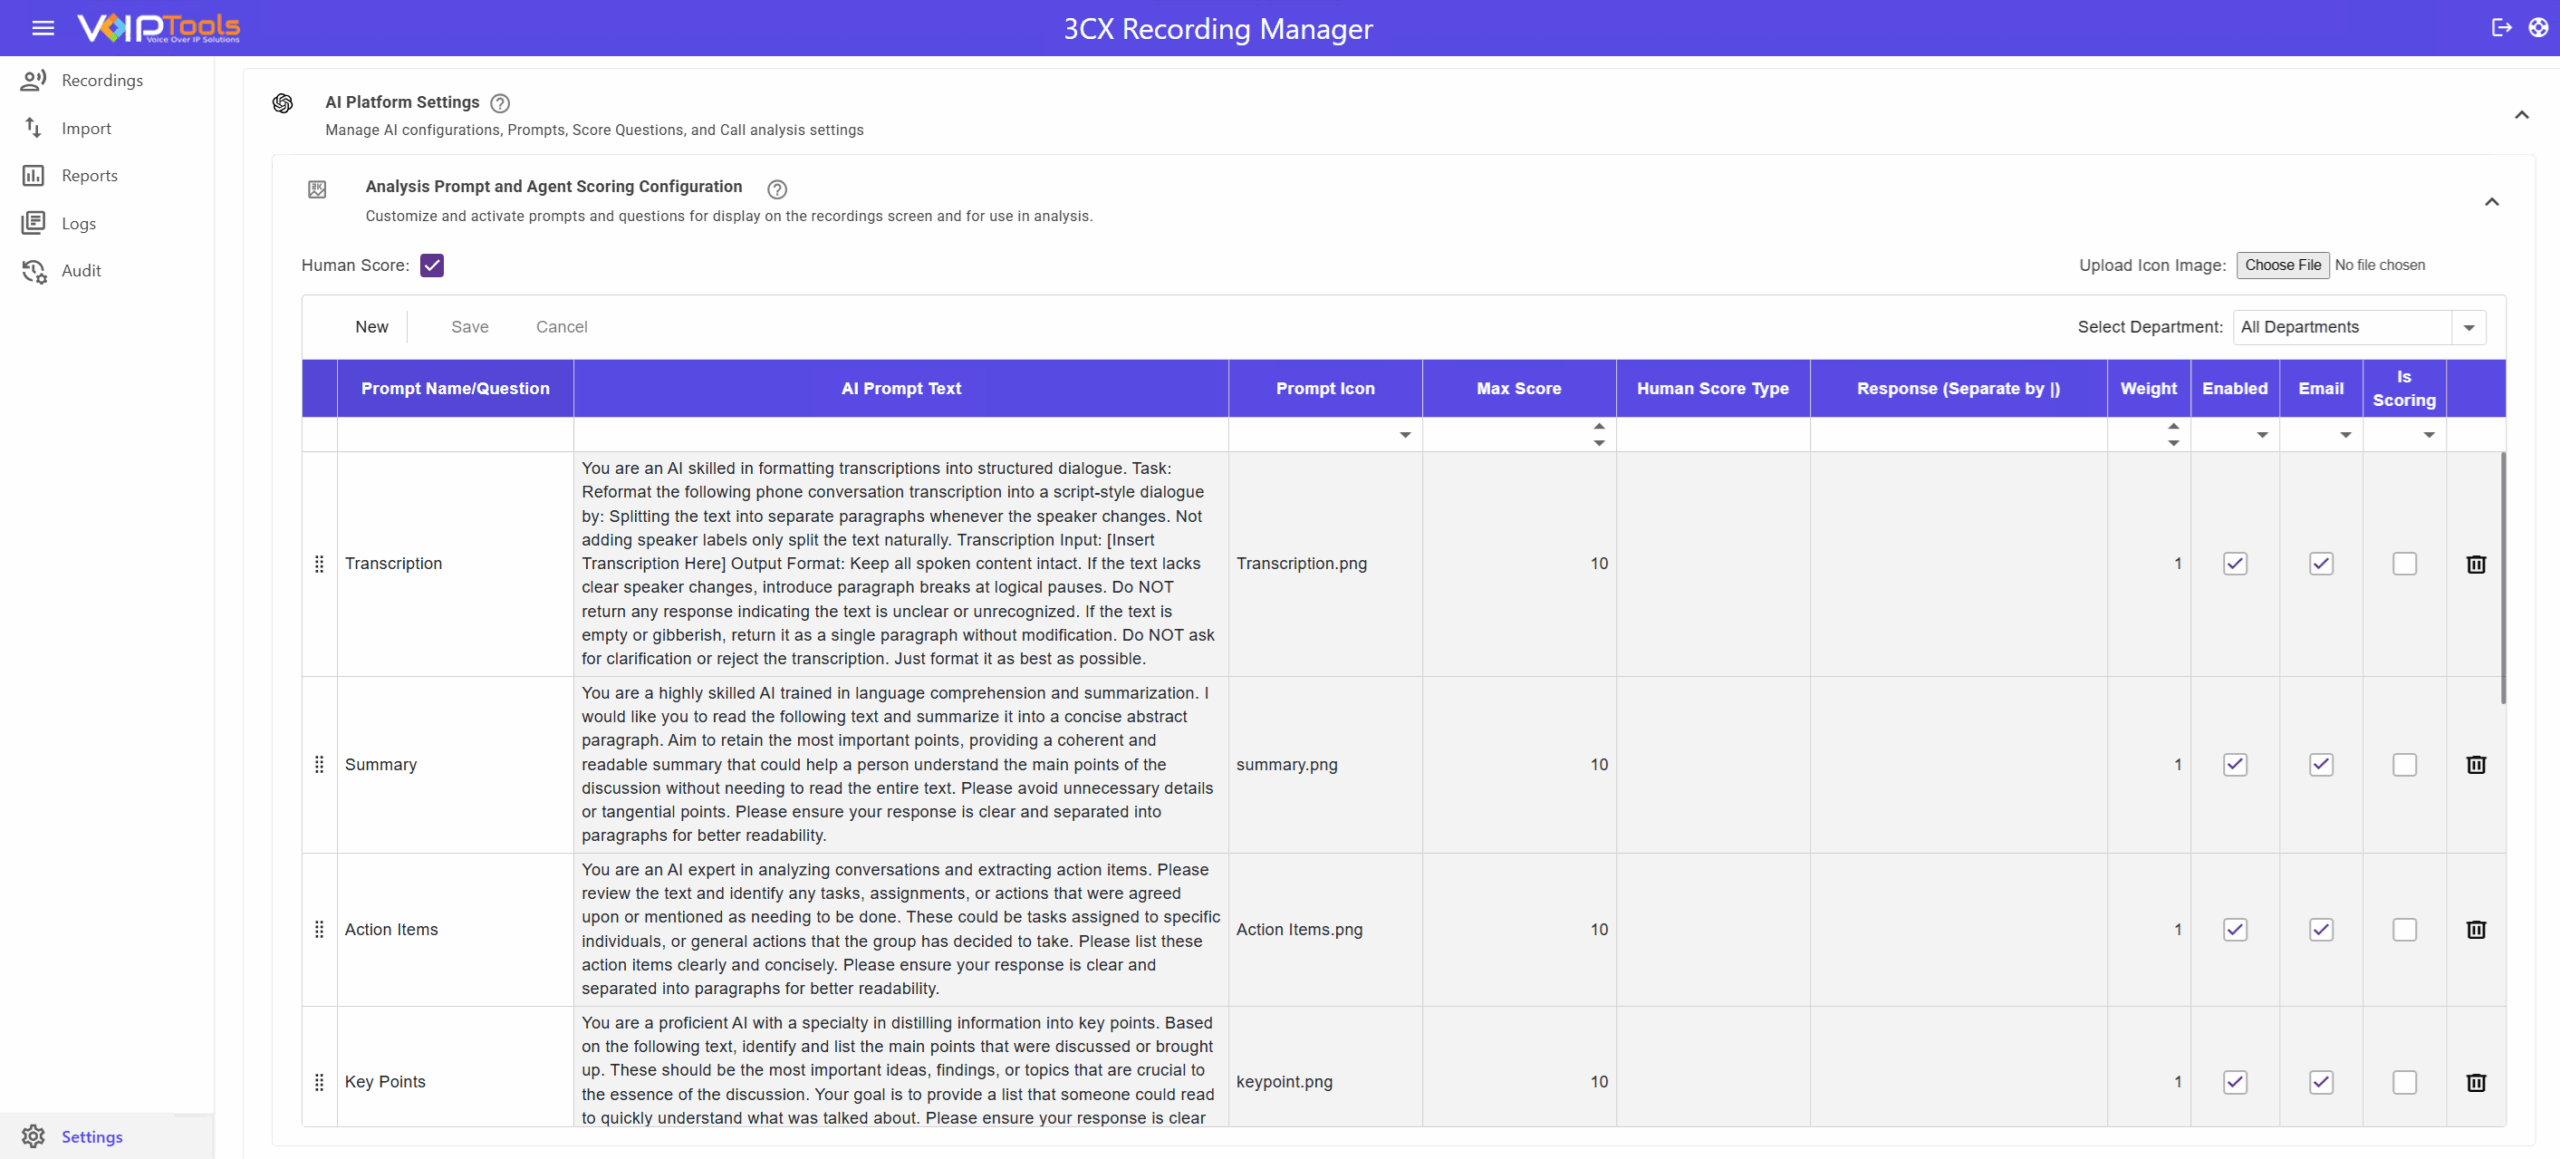
Field Definition #
| Order | Drag using the ⋮⋮ icon to set the display order in popups and emails. Order saves automatically. |
| Prompt Name / Question | The question text shown in the grid and emails. |
| AI Prompt Text | Instructions for AI to understand the question. |
| Prompt Icon | Choose an icon to display in the recordings grid. |
| Max Score | The highest possible score. Defaults to 10 if left blank. |
| Human Score Type | How a human evaluator scores: Single Choice, Multiple Choice, Rating, or Text. |
| Response (Separated by |) | The answer options, separated by a pipe (|) symbol. |
| Weight | How much this question impacts the overall score. Defaults to 1. Higher = more impact. |
| Enabled | Check to include this question in the analysis. |
| Check to include this question’s results in email reports. | |
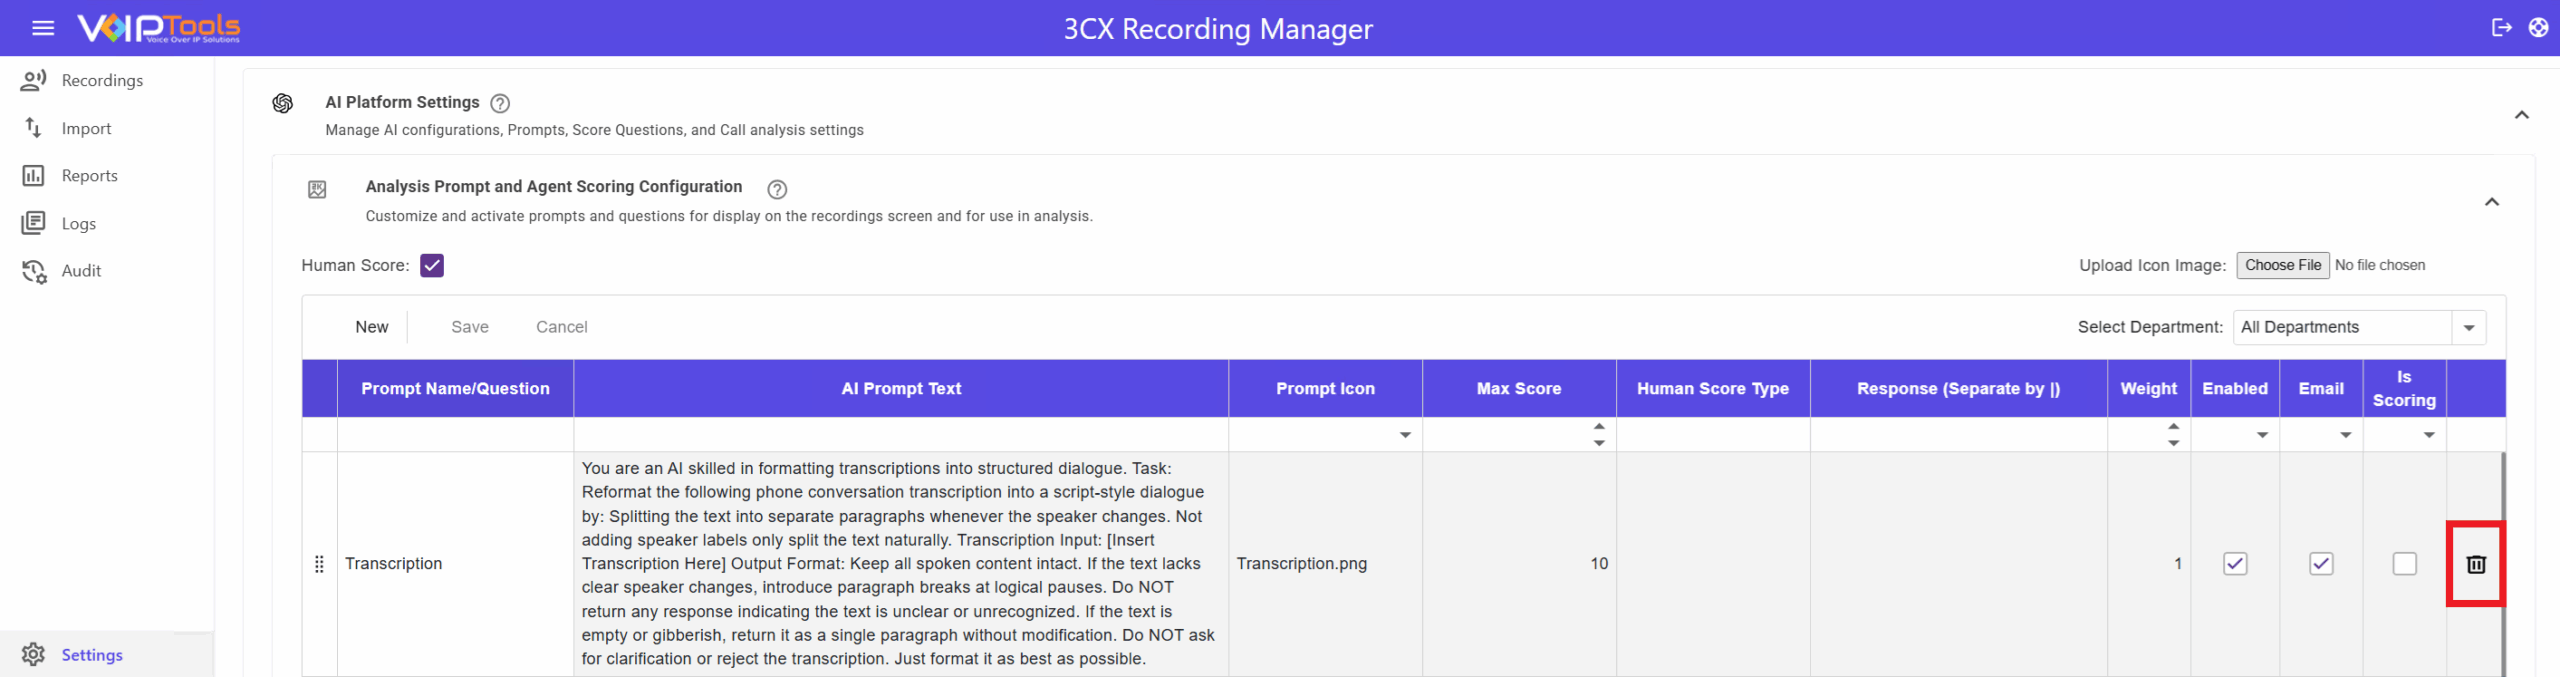
| IS Scoring | Check to mark this prompt as a scored question. |
| Delete | Deletes the existing prompt. |
2. In the Prompt Name/Question columns, enter the text of the question to be analyzed. Create questions to rate agent performance.
3. In the AI Prompt Text column, enter the AI prompt that guides how the question is analyzed by AI.
-
- Select the Enabled checkbox to include the question during the analysis.
- Send scores by Email if needed.
- Mark the checkbox IS Scoring to include AI scoring in the selected question.
- Click the Save button to save your question and the AI prompt.
Delete an AI Question and Prompt #
You can click the Delete button to remove the question and the AI prompt created.
NOTE:
When you click the Delete button, the application does not show any confirmation popups.
Call Analysis Rules Settings #
Call Analysis Rules Settings lets you control which call recordings are sent for AI analysis. You can set limits based on call length, call type, and how often analysis runs — helping you focus on the most relevant calls. This ensures your system uses resources efficiently while still capturing the insights that matter most.
Each setting has an ON/OFF toggle on the right. Switch it on to activate the rule, or off to disable it without losing your saved settings.
.
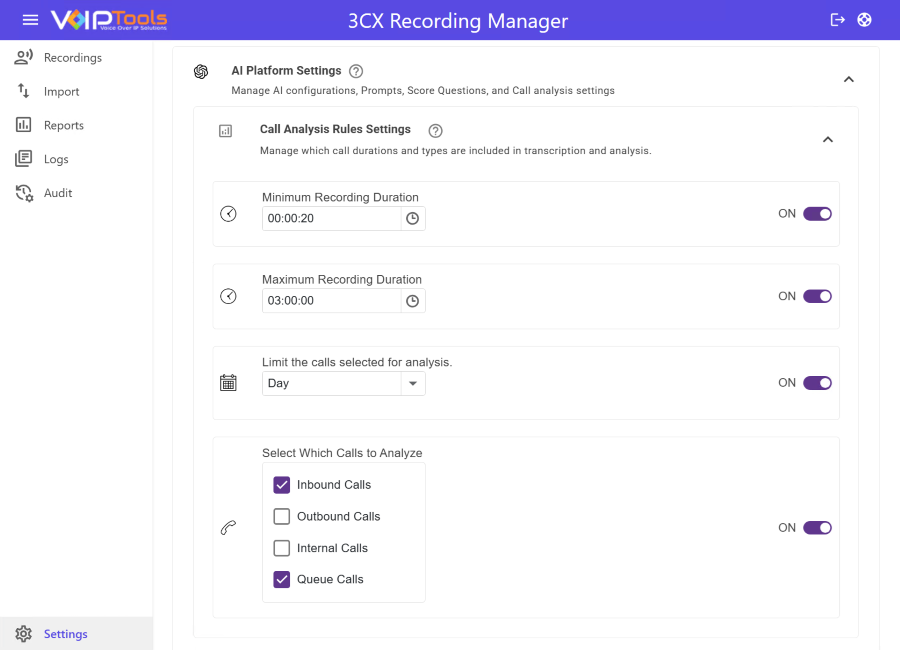
Minimum Recording Duration Set the shortest call length that qualifies for analysis. Calls shorter than this limit will be skipped. For example, set it to 20 seconds (00:00:20) to ignore accidental or very brief calls.
Maximum Recording Duration Set the longest call length that qualifies for analysis. Calls longer than this limit will be excluded. For example, set it to 3 hours (03:00:00) to avoid processing unusually long recordings.
Limit the Calls Selected for Analysis Restrict how often calls are analyzed per extension within a set time period — daily, weekly, monthly, quarterly, or yearly. Only one transcription per period per extension will be processed, keeping resource usage manageable.
Select Which Calls to Analyze Choose the types of calls to include in analysis:
- Inbound — Calls coming into the organization
- Outbound — Calls made out of the organization
- Internal — Calls between staff members
- Queue — Calls handled through a call queue
Note: Filtering by call type helps you focus analysis on the calls that are most important to your team.
Call Analysis Retry Settings #
Call Analysis Retry Settings retries a call transcription or analysis if it fails the first time. This prevents recordings from being skipped due to temporary issues, such as a busy AI service or a file that isn’t ready yet. It improves reliability by giving the system multiple chances to succeed without any manual effort on your part.
This section has an ON/OFF toggle on the right. Switch it on to activate the retry rules, or off to disable it without losing your saved settings.
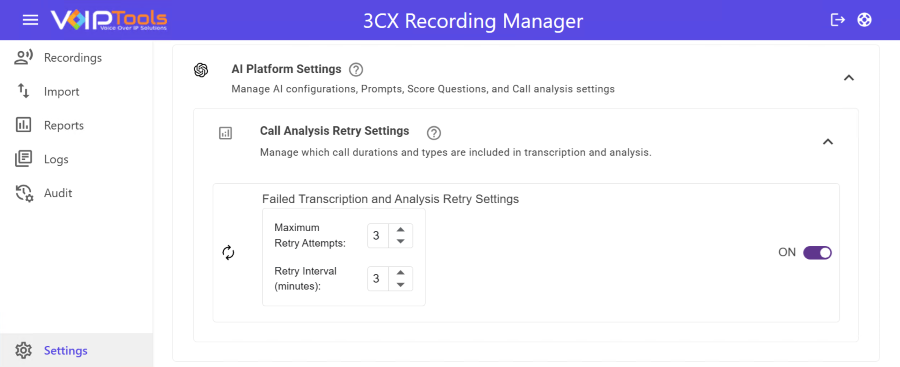
Failed Transcription and Analysis Retry Settings
Maximum Retry Attempts Set how many times the system should try again if a transcription or analysis fails. For example, setting this to 3 means the system will make up to 3 additional attempts before giving up.
Retry Interval (Minutes) Set how long the system should wait between each retry attempt. For example, setting this to 3 means the system will wait 3 minutes before trying again.
Note: These settings help ensure that temporary issues — such as a file still being processed by 3CX or a brief AI service delay — do not result in missed transcriptions or incomplete analysis.
Exporter Integration #
The Exporter Integration tab connects Recording Manager to the Exporter database to add more details to your recordings, such as CDR ID, History ID, call direction, and queue number.
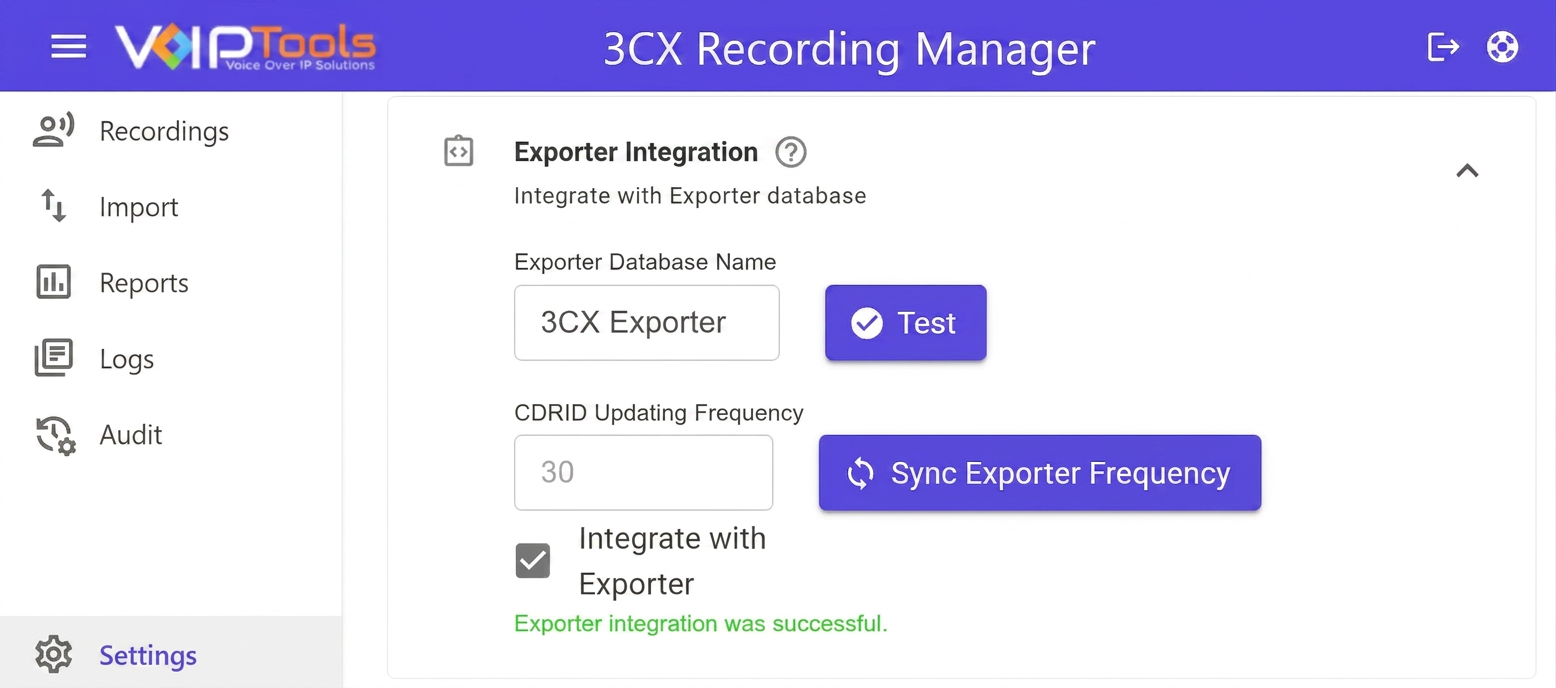
Exporter Database Name: Enter the name of your Exporter database created during the Exporter application setup. Make sure it is correct and accessible.
Test: Click Test to check the connection. If the connection is successful, the system will allow further actions. You’ll see an error if it fails.
CDRID Update Frequency: Shows how often data is updated from the Exporter.
Sync Exporter Frequency: Updates the latest frequency value from the Exporter database.
Integrate with Exporter: Turn this on after a successful test. Recording Manager will update missing details such as CDR ID, History ID, Direction, and Queue Number. A progress indicator will show while syncing.
If disabled, syncing stops and no new data is retrieved.
Note:
Make sure the Exporter system is installed and configured before enabling.
This feature does not affect live calls. It only updates existing recordings and imported data.
Secret Digits Tab #
The Secret Digits tab lets you manage secret digits used by call centers to restrict outbound calling. It hides these digits in displayed numbers and recording file names to maintain call security and prevent agents from bypassing outbound calling restrictions. This ensures calls follow predefined outbound rules and secret digits are concealed effectively in recordings.
If you set your secret digit as 321, the following will happen,
| 1 | Call Initiation | Agents must prepend 321 to any phone number they wish to call. For instance, if they want to dial a number like 555-1234, they would need to dial 3215551234. |
| 2 | Call Rejection | Any attempt to dial a phone number without the 321 prefix will result in the call being rejected. This restriction ensures that all outbound calls are initiated through the specified external application (like a CRM), enhancing control over call management. |
| 3 | Increased Security | By using the secret digit, you prevent unauthorized calls, as agents will not know the secret digits required to make an outbound call directly from their phones. This protects sensitive information and call management processes. |
| 4 | Recording Manager Functionality | The 3CX Recording Manager will recognize calls initiated with the secret digit. It will hide the 321 prefix when displaying the dialed number and when generating downloadable recording files, ensuring that sensitive information is not exposed. |
| 5 | Compliance with Policies | This setting enforces company policies on call handling, ensuring that all outbound calls follow the designated protocol, which helps maintain compliance and operational efficiency. |
Overall, setting a secret digit like 321 adds an extra layer of security and control over how outbound calls are made within your organization.

Web Portal Tab #
Use this tab to define user roles, permissions, and system preferences for accessing the 3CX Recording Manager Web Portal.
Configure Web Portal Rights #
Choose a role for the user from the dropdown (e.g., Manager, Agent). Roles define what features and access the user has.
Field Definitions #
| Download Recordings | Allows users to download audio files. |
| Delete Recordings | Permits deletion of call recordings. |
| Forward Recordings | Enables emailing of recordings from the portal. |
| Add Recording Notes | Allows users to annotate recordings. |
| User Call Recording and AI Analysis Settings | Grants access to AI configuration and analysis tools. |
| Score Agents | Enables agent performance scoring. |
| AI Powered Call Analysis Settings | Allows configuration of AI analysis preferences. |
| Import Recordings Page | Permits uploading of external recordings. |
| Reports Page | Provides access to detailed call and performance reports. |
| Log Page | Displays system and activity logs. |
| Audit Page | Shows audit trail for compliance and review. |

Configure Web Portal Settings #
Within the Portal screen, you can customize the following settings:
-
- Choose the desired time zone for the Web Application.
-
- Select the language and culture for your web application.
-
- Determine the preferred authentication method for accessing your web portal.
Follow the procedure to configure your web application,
-
- In the Default Time Zone list, select your preferred time zone.

-
- In the Display Culture list, select your preferred language and culture.

-
- In the Authentication section, select the password type you want to use to log in to the web application.

You can now see the authentication changed in the Login page.

3CX Recording Movers Settings #
The 3CX Recording Movers Settings help you manage how and when your call recordings are transferred from the 3CX system to a remote location like an FTP server. You can choose which recordings to move based on queues, departments, or ring groups, and set the timing and method of export.
Enable Recording Movers #

Click on the checkbox before “Move Recordings” to activate the recording mover feature. When enabled, the system will follow all export settings you configure.
Filter Recordings by Group #
You can choose which recordings to export based on three categories:
| Queues |
Select specific call queues. Only recordings from these queues will be moved.  |
| Departments |
Choose departments whose recordings should be exported.  |
| Ring Groups |
Pick ring groups to move to the configured server.  |
FTP Credentials #
This section sets up the destination for your recordings. All fields must be filled correctly to ensure a secure and successful transfer.

| URL |
Enter the FTP server address (IP or domain). |
| Port |
Specify the FTP port (default is usually 21). |
| SSL |
Check this box to use a secure, encrypted connection. |
| Username |
Enter the login name for the FTP server. |
| Password |
Enter the password (hidden for security). |
| Path |
Define the folder on the FTP server where recordings will be saved. You must type a slash “/” at the end of the FTP folder path. Without the “/” the Recording Mover cannot export the recordings. |
Make sure the FTP path exists or has permission to create folders. Click the Test button to verify your FTP settings. The system will try a test connection to confirm everything works.
Export Configuration #
This lets you schedule exports daily or in real-time and it can include inbound and/or outbound calls

Export Frequency
• Daily: This lets you move recordings once per day at a set time.
• Export At: This lets you choose the exact time for daily exports.
• Live: This lets you move recordings in near real-time as soon as they’re available.
Use Daily for batch transfers during off-hours, and Live for immediate access in fast-paced environments.
Call Types
• Inbound: Includes recordings of incoming calls.
• Outbound: Includes recordings of outgoing calls.
Custom Branding Tab #
The Custom Branding tab allows you to personalize the site’s look by setting the header title, logo, gradient colors, and grid color. You can upload your logo and choose custom colors to match your brand or style. You also have the option to reset to defaults or apply changes for a consistent, professional appearance.
Follow the procedure to customize your site,
-
In the Left Side Panel click the Settings menu.
-
Click to expand the Custom Branding tab.
-
Perform any of the following customizations and click the
 Apply button to save your settings.
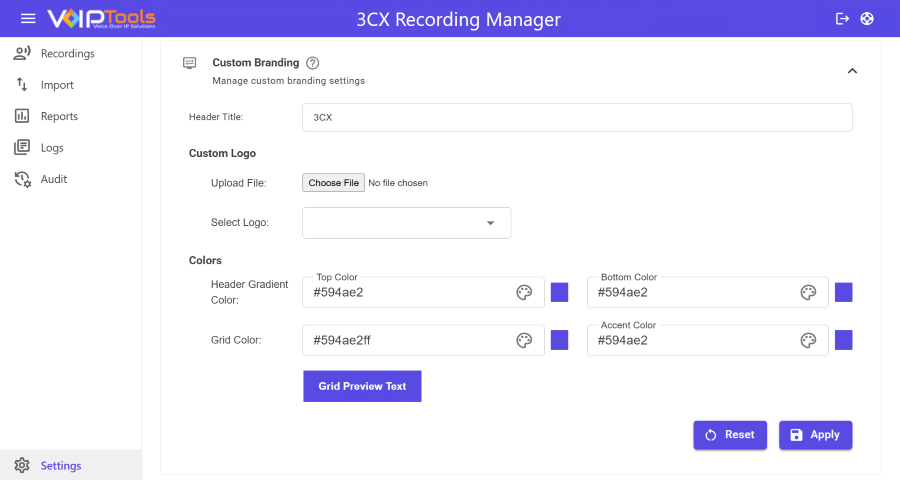
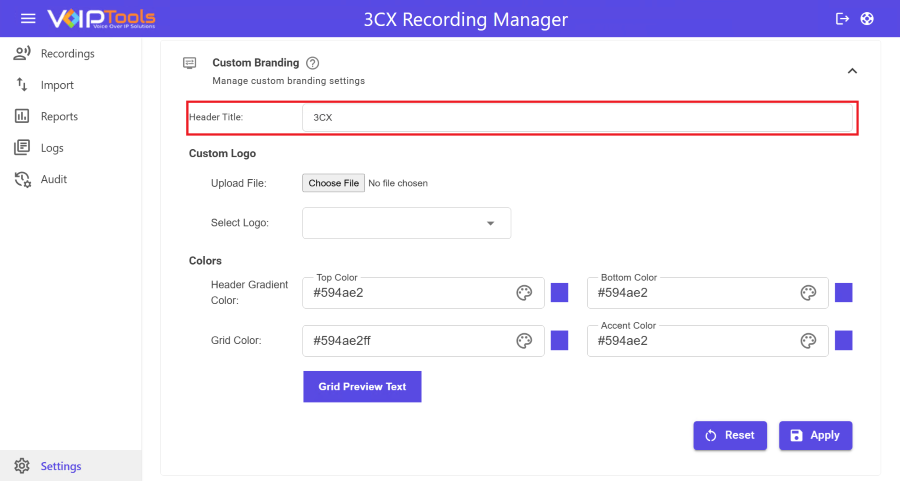
Customize ‘Header Title Prefix’ Text #
-
Click inside the Header Title input box.
-
Type your desired title (e.g., your company name or department).
-
This title will be displayed prominently in the header.
Customize Logo #
-
In the Custom Logo section, click the “Choose File” button to choose a logo from your device.
-
Select the uploaded logo from the “Select Logo” dropdown list.
-
Click the
Apply button to save your changes.
Customize Colors #
You can personalize the application’s color scheme using the following options:
| Header Gradient Color | Choose top and bottom colors to create a gradient effect in the header. |
| Grid Color | Pick a color for the background of all grids in the application. |
| Accent Color | Select a color for text headers throughout the interface. |
-
Click the color picker next to each setting.
-
Choose your preferred color or enter a hex code (e.g., #594ae2).
-
The preview will update to reflect your choices.
When you’re satisfied with the set up, click the Apply button to save and apply your custom branding changes to the application interface.
Recordings Menu #
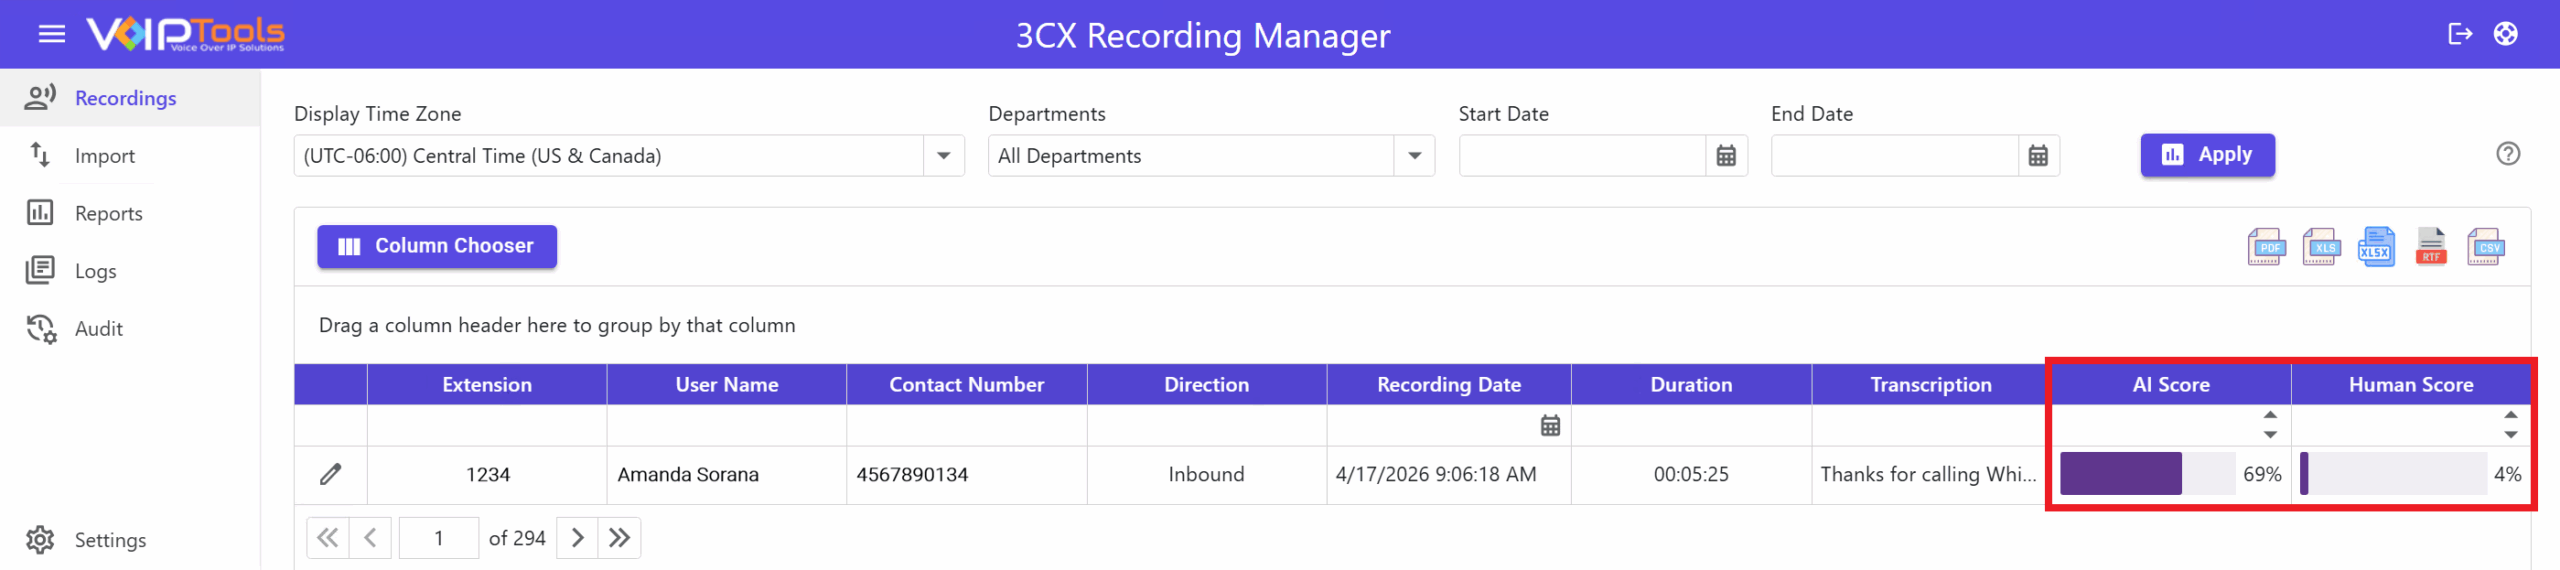
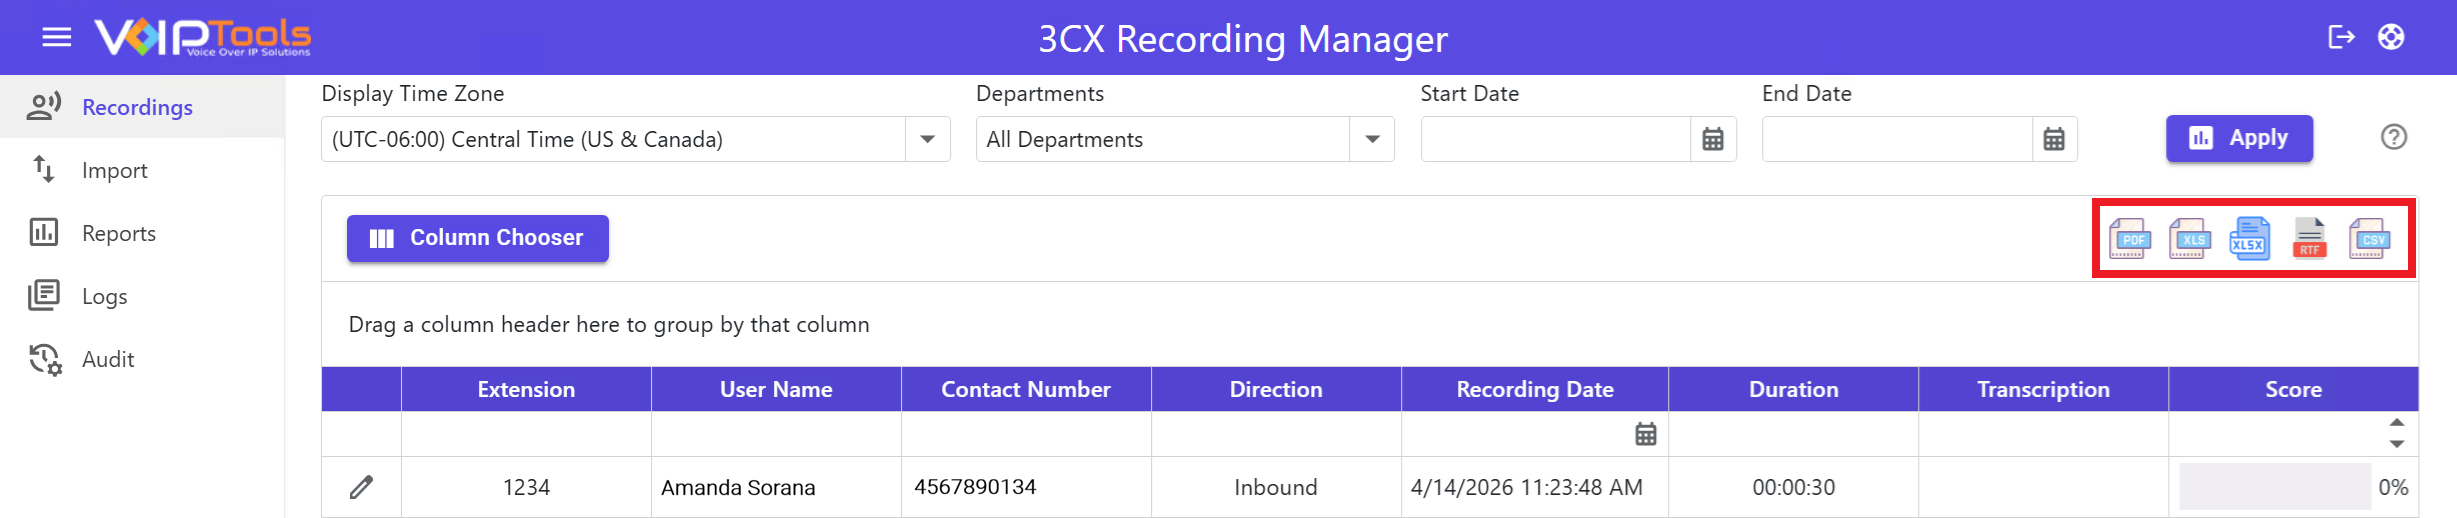
The Recordings Menu is your central hub for viewing and managing all call recordings. Use the filters at the top : Display Time Zone, Department, Start Date, and End Date to narrow down results, and the Column Chooser to show or hide the columns you need. The recording list displays key call details including Extension, User Name, Contact Number, Direction, Recording Date, Duration, Transcription, and Score, with an edit icon ![]() on each row to view or update a recording. Use the export icons in the top right to save or print your data, and the pagination controls at the bottom to browse through all available recordings.
on each row to view or update a recording. Use the export icons in the top right to save or print your data, and the pagination controls at the bottom to browse through all available recordings.
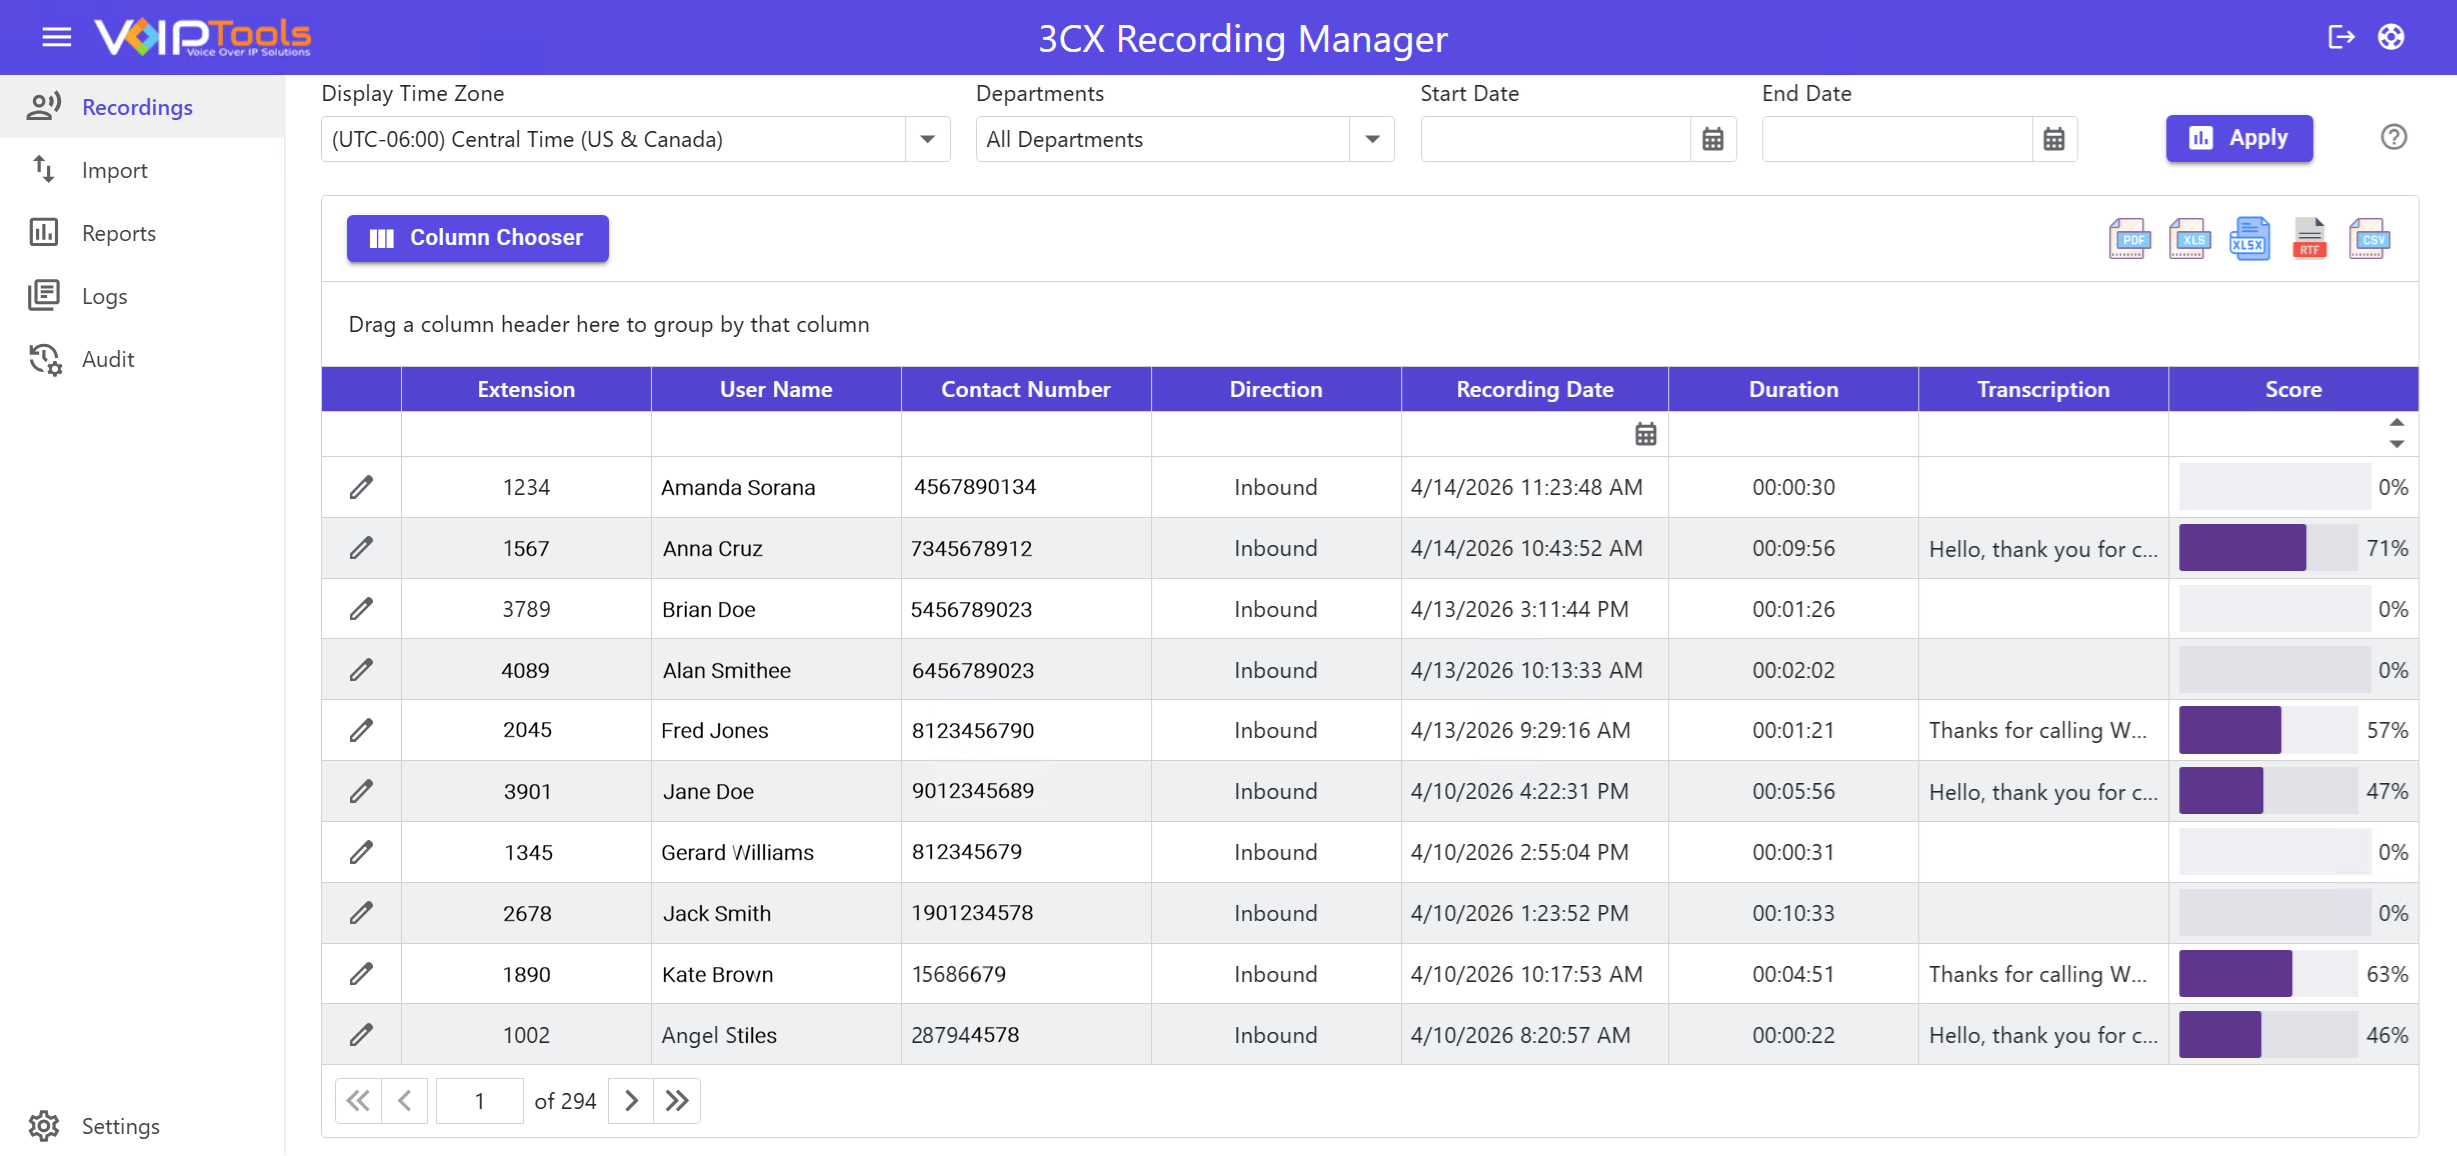
Field Definitions #
|
The blank first row serves as search bar for the call logs. |
|
| Extension |
The extension (number format) involved during the log event. |
| User Name |
The name of the person associated with the extension. |
| Contact Number |
The external phone number of the caller or the person being called. |
| Direction |
Indicates whether the call was Inbound (received) or Outbound (made). |
| Recording Date |
The exact date and time the call was recorded. The time zone can be configured in the Recordings menu. |
| Duration |
The length of a telephone conversation from the moment the call is answered to when it is terminated. |
| Transcription |
The conversion of a call audio track into written words stored as plain text in English language. |
| Score |
Shown as a percentage and a progress bar, reflecting how well the call met the set criteria. |
| Human Score |
An assessment of a call made by a person in a percentage-based system, reflecting empathy, context, tone, intent, and emotional cues that automated systems may overlook. |
Configure Display Time Zone #
-
At the top left of the Recordings screen, click the Display Time Zone dropdown and select the time zone that matches your location or preference
-
Click the Apply button at the top right to update the recording list and display all dates and times according to your selected time zone.

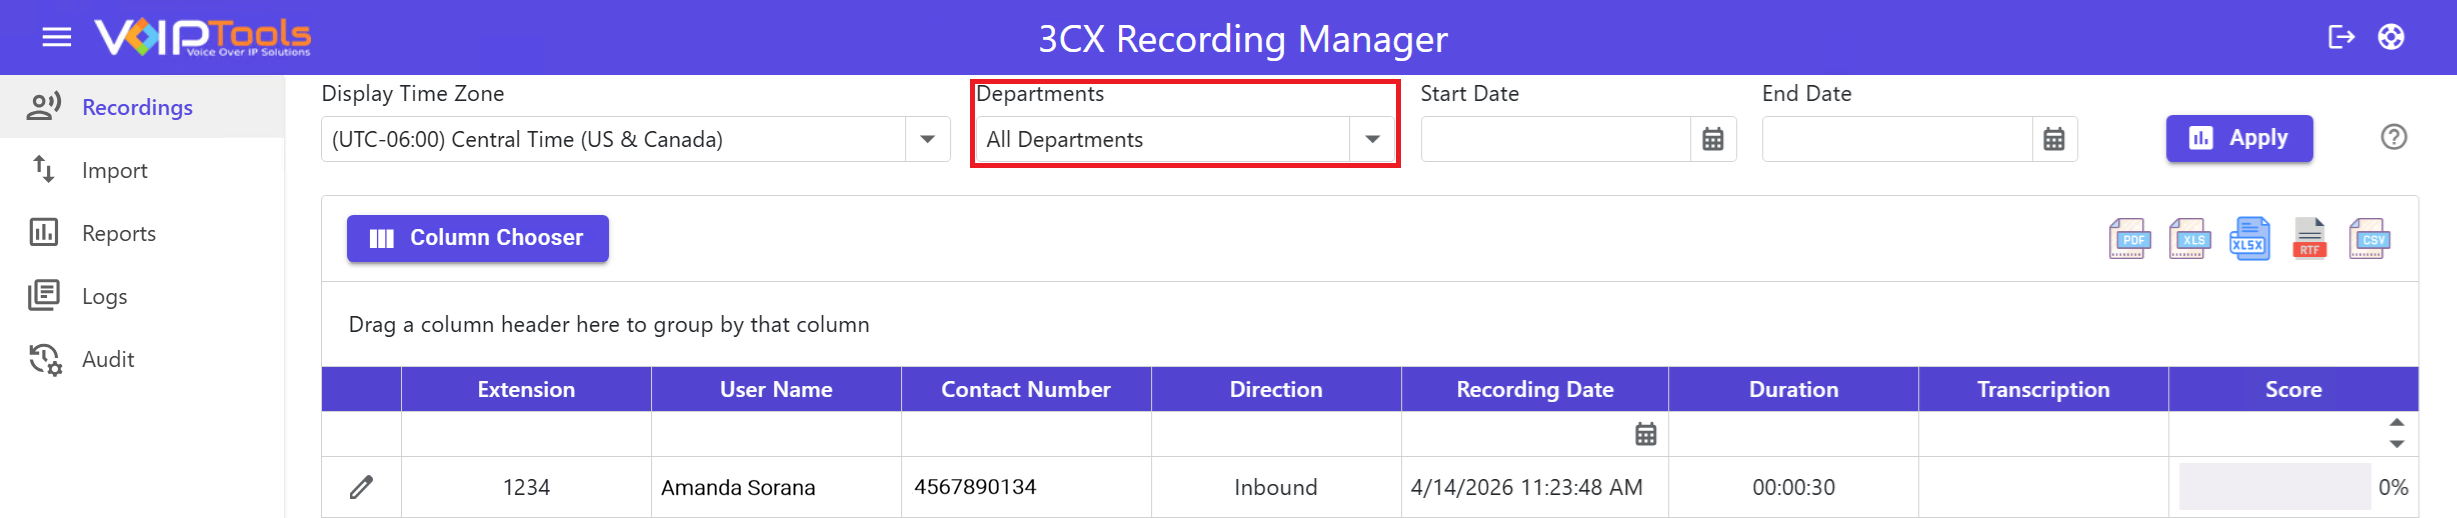
Configure Departments #
-
At the top of the Recordings screen, click the Departments dropdown and select the specific department you want to filter recordings by. By default, it is set to All Departments, which displays recordings from every department.
-
Click the Apply button at the top right to update the recording list and show only the recordings that belong to your selected department.
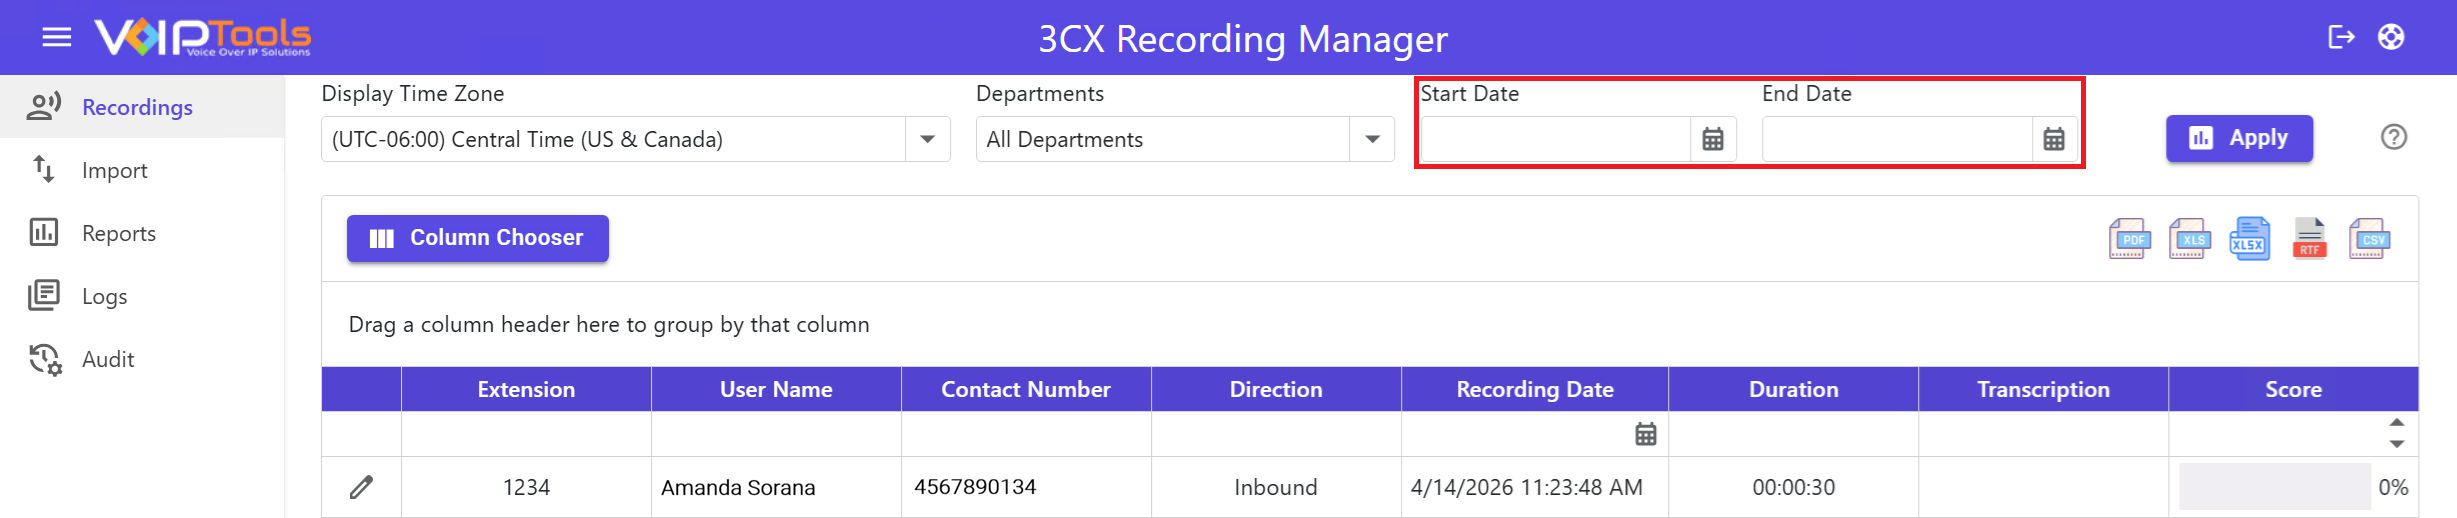
Configure Start Date and End Date #
-
At the top of the Recordings screen, click the calendar icon next to the Start Date field and select the date you want your recording search to begin from.
-
Click the calendar icon next to the End Date field and select the date you want your recording search to end. Make sure the End Date is the same as or later than the Start Date.
- Click the Apply button at the top right to update the recording list and display only the recordings that fall within your selected date range.
Recording Details Screen #
-
Click the Recording Details
 button to open the “Recording Details” screen.
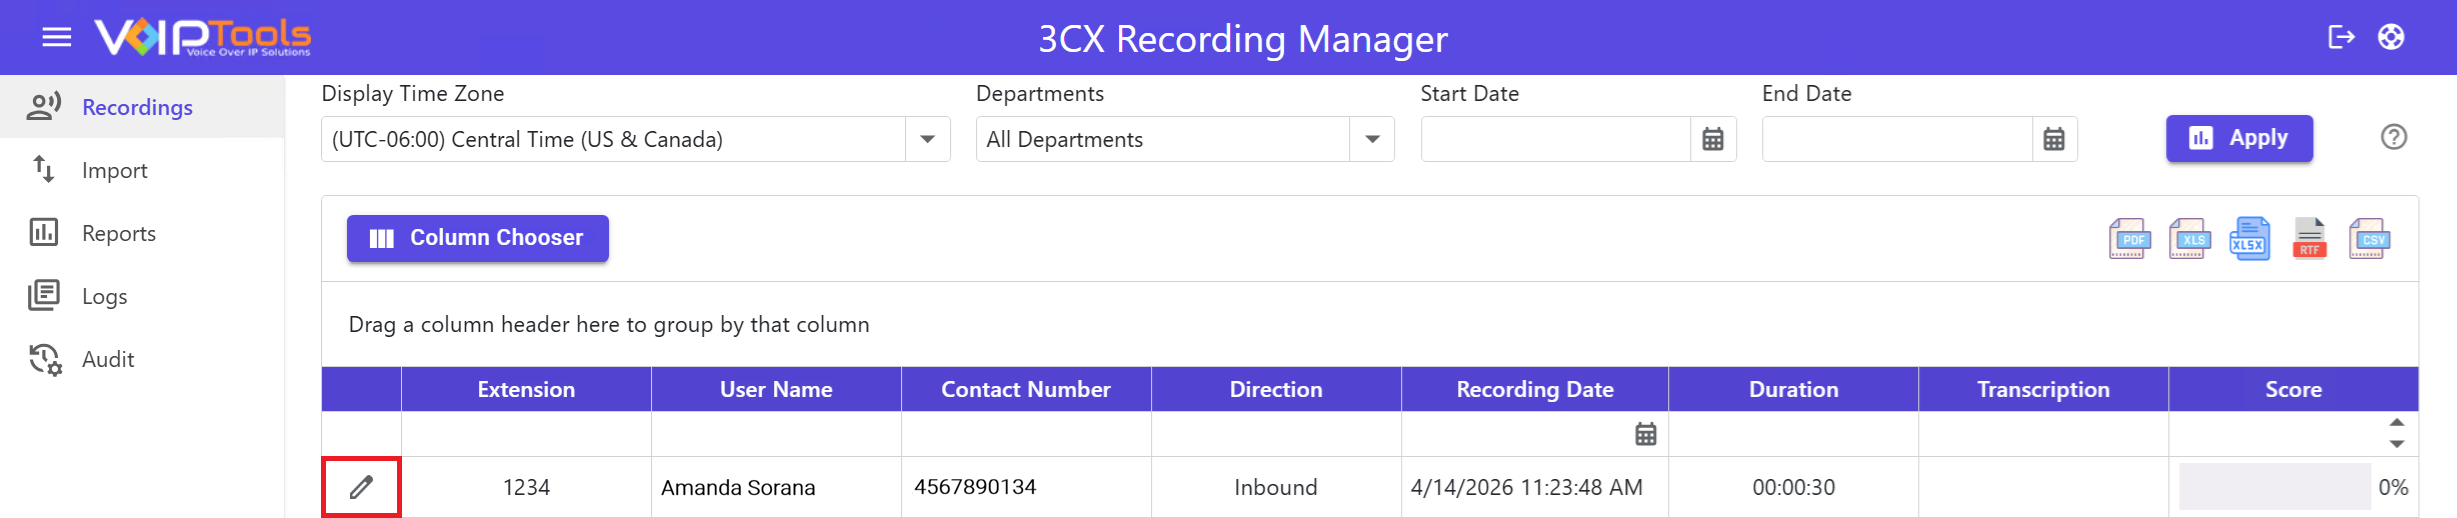
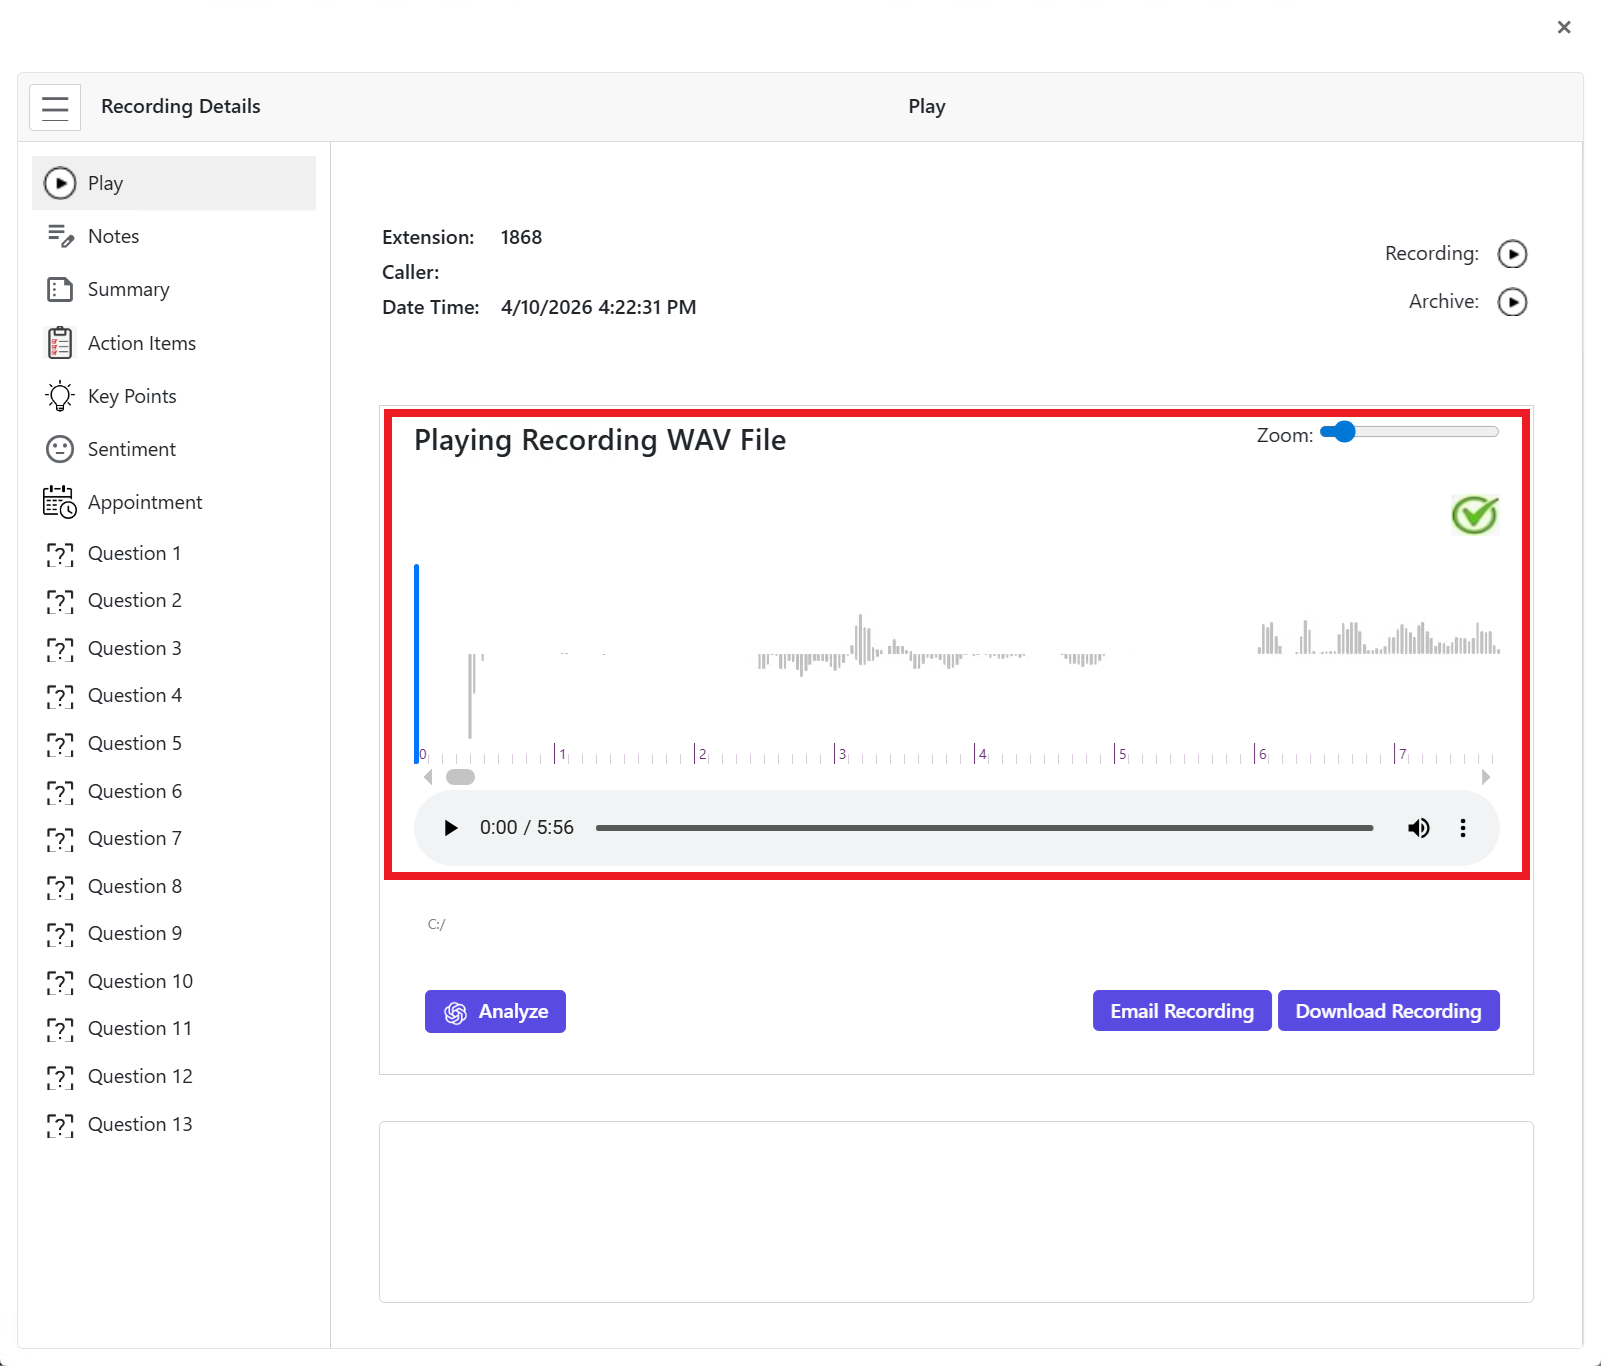
The following image gives you an overview of the “Recording Details” screen.
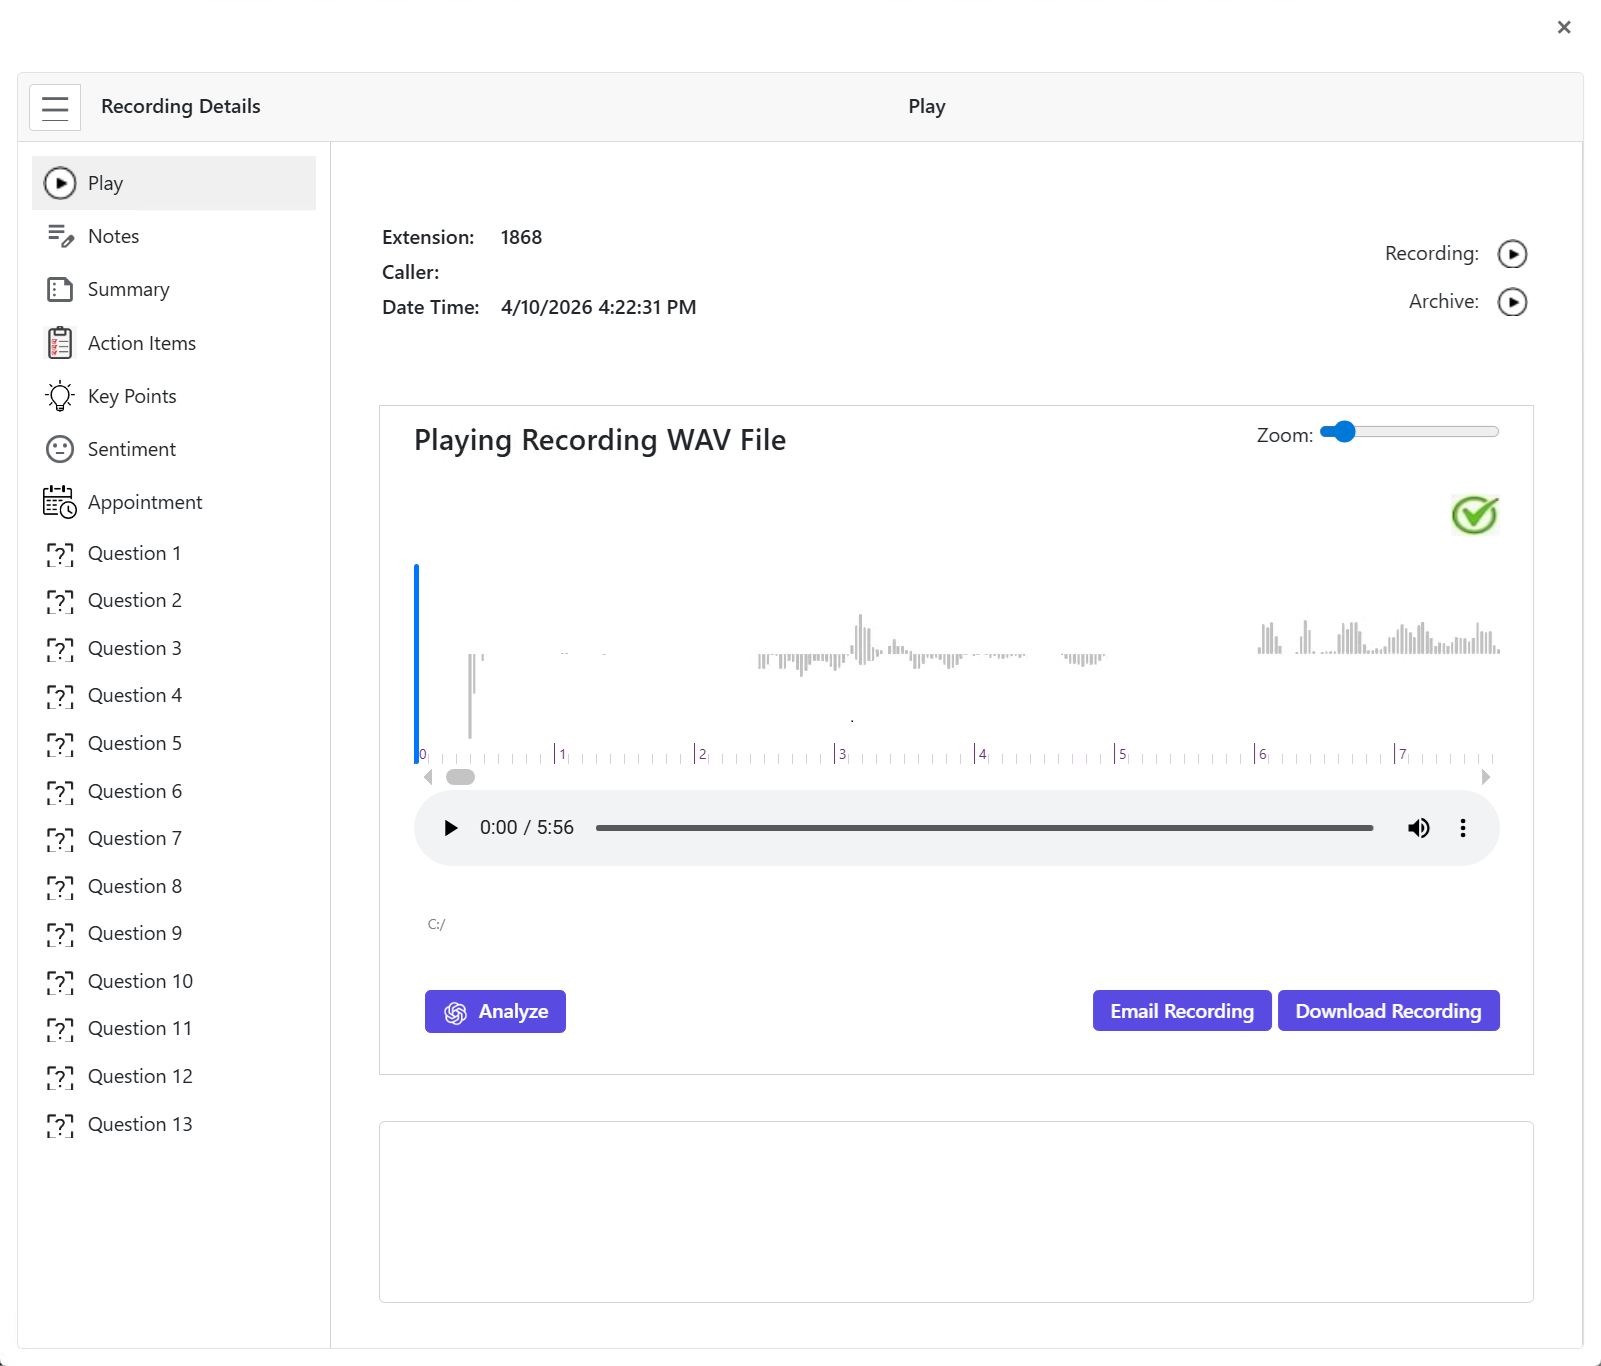
Play the Recording #
-
In the Recording Details screen, click the “Recording” button or the “Archive” Button.
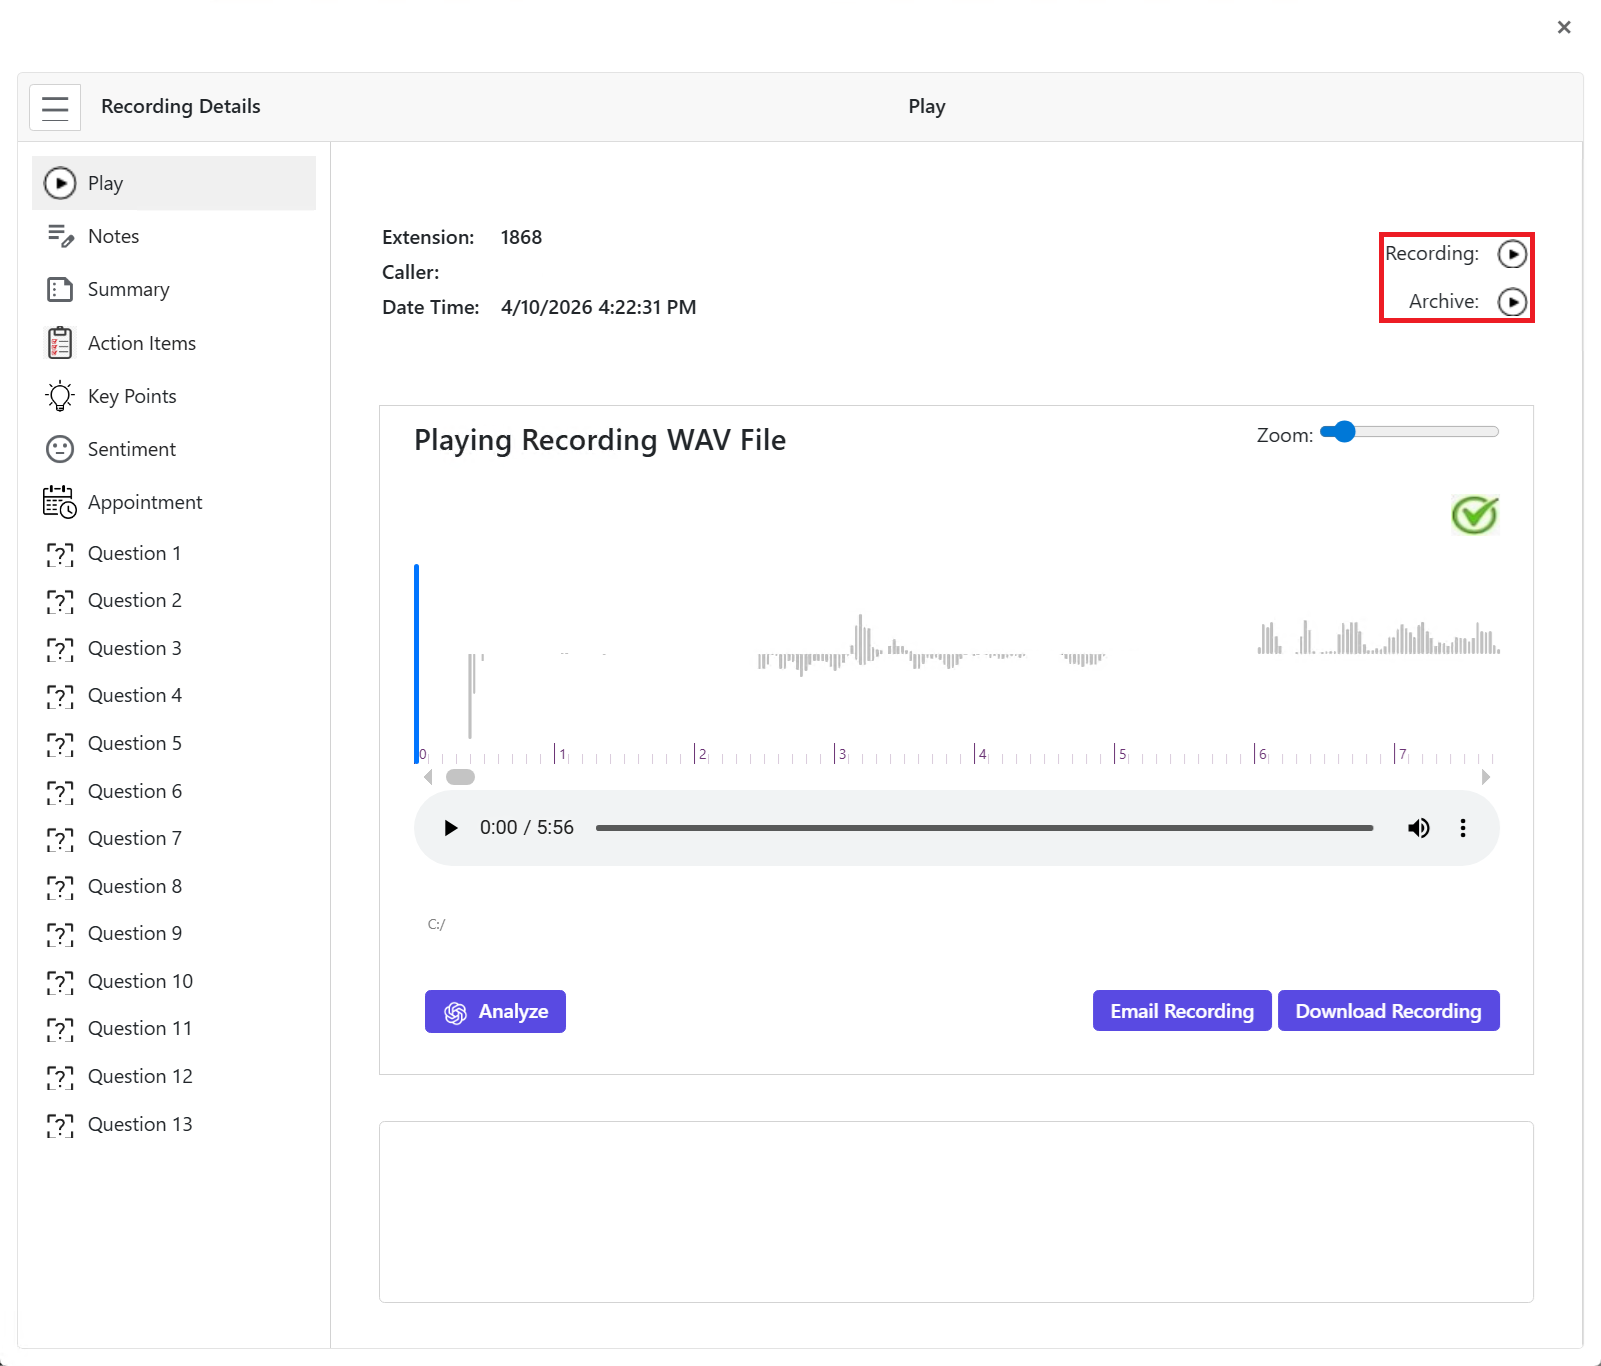
You can play the recording file using the built in audio player.
Download Recordings #
-
In the Recording Details screen, click the “Recording” button.
-
Click the “Download Recording” button.
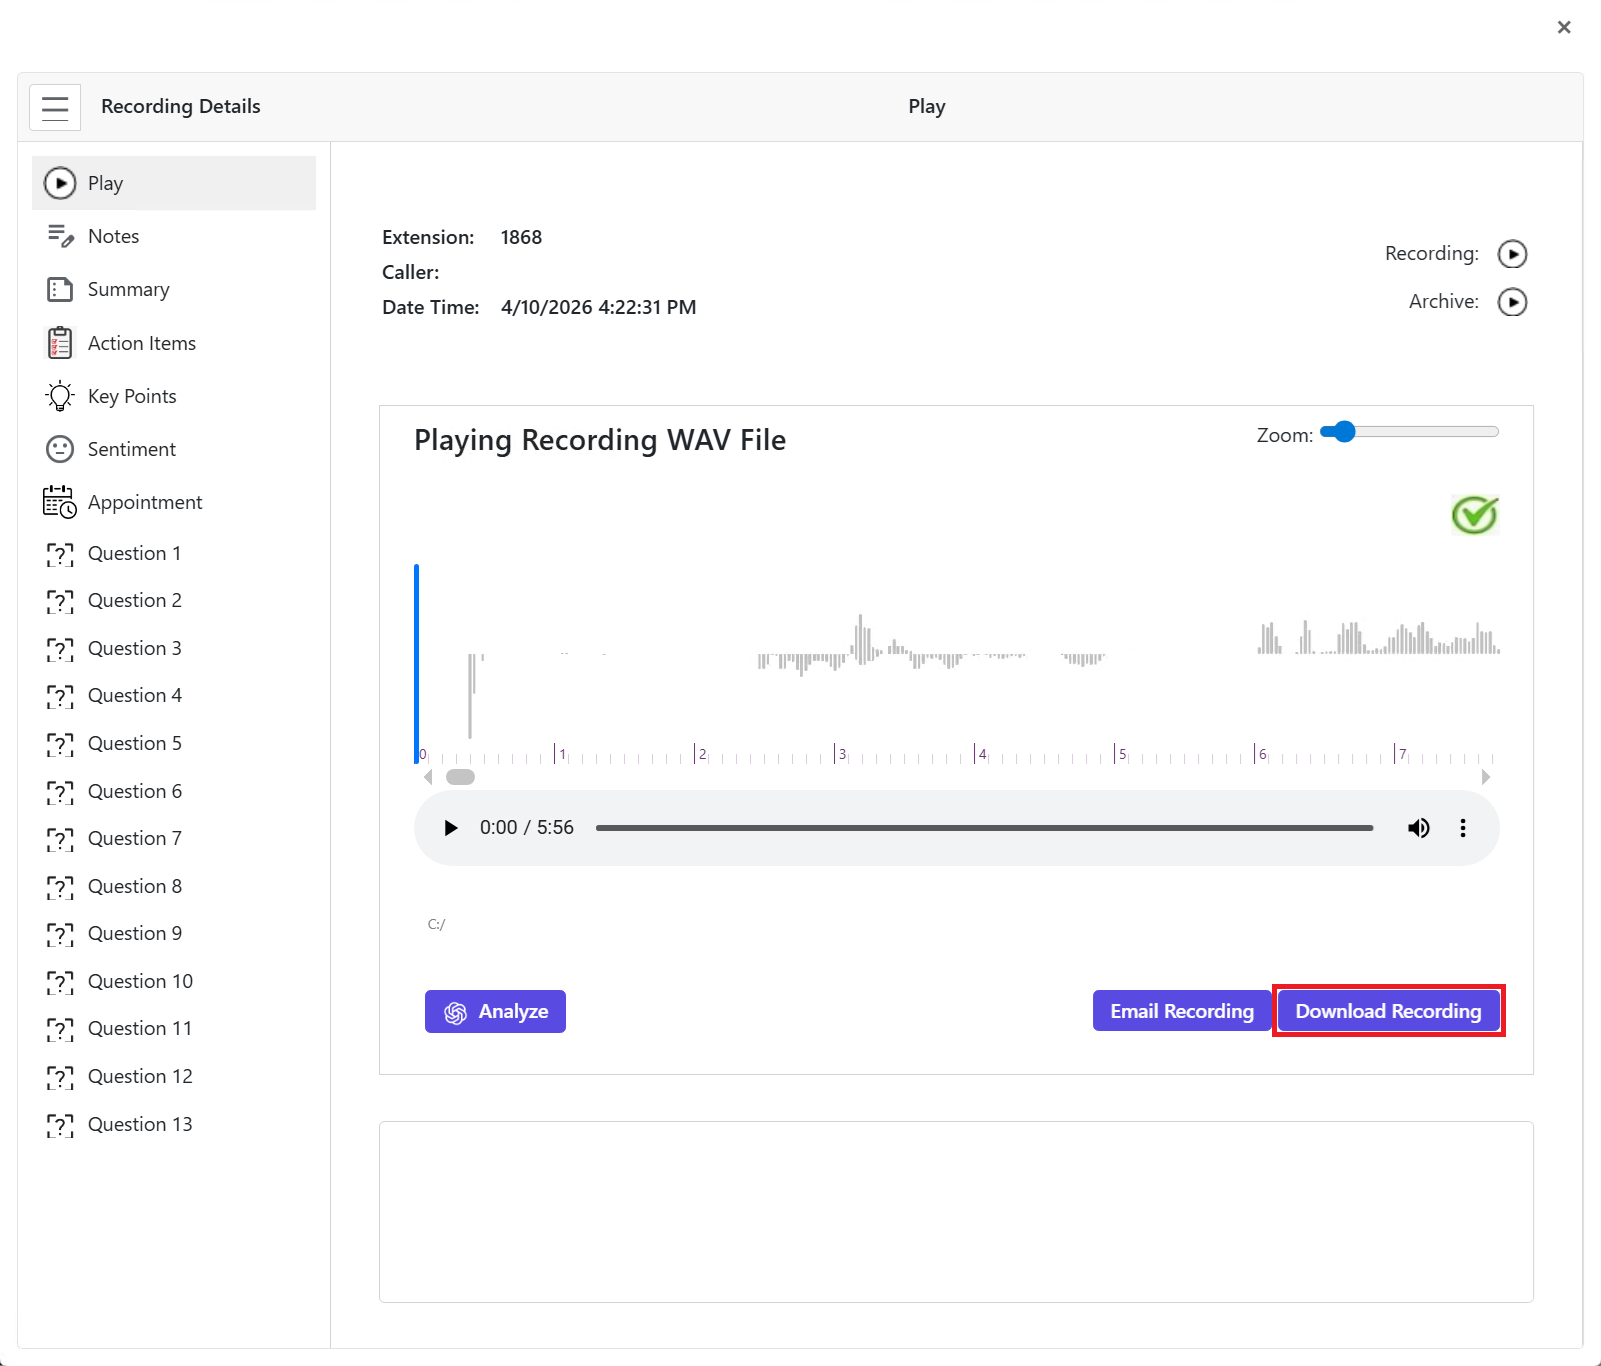
You get a “Success” popup indicating the download path,
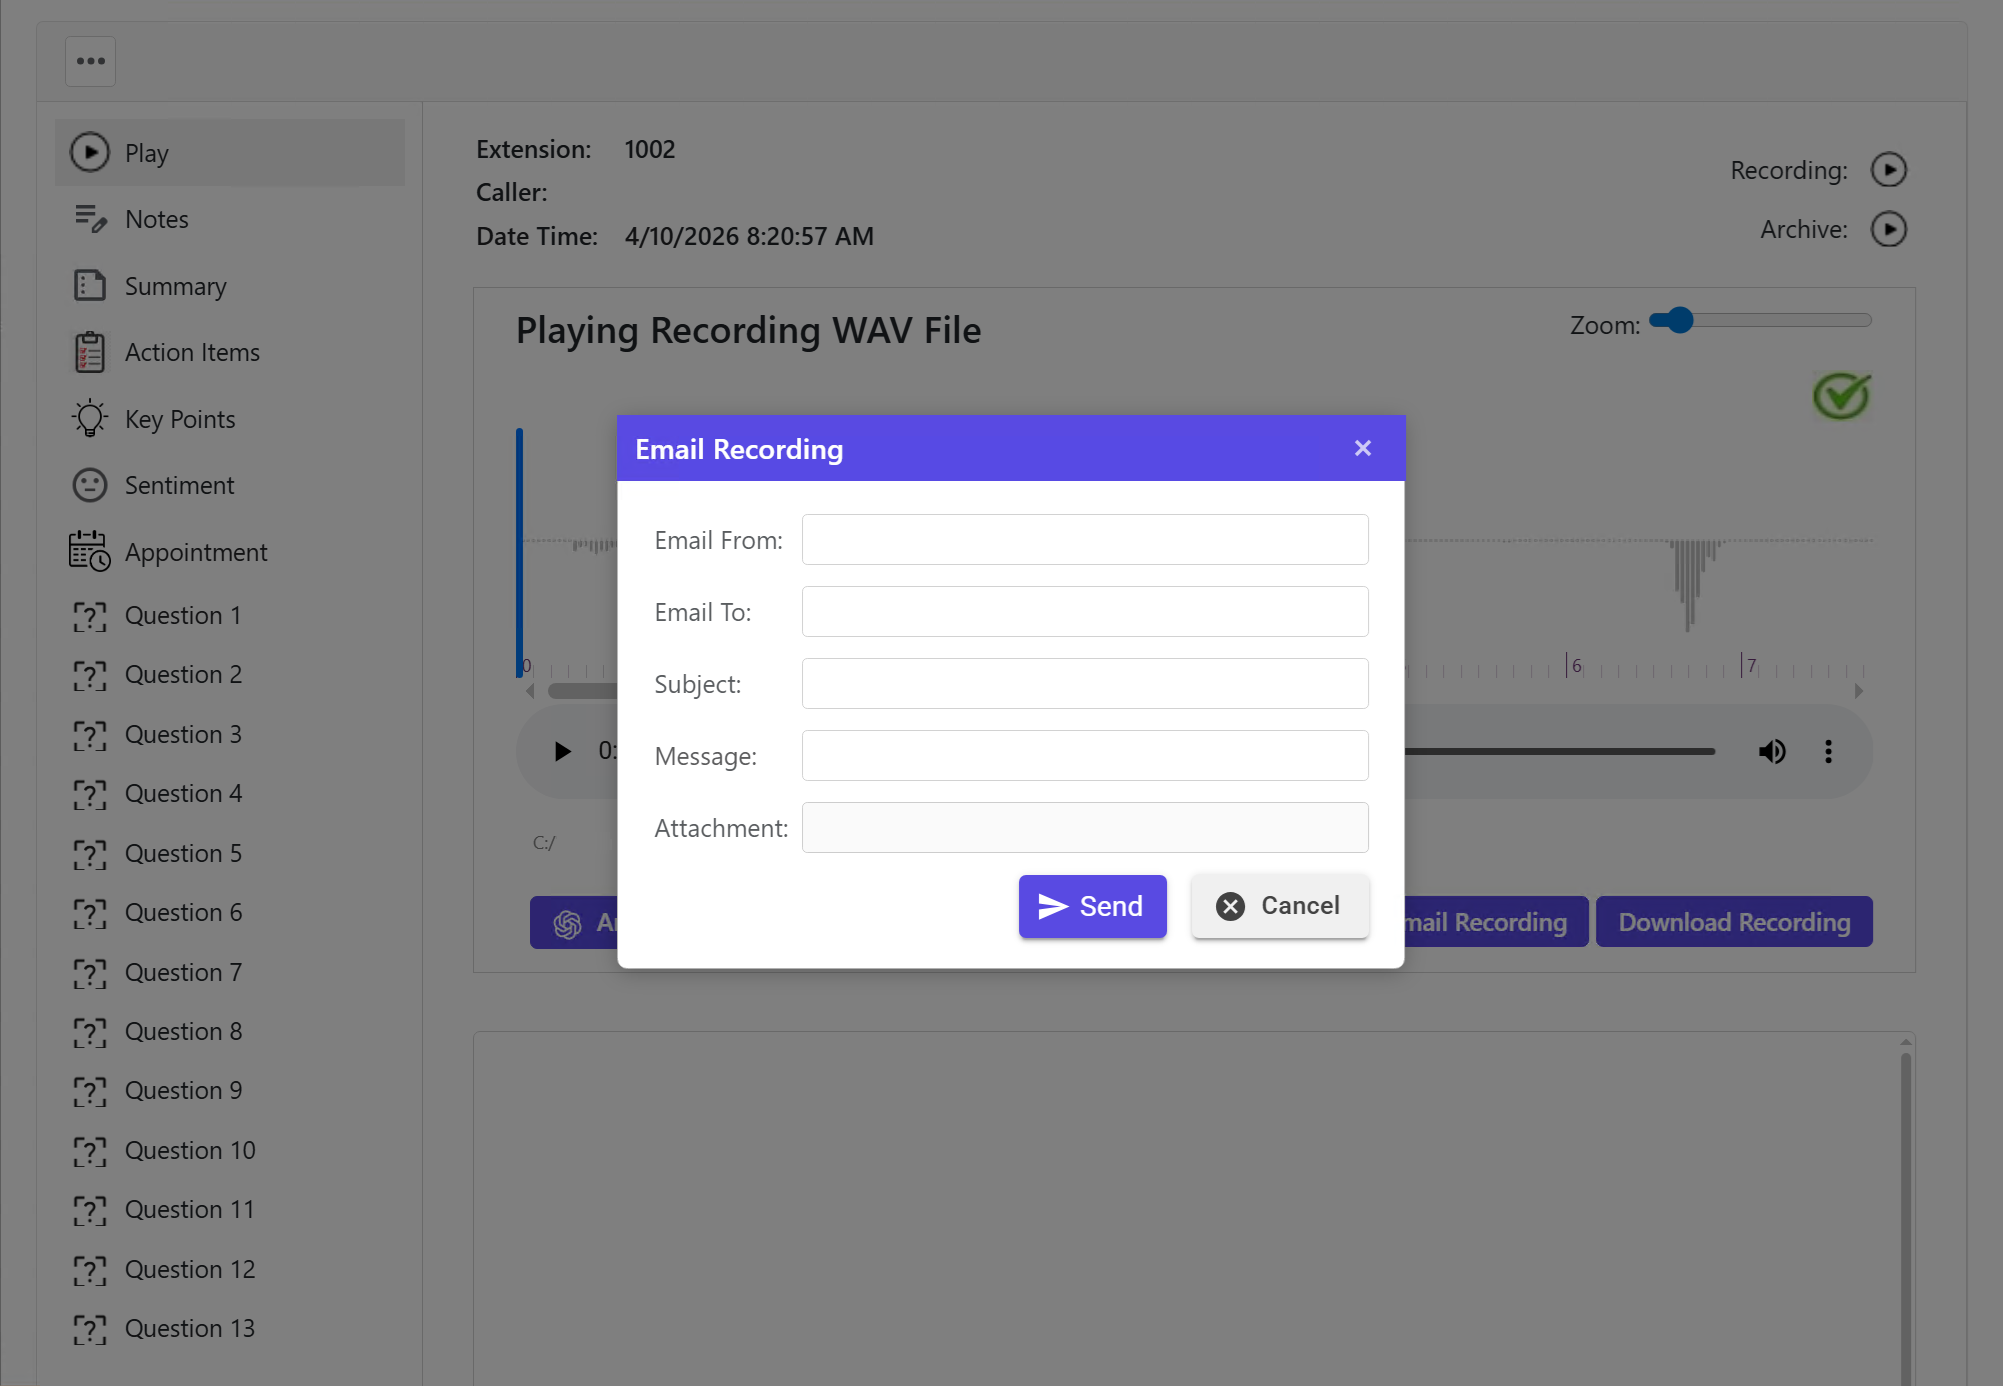
Email Recordings #
-
In the Recording Details screen, click the “Recording” button.
-
Click the “Email Recording” button.
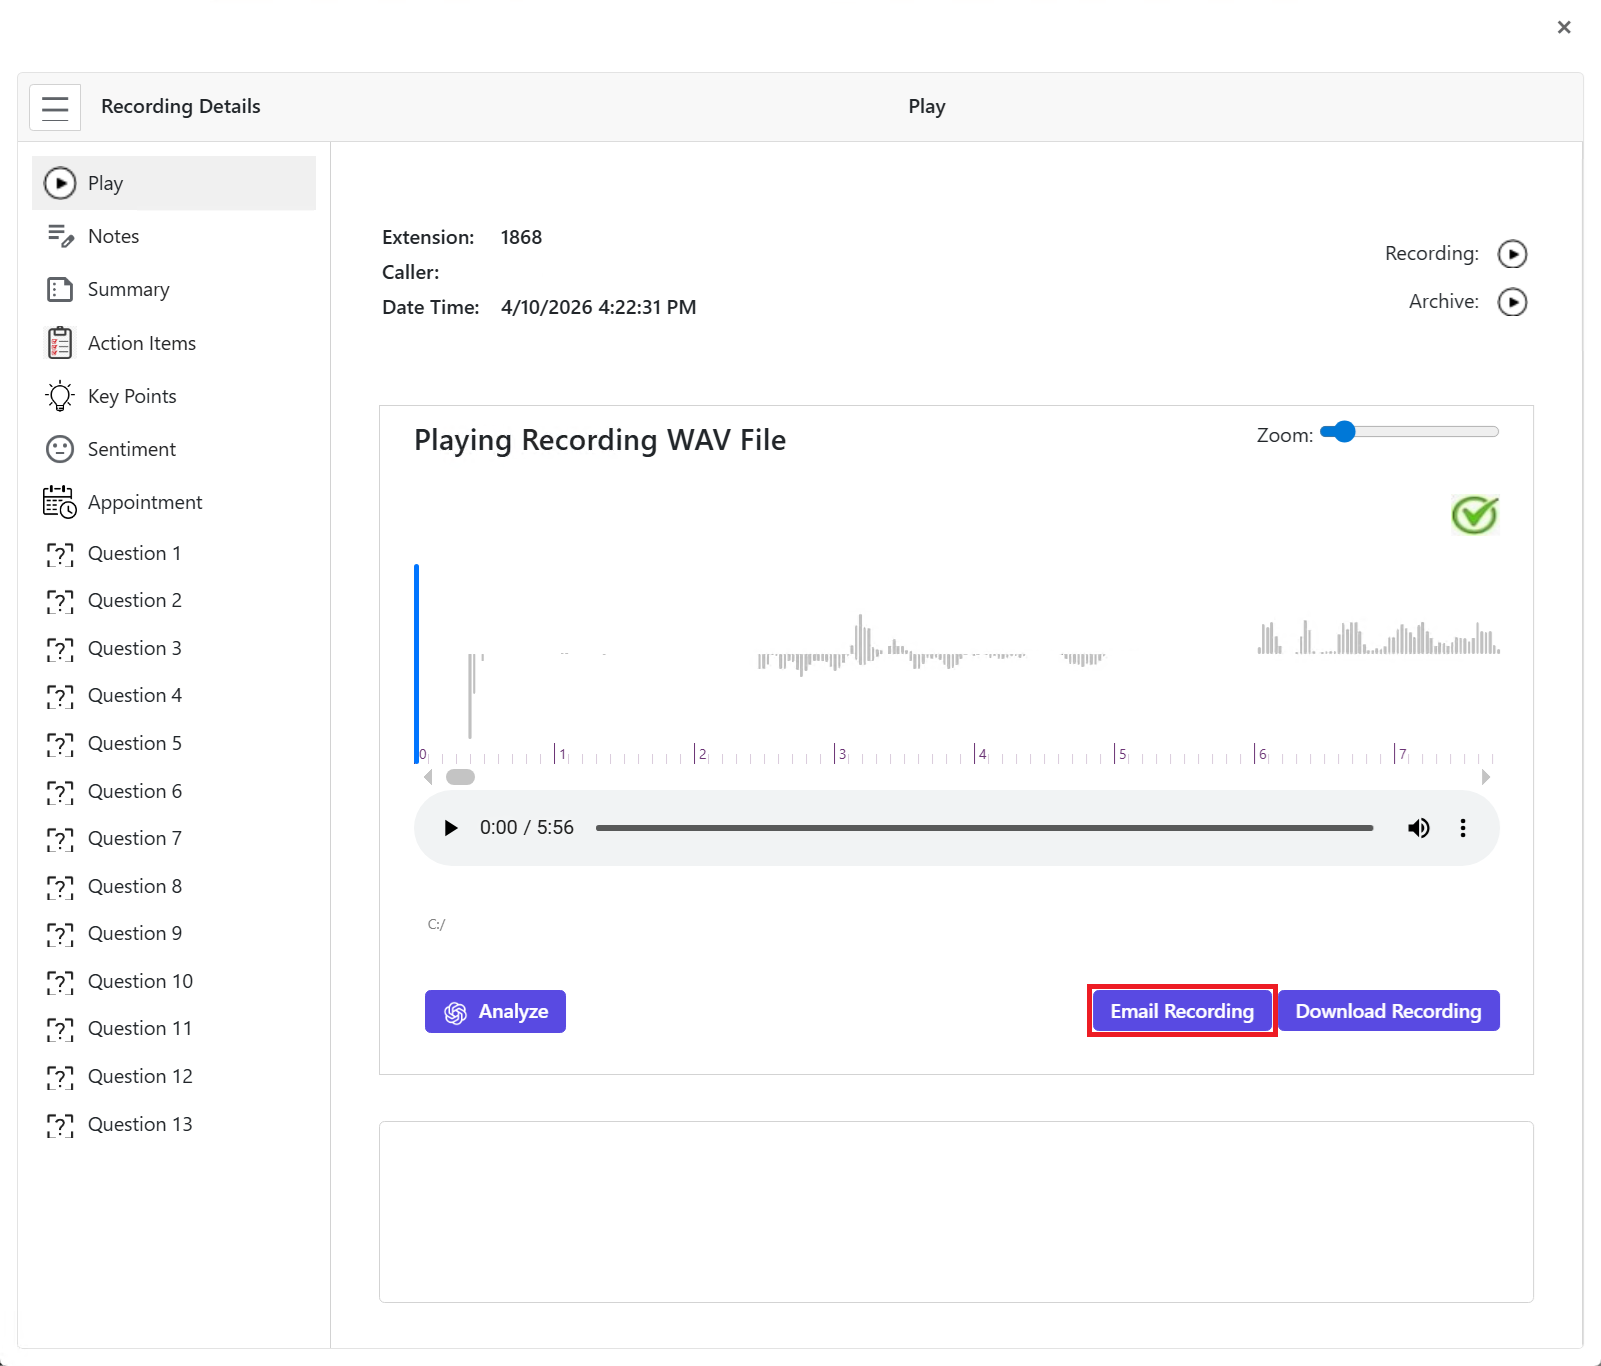
-
Enter the “Email details” in the Email Recordings popup and click the “Send” button.
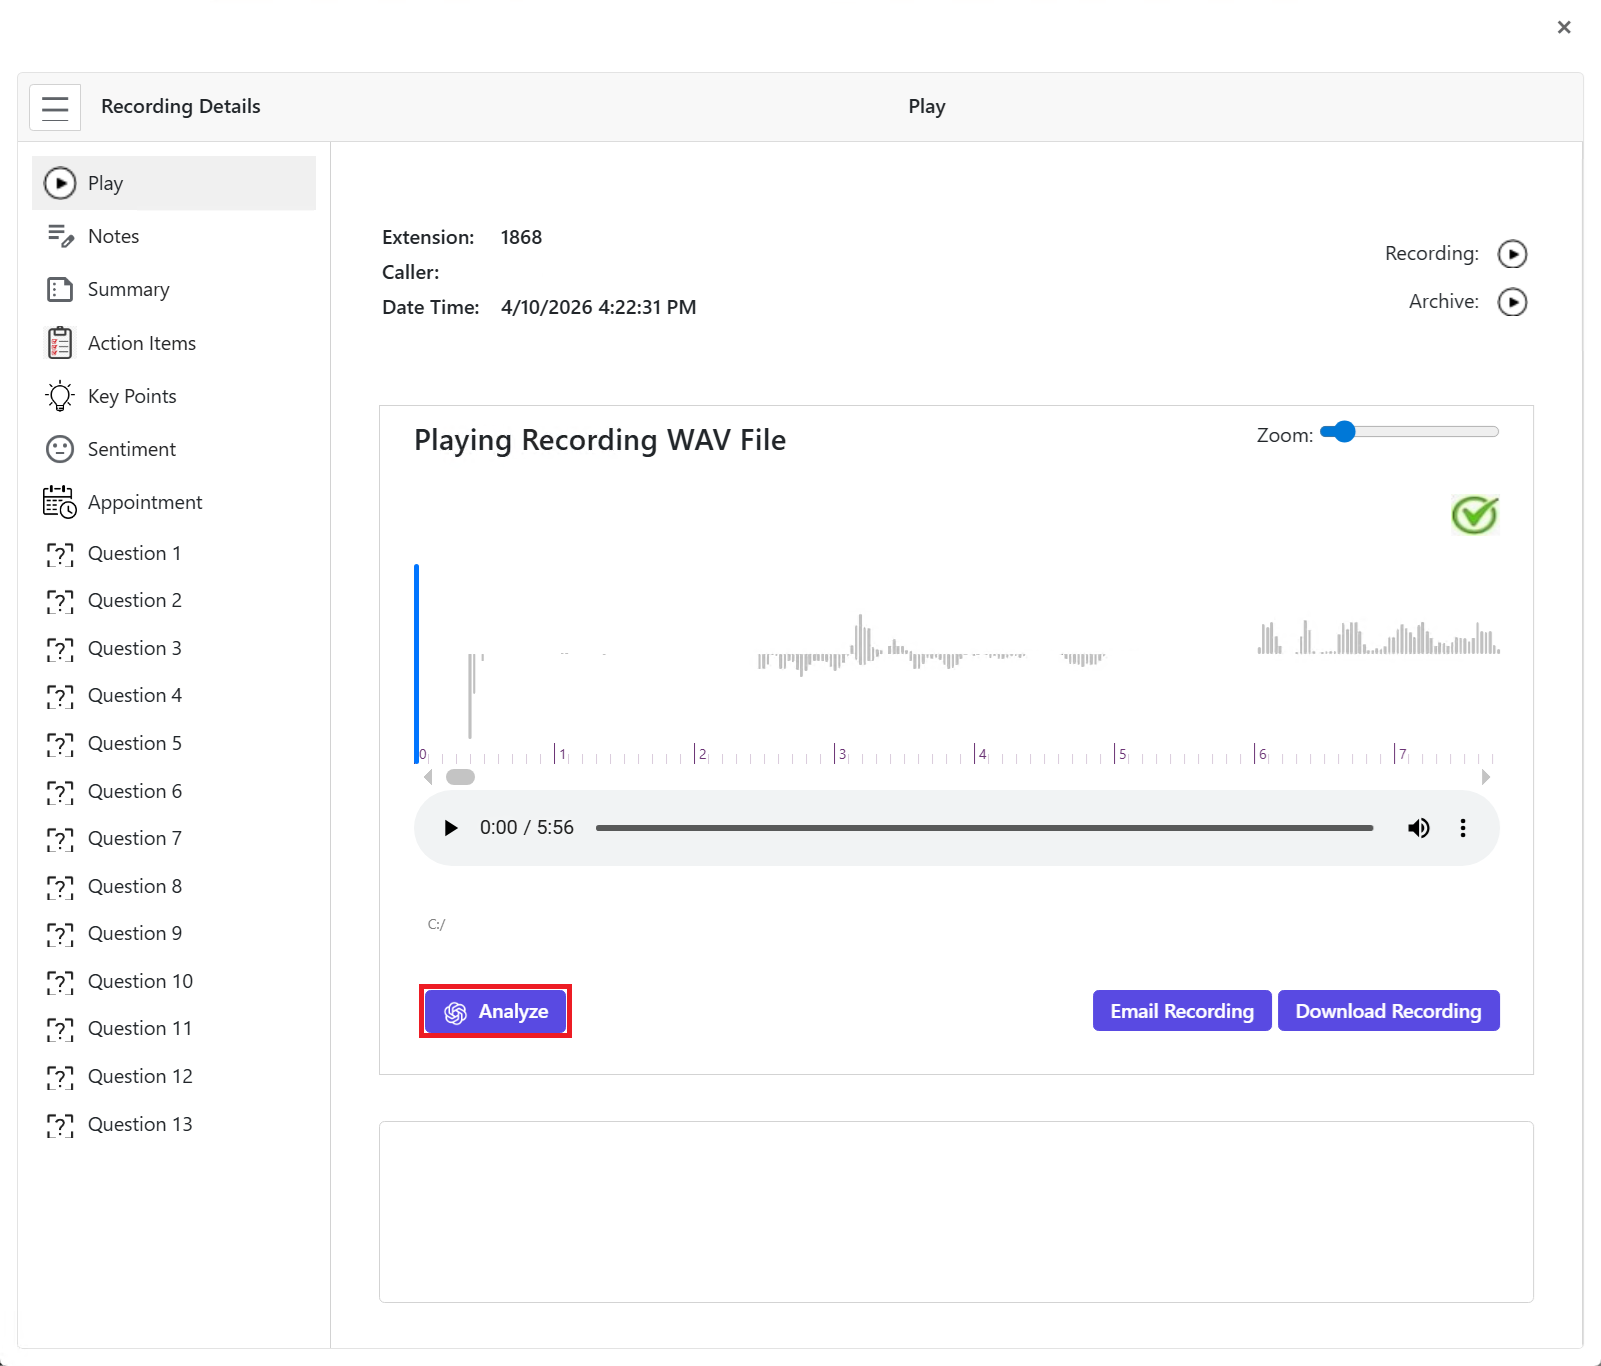
Analyze Recording #
The Analyze button uses AI to review the recorded conversation and generate insights. It helps you understand the call without having to listen to the entire recording or read the full transcript. With one click, it can summarize the call, identify key points, detect sentiment, and more.
Add Notes to Recordings #
-
Click to open the Notes section in the left side panel.
-
Click the Add
 button to add your notes.
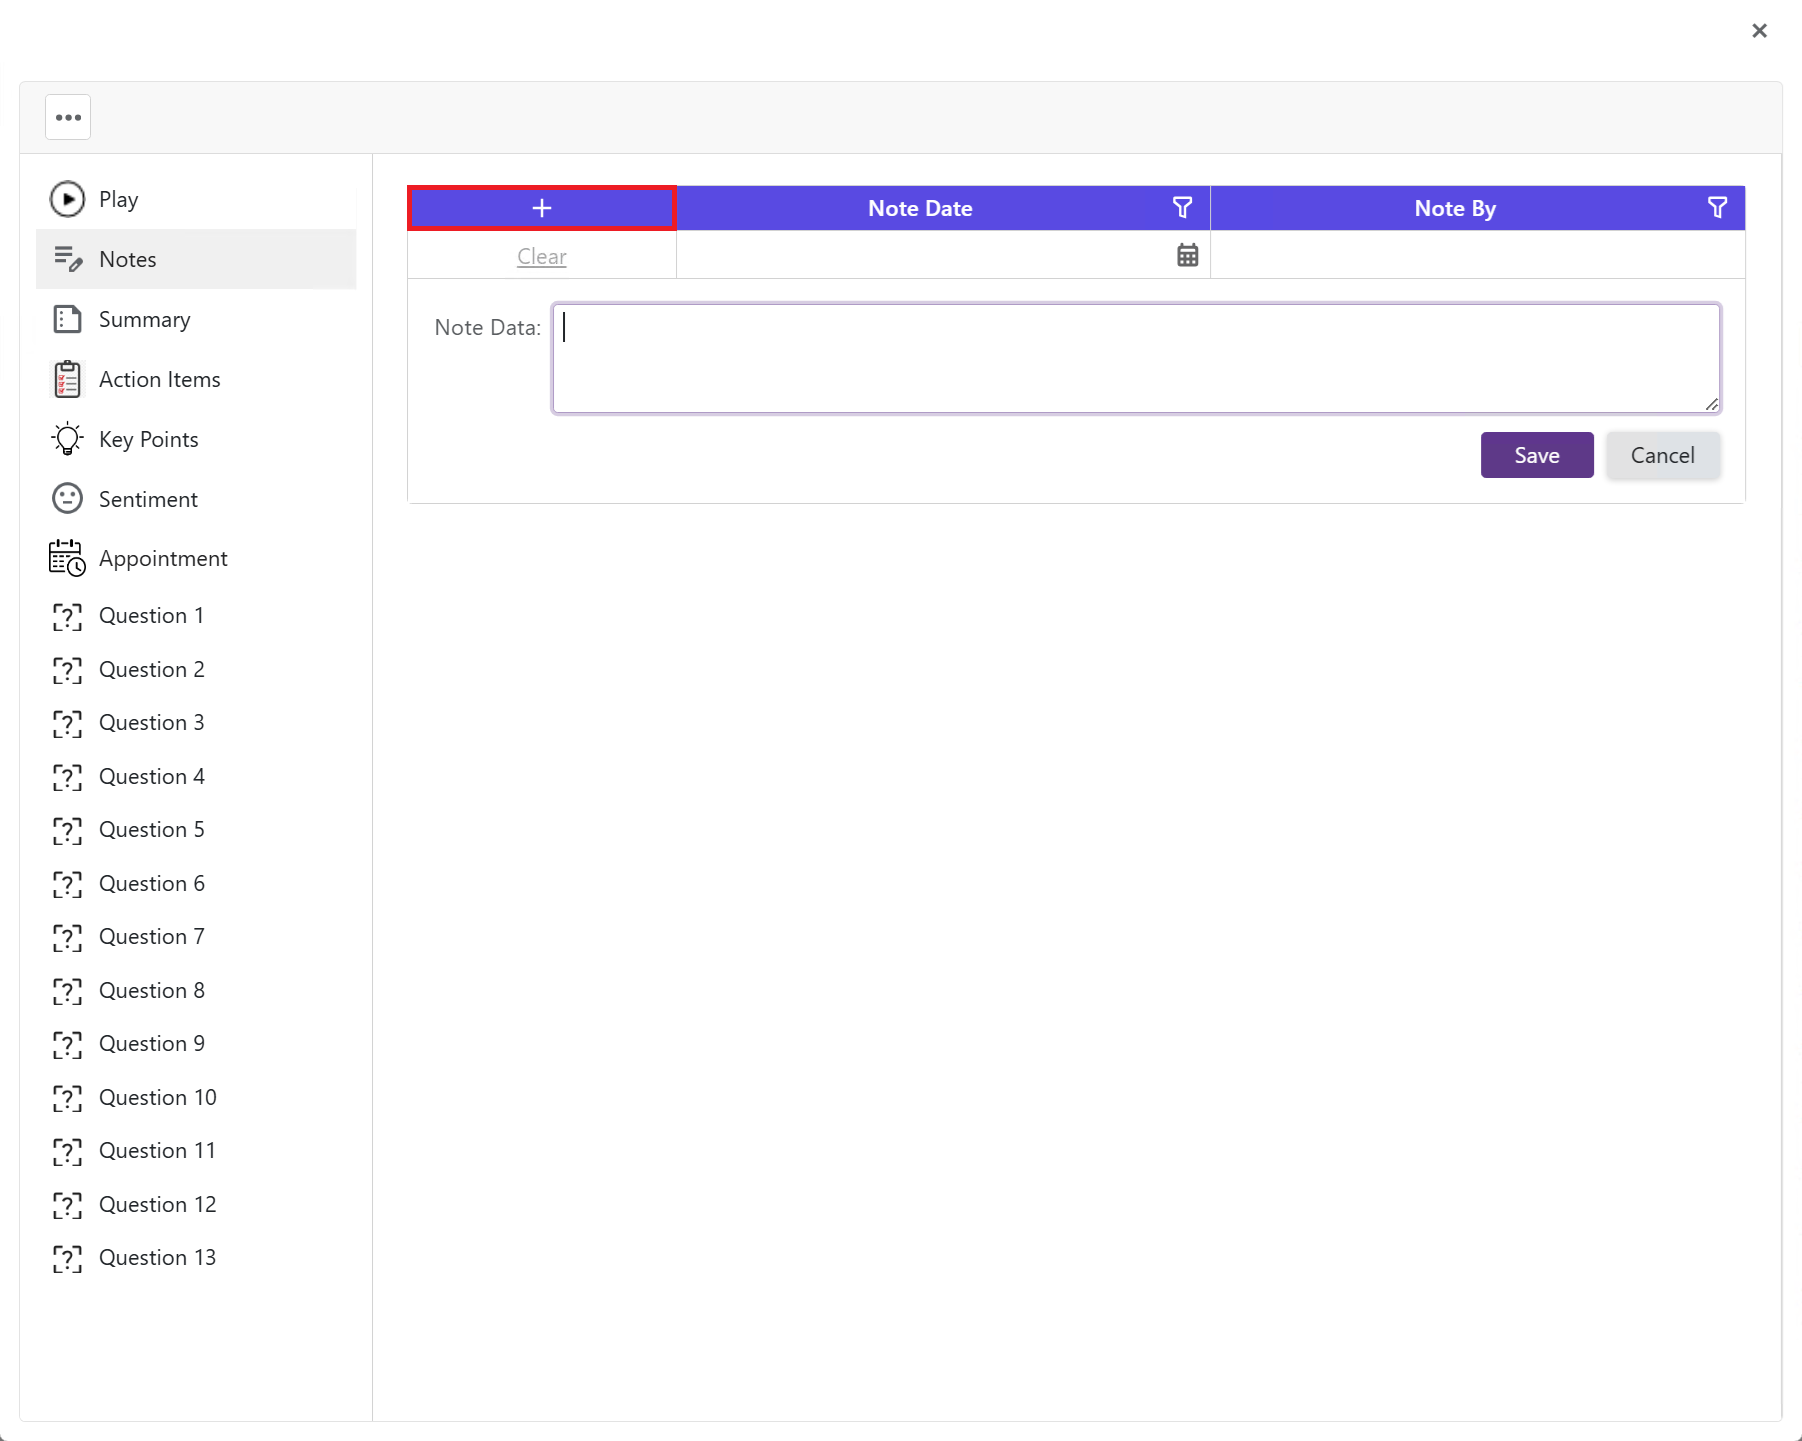
-
Enter the “recording notes” in the Notes Data field and click the “Save” button.
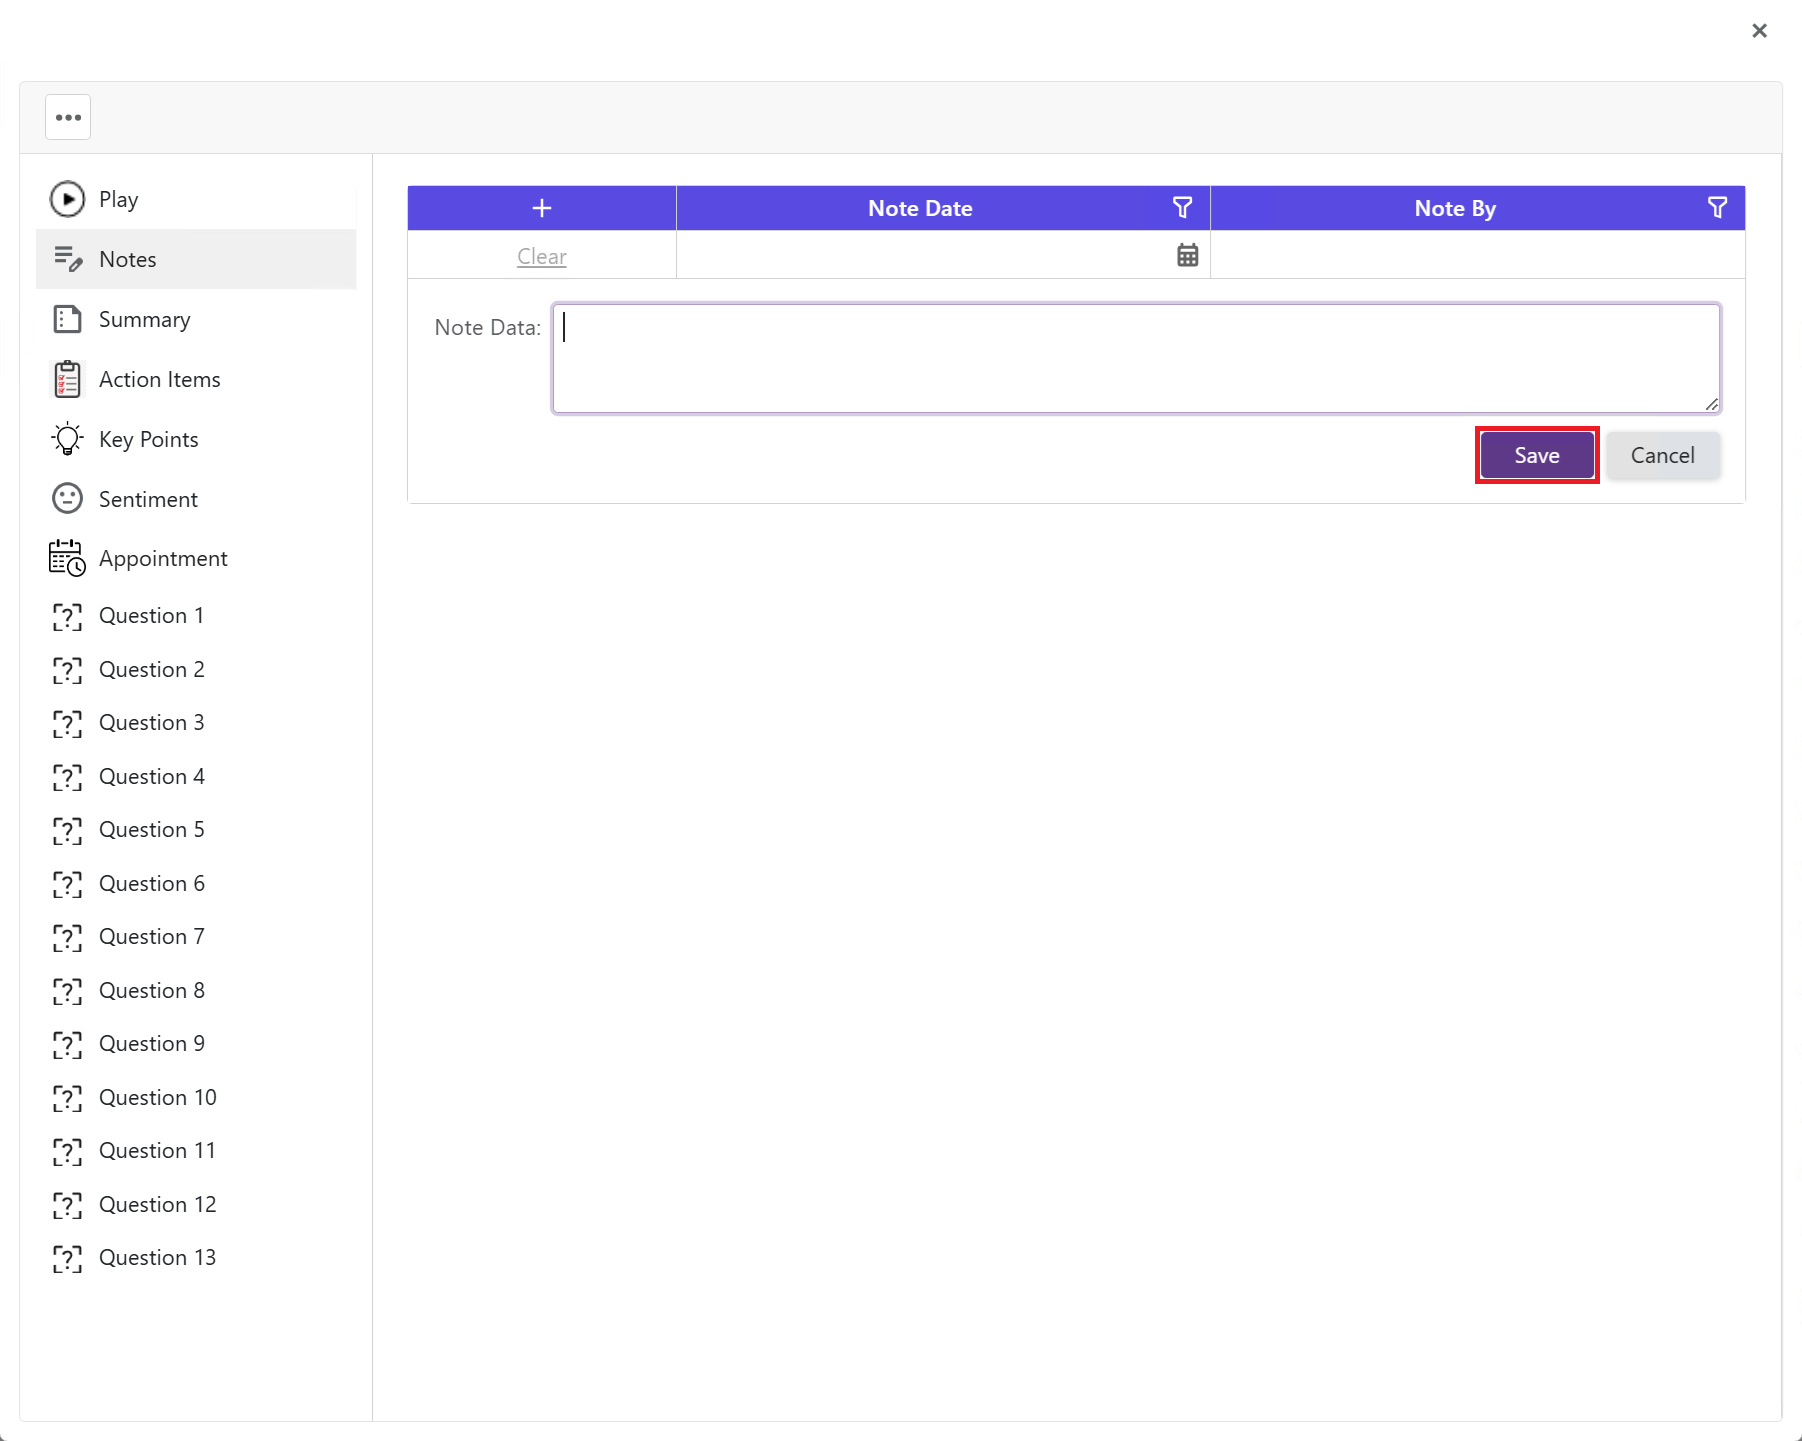
Notes that are added is recorded with the date and time for easy tracking,
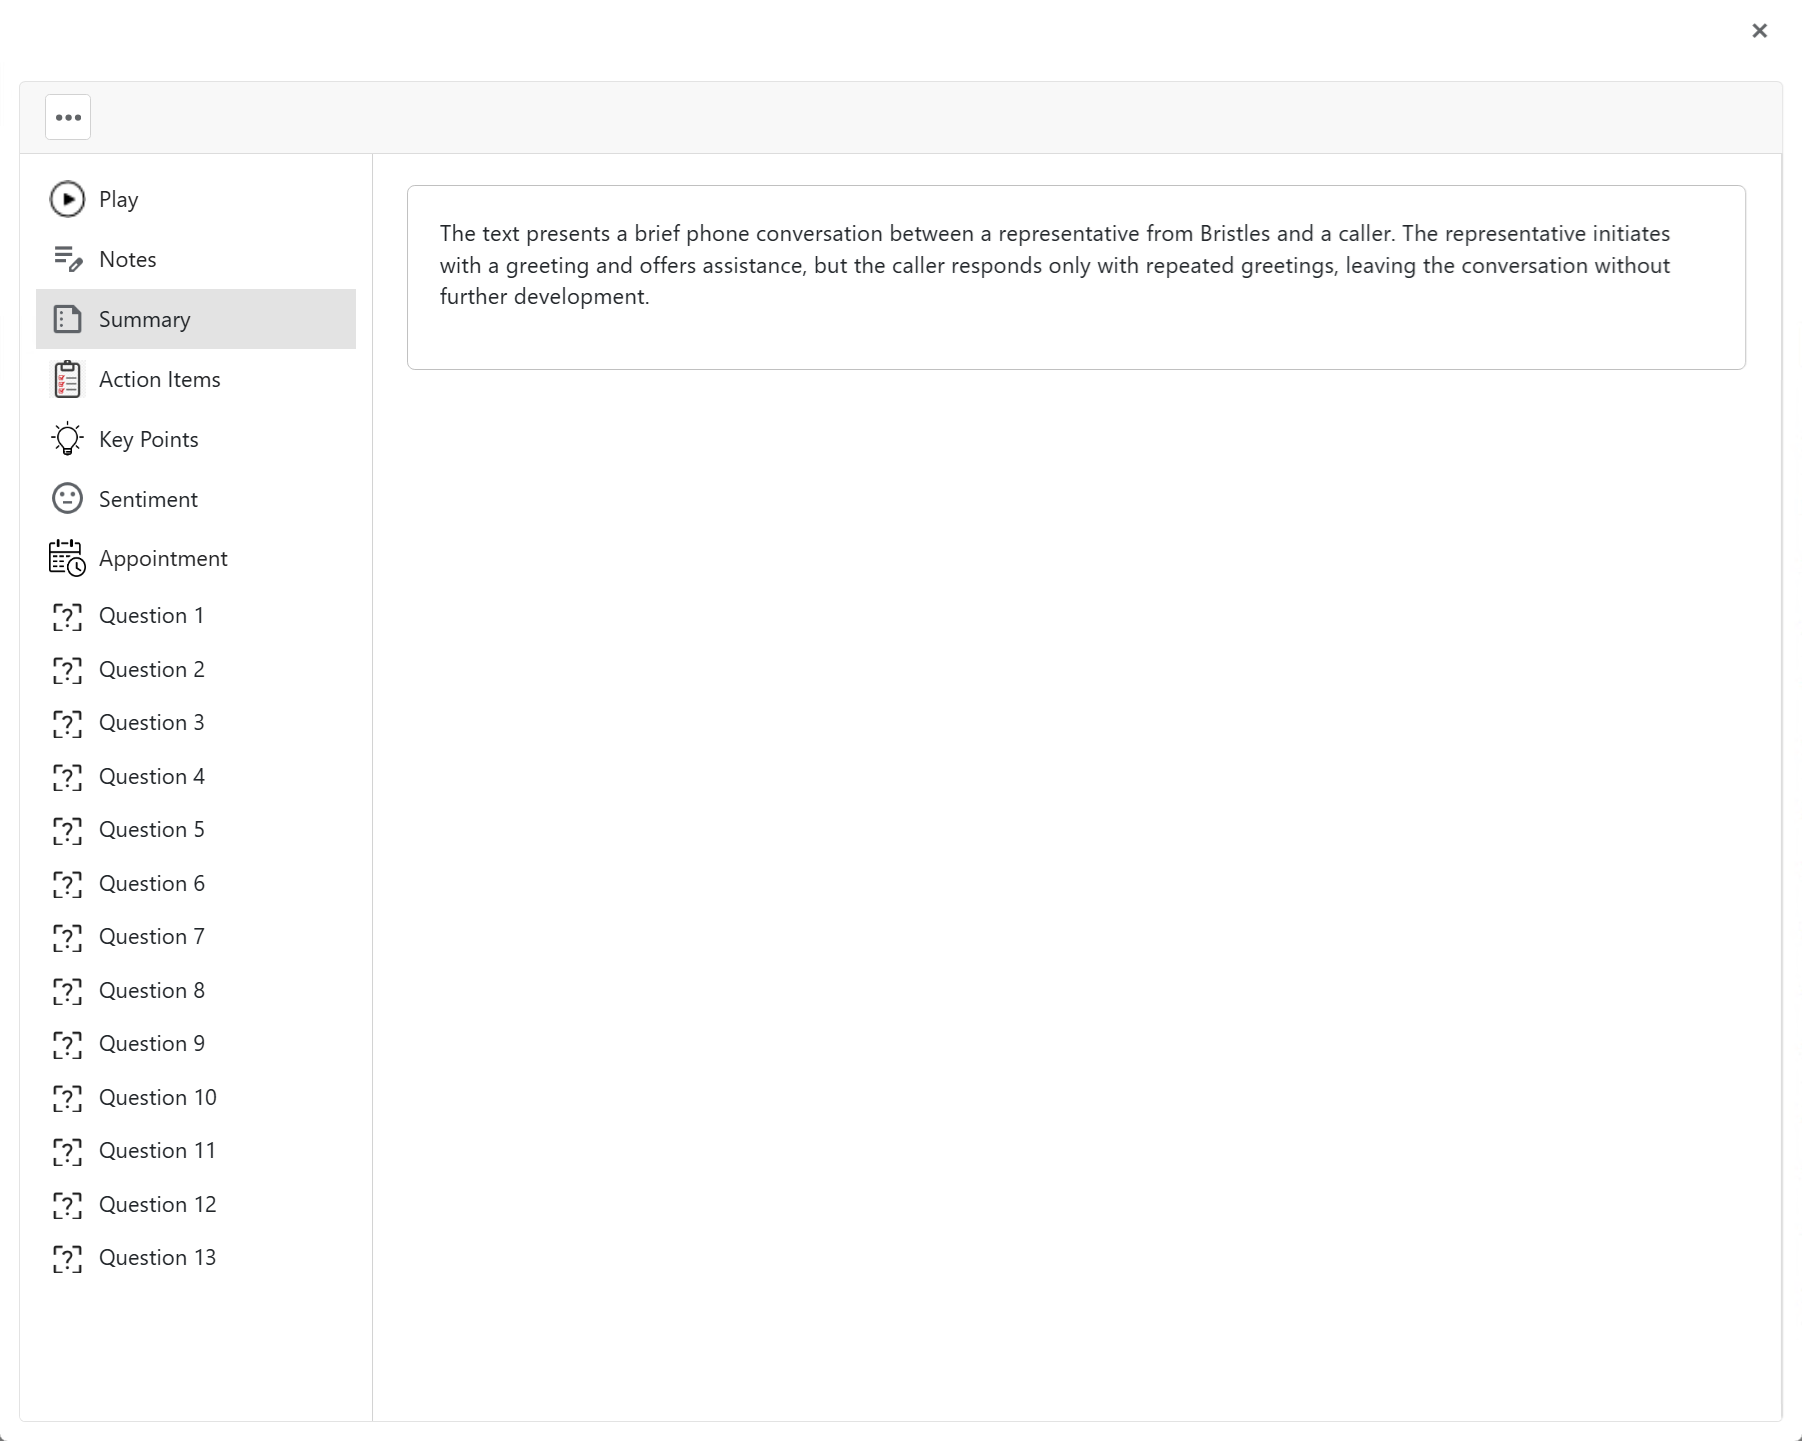
Summary #
The Summary tab provides a quick overview of the conversation that took place during a recorded call. It’s designed to help users understand the main points of the call without having to listen to the entire recording or read the full transcript. You will see short paragraph summarizing the caller’s issue or concern. Key context from the conversation, such as what the caller was asking for or reporting.
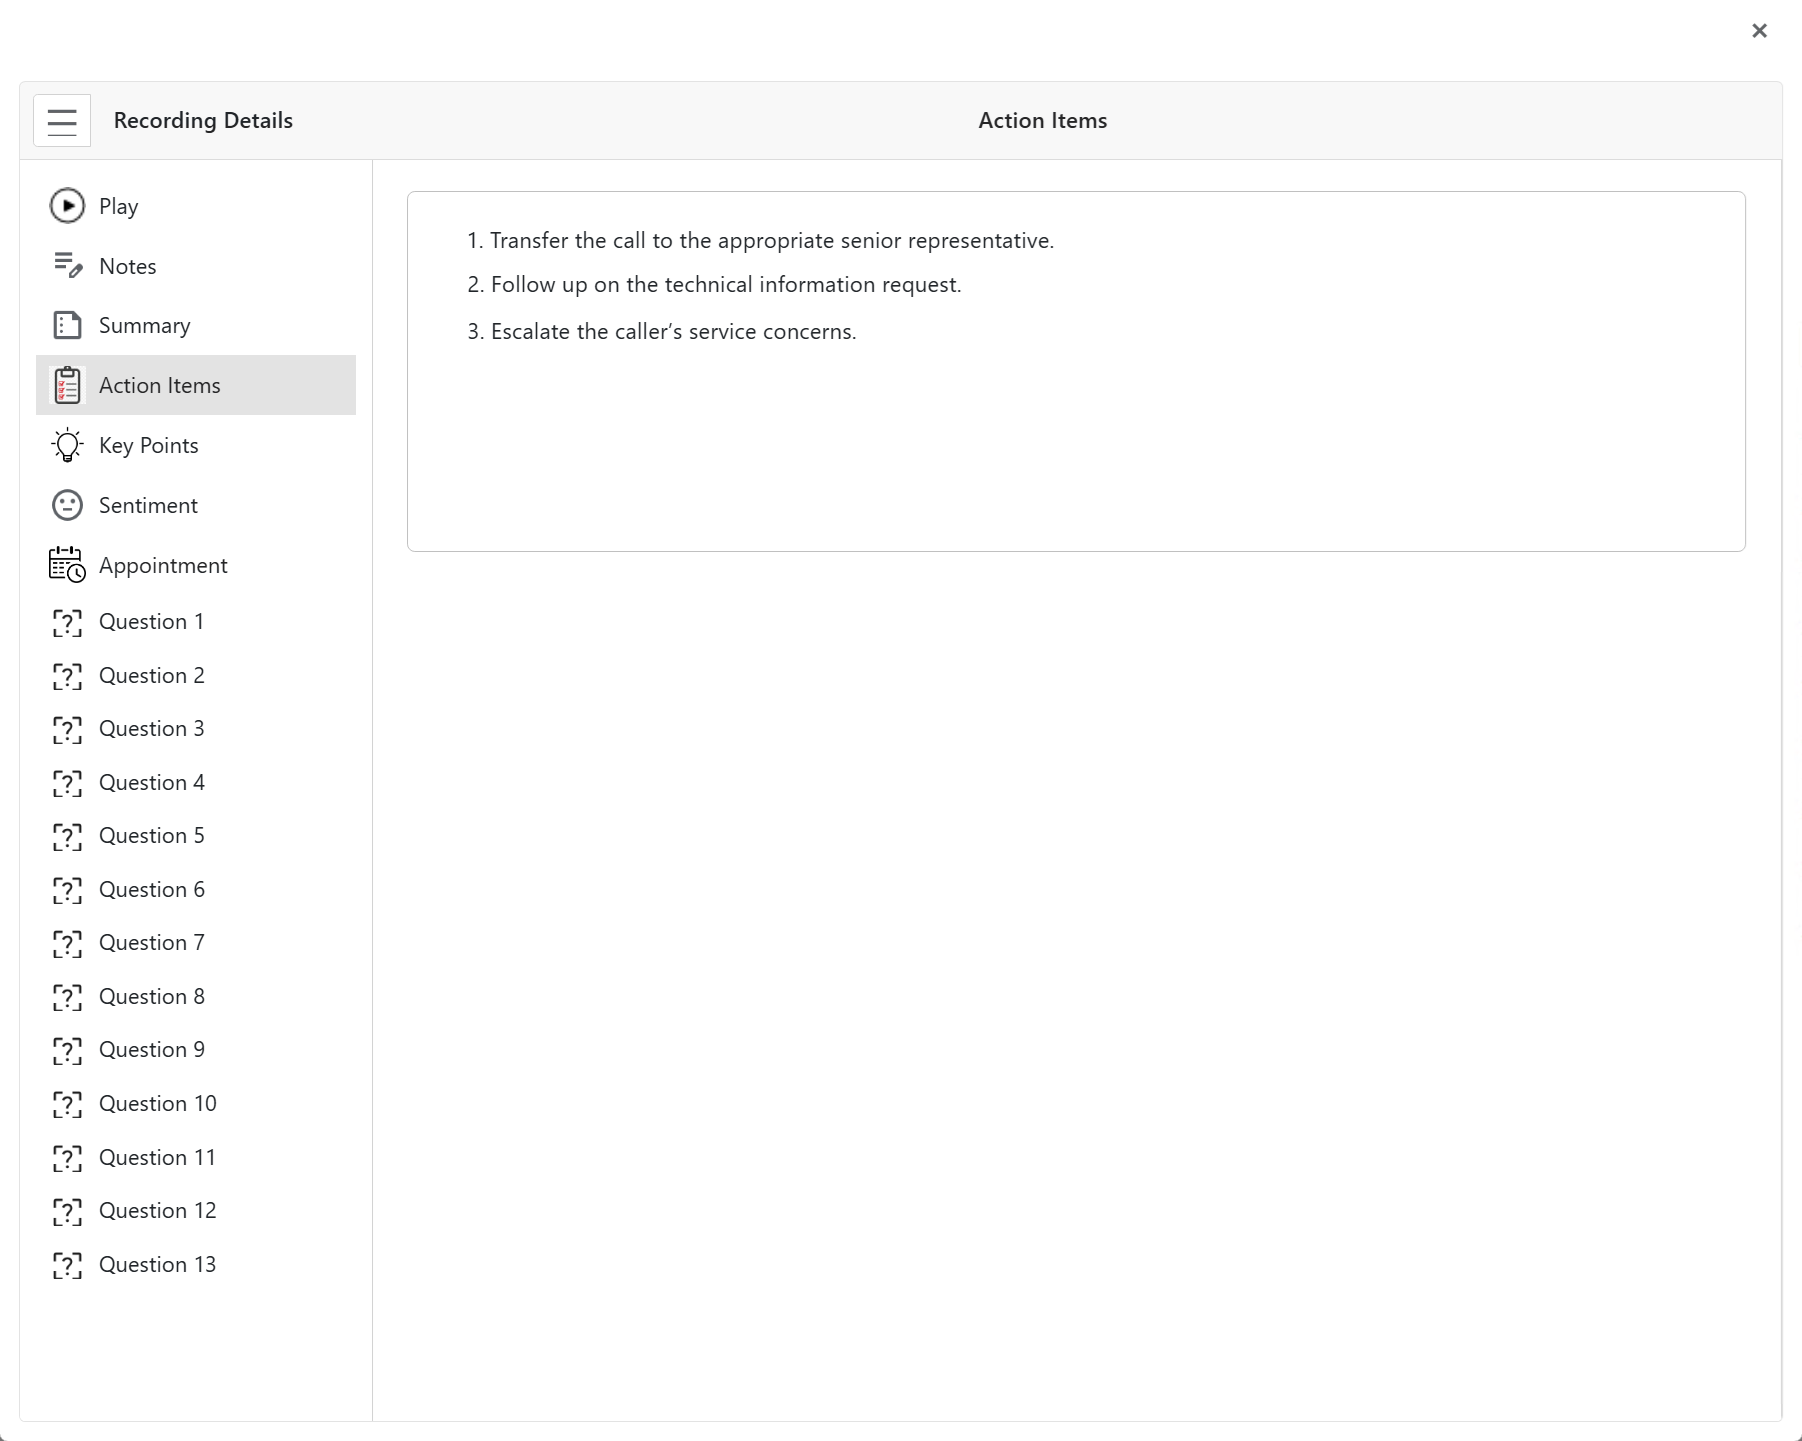
Action Items
The Action Items tab highlights any tasks, follow-ups, or resolutions discussed during a recorded call. It helps users quickly identify what actions were taken or need to be taken based on the conversation. You’ll see a short summary of the next steps or resolved issues from the call, notes confirming whether the caller’s concerns were addressed, and any instructions or actions that were agreed upon during the conversation.
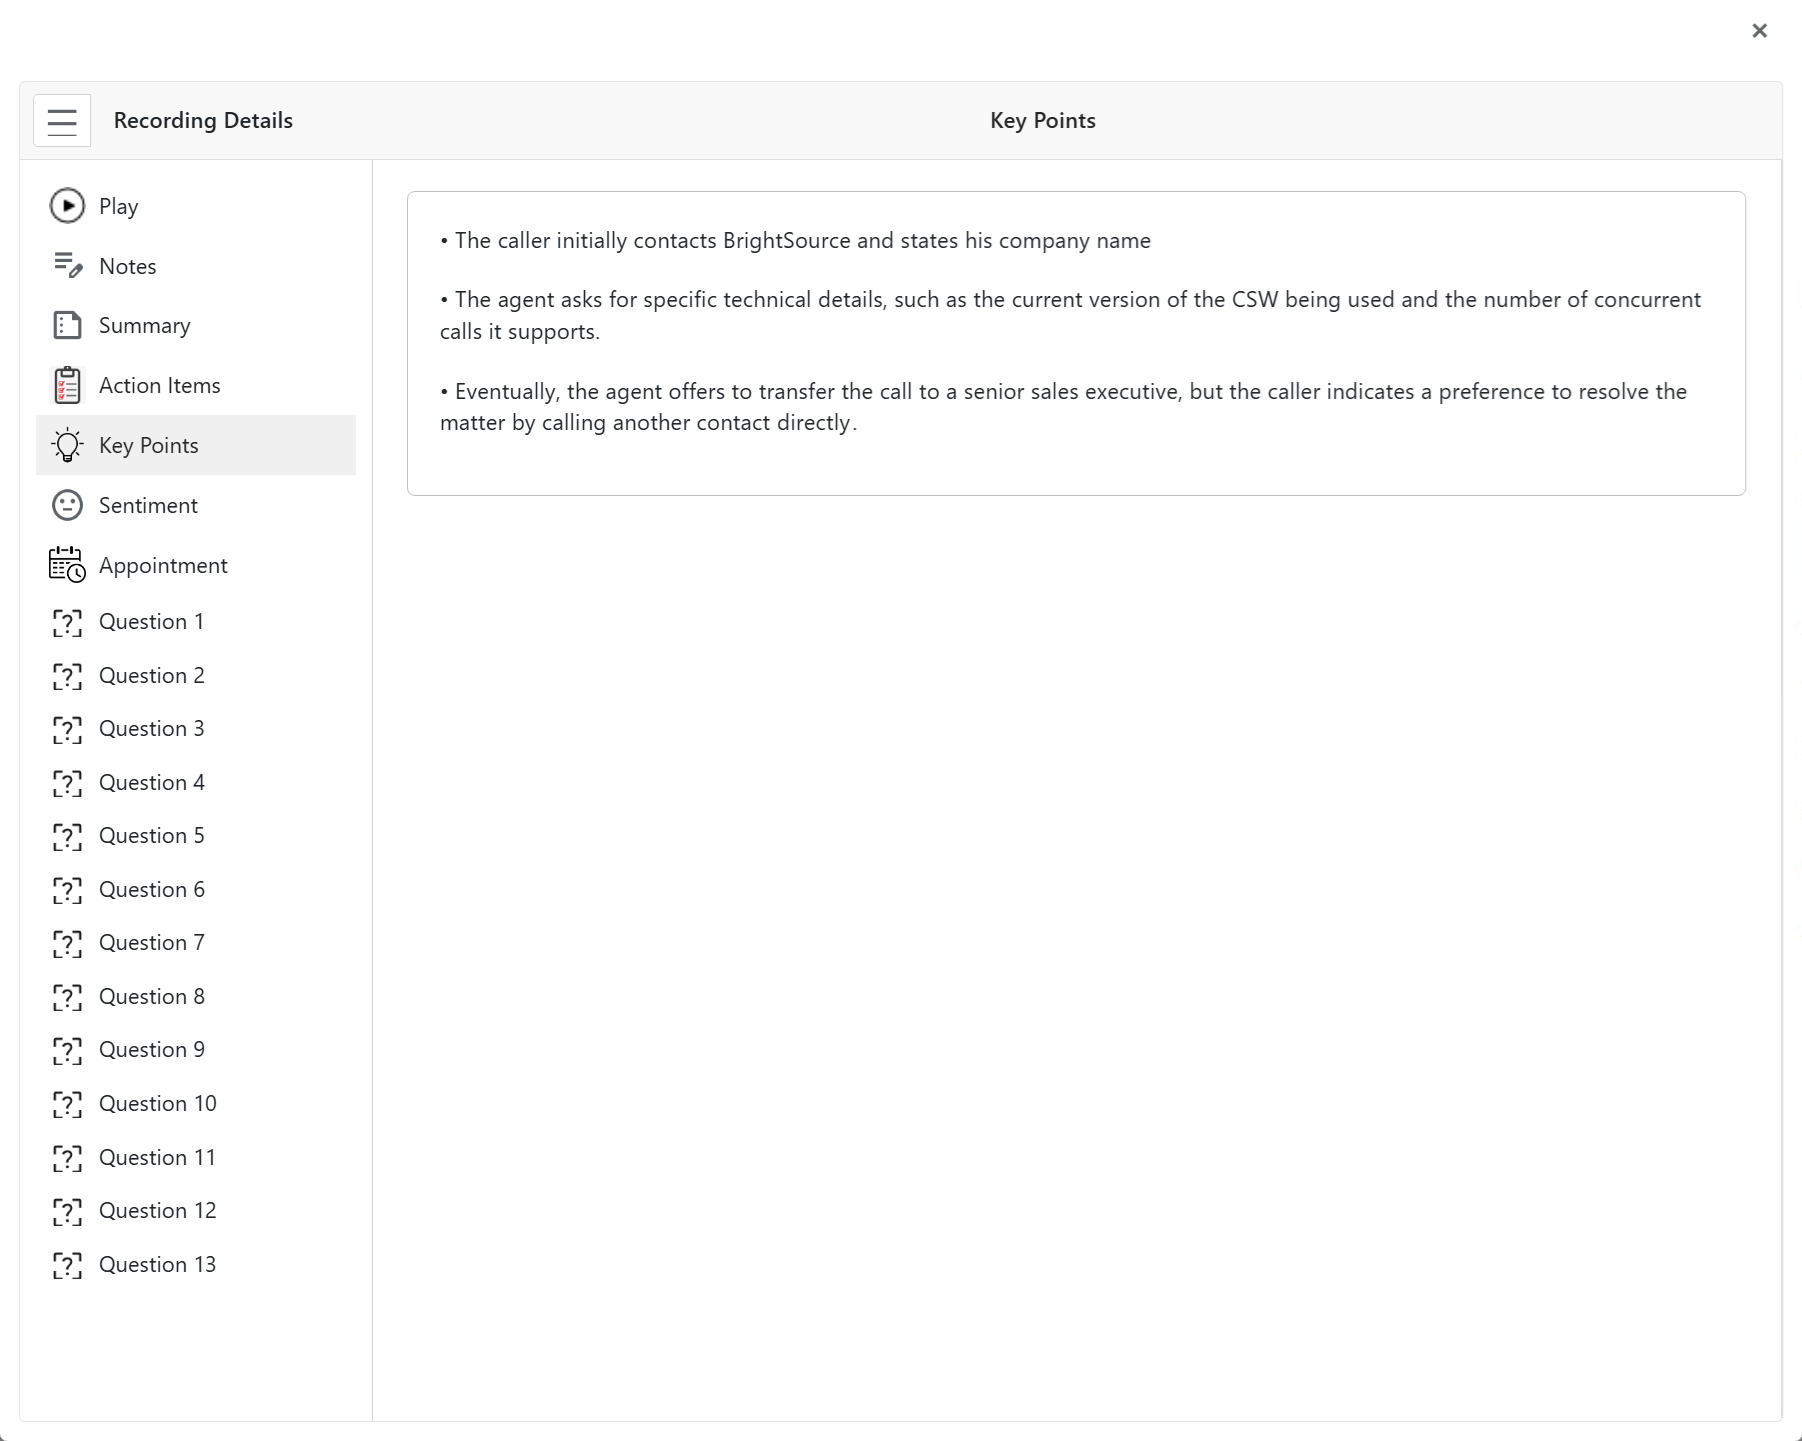
Key Points
The Key Points tab gives you a quick summary of the most important parts of a recorded conversation. It helps you understand the main topics discussed without reading the full transcript or listening to the entire call. You’ll see a list of highlighted moments from the call, each point summarizes a key issue, resolution, or interaction. And these points are automatically generated to save time and improve review efficiency.
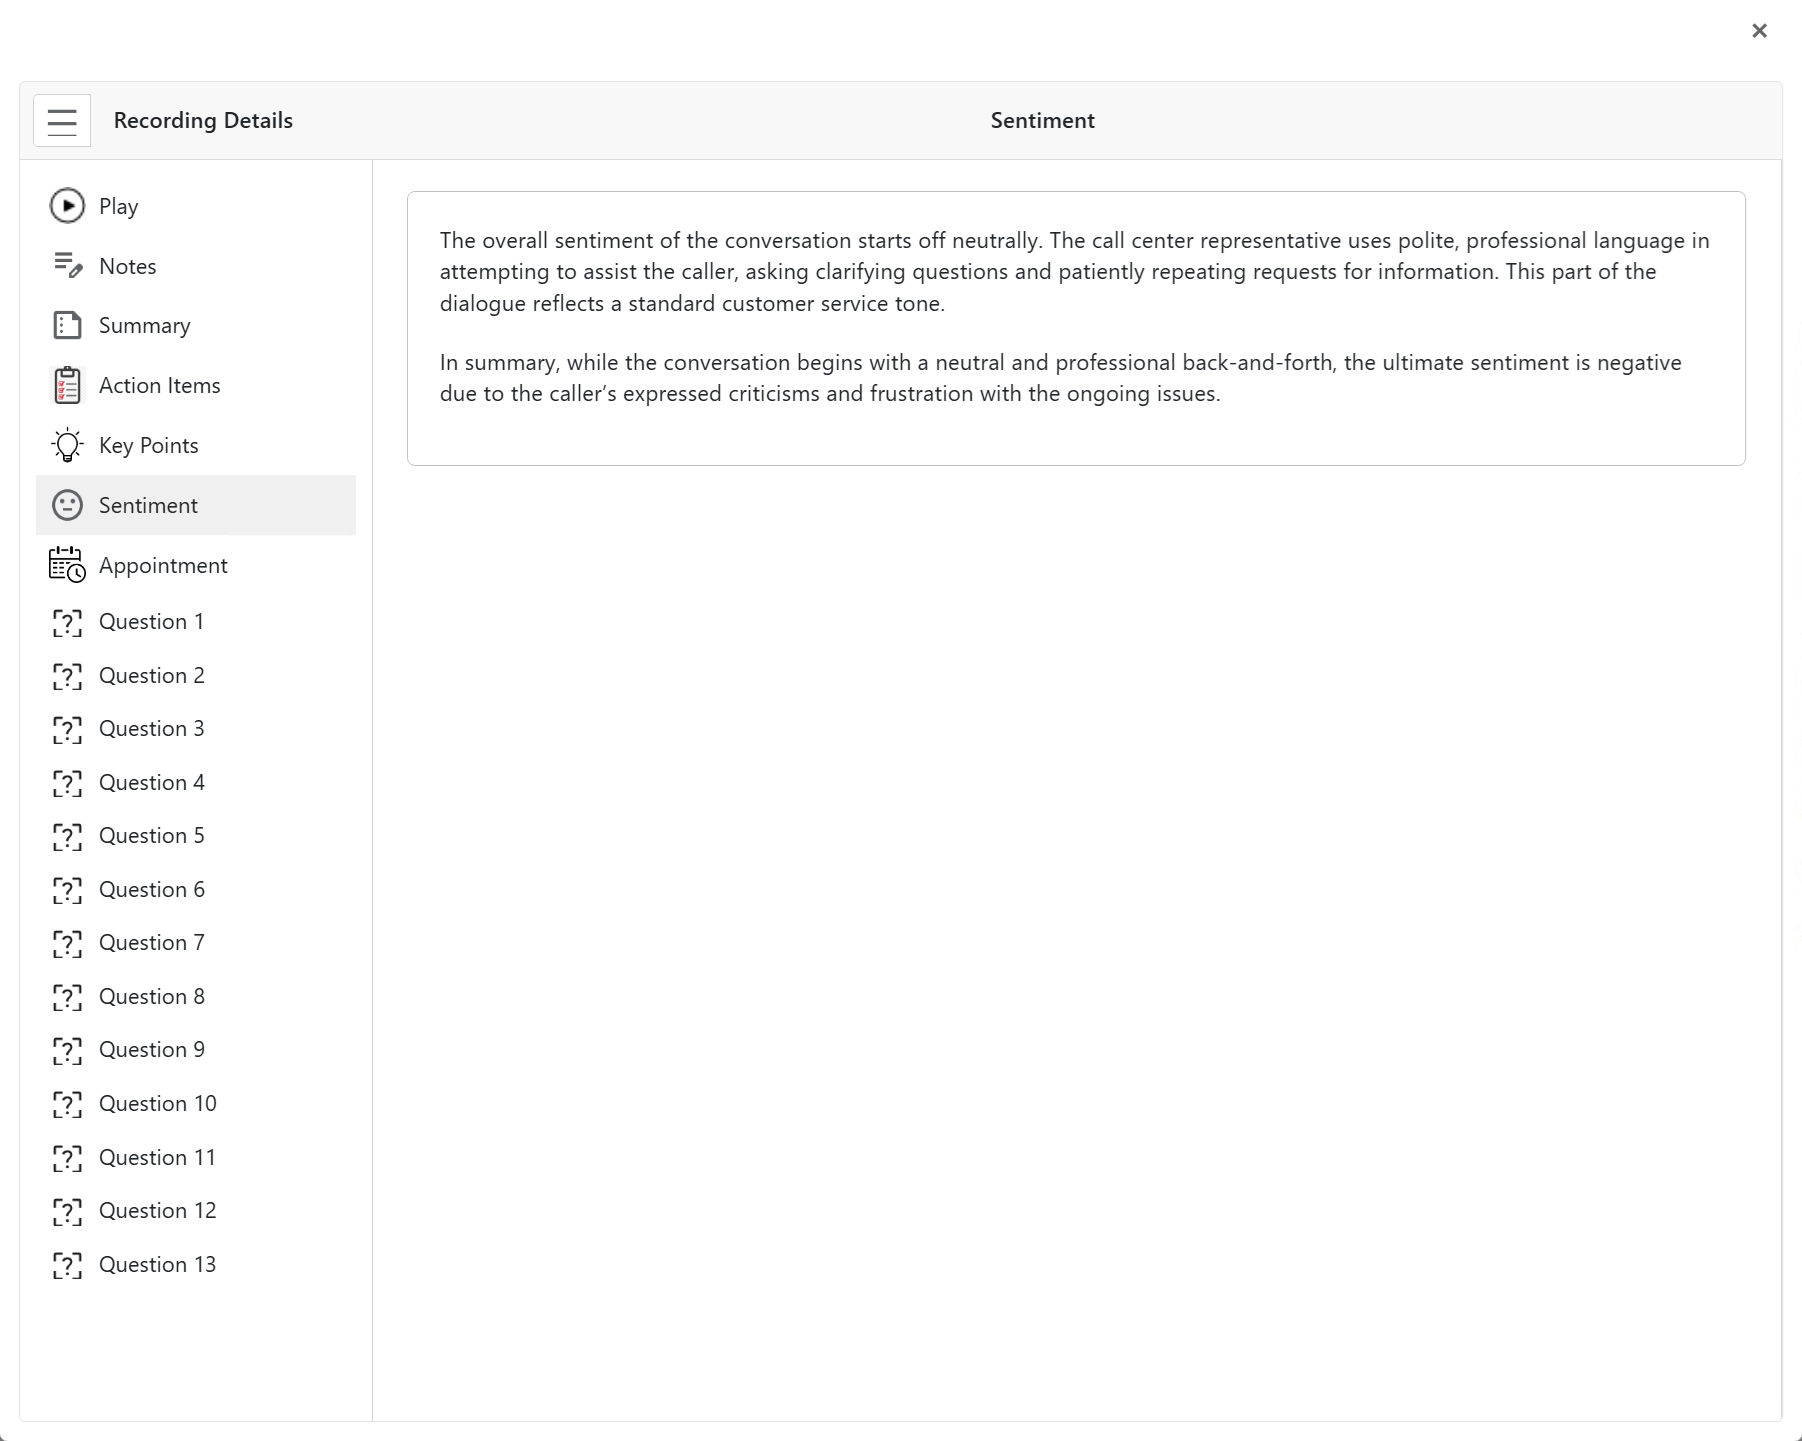
Sentiment
The Sentiment tab helps you understand the emotional tone of a recorded conversation. It shows whether the call was generally positive, neutral, or negative, based on how the caller and agent interacted.
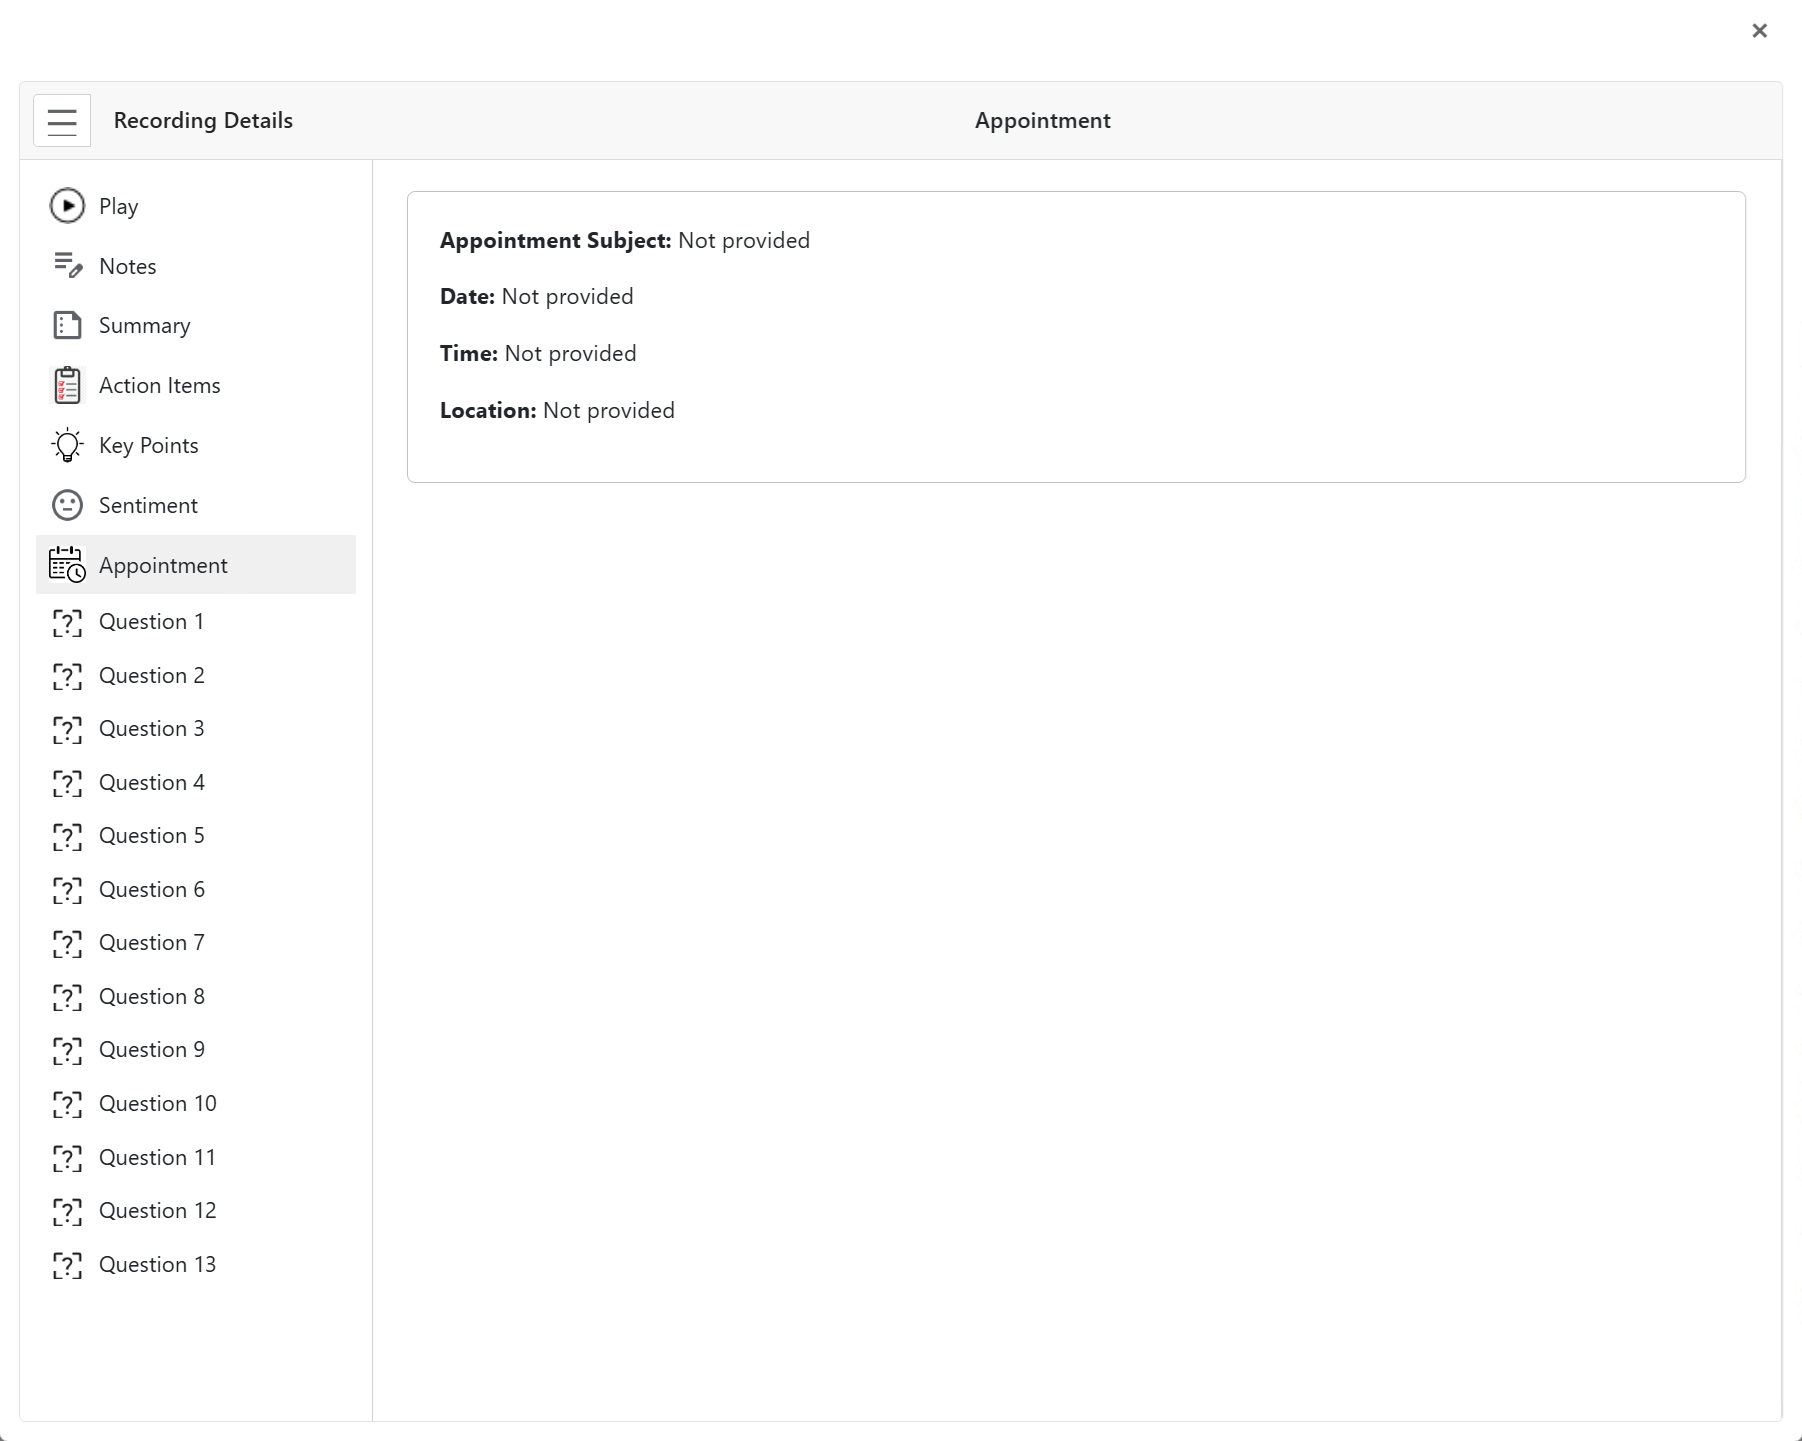
Appointment
The Appointment tab shows if a meeting or service appointment for a follow up was scheduled during a recorded call. It helps users track follow-ups, service requests, or resolutions that were discussed and confirmed.
Questions
The Questions section lets you set up evaluation criteria used to assess call recordings. Each question is an independent checkpoint that measures call quality, compliance, and agent performance, and can be customized to fit your business needs such as communication quality, resolution effectiveness, or process adherence. Together, the questions paint a complete picture of how a call was handled, helping you spot trends, gaps, and areas for improvement over time. Note that the scores generated from these questions are entered by the evaluator, giving you direct control over how each call is rated.
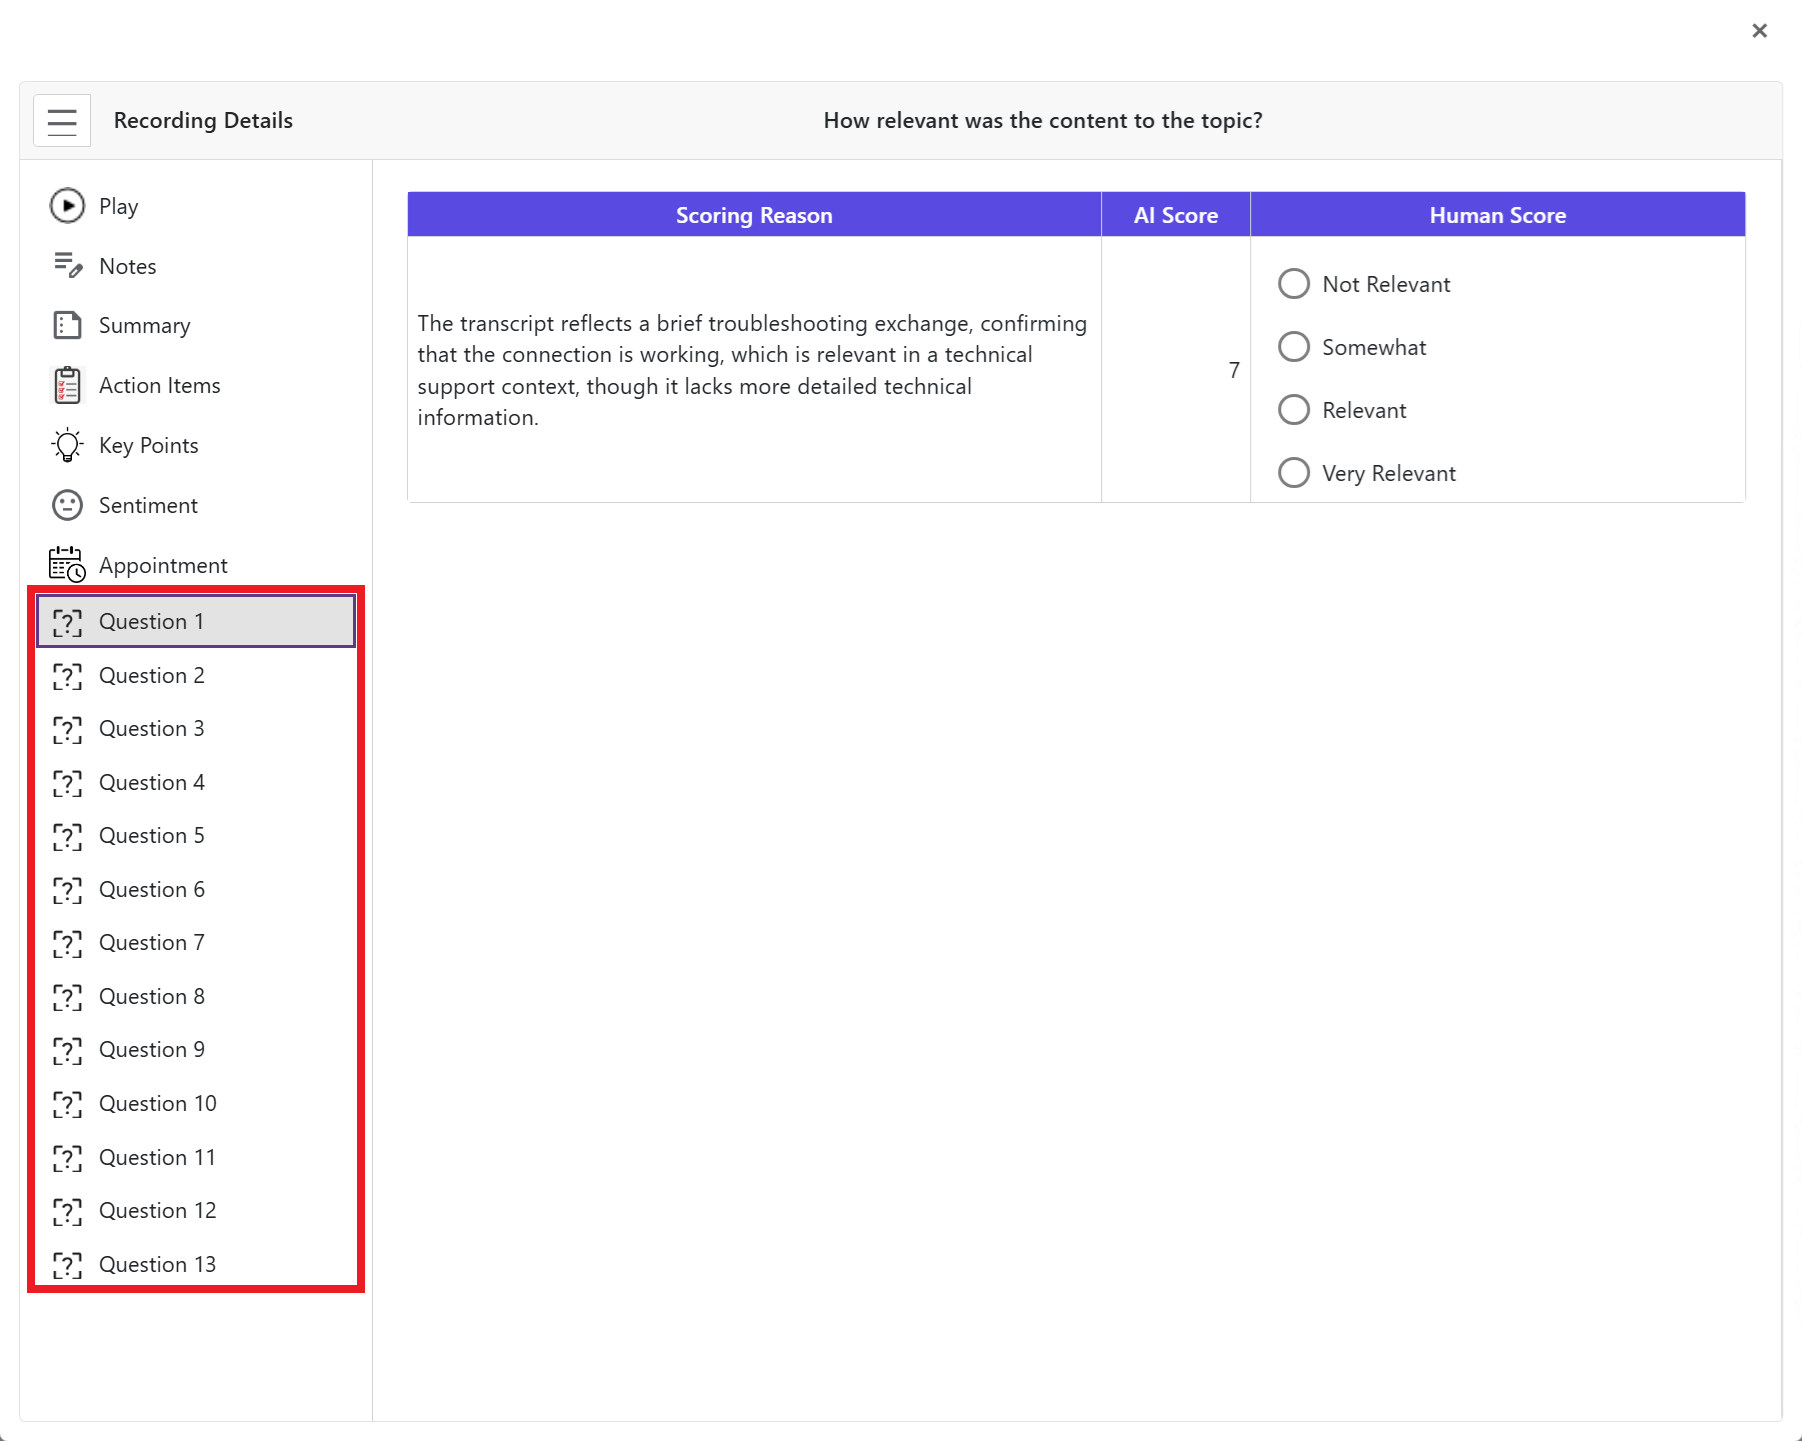
The score gets updated in the Recordings menu screen as a graphical bar
Export Recordings #
The Recording screen lets you export the recordings in various formats like PDF, CSV, RTF and XLS to your local machine.
Import Menu #
The Import Menu in 3CX Recording Manager lets you add existing recordings to the portal for centralized access and management. This feature is essential for maintaining organized records of past calls. It provides options to archive recordings and adjust file paths, ensuring efficient data retention and access management.
With advanced settings, you can control how the recording date and time are obtained, offering flexibility in handling both older and newer 3CX versions. This helps ensure accurate record-keeping, even when dealing with time discrepancies.
Quick Import of Recordings #
Quick Import allows you to efficiently import recordings with a simplified process.
Configure the location (path) of the recording files in 3CX
Set the archive location under the “Retention” tab of the Recording Manager.
Ensure that Microsoft SQL Server is installed and properly set up, as it stores the recording information.
-
In the Left Side Panel, click to open the “Import” menu.
-
Click the “Import” button to make a quick import of your recordings.

Import With Restrictions #
The purpose of the advanced import restrictions is to allow users to filter recordings for import based on specific criteria such as extension ranges, dates, or the embedded recording date in the file name. This ensures selective and efficient import of relevant recordings.
Follow the procedure to import your recordings with restrictions,
-
In the “Import” menu click the “Advanced Settings” option.

-
You can restrict in either of the following methods:
Restrict an extension range
-
In the “Start” field, enter the start of the extension range.
-
In the “End” field, enter the end of the extension range.
When you input a value of 1001 in the “Start” field and 1006 in the “End” field, the Recording Manager filters the recordings to exclude only those from extensions 1001 to 1006. This allows for precise control over the range of recordings you wish to access.

B. Restrict All Extensions
-
Select the “All Extensions Or Range” box to restrict import of recordings from all the extensions.

-
Select the “Recording Date Embed In The File Name” box to embed the recording date in the recording file.

-
Select the “Import Start Date” box to import recordings from a desired date and click the “Calendar” icon to select the start date for your import.

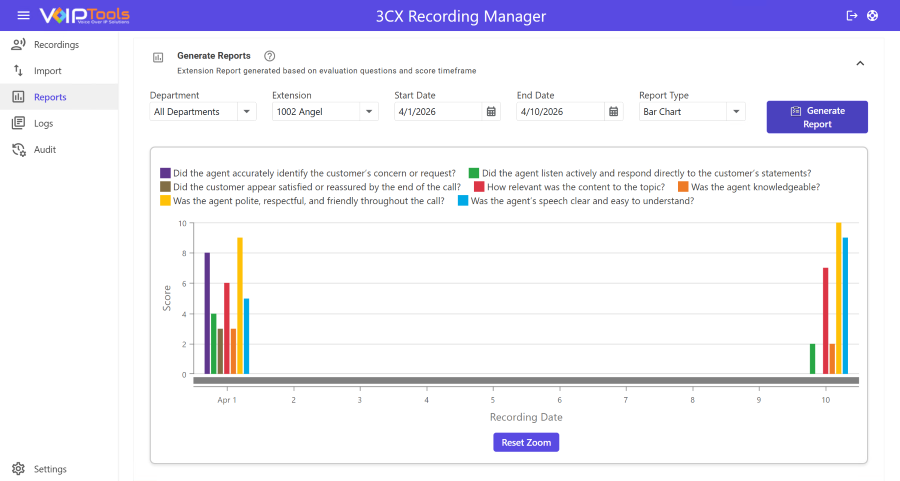
Reports Menu #
The Reports Menu allows users to generate visual reports based on evaluation scores over a selected timeframe. These reports help identify trends, assess individual or departmental performance, and support data-driven decision-making. With customizable filters and visual reporting options, users can gain actionable insights to improve service quality and team efficiency.
-
In the Left Side Panel, click the “Reports” icon to open the menu.
-
Select a predefined question set for the department.

3. Select extension number to view the performance report for that department member.

4. Click each field to open the calendar and pick inclusive start and end dates (example: Start = 8/4/2025; End = 9/8/2025).

5. Choose how data is visualized Line Chart or Bar Chart.
Guidance:
– Line Chart: Best for trends over time.
– Bar Chart: Best for comparing agents or categories.

6. Click “Generate Report” on the right. The system processes the selected data and displays the report below the controls. Larger date ranges may take longer to view.

This is how the report looks with the line chart selected.

This is how the report looks with the bar chart selected.
Logs Menu #
The Logs Menu lets you view the login and logout events of all the sessions along with ‘Date’ and ‘Time’ that is according to the time zone set in the ‘Recordings’ menu.

Field Definition #
| Date/Time |
The Date is in MM-DD-YYYY format and Time is shown in HH:MM:SS (24 hours) format. The time zone can be configured in the Recordings menu. |
| Type |
Shows the category of a log entry to classify events. ‘INF’ (Informational) marks normal operations like status updates, while ‘ERR’ (Error) flags issues such as failed connections. |
| Method |
Indicates the part of the software (function, class, or component) that generates the log entry. |
| Message |
Displays the content of a log entry, describing the system’s action or any issue that occurred. |
Audit Menu #
The Audit Menu is designed to give users visibility into login activities across extensions. It supports security auditing, troubleshooting, and compliance monitoring by providing detailed logs of login events. Efficiently browse large sets of audit logs without cluttering the interface.
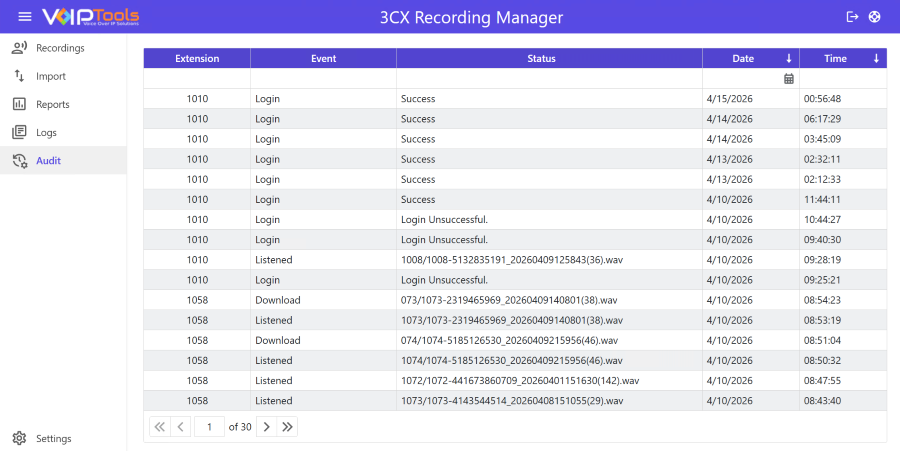
Field Definition #
| Extension |
Shows the extension number used during login. |
| Event |
Understand the nature of recorded activity. Indicates the type of event (e.g., Login). |
| Status |
Spot failed login attempts for security checks. Displays whether the login was successful or failed. |
| Date |
Shows the date of the event. Track login patterns over time. |
| Time |
Time is shown in HH:MM:SS (24 hours) format. The time zone can be configured in the Recordings menu. |
Customize your view to prioritize recent logins, failed attempts, or specific extensions. Click any column header to sort by that field (ascending or descending).
