Introduction #
3CX On Call Manager is a great solution for after-hours office calls. This tool seamlessly integrates with 3CX, simplifying automated after-hours notifications. Forget about expensive answering services. Create recurring on-call schedules for your staff, choose live answering or voicemail options, and customize employee notifications via phone, email, or SMS with 30 escalation levels. Say goodbye to updating forwarding numbers or using support cell phones. With 3CX On Call Manager, set up schedules easily, manage them on a user-friendly web portal, and handle after-hours support.
Common Challenges Faced when Handling On-call Requests #
 |
COSTLY BURDEN | Handling on-call requests can pose significant financial challenges, especially for large companies with multiple departments, due to the high costs associated with the traditional system. |
 |
TIME-CONSUMING SPREADSHEETS | Handling your answering service using intricate spreadsheets can become burdensome and time-consuming, particularly when considering factors such as sick leaves and other variables. |
 |
INEFFICIENT NOTIFICATIONS | Notifying the appropriate individuals promptly can be challenging, resulting in delays and possible miscommunication that could affect vital operations and decision-making. |
 |
UNRESPONSIVE STAFF CHALLENGES | Handling on-call requests becomes problematic when staff members fail to respond, leading to potential service disruptions and difficulties in promptly resolving issues. |
| TRACKING PERFORMANCE AND SLA | Monitoring and tracking Service Level Agreements (SLAs) and staff performance can be a challenging and time-consuming task, making it hard to uphold consistent service standards and identify improvement areas. | |
 |
CHOOSING BETWEEN VOICEMAIL AND LIVE ANSWER | Choosing between voice mail and live answering services can be a challenging decision due to the differing limitations and drawbacks of each option, which might not align with your particular requirements and customer expectations. |
Why On Call Manager? #
 |
CONNECT WITH 3CX SYSTEM | Effortlessly integrate the 3CX On Call Manager to streamline automated notifications and empower exceptional customer service. Connect seamlessly with your current 3CX system and revolutionize communication methods. |
 |
COST-EFFECTIVE SCALABILITY | Farewell to rising costs! The On Call Manager differs from other answering services by providing unlimited notification groups. You can now expand your operations without concerns about extra charges. |
 |
UNLIMITED VOICEMAIL | Ensure you never miss a message again by utilizing unlimited voicemail boxes. Organize and access your voicemails with ease, guaranteeing that all essential messages are accounted for and promptly attended to. |
 |
SIMPLIFIED CALENDAR-BASED SCHEDULING | Streamline scheduling with the calendar-based recurring schedule feature. Say goodbye to manual forwarding rule adjustments, phone passing between colleagues, and cumbersome spreadsheets. Efficiently manage on-call agent availability, saving time and reducing potential errors. |
 |
MULTIPLE ESCALATION CHANNELS | Enhance escalation capabilities through diverse communication channels for prompt handling of urgent matters. Utilize SMS, email, and phone calls to instantly escalate important issues, ensuring timely and efficient delivery of critical notifications to the appropriate recipients. |
 |
SECURE USER ROLES | Ensure control and security through customizable roles. Grant administrative privileges solely to managers, protecting schedules and preventing unauthorized changes by agents. |
 |
INSIGHTFUL EVENT LOGS | Enhance operational efficiency using comprehensive event logs. Monitor support requests during non-business hours, ensure adherence to service level agreements, and assess staff performance efficiently for informed decision-making. |
 |
EFFORTLESS ON-CALL SCHEDULES | Efficiently establish recurring on-call schedules, removing the necessity for frequent call forwarding rule updates or the shared use of on-call cell phones within your team. Sustain a seamless and consistent schedule without interruptions. |
 |
EFFECTIVE NOTIFICATION HANDLING | Achieve prompt response rates by implementing a notification escalation system for unanswered calls. Employ up to 30 escalation levels with multiple contacts assigned to each level, ensuring critical calls are always attended to. |
 |
FLEXIBLE CALL HANDLING | Improve customer experience through adaptable call handling. Direct callers to a queue initially for personalized service. If agents are busy, seamlessly switch to voicemail to capture crucial messages. |
How It Works #
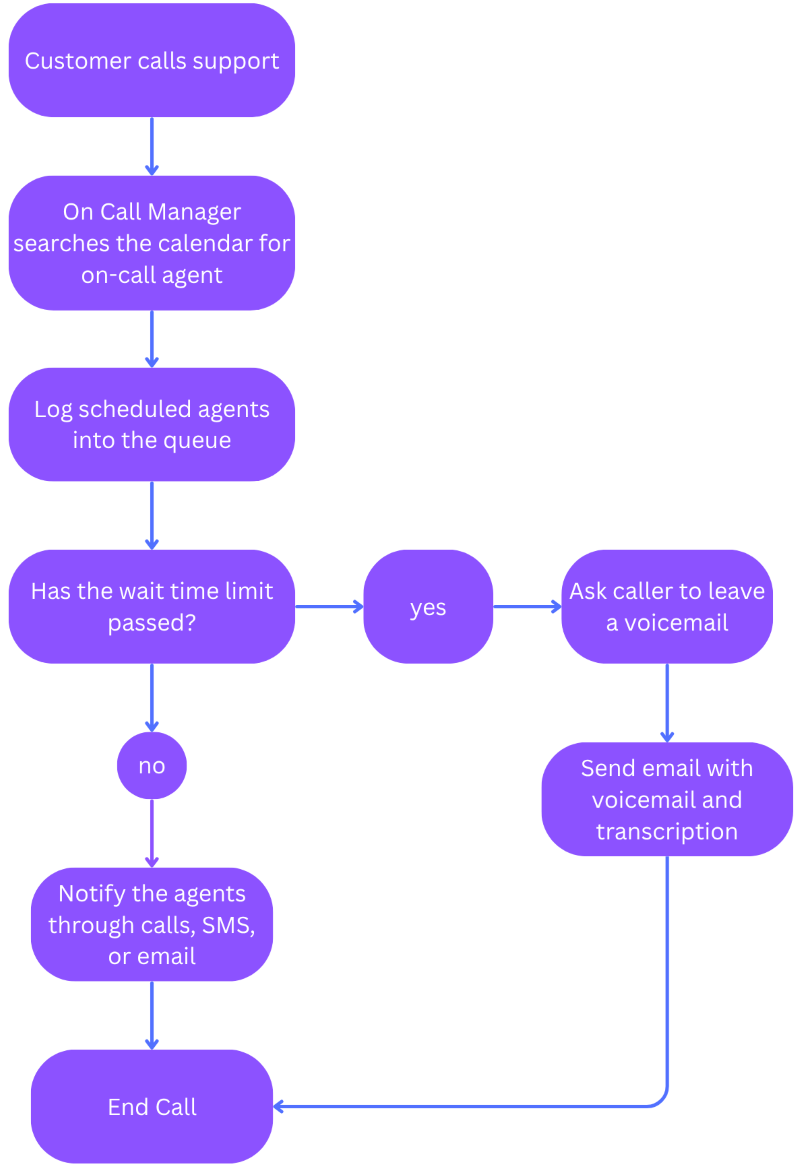
When customers are directed to a support queue, 3CX On Call Manager actively searches a calendar to identify the designated agent responsible for handling after-hours support calls. The software seamlessly logs the assigned agents into the queue, ensuring efficient management. In cases where the maximum queue hold time is exceeded, the caller will be prompted to leave a voicemail. 3CX On Call Manager promptly notifies your staff about the newly generated support request, employing various communication channels. In addition to initiating phone calls to your staff, this program facilitates the transmission of text messages and emails. These notifications contain a comprehensive package, comprising the customer’s voicemail recording and a text transcription for convenient reference by your team.
Prerequisites #
Before installing 3CX On Call Manager, you need to ensure that your computer meets the minimum requirements mentioned below:
| PREREQUISITE | PURPOSE |
|---|---|
| 3CX Version V20 | 3CX On Call Manager is designed to work seamlessly with this version for enhanced features and performance. |
| Windows 10 or above / Windows Server 2012 or above | These operating systems provide the necessary environment for the application to run efficiently. |
| IIS Features and Configuration – VoIPTools | IIS is needed as a web server to host and manage web-based applications and services. |
| .NET Framework 4.7.2 (Web Installer) | This framework provides essential components for running and developing applications. |
| VoIPTools Universal Updater | This component is necessary for updates, ensuring the application remains current and functional. |
| VoIPTools Relay Service | It is used for proper integration and functionality of the 3CX Competitive Wallboard within the 3CX environment. |
| Microsoft SQL Server 2016 or above (Including the free SQL Express edition) | 3CX requires Microsoft SQL Server 2016 or later for database management. |
| Static IP for VoIPTools and 3CX servers | This is to ensure proper two-way communication, both the 3CX server (Relay) and the VoIPTools server. Dynamically assigned IP addresses are not supported. Additionally, it is recommended to use HTTPS for secure communication, which requires a FQDN for SSL/TLS certificate validation between the VoIPTools server and the Relay. |
| Port number 5550 opened on your device | Port 5550 is a specific network port used by 3CX for communication purposes. Opening this port on the device’s firewall allows incoming and outgoing traffic to pass through, enabling the 3CX software to send and receive data over the network effectively. |
NOTE:
- When installing SQL Server, we recommend you install it in “Mixed Mode” to include SQL Authentication, and install SQL Management Studio
- When installing IIS, be sure to install Basic Authentication, .Net Extensibility, and ASP.Net 4.X
Installation overview #
 |
DOWNLOAD SOFTWARE | You can order 3CX On Call Manager online at https://www.voiptools.com. Your order confirmation email will include your license key and a link to download the software. |
 |
INSTALL PREREQUISITES | You must install several prerequisites before installing the 3CX On Call Manager. The Advanced Installer identifies and installs these applications automatically. Click here to learn about the required prerequisites. |
 |
INSTALL 3CX ON-CALL MANAGER | This User Guide contains step-by-step instructions to install 3CX On Call Manager. Begin by extracting the installer from the downloaded zip file (Step 1 above), then run the setup program named OnCallManager.exe |
 |
LOG IN TO THE WEB APPLICATION | You can now log in to the web application using the extension number and the PIN. |
Step By Step Installation Procedure #
The following section guides you through a detailed walk-through of the installation process:
Step 1: Download 3CX On Call Manager #
Find the software download link in the Order Confirmation Email, or you can download the application by following the procedure:
- Open your browser and go to the VoIPTools official website or click here to get redirected to the website.
- Search for the On Call Manager Application and click the Download
 button to download your application.
Step 2: Install the Prerequisites #
Click on the software installer that was downloaded in step 1 above. The installation wizard will automatically identify the needed prerequisites and assist you with the installation of the prerequisites needed to run ‘3CX On Call Manager’.
-
- Click the downloaded installer executable to launch the Prerequisites Setup Wizard and click Next.
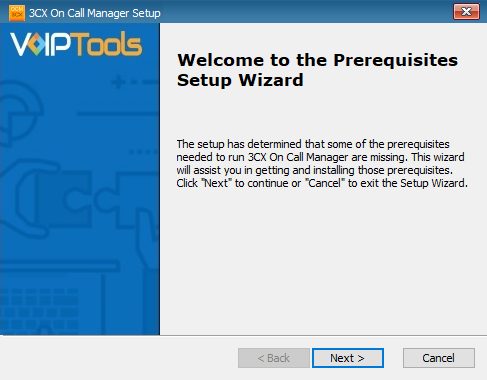 Figure 1: Prerequisites Setup Wizard
-
- In the Prerequisites window, the installer will identify the missing prerequisites. You can select/unselect the applications to be installed and click Next to continue.
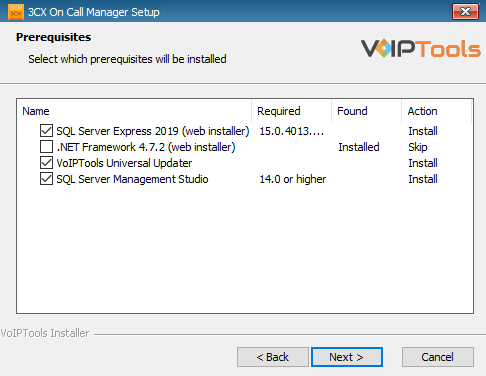 Figure 2: Select Prerequisites to Install
The installer will download and install the selected applications.
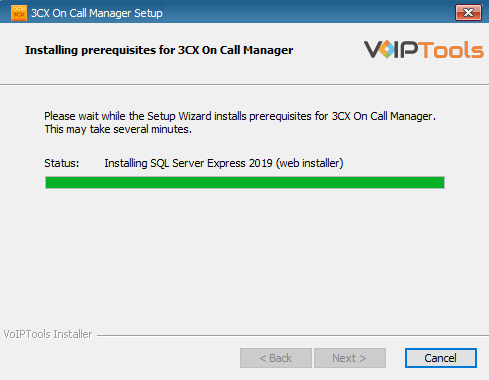 Figure 3: Prerequisites Installation in Progress
-
- In the Microsoft SQL Server License Terms click the Accept button to acknowledge the license terms and continue.
-
- This page appears if you do not have SQL Server Express preinstalled in your device.
-
- In the Microsoft SQL Server License Terms click the Accept button to acknowledge the license terms and continue.
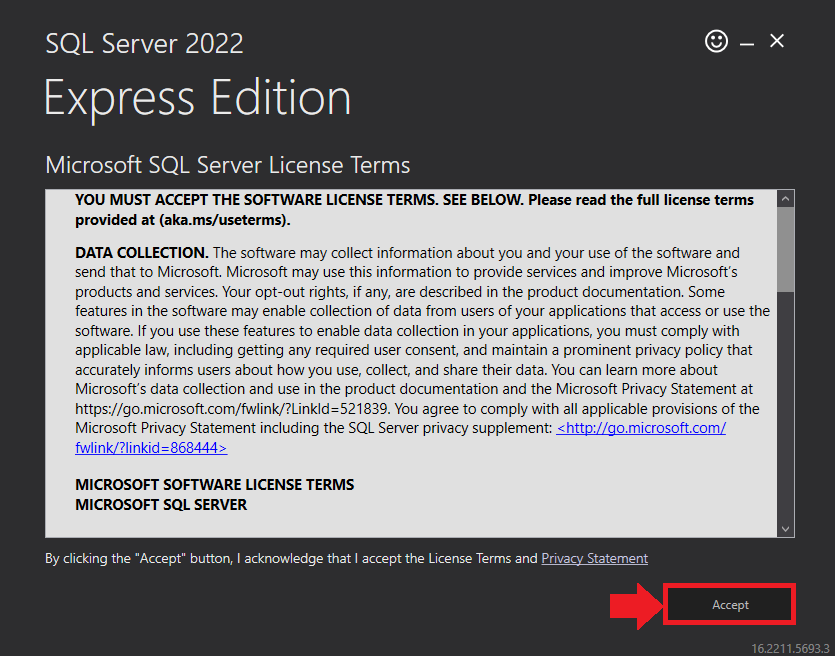 Figure 4: SQL Server Express: Accept License Terms
-
- View the SQL Server Media target location in the Media Location field. If required, you can click the Browse button to change the location. Click Install to begin the installation of SQL Server Express.
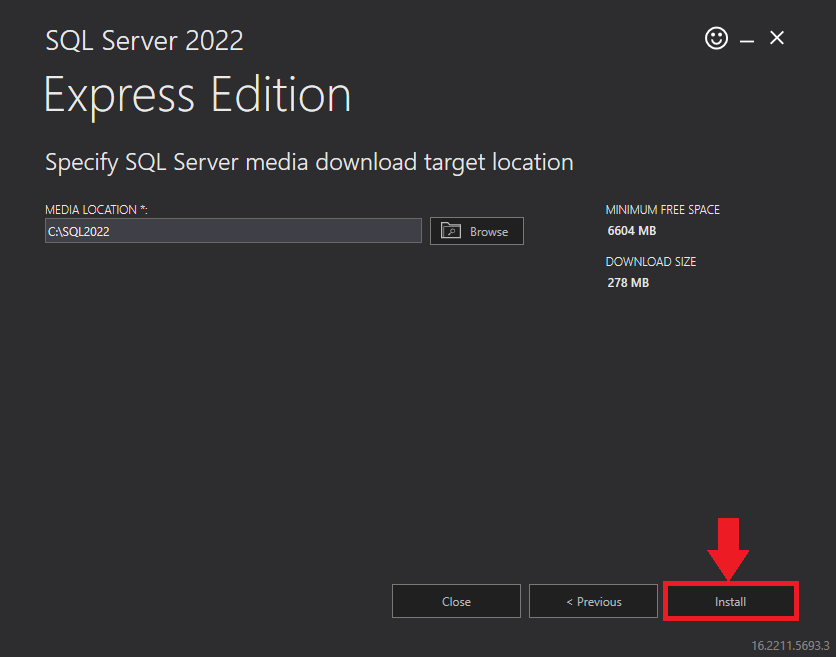 Figure 5: SQL Server Express: Target Location
SQL server installation is in progress. This may take several minutes to complete.
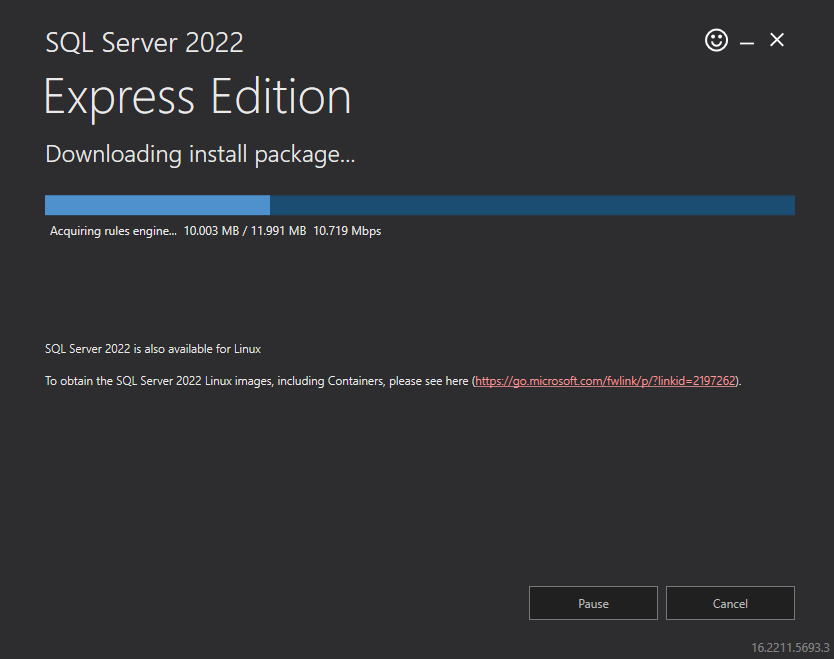 Figure 6: SQL Server Installation In Progress
-
- Click the Close button once the prerequisites are installed.
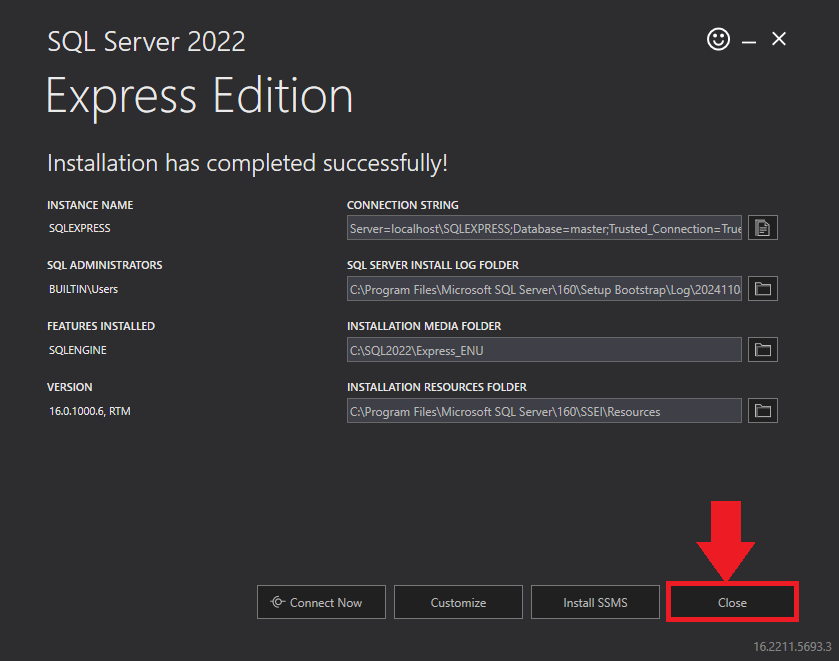 Figure 7: SQL Server Express: Installed Successfully
-
- In the confirmation message box, click Yes to reboot the computer.
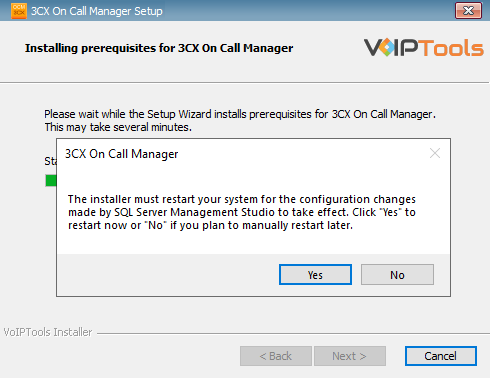 Figure 8: Restart Confirmation Message Box
Step 3: Start the installation process #
-
- After all the prerequisites are installed, the 3CX On Call Manager Setup Wizard appears. Click Next to Continue.
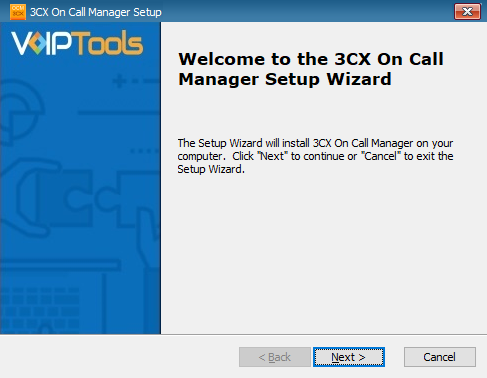 Figure 9: On Call Manager Setup Wizard
-
- On the Select Installation Folder window, the Folder field displays the location where the ‘3CX On Call Manager’ will be installed. Note that you cannot change the path.
-
- Click Next to continue.
 Figure 10: Installation Folder
Step 4: Test Relay Settings #
-
- In the 3CX Relay Services window, in the Relay Host field, enter the FQDN of your 3CX server.
-
- Enter 8801 in the Relay Port field.
-
- Enter the public key you took from VoIPTools Relay services in the Public Key text area.
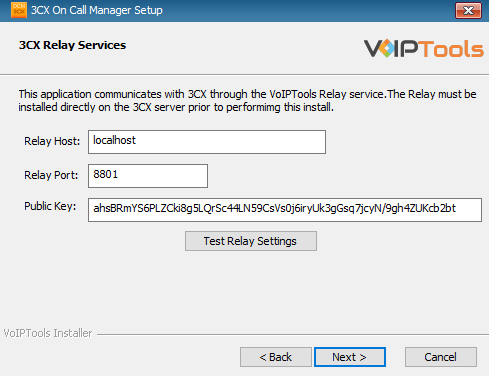 Figure 11: Test Relay Settings
-
- Click the Test Relay Settings to confirm ‘3CX On Call Manager’ can communicate with the Relay services running on the 3CX server.
-
- If the ‘3CX On Call Manager’ is successfully able to communicate with the Relay services that run on the 3CX server, a Success message box appears. Click OK. If the test fails, you will not be able to continue until communication with the relay is established.
-
- Click Next to continue with the installation.
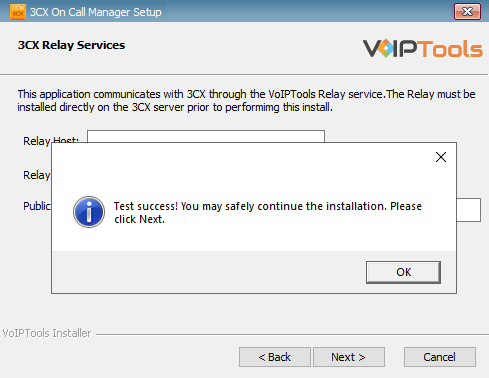 Figure 12: Relay Test Successful Message
- You must set the Relay Port to 8801.
- If the Relay test fails, you cannot continue the installation until you establish communication with the Relay. If the test was unsuccessful,
- Confirm you have the correct firewall port open (default TCP 8801) on the 3CX server and the firewall protecting the 3CX server.
- Confirm that you have entered the correct FQDN for the 3CX server.
- Confirm that the 3CX On Call Manager and Relay use the same port and protocol.
Step 5: Configure the database #
When configuring the 3CX On Call Manager, select an existing Microsoft SQL Server instance in your environment. The database server can be a remote SQL Server, or a local instance running on the VoIPTools server.
You can set up the SQL database using SQL Authentication or Windows Integrated Authentication.
SQL Authentication #
-
- Enter your server name in the Server field.
-
- If using the free SQL Express Edition, the default SQL Instance name is SQLExpress.
-
- Enter your server name in the Server field.
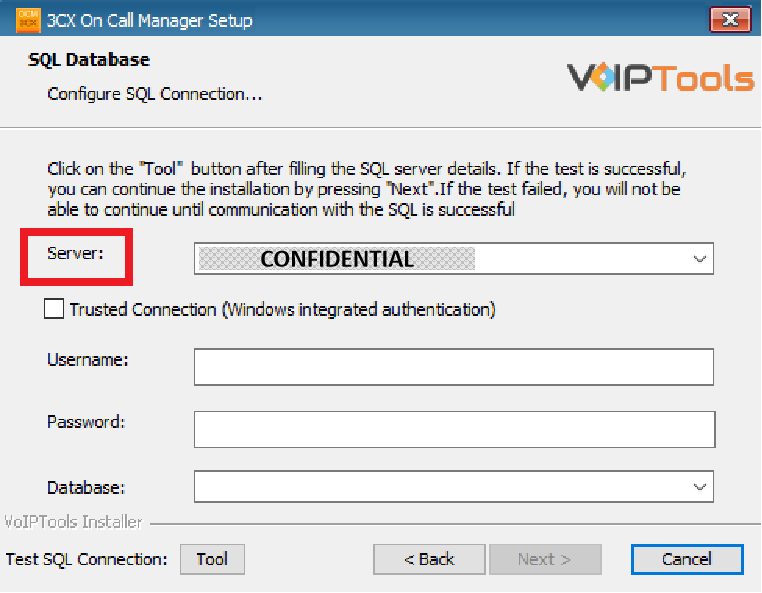 Figure 13: Database Connection – Server Dropdown
- If you want to use ‘SQL Authentication’, then install SQL Server in ‘Mixed‘ mode.
- If SQL Server is installed on a server other than the server where 3CX Exporter is installed, you will need to configure SQL Server to allow remote connections.
-
- Enter your credentials in the Username and Password fields.
The Settings Menu provides the centralized control panel for 3CX On Call Manager. From this comprehensive dashboard, you can manage core functions like general configuration, user rights, and monitoring, while also setting up communication channels (email/SMS), defining Retention Policies, and integrating with AI platforms. These controls ensure system security, optimized performance, and custom branding for your interface.
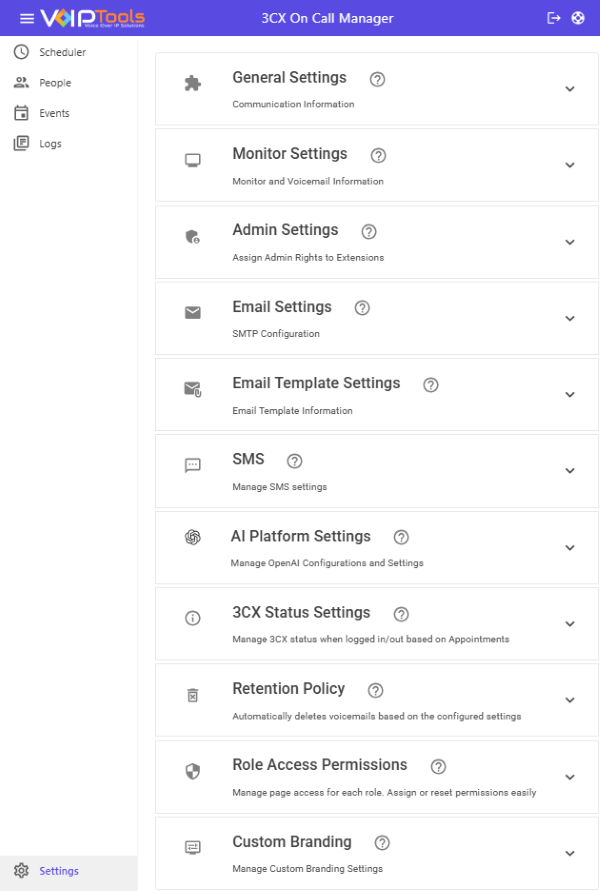 Figure 25: Settings Menu
|
General Settings |
Configure Notification settings and initiate or terminate the 3CX On Call Manager Windows Service. |
| Monitor Settings | Manage call queues and voicemail prompts for each department to ensure calls are directed properly, messages are organized, and prompts are clear to support efficiency and reducing missed calls. |
| Admin Settings | Managers are assigned via the Admin menu to modify schedules and settings. |
| Email Settings | Set up SMTP to enable email alerts and updates to ensure reliable notifications and stay informed without needing to check manually. |
| Email Template Settings | Create customized email and SMS messages, which are then dispatched as notifications to the recipients. |
| SMS | Select Email, Skyetel, or Twilio to send SMS messages for scheduled appointments, ensuring the required credentials for your chosen carrier are saved in the app settings for proper delivery. |
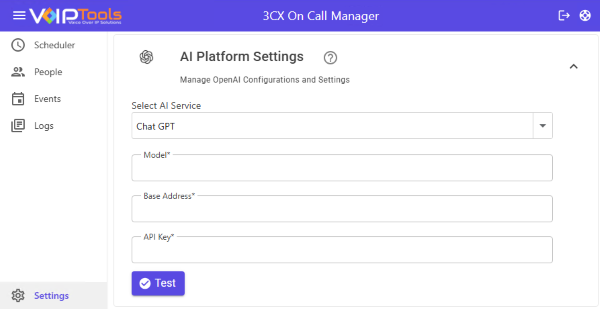
| AI Platform Settings | Allows critical response time for on-call agents by providing immediate, readable context for incoming issues through connecting to a chosen service (OpenAI, Azure, or Google Cloud Speech). |
| 3CX Status Settings | Automatically link your on-call agent schedules to 3CX by applying the selected Login Status during scheduled hours and the designated Logout Status when the shift ends. |
| Retention Policy** | Define a retention period (in days) to delete old voicemails in only those from extensions listed in the Monitor Settings from both the 3CX system and the SQL database at a specified time. |
| Role Access Permissions | Allows administrators to customize user access to specific OCM pages (like Scheduler and Logs) for any selected 3CX role, overriding default settings. |
| Custom Branding | Personalize the application’s appearance by setting a Header Title, uploading a custom logo, choosing gradient colors for the header, and selecting Accent and Grid colors throughout the interface.. |
General Settings #
The General Settings tab puts you in complete control of call escalation logic, ensuring no alert is missed. You can customize reliability by setting the exact number of Contact Attempts and the necessary waiting time between them before escalating a call to the next person. For efficiency and consistency, this tab also lets you apply a consistent Culture for date/time formatting and uses Prepend Digits to guarantee successful call routing within your 3CX system.
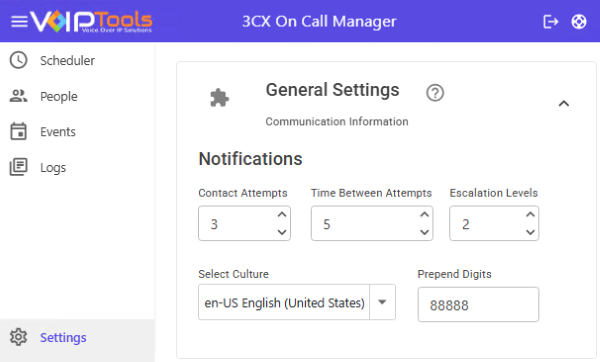 Figure 26: Settings Menu: General Settings
The General Settings tab has the following menu options,
| Contact Attempts | Specify contact attempts to ensure prompt answers without excessive waiting. |
| Time Between Attempts |
Set the wait time in minutes between notification attempts to give the recipient a chance to respond without causing delays. |
| Escalation Levels | Set a limit on how many groups or users the alert cycles through to keep the on-call process efficient and prevent endless escalation. |
| Select Culture | Select a Culture to instantly standardize date, time, and currency formats across the app for a consistent user experience. |
| Prepend Digits | Set Prepend Digits to auto-adjust outbound numbers, ensuring reliable call routing in your 3CX system. |
#
Monitor Settings #
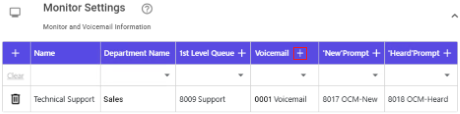
The Monitor Settings tab lets users manage call queues and voicemail prompts for different departments. This helps ensure calls are routed correctly, voicemails are organized, and prompts are clear, improving customer support efficiency and reducing missed messages.
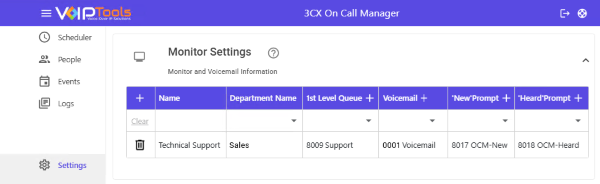 Figure 27: Monitor Settings
I. Understanding the Monitor Table Fields #
Each row in the Monitor table defines one workflow. Click the + button (usually on the far left) to start a new Monitor.
| Field | What it Is | Why You Need It |
| Name | A unique, simple name (e.g., “Emergency IT Support”). | This is the name you’ll use later when you set up the actual On-Call Schedule. |
| Department Name | The 3CX Department this monitor belongs to (e.g., “Sales” or “Admin”). | Helps keep your inbound call flows and agent groups organized. |
| 1st Level Queue | (Optional) The 3CX Queue Extension where the call goes first. | If used, OCM automatically logs the scheduled agent into this queue so they might answer the call live. |
| Voicemail | The monitored Voicemail Extension. | This is the extension that OCM watches. When a voicemail is left here, the agent notification process begins. |
| ‘New’ Prompt | The Digital Receptionist (DR) audio message OCM calls and plays to agents when a new voicemail arrives. | It tells the agent there’s a new request and usually transfers them to the voicemail system to listen to the message. |
| ‘Heard’ Prompt | The DR message OCM calls and plays to agents after the voicemail has been listened to. | This is the “All Clear!” signal, confirming to all notified agents that the issue is now being handled. |
II. Adding New 3CX Components #
-
- Click the Add Queue
 button.
- Click the Add Queue
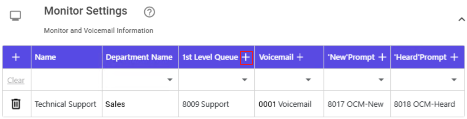 Figure: Add First Level Queue – Add Button
-
- Enter the Queue Name and Fallback Extension in the Create New Queue dropdown.
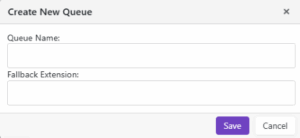 Figure: Add First Level Queue – Queue Information
-
- Click OK in the Success popup.
-
- Click the Add Voicemail button.
- Click the Add Voicemail
-
- Enter the first name and last name of the extension in the Create New Extension popup and click the Save button.
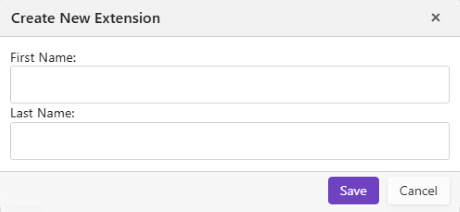
-
- Click OK in the Success popup.
You can see your new extension is now added to the Voicemail dropdown.
-
- Click the Add Extension button.
- Click the Add Extension
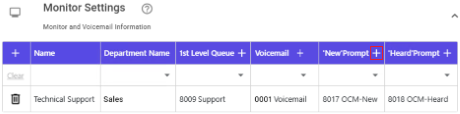 Figure: Add ‘New’ Prompt – Add Button
-
- Enter the IVR name in the Create New Digital Receptionist popup and click the Save button.
 Figure: Add ‘New’ Prompt – New Prompt Details
-
- Click OK in the Success popup.
-
- Click the Add Extension button.
- Click the Add Extension
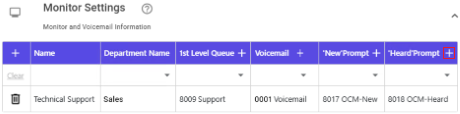 Figure: Add ‘Heard’ Prompt – Add Button
-
- Enter the IVR name in the Create New Digital Receptionist popup and click the Save button.
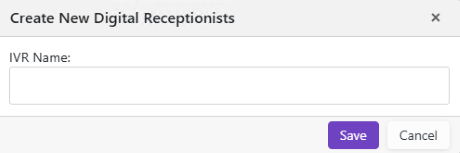 Figure: Add ‘Heard’ Prompt – Heard Prompt IVR Details
-
- Click OK in the Success popup.
You can set up two main call flow patterns based on whether you want the caller to wait for an agent first.
1. Without Using the ‘1st Level Queue’ Feature (Simple Flow) #
This is the fastest way to get the notification process started.
-
Flow: Inbound Call → Digital Receptionist → Voicemail
-
Process: The call goes straight to the monitored Voicemail Extension. Once a message is left, OCM is immediately triggered to notify the on-call agents.
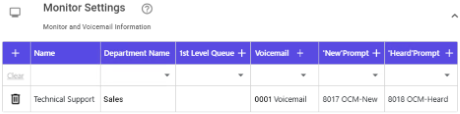 Figure 32: Inbound Call Pattern without ‘1st Queue Level’ Feature
2. Using the ‘1st Level Queue’ Feature (Interactive Flow) #
This flow improves the customer experience by giving them a chance to speak to a live agent before leaving a message.
-
Flow: Inbound Call → Digital Receptionist → Queue → Voicemail
-
Process:
-
The call hits the Digital Receptionist.
-
OCM checks the schedule and automatically logs the on-call agents into the 1st Level Queue.
-
The caller waits in the queue for an agent to answer.
-
If the caller exceeds the maximum wait time, they are forwarded to the Voicemail Extension, which then triggers the OCM agent notification process.
-
Benefits of Using a First Level Queue:
| Improved Caller Experience | The caller waits in a queue, which reassures them that their call may be answered soon by an agent, rather than immediately going to voicemail. |
| Automatic Agent Login | The system automatically logs the scheduled agents into the queue just before the call is transferred, ensuring only on-call agents are handling the queue. |
| Fallback to Voicemail | If the hold time exceeds the defined limit, the caller is still routed to voicemail, ensuring the issue isn’t lost and agents can respond later. |
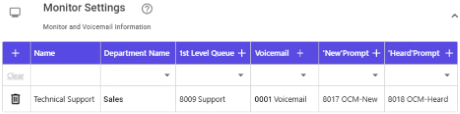 Figure 33: Inbound Call Pattern with ‘1st Level Queue’ Feature
Using the 1st Level Queue feature requires Remote Agents, which are only available in the 3CX Pro Edition (or higher).
You can insert special characters in the Department Name column.
How the Monitors menu changes settings in 3CX Console Management #
When you create something in the Monitor Settings, it automatically creates the corresponding changes inside the 3CX Phone Management Console.
| Action in OCM Monitors Menu | Result in 3CX Console Management |
| Creating a CFD, Voicemail Monitor, or Queue Monitor | Automatically updated in the respective list in the 3CX Phone Management Console. |
| Creating the 1st Level Queue | The queue is created in the Call Queues list. |
| Creating a Voicemail (monitored extension) | The voicemail extension is created in the Extensions list. |
| Creating the New Prompt or Heard Prompt | The Digital Receptionist is created in the respective list. |
- Your access is based on your role: Admins can create Monitors for all departments, while Managers can only view and create Monitors for the groups they manage.
#
Admin Settings #
The Admin Settings tab provides a streamlined method for assigning universal administrator access within the 3CX On Call Manager application, completely independent of the user’s roles within the 3CX Phone System itself.
Understanding the Admin Role in OCM #
The core function of this screen is to elevate a standard 3CX extension user to a global OCM Administrator.
-
Universal Access: Any user granted Admin rights via this screen will have unrestricted access to all settings, schedules, logs, and monitoring pages across the entire 3CX On Call Manager application.
-
Department Agnostic: OCM Admins can view and edit schedules and settings for all departments, regardless of whether their 3CX extension belongs to that department.
-
3CX Role Override: This setting takes precedence over the user’s assigned role in 3CX (e.g., User, Receptionist, Manager). Even if a user is designated as a standard “User” in 3CX, checking their extension here grants them full OCM Admin status.
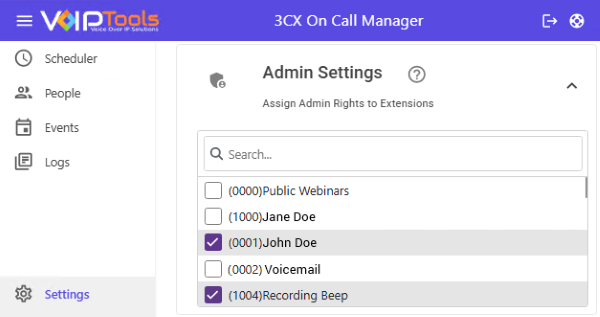 Figure 29: Admin Settings Overview
Only grant Admin access to essential system owners or IT managers. Granting too many users this level of privilege increases security risk and potential for accidental configuration errors.
#
Email Settings #
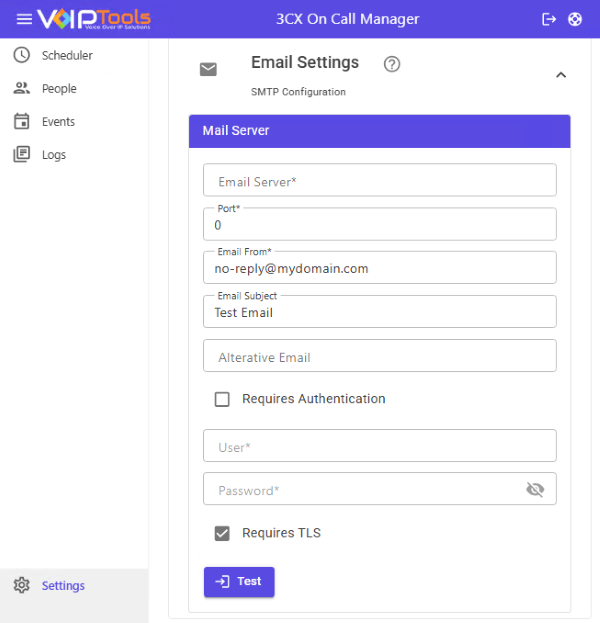
The Email Settings tab is where you configure the SMTP server details, allowing OCM to send out notifications and test emails.
 #
#
#
I. SMTP Server Connection Details #
| Setting | Description | Example / Standard Value |
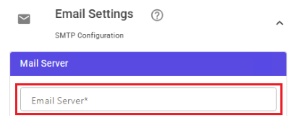
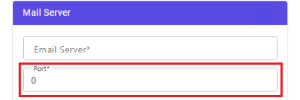
| Email Server / FQDN | Enter the IP address or Fully Qualified Domain Name (FQDN) of your mail server. |
|
| SMTP Port | Enter the port number your mail server uses for outgoing mail. |
Standard: 25. For secure servers (like Gmail/Google Workspace): 587. |
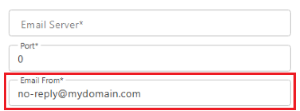
| Email From | Enter the email address the notifications will appear to be sent from. |
|
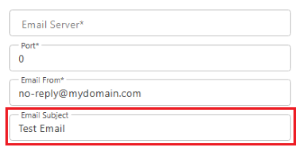
| Email Subject | Enter the subject line that will be used for the Test email. |
Defaults to |
II. Authentication and Security #
This section ensures OCM can securely connect and log into the mail server.
| Setting | Control Type | Purpose |
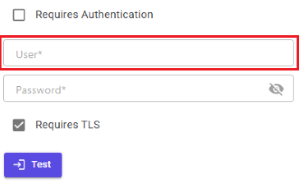
| Requires Authentication | Checkbox () | Check this box if your mail server requires a username and password to send emails.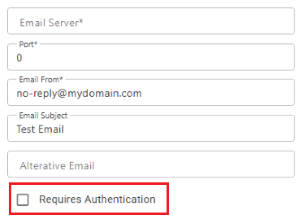 |
| Username | Text Field |
If authentication is required, enter the full username or email address used to log into the SMTP server (e.g.,
|
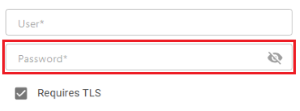
| Password | Password Field |
Enter the password associated with the username. Tip: Click the … button next to the field to temporarily show or hide the password for verification.
|
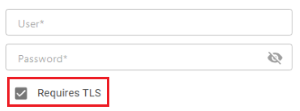
| Requires SSL / TLS | Checkbox () |
Check this box if your mail server requires a secure connection (Secure Sockets Layer or Transport Layer Security). Cloud services like Gmail, Google Workspace, and Microsoft 365 will require this.
|
III. Alternative Email (Recipient Management) #
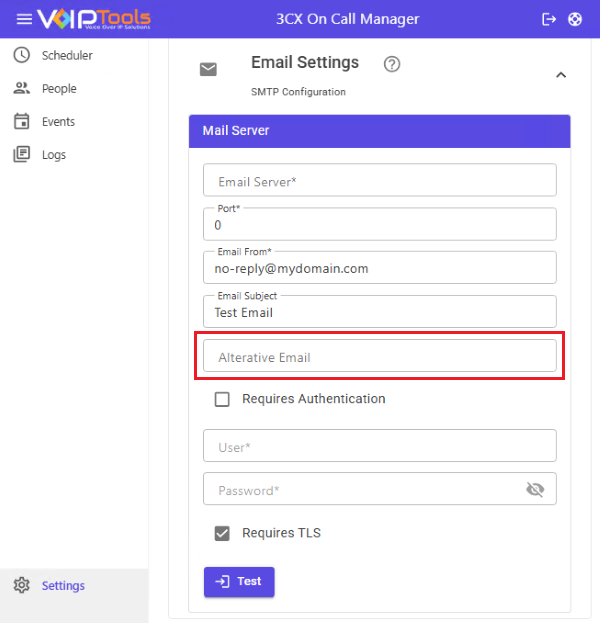
| Setting | Description | Configuration Result |
| Alt. Email | Text Field | Enter a single email address here if you want all voicemail notifications to be forwarded to a centralized mailbox. |
| Leave Blank | If this field is left empty, the system will send the voicemail notification only to the voicemail owner’s registered email address. |
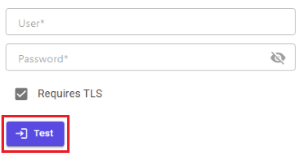
IV. Testing the Configuration #
| Button | Action | Tip |
| Test |
Click this button to send a test email using the configured SMTP settings. |
To test successful delivery: Temporarily enter a known, valid test address (e.g., your own work email) in the Alt. Email field before clicking Test.
|
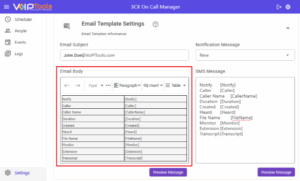
Email Template Settings #
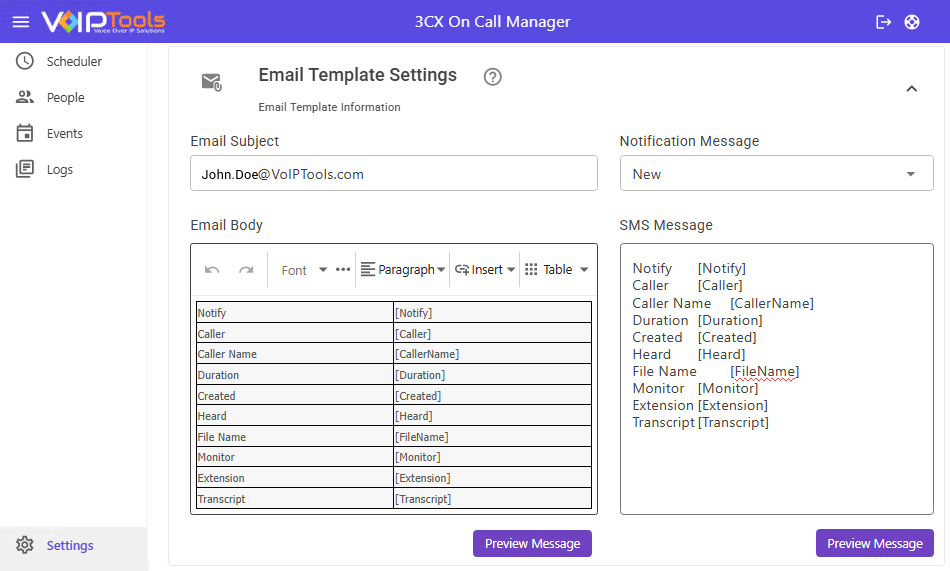
The Email Template Settings page lets you create customized messages for notifications using special placeholder Field Variables that pull in dynamic information about the call, agent, and status.
I. Using Field Variables #
Field variables allow you to insert specific data (like the caller’s name or the date the voicemail was created) directly into your message.
-
How to Use: Simply surround the field name with square brackets:
[FieldName]. -
Example: The text
New voicemail from [CallerName] on line [Extension]will be replaced with the actual data when the message is sent.
Available Field Variables #
| Variable | Description (What the field displays) |
| Notify | The extension/name of the person being notified. |
| Caller | The phone number of the person who placed the call. |
| CallerName | The name associated with the caller’s number. |
| Duration | The length of the voicemail or call. |
| Created | The date and time the voicemail was received. |
| Heard | The date and time the voicemail was marked as heard. |
| FileName | The file path or name of the voicemail audio file. |
| Monitor | The name of the specific Monitor configuration that processed the call. |
| Extension | The extension of the voicemail box that received the message. |
| Transcript | The text transcription of the voicemail (if using an AI integration). |
#
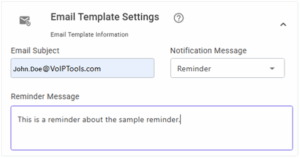
II. Customizing Notification Messages #
You can customize the content for three different types of notifications in their respective sections:
| Section | Purpose | Best Practice |
| Messages (Email) |
Customize the subject and body of the email notification sent to on-call agents when a new voicemail is received.
|
Include critical variables like [Caller], [Extension], and [Created] so agents have all the information they need immediately. |
| SMS Message |
Customize the content of the SMS text message sent to on-call agents.
|
Keep it short! Text carriers enforce character limits. Use only the most critical variables (e.g., [Caller], [Extension]) to avoid messages being cut off or segmented. |
| Reminder Message |
Customize the content of reminder emails sent based on scheduled appointment times (if configured).
|
This should clearly state the appointment time and purpose. |

SMS Settings #
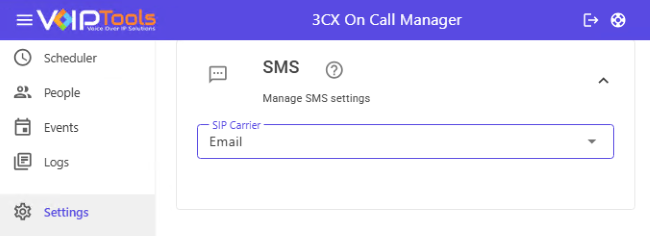
The SMS Settings tab panel lets you choose to send messages via Email, Skyetel, or Twilio as the method for notifying the recipients of scheduled appointments. Each option requires specific setup: Email sends messages to recipients’ email addresses, while Skyetel and Twilio need credentials like SID, secret/auth token, and a sender number saved in the application settings. Be sure to configure the necessary details for your chosen carrier to ensure proper SMS delivery.
I. Choosing Your SMS Carrier #
Use the radio buttons to select one of the following three options based on your company’s communication needs and existing services.
| Option | Description | Setup Requirement |
| This sends the SMS message content to the recipient’s email address (e.g., 5551234567@vtext.com). The mobile carrier converts the email into a text. | None. The system uses your configured Email Settings. | |
| Skyetel | This uses the Skyetel SIP carrier service to send official SMS messages. | Requires specific Skyetel API credentials to be entered below. |
| Twilio | This uses the Twilio SIP carrier service to send official SMS messages. | Requires specific Twilio API credentials to be entered below. |
II. Carrier-Specific Configuration #
Depending on which carrier you select, you must enter the correct authentication details in the fields provided.
A. Skyetel Option #
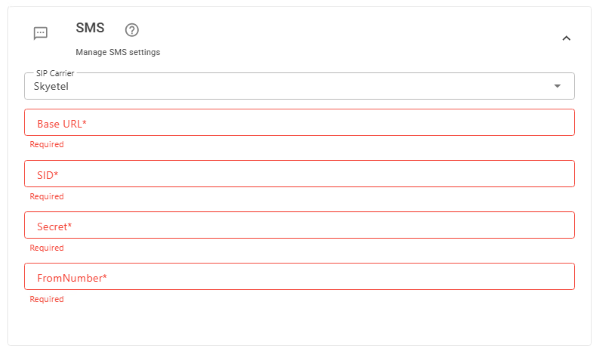
If you choose Skyetel, you must provide the following:
| Field | Purpose | Detail |
| Base URL | The main endpoint address for accessing Skyetel services. | This is provided by Skyetel documentation. |
| SID | The Skyetel Service ID used for authentication. | Used as the unique identifier for your Skyetel account. |
| Secret | The authentication key required for secure access to the API. | Keep this secure! Click Save to encrypt and store it. |
| From Number | The phone number that will be displayed as the sender of the SMS message. | Must be a number provisioned within your Skyetel account. |
B. Twilio Option #
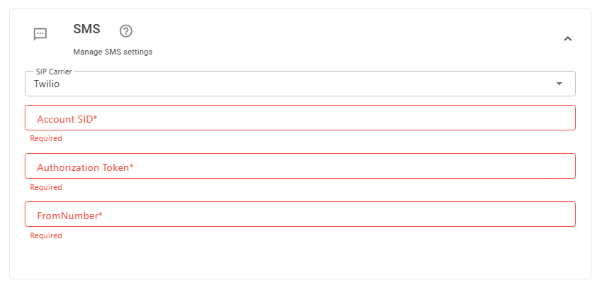
If you choose Twilio, you must provide the following:
| Field | Purpose | Detail |
| Account SID | Your Twilio Account Service ID. | Used as the unique identifier for your Twilio account. |
| Authorization Token | Your secure Authentication Token. | This acts as the password for your Twilio account’s API access. |
| From Number | The phone number that will be displayed as the sender of the SMS message. | Must be a number provisioned within your Twilio account. |
Once you’ve entered all the required information for your selected carrier, simply click outside the data fields to save it.
AI Platform Settings #
The AI Platform Settings allow you to integrate an AI service that is either OpenAI (ChatGPT), Microsoft Azure OpenAI, or Google Cloud Speech to enable voice-to-text transcription and chat functionalities. Configuration requires selecting the service and providing specific credentials like API keys, base addresses, or deployment names to authenticate and utilize the chosen cloud service for audio processing that speeds up the critical response time for on-call agents by providing immediate, readable context for incoming issues.
3CX Status Settings #
The 3CX Status Settings page manages how the On Call Manager automatically changes an agent’s status in 3CX based on their scheduled on-call shifts. This ensures that when an agent is scheduled to be on call, their 3CX client status reflects that they are ready for work.
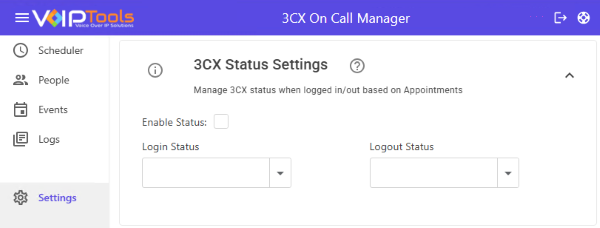
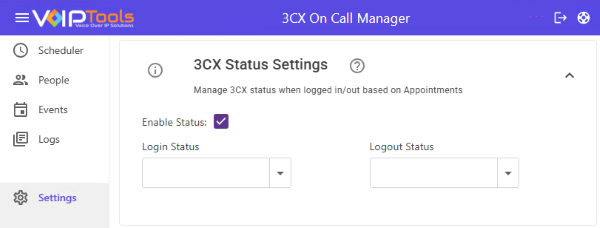
I. Enabling and Controlling Status Sync #
The top of the page controls whether OCM is actively managing your agents’ 3CX statuses.
| Setting | Purpose | Key Details |
| Enabled Status (Checkbox) | This is the master switch for the whole feature. | When this box is checked, OCM will start updating the presence status of extensions based on your schedules. If it’s unchecked, OCM will not change any agent statuses. |
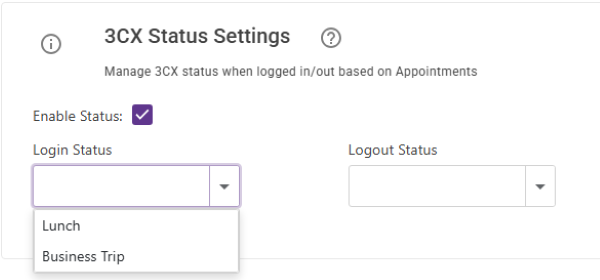
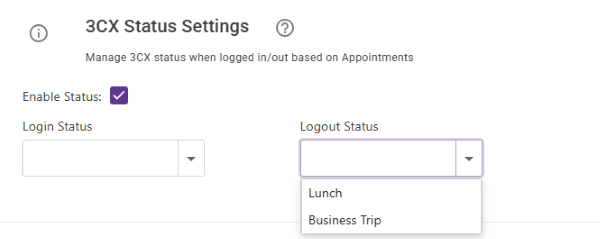
II. Configuring Login and Logout Statuses #
These settings tell OCM exactly what status to apply in 3CX when a scheduled shift starts and what status to apply when it ends.
| Setting | Purpose | When is it Applied? |
| Login Status (Dropdown) | The status that will be automatically applied to the agent’s 3CX extension. | Applied at the start of their scheduled working hours. |
 |
||
| Logout Status (Dropdown) | The status that will be automatically applied to the agent’s 3CX extension. | Applied at the end of their scheduled working hours. |
 |
||
How the Feature Works #
This feature creates a direct link between the OCM scheduling tool and the 3CX phone system:
-
Shift Starts: When the time on the schedule matches the current time, OCM applies the Login Status to the agent’s 3CX extension.
-
Shift Ends: When the shift ends, OCM applies the Logout Status to the agent’s 3CX extension.
This ensures that the 3CX phone system always knows who is responsible and available for the incoming calls defined in your Monitor Settings.
Retention Policy #
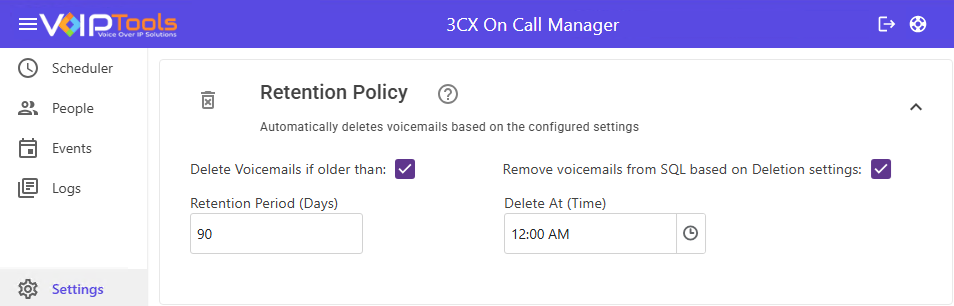
The Retention Policy Settings manage the automatic cleanup of old voicemail files to save disk space and keep your system tidy. This feature lets you define how long voicemails should be kept before they are permanently deleted.
I. How the Retention Policy Works #
The most important thing to know is that this policy only affects voicemails that came through the extensions you have set up in your Monitor Settings. It will not touch other voicemails in your 3CX system.
When the policy runs, it deletes the voicemail from two places:
-
3CX System: The actual audio file is removed.
-
SQL Database: The record of the voicemail is removed from the OCM database (if configured).
II. Configuring the Deletion Schedule #
Use the settings below to define the criteria and timing for the automatic cleanup process.
| Setting | Purpose | Key Details |
| Delete Voicemails if Older Than (Checkbox) | This is the master switch to turn the automatic deletion feature ON or OFF. | Check this box to activate the policy and begin deleting old files. |
| Retention Period (Days) | The maximum number of days you want to keep a voicemail. | OCM compares the current date to the voicemail’s creation date. Any voicemail older than this number of days will be marked for deletion. |
| Delete At (Time) | The exact time of day when the system will run the deletion process. | Set this to a time when your system is generally idle (e.g., 2:00 AM) to avoid impacting performance during business hours. |
| Remove Voicemails from SQL Based on Deletion Settings (Checkbox) | Tells OCM to also clean up the historical records in its database. | Checking this box ensures that the voicemail record is completely removed from both the 3CX server (audio file) and the OCM database (data entry).” |
Role Access Permissions #
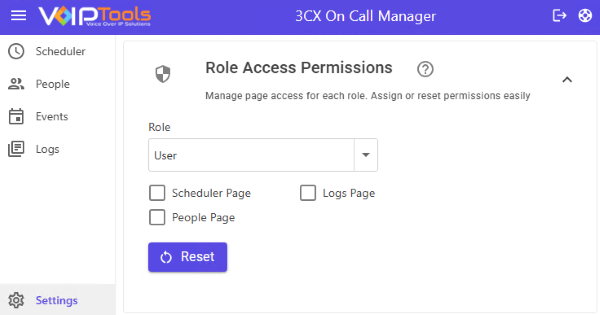
The Role Access Permissions feature allows you to control exactly which parts of the On Call Manager application (the pages or menus) different types of 3CX users can see and access. This is essential for maintaining security and ensuring users only see the tools they need.
I. How to Configure Permissions #
-
Select a Role: Use the Role dropdown menu at the top of the page to choose the user group (role) you want to modify (e.g., User, Department Administrator, etc.).
-
Edit Access: Below the dropdown, you will see a list of OCM pages. Check the box next to a page name (e.g., Scheduler Page) to grant access to users with the selected role, or uncheck the box to deny access.
-
Save Changes: After modifying the permissions, click Apply to save the new settings.
Restoring Default Settings #
If you make changes and want to revert to the factory settings for the selected role, click the Reset button. This will discard your recent changes and restore the original permissions (see default access below).
II. Default Access Permissions #
The system starts with the following default permissions. Note that these can be changed unless the user is a System Administrator.
| User Role | Default Access | Summary of Access |
| System Administrator / System Owner | Full access to all Pages | Has complete control and can see every menu and setting. |
| Department Administrator / Manager / Owner | Scheduler Page, People Page, Events Page, Logs Page, Monitor Settings Page | Can manage most operational aspects, including schedules and user lists. |
| User / Receptionist | Events Page | Limited access, usually only able to view the live events and their own activity. |
If an agent’s Extension is specifically granted administrator rights in the OCM Admin Settings panel, they will automatically override all other permissions and be granted Full access to all pages, regardless of the settings defined here.
#
Custom Branding #
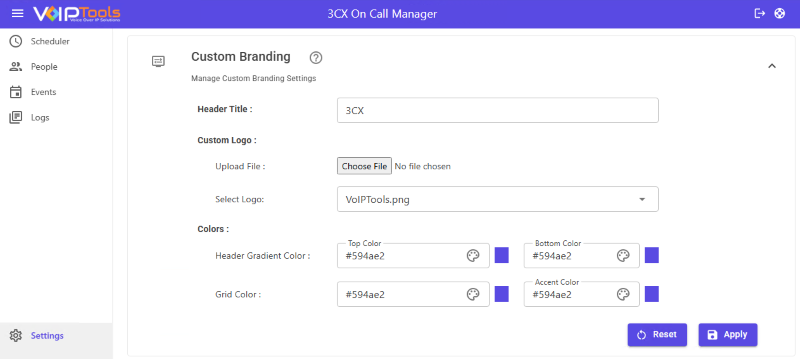
The Custom Branding feature allows you to personalize the look and feel of the On Call Manager web portal. You can change the colors, update the logo, and set a custom title to match your company’s identity.
I. Logo and Title Customization #
These settings control the text and image that appear in the main application header.
| Setting | Purpose | How to Use |
| Header Title | The text that appears at the very top of the OCM pages (e.g., Your Company On-Call Portal). | Type the desired title into the text box provided. |
| Upload File | To upload a new logo from your computer. | Click Choose File and select a logo image (e.g., .png or .jpg format). |
| Select Logo | To use a logo that has already been uploaded. | Choose the file name from the dropdown list. The selected image will appear in the application’s header. |
II. Color Scheme Customization #
You can use the color pickers to select specific colors for the main parts of the interface.
| Setting | Purpose | What it Affects |
| Header Gradient Color | Creates a smooth transition between two colors in the header area. | Choose two colors (a top color and a bottom color) using the color pickers provided. |
| Accent Color | The color used for titles and important text headers throughout the application. | Select a color that you want applied to all text headers in the interface. |
| Grid Color | The background color used for all data tables (grids) within the application. | Select a color for the table backgrounds to improve visual separation. |
III. Actions #
These buttons control how you manage your design changes.
| Action | Purpose | Key Details |
| Apply | Saves and applies all the changes you have made (title, logo, and colors) to the web portal. | Always click Apply after making any changes to see them take effect. |
| Reset | Reverts all color settings back to the original default colors. |
Use this if you want to discard your color changes and start over. |
#
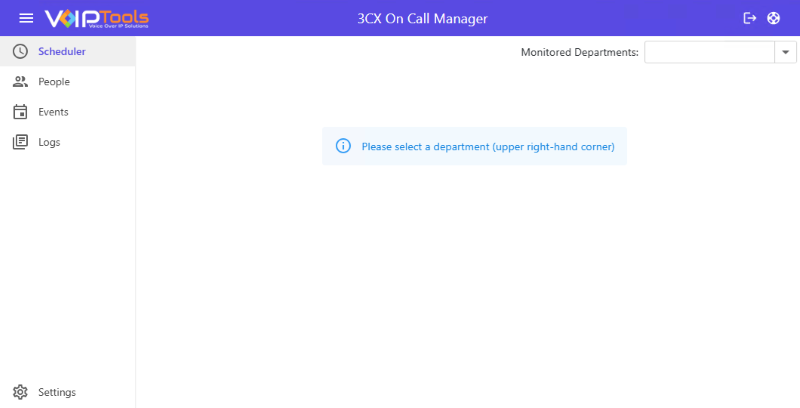
Scheduler Tab #
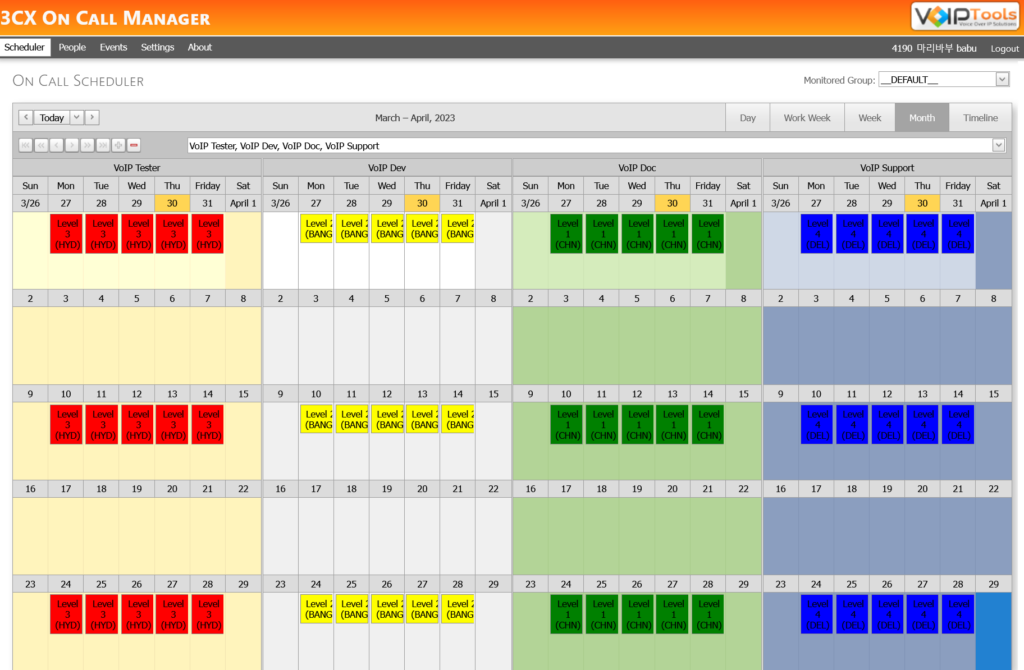
The Scheduler screen enables you to control visible resource count, view resource appointments for a specific date and in desired calendar format, create new appointments and edit/ delete existing appointments, set levels for resources, and set reminders for appointments and events
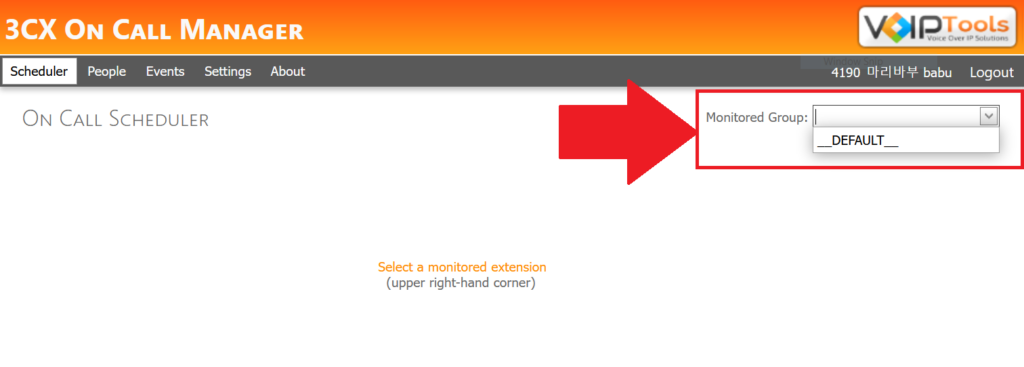
Default View #
The Scheduler tab does not display any Monitored Groups by default.
As a ‘Manager’, you can view and create schedulers only for those groups to which you are manager while as an ‘Admin’, you can create and view for all the groups.
The default view of the Scheduler tab when no monitored group is selected,
Overview of Scheduler tab #
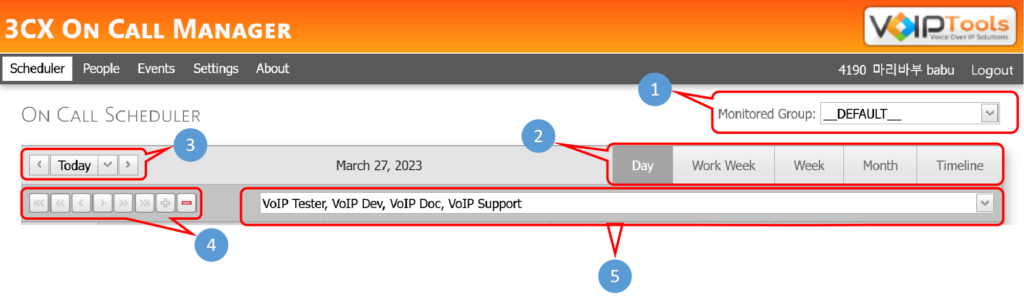
The Scheduler tab has the following buttons to assist you in scheduling calls to your resources.
| Monitored Group | Select the monitored group. |
| Calendar Format | The Shortcut Icons facilitate task execution with a single click. |
| Day Selection | choose the preferred time period for scheduling events/appointments with their resources. |
| Shortcut Icons | Perform tasks in a single click |
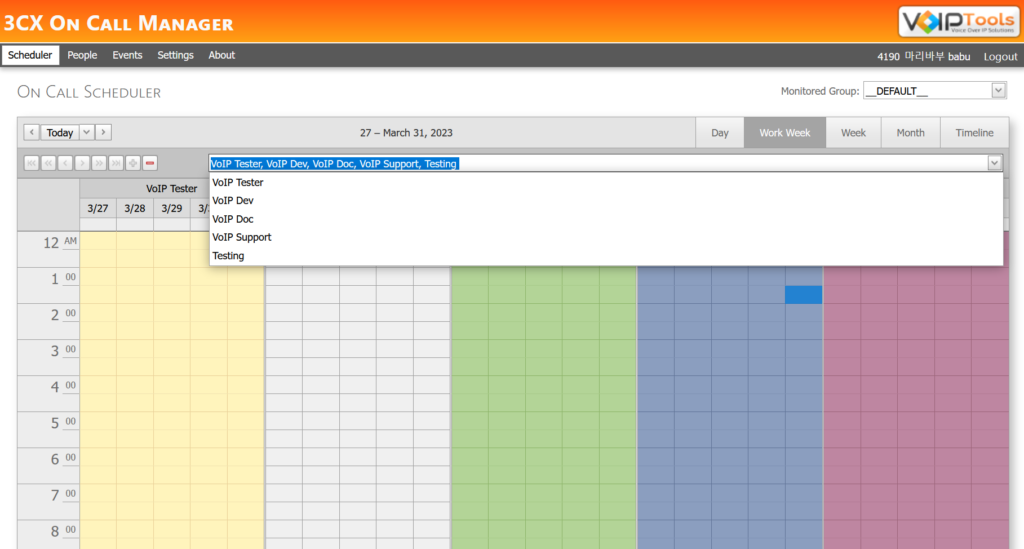
| Resources List | Displays the resources available for the selected Monitored Group. |
Monitored Group #
The Monitored Group list lets you select the group to monitor.
Shortcut Icons #
The Shortcut Icons lets you perform the tasks listed below in a single click.
 |
First button | Lets you select the first agent from the ‘Visible Resources’ list |
 |
The Previous Page button | Lets you view resources from previous page of the ‘Scheduler’ |
 |
Previous button | Lets you go to the previous resource |
 |
Next button | Lets you to go to the next resource |
 |
Next Page button | Lets you to view resources in the next page of the ‘Scheduler’ |
 |
Last button | Lets you to view last resource from ‘Visible Resource’ list |
 |
Increase visible resources count | Lets you to add one resource at a time in consecutive order from the ‘Visible Resources Count’ list |
 |
Decrease visible resources count | Lets you to remove one resource at a time in the order you added from the ‘Visible Resources Count’ list |
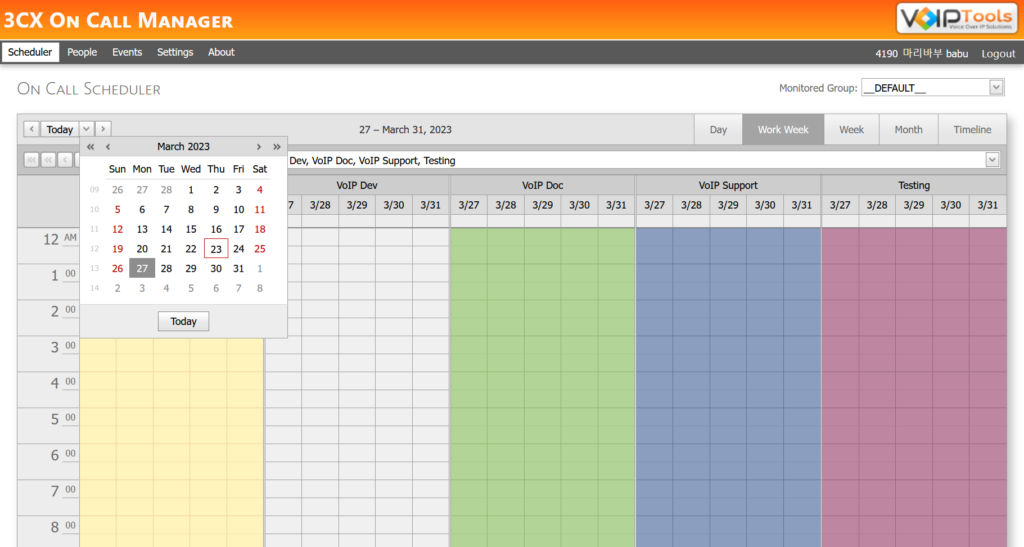
Calendar Formats #
On the right-hand side of the ‘Calendar’ header, you can select the appropriate tab to view the scheduled appointments of the visible resources in various calendar formats like Day, Work Week, Week, Month or Timeline.
| Day | Displays all the visible resource appointments for a specific date in day format. |
| Work Week | Displays all the visible resource appointments in the work week (Monday-Friday) format. |
| Week | Displays all the visible resource appointments in a weekly (Sunday-Saturday) format. |
| Month | Displays all the visible resource appointments in a monthly format. |
| Timeline | Displays all the visible resource appointments in a timeline format. |
Day Selection button #
The Day Selection buttons let you select the desired time frame to schedule events/appointments for your resources.
|
Previous | Takes you to the previous sheet of the selected time frame. For example, if you have selected Week in the Calendar Formats, the Previous button button takes you to the previous week. |
|
Next | Takes you to the next sheet of the selected time frame. For example, if you have selected Week in the Calendar Formats, the Next button button takes you to the next week. |
 |
Go To Date | Lets you to select the specific date that you want to schedule the events. |
Resource list #
The Resource list displays the resources available for the selected Monitored Group.
Right Click menu #
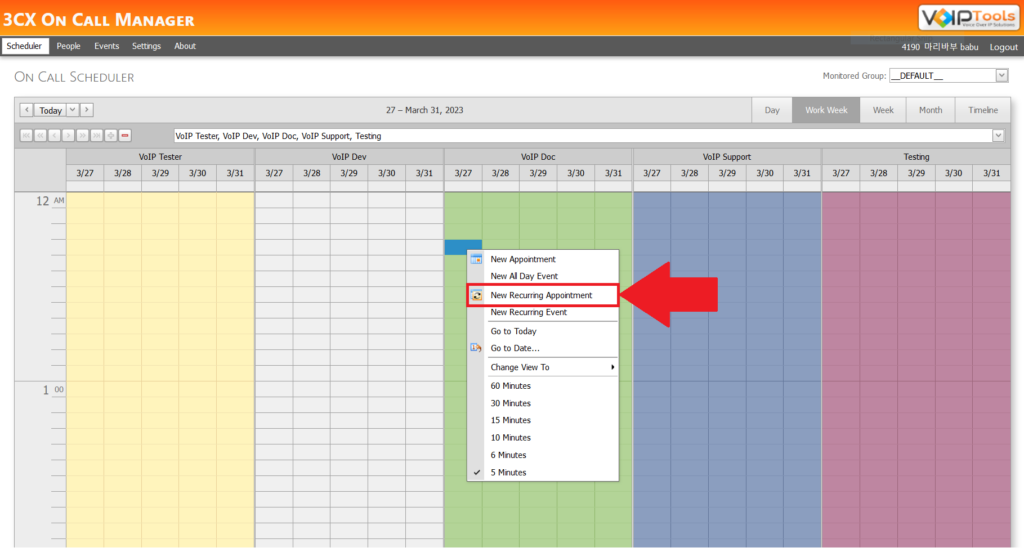
New Event/Appointment Right Click menu: #
You can right click anywhere on the grids to open the right click menu. Read further to know the definitions of each options.
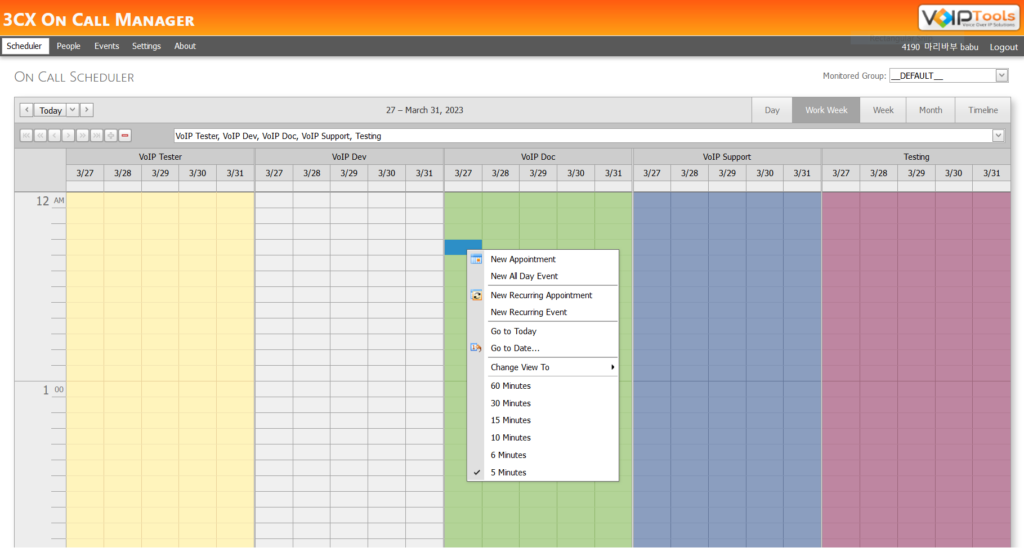
| NEW APPOINTMENT | Select this option to create new appointment for a resource |
|---|---|
| NEW ALL-DAY EVENT | Opens an Appointment dialog box with All Day Event box checked |
| NEW RECURRING APPOINTMENT | Opens an Appointment dialog box with Recurring box checked. |
| NEW RECURRING EVENT | Opens Event dialog box to create a new event for a resource |
| GO TO TODAY | Opens Scheduler screen in “Today’s” date |
| GO TO DATE… | Opens Go To Date box that enables you to select specific date and calendar format in which you want to view the Scheduler screen |
| CHANGE VIEW TO | Lets you select the desired calendar format. |
| 60 MINUTES | Lets you view the Scheduler screen that divides the grid to show time interval in terms of 60 minutes. Similarly, you can view the grid in other time divisions like 30 minutes, 15 minutes, 10 minutes, 6 minutes, or 5 minutes. |
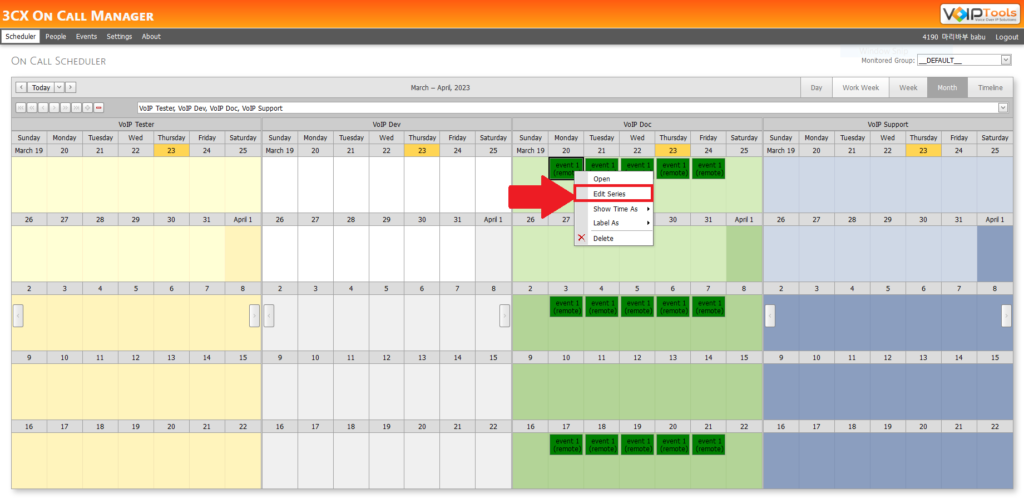
Edit Appointment/Event Right Click menu: #
You can right-click anywhere on the existing appointment to open the Right Click menu. Read further to know the definitions of each option.
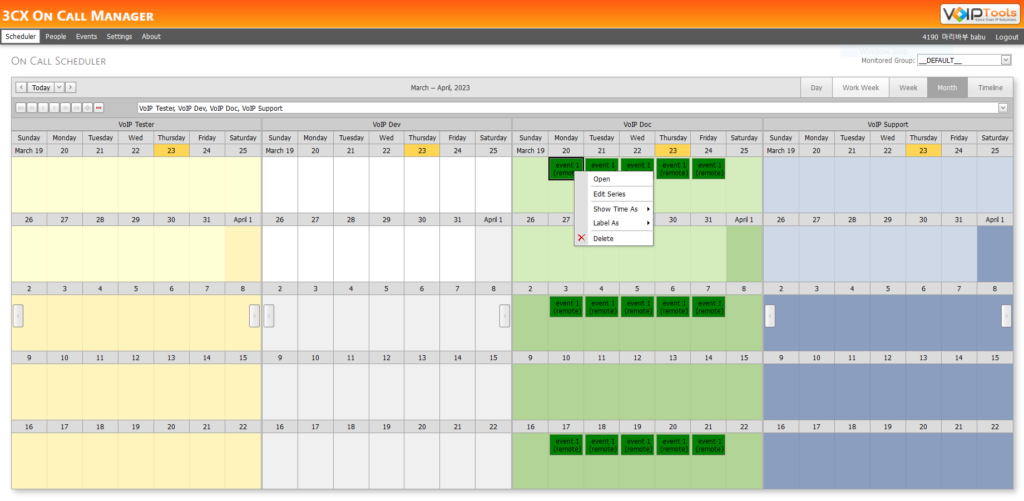
| OPEN | Enables you to open selected appointment |
|---|---|
| EDIT SERIES | Enables you to edit all occurrences of the selected recurring appointment |
| SHOW TIME AS | Edits Show Time As for the selected appointment as Free, Tentative, Busy, Out of Office or Working Elsewhere. |
| LABEL AS | Edits Label As for the selected appointment to the desired escalation level. |
| DELETE | Enables you to delete the ‘Series’ or ‘Occurrence’ of an appointment. |
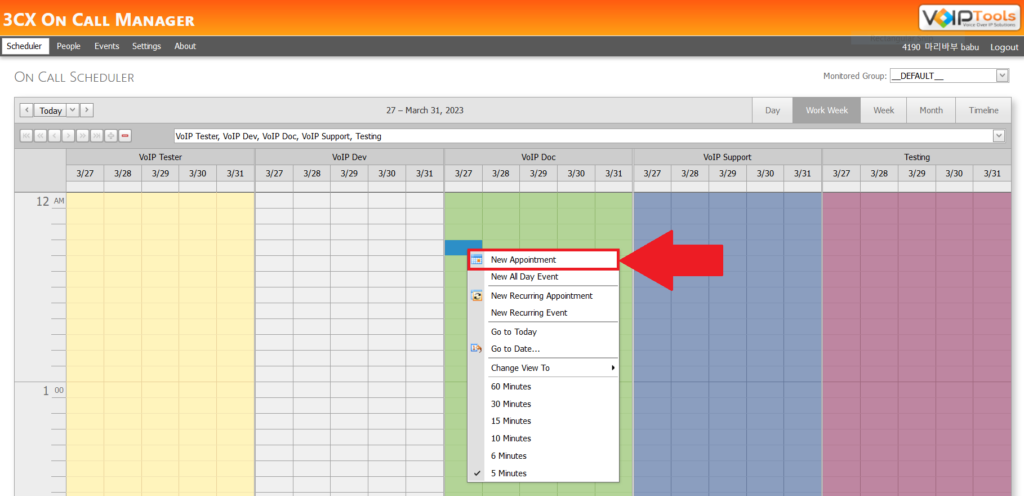
Create an Appointment #
To create an appointment,
-
- Open the Right Click menu.
-
- Click the New Appointment option.
You can create two types of appointments,
-
- Non Recurring Appointments
-
- Recurring Appointments
Non Recurring Appointments #
Non-recurring appointments create appointments for the resources only for the specified date and time. Follow the procedure to create a non-recurring appointment,
-
- In the Right Click menu, click the New Appointment option.
-
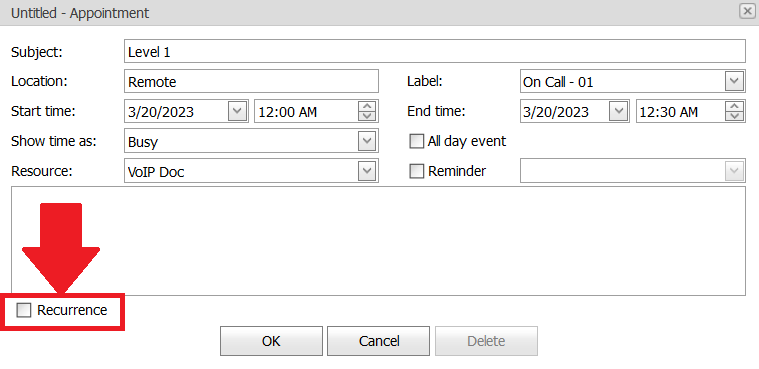
- Enter the required details in the New Appointment box.
-
- Click the OK button to save your appointment.
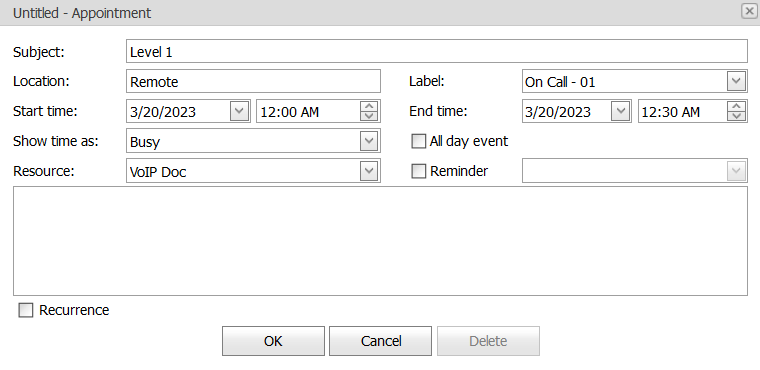
| SUBJECT | Brief description of the appointment |
|---|---|
| LOCATION | Location of the agent for whom you are creating the appointment |
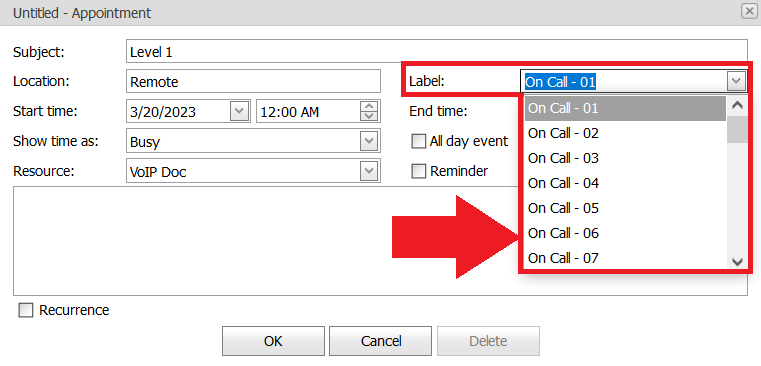
| LABEL | Escalation evel in which you want to place the agent |
| START TIME | The date and time from which the ‘On Call’ time starts for the agent |
| END TIME | The date and time at which the ‘On Call’ time ends for the agent |
| SHOW TIME AS | Specifies the work status of the agent as busy, free, tentative, out of the office or working elsewhere. Show time as is valid for Start time to End time |
| ALL DAY EVENT | If the schedule is for the complete day, then check the All day event box. If you check this box, you will observe that the time selection box (from ‘Start time’) will disappear. |
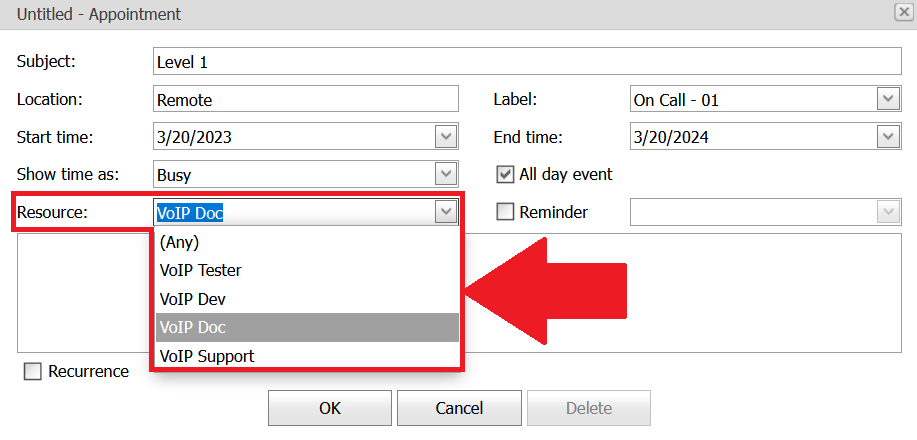
| RESOURCE | Select the agent from the dropdown for whom you are creating the appointment. |
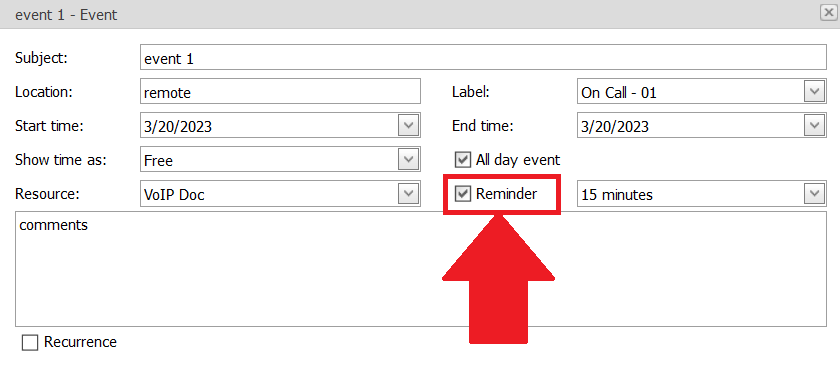
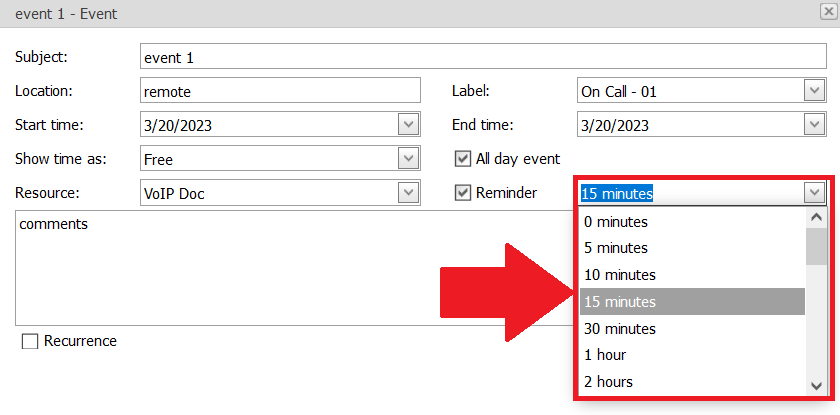
| REMAINDER | Check this box if you want to remind the appointment to the agent. You can select the time from the dropdown so the agent receives the reminder message after the specified time. |
| RECURRENCE | If you want the appointment to recur, check the Recurrence box. From the available options select the appropriate value (Daily, Weekly, Monthly, Yearly, Every—day(s) or Every weekday) for the appointment to recur. |
| NO END DATE | Select this option if you do not want to stop the recurrence of the appointment. |
| END AFTER | Select the appropriate number from the drop-down so that the appointment recurrence will occur for the specified number of times. |
| END BY | Select this option and select the appropriate date from the ‘Date’ drop-down so that the appointment recurrence will end by the specified date. |
Recurring appointment #
Recurring appointments create a repeated appointment for the resources until the end date. Follow the procedure to create a recurring appointment,
-
- You can open the recurring appointment settings in two ways,
-
- In the Right Click menu click the New Recurring Appointment option
-
- You can open the recurring appointment settings in two ways,
-
- You can select the Recurrence checkbox to create a new recurring appointment.
-
- Set the recurrence as Daily, Weekly, Monthly, or Yearly by selecting the appropriate radio button.
-
- Select the No End Date radio button to stop the recurrence after a set period or unselect the No End Date radio button for continuous recurrence of appointments.
-
- Click the OK button to save the recurring appointment.
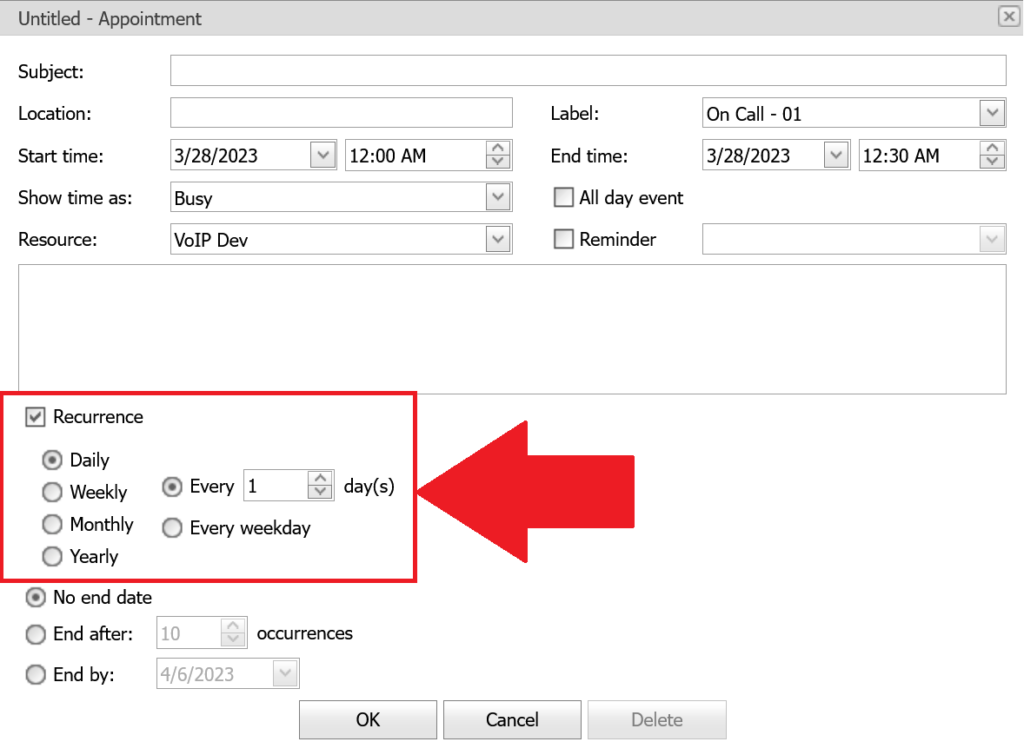
Set Daily Recurrence #
To set daily occurrences, follow the steps,
-
- In the Appointment box, select the Recurrence box to schedule a recurring appointment.
-
- Select the Daily radio box to set the appointment repeat daily.
-
- Set the daily occurrence in any of the following ways,
-
- In the Days field, set the number of days. The appointment repeats after the set days.
-
- Select the Every Weekday radio button to repeat the appointment from Monday to Friday.
-
- Set the daily occurrence in any of the following ways,
-
- Click the OK button to save the recurring appointment.
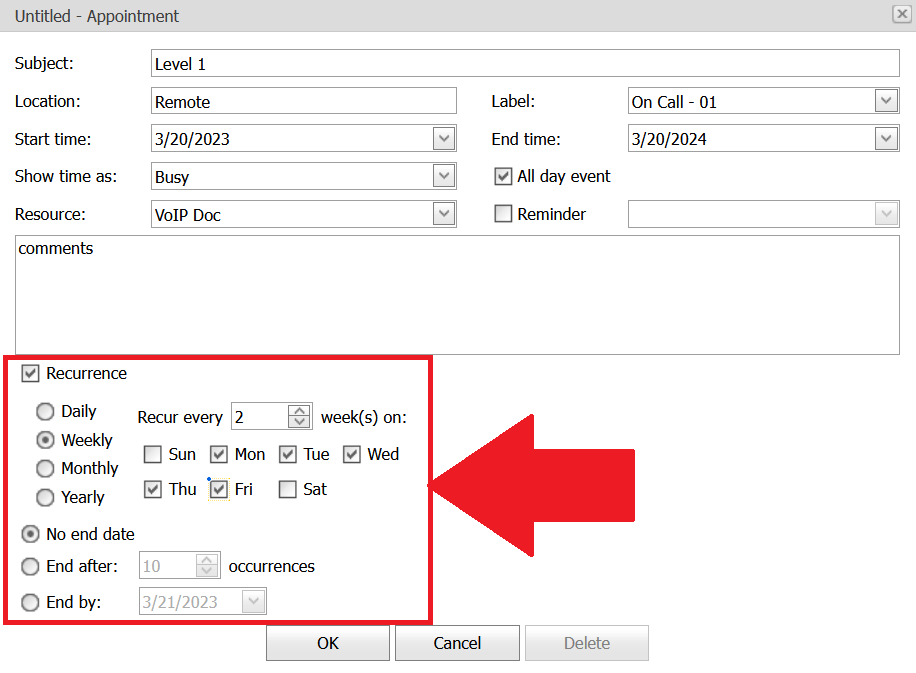
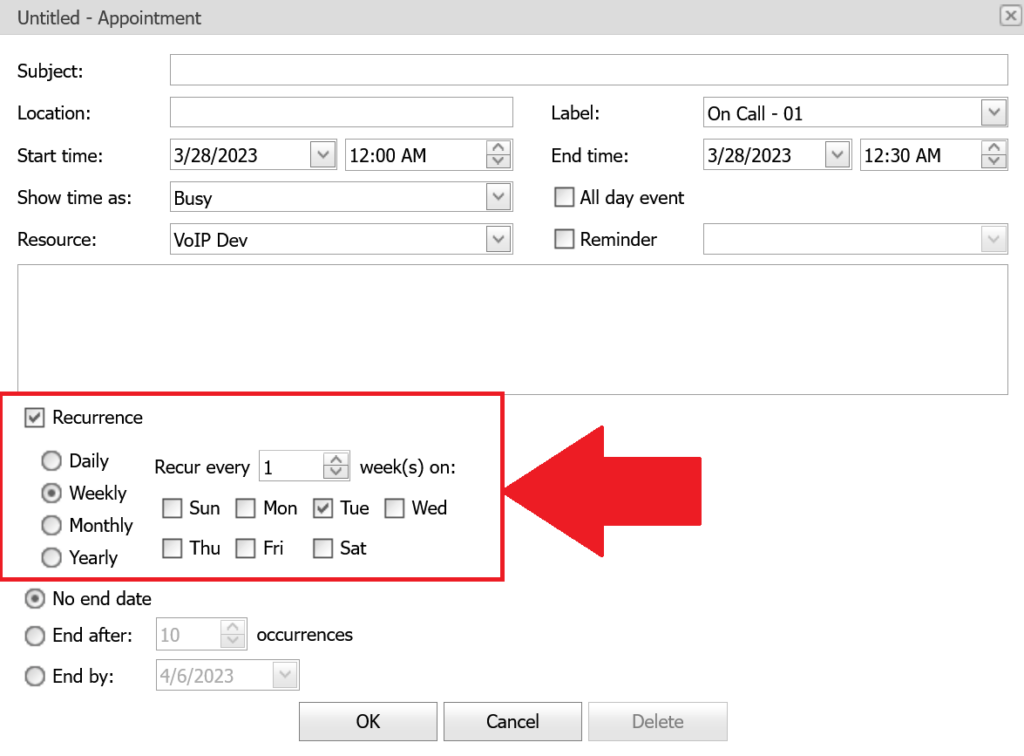
Set Weekly Recurrence #
To set weekly occurrences, follow the steps,
-
- In the Appointment box, select the Recurrence box to schedule an recurring appointment.
-
- Select the Weekly radio box to make the appointment repeat weekly.
-
- In the Weeks field, set the number of weeks. The appointment repeats after the set number of weeks.
-
- Select the Day on on which you want the appointments to repeat weekly.
-
- Click the OK button to save the recurring appointment.
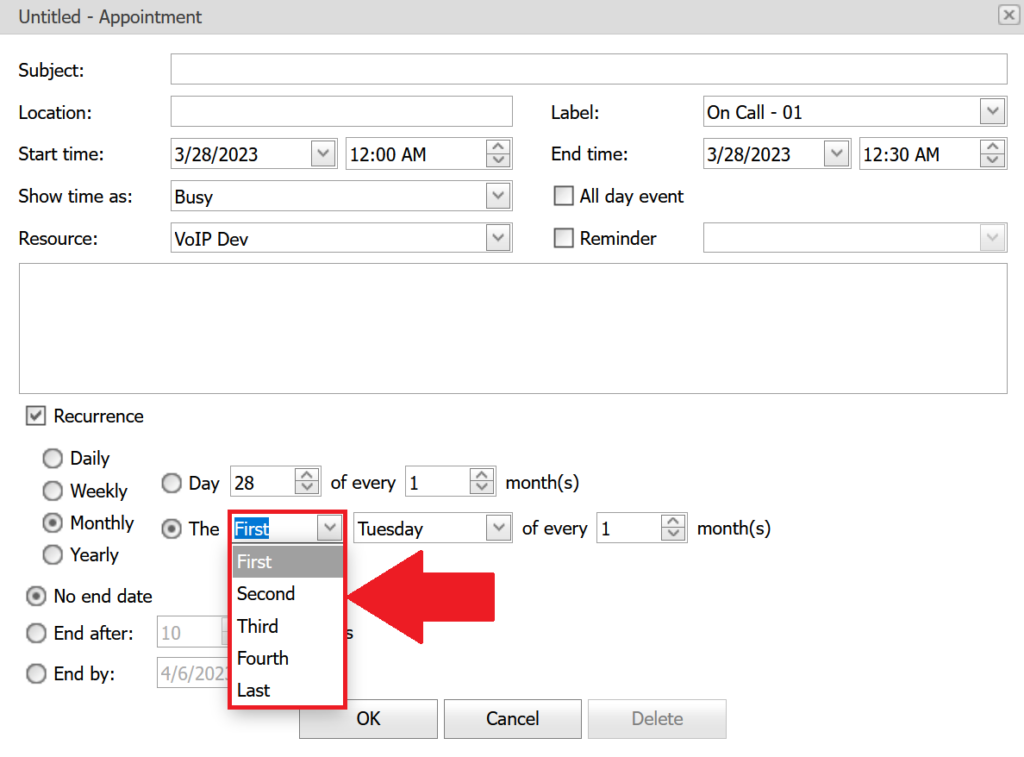
Set Monthly Recurrence #
To set monthly occurrence, follow the steps,
-
- In the Appointment box, select the Recurrence box to schedule a recurring appointment.
-
- Select the Monthly radio box to make the appointment repeat monthly.
-
- Set the Monthly occurrence in any of the following ways,
-
- Monthly Recurrence on specific date,
-
- In the Day field select the day
-
- In the Month field select the number of months after which you want the appointment to repeat.
-
- Example: To repeat the appointment on 20th of every Two months,
-
- Set 20 in the Day field.
-
- Set 2 in the Months field.
-
- Example: To repeat the appointment on 20th of every Two months,
-
- In the Month field select the number of months after which you want the appointment to repeat.
-
- Monthly Recurrence on specific date,
-
- Monthly recurrence on a specific day in a month,
-
- Select the desired week of a month in the Week dropdown.
-
- Monthly recurrence on a specific day in a month,
-
- Set the Monthly occurrence in any of the following ways,
-
-
- In the Day dropdown, select the desired day of the selected week.
-

-
-
- Select the number of months in the Months field.
-
- Click the OK button to save the recurring appointment.
Set Yearly Recurrence #
To set yearly occurrence, follow the steps,
-
- In the Appointment box, select the Recurrence box to schedule a recurring appointment.
-
- Select the Yearly radio box to make the appointment repeat yearly.
-
- Set the Yearly occurrence in any of the following ways,
-
- Yearly occurrence by selecting a specific date,
-
- In the Month dropdown, select the desired month.
-
- Yearly occurrence by selecting a specific date,
-
- Set the Yearly occurrence in any of the following ways,

-
-
- In the Date field, enter the date at which appointment repeats yearly for the selected month.
- Yearly occurrence by selecting specific day in a year.
- In the Week dropdown, select the week.
-

-
-
- In the Day dropdown, select the day of the selected week.
-

-
-
- In the Month dropdown, select the month at which you want the appointment to repeat yearly.
-

-
- Click the OK button to save the recurring appointment.
Edit an Appointment #
To edit an existing appointment, follow the procedure,
-
- On the existing appointment, right-click on the appointment to open the Right Click menu.
-
- On the Event or Appointment edit the necessary details.
-
- Click the OK button to save the Event or Appointment.
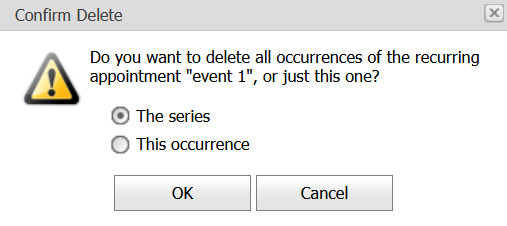
Delete an Appointment #
-
- On the existing appointment, right-click on the appointment to open the Right Click menu.
-
- Click the Delete
 option.
- Click the Delete

-
- In the Confirm Delete warning message, select any of the following options,
| This Series | To delete the entire series of recurring events |
| This Occurrence | To delete only the selected appointment. |
-
- Click the OK button to confirm your deletion.
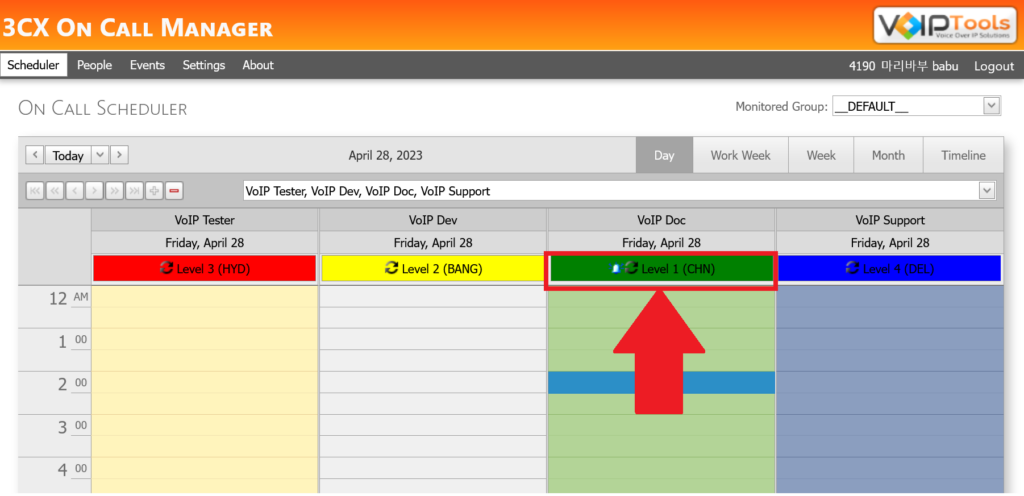
Set level for resources #
The On Call Manager lets you set different levels of escalations for your resources. Follow the procedure to set different levels for your resources,
-
- In the New Appointment Right Click menu click the New Appointments option or in the Edit Appointment Right Click menu click the Edit Appointments option.
-
- In the Label dropdown, select level for your resource.
-
- In the Resource dropdown, select the resource to assign the set level.
-
- Click the OK button to save your changes.
The resources assigned to different levels are displayed in different colours on the Scheduler screen.
Set Reminders for events/appointments: #
The On Call Managers can remind a resource for an upcoming event or an appointment.
Follow the steps to remainder for events or appointments,
-
- In the New Appointment Right Click menu click the New Appointments option or in the Edit Appointment Right Click menu click the Edit Appointments option.
-
- Select the Remainder box to set remainders.
-
- In the Remainder dropdown, select the remainder time and click the OK button to save your changes.
The On Call Managers indicate an event or appointment having remainders with a Bell ![]() icon.
icon.
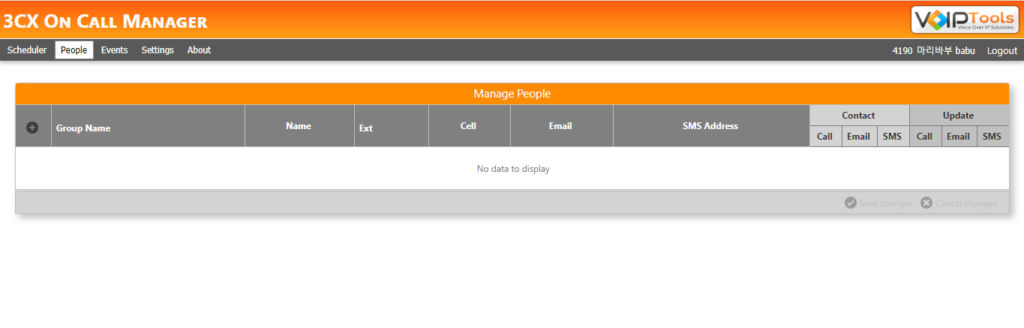
People #
The People tab lets you identify the resources (agents) available to be on call and how they are to be notified. The assumption is that these resources are employees and you have the right to get the cell phone carrier of your employees.
You can do the following taks in the people screen,
-
- Add people to the header column
-
- Notify the agents of the voicemail received in the monitoring extension
-
- Notify the agents if the voicemail is heard in the monitoring extension
NOTE:
As an Admin, you can view and create people for all the groups.

As an Manager, you can view and create people for only those groups to which you are manager.
Field Definitions #
| Group Name | A group created in 3CX which has agents for attending the calls. | |
| Name | Name of the resource from the Group assigned for the call. | |
| Extension | Extension of the resource | |
| Cell | Cellphone number of the resource | |
| Email SMS Address |
The SMS address of the resource.
|
|
| Contact Decides how an employee must be notified when a new call comes in. |
Call | Plays the New Prompt audio to the resource through call using the cellphone number provided. |
| Plays the New Prompt audio to the resource through Email using the Email addres provided. | ||
| SMS | Plays the New Prompt audio to the resource through SMS using the SMS addres provided. | |
| Update Decides how an agent must be notified when a call has been answered by some other person. This is useful when multiple agents are available for a call. |
Call | Plays the Heard Prompt audio to the resource through call using the cellphone number provided. |
| Plays the Heard Prompt audio to the resource through Email using the Email addres provided. | ||
| SMS | Plays the Heard Prompt audio to the resource through SMS using the SMS addres provided. |
Add people to the header column #
-
- To add people, on the header column, click the Add
 button.
- To add people, on the header column, click the Add
-
- From the Group Name dropdown list, select the group to which you want to create people.
-
- If you are a manager, then the dropdown lists only those groups to which you are a manager.
-
- If you are admin, then the dropdown lists all the groups from 3CX Management Console.
-
- From the Group Name dropdown list, select the group to which you want to create people.
-
- In the Name field, enter the agent’s name.
-
- In the Ext field, enter the extension number of the agent.
-
- In the Cell field, enter the cell number to which the agent receives the notification through call.
-
- In the Email field, enter the email address of the agent to which the notification should be sent.
-
- In the SMS Address field, enter the contact number to which the notification should be sent as sms.
-
- At the footer of the Manage People page, click Save.
Notify the agents of the voicemail received in the monitoring extension #
-
- On the People screen, in the Contact section, do the following,
-
- Check the Call box if you want to notify through call.
-
- Check the Email box if you want to notify through email.
-
- Check the SMS box if you want to notify through SMS.
-
- On the People screen, in the Contact section, do the following,
-
- Click Save
 to save your changes.
- Click Save
Notify the agents of the voicemail is heard in the monitoring extension #
-
- On the People screen, in the Update section, do any of the following,
-
- Check the Call box if you want to notify through call.
-
- Check the Email box if you want to notify through email.
-
- Check the SMS box if you want to notify through SMS.
-
- On the People screen, in the Update section, do any of the following,
-
- Click Save to save your changes.
- Click Save
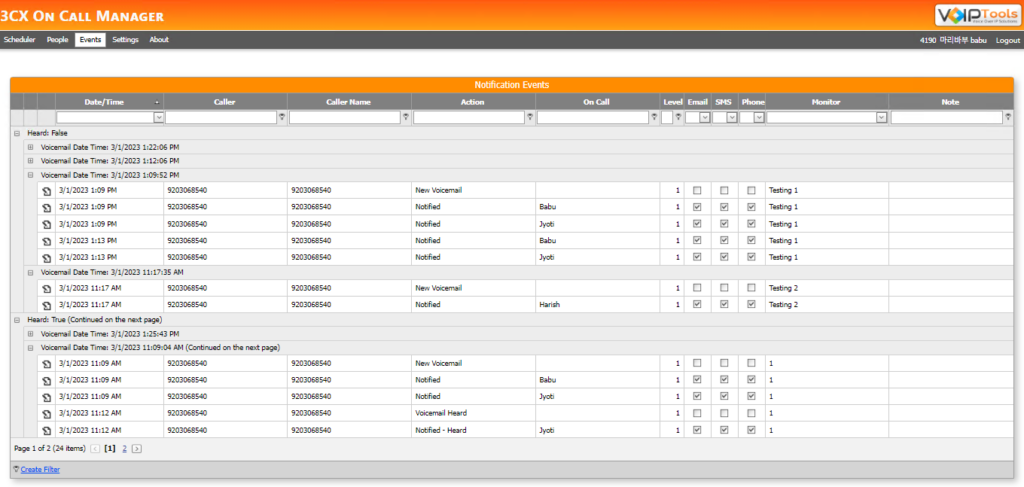
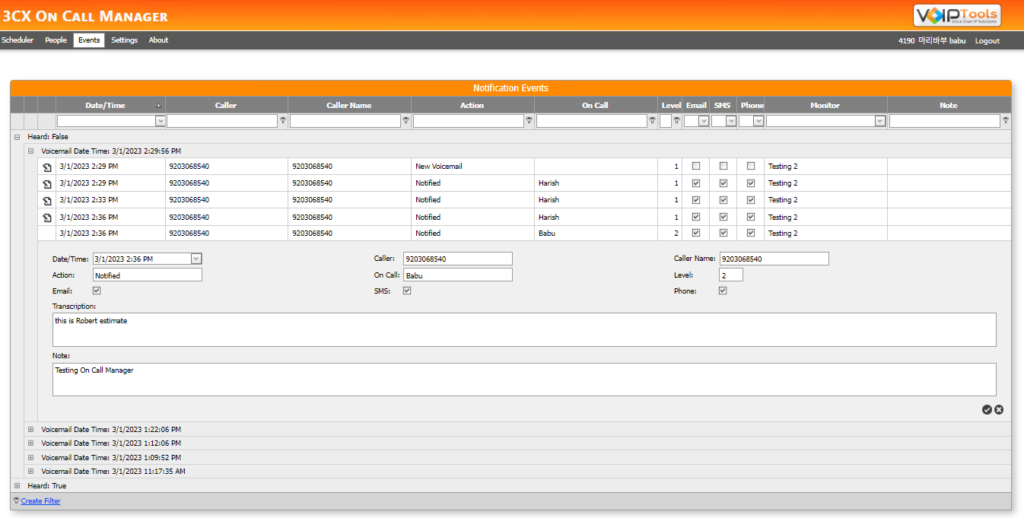
Events #
The Events tab is a call log that lets you know the incoming calls that were heard and that were not heard. You can view the call logs of all the ‘On Call’ events for all the monitored extensions between the agents and the customers. The details of every event include date/ time, caller extension, caller name, action, notification type, monitor extension, and notes.
You can perform the following tasks in the events tab,
-
- View log details
-
- Insert a note
Purpose of Events tab: #
-
- Identify whether the agents are picking up the call within the SLA period.
-
- Monitor the agent’s performance by checking the number of notifications missed by the agent.
-
- Make critical decisions when a customer complains about not keeping up with the promised SLA period.

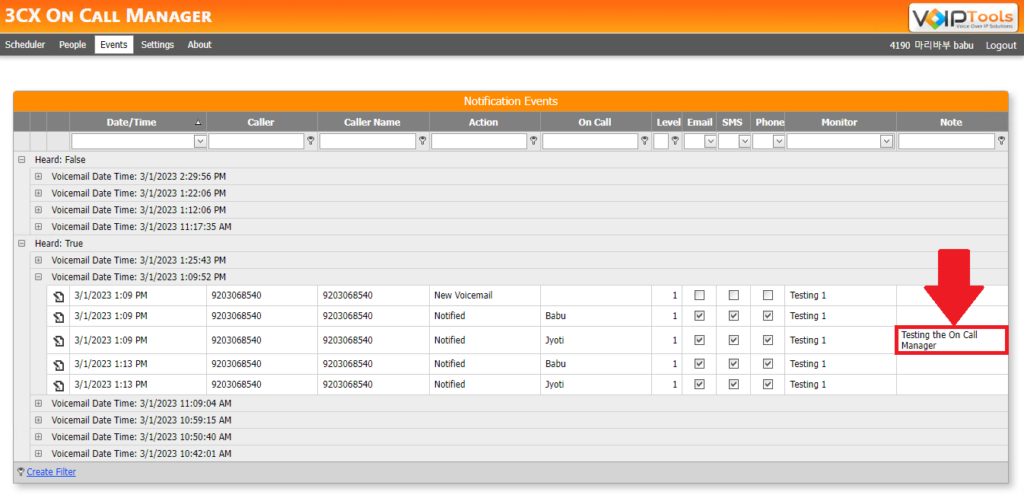
View log details #
-
- Click the Heard: False expand button
 to view the list of unattended calls or click Heard True expand button to view the list of attended calls.
- Click the Heard: False expand button

-
- Click the Expand button on any of the voicemails to see the list of calls.
- Click the Expand
-
- Click the Edit icon
 to view and edit an event. Read further to know the field definitions.
- Click the Edit icon
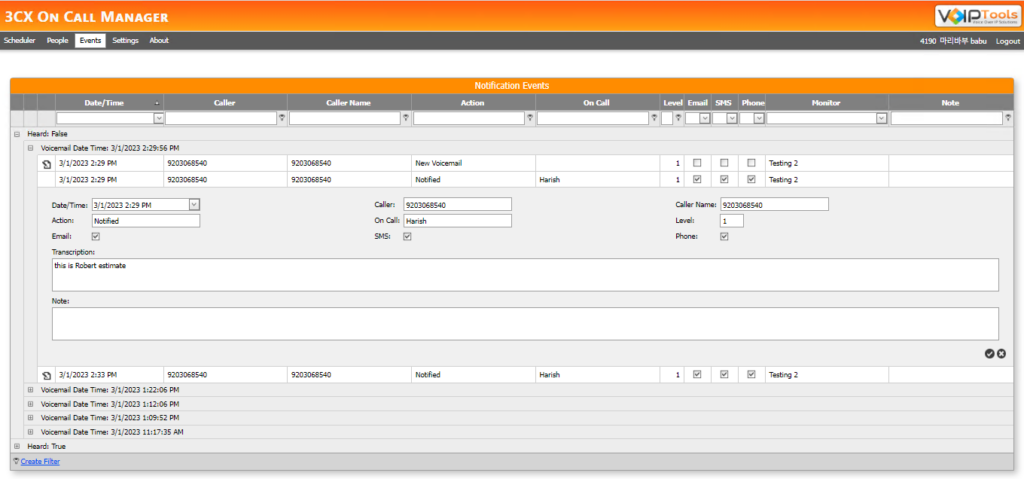
Insert a Note #
-
- Click the Heard: False expand button
 to view the list of unattended calls or click Heard True expand button to view the list of attended calls.
- Click the Heard: False expand button
-
- Click the Expand button on any of the voicemails to see the list of calls.
- Click the Expand
-
- Click the Edit
 icon to insert a note to the event and click Save
  to save the note.
- Click the Edit
The note is displayed in the Notes column.
Field definitions #
| Date/Time | The Date and Time at which the call is made. The date format is DD/MM/YYYY. The time format is HH: MM:SS in the twelve-hour clock. |
| Caller | The number of the caller who made the call. |
| Caller Name | Name of the caller who made the call. |
| Action | Indicates whether the status of the call (attended/missed) is notified to the agent. |
| On Call | The agent who received the call. |
| Level | Level assigned to the agent. |
| Email box | It is selected when the agent is notified by email. |
| SMS box | It is selected when the agent is notified by SMS. |
| Phone box | It is selected when the agent is notified by SMS. |
| Transcription |
The transcript of the call.
|
| Note | Text area to write notes about the call. |
Need Support? #
You get quick answers to most of your inquiries in our online manual. If you prefer direct contact, we offer various support channels, including phone, email, live chat, and our helpful VoIPTools forums.

24/7 Support Availability #
Rest assured, our dedicated team is here to assist you around the clock, every day of the year. Whether you're based in the USA or India, we're ready to provide prompt responses to your technical queries.

Windows Event Log for VoIPTools Applications and Services #
For troubleshooting any application errors, our Windows Event Log contains a comprehensive list of error messages, warnings, and informative notes related to all our VoIPTools applications and services. It's a valuable resource to help you pinpoint and resolve any issues you may encounter.

Join Our Forum Community #
Are you looking to collaborate with other VoIPTools customers facing similar challenges? Our forum is the perfect platform to exchange ideas, solutions, and best practices. Join the conversation at: https://www.voiptools.com/community/

Real-Time Live Chat Assistance #
Got questions that need immediate answers? Our chat support team is available to assist you in real time. Just click on the Live Chat button located at the lower right corner of our website, and we'll acknowledge your queries right away.

Efficient Email Support #
To ensure a thorough understanding of your concerns, email us at support@voiptools.com. Describe your issue in detail, and we'll get back to you within one business day with the support you need.

Reach Us by Phone #
If you prefer to speak with a representative directly, you can reach us at +1 801-642-4655. Our attentive team is available to take your calls from 8:00 AM to 6:00 PM (Central Standard Time).
Comprehensive support services: #

Free Support #
If you've purchased our products through a VoIPTools Partner, rest assured that they provide first-level support at no additional cost. Partners have access to 100% free technical assistance and actively participate in the troubleshooting process.
VoIPTools customers enjoy access to our online manuals and receive support through emails (with responses within one business day) and live chat. However, please note that we do not provide remote server login assistance.

Paid Support #
For a more hands-on experience, consider our "Installation Support" package. Our expert support team can log in to your servers, and install and configure all our tools. This comprehensive service includes setting up SQL Server Express and Internet Information Server if necessary. We'll work closely with you to tailor our applications to meet your requirements.
We're committed to providing top-notch support to ensure your VoIPTools experience is smooth and hassle-free. Contact us today, and let us assist you in making the most of our powerful tools!
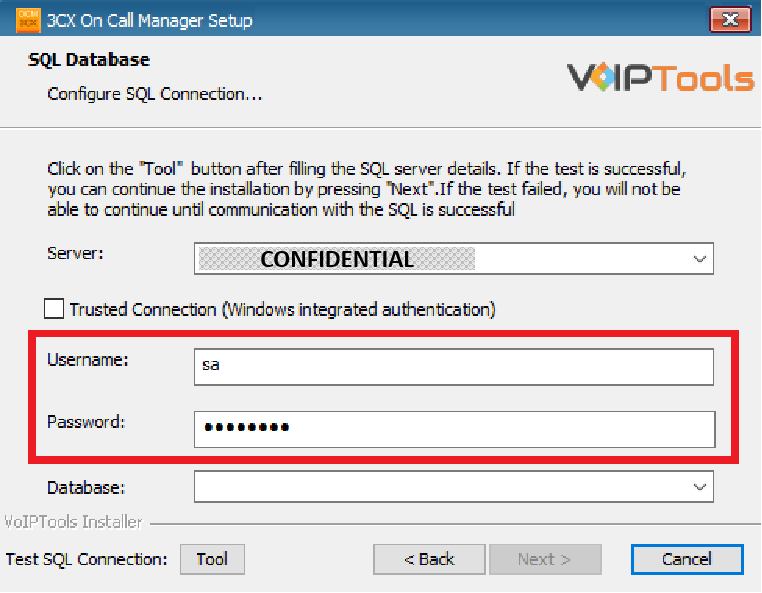 Figure 14: Configure Database – Database Credentials
Make sure that you select a SQL Login that has sufficient permissions to alter the database and create SQL objects.
-
- Select or enter the 3CX On Call Manager in the Database dropdown.
Figure 15: Configure Database – Database Dropdown-
- In the Test SQL Connections section, click the Tool button to test the connection and click OK in the Test Results popup box.
Figure 16: Configure Database – Database Connection Successful#
Windows Integrated Authentication #
-
- To use Windows Integrated Authentication check the Trusted Connection (Windows integrated authentication) checkbox.
-
- The VoIPTools installer will create a local Windows user name as “VoIPTools” and give you sufficient rights to this user to create/update the SQL database.
-
- To use Windows Integrated Authentication check the Trusted Connection (Windows integrated authentication) checkbox.
Figure 17: Configure Database Connection – Trusted Connection Checkbox-
- In the Test SQL Connection section, click the Tool button to test the connection.
-
- Click the Next button which gets enabled when the database connection is successful.
Figure 18: Configure Database – Trusted Connection Test Success Message
We encourage you to use SQL Authentication rather than Windows authentication. Many of our tools leverage a Call Flow Designer (CFD) application running on the 3CX. Frequently our CFD applications require access to a SQL database. If the 3CX server and the database server are not in an Active Directory domain, Windows authentication will fail. To use SQL authentication, your SQL Server must be configured to run in “Mixed Mode”. If you installed SQL Server with one of our tools, we configure SQL in “Mixed Mode”.
#
Step 6: Installing 3CX On Call Manager #
-
- In the Ready to Install window, click Install to start the installation of the ‘3CX On Call Manager’.
Figure 19: Ready To Install WindowThe application installation progresses. This may take several minutes to install.
Figure 20: Installation in Progress-
- Once the installation is complete, click the Finish button.
Figure 21: Finish Button#
Step 7: Log In to the Web Application #
-
- Double-click the 3CX On Call Manager desktop icon to open the web application.
- Double-click the 3CX On Call Manager desktop icon
-
- In the Login page, do the following tasks,
-
- In the Extension field, enter your 3CX extension number.
-
- In the PIN field, enter your 3CX voicemail PIN.
-
- Click the Login button to log in to your account.
-
- In the Login page, do the following tasks,
Figure 22: 3CX On Call Manager Web Portal LoginWeb Portal #
To access the ‘3CX On Call Manager’ web portal, click the Web Portal button on the configuration program, or click on the desktop icon that was created during the installation process (‘3CX On Call Manager’ Web).
Login Privileges #
As a Manager, you can have access to all the pages of the application.
Figure 23: Login as Manager• As an Agent, you can only access the ‘Events’ page.
Figure 24: Login as AgentSettings Menu #
The Settings Menu provides the centralized control panel for 3CX On Call Manager. From this comprehensive dashboard, you can manage core functions like general configuration, user rights, and monitoring, while also setting up communication channels (email/SMS), defining Retention Policies, and integrating with AI platforms. These controls ensure system security, optimized performance, and custom branding for your interface.
Figure 25: Settings Menu
|
General Settings |
Configure Notification settings and initiate or terminate the 3CX On Call Manager Windows Service. |
| Monitor Settings | Manage call queues and voicemail prompts for each department to ensure calls are directed properly, messages are organized, and prompts are clear to support efficiency and reducing missed calls. |
| Admin Settings | Managers are assigned via the Admin menu to modify schedules and settings. |
| Email Settings | Set up SMTP to enable email alerts and updates to ensure reliable notifications and stay informed without needing to check manually. |
| Email Template Settings | Create customized email and SMS messages, which are then dispatched as notifications to the recipients. |
| SMS | Select Email, Skyetel, or Twilio to send SMS messages for scheduled appointments, ensuring the required credentials for your chosen carrier are saved in the app settings for proper delivery. |
| AI Platform Settings | Allows critical response time for on-call agents by providing immediate, readable context for incoming issues through connecting to a chosen service (OpenAI, Azure, or Google Cloud Speech). |
| 3CX Status Settings | Automatically link your on-call agent schedules to 3CX by applying the selected Login Status during scheduled hours and the designated Logout Status when the shift ends. |
| Retention Policy** | Define a retention period (in days) to delete old voicemails in only those from extensions listed in the Monitor Settings from both the 3CX system and the SQL database at a specified time. |
| Role Access Permissions | Allows administrators to customize user access to specific OCM pages (like Scheduler and Logs) for any selected 3CX role, overriding default settings. |
| Custom Branding | Personalize the application’s appearance by setting a Header Title, uploading a custom logo, choosing gradient colors for the header, and selecting Accent and Grid colors throughout the interface.. |
General Settings #
The General Settings tab puts you in complete control of call escalation logic, ensuring no alert is missed. You can customize reliability by setting the exact number of Contact Attempts and the necessary waiting time between them before escalating a call to the next person. For efficiency and consistency, this tab also lets you apply a consistent Culture for date/time formatting and uses Prepend Digits to guarantee successful call routing within your 3CX system.
Figure 26: Settings Menu: General SettingsThe General Settings tab has the following menu options,
| Contact Attempts | Specify contact attempts to ensure prompt answers without excessive waiting. |
| Time Between Attempts |
Set the wait time in minutes between notification attempts to give the recipient a chance to respond without causing delays. |
| Escalation Levels | Set a limit on how many groups or users the alert cycles through to keep the on-call process efficient and prevent endless escalation. |
| Select Culture | Select a Culture to instantly standardize date, time, and currency formats across the app for a consistent user experience. |
| Prepend Digits | Set Prepend Digits to auto-adjust outbound numbers, ensuring reliable call routing in your 3CX system. |
#
Monitor Settings #
The Monitor Settings tab lets users manage call queues and voicemail prompts for different departments. This helps ensure calls are routed correctly, voicemails are organized, and prompts are clear, improving customer support efficiency and reducing missed messages.
Figure 27: Monitor Settings
I. Understanding the Monitor Table Fields #
Each row in the Monitor table defines one workflow. Click the + button (usually on the far left) to start a new Monitor.
| Field | What it Is | Why You Need It |
| Name | A unique, simple name (e.g., “Emergency IT Support”). | This is the name you’ll use later when you set up the actual On-Call Schedule. |
| Department Name | The 3CX Department this monitor belongs to (e.g., “Sales” or “Admin”). | Helps keep your inbound call flows and agent groups organized. |
| 1st Level Queue | (Optional) The 3CX Queue Extension where the call goes first. | If used, OCM automatically logs the scheduled agent into this queue so they might answer the call live. |
| Voicemail | The monitored Voicemail Extension. | This is the extension that OCM watches. When a voicemail is left here, the agent notification process begins. |
| ‘New’ Prompt | The Digital Receptionist (DR) audio message OCM calls and plays to agents when a new voicemail arrives. | It tells the agent there’s a new request and usually transfers them to the voicemail system to listen to the message. |
| ‘Heard’ Prompt | The DR message OCM calls and plays to agents after the voicemail has been listened to. | This is the “All Clear!” signal, confirming to all notified agents that the issue is now being handled. |
II. Adding New 3CX Components #
-
- Click the Add Queue button.
- Click the Add Queue
Figure: Add First Level Queue – Add Button-
- Enter the Queue Name and Fallback Extension in the Create New Queue dropdown.
Figure: Add First Level Queue – Queue Information-
- Click OK in the Success popup.
You can see your new queue added to the First Level Queue dropdown.
Add New Voicemail #
-
- Click the Add Voicemail button.
- Click the Add Voicemail
-
- Enter the first name and last name of the extension in the Create New Extension popup and click the Save button.
-
- Click OK in the Success popup.
You can see your new extension is now added to the Voicemail dropdown.
#
Add New IVR to the New Prompt Dropdown #
-
- Click the Add Extension button.
- Click the Add Extension
Figure: Add ‘New’ Prompt – Add Button-
- Enter the IVR name in the Create New Digital Receptionist popup and click the Save button.
Figure: Add ‘New’ Prompt – New Prompt Details-
- Click OK in the Success popup.
You can now see the IVR added to the New Prompt dropdown.
Add New IVR to the Heard Prompt Dropdown #
-
- Click the Add Extension button.
- Click the Add Extension
Figure: Add ‘Heard’ Prompt – Add Button-
- Enter the IVR name in the Create New Digital Receptionist popup and click the Save button.
Figure: Add ‘Heard’ Prompt – Heard Prompt IVR Details-
- Click OK in the Success popup.
You can now see the IVR added to the New Prompt dropdown.
#
Methods to Handle Incoming Calls #
You can set up two main call flow patterns based on whether you want the caller to wait for an agent first.
1. Without Using the ‘1st Level Queue’ Feature (Simple Flow) #
This is the fastest way to get the notification process started.
-
Flow: Inbound Call → Digital Receptionist → Voicemail
-
Process: The call goes straight to the monitored Voicemail Extension. Once a message is left, OCM is immediately triggered to notify the on-call agents.
Figure 32: Inbound Call Pattern without ‘1st Queue Level’ Feature
2. Using the ‘1st Level Queue’ Feature (Interactive Flow) #
This flow improves the customer experience by giving them a chance to speak to a live agent before leaving a message.
-
Flow: Inbound Call → Digital Receptionist → Queue → Voicemail
-
Process:
-
The call hits the Digital Receptionist.
-
OCM checks the schedule and automatically logs the on-call agents into the 1st Level Queue.
-
The caller waits in the queue for an agent to answer.
-
If the caller exceeds the maximum wait time, they are forwarded to the Voicemail Extension, which then triggers the OCM agent notification process.
-
Benefits of Using a First Level Queue:
| Improved Caller Experience | The caller waits in a queue, which reassures them that their call may be answered soon by an agent, rather than immediately going to voicemail. |
| Automatic Agent Login | The system automatically logs the scheduled agents into the queue just before the call is transferred, ensuring only on-call agents are handling the queue. |
| Fallback to Voicemail | If the hold time exceeds the defined limit, the caller is still routed to voicemail, ensuring the issue isn’t lost and agents can respond later. |
Figure 33: Inbound Call Pattern with ‘1st Level Queue’ Feature
Using the 1st Level Queue feature requires Remote Agents, which are only available in the 3CX Pro Edition (or higher).
You can insert special characters in the Department Name column.
How the Monitors menu changes settings in 3CX Console Management #
When you create something in the Monitor Settings, it automatically creates the corresponding changes inside the 3CX Phone Management Console.
| Action in OCM Monitors Menu | Result in 3CX Console Management |
| Creating a CFD, Voicemail Monitor, or Queue Monitor | Automatically updated in the respective list in the 3CX Phone Management Console. |
| Creating the 1st Level Queue | The queue is created in the Call Queues list. |
| Creating a Voicemail (monitored extension) | The voicemail extension is created in the Extensions list. |
| Creating the New Prompt or Heard Prompt | The Digital Receptionist is created in the respective list. |
- Your access is based on your role: Admins can create Monitors for all departments, while Managers can only view and create Monitors for the groups they manage.
#
Admin Settings #
The Admin Settings tab provides a streamlined method for assigning universal administrator access within the 3CX On Call Manager application, completely independent of the user’s roles within the 3CX Phone System itself.
Understanding the Admin Role in OCM #
The core function of this screen is to elevate a standard 3CX extension user to a global OCM Administrator.
-
Universal Access: Any user granted Admin rights via this screen will have unrestricted access to all settings, schedules, logs, and monitoring pages across the entire 3CX On Call Manager application.
-
Department Agnostic: OCM Admins can view and edit schedules and settings for all departments, regardless of whether their 3CX extension belongs to that department.
-
3CX Role Override: This setting takes precedence over the user’s assigned role in 3CX (e.g., User, Receptionist, Manager). Even if a user is designated as a standard “User” in 3CX, checking their extension here grants them full OCM Admin status.
Figure 29: Admin Settings Overview
Only grant Admin access to essential system owners or IT managers. Granting too many users this level of privilege increases security risk and potential for accidental configuration errors.
#
Email Settings #
The Email Settings tab is where you configure the SMTP server details, allowing OCM to send out notifications and test emails.
#
#
I. SMTP Server Connection Details #
| Setting | Description | Example / Standard Value |
| Email Server / FQDN | Enter the IP address or Fully Qualified Domain Name (FQDN) of your mail server. |
|
| SMTP Port | Enter the port number your mail server uses for outgoing mail. |
Standard: 25. For secure servers (like Gmail/Google Workspace): 587. |
| Email From | Enter the email address the notifications will appear to be sent from. |
|
| Email Subject | Enter the subject line that will be used for the Test email. |
Defaults to |
II. Authentication and Security #
This section ensures OCM can securely connect and log into the mail server.
| Setting | Control Type | Purpose |
| Requires Authentication | Checkbox () | Check this box if your mail server requires a username and password to send emails. |
| Username | Text Field |
If authentication is required, enter the full username or email address used to log into the SMTP server (e.g.,
|
| Password | Password Field |
Enter the password associated with the username. Tip: Click the … button next to the field to temporarily show or hide the password for verification.
|
| Requires SSL / TLS | Checkbox () |
Check this box if your mail server requires a secure connection (Secure Sockets Layer or Transport Layer Security). Cloud services like Gmail, Google Workspace, and Microsoft 365 will require this.
|
III. Alternative Email (Recipient Management) #
| Setting | Description | Configuration Result |
| Alt. Email | Text Field | Enter a single email address here if you want all voicemail notifications to be forwarded to a centralized mailbox. |
| Leave Blank | If this field is left empty, the system will send the voicemail notification only to the voicemail owner’s registered email address. |
IV. Testing the Configuration #
| Button | Action | Tip |
| Test |
Click this button to send a test email using the configured SMTP settings. |
To test successful delivery: Temporarily enter a known, valid test address (e.g., your own work email) in the Alt. Email field before clicking Test.
|
Email Template Settings #
The Email Template Settings page lets you create customized messages for notifications using special placeholder Field Variables that pull in dynamic information about the call, agent, and status.
I. Using Field Variables #
Field variables allow you to insert specific data (like the caller’s name or the date the voicemail was created) directly into your message.
-
How to Use: Simply surround the field name with square brackets:
[FieldName]. -
Example: The text
New voicemail from [CallerName] on line [Extension]will be replaced with the actual data when the message is sent.
Available Field Variables #
| Variable | Description (What the field displays) |
| Notify | The extension/name of the person being notified. |
| Caller | The phone number of the person who placed the call. |
| CallerName | The name associated with the caller’s number. |
| Duration | The length of the voicemail or call. |
| Created | The date and time the voicemail was received. |
| Heard | The date and time the voicemail was marked as heard. |
| FileName | The file path or name of the voicemail audio file. |
| Monitor | The name of the specific Monitor configuration that processed the call. |
| Extension | The extension of the voicemail box that received the message. |
| Transcript | The text transcription of the voicemail (if using an AI integration). |
#
II. Customizing Notification Messages #
You can customize the content for three different types of notifications in their respective sections:
| Section | Purpose | Best Practice |
| Messages (Email) |
Customize the subject and body of the email notification sent to on-call agents when a new voicemail is received.
|
Include critical variables like [Caller], [Extension], and [Created] so agents have all the information they need immediately. |
| SMS Message |
Customize the content of the SMS text message sent to on-call agents.
|
Keep it short! Text carriers enforce character limits. Use only the most critical variables (e.g., [Caller], [Extension]) to avoid messages being cut off or segmented. |
| Reminder Message |
Customize the content of reminder emails sent based on scheduled appointment times (if configured).
|
This should clearly state the appointment time and purpose. |
SMS Settings #
The SMS Settings tab panel lets you choose to send messages via Email, Skyetel, or Twilio as the method for notifying the recipients of scheduled appointments. Each option requires specific setup: Email sends messages to recipients’ email addresses, while Skyetel and Twilio need credentials like SID, secret/auth token, and a sender number saved in the application settings. Be sure to configure the necessary details for your chosen carrier to ensure proper SMS delivery.
I. Choosing Your SMS Carrier #
Use the radio buttons to select one of the following three options based on your company’s communication needs and existing services.
| Option | Description | Setup Requirement |
| This sends the SMS message content to the recipient’s email address (e.g., 5551234567@vtext.com). The mobile carrier converts the email into a text. | None. The system uses your configured Email Settings. | |
| Skyetel | This uses the Skyetel SIP carrier service to send official SMS messages. | Requires specific Skyetel API credentials to be entered below. |
| Twilio | This uses the Twilio SIP carrier service to send official SMS messages. | Requires specific Twilio API credentials to be entered below. |
II. Carrier-Specific Configuration #
Depending on which carrier you select, you must enter the correct authentication details in the fields provided.
A. Skyetel Option #
If you choose Skyetel, you must provide the following:
| Field | Purpose | Detail |
| Base URL | The main endpoint address for accessing Skyetel services. | This is provided by Skyetel documentation. |
| SID | The Skyetel Service ID used for authentication. | Used as the unique identifier for your Skyetel account. |
| Secret | The authentication key required for secure access to the API. | Keep this secure! Click Save to encrypt and store it. |
| From Number | The phone number that will be displayed as the sender of the SMS message. | Must be a number provisioned within your Skyetel account. |
B. Twilio Option #
If you choose Twilio, you must provide the following:
| Field | Purpose | Detail |
| Account SID | Your Twilio Account Service ID. | Used as the unique identifier for your Twilio account. |
| Authorization Token | Your secure Authentication Token. | This acts as the password for your Twilio account’s API access. |
| From Number | The phone number that will be displayed as the sender of the SMS message. | Must be a number provisioned within your Twilio account. |
Once you’ve entered all the required information for your selected carrier, simply click outside the data fields to save it.
AI Platform Settings #
The AI Platform Settings allow you to integrate an AI service that is either OpenAI (ChatGPT), Microsoft Azure OpenAI, or Google Cloud Speech to enable voice-to-text transcription and chat functionalities. Configuration requires selecting the service and providing specific credentials like API keys, base addresses, or deployment names to authenticate and utilize the chosen cloud service for audio processing that speeds up the critical response time for on-call agents by providing immediate, readable context for incoming issues.
3CX Status Settings #
The 3CX Status Settings page manages how the On Call Manager automatically changes an agent’s status in 3CX based on their scheduled on-call shifts. This ensures that when an agent is scheduled to be on call, their 3CX client status reflects that they are ready for work.
I. Enabling and Controlling Status Sync #
The top of the page controls whether OCM is actively managing your agents’ 3CX statuses.
| Setting | Purpose | Key Details |
| Enabled Status (Checkbox) | This is the master switch for the whole feature. | When this box is checked, OCM will start updating the presence status of extensions based on your schedules. If it’s unchecked, OCM will not change any agent statuses. |
II. Configuring Login and Logout Statuses #
These settings tell OCM exactly what status to apply in 3CX when a scheduled shift starts and what status to apply when it ends.
| Setting | Purpose | When is it Applied? |
| Login Status (Dropdown) | The status that will be automatically applied to the agent’s 3CX extension. | Applied at the start of their scheduled working hours. |
|
||
| Logout Status (Dropdown) | The status that will be automatically applied to the agent’s 3CX extension. | Applied at the end of their scheduled working hours. |
|
||
How the Feature Works #
This feature creates a direct link between the OCM scheduling tool and the 3CX phone system:
-
Shift Starts: When the time on the schedule matches the current time, OCM applies the Login Status to the agent’s 3CX extension.
-
Shift Ends: When the shift ends, OCM applies the Logout Status to the agent’s 3CX extension.
This ensures that the 3CX phone system always knows who is responsible and available for the incoming calls defined in your Monitor Settings.
Retention Policy #
The Retention Policy Settings manage the automatic cleanup of old voicemail files to save disk space and keep your system tidy. This feature lets you define how long voicemails should be kept before they are permanently deleted.
I. How the Retention Policy Works #
The most important thing to know is that this policy only affects voicemails that came through the extensions you have set up in your Monitor Settings. It will not touch other voicemails in your 3CX system.
When the policy runs, it deletes the voicemail from two places:
-
3CX System: The actual audio file is removed.
-
SQL Database: The record of the voicemail is removed from the OCM database (if configured).
II. Configuring the Deletion Schedule #
Use the settings below to define the criteria and timing for the automatic cleanup process.
| Setting | Purpose | Key Details |
| Delete Voicemails if Older Than (Checkbox) | This is the master switch to turn the automatic deletion feature ON or OFF. | Check this box to activate the policy and begin deleting old files. |
| Retention Period (Days) | The maximum number of days you want to keep a voicemail. | OCM compares the current date to the voicemail’s creation date. Any voicemail older than this number of days will be marked for deletion. |
| Delete At (Time) | The exact time of day when the system will run the deletion process. | Set this to a time when your system is generally idle (e.g., 2:00 AM) to avoid impacting performance during business hours. |
| Remove Voicemails from SQL Based on Deletion Settings (Checkbox) | Tells OCM to also clean up the historical records in its database. | Checking this box ensures that the voicemail record is completely removed from both the 3CX server (audio file) and the OCM database (data entry).” |
Role Access Permissions #
The Role Access Permissions feature allows you to control exactly which parts of the On Call Manager application (the pages or menus) different types of 3CX users can see and access. This is essential for maintaining security and ensuring users only see the tools they need.
I. How to Configure Permissions #
-
Select a Role: Use the Role dropdown menu at the top of the page to choose the user group (role) you want to modify (e.g., User, Department Administrator, etc.).
-
Edit Access: Below the dropdown, you will see a list of OCM pages. Check the box next to a page name (e.g., Scheduler Page) to grant access to users with the selected role, or uncheck the box to deny access.
-
Save Changes: After modifying the permissions, click Apply to save the new settings.
Restoring Default Settings #
If you make changes and want to revert to the factory settings for the selected role, click the Reset button. This will discard your recent changes and restore the original permissions (see default access below).
II. Default Access Permissions #
The system starts with the following default permissions. Note that these can be changed unless the user is a System Administrator.
| User Role | Default Access | Summary of Access |
| System Administrator / System Owner | Full access to all Pages | Has complete control and can see every menu and setting. |
| Department Administrator / Manager / Owner | Scheduler Page, People Page, Events Page, Logs Page, Monitor Settings Page | Can manage most operational aspects, including schedules and user lists. |
| User / Receptionist | Events Page | Limited access, usually only able to view the live events and their own activity. |
If an agent’s Extension is specifically granted administrator rights in the OCM Admin Settings panel, they will automatically override all other permissions and be granted Full access to all pages, regardless of the settings defined here.
#
Custom Branding #
The Custom Branding feature allows you to personalize the look and feel of the On Call Manager web portal. You can change the colors, update the logo, and set a custom title to match your company’s identity.
I. Logo and Title Customization #
These settings control the text and image that appear in the main application header.
| Setting | Purpose | How to Use |
| Header Title | The text that appears at the very top of the OCM pages (e.g., Your Company On-Call Portal). | Type the desired title into the text box provided. |
| Upload File | To upload a new logo from your computer. | Click Choose File and select a logo image (e.g., .png or .jpg format). |
| Select Logo | To use a logo that has already been uploaded. | Choose the file name from the dropdown list. The selected image will appear in the application’s header. |
II. Color Scheme Customization #
You can use the color pickers to select specific colors for the main parts of the interface.
| Setting | Purpose | What it Affects |
| Header Gradient Color | Creates a smooth transition between two colors in the header area. | Choose two colors (a top color and a bottom color) using the color pickers provided. |
| Accent Color | The color used for titles and important text headers throughout the application. | Select a color that you want applied to all text headers in the interface. |
| Grid Color | The background color used for all data tables (grids) within the application. | Select a color for the table backgrounds to improve visual separation. |
III. Actions #
These buttons control how you manage your design changes.
| Action | Purpose | Key Details |
| Apply | Saves and applies all the changes you have made (title, logo, and colors) to the web portal. | Always click Apply after making any changes to see them take effect. |
| Reset | Reverts all color settings back to the original default colors. |
Use this if you want to discard your color changes and start over. |
#
Scheduler Tab #
The Scheduler screen enables you to control visible resource count, view resource appointments for a specific date and in desired calendar format, create new appointments and edit/ delete existing appointments, set levels for resources, and set reminders for appointments and events
Default View #
The Scheduler tab does not display any Monitored Groups by default.
As a ‘Manager’, you can view and create schedulers only for those groups to which you are manager while as an ‘Admin’, you can create and view for all the groups.
The default view of the Scheduler tab when no monitored group is selected,
Overview of Scheduler tab #
The Scheduler tab has the following buttons to assist you in scheduling calls to your resources.
| Monitored Group | Select the monitored group. |
| Calendar Format | The Shortcut Icons facilitate task execution with a single click. |
| Day Selection | choose the preferred time period for scheduling events/appointments with their resources. |
| Shortcut Icons | Perform tasks in a single click |
| Resources List | Displays the resources available for the selected Monitored Group. |
Monitored Group #
The Monitored Group list lets you select the group to monitor.
Shortcut Icons #
The Shortcut Icons lets you perform the tasks listed below in a single click.
|
First button | Lets you select the first agent from the ‘Visible Resources’ list |
|
The Previous Page button | Lets you view resources from previous page of the ‘Scheduler’ |
|
Previous button | Lets you go to the previous resource |
|
Next button | Lets you to go to the next resource |
|
Next Page button | Lets you to view resources in the next page of the ‘Scheduler’ |
|
Last button | Lets you to view last resource from ‘Visible Resource’ list |
|
Increase visible resources count | Lets you to add one resource at a time in consecutive order from the ‘Visible Resources Count’ list |
|
Decrease visible resources count | Lets you to remove one resource at a time in the order you added from the ‘Visible Resources Count’ list |
Calendar Formats #
On the right-hand side of the ‘Calendar’ header, you can select the appropriate tab to view the scheduled appointments of the visible resources in various calendar formats like Day, Work Week, Week, Month or Timeline.
| Day | Displays all the visible resource appointments for a specific date in day format. |
| Work Week | Displays all the visible resource appointments in the work week (Monday-Friday) format. |
| Week | Displays all the visible resource appointments in a weekly (Sunday-Saturday) format. |
| Month | Displays all the visible resource appointments in a monthly format. |
| Timeline | Displays all the visible resource appointments in a timeline format. |
Day Selection button #
The Day Selection buttons let you select the desired time frame to schedule events/appointments for your resources.
|
Previous | Takes you to the previous sheet of the selected time frame. For example, if you have selected Week in the Calendar Formats, the Previous button button takes you to the previous week. |
|
Next | Takes you to the next sheet of the selected time frame. For example, if you have selected Week in the Calendar Formats, the Next button button takes you to the next week. |
|
Go To Date | Lets you to select the specific date that you want to schedule the events. |
Resource list #
The Resource list displays the resources available for the selected Monitored Group.
Right Click menu #
New Event/Appointment Right Click menu: #
You can right click anywhere on the grids to open the right click menu. Read further to know the definitions of each options.
| NEW APPOINTMENT | Select this option to create new appointment for a resource |
|---|---|
| NEW ALL-DAY EVENT | Opens an Appointment dialog box with All Day Event box checked |
| NEW RECURRING APPOINTMENT | Opens an Appointment dialog box with Recurring box checked. |
| NEW RECURRING EVENT | Opens Event dialog box to create a new event for a resource |
| GO TO TODAY | Opens Scheduler screen in “Today’s” date |
| GO TO DATE… | Opens Go To Date box that enables you to select specific date and calendar format in which you want to view the Scheduler screen |
| CHANGE VIEW TO | Lets you select the desired calendar format. |
| 60 MINUTES | Lets you view the Scheduler screen that divides the grid to show time interval in terms of 60 minutes. Similarly, you can view the grid in other time divisions like 30 minutes, 15 minutes, 10 minutes, 6 minutes, or 5 minutes. |
Edit Appointment/Event Right Click menu: #
You can right-click anywhere on the existing appointment to open the Right Click menu. Read further to know the definitions of each option.
| OPEN | Enables you to open selected appointment |
|---|---|
| EDIT SERIES | Enables you to edit all occurrences of the selected recurring appointment |
| SHOW TIME AS | Edits Show Time As for the selected appointment as Free, Tentative, Busy, Out of Office or Working Elsewhere. |
| LABEL AS | Edits Label As for the selected appointment to the desired escalation level. |
| DELETE | Enables you to delete the ‘Series’ or ‘Occurrence’ of an appointment. |
Create an Appointment #
To create an appointment,
-
- Open the Right Click menu.
-
- Click the New Appointment option.
You can create two types of appointments,
-
- Non Recurring Appointments
-
- Recurring Appointments
Non Recurring Appointments #
Non-recurring appointments create appointments for the resources only for the specified date and time. Follow the procedure to create a non-recurring appointment,
-
- In the Right Click menu, click the New Appointment option.
-
- Enter the required details in the New Appointment box.
-
- Click the OK button to save your appointment.
| SUBJECT | Brief description of the appointment |
|---|---|
| LOCATION | Location of the agent for whom you are creating the appointment |
| LABEL | Escalation evel in which you want to place the agent |
| START TIME | The date and time from which the ‘On Call’ time starts for the agent |
| END TIME | The date and time at which the ‘On Call’ time ends for the agent |
| SHOW TIME AS | Specifies the work status of the agent as busy, free, tentative, out of the office or working elsewhere. Show time as is valid for Start time to End time |
| ALL DAY EVENT | If the schedule is for the complete day, then check the All day event box. If you check this box, you will observe that the time selection box (from ‘Start time’) will disappear. |
| RESOURCE | Select the agent from the dropdown for whom you are creating the appointment. |
| REMAINDER | Check this box if you want to remind the appointment to the agent. You can select the time from the dropdown so the agent receives the reminder message after the specified time. |
| RECURRENCE | If you want the appointment to recur, check the Recurrence box. From the available options select the appropriate value (Daily, Weekly, Monthly, Yearly, Every—day(s) or Every weekday) for the appointment to recur. |
| NO END DATE | Select this option if you do not want to stop the recurrence of the appointment. |
| END AFTER | Select the appropriate number from the drop-down so that the appointment recurrence will occur for the specified number of times. |
| END BY | Select this option and select the appropriate date from the ‘Date’ drop-down so that the appointment recurrence will end by the specified date. |
Recurring appointment #
Recurring appointments create a repeated appointment for the resources until the end date. Follow the procedure to create a recurring appointment,
-
- You can open the recurring appointment settings in two ways,
-
- In the Right Click menu click the New Recurring Appointment option
-
- You can open the recurring appointment settings in two ways,
-
- You can select the Recurrence checkbox to create a new recurring appointment.
-
- Set the recurrence as Daily, Weekly, Monthly, or Yearly by selecting the appropriate radio button.
-
- Select the No End Date radio button to stop the recurrence after a set period or unselect the No End Date radio button for continuous recurrence of appointments.
-
- Click the OK button to save the recurring appointment.
Set Daily Recurrence #
To set daily occurrences, follow the steps,
-
- In the Appointment box, select the Recurrence box to schedule a recurring appointment.
-
- Select the Daily radio box to set the appointment repeat daily.
-
- Set the daily occurrence in any of the following ways,
-
- In the Days field, set the number of days. The appointment repeats after the set days.
-
- Select the Every Weekday radio button to repeat the appointment from Monday to Friday.
-
- Set the daily occurrence in any of the following ways,
-
- Click the OK button to save the recurring appointment.
Set Weekly Recurrence #
To set weekly occurrences, follow the steps,
-
- In the Appointment box, select the Recurrence box to schedule an recurring appointment.
-
- Select the Weekly radio box to make the appointment repeat weekly.
-
- In the Weeks field, set the number of weeks. The appointment repeats after the set number of weeks.
-
- Select the Day on on which you want the appointments to repeat weekly.
-
- Click the OK button to save the recurring appointment.
Set Monthly Recurrence #
To set monthly occurrence, follow the steps,
-
- In the Appointment box, select the Recurrence box to schedule a recurring appointment.
-
- Select the Monthly radio box to make the appointment repeat monthly.
-
- Set the Monthly occurrence in any of the following ways,
-
- Monthly Recurrence on specific date,
-
- In the Day field select the day
-
- In the Month field select the number of months after which you want the appointment to repeat.
-
- Example: To repeat the appointment on 20th of every Two months,
-
- Set 20 in the Day field.
-
- Set 2 in the Months field.
-
- Example: To repeat the appointment on 20th of every Two months,
-
- In the Month field select the number of months after which you want the appointment to repeat.
-
- Monthly Recurrence on specific date,
-
- Monthly recurrence on a specific day in a month,
-
- Select the desired week of a month in the Week dropdown.
-
- Monthly recurrence on a specific day in a month,
-
- Set the Monthly occurrence in any of the following ways,
-
-
- In the Day dropdown, select the desired day of the selected week.
-
-
-
- Select the number of months in the Months field.
-
- Click the OK button to save the recurring appointment.
Set Yearly Recurrence #
To set yearly occurrence, follow the steps,
-
- In the Appointment box, select the Recurrence box to schedule a recurring appointment.
-
- Select the Yearly radio box to make the appointment repeat yearly.
-
- Set the Yearly occurrence in any of the following ways,
-
- Yearly occurrence by selecting a specific date,
-
- In the Month dropdown, select the desired month.
-
- Yearly occurrence by selecting a specific date,
-
- Set the Yearly occurrence in any of the following ways,
-
-
- In the Date field, enter the date at which appointment repeats yearly for the selected month.
- Yearly occurrence by selecting specific day in a year.
- In the Week dropdown, select the week.
-
-
-
- In the Day dropdown, select the day of the selected week.
-
-
-
- In the Month dropdown, select the month at which you want the appointment to repeat yearly.
-
-
- Click the OK button to save the recurring appointment.
Edit an Appointment #
To edit an existing appointment, follow the procedure,
-
- On the existing appointment, right-click on the appointment to open the Right Click menu.
-
- On the Event or Appointment edit the necessary details.
-
- Click the OK button to save the Event or Appointment.
Delete an Appointment #
-
- On the existing appointment, right-click on the appointment to open the Right Click menu.
-
- Click the Delete option.
- Click the Delete
-
- In the Confirm Delete warning message, select any of the following options,
| This Series | To delete the entire series of recurring events |
| This Occurrence | To delete only the selected appointment. |
-
- Click the OK button to confirm your deletion.
Set level for resources #
The On Call Manager lets you set different levels of escalations for your resources. Follow the procedure to set different levels for your resources,
-
- In the New Appointment Right Click menu click the New Appointments option or in the Edit Appointment Right Click menu click the Edit Appointments option.
-
- In the Label dropdown, select level for your resource.
-
- In the Resource dropdown, select the resource to assign the set level.
-
- Click the OK button to save your changes.
The resources assigned to different levels are displayed in different colours on the Scheduler screen.
Set Reminders for events/appointments: #
The On Call Managers can remind a resource for an upcoming event or an appointment.
Follow the steps to remainder for events or appointments,
-
- In the New Appointment Right Click menu click the New Appointments option or in the Edit Appointment Right Click menu click the Edit Appointments option.
-
- Select the Remainder box to set remainders.
-
- In the Remainder dropdown, select the remainder time and click the OK button to save your changes.
The On Call Managers indicate an event or appointment having remainders with a Bell icon.
People #
The People tab lets you identify the resources (agents) available to be on call and how they are to be notified. The assumption is that these resources are employees and you have the right to get the cell phone carrier of your employees.
You can do the following taks in the people screen,
-
- Add people to the header column
-
- Notify the agents of the voicemail received in the monitoring extension
-
- Notify the agents if the voicemail is heard in the monitoring extension
As an Admin, you can view and create people for all the groups.
As an Manager, you can view and create people for only those groups to which you are manager.
Field Definitions #
| Group Name | A group created in 3CX which has agents for attending the calls. | |
| Name | Name of the resource from the Group assigned for the call. | |
| Extension | Extension of the resource | |
| Cell | Cellphone number of the resource | |
| Email SMS Address |
The SMS address of the resource.
|
|
| Contact Decides how an employee must be notified when a new call comes in. |
Call | Plays the New Prompt audio to the resource through call using the cellphone number provided. |
| Plays the New Prompt audio to the resource through Email using the Email addres provided. | ||
| SMS | Plays the New Prompt audio to the resource through SMS using the SMS addres provided. | |
| Update Decides how an agent must be notified when a call has been answered by some other person. This is useful when multiple agents are available for a call. |
Call | Plays the Heard Prompt audio to the resource through call using the cellphone number provided. |
| Plays the Heard Prompt audio to the resource through Email using the Email addres provided. | ||
| SMS | Plays the Heard Prompt audio to the resource through SMS using the SMS addres provided. |
Add people to the header column #
-
- To add people, on the header column, click the Add button.
- To add people, on the header column, click the Add
-
- From the Group Name dropdown list, select the group to which you want to create people.
-
- If you are a manager, then the dropdown lists only those groups to which you are a manager.
-
- If you are admin, then the dropdown lists all the groups from 3CX Management Console.
-
- From the Group Name dropdown list, select the group to which you want to create people.
-
- In the Name field, enter the agent’s name.
-
- In the Ext field, enter the extension number of the agent.
-
- In the Cell field, enter the cell number to which the agent receives the notification through call.
-
- In the Email field, enter the email address of the agent to which the notification should be sent.
-
- In the SMS Address field, enter the contact number to which the notification should be sent as sms.
-
- At the footer of the Manage People page, click Save.
Notify the agents of the voicemail received in the monitoring extension #
-
- On the People screen, in the Contact section, do the following,
-
- Check the Call box if you want to notify through call.
-
- Check the Email box if you want to notify through email.
-
- Check the SMS box if you want to notify through SMS.
-
- On the People screen, in the Contact section, do the following,
-
- Click Save to save your changes.
- Click Save
Notify the agents of the voicemail is heard in the monitoring extension #
-
- On the People screen, in the Update section, do any of the following,
-
- Check the Call box if you want to notify through call.
-
- Check the Email box if you want to notify through email.
-
- Check the SMS box if you want to notify through SMS.
-
- On the People screen, in the Update section, do any of the following,
-
- Click Save to save your changes.
- Click Save
Events #
The Events tab is a call log that lets you know the incoming calls that were heard and that were not heard. You can view the call logs of all the ‘On Call’ events for all the monitored extensions between the agents and the customers. The details of every event include date/ time, caller extension, caller name, action, notification type, monitor extension, and notes.
You can perform the following tasks in the events tab,
-
- View log details
-
- Insert a note
Purpose of Events tab: #
-
- Identify whether the agents are picking up the call within the SLA period.
-
- Monitor the agent’s performance by checking the number of notifications missed by the agent.
-
- Make critical decisions when a customer complains about not keeping up with the promised SLA period.
View log details #
-
- Click the Heard: False expand button to view the list of unattended calls or click Heard True expand button to view the list of attended calls.
- Click the Heard: False expand button
-
- Click the Expand button on any of the voicemails to see the list of calls.
- Click the Expand
-
- Click the Edit icon to view and edit an event. Read further to know the field definitions.
- Click the Edit icon
Insert a Note #
-
- Click the Heard: False expand button to view the list of unattended calls or click Heard True expand button to view the list of attended calls.
- Click the Heard: False expand button
-
- Click the Expand button on any of the voicemails to see the list of calls.
- Click the Expand
-
- Click the Edit icon to insert a note to the event and click Save to save the note.
- Click the Edit
The note is displayed in the Notes column.
Field definitions #
| Date/Time | The Date and Time at which the call is made. The date format is DD/MM/YYYY. The time format is HH: MM:SS in the twelve-hour clock. |
| Caller | The number of the caller who made the call. |
| Caller Name | Name of the caller who made the call. |
| Action | Indicates whether the status of the call (attended/missed) is notified to the agent. |
| On Call | The agent who received the call. |
| Level | Level assigned to the agent. |
| Email box | It is selected when the agent is notified by email. |
| SMS box | It is selected when the agent is notified by SMS. |
| Phone box | It is selected when the agent is notified by SMS. |
| Transcription |
The transcript of the call.
|
| Note | Text area to write notes about the call. |
