Streamline Billing with 3CX Enhanced Billing Codes: Enhance Efficiency, Security, and Organization
3CX Enhanced Billing Codes revolutionizes customer call handling by merging collection efforts with customer billing codes, improving efficiency, security, and organization. Collectors now input billing codes when initiating calls, creating a direct link between phone numbers and transactions integrated into customer accounts. With this feature, security measures can be enhanced by mandating an account code. Outbound calls are automatically logged, enabling the generation of comprehensive billing code reports based on account code, department, extension, and date range. This allows for better expense management and informed decision-making. If you are looking to enforce account code usage, allocate call costs to specific departments, or strengthen security measures, 3CX Enhanced Billing Codes is the ideal solution. It enhances accountability, streamlines cost allocation, and fortifies your system effortlessly.
During billing calls, it is essential to actively input customer billing codes to ensure accurate recording of billing information, thereby eliminating the risk of losing any critical details. By diligently entering these codes, you can secure the preservation of vital billing information for each call, minimizing the likelihood of errors or oversights.
EMPOWERED RESTRICTIONS
Experience enhanced control and security with the introduction of Account Codes and their advanced billing codes. These innovative features enable the restriction of authorized calls exclusively, unlocking a new level of security and control.
AUTOMATIC DATA STORAGE
When using enhanced billing codes, every call you make is automatically linked to a specific billing code. Once your call is finished, all relevant information is stored in a database for generating reports and analysis.
SWIFT PHONE NUMBER RETRIEVAL
Enter the billing codes to swiftly retrieve customer phone numbers, enhancing the efficiency and speed of the process for a seamless experience.
EASY ESTIMATE OF YOUR CHARGE-BACK CALL COSTS
3CX Enhanced Billing Codes enable efficient monitoring and tracking of outbound calls. This feature proves beneficial for professionals such as attorneys, consultants, or individuals who are conscious of call expenses. It allows you to allocate costs to each outgoing call based on the country, area code, or specific phone number. By utilizing automated reports, invoicing and chargebacks become simplified, as they accurately calculate call durations and costs.
ENHANCED SECURITY
Enhance the security of your phone system by implementing 3CX Enhanced Billing Codes. These codes effectively mitigate the risk of unauthorized usage by imposing restrictions on international calls per extension. By mandating the use of an account code, an additional layer of protection is added, ensuring that security measures extend beyond the scope of extensions alone.
MONITOR COSTS LIKE NEVER BEFORE
Leverage the capabilities of 3CX Enhanced Billing Codes to gain a transparent overview of your telecommunications expenditures. This feature enables automated tracking of outgoing calls and facilitates the generation of comprehensive reports categorized by account codes, departments, extensions, and specific date ranges. Effortlessly administer and enhance your telecom expenses, ensuring complete control over cost management.
NOTE:
3CX provides the option to assign an account code when making a call, but it lacks a verification system to confirm the existence or accuracy of the entered account number. In the event that you fail to input the account code before initiating the call, there is no means to associate an account with that particular call.
IIS is needed as a web server to host and manage web-based applications and services.
.NET Framework 4.7.2 (Web Installer)
This framework provides essential components for running and developing applications.
VoIPTools Universal Updater
This component is necessary for updates, ensuring the application remains current and functional.
Microsoft SQL Server 2016 or above (Including the free SQL Express edition)
3CX requires Microsoft SQL Server 2016 or later for database management.
Static IP for VoIPTools and 3CX servers
This is to ensure proper two-way communication, both the 3CX server (Relay) and the VoIPTools server. Dynamically assigned IP addresses are not supported. Additionally, it is recommended to use HTTPS for secure communication, which requires a FQDN for SSL/TLS certificate validation between the VoIPTools server and the Relay.
Port number 6100 opened on your device
Port 6100 is a specific network port used by 3CX for communication purposes. Opening this port on the device’s firewall allows incoming and outgoing traffic to pass through, enabling the 3CX software to send and receive data over the network effectively.
NOTE:
Since the add-on ‘3CX Enhanced Billing Codes’ includes a CFD application, you will need to install either Pro or Enterprise version of 3CX
When installing SQL Server, we recommend you install it in “Mixed Mode” to include SQL Authentication, and install SQL Management Studio
When installing IIS, be sure to install Basic Authentication, .Net Extensibility, and ASP.Net 4.X
You can order 3CX Enhanced Billing Codes online at https://www.voiptools.com. Your order confirmation email will include your license key and a link to download the software.
INSTALL PREREQUISITES
You must install several prerequisites before installing the 3CX Enhanced Billing Codes. The Advanced Installer identifies and installs these applications automatically. Click here to learn about the required prerequisites.
INSTALL 3CXENHANCED BILLING CODES
This User Guide contains step-by-step instructions to successfully install 3CX Enhanced Billing Codes. Begin by extracting the installer from the downloaded zip file (Step 1 above), then run the setup program named EnhancedBillingCodes.exe
LOGIN TO THE WEB APPLICATION
You can now log in to your software using the Extension and PIN.
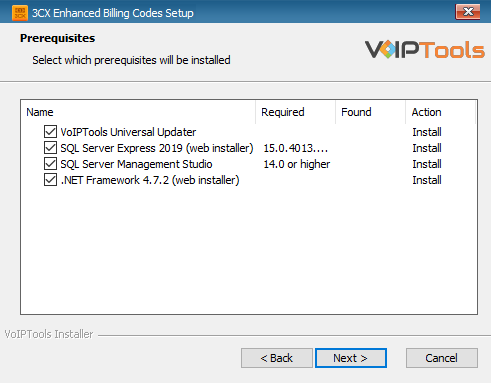
Click on the software installer downloaded in Step 1. The installation wizard will automatically identify the prerequisites and assist you with each installation required to 3CX Enhanced Billing Codes. It includes .NET Framework (Web Installer), SQL Server Express (Web Installer), and SQL Server Management Studio.
Click the downloaded installer executable to launch the Prerequisites Setup Wizard and click Next.
Figure 1: 3CX Enhanced Billing Codes Setup Wizard
In the Prerequisites window, install all the required prerequisites identified by the installer, or select/ unselect the applications based on your requirements and click Next to continue.
Figure 2: Prerequisite installation Selection
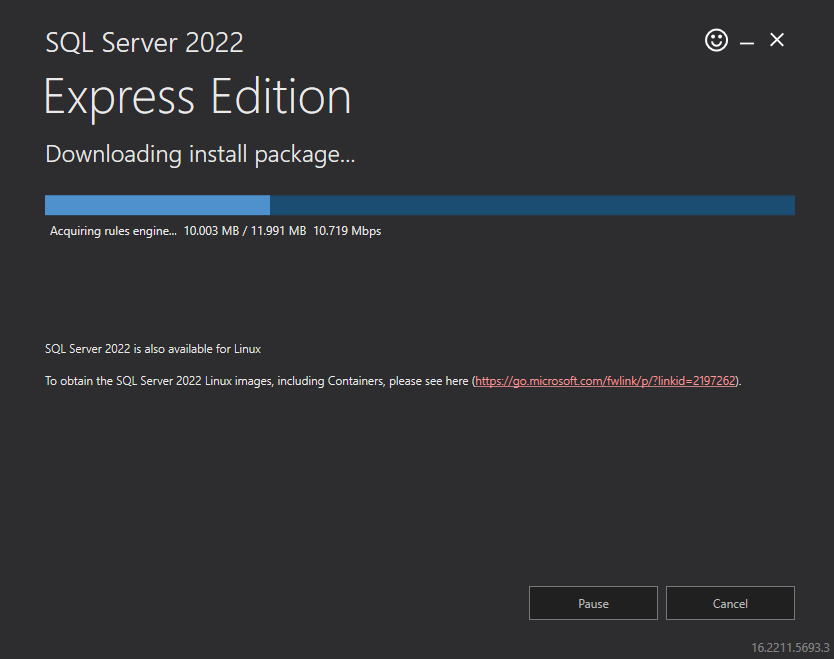
The installer will download and install the selected applications. It may take several minutes to complete.
Figure 3: Prerequisites Installation on Progress
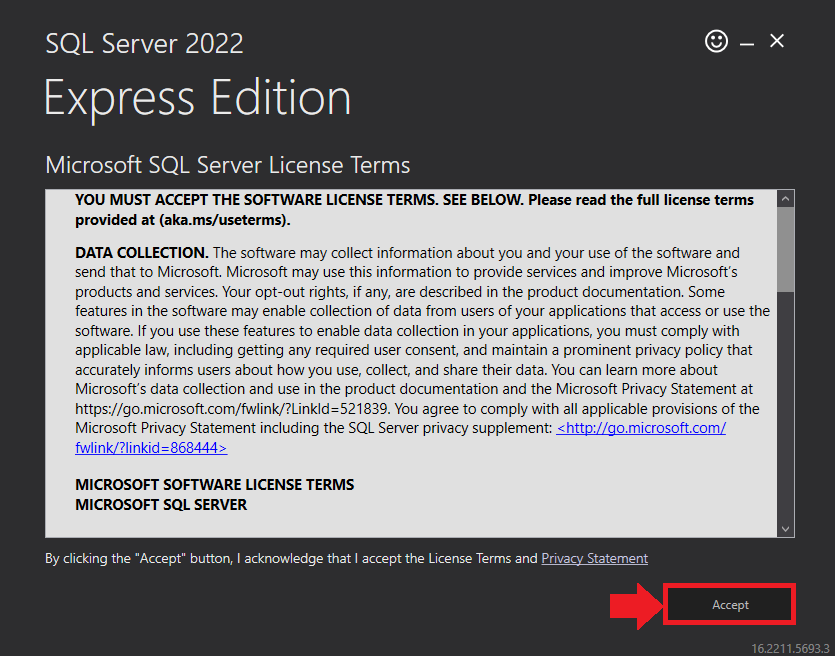
In the Microsoft SQL Server License Terms click the Accept button to acknowledge the license terms and continue.
This page appears if you do not have SQL Server Express preinstalled in your device.
Figure 4: SQL Server Express: Accept License Terms
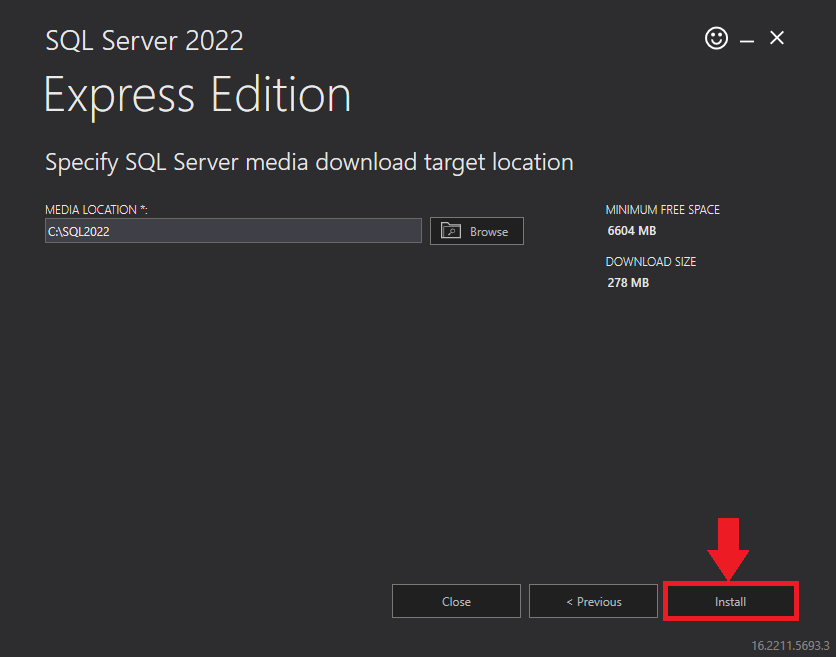
View the SQL Server Media target location in the Media Location field. If required, you can click the Browse button to change the location. Click Install to begin the installation of SQL Server Express.
Figure 5: SQL Server Express: Target Location
SQL server installation is in progress. This may take several minutes to complete.
Figure 6: SQL Server Installation In Progress
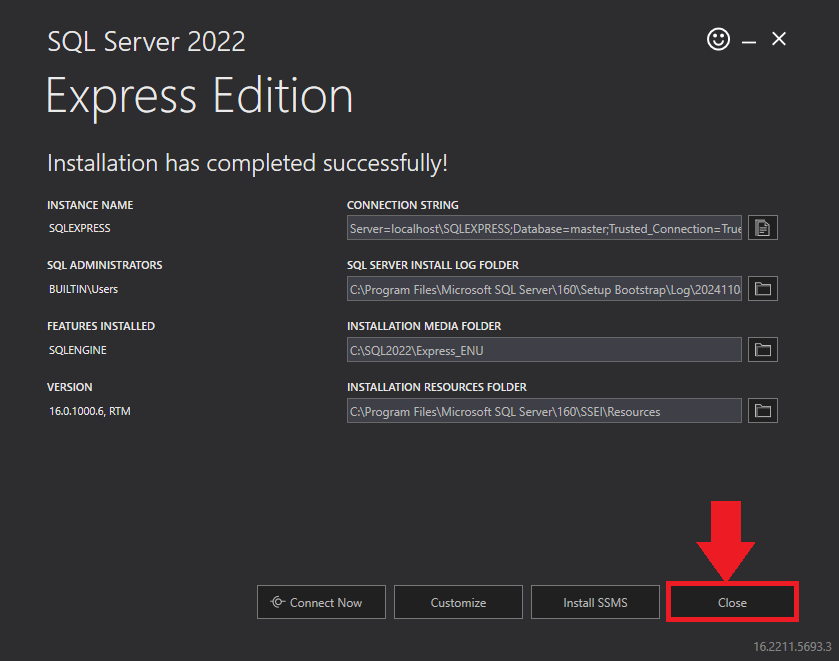
Click the Close button once the prerequisites are installed.
Figure 7: SQL Server Express: Installed Successfully
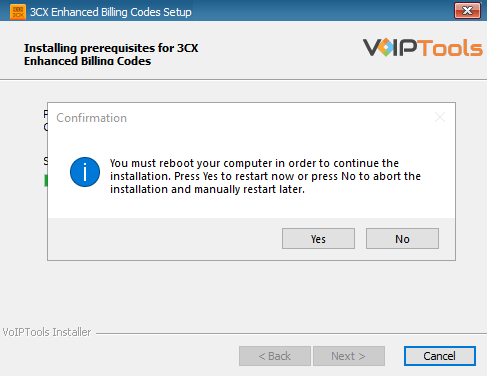
Click Yes in the Confirmation Message Box to reboot the computer.
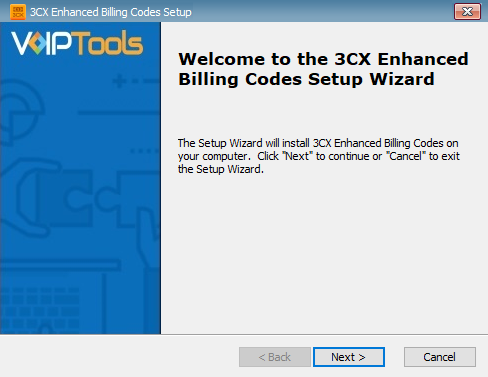
Click Next on the 3CX Enhanced Billing CodesSetup Wizard screen.
Figure10: Enhanced Billing Codes Setup Wizard
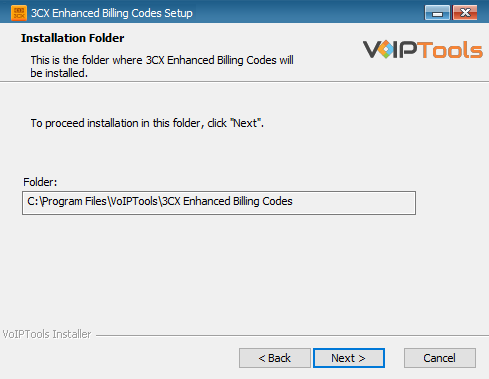
On the Select Installation Folder window, the Folder field displays the path where the 3CX Enhanced Billing Codes gets installed. You cannot change the location path.
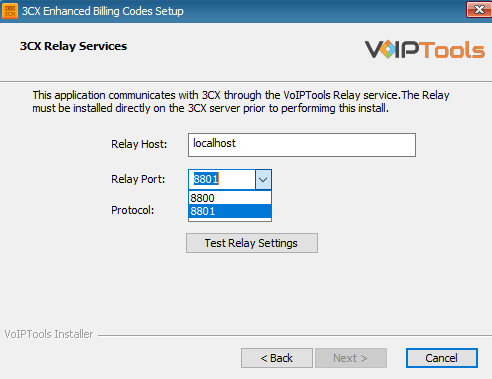
In the 3CX Relay Services window, in the Relay Host field, enter the FQDN of your 3CX server.
Enter 8801 in the Relay Port field.
Enter the public key you took from VoIPTools Relay services in the Public Key text area.
Figure12: Select Relay Port
Click the Test Relay Settings to confirm ‘3CX Exporter’ can communicate with the Relay services running on the 3CX server.
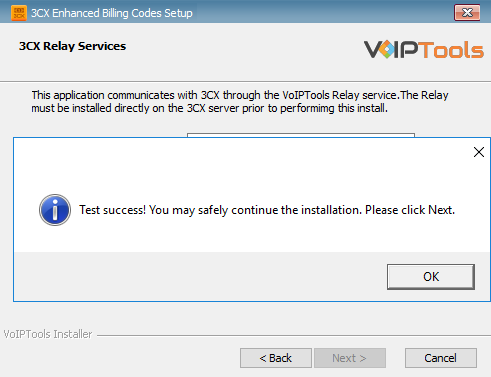
If the ‘3CX Exporter’ is successfully able to communicate with the Relay services that run on the 3CX server, a Success message box appears. Click OK. If the test fails, you will not be able to continue until communication with the relay is established.
Click Next to continue with the installation.
Figure13: Relay Test Success Message
NOTE:
You must set the Relay Port to 8801.
If the Relay test fails, you cannot continue the installation until you establish communication with the Relay. If the test was unsuccessful confirm the following,
Confirm you have the correct firewall port open (default TCP 8801) on the 3CX server and the firewall protecting the 3CX server.
Confirm that you have entered the correct FQDN for the 3CX server.
Confirm that the 3CX On Call Manager and Relay use the same port and protocol.
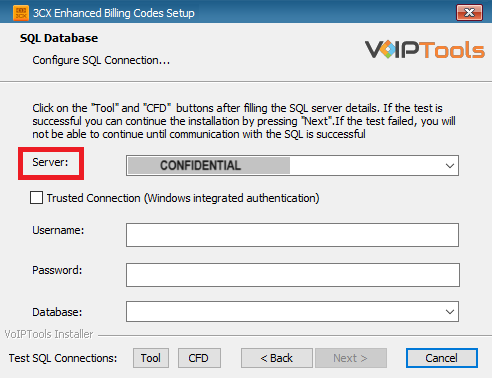
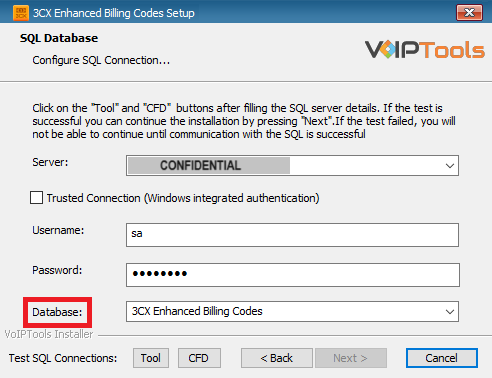
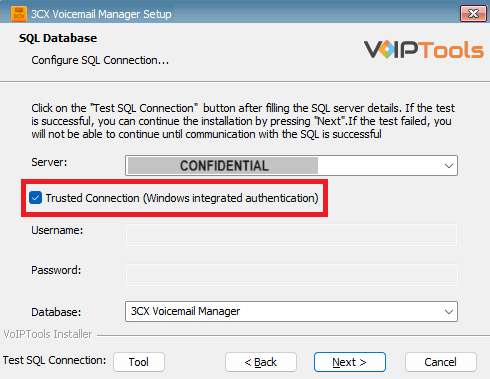
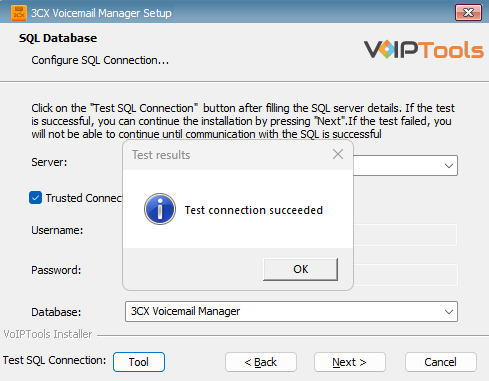
When configuring the 3CX Voicemail Manager, select an existing Microsoft SQL Server instance in your environment. The database server can be a remote SQL Server, or a local instance running on the VoIPTools server.
You can set up the SQL database using SQL Authentication or Windows Integrated Authentication.
If using the free SQL Express Edition, the default SQL Instance name is SQLExpress.
Figure 14: Configure Database – Server Field
NOTE:
If you want to use ‘SQL Authentication’, then install SQL Server in ‘Mixed‘ mode.
If SQL Server is installed on a server other than the server where 3CX Exporter is installed, you will need to configure SQL Server to allow remote connections.
Enter your credentials in the Username and Password fields.
To use Windows Integrated Authentication check the Trusted Connection (Windows integrated authentication) checkbox.
The VoIPTools installer will create a local Windows user name as “VoIPToys” and give you sufficient rights to this user to create/update the SQL database.
Figure 19: Trusted Connection Checkbox
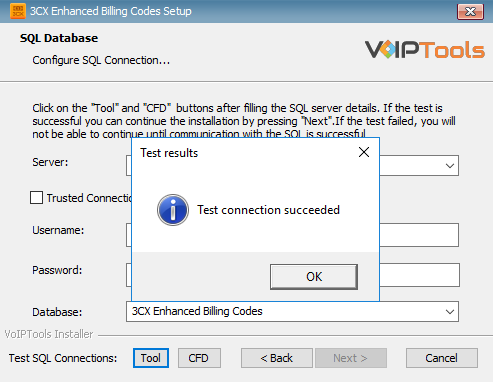
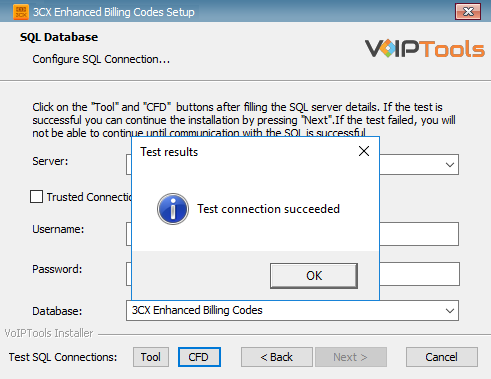
In the Test SQL Connection section, click the Tool button to test the connection.
Click the Next button which gets enabled when the database connection is successful.
Figure 20: Trusted Connection Test Results Message Box
NOTE:
We encourage you to use SQL Authentication rather than Windows authentication. Many of our tools leverage a Call Flow Designer (CFD) application running on the 3CX. Frequently our CFD applications require access to a SQL database. If the 3CX server and the database server are not in an Active Directory domain, Windows authentication will fail. To use SQL authentication, your SQL Server must be configured to run in “Mixed Mode”. If you installed SQL Server with one of our tools, we configure SQL in “Mixed Mode”.
The installer will download and install the selected applications. It may take several minutes to complete.
To enforce the use of billing codes, the phone system must be configured to reject any calls that are not placed through 3CX Enhanced Billing Codes (EBC). To accomplish this, the 3CX administrator needs to create outbound rules that reject phone calls unless they phone number matches a specific format. When a call is placed through Enhanced Billing Codes, it automatically prepends secret digits (8888) to the phone number. By creating outbound rules in 3CX that require the number start with 8888, we ensure numbers dialed directly on the phone are rejected. For this reason, it is imperative that the secret digits not be known by anyone other than the 3CX administrator.
It is important to understand that calls placed through EBC are NOT associated with a specific extension. Rather, the call is placed by the 3CX API method “MakeCall”. Rules intended to be used by EBC CANNOT include extension or group restrictions because MakeCall is not an extension and does not belong to any groups.
The example below can be used as a guide for creating your outbound rules. The important settings are circled in red.
You MUST enter “8888” in the “Calls to numbers starting with prefix” field.
Do NOTenter values in the “Calls from extension(s)” or “Calls from extension group(s)” fields
You MUST pace a “4” in the “Strip Digits” field to remove the secret digits from the phone number before sending the call to your carrier.
It is RECOMMENDED you add a DID in the “Outbound Caller ID” field. Remember, MakeCall is not an extension, so it does not present a valid Caller ID to your carrier. 3CX will pass “MakeCall” as the Caller ID if you do not override the value in some way. Because “MakeCall” is not a valid Caller ID, most carriers will reject the call without a valid Caller ID specified.
If you need to allow some people to bypass EBC, simply create rules that include an extension or group filter.
To access the ‘3CX Enhanced Billing codes’ web portal, click the Web Portal desktop icon that was created during the installation process (3CX Enhanced Billing Codes web).
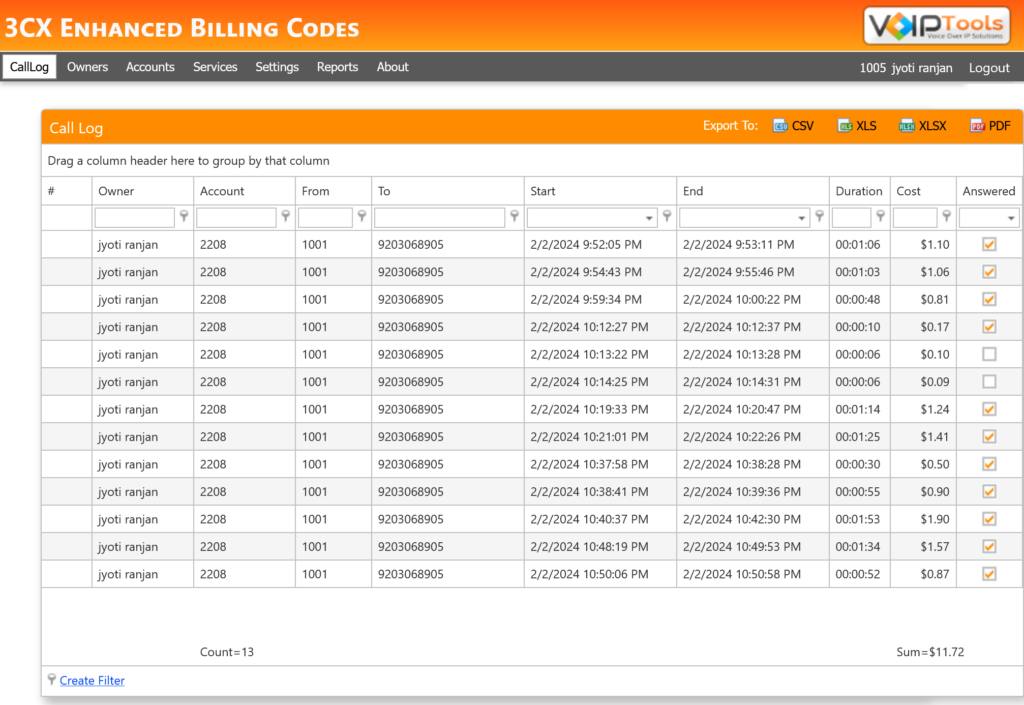
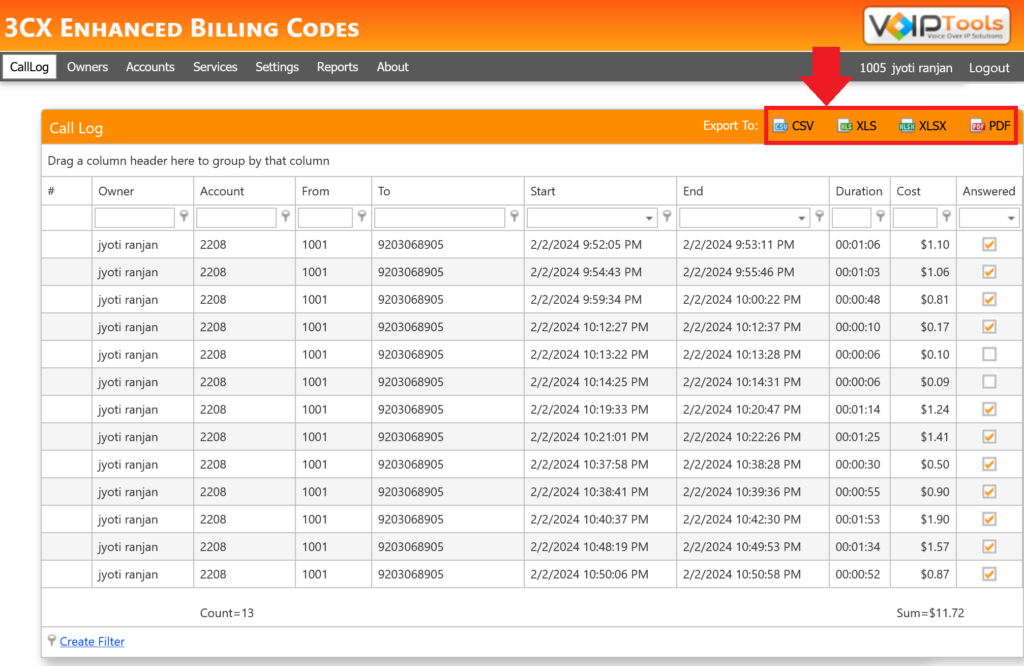
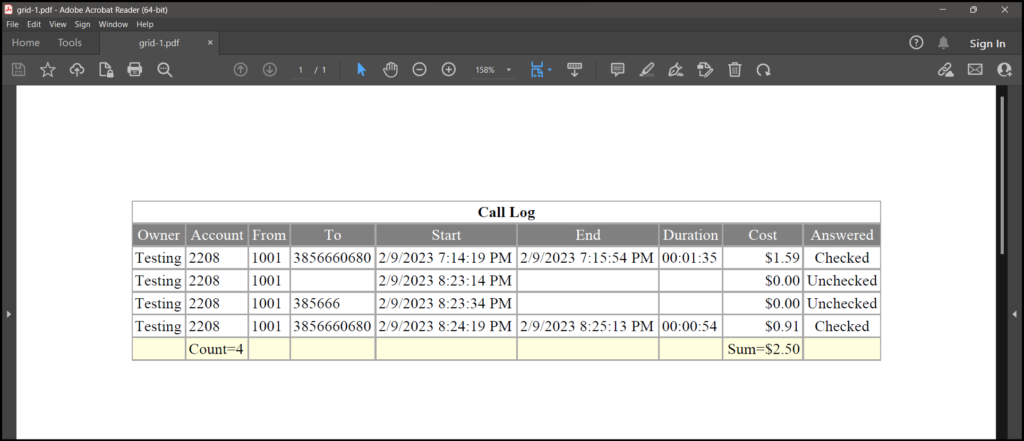
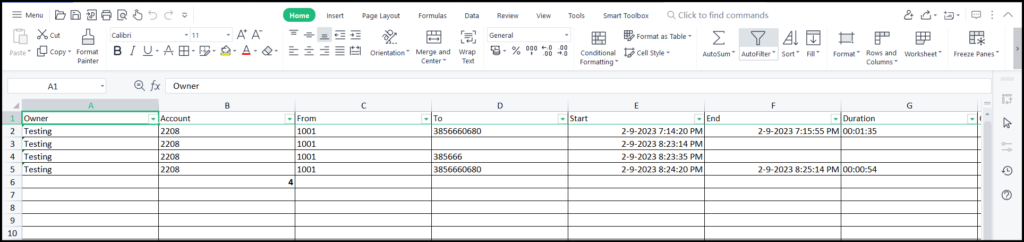
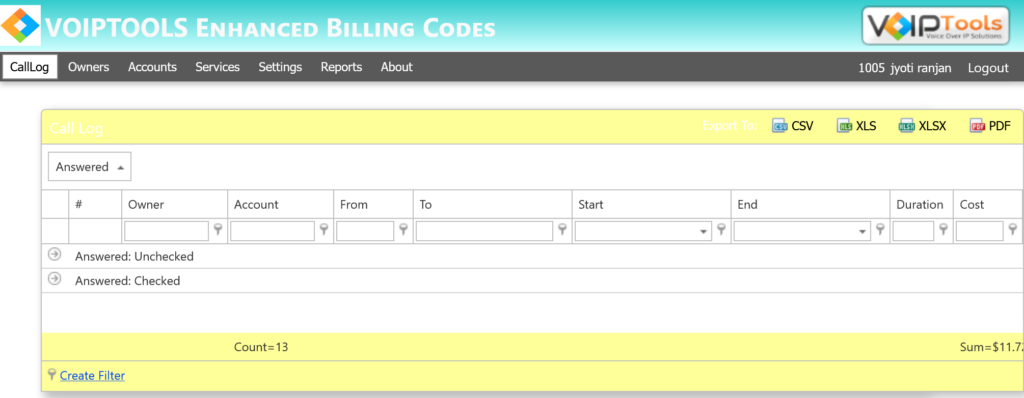
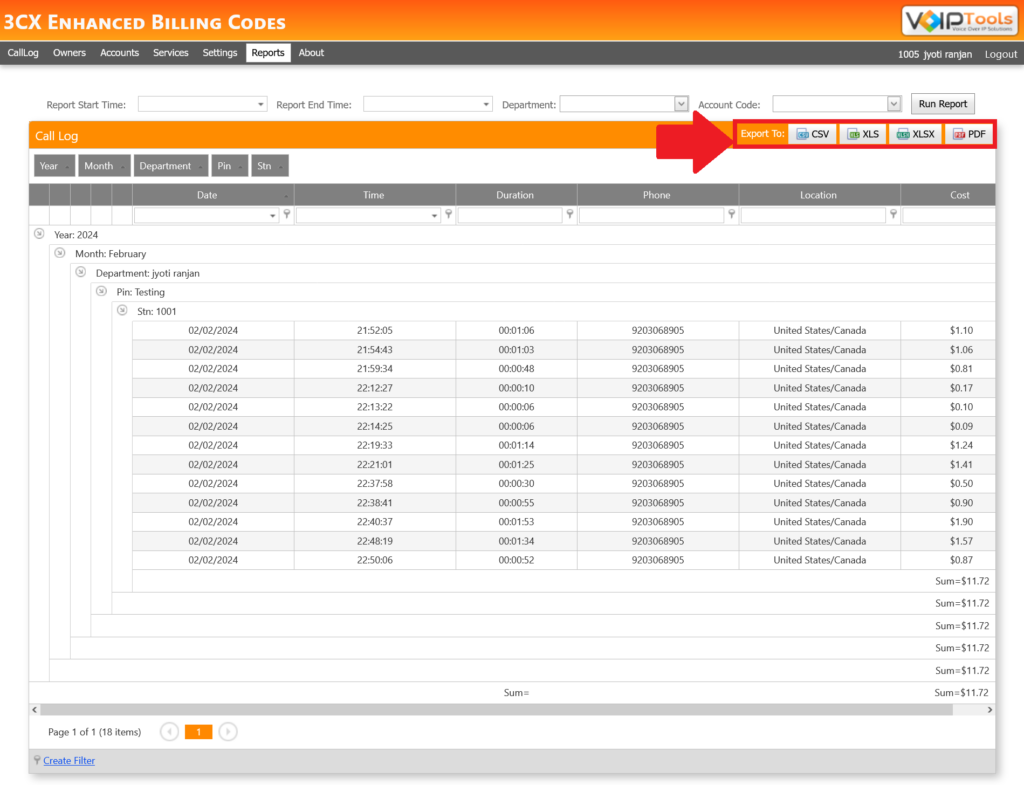
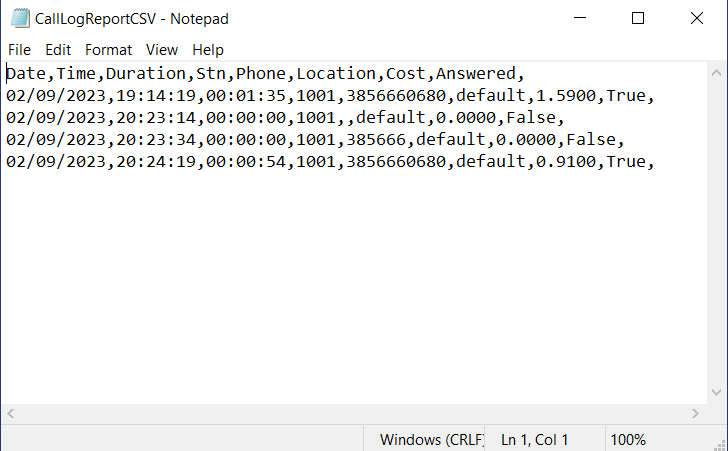
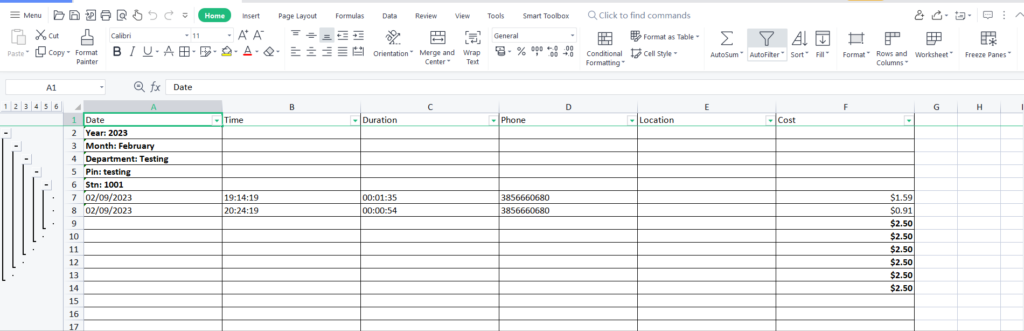
The Call Log screen enables you to view the timing, collection and evaluation of data for all the telephone calls. You can also export the call log report to various formats like .csv, .xlsx and pdf.
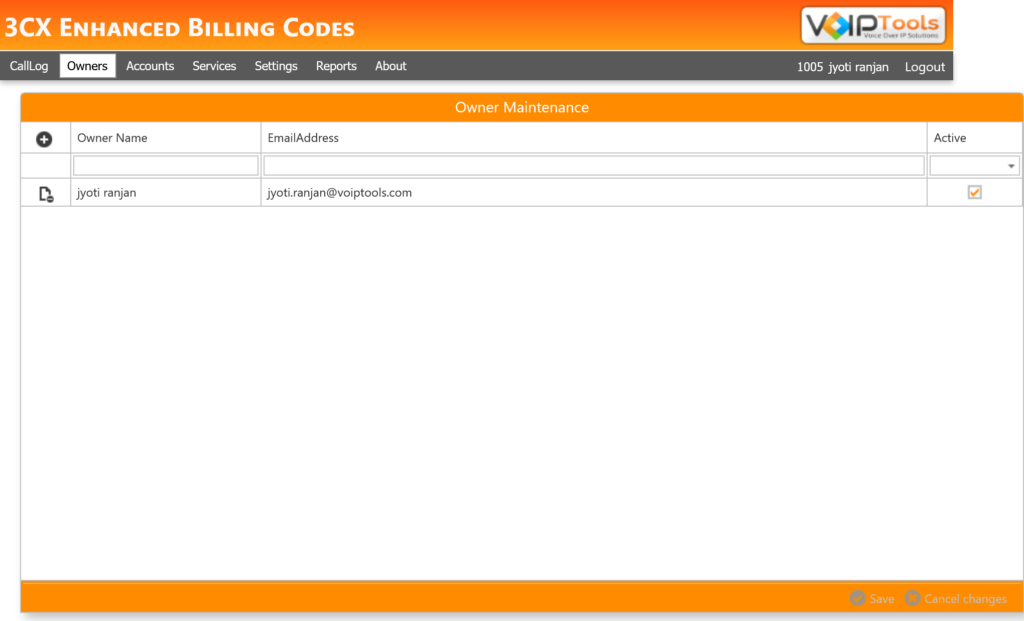
The Owners screen enables you to manage Owners, including assigning emails for automated reports and activate or inactivate an owner. Once an owner is successfully created and activated, the Owner displays in the Owner drop down list of the Accounts screen. Account code reports will be grouped based on the Owner assigned to the account.
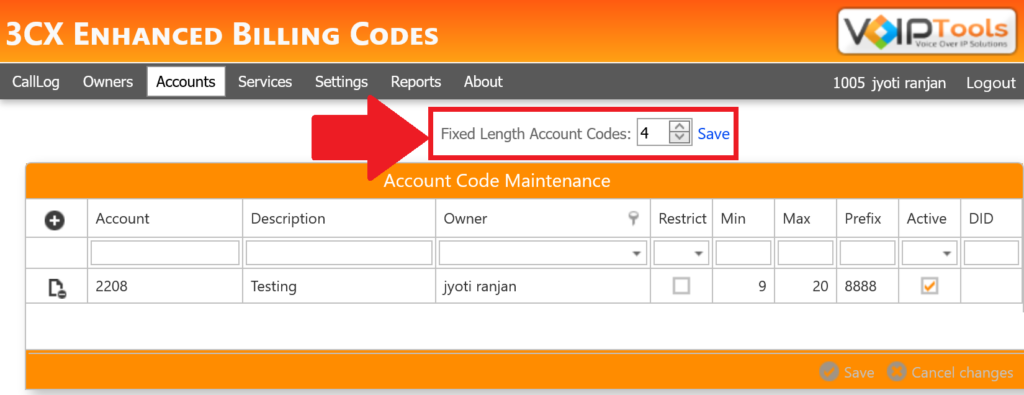
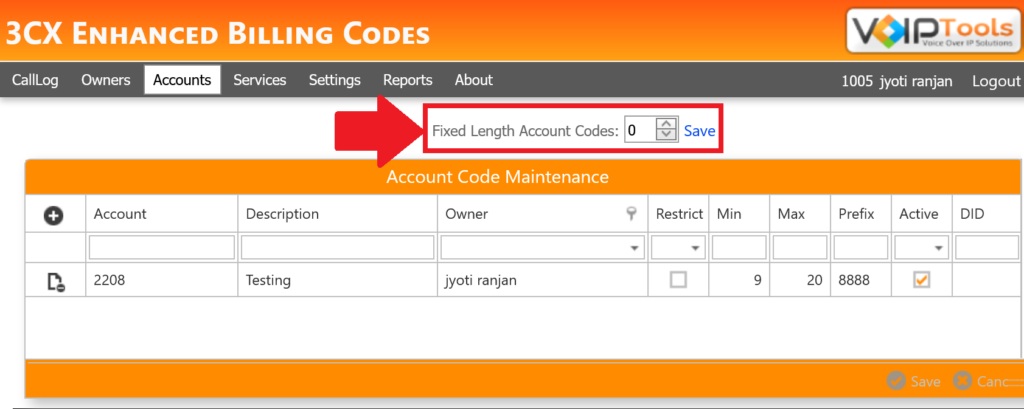
The Accounts screen enables you to create an account code. From here, you can define restrictions on the types of calls permitted. These restrictions will block calls if the phone number dialed is less than the minimum or more than the maximum number of permitted digits, or block calls starting with digits that match a list of specified prefixes (separated by a comma).
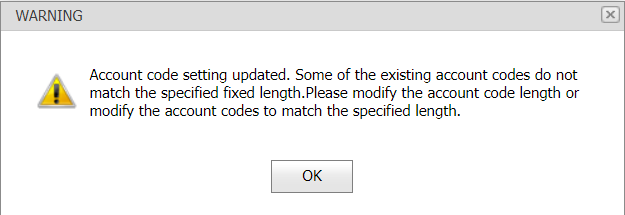
The editor enables you to select a fixed length for your Account Code. If the code length is selected as ‘0’ then, the Account Code length value will not have any restrictions.
ACCOUNT
This column displays ‘Account Codes’, which are used for (billing) tracking purposes. With these codes, you can control cost allocation and out-going call restrictions.
NOTE:
If the Account Code Length is set to ‘0’ then, while dialing, the owner needs to type: ** # If the Account Code length is fixed to any length then, while dialing, the owner needs to type: #
DESCRIPTION
The maximum length of phone number
OWNER
The name of the ‘Account’ owner.
RESTRICT
Check this check box if you want to apply the restrictions defined for the Account Code.
MIN
The first number of dialed digit(s). Here, you can enter multiple prefix codes separated by commas (,) (for example 801, 004, 920988).
If the ‘Restrict’ checkbox is checked, then the prefix restrictions will be applied to all the calls using this account code.
MAX
Minimum length of the phone number
PREFIX
The maximum length of the phone number
ACTIVE
Check the check box if you want to activate the account. If an account code is no longer used, uncheck the checkbox.
Enter the account code, ensuring the number of digits matches the specified Fixed Length Account Codes length.
Enter ‘0’ to create an Unrestricted Account Code.
In the column header and in the first column, click the Add button.
In the Account field, enter the account number.
In the Description field, enter a brief description for the ‘Account’.
In the Owner field, select the Account Owner from the drop-down.
Check the Restrict checkbox if you want to apply the account code restrictions.
In the Min and Max fields, enter the minimum and maximum length of the phone number respectively.
In the Prefix field, enter the prefix code for the phone number (if desired).
Check the Active checkbox to activate the Account.
Click the Save button to save your new account.
NOTE:
To restrict calls starting with digits that match a list of specified prefixes, you can specify multiple prefixes separated by commas (,). The account code restrictions will apply if you check the ‘Restrict’ checkbox for the account.
If the phone number dialed is less than the minimum or more than the maximum number of permitted digits, the account code restrictions will block the call.
Click the Deletebutton beside the Account Code record that you want to delete.
Figure 41: Delete Button
Click OK on the alert message to confirm your deletion.
Figure 42: Confirm Deletion Message Box
NOTE:
To ensure historical information is displayed correctly on reports, we STRONGLY discourage the deleted of account codes that have been used in the past. Rather than delete the account code, it is recommended that you uncheck the Active check box.
The Services tab enables you to ‘Stop’, ‘Start’ or ‘Refresh’ a service.
To start or stop a service, click Start / Stop button.
Click the Refresh link to update the status if changes to the service status were made directly in the Windows Service Snap-in.
Figure 43: Services Screen
NOTE:
If the service status is “Unknown”, this is typically caused by the 3CX Enhanced Billing Codes IIS Application Pool user having insufficient rights. To view changes to the service state made in the Windows services applet, press the refresh button.
IP Address or Fully Qualified Domain Name (FQDN) of your email server.
Example: 192.168.1.20 or mail.mydomail.com
PORT
Default port number is 25. (Google: 587).
FROM EMAIL
This is the email address from which the emails and SMS text notifications will be sent.
TO EMAIL
Enter a valid test email address. This temporary value is only used for sending test emails and is NOT required.
USER & PASSWORD
Enter login credentials of the email account from which you want to send the reports (if required by your mail server).
SSL/ TLS
Your mail server may require a secure connection – Secure Socket Layer (SSL) or Transport Layer Security (TLS) to relay email.
Gmail, Google Apps and Microsoft 365 require a secure connection.
TEST BUTTON
You can test whether your SMTP settings are correct by entering an email address in the ‘To Email’ field, then click the ‘Test’ button.
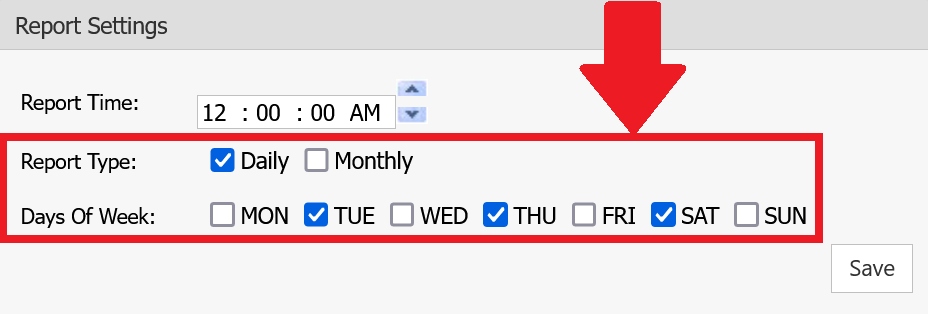
REPORT TIME
You schedule when automatic reports are sent by entering the desired time in the ‘Report Time’ field.
REPORT TYPE
You can generate automated reports on a daily, weekly, and/ or Monthly basis.
DAYS OF WEEK
Select the day(s) of the week so that the report will be emailed on all the selected days of the week.
NOTE:
Be sure to test both the email address and SMS text message. We suggest you to test each email, distribution, or SMS address to ensure you can send to all addresses. Sending mail within your domain may not require authentication, while sending outside your domain (SMS address for example) may require authentication. The domain for sending SMS text messages is specific to the wireless carrier.
Email Example: user@mydomain.com
SMS Example (Verison): 9999999999@VText.com
Owners will receive automated reports that include data for their assigned account codes, while Global email addresses will receive emails containing date for all accounts.
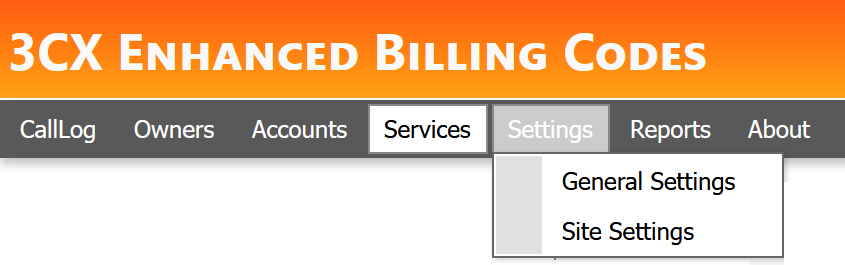
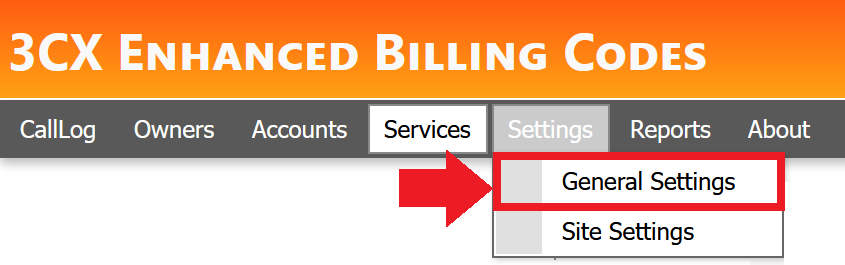
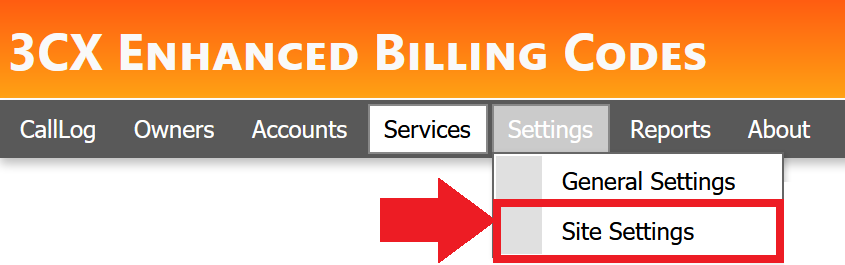
To configure the General Settings,
Hover over the Settings tab to display the settings dropdown.
Select the General Settings option in the settings dropdown.
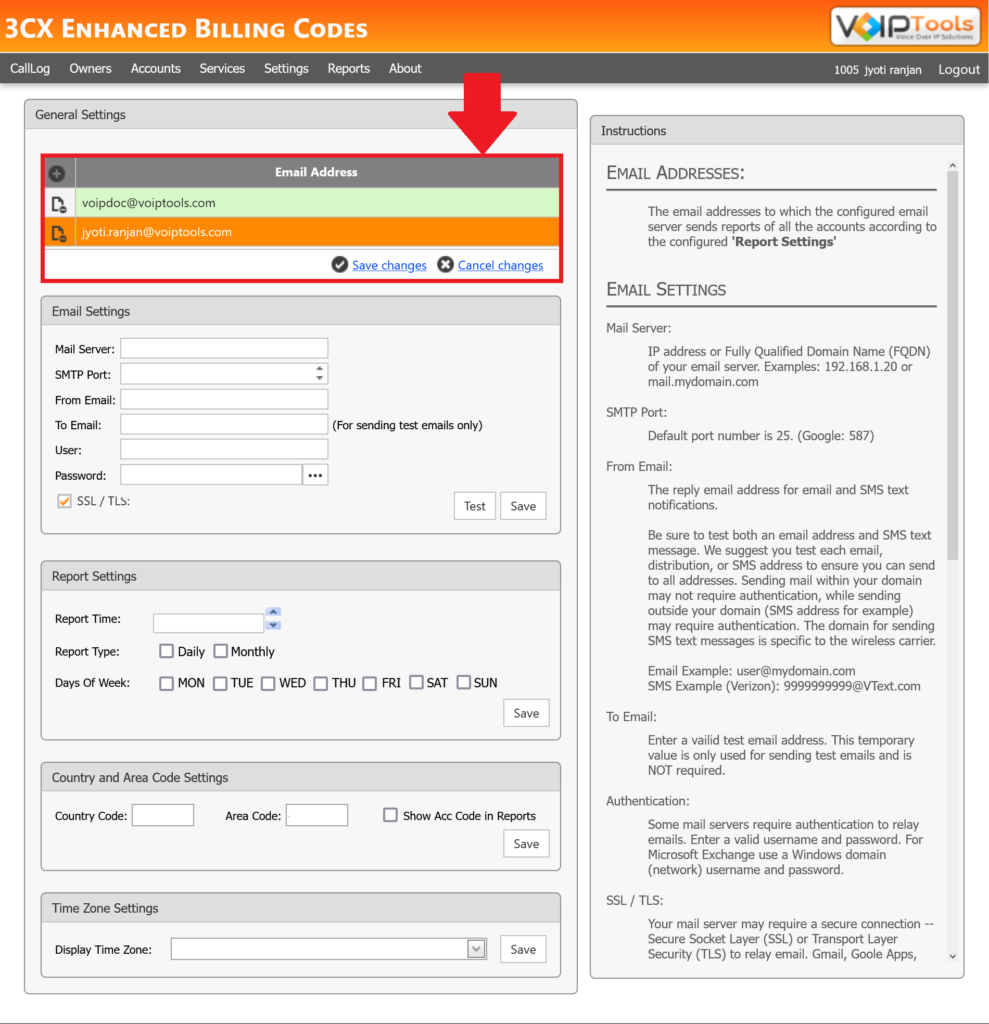
The Email Address grid maintains a list of global email addresses. Global email addresses receive automated reports containing call information for all accounts based on the configured Report Settings
This section lets you define who should receive automated reports containing all accounts
On the left of the Email Address column header, click the Add button to add email addresses. The grid supports batch edit which enables you can add or delete or edit multiple addresses before you save or update the list.
In the Email Address field, enter the email address that will receive automated reports containing all accounts.
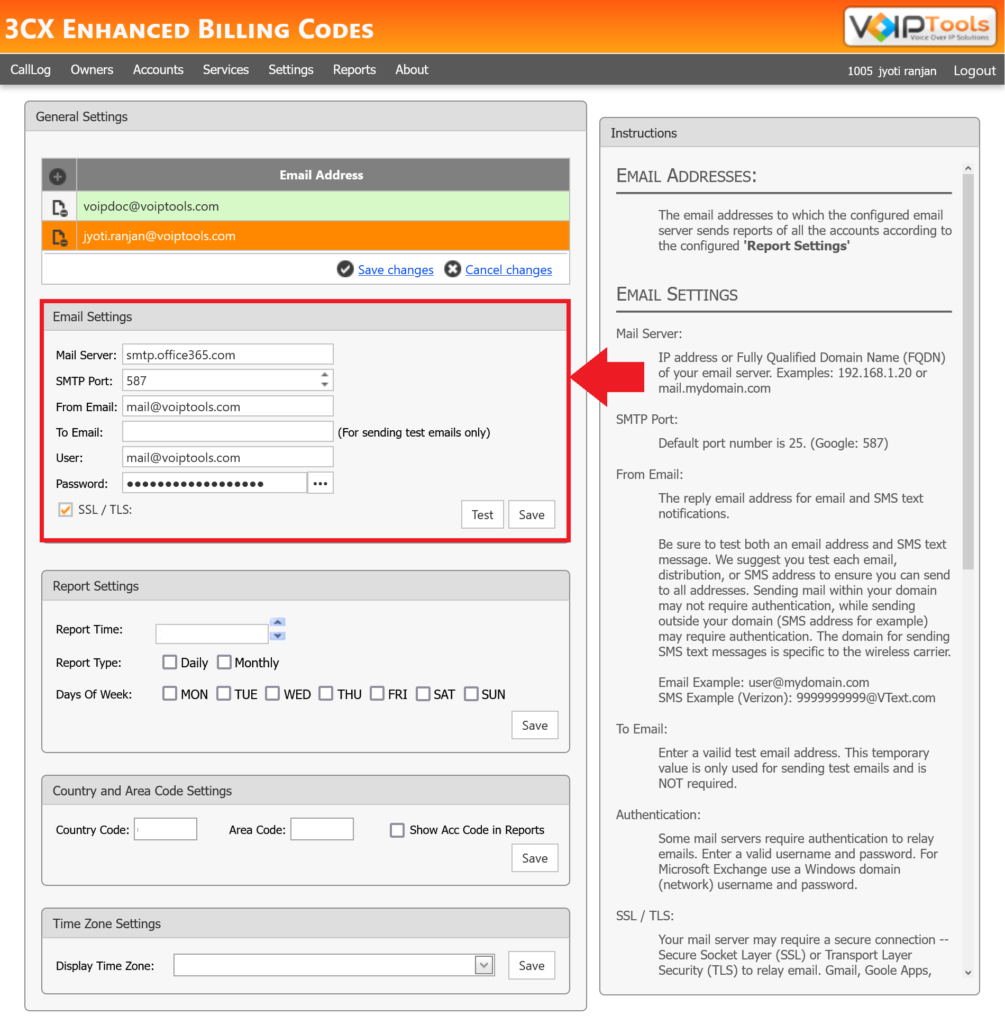
On the Settings menu, in the Email Settings section, in the Mail Server text field, enter the IP Address or Fully Qualified Domain Name (FQDN) of your email server.
In the Port field, enter the port number of the mail server.
In the Reply Address field, enter the email address from which the reports will be sent.
In the User and Password fields, enter the login credentials of the email account from which you want to send the reports (if required by your mail server).
NOTE:
If you want to reveal the password, click the More button; and to conceal it, click the same button once again.
Figure 48: View Password Button
Check SSL/ TLS check box if your mail server requires a secure connection.
To test if SMTP settings are properly configured, enter a valid email address in the To Email field and click Test.
In the Report Time field, select the desired time to send automated reports.
Select the Report Type as:
Daily – if you want to send the reports regularly for the selected day(s) of week.
Monthly – if you want to send the reports on a monthly basis.
NOTE:
‘Report Type’ is multi-selective. If you select ‘Report Type’ as ‘Monthly’ then, the report will be emailed on the last day of every month at 11:59:59 PM.
If you select the Report Type as Daily, select the desired Days of the Week to send automated reports.
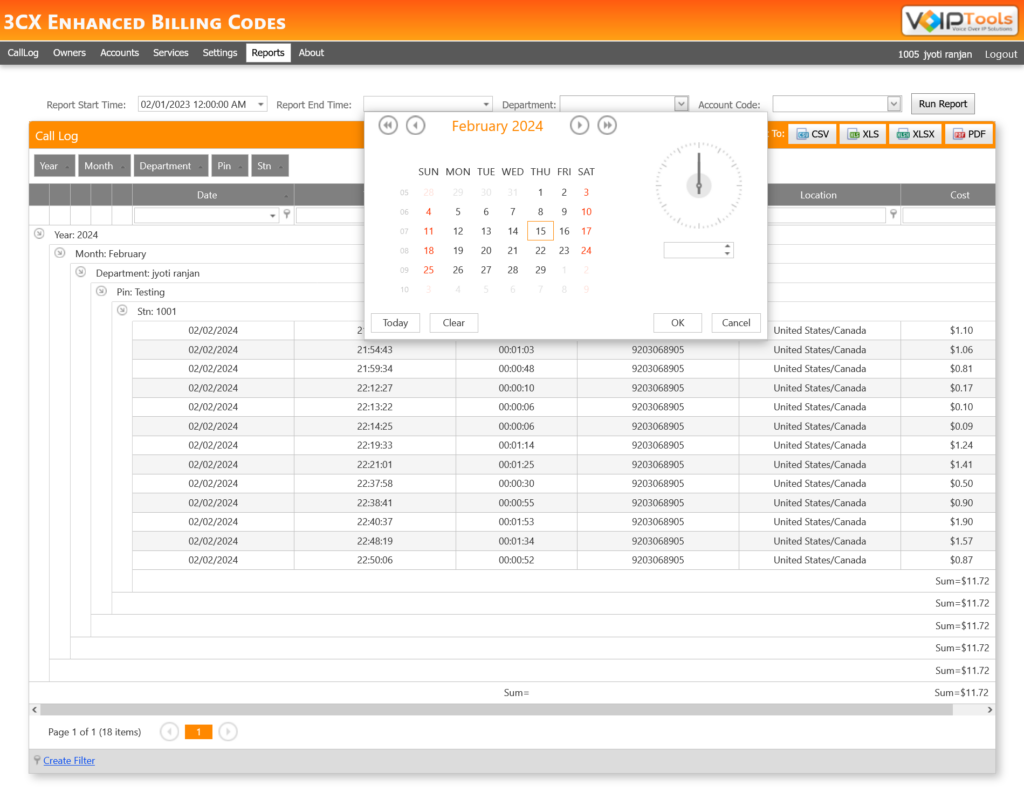
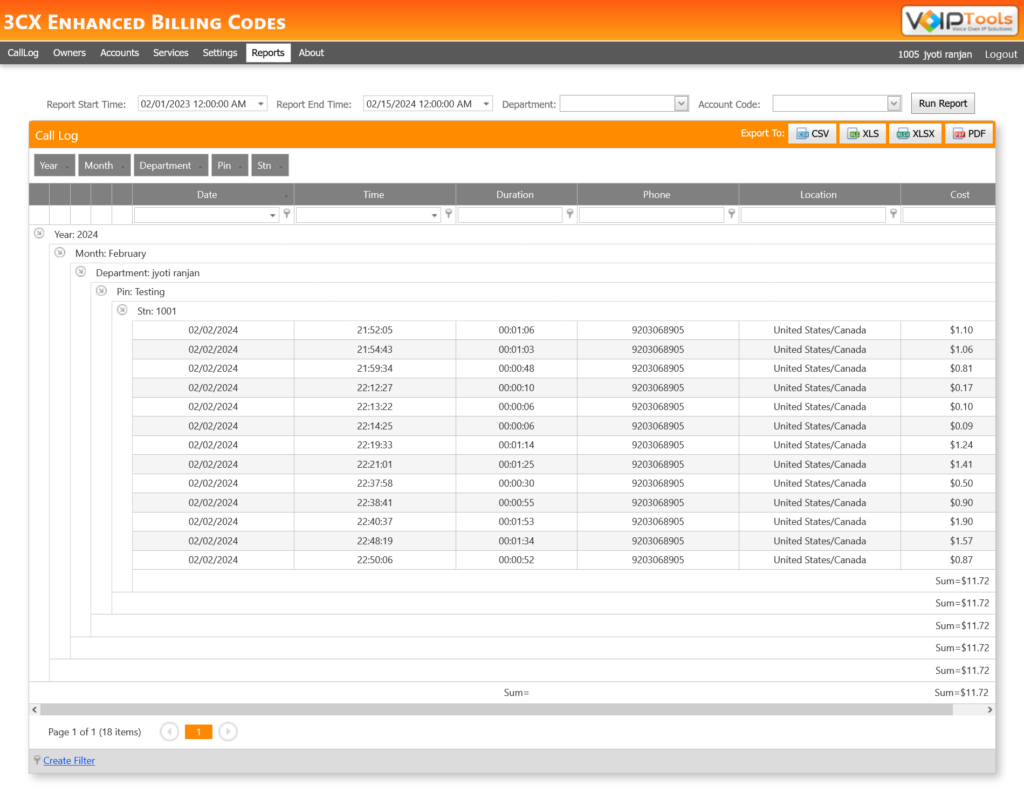
The Reports screen enables you to view reports for all the accounts within the selected time range, in a customizable group view. You can also export the reports to the desired format from the available various options including .csv, .xlsx and .pdf
You can view the report generated based on the selected criteria.
Figure 62: Reports Tab – Scenario 1 – Output
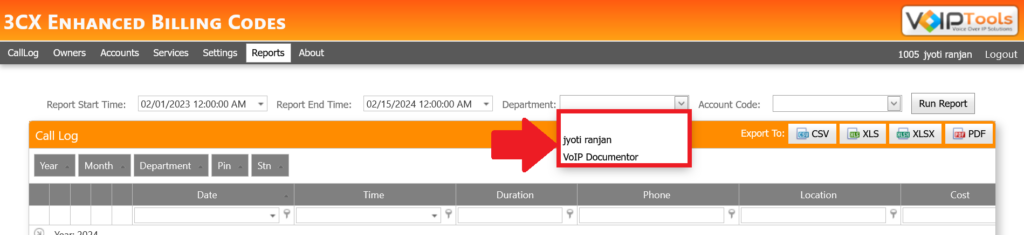
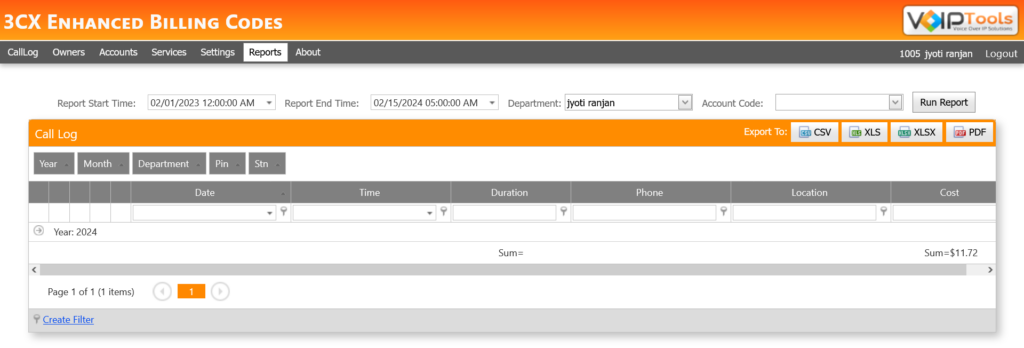
Scenario: 2 – Run Report based on Time Range and Department#
When a user runs a report based on Time Range and Department value, the system retrieves the reports of the selected owner that fall within the selected Report Time Range.
To run the report, follow these steps:
Select the start time for the desired time range by choosing a date from the Report Start Time date box.
Select the end time for the time range by selecting a date from the Report End Time date box.
In the Department drop-down list, select the owner for whom you wish to retrieve the report data within the selected time range.
Figure 63: Reports Tab – Scenario 2 – Department Dropdown
Click on the Run Report button to initiate the report generation process.
Figure 64: Reports Tab – Scenario 2 – Output
NOTE:
While running a report, ‘Report Start Time’ and ‘Report End Time’ cannot be blank.
A single owner can contain multiple accounts. Hence, while retrieving the data of an owner that has more than one account, the system retrieves call log reports for all the accounts of the owner that fall within the selected Report Time Range.
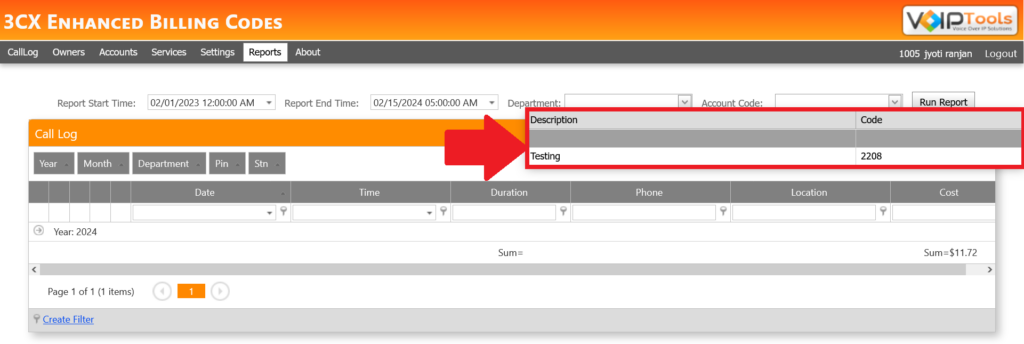
Scenario: 3 – Run Report based on Time Range and Account Code#
When a user runs a report based on Time Range and Account Code value, the system retrieves the reports of the selected Account Code that fall within the selected Report Time Range.
From the Report Start Time date box, select the start time for the time range within which you want to run the report.
From the Report End Time date box, select the end time for the time range within which you want to run the report.
From the Account Code drop down list, select the Account Code for which you want to retrieve the report data within the selected ‘Report Time Range’.
Click the Run Report button to generate the report.
Figure 66: Retrieve Report Data on Time Range and Account Code
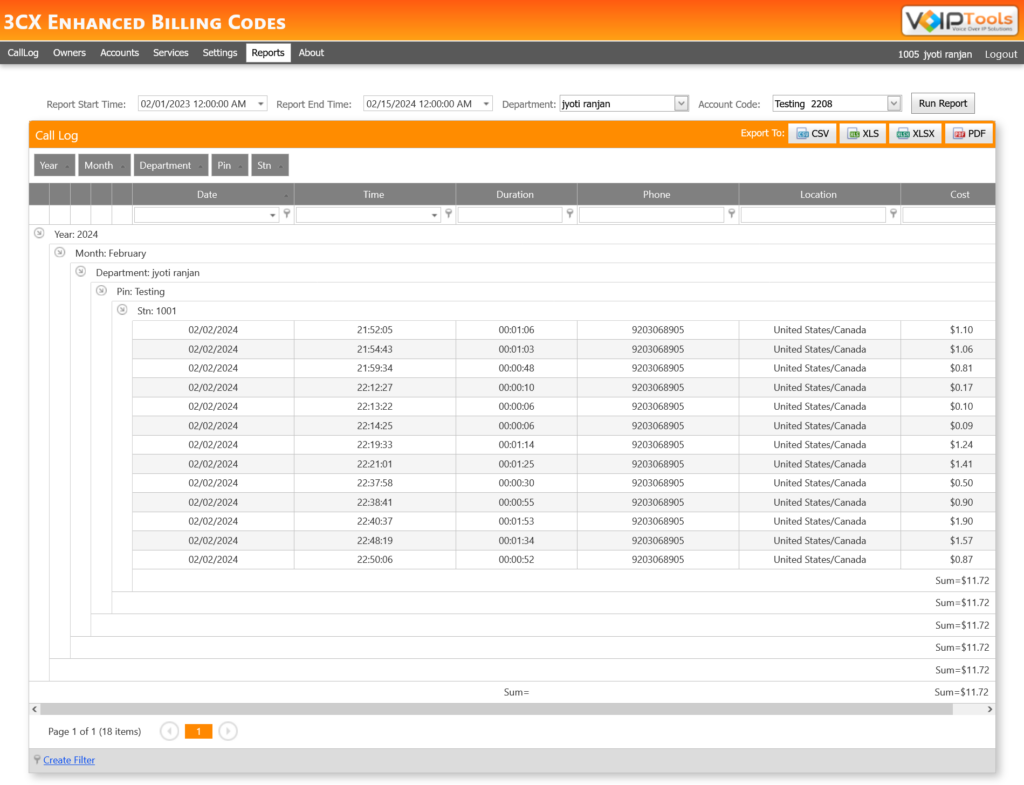
Scenario: 4 – Run Report based on Time Range, Department and Account Code#
When a user runs a report based on Time Range, Department value and Account Code value, the system retrieves the reports of the selected owner’s specified Account Code that fall within the selected Report Time Range.
From the Report Start Time date box, select the start time for the time range within which you want to run the report.
From the Report End Time date box, select the end time for the time range within which you want to run the report.
From the Department drop down list, select the owner for whom you want to retrieve the report data within the selected ‘Report Time Range’.
From the Account Code drop down list, select the Account Code of the selected owner for which you want to retrieve the report data within the selected ‘Report Time Range’.
Click Run Report.
Figure 67: Retrieve Report Data on Time Range, Department and Account Code
When 3CX Enhanced Billing Codes is installed, two special single-digit extensions are automatically created (Extensions 8 and 9). These two extensions are assigned to separate 3CX Call Flow Designer (CFD) applications. When the extensions are called, both applications prompt the caller for the account code and the number to be dialed. When 8 is dialed, the caller is carefully prompted to enter the required information. If 9 is dialed, a streamlined process is presented with fewer prompts (for experienced users).
This extension steps the caller through the process of collecting the account code and phone number by carefully prompting the user for the needed information. This is the best option to choose when initially getting started with Enhanced Billing Codes.
From your phone, dial 8 and wait to be connected to the CFD application.
You will be prompted for a billing code. Enter your billing code and press # to continue to the next step
The billing code you entered will be read back to you. If the code is correct, press 1. If incorrect, press * to reenter the code.
The billing code will be validated against a list of valid account codes
Next, you will be prompted for the phone number to be dialed. Enter the desired phone number and press #.
The phone number will be validated against any restrictions associated with the account code
After validation, the call will be placed automatically
Once you are comfortable using Enhanced Billing Codes to place calls, you can use a more streamlined approach by dialing 9 (rather than 8). This version of the application simply beeps when it is ready and no prompts (other than the beep) are played.
From your phone, dial 9 and wait to be connected to the CFD application.
The CFD is ready to accept your account code and phone number when you hear a beep.
After the beep, enter your account code and phone number, separated by “**”. (For example: 1234**8016424655). Press # when finished entering the digits.
After the billing code and phone number are validated, the phone call will be placed automatically
The call will be logged in a database for reporting.
You get quick answers to most of your inquiries in our online manual. If you prefer direct contact, we offer various support channels, including phone, email, live chat, and our helpful VoIPTools forums.
Rest assured, our dedicated team is here to assist you around the clock, every day of the year. Whether you’re based in the USA or India, we’re ready to provide prompt responses to your technical queries.
Windows Event Log for VoIPTools Applications and Services #
For troubleshooting any application errors, our Windows Event Log contains a comprehensive list of error messages, warnings, and informative notes related to all our VoIPTools applications and services. It’s a valuable resource to help you pinpoint and resolve any issues you may encounter.
Are you looking to collaborate with other VoIPTools customers facing similar challenges? Our forum is the perfect platform to exchange ideas, solutions, and best practices. Join the conversation at: https://www.voiptools.com/community/
Got questions that need immediate answers? Our chat support team is available to assist you in real time. Just click on the Live Chat button located at the lower right corner of our website, and we’ll acknowledge your queries right away.
To ensure a thorough understanding of your concerns, email us at support@voiptools.com. Describe your issue in detail, and we’ll get back to you within one business day with the support you need.
If you prefer to speak with a representative directly, you can reach us at +1 801-642-4655. Our attentive team is available to take your calls from 8:00 AM to 6:00 PM (Central Standard Time).
If you’ve purchased our products through a VoIPTools Partner, rest assured that they provide first-level support at no additional cost. Partners have access to 100% free technical assistance and actively participate in the troubleshooting process.
VoIPTools customers enjoy access to our online manuals and receive support through emails (with responses within one business day) and live chat. However, please note that we do not provide remote server login assistance.
For a more hands-on experience, consider our “Installation Support” package. Our expert support team can log in to your servers, and install and configure all our tools. This comprehensive service includes setting up SQL Server Express and Internet Information Server if necessary. We’ll work closely with you to tailor our applications to meet your requirements.
We’re committed to providing top-notch support to ensure your VoIPTools experience is smooth and hassle-free. Contact us today, and let us assist you in making the most of our powerful tools!


NOTE:
NOTE:


 button to download your application.
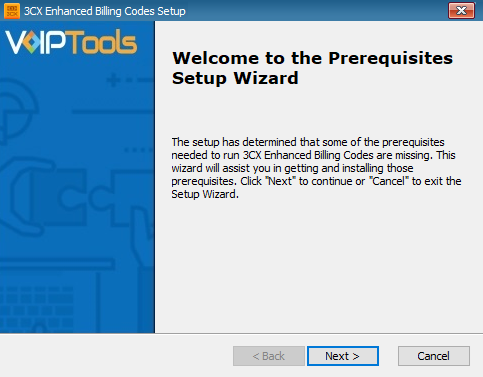

NOTE:

 to open the web application.
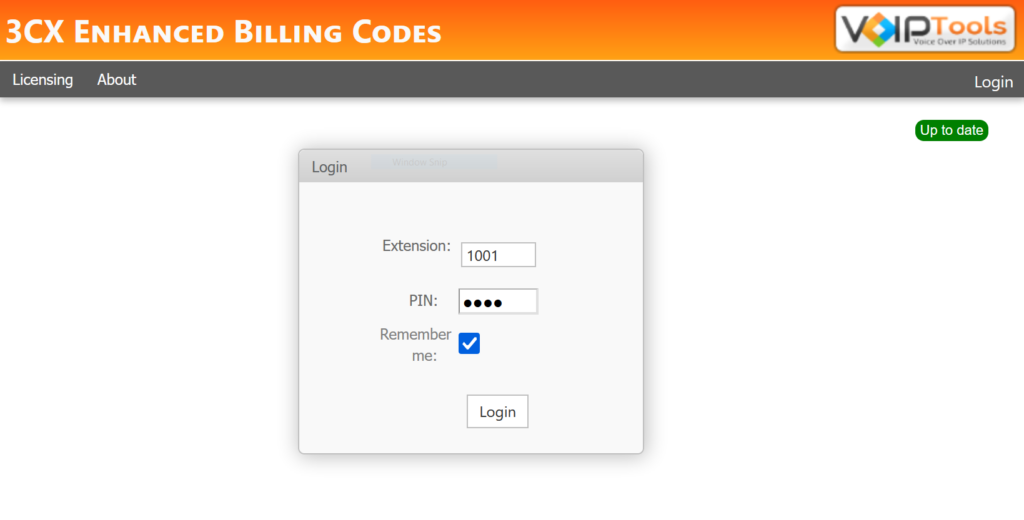

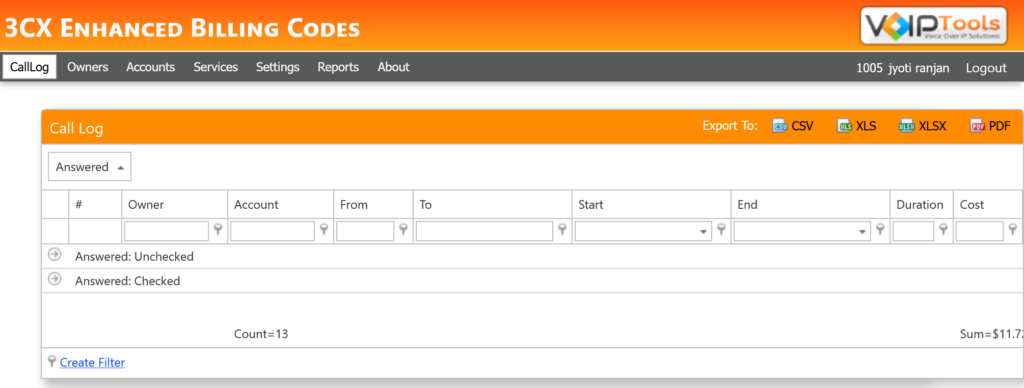
 button to expand the groups to view the complete data.
 button.
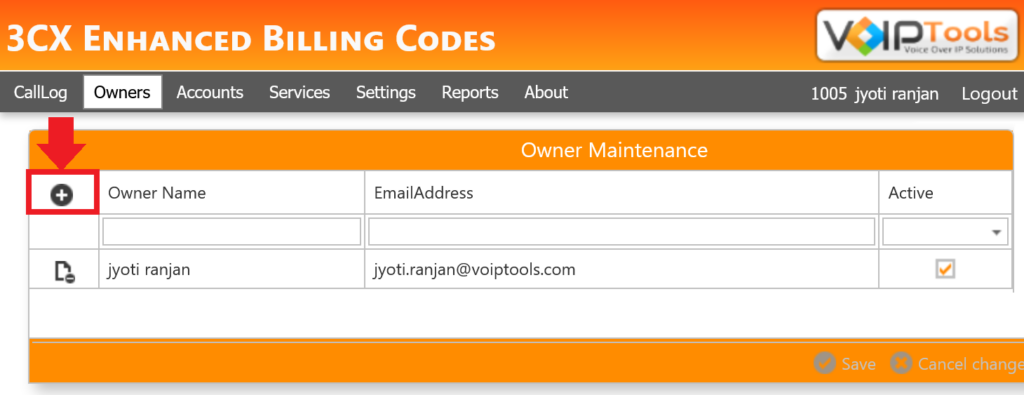
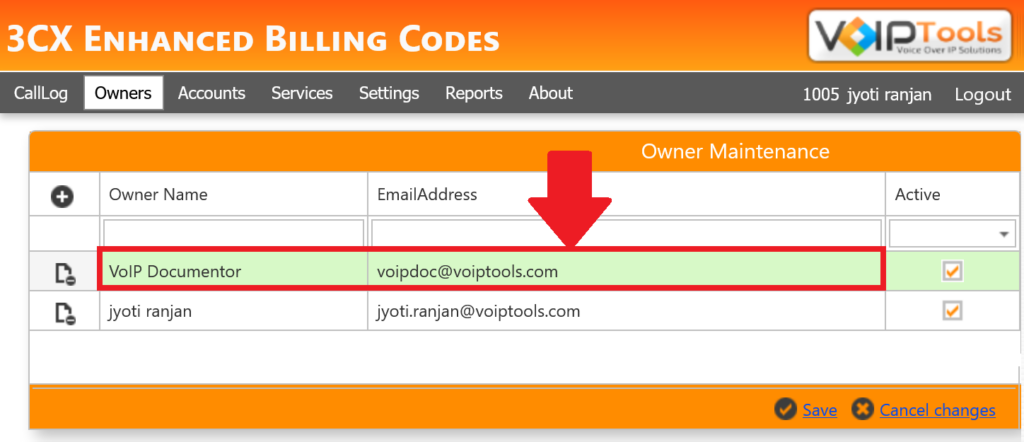
 button to save the owner.
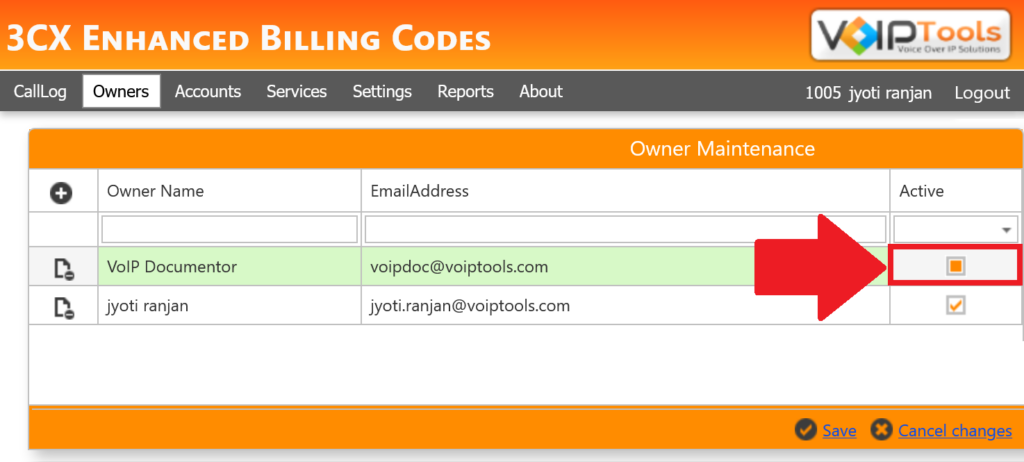
 button beside the record that you want to delete.
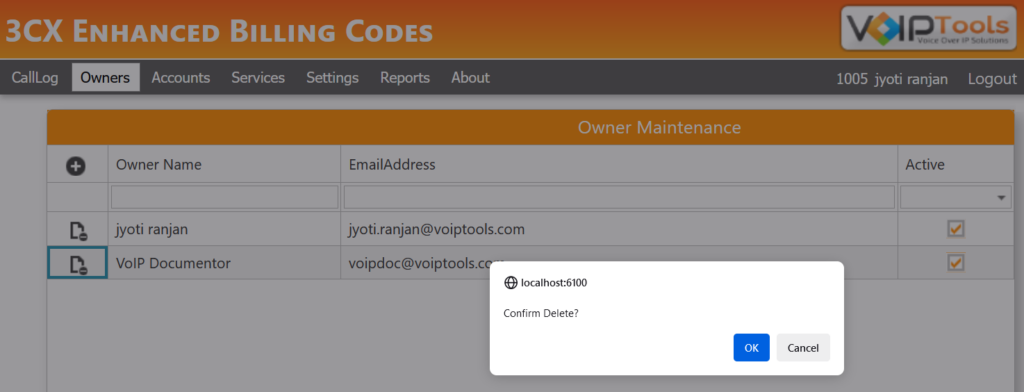

 button to save your new account.
 button beside the Account Code record that you want to delete.
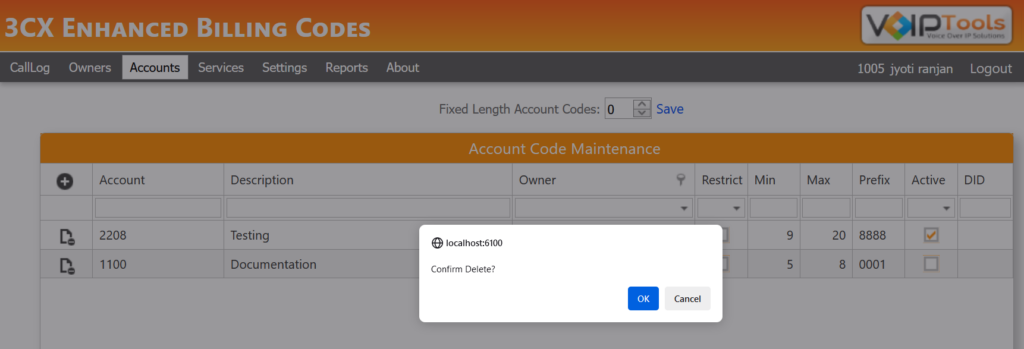
 / Stop
  button.
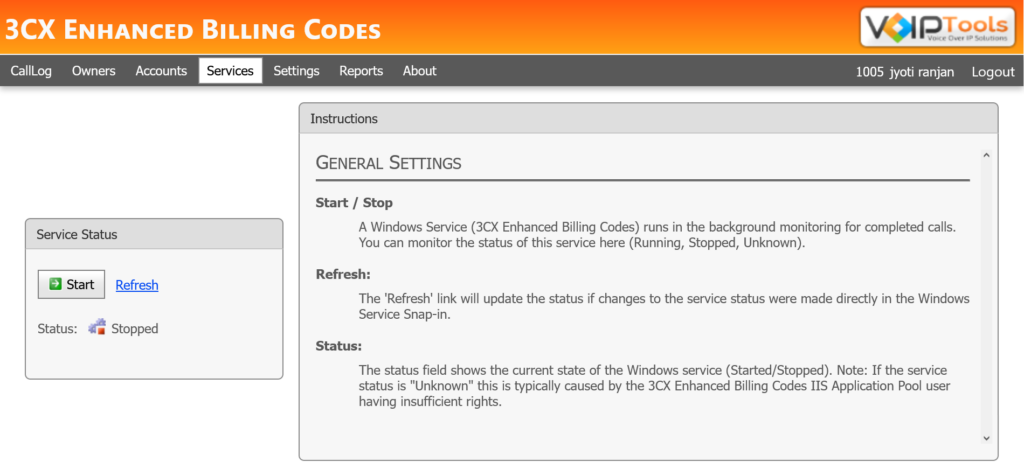

 button to add email addresses. The grid supports batch edit which enables you can add or delete or edit multiple addresses before you save or update the list.
 to save the email addresses.
 button.
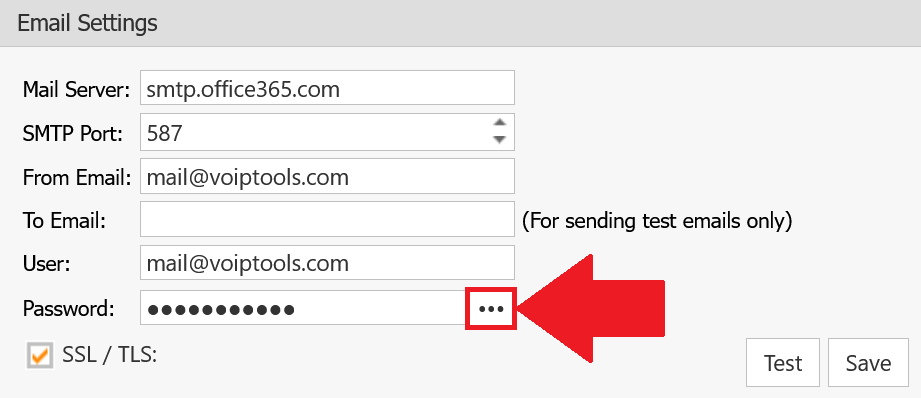

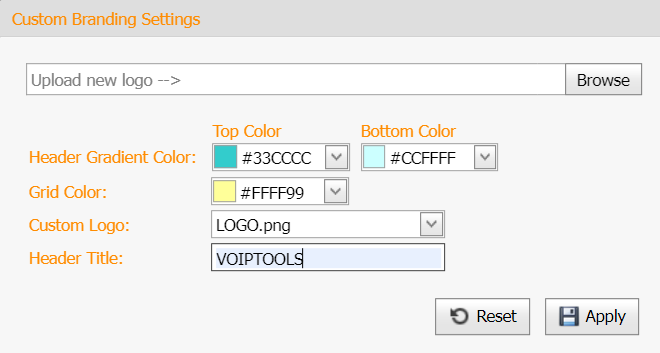
 button to save your customizations.


