Revolutionize Your Voicemail Management with Our Powerful Web Portal
Transform your voicemail management with our advanced web portal. Access your voicemails from anywhere, enjoying unparalleled flexibility and eliminating limitations. Our 3CX Voicemail Manager introduces exciting features that enhance the capabilities of 3CX. Experience the convenience of viewing your voicemails as text through automated transcription and email delivery.
Navigate through our user-friendly web portal, effortlessly searching and filtering your voicemail text using the built-in query manager. Take control by securely archiving your transcriptions in an SQL database and automatically removing old voicemails with a retention policy.
Never miss an important voicemail again with our ‘Escalation’ feature. Ensure no message goes unheard, keeping you on top of your communication. Simplify collaboration by easily sharing voicemails with your team or designated groups using our ‘Distribution’ feature, streamlining your communication channels.
Upgrade your voicemail management today and seize full control of your voicemails. Embrace flexibility, convenience, and efficiency with our powerful web portal and enhanced features. Say goodbye to outdated methods and embrace the future of voicemail management. Try it now and revolutionize the way you handle your voicemails!
With the 3CX Voicemail Manager, you gain the ability to swiftly distribute voicemails to specific groups. Plus, you can easily escalate unanswered voicemails to designated email addresses through a designated extension group. Experience the efficiency of receiving text transcriptions for your voicemails. Enjoy optimized storage space as you compress and archive your voicemails. Effortlessly filter your voicemails using the built-in query manager, ensuring you find what you need quickly. And with the user-friendly web portal, accessing your voicemails remotely becomes a breeze. Upgrade your voicemail management today and streamline your communication processes.
Retrieve and manage your voicemails effortlessly with our user-friendly web portal. Access your voicemails from anywhere and streamline your workflow. With our intuitive interface, you can easily search, listen to, forward, delete, and email voicemails.
ENHANCED PRIVACY
Experience the convenience and privacy of reading your voicemails as transcribed text, automatically delivered to your email. Enjoy the discretion of communicating without listening to voicemails aloud.
EFFICIENT ORGANIZATION
Effortlessly search and filter through the text of your voicemails using our integrated query manager, saving you valuable time and streamlining the process of locating specific messages.
SECURE ARCHIVING
Store your voicemail transcriptions securely and retrieve them with ease using our reliable SQL database. Enjoy the peace of mind of knowing that your important messages are safely archived and readily accessible whenever you need them
AUTOMATIC DELETION
Optimize your voicemail inbox and storage space by setting up a retention policy that automatically deletes old voicemails, ensuring a clutter-free environment.
ESCALATION FEATURES
Experience peace of mind knowing that no critical voicemail will go unheard with our innovative ‘Escalation’ feature, guaranteeing prompt response times and eliminating communication gaps.
STREAMLINED COLLABORATION
Foster efficient communication and collaboration within your team by effortlessly distributing voicemails to designated groups using the ‘Distribution’ feature.
UNMISSED CRITICAL MESSAGES
Ensure uninterrupted communication by staying on top of critical messages with the voicemail escalation feature of the 3CX Voicemail Manager. Even when your staff is unavailable or taking time off, this feature guarantees that important voicemails are promptly addressed. Stay connected and never miss a crucial message again.
Before you begin with the installation steps mentioned in this guide, you need to ensure that your computer meets the minimum requirements mentioned below for installing 3CX Voicemail Manager:
3CX Version V18
VoIPTools Relay installed on the 3CX server
Windows 10 / 11 Pro or Windows Server 2016 / 2019 (64-bit) or above
Microsoft SQL Server 2016 or above (Including the free SQL Express edition)
Set up a Google Cloud account for Google Speech Translate for voicemail transcription services.
Static IP for VoIPTools and 3CX servers
NOTE:
You need a Static IP for both VoIPTools and 3CX servers to ensure proper two-way communication, both the 3CX server (Relay) and the VoIPTools server. Dynamically assigned IP addresses are not supported. Additionally, it is recommended to use HTTPS for secure communication, which requires a FQDN for SSL/TLS certificate validation between the VoIPTools server and the Relay.
NOTE:
While installing SQL Server, ensure the following,
Uninstall the previous versions of SQL Management Studio manually before installing the new version.
Install it in “Mixed Mode” to include SQL Authentication, and install SQL Management Studio
NOTE:
Our installers will offer to install Microsoft SQL Server, SQL Management Studio, Microsoft Internet Information Server (IIS), and Microsoft .Net Framework. If you have the installer perform these installs, all the needed settings will be configured automatically.
If you choose to install IIS yourself, be sure to install Basic Authentication, .Net Extensibility, and ASP.Net 4.X
You can order 3CX Voicemail Manager online at https://www.voiptools.com. Your order confirmation email will include your license key and a link to download the software.
There are a number of prerequisites that must be installed prior to installing the 3CX Voicemail Manager. These prerequisites include Microsoft Internet Information Server (IIS) and Microsoft SQL Server
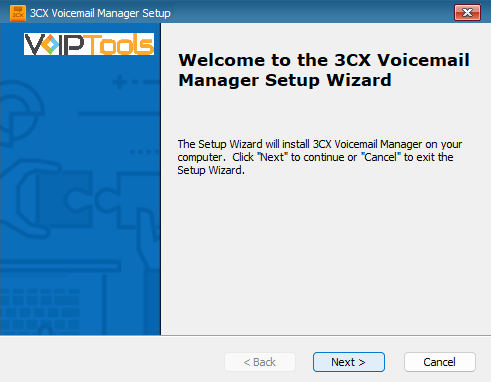
This User Guide contains step-by-step instructions to successfully install 3CX Voicemail Manager. Begin by extracting the installer from the downloaded zip file (Step 1 above), then run the setup program named VoicemailManagerInstaller.exe
You must register your license key to activate 3CX Voicemail Manager. Your license key is included in your order confirmation email, and can also be found in your order history on our website.
Find the software download link in the Order Confirmation Email, or you can find it in your order history on our website and download the 3CX Power Dialer application.
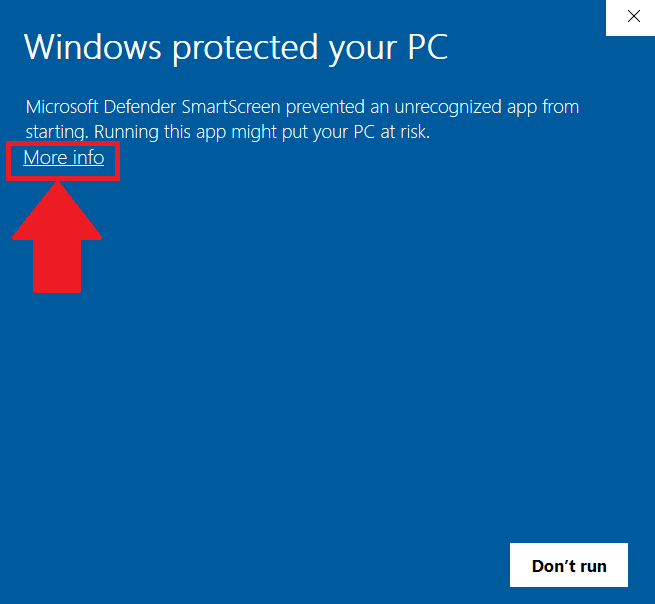
In the Microsoft Defender SmartScreen, click the More Info option.
Figure 1: Microsoft Defender: More info
Click the Run Anyway option to start the installation.
Click on the software installer downloaded in Step 1. The installation wizard will automatically identify the prerequisites and assist you with each installation required to 3CX Power Dialer. It includes .NET Framework (Web Installer), SQL Server Express (Web Installer), and SQL Server Management Studio.
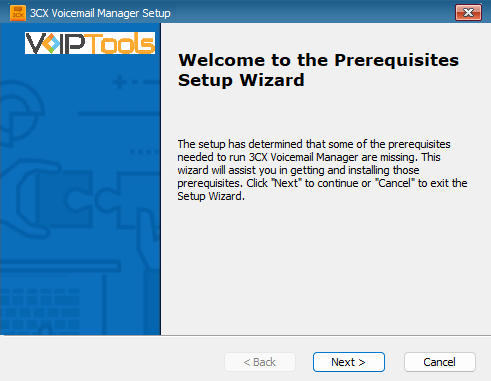
Click the downloaded installer executable to launch the Prerequisites Setup Wizard and click Next.
Figure 3: Prerequisites setup wizard
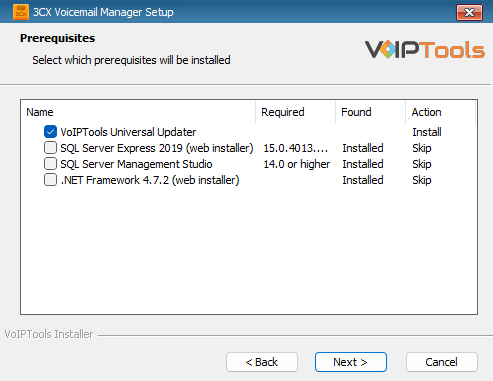
In the Prerequisites window, install all the required prerequisites identified by the installer, or select/ unselect the applications based on your requirements and click Next to continue.
Figure 4: Select prerequisites
NOTE:
The installer will identify any prerequisites needed. It is recommended that you allow the installer to automatically install and configure the required prerequisites. Once all the prerequisites are installed, you can continue with the tool install.
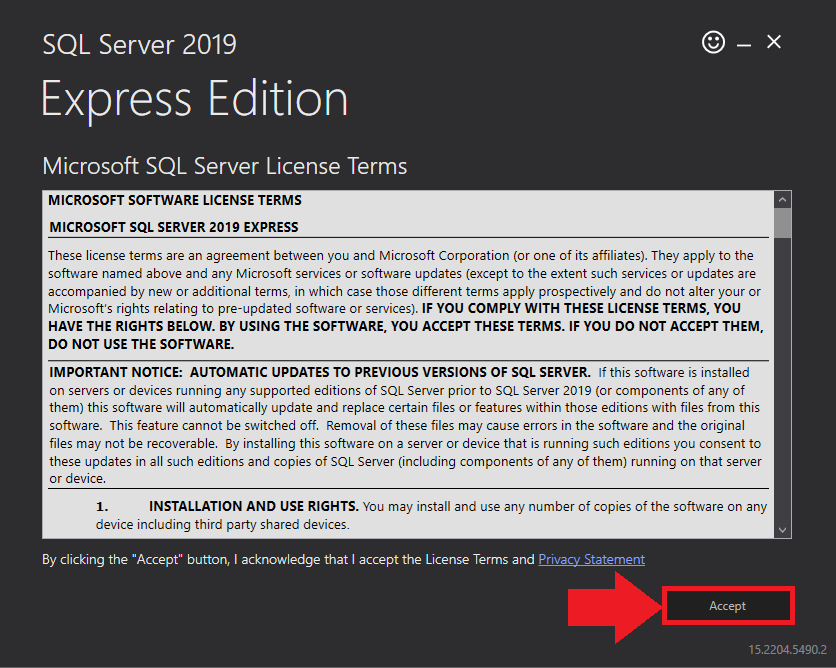
In the Microsoft SQL Server License Terms click the Accept button to acknowledge the license terms and continue.
This page appears if you do not have SQL Server Express preinstalled in your device.
Figure 5: SQL Server Express: Accept License Terms
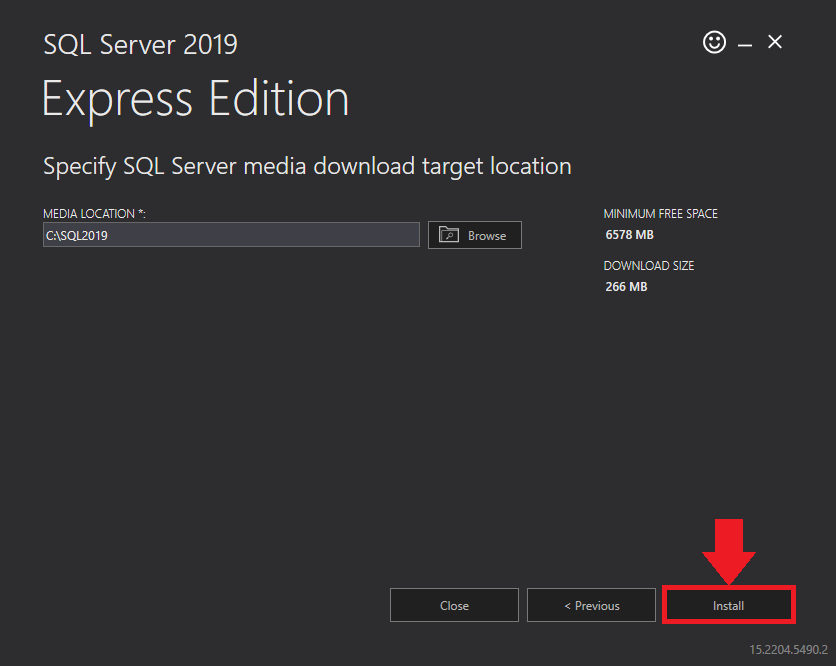
View the SQL Server Media target location in the Media Location field. If required, you can click the Browse button to change the location. Click Install to begin the installation of SQL Server Express.
Figure 6: SQL Server Express: Target Location
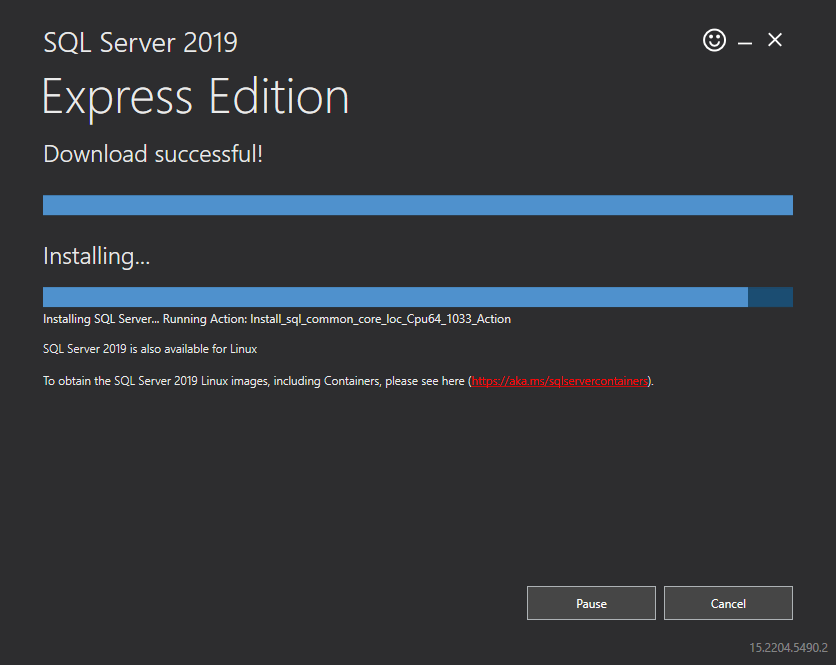
SQL server installation is in progress. This may take several minutes to complete.
Figure 7: SQL Server Installation In Progress
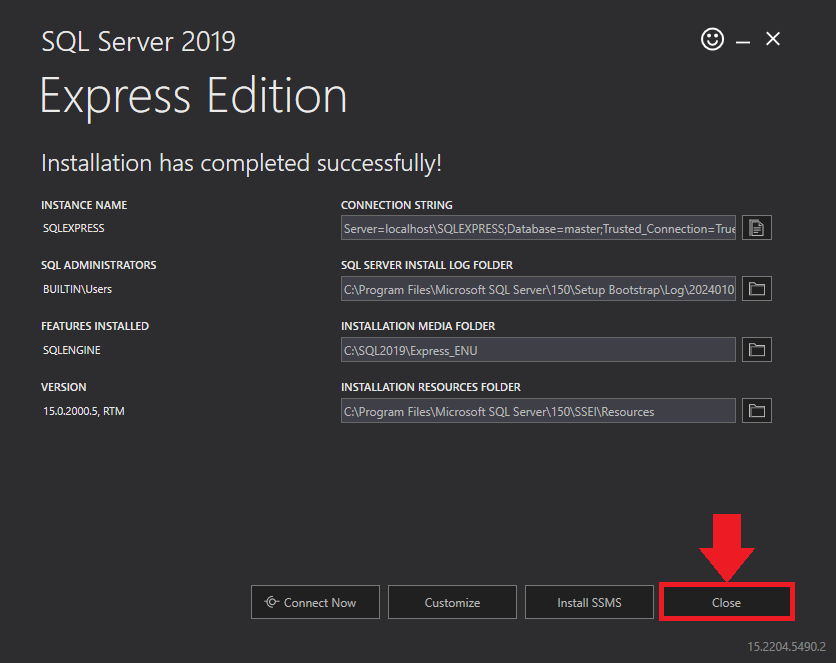
Click the Close button once the prerequisites are installed.
Figure 8: SQL Server Express: Installed Successfully
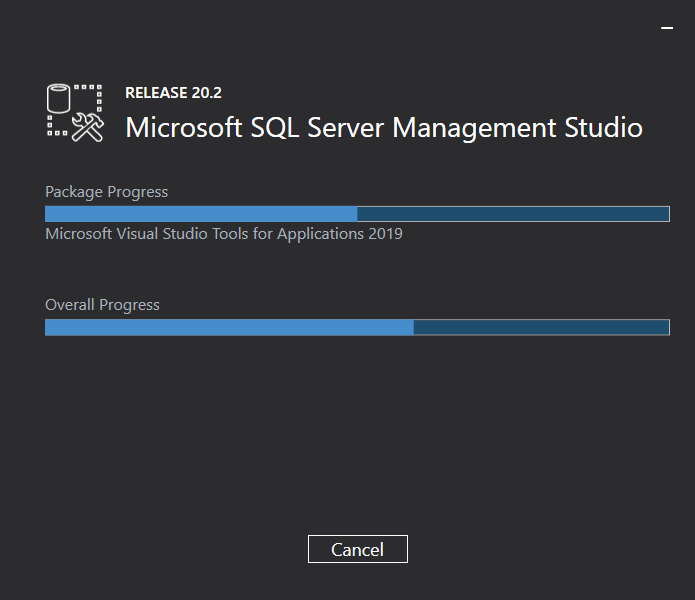
Microsoft SQL Management Studio installation is in progress. This may take several minutes to complete.
Figure 9: Microsoft SQL Server Management Studio: Installation in progress
Click Yes in the Confirmation Message Box to reboot the computer.
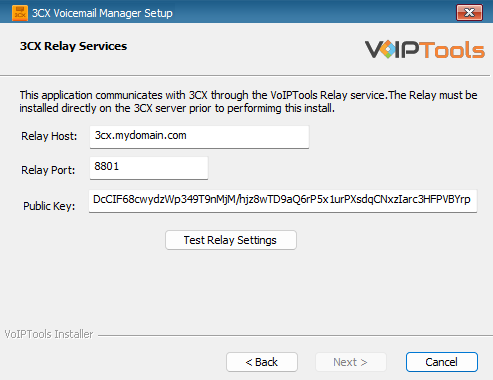
In the 3CX Relay Services window, in the Relay Host field, enter the FQDN of your 3CX server.
NOTE:
Do not include https:// to the Relay host data.
Enter 8801 in the Relay Port field.
Enter the public key you copied from VoIPTools Relay services in the Public Key text area.
Figure 13: Windows Installer: Relay Settings
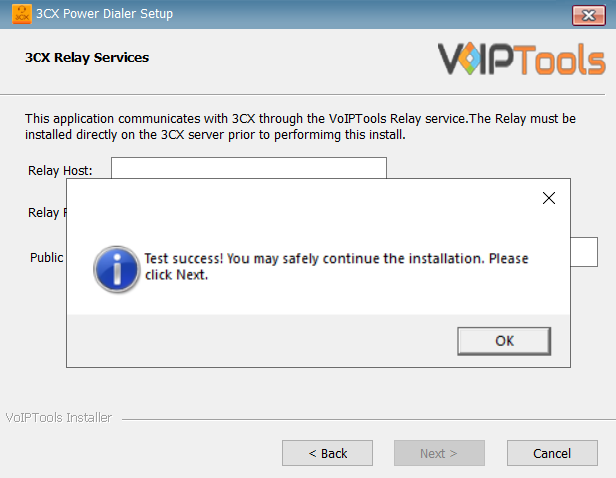
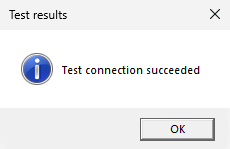
Click the Test Relay Settings to confirm 3CX Voicemail Manager can communicate with the Relay services running on the 3CX server.
If the 3CX Voicemail Manager is successfully able to communicate with the Relay services that run on the 3CX server, a Success message box appears. Click OK. If the test fails, you will not be able to continue until communication with the relay is established.
Click Next to continue with the installation.
Figure14: Test Relay Success
NOTE:
You must set the Relay Port to 8801.
If the Relay test fails, you cannot continue the installation until you establish communication with the Relay. If the test was unsuccessful:
Confirm you have the correct firewall port open (default TCP 8801) on the 3CX server and the firewall protecting the 3CX server.
Confirm that you have entered the correct FQDN for the 3CX server.
Confirm that the 3CX Power Dialer and Relay use the same port and protocol.
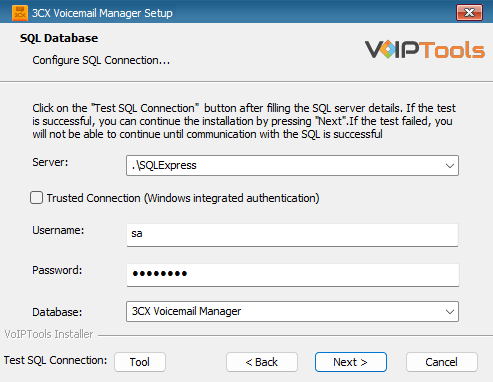
When configuring 3CX Voicemail Manager, select an existing Microsoft SQL Server instance in your environment. The database server can be a remote SQL Server or a local instance running on the VolPTools server.
On the SQL Database window in the Server field, select the desired instance of SQL Server IP/FQDN followed by the SQL Instance name.
If SQL is installed on the same server as 3CX Voicemail Manager, you can use “.” to represent ‘localhost’.
Uncheck the Trusted Connection box.
We do not recommend using a trusted connection (Windows Integrated security).
In the Username and Password fields, enter valid SQL login account credentials.
If SQL was installed automatically, SQL Server was installed in “mixed” mode and the ‘sa’ password is V01PT0y5.
In the Database list, select the desired database.
We strongly urge you to use the default database name provided and allow the installer to create the database automatically.
Figure 15: Windows Installer: SQL Server database settings
NOTE:
We strongly recommend utilizing SQL Authentication over Windows authentication. Our suite of tools heavily relies on the Call Flow Designer (CFD) application, which operates on the 3CX platform. The CFD applications often necessitate access to a SQL database. If the 3CX server and the database server do not belong to an Active Directory domain, Windows authentication will prove ineffective. In order to employ SQL authentication, it is imperative that your SQL Server is configured to operate in “Mixed Mode”. If you have installed SQL Server using our tools, we have already configured it to function in “Mixed Mode”.
On the SQL screen, press the Tool button to test connectivity with your SQL Server,
Figure 16: SQL connectivity test
NOTE:
If you encounter difficulties establishing the SQL connection and your SQL Server resides on a distinct server from your VoIPTools server, it is imperative to configure SQL in a manner that permits remote connections. Moreover, it is crucial to verify that any existing firewalls are appropriately configured to grant access.
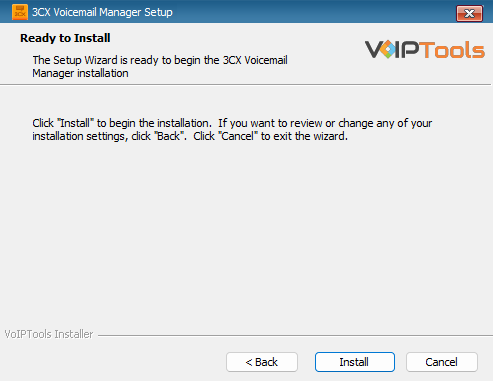
On the Ready to Install screen, press Install to install 3CX Voicemail Manager
Figure 17: Windows Installer: Ready to Install
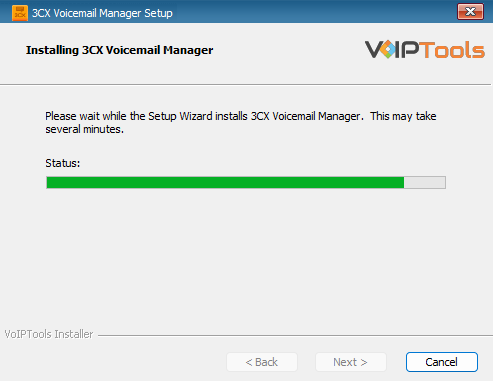
The 3CX Voicemail Manager installation is in process. This may take several minutes to complete.
To ensure the authorization of your license key, it is necessary to complete the registration process. By registering with VoIPTools, you gain access to a range of benefits:
Key Replacement Assistance
In the unfortunate event of a lost license key, registering with VoIPTools lets us provide you with a replacement key promptly.
Product Updates and Reminders
By registering, you will receive timely notifications from VoIPTools regarding any product updates. Additionally, we will send reminders when your key is nearing its renewal date, ensuring uninterrupted access to our services.
Enter your registration information in all the fields (Note the red dot denotes a required field) and click Register to register your software.
Figure 20: License Screen
After successfully registering the software and starting the ‘3CX Voicemail Manager’ service, the ‘Voicemail Watcher’ event will be automatically enabled in the 3CX Relay.
NOTE:
The license key permits you to install the software on one computer.
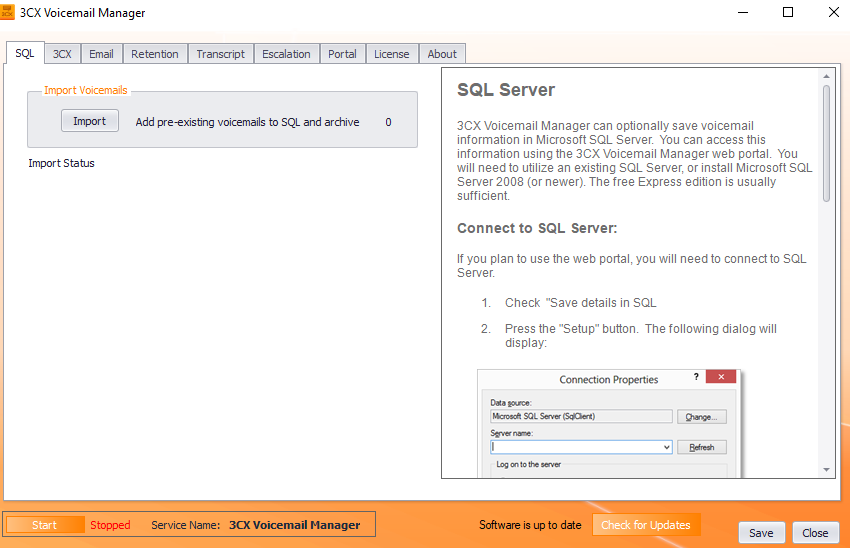
SQL tab: Save Voicemail information in SQL Server #
In the SQL tab, under the SQL Server section, check the Save Voicemail Details In SQL check box to save the voicemail information in Microsoft SQL Server.
Click the Import button to add existing voicemails to the web portal and archive the voicemails (if the archive option was selected from the Retention tab). While the location where 3CX stores voicemails is not modifiable, you can choose the location where voicemails should be archived.
The “Processing Complete” confirmation message box appears. Click OK.
Figure 22: SQL Screen
NOTE:
If you have a large number of existing voicemails, you may want to wait until after business hours to select this option. Processing a large number of voicemails may impact the performance of 3CX.
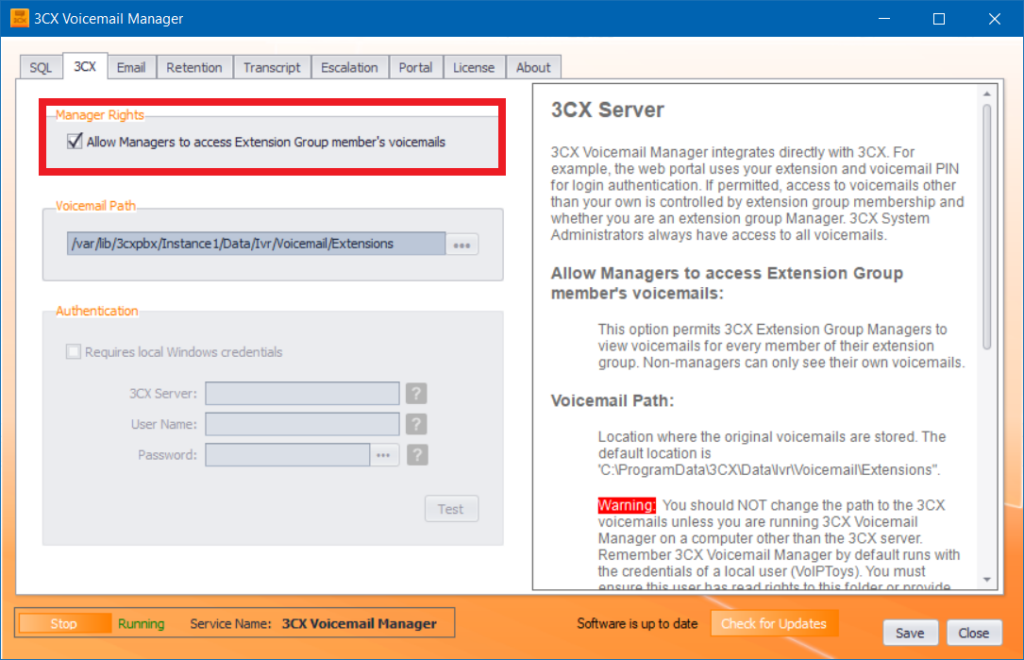
3CX tab: Set Manager Rights, Voicemail Path, Authentication #
3CX Voicemail Manager integrates directly with 3CX. For example, the web portal uses your extension and voicemail PIN for login authentication. If permitted, access to voicemails other than your own is controlled by extension group membership and whether you are an extension group Manager. 3CX System Administrators always have access to all voicemails.
Under the Manager Rights section, check the Allow Managers To Access Extension Group Member’s Voicemails check box to permit 3CX Extension Group Managers to view the voicemails of every member of their extension group.
Under the Voicemail Path section, browse and set the location where you want the original voicemails to be stored. By default, the location is:
“C:ProgramData3CXDataIvrVoicemailExtensions”.
NOTE:
You should NOT change the path to the 3CX voicemails unless you are running 3CX Voicemail Manager on a computer other than the 3CX server. Remember 3CX Voicemail Manager by default runs with the credentials of a local user (VoIPToys). You must ensure this user has read rights to this folder or provide alternative authentication.
If you have installed “3CX Voicemail Manager” on a remote computer you will need to create a Windows share pointing to the voicemail path and provide authentication credentials to access the share. If you are using a firewall on your 3CX server, you may need to create a firewall exception to permit remote access to the share.
Under the Authentication section, check Requires local Windows credentials box to provide local user rights on the remote server.
NOTE:
If your file share resides on a remote server, and the two servers are not members of the same Active Directory Domain, you will need to provide local user rights on the remote server.
In the 3CX Server field, enter the Fully Qualified Domain Name (FQDN) or IP address of the 3CX server.
In the User Name field, enter username and password for authentication.
Click the Test button to test whether the credentials provided can access the voicemail path.
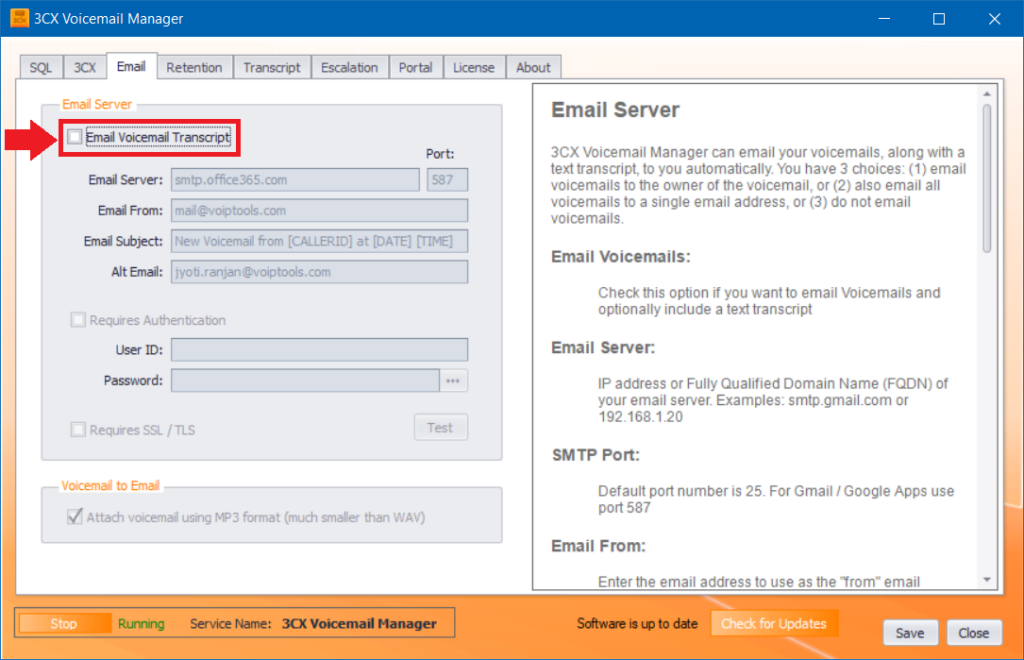
Under the Email Server section, check the Email Voicemail Transcript check box if you want to email Voicemails and optionally include a text transcript
In the Email Server field, enter the IP address or ‘Fully Qualified Domain Name (FQDN) of your email server.
Examples: smtp.gmail.com or 192.168.1.20
In the Port field, enter the port number.
The default value is 25.
For Gmail/ Google Apps use port 587
In the Email From field, enter the email address to use as the “from” email address.
Note that your SMTP server may require a valid email address be used.
For example no-reply@mydomain.com
In the Email Subject field, enter the email subject.
The default subject is “New Voicemail from [CALLERID], [DATE], [TIME]”.
You can include any of the 3 available replaceable variables [CALLERID],[DATE] or [TIME]. Placing these exact string variables in the subject line will cause the variables to be replaced with the current caller information.
In the Alt Email field, enter an email address (example: user@mydomain.com) if you want all voicemails sent to a single email address. To only have emails sent to the owner of the voicemail, leave this field blank.
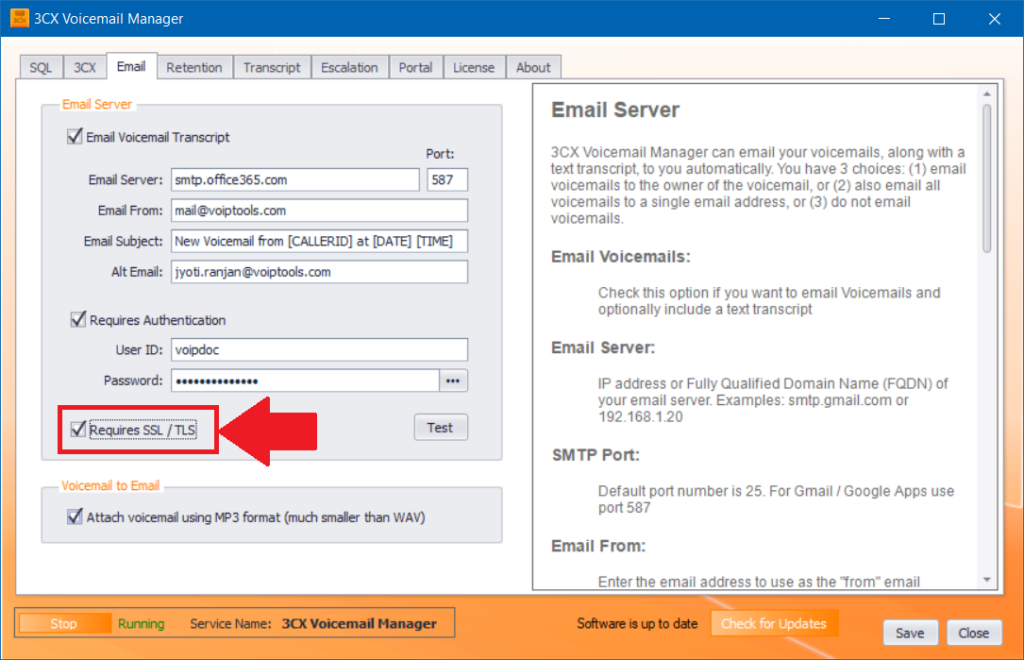
Select Requires SSL/ TLS check box if your mail server requires a secure connection – Secure Socket Layer (SSL) or Transport Layer Security (TLS) to relay email. Gmail, Google Apps, and Microsoft 365 require a secure connection.
Click the Test button to confirm whether 3CX Voicemail Manager can send emails.
For this, temporarily enter an email address in the Alt Email field and press the Test button.
You may need to make configuration changes to your mail server to permit the relay of emails from the 3CX Voicemail Manager.
Figure 27: Email tab – Requires SSL/TLS section
NOTE:
Sending mail within your domain may not require authentication, while sending outside your domain may require authentication.
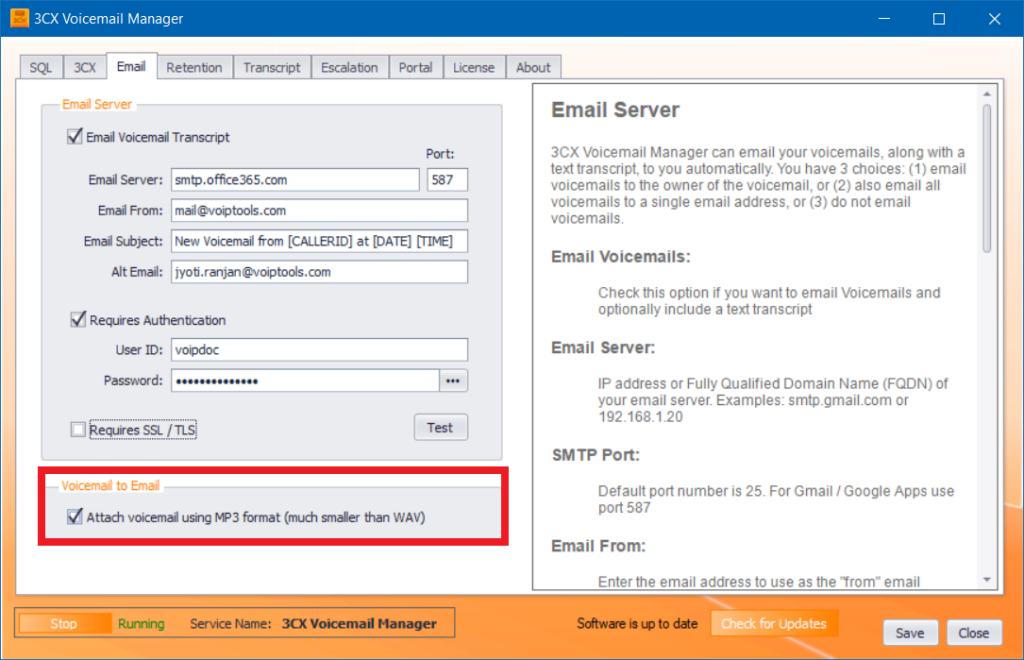
Check Attach voicemail using MP3 format (much smaller than WAV) check box to email the .MP3 version.
Figure 28: Email tab – Voicemail to email checkbox
NOTE:
Because voicemails can be very large, 3CX Voicemail Manager can first make a copy of the voicemail and then convert the copy to .MP3 format and email the .MP3 version.
The MP3 is often is 1/7 the size of the original voicemail. This conversion does result in a small loss in audio quality. However, the original voicemail can be heard or downloaded from the web portal unless it was deleted by the retention policy, the owner or an administrator.
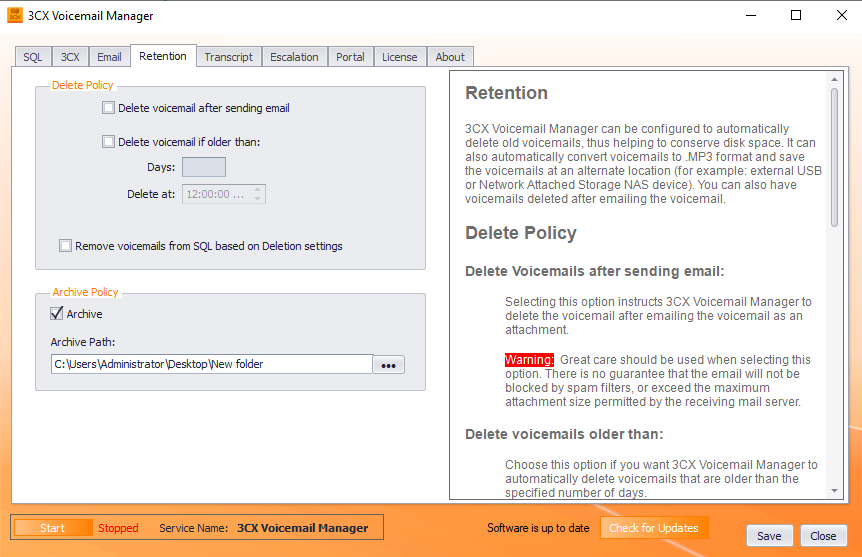
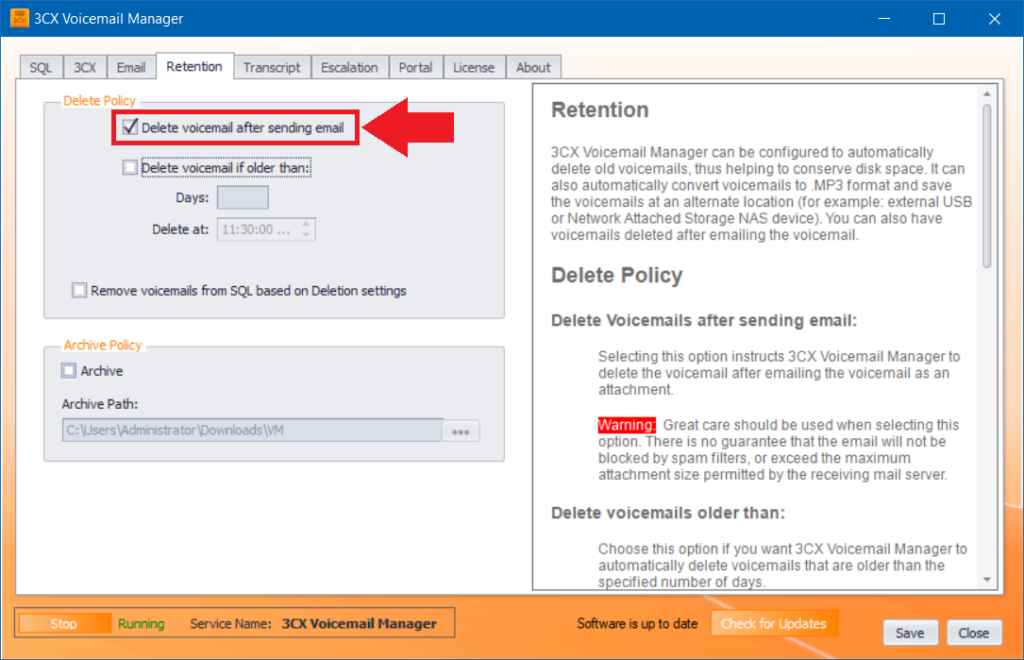
3CX Voicemail Manager can be configured to automatically delete old voicemails, thus helping to conserve disk space. It can also automatically convert voicemails to MP3 format and save the voicemails at an alternate location (for example an external USB or Network Attached Storage NAS device). You can also have voicemails deleted after emailing the voicemail.
Check the Delete voicemail after sending email check box to instruct the 3CX Voicemail Manager to delete the voicemail after emailing the voicemail as an attachment.
Great care should be taken when selecting this option. There is no guarantee that the email will not be blocked by spam filters, or exceed the maximum attachment size permitted by the receiving mail server.
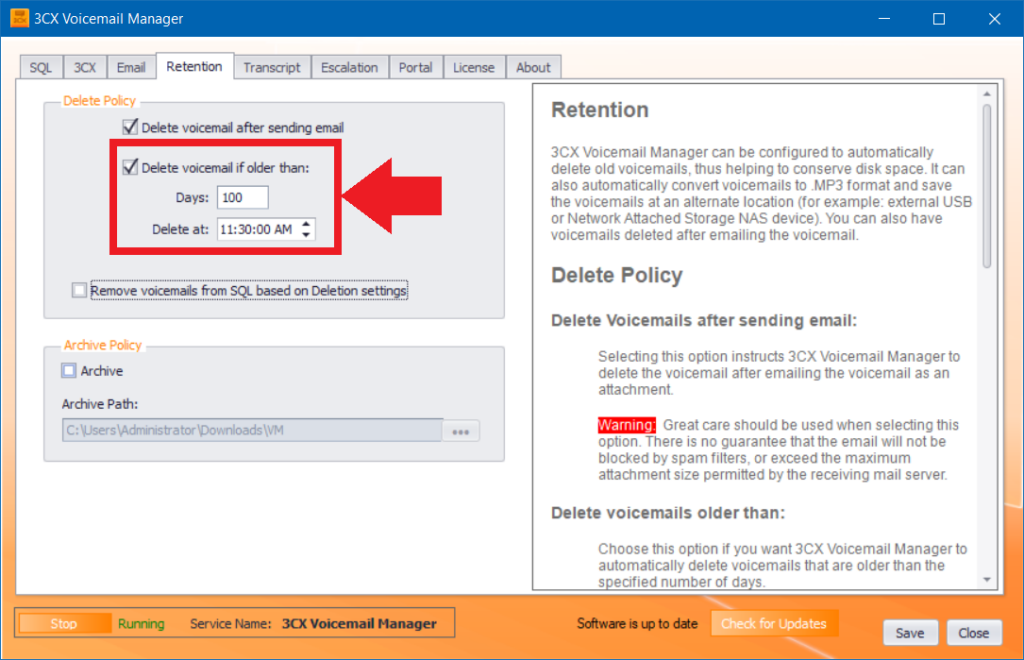
Check to Delete Voicemail If Older Than box if you want 3CX Voicemail Manager to delete voicemails older than the specified number of days automatically.
Enter the number of days in the Days field so that all the voicemails older than the number of days specified will be deleted. The current date is compared with the date the voicemail was created. All voicemails older than the number of days selected will be deleted. This setting is for all voicemails made by all extensions.
Figure 31: Retention tab – Delete voicemail Older Than condition
NOTE:
If you choose to archive voicemails, the archived version of the voicemail will not be deleted.
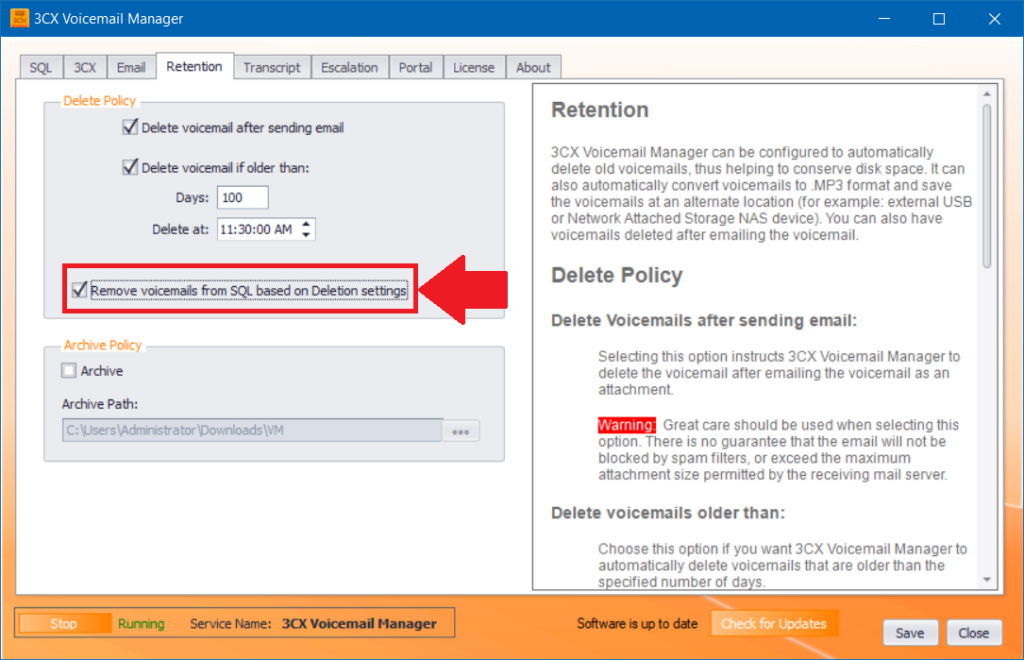
Check Remove Voicemails from SQL based on Deletion settings check box if you want the deleted voicemails to be also deleted from SQL. Deleting the records from SQL will remove any history for the voicemails in the web portal.
Figure 32: Retention tab – Remove voicemails from SQL
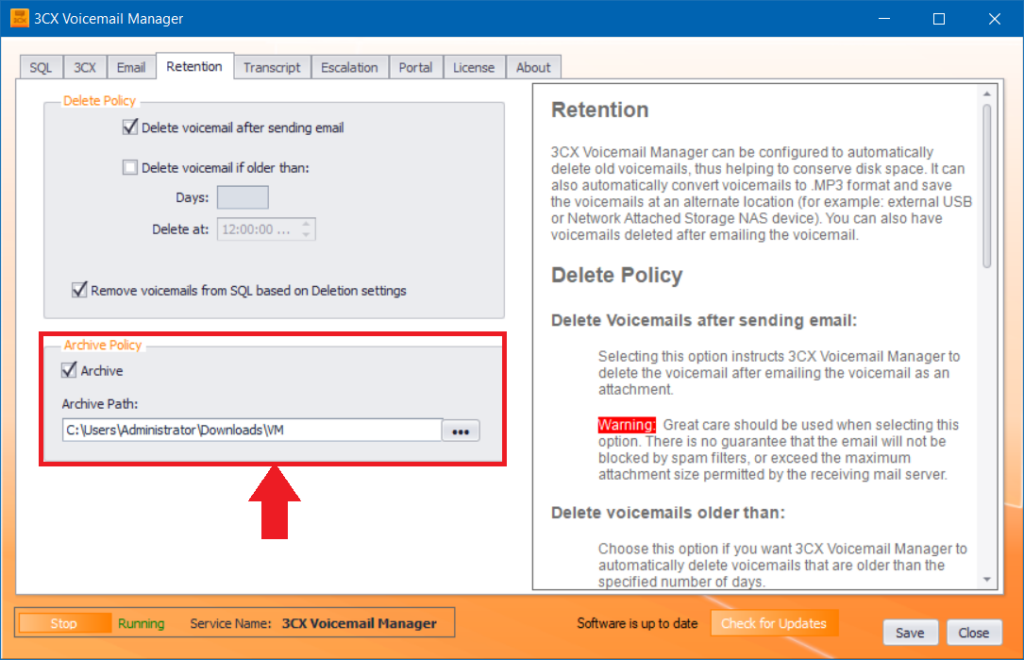
Check the Archive check box if you want to make a compressed (MP3) copy of all voicemails.
In the Archive Path field, enter the location where you want to store all the archived voicemails. Archived voicemails will be saved in .MP3 format and are NOT affected by the Delete Policy.
Use the browse button to browse to the location where archived voicemails will be saved.
Figure 33: Retention tab – Archive policy
NOTE:
3CX Voicemail Manager by default runs with the credentials of a local user (VoIPToys). If you choose to save archives on a different server, will need to adjust permissions on the archive folder, or change the credentials used by 3CX Voicemail Manager’s:
The accuracy of voice recognition can be greatly affected by a number of factors. For example, the quality of the recording, background noise, the volume of the speaker, and the speech patterns of the speaker can all have a significant impact on the accuracy of the transcription.
Follow the procedure to enable the speech transcriptions,
In the Transcript tab, select the Enable VoIPTools Speech Transcriptions box.
In the Google Speech Service Account File Path field, click the Browse button to select the file location.
In the Cloud Storage Bucket Name field, enter the name of the cloud storage bucket.
3CX Voicemail Manager uses Google Speech Translate for voice transcriptions. To enable and perform transcriptions, mention the ‘Google Speech Service Account File’ path that consists of Google credentials and then mention the ‘Cloud Storage Bucket’ name where you want to store the transcriptions. If you do not have Cloud Storage Bucket and the respective Service Account file, you can create one and then add them to the configuration file.
Cloud Speech-To-Text is priced monthly based on the amount of audio successfully processed by the service, measured in increments rounded up to 15 seconds. For more details regarding pricing, please go through this link.
NOTE:
Voicemail Manager uses your local file copy to transcribe the audio file if its duration is upto 60 seconds; or uses google cloud storage if the duration is beyond 60 seconds with the help of cloud storage buckets. Once the file is transcribed successfully in the google cloud, the Voicemail Manager deletes the file from the storage bucket.
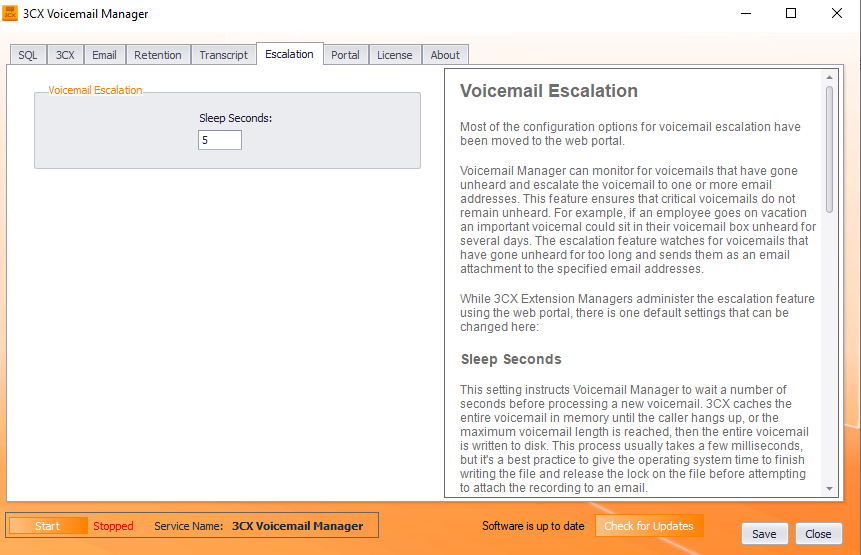
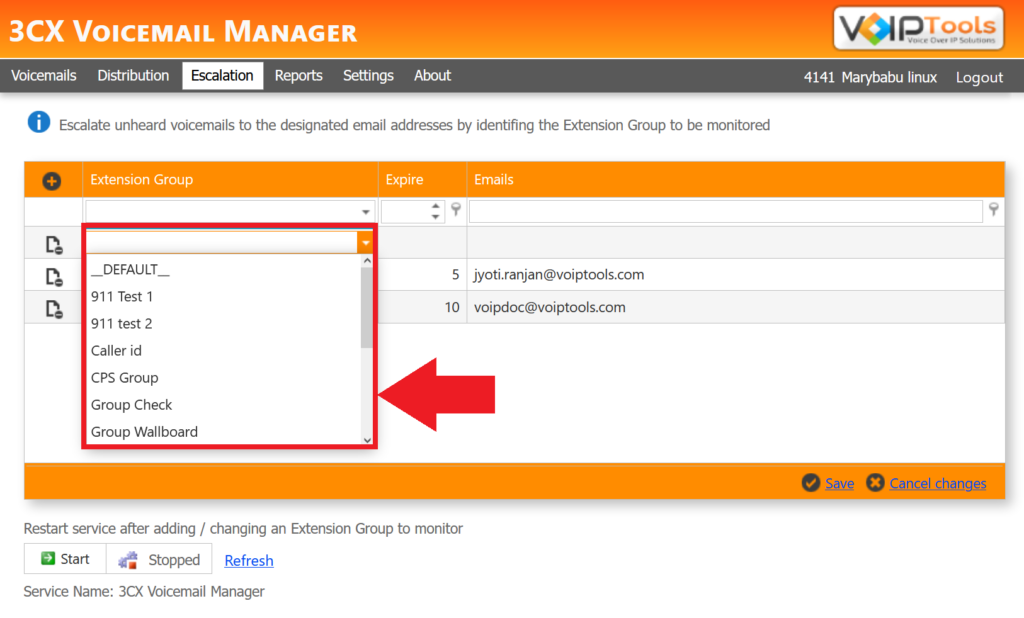
Most of the options for configuring voicemail escalation have been moved to the web portal. With Voicemail Manager, you can monitor unheard voicemails and ensure they don’t go unnoticed. This feature is particularly useful when, for example, an employee is on vacation and an important voicemail remains unattended in their mailbox for several days. The escalation feature keeps an eye on such voicemails and, if they are ignored for too long, sends them as email attachments to the designated email addresses. While the web portal allows 3CX Extension Managers to administer the escalation feature, there is one default setting that can be changed there:
This setting tells Voicemail Manager to wait for a few seconds before dealing with a new voicemail. 3CX keeps the entire voicemail in its memory until the caller hangs up or the voicemail reaches its maximum length. Then, it saves the voicemail to a disk. Usually, this process takes just a few milliseconds. However, it’s a good idea to give the operating system some extra time to finish writing the file and release its hold before you try to attach the recording to an email.
Under the Voicemail Escalation section, in the Sleep Seconds field, enter the number of seconds so that the Voicemail Manager can wait for the specified time before processing a new voicemail.
Figure 35: Escalation Screen
NOTE:
Most of the configuration options for voicemail escalation have been moved to the web portal.
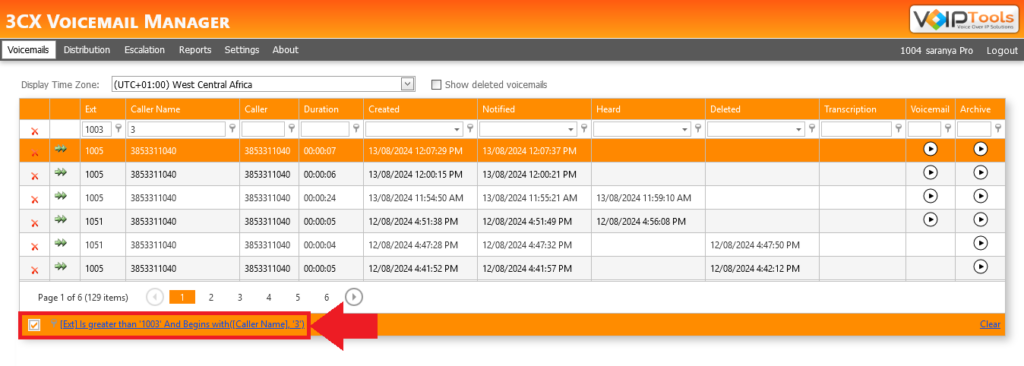
The 3CX Voicemail Manager web portal enables you to easily find voicemails using the built-in query manager. From the portal, you can listen to, download, email, forward, and delete voicemails.
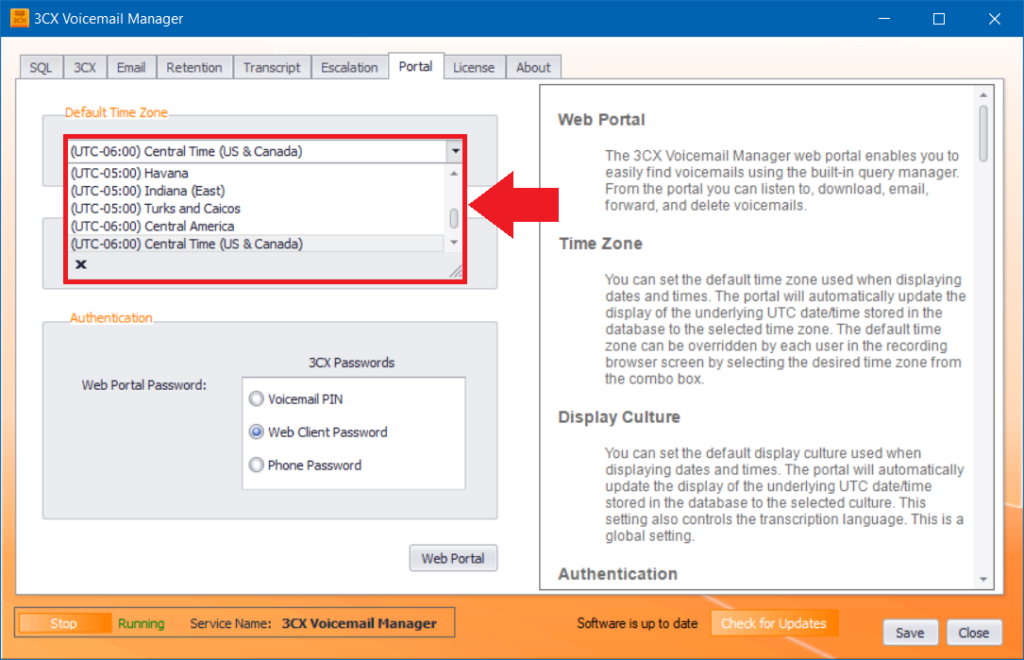
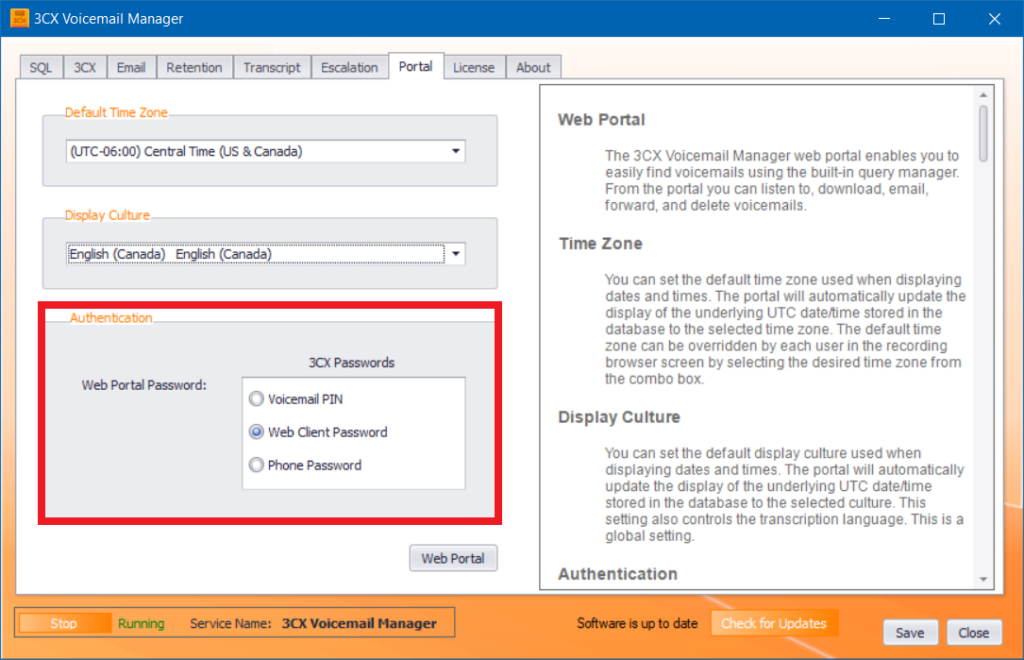
From here, you can connect to the web portal, and select Default Time Zone, Culture, and Authentication method.
You can set the default time zone used when displaying dates and times. The portal will automatically update the display of the underlying UTC date/ time stored in the database to the selected time zone. Each user can override the default time zone in the recording browser screen by selecting the desired time zone from the combo box.
From the Default Time Zone dropdown, select an appropriate time zone.
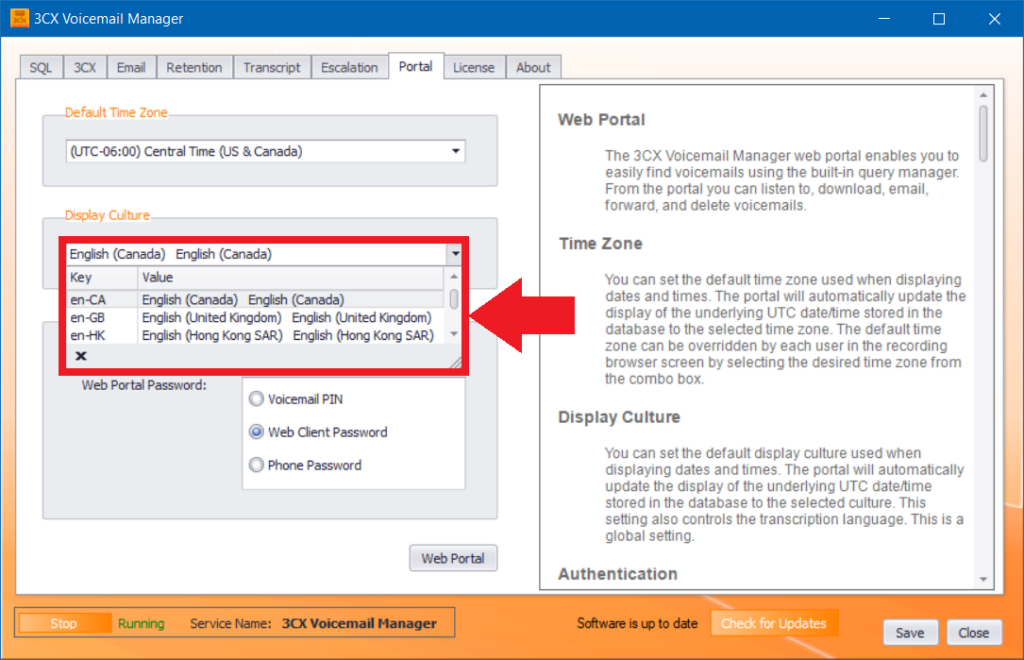
You can set the default display culture used when displaying dates and times. The portal will automatically update the display of the underlying UTC date/ time stored in the database to the selected culture. This setting also controls the transcription language. This is a global setting.
From the Display Culture dropdown, select the appropriate language. The default language is English-US.
The ‘Authentication’ setting allows you to control what 3CX password is used to authenticate your credentials. You can select either your voicemail PIN, web client password, or phone authentication password. The default setting is voicemail PIN.
From the Authentication section and under 3CX Passwords, select the type of authentication using which you want to be authenticated.
The Check for Updates button at the footer of the configuration screen enables you to download the latest version of 3CX Voicemail Manager easily. If a newer version of 3CX Voicemail Manager is available, the message will indicate that a newer version is available. Clicking the button will automatically download a .zip file of the latest version of the software. You can install the new version directly over the top of a previous version without the need to uninstall the previous version.
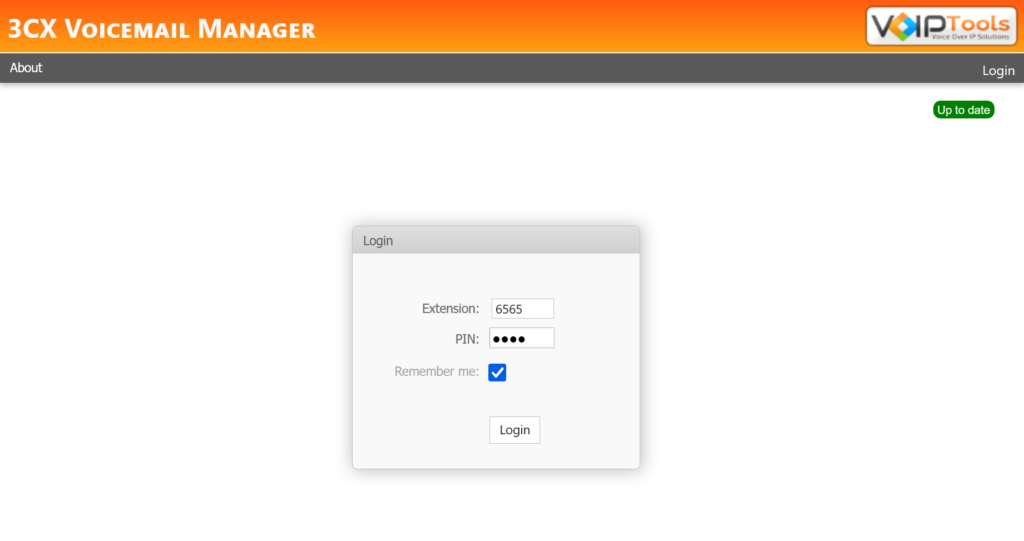
To access the ‘3CX Voicemail Manager’ web portal, click the Web Portal button on the configuration program, or click on the desktop icon that was created during the installation process (‘3CX Voicemail Manager’ Web).
The following screens are available in the web portal,
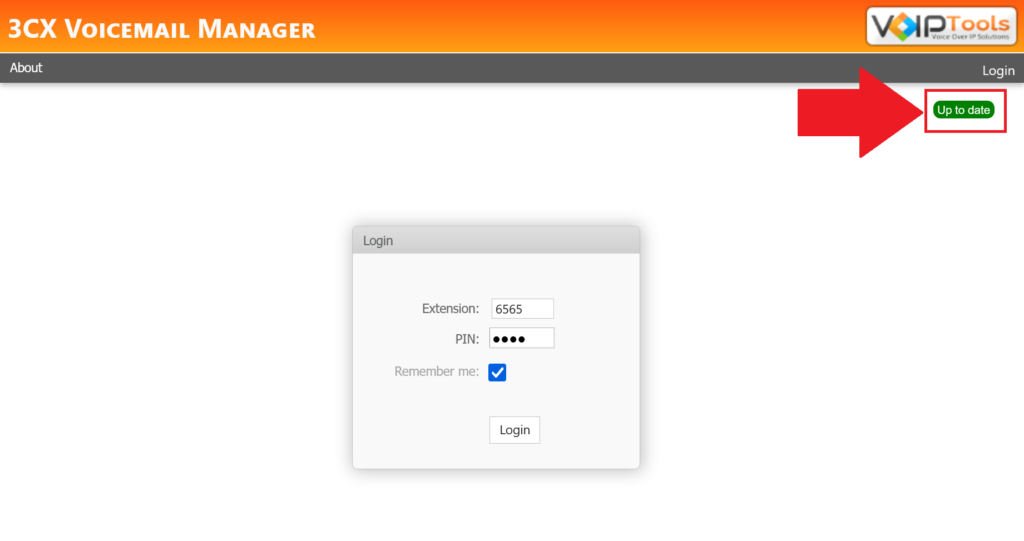
If your application is up to date with the latest version released by VoIPTools, then the right top corner of the login screen displays as Up to date.
Figure 40: 3CX Voicemail Manager-Web Portal Login (Up to date)
If your application is not up to date with the latest version released by VoIPTools, then:
The right top corner of the login screen displays both the currently installed version and the latest released version. To download the latest version, click the Download link
In the A new version is available popup, click Download.
Once the download process starts, Download Started message appears.
Voicemail Manager website in IIS. A local user account named “VoIPToys” is created, and the site is configured to use this account. The default password for the VoIPToys user is “VoIPToys”. Normally you will never need to interact with this account. However, if you archive voicemails on a different server, you may need to change this account to a domain account with rights to the archive folder. To change the user account used by 3CX Voicemail Manager, use the “Windows” tab to update the user.
You can listen to the original wav file if it has not been deleted by the owner, administrator, or retention policy, or you can listen to the archived version (if archiving voicemails is configured).
Follow the steps to listen to a voicemail,
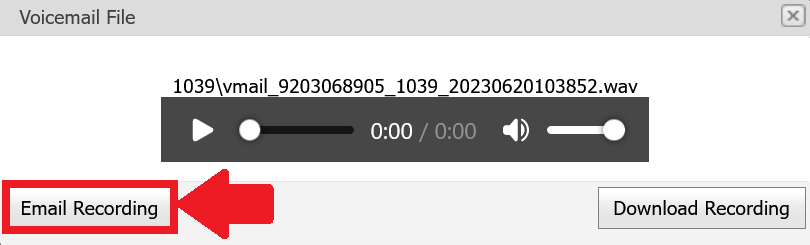
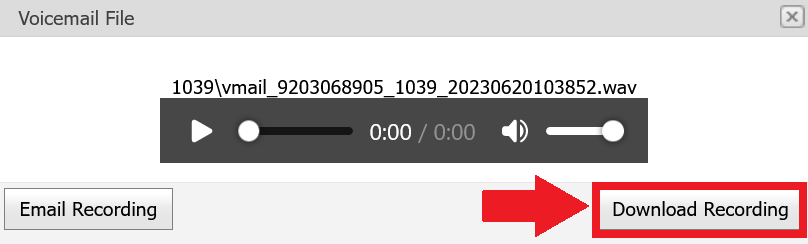
Click the Play button beside the voicemail to open the voicemail audio file.
In the Play Recording dialogue box, you can play, scrub, mute, and adjust the volume of the voicemail. You can also Email and Downloadthe recordings.
Figure 45: Listen to Voicemail
NOTE:
To listen to voicemail from within the browser, your web browser must support HTML5 Audio. The current version of all major browsers supports this feature. For older browsers you can download the voicemail and play it from your computer.
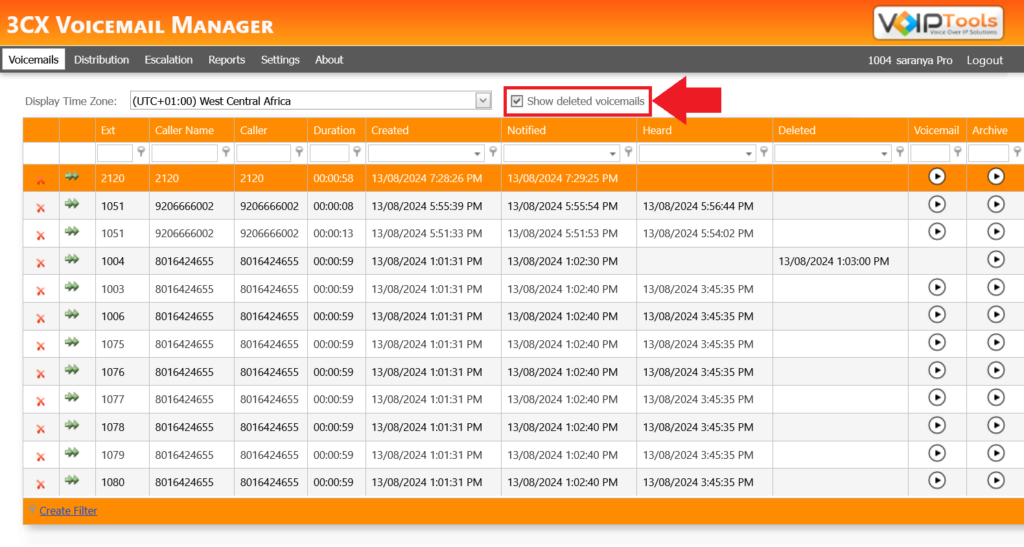
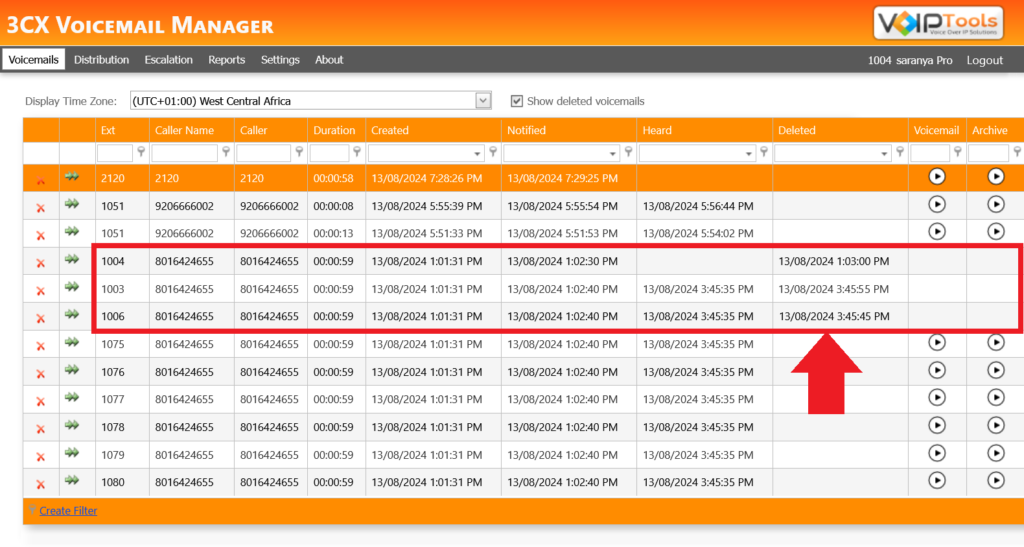
The checkbox provides the option to display or hide deleted voicemails in the grid, enabling users to monitor the timing of voicemail deletions.
NOTE:
The 3CX Voicemail Manager offers an optional retention policy that automatically removes voicemails and their corresponding database records after a specified period. Deleted voicemail records will only be removed from the database in accordance with this retention policy.
Select the Show Deleted Voicemail box to display the list of voicemails that does not have both voicemail and archive audio files.
Figure 46: Show Deleted Voicemail Box
You can view the voicemails without the audio files.
Figure 47: Deleted Voicemails Displayed
NOTE:
If the voicemail audio files are deleted in 3CX Console Management while the relay or Voicemail Manager service is turned off, the system will log the deletion time as the moment when the relay or Voicemail Manager service is restarted. This approach ensures accurate record-keeping and system synchronization.
Example:
When you delete a voicemail audio file at 8 a.m., but the service is turned off during that time, the system will record the deletion as occurring at 10 a.m. upon the reactivation of the service.
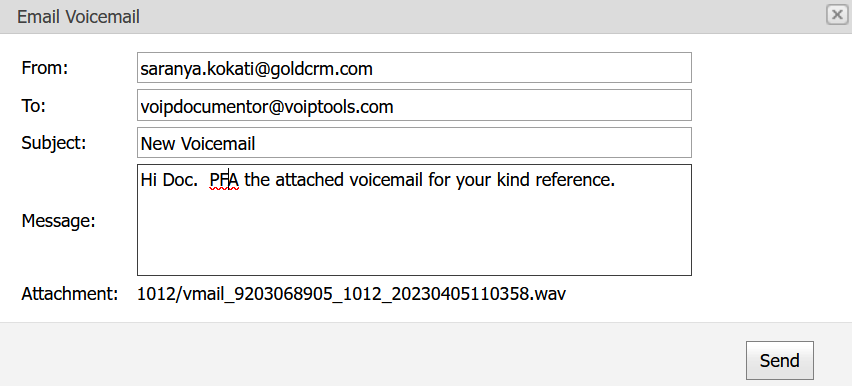
You can email the voicemail recordings to specific email addresses when required. Because voicemails can be very large, consider sending the archived version of the voicemail. This version of the voicemail is saved in .MP3 format which is much smaller and therefore less likely to be blocked by email servers because the voicemail exceeds the maximum email attachment size.
Click the Play button beside the voicemail to open the voicemail audio file.
On the Voicemail File dialogue box, click the Email Recording button.
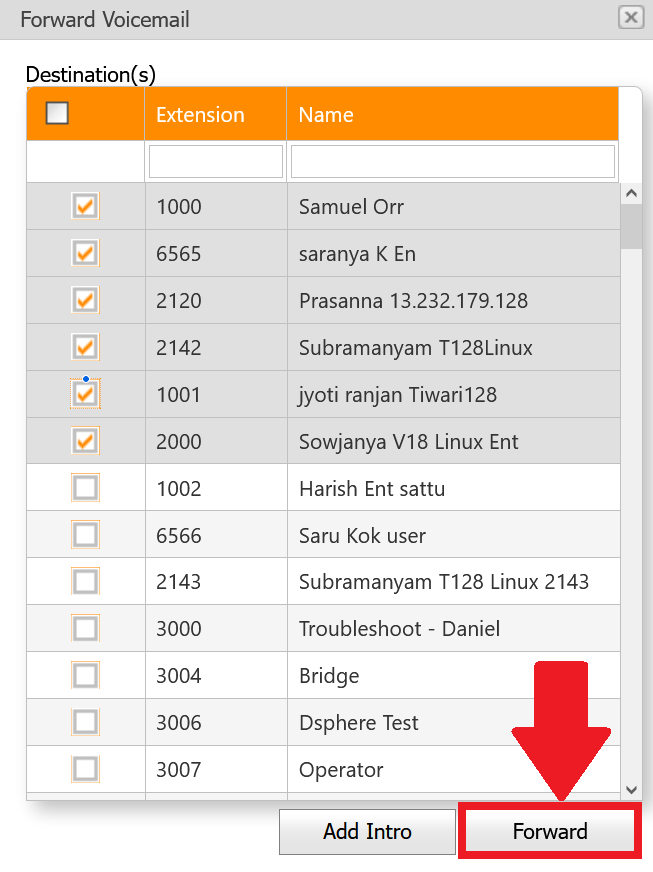
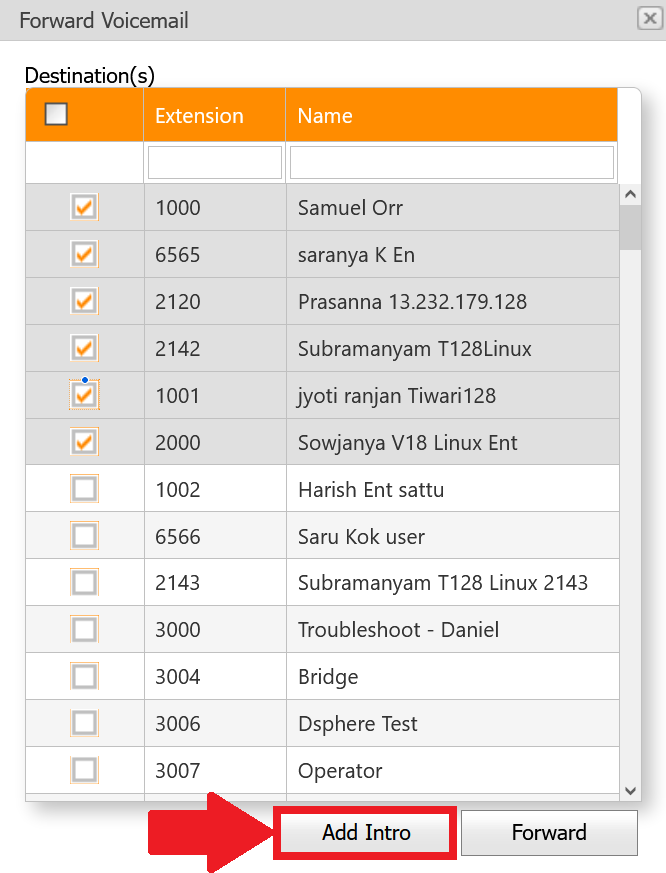
You can forward an existing voicemail to desired extensions. You can also add introduction audio as a prefix to the voicemail so that when the received extensions play the voicemail, the intro audio plays first, followed by the actual voicemail audio.
Click on the Forward button of the desired voicemail that you want to forward.
Figure 53: Forward voicemail – Forward icon
In the Forward Voicemail dialogue box, select the extensions you want to send the voicemail and click the Forward button to forward the voicemail.
You can also add intro audio as a prefix to the voicemail and then forward the audio file to the desired extensions.
Click the Forward button beside the desired voicemail to open the Forward Voicemail box.
Click Add Intro button to receive a CFD (Call Forwarding Diversion) call on your logged-in extension.
Figure 55: Add Intro button
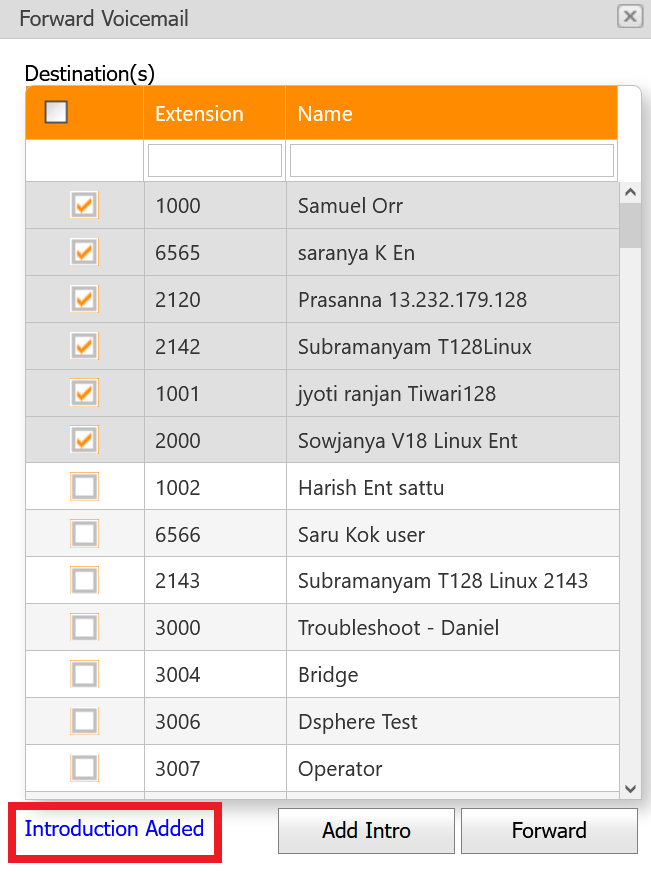
Follow the CFD prompts and select the desired options until you hear the desired intro audio. Then, the call will disconnect, and the 3CX Voicemail Manager will save the audio file to the specified path.
A success message is displayed when the intro audio is successfully added.
Figure 56: Forward button
In the Forward Voicemail dialogue box, select the extensions to which you want to forward the voicemail, and then click the Forward button.
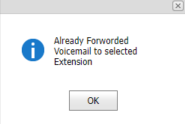
After successfully sending the voicemail, Click OK on the Success Message box.
Figure 57: Forward Voicemail popup: Select Extensions and click Forward
The Distribution feature simplifies the process of designating a standard 3CX voicemail box as a group voicemail box. When a voicemail is saved in a group voicemail box, it is automatically distributed to the extensions listed in the distribution group. If any extension within the group listens to the voicemail, the HEARD date and time will be updated for all extensions in the group. This functionality proves useful when the company CEO wants to send a voicemail message to all employees or when a manager wishes to communicate with everyone in their specific group.
The Add/ Edit Group button displays a dialog box where you can designate a new or edit and existing voicemail box. The extensions that you assign to the group voicemail box will receive a copy of voicemails saved in the group voicemail box.
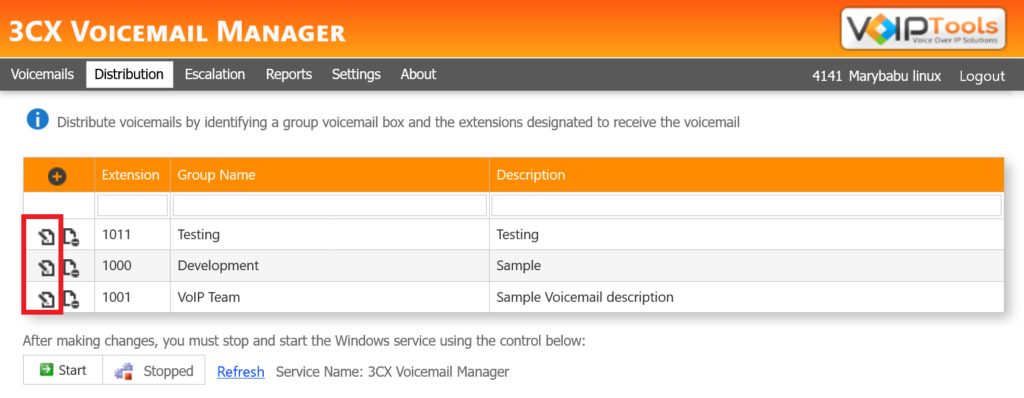
On the tab bar, in the Distribution tab, click Add/ Edit Group button.
Figure 61: Edit button
In the Add/ Edit Group dialog box, from the Group Voicemail dropdown, select the extension to set as admin for the group voicemail box.
In the Group Name field, enter the name of the group voicemail box.
In the Description field, enter the description for the group voicemail box.
From the Group Members list box that lists all the user extensions defined in 3CX,
Click the Save button to create a new group voicemail box, or save any changes to an existing group voicemail box.
To delete the group, click the Delete button beside the desired record you want to delete, and then in the confirmation message box, click OK.
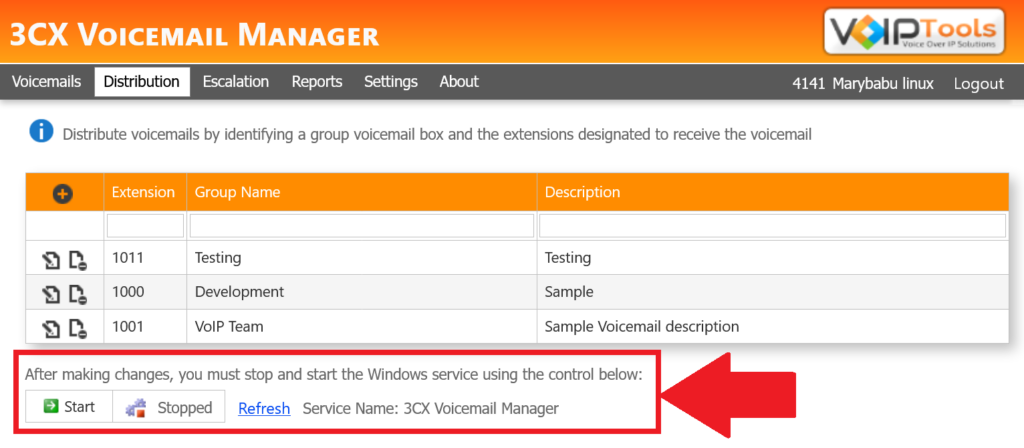
NOTE:
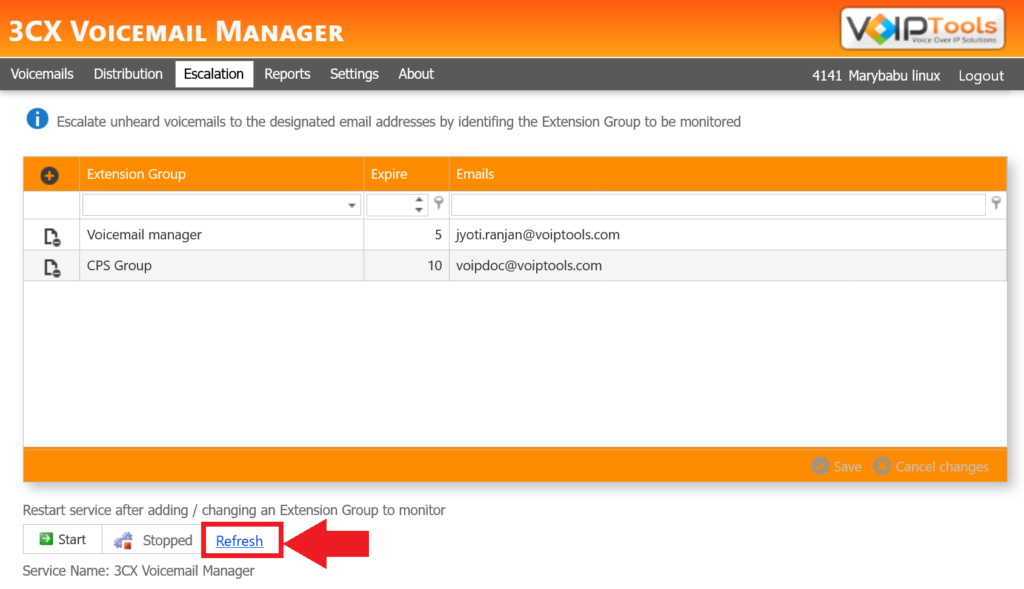
Restart service after adding/editing/deleting a group.
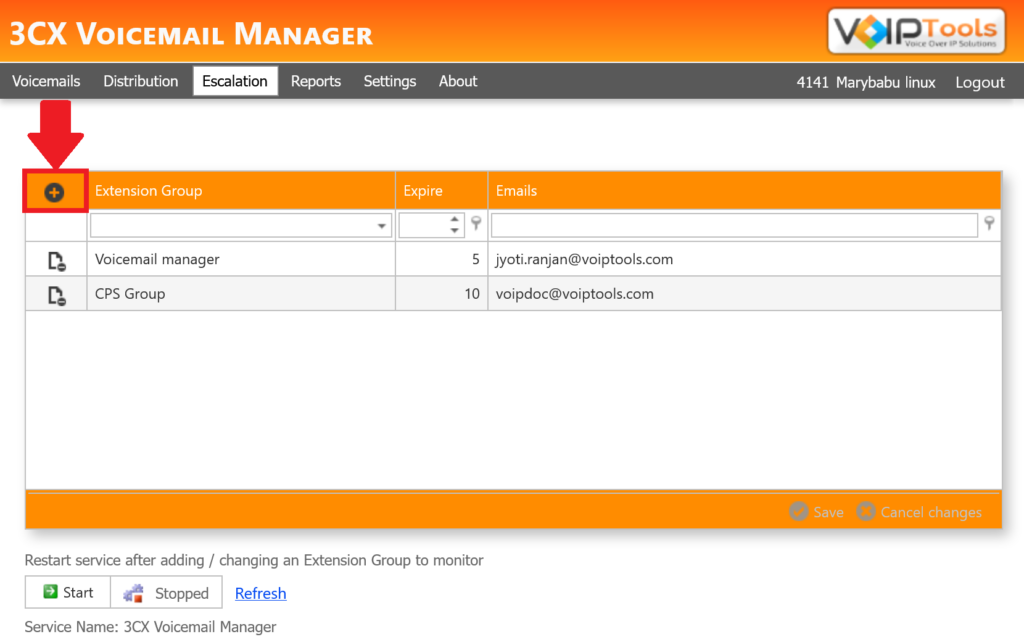
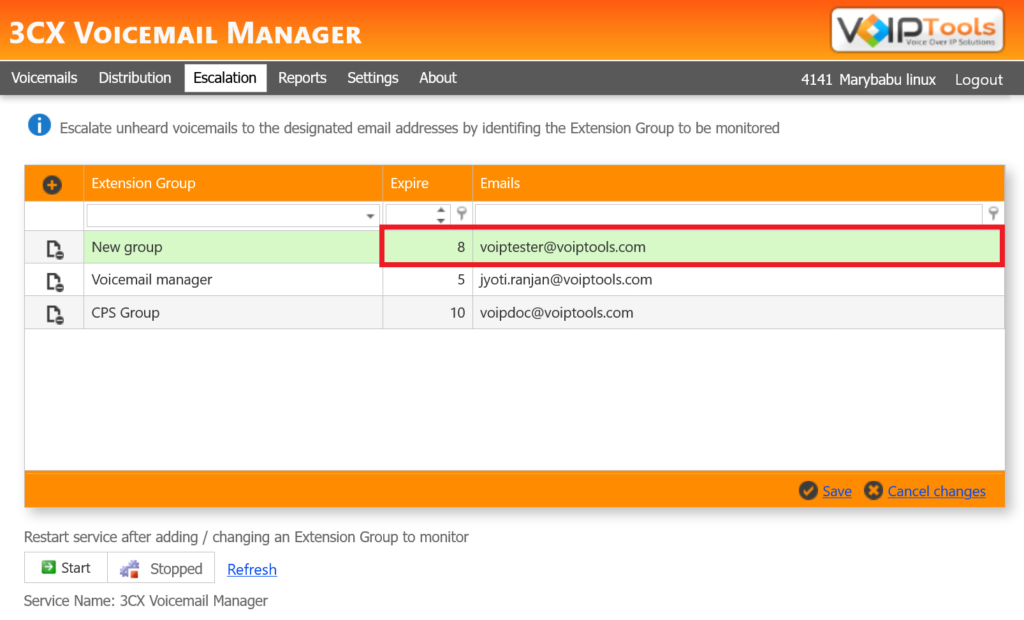
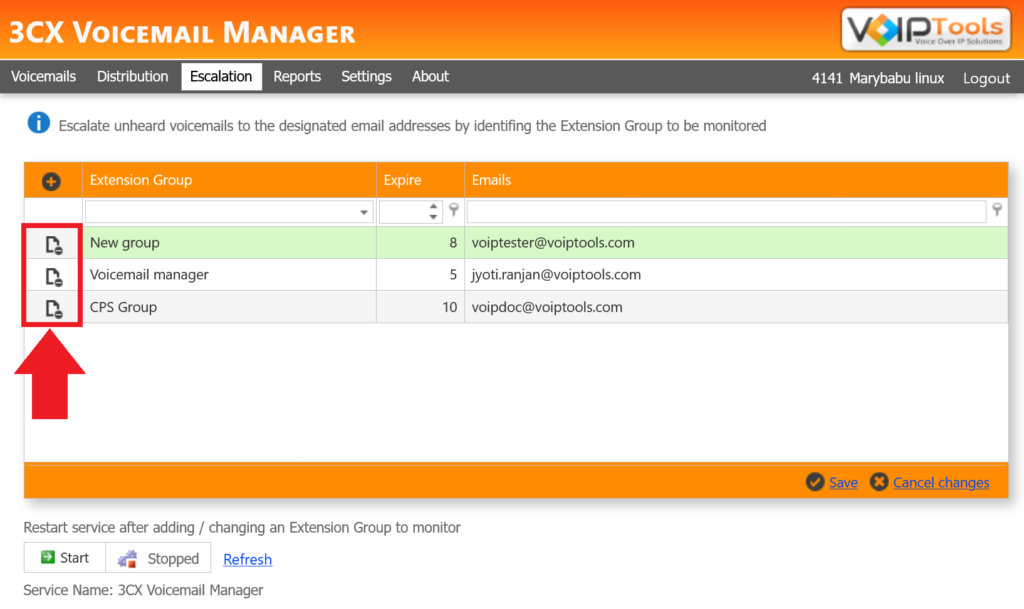
With the Escalation feature, you can ensure important voicemails never go unheard. This feature makes it easy to automatically escalate unheard voicemails to the designated email addresses. For example, you can escalate sales voicemails to the sales manager when a salesperson is on vacation. Simply create a “Sales” extension group in 3CX, assign all the sales extensions to this group, then configure the group for escalation. With escalation, any extensions in this group will be monitored for unheard voicemails. If an unheard voicemail is detected, the voicemail will be escalated automatically to the designated email addresses.
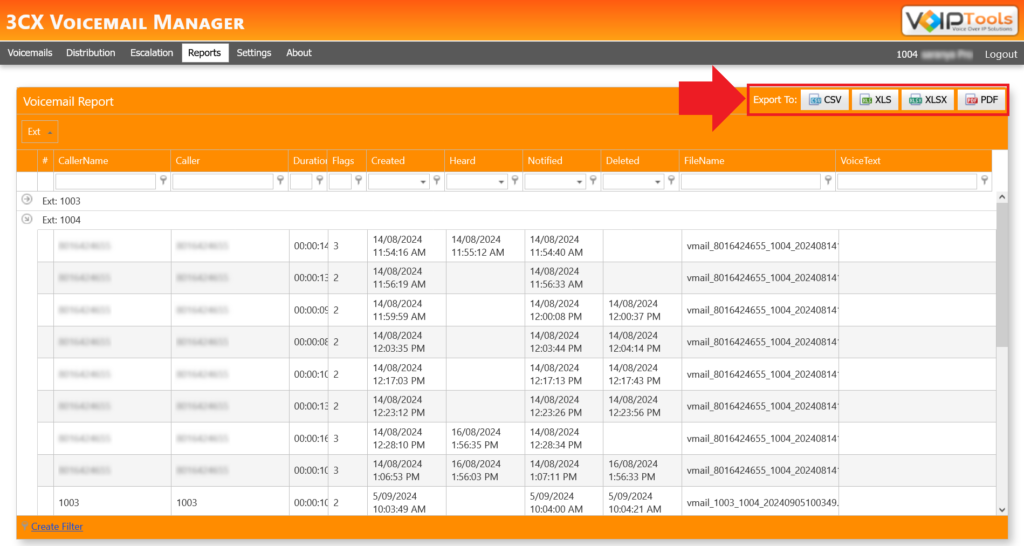
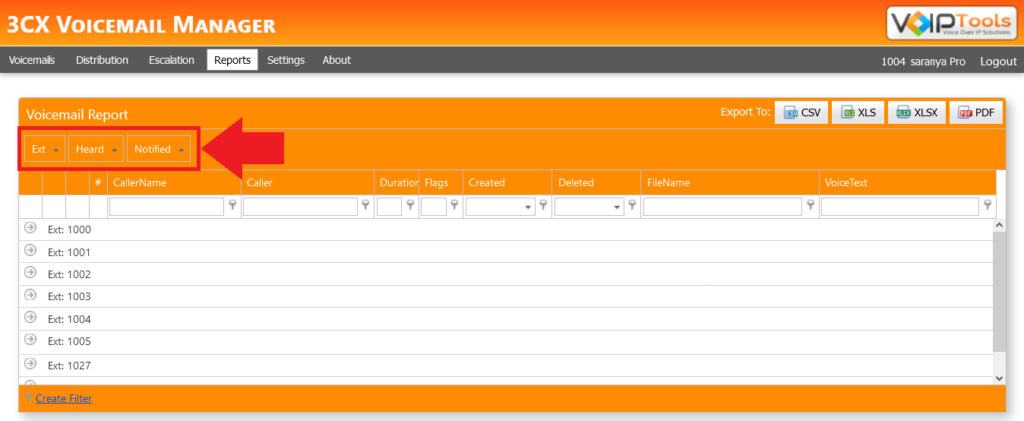
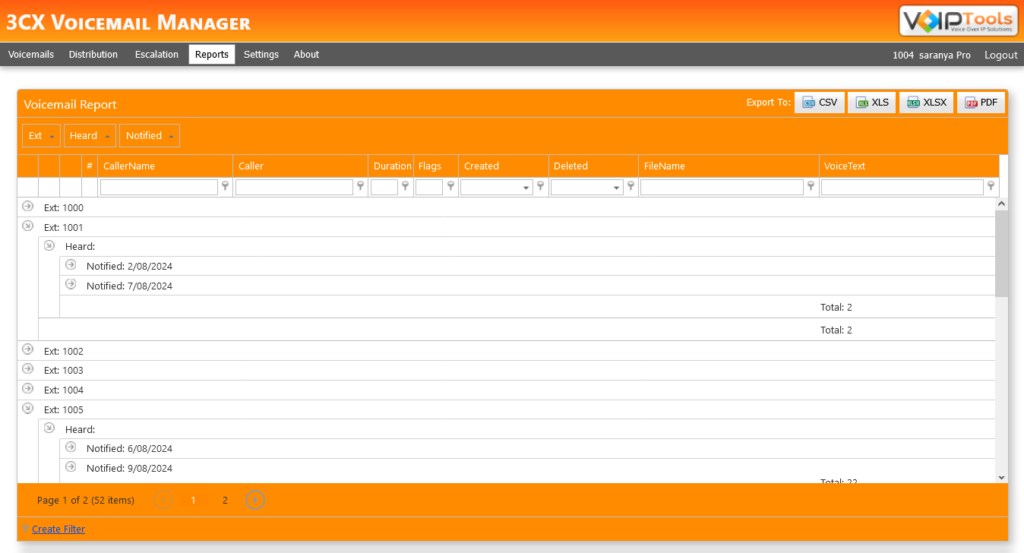
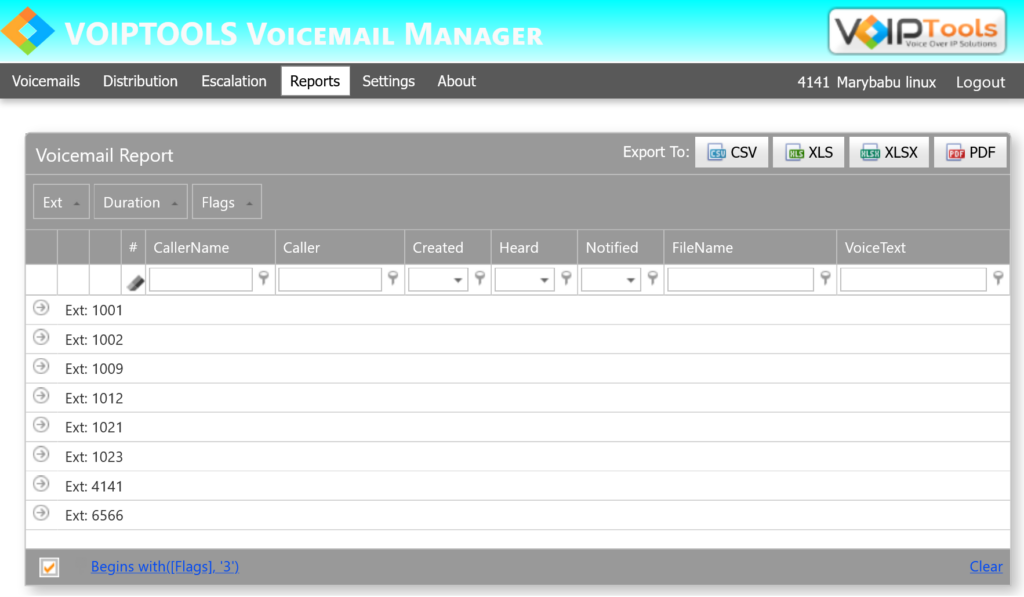
The Reports screen provides exclusive access to users with the Manager role for viewing and exporting voicemail log data in multiple formats and the ability tofilter call records using a built-in query builder through the Filter link located in the left-hand corner of the screen. Additionally, users have the option to group grid data by desired column(s) by dragging them above the column header, with the ‘Ext’ column being grouped by default.
To present the reports in a more professional manner, you can simply group the columns. This helps you achieve a well-organized and polished look for the information displayed.
Follow the procedure to group the grid data,
In the Reports tab, drag and drop the desired column in the space provided above the columns.
Figure 71: Columns grouped
Click the Expand button to view your data in a more professional way.
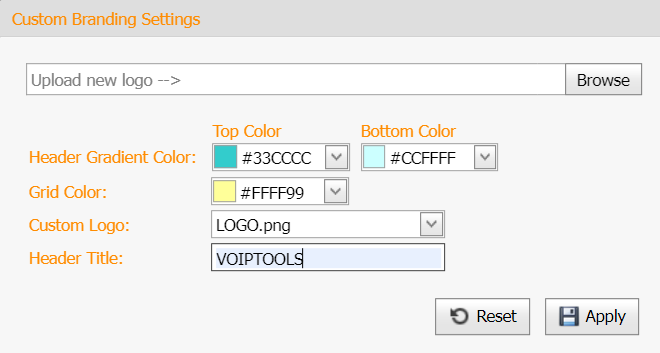
In the Settings tab, you can customize the branding options. You have the ability to change the header gradient color, grid color, add a logo to the header, and edit the header title by adding a prefix to Voicemail Manager. Moreover, you can transcribe all voicemails to your preferred extensions.
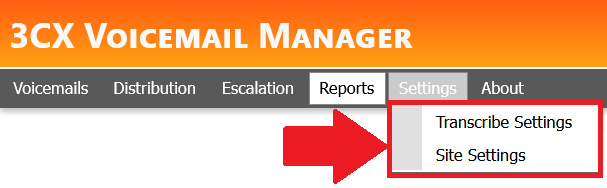
Hover over the mouse on the Settings tab to display the dropdown menu with the following menu options:
Transcribe Settings enable you to transcribe all the voicemails for the desired extensions.
Hover the cursor to the Settings menu and click the Transcribe Settings option from the drop-down menu.
Figure 79: Transcribe Settings
In the Transcribe Settings form, check the checkboxes beside all the desired extensions for which you want to transcribe all of its voicemails and click the Update button.
You get quick answers to most of your inquiries in our online manual. If you prefer direct contact, we offer various support channels, including phone, email, live chat, and our helpful VoIPTools forums.
Rest assured, our dedicated team is here to assist you around the clock, every day of the year. Whether you’re based in the USA or India, we’re ready to provide prompt responses to your technical queries.
Windows Event Log for VoIPTools Applications and Services #
For troubleshooting any application errors, our Windows Event Log contains a comprehensive list of error messages, warnings, and informative notes related to all our VoIPTools applications and services. It’s a valuable resource to help you pinpoint and resolve any issues you may encounter.
Are you looking to collaborate with other VoIPTools customers facing similar challenges? Our forum is the perfect platform to exchange ideas, solutions, and best practices. Join the conversation at: https://www.voiptools.com/community/
Got questions that need immediate answers? Our chat support team is available to assist you in real time. Just click on the Live Chat button located at the lower right corner of our website, and we’ll acknowledge your queries right away.
To ensure a thorough understanding of your concerns, email us at support@voiptools.com. Describe your issue in detail, and we’ll get back to you within one business day with the support you need.
If you prefer to speak with a representative directly, you can reach us at +1 801-642-4655. Our attentive team is available to take your calls from 8:00 AM to 6:00 PM (Central Standard Time).
If you’ve purchased our products through a VoIPTools Partner, rest assured that they provide first-level support at no additional cost. Partners have access to 100% free technical assistance and actively participate in the troubleshooting process.
VoIPTools customers enjoy access to our online manuals and receive support through emails (with responses within one business day) and live chat. However, please note that we do not provide remote server login assistance.
For a more hands-on experience, consider our “Installation Support” package. Our expert support team can log in to your servers, and install and configure all our tools. This comprehensive service includes setting up SQL Server Express and Internet Information Server if necessary. We’ll work closely with you to tailor our applications to meet your requirements.
We’re committed to providing top-notch support to ensure your VoIPTools experience is smooth and hassle-free. Contact us today, and let us assist you in making the most of our powerful tools!


NOTE:


 to open the Desktop Config Application.
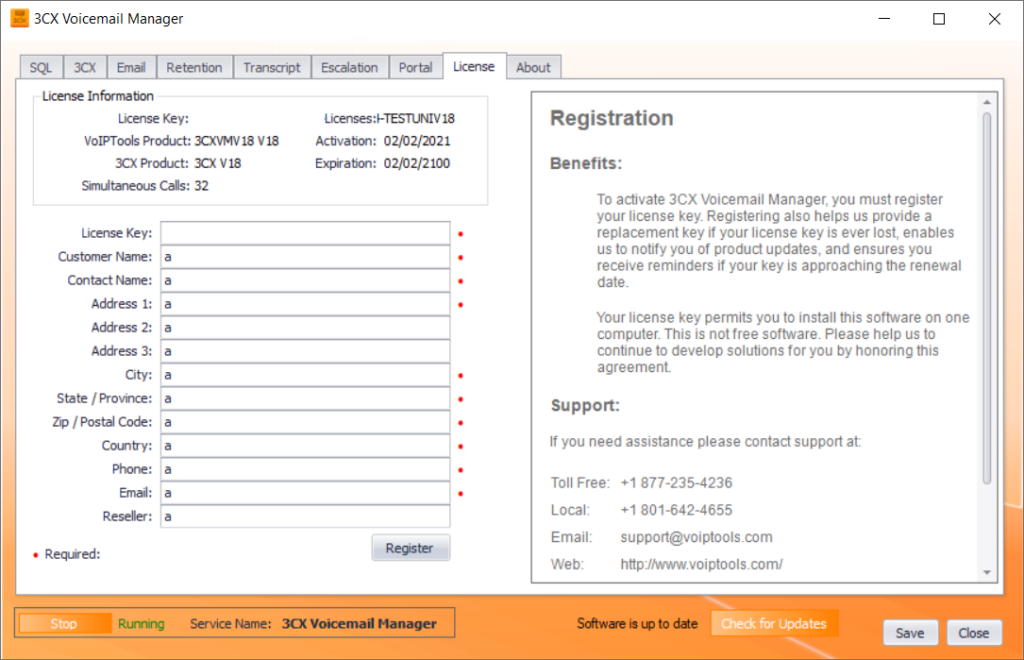


 button to display password characters.
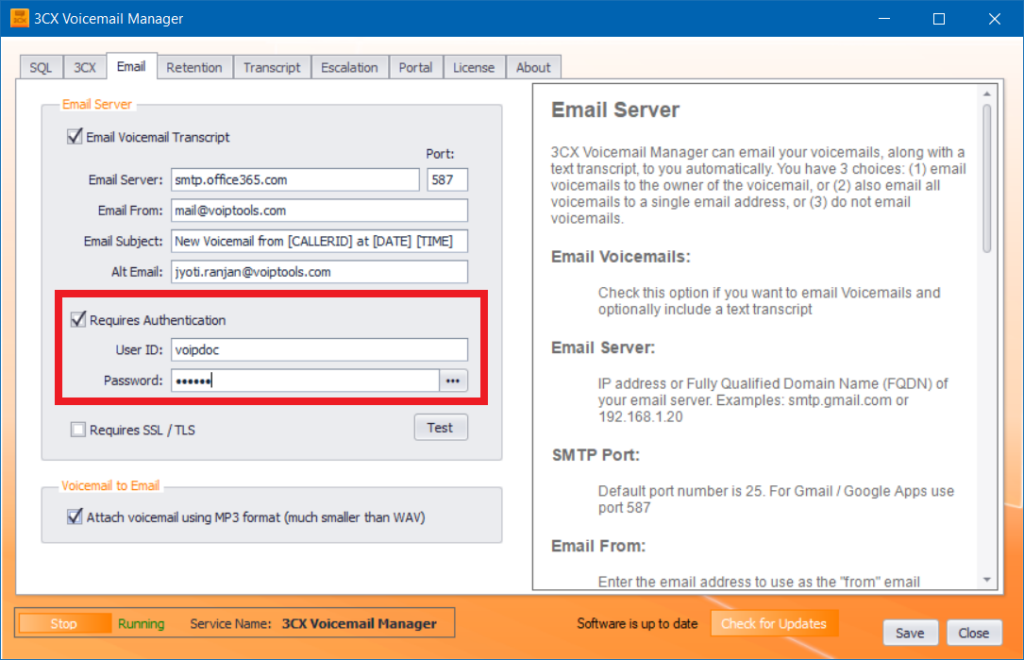

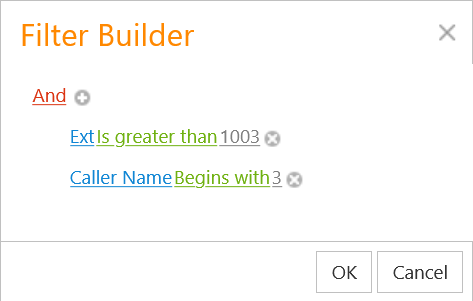
 link to open the Filter Builder.
 button to start adding your filter.
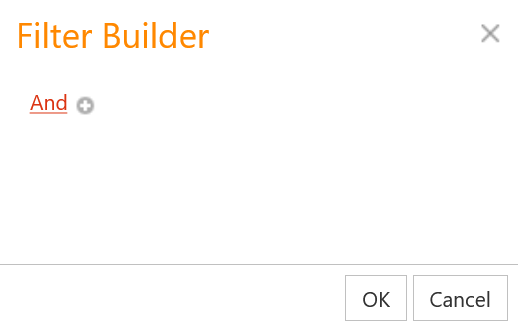
 button beside the voicemail to open the voicemail audio file.
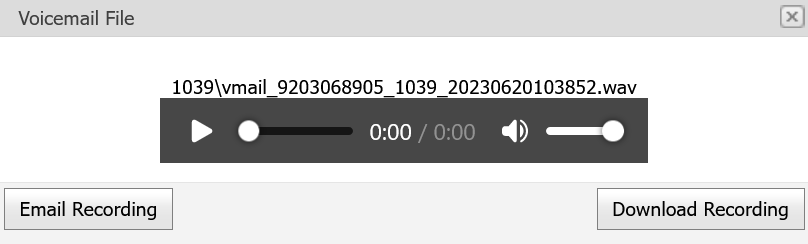
 icon beside the voicemail you want to delete.
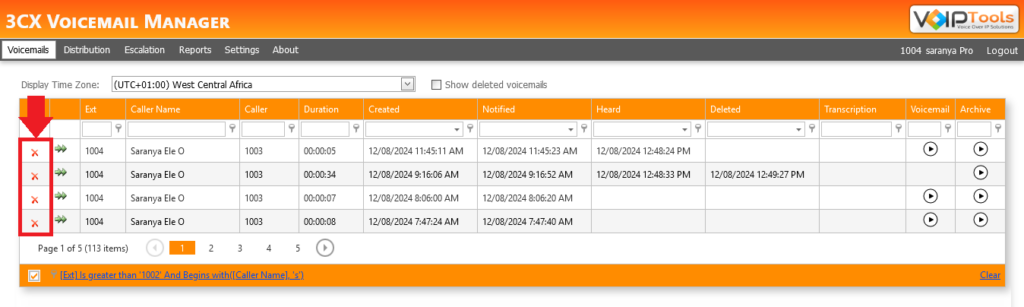
 button of the desired voicemail that you want to forward.
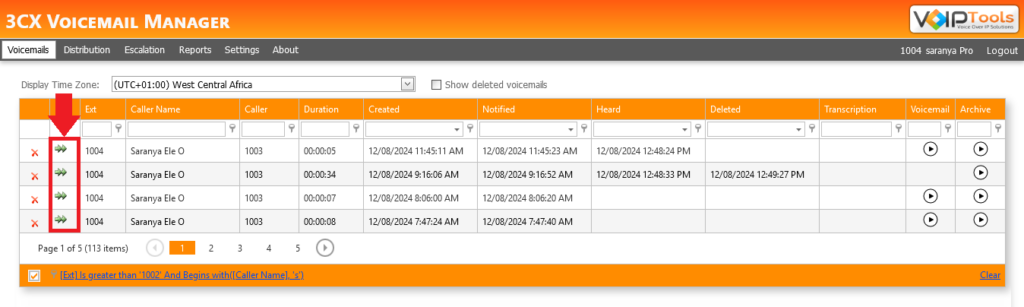
 button to open the Add/Edit Group box.
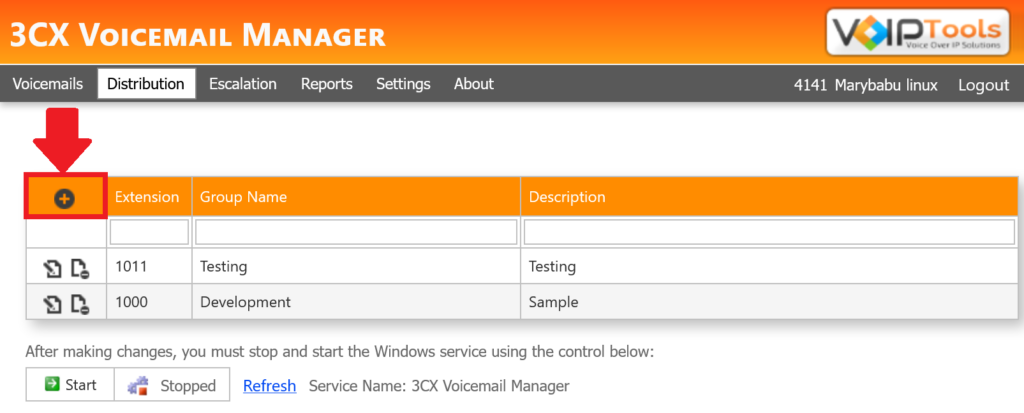

 button to save the group.
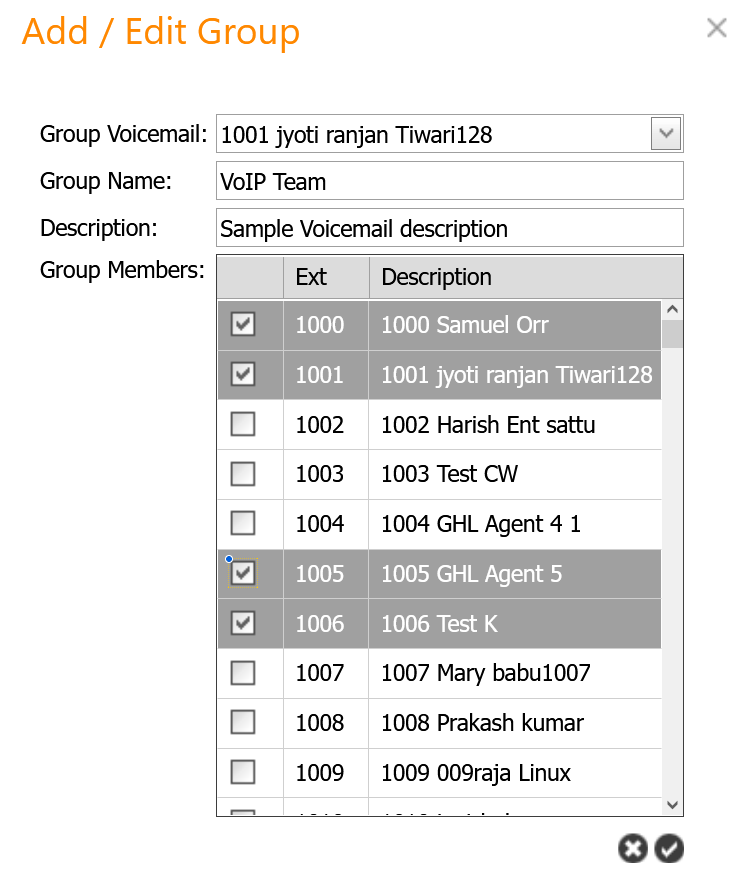

 icon on the desired extension to view the voicemail reports.
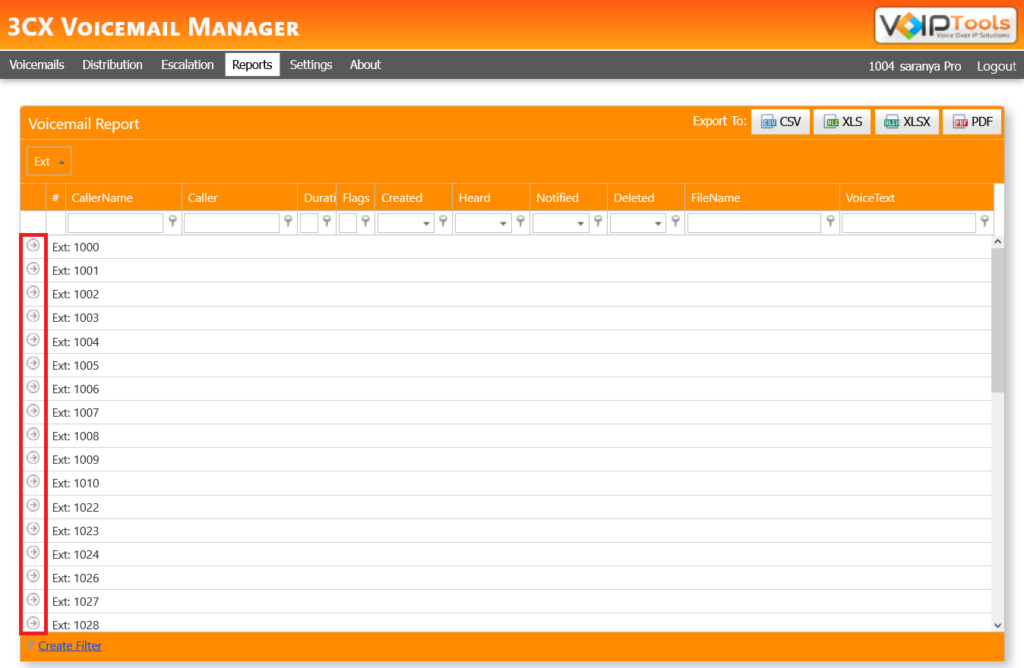
 to Save the settings.


