3CX Recording Manager is the ultimate solution for efficient disk space management. You can archive your 3CX phone conversation recordings as MP3 files to a designated location, reducing storage requirements significantly compared to WAV files. Enjoy automated compression for optimal storage efficiency and secure backup in an alternate location. Our retention policy automatically deletes old recordings beyond a specified date, streamlining your storage management process.
3CX Recording Manager is an incredible plugin designed specifically for your 3CX/PBX system. You can effortlessly handle and organize call recordings through a user-friendly web portal and take advantage of ad-hoc recording for individual calls, monitor specific extensions, or record all calls within your phone system.
Discover the Convenience of 3CX Recording Manager!
SIMPLIFIED EXPERIENCE
Simplify Your Recording Experience: With 3CX Recording Manager, experience a simplified and effortless recording journey. Easily navigate through your recordings, locate specific ones, and organize them with ease.
EASY ORGANIZATION
Effortlessly Locate, Listen, and Organize Recordings: With 3CX Recording Manager, effortlessly locate, listen to, and organize your recordings. Find the exact recording you need in no time, making your workflow efficient and hassle-free.
HASSLE-FREE INSTALLATION
Enjoy a simplified installation and update process with 3CX Recording Manager. Setting up the system and keeping it up to date is made easy, saving you time and effort.
BROWSER COMPATABILITY
Benefit from seamless compatibility with popular browsers such as Internet Explorer, Google Chrome, Firefox, and Safari. Access your recordings with any of these browsers without any compatibility issues.
CONVENIENT ACCESS
Access your recordings conveniently from your PC, MAC, or smartphone. Whether you’re in the office, at home, or on the go, you can easily access and manage your recordings without limitations.
SERVER SPACE OPTIMIZATION
Remove outdated recordings effortlessly to free up valuable server space. Keep your recording storage optimized and avoid unnecessary clutter.
BROWSER COMPATIBILITY
Effortlessly manage recorded extensions through the user-friendly web portal. Easily assign, modify, or remove extensions, making extension management a breeze.
STREAMLINED ADMINISTRATION
Streamline your administration tasks with the integrated 3CX Login Database. Manage user access and permissions efficiently, ensuring a smooth and secure recording management process.
UTILIZE FREE MICROSOFT TOOLS
Enjoy a seamless purchasing experience with 3CX Recording Manager. Take advantage of free tools from Microsoft to facilitate your purchase, making it quick, convenient, and cost-effective.
To make the most of 3CX Recording Manager’s powerful features, it is vital that you understand the straightforward yet essential steps for its setup and usage. This user-friendly software only needs to be installed once, guaranteeing convenient access to its extensive recording capabilities.
3CX Recording Manager as a Remote Server Support #
To efficiently set up 3CX Recording Manager, you have two installation options: directly on the 3CX server or on a remote server. If you choose the latter, you must install the 3CX Relay Agent on the 3CX Server. Additionally, you can distribute the installation of the Windows service, SQL Server, and web portal across separate servers for optimal performance.
You must ensure that your computer satisfies the minimum requirements specified below to install 3CX Recording Manager before you begin with the installation steps mentioned in this guide,
3CX Version V18
Windows 10 or above / Windows Server 2012 (64 bit) or above
Microsoft SQL Server 2016 or above (Including the free SQL Express edition)
To play recordings within browser requires HTML5 audio support
You need a Static IP for both VoIPTools and 3CX servers to ensure proper two-way communication, both the 3CX server (Relay) and the VoIPTools server. Dynamically assigned IP addresses are not supported. Additionally, it is recommended to use HTTPS for secure communication, which requires a FQDN for SSL/TLS certificate validation between the VoIPTools server and the Relay.
NOTE:
While installing SQL Server, ensure the following,
Uninstall the previous versions of SQL Management Studio manually before installing the new version.
Install it in “Mixed Mode” to include SQL Authentication, and install SQL Management Studio
NOTE:
When you install IIS, make sure to install Basic Authentication, .Net Extensibility, and ASP.Net 4.X.
Installing on a Domain Controller is feasible but will necessitate VoIPTools technical assistance, which costs $115 per hour
You can order 3CX Recording Manager online at https://www.voiptools.com. Your order confirmation email will include your license key and a link to download the software.
There are a number of prerequisites that must be installed prior to installing the 3CX Recording Manager. These prerequisites include Microsoft Internet Information Server (IIS) and Microsoft SQL Server
This User Guide contains step-by-step instructions to successfully install 3CX Recording Manager. Begin by extracting the installer from the downloaded zip file (Step 1 above), then run the setup program named RecordingManagerInstaller.exe
You must register your license key to activate 3CX Recording Manager. Your license key is included in your order confirmation email, and can also be found in your order history on our website.
You can locate the software download link in the Order Confirmation Email or access it in your order history on our website to obtain the 3CX Recording Manager application.
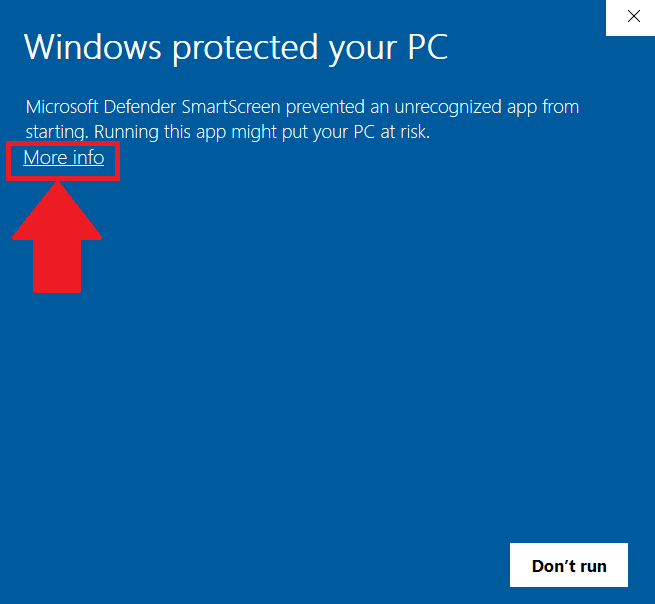
In the Microsoft Defender SmartScreen, click the More Info option.
Figure 1: Microsoft Defender: More info
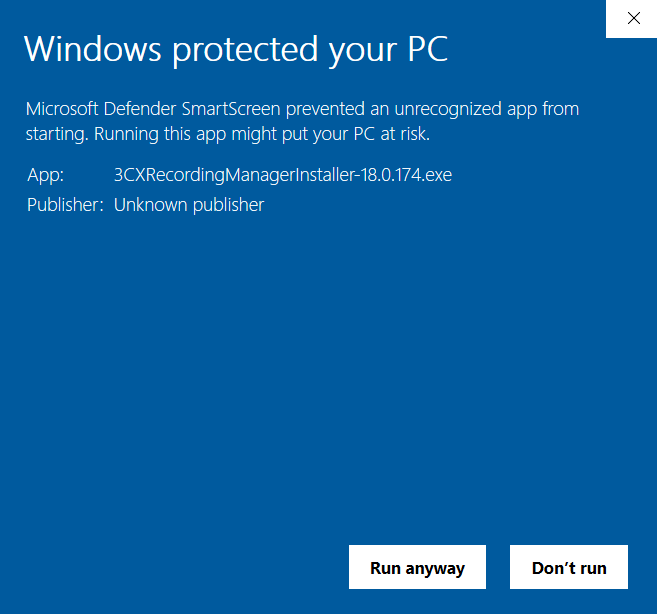
Click the Run Anyway option to start the installation.
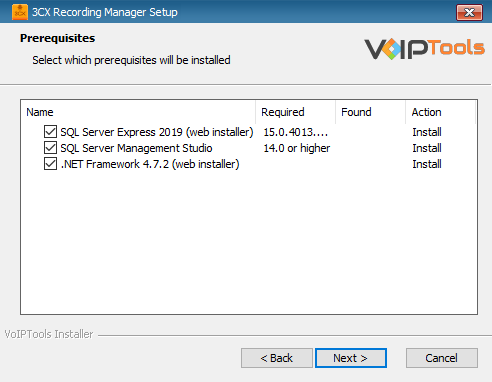
Click on the software installer that was downloaded in step 1 above. The installation wizard will automatically identify the needed prerequisites and assist you with the install of the prerequisites needed to run ‘3CX Recording Manager’. These include .NET Framework (Web Installer), SQL Server Express (Web Installer) and, SQL Server Management Studio.
Click the downloaded installer executable to launch the Prerequisites Setup Wizard and click Next.
Figure 3: Prerequisites Setup Wizard
In the Prerequisites window, the installer will identify the missing prerequisites. It is important that you install all the required prerequisites. However, you can select/unselect the applications to be installed based on your unique requirements. Click Next to continue.
Figure 4: Select Prerequisites to Install
The installer will download and install the selected applications.
Figure 5: Prerequisites Installation in progress
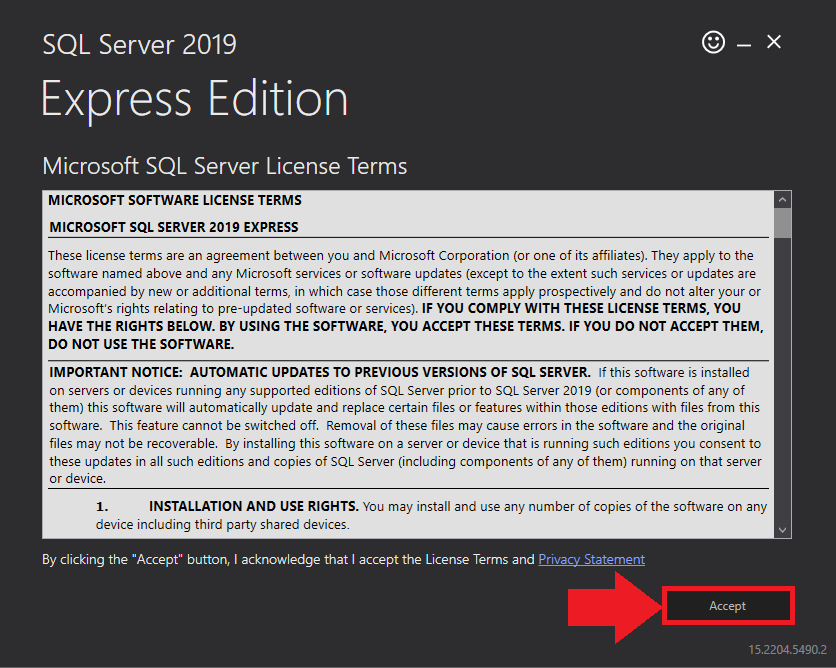
In the Microsoft SQL Server License Terms click the Accept button to acknowledge the license terms and continue.
This page appears if you do not have SQL Server Express preinstalled in your device.
Figure 6: SQL Server Express: Accept License Terms
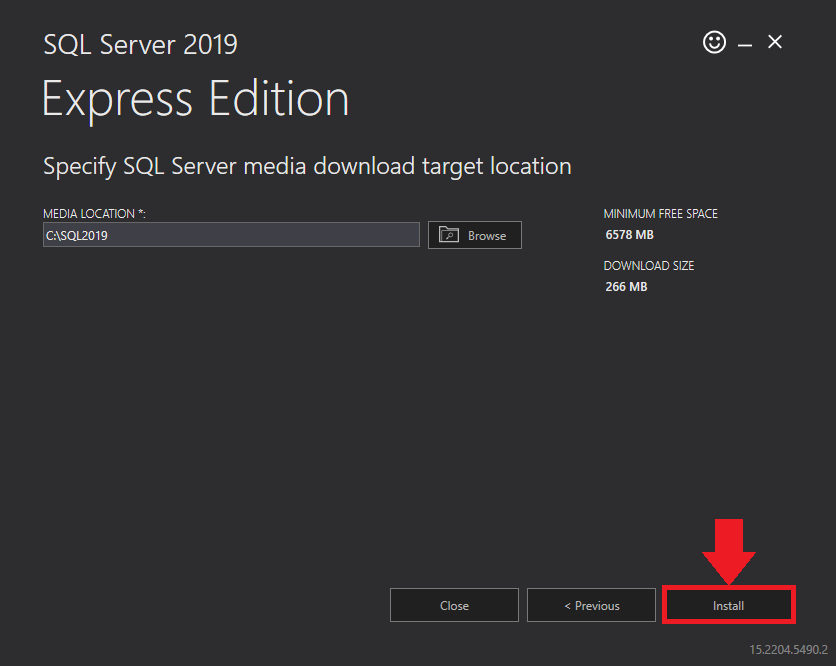
View the SQL Server Media target location in the Media Location field. If required, you can click the Browse button to change the location. Click Install to begin the installation of SQL Server Express.
Figure 7: SQL Server Express: Target Location
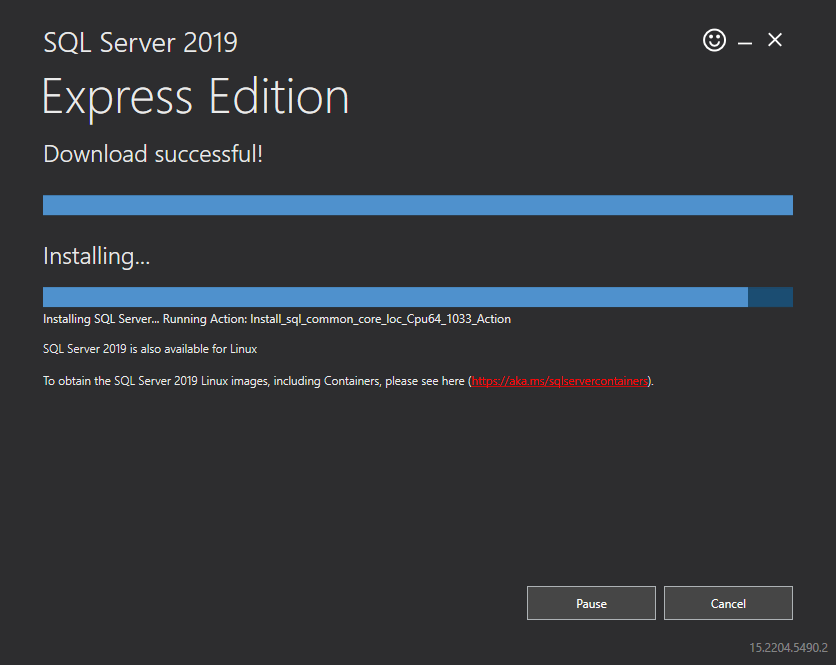
SQL server installation is in progress. This may take several minutes to complete.
Figure: SQL Server Installation In Progress
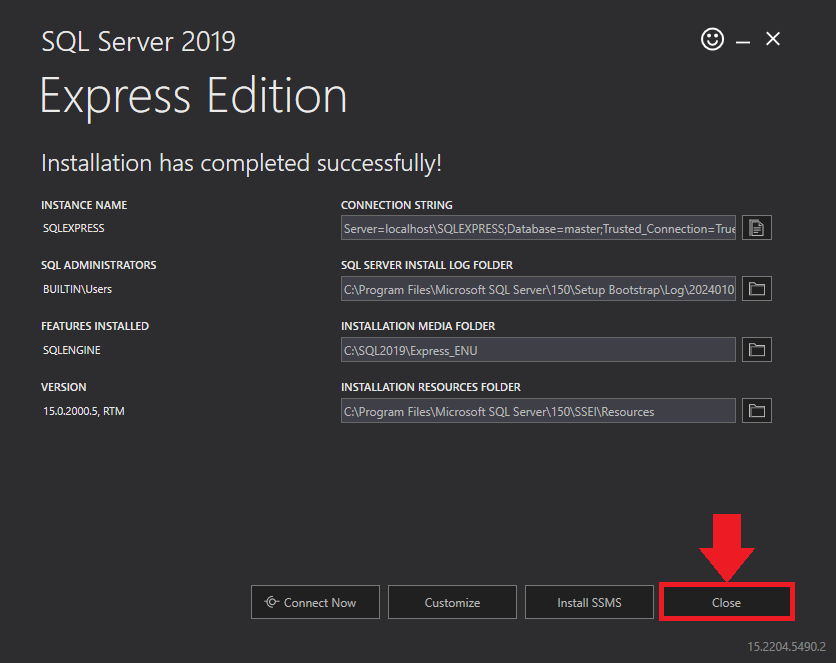
Click the Close button once the prerequisites are installed.
Figure 8: SQL Server Express: Installed Successfully
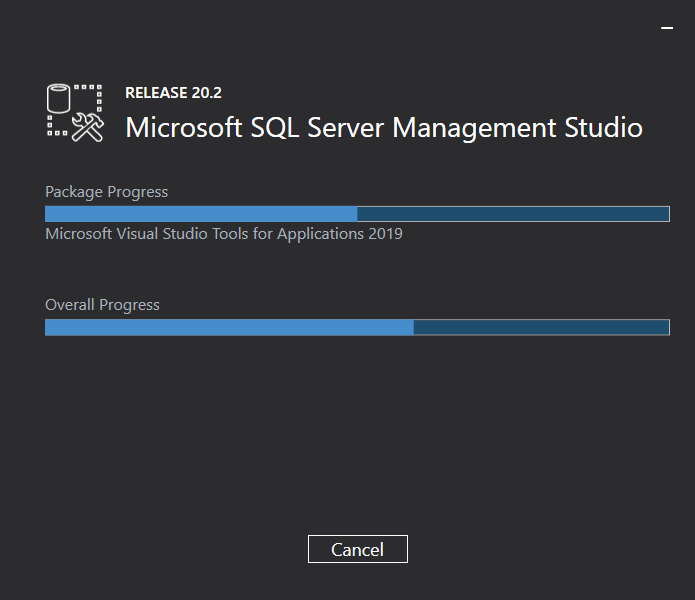
Microsoft SQL Management Studio installation is in progress. This may take several minutes to complete.
Figure 9: Microsoft SQL Server Management Studio: Installation in progress
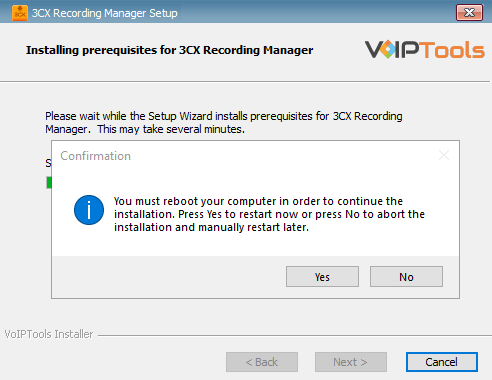
In the confirmation message box, click Yes to reboot the computer.
Figure 10: SQL Server Express: Reboot your computer
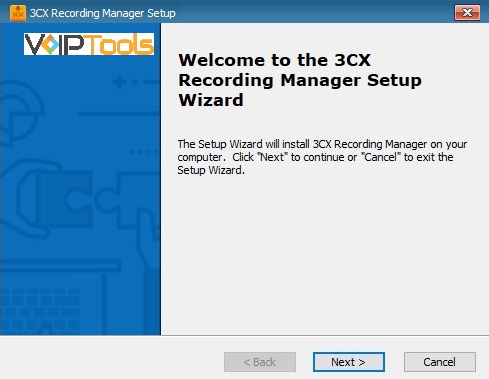
After all the prerequisites are installed, the 3CX Recording Manager Setup Wizard appears. Click Next to Continue.
Figure 11: 3CX Recording Manager Setup Wizard
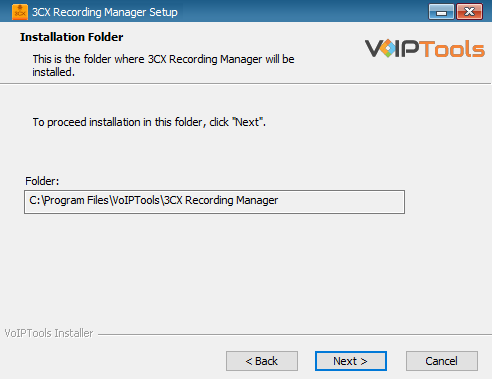
On the Select Installation Folder window, the Folder field displays the location where the ‘3CX Recording Manager’ will be installed. Note that you cannot change the path.
In the 3CX Relay Services window, in the Relay Host field, enter the FQDN of your 3CX server.
Enter 8801 in the Relay Port field.
Enter the public key you took from VoIPTools Relay services in the Public Key text area.
Figure 13: Configure Relay Services
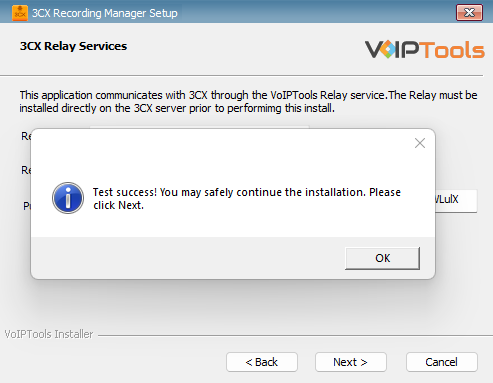
Click the Test Relay Settings to confirm ‘3CX Recording Manager’ can communicate with the Relay services running on the 3CX server.
If the ‘3CX Recording Manager’ is successfully able to communicate with the Relay services that run on the 3CX server, a Success message box appears. Click OK. Click Next to continue with the installation.
Figure 14:Test Relay services
NOTE:
If the test fails, you will not be able to continue until communication with the relay is established. If the test was unsuccessful:
confirm you have the correct firewall port open (default TCP 8801) on the 3CX server and the firewall protecting the 3CX server.
confirm that you have entered the correct FQDN for the 3CX server.
confirm that 3CX Recording Manager and the Relay are using the same port and protocol.
When configuring 3CX Recording Manager, select an existing Microsoft SQL Server instance in your environment. The database server can be a remote SQL Server or a local instance running on the VoIPTools server.
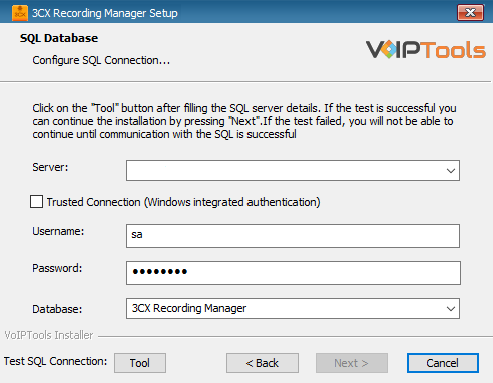
On the SQL Database window, in the Server field, select the desired instance of SQL Server
NOTE:
We encourage you to use SQL Authentication rather than Windows authentication. Many of our tools leverage a Call Flow Designer (CFD) application running on the 3CX. Frequently our CFD applications require access to a SQL database. If the 3CX server and the database server are not in an Active Directory domain, Windows authentication will fail. To use SQL authentication, your SQL Server must be configured to run in “Mixed Mode”. If you installed SQL Server with one of our tools, we configure SQL in “Mixed Mode”.
Figure 15: SQL Authentication
To use SQL Authentication, be sure to uncheck the Trusted Connection checkbox.
In the Username and Password fields, enter valid SQL login account credentials.
To use Windows Integrated Authentication (not recommended), check the Trusted Connection (Windows integrated authentication) checkbox.
In the Database field, the installer will automatically display the default database name. We encourage you to use the default name. If you are upgrading or reinstalling 3CX Recording Manager, select the existing database name from the list.
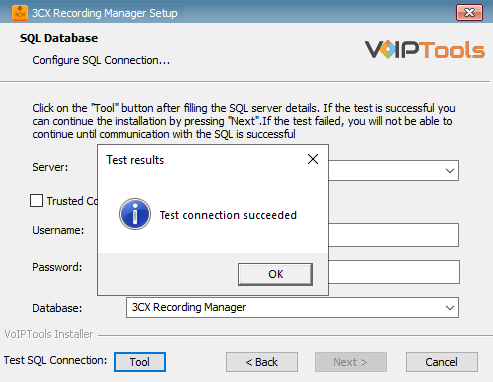
Click the Test SQL Connection button to confirm connectivity to SQL Server and then click Next to continue.
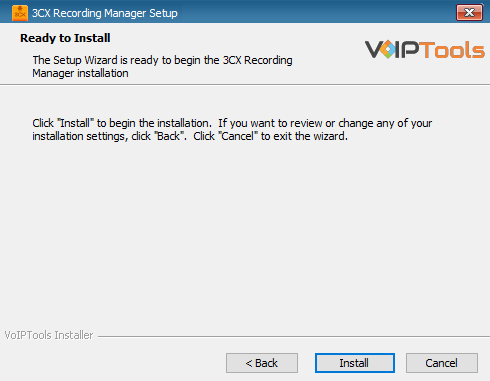
In the Ready to Install window, click Install to start the installation of the ‘3CX Recording Manager’.
Figure 17: Install 3CX Recording Manager
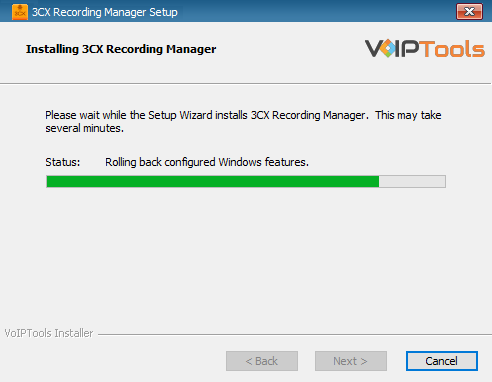
The application installation is in progress. It may take several minutes to complete.
Figure 18: Installation of ‘3CX Recording Manager’ in Progress
Once the installation is complete, check Launch 3CX Recording Manager check box and then click Finish. The 3CX Recording Manager configuration screen opens. If you want to simply close the installer without opening the configuration screen, then simply uncheck Launch 3CX Recording Manager check box and then click Finish
To ensure the authorization of your license key, it is necessary to complete the registration process. By registering with VoIPTools, you gain access to a range of benefits:
Key Replacement Assistance
In the unfortunate event of a lost license key, registering with VoIPTools lets us provide you with a replacement key promptly.
Product Updates and Reminders
By registering, you will receive timely notifications from VoIPTools regarding any product updates. Additionally, we will send reminders when your key is nearing its renewal date, ensuring uninterrupted access to our services.s
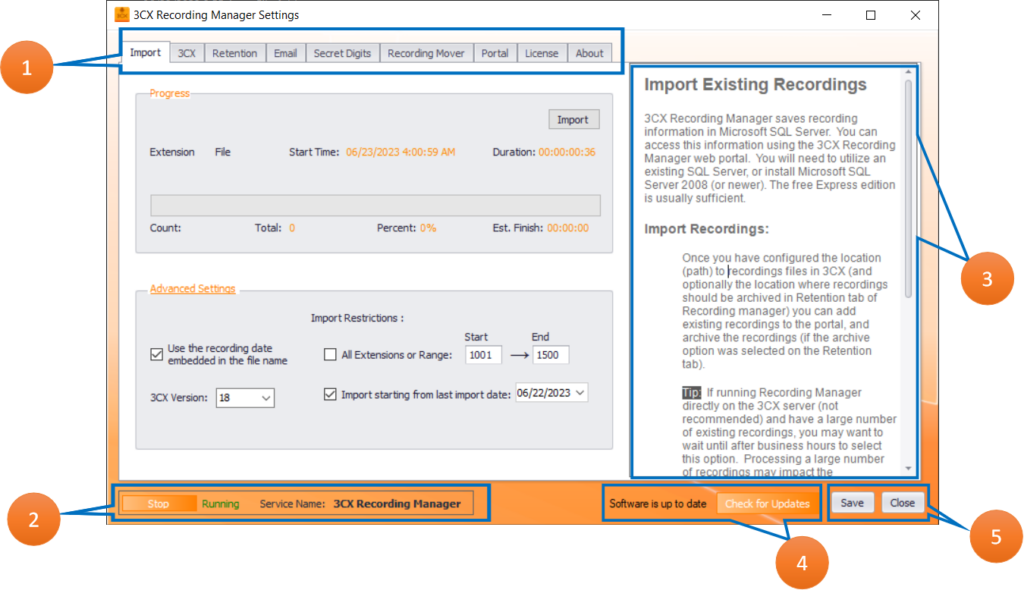
The 3CX Recording Manager Settings screen lets you register the software, configure the recording path, archive path, email server settings, and time zone, import existing records, set retention policy, and connect to the web portal.
The 3CX Recording Manager Configuration application has the following screens,
This section explains the overview of the config application.
Figure: Configuration application overview
Tabs section
To access various screens and customize the application, choose the appropriate tab as previously mentioned.
Service Status
This section provides information about the status of the 3CX Recording Manager service. You have the ability to control the service by stopping or starting it through this interface.
Notes section
You can view important notes and basic functions of the features.
Check For Updates
You can verify the status of your software’s updates here. Additionally, you have the option to click on the Check For Updates button to determine if any updates are currently accessible for 3CX Recording Manager.
Save/Close
The Save button lets you preserve any modifications made within the configuration application.
The Import screen enables you to import recording files. The Recording Manager automatically inserts the recordings into the database, utilizing the recording path you specify in 3CX. If you decide to ‘Archive’ the recordings, the Recording Manager will archive them sim ultaneously during import.
In the Import screen, you have the ability to perform several functions:
Importing specific recording files: If you only want to import certain recording files, you have the option to choose and import them selectively.
Extracting date and time from file names:The system allows you to extract the date and time information embedded within the file names of the recordings. This feature enables you to organize and categorize your recordings based on their respective date and time details.
The 3CX Recording Manager automatically retrieves the recording path from 3CX and inserts the recording data into the database. If you choose the Archive option in the Retention tab, the system will simultaneously archive the recordings.
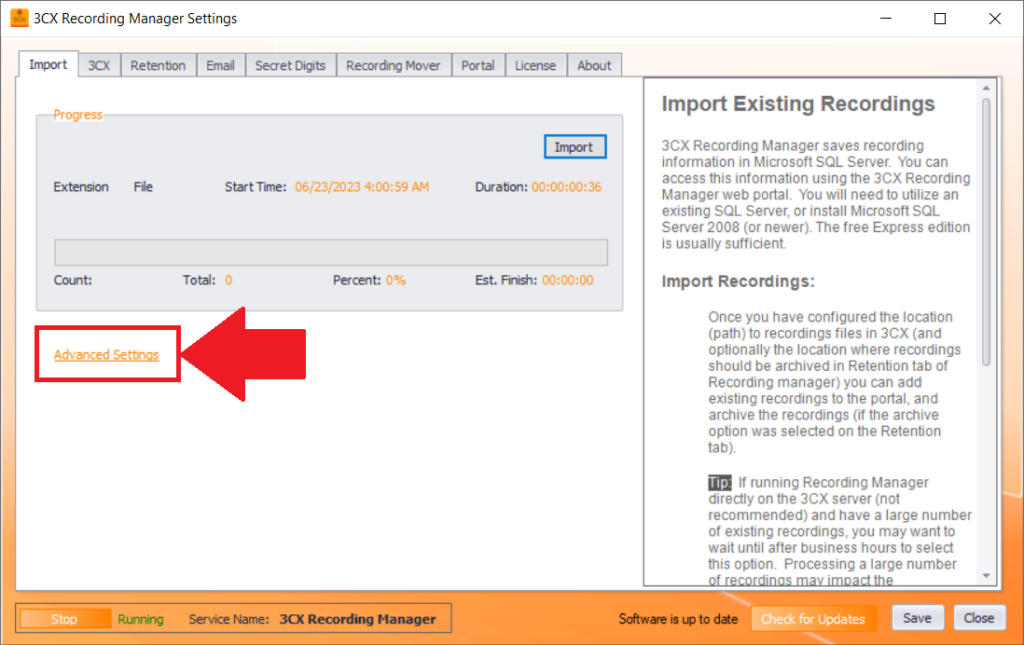
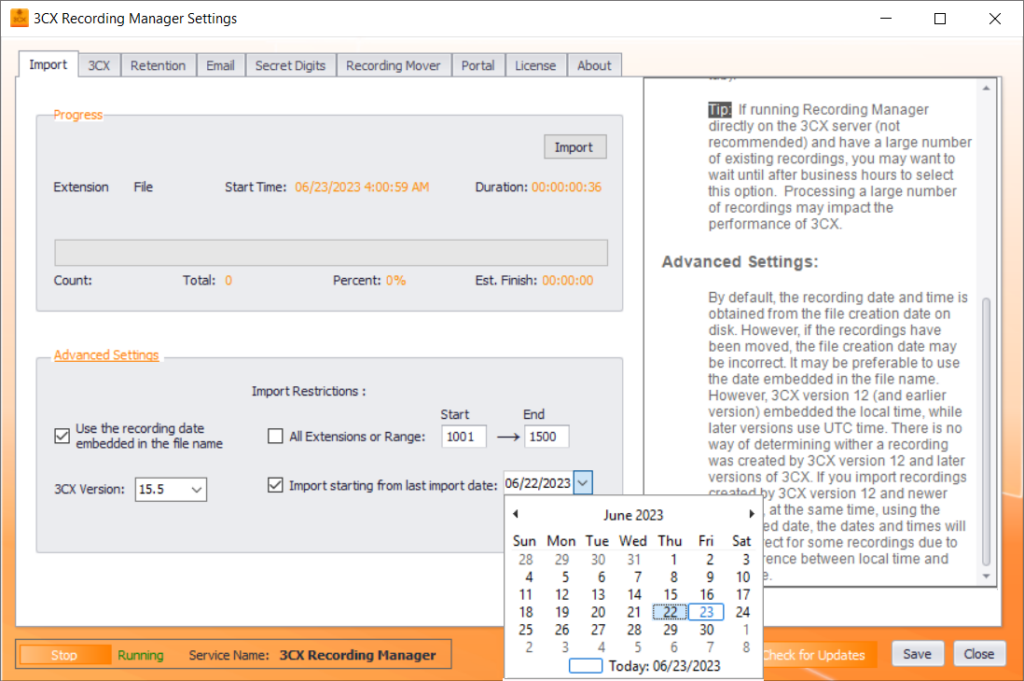
You can use the Advanced Settings option to import specific recording files to your database.
In the Import screen, click the Advanced Settings option.
Figure: Advanced Settings option
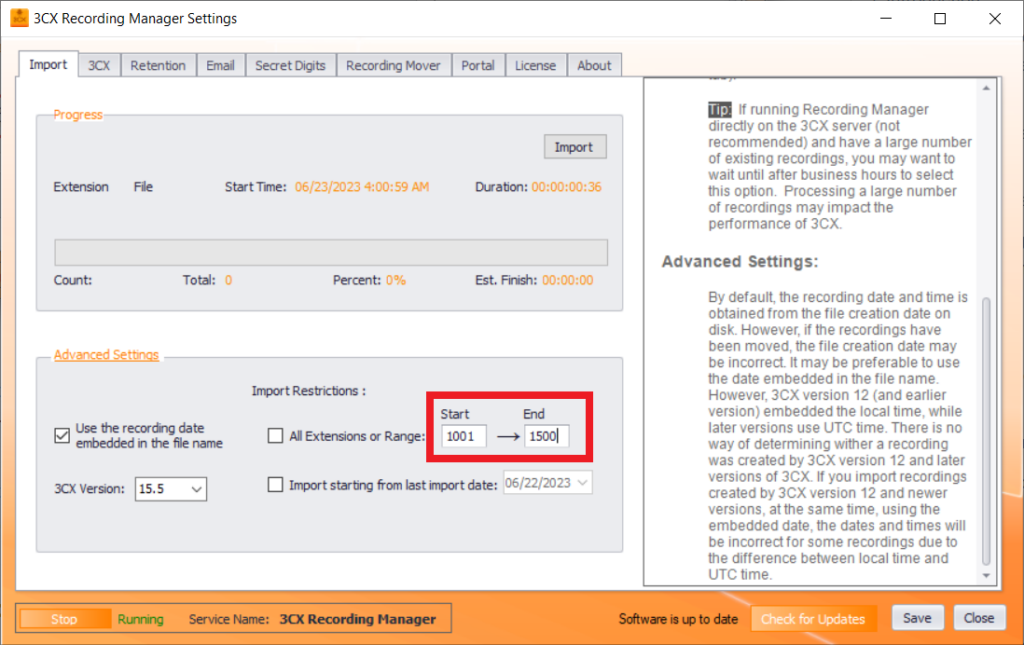
To import recording files from a specific range of extensions, you have two options,
Select the All Extensions or Range box to import recording files from all the extensions.
Unselect the box and enter the desired range of extensions in the Start and End fields.
For instance, if you wish to import recording files from extensions 1001 to 1500, enter 1001 in the Start field and 1500 in the End field.
Figure: Import recording files from a range of extensions
If you want to import recording files starting from your last import date, select the Import Starting From Last Import Date box. Alternatively, unselect the box to import files from a specific desired date, and in the Date dropdown select the desired date from which you want to import the recording files.
Click the Import button to import your filtered set of recording files.
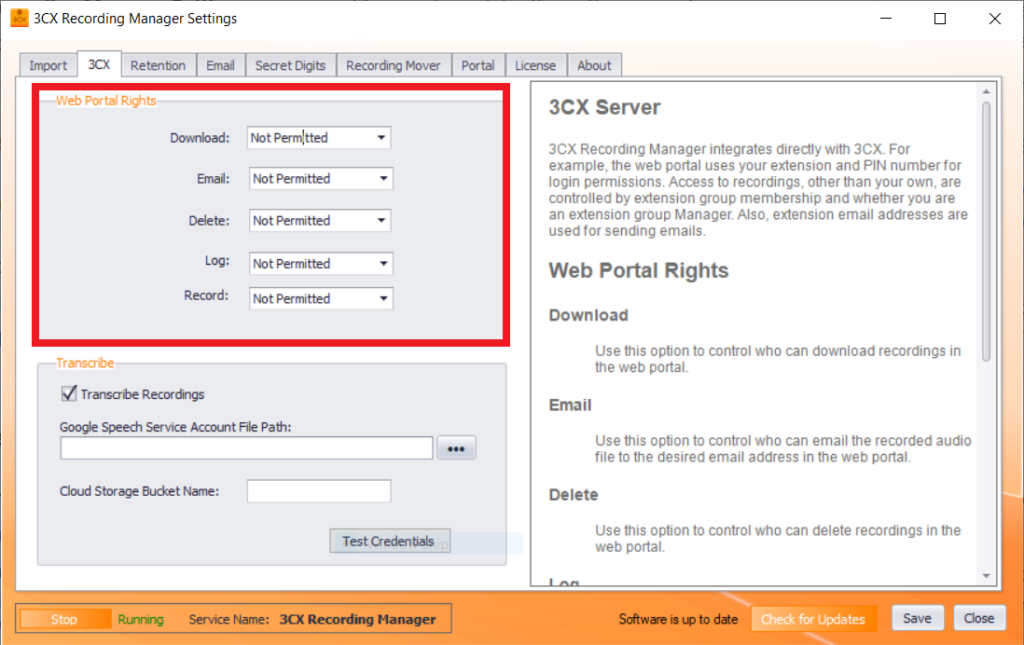
The 3CX Recording Manager effortlessly integrates with 3CX, offering you a range of convenient features. To access the web portal, use your extension and PIN number. You can easily retrieve your own recordings. However, access to other recordings is subject to control, based on your extension group membership and whether you are an extension group Manager. Additionally, the system employs extension email addresses for email communication. Within the 3CX screen, you have control over web portal access for various users and can set the file path to store the transcript documents of the recordings.
You can use the Transcribe settings to transcribe your recordings and save the transcript document in a specific file path.
In the Transcribe section, select the Transcribe Recordings box.
In the Google Speech Service Account File Path field enter the path of the JSON file or use the Browse button to browse for the JSON file that you obtain after creating yourGoogle Cloud account.
In the Cloud Storage Bucket Name field, enter the name of the cloud storage bucket you created in yourGoogle Cloud account.
This allows recordings longer than 1 minute to be uploaded to the cloud, transcribed, and subsequently deleted.
Click the Test Credentials button to ensure the transcribe feature functions correctly.
Access the Recording Options settings in the Web Application and select the list of extensions you want to transcribe.
Figure: Transcribe settings
NOTE:
To know how to setup Google Cloud Account for usage of Speech-to-Text transcription, click here.
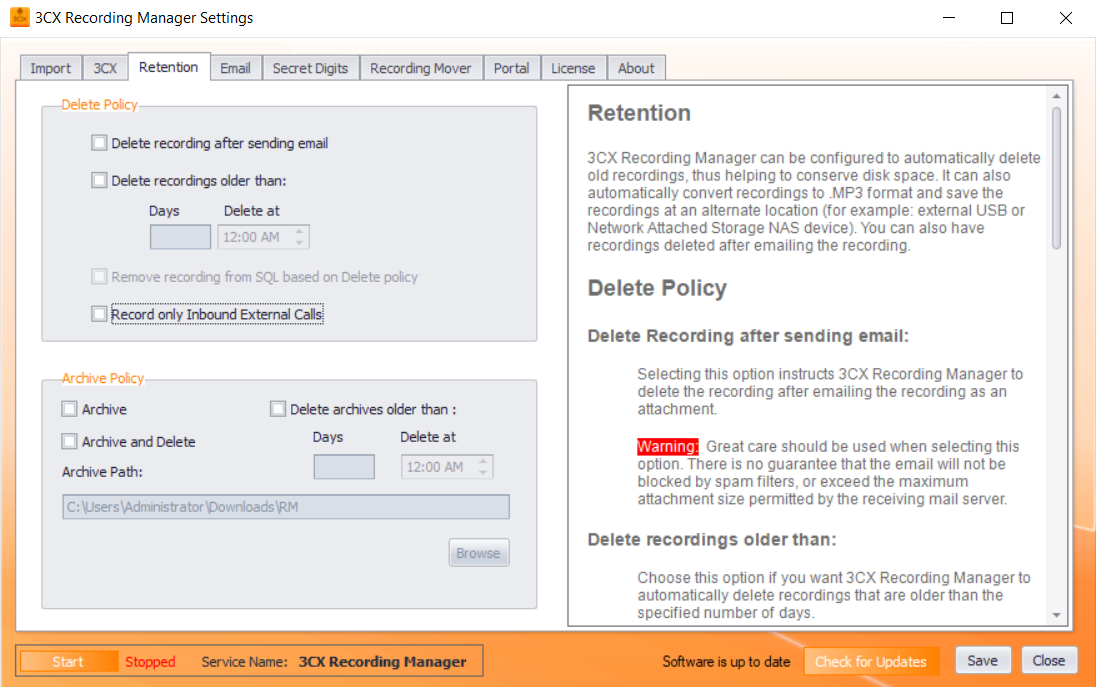
The Retention screen lets you configure 3CX Recording Manager automatically delete old recordings, effectively conserving disk space. Additionally, it can automatically convert recordings to .MP3 format and save them at an alternate location, such as an external USB or Network Attached Storage (NAS) device. Furthermore, you have the option to delete recordings after emailing them.
This section contains various checkboxes that let you control the deletion policy of 3CX Recording Manager.
CHECKBOX
PURPOSE
Delete Recording After Sending Email
When you choose this option, 3CX Recording Manager deletes the recording after sending it as an attachment via email.
NOTE:
When you select this option, exercise caution. There is no guarantee that spam filters will not block the email or that the receiving mail server will not exceed the maximum attachment size permitted.
Delete Recordings Older Than
Select this option if you desire the 3CX Recording Manager to autonomously remove recordings that surpass a designated number of days.
1. Enter the number of days in the Days field. 2. Set the desired deletion time in the Delete At field.
NOTE:
The system compares the current date with the date of recording creation and deletes all recordings that are older than the selected number of days. This setting applies to all recordings created by any extension. The system deletes recordings once a day at the specified time, except for recordings deleted after email, which are immediately removed.
If you choose to archive recordings, the archived version of the recordings will not be deleted.
Remove Recording From SQL Based On Delete Policy
This setting allows you to control whether database records for deleted recordings should be deleted from SQL. When the records are deleted from SQL, all historical information for the recording will be removed from the web portal.
Record Only Inbound External Calls
When you select this option, 3CX Recording Manager records only inbound external calls.
Figure: Delete Policy
NOTE:
If the Archive Policy is not enabled, then the Recording Manager saves the records that reached the Delete recordings older than time, to the ‘Default Archive Path’.
If the Archive Policy is enabled, then Recording Manager saves the records that reached the Delete recordings older thantime to the Archive Path that you set in Archive Policy.
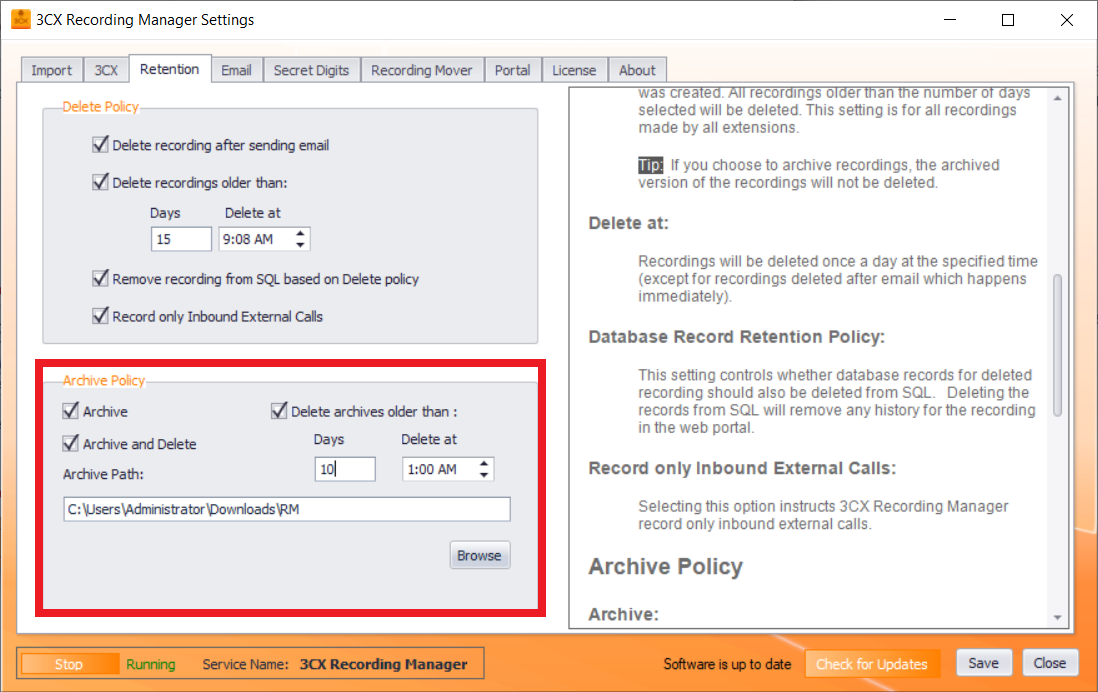
This section contains various options that let you control the archive policy of 3CX Recording Manager.
STEP NUMBER
TASK DONE
OUTCOME
1
Select the Archive checkbox
To make a compressed (MP3) copy of all recordings and archive them to another location
2
Select the Archive and Delete checkbox
The Recording Manager will perform the following actions:
– Copy the recording files from the recording path to the archive path. – Delete the copied files from the recording path.
3
Select the Delete Archives Older Than box
Delete the recording files according to the scheduled time period.
1. In the Days field, enter the number of days. 2. In the Delete At field, enter the timeyou want to delete the archives.
4
To delete the recording files according to the scheduled time period.
1. In the Days field, enter the number of days. 2. In the Delete At the field, enter the time at which you want to delete the archives.
Archives the audio files at the set archive path.
Archived recordings will be saved in .MP3 format and are NOT affected by the Delete Policy.
NOTE:
3CX Recording Manager by default runs with the credentials of a local user (VoIPToys). If you choose to save archives on a different server, will need to adjust permissions on the archive folder, or change the credentials used by 3CX Recording Manager’s Windows service and IIS application pool.
5
Click the Browse button
Use this button to browse to the location where archived recordings will be saved.
Figure 24: Archive Policy
NOTE:
You must not set the Archive Path as the Recording Manager folder. This creates overwriting of files and may lead to deletion of filed when new build is released.
Due to potentially large size of the recording files, 3CX Recording Manager initially creates a duplicate of each recording and then converts it to the .MP3 format before sending it via email. The .MP3 version of the recording is typically about one-seventh the size of the original file. However, this conversion process does result in a slight decrease in audio quality. Nevertheless, unless the recording has been deleted according to the retention policy, by the owner, or by an administrator, the original recording remains accessible for listening or downloading through the web portal.
IP address or Fully Qualified Domain Name (FQDN) of your email server. Examples: smtp.gmail.com or 192.168.1.20
SMTP Port
Simple Mail Transfer Port. Default port number is 25. For Gmail / Google Apps use port 587
Alt. Email
Alternate email to send all the emails to a single email address.
Email New Recording Notes
Send an email to the owner of the recording and their manager when a new note is added.
Requires Authentication
Check this option if your mail server requires authentication to relay emails. Enter a valid username and password. For Microsoft Exchange use a Windows domain (network) username and password. For Google Apps use your Google Apps email address and password
SSL / TLS
Select this option if your mail server requires a secure connection — Secure Socket Layer (SSL) or Transport Layer Security (TLS) to relay email. Gmail, Google Apps, and Microsoft 365 require a secure connection.
There are 4 ways in which you can configure 3CX Recording Manager to send email notifications.
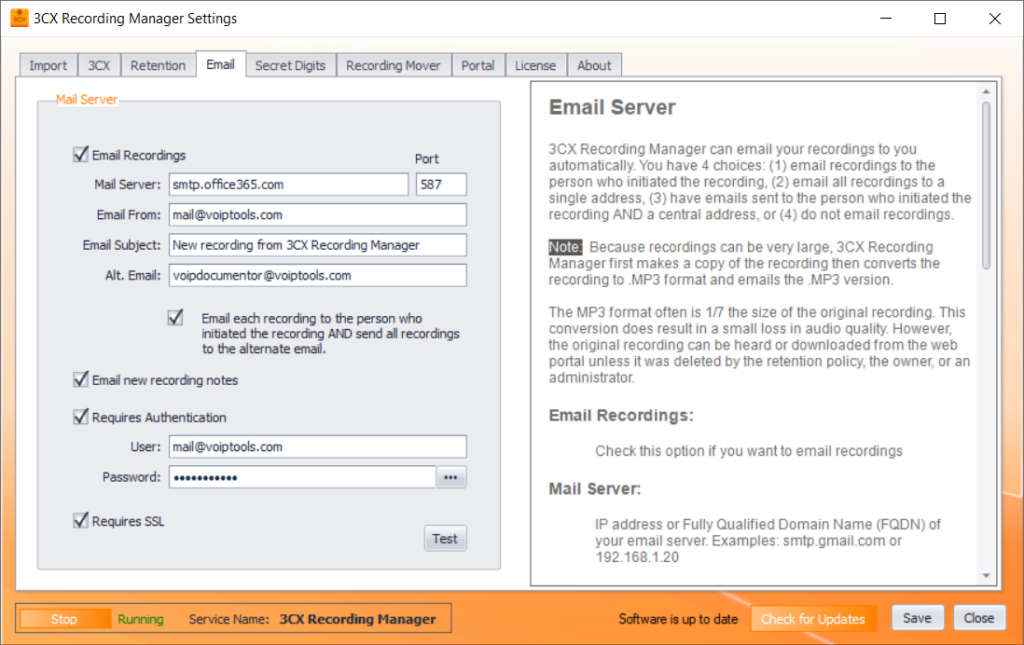
Case 1: Email to individuals who initiated the recording #
On the Email screen, in the Mail Server section, select the Email Recordings checkbox.
In the Email Server field, enter the IP address or Fully Qualified Domain Name (FQDN) of your email server.
Examples: smtp.office365.com or 192.168.1.20.
In the Port field, enter the port number.
The default value is 25.
For Gmail/ Google Apps, use port 587.
In the Email From field, enter the sender’s email address.
Your SMTP server may require a valid email address.
For example, you can use the mail@voiptools.com format.
In the Email Subject field, enter the email subject.
Check the Email Each Recording To The Person Who Initiated The Recording And Send All Recordings To The Alternate Email box.
You can check the Email New Recording Notes box to automatically send emails to the recording owner and the owner’s manager whenever a new note is added.
Refer to the Field Definitionfor Requires Authentication checkbox and Requires SSL checkbox and click the Test button.
If the test is successful, click the Save button to save the email settings.
Figure: Case 1 – Email to individuals who initiated the recording
Case 2: Email all the recordings to a designated address #
On the Email screen, in the Mail Server section, select the Email Recordings checkbox.
In the Email Server field, enter the IP address or Fully Qualified Domain Name (FQDN) of your email server.
Examples: smtp.office365.com or 192.168.1.20.
In the Port field, enter the port number.
The default value is 25.
For Gmail/ Google Apps, use port 587.
In the Email From field, enter the sender’s email address.
Your SMTP server may require a valid email address.
For example, you can use the mail@voiptools.com format.
In the Email Subject field, enter the email subject.
In the Alt. Email field, enter an alternative email address.
You can check the Email New Recording Notes box to automatically send emails to the recording owner and the owner’s manager whenever a new note is added.
Refer to the Field Definitionfor Requires Authentication checkbox and Requires SSL checkbox and click the Test button.
If the test is successful, click the Save button to save the email settings.
Figure: Case 2 – Email recordings to designated address
Case 3: Email both the recording owner and the central address #
On the Email screen, in the Mail Server section, select the Email Recordings checkbox.
In the Email Server field, enter the IP address or Fully Qualified Domain Name (FQDN) of your email server.
Examples: smtp.office365.com or 192.168.1.20.
In the Port field, enter the port number.
The default value is 25.
For Gmail/ Google Apps, use port 587.
In the Email From field, enter the sender’s email address.
Your SMTP server may require a valid email address.
For example, you can use the mail@voiptools.com format.
In the Email Subject field, enter the email subject.
In the Alt. Email field, enter an alternative email address.
Check the Email Each Recording To The Person Who Initiated The Recording And Send All Recordings To The Alternate Email box.
You can check the Email New Recording Notes box to automatically send emails to the recording owner and the owner’s manager whenever a new note is added.
Refer to the Field Definitionfor Requires Authentication checkbox and Requires SSL checkbox and click the Test button.
If the test is successful, click the Save button to save the email settings.
Figure: Case 3 – Email recordings to both the owner and central address
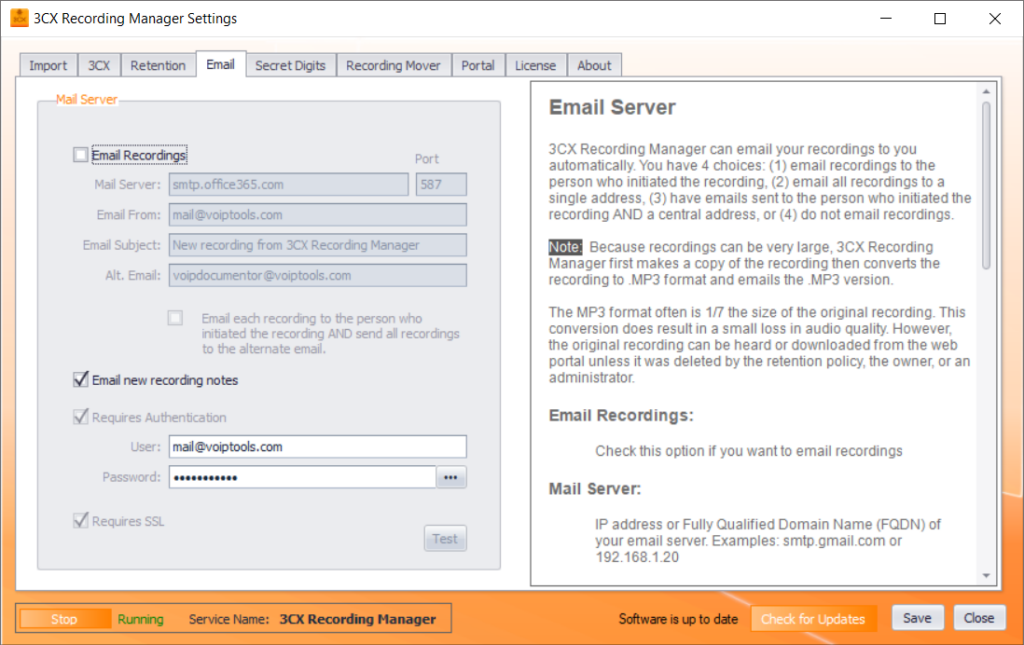
Case 4: Exclude recordings from email notifications #
On the Email screen, in the Mail Server section, unselect the Email Recordings checkbox.
Click the Save button to save the email settings.
Figure 28:Exclude recordings from email notifications
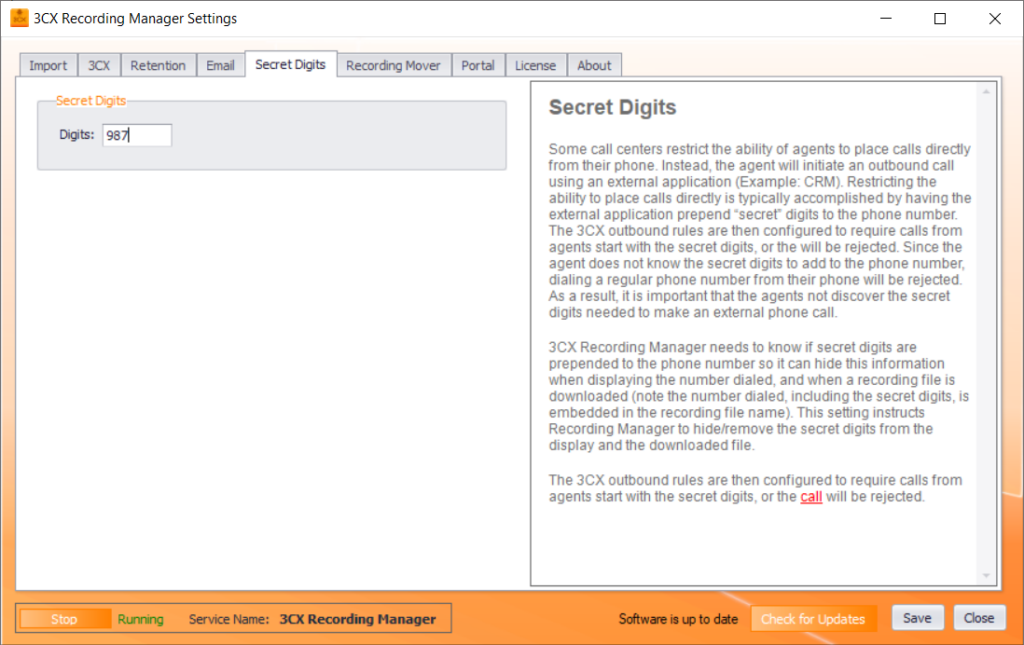
Restrictions on Direct Outbound Calls and the Importance of Concealing Secret Digits #
In specific call centers, there is a restriction on agents directly placing outbound calls from their phones. Instead, agents must initiate outbound calls using an external application, such as a CRM system. This restriction is implemented by the external application adding “secret” digits to the phone number before dialing. The 3CX outbound rules are set up to mandate that calls initiated by agents must begin with these secret digits; otherwise, the calls will be rejected. Consequently, if agents try to dial a regular phone number directly from their phones, the calls will be rejected as they are unaware of the secret digits required.
Therefore, it is of utmost importance that agents are not able to discover the secret digits needed to make external phone calls. This information is crucial for the 3CX Recording Manager, as it needs to be aware of whether secret digits are prepended to the phone number. This awareness enables the Recording Manager to conceal the secret digits when displaying the dialed number and when downloading recording files. It is worth noting that the number dialed, including the secret digits, is embedded in the file name of the recording.
Consequently, the configuration of the 3CX outbound rules necessitates that calls initiated by agents commence with the secret digits; otherwise, the calls will be rejected.
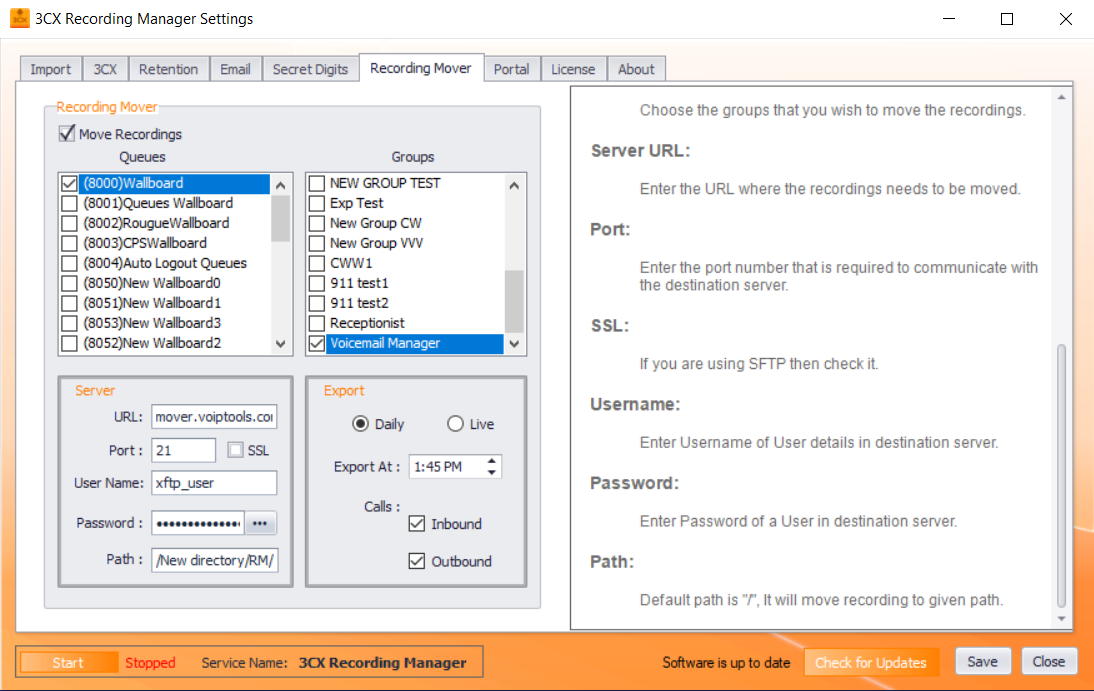
The Recording Mover tab lets you configure settings so that you can move recordings from one server to another server using API.
NOTE:
The changes made to ‘Recording Mover’ settings will be effective only after restarting ‘3CX Recording Manager’ service.
In the Recording Mover tab, check the Move Recordings checkbox to enable and configure Recording Mover settings.
In the Queues section, check all the desired queues whose recordings you want to move to the configured server.
In the Groups section, check all the desired groups whose recordings you want to move to the configured server.
In the Server section:
In the URL field, enter the server URL to which you want to move the configured recording files.
In the Port field, enter the server port number.
In the Username and Password fields, enter valid server login credentials.
Check the SSL checkbox if the server requires a secure connection.
Enter theFTP folder path in the Path field to which the Recordings get exported.
NOTE:
You must type a slash “/” at the end of the FTP folder path. Without the “/” the Recording Mover cannot export the recordings.
In the Export section,
You can select either the Daily radio button to export your recordings on a daily basis or select the Live radio button if you want to export your recordings live.
Check the Daily option if you want to move the recordings on a daily basis and configure the time in the Export At field at which you want to export the recordings.
Check the Live option if you want to move the recordings and individual CSV files (We generate the CSV file with all the CDR data) once the recording is finished.
Under the Calls sub-section,
check the Inbound checkbox to move only inbound recordings.
check the Outbound checkbox to move only outbound recordings
Check both Inbound and Outbound boxes to move both inbound and outbound recordings to the server.
Figure 26: Configure Recording Mover settings
NOTE:
You must disable the settings in the Retention tab when using the Export Daily option.
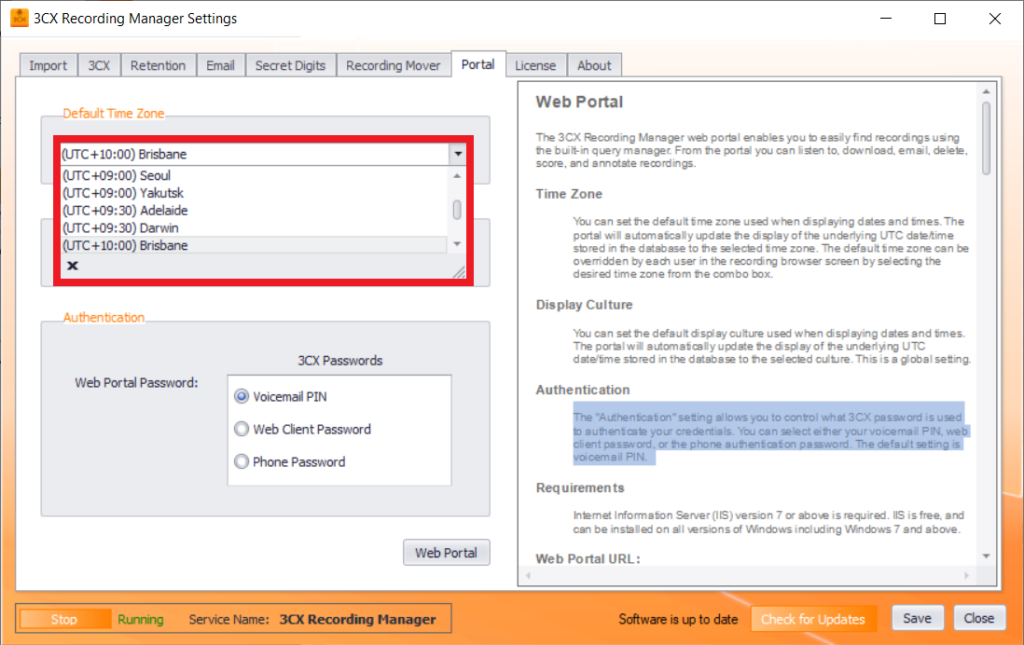
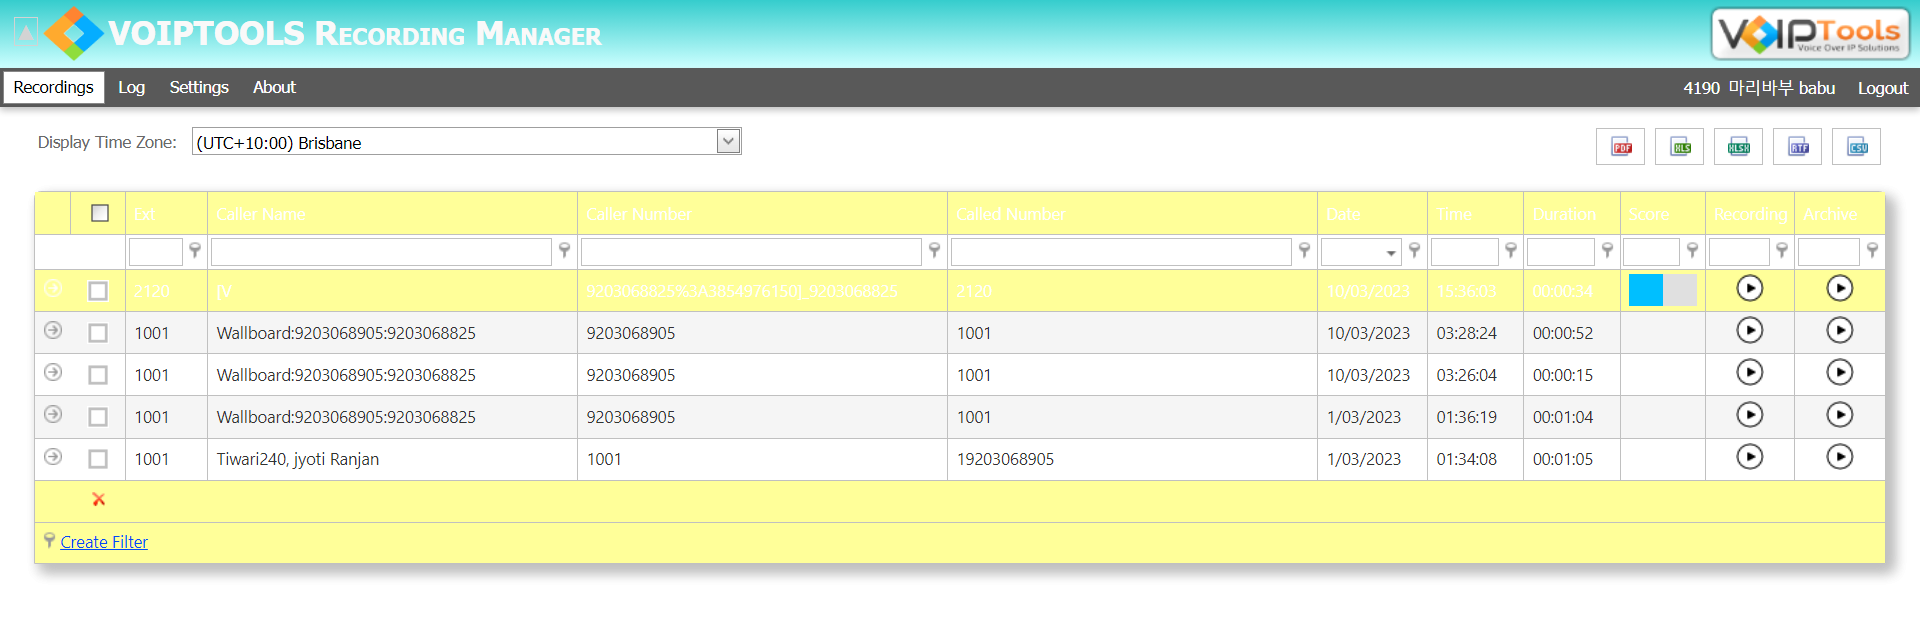
The 3CX Recording Manager Web Portal lets you locate recordings through an integrated query manager. You can listen to, download, email, and delete recordings in the Portal,
Within the Portal screen, you can customize the following settings:
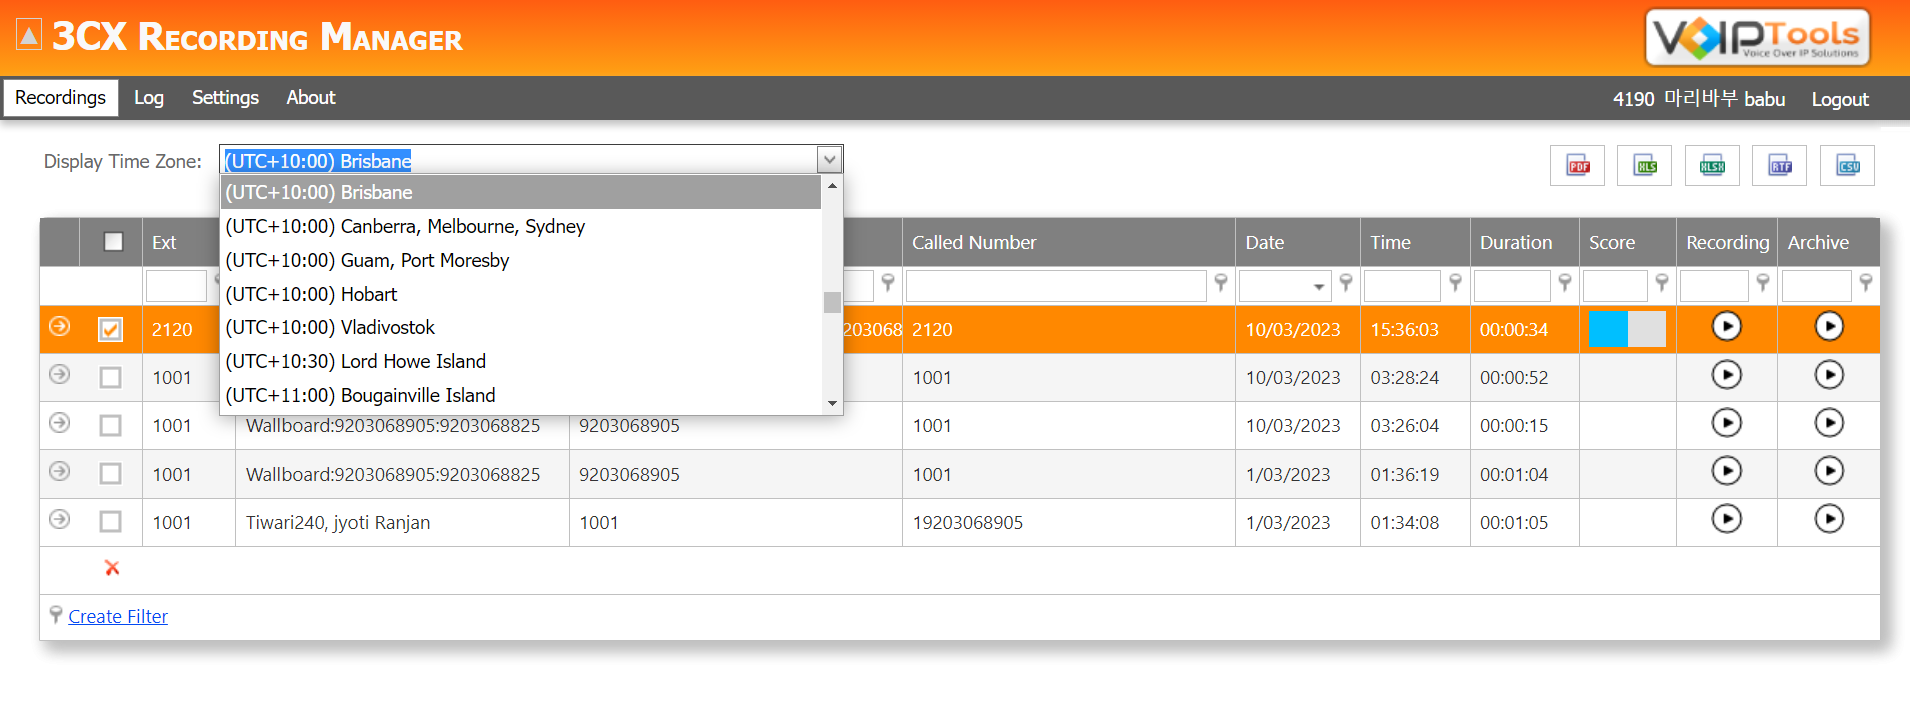
Choose the desired time zone for the Web Application.
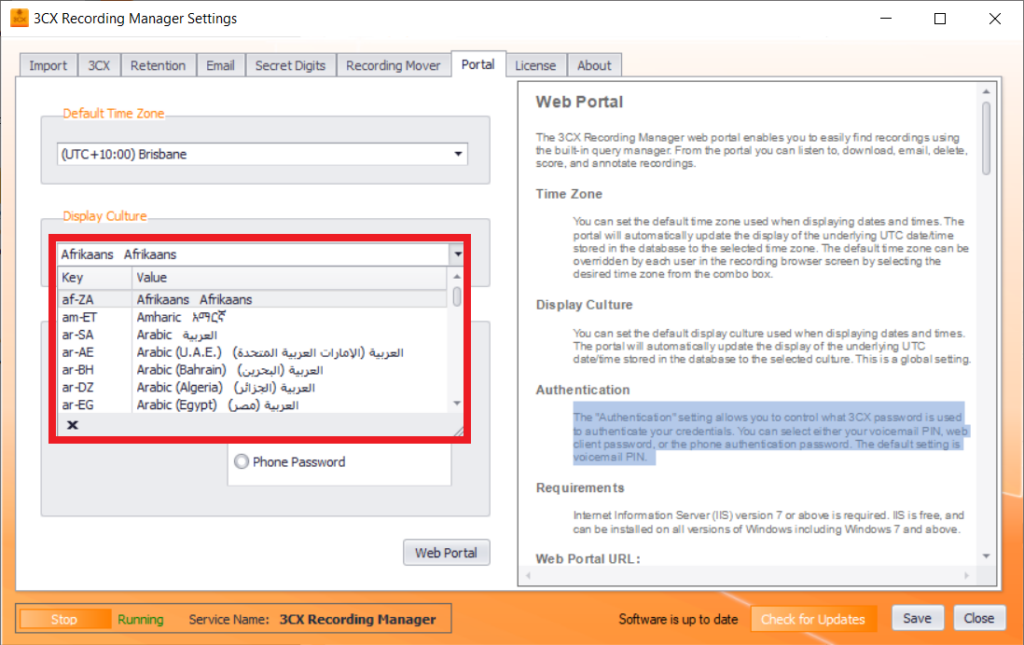
Select the language and culture for your web application.
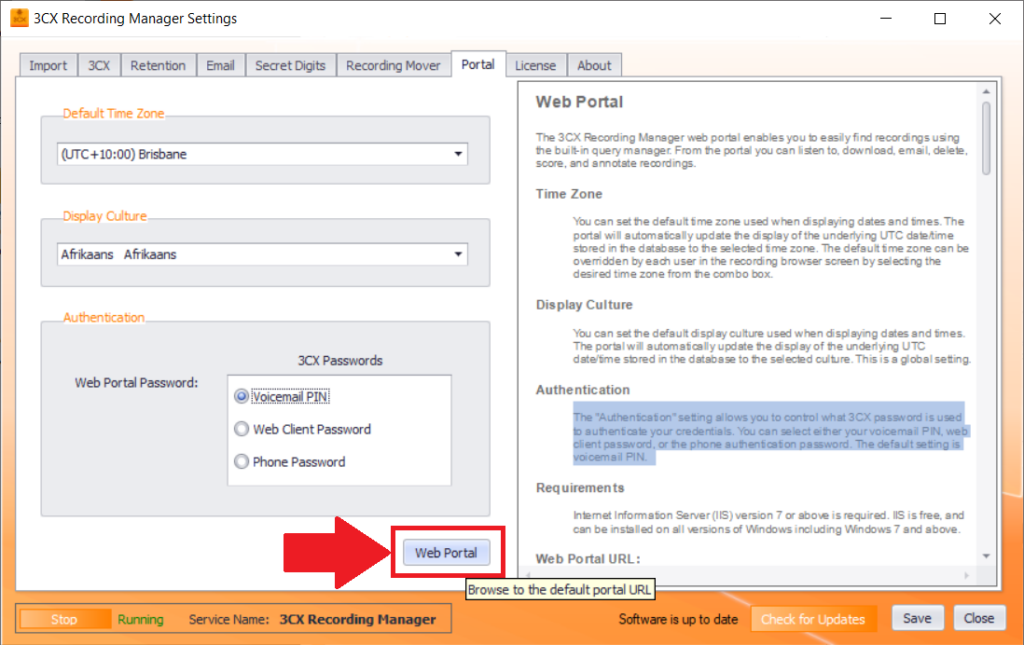
Determine the preferred authentication method for accessing your web portal.
Follow the procedure to configure your web application,
In the Default Time Zone list, select your time zone.
In the Display Culture list, select your language and culture.
In the Authentication section, select the password type you want to use to log in to the web application.
Click the Save button and click the Web Portal button to open the web application with the configured settings.
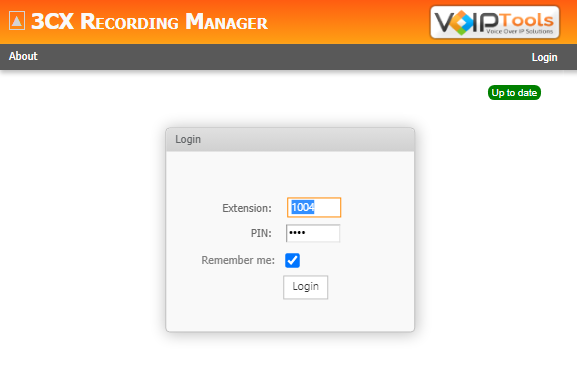
The web portal login page opens when you click the Web Portal button,
Figure 30: 3CX Recording Manager Standard Web Portal Login
The default time zone for displaying dates and times.
NOTE:
Once the default time zone is set, the portal will automatically convert and display the underlying UTC date/time stored in the database according to the selected time zone. It is important to note that each user has the ability to override the default time zone individually. On the recording browser screen, users can select their preferred time zone from the combo box, overriding the default setting.
Display Culture
The default display culture for dates and times can be set.
The portal automatically updates the display of the UTC date/time stored in the database to the chosen culture. This setting applies globally.
Authentication
You can select the 3CX password for authentication of your credentials.
The available options for selection include the voicemail PIN, web client password, or phone authentication password.
By default, the system is configured to utilize the voicemail PIN as the preferred setting.
The About screen provides you with essential contact information about VoIPTools, including the application’s version number. It is crucial to ensure that you have the most up-to-date version of the Recording Manager. To learn more about our contact details and the support we offer, please click here.
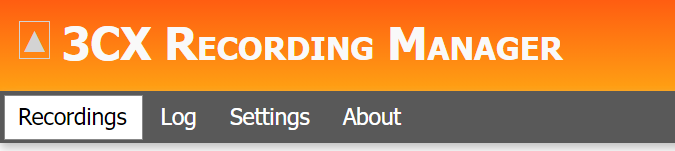
To access the ‘3CX Recording Manager Standard’ web portal, click the Web Portal button on the configuration program (Portal tab on the configuration screen), or click on the desktop icon that was created during the installation process (‘3CX Recording Manager’ Web).
You can utilize the 3CX Recording Manager to assume the roles of both a Manager and an Agent. This feature serves to enhance security measures, enable meticulous access control, ensure accountability, support personalization, and facilitate targeted performance monitoring and evaluation. By leveraging these advantages, an efficient and secure operational environment is fostered.
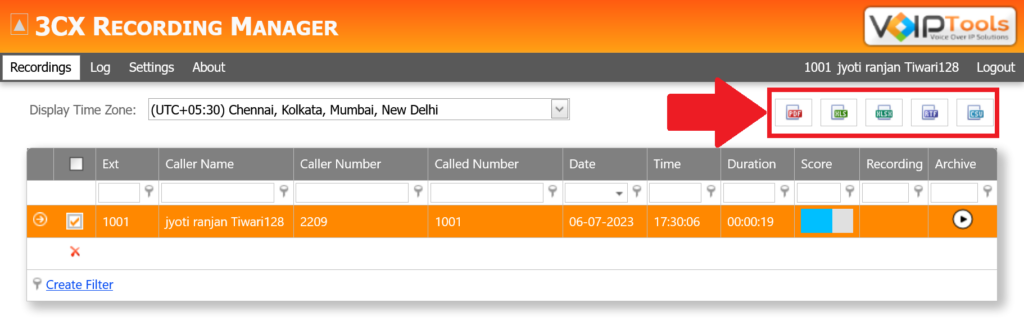
The date and time of the recordings will be according to the Date Time Zone set in the Recordings screen.
EXT
The extension number of the device that initiated the call.
CALLER NAME
The name of the caller of the extension that initiated the call.
CALLER NUMBER
The number of the extension/ phone number of the caller that initiated the call.
CALLED NUMBER
The extension/ phone number of the device that received the call from the ‘Caller’.
DATE
The ‘Date’ (according to the ‘Display Time Zone’) at which the caller initiated the call.
TIME
The ‘Time’ (according to the ‘Display Time Zone’) at which the caller initiated the call.
DURATION
The duration of the call that is recorded.
SCORE
It is the ‘Score’ for the recorded call. It is generally between 1 and 10 and the system displays the result in a graphical bar.
RECORDING
The audio file of the recorded call.
ARCHIVE
If the ‘Recording Manager’ is configured to archive the recorded audio files, then the archived audio file will be displayed in the Web Portal in ‘Recordings’ screen.
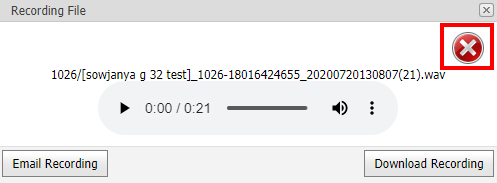
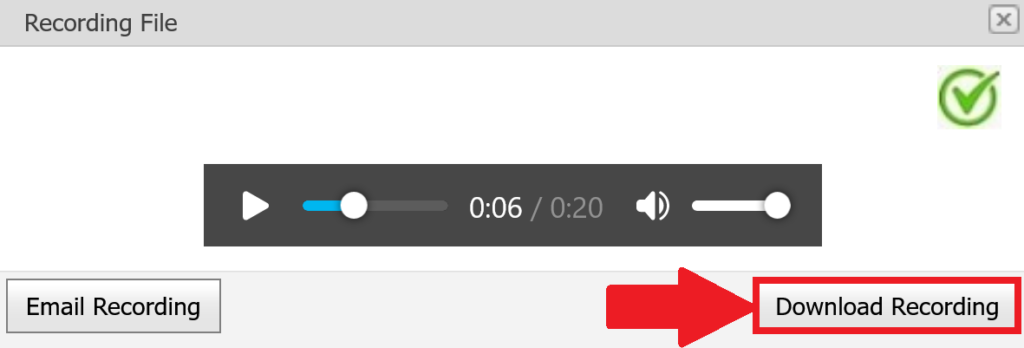
The Recording Manager ensures the integrity of a recording file by verifying if it has been tampered with. When a call between a client and an agent is concluded, the Recording Manager promptly encodes and stores the recording file in a database. When a user attempts to play the same recording file through the web portal, the Recording Manager compares the current file from the recording path to the saved version in the database. If it is determined that the file has not undergone any modifications, the symbol is displayed; however, if alterations have been made, the symbol is displayed instead.
In the Recordings screen and in the Recording column, click the Play button of the desired recording that you want to verify.
In the Recording File popup, if symbol appears then the recording has not been tampered.
Figure 33: Non-Tampered Recording File
Figure 34: Tampered Recording File
NOTE:
The recordings saved in previous version of Recording Manager will be shown as ‘Verified’ by default.
In the Recordings screen, click Expand button beside the extension for which you want to add new notes.
In the Note text box, click Add button to display the text box to add the notes.
In the text box, type the text for the recorded call.
Click Save to save or Cancel to cancel the notes.
Figure 37: Add a new note
NOTE:
If an agent adds note, the manager will be notified about the note along with the recording through an email. And, if a manager adds a note, the respective agent will be notified about the note through an email. For this, ensure that the email settings are configured in the configuration screen.
The Recordings screen lets you view and edit the transcriptions for the recorded calls. Click here to know how to enable transcribe settings for the recordings.
Follow the procedure to view the call transcriptions,
Click the Expand button beside the extension you want to see the call transcription.
In the Transcription section, you can view the call transcripts.
Figure: View transcripts
You can click the Edit Transcripticon and edit the call transcripts.
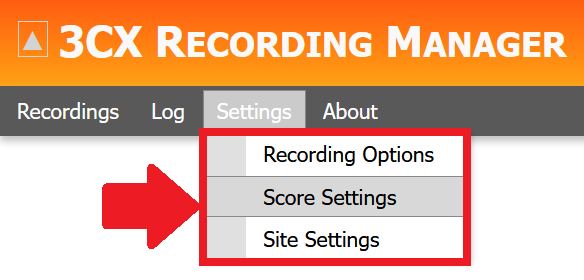
The Settings screen enables you to select the extensions for which you want to automate call recording for both incoming and outgoing calls, and customize brand settings. You can access ‘Settings’ screen only as a manager.
Hover over the mouse on Settings tab to display the dropdown menu with the following menu options:
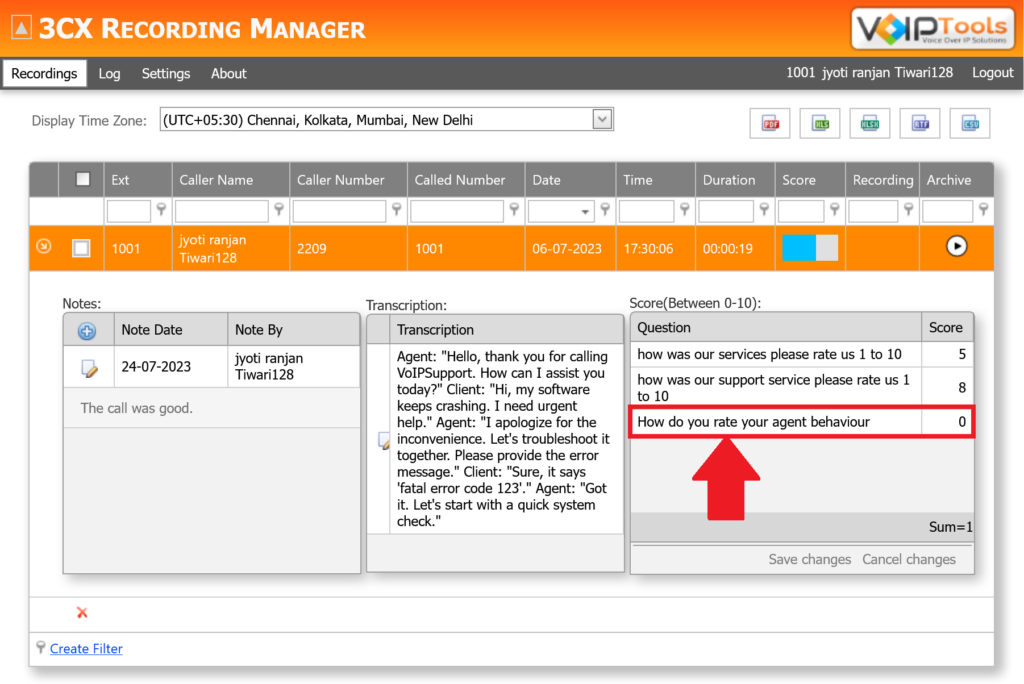
The Score Settings screen enables you to select the desired questions that you want to display in the Recordings screen. The manager then gives the ‘Score’ for the recorded call. It is generally between 1 and 10 and the system displays the result in a graphical bar.
Follow the procedure to add a question to score,
Hover over the mouse on the Settings tab and select Score Settings from the drop-down menu.
Figure 45: Select Score Settings
Click the Add button to add a new question for scoring.
Figure: Score Settings – Add new score – Add button
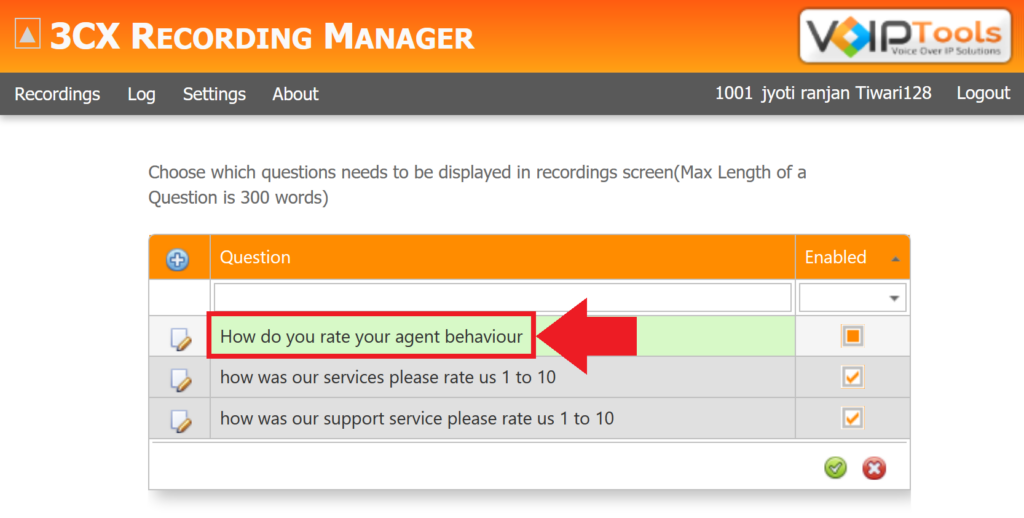
In the Question field, enter your desired question text.
Figure: Score Settings – Add new score – Question text
Check the Enabled checkbox to enable the question and click the Save button to save your changes.
Figure: Score Settings – Add new score – Enable the score
You can see your score added in the Recordings screen,
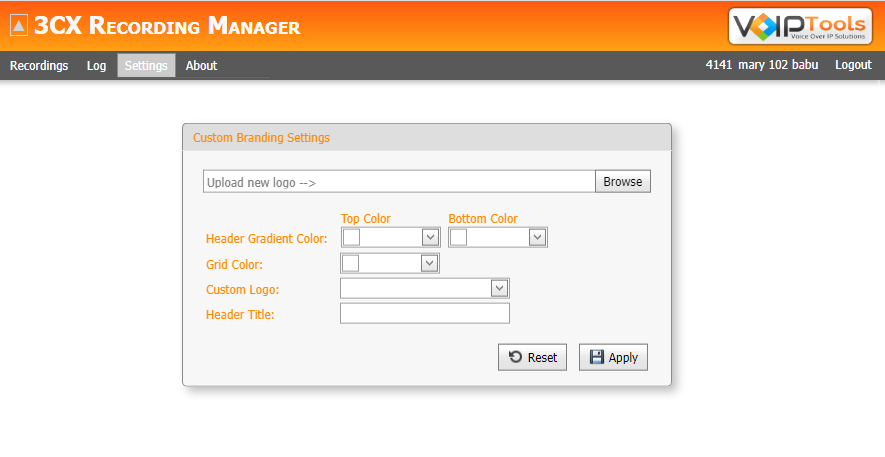
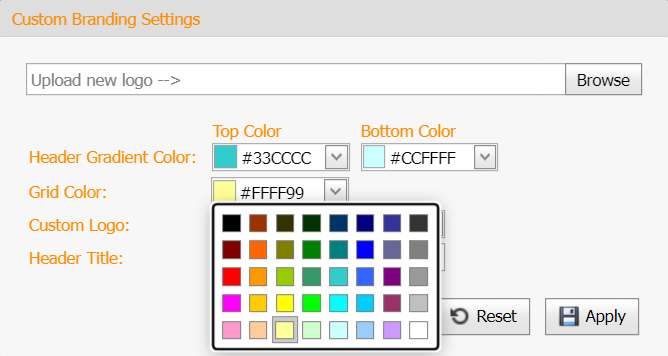
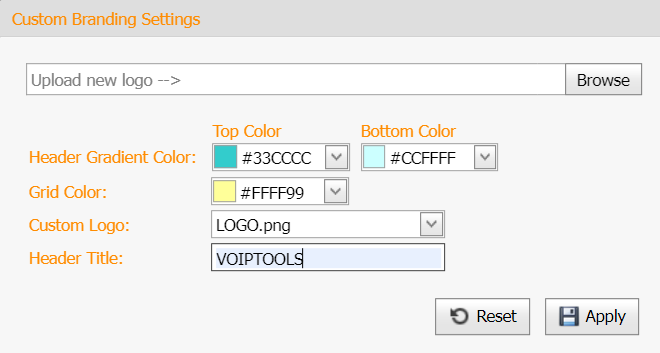
Site Settings enable you to optimize the branding, visual appeal, data presentation, and personalization aspects of your application, resulting in an enhanced user experience and reinforcing the brand presence of your organization.
Follow the procedure to make changes to the site settings,
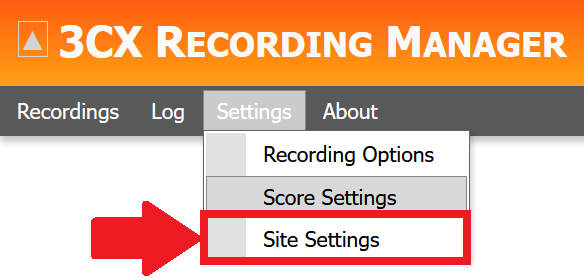
Hover over the mouse on the Settings tab and select Site Settings from the drop-down menu.
Figure 47: Select Site Settings
Site Settings enable you to customize branding settings for the application that includes the following,
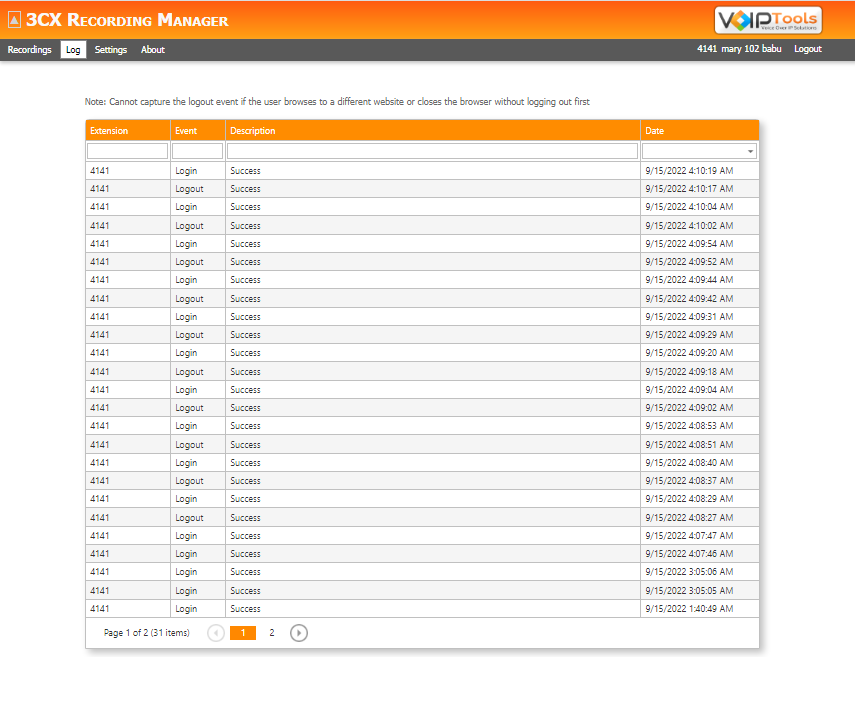
Log screen enables you to view the login and logout events of all the sessions along with ‘Date’ and ‘Time’ that is according to the time zone set in ‘Recordings’ screen.
NOTE:
The Recording Manager Standard will not capture the logout event if the user browses to a different website or closes the browser without logging out first.
You get quick answers to most of your inquiries in our online manual. If you prefer direct contact, we offer various support channels, including phone, email, live chat, and our helpful VoIPTools forums.
Rest assured, our dedicated team is here to assist you around the clock, every day of the year. Whether you’re based in the USA or India, we’re ready to provide prompt responses to your technical queries.
Windows Event Log for VoIPTools Applications and Services #
For troubleshooting any application errors, our Windows Event Log contains a comprehensive list of error messages, warnings, and informative notes related to all our VoIPTools applications and services. It’s a valuable resource to help you pinpoint and resolve any issues you may encounter.
Are you looking to collaborate with other VoIPTools customers facing similar challenges? Our forum is the perfect platform to exchange ideas, solutions, and best practices. Join the conversation at: https://www.voiptools.com/community/
Got questions that need immediate answers? Our chat support team is available to assist you in real time. Just click on the Live Chat button located at the lower right corner of our website, and we’ll acknowledge your queries right away.
To ensure a thorough understanding of your concerns, email us at support@voiptools.com. Describe your issue in detail, and we’ll get back to you within one business day with the support you need.
If you prefer to speak with a representative directly, you can reach us at +1 801-642-4655. Our attentive team is available to take your calls from 8:00 AM to 6:00 PM (Central Standard Time).
If you’ve purchased our products through a VoIPTools Partner, rest assured that they provide first-level support at no additional cost. Partners have access to 100% free technical assistance and actively participate in the troubleshooting process.
VoIPTools customers enjoy access to our online manuals and receive support through emails (with responses within one business day) and live chat. However, please note that we do not provide remote server login assistance.
For a more hands-on experience, consider our “Installation Support” package. Our expert support team can log in to your servers, and install and configure all our tools. This comprehensive service includes setting up SQL Server Express and Internet Information Server if necessary. We’ll work closely with you to tailor our applications to meet your requirements.
We’re committed to providing top-notch support to ensure your VoIPTools experience is smooth and hassle-free. Contact us today, and let us assist you in making the most of our powerful tools!


NOTE:


 to open the configuration application.


 button to browse for the JSON file that you obtain after creating your Google Cloud account.
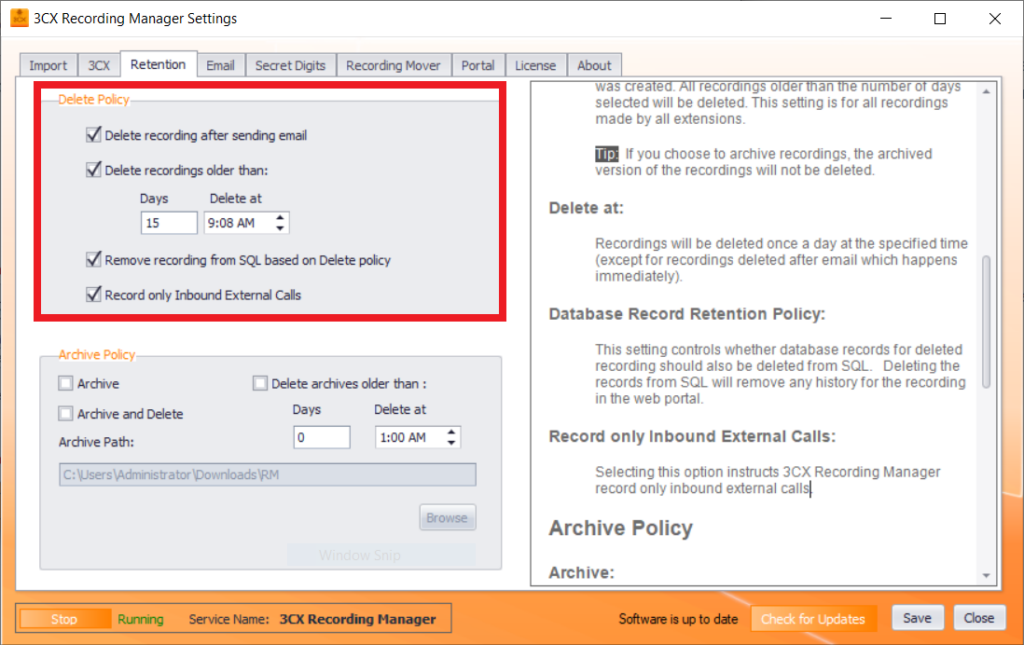
NOTE:


 Play button of the desired recording that you want to verify.
 symbol appears then the recording has not been tampered.
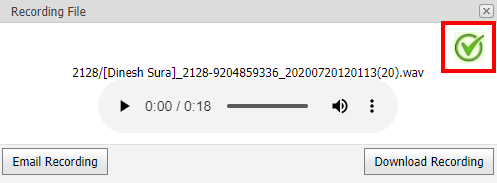
 beside the extension for which you want to add new or update an existing score.
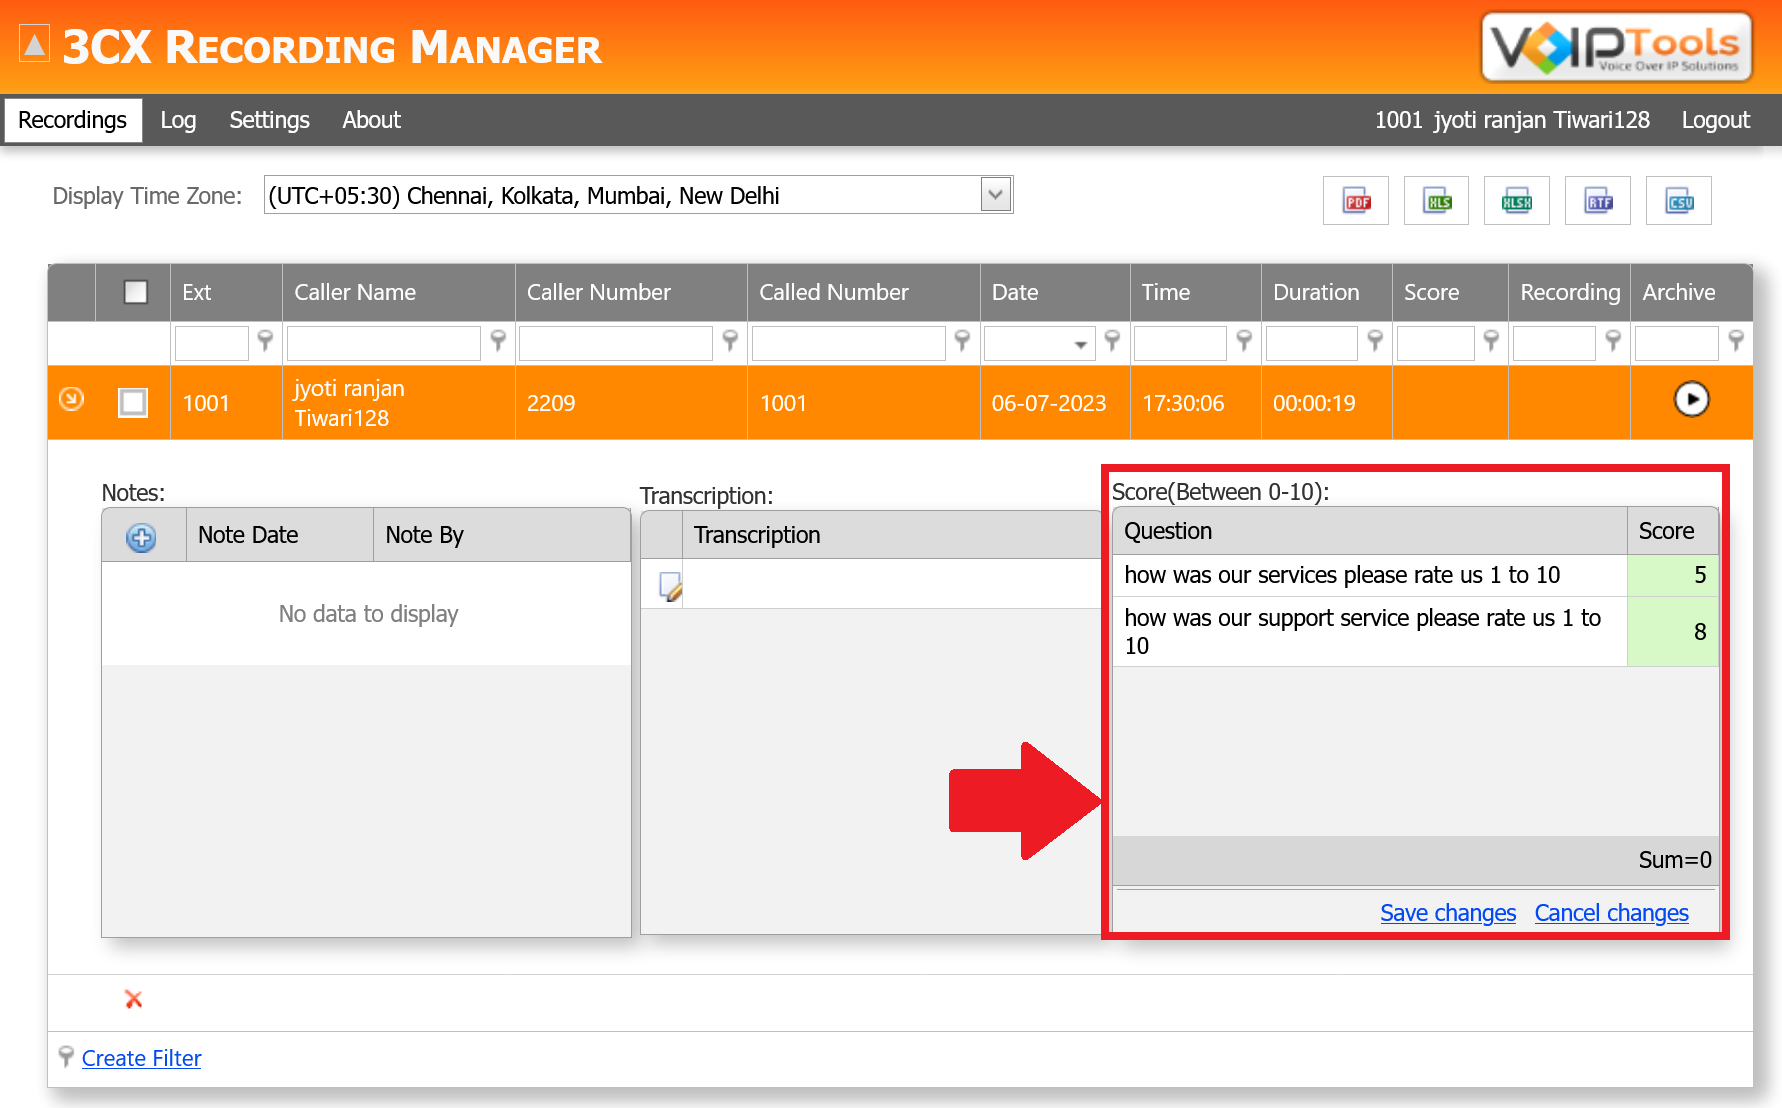

 Add button to display the text box to add the notes.
 Save to save or
  Cancel to cancel the notes.
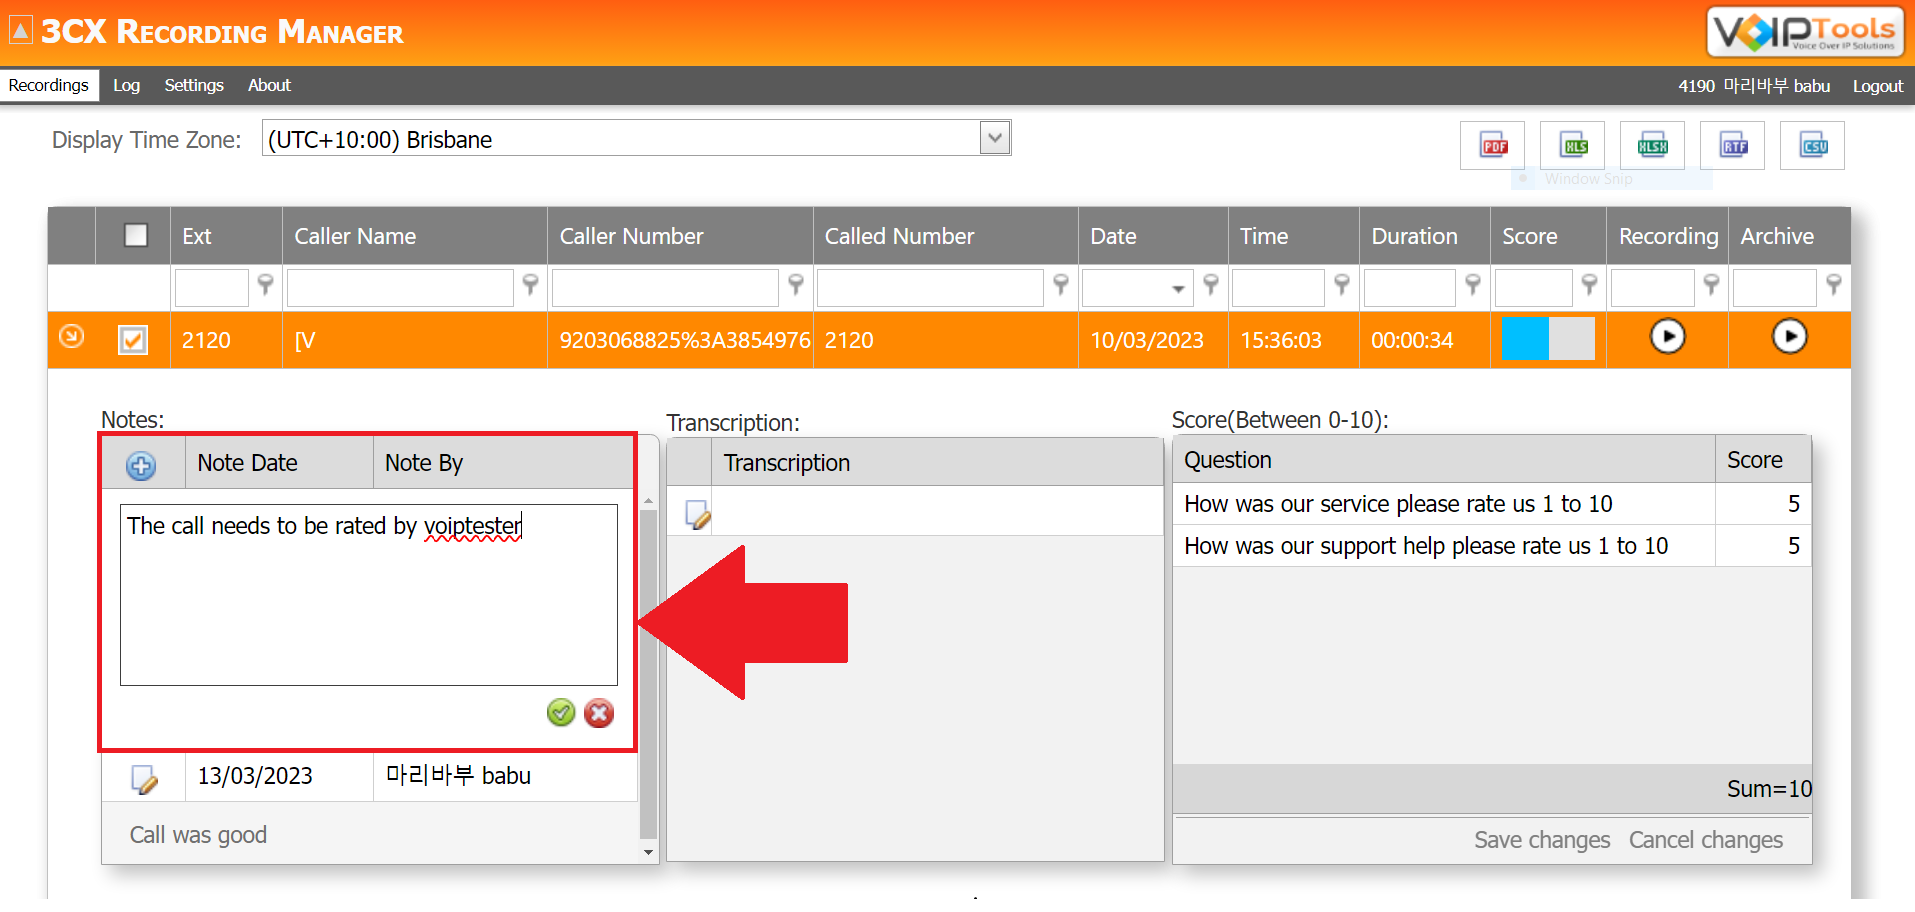
 Edit button beside the notes that you want to update.


 button to add a new question for scoring.
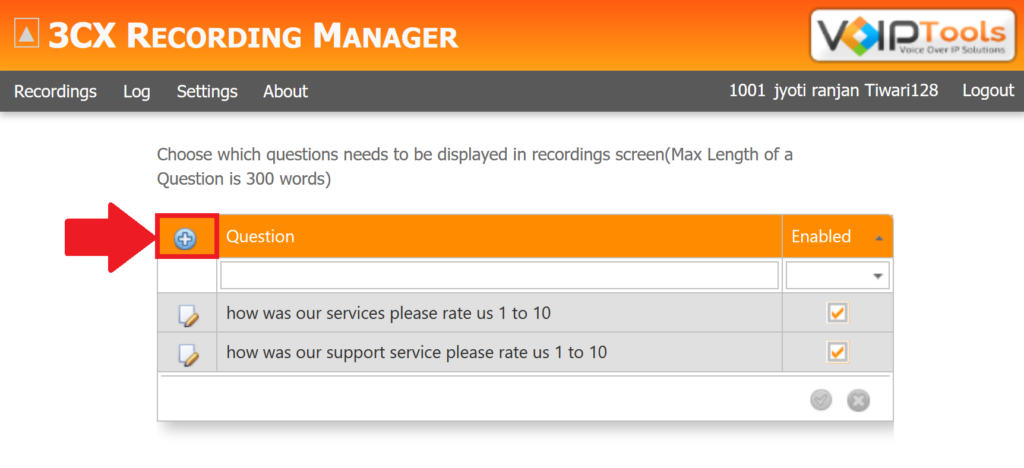
 button to save your changes.
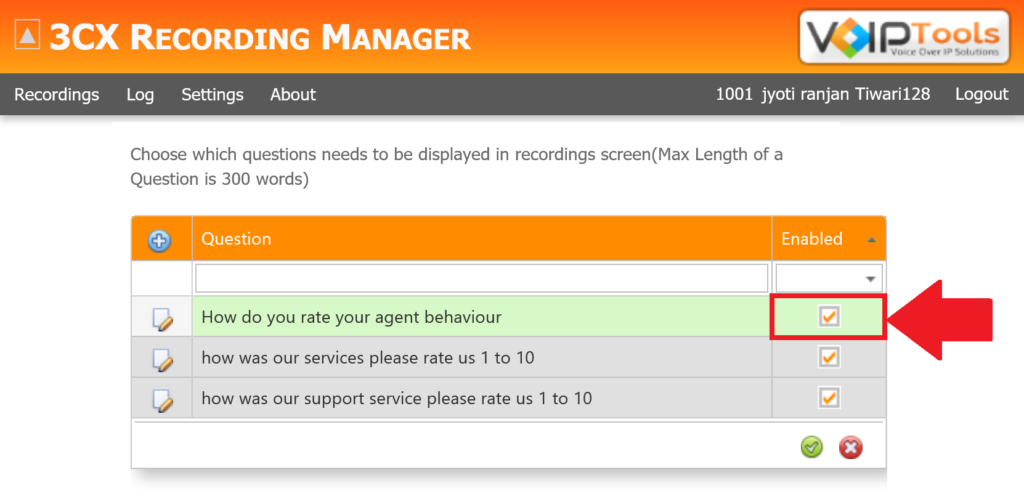
 to Save the settings.


