Introduction #
Efficiently retrieve your existing user settings from your Active Directory Server with the seamless integration of the 3CX Phone System. Leveraging the LDAP protocol, this integration allows you to effortlessly query essential user data, including first and last names, mobile numbers, and email addresses. With just a simple click, extensions are automatically generated, saving administrators valuable time and resources. Discover the time-saving benefits of the 3CX Phone System’s smooth integration with your Active Directory Server.
What does it do? #
To ensure seamless synchronization between Microsoft Active Directory (AD) and 3CX, the ‘3CX Active Directory Sync’ application provides an automated solution. When a user is deleted from AD, it’s important to remove the corresponding user from 3CX. The ‘3CX Active Directory Sync’ simplifies this process by performing a series of actions automatically.
Using valid credentials, the application logs into AD and retrieves a list of users in AD with a specified extension. It then compares this list with the users in 3CX. During the comparison, if the application finds an extension in 3CX that doesn’t exist in AD, it takes the necessary steps to remove that extension from 3CX.
For added convenience, you can configure the ‘Schedule Timer’ according to your preferences. Whether you want a specific frequency, a particular time of the day, or an on-demand trigger, you can set up the ‘Schedule Timer’ to initiate the ‘3CX Active Directory Sync’ and perform the synchronization actions.
By utilizing the ‘3CX Active Directory Sync’ and its configurable ‘Schedule Timer’, you can ensure smooth and accurate synchronization between Microsoft Active Directory and 3CX. This saves time and effort for your company, simplifying the management of user data.
Features of 3CX Active Directory Sync #
 | REDUCED ADMINISTRATION | Experience Streamlined Administration for Organizations of Any Size Whether you lead a small team of 10 or oversee a large workforce of 10,000, the prospect of streamlining administrative tasks is undeniably enticing. |
 | AUTO BACKUPS | By proactively utilizing our Auto Backups feature, you can have peace of mind, knowing that your vital audio files are securely duplicated and readily accessible whenever you need them. |
 | SIMPLE TO USE | Stay ahead of the game with Active Directory Sync’s straightforward setup process. Its intuitive design and step-by-step guidance allow you to swiftly configure the synchronization settings, eliminating any hassle or confusion. |
 | AUTOMATICALLY DELETE RIGHTS | With just a few clicks, our automated system will remove all rights to the phone system, promptly severing the connection between the former employee and your company’s communication infrastructure. This ensures that sensitive information remains secure and confidential. |
Prerequisites #
Before installing the 3CX Active Directory Sync, you need to ensure that your computer meets the minimum requirements mentioned below:
| PREREQUISITE | PURPOSE |
|---|---|
| 3CX Version V20 | 3CX Active Directory Sync is designed to work seamlessly with this version for enhanced features and performance. |
| Windows 10 or above / Windows Server 2012 or above | These operating systems provide the necessary environment for the application to run efficiently. |
| IIS Features and Configuration – VoIPTools | IIS is needed as a web server to host and manage web-based applications and services. |
| .NET Framework 4.7.2 (Web Installer) | This framework provides essential components for running and developing applications. |
| VoIPTools Universal Updater | This component is necessary for updates, ensuring the application remains current and functional. |
| VoIPTools Relay Service | It is used for proper integration and functionality of the 3CX Active Directory Sync within the 3CX environment. |
| Microsoft SQL Server 2016 or above (Including the free SQL Express edition) | 3CX requires Microsoft SQL Server 2016 or later for database management. |
| Static IP for VoIPTools and 3CX servers | This is to ensure proper two-way communication, both the 3CX server (Relay) and the VoIPTools server. Dynamically assigned IP addresses are not supported. Additionally, it is recommended to use HTTPS for secure communication, which requires a FQDN for SSL/TLS certificate validation between the VoIPTools server and the Relay. |
| Port number 7550 opened on your device | Port 7550 is a specific network port used by 3CX for communication purposes. Opening this port on the device’s firewall allows incoming and outgoing traffic to pass through, enabling the 3CX software to send and receive data over the network effectively. |
Installation overview #
 | DOWNLOAD SOFTWARE | You can order the 3CX Active Directory Sync online at https://www.voiptools.com. Your order confirmation email will include your license key and a link to download the software. |
 | INSTALL PREREQUISITES | You must install several prerequisites before installing the 3CX Active Directory Sync. The Advanced Installer identifies and installs these applications automatically. Click here to learn about the required prerequisites. |
 | INSTALL 3CX ACTIVE DIRECTORY SYNC | This User Guide contains step-by-step instructions to successfully install the 3CX Active Directory Sync. Begin by extracting the installer from the downloaded zip file (Step 1 above), then run the setup program named ActiveDirectorySyncexe |
 | LOGIN TO THE WEB APPLICATION | You can now log in to your software using the Extension and PIN. |
Step-by-Step Installation Procedure #
The following section guides you through a detailed walk-through of the installation process.
Step 1: Download 3CX Active Directory Sync #
Find the software download link in the Order Confirmation Email, or you can download the application by following the procedure,
- Open your browser and go to the VoIPTools official website or click here to get redirected to the website.
- Search for the Active Directory Sync Application and click the Download
 button to download your application.
Step 2: Install Prerequisites #
Click on the software installer that was downloaded in Step 1 above. The installation wizard will automatically identify the needed prerequisites and assist you with the installation of the prerequisites needed to run the 3CX Active Directory Sync.
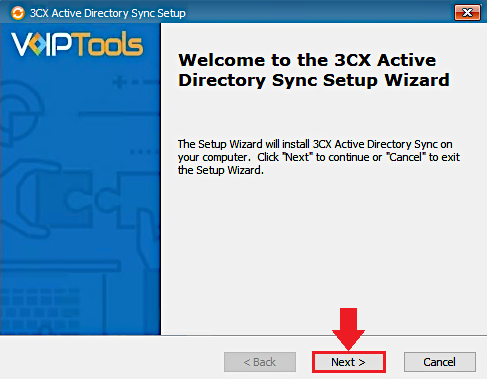
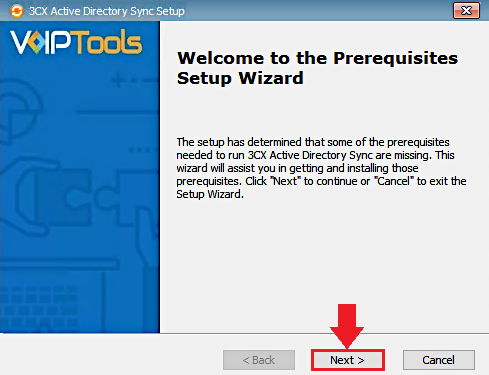
- Click the downloaded installer executable to launch the Prerequisites Setup Wizard and click Next.
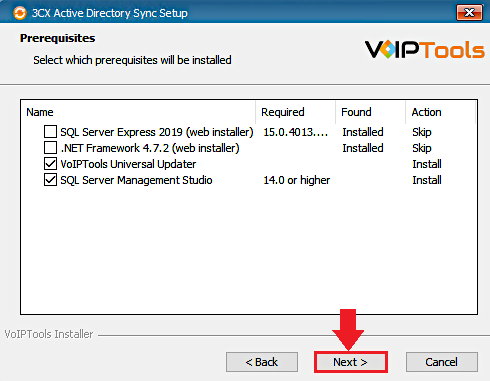
- In the Prerequisites window, the installer will identify the missing prerequisites. You must install all the required prerequisites. However, you can select/unselect the applications to be installed based on your unique requirements and click Next to continue.
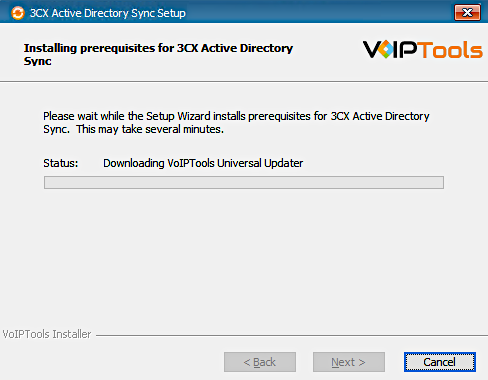
The installer will download and install the selected applications.
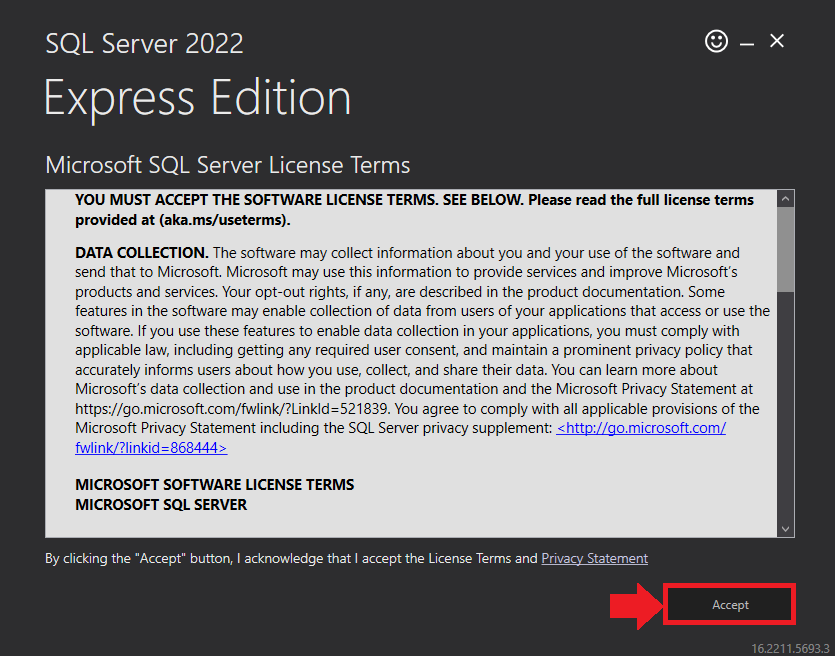
- In the Microsoft SQL Server License Terms click the Accept button to acknowledge the license terms and continue.
- This page appears if you do not have SQL Server Express preinstalled in your device.
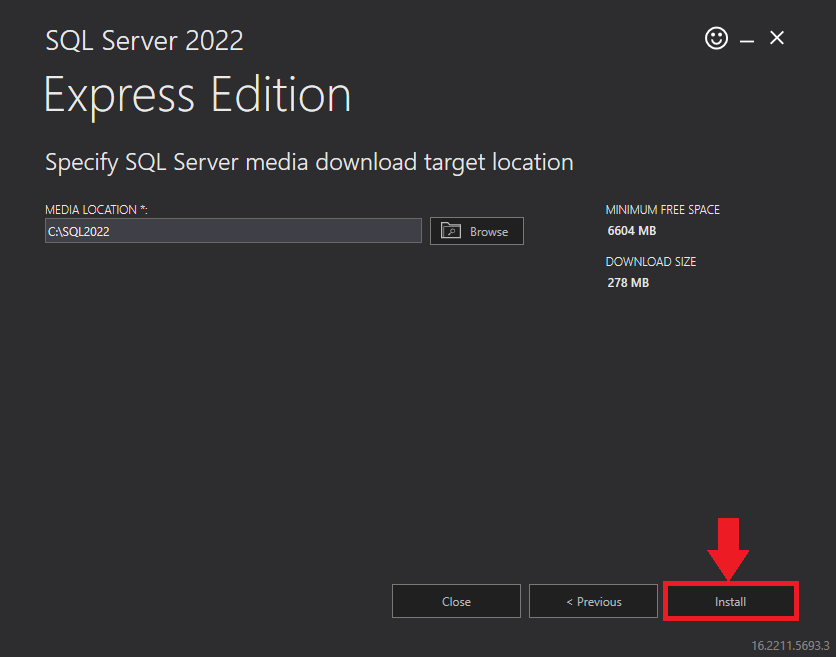
- View the SQL Server Media target location in the Media Location field. If required, you can click the Browse button to change the location. Click Install to begin the installation of SQL Server Express.
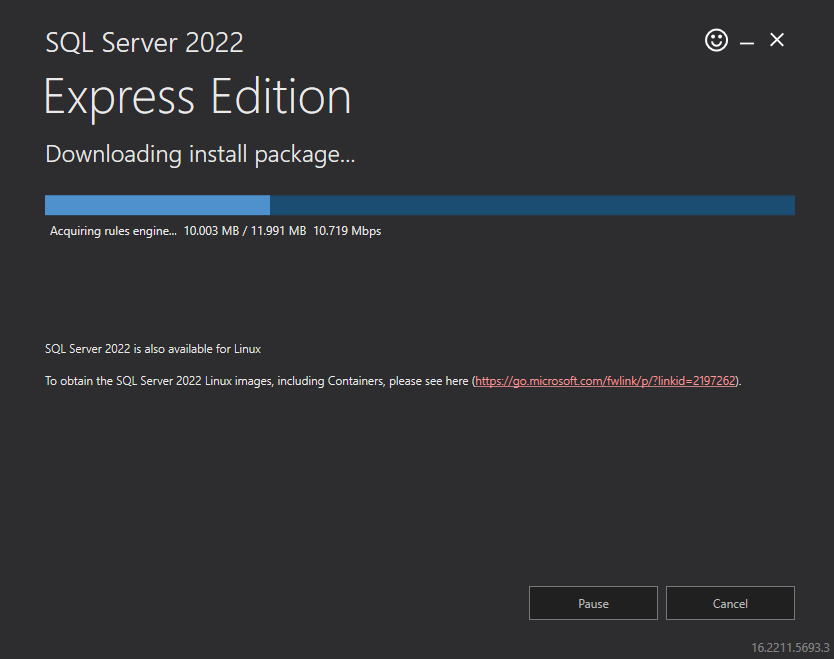
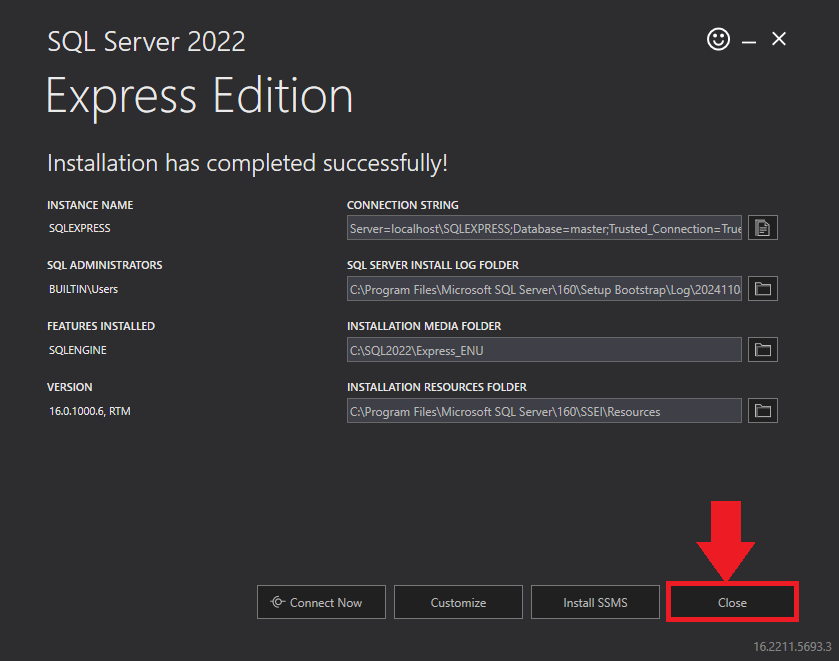
SQL server installation is in progress. This may take several minutes to complete.
- Click the Close button once the prerequisites are installed.
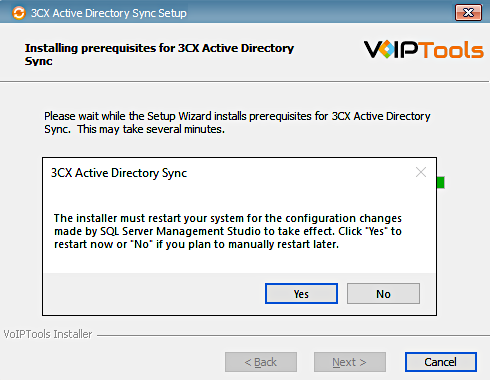
- In the Confirmation Message box, click OK to reboot the computer.
Step 3: Start the installation process #
- After all the prerequisites are installed, click Next in the 3CX Active Directory Sync Setup Wizard Continue.
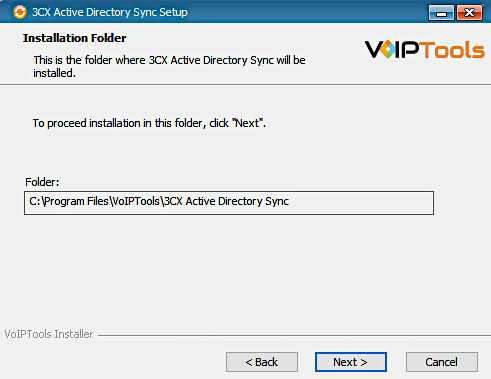
- On the Select Installation Folder window, in the Folder field view the location where the 3CX Active Directory Sync gets installed.
- Click Next to continue with the installation.
NOTE:
You cannot change the path.
Step 4: Test Relay Settings #
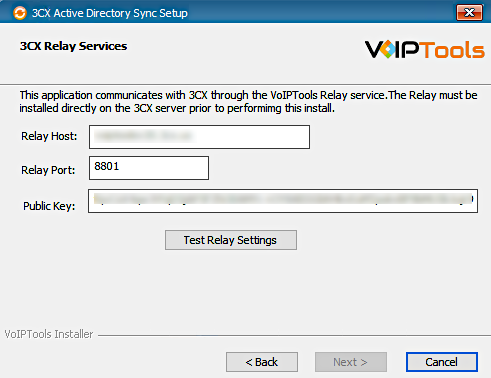
- In the 3CX Relay Services window, in the Relay Host field, enter the FQDN of your 3CX server.
- Enter 8801 in the Relay Port field.
- Enter the public key you took from VoIPTools Relay services in the Public Key text area.
- Click the Test Relay Settings to confirm 3CX Active Directory Sync can communicate with the Relay services running on the 3CX server.
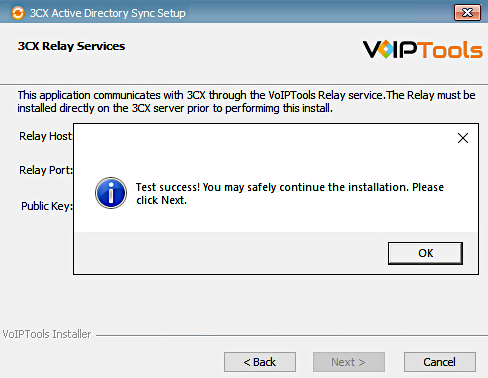
- If the 3CX Active Directory Sync successfully communicates with the Relay services that run on the 3CX server, a Success message box appears. Click OK. If the test fails, you will not be able to continue until communication with the relay is established.
- Click Next to continue with the installation.
NOTE:
- You must set the Relay Port to 8801.
- If the Relay test fails, you cannot continue the installation until you establish communication with the Relay. Confirm the following if the test was unsuccessful:
- Confirm you have the correct firewall port open (default TCP 8801) on the 3CX server and the firewall protecting the 3CX server.
- Confirm that you have entered the correct FQDN for the 3CX server.
- Confirm that the 3CX Active Directory Sync and Relay use the same port and protocol.
Step 5: Configure the database #
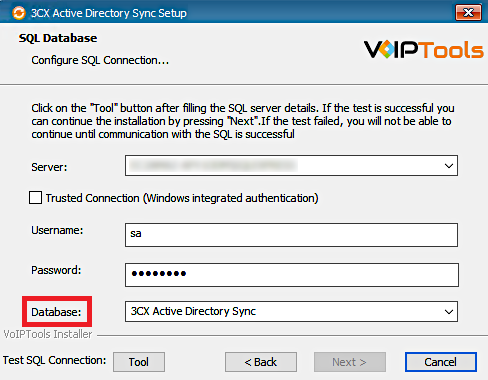
When configuring the 3CX Active Directory Sync, select an existing Microsoft SQL Server instance in your environment. The database server can be a remote SQL Server, or a local instance running on the VoIPTools server.
You can set up the SQL database using SQL Authentication or Windows Integrated Authentication.
SQL Authentication #
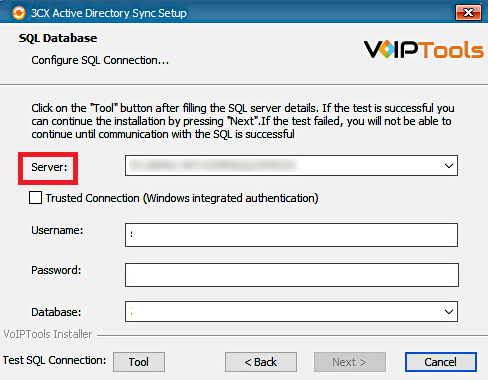
- Enter your server name in the Server field.
- If using the free SQL Express Edition, the default SQL Instance name is SQLExpress.
NOTE:
- If you want to use ‘SQL Authentication’, then install SQL Server in ‘Mixed‘ mode.
- If SQL Server is installed on a server other than the server where 3CX Exporter is installed, you will need to configure SQL Server to allow remote connections.
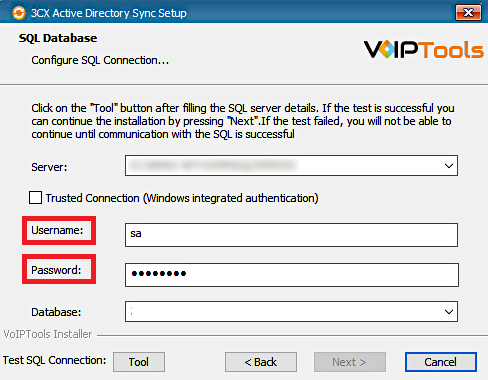
- Enter your credentials in the Username and Password fields.
NOTE:
Make sure that you select a SQL Login that has sufficient permissions to alter the database and create SQL objects.
- Select or enter the 3CX Active Directory Sync in the Database dropdown.
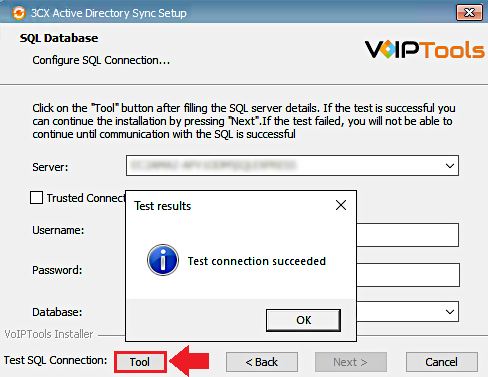
- In the Test SQL Connections section, click the Tool button to test the connection and click OK in the Test Results popup box.
Windows Integrated Authentication #
- To use Windows Integrated Authentication check the Trusted Connection (Windows integrated authentication) checkbox.
- The VoIPTools installer will create a local Windows user name as “VoIPToys” and give you sufficient rights to this user to create/update the SQL database.
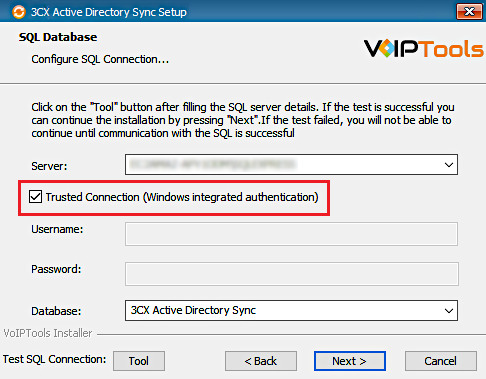
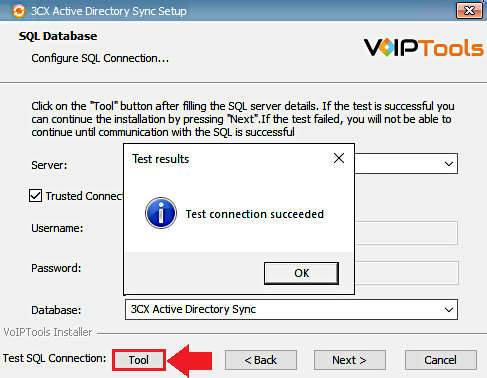
- In the Test SQL Connection section, click the Tool button to test the connection.
- Click the Next button which gets enabled when the database connection is successful.
NOTE:
We encourage you to use SQL Authentication rather than Windows authentication. Many of our tools leverage a Call Flow Designer (CFD) application running on the 3CX. Frequently our CFD applications require access to a SQL database. If the 3CX server and the database server are not in an Active Directory domain, Windows authentication will fail. To use SQL authentication, your SQL Server must be configured to run in “Mixed Mode”. If you installed SQL Server with one of our tools, we configure SQL in “Mixed Mode”.
Step 6: Installing 3CX Active Directory Sync #
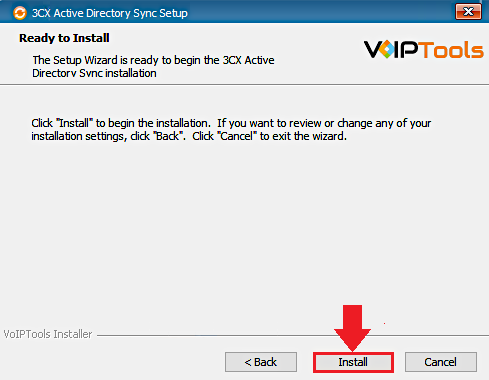
- In the Ready to Install window, click Install to start the installation of the 3CX Active Directory Sync.
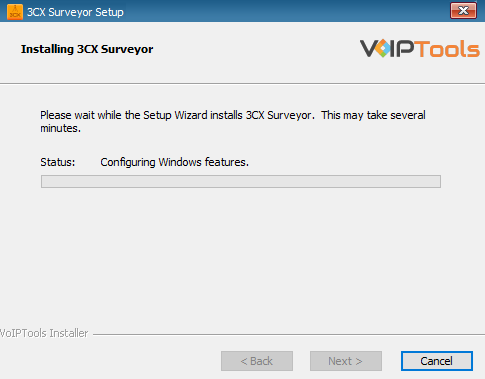
The application installation progresses.
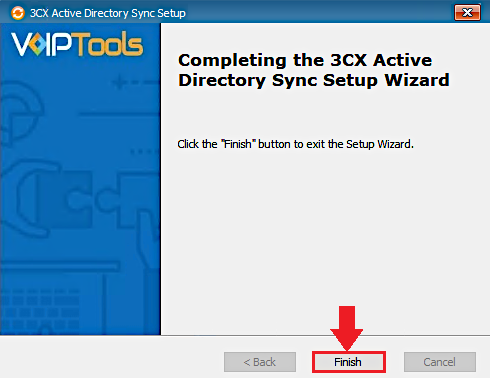
- Once the installation is complete, click Finish to complete the installation process.
Step 7: Login to the Web Application: #
Before you Start: Make sure you have registered with the VoIPTools Relay which grants access to the application.
Follow the procedure to register your software,
- Click the 3CX Active Directory Sync Desktop Icon to open the web application.
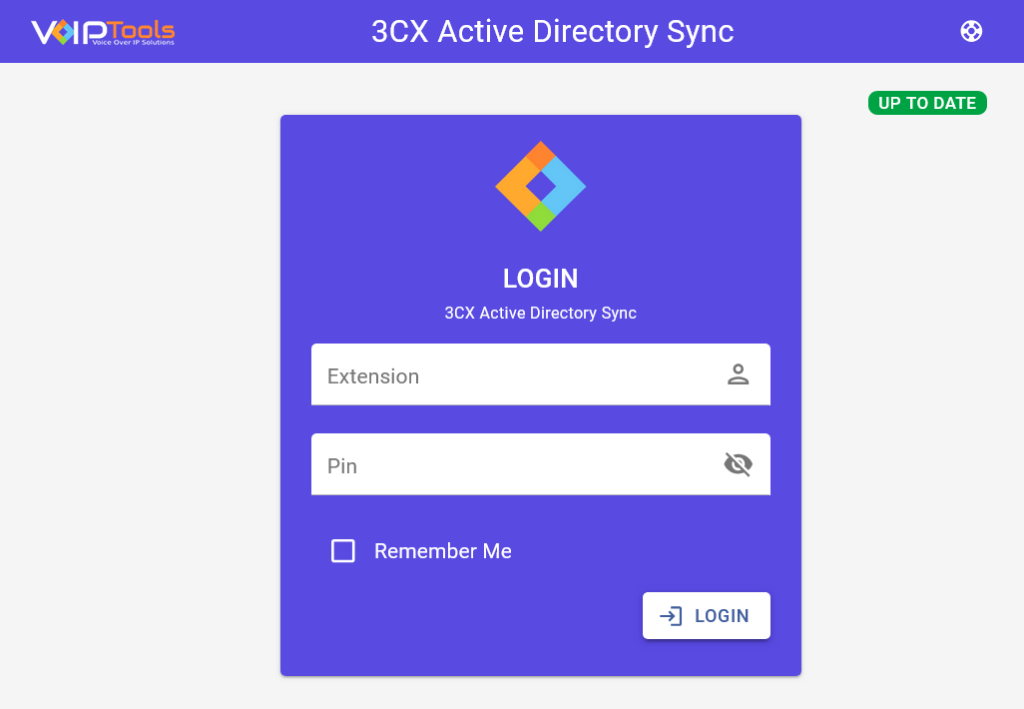
- On the Login page, do the following tasks,
- In the Extension field, enter your 3CX extension number.
- In the PIN field, enter your 3CX voicemail PIN. This is the default password for new users.
- Click the Login button to log in to your account
Getting Started with 3CX Active Directory Sync #
This section provides a comprehensive overview of the web application, detailing its main features, layout, and functionality. It includes a description of each available menu item, helping you navigate the application efficiently and understand the tools and options at your disposal.
Overview of the Web Application Interface #

 | Menu Options | As a manager you can access all the menu items of 3CX Active Directory Sync web application. |
 | Left Side Panel View Options | You can either expand or minimize the menu items. |
 | Custom Logo | You can upload a custom logo to the Active Directory Sync web application to display your organization’s brand. |
 | Header Title Prefix | You can adjust the web application’s header title to suit your preferences. |
 | User Details | This field shows your name and extension number, as configured in the 3CX Console Management. |
 | Logout Button | You can use this button to log out of the application when needed. |
 | Support Resources Icon | Gives you basic information about the application and contact details of the VoIPTools support team. |
A Brief about Active Directory Sync Menu Items #
The Left Side Panel consists of all the menus of the web application. You can minimize the Left Side Panel to enlarge your main content.
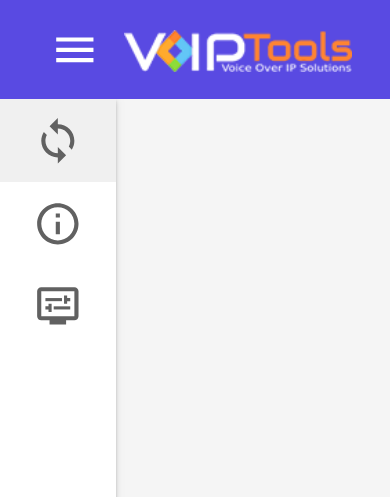
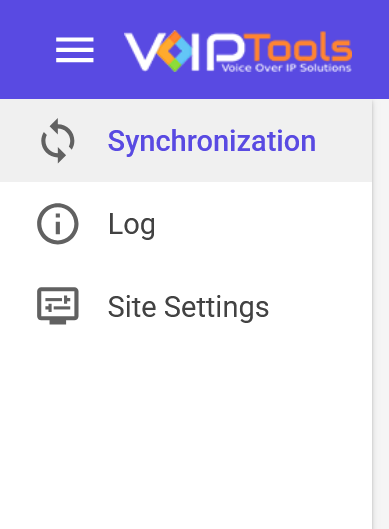
The left side panel consists of the following menus,
 | Synchronization | The Synchronization Menu enables streamlined system management including Active Directory integration, extension management, and update scheduling. |
 | Log | The Log screen summarizes Scheduler events, supports log export, and allows clearing logs, ensuring efficient management and streamlined tracking. |
 | Site Settings | The Site Settings menu allows you to customize login credentials, branding, colors, and titles, ensuring a consistent and user-friendly experience. |
Synchronization Menu #
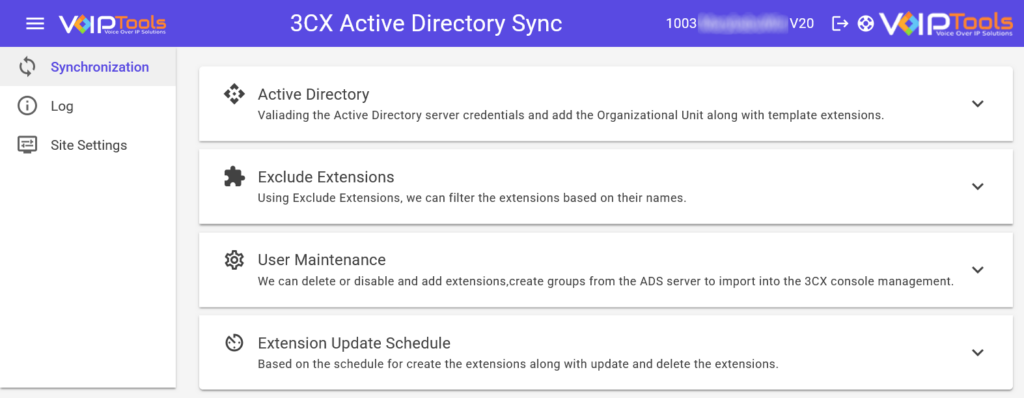
The Synchronization Menu is your central hub for managing and configuring the system effectively. It enables you to configure Active Directory integration, filter or manage extensions, and schedule updates. With tools for synchronizing extensions, adding missing groups, and archiving data, the menu ensures streamlined operations and organizational efficiency. You can customize settings such as update schedules, password policies, and Active Directory sync preferences to align with your organizational needs and policies.
Configuring Active Directory Settings #
The Configuring Active Directory Settings feature simplifies integration with 3CX by enabling domain connection, extension setup, voicemail archiving, and organizational unit creation. It ensures seamless synchronization, enhancing efficiency and reducing manual configuration efforts.
Step 1: Configure Active Directory Login Credentials #
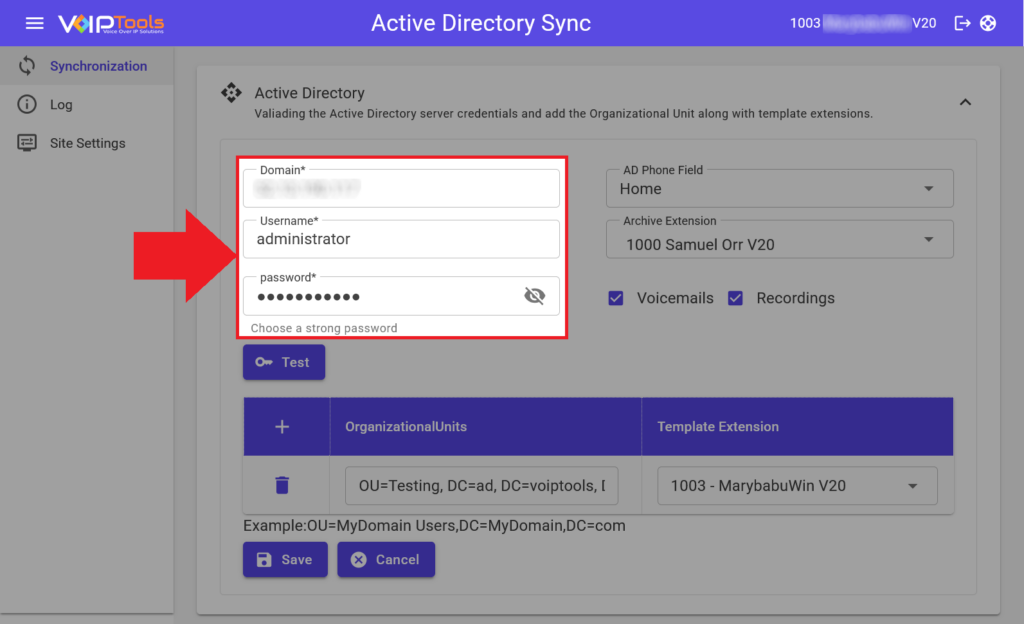
- In the Domain field, enter the domain you want to connect. Example 11.22.333.444
- Enter the Username and Password for the Active Directory account.
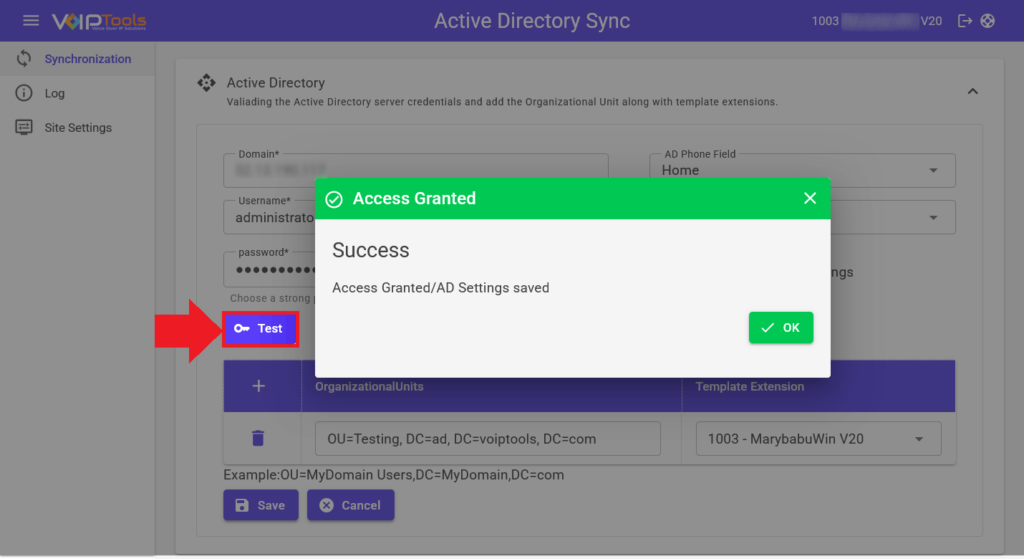
- Click the Test Button to validate your credentials.
Results: If the credentials are correct, a success message gets displayed.
NOTE:
If you make any changes in the fields mentioned in Step 1, you must click the Test button again to save your changes.
Step 2: Set AD Phone and Archive Extension #
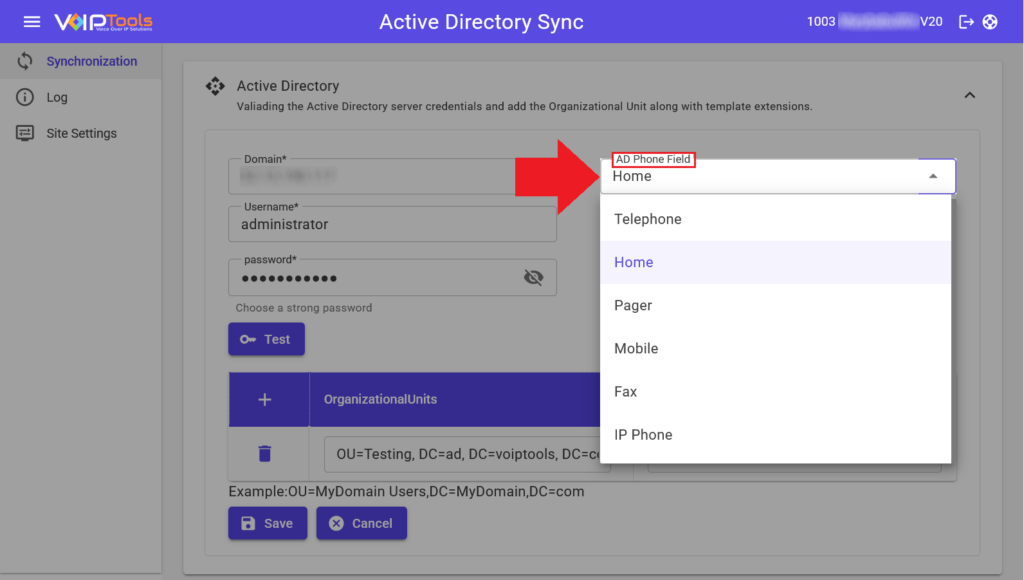
- In the AD Phone Field drop-down list, select the field that represents the user’s extension number.
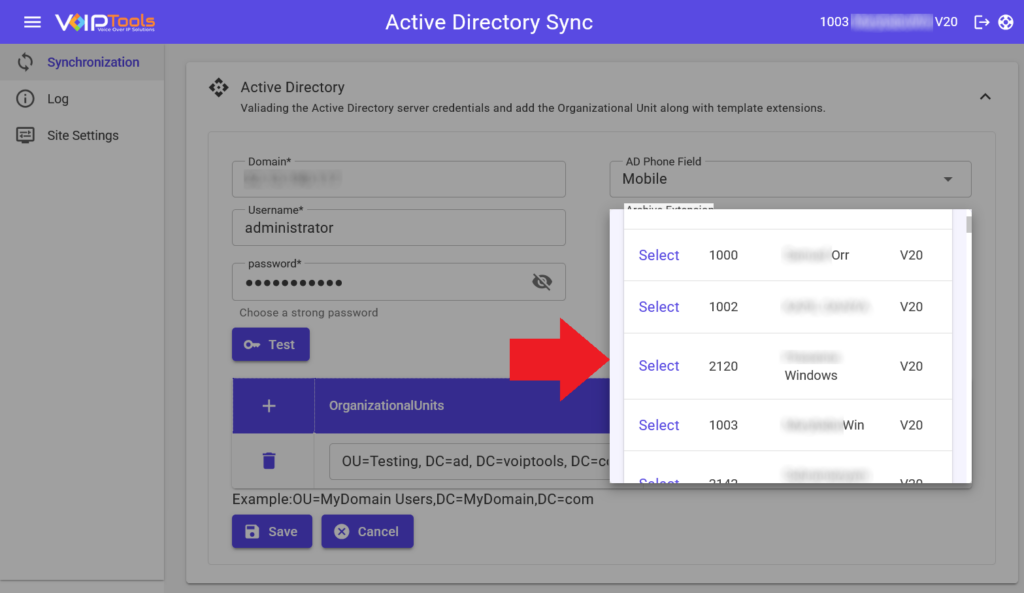
- From the Archive Extension drop-down list, select an extension to archive voicemails and recordings of deleted extensions (optional).
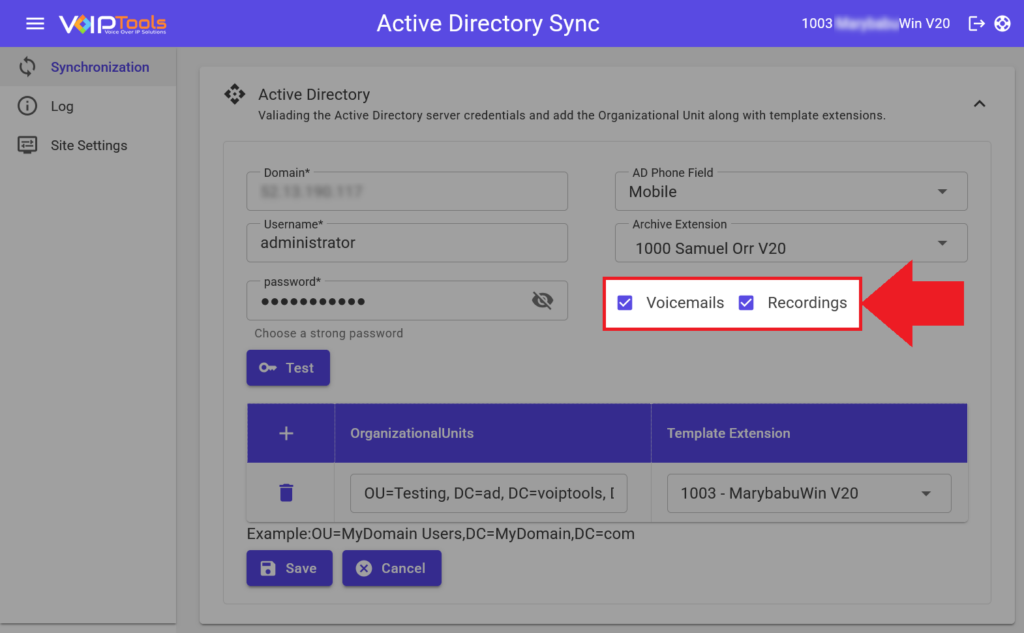
- Select the checkboxes for Voicemails and Recordings if you want to include these features in the Active Directory Sync.
NOTE:
If you make any changes in the fields mentioned in Step 2, you must click the Test button again to save your changes.
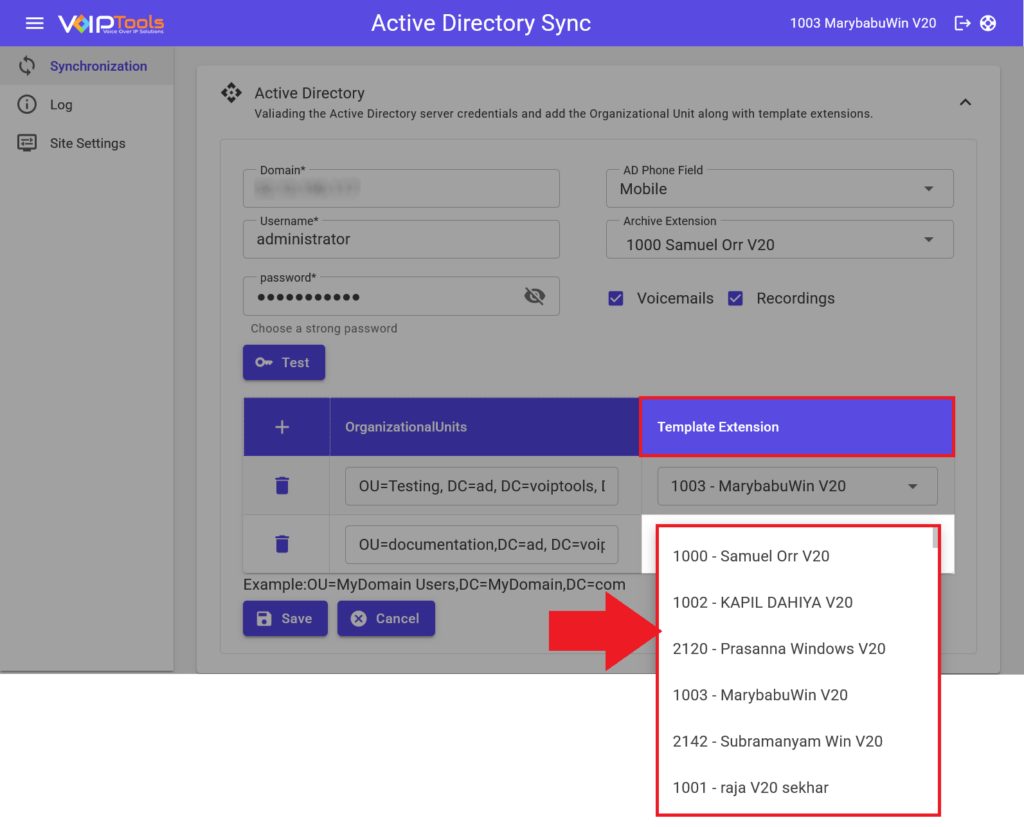
Step 3: Add Organizational Units (OUs) #
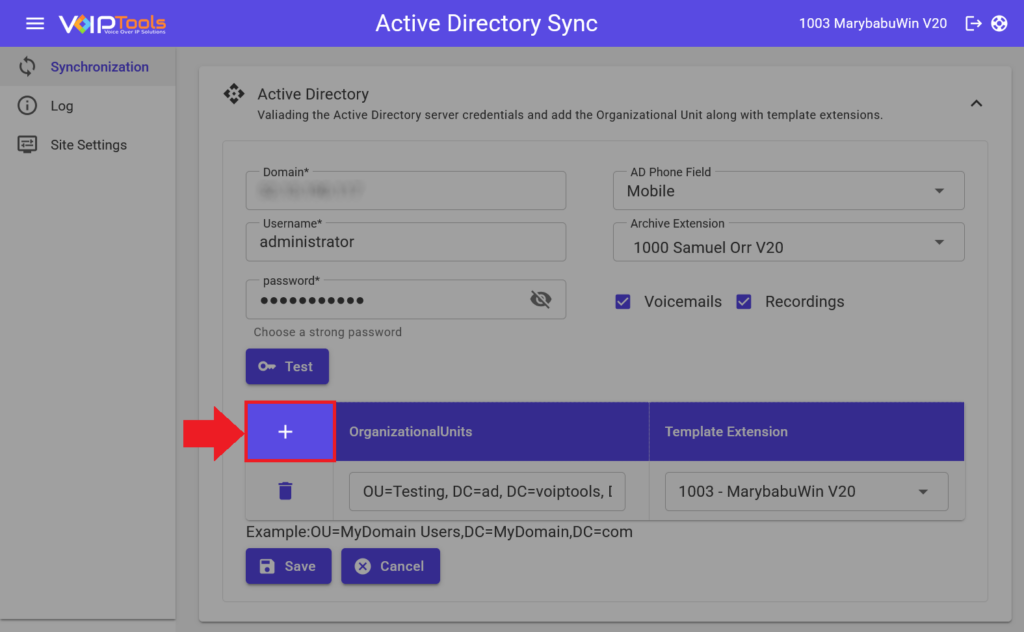
- Click the Add icon.
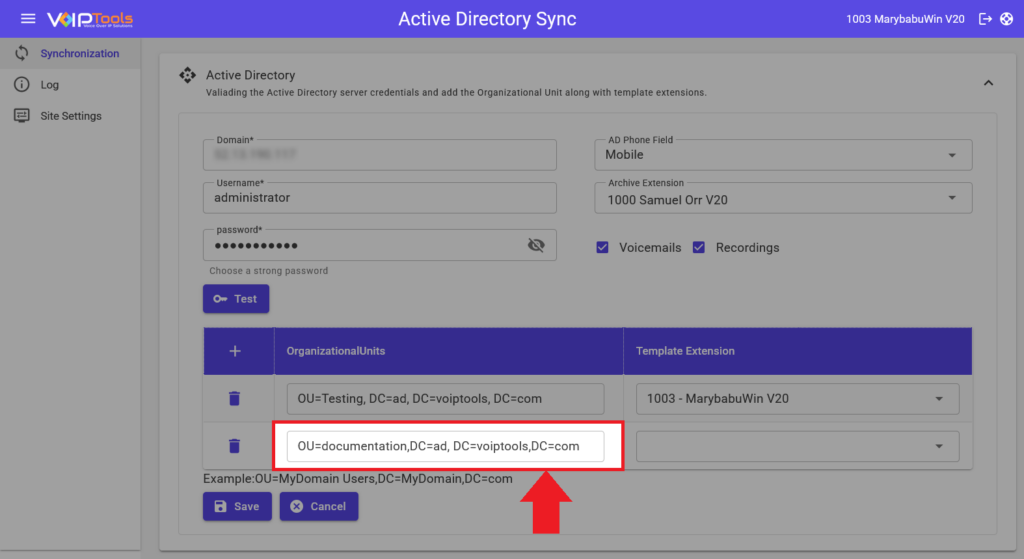
- Enter the OU details in the format:
OU=<OU_Name>,DC=<Domain_Component>,DC=com.- Example:
OU=documentation,DC=ad,DC=voiptools,DC=com.
- Example:
NOTE:
The entry
OU=documentation,DC=ad,DC=voiptools,DC=comis written in a format that adheres to the Distinguished Name (DN) notation used in Active Directory (AD). This notation defines the hierarchical structure of the object within the AD domain. Here’s a breakdown of the structure:
- OU=documentation:
Specifies an Organizational Unit (OU) named documentation. OUs are containers in AD that group objects such as users, computers, or other OUs.- DC=ad:
Indicates a Domain Component (DC) named ad. The domain components define the AD domain’s namespace.- DC=voiptools:
Specifies the second level of the domain, here named voiptools.- DC=com:
Defines the top-level domain (TLD) as com.When combined,
OU=documentation,DC=ad,DC=voiptools,DC=comuniquely identifies the documentation OU within the ad.voiptools.com domain. This format ensures that AD can locate the specified OU within its hierarchical structure
- In the Template Extension drop-down list, select a template extension to apply settings to missing extensions within the specified OU.
- Click the Save button.
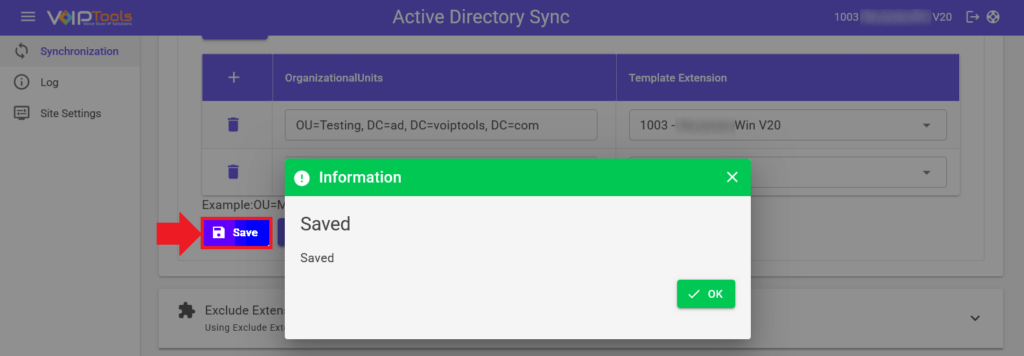
Results: The configuration syncs 3CX with Active Directory, setting up extensions, archiving, and organizational units.
NOTE:
- The Managers can add or not add the Template Extensions to the Organizational Units.
- If Managers choose not to add Template Extensions to the Organizational Units, Active Directory Sync will automatically include the default groups.
Filter Extensions from Active Directory #
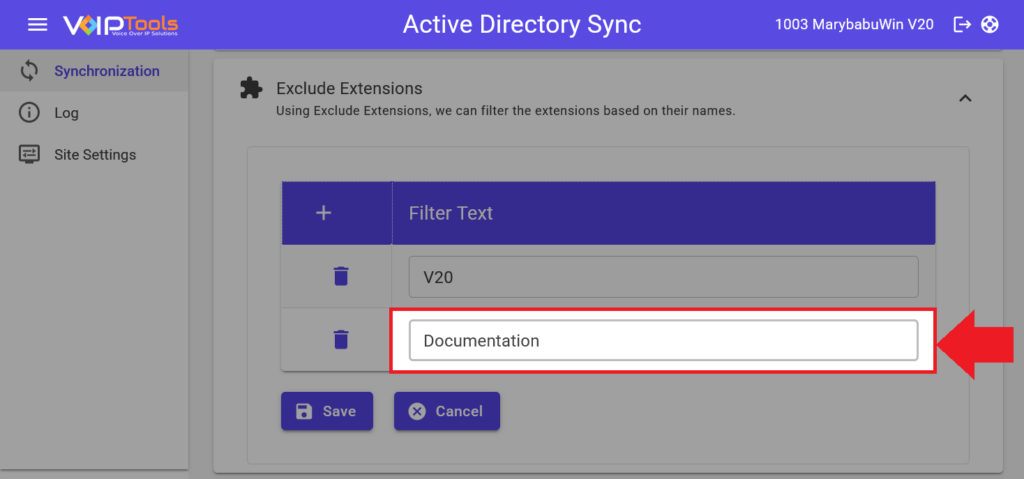
The Filter Extensions from Active Directory feature allows managers to exclude specific extensions by name, ensuring precise synchronization and streamlined management between Active Directory and 3CX.
This section guides you to filter extensions from the active directory based on extension names.
Before you Start: Make sure you have logged in with the Manager rights and have navigated to the Exclude Extensions tab under the Synchronization menu.
- Click the Add icon.
- Enter the extension name to filter in the Filter Text field.
- Click the Save button.
Results: The desired extension now get filtered from the active directory.
User Maintenance Tab #
The User Maintenance Tab streamlines extension management, allowing you to disable, delete, or add missing extensions from Active Directory (AD). It ensures seamless synchronization with 3CX, enhancing organization and operational efficiency.
Disable or Delete Extension #
This section guides you to disable or delete the extensions in Active Directory (AD).
Before you Start: Make sure you have logged in with the Manager rights and have navigated to the User Maintenance tab under the Synchronization menu.
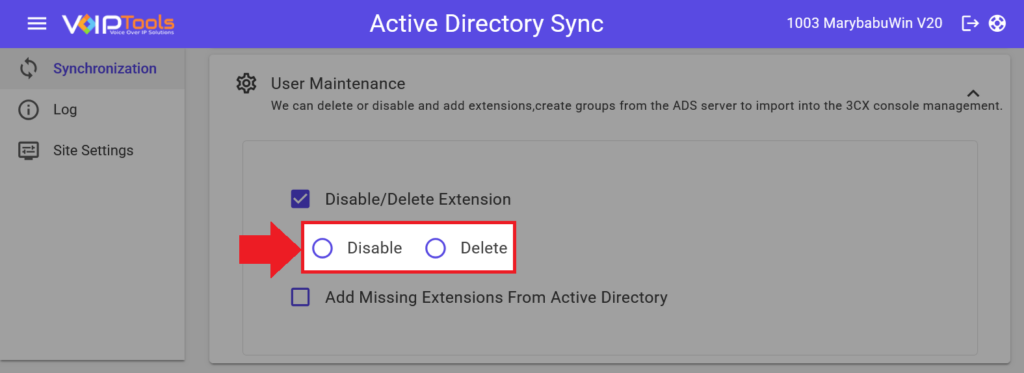
- Click the Disable/Delete Extension box.

- Select any of the following,
- Disable – To inactivate the extensions in 3CX which are found in AD but not in 3CX.
- Delete – To delete the extensions in 3CX which are found in AD but not in 3CX.
NOTE:
- If you do not select any option then by default, the ‘Active Directory Sync’ will consider ‘Delete’ option.
Add Missing Extensions from Active Directory #
This section guides you to add missing extensions from Active Directory and Add Extensions to 3CX Groups.
Before you Start: Make sure you have logged in with the Manager rights and have navigated to the User Maintenance tab under the Synchronization menu.
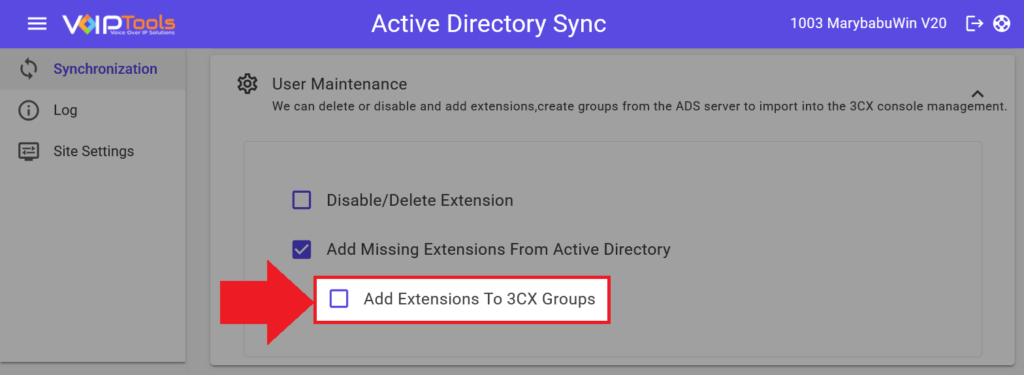
- Check the Add Missing Extensions From Active Directory checkbox to add missing extensions from Active Directory to 3CX.

- Check the Add Extensions to 3CX Groups checkbox to add missing extensions to their respective groups.
- From the AD Group Field dropdown, select the field name to for Active Directory Sync to locate the group name for the missing extension
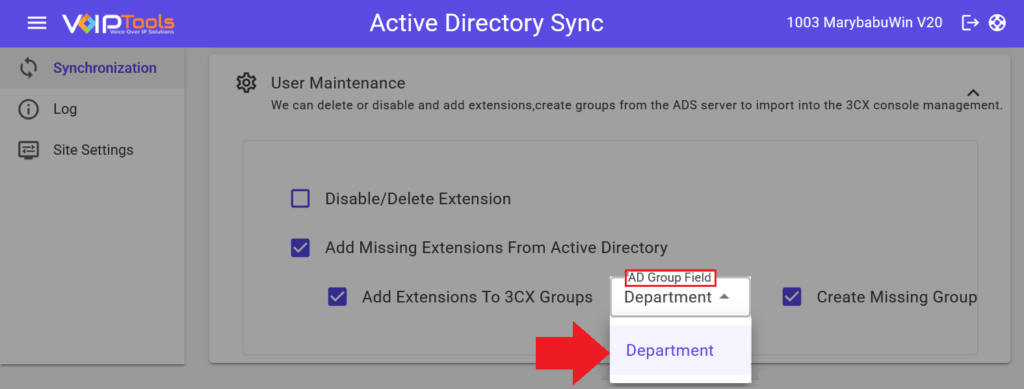
- Check the Create Missing Group checkbox to create missing groups in 3CX for the respective extensions.
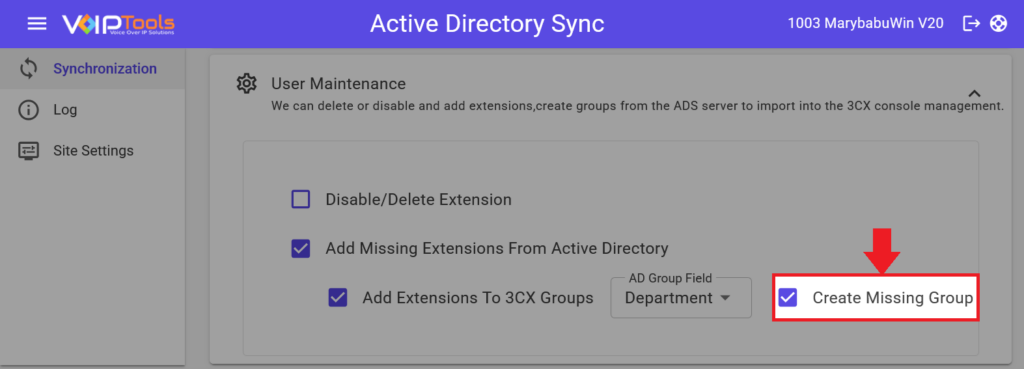
Results: The missing extensions are added to 3CX, assigned to groups, or default groups if groups are unavailable.
Extension Update Schedule Tab #
The Extension Update Schedule Tab enables you to manage extension updates efficiently. It provides options to schedule updates at specific intervals, times, or on demand, ensuring optimal performance and operational flexibility.
Update Extension Based on Set Frequency Interval #
This section guides you to create the extensions along with update and delete extensions based on a set frequency interval.
Before you Begin: Make sure you have logged with Manager credentials and have navigated to the Extension Update Schedule tab under the Synchronization menu.
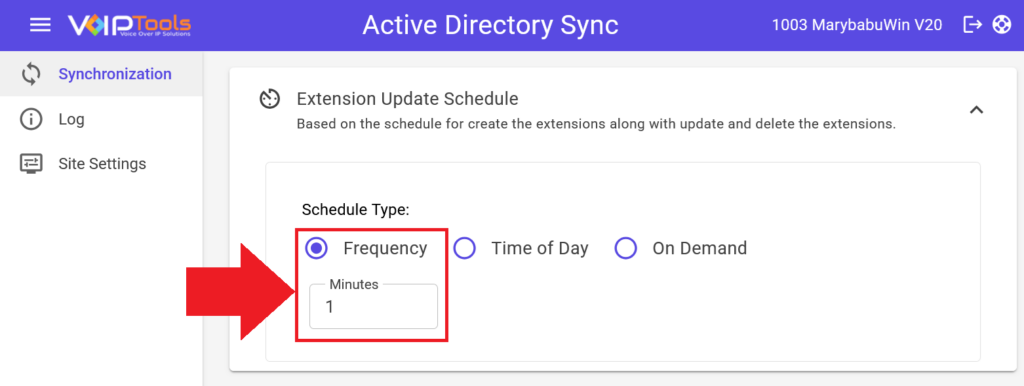
- Select the Frequency box in the Schedule Type section.
- Enter the frequency interval in the Minutes field.
Update Extension at a Specific Time of Day #
This section guides you to create the extensions along with update and delete extensions at a Specific Time of Day.
Before you Begin: Make sure you have logged with Manager credentials and have navigated to the Extension Update Schedule tab under the Synchronization menu.
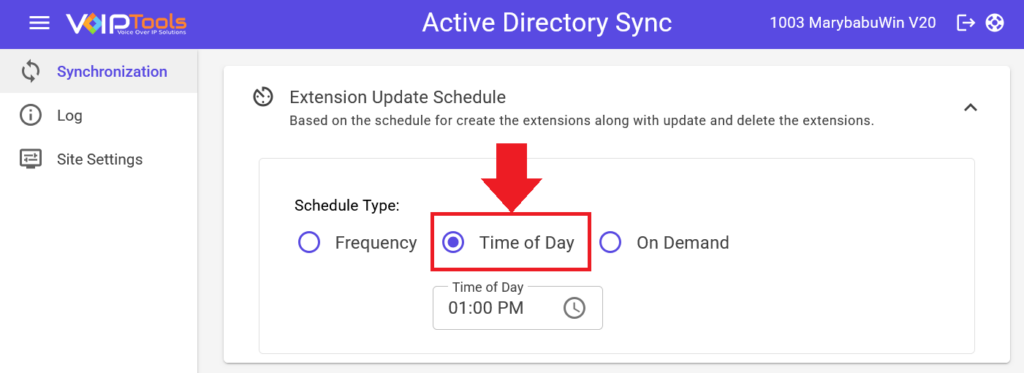
- Select the Time Of Day box in the Schedule Type section.
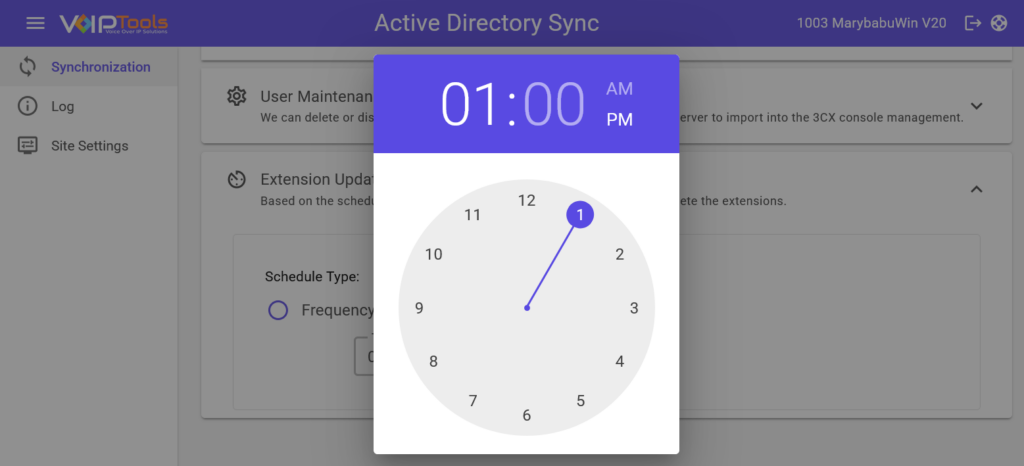
- Select the time from the time picker.
Update Extension On Demand #
This section guides you to create the extensions along with update and delete extensions at a Specific Time of Day.
Before you Begin: Make sure you have logged with Manager credentials and have navigated to the Extension Update Schedule tab under the Synchronization menu.
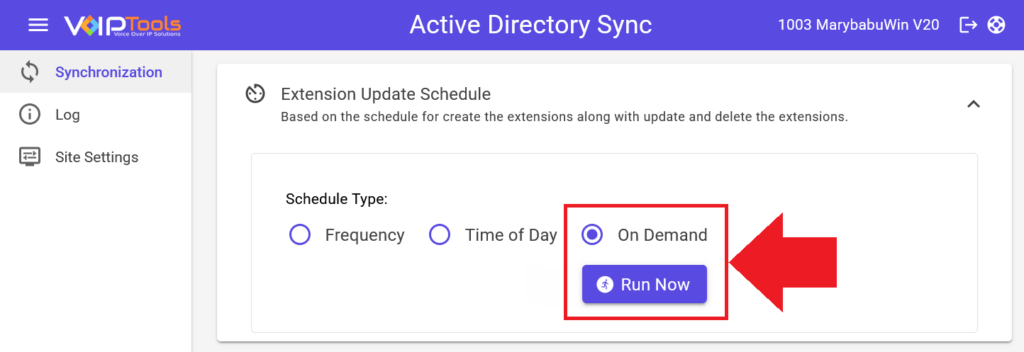
- Select the On Demand box in the Schedule Type section.
- Click the Run Now button to update immediately.
Site Settings #
The Site Settings menu allows you to centrally manage and customize the application’s appearance and functionality. It enables you to configure login passwords, upload custom logos, modify header gradients and grid colors, and set title prefixes. These features help maintain brand consistency, enhance user experience, and improve overall accessibility.
Set Login Password #
The Password Settings tab lets you set password to log in to the web application.
Before you Begin: Make sure you have logged in with Manager Rights and have navigated to the Password Settings tab under the Synchronization menu.
- Select any of the password type and refresh the page.

Results: The password for the web application is changed.
Custom Brand Settings #
The Site Settings feature provides managers with centralized control over the application’s visual and functional aspects, allowing for easy customization of the interface. Key options include uploading custom logos, adjusting header and grid colors, and setting title prefixes. These features ensure a branded, user-friendly experience that aligns with organizational standards and enhances usability.
Upload Custom Logo #
This section guides you to upload or update custom logo to the web application.
Before you Begin: Make sure you have logged into the application with the manager rights and navigated to the Site Settings menu, in the left side panel.
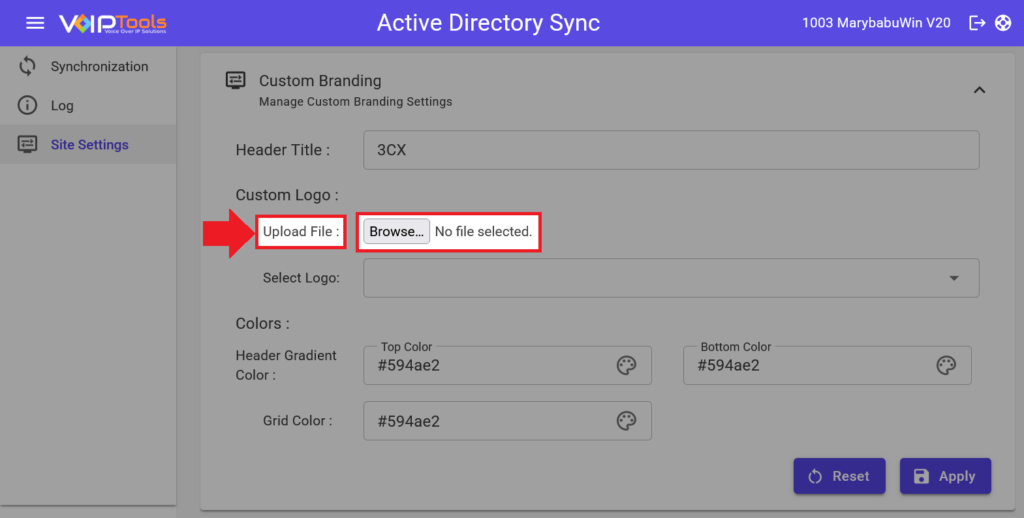
- Click the Browse button and select the desired logo from your device.
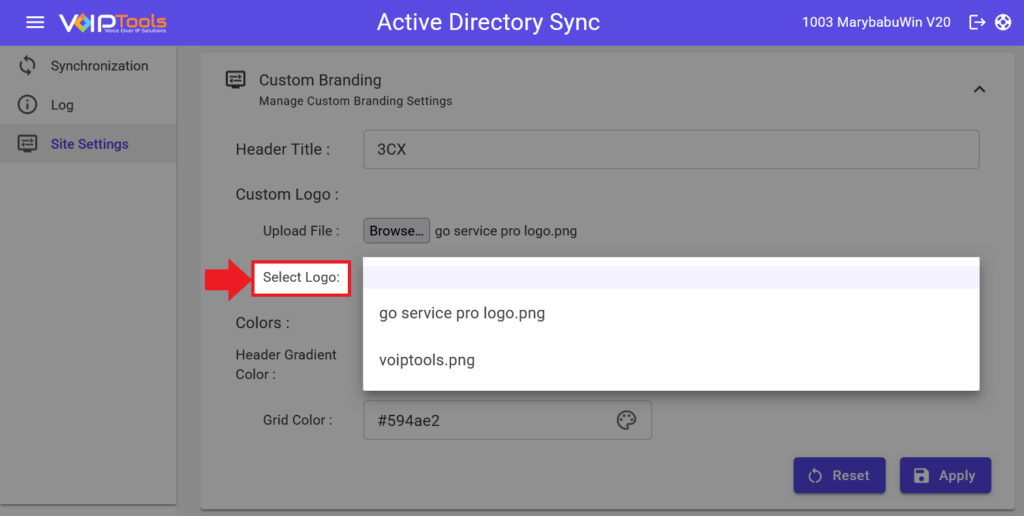
- Select the uploaded logo in the Custom Logo dropdown.
- Click Apply
 to save your changes.
Results: Your logo gets updated to the website.

Change Header Gradient Color #
This section guides you to change the header gradient top and bottom colors.
Before you Begin: Make sure you have logged into the application with the manager rights and navigated to the Site Settings menu, in the left side panel.
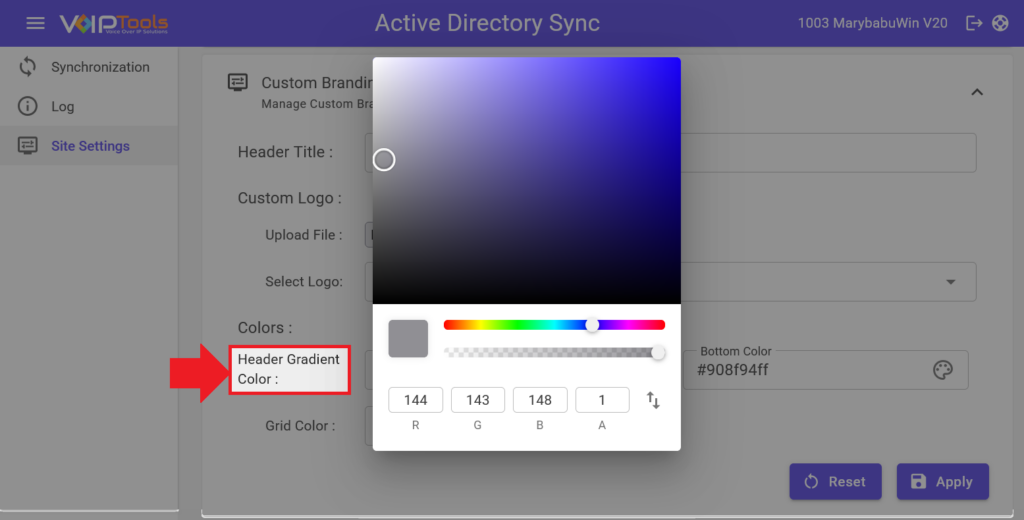
- In the Header Gradient Color section, select the Top Color from the palette.
- Select the Bottom Color from the palette.
Results: You have customized the header gradient color of the application.

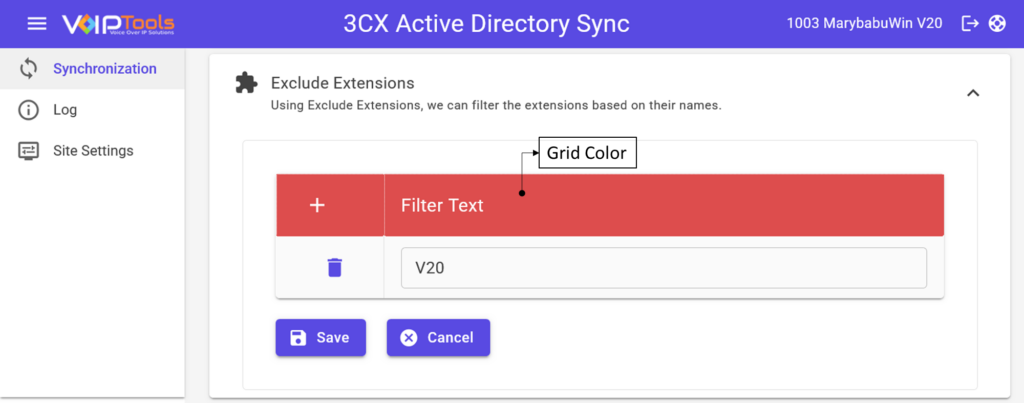
Change Grid Color #
This section guides you to change the grid color of the web application.
Before you Begin: Make sure you have logged into the application with the manager rights and navigated to the Site Settings menu, in the left side panel.
- Select the grid color from the Grid Color palette.
- Click the Apply
 button to save your changes.
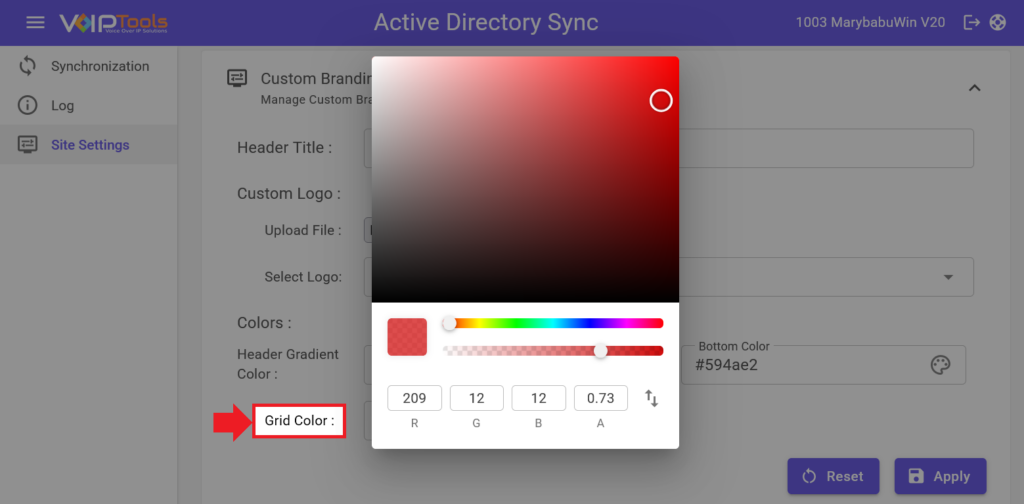
Results: You have customized the grid color of the application.
Change Header Title Prefix #
This section guides you to change the prefix of the title header.
Before you Begin: Make sure you have logged into the application with the manager rights and navigated to the Site Settings menu, in the left side panel.
- Enter the title prefix in the Header Title field.
- Click the Apply
 button to save your changes.
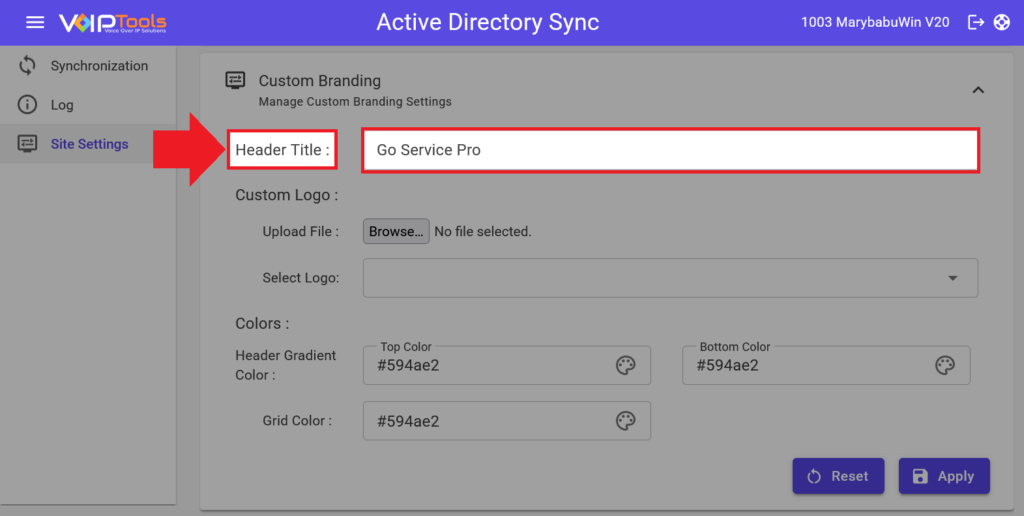
Results: You have changed the prefix of the title header.

Log Menu #
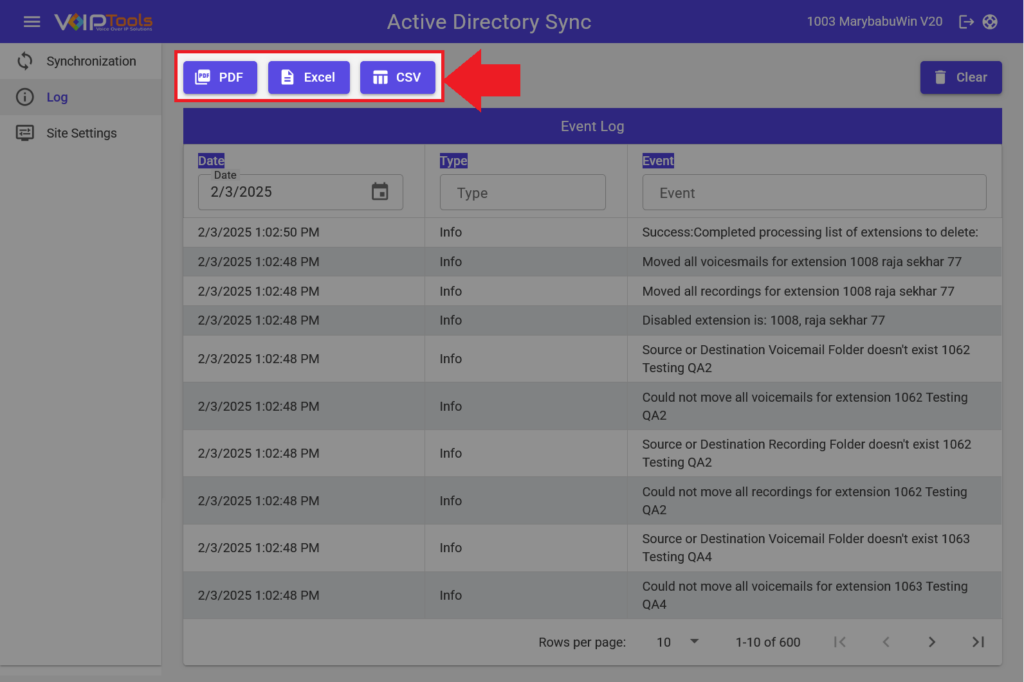
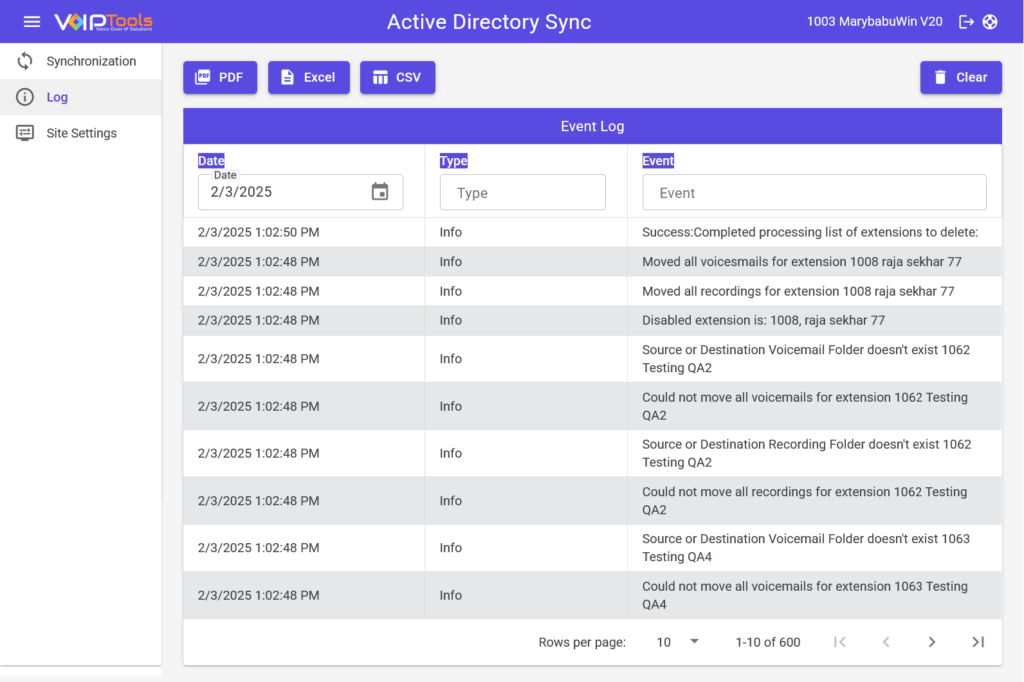
The Log screen provides a detailed summary of events occurring during Scheduler execution, including actions triggered by the ‘3CX Active Directory Sync’ based on configured application settings. It also allows you to export log data in your preferred format. Additionally, you have the option to clear logs if they are no longer needed, ensuring streamlined log management.
Column Definition #
This section provides you a detail overview of all the columns in the Event Log table.
| Column Name | Column Definition / Purpose |
|---|---|
| Date | Displays the date and time of each logged event. The date format is DD/MM/YYYY and the time format is HH:MM:SS AM/PM. |
| Type | Indicates the nature or category of the logged event. Provides quick insights into the severity or informational context of the event for troubleshooting and analysis. |
| Event | Describes the details or message associated with the logged event. Offers specific information about actions performed, statuses, or issues encountered during the application’s operation. |
Export Log Reports #
This section guides you to export log events report to your device.
Before you Begin: Make sure you have logged in with Manager credentials and have navigated to the Log menu in the left side panel.
- Click any of the export formats to download the report.
Result: The report gets downloaded to your device in the desired format.
Need Support? #
You get quick answers to most of your inquiries in our online manual. If you prefer direct contact, we offer various support channels, including phone, email, live chat, and our helpful VoIPTools forums.
24/7 Support Availability #
Rest assured, our dedicated team is here to assist you around the clock, every day of the year. Whether you’re based in the USA or India, we’re ready to provide prompt responses to your technical queries.

Windows Event Log for VoIPTools Applications and Services #
For troubleshooting any application errors, our Windows Event Log contains a comprehensive list of error messages, warnings, and informative notes related to all our VoIPTools applications and services. It’s a valuable resource to help you pinpoint and resolve any issues you may encounter.

Join Our Forum Community #
Are you looking to collaborate with other VoIPTools customers facing similar challenges? Our forum is the perfect platform to exchange ideas, solutions, and best practices. Join the conversation at: https://www.voiptools.com/community/

Real-Time Live Chat Assistance #
Got questions that need immediate answers? Our chat support team is available to assist you in real time. Just click on the Live Chat button located at the lower right corner of our website, and we’ll acknowledge your queries right away.

Efficient Email Support #
To ensure a thorough understanding of your concerns, email us at support@voiptools.com. Describe your issue in detail, and we’ll get back to you within one business day with the support you need.

Reach Us by Phone #
If you prefer to speak with a representative directly, you can reach us at +1 801-642-4655. Our attentive team is available to take your calls from 8:00 AM to 6:00 PM (Central Standard Time).
Comprehensive support services: #

Free Support #
If you’ve purchased our products through a VoIPTools Partner, rest assured that they provide first-level support at no additional cost. Partners have access to 100% free technical assistance and actively participate in the troubleshooting process.
VoIPTools customers enjoy access to our online manuals and receive support through emails (with responses within one business day) and live chat. However, please note that we do not provide remote server login assistance.

Paid Support #
For a more hands-on experience, consider our “Installation Support” package. Our expert support team can log in to your servers, and install and configure all our tools. This comprehensive service includes setting up SQL Server Express and Internet Information Server if necessary. We’ll work closely with you to tailor our applications to meet your requirements.
We’re committed to providing top-notch support to ensure your VoIPTools experience is smooth and hassle-free. Contact us today, and let us assist you in making the most of our powerful tools!
