Imagine yourself as an agent handling a queue call. With the Audio Announcer feature, a remarkable tool comes into play as soon as you answer the call. It automatically plays a pre-recorded message customized to your unique voice. This message can be a warm introduction, setting a positive tone for the conversation, or it can convey important regulatory notifications, informing the caller about call recording procedures. This ingenious tool saves you from the repetitive task of saying the same message for each new call.
Audio Announcer enables businesses to deliver callers a polished and professional image.
IMPROVED CUSTOMER EXPERIENCE
You can ensure that callers are greeted promptly and directed to the appropriate department or agent.
TIME SAVING AUTOMATION
Automate routine tasks and provide self-service options to callers. This reduces the need for manual intervention and lets customers access relevant information
ENHANCED BRAND CONSISTENCY
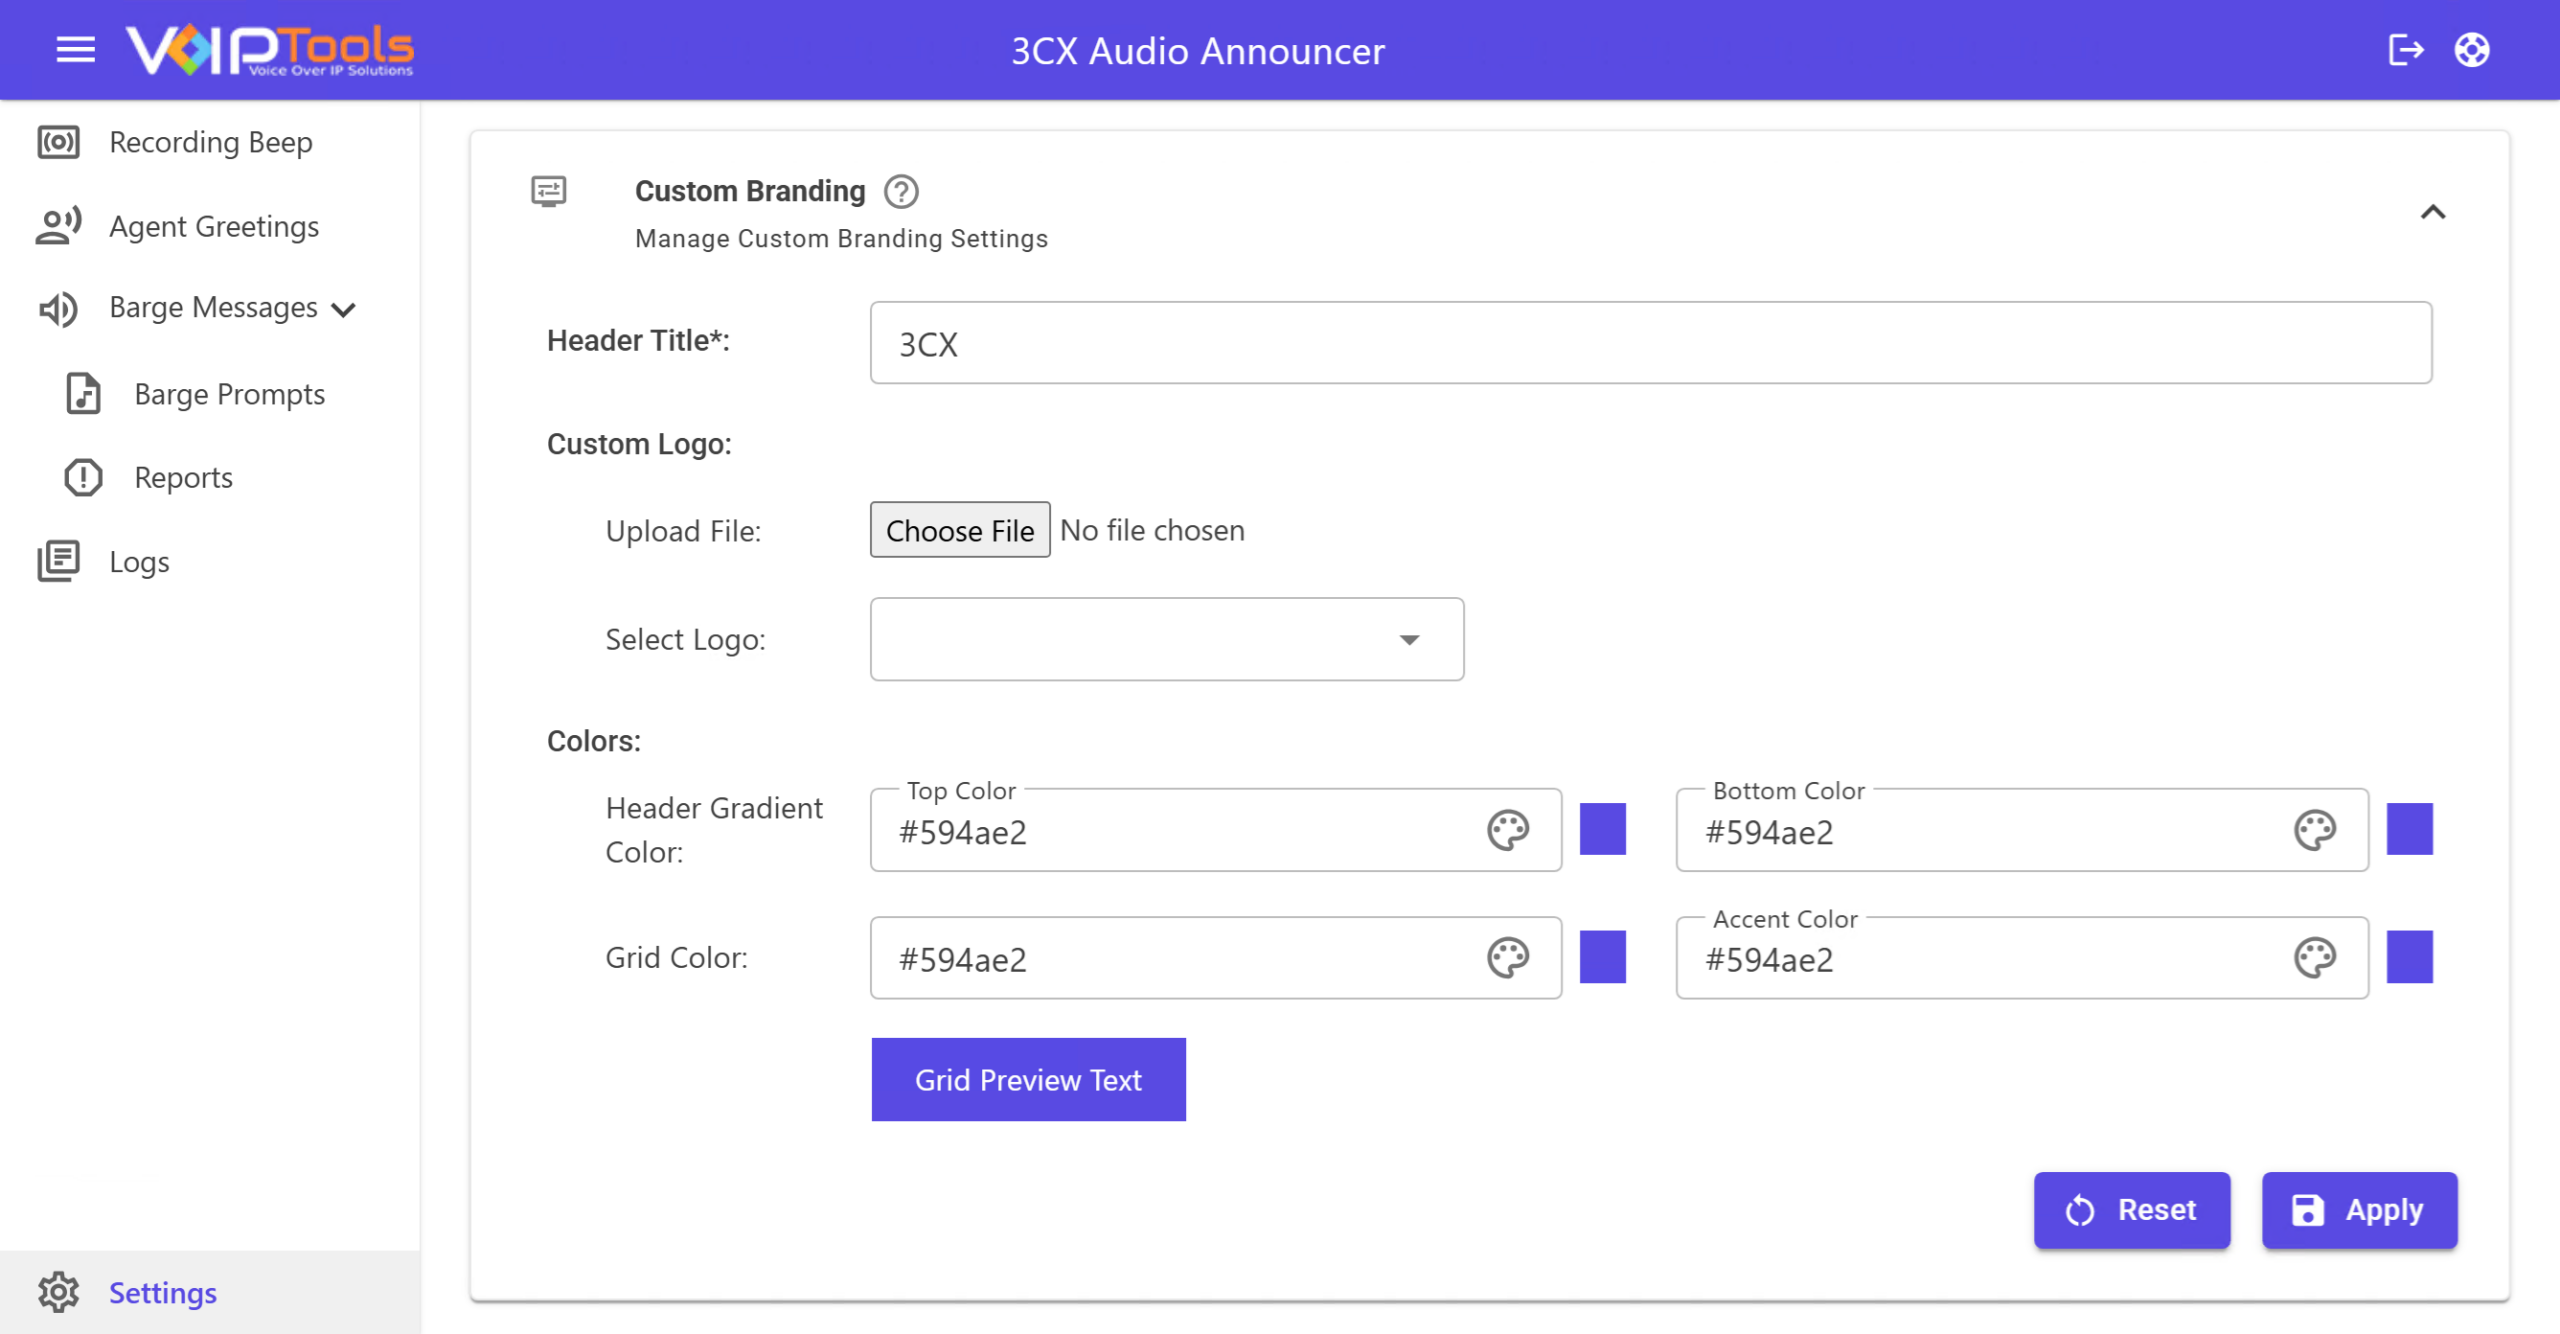
Modify the application’s name, logo, and color scheme to effortlessly blend in with your desired theme. Your agents will be oblivious to the fact that you are utilizing a third-party application.
You can order 3CX Audio Announcer online at https://www.voiptools.com. Your order confirmation email will include your license key and a link to download the software.
There are a number of prerequisites that must be installed prior to installing the 3CX Audio Announcer. These prerequisites include Microsoft SQL Server.
This User Guide provides step-by-step instructions for installing 3CX Audio Announcer. Once the installer has been downloaded (Step 1 above), double-click the setup program named: AudioAnnouncerInstaller.exe
Before installing the 3CX Audio Announcer, ensure that your computer meets the minimum requirements listed below:
PREREQUISITE
PURPOSE
3CX Version V20
3CX Audio Announcer is designed to work with this version for enhanced features and performance.
Windows 10 or above / Windows Server 2012 or above
These operating systems provide the necessary environment for the application to run efficiently.
VoIPTools Universal Updater
This component is necessary for updates, ensuring the application remains current and functional.
VoIPTools Relay Service
It is used for proper integration and functionality of the 3CX Audio Announcer within the 3CX environment.
Microsoft SQL Server 2016 or above (Including the free SQL Express edition)
3CX requires Microsoft SQL Server 2016 or later for database management.
Static IP for VoIPTools and 3CX servers
Use a static IP for communication between the 3CX Relay and VoIPTools servers, as dynamic IPs are not supported. HTTPS communication requires an FQDN and a valid SSL/TLS certificate.
Port number 7150 opened on your device
Port 7150 is required for 3CX communication. Ensure it is open on the firewall to allow incoming and outgoing network traffic.
Find the software download link in the Order Confirmation Email, or you can find it in your order history on our website and download the 3CX Audio Announcer application.
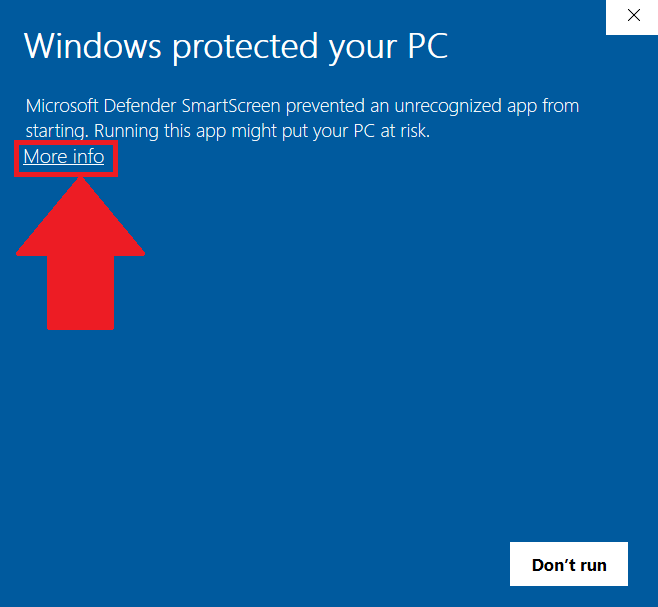
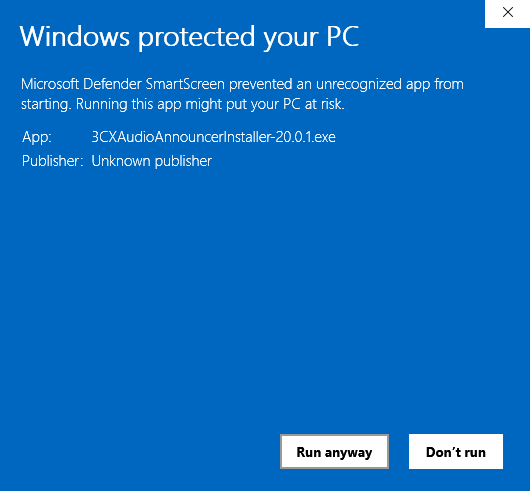
In the Microsoft Defender SmartScreen, click the More Info option.
Figure 1: Microsoft Defender – More info
Click the Run Anyway option to start the installation.
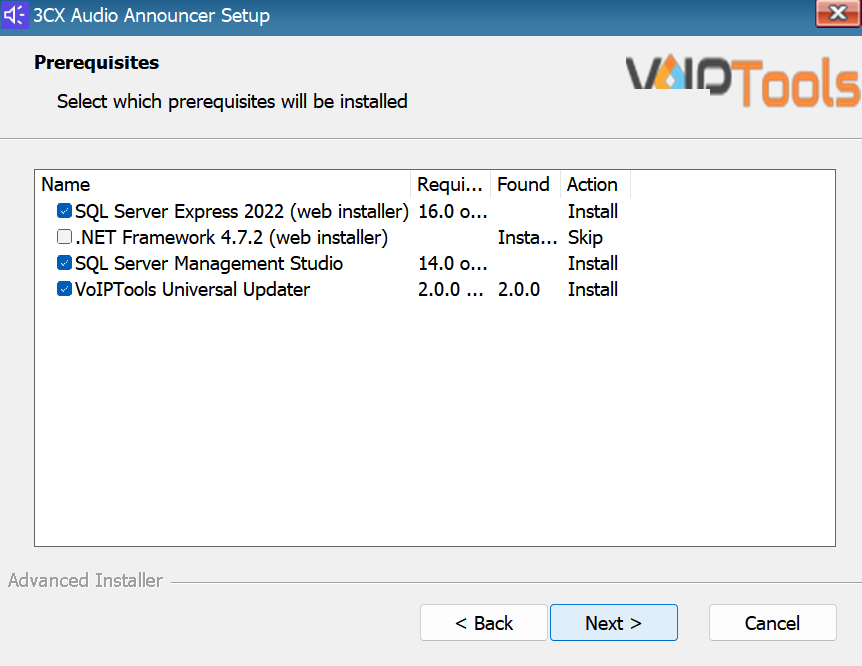
Click on the software installer downloaded in Step 1. The installation wizard will automatically identify the prerequisites and assist you with each installation required to 3CX Audio Announcer. It includes SQL Server Express (Web Installer) and SQL Server Management Studio.
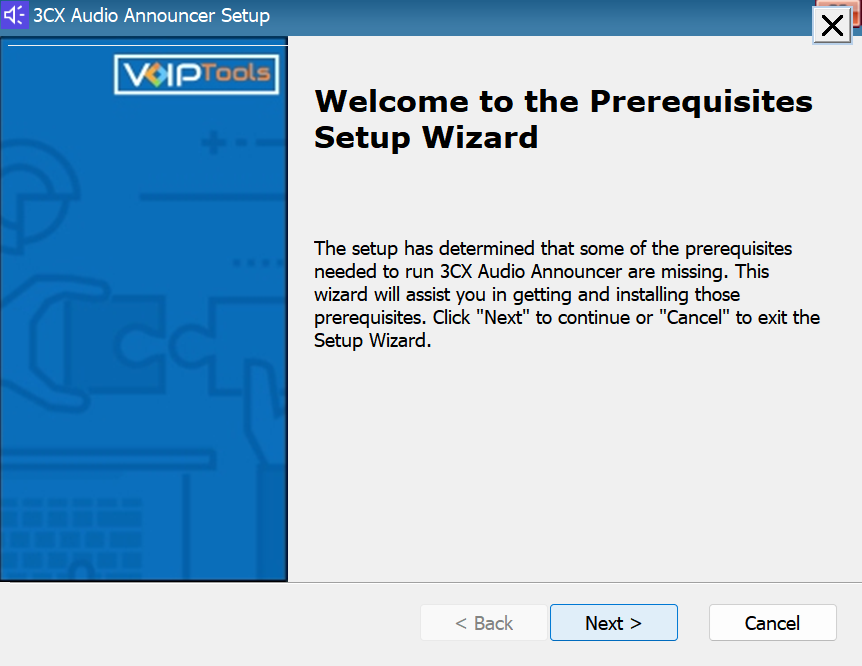
Click the downloaded installer executable to launch the Prerequisites Setup Wizard and click Next.
Figure 3: Prerequisites Setup Wizard
In the Prerequisites window, install all the required prerequisites identified by the installer, or select/ unselect the applications based on your requirements and click Next to continue.
Figure 4: Prerequisite Installation Selection
The installer will download and install the selected applications. It may take several minutes to complete.
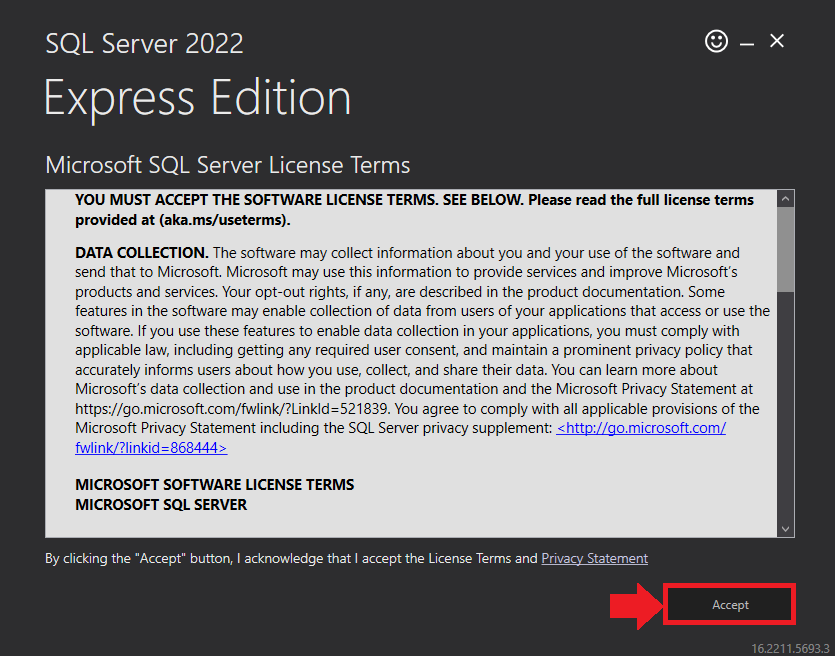
In the Microsoft SQL Server License Terms click the Accept button to acknowledge the license terms and continue.
This page appears if you do not have SQL Server Express preinstalled in your device.
Figure 5: SQL Server Express: Accept License Terms
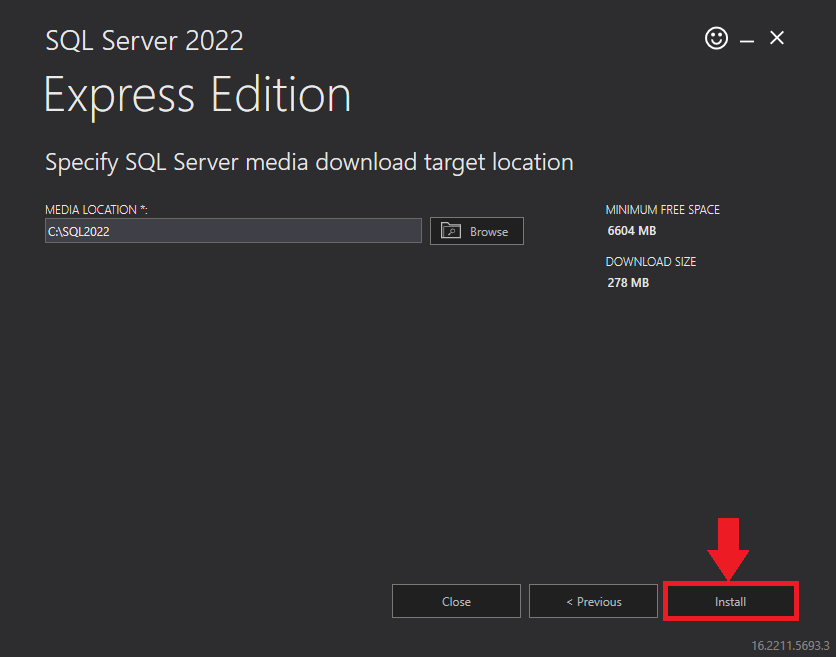
View the SQL Server Media target location in the Media Location field. If required, you can click the Browse button to change the location. Click Install to begin the installation of SQL Server Express.
Figure 6: SQL Server Express: Target Location
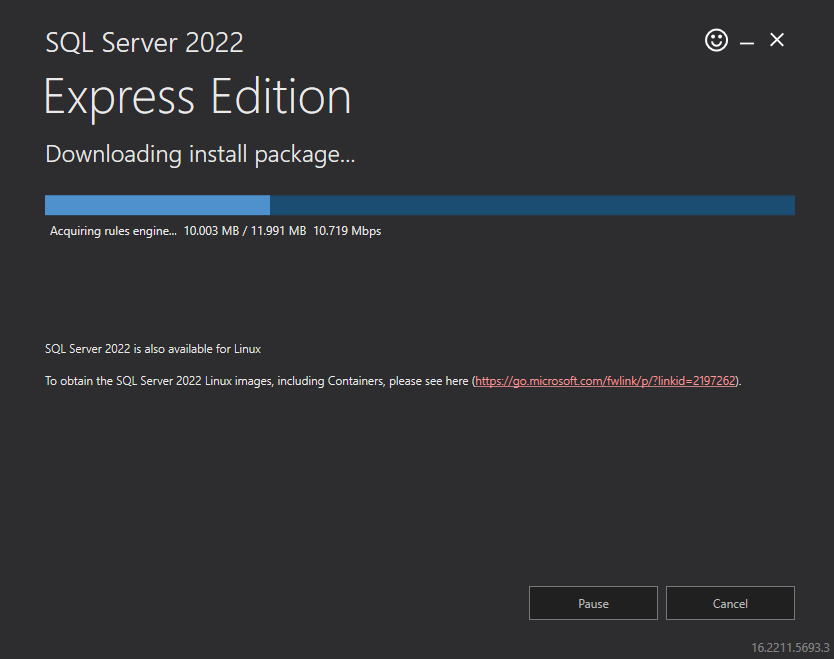
SQL server installation is in progress. This may take several minutes to complete.
Figure 7: SQL Server Installation In Progress
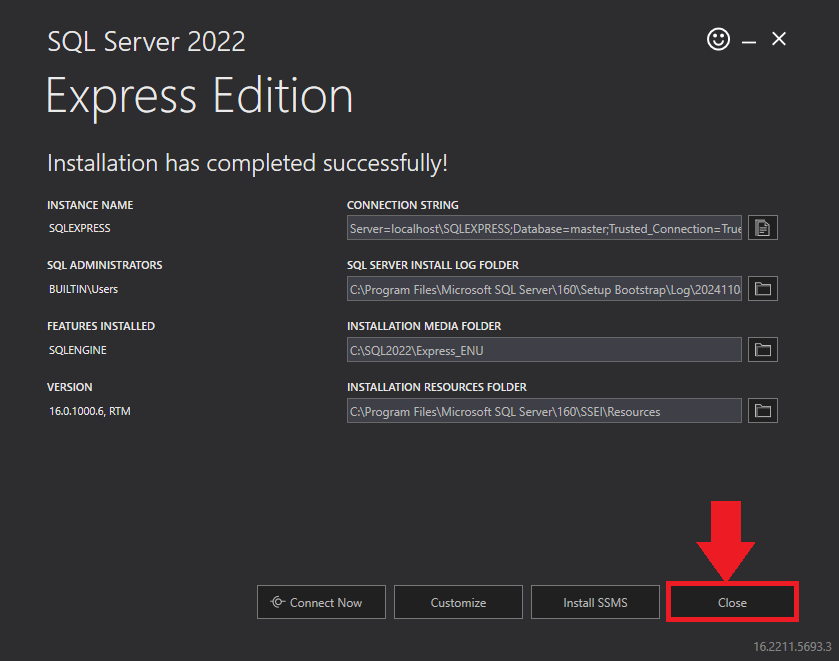
Click the Close button once the prerequisites are installed.
Figure 8: SQL Server Express: Installed Successfully
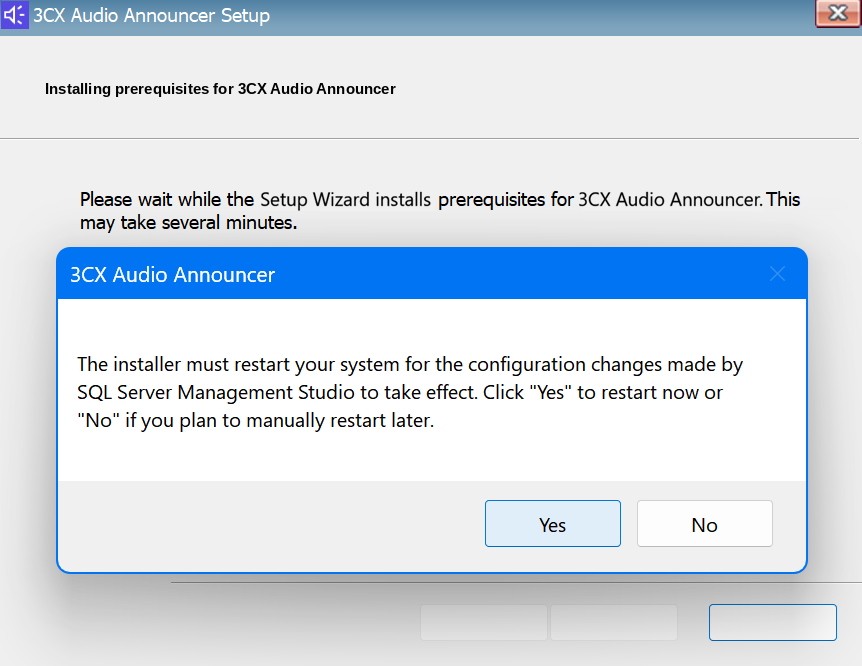
Click Yes in the Confirmation Message Box to reboot the computer.
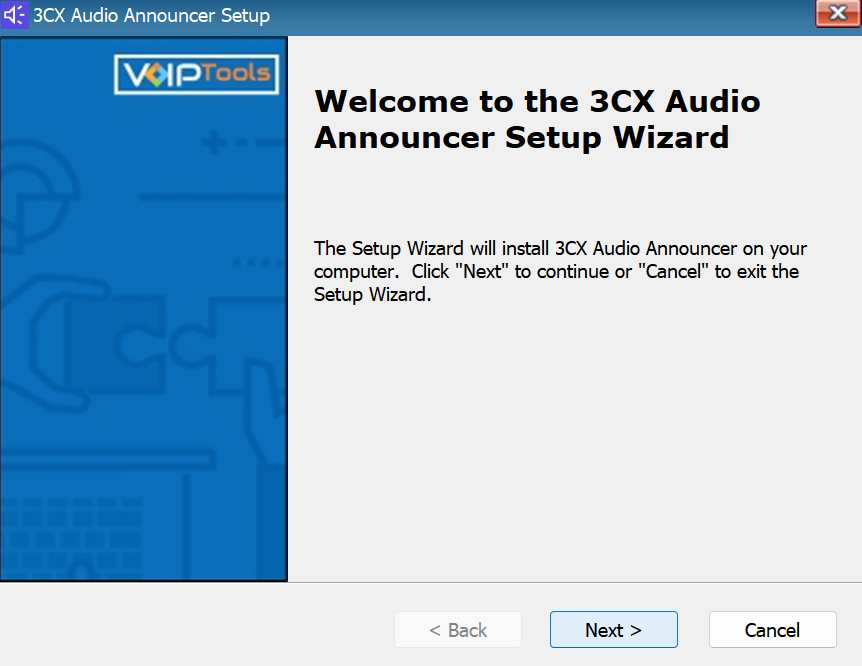
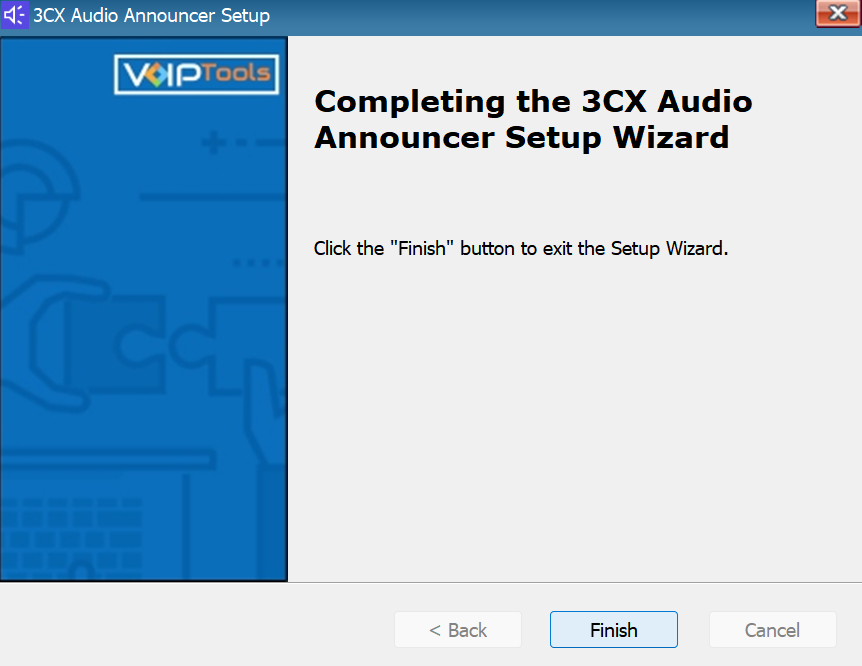
Click Next on the 3CX Audio AnnouncerSetup Wizard screen.
Figure 10: Audio Announcer Setup Wizard
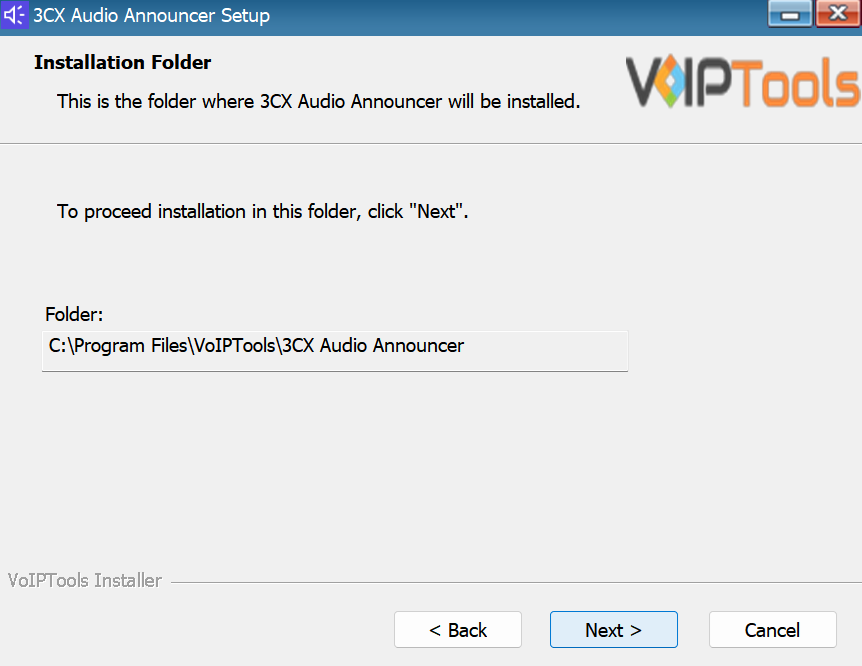
On the Select Installation Folder window, the Folder field displays the path where the 3CX Audio Announcer gets installed. You cannot change the location path.
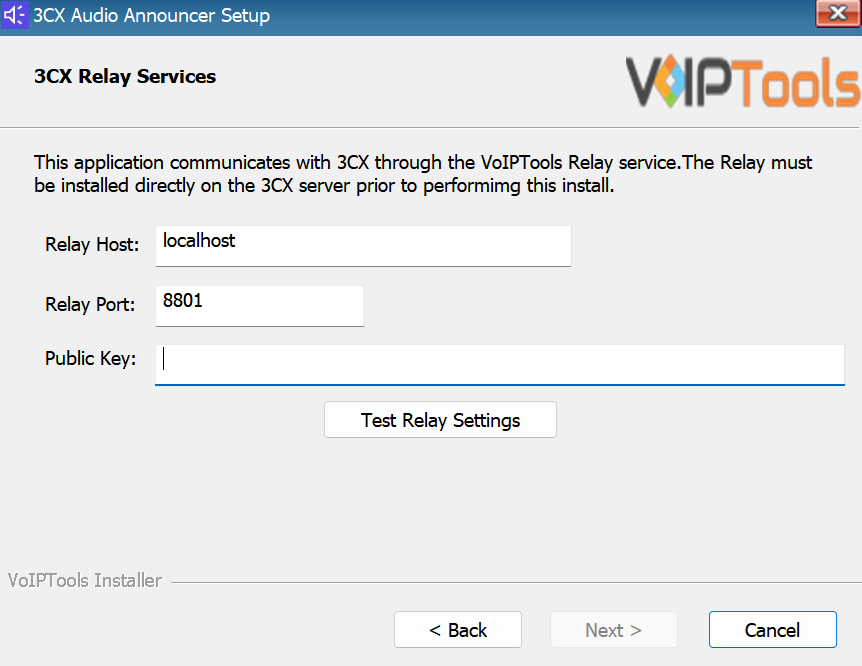
In the 3CX Relay Services window, in the Relay Host field, enter the FQDN of your 3CX server.
NOTE:
Do not include https:// to the Relay host data.
Enter 8801 in the Relay Port field.
Enter the public key you copied from VoIPTools Relay services in the Public Key text area.
Figure 12: Configure Relay Services
Click the Test Relay Settings to confirm that ‘3CX Audio Announcer’ can communicate with the Relay services running on the 3CX server.
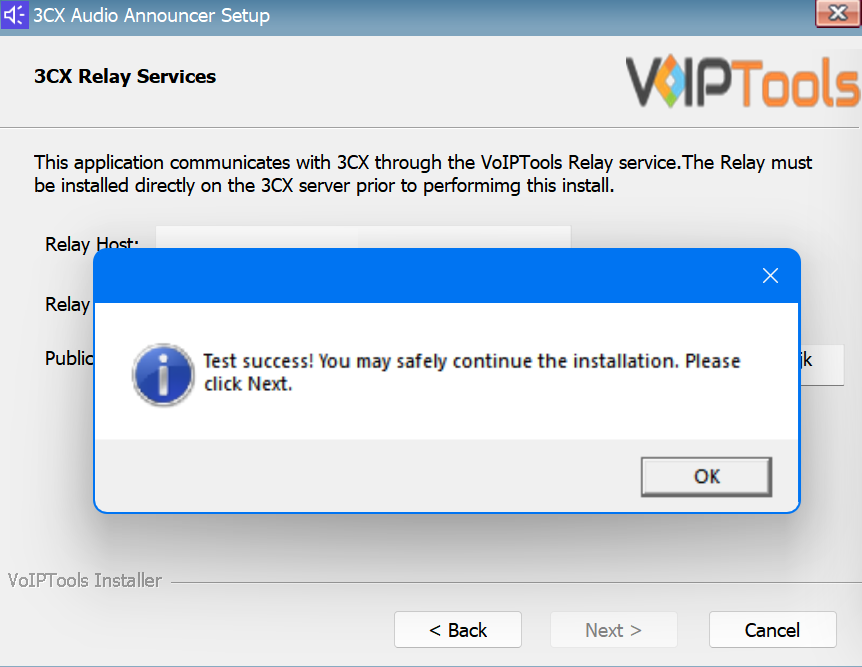
If the ‘3CX Audio Announcer’ is successfully able to communicate with the Relay services that run on the 3CX server, a Success message box appears. Click OK. If the test fails, you will not be able to continue until communication with the relay is established.
Click Next to continue with the installation.
Figure 13: Test Relay Success
NOTE:
You must set the Relay Port to 8801.
If the Relay test fails, you cannot continue the installation until you establish communication with the Relay. If the test was unsuccessful:
Confirm you have the correct firewall port open (default TCP 8801) on the 3CX server and the firewall protecting the 3CX server.
Confirm that you have entered the correct FQDN for the 3CX server.
Confirm that the 3CX Audio Announcer and Relay use the same port and protocol.
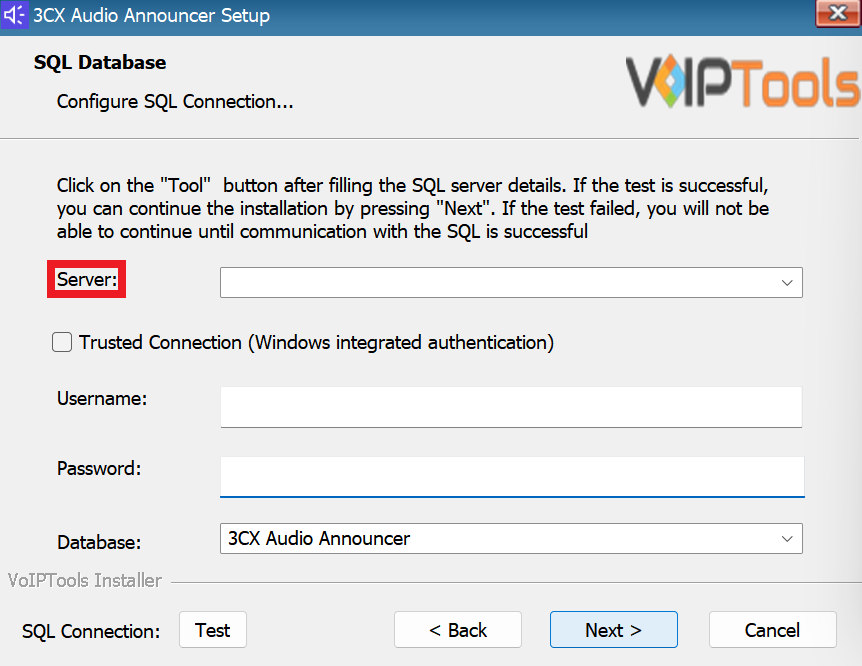
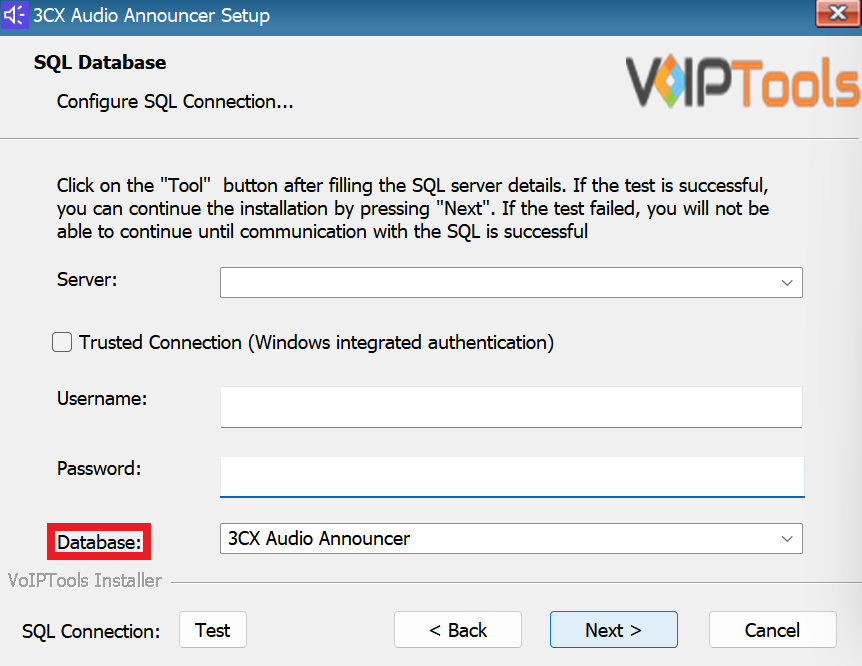
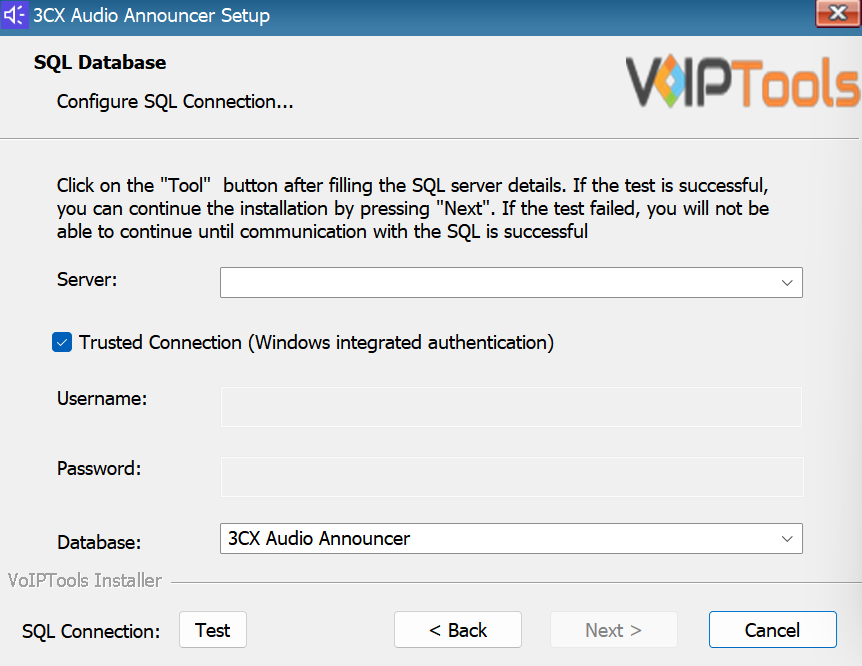
When configuring the 3CX Audio Announcer, select an existing Microsoft SQL Server instance in your environment. The database server can be a remote SQL Server, or a local instance running on the VoIPTools server.
You can set up the SQL database using SQL Authentication or Windows Integrated Authentication.
If using the free SQL Express Edition, the default SQL Instance name is SQLExpress.
Figure 14: Configure Database – Server Field
NOTE:
If you want to use ‘SQL Authentication’, then install SQL Server in ‘Mixed‘ mode.
If SQL Server is installed on a server other than the server where 3CX Audio Announcer is installed, you will need to configure SQL Server to allow remote connections.
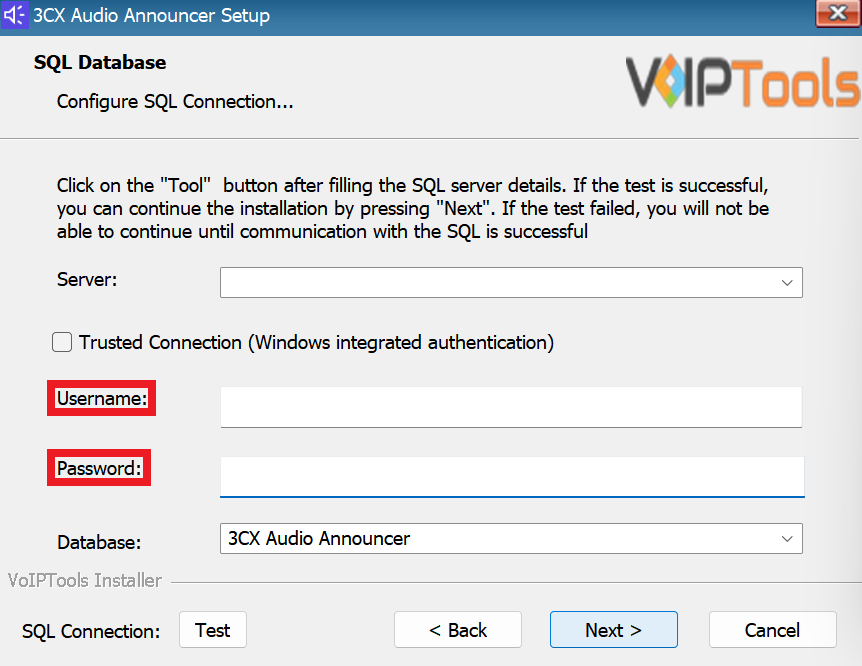
Enter your credentials in the Username and Password fields.
To use Windows Integrated Authentication check the Trusted Connection (Windows integrated authentication) checkbox.
The VoIPTools installer will create a local Windows user name as “VoIPTools” and give you sufficient rights to this user to create/update the SQL database.
Figure 18: Trusted Connection Checkbox
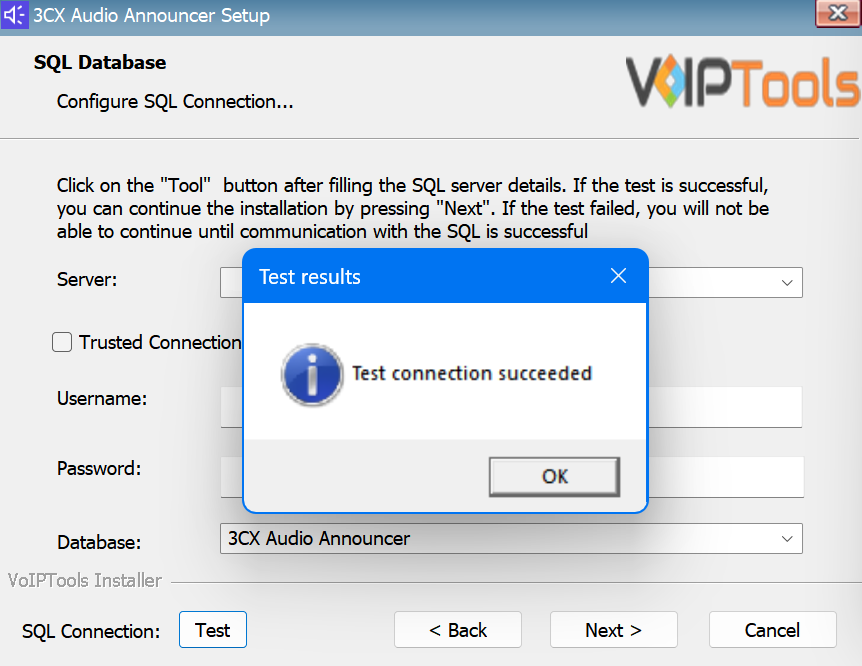
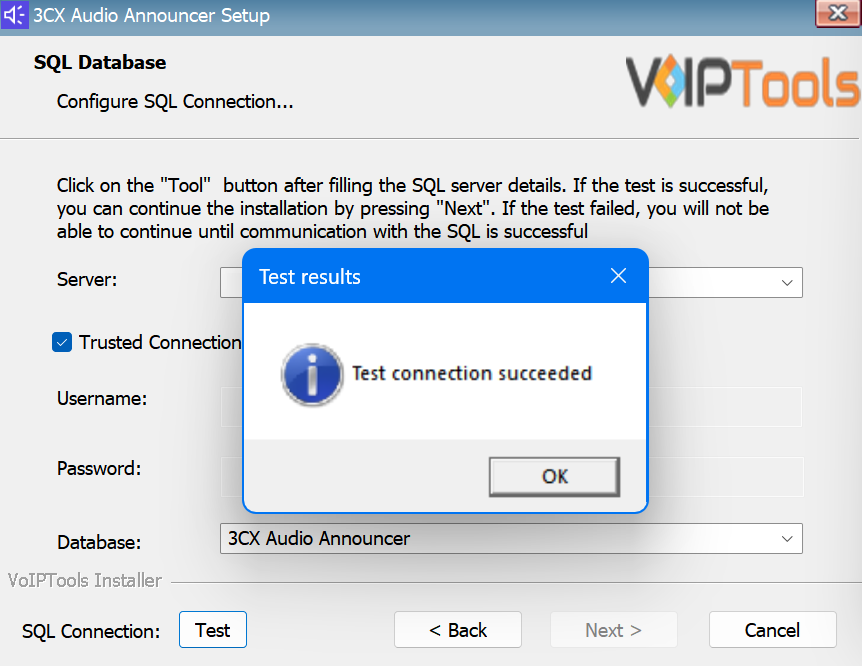
In the SQL Connection: Test section, click the Test button to test the connection.
Click the OK on the Test Results dialogue box.
Figure 19: Trusted Connection Test Results Message Box
NOTE:
We encourage you to use SQL Authentication rather than Windows authentication. Many of our tools leverage a Call Flow Designer (CFD) application running on the 3CX. Frequently our CFD applications require access to a SQL database. If the 3CX server and the database server are not in an Active Directory domain, Windows authentication will fail. To use SQL authentication, your SQL Server must be configured to run in “Mixed Mode”. If you installed SQL Server with one of our tools, we configure SQL in “Mixed Mode”.
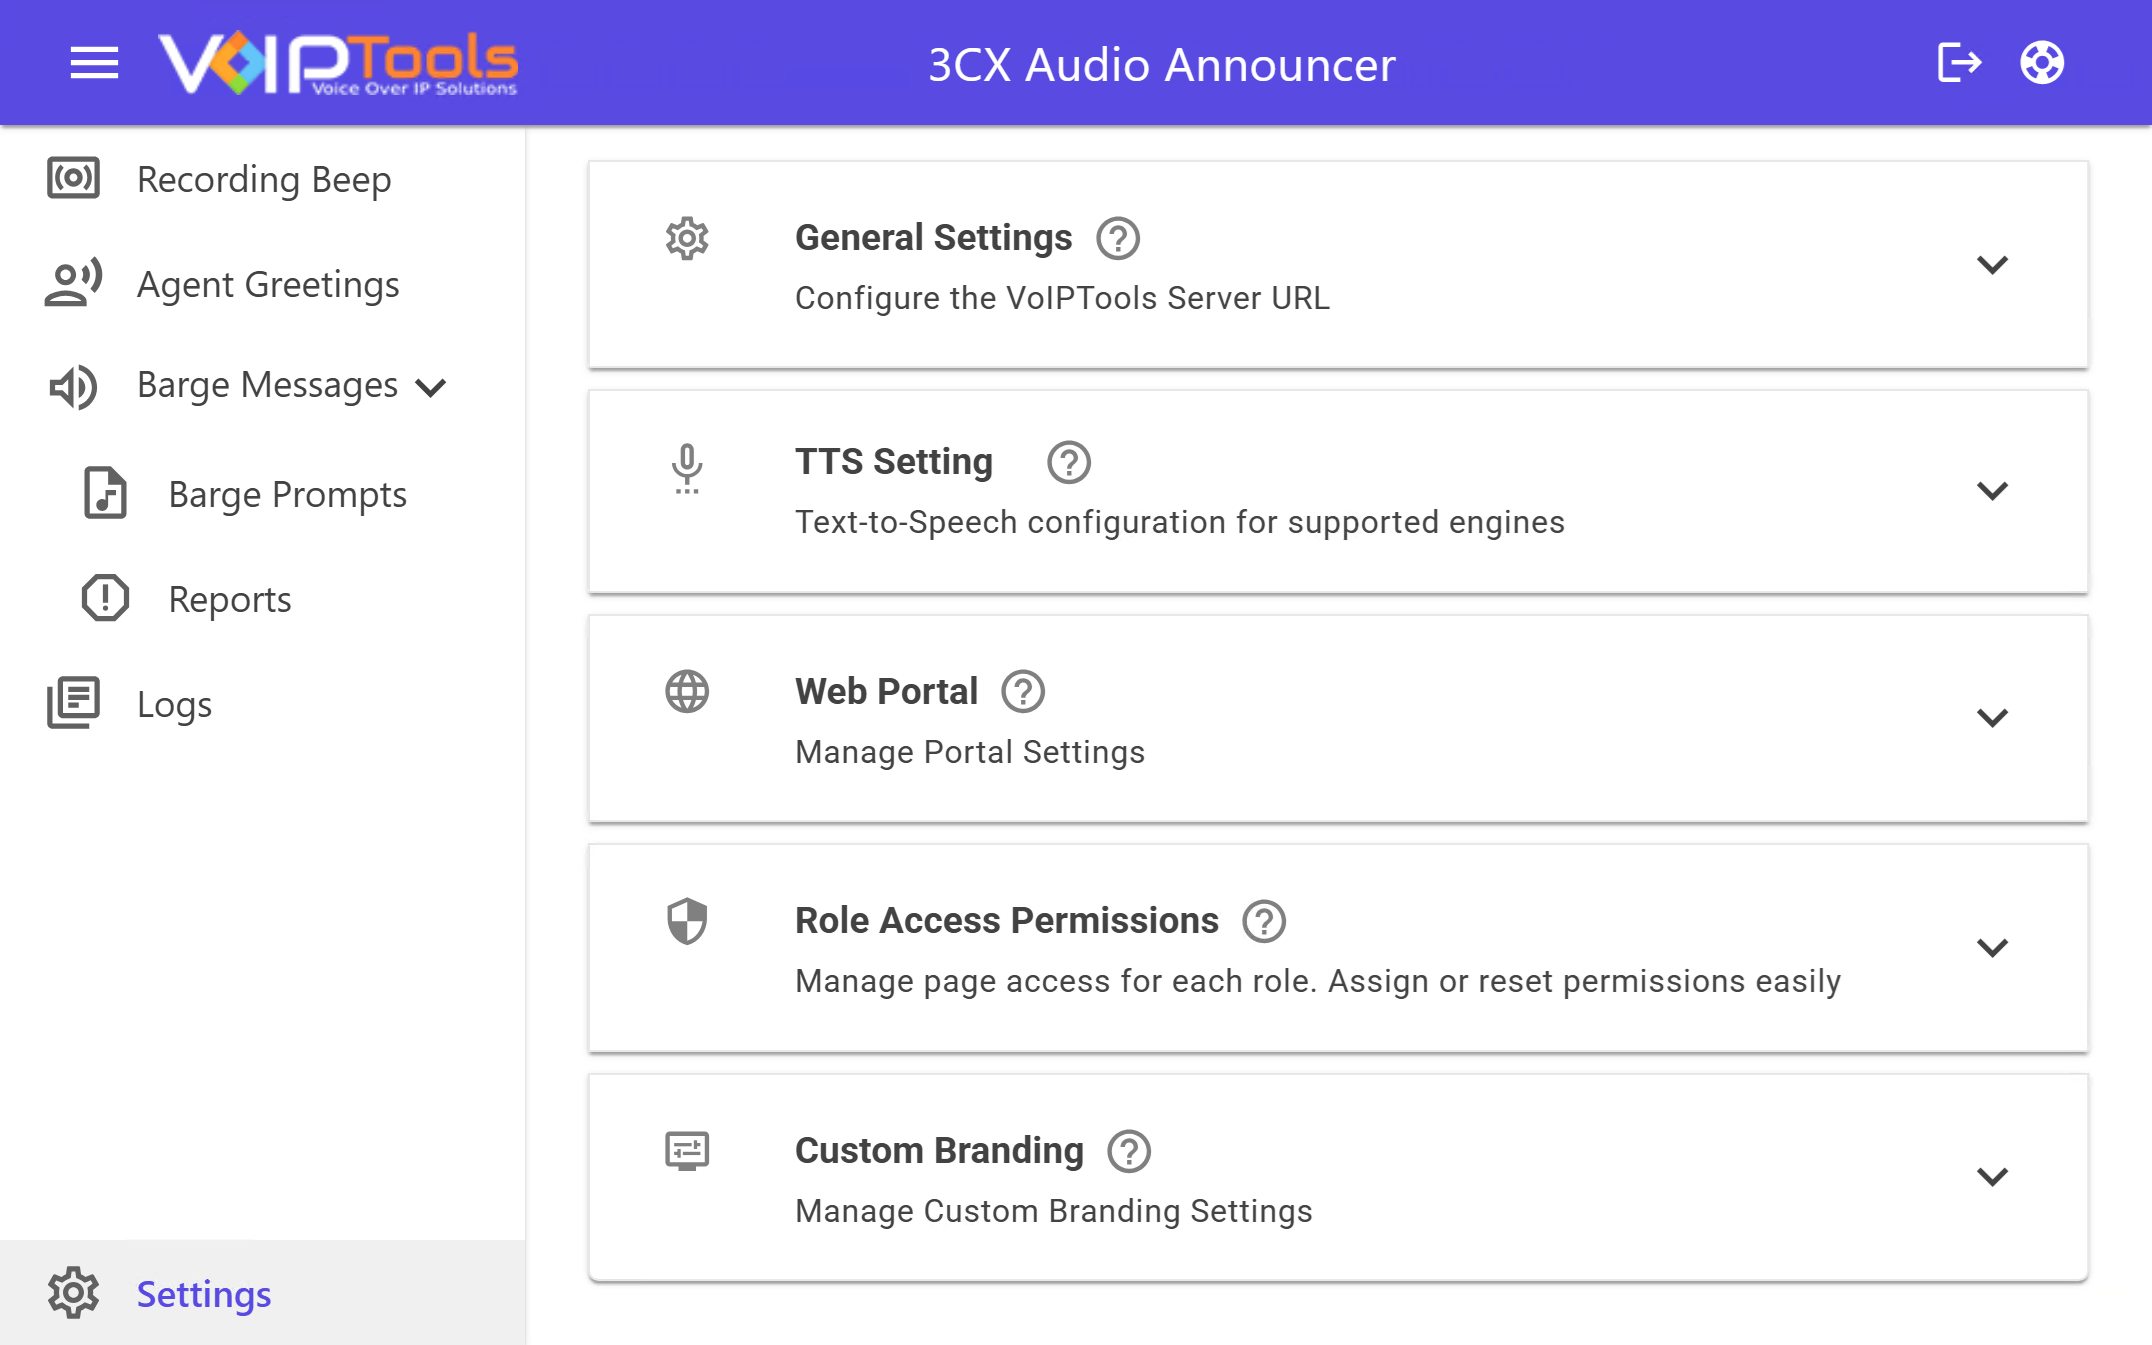
To access the ‘3CX Audio Announcer’ web portal, click the Web Portal button on the configuration program, or click on the desktop icon that was created during the installation process (‘3CX Audio Announcer’ Web).
The Settings menu enables you to configure settings for the desired group and for the desired type of calls like Queue Calls/Inbound/Outbound calls. You can also configure the settings to play only once or as per the configured frequency.
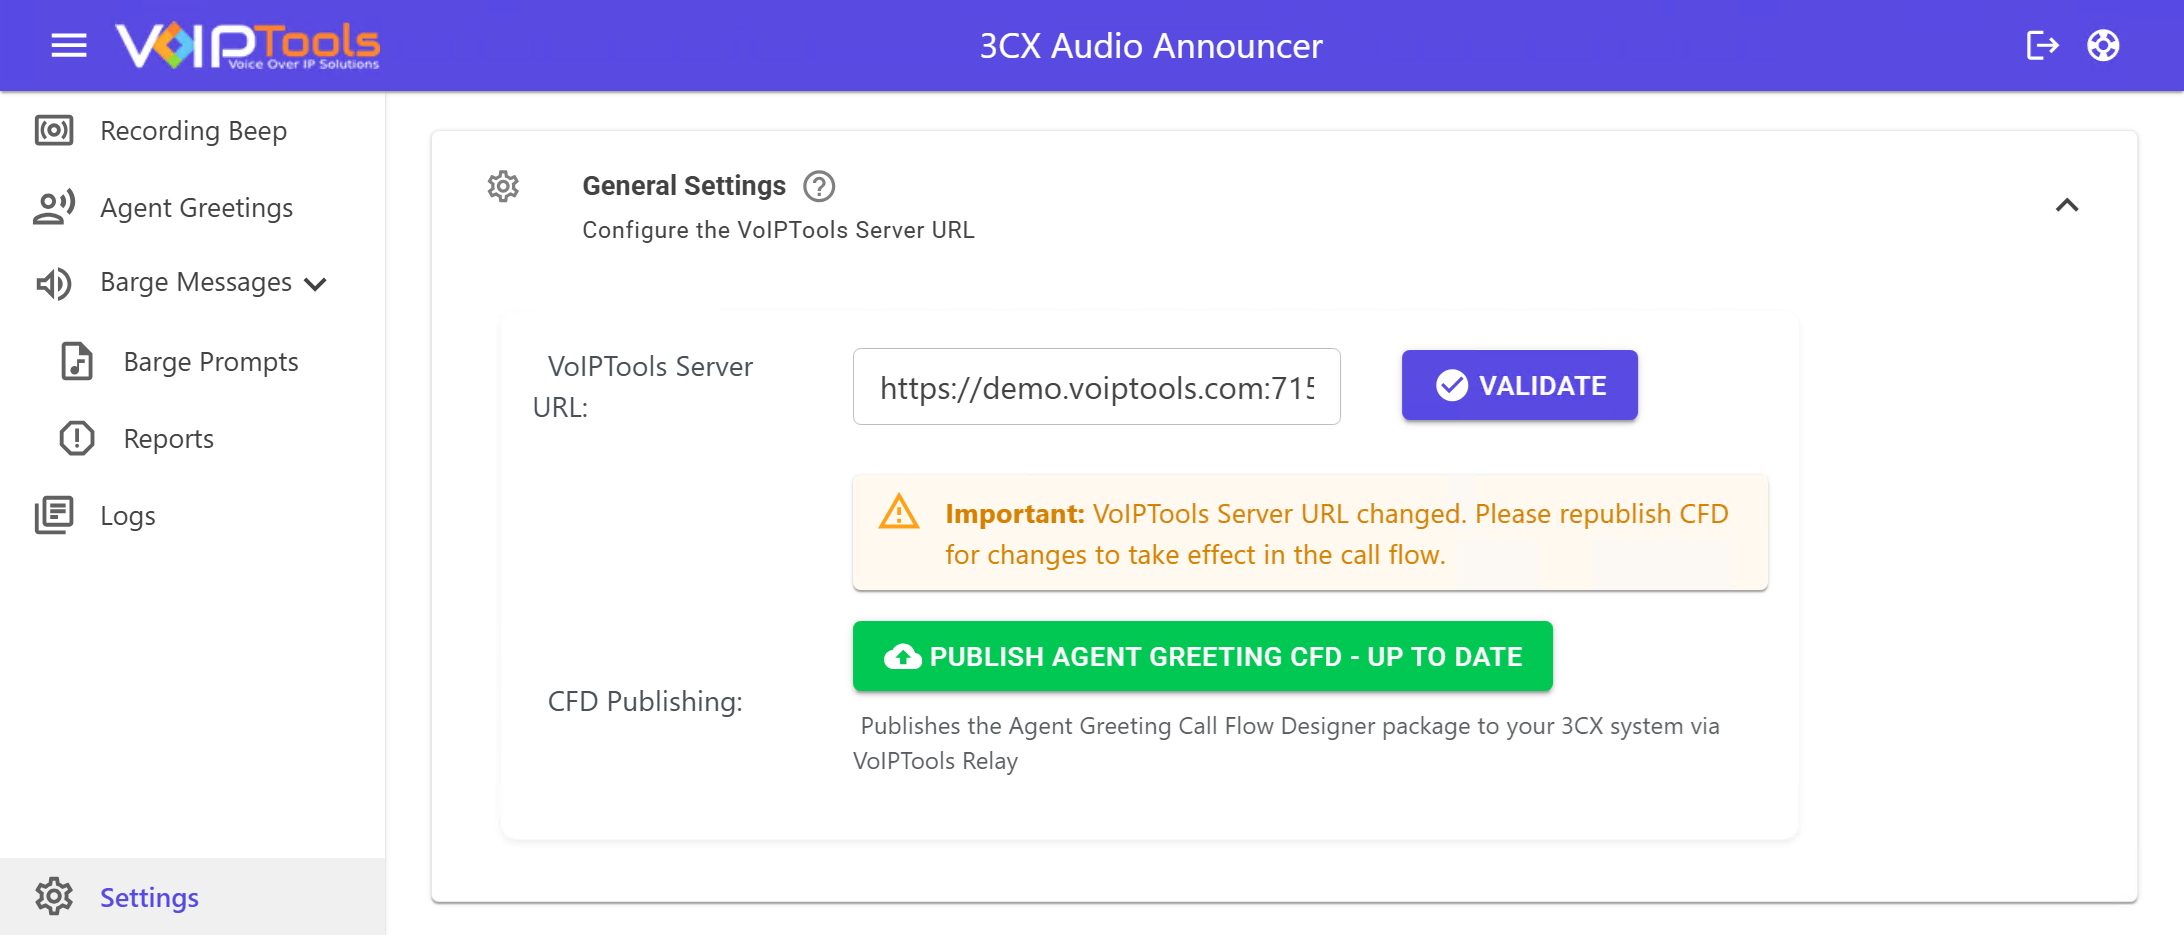
Connect Audio Announcer to your VoIPTools server and deploy the Agent Greeting call flow. This is the first thing to set up. Nothing else works without a valid server URL.
This deploys the call flow that handles agent greeting recordings to your 3CX system. Do it once on initial setup and again whenever an update is available.
Button states
Up to Date: You’re all set. No action needed.
Update Available: A newer version is ready — publish it.
Disabled: No server URL configured yet.
Make sure the server URL is saved and validated first.
Click Publish Agent Greeting CFD.
Wait for the confirmation message. The system uploads the call flow to 3CX automatically.
After publishing, agents can record greetings and admins can assign them to queues. Callers hear the greeting automatically when the agent picks up.
Publish fails? Confirm that AgentGreeting.zip exists in your CFD folder and the relay service has write access to the 3CX VoiceApps directory.
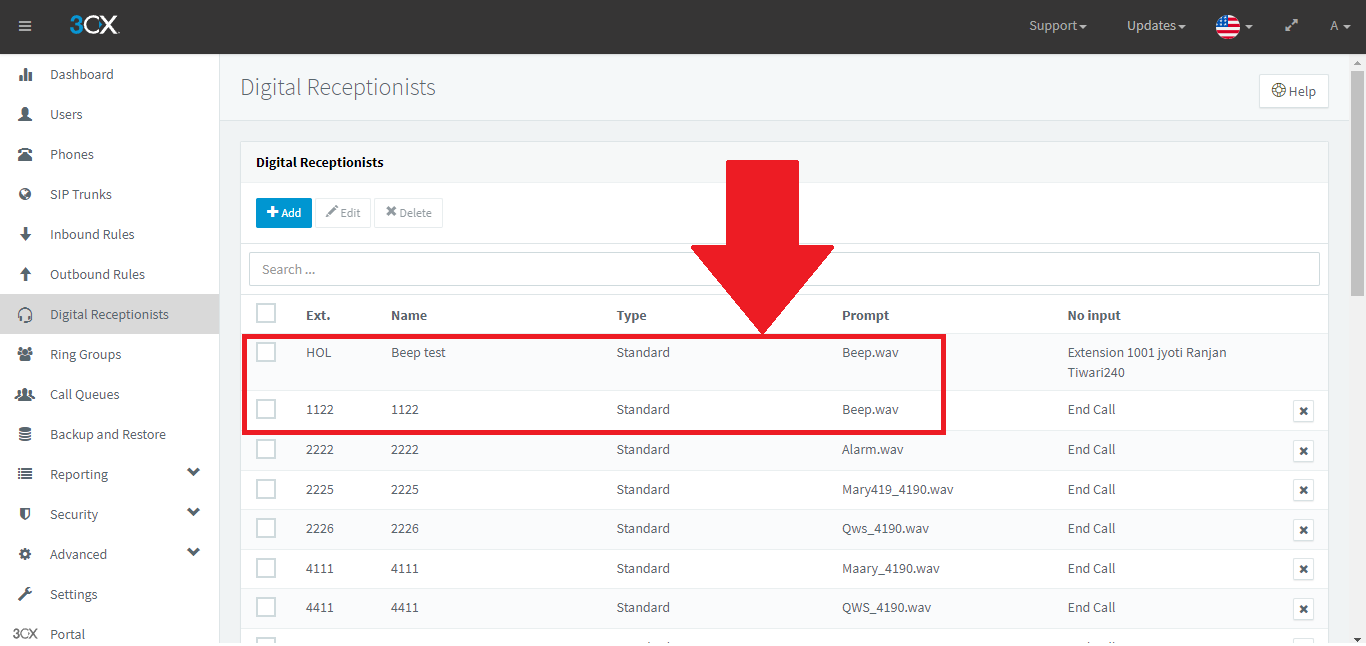
NOTE:
You cannot have prompt files with the same name for different IVRs.
Figure 25: Invalid Prompt names
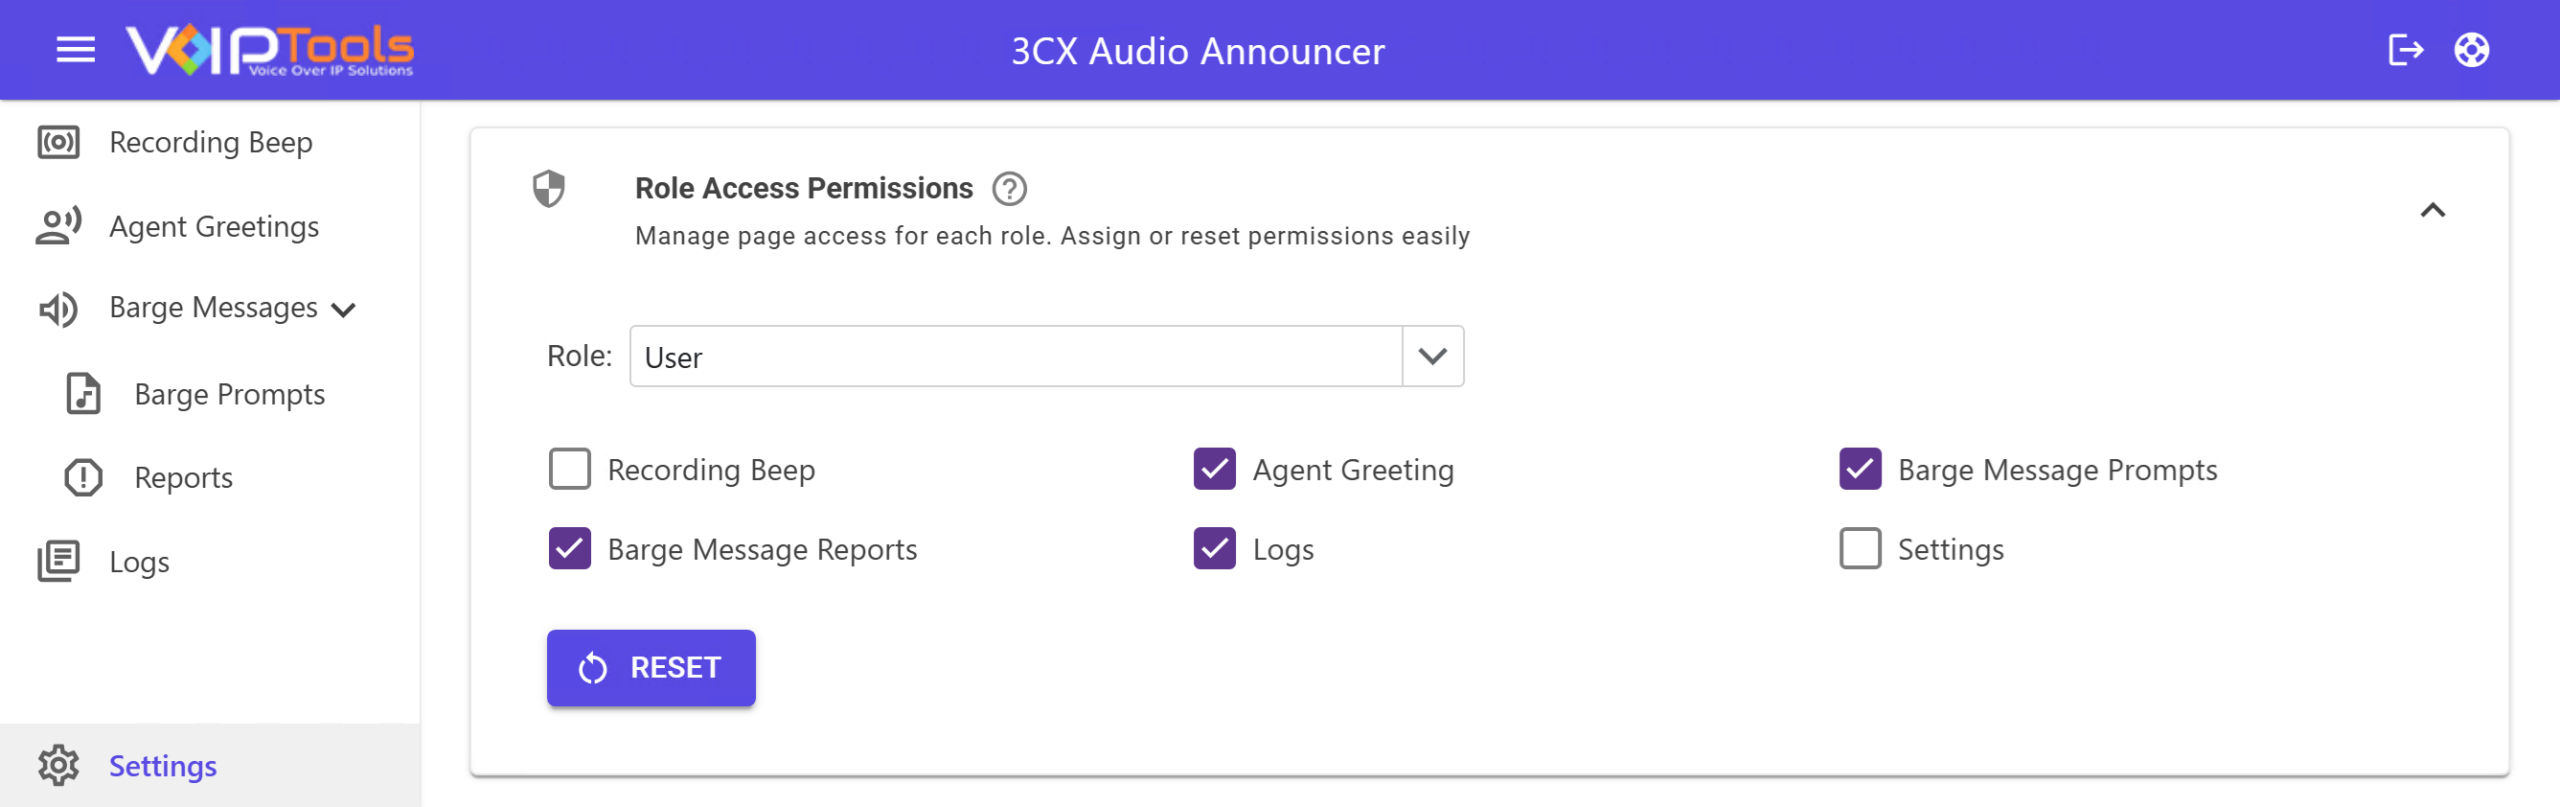
Once you edit any of the settings in the Settings screen, you should restart the ‘3CX Audio Announcer Service’ in order to apply the changes.
NOTE:
The uploaded prompt file, in .wav format, must have an audio duration exceeding one second. Click the link to access 3CX’s audio file conversion feature to convert your audio files into .WAV format.
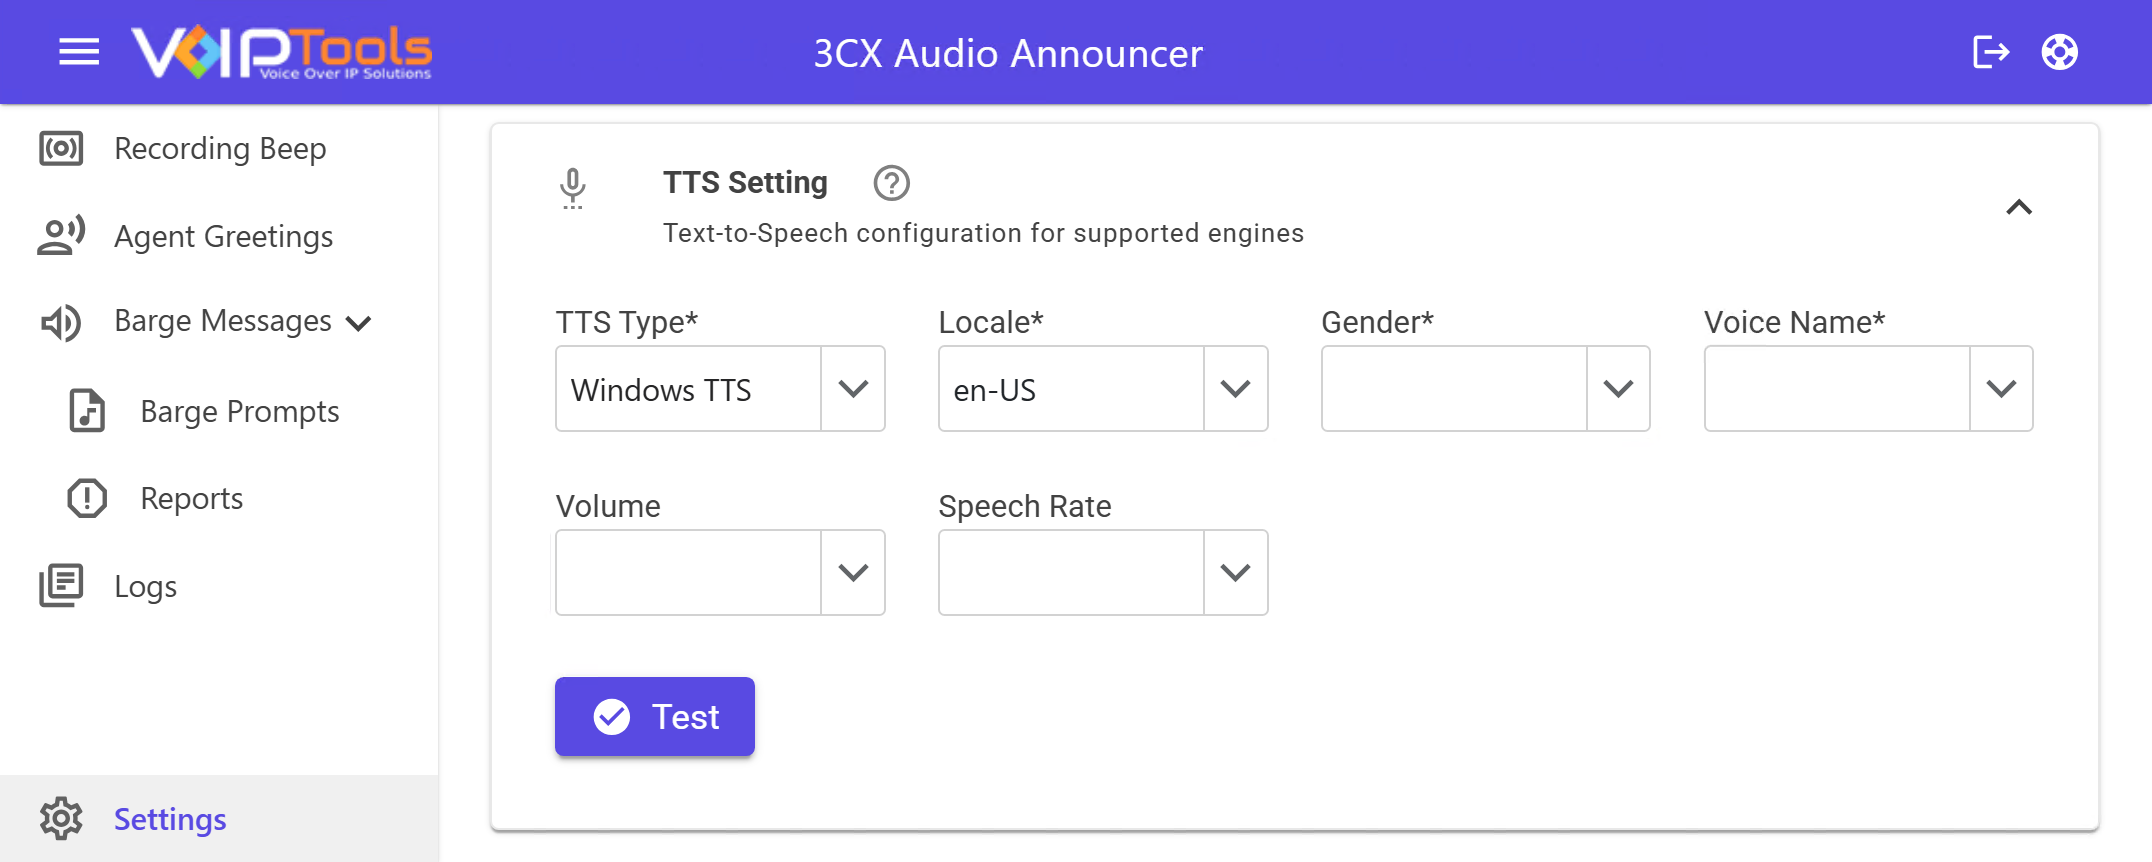
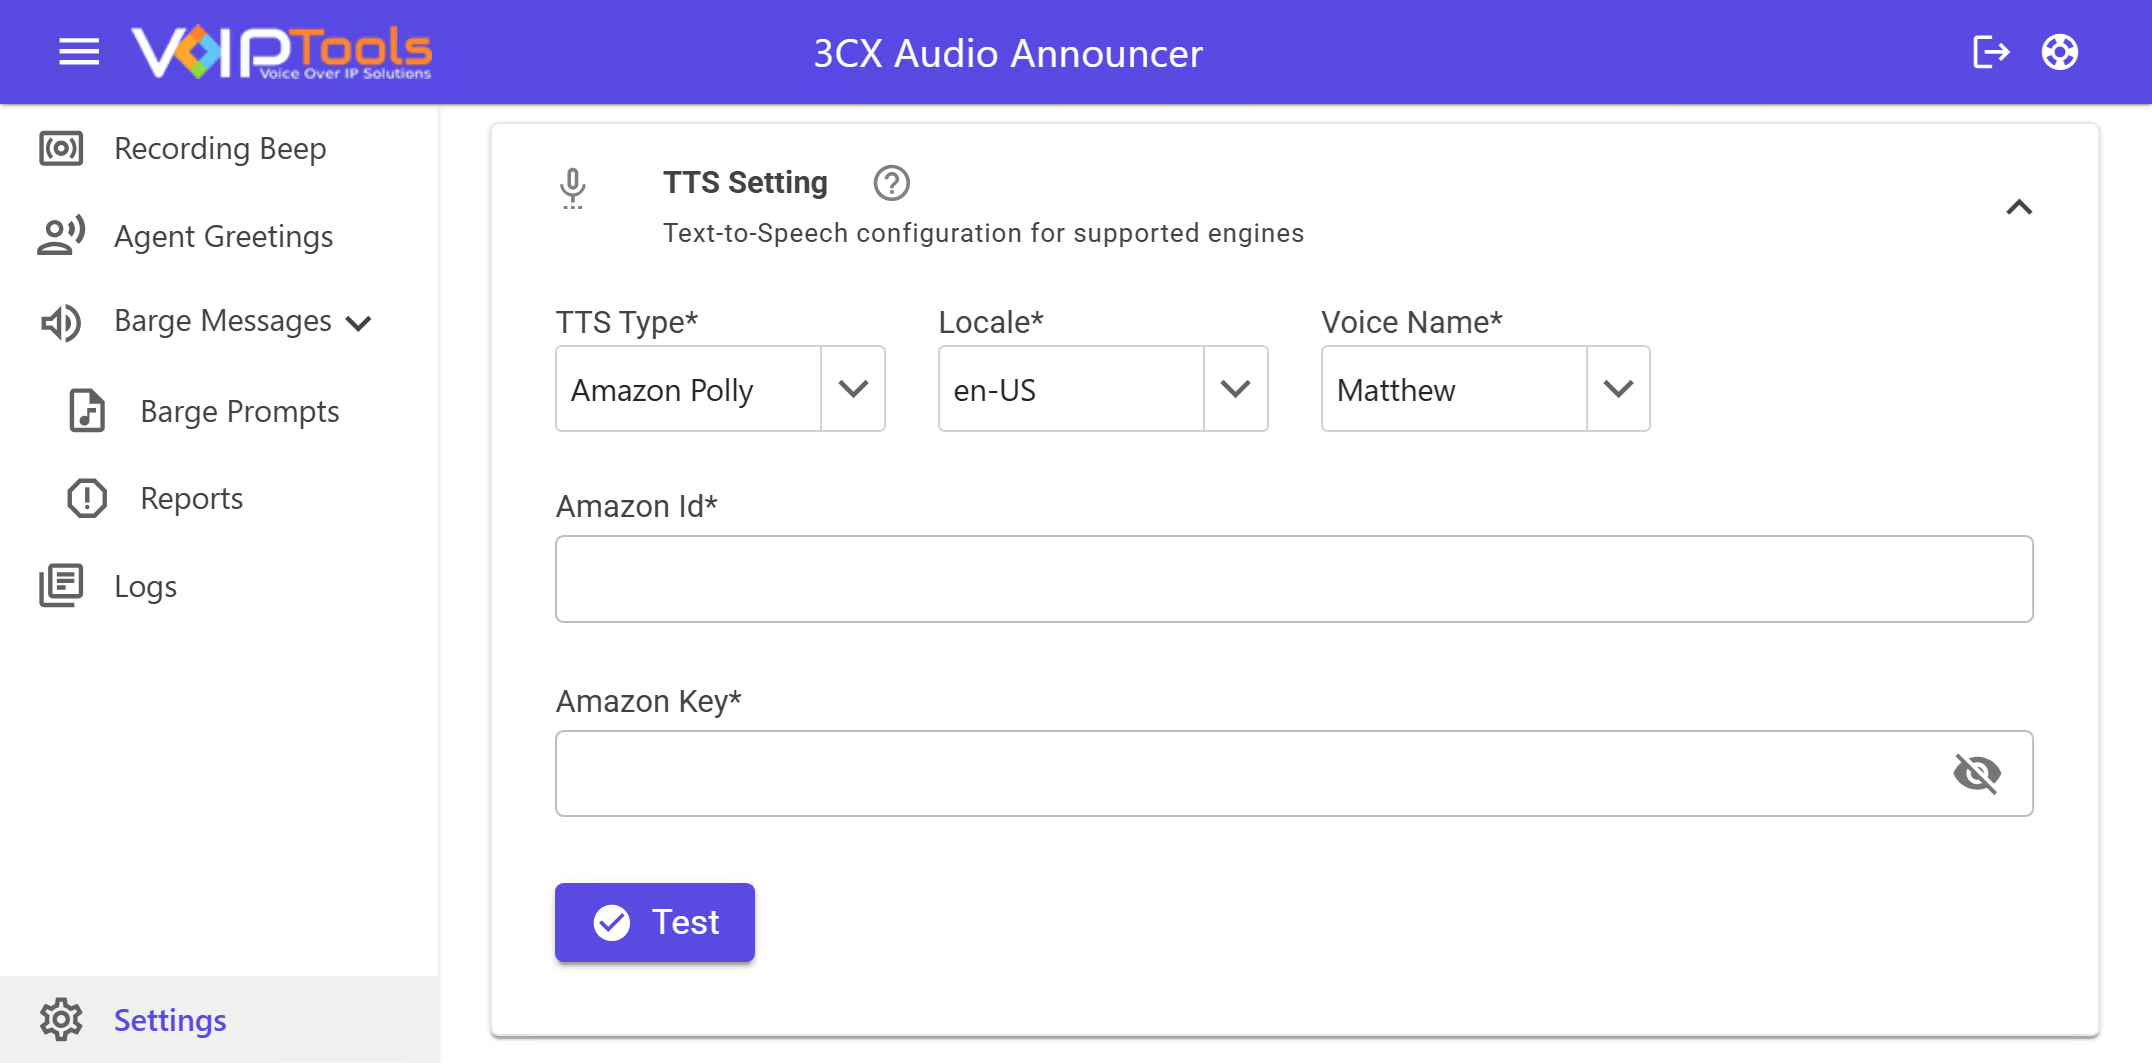
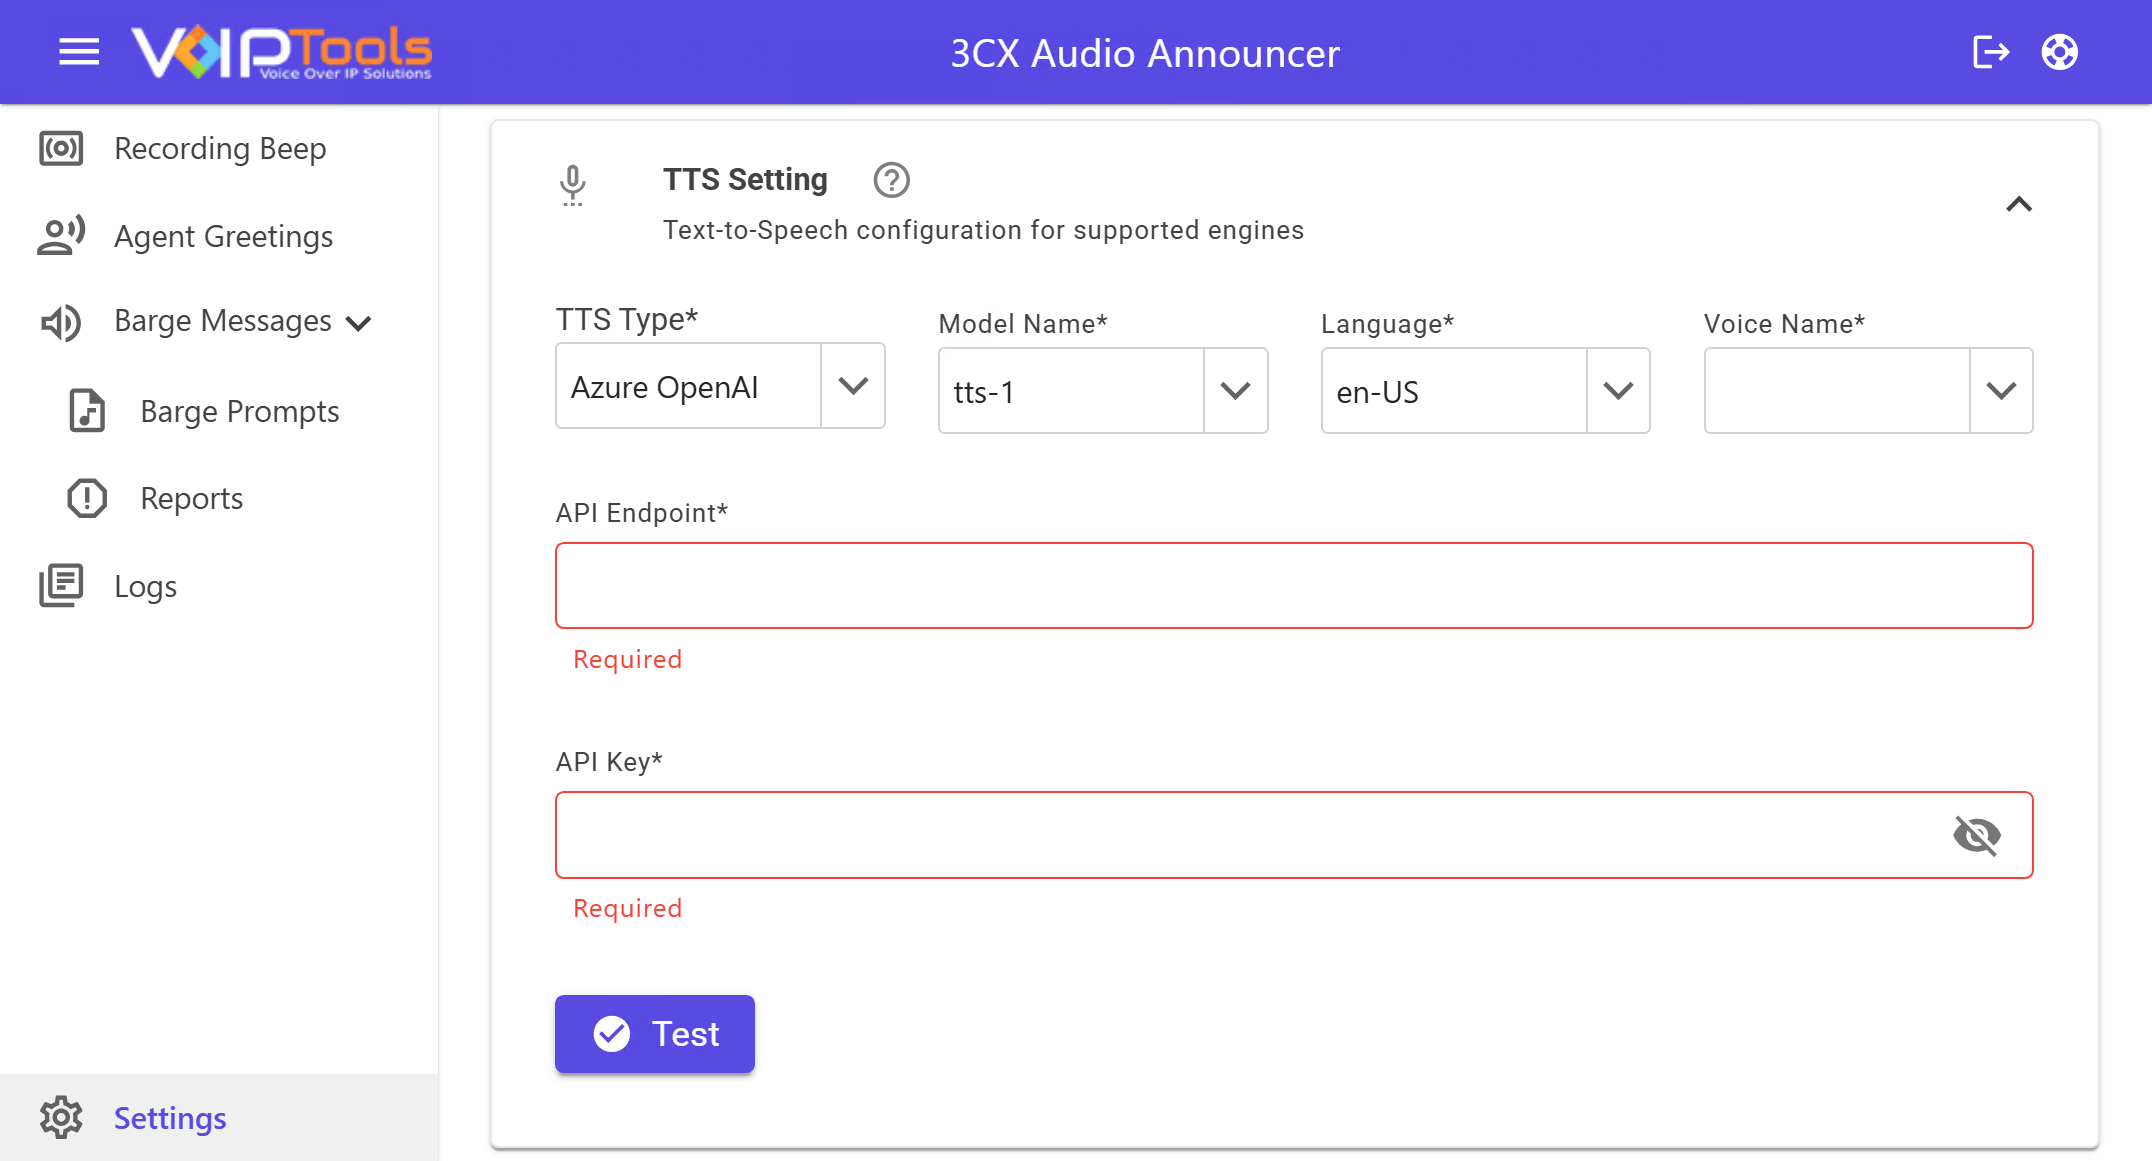
Choose the text-to-speech engine that converts written announcements into spoken audio. Pick whichever service you have access to, fill in its credentials, then click Test to confirm it works.
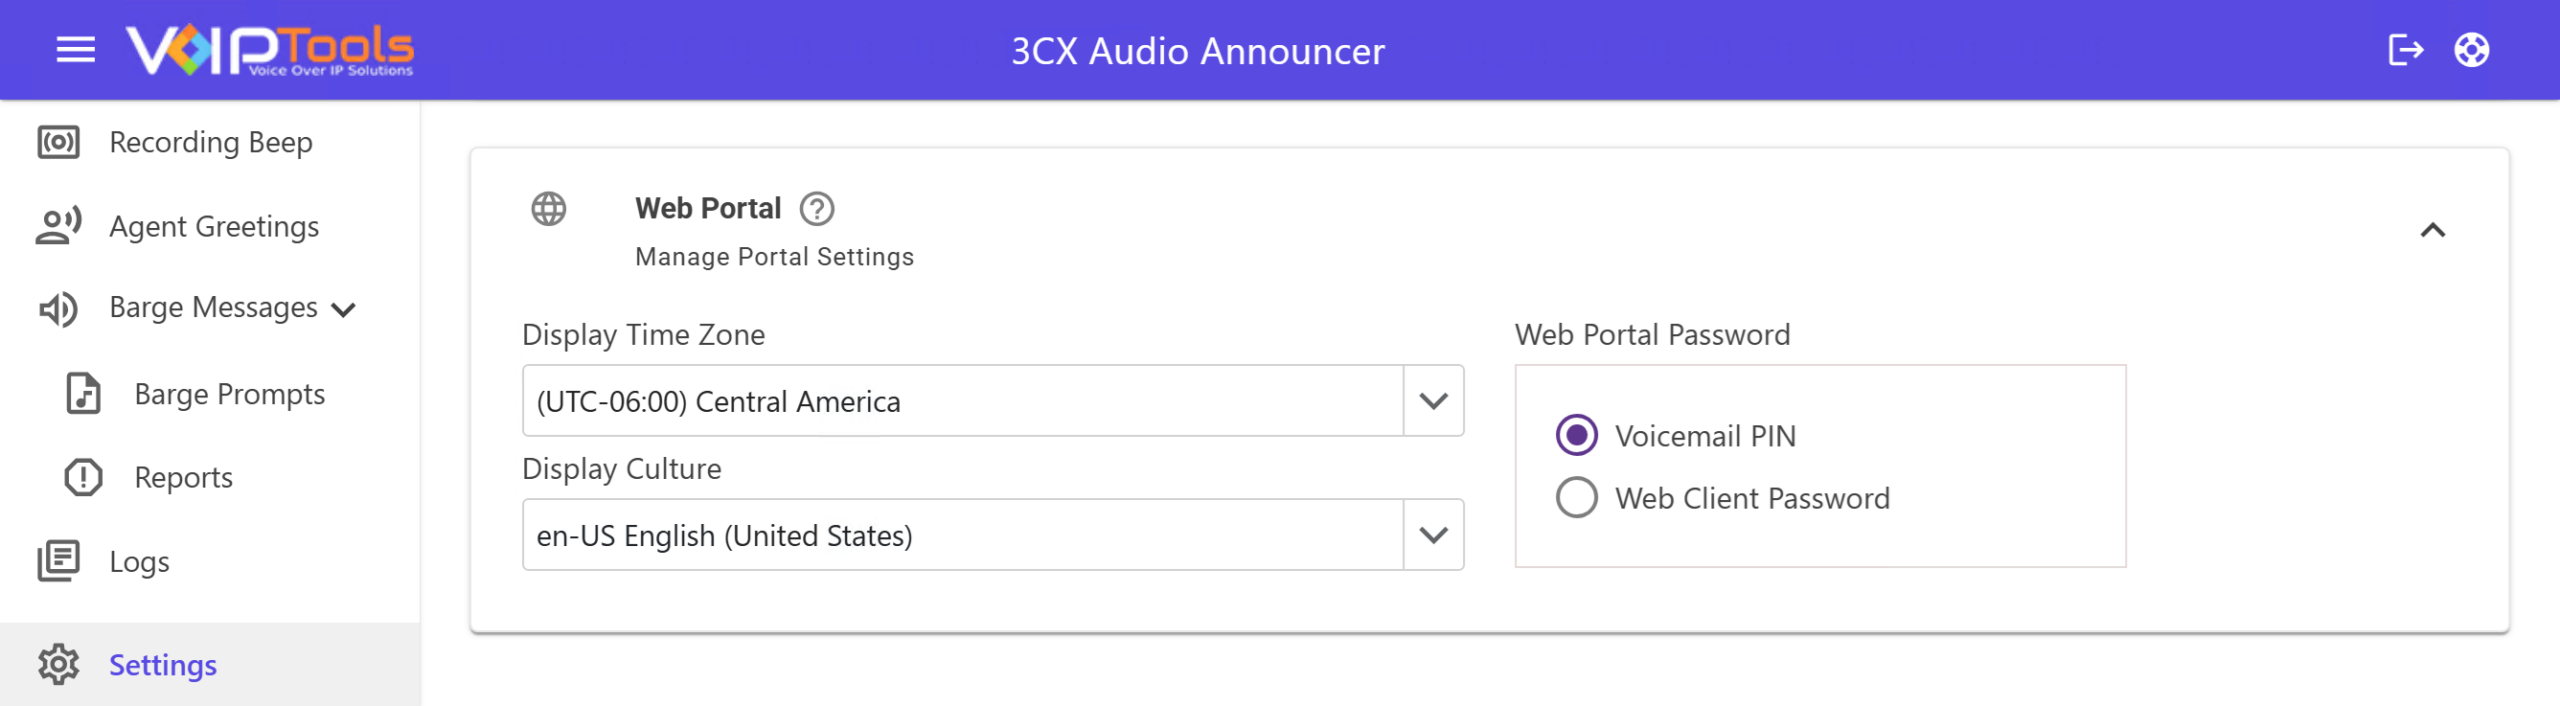
Three settings that control how agents log in and how dates and times appear across the portal.
Figure 30: Web Portal section expanded showing all three settings
Setting
What it does
Display Time Zone
Sets the time zone for all date/time values shown to users. This is a global setting — it applies to everyone. It only changes how times are displayed, not how they’re stored.
Display Culture
Controls date formatting throughout the portal (e.g. MM/DD/YYYY vs. DD/MM/YYYY). Select the format that matches your region.
Web Portal Password
Picks which 3CX password agents use to log in: Voicemail PIN (default) or Web Client Password. Choose whichever your team already uses.
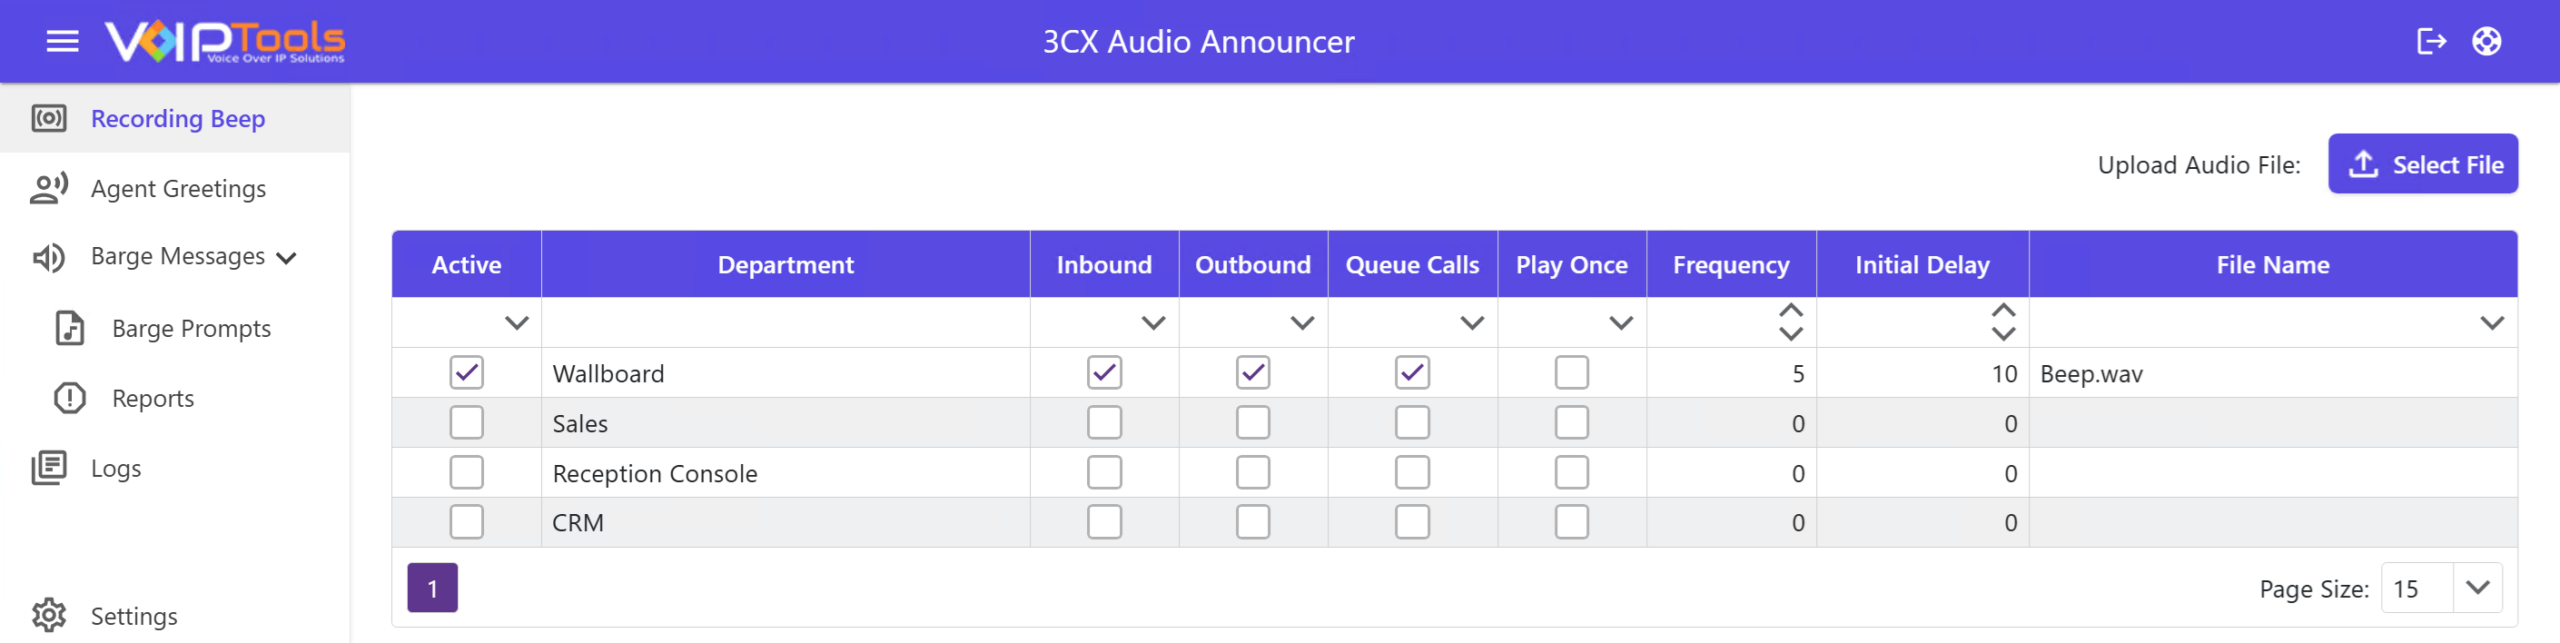
Recording Beep plays an audio tone to let callers know a conversation is being recorded. You can set which departments use it, which call types it applies to, and how often the beep plays.
Figure 33: The Recording Beep page showing the department grid and Upload Audio File button
Field
Definition
Active
Enables or disables the recording beep setting for the selected department.
Department
Displays the department or queue name to which the recording beep settings apply.
Inbound
Specifies whether the recording beep plays for inbound calls.
Outbound
Specifies whether the recording beep plays for outbound calls.
Queue Calls
Specifies whether the recording beep plays for queue calls.
Play Once
When selected, plays the beep only one time instead of repeating it.
Frequency
Defines how often the recording beep plays, measured in seconds. Example: 5 seconds.
Initial Delay
Defines the delay before the first beep plays, measured in seconds. Example: 10 seconds.
File Name
Displays the audio file used for the recording beep, such as Beep.wav.
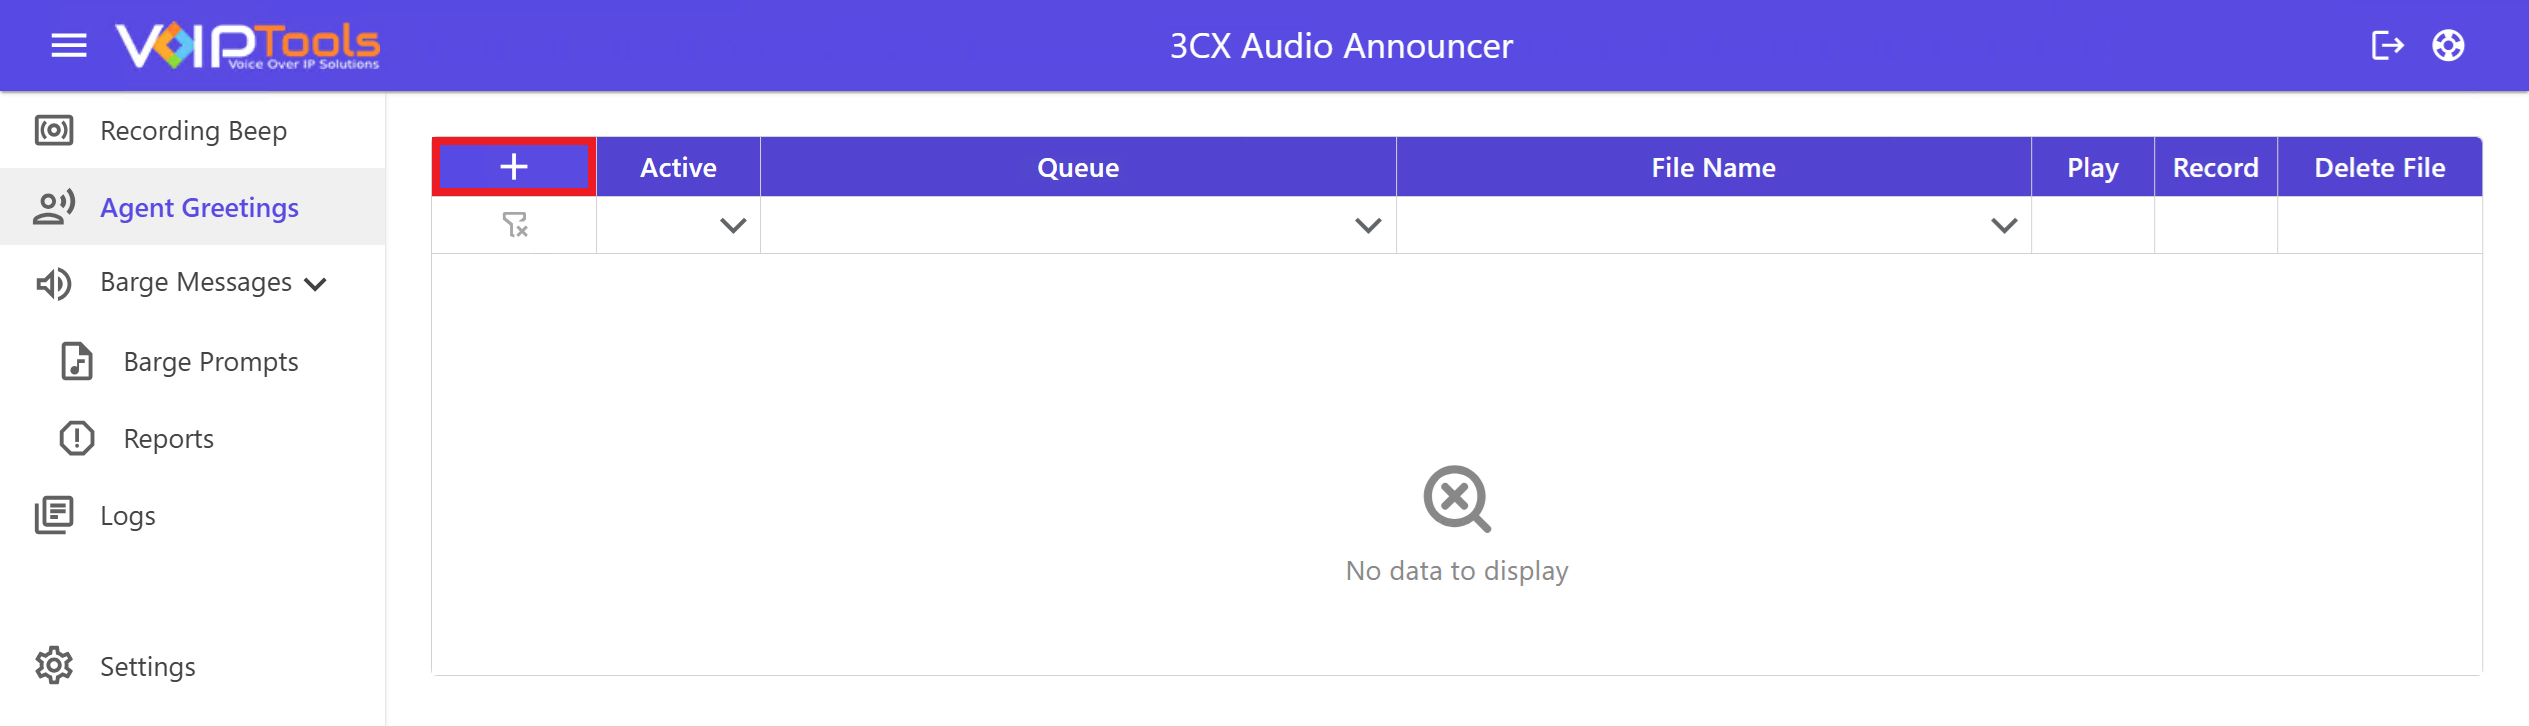
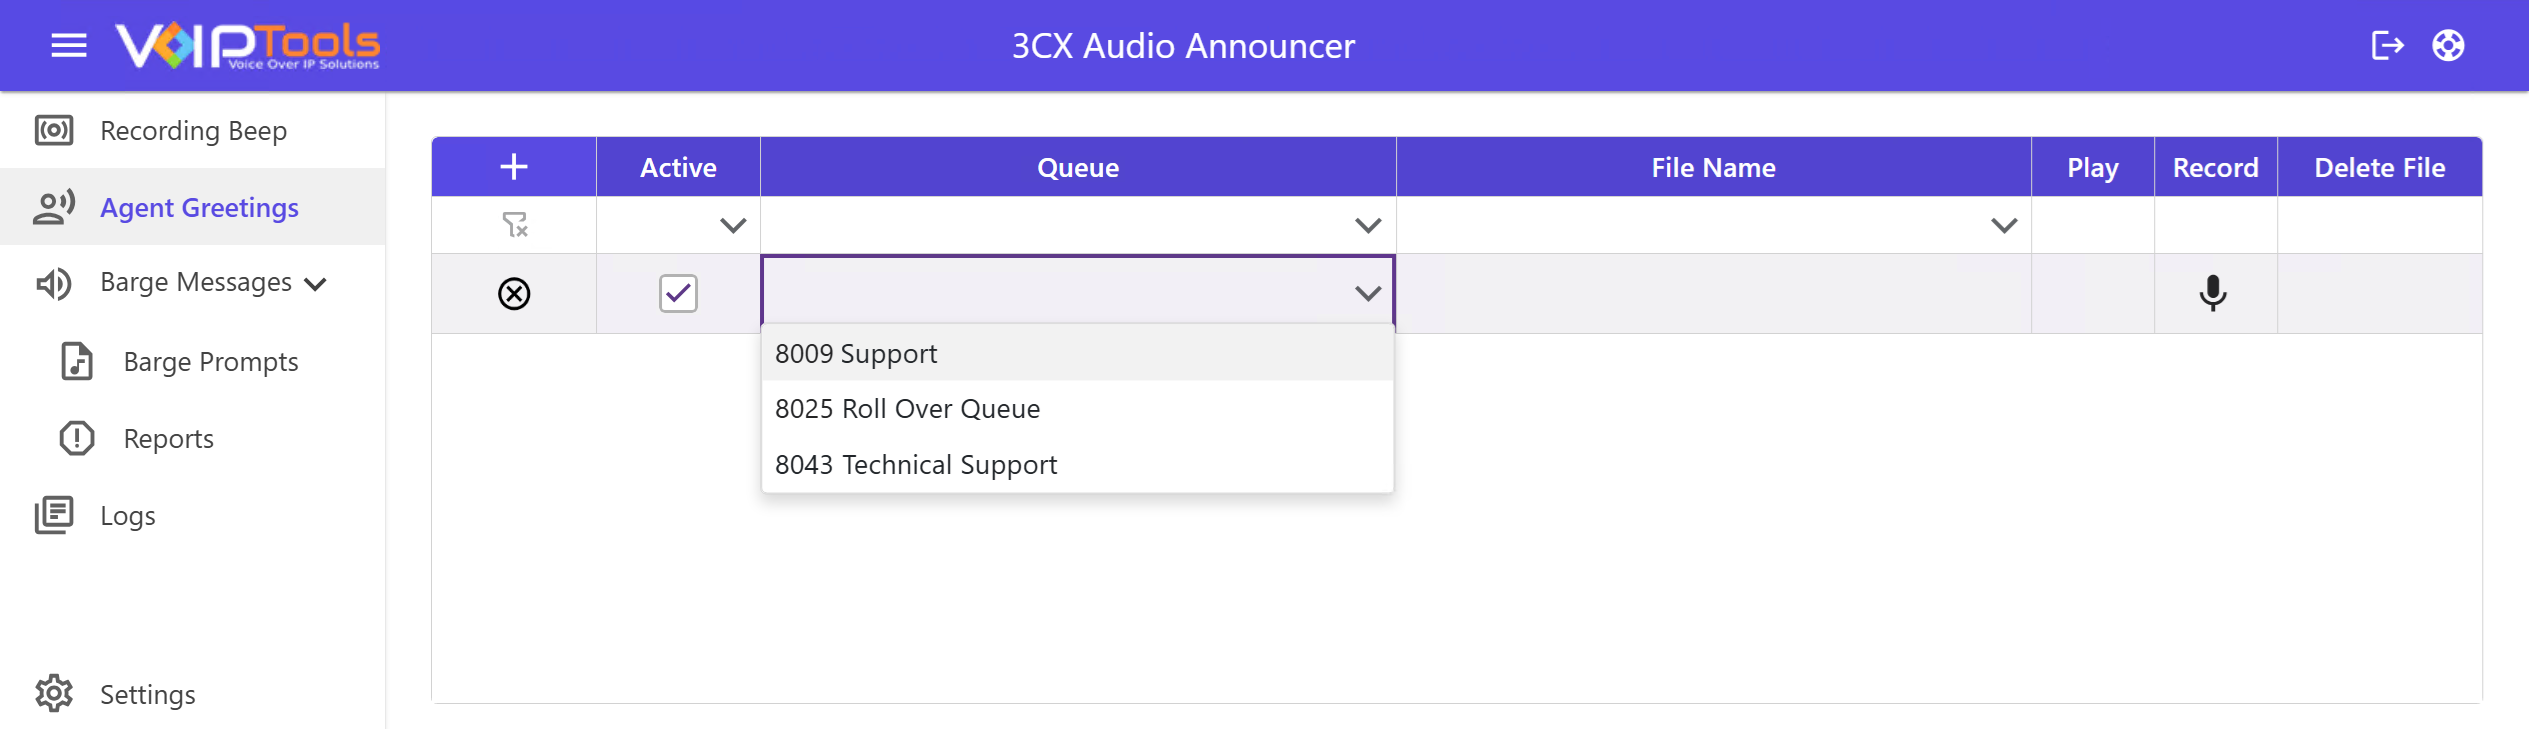
Agent Greetings lets you assign a personalized audio message to a queue. When an agent answers a call from that queue, the greeting plays automatically before the conversation begins so the caller hears a consistent, professional introduction every time.
How it works
Add a row › Pick a queue › Record or upload a greeting › Mark it active
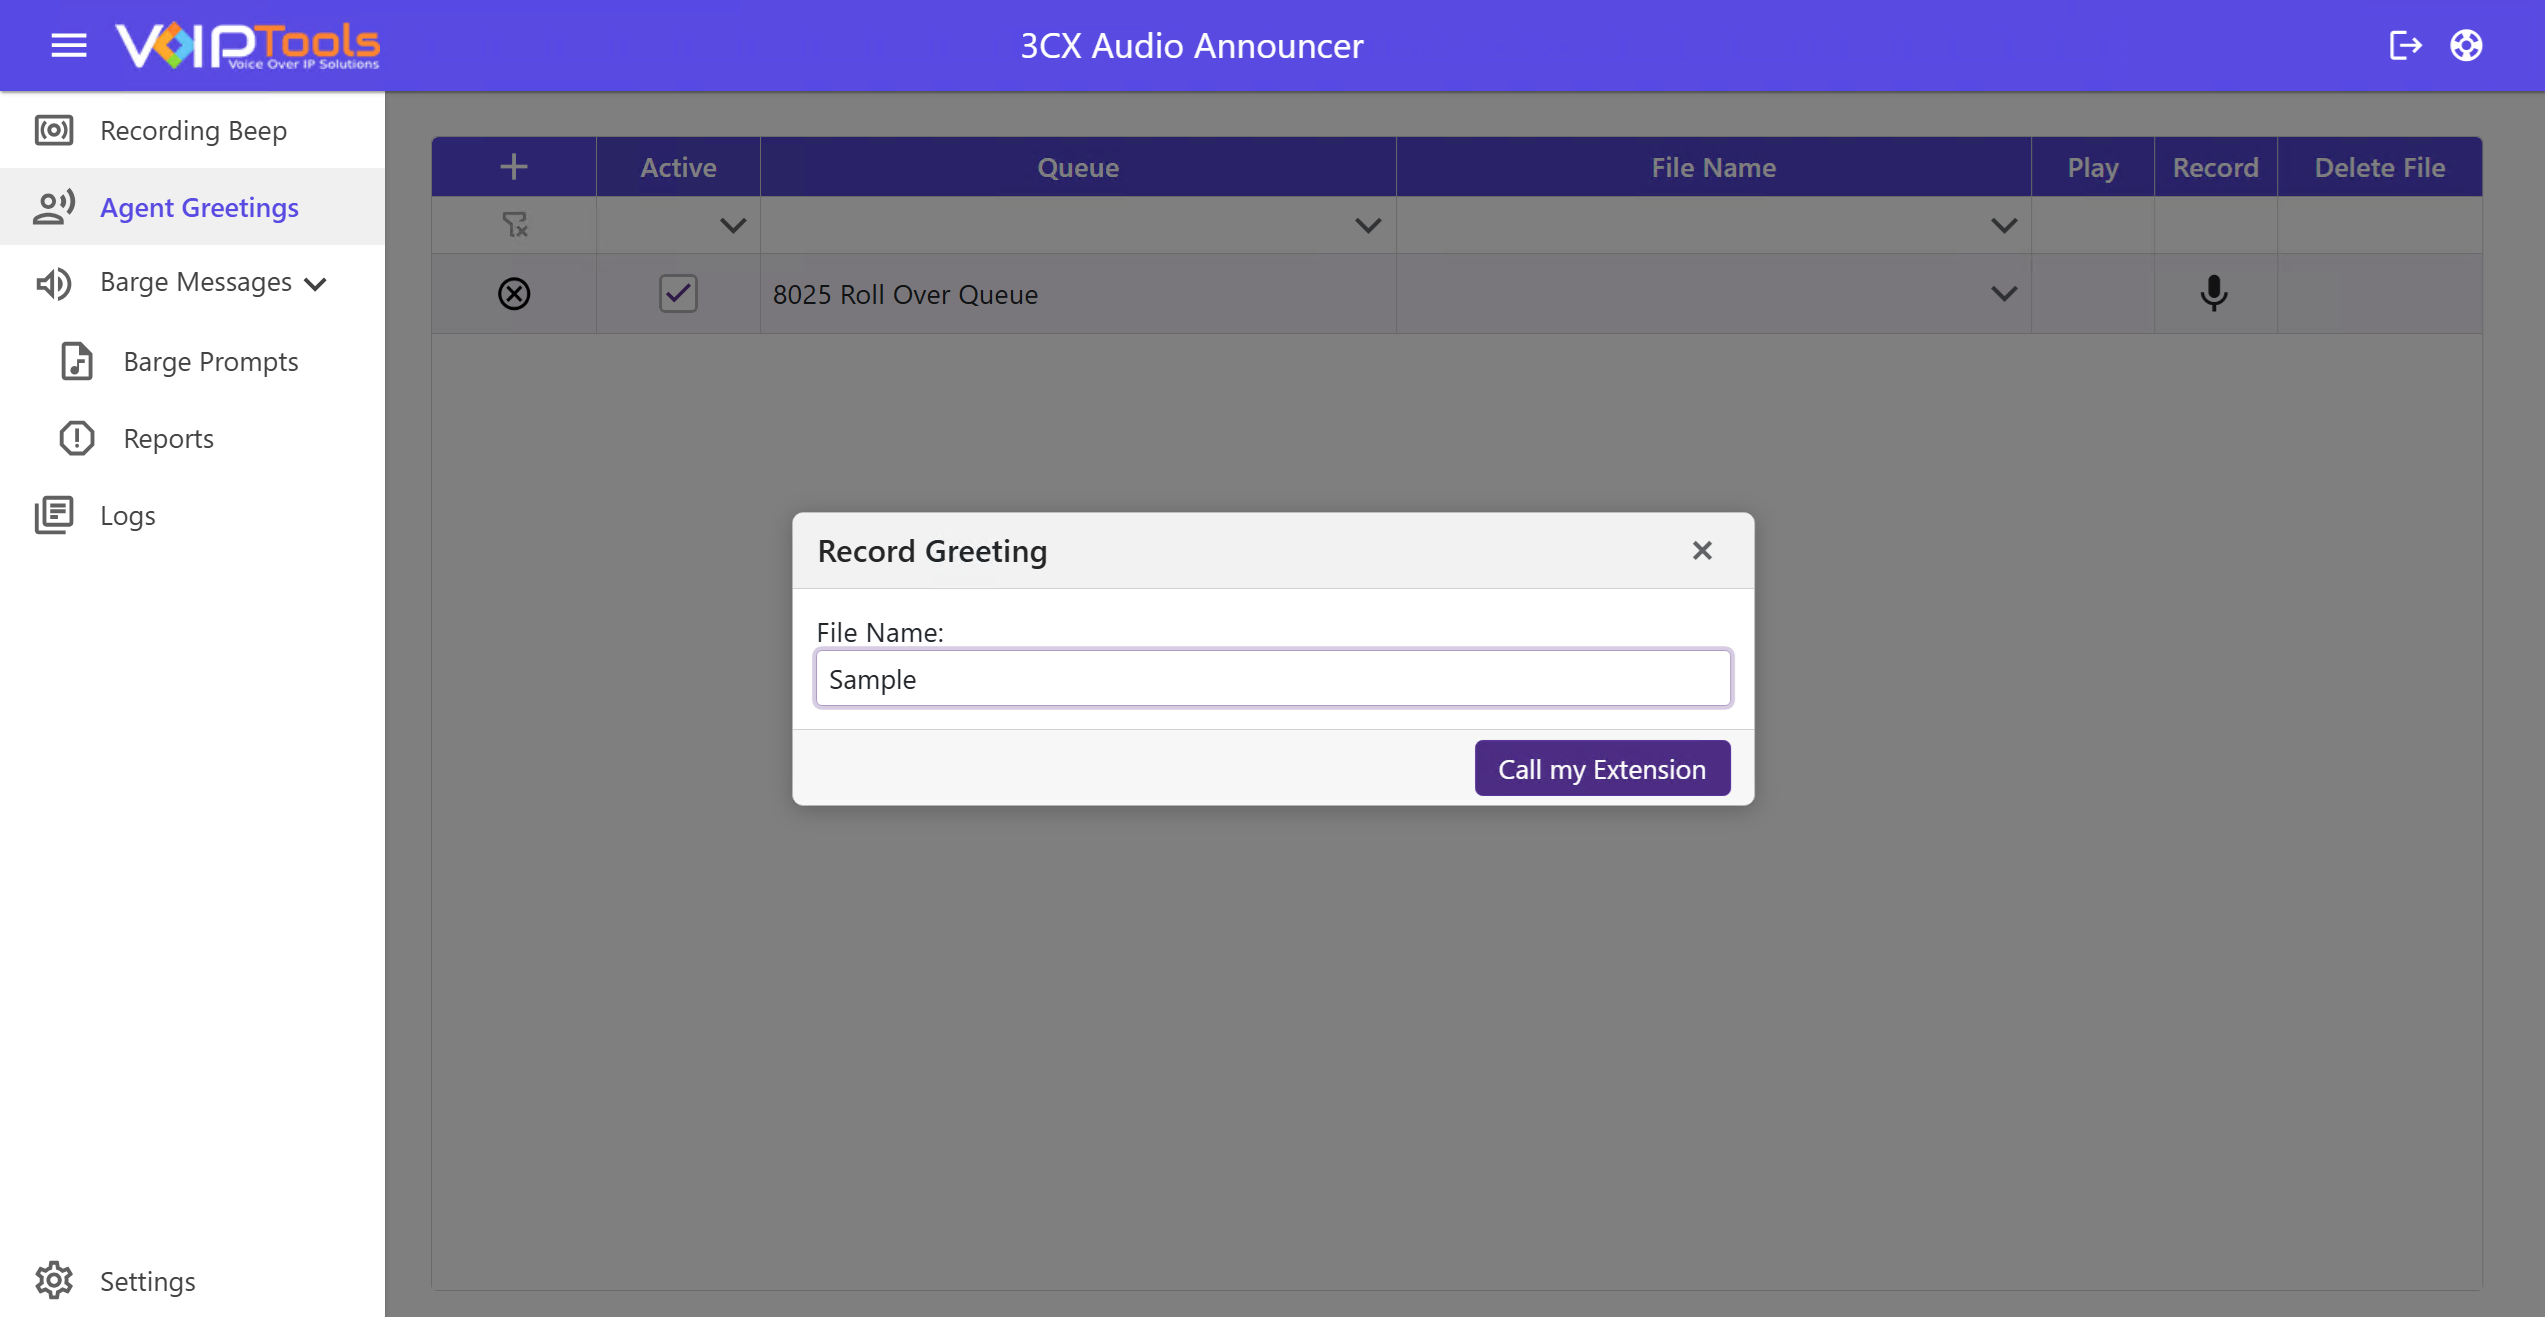
The quickest way to record a greeting is straight from your desk phone. Audio Announcer calls your extension and records whatever you say.
Figure 36: Record Greeting dialog with the File Name field and “Call my Extension” button
On the new row, click the microphone icon Record in the Record column.
In the Record Greeting dialog, type a name for the file in the File Name field (e.g. Sample).
Click Call my Extension. Your desk phone will ring, pick up, and record your greeting after the tone.
Hang up when you’re done. The file saves automatically and appears in the File Name column.
Make sure your extension is registered in 3CX before using this method. If your phone doesn’t ring, check with your administrator that your extension is active.
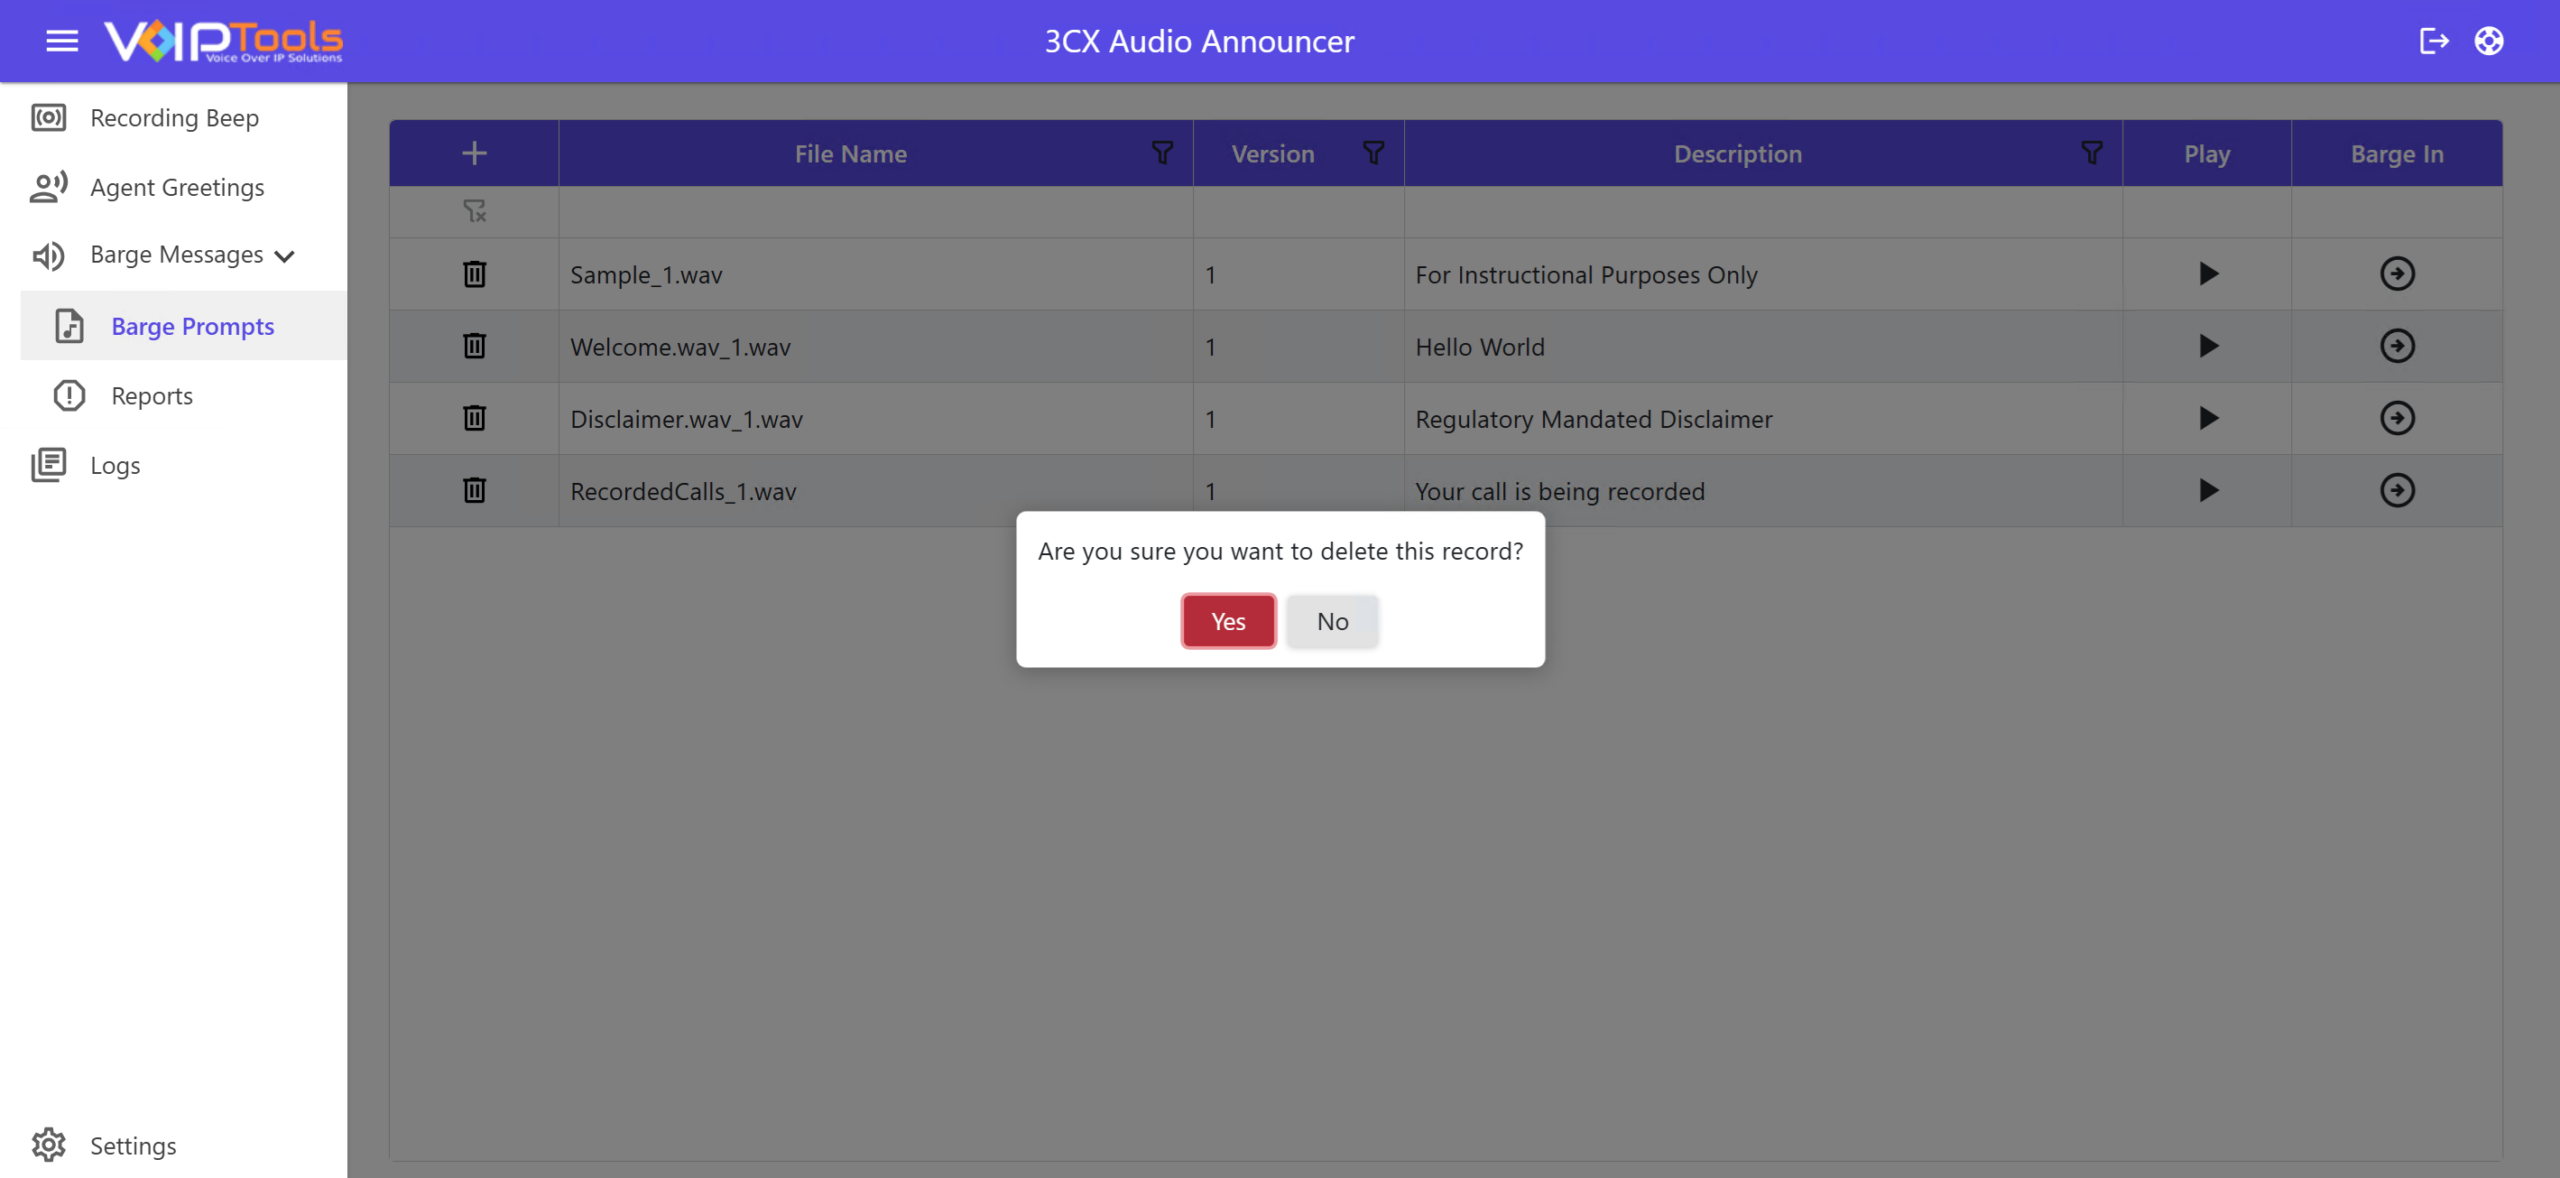
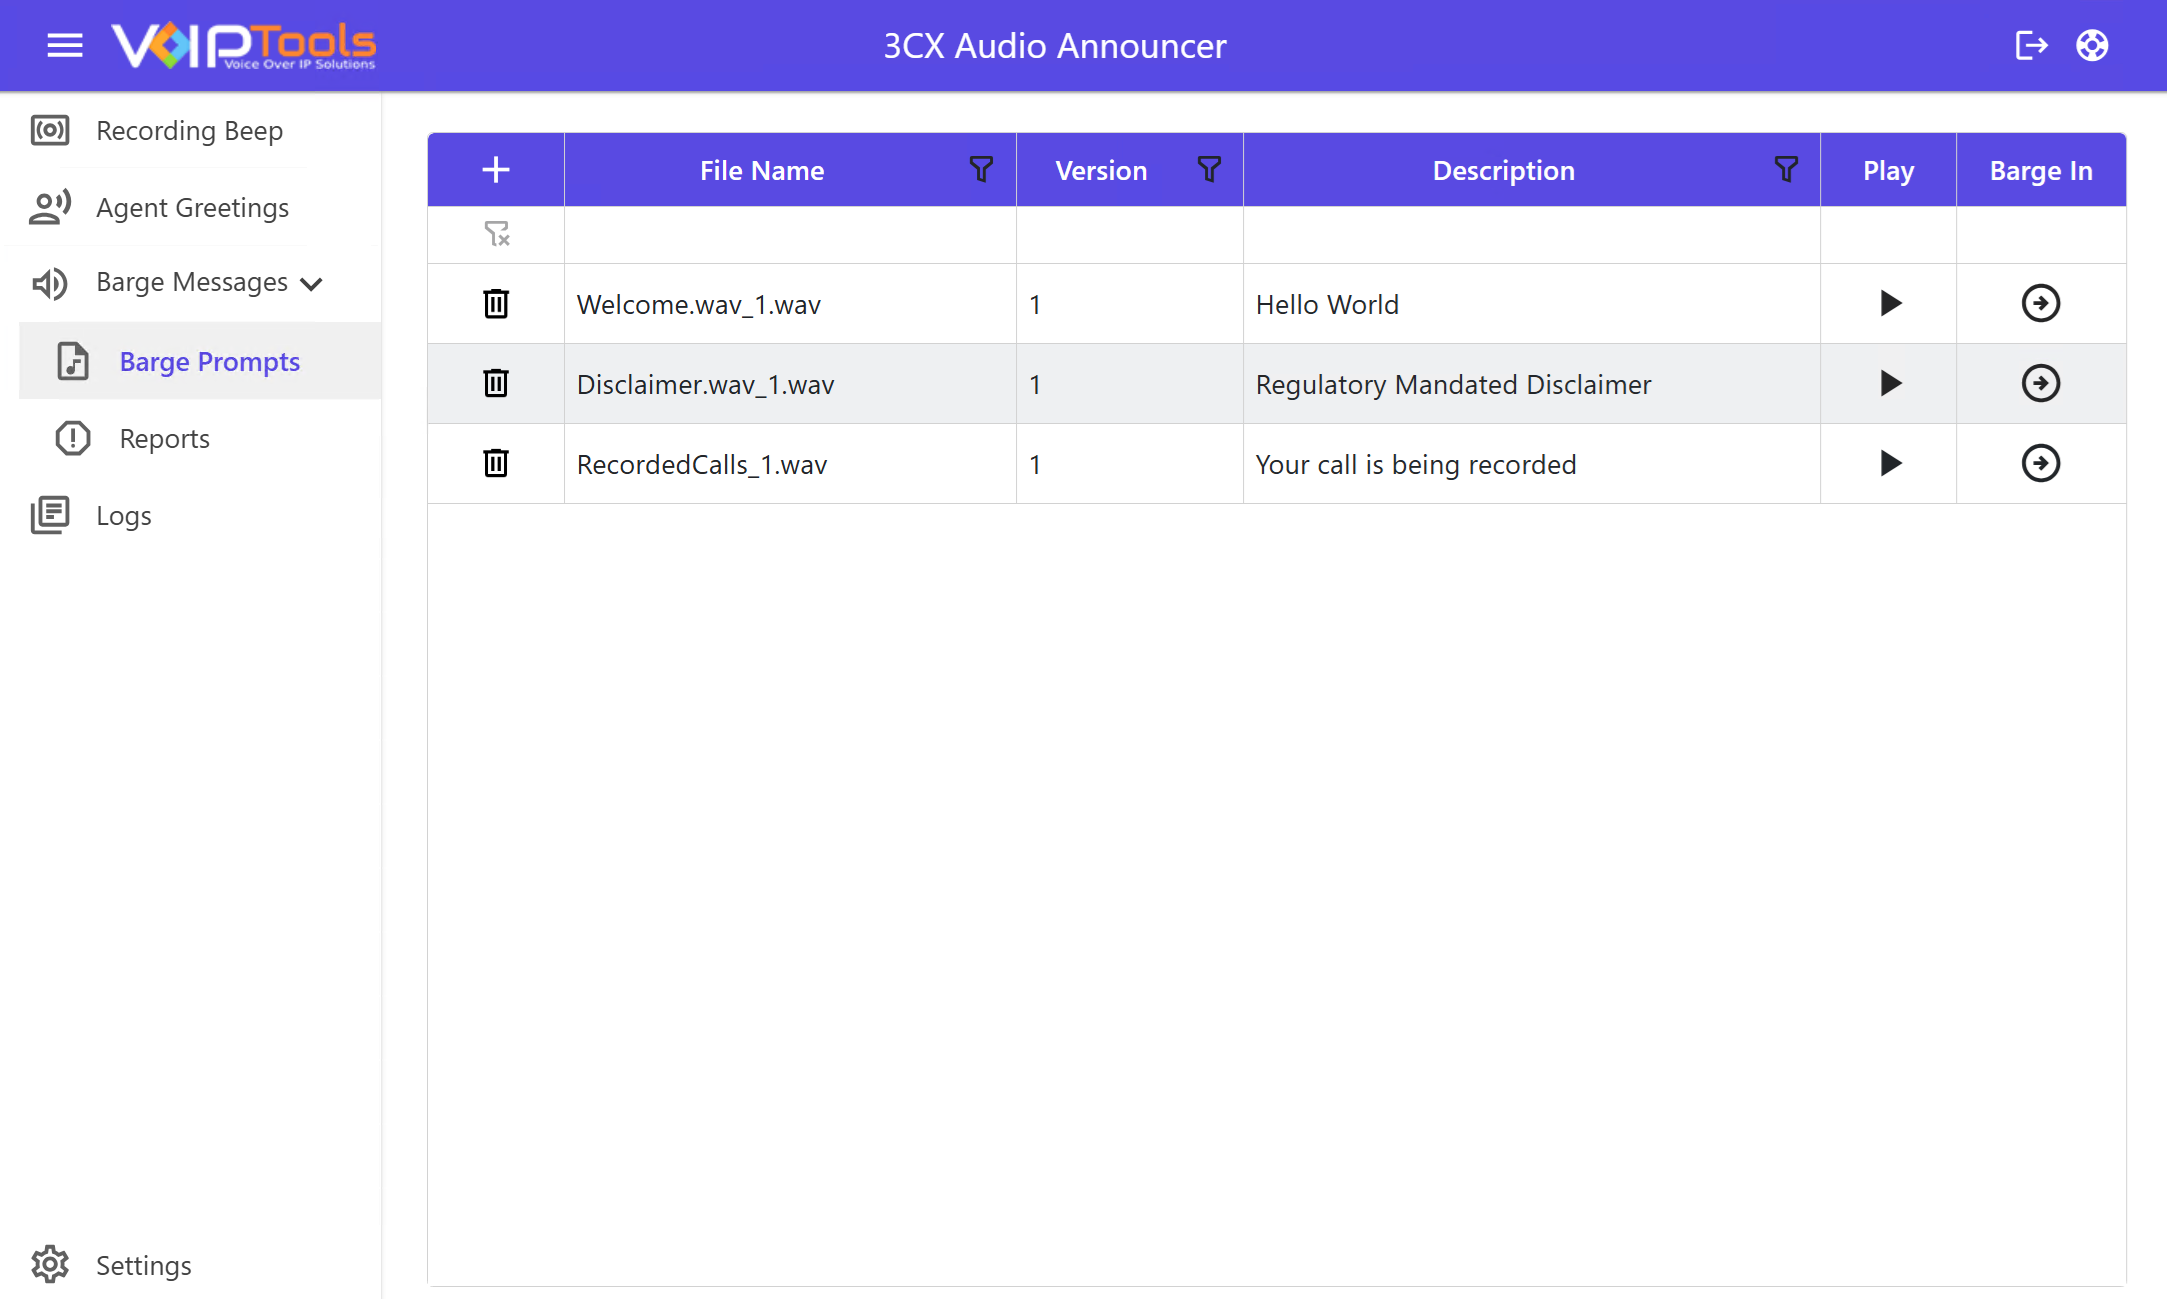
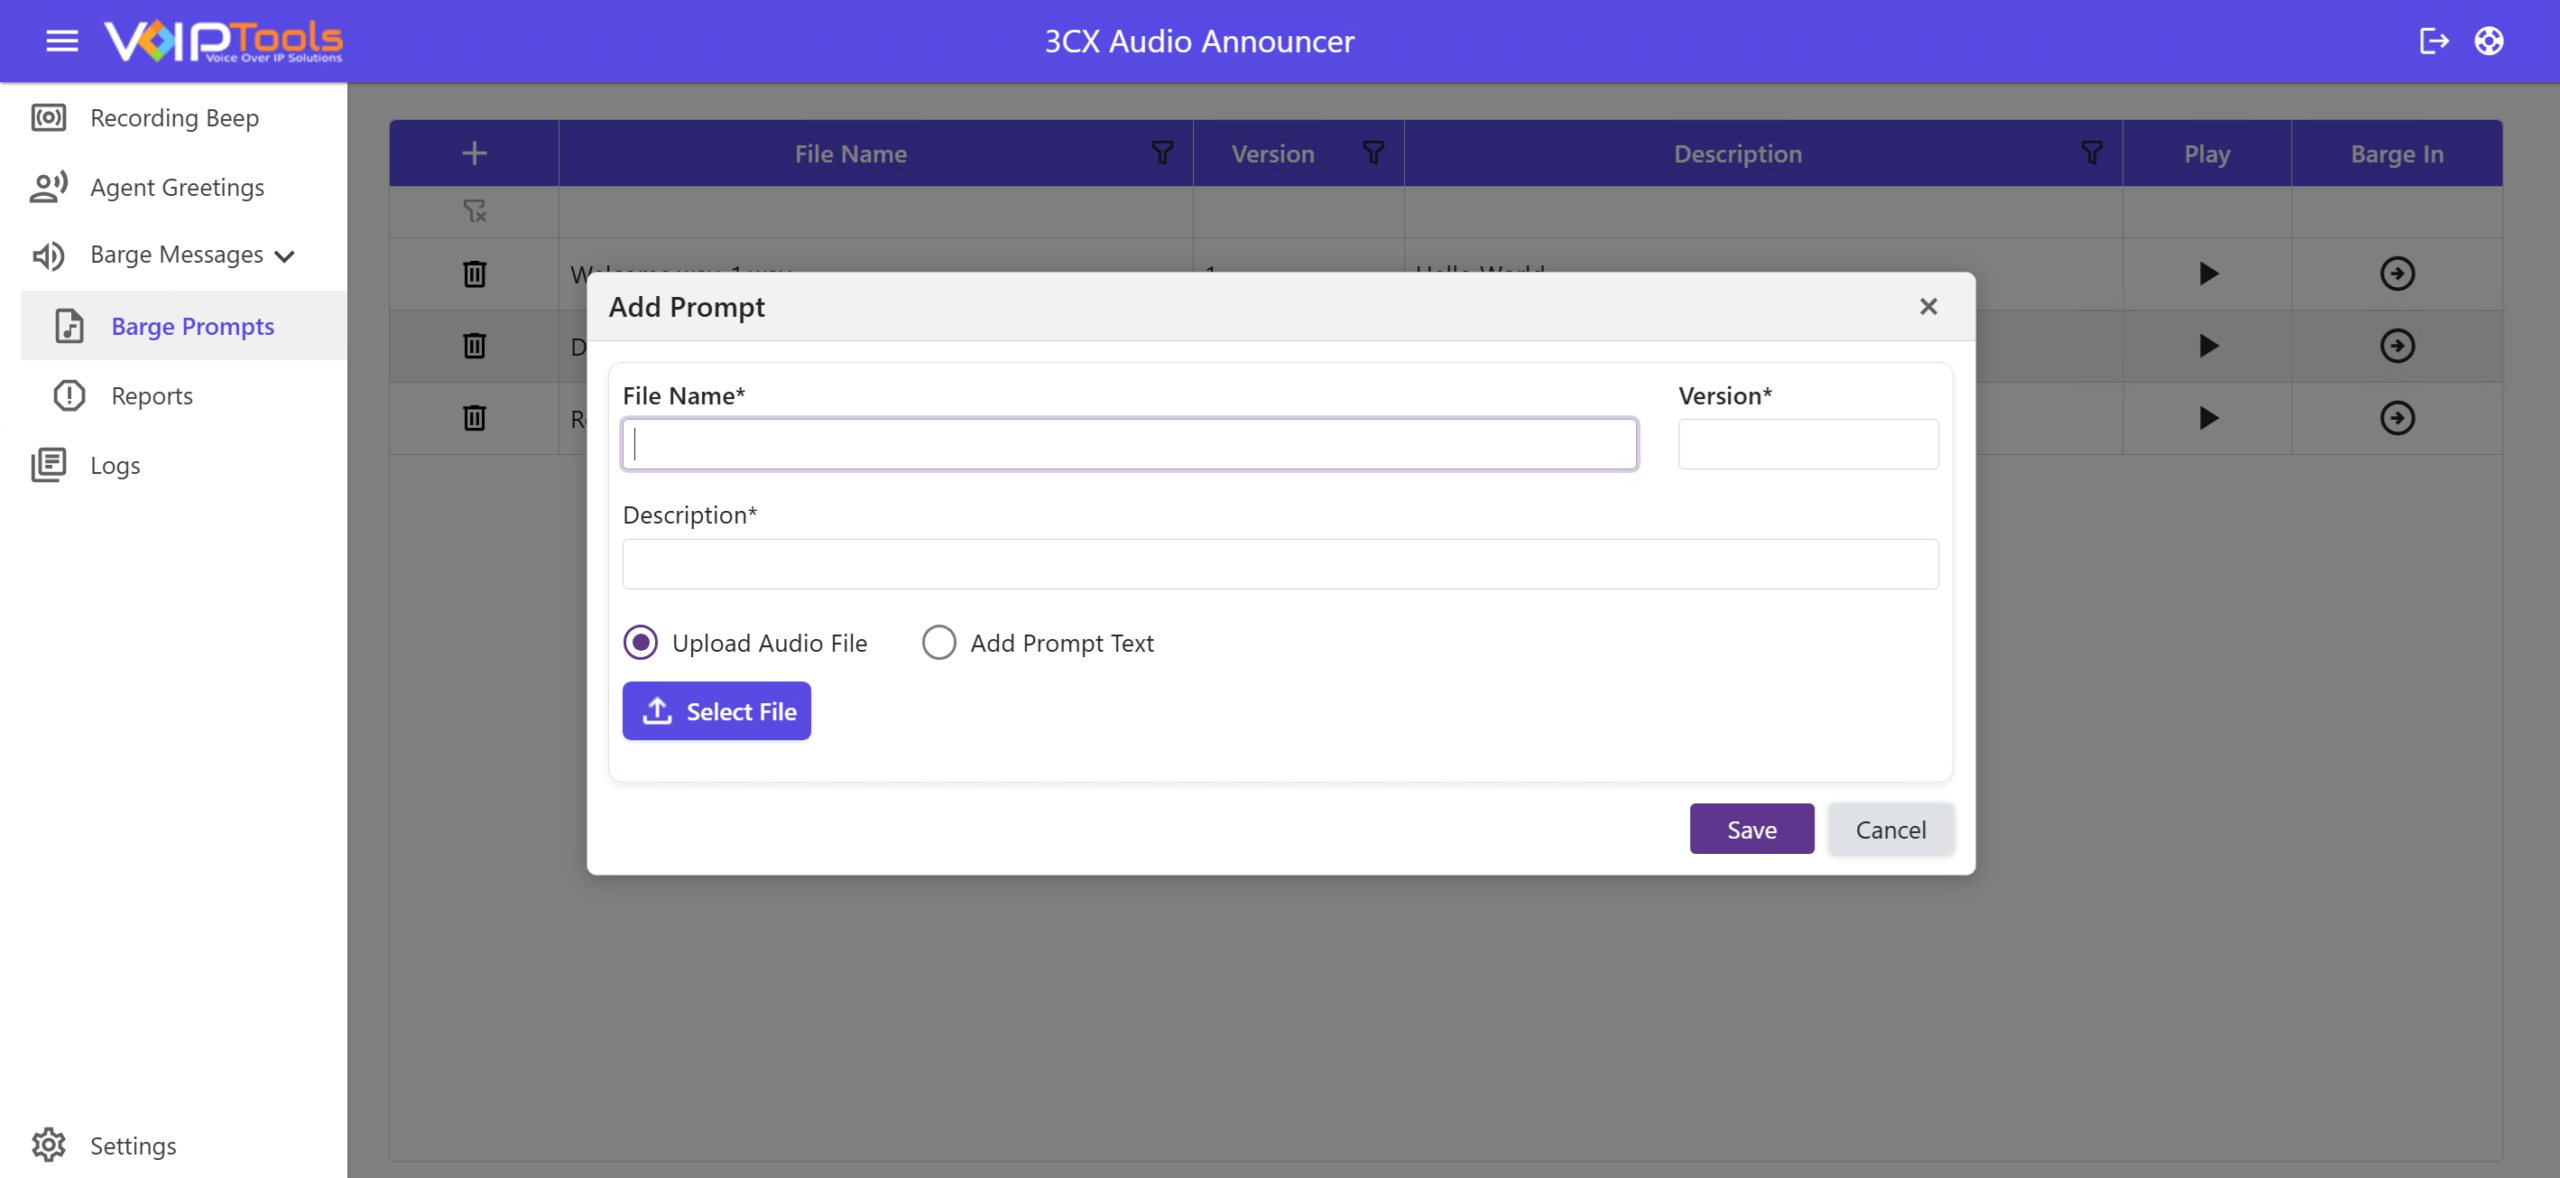
Barge Prompts are short audio messages that play when a supervisor joins or “barges into” a live call. Think of them as a polite heads-up to the caller that someone else has entered the conversation. You can create prompts from an audio file you upload, or by typing text that gets converted to speech.
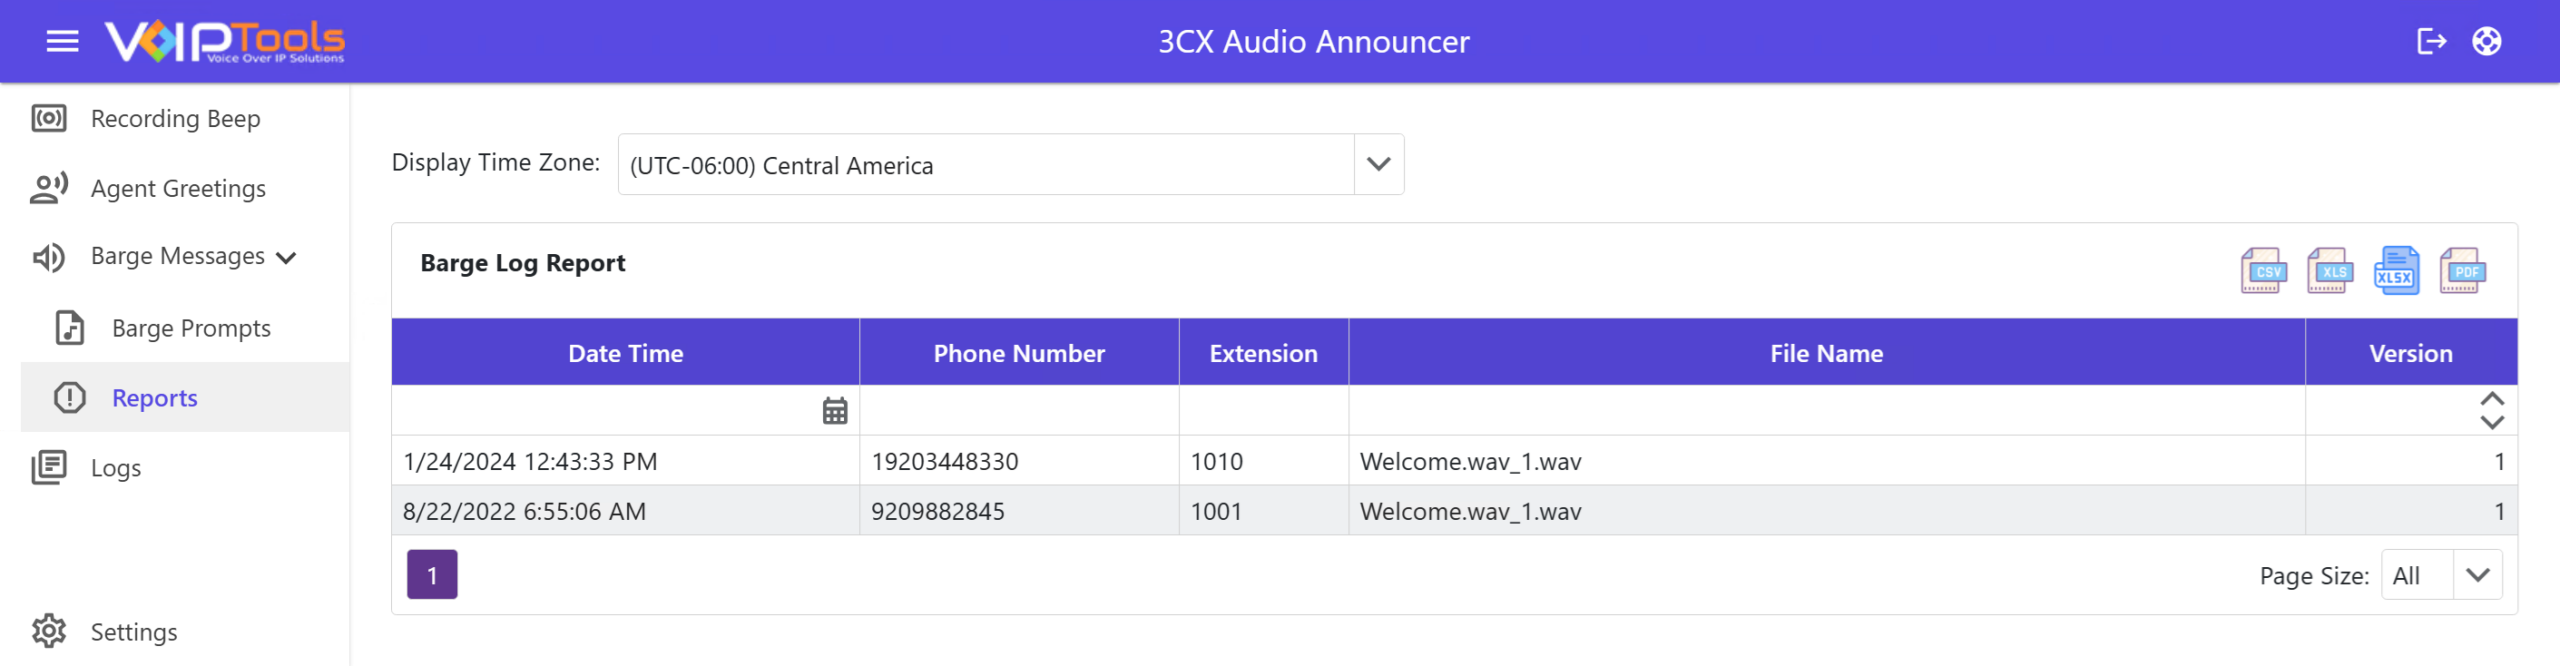
In the Reports screen, you can see the reports of the BargedIn calls made by the user and the manager.
Figure 44: Reports screen
Field Definitions
DATE TIME
The date and time of the prompt messages barged in. The date format is MM/DD/YYYY and the time format is HH:MM:SS.
PHONE NUMBER
Phone number to which your prompt messages barged in. If the phone number is the same server extension, it is an Internal inbound call. If the phone number has another server inbound number, it is an External call.
EXTENSION
The extensions to which you barged in your prompt messages.
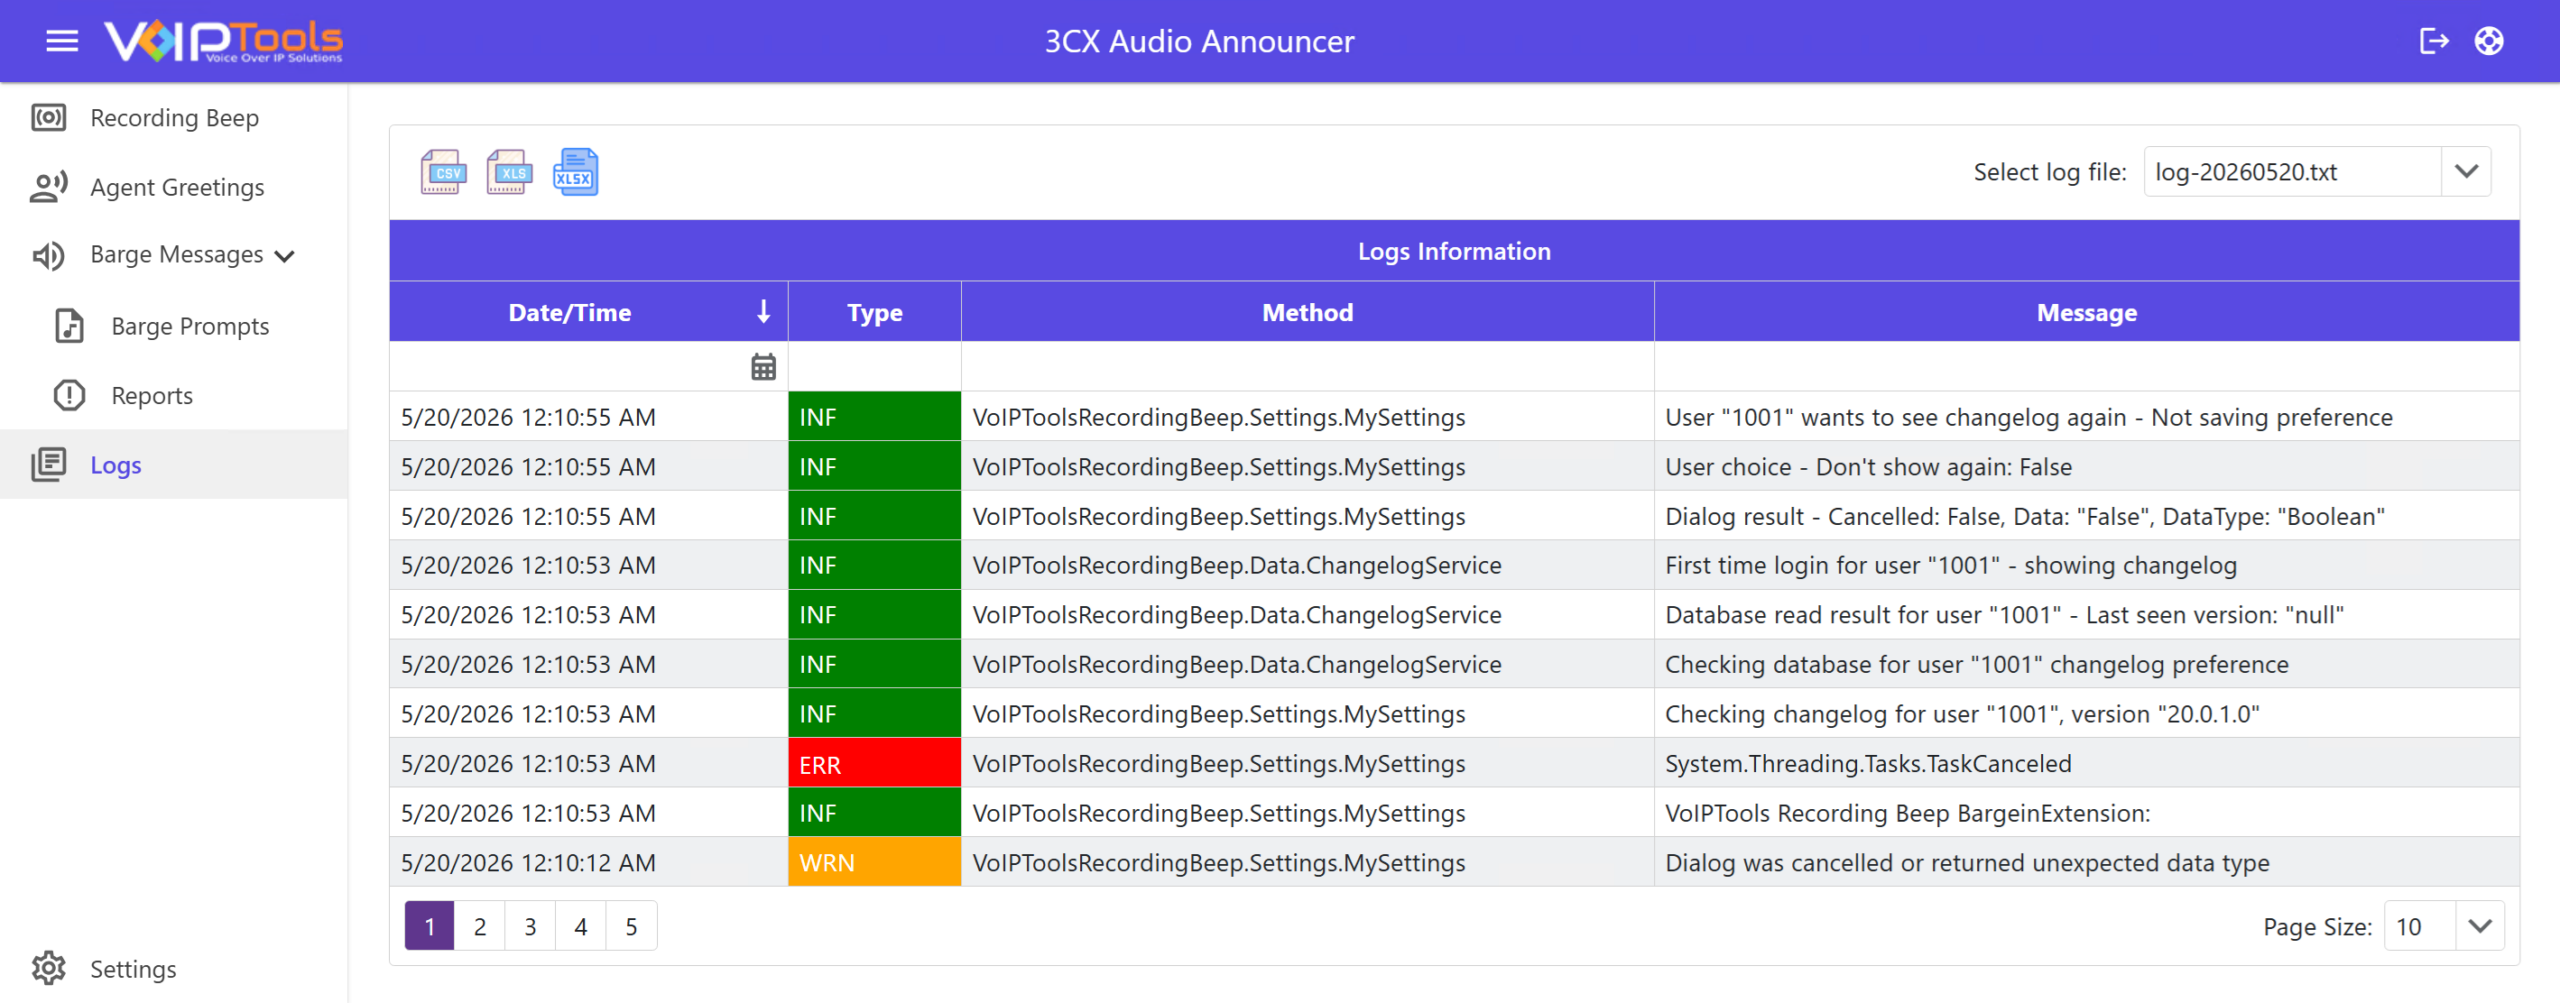
The Logs Menu lets you view the login and logout events of all the sessions along with ‘Date’ and ‘Time’ that is according to the time zone set in the ‘Web Portal’ tab in Settings menu.
Figure 45: Logs Menu Overview
Field Definitions
Field
Definition
Logs Information Table
Displays system events and activity records used for monitoring, troubleshooting, and auditing. It helps users review application behavior, track system actions, and identify issues based on the selected log file.
Date/Time
Displays the date and time when the log event occurred based on the system-generated timestamp.
Type
Indicates the category or severity level of the log entry to help identify the nature of the event. INF = Informational (normal activity), WRN = Warning (potential issue), ERR = Error (system issue or failure).
Method
Displays the system component, process, or function where the log event originated.
Message
Shows detailed information about the recorded event, including actions performed, warnings, errors, or system responses.
Select Log File
Allows you to select a specific log file to view its recorded events. Example is log-20260520.
Page Size
Defines the number of log entries displayed per page.


NOTE:

 icon and then click Download.


 to play and test your prompt message.
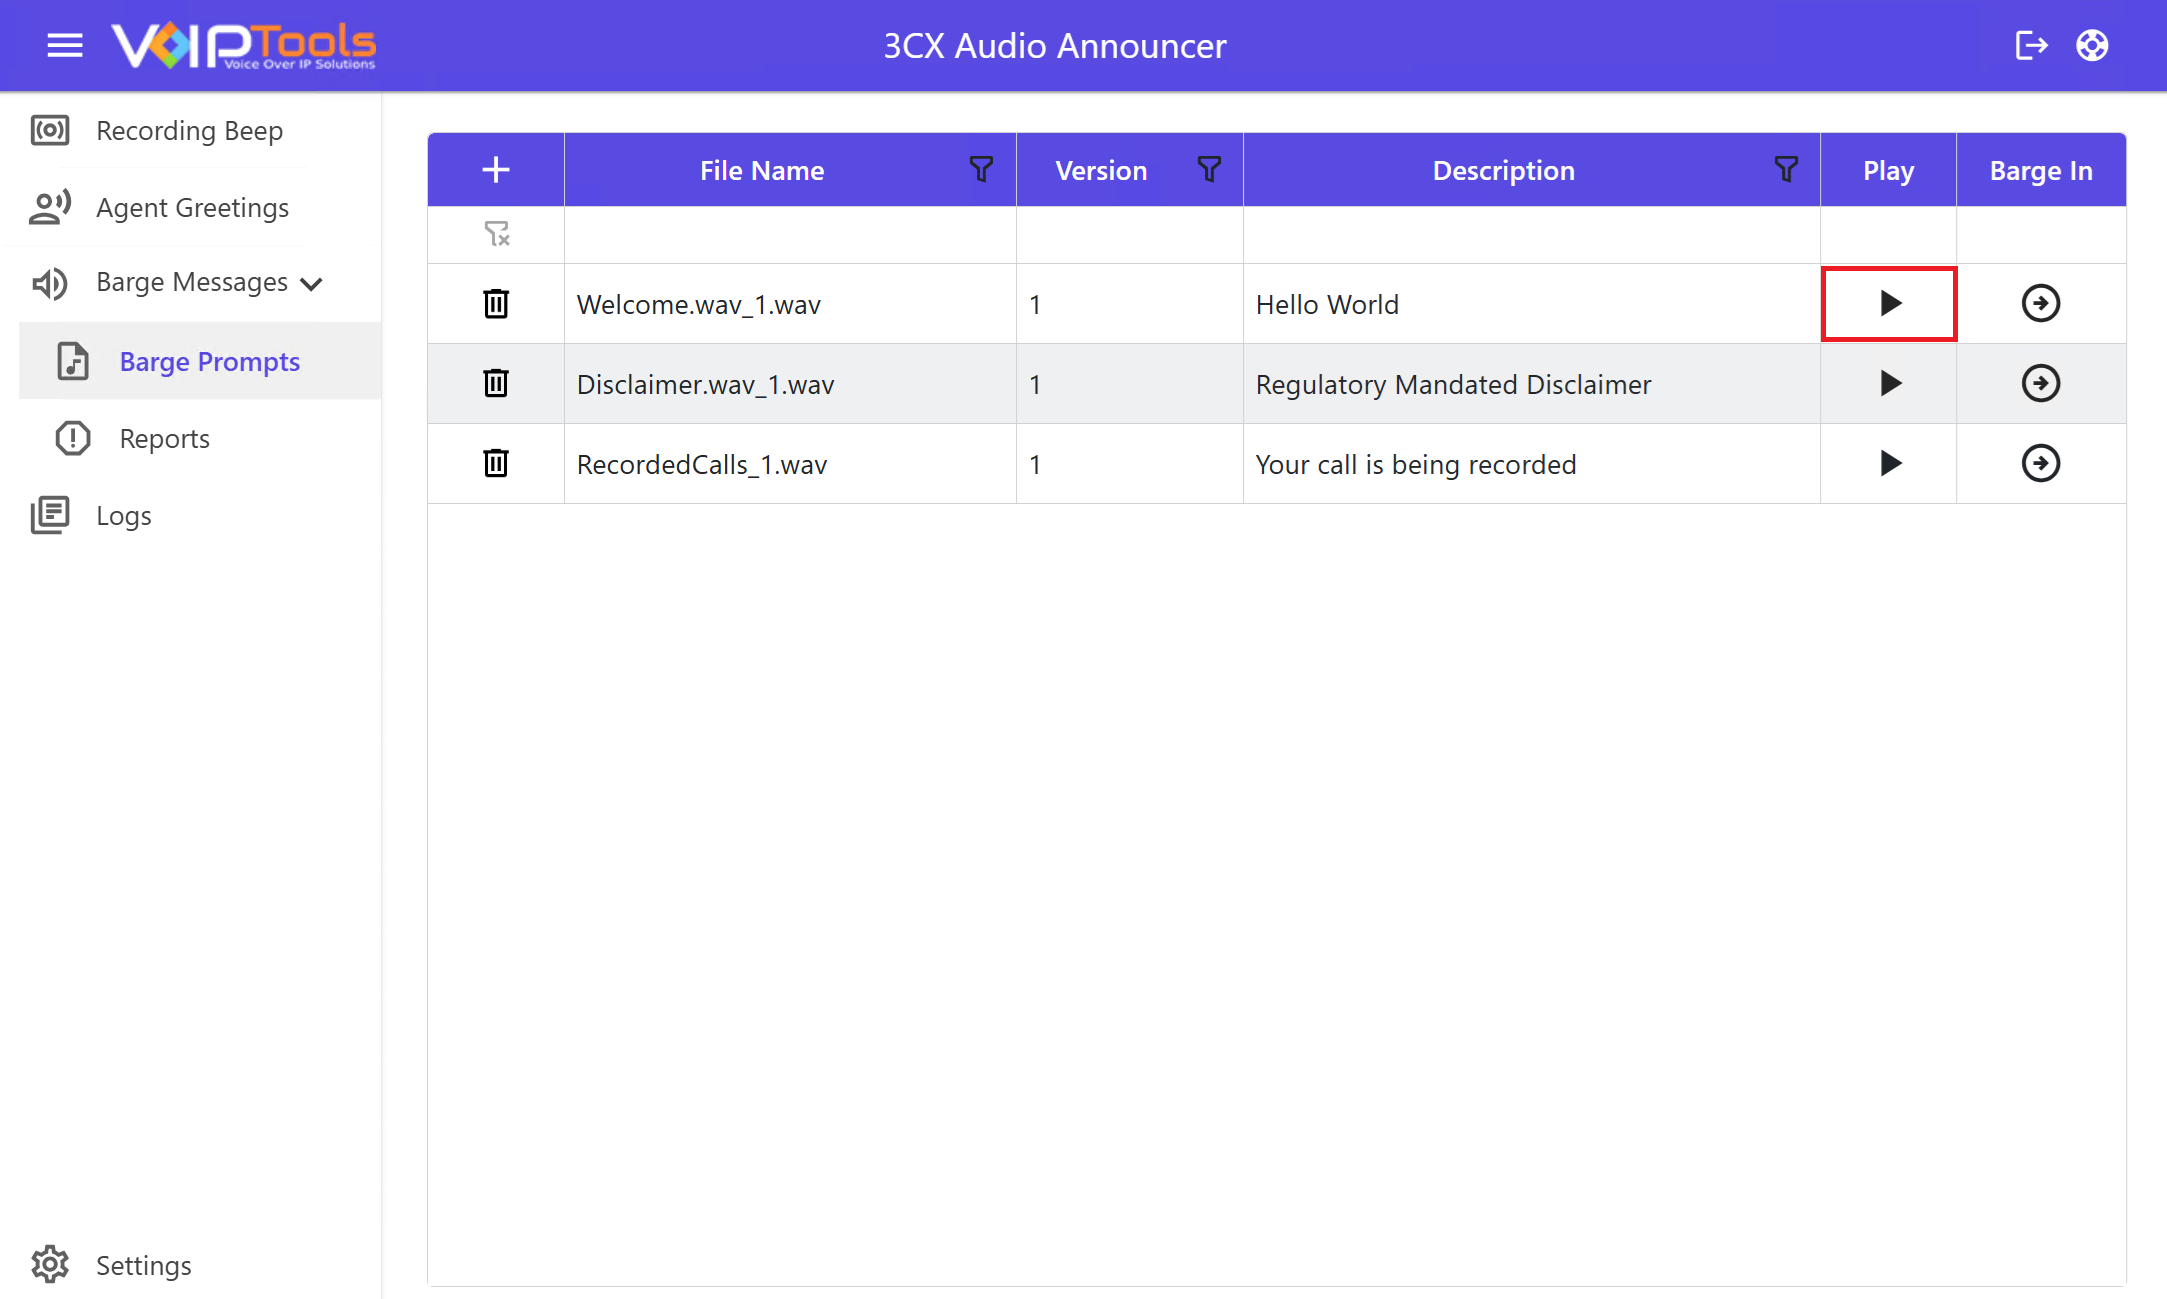
 to barge in your prompt message to the call.
 then confirm by clicking Yes to delete the prompt message from the Prompt Table.